
lura a mcCabe’s embellished lura a mcCabe’s … Jean McCabe is a primarily self-taught...
8
Laura McCabe’s beadweaving master class jewelry lavished with fringe, fronds, lacework & more EMBELLISHED BEADWEAVING
Transcript of lura a mcCabe’s embellished lura a mcCabe’s … Jean McCabe is a primarily self-taught...

Laura Jean McCabe is a primarily self-taught beadweaver. She shows in both national and international beadwork exhibitions and teaches beading workshops in the United States as well as around the globe.
$24.95 | Can. $31.95
For more information about Lark Books, visit our website at www.larkbooks.com.
A Division of Sterling Publishing Co., Inc.New York / London
Imagine the processes of a talented beader’s mind captured within the
pages of a book! Laura McCabe shares her ingenious embellishment
techniques in clear, step-by-step, illustrated instructions. This volume is a
must-have for any creative library.
—Carol Wilcox Wells, author of Masters: Beadweaving and
The Art & Elegance of Beadweaving
Laura McCabe is a gift to all those captivated by luscious beadwork. This
book is a treasure trove of her imagination, ideas, technical know-how, and
irrepressible spirit. Enjoy!
—NanC Meinhardt, bead artist and educator
Laura McCabe is among the most innovative bead designers of all time.
She’s a prominent member of a select group of young pioneers who have
set new standards for all beaders—even the old pros—and we can learn
from every gorgeous piece she makes.
—Ann Benson, author of The New Beadweaving and owner of Beads East
Laura McCabe’s creative energy is infectious, and she stimulates the
creative juices in everyone around her. The beaded embellishment
techniques described in this book provide a solid foundation to lead you on
your own creative path. The projects are well thought-out and effectively
demonstrate the versatility of the embellishment techniques.
—Marcie Stone, sculptural bead artist
embellished beadweaving
laura mcCabe’s
laura mcCabe’s
beadweaving master class
beadweaving embellishment Techniques
and Jewelry Projects
CrAFtS/JEWELrY
Praise for Laura McCabe’s
Embellished Beadweaving
beading adds color, sparkle, and stylish flair to jewelry, whether
on its own or to beautifully set
off stones. In this addition to
the Beadweaving Master Class
series, Laura McCabe begins
by taking you through basic
stitches and techniques. then
she provides directions for a
variety of lovely embellishment
forms inspired by flora, fauna, art
nouveau, and geometric forms.
Finally, she gives you eighteen
opulent jewelry designs—from
Grape Leaf Earrings and
an Anemone ring to a
rosebud Bracelet and
a Dahlia Necklace—
to put your skills
to use. Complete
with advice on how
to approach color and design plus a photo gallery of
designs by other bead artists, Laura McCabe’s Embel-
lished Beadweaving will give you a solid foundation for
developing your own unique pieces.
laura
mcC
abe’s
em
bellis
hed
bea
dw
eavin
g
jewelrylavished with fringe, fronds,
lacework & more
embellished beadweaving
C M Y K
p.126 CMYK 11603•20911047 p.127 CMYK 11603•20911173
126 127127127
A WELL-KEPT SECRETCreate an embellished, beaded vessel pendant to hold your secret
treasures. This necklace features a complementary pearl neck strap.
S U PP LI E S
Basic Beading Kit (page 12)
1 crystal dentelle, size 60ss, or
1 crystal rivoli, 14 mm
Metallic plum size 11°
Japanese cylinder beads, 10 g
Size 11° Japanese seed beads:
Lavender opaline, 6 g
Metallic dark plum, 3 g
Size 15° Japanese seed beads:
Amethyst green gold luster, 5 g
Matte metallic blue- purple, 5 g
Sterling silver size 15° Czech
charlottes, 4 g
1 mother-of-pearl center-
drilled flower button, 8 mm
1 crystal bicone bead, 3 mm
Three 16-inch (40.6 cm)
strands of purple freshwater
pearls, 5.5–6 mm
Approximately 100 rose
AB crystal sequins
(a.k.a. lochrosen)
Metal shank button, size may
vary, for necklace closure
Note:JapanesecharlottesaremuchlargerthanCzechcharlottes;thetwoarenotinterchangeable.Besuretousethetypedescribedinthematerialslist.
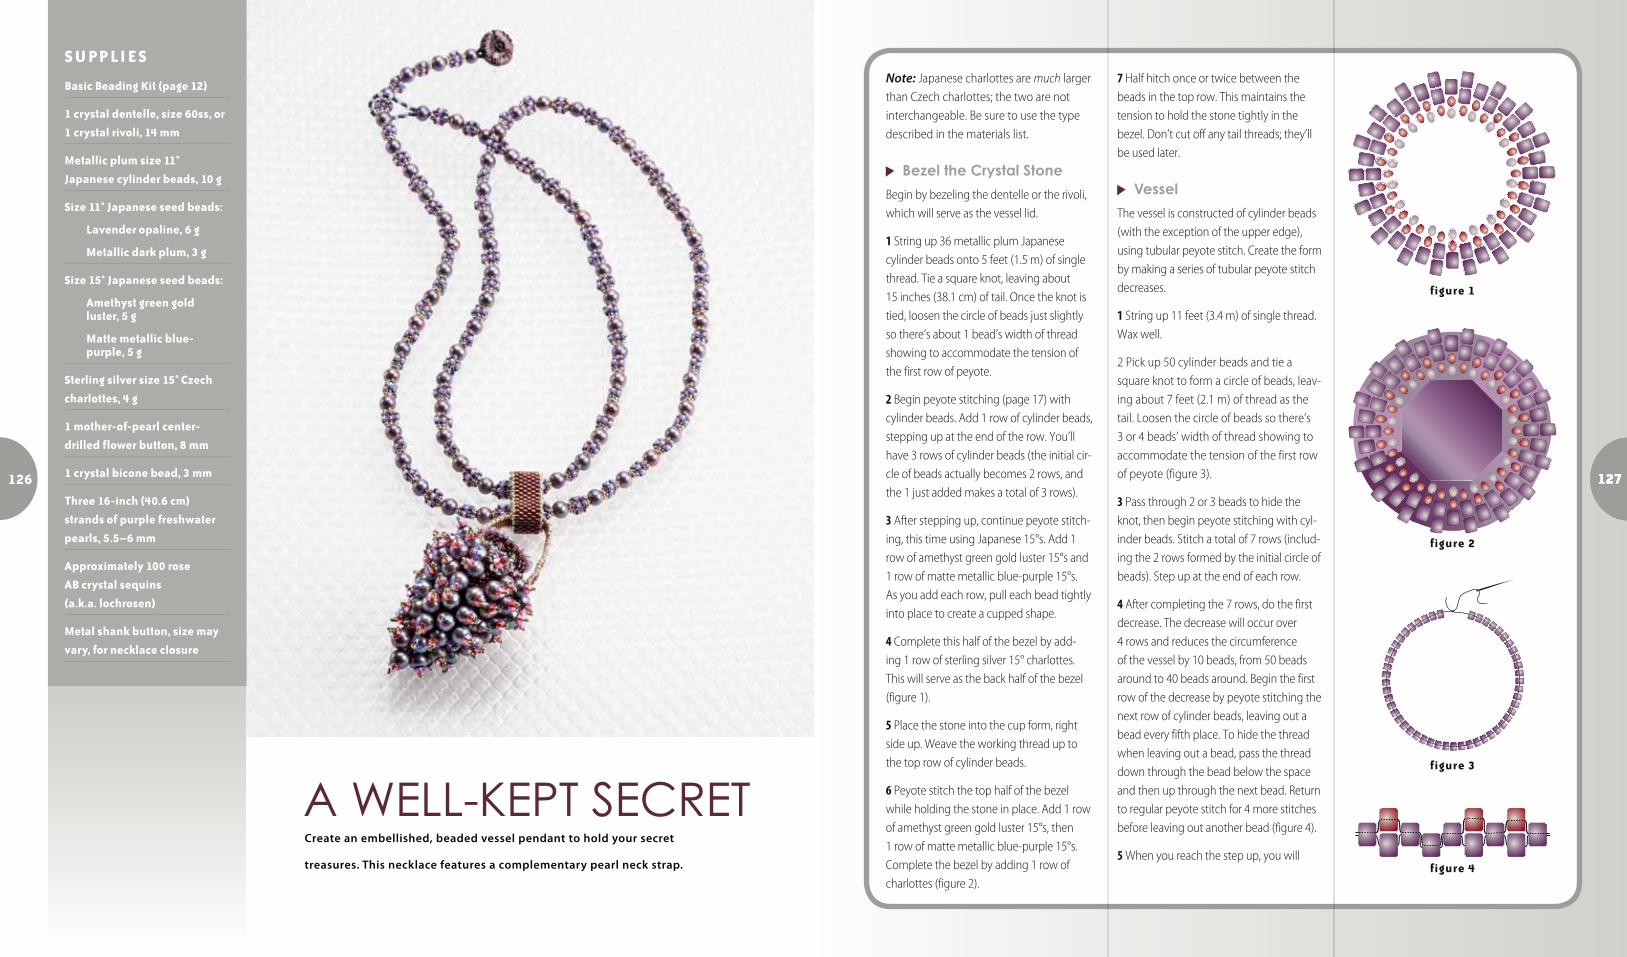
Bezel the Crystal Stone
Beginbybezelingthedentelleortherivoli,whichwillserveasthevessellid.
1Stringup36metallicplumJapanesecylinderbeadsonto5feet(1.5m)ofsinglethread.Tieasquareknot,leavingabout 15inches(38.1cm)oftail.Oncetheknotistied,loosenthecircleofbeadsjustslightlysothere’sabout1bead’swidthofthreadshowingtoaccommodatethetensionofthefirstrowofpeyote.
2Beginpeyotestitching(page17)withcylinderbeads.Add1rowofcylinderbeads,steppingupattheendoftherow.You’llhave3rowsofcylinderbeads(theinitialcir-cleofbeadsactuallybecomes2rows,andthe1justaddedmakesatotalof3rows).
3Aftersteppingup,continuepeyotestitch-ing,thistimeusingJapanese15°s.Add1rowofamethystgreengoldluster15°sand1rowofmattemetallicblue-purple15°s.Asyouaddeachrow,pulleachbeadtightlyintoplacetocreateacuppedshape.
4Completethishalfofthebezelbyadd-ing1rowofsterlingsilver15°charlottes.Thiswillserveasthebackhalfofthebezel(figure1).
5Placethestoneintothecupform,rightsideup.Weavetheworkingthreaduptothetoprowofcylinderbeads.
6Peyotestitchthetophalfofthebezelwhileholdingthestoneinplace.Add1rowofamethystgreengoldluster15°s,then1rowofmattemetallicblue-purple15°s.Completethebezelbyadding1rowofcharlottes(figure2).
7Halfhitchonceortwicebetweenthebeadsinthetoprow.Thismaintainsthetensiontoholdthestonetightlyinthebezel.Don’tcutoffanytailthreads;they’llbeusedlater.
Vessel
Thevesselisconstructedofcylinderbeads(withtheexceptionoftheupperedge),usingtubularpeyotestitch.Createtheformbymakingaseriesoftubularpeyotestitchdecreases.
1Stringup11feet(3.4m)ofsinglethread.Waxwell.
2Pickup50cylinderbeadsandtieasquareknottoformacircleofbeads,leav-ingabout7feet(2.1m)ofthreadasthetail.Loosenthecircleofbeadssothere’s 3or4beads’widthofthreadshowingtoaccommodatethetensionofthefirstrowofpeyote(figure3).
3Passthrough2or3beadstohidetheknot,thenbeginpeyotestitchingwithcyl-inderbeads.Stitchatotalof7rows(includ-ingthe2rowsformedbytheinitialcircleofbeads).Stepupattheendofeachrow.
4Aftercompletingthe7rows,dothefirstdecrease.Thedecreasewilloccurover 4rowsandreducesthecircumferenceofthevesselby10beads,from50beadsaroundto40beadsaround.Beginthefirstrowofthedecreasebypeyotestitchingthenextrowofcylinderbeads,leavingoutabeadeveryfifthplace.Tohidethethreadwhenleavingoutabead,passthethreaddownthroughthebeadbelowthespaceandthenupthroughthenextbead.Returntoregularpeyotestitchfor4morestitchesbeforeleavingoutanotherbead(figure4).
5Whenyoureachthestepup,youwill
figure 1
figure 2
figure 3
figure 4
128 129
p.129 CMYK 11603•20911047p.128 CMYK 11603•20911173
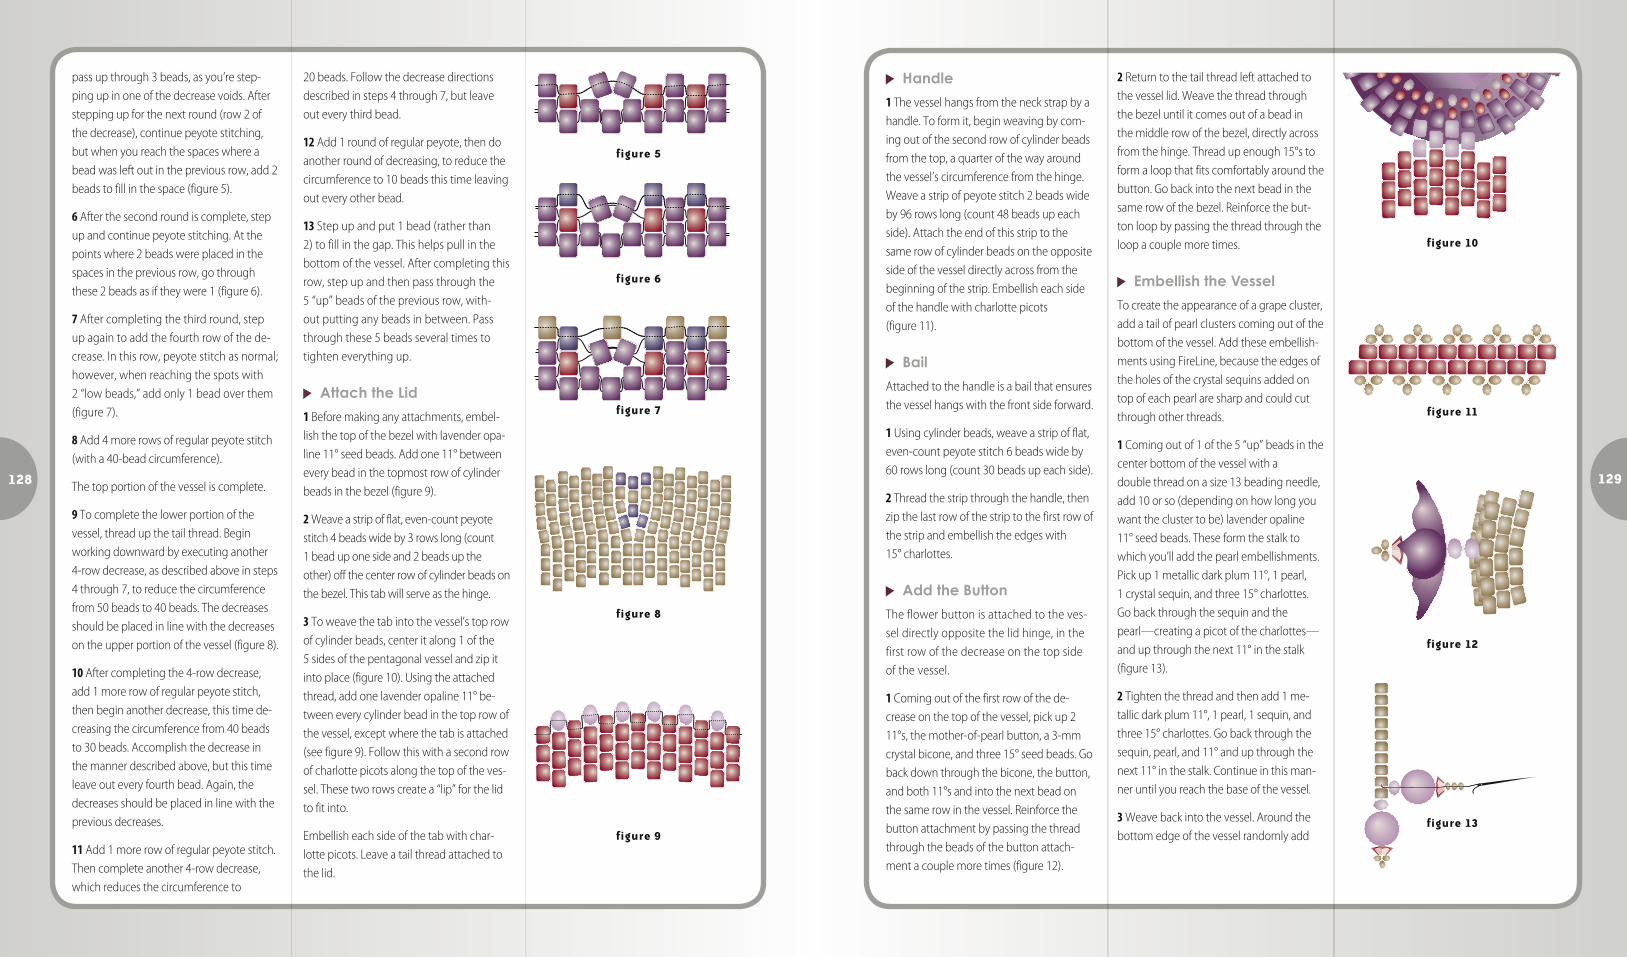
passupthrough3beads,asyou’restep-pingupinoneofthedecreasevoids.Aftersteppingupforthenextround(row2ofthedecrease),continuepeyotestitching,butwhenyoureachthespaceswhereabeadwasleftoutinthepreviousrow,add2beadstofillinthespace(figure5).
6Afterthesecondroundiscomplete,stepupandcontinuepeyotestitching.Atthepointswhere2beadswereplacedinthespacesinthepreviousrow,gothroughthese2beadsasiftheywere1(figure6).
7Aftercompletingthethirdround,stepupagaintoaddthefourthrowofthede-crease.Inthisrow,peyotestitchasnormal;however,whenreachingthespotswith 2“lowbeads,”addonly1beadoverthem(figure7).
8Add4morerowsofregularpeyotestitch(witha40-beadcircumference).
Thetopportionofthevesseliscomplete.
9Tocompletethelowerportionofthevessel,threadupthetailthread.Beginworkingdownwardbyexecutinganother4-rowdecrease,asdescribedaboveinsteps4through7,toreducethecircumferencefrom50beadsto40beads.Thedecreasesshouldbeplacedinlinewiththedecreasesontheupperportionofthevessel(figure8).
10Aftercompletingthe4-rowdecrease,add1morerowofregularpeyotestitch,thenbeginanotherdecrease,thistimede-creasingthecircumferencefrom40beadsto30beads.Accomplishthedecreaseinthemannerdescribedabove,butthistimeleaveouteveryfourthbead.Again,thedecreasesshouldbeplacedinlinewiththepreviousdecreases.
11Add1morerowofregularpeyotestitch.Thencompleteanother4-rowdecrease,whichreducesthecircumferenceto
20beads.Followthedecreasedirectionsdescribedinsteps4through7,butleaveouteverythirdbead.
12Add1roundofregularpeyote,thendoanotherroundofdecreasing,toreducethecircumferenceto10beadsthistimeleavingouteveryotherbead.
13Stepupandput1bead(ratherthan2)tofillinthegap.Thishelpspullinthebottomofthevessel.Aftercompletingthisrow,stepupandthenpassthroughthe5“up”beadsofthepreviousrow,with-outputtinganybeadsinbetween.Passthroughthese5beadsseveraltimestotighteneverythingup.
Attach the Lid
1Beforemakinganyattachments,embel-lishthetopofthebezelwithlavenderopa-line11°seedbeads.Addone11°betweeneverybeadinthetopmostrowofcylinderbeadsinthebezel(figure9).
2Weaveastripofflat,even-countpeyotestitch4beadswideby3rowslong(count 1beaduponesideand2beadsuptheother)offthecenterrowofcylinderbeadsonthebezel.Thistabwillserveasthehinge.
3Toweavethetabintothevessel’stoprowofcylinderbeads,centeritalong1ofthe5sidesofthepentagonalvesselandzipitintoplace(figure10).Usingtheattachedthread,addonelavenderopaline11°be-tweeneverycylinderbeadinthetoprowofthevessel,exceptwherethetabisattached(seefigure9).Followthiswithasecondrowofcharlottepicotsalongthetopoftheves-sel.Thesetworowscreatea“lip”forthelidtofitinto.
Embellisheachsideofthetabwithchar-lottepicots.Leaveatailthreadattachedtothelid.
Handle
1Thevesselhangsfromtheneckstrapbyahandle.Toformit,beginweavingbycom-ingoutofthesecondrowofcylinderbeadsfromthetop,aquarterofthewayaroundthevessel’scircumferencefromthehinge.Weaveastripofpeyotestitch2beadswideby96rowslong(count48beadsupeachside).Attachtheendofthisstriptothesamerowofcylinderbeadsontheoppositesideofthevesseldirectlyacrossfromthebeginningofthestrip.Embellisheachsideofthehandlewithcharlottepicots (figure11).
Bail
Attachedtothehandleisabailthatensuresthevesselhangswiththefrontsideforward.
1Usingcylinderbeads,weaveastripofflat,even-countpeyotestitch6beadswideby60rowslong(count30beadsupeachside).
2Threadthestripthroughthehandle,thenzipthelastrowofthestriptothefirstrowofthestripandembellishtheedgeswith 15°charlottes.
Add the Button
Theflowerbuttonisattachedtotheves-seldirectlyoppositethelidhinge,inthefirstrowofthedecreaseonthetopsideofthevessel.
1Comingoutofthefirstrowofthede-creaseonthetopofthevessel,pickup211°s,themother-of-pearlbutton,a3-mmcrystalbicone,andthree15°seedbeads.Gobackdownthroughthebicone,thebutton,andboth11°sandintothenextbeadonthesamerowinthevessel.Reinforcethebuttonattachmentbypassingthethreadthroughthebeadsofthebuttonattach-mentacouplemoretimes(figure12).
2Returntothetailthreadleftattachedtothevessellid.Weavethethreadthroughthebezeluntilitcomesoutofabeadinthemiddlerowofthebezel,directlyacrossfromthehinge.Threadupenough15°stoformaloopthatfitscomfortablyaroundthebutton.Gobackintothenextbeadinthesamerowofthebezel.Reinforcethebut-tonloopbypassingthethreadthroughtheloopacouplemoretimes.
Embellish the Vessel
Tocreatetheappearanceofagrapecluster,addatailofpearlclusterscomingoutofthebottomofthevessel.Addtheseembellish-mentsusingFireLine,becausetheedgesoftheholesofthecrystalsequinsaddedontopofeachpearlaresharpandcouldcutthroughotherthreads.
1Comingoutof1ofthe5“up”beadsinthecenterbottomofthevesselwitha doublethreadonasize13beadingneedle,add10orso(dependingonhowlongyouwanttheclustertobe)lavenderopaline 11°seedbeads.Theseformthestalktowhichyou’lladdthepearlembellishments. Pickup1metallicdarkplum11°,1pearl, 1crystalsequin,andthree15°charlottes. Gobackthroughthesequinandthepearl—creatingapicotofthecharlottes—andupthroughthenext11°inthestalk(figure13).
2Tightenthethreadandthenadd1me-tallicdarkplum11°,1pearl,1sequin,andthree15°charlottes.Gobackthroughthesequin,pearl,and11°andupthroughthenext11°inthestalk.Continueinthisman-neruntilyoureachthebaseofthevessel.
3Weavebackintothevessel.Aroundthebottomedgeofthevesselrandomlyadd
figure 11
figure 12
figure 10
figure 13
figure 6
figure 7
figure 8
figure 5
figure 9
p.130 CMYK 11603•20911047 p.131 CMYK 11603•20911047
130 131
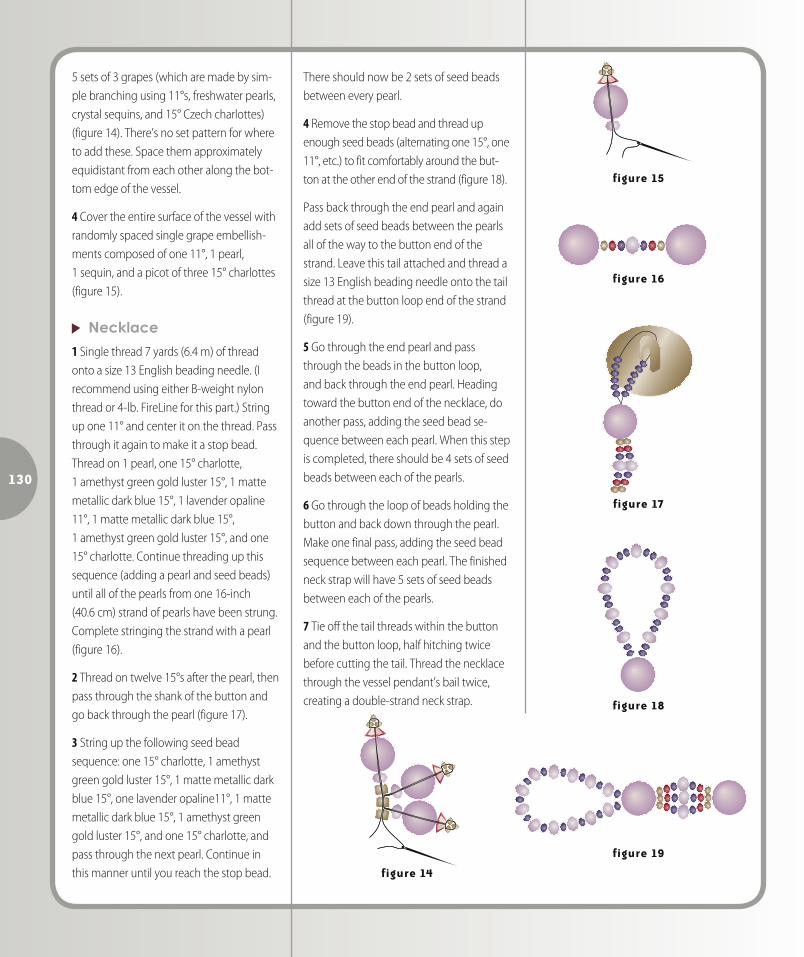
5setsof3grapes(whicharemadebysim-plebranchingusing11°s,freshwaterpearls,crystalsequins,and15°Czechcharlottes)(figure14).There’snosetpatternforwheretoaddthese.Spacethemapproximatelyequidistantfromeachotheralongthebot-tomedgeofthevessel.
4Covertheentiresurfaceofthevesselwithrandomlyspacedsinglegrapeembellish-mentscomposedofone11°,1pearl, 1sequin,andapicotofthree15°charlottes(figure15).
Necklace
1Singlethread7yards(6.4m)ofthreadontoasize13Englishbeadingneedle.(IrecommendusingeitherB-weightnylonthreador4-lb.FireLineforthispart.)Stringupone11°andcenteritonthethread.Passthroughitagaintomakeitastopbead.Threadon1pearl,one15°charlotte, 1amethystgreengoldluster15°,1mattemetallicdarkblue15°,1lavenderopaline11°,1mattemetallicdarkblue15°, 1amethystgreengoldluster15°,andone15°charlotte.Continuethreadingupthissequence(addingapearlandseedbeads)untilallofthepearlsfromone16-inch (40.6cm)strandofpearlshavebeenstrung.Completestringingthestrandwithapearl(figure16).
2Threadontwelve15°safterthepearl,thenpassthroughtheshankofthebuttonandgobackthroughthepearl(figure17).
3Stringupthefollowingseedbeadsequence:one15°charlotte,1amethystgreengoldluster15°,1mattemetallicdarkblue15°,onelavenderopaline11°,1mattemetallicdarkblue15°,1amethystgreengoldluster15°,andone15°charlotte,andpassthroughthenextpearl.Continueinthismanneruntilyoureachthestopbead.
Thereshouldnowbe2setsofseedbeadsbetweeneverypearl.
4Removethestopbeadandthreadupenoughseedbeads(alternatingone15°,one11°,etc.)tofitcomfortablyaroundthebut-tonattheotherendofthestrand(figure18).
Passbackthroughtheendpearlandagainaddsetsofseedbeadsbetweenthepearlsallofthewaytothebuttonendofthestrand.Leavethistailattachedandthreadasize13Englishbeadingneedleontothetailthreadatthebuttonloopendofthestrand(figure19).
5Gothroughtheendpearlandpassthroughthebeadsinthebuttonloop,andbackthroughtheendpearl.Headingtowardthebuttonendofthenecklace,doanotherpass,addingtheseedbeadse-quencebetweeneachpearl.Whenthisstepiscompleted,thereshouldbe4setsofseedbeadsbetweeneachofthepearls.
6Gothroughtheloopofbeadsholdingthebuttonandbackdownthroughthepearl.Makeonefinalpass,addingtheseedbeadsequencebetweeneachpearl.Thefinishedneckstrapwillhave5setsofseedbeadsbetweeneachofthepearls.
7Tieoffthetailthreadswithinthebuttonandthebuttonloop,halfhitchingtwicebeforecuttingthetail.Threadthenecklacethroughthevesselpendant’sbailtwice,creatingadouble-strandneckstrap.
S U PP LI E S
Basic Beading Kit (page 12)
Matte metallic 24-karat gold
size 11° Japanese cylinder
beads, 2 g
Matte metallic silver size 11°
Japanese seed beads, 5 g
Size 15° Japanese seed beads:
Matte metallic 24-karat gold, 2 g
Opaline 24-karat gold lined, 2 g
Matte metallic silver, 10 g
Clear 24-karat gold lined, 2 g
Opaque black, 5 g
Metallic 24-karat gold size 15°
Czech charlottes, 4 g
3 black freshwater pearls, 8 mm
Metallic blue green 3-mm
magatamas, 10 g
APRIL SHOWERS NECKLACEHere’s a great everyday piece so elegant it works for more formal occasions,
too. With its cascading floral focal point, it teaches how to work Ndebele
stitch off of peyote stitch, and how to create three-dimensional forms off
of an Ndebele base.
figure 17
figure 19
figure 18
figure 14
figure 15
figure 16
13
p.13 CMYK 11603•20911047p.12 CMYK 11603•20911173
BASIC BEADING KITC H A P T E R T W O
when it comes to the beader’s toolbox, the options for equipment are endless, and more and more tools are constantly
entering the marketplace.
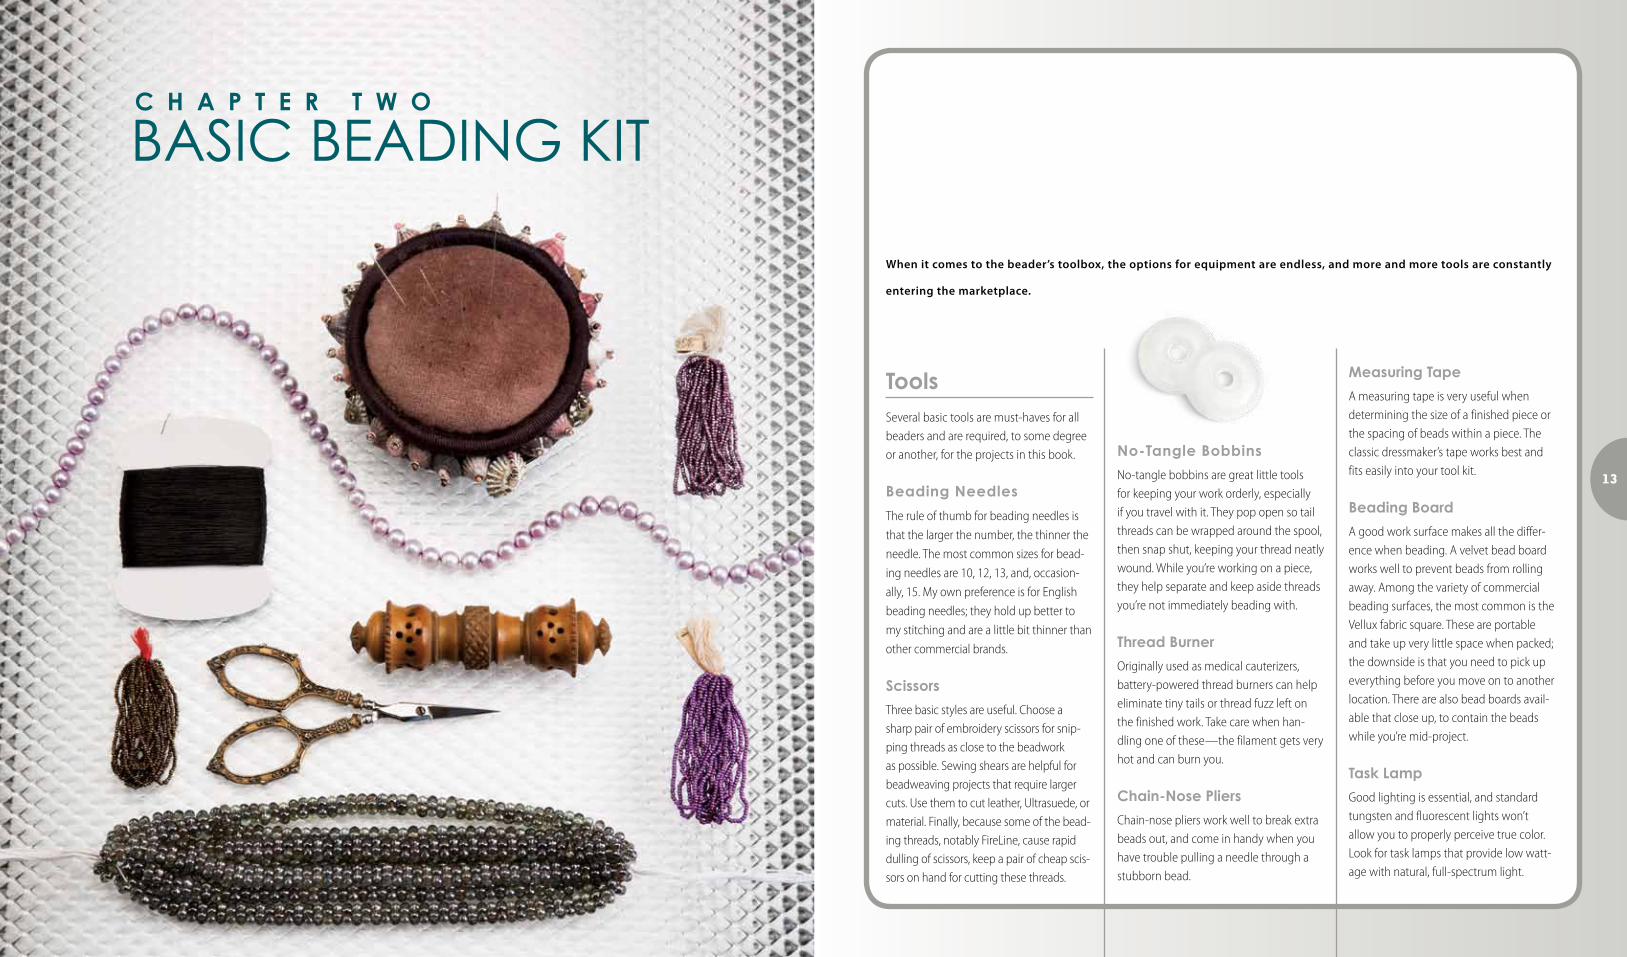
ToolsSeveral basic tools are must-haves for all beaders and are required, to some degree or another, for the projects in this book.
Beading Needles
Theruleofthumbforbeadingneedlesis
that the larger the number, the thinner the
needle.Themostcommonsizesforbead-
ingneedlesare10,12,13,and,occasion-
ally,15.MyownpreferenceisforEnglish
beading needles; they hold up better to
my stitching and are a little bit thinner than
other commercial brands.
Scissors
Threebasicstylesareuseful.Chooseasharp pair of embroidery scissors for snip-ping threads as close to the beadwork as possible. Sewing shears are helpful for beadweaving projects that require larger cuts. Use them to cut leather, Ultrasuede, or material. Finally, because some of the bead-ing threads, notably FireLine, cause rapid dulling of scissors, keep a pair of cheap scis-sors on hand for cutting these threads.
No-Tangle Bobbins
No-tangle bobbins are great little tools for keeping your work orderly, especially ifyoutravelwithit.Theypopopensotailthreads can be wrapped around the spool, then snap shut, keeping your thread neatly wound.Whileyou’reworkingonapiece,they help separate and keep aside threads you’re not immediately beading with.
Thread Burner
Originallyusedasmedicalcauterizers,battery-powered thread burners can help eliminate tiny tails or thread fuzz left on thefinishedwork.Takecarewhenhan-dling one of these—the filament gets very hot and can burn you.
Chain-Nose Pliers
Chain-nose pliers work well to break extra beads out, and come in handy when you have trouble pulling a needle through a stubborn bead.
Measuring Tape
A measuring tape is very useful when determining the size of a finished piece or thespacingofbeadswithinapiece.Theclassic dressmaker’s tape works best and fits easily into your tool kit.
Beading Board
A good work surface makes all the differ-ence when beading. A velvet bead board works well to prevent beads from rolling away. Among the variety of commercial beading surfaces, the most common is the Velluxfabricsquare.Theseareportableand take up very little space when packed; the downside is that you need to pick up everything before you move on to another location.Therearealsobeadboardsavail-able that close up, to contain the beads while you’re mid-project.
Task Lamp
Good lighting is essential, and standard tungsten and fluorescent lights won’t allow you to properly perceive true color. Look for task lamps that provide low watt-age with natural, full-spectrum light.
p.14 CMYK 11603•20911047 p.15 CMYK 11603•20911047
1514
MaterialsAlthough bead requirements vary from project to project, you’ll want to always keep the following basic materials in
your toolbox.
Beading Threads
FireLine is a brand of fishing line that works well for beading and holds up to sharp-edged beads such as crystals. It comes in a variety of weights and colors; I tend to use6-lb.weight(sometimesalsodenotedassizeDor.006"/0.15mm),andIsticktocrystalandsmoke.Thesmokecolorhasablack oil coating, which makes it messy to work with, but a pre-wax washing helps remove some of the oil from the line. Justrunthethreadedstrandthroughapaper towel with a little warm water and dish soap, and run it through a clean dry towelafewtimesbeforewaxing.Tomakethreading the needle a little easier, flatten the ends with your fingernails or a pair of pliers. Tip: WiththecrystalFireLine,colorthe tip of your thread with a permanent marker so it’s easy to see when threading.
There’sanextensivearrayofnylonbeadingthreads. Although there’s some variation from brand to brand, most are good, du-rable threads for many types of beading projects. Nylon threads don’t hold up to sharp beads the way FireLine does, but they’re perfectly suitable for projects using glass seed beads, pressed glass beads, or pearls.Theyhaveasofthandandworkwell in creating fluid and organic embel-lishments on beadwork.
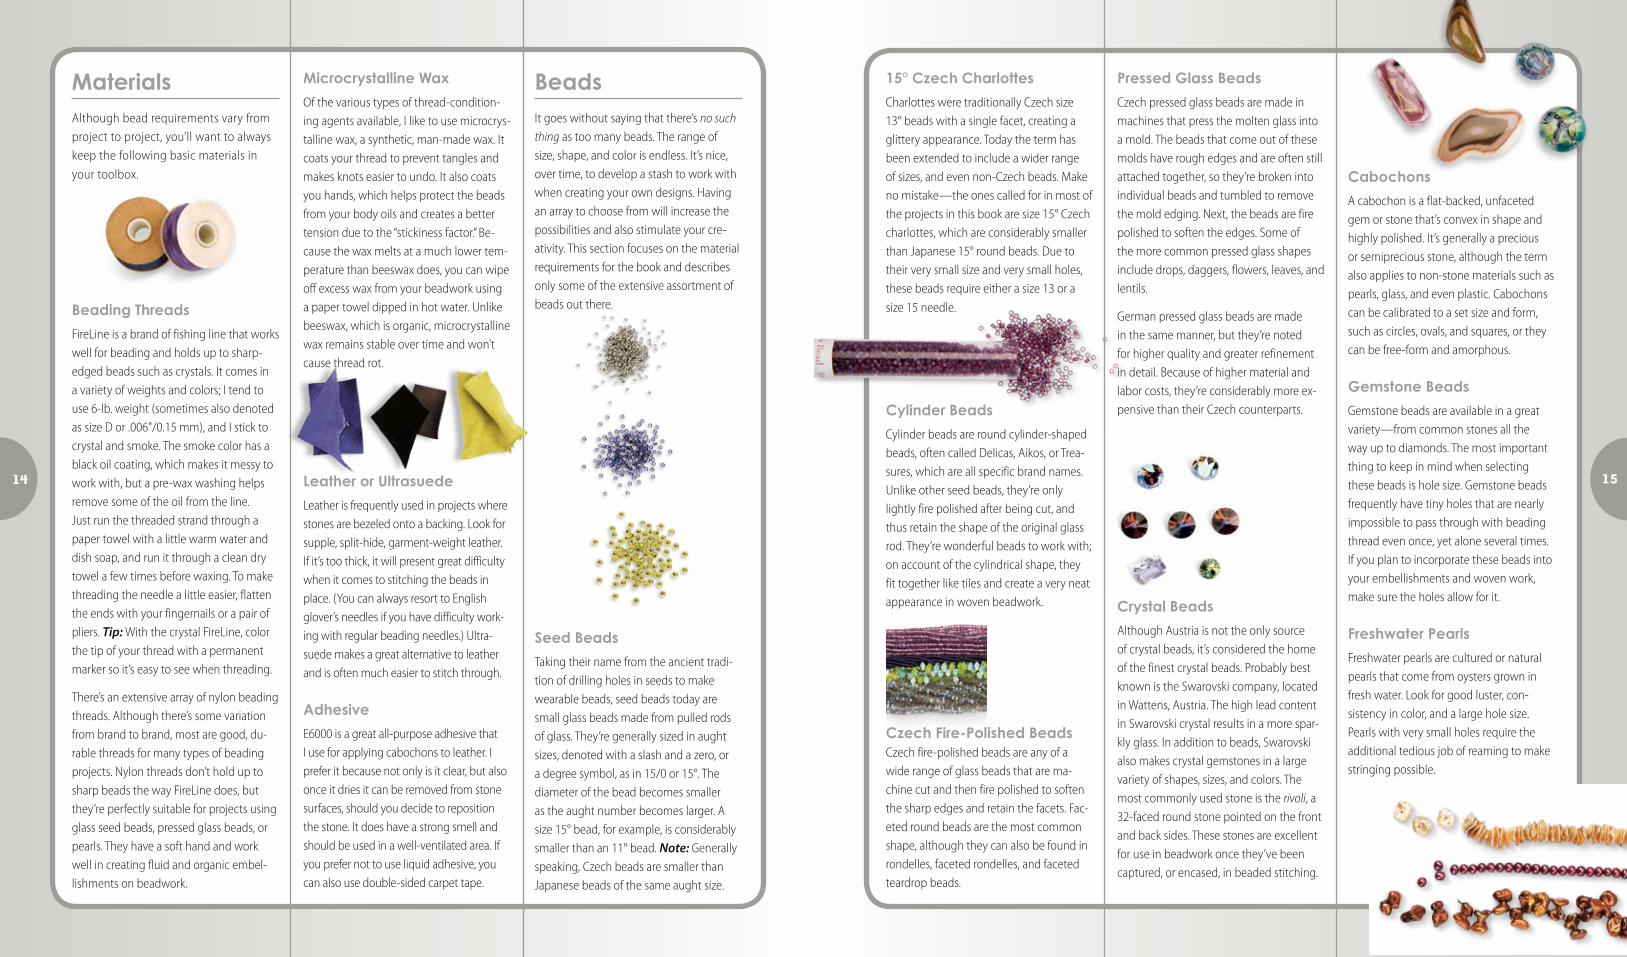
15° Czech Charlottes
Charlottes were traditionally Czech size 13° beads with a single facet, creating a glitteryappearance.Todaythetermhasbeen extended to include a wider range of sizes, and even non-Czech beads. Make no mistake—the ones called for in most of the projects in this book are size 15° Czech charlottes, which are considerably smaller thanJapanese15°roundbeads.Duetotheir very small size and very small holes, these beads require either a size 13 or a
size 15 needle.
Cylinder Beads
Cylinder beads are round cylinder-shaped beads,oftencalledDelicas,Aikos,orTrea-sures, which are all specific brand names. Unlike other seed beads, they’re only lightly fire polished after being cut, and thus retain the shape of the original glass rod.They’rewonderfulbeadstoworkwith;on account of the cylindrical shape, they fit together like tiles and create a very neat appearance in woven beadwork.
Czech Fire-Polished Beads Czech fire-polished beads are any of a wide range of glass beads that are ma-chine cut and then fire polished to soften the sharp edges and retain the facets. Fac-eted round beads are the most common shape, although they can also be found in rondelles, faceted rondelles, and faceted teardrop beads.
Pressed Glass Beads
Czech pressed glass beads are made in machines that press the molten glass into amold.Thebeadsthatcomeoutofthesemolds have rough edges and are often still attached together, so they’re broken into individual beads and tumbled to remove the mold edging. Next, the beads are fire polished to soften the edges. Some of the more common pressed glass shapes include drops, daggers, flowers, leaves, and lentils.
German pressed glass beads are made in the same manner, but they’re noted for higher quality and greater refinement in detail. Because of higher material and labor costs, they’re considerably more ex-pensive than their Czech counterparts.
Crystal Beads
Although Austria is not the only source of crystal beads, it’s considered the home of the finest crystal beads. Probably best known is the Swarovski company, located inWattens,Austria.Thehighleadcontentin Swarovski crystal results in a more spar-kly glass. In addition to beads, Swarovski also makes crystal gemstones in a large varietyofshapes,sizes,andcolors.Themost commonly used stone is the rivoli, a 32-facedroundstonepointedonthefrontandbacksides.Thesestonesareexcellentfor use in beadwork once they’ve been captured, or encased, in beaded stitching.
Cabochons
A cabochon is a flat-backed, unfaceted gem or stone that’s convex in shape and highly polished. It’s generally a precious or semiprecious stone, although the term also applies to non-stone materials such as pearls, glass, and even plastic. Cabochons can be calibrated to a set size and form, such as circles, ovals, and squares, or they can be free-form and amorphous.
Gemstone Beads
Gemstone beads are available in a great variety—from common stones all the wayuptodiamonds.Themostimportantthing to keep in mind when selecting these beads is hole size. Gemstone beads frequently have tiny holes that are nearly impossible to pass through with beading thread even once, yet alone several times. If you plan to incorporate these beads into your embellishments and woven work, make sure the holes allow for it.
Freshwater Pearls
Freshwater pearls are cultured or natural pearls that come from oysters grown in fresh water. Look for good luster, con-sistency in color, and a large hole size. Pearls with very small holes require the additional tedious job of reaming to make stringing possible.
BeadsIt goes without saying that there’s no such
thingastoomanybeads.Therangeofsize, shape, and color is endless. It’s nice, over time, to develop a stash to work with whencreatingyourowndesigns.Havingan array to choose from will increase the possibilities and also stimulate your cre-ativity.Thissectionfocusesonthematerialrequirements for the book and describes only some of the extensive assortment of beads out there.
Seed Beads
Takingtheirnamefromtheancienttradi-tion of drilling holes in seeds to make wearable beads, seed beads today are small glass beads made from pulled rods ofglass.They’regenerallysizedinaughtsizes, denoted with a slash and a zero, or adegreesymbol,asin15/0or15°.Thediameter of the bead becomes smaller as the aught number becomes larger. A size 15° bead, for example, is considerably smaller than an 11° bead. Note: Generally speaking, Czech beads are smaller than Japanesebeadsofthesameaughtsize.
Microcrystalline Wax
Ofthevarioustypesofthread-condition-ing agents available, I like to use microcrys-talline wax, a synthetic, man-made wax. It coats your thread to prevent tangles and makes knots easier to undo. It also coats you hands, which helps protect the beads from your body oils and creates a better tension due to the “stickiness factor.” Be-cause the wax melts at a much lower tem-perature than beeswax does, you can wipe off excess wax from your beadwork using a paper towel dipped in hot water. Unlike beeswax, which is organic, microcrystalline wax remains stable over time and won’t cause thread rot.
Leather or Ultrasuede
Leather is frequently used in projects where stones are bezeled onto a backing. Look for supple, split-hide, garment-weight leather. If it’s too thick, it will present great difficulty when it comes to stitching the beads in place.(YoucanalwaysresorttoEnglishglover’s needles if you have difficulty work-ingwithregularbeadingneedles.)Ultra-suede makes a great alternative to leather and is often much easier to stitch through.
Adhesive
E6000isagreatall-purposeadhesivethatI use for applying cabochons to leather. I prefer it because not only is it clear, but also once it dries it can be removed from stone surfaces, should you decide to reposition the stone. It does have a strong smell and should be used in a well-ventilated area. If you prefer not to use liquid adhesive, you can also use double-sided carpet tape.
16 17
p.16 CMYK 11603•20911047 p.17 CMYK 11603•20911047
BASIC STITCHES AND TECHNIQUES
C H A P T E R T H R E E
In off-loom beadwork there are enough different stitches, and variations thereof, to fill an entire book. Rather than
attempt to cover all the types of stitching, this chapter is devoted to just the techniques used in the embellishments and
projects in this book. Every beaded form you encounter in these pages is constructed using one (or a combination) of the
following stitches: peyote stitch, spiral stitch, herringbone stitch, or lacy stitch, and in some cases, bead embroidery and
simple stringing techniques.
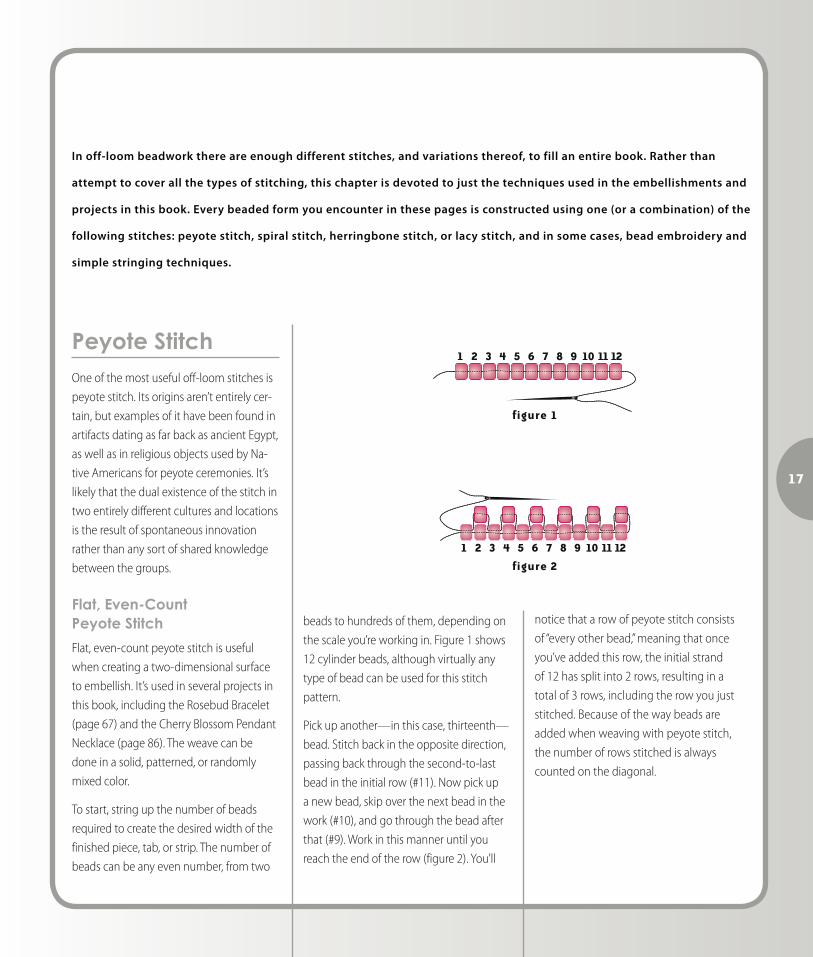
Peyote StitchOneofthemostusefuloff-loomstitchesis
peyote stitch. Its origins aren’t entirely cer-
tain, but examples of it have been found in
artifactsdatingasfarbackasancientEgypt,
as well as in religious objects used by Na-
tive Americans for peyote ceremonies. It’s
likely that the dual existence of the stitch in
two entirely different cultures and locations
is the result of spontaneous innovation
rather than any sort of shared knowledge
between the groups.
Flat, Even-Count Peyote Stitch
Flat, even-count peyote stitch is useful
when creating a two-dimensional surface
to embellish. It’s used in several projects in
this book, including the Rosebud Bracelet
(page67)andtheCherryBlossomPendant
Necklace(page86).Theweavecanbe
done in a solid, patterned, or randomly
mixed color.
Tostart,stringupthenumberofbeads
required to create the desired width of the
finishedpiece,tab,orstrip.Thenumberof
beads can be any even number, from two
beads to hundreds of them, depending on
the scale you’re working in. Figure 1 shows
12cylinderbeads,althoughvirtuallyany
type of bead can be used for this stitch
pattern.
Pick up another—in this case, thirteenth—
bead. Stitch back in the opposite direction,
passing back through the second-to-last
beadintheinitialrow(#11).Nowpickup
a new bead, skip over the next bead in the
work(#10),andgothroughthebeadafter
that(#9).Workinthismanneruntilyou
reachtheendoftherow(figure2).You’ll
notice that a row of peyote stitch consists
of “every other bead,” meaning that once
you’ve added this row, the initial strand
of12hassplitinto2rows,resultingina
total of 3 rows, including the row you just
stitched. Because of the way beads are
added when weaving with peyote stitch,
the number of rows stitched is always
counted on the diagonal.
figure 1
figure 2
1 2 3 4 5 6 7 8 9 10 11 12
1 2 3 4 5 6 7 8 9 10 11 12
18 19
p.18 CMYK 11603•20911047 p.19 CMYK 11603•20911173
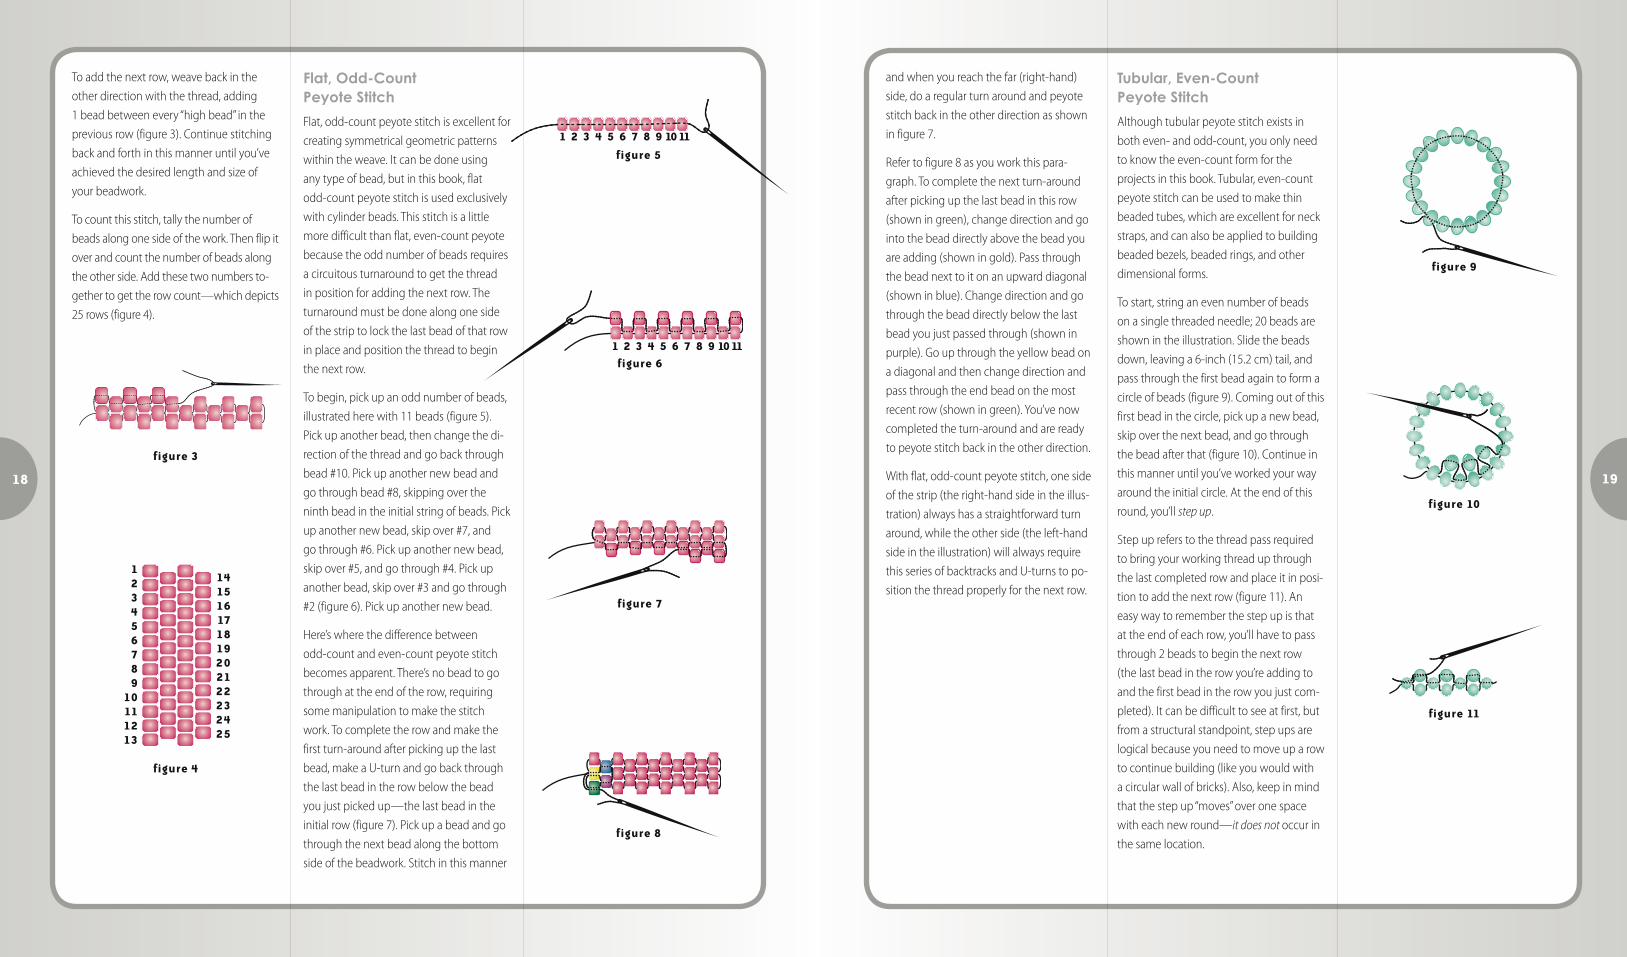
Toaddthenextrow,weavebackinthe
other direction with the thread, adding
1 bead between every “high bead” in the
previousrow(figure3).Continuestitching
back and forth in this manner until you’ve
achieved the desired length and size of
your beadwork.
Tocountthisstitch,tallythenumberof
beadsalongonesideofthework.Thenflipit
over and count the number of beads along
the other side. Add these two numbers to-
gether to get the row count—which depicts
25rows(figure4).
andwhenyoureachthefar(right-hand)
side, do a regular turn around and peyote
stitch back in the other direction as shown
infigure7.
Refertofigure8asyouworkthispara-
graph.Tocompletethenextturn-around
after picking up the last bead in this row
(showningreen),changedirectionandgo
into the bead directly above the bead you
areadding(showningold).Passthrough
the bead next to it on an upward diagonal
(showninblue).Changedirectionandgo
through the bead directly below the last
beadyoujustpassedthrough(shownin
purple).Goupthroughtheyellowbeadon
a diagonal and then change direction and
pass through the end bead on the most
recentrow(showningreen).You’venow
completed the turn-around and are ready
to peyote stitch back in the other direction.
Withflat,odd-countpeyotestitch,oneside
ofthestrip(theright-handsideintheillus-
tration)alwayshasastraightforwardturn
around,whiletheotherside(theleft-hand
sideintheillustration)willalwaysrequire
this series of backtracks and U-turns to po-
sition the thread properly for the next row.
Tubular, Even-Count Peyote Stitch
Although tubular peyote stitch exists in
both even- and odd-count, you only need
to know the even-count form for the
projectsinthisbook.Tubular,even-count
peyote stitch can be used to make thin
beaded tubes, which are excellent for neck
straps, and can also be applied to building
beaded bezels, beaded rings, and other
dimensional forms.
Tostart,stringanevennumberofbeads
onasinglethreadedneedle;20beadsare
shown in the illustration. Slide the beads
down,leavinga6-inch(15.2cm)tail,and
pass through the first bead again to form a
circleofbeads(figure9).Comingoutofthis
first bead in the circle, pick up a new bead,
skip over the next bead, and go through
thebeadafterthat(figure10).Continuein
this manner until you’ve worked your way
around the initial circle. At the end of this
round, you’ll step up.
Step up refers to the thread pass required
to bring your working thread up through
the last completed row and place it in posi-
tiontoaddthenextrow(figure11).An
easy way to remember the step up is that
at the end of each row, you’ll have to pass
through2beadstobeginthenextrow
(thelastbeadintherowyou’readdingto
and the first bead in the row you just com-
pleted).Itcanbedifficulttoseeatfirst,but
from a structural standpoint, step ups are
logical because you need to move up a row
tocontinuebuilding(likeyouwouldwith
acircularwallofbricks).Also,keepinmind
that the step up “moves” over one space
with each new round—it does not occur in
the same location.
figure 3
figure 5
figure 10
figure 11
figure 6
figure 7
figure 8
figure 4
Flat, Odd-Count Peyote Stitch
Flat, odd-count peyote stitch is excellent for
creating symmetrical geometric patterns
within the weave. It can be done using
any type of bead, but in this book, flat
odd-count peyote stitch is used exclusively
withcylinderbeads.Thisstitchisalittle
more difficult than flat, even-count peyote
because the odd number of beads requires
a circuitous turnaround to get the thread
inpositionforaddingthenextrow.The
turnaround must be done along one side
of the strip to lock the last bead of that row
in place and position the thread to begin
the next row.
Tobegin,pickupanoddnumberofbeads,
illustratedherewith11beads(figure5).
Pick up another bead, then change the di-
rection of the thread and go back through
bead#10.Pickupanothernewbeadand
gothroughbead#8,skippingoverthe
ninth bead in the initial string of beads. Pick
upanothernewbead,skipover#7,and
gothrough#6.Pickupanothernewbead,
skipover#5,andgothrough#4.Pickup
anotherbead,skipover#3andgothrough
#2(figure6).Pickupanothernewbead.
Here’swherethedifferencebetween
odd-count and even-count peyote stitch
becomesapparent.There’snobeadtogo
through at the end of the row, requiring
some manipulation to make the stitch
work.Tocompletetherowandmakethe
first turn-around after picking up the last
bead, make a U-turn and go back through
the last bead in the row below the bead
you just picked up—the last bead in the
initialrow(figure7).Pickupabeadandgo
through the next bead along the bottom
side of the beadwork. Stitch in this manner
1 2 3 4 5 6 7 8 9 10 11
1 2 3 4 5 6 7 8 9 10 11
123456789
10111213
141516171819202122232425
figure 9