Lumify Ultrasound System - philips.com · The Lumify Ultrasound System is intended for diagnostic...
148
User Manual English Lumify Ultrasound System
Transcript of Lumify Ultrasound System - philips.com · The Lumify Ultrasound System is intended for diagnostic...

User Manual
English
Lumify Ultrasound System


Contents
Lumify Ultrasound System 3
Phili
ps H
ealth
care
4535
619
091
31_A
/795
* A
PR 2
017
Contents1 Read This First.......................................................................................................................................... 9
Intended Audience.......................................................................................................................................... 10
Intended Use................................................................................................................................................... 10
Warnings......................................................................................................................................................... 11
Warning Symbols............................................................................................................................................ 12
User Information Components....................................................................................................................... 12
User Information Conventions........................................................................................................................ 13
Upgrades and Updates................................................................................................................................... 16
Supplies and Accessories................................................................................................................................ 16
Customer Service............................................................................................................................................ 17
Recycling, Reuse, and Disposal....................................................................................................................... 17
2 Safety..................................................................................................................................................... 21
Basic Safety..................................................................................................................................................... 21
Electrical Safety............................................................................................................................................... 24Defibrillators...................................................................................................................................... 27Fire Safety.......................................................................................................................................... 28
Equipment Protection..................................................................................................................................... 29
Product Compatibility..................................................................................................................................... 30
Symbols........................................................................................................................................................... 31
Biological Safety.............................................................................................................................................. 34FDA Medical Alert on Latex............................................................................................................... 36ALARA Education Program................................................................................................................ 37Output Display................................................................................................................................... 41Control Effects................................................................................................................................... 45Related Guidance Documents........................................................................................................... 46

Contents
4 Lumify Ultrasound System
Phili
ps H
ealth
care
4535
619
091
31_A
/795
* A
PR 2
017
Acoustic Output and Measurement.................................................................................................. 47Acoustic Output Tables...................................................................................................................... 50Acoustic Measurement Precision and Uncertainty........................................................................... 51
Operator Safety.............................................................................................................................................. 52Repetitive Strain Injury ..................................................................................................................... 52Philips Transducers............................................................................................................................ 53Glutaraldehyde Exposure.................................................................................................................. 53Infection Control................................................................................................................................ 53
Electromagnetic Compatibility ....................................................................................................................... 54Electrostatic Discharge Precautions.................................................................................................. 55Electromagnetic Emissions................................................................................................................ 56Approved Cables for Electromagnetic Compliance........................................................................... 57Approved Transducers for Electromagnetic Compliance.................................................................. 57Approved Accessories for Electromagnetic Compliance................................................................... 58Electromagnetic Immunity................................................................................................................ 58Electromagnetic Interference............................................................................................................ 61Recommended Separation Distance................................................................................................. 63Avoiding Electromagnetic Interference............................................................................................. 65Use Restrictions Due to Interference................................................................................................ 65
3 System Overview.................................................................................................................................... 67
Device Requirements...................................................................................................................................... 67
System Capabilities......................................................................................................................................... 68Measurements................................................................................................................................... 68Transducer Types............................................................................................................................... 69Indications for Use and Supporting Transducers............................................................................... 69Patient Data Protection..................................................................................................................... 70Wireless Networking......................................................................................................................... 71
System Components....................................................................................................................................... 71Data Storage...................................................................................................................................... 72
System Settings............................................................................................................................................... 72
System Information........................................................................................................................................ 74

Contents
Lumify Ultrasound System 5
Phili
ps H
ealth
care
4535
619
091
31_A
/795
* A
PR 2
017
4 Using the System.................................................................................................................................... 75
Downloading and Installing the Lumify App................................................................................................... 75
Registration and Entitlement.......................................................................................................................... 75
Registering Your Transducers......................................................................................................................... 76
Giving Lumify Access to Shared Device Storage............................................................................................. 77
Updating the Lumify App................................................................................................................................ 77
Viewing the App Walkthrough........................................................................................................................ 78
Canceling Your Subscription........................................................................................................................... 78
Turning the System On and Off....................................................................................................................... 78
Setting the System Time and Date.................................................................................................................. 79
Setting the Thermal Index Display.................................................................................................................. 79
Imaging Display............................................................................................................................................... 80
Quick Exams.................................................................................................................................................... 83Starting Quick Exams......................................................................................................................... 83
Using Your Device's Camera as a Barcode Scanner........................................................................................ 84Saving Barcode Formats.................................................................................................................... 85Supported Barcode Formats.............................................................................................................. 86
Connecting Transducers................................................................................................................................. 87
Deleting Patient Data and Lumify Settings..................................................................................................... 87
Modality Worklist........................................................................................................................................... 87Adding a Modality Worklist Server.................................................................................................... 88Modifying or Deleting a Modality Worklist Server............................................................................ 89
5 Performing an Exam............................................................................................................................... 91
Starting New Exams........................................................................................................................................ 91
Searching in the Worklist................................................................................................................................ 93
Changing Presets During Exams...................................................................................................................... 94
Editing Patient Data........................................................................................................................................ 94

Contents
6 Lumify Ultrasound System
Phili
ps H
ealth
care
4535
619
091
31_A
/795
* A
PR 2
017
Reviewing Saved Exams.................................................................................................................................. 94
Restarting a Paused Exam............................................................................................................................... 95
Imaging Modes............................................................................................................................................... 952D Mode............................................................................................................................................ 95Using 2D Mode.................................................................................................................................. 95Color Mode ....................................................................................................................................... 96Using Color Mode.............................................................................................................................. 96M-Mode............................................................................................................................................. 97Using M-Mode................................................................................................................................... 97
Imaging Features............................................................................................................................................ 98AutoSCAN.......................................................................................................................................... 98Zoom Magnification........................................................................................................................... 98Full-Screen View................................................................................................................................ 99Displaying a Centerline...................................................................................................................... 99
Acquiring Images............................................................................................................................................. 99
Acquiring Loops............................................................................................................................................ 100
Annotation.................................................................................................................................................... 101Adding Labels................................................................................................................................... 101
Measurement and Analysis........................................................................................................................... 101Performing a 2D Distance Measurement........................................................................................ 102Performing a 2D Ellipse Measurement............................................................................................ 103Measurement Accuracy................................................................................................................... 103Measurement Accuracy Tables....................................................................................................... 104Performing Fetal Analysis................................................................................................................ 104
Ending an Exam............................................................................................................................................. 106
6 Review.................................................................................................................................................. 107
Starting Review During an Exam................................................................................................................... 107
Starting Review After an Exam..................................................................................................................... 107
Navigating Thumbnails and Images.............................................................................................................. 107

Contents
Lumify Ultrasound System 7
Phili
ps H
ealth
care
4535
619
091
31_A
/795
* A
PR 2
017
Viewing the Fetal Age Summary................................................................................................................... 108
Playing Loops................................................................................................................................................ 108
Exporting Images and Loops......................................................................................................................... 109
Deleting Images and Loops........................................................................................................................... 111
Exporting Exams............................................................................................................................................ 112
Showing or Hiding Patient Data on Exported Images and Loops.................................................................. 113
Deleting Exams............................................................................................................................................. 113
Configuring Export Destinations................................................................................................................... 114
Export Destination Settings.......................................................................................................................... 114
Editing Export Destinations........................................................................................................................... 117
Viewing the Export Queue............................................................................................................................ 117
Enabling DICOM Logging............................................................................................................................... 118
7 Transducers.......................................................................................................................................... 119
Transducer Safety......................................................................................................................................... 119
Clinical Applications and Transducers........................................................................................................... 120
Transducer Maintenance.............................................................................................................................. 120
Acoustic Artifacts.......................................................................................................................................... 121
Transducer Covers........................................................................................................................................ 124
Ultrasound Transmission Gels...................................................................................................................... 125
Transducer Storage....................................................................................................................................... 126Storage for Transport ..................................................................................................................... 126Daily and Long-Term Storage.......................................................................................................... 126
Testing Transducers...................................................................................................................................... 127
8 System Maintenance............................................................................................................................ 129
Transducer Care............................................................................................................................................ 129
Device Maintenance..................................................................................................................................... 130

Contents
8 Lumify Ultrasound System
Phili
ps H
ealth
care
4535
619
091
31_A
/795
* A
PR 2
017
Transducer Maintenance.............................................................................................................................. 130
Sending System Logs..................................................................................................................................... 131
Viewing Audit Logs........................................................................................................................................ 131
Troubleshooting............................................................................................................................................ 132
Error Messages............................................................................................................................................. 133
For Assistance............................................................................................................................................... 133
9 References............................................................................................................................................ 135
10 Specifications........................................................................................................................................ 137
System Specifications................................................................................................................................... 137
Safety and Regulatory Requirements........................................................................................................... 138
Index.................................................................................................................................................... 139

Read This First
Lumify Ultrasound System 9
Phili
ps H
ealth
care
4535
619
091
31_A
/795
* A
PR 2
017
Read This First
CAUTION
United States federal law restricts this device to sale by or on the order of a physician.
This manual is intended to assist you with the safe and effective operation of your Philipsproduct. Before attempting to operate the product, read this manual and strictly observe allwarnings and cautions. Pay special attention to the information in the “Safety” section.
The user information for your Philips product describes the most extensive configuration of theproduct, with the maximum number of options and accessories. Some functions described maybe unavailable on your product's configuration.
This document and the information contained in it is proprietary and confidential informationof Philips Healthcare ("Philips") and may not be reproduced, copied in whole or in part,adapted, modified, disclosed to others, or disseminated without the prior written permission ofthe Philips Legal Department. This document is intended to be used either by customers, and islicensed to them as part of their Philips equipment purchase, or to meet regulatorycommitments as required by the FDA under 21 CFR 1020.30 (and any amendments to it) andother local regulatory requirements. Use of this document by unauthorized persons is strictlyprohibited.
Philips provides this document without warranty of any kind, implied or expressed, including,but not limited to, the implied warranties of merchantability and fitness for a particularpurpose.
Philips has taken care to ensure the accuracy of this document. However, Philips assumes noliability for errors or omissions and reserves the right to make changes without further notice toany products herein to improve reliability, function, or design. Philips may make improvementsor changes in the products or programs described in this document at any time.
1

Read This First Intended Audience
10 Lumify Ultrasound System
Phili
ps H
ealth
care
4535
619
091
31_A
/795
* A
PR 2
017
Unauthorized copying of this document, in addition to infringing copyright, might reduce theability of Philips to provide accurate and current information to users.
Non-Philips product names may be trademarks of their respective owners.
Intended AudienceBefore you use your user information, you need to be familiar with ultrasound techniques.Sonography training and clinical procedures are not included here.
This document is intended for healthcare professionals who operate and maintain your Philipsproduct.
Intended UseThe Intended Use of the product is to collect ultrasound image data that may be used byclinicians for screening, diagnostic, and procedural purposes. The product shall provide theability for gathering clinically acceptable images and ultrasound data for the clinical applicationsand anatomies listed in “Indications for Use and Supporting Transducers” on page 69.
This product is intended to be installed, used, and operated only in accordance with the safetyprocedures and operating instructions given in the product user information, and only for thepurposes for which it was designed. However, nothing stated in the user information reducesyour responsibility for sound clinical judgment and best clinical procedure.
The Lumify Ultrasound System is intended for diagnostic ultrasound imaging in B (2D), ColorDoppler, the Combined Mode (B+Color), and M-Mode. The device is indicated for diagnosticultrasound imaging and fluid flow analysis in the following applications: Fetal/Obstetric,Abdominal, Pediatric, Cephalic, Urology, Gynecological, Cardiac Fetal Echo, Small Organ,Musculoskeletal, Peripheral Vessel, Carotid, and Cardiac. The Lumify Ultrasound System is atransportable ultrasound system intended for use in environments where healthcare isprovided by healthcare professionals.

Warnings Read This First
Lumify Ultrasound System 11
Phili
ps H
ealth
care
4535
619
091
31_A
/795
* A
PR 2
017
WARNING
Do not use the system for purposes other than those intended and expressly stated byPhilips. Do not misuse the system, and do not use or operate the system incorrectly.
Installation, use, and operation of this product are subject to the law in the jurisdictions inwhich the product is used. Install, use, and operate the product only in such ways that do notconflict with applicable laws or regulations, which have the force of law.
Use of the product for purposes other than those intended and expressly stated by Philips, aswell as incorrect use or operation, may relieve Philips or its agents from all or someresponsibility for resultant noncompliance, damage, or injury.
WARNING
System users are responsible for image quality and diagnosis. Inspect the data that is beingused for the analysis and diagnosis, and ensure that the data is sufficient both spatially andtemporally for the measurement approach being used.
WarningsBefore using the system, read these warnings and the “Safety” section.
WARNING
Do not operate this system in the presence of flammable gases or anesthetics. Explosion canresult. The system is not compliant in AP/APG environments as defined by IEC 60601-1.

Read This First Warning Symbols
12 Lumify Ultrasound System
Phili
ps H
ealth
care
4535
619
091
31_A
/795
* A
PR 2
017
WARNING
Medical equipment must be installed and put into service according to the specialelectromagnetic compatibility (EMC) guidelines provided in the “Safety” section.
WARNING
The use of portable and mobile radio-frequency (RF) communications equipment can affectthe operation of medical equipment.
Warning SymbolsThe system uses various warning symbols. For symbols used on the system, see “Symbols” onpage 31.
User Information ComponentsThe user information provided with your product includes the following components:
• User Information CD: Includes all of the user information, except the Operating Notes.
• Operating Notes: Contains information that clarifies certain product responses that mightbe misunderstood or cause user difficulty.
• User Manual: Provided with the product and included on the CD. The User Manualintroduces you to features and concepts, helps you set up your system, containscomprehensive instructions for using the system and includes important safety information.
• Acoustic Output Tables: Included on the CD, it contains information about acoustic outputand patient-applied part temperatures.
• Medical Ultrasound Safety: Included on the CD, it contains information on bioeffects andbiophysics, prudent use, and implementing ALARA (as low as reasonably achievable).
User Information Conventions Read This First
Lumify Ultrasound System 13
Phili
ps H
ealth
care
4535
619
091
31_A
/795
* A
PR 2
017
• Shared Roles for System and Data Security: Included on the CD, it contains guidelines tohelp you understand security recommendations for your Philips product and information onPhilips' efforts to help you prevent security breaches.
Some user information is also available on the Support section of the Lumify portal:
www.philips.com/lumify
User Information ConventionsThe user information for your product uses the following typographical conventions to assistyou in finding and understanding information:
• All procedures are numbered, and all subprocedures are lettered. You must complete stepsin the sequence they are presented to ensure success.
• Bulleted lists indicate general information about a particular function or procedure. They donot imply a sequential procedure.
• Control names and menu items or titles are spelled as they are on the system, and theyappear in bold text.
• Symbols appear as they appear on the system.
• Select means to touch an object on the display to "highlight" the object (such as an item in alist), or in the case of a check box or when selecting options, to fill the object. Deselectmeans touching the item to remove the highlight or fill.
• System and ultrasound system refer to the combination of a Philips transducer, the PhilipsLumify app, and a compatible Android device.
• Device refers to a Lumify-compatible Android device.
• Operating system refers to the Android operating system.
The following touch gestures are used to control your system.

Read This First User Information Conventions
14 Lumify Ultrasound System
Phili
ps H
ealth
care
4535
619
091
31_A
/795
* A
PR 2
017
Touch Gestures
Gesture Name Description
Drag Touch the screen with a finger and move the fingeracross the screen without lifting the finger.
Double tap Touch the screen briefly twice with the same finger.
Pinch Touch the screen with two fingers and move themtoward each other.
Touch Touch a control with your finger.

User Information Conventions Read This First
Lumify Ultrasound System 15
Phili
ps H
ealth
care
4535
619
091
31_A
/795
* A
PR 2
017
Gesture Name Description
Touch and hold Touch the screen for a short time without moving yourfinger.
Spread Touch the screen with two fingers and move them apart.
Swipe Touch the screen with your finger and move the finger ina quick motion right, left, up, or down.
Information that is essential for the safe and effective use of your product appears throughoutyour user information as follows:
WARNING
Warnings highlight information vital to the safety of you, the operator, and the patient.

Read This First Upgrades and Updates
16 Lumify Ultrasound System
Phili
ps H
ealth
care
4535
619
091
31_A
/795
* A
PR 2
017
CAUTION
Cautions highlight ways that you could damage the product and consequently void yourwarranty or service contract or ways that you could lose patient or system data.
NOTE
Notes bring your attention to important information that will help you operate the productmore effectively.
Upgrades and UpdatesPhilips is committed to innovation and continued improvement. Upgrades may be announcedthat consist of hardware or software improvements. Updated user information will accompanythose upgrades.
For more information, see “Updating the Lumify App” on page 77.
Supplies and AccessoriesTo order supplies and accessories, visit the Lumify portal (www.philips.com/lumify), or contactCIVCO Medical Solutions:
CIVCO Medical Solutions
102 First Street South, Kalona, IA 52247‑9589
Telephone: 800‑445‑6741 (USA and Canada), +1 319‑248‑6757 (International)
Fax: 877‑329‑2482 (USA and Canada), +1 319‑248‑6660 (International)
E-mail: [email protected]
Internet: www.civco.com

Customer Service Read This First
Lumify Ultrasound System 17
Phili
ps H
ealth
care
4535
619
091
31_A
/795
* A
PR 2
017
System Accessories
Item Additional Information
Cables See “Approved Cables for Electromagnetic Compliance”on page 57.
Transducers See “Clinical Applications and Transducers” on page 120.
Customer ServiceCustomer service representatives are available worldwide to answer questions and to providemaintenance and service. Please contact your local Philips representative for assistance. Youcan also visit the Lumify portal or contact the following office for referral to a customer servicerepresentative:
www.philips.com/lumify
Philips Ultrasound, Inc.
22100 Bothell Everett Hwy, Bothell, WA 98021-8431, USA
1-844-MYLUMIFY (1-844-695-8643)
Recycling, Reuse, and DisposalPhilips is concerned with helping protect the natural environment and helping ensurecontinued safe and effective use of this system through proper support, maintenance, andtraining. Philips designs and manufactures equipment in compliance with relevant guidelinesfor environmental protection. As long as the equipment is properly operated and maintained, itpresents no risk to the environment. However, the equipment may contain materials that couldbe harmful to the environment if disposed of incorrectly. Use of such materials is essential forthe implementation of certain functions and for meeting certain statutory and otherrequirements.

Read This First Recycling, Reuse, and Disposal
18 Lumify Ultrasound System
Phili
ps H
ealth
care
4535
619
091
31_A
/795
* A
PR 2
017
The European Union Directive on Waste Electrical and Electronic Equipment (WEEE) requiresproducers of electrical and electronic equipment to provide reuse and treatment informationfor each product. This information is provided in a Philips Healthcare Recycling Passport. Suchrecycling passports for Philips Ultrasound systems are available on this website:
www.healthcare.philips.com/main/about/sustainability/recycling/ultrasound.wpd
Recycling, reuse, and disposal information in this document is directed mainly at the entity withlegal authority over the equipment. Operators are usually uninvolved in disposal, except in thecase of certain batteries.
Passing Your Transducer to Another User
If you purchased the transducer outright and you pass it to another user who will use thetransducer for its intended purpose, then pass it on in its complete state. Particularly, ensurethat all the product-support documentation, including all instructions for use, are passed on tothe new user. Make the new user aware of the support services that Philips Healthcareprovides for maintaining the transducer, and for comprehensive operator training, as well asfinal disposal of the transducer at the end of its useful life. Existing users must remember thatpassing on medical electrical equipment to new users may present serious technical, medical,privacy, and legal risks. The original user may remain liable, even if the equipment is givenaway.
Philips strongly advises you to seek advice from your local Philips representative beforeagreeing to pass on any equipment.
After you pass the transducer to a new user, you might still receive important safety-relatedinformation, such as bulletins and field change orders. In many jurisdictions the original ownerhas a clear duty to communicate such safety-related information to new users. If you areunable or unprepared to do this, inform Philips Healthcare about the new user, so that PhilipsHealthcare can provide the new user with safety-related information.
Final Disposal of Your Device

Recycling, Reuse, and Disposal Read This First
Lumify Ultrasound System 19
Phili
ps H
ealth
care
4535
619
091
31_A
/795
* A
PR 2
017
If you are subscribing to the transducer, at the end of your Lumify subscription, you must returnyour transducer or transducers to Philips. Do not dispose of the transducers. For moreinformation, see the Support section of the Lumify portal:
www.philips.com/lumify
If you purchased the transducer outright, Philips Healthcare gives support for the following:
• Recovery of useful transducer parts
• Recycling of useful transducer materials by competent disposal companies
• Safe and effective disposal of transducer
For advice and information, contact your Philips service organization, or see the followingwebsite:
www.healthcare.philips.com/us/about/sustainability/recycling
Final disposal of your device is when you dispose of the device in such a way that it can nolonger be used for its intended purpose.
For information on proper disposal of your device, see the documentation that accompaniesyour device.
WARNING
Do not dispose of the device (or any parts of it) with industrial or domestic waste. Thesystem may contain materials such as lead, tungsten, or oil, or other hazardous substancesthat can cause serious environmental pollution. The device also contains privacy-sensitiveinformation, which should be properly removed (scrubbed). Philips advises you to contactyour Philips service organization before disposing of this system.
Discarding Batteries
Batteries are internal to the device. The device should be discarded in an environmentally safemanner. Properly dispose of the device according to local regulations.

Read This First Recycling, Reuse, and Disposal
20 Lumify Ultrasound System
Phili
ps H
ealth
care
4535
619
091
31_A
/795
* A
PR 2
017
WARNING
Do not disassemble, puncture, or incinerate batteries. Be careful not to short the batteryterminals, because that could result in a fire hazard.
WARNING
Use caution when handling, using, and testing the batteries. Do not short circuit, crush,drop, mutilate, puncture, apply reverse polarity, expose to high temperatures, ordisassemble. Misuse or abuse could cause physical injury.
WARNING
If electrolyte leakage occurs, wash your skin with large amounts of water, to prevent skinirritation and inflammation.

Basic Safety Safety
Lumify Ultrasound System 21
Phili
ps H
ealth
care
4535
619
091
31_A
/795
* A
PR 2
017
SafetyPlease read this information before using your ultrasound system. It applies to the device, thetransducers, and the software. This section covers general safety information only. Safetyinformation that applies only to a specific task is included in the procedure for that task.
The combination of a Philips transducer, the Philips Lumify app, and a compatible Androiddevice is considered a medical device. This device is intended for use by, or by the order of, andunder the supervision of a licensed physician qualified to direct the use of the device.
WARNING
Warnings highlight information vital to the safety of you, the operator, and the patient.
CAUTION
Cautions highlight ways that you could damage the product and consequently void yourwarranty or service contract or ways that you could lose patient or system data.
Basic Safety
WARNING
Do not use the system for any application until you have read, understood, and know all thesafety information, safety procedures, and emergency procedures contained in this "Safety"section. Operating the system without a proper awareness of safe use could lead to fatal orother serious personal injury.
2

Safety Basic Safety
22 Lumify Ultrasound System
Phili
ps H
ealth
care
4535
619
091
31_A
/795
* A
PR 2
017
WARNING
If any part of the system is known or suspected to be defective or incorrectly adjusted, donot use the system until it is repaired. Operating the system with defective or incorrectlyadjusted components could expose you and the patient to safety hazards.
WARNING
The transducers have small, detachable parts that pose a choking hazard, and thetransducer cable is a strangulation hazard. Do not leave children unattended with thesystem.
WARNING
Do not use the system for any application until you are adequately and properly trained onits safe and effective operation. If you are unsure of your ability to operate the systemsafely and effectively, do not use it. Operation of the system without proper and adequatetraining could lead to fatal or other serious personal injury.
WARNING
Do not operate the system with patients unless you have an adequate understanding of itscapabilities and functions. Using the system without such understanding may compromisethe system's effectiveness and the safety of the patient, you, and others.
WARNING
Never attempt to remove, modify, override, or frustrate any safety device on the system.Interfering with safety devices could lead to fatal or other serious personal injury.
Basic Safety Safety
Lumify Ultrasound System 23
Phili
ps H
ealth
care
4535
619
091
31_A
/795
* A
PR 2
017
WARNING
Use the system only for its intended purposes and do not misuse the system. Do not use thesystem with any product that Philips does not recognize as compatible with the system.Operation of the product for unintended purposes, or with incompatible products, couldlead to fatal or other serious injury.
WARNING
Stop use immediately if the system or the transducer appear to be malfunctioning. Contactyour Philips representative immediately.
WARNING
You are responsible for configuring your device in accordance with your institution's securitypolicies. Notifications and alerts from third-party applications may interfere with an exam.
WARNING
Thin needles can bend when entering tissue. Actual position must be verified by identifyingthe echoes from the needle.
WARNING
Do not perform a needle procedure if the needle is not visible.

Safety Electrical Safety
24 Lumify Ultrasound System
Phili
ps H
ealth
care
4535
619
091
31_A
/795
* A
PR 2
017
WARNING
Reverberation or other tissue artifacts may produce false needle images, which can causeconfusion in locating the actual needle image. Ensure that you are not using a false needleimage to locate the needle.
Electrical SafetyThe transducer and software, along with a representative device, have been verified ascompliant with IEC 60601‑1. The transducers meet Type BF isolated applied part requirements.When the transducer and software are used in conjunction with a device compliant withIEC 60950‑1, the system meets IEC 60601‑1 requirements for Class II/internally poweredequipment. (The safety standards met by this system are included in the “Specifications”section.) For maximum safety, observe these warnings and cautions:
WARNING
Devices that are compliant with IEC 60950‑1 have not been evaluated for compliance withthe IEC 60601‑1 temperature limits for patient contact. Therefore, only the operator isallowed to handle the device.
WARNING
Do not operate this system in the presence of flammable gases or anesthetics. Explosion canresult. The system is not compliant in AP/APG environments as defined by IEC 60601-1.
WARNING
To avoid risk of electrical shock hazards, always inspect the transducer before use. Check theface, housing, and cable before use. Do not use if the face is cracked, chipped, or torn; thehousing is damaged; or the cable is abraded.

Electrical Safety Safety
Lumify Ultrasound System 25
Phili
ps H
ealth
care
4535
619
091
31_A
/795
* A
PR 2
017
WARNING
All patient-contact devices, such as transducers, pencil probes, and ECG leads not specificallyindicated as defibrillation-proof, must be removed from patient contact before applicationof a high-voltage defibrillation pulse. See “Defibrillators” on page 27.
WARNING
Ultrasound equipment in normal operation, as with other medical electronic diagnosticequipment, uses high-frequency electrical signals that can interfere with pacemakeroperation. Though the possibility of interference is slight, be alert to this potential hazardand stop system operation immediately if you note interference with a pacemaker.
WARNING
When using additional peripheral equipment that is to be interconnected by functionalconnection, the combination is considered to be a medical electrical system. It is yourresponsibility to comply with IEC 60601‑1 and test the system to those requirements. If youhave questions, contact your Philips representative.
WARNING
Patient-applied parts meet the standard IEC 60601‑1. Applied voltages exceeding thestandard, although unlikely, may result in electrical shock to the patient or operator.
WARNING
Connection of optional devices not supplied by Philips Ultrasound could result in electricalshock. When such optional devices are connected to your ultrasound system, ensure thatthe total system earth leakage current does not exceed 500 µA.

Safety Electrical Safety
26 Lumify Ultrasound System
Phili
ps H
ealth
care
4535
619
091
31_A
/795
* A
PR 2
017
WARNING
To avoid risk of electrical shock, do not use any transducer that has been immersed beyondthe specified cleaning or disinfection level.
WARNING
Electrosurgical units (ESUs) and other devices intentionally introduce radio frequencyelectromagnetic fields or currents into patients. Because imaging ultrasound frequencies arecoincidentally in the radio frequency range, ultrasound transducer circuits are susceptible toradio frequency interference. While an ESU is in use, severe noise interferes with the black-and-white image and completely obliterates the color image.
WARNING
To avoid risk of a burn hazard, do not use transducers with high-frequency surgicalequipment. A burn hazard may result from a defect in the high-frequency surgical neutralelectrode connection.
WARNING
Using cables, transducers, and accessories other than those specified for use with thesystem may result in increased emissions from, or decreased immunity of, the system.

Electrical Safety Safety
Lumify Ultrasound System 27
Phili
ps H
ealth
care
4535
619
091
31_A
/795
* A
PR 2
017
CAUTION
Use of the system in the presence of an electromagnetic field can cause momentarydegradation of the ultrasound image. When interference is present or intermittent, usecaution when continuing to use the system. If interference occurs often, review theenvironment in which the system is being used to identify possible sources of radiatedemissions. These emissions could be from other electrical devices used within the sameroom or an adjacent room. Communication devices such as cellular phones and pagers cancause these emissions. The existence of radio, TV, or microwave transmission equipmentlocated nearby can cause emissions. In cases where EMI is causing disturbance, it may benecessary to relocate your system.
CAUTION
For information on electromagnetic emissions and immunity as it applies to the system, see“Electromagnetic Compatibility ” on page 54. Ensure that the operating environment ofyour system meets the conditions specified in the referenced information. Operating thesystem in an environment that does not meet those conditions may degrade systemperformance.
DefibrillatorsObserve the following warnings when a defibrillation is required while using the ultrasoundsystem.
WARNING
Before defibrillation, always remove all patient-applied parts from the patient.

Safety Electrical Safety
28 Lumify Ultrasound System
Phili
ps H
ealth
care
4535
619
091
31_A
/795
* A
PR 2
017
WARNING
Before defibrillation, always disconnect invasive transducers that remain in contact with thepatient from the system.
WARNING
A disposable transducer cover provides no protective electrical insulation againstdefibrillation.
WARNING
A small hole in the outer layer of the transducer opens a conductive path to grounded metalparts of the transducer. The secondary arcing that could occur during defibrillation couldcause patient burns. The risk of burns is reduced, but not eliminated, by using anungrounded defibrillator.
Use defibrillators that do not have grounded patient circuits. To determine whether adefibrillator patient circuit is grounded, see the defibrillator service guide, or consult abiomedical engineer.
Fire Safety
WARNING
On electrical or chemical fires, use only extinguishers that are specifically labeled for thosepurposes. Using water or other liquids on an electrical fire can lead to fatal or other seriouspersonal injury. Before attempting to fight a fire, if it is safe to do so, attempt to isolate theproduct from electrical and other supplies, to reduce the risk of electrical shock.

Equipment Protection Safety
Lumify Ultrasound System 29
Phili
ps H
ealth
care
4535
619
091
31_A
/795
* A
PR 2
017
Use of electrical products in an environment for which they were not designed can lead to fireor explosion. Fire regulations for the type of medical area being used should be fully applied,observed, and enforced. Fire extinguishers should be available for both electrical andnonelectrical fires.
Equipment ProtectionFollow these precautions to protect your system:
WARNING
If the system or transducers have been in an environment above 40°C (104°F), allow them tocool to operating temperature before turning on the system or connecting the transducers.Do not allow the transducer to contact the patient if the temperature of the transducer ishigher than 43°C (109°F). Allow 25 minutes for the transducer to cool. If the transducerswere only briefly exposed to temperatures above 40°C (104°F), then the time required forthe devices to return to operating temperature could be less than 25 minutes.
CAUTION
If the system or transducers have been in an environment below 0°C (32°F), allow them toreach operating temperature before turning on the system or connecting the transducers.Allow 20 minutes for the transducers to warm to operating temperature. Otherwise,condensation inside the devices could cause damage. If the transducers were only brieflyexposed to temperatures below 0°C (32°F), then the time required for the devices to returnto operating temperature could be less than 20 minutes.

Safety Product Compatibility
30 Lumify Ultrasound System
Phili
ps H
ealth
care
4535
619
091
31_A
/795
* A
PR 2
017
CAUTION
Excessive bending or twisting of cables on patient-applied parts may cause failure orintermittent operation of the system.
CAUTION
In general, only the area of the transducer acoustic window is liquid-tight. Except wherespecified in specific transducer-cleaning instructions, do not immerse the remainder of atransducer in any liquid.
CAUTION
Do not submerge the transducer connector in solution. The cables and transducer bodies areliquid‑tight, but the connectors are not.
CAUTION
Do not use abrasive cleaners, or acetone, MEK, paint thinner, or other strong solvents onthe system, peripherals, or transducers.
Product CompatibilityDo not use your system in combination with other products or components, unless Philipsexpressly recognizes those other products or components as compatible. For information aboutsuch products and components, contact your Philips representative.
Changes and additions to the system should be made only by Philips or by third partiesexpressly authorized by Philips to do so. Such changes and additions must comply with allapplicable laws and regulations that have the force of law within the jurisdictions concerned,and best engineering practices.

Symbols Safety
Lumify Ultrasound System 31
Phili
ps H
ealth
care
4535
619
091
31_A
/795
* A
PR 2
017
WARNING
System changes and additions that are made without the appropriate training or by usingunapproved spare parts may void the warranty. As with all complex technical products,maintenance by unqualified persons or using unapproved spare parts carries serious risks ofsystem damage and personal injury.
SymbolsThe International Electrotechnical Commission (IEC) has established a set of symbols formedical electronic equipment that classify a connection or warn of potential hazards. Of thosesymbols, the following may be used on your product and its accessories and packaging.
Symbol Description
USA federal law restricts this device to sale by or on the order of a physician.
Isolated patient connection (Type BF applied part).
Identifies a caution.
Indicates that the user should see the instructions for use for safetyinformation.
Indicates conformance with European Council Directive 93/42/EEC.

Safety Symbols
32 Lumify Ultrasound System
Phili
ps H
ealth
care
4535
619
091
31_A
/795
* A
PR 2
017
Symbol Description
EU Authorized Representative
Indicates that the equipment inside the enclosure is protected against ingress ofsolid foreign objects having a diameter of 1.0 mm and greater. Indicates that thedevice is protected against the effects of immersion. This degree of protectioncan apply to transducers and foot-operated devices.
Indicates the need for separate collection for electrical and electronicequipment in compliance with the Waste Electrical and Electronic Equipment
(WEEE) Directive. When accompanied by or , components of the devicemay contain lead or mercury, respectively, which must be recycled or disposedof in accordance with local, state, or federal laws. The backlight lamps in an LCDsystem monitor contain mercury.
Do not throw away. Dispose of in accordance with local, state, or federal laws.
Global Medical Device Nomenclature Code
Global Trade Item Number
Model name for the device.
Identifies the date of manufacture.

Symbols Safety
Lumify Ultrasound System 33
Phili
ps H
ealth
care
4535
619
091
31_A
/795
* A
PR 2
017
Symbol Description
Identifies the legal manufacturer.
This side up: Points toward the side of the shipping crate that should be keptfacing up.
Indicates that the device should be kept dry.
Indicates that the device is fragile; handle with care.
Do not use if damaged.
Keep away from sunlight.
Non-sterile.
Catalog number.
Batch code.

Safety Biological Safety
34 Lumify Ultrasound System
Phili
ps H
ealth
care
4535
619
091
31_A
/795
* A
PR 2
017
Symbol Description
Serial number.
Unique Device Identifier.
Biological SafetyThis section contains information about biological safety and a discussion of the prudent use ofthe system.
A list of precautions related to biological safety follows; observe these precautions when usingthe system. For more information, see Medical Ultrasound Safety on your User Information CD.
WARNING
Do not use the system if an error message on the display indicates that a hazardouscondition exists. Note the error code, turn off power to the system, and call your customerservice representative.
WARNING
Do not use a system that exhibits erratic or inconsistent image updating. Discontinuities inthe scanning sequence indicate a hardware failure that must be corrected before use.

Biological Safety Safety
Lumify Ultrasound System 35
Phili
ps H
ealth
care
4535
619
091
31_A
/795
* A
PR 2
017
WARNING
Perform ultrasound procedures prudently. Use the ALARA (as low as reasonably achievable)principle.
WARNING
Use only acoustic standoffs that have been approved by Philips Ultrasound. For informationon ordering approved accessories, see “Supplies and Accessories” on page 16.
WARNING
Transducer covers may contain natural rubber latex. Those covers may cause allergicreactions in some individuals. See “FDA Medical Alert on Latex” on page 36.
WARNING
If a sterile transducer cover becomes compromised during an intraoperative applicationinvolving a patient with transmissible spongiform encephalopathy, such as Creutzfeldt-Jakob disease, follow the guidelines of the U.S. Centers for Disease Control and thisdocument from the World Health Organization: WHO/CDS/ APH/2000/3, WHO InfectionControl Guidelines for Transmissible Spongiform Encephalopathies. The transducers for yoursystem cannot be decontaminated using a heat process.
WARNING
If the system becomes contaminated internally with bodily fluids carrying pathogens, youmust immediately notify your Philips service representative. Components inside the systemcannot be disinfected. In that case, the system must be disposed of as biohazardousmaterial in accordance with local or federal laws.

Safety Biological Safety
36 Lumify Ultrasound System
Phili
ps H
ealth
care
4535
619
091
31_A
/795
* A
PR 2
017
WARNING
Select the correct application when starting an exam, and remain in that applicationthroughout the exam. Some applications are for parts of the body that require lower limitsfor acoustic output.
FDA Medical Alert on LatexMarch 29, 1991, Allergic Reactions to Latex-Containing Medical Devices
Because of reports of severe allergic reactions to medical devices containing latex (naturalrubber), the FDA is advising health care professionals to identify their latex sensitive patientsand be prepared to treat allergic reactions promptly. Patient reactions to latex have rangedfrom contact urticaria to systemic anaphylaxis. Latex is a component of many medical devices,including surgical and examination gloves, catheters, intubation tubes, anesthesia masks, anddental dams.
Reports to the FDA of allergic reactions to latex-containing medical devices have increasedlately. One brand of latex cuffed enema tips was recently recalled after several patients died asa result of anaphylactoid reactions during barium enema procedures. More reports of latexsensitivity have also been found in the medical literature. Repeated exposure to latex both inmedical devices and in other consumer products may be part of the reason that the prevalenceof latex sensitivity appears to be increasing. For example, it has been reported that 6% to 7% ofsurgical personnel and 18% to 40% of spina bifida patients are latex sensitive.
Proteins in the latex itself appear to be the primary source of the allergic reactions. Although itis not now known how much protein is likely to cause severe reactions, the FDA is working withmanufacturers of latex-containing medical devices to make protein levels in their products aslow as possible.
FDA’s recommendations to health professionals in regard to this problem are as follows:
• When taking general histories of patients, include questions about latex sensitivity. Forsurgical and radiology patients, spina bifida patients and health care workers, thisrecommendation is especially important. Questions about itching, rash or wheezing afterwearing latex gloves or inflating a toy balloon may be useful. Patients with positive historiesshould have their charts flagged.

Biological Safety Safety
Lumify Ultrasound System 37
Phili
ps H
ealth
care
4535
619
091
31_A
/795
* A
PR 2
017
• If latex sensitivity is suspected, consider using devices made with alternative materials, suchas plastic. For example, a health professional could wear a non-latex glove over the latexglove if the patient is sensitive. If both the health professional and the patient are sensitive,a latex middle glove could be used. (Latex gloves labeled “Hypoallergenic” may not alwaysprevent adverse reactions.)
• Whenever latex-containing medical devices are used, especially when the latex comes incontact with mucous membranes, be alert to the possibility of an allergic reaction.
• If an allergic reaction does occur and latex is suspected, advise the patient of a possiblelatex sensitivity and consider an immunologic evaluation.
• Advise the patient to tell health professionals and emergency personnel about any knownlatex sensitivity before undergoing medical procedures. Consider advising patients withsevere latex sensitivity to wear a medical identification bracelet.
The FDA is asking health professionals to report incidents of adverse reactions to latex or othermaterials used in medical devices. (See the October 1990 FDA Drug Bulletin.) To report anincident, contact the FDA Problem Reporting Program, MedWatch, at 1-800-332-1088, or onthe Internet:
www.fda.gov/Safety/MedWatch/
For a single copy of a reference list on latex sensitivity, write to: LATEX, FDA, HFZ-220, Rockville,MD 20857.
NOTE
The transducers described in this document do not contain natural rubber latex that contactshumans. Natural rubber latex is not used on any Philips ultrasound transducer.
ALARA Education ProgramThe guiding principle for the use of diagnostic ultrasound is defined by the "as low asreasonably achievable" (ALARA) principle. The decision as to what is reasonable has been left tothe judgment and insight of qualified personnel. No set of rules can be formulated that would

Safety Biological Safety
38 Lumify Ultrasound System
Phili
ps H
ealth
care
4535
619
091
31_A
/795
* A
PR 2
017
be sufficiently complete to dictate the correct response to every circumstance. By keepingultrasound exposure as low as possible, while obtaining diagnostic images, users can minimizeultrasonic bioeffects.
Since the threshold for diagnostic ultrasound bioeffects is undetermined, it is the sonographer’sresponsibility to control total energy transmitted into the patient. The sonographer mustreconcile exposure time with diagnostic image quality. To ensure diagnostic image quality andlimit exposure time, an ultrasound system provides controls that can be manipulated during theexam to optimize the results of the exam.
The ability of the user to abide by the ALARA principle is important. Advances in diagnosticultrasound, not only in the technology but in the applications of that technology, have resultedin the need for more and better information to guide the user. The output display indices aredesigned to provide that important information.
There are a number of variables which affect the way in which the output display indices can beused to implement the ALARA principle. These variables include index values, body size,location of the bone relative to the focal point, attenuation in the body, and ultrasoundexposure time. Exposure time is an especially useful variable, because it is controlled by theuser. The ability to limit the index values over time supports the ALARA principle.
Applying ALARA
The system imaging mode used depends upon the information needed. 2D imaging providesanatomical information, while Color imaging provides information about blood flow.Understanding the nature of the imaging mode being used allows the sonographer to apply theALARA principle with informed judgment. Additionally, the transducer frequency, system setupvalues, scanning techniques, and operator experience allow the sonographer to meet thedefinition of the ALARA principle.
The decision as to the amount of acoustic output is, in the final analysis, up to the systemoperator. This decision must be based on the following factors: type of patient, type of exam,patient history, ease or difficulty of obtaining diagnostically useful information, and thepotential localized heating of the patient due to transducer surface temperatures. Prudent useof the system occurs when patient exposure is limited to the lowest index reading for theshortest amount of time necessary to achieve acceptable diagnostic results.

Biological Safety Safety
Lumify Ultrasound System 39
Phili
ps H
ealth
care
4535
619
091
31_A
/795
* A
PR 2
017
Although a high index reading does not mean that a bioeffect is actually occurring, a high indexreading should be taken seriously. Every effort should be made to reduce the possible effects ofa high index reading. Limiting exposure time is an effective way to accomplish this goal.
There are several system controls that the operator can use to adjust the image quality andlimit the acoustic intensity. These controls are related to the techniques that an operator mightuse to implement ALARA. These controls can be divided into three categories: direct, indirect,and receiver controls.
Acoustic Output Limits
This ultrasound system maintains acoustic output below the appropriate limits for eachapplication, as listed here. The significant difference in magnitude emphasizes the need toselect the correct application and remain in that application, so the correct application limitsare in use for the appropriate application.
Limits for Non-Ophthalmic Applications
• Ispta.3 ≤ 720 mW/cm2
• MI ≤ 1.9
• TI ≤ 6.0
Direct Controls
Application selection and the output-power control directly affect acoustic intensity. There aredifferent ranges of allowable intensity or output based on your selection. Selecting the correctrange of acoustic intensity for the application is one of the first things that occurs in any exam.For example, peripheral vascular intensity levels are not recommended for fetal exams. Somesystems automatically select the proper range for a particular application, while others requiremanual selection. Ultimately, the user has the responsibility for proper clinical use. Theultrasound system provides both automatic (default) settings and manual (user-selectable)settings.

Safety Biological Safety
40 Lumify Ultrasound System
Phili
ps H
ealth
care
4535
619
091
31_A
/795
* A
PR 2
017
Output power has direct impact on acoustic intensity. Once the application has beenestablished, the power control can be used to increase or decrease the intensity output. Thepower control allows you to select intensity levels less than the established maximum. Prudentuse dictates that you select the lowest output intensity that is consistent with good imagequality.
Indirect Controls
The indirect controls are those that have an indirect effect on acoustic intensity. These controlsaffect imaging mode, pulse repetition frequency, focus depth, pulse length, and transducerselection.
The choice of imaging mode determines the nature of the ultrasound beam. 2D is a scanningmode; Doppler is a stationary or unscanned mode. A stationary ultrasound beam concentratesenergy in a single location. A moving or scanned ultrasound beam disperses the energy over anarea and the beam is concentrated on the same area for a fraction of the time as that of anunscanned mode.
Focus of the ultrasound beam affects the image resolution. To maintain or increase resolutionat a different focus requires a variation in output over the focal zone. This variation of output isa function of system optimization. Different exams require different focal depths. Setting thefocus at the proper depth improves the resolution of the structure of interest.
Transducer selection indirectly affects intensity. Tissue attenuation changes with frequency.The higher the transducer operating frequency, the greater the attenuation of the ultrasonicenergy. A higher transducer operating frequency requires more output intensity to scan at adeeper depth. To scan deeper at the same output intensity, a lower transducer frequency isrequired. Using more gain and output beyond a point, without corresponding increases inimage quality, can mean that a lower frequency transducer is needed.
Receiver Controls
Receiver controls are used by the operator to improve image quality. These controls have noeffect on output. Receiver controls only affect how the ultrasound echo is received. Thesecontrols include gain, time gain compensation (TGC), dynamic range, and image processing. The

Biological Safety Safety
Lumify Ultrasound System 41
Phili
ps H
ealth
care
4535
619
091
31_A
/795
* A
PR 2
017
important thing to remember, relative to output, is that receiver controls should be optimizedbefore output is increased. For example, before increasing output, optimize gain to improveimage quality.
An Example of Applying the ALARA Principle
An ultrasound scan of a patient’s liver begins with selecting the appropriate transducerfrequency. After selecting the transducer and the application, which are based on patientanatomy, adjustments to output power should be made to ensure that the lowest possiblesetting is used to acquire an image. After the image is acquired, adjusting the focus of thetransducer, and then increasing the receiver gain to produce a uniform representation of thetissue follows. If an adequate image can be obtained with the increase in gain, then a decreasein output should be made. Only after making these adjustments should you increase output tothe next level.
Having acquired the 2D display of the liver, Color can be used to localize blood flow. As with the2D image display, gain and image processing controls must be optimized before increasingoutput.
In summary: Select the correct transducer frequency and application for the job; start with alow output level; and optimize the image by using focus, receiver gain, and other imagingcontrols. If the image is not diagnostically useful at this point, then increase output.
Additional Considerations
Ensure that scanning time is kept to a minimum, and ensure that only medically requiredscanning is performed. Never compromise quality by rushing through an exam. A poor exammay require a follow‑up, which ultimately increases exposure time. Diagnostic ultrasound is animportant tool in medicine, and like any tool, it should be used efficiently and effectively.
Output DisplayThe system output display comprises two basic indices: a mechanical index and a thermal index.
The mechanical index is continuously displayed over the range of 0.0 to 1.9, in increments of0.1.

Safety Biological Safety
42 Lumify Ultrasound System
Phili
ps H
ealth
care
4535
619
091
31_A
/795
* A
PR 2
017
The thermal index further consists of the following indices: soft tissue (TIS), bone (TIB), andcranial bone (TIC). Only one of these is displayed at any time. Each transducer application has adefault selection that is appropriate for that combination. The TIB, TIS, or TIC is continuouslydisplayed over the range of 0.0 to maximum output, based on the transducer and application,in increments of 0.1. For the location of the output display, see “Imaging Display” on page 80.
The application-specific nature of the default setting is also an important factor of indexbehavior. A default setting is a system control state that is preset by the manufacturer or theoperator. The system has default index settings for the transducer application. The defaultsettings are invoked automatically by the ultrasound system when power is turned on, whennew patient data is entered into the system database, or when an application change occurs.
The decision as to which of the three thermal indices to display should be based on thefollowing criteria:
• Appropriate index for the application: TIS is used for imaging soft tissue, TIB for a focus at ornear bone, and TIC for imaging through bone near the surface, as in a cranial exam.
• Mitigating factors that might create artificially high or low thermal index readings: locationof fluid or bone, or blood flow. For example, is there a highly attenuating tissue path so thatthe actual potential for local zone heating is less than the thermal index displays?
• Scanned modes versus unscanned modes of operation affect the thermal index. Forscanned modes, heating tends to be near the surface; for unscanned modes, the potentialfor heating tends to be deeper in the focal zone.
• Always limit ultrasound exposure time. Do not rush the exam. Ensure that the indices arekept to a minimum and that exposure time is limited without compromising diagnosticsensitivity.
Mechanical Index (MI) Display
Mechanical bioeffects are threshold phenomena that occur when a certain level of output isexceeded. The threshold level varies, however, with the type of tissue. The potential formechanical bioeffects varies with peak rarefactional pressure and ultrasound frequency. The MIaccounts for these two factors. The higher the MI value, the greater the likelihood of

Biological Safety Safety
Lumify Ultrasound System 43
Phili
ps H
ealth
care
4535
619
091
31_A
/795
* A
PR 2
017
mechanical bioeffects occurring. There is no specific MI value that means that a mechanicaleffect is actually occurring. The MI should be used as a guide for implementing the ALARAprinciple.
Thermal Index (TI) Displays
The TI informs the user about the conditions that exist that might lead to an increase intemperature at the surface of the body, within the body tissue, or at the point of focus of theultrasound beam on bone. That is, the TI informs the user of the potential for temperature risein body tissue. It is an estimate of temperature increase in body tissue with specific properties.The actual amount of any temperature rise is influenced by factors such as tissue type,vascularity, mode of operation, and others. The TI should be used as a guide for implementingthe ALARA principle.
The bone thermal index (TIB) informs the user about potential heating at or near the focus afterthe ultrasound beam has passed through soft tissue or fluid; for example, at or near second- orthird-trimester fetal bone.
The cranial bone thermal index (TIC) informs the user about the potential heating of bone at ornear the surface; for example, cranial bone.
The soft tissue thermal index (TIS) informs the user about the potential for heating within softhomogeneous tissue.
You can choose to display TIS, TIC, or TIB. For details on changing the TI display, see “Setting theThermal Index Display” on page 79.
Mechanical and Thermal Indices Display Precision and Accuracy
The MI and TI precision is 0.1 unit on the system.
The MI and TI display accuracy estimates for the system are given in Acoustic Output Tables, onyour User Information CD. Those accuracy estimates are based on the variability range oftransducers and systems, inherent acoustic output modeling errors, and measurementvariability, as discussed in this section.
The displayed values should be interpreted as relative information to help the system operatorachieve the ALARA principle through prudent use of the system. The values should not beinterpreted as actual physical values in interrogated tissue or organs. The initial data that is

Safety Biological Safety
44 Lumify Ultrasound System
Phili
ps H
ealth
care
4535
619
091
31_A
/795
* A
PR 2
017
used to support the output display is derived from laboratory measurements based on theAmerican Institute of Ultrasound in Medicine (AIUM) measurement standard. Themeasurements are then put into algorithms for calculating the displayed output values.
Many of the assumptions used in the process of measurement and calculation are conservativein nature. Overestimation of actual in situ intensity exposure, for the vast majority of tissuepaths, is built into the measurement and calculation process. For example:
• The measured water tank values are derated using a conservative, industry standard,attenuation coefficient of 0.3 dB/cm‑MHz.
• Conservative values for tissue characteristics were selected for use in the TI models.Conservative values for tissue or bone absorption rates, blood perfusion rates, blood heatcapacity, and tissue thermal conductivity were selected.
• Steady State temperature rise is assumed in the industry standard TI models, and theassumption is made that the ultrasound transducer is held steady in one position longenough for steady state to be reached.
A number of factors are considered when estimating the accuracy of the displayed values:hardware variations, estimation algorithm accuracy, and measurement variability. Variabilityamong transducers and systems is a significant factor. Transducer variability results frompiezoelectric crystal efficiencies, process-related impedance differences, and sensitive lens-focusing parameter variations. Differences in system pulser voltage control and efficiencies isalso a contributor to variability. There are inherent uncertainties in the algorithms used toestimate acoustic output values over the range of possible system operating conditions andpulser voltages. Inaccuracies in laboratory measurements are related to, among others,differences in hydrophone calibration and performance, positioning, alignment, and digitizationtolerances, and variability among test operators.
The conservative assumptions of the output estimation algorithms of linear propagation, at alldepths, through a 0.3 dB/cm‑MHz attenuative medium is not considered in the accuracyestimate for the display. Neither linear propagation, nor uniform attenuation at the 0.3 dB/cm‑MHz rate, occur in water tank measurements or in most tissue paths in the body. In thebody, different tissues and organs have dissimilar attenuation characteristics. In water, there isalmost no attenuation. In the body, and in particular, in water tank measurements, nonlinearpropagation and saturation losses occur as pulser voltages increase.

Biological Safety Safety
Lumify Ultrasound System 45
Phili
ps H
ealth
care
4535
619
091
31_A
/795
* A
PR 2
017
Therefore, the display accuracy estimates are based on the variability range of transducers andsystems, inherent acoustic output modeling errors, and measurement variability. Displayaccuracy estimates are not based on errors in, or caused by measuring according to, the AIUMmeasurement standards, or the effects of nonlinear loss on the measured values.
Control Effects
Controls Affecting the Indices
As various system controls are adjusted, the TI and MI values may change. This will be mostapparent as the output power control is adjusted; but other system controls affect theon‑screen output values.
Power
The output power control affects the system acoustic output. Two real‑time output values areon the display: TI and MI. They change as the system responds to power-control adjustments.
In combined modes, such as simultaneous Color and 2D, the individual modes each add to thetotal TI. One mode will be the dominant contributor to this total. The displayed MI will be fromthe mode with the largest MI value.
2D Controls
• Focus: Changing the focal depth will change MI. Generally, higher MI values will occur whenthe focal depth is near the natural focus of the transducer.
• Zoom: Increasing the zoom magnification by spreading the display may increase frame rate.This action will increase the TI. The number of focal zones may also increase automaticallyto improve resolution. This action may change the MI, because the peak MI can occur at adifferent depth.
Color Controls
• Color Sector Width: Narrower color sector width will increase color frame rate and the TIwill increase. The system may automatically decrease pulser voltage to stay below thesystem maximum. A decrease in pulser voltage will decrease the MI.

Safety Biological Safety
46 Lumify Ultrasound System
Phili
ps H
ealth
care
4535
619
091
31_A
/795
* A
PR 2
017
• Color Sector Depth: Deeper color sector depth may automatically decrease color frame rateor select a new color focal zone or color pulse length. The TI will change due to thecombination of these effects. Generally, the TI will decrease with increased color sectordepth. MI will correspond to the MI of the dominant pulse type which is a color pulse.
Other Control Effects
• 2D Depth: An increase in 2D depth will automatically decrease the 2D frame rate. This willdecrease the TI. The system may also automatically choose a deeper 2D focal depth. Achange of focal depth may change the MI. The MI displayed is that of the zone with thelargest MI value.
• Application: Acoustic output defaults are set when you select an application. Factorydefaults vary with transducer, application, and mode. Defaults have been chosen below theFDA limits for intended use.
• Imaging Mode Controls: When a new imaging mode is selected, both the TI and MI maychange to default settings. Each mode has a corresponding pulse repetition frequency andmaximum intensity point. In combined or simultaneous modes, the TI is the sum of thecontribution from the modes enabled, and the displayed MI is the largest of the MI valuesassociated with each mode and focal zone enabled. The system will return to the previouslyselected state if a mode is turned off and then reselected.
• Transducer: Each transducer type has unique specifications for contact area, beam shape,and center frequency. Defaults are initialized when you select a transducer. Factory defaultsvary with transducer, application, and selected mode. Defaults have been chosen below theFDA limits for intended use.
Related Guidance DocumentsFor more information about ultrasonic bioeffects and related topics, see the following:
• "Bioeffects and Safety of Diagnostic Ultrasound." AIUM Report, January 28, 1993.
• "American Institute of Ultrasound in Medicine Bioeffects Consensus Report." Journal ofUltrasound in Medicine, Vol. 27, Issue 4, April 2008.

Biological Safety Safety
Lumify Ultrasound System 47
Phili
ps H
ealth
care
4535
619
091
31_A
/795
* A
PR 2
017
• Acoustic Output Measurement Standard for Diagnostic Ultrasound Equipment. (AIUM,NEMA, 2004)
• Third Edition of the AIUM Medical Ultrasound Safety brochure, 2014. (A copy of thisdocument is provided with each system.)
• Information for Manufacturers Seeking Marketing Clearance of Diagnostic UltrasoundSystems and Transducers. FDA, September 2008.
• Standard for Real‑Time Display of Thermal and Mechanical Acoustic Output Indices onDiagnostic Ultrasound Equipment. (AIUM, NEMA, 2004)
• WFUMB. "Symposium on Safety of Ultrasound in Medicine: Conclusions andRecommendations on Thermal and Non‑Thermal Mechanisms for Biological Effects ofUltrasound." Ultrasound in Medicine and Biology, 1998: Vol. 24, Supplement 1.
Acoustic Output and MeasurementSince the initial use of diagnostic ultrasound, the possible human bioeffects from ultrasoundexposure have been studied by various scientific and medical institutions. In October 1987, theAmerican Institute of Ultrasound in Medicine (AIUM) ratified a report prepared by its BioeffectsCommittee ("Bioeffects Considerations for the Safety of Diagnostic Ultrasound." Journal ofUltrasound in Medicine, Vol. 7, No. 9 Supplement, September 1988), sometimes referred to asthe Stowe Report, which reviewed available data on possible effects of ultrasound exposure.Another report, “Bioeffects and Safety of Diagnostic Ultrasound,” dated January 28, 1993,provides more-current information.
The acoustic output for this system has been measured and calculated in accordance with the“Acoustic Output Measurement Standard for Diagnostic Ultrasound Equipment” (Revision 3,AIUM, NEMA, 2004), the “Standard for Real-Time Display of Thermal and Mechanical AcousticOutput Indices on Diagnostic Ultrasound Equipment” (Revision 2, AIUM, NEMA, 2004), and theSeptember 2008 FDA document "Information for Manufacturers Seeking Marketing Clearanceof Diagnostic Ultrasound Systems and Transducers."

Safety Biological Safety
48 Lumify Ultrasound System
Phili
ps H
ealth
care
4535
619
091
31_A
/795
* A
PR 2
017
In Situ, Derated, and Water Value Intensities
All intensity parameters are measured in water. Since water absorbs very little acoustic energy,these water measurements represent a worst case value. Biological tissue does absorb acousticenergy. The true value of the intensity at any point depends on the amount and type of tissueand the frequency of the ultrasound that passes through the tissue. The intensity value in thetissue, In Situ, has been estimated by using the following formula:
In Situ = Water [e-0.23alf]
Where:
Variable Value
In Situ In Situ intensity value
Water Water value intensity
e 2.7183
a Attenuation factor
Tissue a(dB/cm-MHz)
Amniotic Fluid 0.006
Brain 0.53
Heart 0.66
Kidney 0.79
Liver 0.43
Muscle 0.55
l Skin line to measurement depth (cm)
f Center frequency of the transducer/system/mode combination (MHz)

Biological Safety Safety
Lumify Ultrasound System 49
Phili
ps H
ealth
care
4535
619
091
31_A
/795
* A
PR 2
017
Since the ultrasonic path during an examination is likely to pass through varying lengths andtypes of tissue, it is difficult to estimate the true in situ intensity. An attenuation factor of 0.3 isused for general reporting purposes; therefore, the In Situ value which is commonly reporteduses the formula:
In Situ derated = Water [e-0.069lf]
Since this value is not the true in situ intensity, the term “derated” is used.
Mathematical derating of water based measurements using the 0.3 dB/cm‑MHz coefficient mayyield lower acoustic exposure values than would be measured in a homogenous 0.3 dB/cm‑MHz tissue. This is true because nonlinearly propagating acoustic energy waveformsexperience more distortion, saturation, and absorption in water than in tissue, whereattenuation present all along the tissue path will dampen the buildup of nonlinear effects.
The maximum derated and the maximum water values do not always occur at the sameoperating conditions; therefore, the reported maximum water and derated values may not berelated by the in situ (derated) formula. For example: A multi-zone array transducer that hasmaximum water value intensities in its deepest zone may have its largest derated intensity inone of its shallowest focal zones.
Conclusions Regarding Tissue Models and Equipment Survey
Tissue models are necessary to estimate attenuation and acoustic exposure levels in situ frommeasurements of acoustic output made in water. Presently, available models may be limited intheir accuracy because of varying tissue paths during diagnostic ultrasound exposures anduncertainties in acoustical properties of soft tissues. No single tissue model is adequate forpredicting exposures in all situations from measurements made in water, and continuedimprovement and verification of these models is necessary for making exposure assessmentsfor specific applications.
A homogeneous tissue model with an attenuation coefficient of 0.3 dB/cm‑MHz throughout thebeam path is commonly used when estimating exposure levels. The model is conservative inthat it overestimates the in situ acoustic exposure when the path between the transducer andthe site of interest is composed entirely of soft tissue, because the attenuation coefficient ofsoft tissue is generally higher than 0.3 dB/cm‑MHz. When the path contains significant amountsof fluid, as in many first- and second-trimester pregnancies scanned transabdominally, thismodel may underestimate the in situ acoustical exposure. The amount of underestimation

Safety Biological Safety
50 Lumify Ultrasound System
Phili
ps H
ealth
care
4535
619
091
31_A
/795
* A
PR 2
017
depends on each specific situation. For example, when the beam path is longer than 3 cm andthe propagation medium is predominantly fluid (conditions that may exist duringtransabdominal OB scans), a more accurate value for the derating term is 0.1 dB/cm‑MHz.
Fixed-path tissue models, in which soft tissue thickness is held constant, sometimes are used toestimate in situ acoustical exposures when the beam path is longer than 3 cm and consistslargely of fluid. When this model is used to estimate maximum exposure to the fetus duringtransabdominal scans, a value of 1 dB/cm‑MHz may be used during all trimesters.
The maximum acoustic output levels of diagnostic ultrasound devices extend over a broadrange of values:
• A survey of 1990-equipment models yielded mechanical index (MI) values between 0.1 and1 at their highest output settings. Maximum MI values of approximately 2 are known tooccur for currently available equipment. Maximum MI values are similar for real-time 2D,M-mode, PW Doppler, and Color flow imaging.
• Computed estimates of upper limits to temperature elevations during transabdominal scanswere obtained in a survey of 1988 and 1990 PW Doppler equipment. The vast majority ofmodels yielded upper limits less than 1°C and 4°C for exposures of first-trimester fetaltissue and second-trimester fetal bone, respectively. The largest values obtained wereapproximately 1.5°C for first-trimester fetal tissue and 7°C for second-trimester fetal bone.Estimated maximum temperature elevations given here are for a “fixed-path” tissue modeland are for devices having Ispta (derated) values greater than 500 mW/cm2. Thetemperature elevations for fetal bone and tissue were computed based on calculationprocedures given in Sections 4.3.2.1 through 4.3.2.6 in "Bioeffects and Safety of DiagnosticUltrasound" (AIUM Report, January 28, 1993).
Acoustic Output TablesAcoustic output tables are in Acoustic Output Tables, on your User Information CD.

Biological Safety Safety
Lumify Ultrasound System 51
Phili
ps H
ealth
care
4535
619
091
31_A
/795
* A
PR 2
017
Acoustic Measurement Precision and UncertaintyAll table entries have been obtained at the same operating conditions that give rise to themaximum index value in the first column of the tables. Measurement precision and uncertaintyfor power, pressure, intensity, and center frequency are listed in the following tables.
NOTE
Per Section 6.4 of the Output Display Standard, measurement precision on the followingquantities is determined by making repeated measurements and stating the standarddeviation as a percentage.
Acoustic Measurement Precision
Quantity Precision (Percentage Standard Deviation)
Pr is the underated peak rarefactional pressuremeasured in megapascals (MPa).
Pr: 5.4%
P is the ultrasonic power in milliwatts (mW). 6.2%
fawf is the center frequency in megahertz (MHz)(NEMA UD-2 definition).
<1%
PII.3 is the derated spatial-peak pulse intensityintegral in joules per square centimeter (J/cm2).
PII.3: 3.2%
Acoustic Measurement Uncertainty
Quantity Measurement Uncertainty (Percentage, 95%Confidence Value)
Pr is the underated peak rarefactional pressuremeasured in megapascals (MPa).
Pr: ±11.3%
P is the ultrasonic power in milliwatts (mW). ±10%

Safety Operator Safety
52 Lumify Ultrasound System
Phili
ps H
ealth
care
4535
619
091
31_A
/795
* A
PR 2
017
Quantity Measurement Uncertainty (Percentage, 95%Confidence Value)
fawf is the center frequency in megahertz (MHz)(NEMA UD-2 definition).
±4.7%
PII.3 is the derated spatial-peak pulse intensityintegral in joules per square centimeter (J/cm2).
PII.3: +18% to -23%
Operator SafetyThe following issues and situations can affect operator safety when you are using an ultrasoundsystem.
Repetitive Strain InjuryRepetitive ultrasound scanning has been associated with carpal tunnel syndrome (CTS) andrelated musculoskeletal problems. Some investigators have looked at a large population ofsonographers with different types of equipment. An article, with feedback from a smallergeographical area, makes the following recommendations:
• Maintain your joints in optimum positions with a balanced posture while scanning.
• Allow frequent breaks to give soft tissue a chance to recuperate from awkward positionsand repetitive movement.
• Avoid gripping the transducer with excessive force.
Repetitive Strain References
Pike, I., et al. "Prevalence of Musculoskeletal Disorders and Related Work and Personal FactorsAmong Diagnostic Medical Sonographers." Journal of Diagnostic Medical Sonographers, Vol. 13,No. 5: 219-227, September 1997.
Necas, M. "Musculoskeletal Symptomatology and Repetitive Strain Injuries in DiagnosticMedical Sonographer." Journal of Diagnostic Medical Sonographers, 266-227, November/December 1996.

Operator Safety Safety
Lumify Ultrasound System 53
Phili
ps H
ealth
care
4535
619
091
31_A
/795
* A
PR 2
017
Philips TransducersUse only transducers that are approved by Philips for use with your Philips ultrasound system.See “Clinical Applications and Transducers” on page 120 for a list of the transducers that arecompatible with your ultrasound system.
Glutaraldehyde ExposureThe United States Occupational Safety and Health Administration (OSHA) has issued aregulation covering levels of acceptable glutaraldehyde exposure in the working environment.Philips does not sell glutaraldehyde-based disinfectants with its products, but this type ofdisinfectant is recommended for the disinfection of transducers used in TEE, intraoperative,endocavity, and biopsy procedures.
To reduce the presence of glutaraldehyde fumes in the air, be sure to use a covered orventilated soaking basin. Such systems are commercially available.
Infection ControlIssues related to infection control affect the operator and the patient. Follow the infection-control procedures established in your facility for the protection of both the staff and thepatient.
Removing Blood and Infectious Material from the System
It is important to clean and maintain the ultrasound system and peripherals. If the equipmenthas come in contact with blood or infectious material, clean and disinfect the system andperipherals according to the instructions in the “System Maintenance” section.
Disposable Drape
If you believe contamination of the system might occur during an exam, take universalprecautions and cover the system with a disposable drape. Consult your facility's rulesregarding equipment use in the presence of infectious disease.

Safety Electromagnetic Compatibility
54 Lumify Ultrasound System
Phili
ps H
ealth
care
4535
619
091
31_A
/795
* A
PR 2
017
Electromagnetic CompatibilityElectromagnetic compatibility (EMC) is defined as the ability of a product, a device, or a systemto function satisfactorily in the presence of the electromagnetic phenomena that exists in thelocation of the product, the device, or the system being used; and, in addition, to not introduceintolerable electromagnetic disturbances to anything in that same environment.
Electromagnetic immunity is the ability of a product, a device, or a system to functionsatisfactorily in the presence of electromagnetic interference (EMI).
Electromagnetic emissions is the ability of a product, a device, or a system to introduceintolerable electromagnetic disturbances into the use environment.
Your system has been manufactured in compliance with existing electromagnetic compatibilityrequirements. Use of this system in the presence of an electromagnetic field can causemomentary degradation of the image quality. If this occurs often, review the environment inwhich the system is being used to identify possible sources of radiated emissions. Theseemissions could be from other electrical devices used within the same room or an adjacentroom, or from portable and mobile RF communications equipment such as cellular phones andpagers, or from the existence of radio, TV, or microwave transmission equipment locatednearby. In cases where electromagnetic interference (EMI) is causing disturbances, it may benecessary to relocate your system.
The transducer and representative Android device are classified as Group 1, Class B equipmentin accordance with international standard CISPR 11 for radiated and conducted electromagneticdisturbances. Compliance with this standard allows the system to be used in all establishments,including domestic establishments and those directly connected to the public low-voltagepower supply network that supplies buildings used for domestic purposes.
WARNING
Using cables, transducers, or accessories other than those specified for use with the systemmay result in increased emissions or decreased immunity of the system.

Electromagnetic Compatibility Safety
Lumify Ultrasound System 55
Phili
ps H
ealth
care
4535
619
091
31_A
/795
* A
PR 2
017
CAUTION
Medical equipment has special precautions regarding EMC and must be installed and putinto service according to the EMC information provided in the system’s accompanyingdocuments.
This section includes information on electromagnetic emissions and immunity as it applies tothe system. Ensure that the operating environment of your system meets the conditionsspecified in the referenced information. Operating the system in an environment that does notmeet these conditions may degrade system performance.
The information and warnings contained in this and other sections should be observed wheninstalling and using the system to ensure its EMC.
NOTE
See the other electrical-safety warnings and cautions in this section.
Electrostatic Discharge PrecautionsElectrostatic discharge (ESD), commonly referred to as a static shock, is a naturally occurringphenomenon that results in the flow of an electrical charge from a higher charged object orperson to a lower charged object or person. ESD is most prevalent during conditions of lowhumidity, which can be caused by heating or air-conditioning. During low humidity conditions,electrical charges naturally build up on individuals and objects and can create static discharges.
The following cautions can help to reduce ESD effect:

Safety Electromagnetic Compatibility
56 Lumify Ultrasound System
Phili
ps H
ealth
care
4535
619
091
31_A
/795
* A
PR 2
017
CAUTION
The following precautions can help to reduce ESD: anti-static spray on carpets; anti-staticspray on linoleum; anti-static mats; or a ground wire connection between the system andthe patient table or bed.
CAUTION
On connectors labeled with the ESD sensitivity symbol , do not touch the connector pins,and always observe the preceding ESD precautions when handling or connectingtransducers.
Electromagnetic EmissionsThe system is intended for use in the electromagnetic environment specified in the table. Thecustomer or the user of the system should ensure that it is used in such an environment. Electromagnetic Emissions: Environment Guidance
Emissions Test Compliance Electromagnetic EnvironmentGuidance
RF emissions, CISPR 11 Group 1 The system uses RF energy only for itsinternal function. Therefore, its RFemissions are very low and are notlikely to cause any interference innearby electronic equipment.
RF emissions, CISPR 11 Class B The system is suitable for use in allestablishments, including domesticestablishments and those directlyconnected to the public low-voltagepower supply network that suppliesbuildings used for domestic purposes.
Harmonic emissions, IEC 61000-3-2 Class A
Voltage fluctuations/flickeremissions, IEC 61000-3-3
Complies
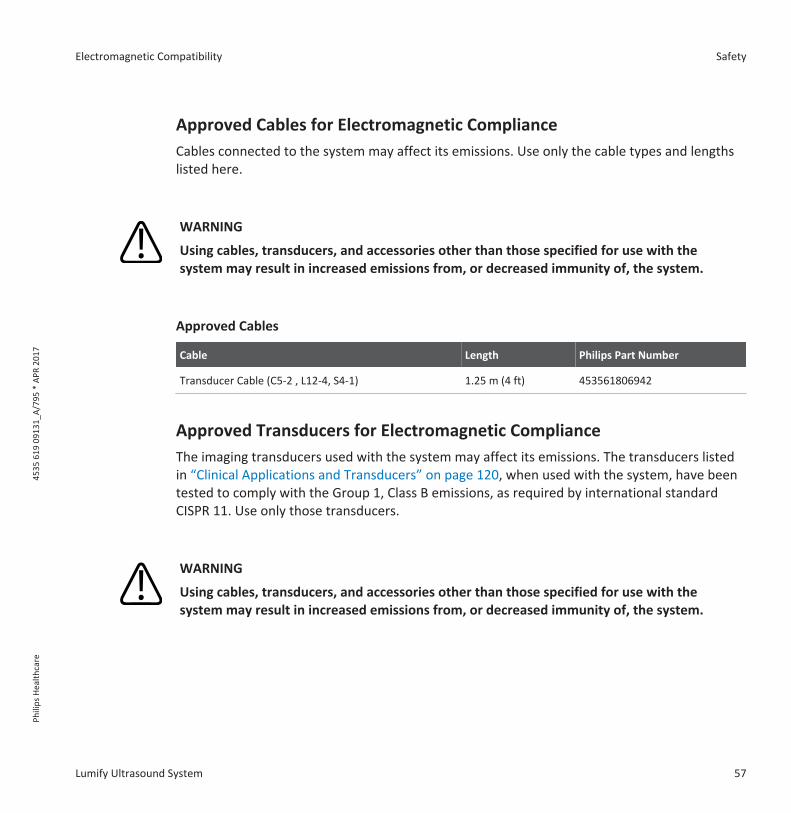
Electromagnetic Compatibility Safety
Lumify Ultrasound System 57
Phili
ps H
ealth
care
4535
619
091
31_A
/795
* A
PR 2
017
Approved Cables for Electromagnetic ComplianceCables connected to the system may affect its emissions. Use only the cable types and lengthslisted here.
WARNING
Using cables, transducers, and accessories other than those specified for use with thesystem may result in increased emissions from, or decreased immunity of, the system.
Approved Cables
Cable Length Philips Part Number
Transducer Cable (C5-2 , L12-4, S4-1) 1.25 m (4 ft) 453561806942
Approved Transducers for Electromagnetic ComplianceThe imaging transducers used with the system may affect its emissions. The transducers listedin “Clinical Applications and Transducers” on page 120, when used with the system, have beentested to comply with the Group 1, Class B emissions, as required by international standardCISPR 11. Use only those transducers.
WARNING
Using cables, transducers, and accessories other than those specified for use with thesystem may result in increased emissions from, or decreased immunity of, the system.

Safety Electromagnetic Compatibility
58 Lumify Ultrasound System
Phili
ps H
ealth
care
4535
619
091
31_A
/795
* A
PR 2
017
Approved Accessories for Electromagnetic ComplianceAccessories used with the system may affect its emissions. The accessories listed here, whenused with the system, have been tested to comply with the Group 1, Class B emissions asrequired by international standard CISPR 11. Use only the accessories listed here.
When connecting other accessories to the system, such as a printer or computer, it is the user'sresponsibility to ensure the electromagnetic compatibility of the system. Use only CISPR 11 orCISPR-22, Class B-compliant devices, unless otherwise noted.
WARNING
Using cables, transducers, and accessories other than those specified for use with thesystem may result in increased emissions from, or decreased immunity of, the system.
Approved Accessories
Accessory Manufacturer Model Number
Ultrasonic imaging transducer Philips Use only the transducers listed in“Clinical Applications andTransducers” on page 120.
Electromagnetic ImmunityThe system is intended for use in the electromagnetic environment specified here. Thecustomer or the user of the system should ensure that it is used in such an environment.

Electromagnetic Compatibility Safety
Lumify Ultrasound System 59
Phili
ps H
ealth
care
4535
619
091
31_A
/795
* A
PR 2
017
CAUTION
Cables, transducers, and accessories connected to the system may affect its immunity to theelectromagnetic phenomena listed here. Use only approved accessories, cables, andtransducers to minimize the chance of performance degradation of the system due to thosetypes of electromagnetic phenomena.
NOTE
The guidelines specified here may not apply in all situations. Electromagnetic propagation isaffected by absorption and reflection from structures, objects, and people.
NOTE
At 80 MHz and 800 MHz, the separation distance for the higher frequency range applies.
Electromagnetic Immunity: Environment Guidance
Immunity Test IEC 60601 Test Level Compliance Level ElectromagneticEnvironment Guidance
Electrostatic discharge(ESD), IEC 61000-4-2
8 kV air discharge, 6 kVcontact discharge
8 kV air discharge, 6 kVcontact discharge
Floors should be wood,concrete, or ceramic tile. Iffloors are covered withsynthetic material, therelative humidity should beat least 30%.
Electrical fast transient/burst, IEC 61000-4-4
Not applicable. The devicedoes not function on ACpower
- - Mains power quality shouldbe that of a typicalcommercial or hospitalenvironment.

Safety Electromagnetic Compatibility
60 Lumify Ultrasound System
Phili
ps H
ealth
care
4535
619
091
31_A
/795
* A
PR 2
017
Immunity Test IEC 60601 Test Level Compliance Level ElectromagneticEnvironment Guidance
Surge, IEC 61000-4-5 Not applicable. The devicedoes not function on ACpower
- - Mains power quality shouldbe that of a typicalcommercial or hospitalenvironment.
Voltage dips, shortinterruptions, and voltagevariations on power supplyinput lines, IEC 61000-4-11
Not applicable. The devicedoes not function on ACpower
- - Mains power quality shouldbe that of a typicalcommercial or hospitalenvironment. If you requirecontinued operation duringpower mains interruptions,Philips recommends thatthe system be poweredfrom an uninterruptiblepower supply or a battery.
Power frequency(50/60 Hz) magnetic field,IEC 61000-4-8
3 A/m 3 A/m Power frequency magneticfields should be at levelscharacteristic of a typicallocation in a typicalcommercial or hospitalenvironment.
Conducted RF,IEC 61000-4-6
3 VRMS 3 VRMS For recommendedseparation distances, see“Recommended SeparationDistance” on page 63.
Radiated RF, IEC 61000-4-3 3 V/m 3 V/m For recommendedseparation distances, see“Recommended SeparationDistance” on page 63.

Electromagnetic Compatibility Safety
Lumify Ultrasound System 61
Phili
ps H
ealth
care
4535
619
091
31_A
/795
* A
PR 2
017
Although most remote devices comply with their applicable standards for immunity, thosedevice requirements may not be as stringent as those required for medical equipment. It is theresponsibility of the installer and the user of this remote customer-supplied equipment toensure that it functions properly in the electromagnetic environment where the system isinstalled. The installer or the user of such a system should consult with experts in the field ofelectromagnetic compatibility and safety for guidance to ensure the safe and effective use ofthe created system.
Electromagnetic InterferenceElectromagnetic interference may appear in many ways on the system and depends on themode the equipment is operating in, the imaging control settings, the type of transducer beingused, the type of electromagnetic phenomena, and the intensity level of the phenomena.
CAUTION
When interference is present or intermittent, use caution when continuing to use thesystem.
NOTE
Electromagnetic phenomena are not always present and may be transitory in nature. It maybe extremely difficult to identify the source of the interference.

Safety Electromagnetic Compatibility
62 Lumify Ultrasound System
Phili
ps H
ealth
care
4535
619
091
31_A
/795
* A
PR 2
017
NOTE
The following table describes a few typical interferences seen in imaging systems. It isimpossible to describe all manifestations of interference, because it depends on manyparameters of the transmitting device, such as the type of modulation used by the signalcarrier, the source type, and the transmitted level. It is also possible for the interference todegrade the imaging system's performance and not be visible in the image. If the diagnosticresults are suspicious, other means should be used to confirm the diagnosis.
Typical Interference on Ultrasonic Imaging Systems
Imaging Mode ESD1 RF2 Power Line3
2D Change of operating mode,system settings, or systemreset. Brief flashes in thedisplayed or recordedimage.
For sector imagingtransducers, white radialbands or flashes in thecenter lines of the image.For linear imagingtransducers, white verticalbands, sometimes morepronounced on the sides ofthe image.
White dots, dashes, ordiagonal lines near thecenter of the image.
Color Change of operating mode,system settings, or systemreset. Brief flashes in thedisplayed or recordedimage.
Color flashes, radial orvertical bands, increase inbackground noise, orchanges in image color.
Color flashes, dots, dashes,or changes in the colornoise level.
M-mode Change of operating mode,system settings, or systemreset. Brief flashes in thedisplayed or recordedimage.
Increase in the imagebackground noise or whiteM-mode lines.
White dots, dashes,diagonal lines, or increasein image background noise.

Electromagnetic Compatibility Safety
Lumify Ultrasound System 63
Phili
ps H
ealth
care
4535
619
091
31_A
/795
* A
PR 2
017
1. Electrostatic discharge (ESD) caused by discharging of electric charge buildup on insulatedsurfaces or persons.
2. Radio frequency (RF) energy from RF transmitting equipment such as portable phones,handheld radios, wireless devices, commercial radio and TV stations, and so on.
3. Conducted interference on power lines or connected cables caused by other equipment,such as switching power supplies, electrical controls, and natural phenomena such aslightning.
Recommended Separation DistanceThe following table provides recommended separation distances, which are guidelines on thedistances that any RF transmitting equipment should be kept away from the ultrasound systemto reduce the risk of interference with the system. Portable and mobile RF communicationsequipment should be used no closer to any part of the system, including cables, than therecommended separation distance calculated from the equation applicable to the frequency ofthe transmitter. Field strengths from fixed RF transmitters, as determined by anelectromagnetic site survey, should be less than the compliance level in each frequency rangeas noted in the table. Interference may occur in the vicinity of equipment marked with the
following symbol: .
Field strengths from fixed transmitters, such as base stations for radio (cellular/cordless)telephones and land mobile radios, amateur radio, AM and FM radio broadcast, and TVbroadcast, cannot be predicted theoretically with accuracy. To assess the electromagneticenvironment due to fixed RF transmitters, an electromagnetic site survey should be considered.If the measured field strength in the location in which the system is used exceeds the applicableRF compliance level in the table, the system should be observed to verify normal operation. Ifabnormal performance is observed, additional measures may be necessary, such as reorientingor relocating the system.
NOTE
At 80 MHz and 800 MHz, the higher frequency range applies.

Safety Electromagnetic Compatibility
64 Lumify Ultrasound System
Phili
ps H
ealth
care
4535
619
091
31_A
/795
* A
PR 2
017
NOTE
The recommended separation distance guidelines in the following table may not apply to allsituations. Electromagnetic propagation is affected by absorption and reflection fromstructures, objects, and people.
The information provided here, in conjunction with “Electromagnetic Interference” on page 61,provides guidance on conducted and radiated interference from portable and fixed RFtransmitting equipment.Recommended Separation Distances by Transmitter Frequency
Rated Maximum OutputPower of Transmitter(Watts)
150 kHz to 80 MHz 80 to 800 MHz 800 MHz to 2.5 GHz
0.01 0.35 m (13.8 in) 0.12 m (4.7 in) 0.23 m (9.1 in)
0.1 1.1 m (3.6 ft) 0.38 m (15 in) 0.73 m (28.7 in)
1 3.5 m (11.5 ft) 1.2 m (3.9 ft) 2.3 m (7.5 ft)
10 11 m (36.1 ft) 3.8 m (12.5 ft) 7.3 m (24 ft)
100 35 m (114.8 ft) 12 m (39.4 ft) 23 m (75.5 ft)
Ultrasound systems can be sensitive to RF interference in the transducer passband. Forexample, for a 5-MHz imaging transducer, the frequency range of interference from a 3-V/mfield may be from 2 to 10 MHz and manifest itself as described in “ElectromagneticInterference” on page 61.
As an example, if a portable transmitter has maximum radiated power of 1 W and an operatingfrequency of 156 MHz, it should only be operated at distances greater than 1.2 m (3.9 ft) fromthe system. Likewise, a 0.01-W Bluetooth wireless LAN device operating at 2.4 GHz should beplaced no closer than 0.24 m (9.5 in) from any part of the system.

Electromagnetic Compatibility Safety
Lumify Ultrasound System 65
Phili
ps H
ealth
care
4535
619
091
31_A
/795
* A
PR 2
017
Avoiding Electromagnetic InterferenceA medical device can either generate or receive electromagnetic interference. The EMCstandards describe tests for both emitted and received interference. Emission tests deal withinterference generated by the device being tested. The ultrasound system does not generateinterference based on the tests described in the referenced standards.
An ultrasound system is designed to receive signals at radio frequencies and is thereforesusceptible to interference generated by RF energy sources. Examples of other sources ofinterference are medical devices, information technology products, and radio and televisiontransmission towers. Tracing the source of radiated interference can be a difficult task.Customers should consider the following in an attempt to locate the source:
• Is the interference intermittent or constant?
• Does the interference show up only with one transducer or with several transducers?
• Do two different transducers operating at the same frequency have the same problem?
• Is the interference present if the system is moved to a different location in the facility?
• Can the EMC coupling path be attenuated? For example, placement of a transducer orprinter close to an ECG cable can increase electromagnetic interference. Moving the cableor other medical equipment away from the location of the transducer or printer can resultin reduced electromagnetic interference.
The answers to these questions will help determine if the problem resides with the system orthe scanning environment. After you answer the questions, contact your Philips servicerepresentative.
Use Restrictions Due to InterferenceThe physician must determine if an artifact caused by radiated interference will have a negativeimpact on image quality and the subsequent diagnosis.

Safety Electromagnetic Compatibility
66 Lumify Ultrasound System
Phili
ps H
ealth
care
4535
619
091
31_A
/795
* A
PR 2
017
Device Requirements System Overview
Lumify Ultrasound System 67
Phili
ps H
ealth
care
4535
619
091
31_A
/795
* A
PR 2
017
System OverviewUse this section to acquaint yourself with the ultrasound system and its components.
Device Requirements
WARNING
Using the Lumify app on a device that does not meet the minimum specification may resultin poor image quality, unexpected results, and possible misdiagnosis.
For a list of devices that Philips has tested and determined to be compatible with the Lumifyapp, visit the Lumify portal:
www.philips.com/Lumify-Compatible-Devices
Although Philips cannot guarantee that the Lumify app will work on a device that is not on thelist of compatible devices, these are the minimum device specifications. Your device must meetall of the following specifications:
• Minimum 50 MB of storage space (plus more for patient data storage)
• Color display, minimum 14 cm (5.5 in)
• Touch interface
• Internally mounted speakers
• IEC 60950-1-compliant
• Date/time configuration
• Full compliance with USB On-The-Go standard1
• 1280 x 800 resolution (minimum)
• Android 5.0 or later operating system
3

System Overview System Capabilities
68 Lumify Ultrasound System
Phili
ps H
ealth
care
4535
619
091
31_A
/795
* A
PR 2
017
• NVIDIA Tegra 3, Intel Atom Z3580 CPU, or faster equivalent
• Wireless or cellular networking capability
• Access to ports 80 and 4431Philips verifies that the devices in the Lumify Tablet Compatibility table on the Lumify portal(www.philips.com/Lumify-Compatible-Devices) comply with the USB On-The-Go standard.
System CapabilitiesThe Lumify Ultrasound System is intended for abdominal (including gallbladder and lung),cardiac, carotid, general imaging, musculoskeletal, neonatal and adult cephalic, OB/GYN, smallparts (small organ), superficial, urology, and vascular applications. It can be used for 2D,M‑mode, Color, and combined 2D and Color imaging. The system provides 2D distance andellipse area measurement tools. Measurements can be performed while using M‑mode.
NOTE
Voice-to-text capability depends upon your device's support for the feature and on yourwireless or cellular connection.
MeasurementsThe system provides tools for measuring distance and for measuring the area andcircumference of an ellipse.
After you perform measurements, you can save the measurements by acquiring an image thatcontains the measurements. The system displays a maximum of four distance measurements orone ellipse measurement at a time.
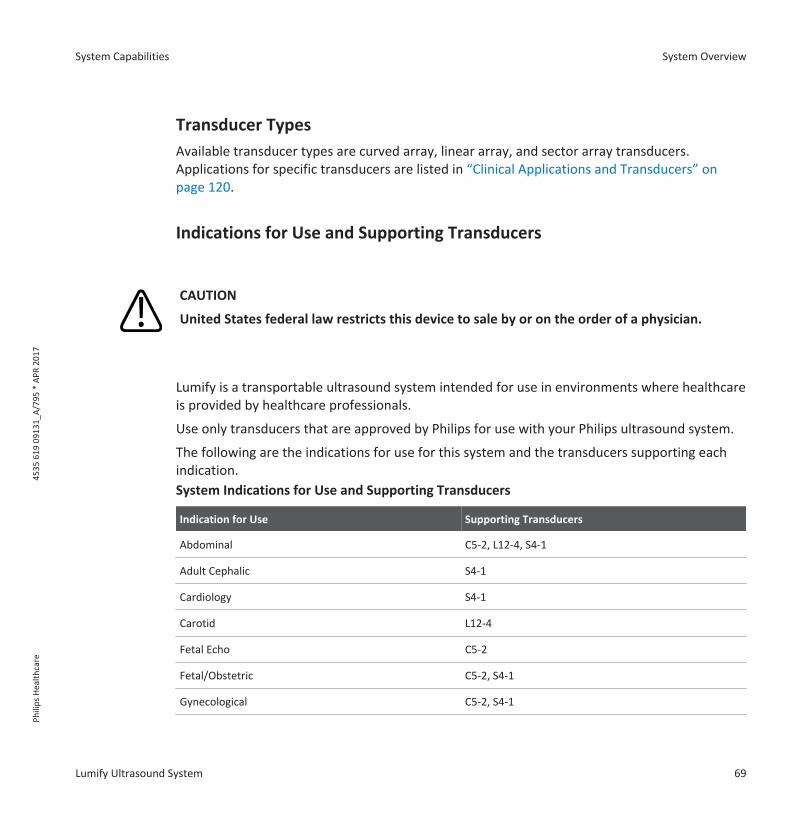
System Capabilities System Overview
Lumify Ultrasound System 69
Phili
ps H
ealth
care
4535
619
091
31_A
/795
* A
PR 2
017
Transducer TypesAvailable transducer types are curved array, linear array, and sector array transducers.Applications for specific transducers are listed in “Clinical Applications and Transducers” onpage 120.
Indications for Use and Supporting Transducers
CAUTION
United States federal law restricts this device to sale by or on the order of a physician.
Lumify is a transportable ultrasound system intended for use in environments where healthcareis provided by healthcare professionals.
Use only transducers that are approved by Philips for use with your Philips ultrasound system.
The following are the indications for use for this system and the transducers supporting eachindication.System Indications for Use and Supporting Transducers
Indication for Use Supporting Transducers
Abdominal C5-2, L12-4, S4-1
Adult Cephalic S4-1
Cardiology S4-1
Carotid L12-4
Fetal Echo C5-2
Fetal/Obstetric C5-2, S4-1
Gynecological C5-2, S4-1

System Overview System Capabilities
70 Lumify Ultrasound System
Phili
ps H
ealth
care
4535
619
091
31_A
/795
* A
PR 2
017
Indication for Use Supporting Transducers
Musculoskeletal L12-4
Neonatal Cephalic S4-1
Pediatric C5-2, L12-4, S4-1
Peripheral Vessel L12-4
Small Parts L12-4
Urology C5-2
Patient Data ProtectionThe Lumify app does not encrypt patient data. It is your responsibility to configure your deviceto meet your local security policies and regulatory requirements. Consult your healthcare-ITsecurity department to ensure that your device is configured in accordance with your specificrequirements for information security.
Philips recommends that you protect patient data by encrypting your device and setting apassword or passcode as a screen lock for your device, in accordance with your institution'ssecurity policies and requirements. For instructions, see the documentation that accompaniesyour device.
When you are finished using the system, you can briefly press the On/Off control on the deviceto lock the screen and prevent unauthorized access to patient data, or you can simply shutdown the system, which logs you off automatically. For more information about patient dataprotection, see Shared Roles for System and Data Security on your User Information CD or inthe Support section of the Lumify portal:
www.philips.com/lumify
The Lumify Ultrasound System is not intended for long-term storage of patient data. Exportexams frequently and delete them after they are exported. You can hide patient data onexported images and loops (see “Exporting Exams” on page 112 and “Showing or HidingPatient Data on Exported Images and Loops” on page 113). You can also delete all patient datafrom the Lumify system (see “Deleting Patient Data and Lumify Settings” on page 87).

System Components System Overview
Lumify Ultrasound System 71
Phili
ps H
ealth
care
4535
619
091
31_A
/795
* A
PR 2
017
Wireless NetworkingFor information about configuring your device for wireless networking, see the documentationthat accompanies your device.
It is your responsibility to configure the wireless network security mechanisms that arecompatible with your network. Consult your healthcare IT security department to ensure thatyour device is configured in accordance with your specific requirements for informationsecurity.
System ComponentsThe system consists of the following:
• The Philips Lumify app, available for download from the Google Play Store
• One or more Philips Lumify transducers
For subscription and purchasing options, visit the Lumify portal: www.philips.com/lumify orcall Philips Lumify Support representatives at 1‑844‑MYLUMIFY (1-844‑695‑8643).
NOTE
Transducer subscription plans are available only to customers located in the USA.
• A compatible Android device (for a list of compatible devices, visit the Lumify portal:www.philips.com/Lumify-Compatible-Devices)
• A carrying bag
• User information (see “User Information Components” on page 12)

System Overview System Settings
72 Lumify Ultrasound System
Phili
ps H
ealth
care
4535
619
091
31_A
/795
* A
PR 2
017
System Components
1 Android device
2 Transducer
3 USB cable
Data StorageYou can export exams and images to a DICOM PACS, to a network share, or to a local directory.You can also e-mail images. Supported e-mail applications include Gmail, K-9 Mail, Yahoo,Outlook, and Inbox. For more information, see “Exporting Exams” on page 112 and “ExportingImages and Loops” on page 109.
System SettingsTo configure the settings for your system, touch and then select Settings .

System Settings System Overview
Lumify Ultrasound System 73
Phili
ps H
ealth
care
4535
619
091
31_A
/795
* A
PR 2
017
Name Description
Audit Logs Allows you to view audit logs, which contain actions such as exam start, exam end,and exam export or e-mail. For more information, see “Viewing Audit Logs” on page131.
Barcode Scanner Allows you to add and rearrange barcode formats.
Customer Information Allows you to edit the contact information provided during registration of thetransducer. For more information, see “Registration and Entitlement” on page 75.
Control Orientation Allows you to set the orientation of the display. To set the location of the imagingcontrols, touch Left or Right.
Loop Duration Allows you to control the duration of a loop. To set the loop length (in seconds), dragthe slider. For more information about acquiring loops, see “Acquiring Loops” on page100.
Patient Database Allows you to repair or reset the patient database. To remove corruption in thesystem, touch Repair Database. To delete all patient data and reset the database,touch Reset Database. For more information, see “Deleting Patient Data and LumifySettings” on page 87.
Power Control Displays a control that you can use to adjust the output power.
Power Saving Allows you to specify that the system reduce the frame rate while you are in theimaging display but not actively scanning a patient. Reducing the frame rate savespower and extends battery life.
System Logs Allows you to send logs to Philips in case of a system problem. For more information,see “Sending System Logs” on page 131.
Thermal Index Display Allows you to select the thermal index that you want to display. For moreinformation, see “Setting the Thermal Index Display” on page 79.
Transducer Tests Allows you to run a series of tests to diagnose image quality issues, transducerrecognition issues, or specific transducer error messages. For more information, see“Testing Transducers” on page 127.

System Overview System Information
74 Lumify Ultrasound System
Phili
ps H
ealth
care
4535
619
091
31_A
/795
* A
PR 2
017
System InformationSystem information is available in the About dialog box (touch and then touch About).
Name Description
Documents and Support Provides links to legal documents, privacy information, the Lumify portal, the UserManual, and open-source software licenses.
EU164 Allows Philips to use this information to identify and to match your device withsystem logs if you require assistance.
Software Version Provides the Lumify app version.
Tablet Identifier Allows Philips to use this information to identify and to match your device withsystem logs if you require assistance.
Transducer Serial Number Provides the transducer serial number. The system automatically records thetransducer serial number when you connect the transducer to the system.

Downloading and Installing the Lumify App Using the System
Lumify Ultrasound System 75
Phili
ps H
ealth
care
4535
619
091
31_A
/795
* A
PR 2
017
Using the SystemThe topics that follow will help you understand and use the features of the system.
Downloading and Installing the Lumify AppThe Lumify app is available from the Google Play Store. The Google Play Store is a digital mediastore, operated by Google, from which you can download apps for the Android operatingsystem. Before you install the Lumify app, make sure that your device meets or exceeds theminimum specifications (see “Device Requirements” on page 67) and visit the Lumify portal fora list of compatible devices:
www.philips.com/Lumify-Compatible-Devices
1. On your Lumify-compatible Android device, open the Google Play Store:
https://play.google.com
2. Search for Lumify. If you cannot find Lumify, your device may not meet the minimumspecifications. For more information, visit the Lumify portal for a list of compatible devices:
www.philips.com/Lumify-Compatible-Devices
3. Follow the displayed instructions to download and install the Lumify app.
Registration and EntitlementBefore you can use the Lumify app, you must register one or more transducers. The Lumify appprompts you to connect your transducer and, if you purchased the transducer outright, provideyour contact information.
If you are subscribing to the transducer, at least once a month, with the Lumify app open, makesure that your device is connected to a wireless or cellular network. Your system automaticallyreregisters all previously registered transducers. If you receive notification that the transducer'sregistration has expired, connect your device to a wireless or cellular network and reconnectthe transducer.
4

Using the System Registering Your Transducers
76 Lumify Ultrasound System
Phili
ps H
ealth
care
4535
619
091
31_A
/795
* A
PR 2
017
If you purchased the transducer outright, then you must register your transducer and provideyour most up-to-date contact information the first time you install your Lumify software andinitialize the transducer. Philips uses the contact information you provide to communicateimportant product information and updates to you. You do not need to reregister thetransducer once a month.
NOTE
If you upgrade the Lumify app or the Android operating system, the system prompts you toreregister the next time you connect a transducer.
Registering Your Transducers1. Make sure that your device is connected to a wireless or cellular network.
2. Start the Lumify app.
3. Carefully read the Terms and Conditions and then touch I Agree.
4. Touch Register.
5. Connect your Philips transducer to your device. The first time you connect the transducerto your device, the device prompts you to Open Lumify When This USB Device isConnected. Select Use By Default For This USB Device, and then touch OK. The Lumify appperforms a system check and registers your transducer.
6. If you are subscribing to the transducer, on the Registration Complete display, touchAccept to begin using the system.
7. If you purchased the transducer outright, touch Continue and, on the Contact Preferencesform, do the following:
a. Enter your information for First Name, Last Name, Institution, Country, and EmailAddress.
b. If preferred, select Keep me informed of news, products, and promotions from Philips.

Giving Lumify Access to Shared Device Storage Using the System
Lumify Ultrasound System 77
Phili
ps H
ealth
care
4535
619
091
31_A
/795
* A
PR 2
017
c. If preferred, deselect Remember my contact information when registering on othermobile devices.
d. Touch Submit Info.
e. On the Registration Complete display, touch Accept to begin using the system.
If registration fails, see “Troubleshooting” on page 132, or visit the Lumify portal for FAQs andtroubleshooting tips:
www.philips.com/lumify
Giving Lumify Access to Shared Device StorageLumify uses shared device storage for the patient database and to access your device's camerafor barcode scanning.
Some versions of the Android operating system require that you specify that an app is allowedaccess to shared device storage. If your device prompts you to allow Lumify to access photos,media, or files on your device, touch Allow. If you touch Deny, you cannot use Lumify until yougive access to shared device storage in the Android App Permissions settings.
Updating the Lumify AppYou can configure your device to update apps individually or allow them to be updatedautomatically.
If your Lumify-compatible device is configured to automatically update apps, the Lumify appupdates automatically when an update is available, unless the update includes a permissionschange. In that case, you are prompted to update the Lumify app.
If your device is configured to update apps individually, you can obtain the latest Lumify updatefrom the Google Play Store. For more information, search for "update apps" in Google PlayHelp.

Using the System Viewing the App Walkthrough
78 Lumify Ultrasound System
Phili
ps H
ealth
care
4535
619
091
31_A
/795
* A
PR 2
017
Viewing the App WalkthroughThe first time you start the Lumify app, it displays a walkthrough tutorial to familiarize you withthe features of the system. To begin an exam after the walkthrough ends, touch Start Scanning.
You can view the walkthrough at any time.
Touch , and then touch Walkthrough .
Canceling Your SubscriptionTransducer subscription plans are available only to customers in the United States. To cancelyour subscription, call Philips Lumify Support representatives at 1‑844‑MYLUMIFY(1‑844‑695‑8643).
Turning the System On and Off
WARNING
Failing to end the current exam before starting a new exam can result in data being acquiredand stored under the wrong patient name. If you close the Lumify app without ending theexam, the system pauses the exam.
NOTE
If battery power is unavailable, or if the battery charge level is critically low, disconnect thetransducer and charge your device.

Setting the System Time and Date Using the System
Lumify Ultrasound System 79
Phili
ps H
ealth
care
4535
619
091
31_A
/795
* A
PR 2
017
NOTE
Philips recommends that your device be fully charged before you start imaging. To avoidunexpected battery discharging, charge your device at regular intervals, or when the devicedisplays the low-battery warning.
Before you turn on your device, disconnect the transducer and all peripheral devices.
Before you turn off your device, end the current exam.
For instructions on turning the system on or off, see the documentation that accompanies yourdevice.
Setting the System Time and DateThe Lumify app uses your device's clock and calendar function to display the time and date onthe imaging display, and to provide a time stamp on patient exams and acquired images. If youchange the time or date on your device, the Lumify app prompts you to restart.
For instructions on changing the time and date, see the documentation that accompanies yourdevice.
Setting the Thermal Index DisplayYou can set which of the thermal indices to display depending on the type of tissue you areimaging.
1. Touch and select Settings .
2. In Thermal Index Display, select the thermal index you want.
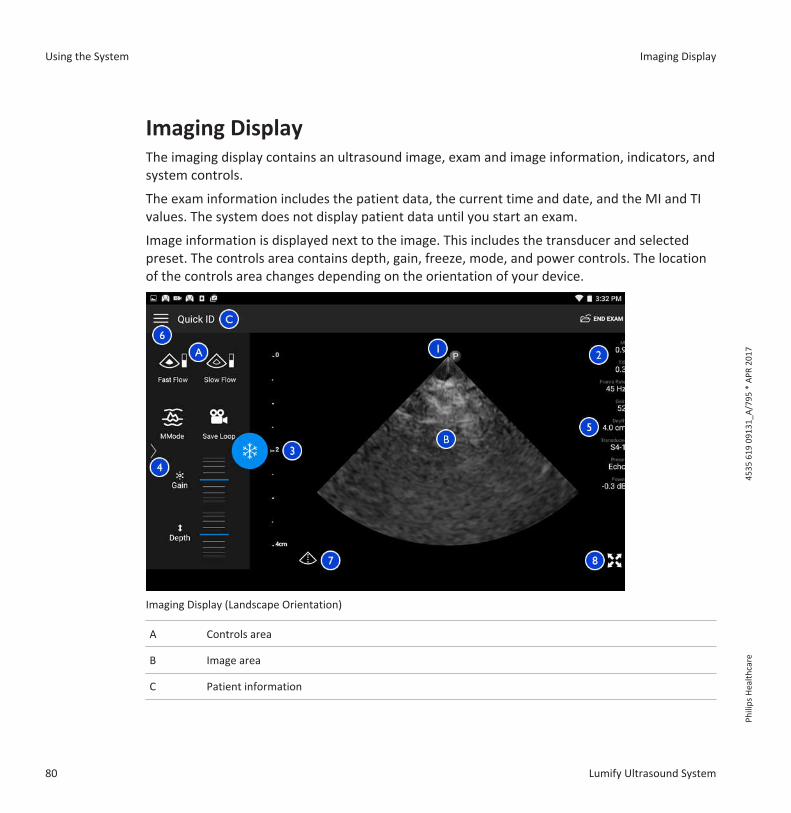
Using the System Imaging Display
80 Lumify Ultrasound System
Phili
ps H
ealth
care
4535
619
091
31_A
/795
* A
PR 2
017
Imaging DisplayThe imaging display contains an ultrasound image, exam and image information, indicators, andsystem controls.
The exam information includes the patient data, the current time and date, and the MI and TIvalues. The system does not display patient data until you start an exam.
Image information is displayed next to the image. This includes the transducer and selectedpreset. The controls area contains depth, gain, freeze, mode, and power controls. The locationof the controls area changes depending on the orientation of your device.
Imaging Display (Landscape Orientation)
A Controls area
B Image area
C Patient information

Imaging Display Using the System
Lumify Ultrasound System 81
Phili
ps H
ealth
care
4535
619
091
31_A
/795
* A
PR 2
017
1 Scan plane orientation marker
2 MI and TI values
3 Focal indicator
4 Page indicator: Touch the indicator to go to the next page of controls, or swipe to move between pages.
5 Image information
6 Review and settings menu
7 Centerline control
8 Full-screen view control
In portrait orientation, the location of the controls area changes.

Using the System Imaging Display
82 Lumify Ultrasound System
Phili
ps H
ealth
care
4535
619
091
31_A
/795
* A
PR 2
017
Imaging Display (Portrait Orientation)
A Controls area
B Image area
C Patient information

Quick Exams Using the System
Lumify Ultrasound System 83
Phili
ps H
ealth
care
4535
619
091
31_A
/795
* A
PR 2
017
1 Scan plane orientation marker
2 MI and TI values
3 Focal indicator
4 Page indicator: Touch the indicator to go to the next page of controls, or swipe to move between pages.
5 Image information
6 Review and settings menu
7 Centerline control
8 Full-screen view control
Quick ExamsIn an emergency, you can start an exam without entering patient data. This is called a quickexam. During a quick exam, the system provides a medical record number (MRN) and the wordsQuick ID appear as the patient's last name.
You can edit patient data until you end the exam.
Starting Quick Exams
CAUTION
You cannot edit patient information after you end the exam. After you end the exam, youcan only view patient information. You cannot edit data for previous exams.
1. On the Scan/Create Patient display, touch an exam preset or drag the selector on thepreset selector wheel to the exam preset you want.

Using the System Using Your Device's Camera as a Barcode Scanner
84 Lumify Ultrasound System
Phili
ps H
ealth
care
4535
619
091
31_A
/795
* A
PR 2
017
Drag the Wheel Selector to Select a Preset
2. Touch Scan. You can now begin imaging if you do not want to add any patient information.
3. To add patient information:
a. On the imaging display, touch Quick ID.
b. On the Patient Info display, type the patient information, query a Modality Worklist(MWL), or scan a barcode. For more information, see “Starting New Exams” on page91.
c. Touch Save and Return.
d. Resume imaging.
Using Your Device's Camera as a Barcode ScannerYou can use your device's camera to scan barcodes and populate patient information fields.
You can save multiple barcode formats. See “Saving Barcode Formats” on page 85.

Using Your Device's Camera as a Barcode Scanner Using the System
Lumify Ultrasound System 85
Phili
ps H
ealth
care
4535
619
091
31_A
/795
* A
PR 2
017
The first time you scan a barcode format, you must map the format to at least one patientinformation field. Lumify remembers this information for subsequent barcode scans of thesame format.
The barcode you scan must meet the following conditions or Lumify will return an error:
• There is a delimiter between strings.
• The values must be unique.
• The delimiter is a non-alphanumeric, single character.
If you receive an error message, create a sample barcode where each field is a unique value andfollow the steps in the following procedure to scan and map the format.
You can scan in either portrait or landscape orientation.
1. On the Patient Info display, touch Scan Barcode .
2. If prompted, touch Allow to allow Lumify to use your device's camera.
3. Use the viewfinder to place the horizontal red line across the barcode. Make sure that theentire barcode is included in the viewfinder, perpendicular to the red line. If sound isenabled on your device, it beeps when Lumify scans the code.
4. If this is the first time you have scanned this barcode format, do the following:
a. Type a Format Nickname and touch Continue. Lumify displays the patient informationfields from the barcode.
b. In Barcode Configuration, drag the barcode text to the corresponding patient data
entry field (to adjust your selection, drag and ). Alternatively, type the patientinformation fields exactly as they appear in the displayed barcode result. Each field'svalue must be unique (for example, you cannot enter the same value for the Last Nameand the First Name).
5. Touch Save.
Saving Barcode FormatsYou can save multiple barcode formats. When Lumify scans a barcode, it searches the formatsfor the best match.

Using the System Using Your Device's Camera as a Barcode Scanner
86 Lumify Ultrasound System
Phili
ps H
ealth
care
4535
619
091
31_A
/795
* A
PR 2
017
1. Do either of the following:
• In the barcode viewfinder, touch .
• Touch , select Settings , and then touch Barcode Settings.
2. In Barcode Settings, do any of the following:
• To add a new barcode format, touch Add New and scan a barcode. Type a name for thebarcode and touch Continue.
Lumify displays the patient information fields from the barcode result. In BarcodeConfiguration, drag the barcode text to the corresponding patient data entry field (to
adjust your selection, drag and ). Alternatively, type the patient informationfields exactly as they appear in the displayed barcode result. Each field's value must beunique (for example, you cannot enter the same value for the Last Name and the FirstName) and you must complete at least one field. Touch Save.
• To rearrange barcode formats, drag the entries.
• To remove a barcode format, touch .
Supported Barcode FormatsLumify supports the following barcode formats:
Format Symbologies
1D Product Barcodes UPC-A, UPC-E, EAN-8, EAN-13
1D Industrial Barcodes Code 39, Code 93, Code 128, Codabar, ITF-14, RSS-14,RSS-Expanded
Matrix (2D) Barcodes QR Code, Data Matrix, Aztec, PDF 417

Connecting Transducers Using the System
Lumify Ultrasound System 87
Phili
ps H
ealth
care
4535
619
091
31_A
/795
* A
PR 2
017
Connecting TransducersPlug the transducer into the USB port on the device. When initialization is complete, the nameof the transducer appears on the imaging display.
When you first connect a transducer, the Android operating system prompts you to selectwhether the Lumify app should open when the transducer (USB device) is connected. If youselect Use By Default For This USB Device and touch OK, the Lumify app opens whenever thetransducer is connected, regardless of which app is currently open on the device.
Deleting Patient Data and Lumify SettingsYou can delete all patient data and Lumify settings from the system, including data from thecurrent exam.
To delete patient data from exported images and loops, see “Showing or Hiding Patient Data onExported Images and Loops” on page 113.
Do one of the following:
• To delete only patient data, touch and select Settings . Touch Reset Database.Touch Yes to confirm.
• To delete patient data and all Lumify settings, including registration information, DICOMlogs, and audit logs, in the Android operating system, go to Settings. Touch Apps, touchLumify, and then touch Clear Data.
Modality WorklistYou can load patient data and select a scheduled procedure from a DICOM Modality WorklistServer (MWL) instead of entering the patient data manually.
Before you can use the modality worklist feature, you must add a DICOM Modality Worklistserver.

Using the System Modality Worklist
88 Lumify Ultrasound System
Phili
ps H
ealth
care
4535
619
091
31_A
/795
* A
PR 2
017
Adding a Modality Worklist Server1. Do one of the following:
• Touch , and then touch Setup Modality Worklist .
• On the Patient Info form, touch Query MWL , and then touch Setup .
NOTE
If you have previously added a Modality Worklist server, Query MWL will query the server,instead of letting you access Setup.
2. In Setup Worklists, touch Add New.
3. In the Setup MWL Server dialog box, type or select values from the menus for thefollowing:
• Server Nickname
• Lumify AE Title (the AE title for your device)
• Remote AE Title (the AE title for the Modality Worklist server)
• Hostname or IP (use a DNS or a static IP address)
• DNS Suffix
• Port (the port number for the Modality Worklist server)
4. Select Query Options.
5. To specify advanced connection settings, select Show Advanced Options:
• DNS Suffix: The DNS name without the hostname
• Read Timeout (Sec): The network reply timeout
• Connection Timeout (Sec): The DICOM ARTIM timeout
6. To test the connection to the server, touch Test.

Modality Worklist Using the System
Lumify Ultrasound System 89
Phili
ps H
ealth
care
4535
619
091
31_A
/795
* A
PR 2
017
7. Touch Save.
Modifying or Deleting a Modality Worklist Server1. Touch and then touch Setup Modality Worklist .
2. Select the Modality Worklist server you want to modify or delete.
3. Do one of the following:
• To modify the Modality Worklist server, type settings or select options, and then touchSave.
• To delete the Modality Worklist server, touch .

Using the System Modality Worklist
90 Lumify Ultrasound System
Phili
ps H
ealth
care
4535
619
091
31_A
/795
* A
PR 2
017

Starting New Exams Performing an Exam
Lumify Ultrasound System 91
Phili
ps H
ealth
care
4535
619
091
31_A
/795
* A
PR 2
017
Performing an ExamThis section guides you through procedures commonly used in performing patient exams withthe system. These procedures include entering patient data, acquiring and reviewing images,and making measurements and calculations.
Have a backup system present during critical exams to ensure completion of the exam in theevent that the primary system fails.
WARNING
You are responsible for configuring your device in accordance with your institution's securitypolicies. Notifications and alerts from third-party applications may interfere with an exam.
Starting New Exams1. On the Scan/Create Patient display, touch an exam preset or drag the selector on the
preset selector wheel to the exam preset you want.
5

Performing an Exam Starting New Exams
92 Lumify Ultrasound System
Phili
ps H
ealth
care
4535
619
091
31_A
/795
* A
PR 2
017
Drag the Wheel Selector to Select a Preset
2. Do one of the following:
• To create a temporary Quick ID and start scanning immediately, touch Scan. Theimaging display appears, and you can begin scanning. For more information, see“Starting Quick Exams” on page 83.
• To manually enter patient information before you begin scanning, touch Create Patient.To show additional Patient Info fields, select Show Detailed Form. To begin scanning,touch Start Exam.
NOTE
The last name is required. If you do not enter a medical record number (MRN), the systemcreates an MRN for the exam. If the system finds a matching MRN in the patient database, thesystem completes the remaining Patient Info fields.

Searching in the Worklist Performing an Exam
Lumify Ultrasound System 93
Phili
ps H
ealth
care
4535
619
091
31_A
/795
* A
PR 2
017
3. To search a Modality Worklist for a specific exam, touch Create Patient and then touch
Query MWL (see “Searching in the Worklist” on page 93).
4. To enter data into the system by scanning a patient's barcode, touch Create Patient and
then touch Scan Barcode (see “Using Your Device's Camera as a Barcode Scanner” onpage 84).
Searching in the WorklistYou can search for a specific exam from a Modality Worklist by using Query MWL on thePatient Info form. Before you can search for a Modality Worklist exam, you must configure aconnection to a Modality Worklist server (see “Adding a Modality Worklist Server” on page 88).
1. Touch Query MWL on the Patient Info form.
2. Select the Modality Worklist server you want to query.
3. In the Enter Advanced Query Information dialog box, do any of the following:
• To search for a patient by Patient Name, MRN, Accession #, or Requested ProcedureID, type search criteria.
• To search for all patients, leave all fields blank.
• To insert a wildcard symbol (*) in the Patient Name or MRN field that allows the systemto replace or represent one or more characters, touch Insert Wildcard. For example,type 45678 in the MRN field and then touch Insert Wildcard to allow the system toreturn all MRNs that begin with 45678 (456781, 456782, 456783, and so on.)
4. Touch Search.
5. Do any of the following:
• To see additional entries, swipe down.
• To filter the Query Results, touch Search All Fields and type criteria. The systemdisplays results that meet the criteria.
6. Select the patient from Query Results.

Performing an Exam Changing Presets During Exams
94 Lumify Ultrasound System
Phili
ps H
ealth
care
4535
619
091
31_A
/795
* A
PR 2
017
Changing Presets During ExamsYou can change presets during an active exam.
1. Touch .
2. Under Current Exam , touch a preset.
Editing Patient Data
CAUTION
You cannot edit patient information after you end the exam. After you end the exam, youcan only view patient information. You cannot edit data for previous exams.
1. Touch and select Edit Patient Info.
2. Touch the field you want to edit and use the keyboard to replace, insert, or delete text. Toshow additional Patient Info fields, select Show Detailed Form.
3. Touch Save and Return.
Reviewing Saved ExamsYou can review saved exams.
1. Touch .
2. Select Saved Exams .
3. Select an exam from the list. The exam opens in Review.
4. In the Review display, do any of the following:

Restarting a Paused Exam Performing an Exam
Lumify Ultrasound System 95
Phili
ps H
ealth
care
4535
619
091
31_A
/795
* A
PR 2
017
• To delete images from a saved exam, see “Deleting Images and Loops” on page 111.
• To export images and loops from a saved exam, see “Exporting Images and Loops” onpage 109.
• To export the exam, see “Exporting Exams” on page 112.
5. To exit the Review display and return to the current exam, touch and select Current
Exam .
Restarting a Paused ExamIf you leave an exam or close the system, you can return to the open exam within 24 hours by
touching and selecting Current Exam .
Imaging ModesAvailable imaging modes are 2D, Color, and M-Mode.
2D Mode2D mode is the most commonly used imaging mode. In 2D mode, the image is displayed ingrayscale.
Using 2D Mode1. Start an exam. The system enters 2D mode.
2. Optimize the image, using the controls in the controls area. If necessary, touch the page
indicator ( or ) or swipe to move between controls pages.
• To control the image gain, adjust the Gain dial.

Performing an Exam Imaging Modes
96 Lumify Ultrasound System
Phili
ps H
ealth
care
4535
619
091
31_A
/795
* A
PR 2
017
• To increase or decrease the distance from the face of the transducer to the deepest
point in the displayed image, use the Depth dial.
• To increase or decrease the power output, use the Power dial.
• To view part of the image in more detail, spread your thumb and finger to zoom in onthat area of the image. For more information, see “Zoom Magnification” on page 98.
• To view the image in full-screen view, touch in the lower right corner of the image.For more information, see “Full-Screen View” on page 99.
• To display a centerline on the image, touch . For more information, see “Displaying aCenterline” on page 99.
Color ModeIn Color mode, a color box is overlaid on the 2D image; its size and position can be adjustedwithin the 2D image. The velocity and direction of flow in the color box are represented withdifferent colors for direction and different shades for velocity. The colors being used appear inthe color bar in the upper right corner of the imaging display.
Two color modes are available: Fast Flow (high color scale for arterial flow) and Slow Flow (lowcolor scale for venous flow).
Using Color Mode1. In 2D mode, optimize the image.
2. If necessary, touch the page indicator ( or ) or swipe to display Fast Flow or
Slow Flow .
3. Touch Fast Flow or Slow Flow .
4. To position the color box on the anatomy of interest, drag the color box. (If you dragoutside the color box, you pan the image.)

Imaging Modes Performing an Exam
Lumify Ultrasound System 97
Phili
ps H
ealth
care
4535
619
091
31_A
/795
* A
PR 2
017
5. To change the size of the color box, pinch or spread inside the color box. (If you pinch orspread outside the color box, you zoom the image.)
6. To control the color gain, adjust the Gain dial.
7. To view the image in full-screen view, touch in the lower right corner of the image. Formore information, see “Full-Screen View” on page 99.
8. To display a centerline on the image, touch . For more information, see “Displaying aCenterline” on page 99.
9. To exit Color imaging, touch Fast Flow or Slow Flow .
M-ModeIn M-mode, you can learn about the movement of an area of anatomy. In M-mode, the tissueinterface position or depth is displayed along the vertical axis, and time is displayed along thehorizontal axis. First, you position the M-line in the 2D image on the anatomy of interest. Thenyou can display information about movement along that line in an M-mode trace. Over time,the movement of the anatomy along the M-line, which is displayed on the 2D image, creates ascrolling display.
Using M-Mode1. In 2D mode, optimize the image.
2. Touch MMode to display the M-line on the 2D image.
3. Drag the M-line to move it to the anatomy of interest.
4. Optimize the image using any of the following methods:
• To control the image gain, adjust the Gain dial.
• To increase or decrease the distance from the face of the transducer to the deepest
point in the displayed image, use the Depth dial.

Performing an Exam Imaging Features
98 Lumify Ultrasound System
Phili
ps H
ealth
care
4535
619
091
31_A
/795
* A
PR 2
017
• To increase or decrease the power output, use the Power dial.
• To view part of the image in more detail, spread your thumb and finger to zoom in onthat area of the image. For more information, see “Zoom Magnification” on page 98.
• To view the image in full-screen view, touch in the lower right corner of the image.For more information, see “Full-Screen View” on page 99.
• To display a centerline on the image, touch . For more information, see “Displaying aCenterline” on page 99.
5. To review the M-mode trace, touch Freeze, and drag the loop time line to scroll forward orbackward.
6. To exit M-mode, touch MMode.
Imaging FeaturesThe system offers imaging features that provide improved imaging and greater flexibility whenyou are imaging a patient.
AutoSCANAutoSCAN automatically and continuously optimizes 2D image brightness at the default gain.AutoSCAN is always on.
Zoom MagnificationUsing Zoom magnification, you can magnify a region of interest in an image for closerexamination.
With your thumb and finger, spread to expand or pinch to reduce the specific area of theimage. Touch the image and move your finger to pan or move the magnified image.

Acquiring Images Performing an Exam
Lumify Ultrasound System 99
Phili
ps H
ealth
care
4535
619
091
31_A
/795
* A
PR 2
017
NOTE
If you spread or pinch inside a color box, you resize the color box instead of zooming.
Full-Screen ViewYou can specify that Lumify display live or frozen images in full-screen view, including inReview.
1. To view an image in full-screen view, touch in the lower right corner of the image.
2. To restore normal viewing, touch .
Displaying a CenterlineYou can display a centerline during live imaging (including when an image is frozen) to assistwith needle guidance. The line is included in acquired images or loops.
To display the centerline, touch on the lower left corner of the imaging display. To hide the
centerline, touch again.
Acquiring ImagesYou can acquire and save a still image from the current exam. The acquired image is saved inthe patient exam, and a thumbnail of it is available in the Review display.
Acquiring an Image in Live Imaging
Touch Save Image . The system beeps when the image acquisition is complete.

Performing an Exam Acquiring Loops
100 Lumify Ultrasound System
Phili
ps H
ealth
care
4535
619
091
31_A
/795
* A
PR 2
017
Acquiring an Image in Live Imaging to Measure or Annotate
Touch , and then do any of the following:
• To select a frame to acquire, drag the scroll bar or touch or to move through theimages in the cineloop sequence to display the image that you want to acquire.
• To make a measurement, touch Measure . For more information, see “Performing a 2DDistance Measurement” on page 102 and “Performing a 2D Ellipse Measurement” on page103.
To add a label, touch Annotate . For more information, see “Adding Labels” on page101.
• To save the image to the patient exam, touch Save Image . The system beeps when theimage acquisition is complete.
Acquiring LoopsYou can acquire and save a loop from the current exam. The acquired loop is saved in thepatient exam, and a thumbnail of it is available in the Review display. Loops in Review have the
icon in the lower right corner of the thumbnail.
The system captures loops prospectively. You can specify the loop length duration in Settings.For more information, see “System Settings” on page 72.
To acquire a loop during live imaging, touch Save Loop . To stop acquisition, touch Stop.
The system beeps and a confirmation statement appears on the imaging display when the loophas been saved.

Annotation Performing an Exam
Lumify Ultrasound System 101
Phili
ps H
ealth
care
4535
619
091
31_A
/795
* A
PR 2
017
AnnotationThe annotation feature is available in 2D and Color frozen mode.
Adding LabelsYou can place text labels on an image to identify anatomical structures and locations.
1. Obtain the image you want to annotate and touch .
2. If necessary, touch the page indicator ( or ) or swipe to display Annotate .
3. Touch Annotate .
4. Use the keyboard to type a label. Auto-words appear to the left and right of the letters youare typing. You can touch an auto-word to add it to your label.
5. Drag the label into position in the imaging area.
6. To edit a label, do the following:
a. Touch the label. A line and the keyboard appear beneath it.
b. Touch a starting point in the label and begin typing, or use the Backspace key to eraseletters.
c. Touch anywhere in the imaging area to exit annotation.
7. To delete a label, touch and hold the label. Touch Delete Annotation when it appears.
Measurement and AnalysisThe ultrasound system supports measurements. The measurement tools appear on the touchscreen. Touching the tool label on the touch screen launches the tool.
The accuracy of the measurement depends, in part, on the ability of the operator.

Performing an Exam Measurement and Analysis
102 Lumify Ultrasound System
Phili
ps H
ealth
care
4535
619
091
31_A
/795
* A
PR 2
017
Performing a 2D Distance MeasurementA 2D distance measurement uses two calipers to measure the length of a straight line betweenthe two points. You can create a maximum of four distance measurements at a time. Eachdistance measurement uses a set of uniquely shaped calipers to help identify a measurementwith their corresponding calipers.
While you are using the 2D distance measurement tool, double tap to zoom the image. Thesystem removes measurements from the image when it is unfrozen or when the exam ends. Toretain the measurement on an image, acquire it (see “Acquiring Images” on page 99).
1. Obtain the 2D image you want to measure and touch .
2. Touch Measure .
3. Touch Distance from the menu. The word Distance and an initial value appear at thetop of the image.
4. Touch the first caliper and drag to position it.
5. Touch the second caliper and drag to position it. The results update as the distancebetween the calipers changes.
6. To add additional distance measurements, repeat step 2 through step 5. A maximum offour distance measurements can be added to the image.
NOTE
If you touch Ellipse from the Measure menu while performing a distancemeasurement, all distance measurements on the imaging display are removed.
7. To save an image with the distance shown, touch Save Image .
8. To remove the measurements, touch Clear All .

Measurement and Analysis Performing an Exam
Lumify Ultrasound System 103
Phili
ps H
ealth
care
4535
619
091
31_A
/795
* A
PR 2
017
Performing a 2D Ellipse MeasurementA 2D ellipse measurement uses an ellipse caliper to define the area and circumference of anellipse.
While you are using the 2D ellipse measurement tool, double tap to zoom the image. Thesystem removes measurements from the image when it is unfrozen or when the exam ends. Toretain the measurement on an image, acquire it (see “Acquiring Images” on page 99).
1. Obtain the 2D image you want to measure and touch .
2. Touch Measure .
3. Touch Ellipse from the menu. The word Area and Circumference with their initialvalues appear at the top of the image.
4. Using the control points, drag the ellipse into position in the imaging area. The resultsupdate as you move the ellipse into position.
5. To save an image with the area and circumference shown, touch Save Image .
6. To remove the measurement, touch Clear All .
Measurement AccuracyYou can use the ultrasound system to make measurements on ultrasound images. Themeasurements are then used with other clinical data to make a diagnosis.
Making a diagnosis based solely on measurements is not recommended. There are numerousfactors to consider when using quantified data from any ultrasound imaging system. A carefulanalysis of those factors indicates that the accuracy of each measurement is highly dependenton image quality. Image quality in turn is highly dependent on system design, operator scanningtechnique, familiarity with system controls and, most important, patient echogenicity.

Performing an Exam Measurement and Analysis
104 Lumify Ultrasound System
Phili
ps H
ealth
care
4535
619
091
31_A
/795
* A
PR 2
017
WARNING
System users are responsible for image quality and diagnosis. Inspect the data that is beingused for the analysis and diagnosis and ensure that the data is sufficient both spatially andtemporally for the measurement approach being used.
Measurement Accuracy Tables2D Measurement Range and Accuracy
Measurement Accuracy Maximum Range
Axial Distance ≤ ± 2% or 2 mm >30.0 cm
Lateral Distance ≤ ± 2.5% or 3 mm >40.0 cm
Diagonal Distance ≤ ± 2% or 2 mm >32.0 cm
M-Mode Measurement Range and Accuracy
Measurement Accuracy Range
Depth ≤ ± 2% or 1 mm 0.003 to >30 cm
Time ≤ ± 2% of time or 4 ms measurement 0.002 to >2.5 s
Slope ≤ ± 0.2 cm/sec or ± 1% --
Performing Fetal AnalysisYou can perform fetal analysis from the current exam. The Fetal Age Summary is saved in thepatient exam, and is available in the Review display (see “Viewing the Fetal Age Summary” onpage 108).

Measurement and Analysis Performing an Exam
Lumify Ultrasound System 105
Phili
ps H
ealth
care
4535
619
091
31_A
/795
* A
PR 2
017
WARNING
You are solely responsible for custom measurements and calculations and the accuracy ofelements entered into the equations.
1. If necessary, touch the page indicator ( or ) or swipe to display Fetal Age .
2. Touch Fetal Age .
3. Obtain the 2D image you want to measure and touch .
4. Touch a system-defined fetal age or growth measurement.
5. For HC and AC , using the control points, drag the ellipse into position in the imaging
area, and then touch Confirm Measurement .
6. For FL and BPD , drag the calipers into position in the imaging area, and then touch
Confirm Measurement .
7. For LMP/EDD , touch to select the EDD date from the calendar. The LMP(c) date isautomatically calculated based on your selection.
• To switch to the next or previous weeks or months, swipe up or swipe down from thecalendar.
• To save the LMP/EDD measurement, touch OK.
• To return to the Fetal Age menu without saving the LMP/EDD measurement, touchSkip.
8. To expand the Fetal Age Summary, touch . To collapse the Fetal Age Summary, touch
.

Performing an Exam Ending an Exam
106 Lumify Ultrasound System
Phili
ps H
ealth
care
4535
619
091
31_A
/795
* A
PR 2
017
Ending an Exam
WARNING
Failing to end the current exam before starting a new exam can result in data being acquiredand stored under the wrong patient name. If you turn off the system without ending theexam, the system pauses the exam before shutting down.
You must end the exam before you can export the exam or e-mail images from the exam. Youcannot end an exam while in Review.
You will not be able to end the exam until the system has saved exam data for the currentexam. (The system saves exam data when you acquire an image.) Ending an exam stores allexam data, clears the Patient Info form, and prepares for the next exam.
The system automatically ends an exam if it has been open for longer than 24 hours. Youcannot append images to an ended exam.
When the exam is complete, touch End Exam at the top of the imaging display.

Starting Review During an Exam Review
Lumify Ultrasound System 107
Phili
ps H
ealth
care
4535
619
091
31_A
/795
* A
PR 2
017
ReviewIn the Review display, you can view and delete images and loops from the current exam orfrom saved exams. You can also export or e-mail images from Review. You must end the exambefore you can export the exam or e-mail images from the exam. You cannot end an examwhile in Review.
Starting Review During an ExamTo start Review during an exam:
1. Touch and select Review Exam.
2. To exit Review and return to the current exam, touch and select Current Exam .
Starting Review After an ExamTo start Review from the Scan/Create Patient display:
1. Touch and select Saved Exams .
2. To view an exam, select it from the list.
3. To exit Review and return to the Scan/Create Patient display, touch and select Current
Exam .
Navigating Thumbnails and ImagesIn Review, small images, called thumbnails, appear on the side or bottom of the Reviewdisplay, depending on the screen orientation. From these thumbnails, you can display one ormore images and loops in their original format.
6

Review Viewing the Fetal Age Summary
108 Lumify Ultrasound System
Phili
ps H
ealth
care
4535
619
091
31_A
/795
* A
PR 2
017
• To view a full-size image or loop, touch a thumbnail.
• To scroll through the available thumbnails, drag the thumbnails left or right, or up or down,depending on the screen orientation.
Viewing the Fetal Age SummaryIn Review, if you performed fetal analysis during an exam, Summary appears on the upper rightcorner of the Review display.
1. Touch Summary to view the Fetal Age Summary.
2. Touch Done to close the Fetal Age Summary and return to the Review display.
Playing LoopsLoops are identified by the icon located in the bottom right corner of the thumbnail.
1. Touch the loop thumbnail.
2. Use the loop controls that appear beneath the loop.
Loop Controls
1 Play control. Touch to play the loop at normal speed or to pause the loop.
2 Step back control. Touch to step a single frame backward.
3 Step forward control. Touch to step a single frame forward.
4 Loop time line. Drag to cycle through the loop at the specified loop speed. When the loop is paused,you can drag the line to a specific frame.

Exporting Images and Loops Review
Lumify Ultrasound System 109
Phili
ps H
ealth
care
4535
619
091
31_A
/795
* A
PR 2
017
Exporting Images and LoopsYou must end the exam before you can export the exam or e-mail images from the exam.
You can use one of the supported e-mail clients on the device to e-mail the following:
• Images
• Loops
• Fetal Age Summary (if created)
You can also export images, loops, and the Fetal Age Summary from the system to a configurednetwork destination.
E-mailing Images and Loops
WARNING
It is your responsibility to ensure that the security of your device and the protection ofpatient data meet your local security policies and regulatory requirements. Before e-mailingimages and loops, consult your healthcare IT security department to ensure that you are incompliance with your department's specific policies and regulations regarding the handlingof patient information. For more information, see Shared Roles for System and Data Securityon your User Information CD or in the Support section of the Lumify portal(www.philips.com/lumify).
You may need to set up an e-mail client on the device before you can e-mail images. For setupinstructions, see the following website and search for "configure email client":
https://support.google.com
If several e-mail accounts are available on the device, the system prompts you to select from alist of the available accounts. Possible e-mail accounts include:
• Inbox
• Gmail

Review Exporting Images and Loops
110 Lumify Ultrasound System
Phili
ps H
ealth
care
4535
619
091
31_A
/795
* A
PR 2
017
• K-9 Mail
• Outlook
• Yahoo
The system e-mails still images and the Fetal Age Summary in PNG format. The system e-mailsloops in MP4 format.
1. Touch and select Saved Exams .
2. Touch a saved exam to open it in Review.
3. In the Review display, do one of the following:
• To e-mail all of the exam's images, touch Export .
• To e-mail select images and loops, touch and hold a thumbnail. A check mark with Doneappears in the upper left corner of the imaging display. Touch additional images and
loops to add them to the e-mail. Touch Export Selected .
4. Touch Email.
5. If the Pick an Email Application to Use dialog box appears, touch to select an e-mailapplication from the list and then do any of the following:
• Touch Just Once to only use the selected e-mail application during the current export.The Pick an Email Application to Use dialog box appears until Always is selected.
• Touch Always to set the selected e-mail application as the default.
6. Touch Continue to accept the content of the privacy notice. The device's default e-mailaccount opens and displays a new message with the images attached.
7. Add recipients and text to the e-mail and send the e-mail. The images, loops, and the FetalAge Summary are automatically attached to the e-mail.
Exporting Images and Loops to a Network Destination
You can export images, loops, and the Fetal Age Summary to a DICOM PACS, to a networkshare, or to a local directory. The system exports still images, loops, and the Fetal AgeSummary in RLE (Lossless) or JPEG (Lossy) format.

Deleting Images and Loops Review
Lumify Ultrasound System 111
Phili
ps H
ealth
care
4535
619
091
31_A
/795
* A
PR 2
017
You can add, edit, copy, rename, or delete an export destination (see “Configuring ExportDestinations” on page 114 and “Editing Export Destinations” on page 117).
1. Touch and select Saved Exams .
2. Touch a saved exam to open it in Review.
3. In the Review display, do one of the following:
• To export all of the exam's images, touch Export .
• To export select images, touch and hold a thumbnail image. A check mark with Doneappears in the upper left corner of the imaging display. Touch additional images to add
them to the export. Touch Export Selected .
4. To add a new destination, touch Add New. For more information, see “Configuring ExportDestinations” on page 114.
5. If an export destination profile has previously been created, touch to select it from the
Export Selected menu, and the images, loops, and Fetal Age Summary exportautomatically.
NOTE
After you create a new export destination, it will be saved on the system and appear in the
Export Selected menu. Touch to select a saved export destination, and the images exportautomatically.
Deleting Images and Loops1. In the Review display, touch and hold a thumbnail image. A check mark with Done appears
in the upper left corner of the imaging display. Touch additional images to delete morethan one image.
2. Touch Delete .

Review Exporting Exams
112 Lumify Ultrasound System
Phili
ps H
ealth
care
4535
619
091
31_A
/795
* A
PR 2
017
3. Touch Yes to confirm the deletion.
Exporting ExamsYou can export exams to a DICOM PACS, to a network share, or to a local directory. See“Configuring Export Destinations” on page 114.
You must end the exam before you can export the exam or e-mail images from the exam.
For exams exported to a DICOM PACS, the system uses the following formats:
• For still images and the Fetal Age Summary, JPG or RLE format
• For loops, JPG or RLE Ultrasound Multi-Frame Image format
For exams exported to a network share or to a local directory, the system uses the followingformats:
• For still images and the Fetal Age Summary, PNG format
• For loops, MP4 format
1. Touch and select Saved Exams .
2. Touch and hold an exam until Selected Exams appears.
3. Do one of the following:
• To export a single exam, touch it to open it in Review and then touch Export Exam .
• To export one or more exams, touch and hold additional exams and then touch Export
.
• To export all of the exams, touch Select All and then touch Export .
4. Select a destination from the Export menu. (To add a new destination, select Add New.For more information, see “Configuring Export Destinations” on page 114.)
A confirmation message appears when the export is complete.

Showing or Hiding Patient Data on Exported Images and Loops Review
Lumify Ultrasound System 113
Phili
ps H
ealth
care
4535
619
091
31_A
/795
* A
PR 2
017
Showing or Hiding Patient Data on Exported Images andLoopsYou can choose to show or hide patient information on images and loops that you export to aDICOM server, to a network share, or to a local directory. By default, the system includespatient data when you export to a network share or to a local directory, and removes patientdata when you export to a DICOM server.
1. Touch and select Export Destinations .
2. Select the export destination for which you want to specify that patient data be shown orhidden (if you need to add an export destination, see “Configuring Export Destinations” onpage 114).
3. Select Show Advanced Options.
4. Do one of the following:
• To show patient information on exported images and loops, select Include Patient Dataon Each Image.
• To hide patient information on exported images and loops, deselect Include PatientData on Each Image.
Deleting ExamsAfter you have exported exams, you can delete them to save space on the system.
1. Touch and select Saved Exams .
2. Touch and hold an exam until Selected Exams appears.
3. Do one of the following:
• To delete the selected exam, touch Delete .
• To delete multiple exams, touch and hold to select additional exams and then touch
Delete .

Review Configuring Export Destinations
114 Lumify Ultrasound System
Phili
ps H
ealth
care
4535
619
091
31_A
/795
* A
PR 2
017
• To delete all exams, touch Select All and then touch Delete .
4. In the Delete Confirmation dialog box, touch Yes.
Configuring Export DestinationsYou can export exams to a DICOM PACS, to a network share, or to a local directory.
1. Touch and select Export Destinations .
2. Touch Add New.
3. In the Add New Destination dialog box, type a Destination Nickname and select aDestination Type. Touch Continue.
4. Configure destination settings (see “Export Destination Settings” on page 114).
5. To test the connection to the export destination, touch Test.
6. To save the export destination, touch Save.
7. To specify a default export destination, select an option from the Automatically Export to[Option] When Exams Are Completed menu.
Export Destination SettingsDICOM Destination Settings
Setting Description
Lumify AE Title The AE title for the device
Remote AE Title The AE title for the server
Hostname or IPAddress
Use a DNS or a static IP address
Port The port number for the server

Export Destination Settings Review
Lumify Ultrasound System 115
Phili
ps H
ealth
care
4535
619
091
31_A
/795
* A
PR 2
017
Setting Description
Export Format RLE (Lossless) or JPEG (Lossy)
Advanced Options,DisplayCompensation
Brightness and Contrast
Advanced Options,Include Patient Dataon Each Image
Adds patient information to exported images and loops (by default, this option isdeselected).
Advanced Options,AdvancedConnection Settings
• DNS Suffix
• Read Timeout (Sec): The network reply timeout
• Connection Timeout (sec): The DICOM ARTIM timeout
• Retry Interval (sec) : How much time the system will wait before retrying a job to theserver
• Max Retries: How many retries the system will perform before failing the job
Network Share Destination Settings
Setting Description
Hostname The IP address or computer name of the server hosting the network share
User The domain and user name for the network share
Password The password for the network share
Remote Directory The path to the network share
Exported FilenameSyntax
The order in which you select file name fields reflects the order that the field appears in thefolder name for the exported content and is reflected in Example Export Path. For example,if you select Last and then MRN, the folder name will begin with the Last name, followed bythe MRN.
Advanced Options,Image Resolution
Choose a resolution that matches the display on which the exam will be viewed

Review Export Destination Settings
116 Lumify Ultrasound System
Phili
ps H
ealth
care
4535
619
091
31_A
/795
* A
PR 2
017
Setting Description
Advanced Options,Include Patient Dataon Each Image
Deselect to remove patient information from exported images and loops (by default, thisoption is selected).
Advanced Options,DisplayCompensation
Brightness and Contrast
Advanced Options,AdvancedConnection Settings
• DNS Suffix
• Retry Interval (sec) : How much time the system will wait before retrying a job to theserver
• Max Retries: How many retries the system will perform before failing the job
Local Directory Destination Settings
Setting Description
Directory Type the path to the directory in which you want to store exams
Exported FilenameSyntax
The order in which you select file name fields reflects the order that the field appears in thefolder name for the exported content and is reflected in Example Export Path. For example,if you select Last and then MRN, the folder name will begin with the Last name, followed bythe MRN.
Advanced Options,Image Resolution
Choose a resolution that matches the display on which the exam will be viewed
Advanced Options,Include Patient Dataon Each Image
Deselect to remove patient information from exported images and loops (by default, thisoption is selected).
Advanced Options,DisplayCompensation
Brightness and Contrast

Editing Export Destinations Review
Lumify Ultrasound System 117
Phili
ps H
ealth
care
4535
619
091
31_A
/795
* A
PR 2
017
Editing Export DestinationsYou can edit, copy, rename, or delete export destinations when the system is not exportingimages or exams.
1. Touch and select Export Destinations .
2. Do any of the following:
• To edit the export destination, touch the export destination and use the keyboard tomodify fields and options. Touch Save.
• To delete the export destination, touch and hold the export destination until Done
appears. Touch Delete . Touch Yes to confirm the deletion.
• To rename the export destination, touch and hold the export destination until Done
appears. Touch Rename . In the Rename Destination dialog box, type a new name
for the destination and touch Rename .
• To copy an export destination, touch and hold the export destination until Done
appears. Touch Copy . In the Copy Destination dialog box, type a name for the new
destination and touch Copy .
Viewing the Export QueueThe export queue displays the progress of exported exams and images. You can configure thenumber of export retries and the retry interval when you configure an export destination (see“Export Destination Settings” on page 114).
1. Touch and select Export Queue . If a job is in progress, the system displays it alongwith a status, the destination, and information about its progress.
2. If a job has failed or if you want to see details about the job while it is in progress, touch it.In the Job Details dialog box, do any of the following:
• To view or edit the export destination, touch View Destination Details.

Review Enabling DICOM Logging
118 Lumify Ultrasound System
Phili
ps H
ealth
care
4535
619
091
31_A
/795
* A
PR 2
017
• To retry the job, touch Retry Job.
Enabling DICOM LoggingYou can enable DICOM logging to troubleshoot DICOM connectivity issues. DICOM logging is anadvanced feature for IT professionals.
1. Do one of the following:
• Touch , select Export Queue , and then touch .
• Touch , select Export Destinations , and then touch .
2. To start logging, touch Start DICOM Logging. To stop logging, touch Stop DICOM Logging.
3. To view logs, touch View DICOM Logs From [Date and Time].
4. To delete logs, touch Delete DICOM Logs.

Transducer Safety Transducers
Lumify Ultrasound System 119
Phili
ps H
ealth
care
4535
619
091
31_A
/795
* A
PR 2
017
TransducersThe transducer is the most important factor in image quality. Optimal imaging cannot beobtained without the correct transducer. The system is optimized for use based on yourtransducer selection.
Transducer Safety
WARNING
Use only Philips transducers and Philips-approved biopsy guides, covers, brackets, supplies,components, and accessories. Other brands may not properly fit Philips transducers.Improper installation may result in patient injury.
WARNING
Always remove the transducer from the patient before defibrillation.
WARNING
To limit potential harm when scanning neonatal, pediatric, and medicated patients,minimize the time spent imaging at temperatures above 41°C (106°F).
The system limits patient contact temperature to 43°C (109°F), and acoustic output values totheir respective U.S. Food and Drug Administration limits. A power-protection circuit protectsagainst over-current conditions. If the power monitor protection circuit senses an over-current
7

Transducers Clinical Applications and Transducers
120 Lumify Ultrasound System
Phili
ps H
ealth
care
4535
619
091
31_A
/795
* A
PR 2
017
condition, then the drive voltage to the transducer is shut off immediately, preventingoverheating of the transducer surface and limiting acoustic output. Validation of the powerprotection circuit is done under normal system operation.
Clinical Applications and TransducersA clinical application, available for one or more transducers, optimizes the system for a specificapplication. A clinical application consists of a preset for the transducer.
The presets for the transducers that are compatible with your ultrasound system are listedhere.System Transducers and Supported Presets
Transducer Presets
C5-2 Abdomen, Gallbladder, Lung, OB/GYN
L12-4 Lung, MSK, Soft Tissue, Superficial, Vascular
S4-1 Abdomen, Cardiac, FAST, Lung, OB/GYN
Transducer MaintenanceInspect the transducer, cable, and lens before each use. Check for cracks or other damage thatjeopardizes the integrity of the transducer. Report any transducer damage to your authorizedservice representative, and discontinue use of the transducer.
For all information on transducer cleaning and disinfection, including information oncompatible disinfectants, see Care and Cleaning of Ultrasound Systems and Transducers,Disinfectants and Cleaning Solutions for Ultrasound Systems and Transducers, and the PhilipsUltrasound Transducer Care website:
www.philips.com/transducercare
If you encounter poor image quality or transducer problems, see “Troubleshooting” on page132.

Acoustic Artifacts Transducers
Lumify Ultrasound System 121
Phili
ps H
ealth
care
4535
619
091
31_A
/795
* A
PR 2
017
CAUTION
Some ultrasound coupling gels, as well as some solutions for pre-cleaning, disinfecting, andsterilizing can damage a transducer. Before using a gel or solution on a transducer, see“Ultrasound Transmission Gels” on page 125 and Disinfectants and Cleaning Solutions forUltrasound Systems and Transducers or the Philips Ultrasound Transducer Care website:www.philips.com/transducercare. You can also contact your authorized servicerepresentative. For contact information, see “Customer Service” on page 17.
Acoustic ArtifactsThe transducer adds its own signature to the echo information in the form of beam widtheffects, axial resolution limitations, and frequency characteristics. The control choices made bythe sonographer that affect amplification, signal processing, and echo signal display can lead tosignificant differences in the displayed appearance of echo data. Following is a brief discussionof acoustic artifacts. An understanding of the physical basis for the production of signalsdisplayed on ultrasound images is helpful in minimizing artifacts on images and interpreting theresults of studies.
An artifact is an echo displayed in a different position than its corresponding reflector in thebody. Artifacts can also be caused by intervening tissue properties. Artifacts can originate fromexternal noise, reverberations, multi-path reflections, or misadjusted equipment. They can alsocome from the ultrasonic beam geometry and unusual changes in beam intensity. Artifacts andtheir manifestations are listed below, and following are some definitions of various artifacts.
• Added objects displayed as speckle, section thickness, reverberation, mirror image, comettail, or ring down
• Missing objects due to poor resolution
• Incorrect object brightness due to shadowing or enhancement
• Incorrect object location due to refraction, multi-path reflections, side lobes, grating lobes,speed error, or range ambiguity
• Incorrect object size due to poor resolution, refraction, or speed error
• Incorrect object shape due to poor resolution, refraction, or speed error

Transducers Acoustic Artifacts
122 Lumify Ultrasound System
Phili
ps H
ealth
care
4535
619
091
31_A
/795
* A
PR 2
017
Acoustic saturation occurs when received signals reach a system's high-amplitude limit. At thatpoint the system becomes unable to distinguish or display signal intensities. At the point ofsaturation, increased input will not increase output.
Aliasing occurs when the detected Doppler frequency exceeds the Nyquist limit. It ischaracterized on the spectral display by the Doppler peaks going off the display, top or bottom,and then continuing on the other side of the baseline. On the Color display an immediatechange in color from one Nyquist limit to the other is seen.
Comet tail is a form of reverberation artifact produced when two or more strong reflectors areclose together and have a high propagation speed. In this case, sound does not travel directly toa reflector and back to the transducer; and a strong linear echo appears at the reflector andextends deeper than the reflector.
Enhancement is an increased relative amplitude of echoes caused by an intervening structureof low attenuation.
Focal enhancement, also known as focal banding, is the increased intensity in the focal regionthat appears as a brightening of the echoes on the display.
Mirror imaging artifact is most commonly seen around the diaphragm; this artifact results fromsound reflecting off another reflector and back.
Mirroring is the appearance of artifacts on a spectral display when there is improper separationof forward and reverse signal processing channels. Consequently, strong signals from onechannel mirror into the other.
Multi-path positioning and refraction artifacts describe the situation in which the paths to andfrom a reflector are different. The longer the sound takes traveling to or from a reflector, thegreater the axial error in reflector positioning (increased range). Refraction and multi-pathpositioning errors are normally relatively small and contribute to general degradation of theimage rather than to gross errors in object location.
Propagation speed errors occur when the assumed value for propagation speed by theultrasound system is incorrect. If the actual speed is greater than that assumed, the calculateddistance to a reflector is too small, and the reflector will be displayed too far from thetransducer. Speed error can cause a structure to be displayed with incorrect size and shape.

Acoustic Artifacts Transducers
Lumify Ultrasound System 123
Phili
ps H
ealth
care
4535
619
091
31_A
/795
* A
PR 2
017
Range ambiguity can occur when reflections are received after the next pulse is transmitted. Inultrasound imaging, it is assumed that for each pulse produced, all reflections are receivedbefore the next pulse is sent out. The ultrasound system calculates the distance to a reflectorfrom the echo arrival time assuming that all echoes were generated by the last emitted pulse.The maximum depth to be imaged unambiguously by the system determines its maximumpulse repetition frequency.
Reverberation is the continuing reception of a particular signal because of reverberation ratherthan reflection from a particular acoustic interface. This phenomenon is analogous to the effectcreated by mirrors positioned on opposite walls when an object, a head for instance, is placedbetween the mirrors. The image of the head is reflected back and forth infinitely between thetwo mirrors, creating the optical illusion of multiple heads. Reverberations are easilyidentifiable, because they are equally spaced on the display.
Scattering is the diffuse, low-amplitude sound waves that occur when acoustic energy reflectsoff tissue interfaces smaller than a wavelength. In diagnostic ultrasound, Doppler signals comeprimarily from acoustic energy back-scattered from red blood cells.
Shadowing is the reduction in echo amplitude from reflectors that lie behind a stronglyreflecting or attenuating structure. This phenomenon occurs when scanning a lesion orstructure with an attenuation rate higher than that of the surrounding tissue. The lesion causesa decrease in beam intensity, which results in decreased echo signals from the structuresbeyond the lesion. Consequently, a dark cloud behind the lesion image forms on the display.This cloud, or shadow, is useful as a diagnostic clue.
Side lobes (from single-element transducers) and grating lobes (from array transducers) causeobjects that are not directly in front of the transducer to be displayed incorrectly in lateralposition.
Speckle appears as tissue texture close to the transducer but does not correspond to scatterersin tissue. It is produced by ultrasound wave interference and results in general imagedegradation.
Spectral broadening is a display phenomenon that occurs when the number of energy-bearingFourier frequency components increases at any given point in time. As a consequence, thespectral display is broadened. Spectral broadening can indicate the disturbed flow caused by alesion, and therefore it is important diagnostically. However, broadening can also result frominteraction between flow and sample volume size, in which case it is an artifact.

Transducers Transducer Covers
124 Lumify Ultrasound System
Phili
ps H
ealth
care
4535
619
091
31_A
/795
* A
PR 2
017
Speed of sound artifacts occur if the sound propagation path to a reflector is partially throughbone, and the speed of sound is greater than in the average soft tissue. Echo positionregistration artifacts will be produced. Reflectors appear closer to the transducer than theiractual distance because of this greater speed of sound, resulting in a shorter echo transit timethan for paths not containing bone.
Transducer CoversTo prevent contamination by blood-borne pathogens, sterile transducer covers are required forneedle guidance procedures. Philips recommends the use of qualified covers.
For procedures for using transducer covers, see the instructions provided with the covers.
WARNING
Latex and talc are commonly used in sheaths marketed to help with infection control duringbiopsies. Examine the packaging to confirm latex and talc content. Studies have shown thatpatients can experience allergic reactions with natural rubber latex. See the FDA MedicalAlert, March 29, 1991, reprinted in “FDA Medical Alert on Latex” on page 36.
WARNING
Sterilized transducers should be used with sterile gel and a sterile transducer cover.
WARNING
Inspect transducer covers before and after use.

Ultrasound Transmission Gels Transducers
Lumify Ultrasound System 125
Phili
ps H
ealth
care
4535
619
091
31_A
/795
* A
PR 2
017
WARNING
Do not apply the transducer cover until you are ready to perform the procedure.
WARNING
Sterile transducer covers are disposable and must not be reused.
Ultrasound Transmission GelsFor proper transmission of the acoustic beam, use the ultrasound transmission gel supplied byor recommended by Philips, or another glycol-, glycerol-, or water-based acoustic couplingmedium.
CAUTION
Do not use lotion-based products or gels that contain mineral oil. Such products maydamage the transducer and void the warranty.
CAUTION
Do not use hand sanitizing gels.
CAUTION
Do not apply the transducer gel until you are ready to perform the procedure. Transducersshould not be left soaking in gel.

Transducers Transducer Storage
126 Lumify Ultrasound System
Phili
ps H
ealth
care
4535
619
091
31_A
/795
* A
PR 2
017
CAUTION
Gels listed here are recommended because of their chemical compatibility with productmaterials.
Some recommended gels include:
• Aquasonic 100
• Aquasonic Clear
• Carbogel-ULT
• Scan
Transducer StorageUse the appropriate guidelines for storing transducers for transport, and daily and long-termstorage.
Storage for TransportAlways use the carrying bag that is provided with your transducer to transport the transducerfrom one site to another. Follow these guidelines to properly store transducers for transport:
• Make sure that the transducer is clean and disinfected before placing it in the carrying bagto avoid contaminating the bag
• Place the transducer in the bag carefully to prevent kinking of the cable.
Daily and Long-Term StorageFollow these guidelines to protect your transducer:
• Avoid storing transducers in areas of temperature extremes or in direct sunlight.
Testing Transducers Transducers
Lumify Ultrasound System 127
Phili
ps H
ealth
care
4535
619
091
31_A
/795
* A
PR 2
017
• Store transducers separately from other instruments to avoid inadvertent transducerdamage.
• Before storing transducers, make sure they are thoroughly dry.
Testing TransducersYou can run transducer tests to diagnose image quality and transducer issues.
1. Make sure that your device is connected to a wireless or cellular network.
2. Connect the transducer to your device.
3. Make sure that the transducer lens is clean, dry, and not touching anything.
4. If needed, start the Lumify app.
5. Touch and select Settings .
6. In Transducer Tests, touch Run Tests.
The system runs a series of tests and then sends the logs to Philips Remote Services. If yourdevice is not connected to a wireless or cellular network, the logs are queued until you havenetwork connectivity. For more information, contact your Philips representative or visit theLumify portal:
www.philips.com/lumify

Transducers Testing Transducers
128 Lumify Ultrasound System
Phili
ps H
ealth
care
4535
619
091
31_A
/795
* A
PR 2
017

Transducer Care System Maintenance
Lumify Ultrasound System 129
Phili
ps H
ealth
care
4535
619
091
31_A
/795
* A
PR 2
017
System MaintenanceMaintenance should be performed regularly and as needed.
Because the system is a piece of medical equipment, Philips recommends that only trainedpersonnel service the system.
WARNING
Always use protective eyewear and gloves when cleaning, disinfecting, or sterilizing anyequipment.
CAUTION
Follow all instructions provided to avoid damage during cleaning, disinfection, andsterilization. Failure to do so could void your warranty.
Transducer CareAll Philips transducers require proper care, cleaning, and handling. Reasonable care includesinspection, cleaning, and disinfection or sterilization. Transducers must be cleaned anddisinfected or sterilized after each use. You must also carefully inspect all parts of thetransducer before each use. Check for cracks or other damage that jeopardizes the integrity ofthe transducer. Report any damage to your Philips representative and discontinue use of thetransducer.
For detailed instructions on how to clean, disinfect, and maintain each type of transducer usedwith the system, including disinfectant compatibility, see Care and Cleaning of UltrasoundSystems and Transducers and Disinfectants and Cleaning Solutions for Ultrasound Systems andTransducers. Information on compatible disinfectants is also available at:
www.philips.com/transducercare
8

System Maintenance Device Maintenance
130 Lumify Ultrasound System
Phili
ps H
ealth
care
4535
619
091
31_A
/795
* A
PR 2
017
Device Maintenance
WARNING
If the system becomes contaminated internally with bodily fluids containing pathogens, youmust immediately notify your Philips service representative. Components inside the systemcannot be disinfected. In that case, the system must be disposed of as biohazardousmaterial in accordance with local or federal laws.
It is important to clean and maintain the ultrasound system and peripherals. Thorough cleaningis important for pieces of peripheral equipment, because they contain electromechanicaldevices. If exposed to constant and excessive environmental dust and humidity, these deviceswill suffer in both performance and reliability.
It is your responsibility to appropriately clean and disinfect your device in accordance with thedevice manufacturer's instructions and with your institution's policies for cleaning anddisinfecting of medical devices.
Transducer MaintenanceInspect the transducer, cable, and lens before each use. Check for cracks or other damage thatjeopardizes the integrity of the transducer. Report any transducer damage to your authorizedservice representative, and discontinue use of the transducer.
For all information on transducer cleaning and disinfection, including information oncompatible disinfectants, see Care and Cleaning of Ultrasound Systems and Transducers,Disinfectants and Cleaning Solutions for Ultrasound Systems and Transducers, and the PhilipsUltrasound Transducer Care website:
www.philips.com/transducercare
If you encounter poor image quality or transducer problems, see “Troubleshooting” on page132.
Sending System Logs System Maintenance
Lumify Ultrasound System 131
Phili
ps H
ealth
care
4535
619
091
31_A
/795
* A
PR 2
017
CAUTION
Some ultrasound coupling gels, as well as some solutions for pre-cleaning, disinfecting, andsterilizing can damage a transducer. Before using a gel or solution on a transducer, see“Ultrasound Transmission Gels” on page 125 and Disinfectants and Cleaning Solutions forUltrasound Systems and Transducers or the Philips Ultrasound Transducer Care website:www.philips.com/transducercare. You can also contact your authorized servicerepresentative. For contact information, see “Customer Service” on page 17.
Sending System LogsThe Lumify app sends system logs to Philips periodically. You can explicitly send system logs toPhilips in case of a system problem. For information about privacy, see the Lumify Privacy
Notice (touch , touch About, and then touch Privacy Notice).
1. Touch and select Settings .
2. In System Logs, touch Send Logs.
The system uploads the logs and notifies you when the upload has completed.
Viewing Audit LogsAudit logs record the following information about access to patient data:
• When exams began and ended
• When exams and images were viewed
• When exams and images were exported or deleted
• When images were sent by e-mail
1. Touch and select Settings .
2. In Audit Logs, touch View Audit Logs.
3. Select an audit log from the list.

System Maintenance Troubleshooting
132 Lumify Ultrasound System
Phili
ps H
ealth
care
4535
619
091
31_A
/795
* A
PR 2
017
4. If prompted, choose an application that can display plain text files in which to view the log.
TroubleshootingIf you encounter difficulty in the operation of the system, use the information here to helpcorrect the problem. If the problem is not covered here, contact your Philips representative, orvisit the Lumify portal:
www.philips.com/lumify
The troubleshooting table contains a list of symptoms and the actions to take to correct theproblems.Troubleshooting
Symptom Corrective Action
The system does not power up. Verify that the device is fully charged.
The system spontaneously reverts to the Scan/CreatePatient display.
Verify that the device is fully charged.
The system does not recognize a connected transducer. Disconnect the ultrasound USB cable from thetransducer and connect a standard Type A to Micro BUSB cable. Connect the temporary cable and thetransducer to a Windows PC. Open the Device Manager.If the transducer is working properly, PiUsb appears inOther Devices. If you do not see PiUsb, contact yourPhilips representative for a replacement transducer orcable.
The system continuously reinitializes the transducerwhen attempting to image.
Verify that the device is fully charged.

Error Messages System Maintenance
Lumify Ultrasound System 133
Phili
ps H
ealth
care
4535
619
091
31_A
/795
* A
PR 2
017
Symptom Corrective Action
Registration fails. Make sure that you have constant wireless or cellularnetwork connectivity throughout the registrationprocess, and make sure that the transducer cable isfirmly connected to your device.
Image artifacts appear. Run the transducer test. See “Testing Transducers” onpage 127.
Error MessagesThe system displays error messages in response to operating or error conditions detected bythe system.
The error messages must be noted and reported to your Philips representative.
For AssistanceIf you are unable to correct a problem, call your local Philips representative or visit the Lumifyportal:
www.philips.com/lumify
The Lumify portal includes a list of frequently asked questions (FAQs) which can help youtroubleshoot problems.

System Maintenance For Assistance
134 Lumify Ultrasound System
Phili
ps H
ealth
care
4535
619
091
31_A
/795
* A
PR 2
017

For Assistance References
Lumify Ultrasound System 135
Phili
ps H
ealth
care
4535
619
091
31_A
/795
* A
PR 2
017
ReferencesArea and Circumference from Ellipse
The formula for area and circumference from ellipse via Beyer, where d1 and d2 are the twoaxes of the ellipse, is
Area from Ellipse
Circumference from Ellipse
Beyer, W. H. Standard Mathematical Tables. 28th Edition. CRC Press, Boca Raton, Florida, 1987,p. 126.
Gestational Age (Fetal Age)
The formula for gestational age (wk+day) via Hadlock, using abdominal circumference (ACrange: 4.93 to 38.0 cm) is
8.14 + 0.753(AC) + 0.0036(AC2)
Given the head circumference (HC range: 5.41 to 35.8 cm), the formula for gestational age viaHadlock, GA(HC)Hadl (in weeks) is
8.96 + 0.540(HC) + 0.0003(HC3)
The formula for gestational age (in weeks) via Hadlock, using biparietal diameter (cm) (BPDrange: 1.4 to 10.17 cm) is
9.54 + 1.482(BPD) + 0.1676(BPD2)
9

References For Assistance
136 Lumify Ultrasound System
Phili
ps H
ealth
care
4535
619
091
31_A
/795
* A
PR 2
017
The formula for gestational age (in weeks) via Hadlock, using femur length (FL in cm, range:0.616 to 8.2 cm) is
10.35 + 2.460(FL) + 0.170(FL2)
Hadlock, F. P., Deter, R. L., Harrist, R. B., Park, S. K. "Estimating fetal age: computer-assistedanalysis of multiple fetal growth parameters." Radiology, Vol. 152, No. 2: 497-501, August 1984.
Estimated Due Date (EDD)
The estimated due date given the last menstrual period (LMP) equation is calculated using thefollowing formula:
LMP + 40 weeks
Hagen-Ansert, Sandra L. Textbook of Diagnostic Ultrasonography, Third Edition. The C. V. MosbyCo., 1989, p. 408.
Last Menstrual Period (LMP)
The last menstrual period given the estimated due date (EDD) equation is calculated using thefollowing formula:
EDD - 40 weeks
Hagen-Ansert, Sandra L. Textbook of Diagnostic Ultrasonography, Third Edition. The C. V. MosbyCo., 1989, p. 408.
Estimated Fetal Weight (EFW(BPD, HC, AC, FL))
The formula for the estimated fetal weight (EFW) in grams, from biparietal diameter (BPD),head circumference (HC), abdominal circumference (AC) and femur length (FL) all incentimeters via Hadlock is
10(1.3596-(0.00386AC x FL) + (0.0064HC) + (0.00061BPD x AC) + (0.0424 x AC) + (0.174 x FL))
Normal ranges are grouped by EFW as percent of EFW and a gram offset.
Hadlock, F. P., Harrist, R. B., Sharman R. S., Deter R. L., Park S. K. "Estimation of Fetal Weightwith the Use of Head, Body, and Femur Measurements–A prospective study." AM J OBSTETGYNECOL Vol. 151, No. 3: 333-337, February 1985.

System Specifications Specifications
Lumify Ultrasound System 137
Phili
ps H
ealth
care
4535
619
091
31_A
/795
* A
PR 2
017
SpecificationsThe Lumify system conforms to the following specifications:
System Specifications
Gray Shades
256 in 2D and M-mode
Scan Lines
Up to 1,024 scan lines
Service Life
The service life of the Lumify transducers is 10 years.
Pressure, Humidity, and Temperature Limits
These limits apply only to the Philips Lumify transducers, not to the Android device on whichyou run the Lumify app. It is your responsibility to select a Lumify-compatible device that meetsthe needs of your clinical environment. For information about your device's environmentalspecifications, consult the documentation that accompanies your device.Operating, Transient, and Storage Limits
Operating Limits Transient Operating Limits Storage Limits
Pressure 700 hPa (525 mmHg) to1060 hPa (795 mmHg)
-- 500 hPa (375 mmHg) to1060 hPa (795 mmHg)
Humidity 15% to 95% non-condensing 15% to 95% relative humidity 0% to 95% relative humidity
Temperature 5°C (41°F) to 40°C (104°F) -20°C (-4°F) to 50°C (122°F) -34°C (-29°F) to 70°C (158°F)
10

Specifications Safety and Regulatory Requirements
138 Lumify Ultrasound System
Phili
ps H
ealth
care
4535
619
091
31_A
/795
* A
PR 2
017
Safety and Regulatory Requirements
Classification
• Device with transducers: Class II/internally powered ME equipment. Transducers: Type BFapplied parts, IP47
• Ordinary Equipment/Continuous Operation
• Non-AP/APG
Electromechanical Safety Standards Met
The transducers and software comply with the requirements of IEC 60601-1 Medical ElectricalEquipment, General Requirements for Safety, including all applicable collateral and particularstandards, as well as all applicable deviations. System users are responsible for ensuring thatthe chosen device is compliant with the law in the jurisdiction in which the product is used.
Compliance
Philips products comply with relevant international and national standards and laws.Information on compliance will be supplied by your local Philips representative, or themanufacturer, on request.

Index
Lumify Ultrasound System 139
Phili
ps H
ealth
care
4535
619
091
31_A
/795
* A
PR 2
017
IndexNumerics2D distance measurements 1022D ellipse measurements 1032D mode
about 95using 95
AAccessories 16
electromagnetic compliance 58Accuracy, measurement 103, 104Acoustic artifacts 121Acoustic coupling medium 125Acoustic output
limits 37measurement 47, 51
Acoustic output tables 12, 41, 50Acquiring
images 99loops 100
Adding labels 101ALARA principle
applying 37education program 37example 37related guidance documents 46
Allergic reactions to latex 36Annotation 101App updates 77Artifacts 121Assistance 17, 133
Audience, intended 10Audit logs 72, 131Auto detect 72, 84AutoSCAN 98
BBarcodes
formats 86saving formats 85scanning 84
Batteries 19Biological safety 34
CCables
approved for electromagnetic compliance 57protecting from damage 29
Canceling subscription 78Capabilities, system 68Cautions, described 21CD
user information 12Centerline
displaying 99Cleaning
device 130transducers 120, 130
Clinical applications 120Color mode
about 96using 96

Index
140 Lumify Ultrasound System
Phili
ps H
ealth
care
4535
619
091
31_A
/795
* A
PR 2
017
Compatibilitygels 125product 30
Compliance, electromagneticapproved accessories 58approved cables 57approved transducers 57
Components, system 71Condensation 29Connecting transducers 87Controls affecting MI and TI
direct controls 37indirect controls 37receiver controls 37
Conventionsuser information 13
Coverstransducer 124
Customerservice 17
DData
storage 72Date and time, setting 79Defibrillation, electrical safety 25, 27Deleting exams 113Deleting images 111Deleting loops 111Deleting patient data 87Deleting settings 87Device class 24Device requirements 67
Device reuse 17DICOM
logging 118DICOM export settings 114Disinfecting
device 130transducers 120, 130
Display orientation 72Display, avoiding damage 29Disposal of device 17Distance measurements 102Downloading app 75
EEditing patient data 94Electrical safety 24Electromagnetic compatibility 54Electromagnetic compliance
approved accessories 58approved cables 57approved transducers 57
Electromagnetic emissionsdefined 54environment 56
Electromagnetic immunitydefined 54system environment 58
Electromagnetic interferenceavoiding 65distance to transmitters 63types 61
Electrostatic discharge (ESD) 55Electrosurgical units (ESUs) 26

Index
Lumify Ultrasound System 141
Phili
ps H
ealth
care
4535
619
091
31_A
/795
* A
PR 2
017
Ellipse measurements 103E-mailing Fetal Age Summary 109E-mailing images 109E-mailing loops 109Ending exams 106Entitlement 75Equipment protection 29Error messages 34, 133ESD precautions 55Estimated Due Date (EDD) 136Estimated Fetal Weight 136Exams
deleting 113ending 106exporting 112quick 83restarting paused 95reviewing 94starting new 91
Explosion hazard 11, 24Export
patient data on images 113Export destinations
configuring 114editing 117settings 114
Export queue 117Exporting exams 112Exporting Fetal Age Summary 109Exporting images 109Exporting loops 109
FFAQs 133Fetal age 135Fetal Age Summary
e-mailing 109exporting 109viewing 108
Fire safety 28Full-screen view 99
GGels
compatibility 125recommendations 125
Gestational age 135Gestures
reference 13Glutaraldehyde exposure 53Gray shades specification 137
HHazards
electrical shock 24explosion 11, 24IEC symbols 31
IIcons
imaging display 80IEC symbols 31Image review 107Image updating, inconsistent 34

Index
142 Lumify Ultrasound System
Phili
ps H
ealth
care
4535
619
091
31_A
/795
* A
PR 2
017
Imagesacquiring 99deleting 111e-mailing 109exporting 109viewing full screen 99
Imaging2D 95acoustic artifacts 121Color 96Color mode 96display 80M-mode 97
Imaging features 98Imaging modes 95Indications for use 69Indices 41Infection control 53Installing app 75Intended audience 10Intended use 10Interference 61, 65
LLabels 101
adding 101Latex
allergic reactions 36Leakage current 25Local directory export settings 114Logging, DICOM 118
Logsaudit 72, 131system 72, 131
Loopsacquiring 100deleting 111duration 72e-mailing 109exporting 109playing 108
MMagnification, zoom 98Maintenance
system 129, 130transducers 120, 130
Measurement tools 68Measurement tools references 135Measurements
accuracy 103, 104acoustic 47distance 102ellipse 103tools 68types 68
Mechanical index (MI) 41controls affecting 45display 41display precision and accuracy 41on-screen 41
Medical Ultrasound Safety 12Messages, error 34, 133MI 41

Index
Lumify Ultrasound System 143
Phili
ps H
ealth
care
4535
619
091
31_A
/795
* A
PR 2
017
MI and TI accuracy estimates 41M-mode 97
using 97Modality Worklist 87
searching for exams 93Modality Worklist server
configuring 88deleting 89modifying 89
NNavigating thumbnails and images 107Network share export settings 114
OOn/Off control, system power 78Operating notes 12Operating temperature 29Operator safety 52Ordering supplies and accessories 16Orientation, display 72Output display 41Output power 72Output tables, acoustic 12, 41, 50Overview, system 67
PPacemakers 25Patient contact temperature 119
Patient datadeleting 87editing 94exporting on images 113protecting 70security 70
Patient database 72Performing an exam 91Performing fetal analysis
estimated fetal weight 104fetal age 104fetal growth 104
PermissionsLumify app 77
Philips contact information 17Playing loops 108Portal 133Power (On/Off) control 78Power saving 72Power, output 72Presets, changing 94Problems, correcting 132Product compatibility 30Protection against system damage 29
QQuick exams 83Quick ID 83
RRecycling the device 17

Index
144 Lumify Ultrasound System
Phili
ps H
ealth
care
4535
619
091
31_A
/795
* A
PR 2
017
ReferencesArea and Circumference from Ellipse 135Estimated Due Date (EDD) 135Estimated Fetal Weight 136Estimated Fetal Weight (EFW) 135Gestational Age (Fetal Age) 135Last Menstrual Period (LMP) 135measurement tool 135
Registration, transducers 75, 76Regulatory requirements 138Repetitive strain injury 52Requirements, device 67Restrictions for use 65Resuming a paused exam 95Retrying export jobs 117Review
displaying images 107overview 107starting 107
SSafety 21
acoustic output and measurement 47ALARA principle 37basic 21biological 34defibrillators 27electrical 24electromagnetic emissions and immunity 54electrosurgical units 26equipment protection 29fire 28general warnings 11guidance documents 46mechanical index 41medical ultrasound 12operator 52output display 41pacemakers 25requirements 138symbols 31thermal index 41
Saved exams 94Scan lines specification 137Scanning
barcodes 84Security
data 70Separation distance 63Serial number, transducer 74Service, customer 17

Index
Lumify Ultrasound System 145
Phili
ps H
ealth
care
4535
619
091
31_A
/795
* A
PR 2
017
Settingsdeleting 87export destinations 114system 72
Setups 72Software updates 16Software version 74Solvents 29Specifications
gray shades 137safety requirements 138scan lines 137
Starting new exams 91Starting review 107Static shock 55Storage
access to 77data 72
Storing transducers 126daily and long-term 126for transport 126
Subscription, canceling 78Supplies 16Symbols
definitions 31warning 12
System error messages 133System Information 74System logs 72, 131System maintenance 129System settings 72System upgrades 16
TTables, acoustic output 12, 50Tablet identifier 74Technical support 133Testing transducers 127Tests
transducer 72Thermal index (TI) 41
controls affecting 45display 72, 79display precision and accuracy 41displays 41modes of operation 41on-screen 41using appropriate for application 41
Thumbnails 107TI 41TI and MI values 45Time and date, setting 79Tools, measurement 68Touch gestures 13Transducer maintenance 120, 130

Index
146 Lumify Ultrasound System
Phili
ps H
ealth
care
4535
619
091
31_A
/795
* A
PR 2
017
Transducersaffecting TI and MI values 45care 120, 129, 130cleaning 120, 130clinical applications 120connecting 87covers 124electromagnetic compliance 57gels compatibility 125humidity limits 137indications for use 69inspecting for damage 24maintenance 120, 130pressure limits 137registering 75, 76safety 119serial number 74service life 137storage, daily and long-term 126storage, for transport 126storing 126temperature limits 137testing 72, 127types 69using 119
Troubleshooting 132Turning the system on and off 78Tutorial 78
UUltrasonic bioeffects, related documentation 46
Ultrasound transmission gelcompatibility 125recommended 125
Updates, app 77Upgrades, system 16User information
about 9components 12conventions 13
User Information CD 12
WWalkthrough 78Warning symbols 12, 31Warnings
described 21general 11, 21symbols 12
Website, Philips 17Wireless networking 71Worklist 87
searching for exams 93
ZZoom 98


Philips Healthcare is part of Royal Philips
www.philips.com/[email protected]
Manufacturer’s addressPhilips Ultrasound, Inc.22100 Bothell Everett HwyBothell, WA 98021-8431USA
REPEC
Philips Medical Systems Nederland B.V.Veenpluis 4-65684 PC BestThe Netherlands
0086
© 2017 Koninklijke Philips N.V.All rights are reserved. Reproduction or transmission in whole or in part, in any form or by any means, electronic, mechanical or otherwise, isprohibited without the prior written consent of the copyright owner.
Published in USA4535 619 09131_A/795 * APR 2017 - en-US