Loyal Heights pattern FINAL copy · Loyal Heights Quilt ©2019 By Jera Brandvig for Lecien Fabrics...
6
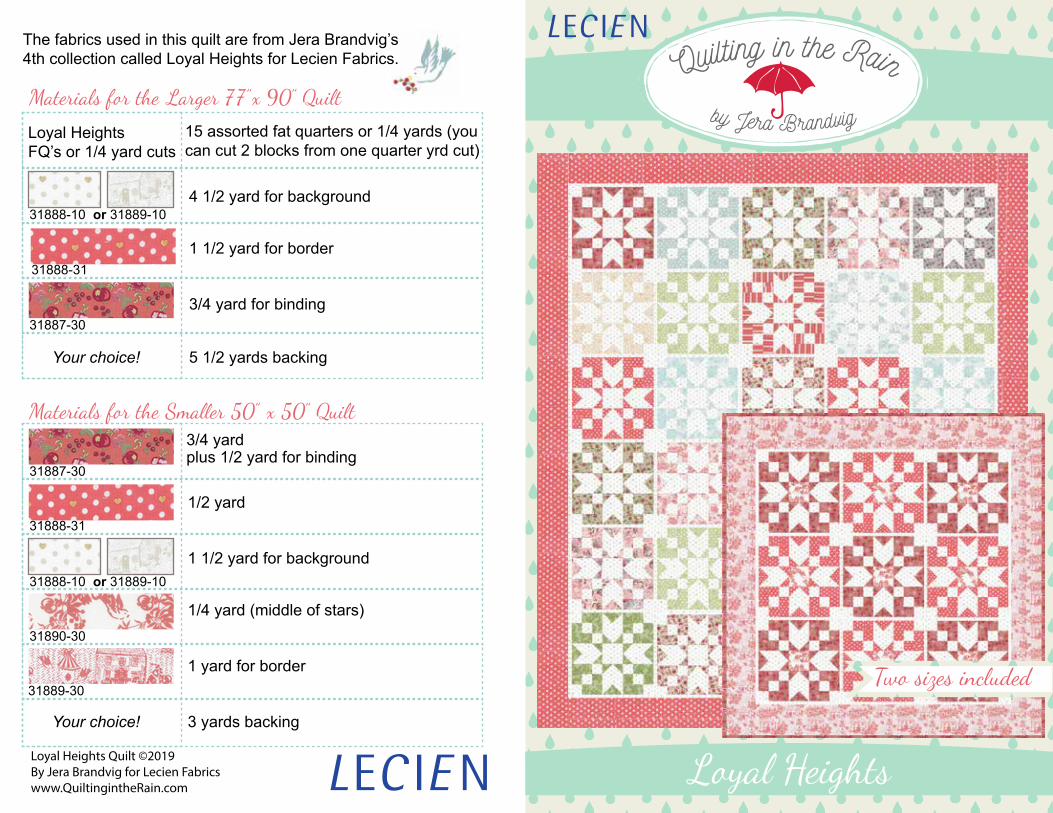
Loyal Heights Quilt ©2019 By Jera Brandvig for Lecien Fabrics www.QuiltingintheRain.com Loyal Heights Two sizes included 3/4 yard 1/2 yard 1 1/2 yard for background 1/4 yard (middle of stars) 1 yard for border plus 1/2 yard for binding 3 yards backing 31887-30 31888-31 31888-10 or 31889-10 Your choice! 31890-30 31889-30 31888-31 Loyal Heights FQ’s or 1/4 yard cuts 15 assorted fat quarters or 1/4 yards (you can cut 2 blocks from one quarter yrd cut) 4 1/2 yard for background 1 1/2 yard for border 3/4 yard for binding 5 1/2 yards backing 31888-10 or 31889-10 31887-30 Your choice! The fabrics used in this quilt are from Jera Brandvig’s 4th collection called Loyal Heights for Lecien Fabrics.
Transcript of Loyal Heights pattern FINAL copy · Loyal Heights Quilt ©2019 By Jera Brandvig for Lecien Fabrics...
Loyal Heights Quilt ©2019By Jera Brandvig for Lecien Fabricswww.QuiltingintheRain.com
Loyal Heights
Two sizes included
3/4 yard
1/2 yard
1 1/2 yard for background
1/4 yard (middle of stars)
1 yard for border
plus 1/2 yard for binding
3 yards backing
31887-30
31888-31
31888-10 or 31889-10
Your choice!
31890-30
31889-30
31888-31
Loyal Heights FQ’s or 1/4 yard cuts
15 assorted fat quarters or 1/4 yards (you can cut 2 blocks from one quarter yrd cut)
4 1/2 yard for background
1 1/2 yard for border
3/4 yard for binding
5 1/2 yards backing
31888-10 or 31889-10
31887-30
Your choice!
The fabrics used in this quilt are from Jera Brandvig’s 4th collection called Loyal Heights for Lecien Fabrics.
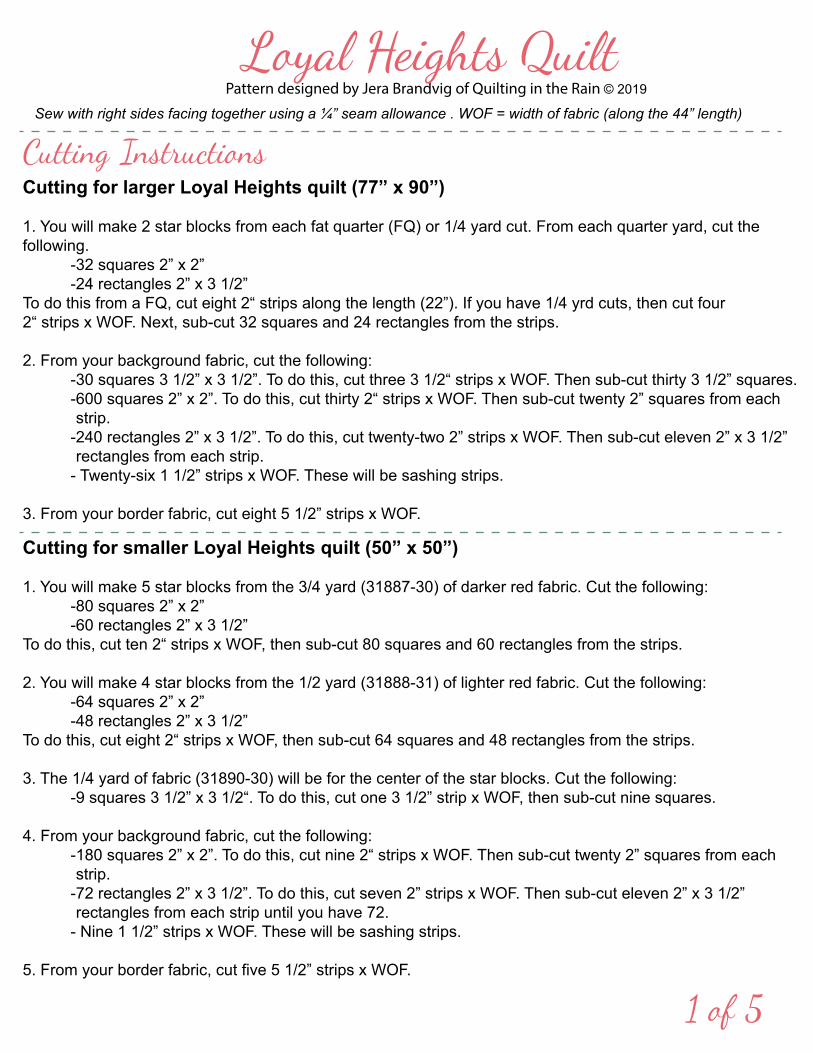
Sew with right sides facing together using a ¼” seam allowance . WOF = width of fabric (along the 44” length)
Pattern designed by Jera Brandvig of Quilting in the Rain © 2019
Cutting for larger Loyal Heights quilt (77” x 90”)
1. You will make 2 star blocks from each fat quarter (FQ) or 1/4 yard cut. From each quarter yard, cut the following. -32 squares 2” x 2” -24 rectangles 2” x 3 1/2” To do this from a FQ, cut eight 2“ strips along the length (22”). If you have 1/4 yrd cuts, then cut four 2“ strips x WOF. Next, sub-cut 32 squares and 24 rectangles from the strips.
2. From your background fabric, cut the following: -30 squares 3 1/2” x 3 1/2”. To do this, cut three 3 1/2“ strips x WOF. Then sub-cut thirty 3 1/2” squares. -600 squares 2” x 2”. To do this, cut thirty 2“ strips x WOF. Then sub-cut twenty 2” squares from each strip. -240 rectangles 2” x 3 1/2”. To do this, cut twenty-two 2” strips x WOF. Then sub-cut eleven 2” x 3 1/2” rectangles from each strip. - Twenty-six 1 1/2” strips x WOF. These will be sashing strips.
3. From your border fabric, cut eight 5 1/2” strips x WOF.
Cutting for smaller Loyal Heights quilt (50” x 50”)
1. You will make 5 star blocks from the 3/4 yard (31887-30) of darker red fabric. Cut the following: -80 squares 2” x 2” -60 rectangles 2” x 3 1/2” To do this, cut ten 2“ strips x WOF, then sub-cut 80 squares and 60 rectangles from the strips.
2. You will make 4 star blocks from the 1/2 yard (31888-31) of lighter red fabric. Cut the following: -64 squares 2” x 2” -48 rectangles 2” x 3 1/2” To do this, cut eight 2“ strips x WOF, then sub-cut 64 squares and 48 rectangles from the strips.
3. The 1/4 yard of fabric (31890-30) will be for the center of the star blocks. Cut the following: -9 squares 3 1/2” x 3 1/2“. To do this, cut one 3 1/2” strip x WOF, then sub-cut nine squares.
4. From your background fabric, cut the following: -180 squares 2” x 2”. To do this, cut nine 2“ strips x WOF. Then sub-cut twenty 2” squares from each strip. -72 rectangles 2” x 3 1/2”. To do this, cut seven 2” strips x WOF. Then sub-cut eleven 2” x 3 1/2” rectangles from each strip until you have 72. - Nine 1 1/2” strips x WOF. These will be sashing strips.
5. From your border fabric, cut five 5 1/2” strips x WOF.
1 of 5
Loyal Heights Quilt
Cutting for larger Loyal Heights quilt (77” x 90”)
1. You will make 2 star blocks from each fat quarter (FQ) or 1/4 yard cut. From each quarter yard, cut the following. -32 squares 2” x 2” -24 rectangles 2” x 3 1/2” To do this from a FQ, cut eight 2“ strips along the length (22”). If you have 1/4 yrd cuts, then cut four 2“ strips x WOF. Next, sub-cut 32 squares and 24 rectangles from the strips.
2. From your background fabric, cut the following: -30 squares 3 1/2” x 3 1/2”. To do this, cut three 3 1/2“ strips x WOF. Then sub-cut thirty 3 1/2” squares. -600 squares 2” x 2”. To do this, cut thirty 2“ strips x WOF. Then sub-cut twenty 2” squares from each strip. -240 rectangles 2” x 3 1/2”. To do this, cut twenty-two 2” strips x WOF. Then sub-cut eleven 2” x 3 1/2” rectangles from each strip. - Twenty-six 1 1/2” strips x WOF. These will be sashing strips.
3. From your border fabric, cut eight 5 1/2” strips x WOF.
Cutting for smaller Loyal Heights quilt (50” x 50”)
1. You will make 5 star blocks from the 3/4 yard (31887-30) of darker red fabric. Cut the following: -80 squares 2” x 2” -60 rectangles 2” x 3 1/2” To do this, cut ten 2“ strips x WOF, then sub-cut 80 squares and 60 rectangles from the strips.
2. You will make 4 star blocks from the 1/2 yard (31888-31) of lighter red fabric. Cut the following: -64 squares 2” x 2” -48 rectangles 2” x 3 1/2” To do this, cut eight 2“ strips x WOF, then sub-cut 64 squares and 48 rectangles from the strips.
3. The 1/4 yard of fabric (31890-30) will be for the center of the star blocks. Cut the following: -9 squares 3 1/2” x 3 1/2“. To do this, cut one 3 1/2” strip x WOF, then sub-cut nine squares.
4. From your background fabric, cut the following: -180 squares 2” x 2”. To do this, cut nine 2“ strips x WOF. Then sub-cut twenty 2” squares from each strip. -72 rectangles 2” x 3 1/2”. To do this, cut seven 2” strips x WOF. Then sub-cut eleven 2” x 3 1/2” rectangles from each strip until you have 72. - Nine 1 1/2” strips x WOF. These will be sashing strips.
5. From your border fabric, cut five 5 1/2” strips x WOF.
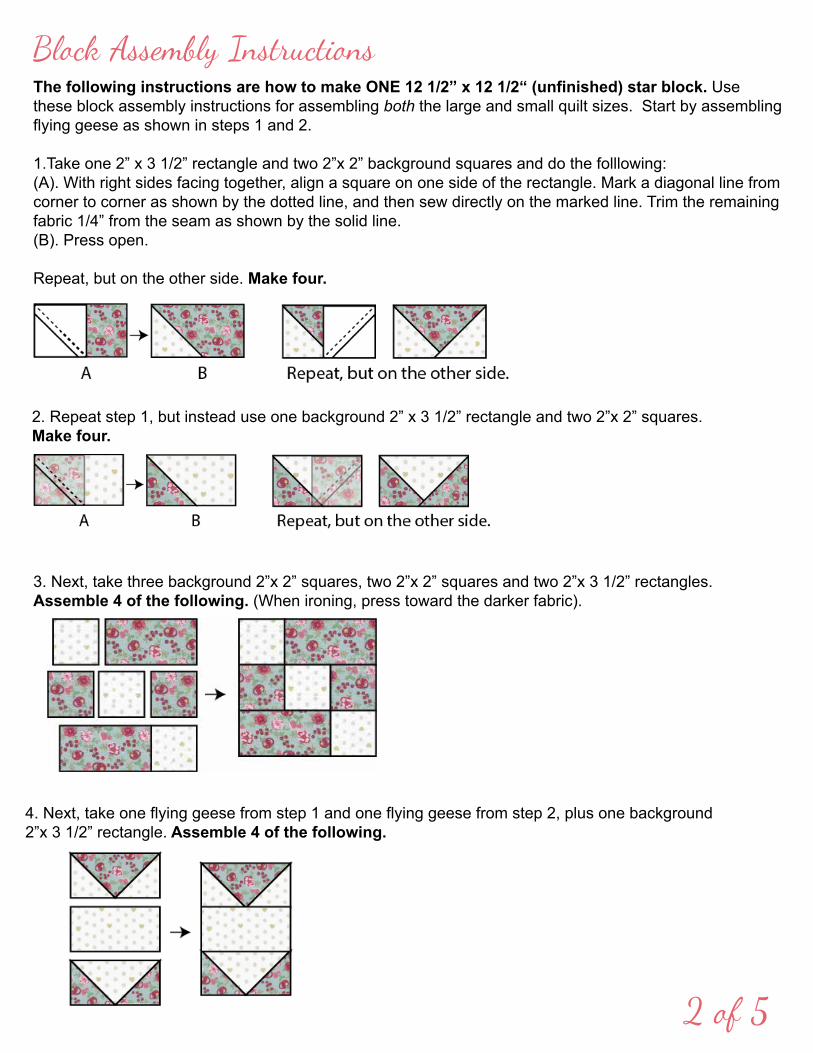
The following instructions are how to make ONE 12 1/2” x 12 1/2“ (unfinished) star block. Use these block assembly instructions for assembling both the large and small quilt sizes. Start by assembling flying geese as shown in steps 1 and 2.
1.Take one 2” x 3 1/2” rectangle and two 2”x 2” background squares and do the folllowing:(A). With right sides facing together, align a square on one side of the rectangle. Mark a diagonal line from corner to corner as shown by the dotted line, and then sew directly on the marked line. Trim the remaining fabric 1/4” from the seam as shown by the solid line. (B). Press open.
Repeat, but on the other side. Make four.
2. Repeat step 1, but instead use one background 2” x 3 1/2” rectangle and two 2”x 2” squares. Make four.
3. Next, take three background 2”x 2” squares, two 2”x 2” squares and two 2”x 3 1/2” rectangles. Assemble 4 of the following. (When ironing, press toward the darker fabric).
4. Next, take one flying geese from step 1 and one flying geese from step 2, plus one background 2”x 3 1/2” rectangle. Assemble 4 of the following.
2 of 5
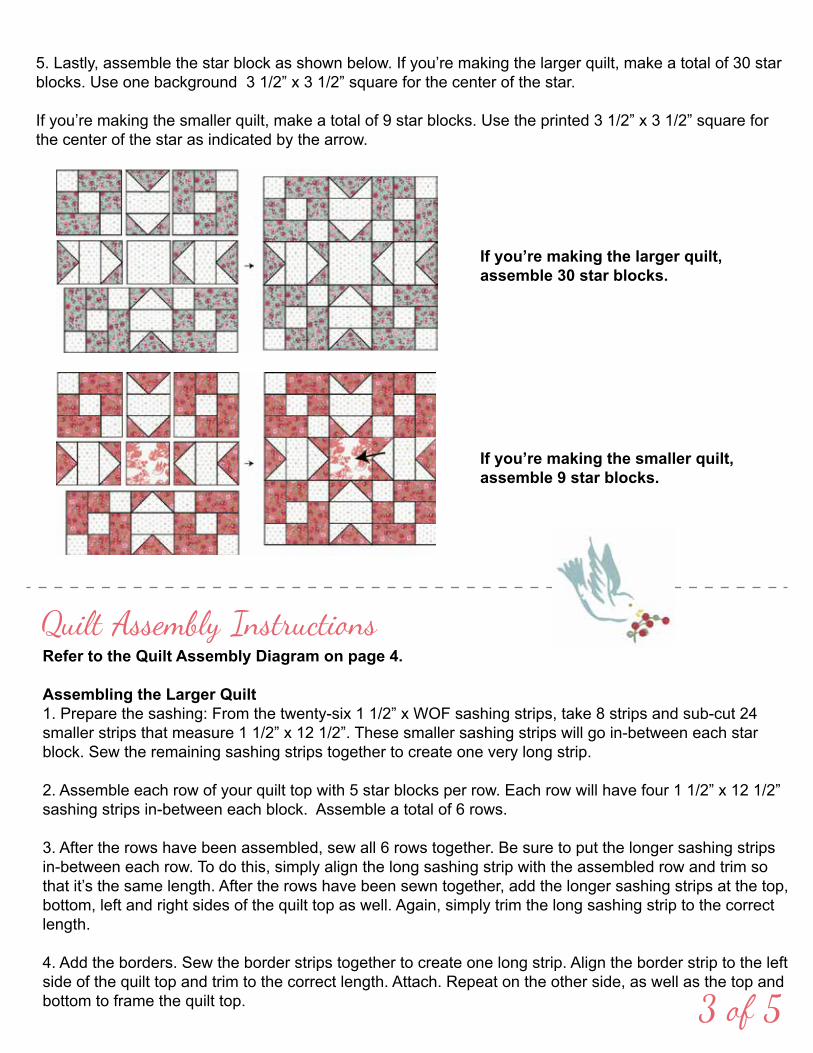
5. Lastly, assemble the star block as shown below. If you’re making the larger quilt, make a total of 30 star blocks. Use one background 3 1/2” x 3 1/2” square for the center of the star.
If you’re making the smaller quilt, make a total of 9 star blocks. Use the printed 3 1/2” x 3 1/2” square for the center of the star as indicated by the arrow.
If you’re making the larger quilt,assemble 30 star blocks.
If you’re making the smaller quilt,assemble 9 star blocks.
Refer to the Quilt Assembly Diagram on page 4.
Assembling the Larger Quilt1. Prepare the sashing: From the twenty-six 1 1/2” x WOF sashing strips, take 8 strips and sub-cut 24 smaller strips that measure 1 1/2” x 12 1/2”. These smaller sashing strips will go in-between each star block. Sew the remaining sashing strips together to create one very long strip.
2. Assemble each row of your quilt top with 5 star blocks per row. Each row will have four 1 1/2” x 12 1/2” sashing strips in-between each block. Assemble a total of 6 rows.
3. After the rows have been assembled, sew all 6 rows together. Be sure to put the longer sashing strips in-between each row. To do this, simply align the long sashing strip with the assembled row and trim so that it’s the same length. After the rows have been sewn together, add the longer sashing strips at the top, bottom, left and right sides of the quilt top as well. Again, simply trim the long sashing strip to the correct length.
4. Add the borders. Sew the border strips together to create one long strip. Align the border strip to the left side of the quilt top and trim to the correct length. Attach. Repeat on the other side, as well as the top and bottom to frame the quilt top. 3 of 5
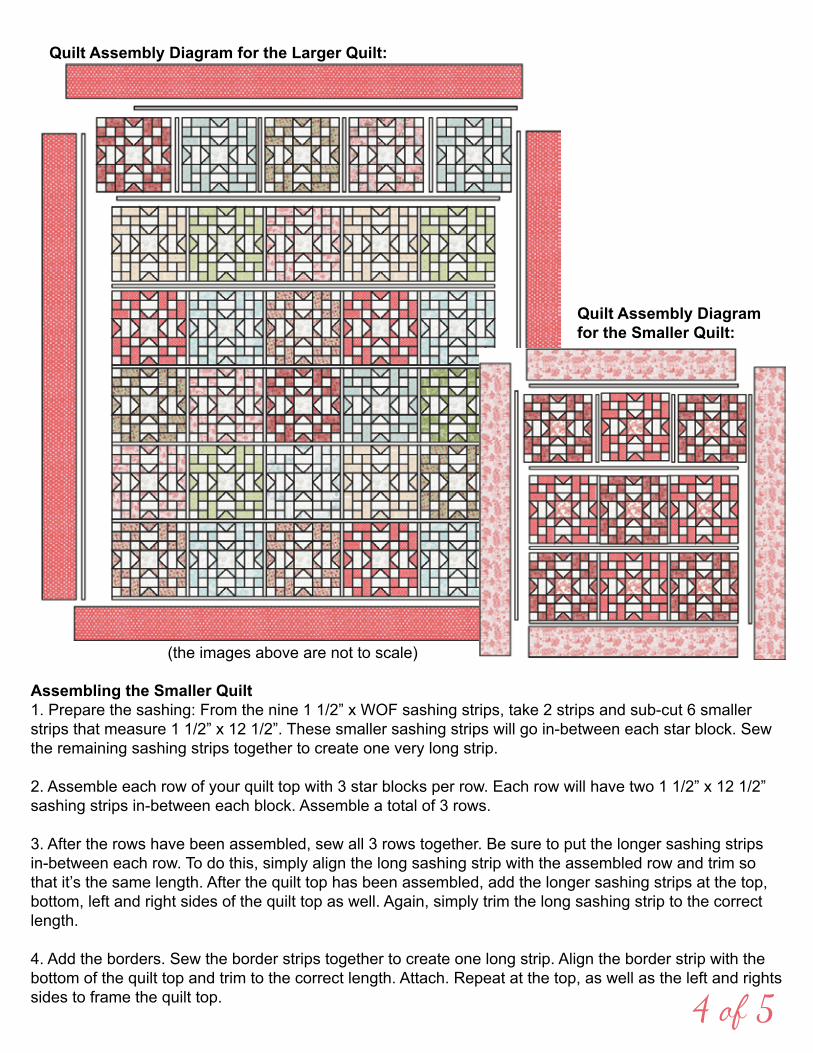
Quilt Assembly Diagram for the Larger Quilt:
Quilt Assembly Diagram for the Smaller Quilt:
Assembling the Smaller Quilt1. Prepare the sashing: From the nine 1 1/2” x WOF sashing strips, take 2 strips and sub-cut 6 smaller strips that measure 1 1/2” x 12 1/2”. These smaller sashing strips will go in-between each star block. Sew the remaining sashing strips together to create one very long strip.
2. Assemble each row of your quilt top with 3 star blocks per row. Each row will have two 1 1/2” x 12 1/2” sashing strips in-between each block. Assemble a total of 3 rows.
3. After the rows have been assembled, sew all 3 rows together. Be sure to put the longer sashing strips in-between each row. To do this, simply align the long sashing strip with the assembled row and trim so that it’s the same length. After the quilt top has been assembled, add the longer sashing strips at the top, bottom, left and right sides of the quilt top as well. Again, simply trim the long sashing strip to the correct length.
4. Add the borders. Sew the border strips together to create one long strip. Align the border strip with the bottom of the quilt top and trim to the correct length. Attach. Repeat at the top, as well as the left and rights sides to frame the quilt top.
(the images above are not to scale)
4 of 5
For the Larger Quilt: - Backing preparation: Cut the 5 1/2 yards of backing fabric in half accross the WOF to yield two rectangles ~99” x WOF. Trim the selvages and then sew together along the ~99“ length. - Binding preparation: From your binding fabric, cut nine 2.5” x WOF strips.
For the Smaller Quilt: - Cut the 3 yards of backing fabric in half accross the WOF to yield two rectangles ~55” x WOF. Trim the selvages and then sew together along the ~55“ length.
- Binding preparation: From your binding fabric, cut six 2 1/2” strips x WOF.
Baste, quilt and then bind. An easy-to-follow binding tutorial can be found on my blog, www.QuiltingintheRain.com, under “Tutorials.”
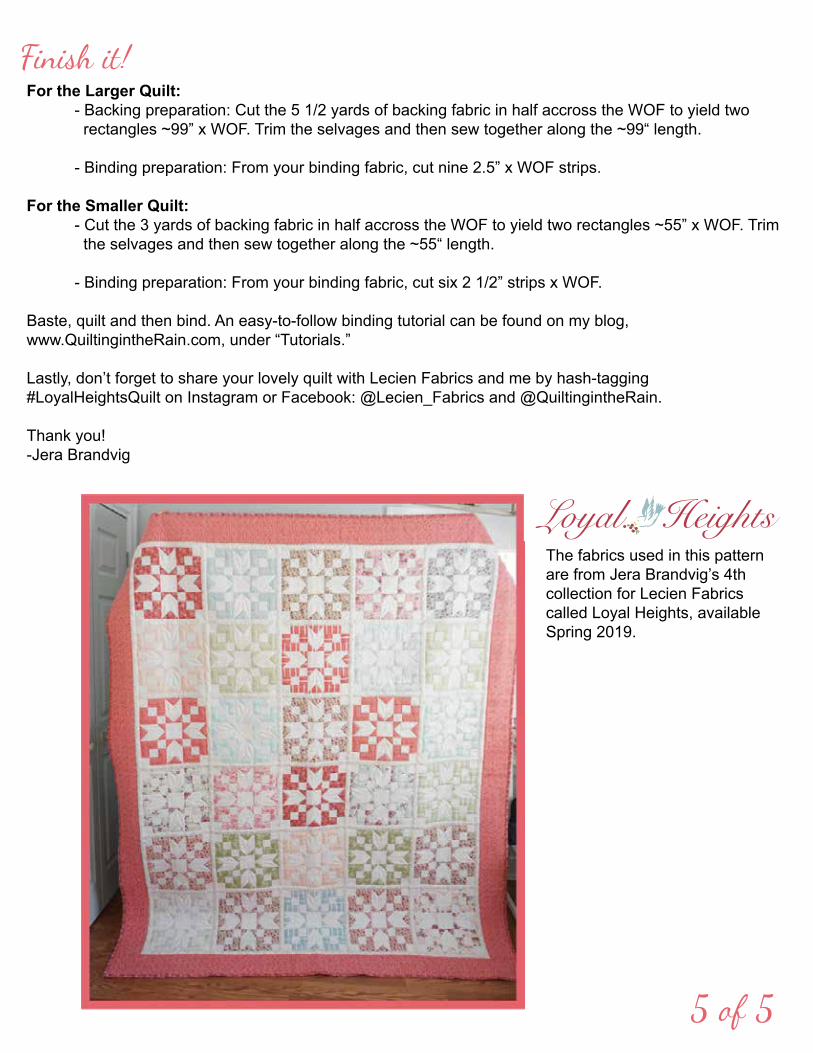
Lastly, don’t forget to share your lovely quilt with Lecien Fabrics and me by hash-tagging #LoyalHeightsQuilt on Instagram or Facebook: @Lecien_Fabrics and @QuiltingintheRain.
Thank you! -Jera Brandvig
5 of 5
The fabrics used in this patternare from Jera Brandvig’s 4th collection for Lecien Fabricscalled Loyal Heights, available Spring 2019.