Apollo Transport Folding-E Front Motor Drive System Owner ...
1
Low Speed Handpiece and Air Motor (APOLLO SERIES)
Operation manual & Maintenance GuideENGLISH 繁體
CODENT TECHNICAL INDUSTRY CO., LTD.QS-B0-0120197
02
CAUTION˙Please consider the safety of the patient when using the handpiece. ˙Please remember when the bur is rotating, pressing the chuck push button that will result in overheating of the handpiece. When pressing the chuck push button, please keep the handpiece away from the face of the patient. ˙Please use carefully and do not drop the handpiece. ˙Never try to take the handpiece apart or tamper with mechanism. ˙If the handpiece operate irregular, stop using immediately and give back to your dealer for service. ˙When you want to remove the bur, please wait to the handpiece completely stop rotating. ˙Please use burs no longer than 26mm. Do not use no-dental burs. ˙Please look over the overheating, vibration and noise outside the patient’s mouth. If you find any unusual situation, please contact with the dealer for service.
Thank you for purchasing Codent Low Speed Handpiece and Air Motor. 0197
03
Contents
1. Performance Specifications......................................................................................................................04
Low Speed Contra-angle Handpiece
Low Speed Straight Handpiece
Air Motor
2. Insert & Remove the bur for Contra Cngles Handpiece................................................................09
3. Insert & Remove the bur for Straight Handpiece.............................................................................10
4. Connect to Air Motor and Disconnect from Air motor.....................................................................11
5. Lubricate...........................................................................................................................................................12
6. Clean and Sterilize.........................................................................................................................................14

04
1. Performance Specifications
※ Low Speed Contra-angle Handpiece
Model A65 L A65 A55 L A55 A85 L A85 A61 L A61 A51
Colling Systen Quattro Single Quattro Quattro
Chuck Type Push Type
Gear Ratio 1:5 1:4.2 1:1
Allowable Max.Speed (rpm) 200,000 168,000 40,000
Bur Size Size: ISO1797-1 Type 3 Ø1.59-1.60mm
Ø2.35mm Latch Type Burs,Surgical Drill / TAP
Fiber Optics ‐‐‐ ‐‐‐ ‐‐‐ ‐‐‐ ‐‐‐
Head type Standard Miniature 45° Standard Miniature

05
※ Low Speed Contra-angle Handpiece
Model A64 L A64 A54 A10 L A10 A16 L A16 A56 A20 L A20
Colling Systen Single Spray / Internal Cooling External / Internal
Chuck Type Push Type
Gear Ratio 4:1 10:1 16:1 20:1
Allowable Max.Speed (rpm) 10,000 4,000 2,500 2,000
Speed (rpm) Ø2.35mm Latch Type Burs,Surgical Drill / TAP
Fiber Optics ‐‐‐ ‐‐‐ ‐‐‐ ‐‐‐ ‐‐‐ ‐‐‐
Head type Standard Miniature Standard Standard Miniature Standard

06
※ Low Speed Contra-angle Handpiece
Model H61 H51 H64 H54 H16 H56 H41 H31
Colling Systen Single Spray / Internal Cooling Single Spray / External Cooling
Chuck Type Push Type
Gear Ratio 1:1 4:1 16:1 1:1
Allowable Max.Speed (rpm) 40,000 10,000 2,500 40,000
Bur Size Ø2.35mm Latch Type Burs,Surgical Drill / TAP
Fiber Optics ‐‐‐
Head type Standard Miniature Standard Miniature Standard Miniature Standard Miniature

07
※ Low Speed Straight Handpiece
ModelA11 L A11 A12 H10 H11 H12
Internal Straight Handpiece External Straight Handpiece
Colling Systen Single Spray / Internal Cooling Single Spray / External Cooling
Chuck Type Switch to disconnect
Gear Ratio 1:1
Allowable Max.Speed (rpm) 40,000
Bur Size Ø2.35mm Latch Type Burs,Surgical Drill / TAP
Fiber Optics ‐‐‐

08
※ Air Motor
ModelAI6N W AI6N AI4N W AI4N AE4N AE4F AE2N AE2F
Internal Air Motor External Air MotorAllowable Max.
Speed (rpm) 25,000
Speed regulation Reverse rotaction
Adjustable Water Volume ‐‐‐ ‐‐‐ ‐‐‐
09
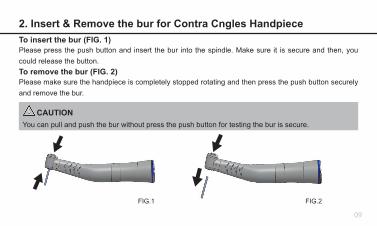
2. Insert & Remove the bur for Contra Cngles HandpieceTo insert the bur (FIG. 1)Please press the push button and insert the bur into the spindle. Make sure it is secure and then, you could release the button.To remove the bur (FIG. 2)Please make sure the handpiece is completely stopped rotating and then press the push button securely and remove the bur.
FIG.1 FIG.2
CAUTION You can pull and push the bur without press the push button for testing the bur is secure.
10
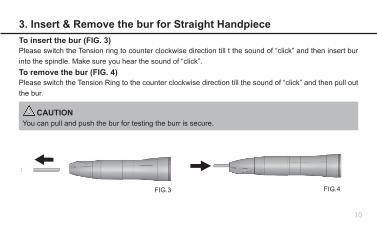
3. Insert & Remove the bur for Straight HandpieceTo insert the bur (FIG. 3)Please switch the Tension ring to counter clockwise direction till t the sound of “click” and then insert bur into the spindle. Make sure you hear the sound of “click”.To remove the bur (FIG. 4)Please switch the Tension Ring to the counter clockwise direction till the sound of “click” and then pull out the bur.
FIG.4FIG.3
CAUTION You can pull and push the bur for testing the burr is secure.
11
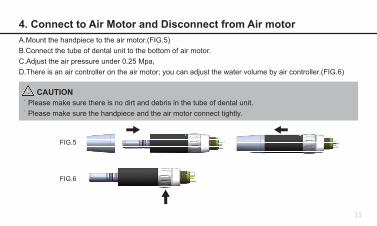
4. Connect to Air Motor and Disconnect from Air motorA.Mount the handpiece to the air motor.(FIG.5)B.Connect the tube of dental unit to the bottom of air motor.C.Adjust the air pressure under 0.25 Mpa,D.There is an air controller on the air motor; you can adjust the water volume by air controller.(FIG.6)
FIG.5
FIG.6
CAUTION˙Please make sure there is no dirt and debris in the tube of dental unit.˙Please make sure the handpiece and the air motor connect tightly.

12
5. LubricateLubricate Codent handpiece by using Codent spray nozzle for Internal, External handpiece and Air Motor.(1) Put on or screw nozzle and then shake the spray can 3-5 times. (FIG.7)(2) Insert the spray nozzle into the air tube of the handpiece and then spray for 4-5 seconds until the oil comes out from the handpiece head. (FIG.8)(3) Connect the tube of dental unit to the bottom of air motor and then rotate the Air Motor for lubrication the interior Air Motor. (FIG.9)
FIG.7 FIG.8

13
CAUTION˙Be sure to grasp the handpiece securely to prevent sliding from doing spray.˙Please keep the spray can top side up.
Strongly recommend please lubricate and clean Air Motor after every use.˙Use clean cotton with alcohol to clean the outside of Air Motor˙Do not immerse Air Motor in disinfectant solution.
FIG.9
14
CAUTION˙Press the foot pedal for 20 seconds and check if there is any dirt on the gauze. ˙Do not immerse Air Motor in disinfectant solution or water.
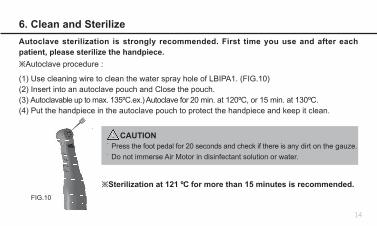
6. Clean and SterilizeAutoclave sterilization is strongly recommended. First time you use and after each patient, please sterilize the handpiece.※Autoclave procedure :
(1) Use cleaning wire to clean the water spray hole of LBIPA1. (FIG.10)(2) Insert into an autoclave pouch and Close the pouch.(3) Autoclavable up to max. 135ºC.ex.) Autoclave for 20 min. at 120ºC, or 15 min. at 130ºC.(4) Put the handpiece in the autoclave pouch to protect the handpiece and keep it clean.
※Sterilization at 121 ºC for more than 15 minutes is recommended. FIG.10

15
Lotus Global Co., Ltd 1 Four Seasons Terrace, West Drayton, Middlesex London, UB7 9GG, United Kingdom
CODENT TECHNICAL INDUSTRY CO., LTD. WWW.CODENT-TECH.COM5F., No. 90, Luke 5th Road, Lujhu Township, Kaohsiung Taiwan R.O.C.
16
注意事項˙ 使用本產品時,請以患者之安全為優先考慮。˙ 切勿在車針運轉時按壓帽蓋,若按壓帽蓋,會導致手機過熱及車針脫針等情況,造成危險。˙ 請謹慎使用,並切勿使手機或馬達掉落地面或遭受劇烈撞擊。˙ 請勿自行拆解或改造本產品。˙ 如使用時發現異狀,應立即停止使用並送回原供應商做維修。˙ 使用手機時,無論有無連接,請確認氣壓馬達為停止狀態。˙ 當您想移除車針時,請等待至手機完全停止運轉時,方可移除更換。˙ 請使用短於 26mm 的車針,請勿使用非牙科器具專用之車針。˙ 若發現過熱、鬆動及雜音等異常現象,請立即停止使用並通知相關服務人員及送修。˙ 生產日期 : 請詳見外包裝標籤。
感謝您購買科頂牙醫用低速手機及氣動馬達 0197

17
目錄
1. 機能規格 ..........................................................................................................................................................18
低速彎手機
低速直手機
氣動馬達
2. 彎機車針之插入與移除 .................................................................................................................................23
3. 直機車針之插入與移除 .................................................................................................................................24
4. 與氣動馬達連接及拆除 .................................................................................................................................25
5. 潤滑保養 ...........................................................................................................................................................26
6. 清潔與消毒 .......................................................................................................................................................28

18
1. 機能規格
※ 低速彎手機
型號 A65 L A65 A55 L A55 A85 L A85 A61 L A61 A51
冷卻系統 四孔出水 單孔出水 四孔出水 單孔出水
更換車針方式 按壓式換針
齒輪轉動比 1:5 1:4.2 1:1
允許最大轉速 rpm 200,000 168,000 40,000
車針尺寸 Ø1.60mm 高速車針 Ø2.35mm 插鞘式車針
光纖 有 無 有 無 有 無 有 無 無
頭部尺寸 標準頭 迷你頭 45 度 標準頭 迷你頭
19
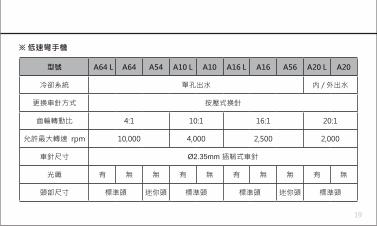
※ 低速彎手機
型號 A64 L A64 A54 A10 L A10 A16 L A16 A56 A20 L A20
冷卻系統 單孔出水 内 / 外出水
更換車針方式 按壓式換針
齒輪轉動比 4:1 10:1 16:1 20:1
允許最大轉速 rpm 10,000 4,000 2,500 2,000
車針尺寸 Ø2.35mm 插鞘式車針
光纖 有 無 無 有 無 有 無 無 有 無
頭部尺寸 標準頭 迷你頭 標準頭 標準頭 迷你頭 標準頭
20
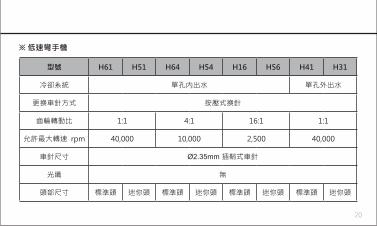
※ 低速彎手機
型號 H61 H51 H64 H54 H16 H56 H41 H31
冷卻系統 單孔内出水 單孔外出水
更換車針方式 按壓式換針
齒輪轉動比 1:1 4:1 16:1 1:1
允許最大轉速 rpm 40,000 10,000 2,500 40,000
車針尺寸 Ø2.35mm 插鞘式車針
光纖 無
頭部尺寸 標準頭 迷你頭 標準頭 迷你頭 標準頭 迷你頭 標準頭 迷你頭

21
※ 低速直手機
型號A11 L A11 A12 H10 H11 H12
内水直機 外水直機
冷卻系統 内置水管 / 單孔出水 外置水管 / 單孔出水
更換車針方式 旋轉式換針
齒輪轉動比 1:1
允許最大轉速 rpm 40,000
車針尺寸 Ø2.35mm 插鞘式車針
光纖 有 無
E 型介面 ISO 標準型短柄 ISO 標準型長柄 ISO 標準型細短柄 ISO 標準型短柄 ISO 標準型長柄
22
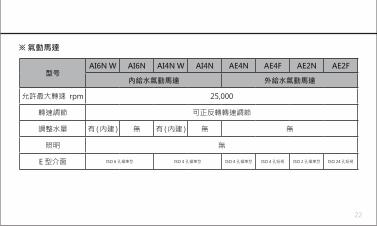
※ 氣動馬達
型号AI6N W AI6N AI4N W AI4N AE4N AE4F AE2N AE2F
內給水氣動馬達 外給水氣動馬達
允許最大轉速 rpm 25,000
轉速調節 可正反轉轉速調節
調整水量 有 ( 内建 ) 無 有 ( 内建 ) 無 無
照明 無
E 型介面 ISO 6 孔標準型 ISO 4 孔標準型 ISO 4 孔標準型 ISO 4 孔短柄 ISO 2 孔標準型 ISO 24 孔短柄
23
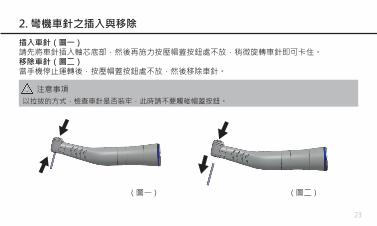
2. 彎機車針之插入與移除
插入車針(圖一)請先將車針插入軸芯底部,然後再施力按壓帽蓋按鈕處不放,稍微旋轉車針即可卡住。移除車針(圖二)當手機停止運轉後,按壓帽蓋按鈕處不放,然後移除車針。
(圖一) (圖二)
注意事項 以拉拔的方式,檢查車針是否裝牢,此時請不要觸碰帽蓋按鈕。
24
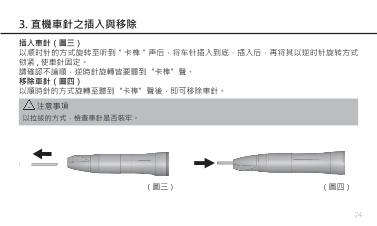
3. 直機車針之插入與移除
插入車針(圖三)以顺时针的方式旋转至听到"卡榫"声后,将车针插入到底,插入后,再将其以逆时针旋转方式锁紧 , 使車針固定。請確認不論順,逆時針旋轉皆要聽到“卡榫”聲。移除車針(圖四)以順時針的方式旋轉至聽到“卡榫”聲後,即可移除車針。
注意事項 以拉拔的方式,檢查車針是否裝牢。
(圖三) (圖四)
25
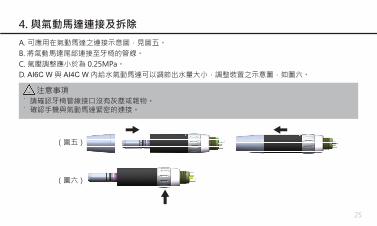
4. 與氣動馬達連接及拆除
A. 可應用在氣動馬達之連接示意圖,見圖五。B. 將氣動馬達尾部連接至牙椅的管線。C. 氣壓調整應小於為 0.25MPa。D. AI6C W 與 AI4C W 內給水氣動馬達可以調節出水量大小,調整裝置之示意圖,如圖六。
注意事項˙ 請確認牙椅管線接口沒有灰塵或雜物。˙ 確認手機與氣動馬達緊密的連接。
(圖五)
(圖六)
26
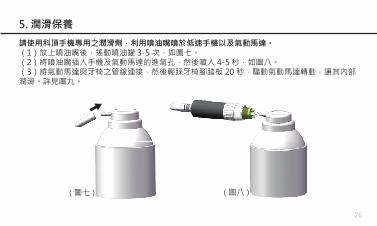
5. 潤滑保養
請使用科頂手機專用之潤滑劑,利用噴油嘴噴於低速手機以及氣動馬達。(1)放上噴油嘴後,搖動噴油罐 3-5 次,如圖七。(2)將噴油嘴插入手機及氣動馬達的進氣孔,然後噴入 4-5 秒,如圖八。(3)將氣動馬達與牙椅之管線連接,然後輕踩牙椅腳踏板 20 秒,驅動氣動馬達轉動,讓其內部潤滑。詳見圖九。
(圖七) (圖八)

27
注意事項˙ 請務必握好手機及氣動馬達,以免潤滑的過程中滑落。˙ 請保持油罐正立向上。
強烈建議您使用氣動馬達後,請做潤滑及清潔之保養。˙ 使用乾淨並沾上酒精之棉花,清潔氣動馬達的外部。˙ 不可將氣動馬達及手機浸泡於消毒劑或藥水中,做消毒程序。
(圖九)

28
6. 清潔與消毒強烈建議使用消毒鍋消毒。第一次使用前及在每個病患看診後,請清潔及消毒手機。消毒過程如下:(1)使用通針柄清潔出水孔,並清潔外部。(圖十)(2)依照潤滑保養步驟完成後,置入消毒鍋專用滅菌袋內並封口。(3)依照消毒鍋程序進行消毒及乾燥。科頂手機及氣動馬達均可耐高溫高壓消毒滅菌。(4)將已消毒之手機置於乾燥滅菌箱內儲放,以保護手機及下次使用準備。
※ 建議在 121℃下消毒至少 15 分鐘或 134ºC 下至少消毒 5 分鐘。
(圖十)

29
Lotus Global Co., Ltd 1 Four Seasons Terrace, West Drayton, Middlesex London, UB7 9GG, United Kingdom
科頂科技工業股份有限公司 WWW.CODENT-TECH.COM82151 台灣高雄市路竹區路科五路 90 號 5 樓(台灣南部科學園區路竹園區)電話:886-7-695-5533 傳真:886-7-695-5683