
Lounge Lizard EP-3
68
USER MANUAL
-
Upload
keyser-soze -
Category
Documents
-
view
116 -
download
5
description
Manual For Lizard Lounge EP-3
Transcript of Lounge Lizard EP-3

USER MANUAL

2
Information in this manual is subject to change without notice and does not represent acommitment on the part of Applied Acoustics Systems DVM Inc. The software describedin this manual is furnished under a license agreement. The software may be used only inaccordance of the terms of this license agreement. It is against the law to copy this softwareon any medium except as specifically allowed in the license agreement. No part of thismanual may be copied, photocopied, reproduced, translated, distributed or converted toany electronic or machine-readable form in whole or in part without prior written approvalof Applied Acoustics Systems DVM Inc.
Copyright c© 2006 Applied Acoustics Systems DVM Inc. All rights reserved. Printedin Canada.
Program Copyrightc© 2002-2006 Applied Acoustics Systems, Inc. All right reserved.
Lounge Lizard EP is a Trademark of Applied Acoustics Systems DVM Inc. Win-dows 98, 2000, NT, ME, XP and DirectX are either trademarks or registered trademarksof Microsoft Corporation. Macintosh, Mac OS, QuickTime and Audio Units are registeredtrademarks of Apple Corporation. VST Instruments and ASIO are trademarks of SteinbergSoft Und Hardware GmbH. RTAS is a registered trademarks of Digidesign. Adobe andAcrobat are trademarks of Adobe Systems incorporated. All other product and companynames are either trademarks or registered trademarks of their respective owner. Unautho-rized copying, renting or lending of the software is strictly prohibited.
Visit Applied Acoustics Systems DVM Inc. on the World Wide Web at
www.applied-acoustics.com

Contents
1 Introduction 7
1.1 System requirements . . . . . . . . . . . . . . . . . . . . . . . . 7
1.2 Installation . . . . . . . . . . . . . . . . . . . . . . . . . . . . . 8
1.3 Authorization and Registration . . . . . . . . . . . . . . . . . . . 8
1.3.1 Step 1: Generating the challenge key . . . . . . . . . . . 9
1.3.2 Step 2: Generating the Response key and Registering yourProduct . . . . . . . . . . . . . . . . . . . . . . . . . . . 9
1.3.3 Step 3: Completing the unlock process . . . . . . . . . . 12
1.3.4 Obtaining your response key and registering by fax or overthe phone: . . . . . . . . . . . . . . . . . . . . . . . . . . 14
1.4 Getting started . . . . . . . . . . . . . . . . . . . . . . . . . . . . 14
1.4.1 UsingLounge Lizard EPin standalone mode . . . . . . . 14
1.4.2 Exploring the factory presets . . . . . . . . . . . . . . . . 15
1.4.3 Using MIDI Links . . . . . . . . . . . . . . . . . . . . . 16
1.4.4 Using MIDI program changes . . . . . . . . . . . . . . . 16
1.4.5 UsingLounge Lizard EPas a Plug-in . . . . . . . . . . . 16
1.5 Getting help . . . . . . . . . . . . . . . . . . . . . . . . . . . . . 17
1.6 Forum and User Library . . . . . . . . . . . . . . . . . . . . . . 17
1.7 About this manual . . . . . . . . . . . . . . . . . . . . . . . . . . 17
2 Presets and MIDI maps 19
2.1 Presets . . . . . . . . . . . . . . . . . . . . . . . . . . . . . . . . 19
2.1.1 The Preset Library . . . . . . . . . . . . . . . . . . . . . 19
2.1.2 The Program list . . . . . . . . . . . . . . . . . . . . . . 19
2.2 Playing and Changing Presets . . . . . . . . . . . . . . . . . . . 20
2.3 Editing and Saving Presets . . . . . . . . . . . . . . . . . . . . . 21
2.4 Saving the Program List . . . . . . . . . . . . . . . . . . . . . . 22
2.5 Organizing the Preset Library . . . . . . . . . . . . . . . . . . . . 23
2.5.1 Creating Folders . . . . . . . . . . . . . . . . . . . . . . 23
CONTENTS 4
2.5.2 Copying and Moving Presets and folders . . . . . . . . . 23
2.5.3 Renaming Presets and folders . . . . . . . . . . . . . . . 23
2.5.4 Deleting Presets and Folders . . . . . . . . . . . . . . . . 24
2.5.5 Documenting Presets . . . . . . . . . . . . . . . . . . . . 24
2.5.6 Locating a Preset in the Browser . . . . . . . . . . . . . . 24
2.5.7 Resizing the Browser . . . . . . . . . . . . . . . . . . . . 24
2.6 MIDI maps . . . . . . . . . . . . . . . . . . . . . . . . . . . . . 25
2.7 Exporting and Importing Presets and MIDI maps . . . . . . . . . 25
2.8 Backuping Presets and MIDI maps . . . . . . . . . . . . . . . . . 25
2.9 Restoring the Factory Presets and MIDI Links . . . . . . . . . . . 26
3 General organization ofLounge Lizard EP 28
3.1 Panel A . . . . . . . . . . . . . . . . . . . . . . . . . . . . . . . 28
3.2 Panel B . . . . . . . . . . . . . . . . . . . . . . . . . . . . . . . 29
3.3 Top part of the interface . . . . . . . . . . . . . . . . . . . . . . . 29
3.4 General Functioning of an Electric Piano . . . . . . . . . . . . . . 30
4 Parameters 32
4.1 General Functioning of the Interface . . . . . . . . . . . . . . . . 32
4.1.1 Tweaking Knobs . . . . . . . . . . . . . . . . . . . . . . 32
4.1.2 Buttons . . . . . . . . . . . . . . . . . . . . . . . . . . . 32
4.1.3 Drop-down menus and Displays . . . . . . . . . . . . . . 32
4.1.4 Modulation Signals . . . . . . . . . . . . . . . . . . . . . 33
4.2 The Mallet Module . . . . . . . . . . . . . . . . . . . . . . . . . 33
4.2.1 Stiffness . . . . . . . . . . . . . . . . . . . . . . . . . . . 34
4.2.2 Noise . . . . . . . . . . . . . . . . . . . . . . . . . . . . 34
4.2.3 Force . . . . . . . . . . . . . . . . . . . . . . . . . . . . 35
4.3 The Fork Module . . . . . . . . . . . . . . . . . . . . . . . . . . 35
4.3.1 The Tine Bar . . . . . . . . . . . . . . . . . . . . . . . . 35
4.3.2 The Tone Bar . . . . . . . . . . . . . . . . . . . . . . . . 36
4.3.3 The Release Time . . . . . . . . . . . . . . . . . . . . . . 36

CONTENTS 5
4.4 The Pickup Module . . . . . . . . . . . . . . . . . . . . . . . . . 36
4.5 The Damper Module . . . . . . . . . . . . . . . . . . . . . . . . 37
4.6 The Tremolo Module . . . . . . . . . . . . . . . . . . . . . . . . 38
4.7 The EQ module . . . . . . . . . . . . . . . . . . . . . . . . . . . 39
4.8 The Keyboard Module . . . . . . . . . . . . . . . . . . . . . . . 40
4.8.1 Tuning . . . . . . . . . . . . . . . . . . . . . . . . . . . 40
4.9 The Clock Module . . . . . . . . . . . . . . . . . . . . . . . . . 41
4.10 The Recorder Module . . . . . . . . . . . . . . . . . . . . . . . . 42
4.11 The Multi-Effect Section . . . . . . . . . . . . . . . . . . . . . . 42
4.11.1 Topology . . . . . . . . . . . . . . . . . . . . . . . . . . 43
4.11.2 Synchronisation . . . . . . . . . . . . . . . . . . . . . . 43
4.11.3 Chorus . . . . . . . . . . . . . . . . . . . . . . . . . . . 43
4.11.4 Flanger . . . . . . . . . . . . . . . . . . . . . . . . . . . 44
4.11.5 Vibrato . . . . . . . . . . . . . . . . . . . . . . . . . . . 44
4.11.6 Delay . . . . . . . . . . . . . . . . . . . . . . . . . . . . 44
4.11.7 Phaser . . . . . . . . . . . . . . . . . . . . . . . . . . . . 45
4.11.8 Wah . . . . . . . . . . . . . . . . . . . . . . . . . . . . . 45
4.11.9 Notch Filter . . . . . . . . . . . . . . . . . . . . . . . . . 46
4.11.10 Distortion . . . . . . . . . . . . . . . . . . . . . . . . . . 46
4.11.11 Reverb . . . . . . . . . . . . . . . . . . . . . . . . . . . 47
5 Toolbar 48
5.1 Program Display . . . . . . . . . . . . . . . . . . . . . . . . . . 48
5.2 MIDI map . . . . . . . . . . . . . . . . . . . . . . . . . . . . . . 48
5.3 CPU meter . . . . . . . . . . . . . . . . . . . . . . . . . . . . . 48
5.4 Value Display . . . . . . . . . . . . . . . . . . . . . . . . . . . . 48
CONTENTS 6
6 Audio and MIDI Settings 49
6.1 Audio Settings . . . . . . . . . . . . . . . . . . . . . . . . . . . 49
6.1.1 Selecting a Audio Device . . . . . . . . . . . . . . . . . . 49
6.1.2 Audio Control Panel . . . . . . . . . . . . . . . . . . . . 49
6.2 MIDI Settings . . . . . . . . . . . . . . . . . . . . . . . . . . . . 50
6.2.1 Selecting a MIDI Device . . . . . . . . . . . . . . . . . . 50
6.2.2 Creating MIDI Links . . . . . . . . . . . . . . . . . . . . 50
6.2.3 Editing MIDI Links . . . . . . . . . . . . . . . . . . . . 50
6.2.4 Deleting MIDI Links . . . . . . . . . . . . . . . . . . . . 51
6.2.5 Creating a MIDI Map . . . . . . . . . . . . . . . . . . . . 52
6.2.6 Empty MIDI Map . . . . . . . . . . . . . . . . . . . . . 52
6.2.7 Defining a Default MIDI map . . . . . . . . . . . . . . . 52
6.2.8 MIDI Program Changes . . . . . . . . . . . . . . . . . . 53
6.3 Latency Settings . . . . . . . . . . . . . . . . . . . . . . . . . . . 53
7 Using theLounge Lizard EPas a Plug-In 55
7.1 Window Size . . . . . . . . . . . . . . . . . . . . . . . . . . . . 55
7.2 Audio and MIDI parameters . . . . . . . . . . . . . . . . . . . . 55
7.3 Automation . . . . . . . . . . . . . . . . . . . . . . . . . . . . . 55
7.4 Multiple Instances . . . . . . . . . . . . . . . . . . . . . . . . . . 55
7.5 Saving Projects . . . . . . . . . . . . . . . . . . . . . . . . . . . 55
7.6 MIDI channel . . . . . . . . . . . . . . . . . . . . . . . . . . . . 56
7.7 MIDI program change . . . . . . . . . . . . . . . . . . . . . . . 56
7.8 Performance . . . . . . . . . . . . . . . . . . . . . . . . . . . . . 56
8 Quick reference to commands and shortcuts 57
9 License Agreement 63

Introduction 7
1 Introduction
TheLounge Lizard EPis a software electric piano based on the classic instrumentsof the seventies (Rhodes, Wurlitzer). Each component of these instruments hasbeen modeled with A|A|S cutting edge physical modeling technology to providerealistic and lively sounds. Physical modeling uses the laws of physics to repro-duce the behavior of an object. In other words, theLounge Lizard EPsolves, inreal time, mathematical equations describing how its different components func-tion. No sampling or wavetables are used in theLounge Lizard EP, the sound issimply calculated in real time by the CPU according to the values each parameteris receiving. TheLounge Lizard EPis more than a simple recreation of vintageinstruments, its parameters can be tweaked to values not possible with the real in-struments to get some truly amazing new sounds that still retain a warm acousticquality.
Each component of theLounge Lizard EPcan be modified in real time. Theyare the hammer, the fork, the pick up and a three band equalizer. In addition, wehave added some classic effects that have been long associated with the electricpiano, these effects are wah, phaser, chorus, vibrato, flanger, notch filter, tremolo,distortion, delay and reverb.
A large number of presets are included with theLounge Lizard EPcovering awide range from bright clean pianos to nastier ones. Also included are some moreexperimental sounds.
Before discussing the synthesizer in more detail, we would like to take thisopportunity to thank you for choosing an A|A|S product. We sincerely hope thatthis product will bring you inspiration, pleasure and fulfill your creative needs.
1.1 System requirements
The following computer configuration is necessary to run theLounge Lizard EP:
Mac OS :
• Mac OSX 10.2 (Jaguar) or later.
• G4 733 MHz Processor
• 256 MB RAM
• 1024 x 768 or higher screen resolution
• MIDI Keyboard (recommended)
• Ethernet Port

1.2 Installation 8
• Quicktime 4.0 or later
Windows :
• Windows 98SE/ME/2000/XP
• PIII 800 MHz
• 128 MB RAM
• 1024 x 768 or higher screen resolution
• DirectX or ASIO supported sound card
• MIDI Keyboard (recommended)
Keep in mind that the computational power required by theLounge LizardEP depends on the number of voices of polyphony and the sampling rate used.These computer configurations will enable you to play the factory presets with areasonable number of voices.
1.2 Installation
Mac OS
Insert theLounge Lizard EPprogram disc into your CD-ROM drive. Open theCD icon once it appears on your desktop. Click on theLounge Lizard EPInstallicon and follow the instructions of the installer.
If you purchased this software online, simply double-click on the installer filethat you have downloaded and follow the instructions of the installer.
Windows
Insert theLounge Lizard EPprogram disc into your CD-ROM drive. LaunchExplorer to view the content of the CD-ROM and double-click on the installer fileto launch the installer.
If you purchased this software online, simply double-click on the installer filethat you have downloaded and follow the instructions of the installer.
1.3 Authorization and Registration
TheLounge Lizard EPuses a proprietary challenge/response copy protection sys-tem which requires authorization of the product. Achallenge keyis a long stringof capital letters and numbers that is generated uniquely for each machine duringthe registration process. In other words, for each machine you install this program

1.3 Authorization and Registration 9
on, a different challenge key will be generated by the program. Theresponse keyis another unique string of capital letters and numbers generated from the data en-crypted in the challenge key. In order to obtain a response key, you will need toconnect to the A|A|S website and provide the following information:
• A valid email address
• Your product serial number (on the back of the sleeve of your CD or in yourconfirmation email for downloads)
• The challenge key generated by the program
Note that it is possible to use the program during 15 days before completingthe authorization process. This period can be convenient if you are installing theprogram on a computer which is not connected to the internet. After that period,the program will not function unless it is supplied with a response key.
In the following sections we review the different steps required to generate thechallenge keys and obtain the response key. The procedure is similar on WindowsXP and Mac OS systems.
1.3.1 Step 1: Generating the challenge key
After launching the installer for the first time, a pop-up window will appear askingyou if you wish to authorize your product now or later. If you are ready to authorizeLounge Lizard EPnow, click on theNext button otherwise click on theAuthorizeLater button. If your computer is connected to the internet, we recommend thatyou authorize your product now.
When you click on theNext button, a second window appears asking you toenter your serial number. Type your serial number as it appears on the back ofthe sleeve of theLounge Lizard EPCD-ROM. If you purchasedLounge Lizard EPonline, an email with your serial number will have been sent to you at the addresswhich you provided during the purchase process.
After entering your serial number, click on theNextbutton and your challengekey will appear automatically in the next pop-up window.
1.3.2 Step 2: Generating the Response key and Registering your Product
If your computer is connected to the internet, click on the link to the A|A|S webserver appearing in the pop-up window. This will launch your web browser and

1.3 Authorization and Registration 10
Figure 1: Choosing to authorizeLounge Lizard EPnow or later.
Figure 2: Enter your serial number in the pop-up window.
connect you to the unlock page of the A|A|S web server. Enter your email address,serial number and challenge key in the form as shown below and click on theSubmitbutton.

1.3 Authorization and Registration 11
Figure 3: Challenge key appears automatically after entering the serial number.
Figure 4: Enter your registration information on the A|A|S webserver.
The next form asks you to provide additional information about yourself in-cluding your mailing address and phone number. This information will be usedto register your product. Note that only a valid email address is required to reg-ister your product. We nevertheless recommend this information be provided toensure our support team is able to contact you to resolve any future support issues,

1.3 Authorization and Registration 12
and notify you of product updates promptly. This information is kept completelyconfidential. Registration of your product will entitle you to receive support anddownload updates when available, as well as take advantage of special upgradeprices offered from time to time to registered A|A|S users. Note that if you alreadypurchased or registered another A|A|S product, the information that you have al-ready supplied under the same email address will appear in the form. Feel freeto update this information if it is outdated. Click on theSubmitbutton and yourresponse key will appear on-screen.
Figure 5: Generation of the response key on the A|A|S server.
If your computer is not connected to the internet, take note of your serial num-ber andchallenge keyand proceed to an internet connected computer. Launch yourbrowser and go to the unlock page of the A|A|S website at:
http://www.applied-acoustics.com/unlock.htm
Enter your email address, serial number, and challenge key, and click next. Youwill then receive your response code on-screen as described above.
1.3.3 Step 3: Completing the unlock process
The response keycorresponding to your serial number andchallenge keywill beprinted in your browser window. In order to complete the unlock process, copy theresponse key and paste it into the corresponding field of the installer window ofLounge Lizard EP. If you obtained your response key from another computer, typethe response key by hand in the installer window.

1.3 Authorization and Registration 13
Figure 6: Final step of the unlock process. Enter your response key in the window.
Click on theNextbutton and a pop-up window will appear informing you thatthe authorization process has been successful. Click on theFinish button to com-plete the process and launchLounge Lizard EP.
Figure 7: Authorization has been successful.

1.4 Getting started 14
You will normally only need to go this process once for a given computerexcept for some special cases. On Windows computers your will need to unlockagain if:
• You change your computer
• You reformat or upgrade your hard drive
• You change or upgrade your operating system
On Mac OS computers, this will only be necessary if:
• You change your computer
• You change the motherboard of the computer
1.3.4 Obtaining your response key and registering by fax or over the phone:
Should you not have access to the internet, A|A|S support representatives are avail-able to assist you in the unlock and registration process Monday to Friday, 9am to6pm EST. You may contact us by phone at:
• North America Toll-free number: 1-888-441-8277
• Outside North America: 1-514-871-8100
• Fax Number: 1-514-845-1875
• Email: [email protected]
1.4 Getting started
1.4.1 UsingLounge Lizard EPin standalone mode
TheLounge Lizard EPcomes with a wide range of factory presets right out of thebox which amounts to a huge range of sounds before you have even turned a singleknob. As you would expect, the best way of coming to grips with the possibilitiesLounge Lizard EPoffers is simply to go through the presets one at a time. Werecommend that you first start using theLounge Lizard EPin standalone mode.
• Windows - Double-click on theLounge Lizard EPicon located on yourdesktop or selectLounge Lizard EPfrom theStart > All Programs > menu.

1.4 Getting started 15
• Mac OS - Double-click on theLounge Lizard EPicon located in the Appli-cations folder.
Before you start exploring the factory presets, take a moment to set up youaudio and MIDI configuration as explained below.
Audio Configuration
Audio configuration tools are available from theAudio menu. TheAudio Settingsfunction allows you to select an audio output device from a list, organized by drivertype, of those available on your computer. On Windows, if you have ASIO driversavailable, these should be selected for optimum performance. Multi-channel inter-faces will have their outputs listed as stereo pairs.
• Select your sound card port from the list in theAudio Configuration dialogfrom theAudio > Audio Settings . . . menu.
For more detailed information on audio configuration, sampling rate selectionand latency adjustments, please refer to section 6.3.
MIDI Configuration
MIDI configuration tools are available from theMIDI menu.
• Select your MIDI input device from the list in theMIDI Configurationwindow available from theMIDI > MIDI Settings . . . menu.
For more detailed information on Audio and MIDI configuration, MIDI linksand MIDI maps, please refer to Chapter 6.
1.4.2 Exploring the factory presets
Factory presets can easily be accessed using the ‘+” and ‘−” buttons in the lowerleft corner of the toolbar. These buttons are used to navigate through a list of 128numbered presets called programs. The content of this program list can be viewedby clicking on theH button of the toolbar. The number of the current program usedand the name of the associated preset appear on the right of this button. Programscan also be changed by using the ‘+” and ‘−” keys from the computer keyboard

1.4 Getting started 16
or by selecting programs directly from the list displayed after clicking clicking ontheH button.
Presets can also be accessed using the browser appearing on the left ofLoungeLizard EP. This browser is similar to the browser your operating system generatesto display the contents of your hard disk, or your email program uses to organizeyour mail and address book. When launching the application for the first time,this “tree view” will include a destination folder for imported presets as well asa Library folder. To open a folder, click on the “+” symbol on Windows orIsymbol on Mac OS which will reveal the folder content.
The preset library is different from the program list and can be viewed as arepository containing all the presets available to the application. Presets are loadedinto the synthesis engine by copying them from the library into the program list.To load a preset, double-click on a preset icon (blue knob) or preset name. Thiswill insert the preset into the program list at the position of the current program.You can also use the arrow keys on the computer keyboard in order to navigate inthe preset list and then the Enter key to load a preset. For additional informationon presets and programs, please refer to Chapter 2 of this manual.
1.4.3 Using MIDI Links
Every parameter on theLounge Lizard EPinterface can be linked to an externalMIDI controller. To assign a MIDI Link, right-click (control-click on Mac) on acontrol (knob, button or slider) and a contextual menu will appear. SelectLearnMIDI Link and move a knob or slider on your MIDI controller to activate the link.To deactivate the link, right-click (control-click on Mac) on the control and choosetheForget MIDI Link command. Refer to section 6.2 for more details on MIDIlinks.
1.4.4 Using MIDI program changes
The synthesizer responds to MIDI program changes. When a program change isreceived, the current program is changed to the program having the same numberas that of the program change message received by the application.
1.4.5 UsingLounge Lizard EPas a Plug-in
TheLounge Lizard EPintegrates seamlessly into the industry’s most popular multi-track recording and sequencing environments as a virtual instrument plug-in. The

1.5 Getting help 17
Lounge Lizard EPworks as any other plug-in in these environments so we recom-mend that you refer to your sequencer documentation in case you have problemsrunning theLounge Lizard EPas a plug-in.
1.5 Getting help
A|A|S technical support representatives are on hand from Monday to Friday, 9amto 6pm EST. Whether you have a question onLounge Lizard EP, or need a handgetting it up and running as a plug-in in your favorite sequencer, we are here tohelp. Contact us by phone, fax, or email at:
• North America Toll Free: 1-888-441-8277
• Worldwide: 1-514-871-8100
• Fax: 1-514-845-1875
• Email: [email protected]
Our online support pages contain downloads of the most recent product up-dates, and answers to frequently asked questions on all A|A|S products. The sup-port pages are located at:
www.applied-acoustics.com/faq.htm
1.6 Forum and User Library
The A|A|S community site contains theLounge Lizard EPuser forum, a placeto meet other users and get answers to your questions. The community site alsocontains an exchange area where you will find presets for your A|A|S productscreated by other users and where you can make your own creations available toother users.
http://community.applied-acoustics.com/php/community/
http://community.applied-acoustics.com/php/forum/
1.7 About this manual
In the next chapter, the use of presets and the browser are described in detail.Chapter 3 describes the general architecture ofLounge Lizard EP. In Chapter 4,the different modules and controls are reviewed in detail. Chapter 5 describes the
1.7 About this manual 18
different functionalities available from the toolbar while Chapter 6 explains the dif-ferent functionalities related to Audio and MIDI and their settings. General issuesinvolved in the use ofLounge Lizard EPas a plug-in in different host sequencers iscovered in Chapter 7. Finally a list of available commands and shortcuts is givenin Chapter 8.
Throughout this manual, the following conventions are used:
• Bold characters are used to name modules, commands and menu names.
• Italic characters are used to name controls on the interface.
• Windows and Mac OS keyboard shortcuts are written as Windows short-cut/Mac OS shortcut.

Presets and MIDI maps 19
2 Presets and MIDI maps
Lounge Lizard EPcomes with several factory presets covering a wide range ofsounds. This collection of presets lets you play and familiarize yourself with thissynthesizer without having to tweak a single knob. Soon, however, you will beexperimenting and creating your own sounds and projects that you will need toarchive or exchange with other users. You may also want to control the parametersof Lounge Lizard EPwith a specific MIDI controller. In this chapter, we willreview the management of presets and MIDI maps.
2.1 Presets
There are two concepts involved in the management of presets, the preset libraryand programs.
2.1.1 The Preset Library
The preset library contains the factory presets,modified versions of the factory presets you mighthave made or any other new presets you mighthave saved. The library may also contain importedpresets as well as MIDI maps as explained in Sec-tion 2.6 and 2.7. In other words, the preset libraryis a repository of all the presets and MIDI mapsavailable toLounge Lizard EP.
All the operations on the preset library are conveniently managed with the helpof theLounge Lizard EPbrowser, similar to those found in most email programswhich use a hierarchical tree structure and a visually intuitive, drag and drop ap-proach. To explore the different presets available in the library, open the differentfolders by clicking on the “+” icon Windows orI symbol on Mac OS to the left offolders. Each preset is represented by a blue knob icon followed by its name.
2.1.2 The Program list
Presets are loaded into the synthesis en-gine of Lounge Lizard EPfrom a list of 128numbered presets called programs. The name

2.2 Playing and Changing Presets 20
of the current program and its number are displayed in the left of the toolbar atthe top of the application window. The entire list of programs can be viewed byclicking on theH button left of the program number.
It is important to note that presets in the program list and in the preset libraryare stored in different locations. They are in fact different copies of the samepresets which may, as explained below, differ even if they share the same name.The version of a preset available in the program list should be viewed as temporaryor as a ‘working copy” of the preset whereas the version in the library should beviewed as permanent or as the ‘reference version”.
When you start the application for the first time, the program list contains aselection of presets from the factory preset library. At that point, the presets in theprogram list are identical to their version in the library.
2.2 Playing and Changing Presets
Presets are always played from the program list. The name of the current pro-gram, in other words the one currently loaded in the synthesis engine, as well as itsnumber are displayed in the left part of the toolbar. Its number and name are alsopreceded by a check mark in the program list. The current program can be changedin different ways:
• scroll up or down in the program list by clicking on the ‘+” and ‘−” buttonslocated on the left of the program name or use the ‘+” and ‘−” keys fromthe computer keyboard,
• Display the content of the program list by clicking on theH button and selecta program by clicking on its name.
• Use theSwitch to Program command from theProgramsmenu and enter aspecific program number. This command can also be activated by using theCtrl-P/Apple-P keyboard shortcut.
• Send MIDI program changes from your MIDI controller.Lounge LizardEP will load the program having the same number as the program changenumber received by the application.
A Preset can also be loaded from the preset library. It is then stored in thecurrent program replacing the preset that was already stored in this location. Itthen becomes immediately available to the synthesis engine. Different options areavailable to load a preset from the preset library into the current program:

2.3 Editing and Saving Presets 21
• In the browser, double-click on a preset icon.
• Drag and drop presets from the browser onto theLounge Lizard EPinterface.
• Select a preset by clicking on its icon and use the Enter key from the com-puter keyboard. Once a preset has been selected in the library, it is possibleto navigate in the library using the Arrow keys from the computer keyboard.A preset is selected when its name is highlighted.
• Select a preset and use theOpen Presetcommand from theFile menu or theCtrl-O/Apple-O keyboard shortcut.
Note that when a preset is loaded from the preset library to the list of programs,the program name displayed in the toolbar changes but not its number. This indi-cates that the current program number used by the synthesis engine is still the samebut that the preset corresponding to that program has changed. The 128 programscan therefore be customized by selecting different program numbers (by using the‘+” and ‘−” buttons from the toolbar or selecting programs from the program list)and loading presets from the library.
2.3 Editing and Saving Presets
Moving the different controls on theLounge Lizard EPinterface modifies the presetloaded in the current program. As soon as the current program is modified, thepreset icon located on the left of the program name in the toolbar changes colorand a ‘*” sign is appended to its name in the program list. In this state, the presetloaded in the current program is different from its original version stored in thepreset library even if they share the same name. If you wish to keep a permanentcopy of the modifications, you must save this new version in the preset library.
• To save the new version in the preset library, use theSave Presetcommandfrom theFile menu or the Ctrl-S/Apple-S shortcut. Be careful, however, asusing this command will overwrite the original preset. If you are not certainof which preset will be overwritten in the library, first use theLocate Pro-gram in Browser command from theProgramsmenu or the Ctrl-L/Apple-Lshortcut in order to locate it in the browser.
• To create a new preset, use theSave Preset Ascommand from theFile menu.A window will appear asking for a name for the new preset. Once the presetis saved using this command, a new preset icon will appear in the browserdirectly under theLibrary folder.

2.4 Saving the Program List 22
• To create a new preset, it is also possible to rename the program using theRename Current Program from theMIDI menu (or the Ctrl-R/Apple-Rkeyboard shortcut) and use theSave Presetor Save Preset Ascommands.
When editing presets, it is very helpful to go back and forth between the dif-ferent stages of your modifications and adjustments. To move back step by stepthrough every modification that was applied to a preset, use theUndo commandfrom the Edit menu or the Ctrl-Z/Apple-Z shortcut. Once theUndo commandhas been used, it is also possible to move up again through the modifications byusing theRedo command from theEdit menu or the Ctrl-Y/Apple-Y command.The number ofUndo levels is unlimited and that this command is effective on anycontrol of the interface but not on the differentSavecommands.
Once a preset has been modified, it is also possible to move back and forthbetween the current state of the preset in the program list and its original versionarchived in the preset library. To hear the original preset, simply click on theCom-pare button at the top of the interface or use theCompare command from theEdit menu. Once this button has been pressed, the original settings of the presetare loaded. In this mode, the graphical interface is frozen and it is therefore notpossible to modify the preset. To further modify the preset, click on theComparebutton again or uncheck theCompare command in theEdit menu to revert to themodified version of the preset and unfreeze the interface. To reload the originalversion, use theLocate Preset in Browsercommand from theView menu, or theCtrl-L/Apple-L shortcut and double click on its icon in order to reload this versioninto the current program.
Lounge Lizard EPwill make sure that you do not loose modifications to apreset. In the case where a program holds a modified version of a preset and whentrying to load a new preset from the library into this program, the application willask you if you want to save the modified preset in the library. This behavior mightnot always be convenient and it is possible to deactivate it by deselecting theAskto save preset before opening anotheroption in thePreferencescommand fromtheEdit menu.
2.4 Saving the Program List
When you openLounge Lizard EP, the applications always loads the same programlist. This implies that, by default, the program list will always contain the samepresets when you open the application and that your modifications to presets willbe lost unless they have been saved in the preset library.

2.5 Organizing the Preset Library 23
• To save the current list of programs and replace the default program list, usetheSave All Programscommand from theProgramsmenu.
This command is helpful if you wish to modify the program list or if you wishto restart the application in exactly the same state as when you left it.
Note that this operation is not necessary when usingLounge Lizard EPas aplug-in in a host sequencer as the program list is always saved with a project. Thedefault program list will be loaded only if a new project is started or if a newinstance ofLounge Lizard EPis opened within a project.
2.5 Organizing the Preset Library
2.5.1 Creating Folders
Sub-folders can be created by first selecting a folder by clicking on it and using theNew Foldercommand fromFile menu.
2.5.2 Copying and Moving Presets and folders
Presets and folders can be copied and moved from one location to another. Firstselect an item by clicking on its icon and use theCopy command from theEditmenu (Ctrl-C/Apple-C shortcut) in order to copy it. Then click on the destinationfolder and use thePastecommand from theEdit menu (Ctrl-V/Apple-V shortcut)in order to paste it. Groups of items can be copied and pasted at the same time.In order to select many items at once, click on different icons while keeping theControl/Apple key depressed. Alternatively to select, within a folder, all the presetslocated between two presets, click on the first one and then on the second one whilekeeping the Shift key depressed. Once a group of items has been selected, use theCopy andPastefunctions as explained above.
2.5.3 Renaming Presets and folders
On Windows systems, to rename a preset or folder, click a first time on the cor-responding icon in the browser in order to select it. Then click a second time toenter in name edition mode. Note that this sequence of operation is different fromdouble-clicking on the icon which loads the preset in the case of a preset icon oropens a folder in the case of a folder icon. In other words, there must be a pausebetween the two clicks.

2.5 Organizing the Preset Library 24
On Mac systems, first select the item to be renamed and the use theRenamecommand from theEdit menu. It is also possible to ctrl-click on the selected itemand then choose theRenamecommand.
2.5.4 Deleting Presets and Folders
To delete a preset or folder, first select it by clicking on its icon in the browser,then use theDeletecommand from theEdit menu or use the Del key from thecomputer keyboard. In order to select and then delete many items at once, clickon different icons while keeping the Control/Apple key depressed. Alternatively toselect, within a folder, all the presets located between two presets, click on the firstone and then on the second one while keeping the Shift key depressed. Once thegroup of items has been selected, use theDeletefunction as explained above.
2.5.5 Documenting Presets
It is possible to document a preset and view related information. To view or editinformation on a preset, first select it in the browser and choose the.Preset Infocommand from theEdit menu or use the Ctrl-I/Apple-I shortcut. It is also possibleto right-click/control-click on the preset icon and choose thePreset Info com-mand. Information on a preset includes the author’s name, copyright notice, dateof creation, last modification date and a text description.
2.5.6 Locating a Preset in the Browser
It might sometimes be helpful to locate in the preset library the preset currently be-ing played or in other words, that corresponding to the current program. To rapidlylocate the current preset in the browser, use theLocate Program in Browsercom-mand from thePrograms menu or the Ctrl-L/Apple-L shortcut. TheLocate com-mand will automatically expand the folder containing the currently used preset andselect the preset.
2.5.7 Resizing the Browser
In standalone mode, the browser can be resized. In order to change the size ofthe browser, position the mouse cursor on the line separating the browser fromtheLounge Lizard EPcontrol panel. When the cursor changes to a double-headedarrow, click-hold and move the mouse to the left or right as desired. In order to

2.6 MIDI maps 25
hide the browser completely, move the double-headed arrow cursor fully to theleft. Note that whenLounge Lizard EPis used as a plug-in, the browser size isfixed and can not be modified.
2.6 MIDI maps
MIDI maps containing information about MIDI links between the MIDI controllersand theLounge Lizard EPinterface can easily be created as will be explained inSection 6.2. MIDI maps are represented in the browser with a MIDI connectoricon. MIDI maps are treated exactly the same way as presets in the browser andare saved using theSave MIDI Links or Save MIDI Links As commands fromtheFile menu.
2.7 Exporting and Importing Presets and MIDI maps
TheImport andExport commands, found in theFile drop down menu, allow oneto easily exchange presets and MIDI maps with otherLounge Lizard EPusers.This feature can also be used to decrease the number of elements in the browser byarchiving older or rarely used ones elsewhere, on CD-R, or a second hard disk forexample. Files containingLounge Lizard EPpresets and MIDI maps are equivalentin size to short text file, making it easy to send presets to other users via email.
To export a folder, a group of folders, presets or MIDI maps within a folder,select the elements to export in the browser and use theExport command from theFile menu. When theExport window appears, choose a file name and a destinationlocation on your hard disk.Lounge Lizard EPexport files will be saved with an“lls” extension.
Importing presets and MIDI maps is just as easy. Simply click on theImportcommand from theFile drop down menu, and select the file to import. A newfolder will then appear under theImports directory in the browser, containing allof the files contained within the imported package. These can then be dragged anddropped to a new folder, or remain in the Imports directory.
2.8 Backuping Presets and MIDI maps
There are basically two ways to backup your presets and MIDI maps: exportationand database backup. The database backup is more efficient when there is a largenumber of elements to backup.

2.9 Restoring the Factory Presets and MIDI Links 26
The exportation methods consists in using theExport command from theFilemenu as explained in section 2.7. Once you have exported the elements you wishto archive, just save the export file(s) to your usual backup location or medium.
The second backup method will enable you to archive the entire material presentin the browser. The content of the browser, including presets, MIDI maps and fold-ers is saved into a database file. This second backup method simply consists inarchiving this file. The database file location is different whether you are workingon a Mac OS or Windows system.
• OnWindowssystems: C:\Documents and Settings\[User]\Application Data\AppliedAcoustics Systems\Lounge Lizard EP.
• OnMac OSsystems: [System Drive]:Users:[User]:Library:Application Sup-port:Applied Acoustics Systems:Lounge Lizard EP.
The name of the database file is LoungeLizard.tdb. In order to archive yourdatabase, just copy this file to your usual backup location or medium. In order torestore a database, replace the version of the LoungeLizard.tdb file with a previ-ously archived one. It is also possible to synchronize different systems by copyingthis file on different computers whereLounge Lizard EPis installed.
2.9 Restoring the Factory Presets and MIDI Links
If necessary, it is possible to restore the original factory library and program list byusing theRestore Factory Library from theFile menu. This operation makes abackup of your current database file in the preset database folder as explained inSection 2.8 and creates a new preset database containing only the factory presetsand MIDI maps. The next time you openLounge Lizard EP, both the browser andthe program list will be in exactly the same state as when you first installed theapplication.
Note that restoring the factory library should be done with caution as you willloose all the work you might have saved into the library and that this operationcan not be undone easily. If you wish to recuperate a certain number of presetsand MIDI maps after restoring the factory library, we recommend that you firstexport all the material you wish to keep using theExport command as explainedin Section 2.7. After re-installation of the factory library, you will easily be able tore-import this material using theImport command.
If you forgot to export material before restoring the factory library or if youwish to bring back the preset library to its state before restoring the factory library,

2.9 Restoring the Factory Presets and MIDI Links 27
it is still possible to recover material from the backup file of the preset databasewhich was created automatically when restoring the factory library as explainedin Section 2.8. This method should be considered as a last resort, however, asrecovering material from this backup file will remove the factory library which youhave just installed and force you to redo the operation. Using the Export commandbefore restoring the factory library is much simpler.
Note that the restore of the factory library is actually performed the next timeyou re-open the application. It is still possible to cancel this operation before exit-ing the application by using theCancel Library Restore command from theFilemenu.

General organization ofLounge Lizard EP 28
3 General organization ofLounge Lizard EP
The graphical interface of the different modules of the synthesizer have been groupedinto two panels as shown in Figures 8 and 9. In the first page (Panel A), one canfind the modules related to the control of the synthesizer and an output effect stage.The actual synthesis modules appear on the second page (Panel B). One can switchfrom one view to the other by using thePanel AandPanel Bbuttons appearing atthe top of the interface. A master level control and level meters appear on the lowerright corner of both panels.
3.1 Panel A
The first row of modules ofPanel Ais an output effect stage which includes twomulti-effect modules and a reverb which can be used in different configurations.The second row of this same panel includes theKeyboard module, the masterClock module, and aRecordermodule.
Figure 8: Control modules and output stage ofLounge Lizard EP(Panel A).

3.2 Panel B 29
3.2 Panel B
The modules ofPanel Bcorrespond to the actual sound generating components ofan electric piano. The main elements of the panel are theMallet , theFork , thePick Up, theDamper andTremolo modules. In addition, anEQ module has beenadded to further shape the sound.
Figure 9: Synthesis modules ofLounge Lizard EP(Panel B).
3.3 Top part of the interface
The top part of both panels is identical and enables one to control general featuresof the instrument.
MIDI LED
The red MIDI LED toggles when a MIDI signal is received by theLounge LizardEP. This is very useful to see ifLounge Lizard EPis receiving MIDI signal fromyour keyboard or other controllers. If the LED does not blink when you play yourkeyboard, check your connections and the transmit/receive channels you are usingor the MIDI settings ofLounge Lizard EPas explained in Section 6.2.
3.4 General Functioning of an Electric Piano 30
Polyphony Combo Box
Displays the number of voices of polyphony (2 to 32). The number of voices canbe adjusted with the drop down menu from the combo box.
MIDI Channel Combo Box
Displays the current MIDI channel on whichLounge Lizard EPis receiving MIDIinformation. The channel can be adjusted with the drop down menu from thecombo box. Inomni mode,Lounge Lizard EPresponds to all MIDI events fromall channels. Note that in this configuration, MIDI links from different controllershaving the same controller number but different channel numbers become equiva-lent.
3.4 General Functioning of an Electric Piano
The individual modules and controls of the user interface will be described in detailin Chapter 4. We will now take a closer look “under the hood” at how an electricpiano functions which will help to understand how the different modules of theLounge Lizard EPinteract.
The electric piano was invented by Harold Rhodes (1910-2000) during the for-ties when he was in the army. The first instruments he built were made of aircraftpieces and were intended to entertain army servicemen. It became a very popularinstrument in jazz and rock and its warm tone still appears in about all new musicalstyles these days.
The mechanism of the electric piano is, in fact, quite simple. A note playedon the keyboard activates a hammer that hits a fork. The sound of that fork is thenamplified by a magnetic coil pick up and sent to the output, very much like anelectric guitar. The fork is made of two parts : the tine and the tone bar. The tinebar is where the mallet hits the fork. One can get great varieties of sounds with justthese basic components. It is possible to adjust how the mallet will hit the tine andthe position of the pick up. On a real electric piano, these settings take a long timeto adjust. On theLounge Lizard EP, they can all be obtained with the twist of aknob.
The following diagram shows the mechanism of an electric piano and its cor-responding parts on theLounge Lizard EPinterface.

3.4 General Functioning of an Electric Piano 31
Figure 10: Geometry of an electric piano and corresponding elements on theLounge Lizard EPinterface.

Parameters 32
4 Parameters
4.1 General Functioning of the Interface
4.1.1 Tweaking Knobs
All the knobs on the interface are selected by clicking on them. Once selected, theycan be controlled in different ways depending on the effect you want to achieve.
• For coarse adjustment click-hold on a knob and drag the mouse upwards ordownwards to move it clockwise or counter-clockwise.
• For fine adjustment, use the left or down arrow of the computer keyboardto move the knob counterclockwise and the right or up arrow to move itclockwise. ThePage UpandPage Downkeys give the same result withslightly faster action. Note that this may not work in certain plug-in formats.
• To move a control to a given position, place the mouse at this position andShift-click/Option-click. To reach this position slowly, do the same, but usethe middle button of the mouse (Windows only).
• Knobs with a green LED above can be moved directly to their center positionby clicking on the LED.
Remember that the keyboard shortcuts affect only the most recently selectedcontrol. The value of the control currently selected is displayed on the toolbar atthe top of theLounge Lizard EPwindow. The number displayed on the counter isa value corresponding to the setting of the control currently selected.
4.1.2 Buttons
Buttons are switchedon or off by clicking on them. The value appearing in thetoolbar when a button is selected represents the state associated with the positionof the button.
4.1.3 Drop-down menus and Displays
Clicking on a display with a small down-pointing triangle on its right, such as theTypecontrol of theReverbmodule in the multi-effect section, reveals a drop-downmenu with a set of possible settings for the control. Adjustment of the control is

4.2 The Mallet Module 33
obtained by clicking on a selection or using the up and down arrows and theEnterkey of the computer keyboard.
The other controls represented by a display without a down-pointing arrow,such as theTempocontrol of theClock module, are adjusted by click-holding onthem and dragging the mouse upward or downward. Selection of these controls ispossible when the mouse is positioned on the display and a double pointing arrowappears.
4.1.4 Modulation Signals
Different parameters can be modulated with the note and velocity signals from theKeyboard. Modulation signals are controlled with the small black knobs locatedon the right of the corresponding control knobs in the different modules of theinstrument.
Thekeyboardmodulation knobs are used to modulate a parameter dependingon the note played on the keyboard. When in its center position, the value of thecorresponding parameter is equal across the whole range of the keyboard. Turn-ing the knob to the left increases the value of the parameter for low notes whiledecreasing its value for high notes. The variations are applied relative to the mid-dle C (C3) whose value is always that corresponding to the settings of the actualparameter knob. Turning the modulation knob to the right has the opposite effectand increases the value of the parameter for high notes while decreasing it for lownotes.
TheVelocitymodulation knobs are used to modulate the value of a parameterdepending on the velocity signal received from the keyboard so that the value of aparameter will increase as notes are played harder on the keyboard. The positionof the knob is used to adjust the amount of modulation applied to the parameter.In its leftmost position, the modulation source is turned off and the value of theparameter will not vary with the velocity signal from the keyboard. Turning theknob clockwise will increase the effect of the modulation signal on the value of theparameter.
4.2 The Mallet Module
TheMallet module is used to control the parameters related to the mallet found inan electric piano. It is divided in 3 sections,Stiffness, NoiseandForce.

4.2 The Mallet Module 34
4.2.1 Stiffness
TheSoft/Hardknob determines if themallet is soft or hard. As this knob isturned clockwise, the mallet gets harder.A softer mallet (knob turned to the left)produces a more mellow tone while aharder one produces a brighter sound.
TheKeyboardmodulation knob ad-justs how the stiffness of the mallet is re-lated to the pitch of the notes played onthe keyboard. When this knob is turnedto the right, the higher the note on the keyboard, the harder the mallet will be. Thisis a behavior found on acoustic instruments like pianos and mallet driven instru-ments.
Likewise, theVelocityknob controls how the stiffness of the mallet varies withthe velocity signal from the keyboard. Turning this knob clockwise causes themallet to become softer as one plays harder on the keyboard and stiffer as oneplays more softly. Again, this is a behavior found on acoustic instruments.
4.2.2 Noise
TheNoisemodule is used to control the noise produced by the impact of the malleton the fork.
ThePitchknob is used to determine the center frequency of the noise. Turningthis knob clockwise increases the center frequency of the spectrum of the noisesignal.
The Decayknob is used to adjust the time taken by the noise signal to fadeout. As the knob is turned clockwise, the decay time increases. For a more naturalsound, a shorter decay is preferable.
TheAmountknob sets the amplitude (volume) of the noise in the final sound.Turning the knob clockwise increases the amount of noise.
TheKeyboardis used to control the amount of noise depending on the pitch ofthe notes played on the keyboard. When turned to the left, there is more noise forlow notes than high notes. Turning the knob to the right has the opposite effect andthe noise component is higher for high notes than low notes.
4.3 The Fork Module 35
4.2.3 Force
The Strengthknob is used to adjust the force of the impact of the mallet on thefork. When in its leftmost position, the impact is very soft and as the knob is turnedclockwise, the impact gets stronger. The strength of the impact can be modulatedboth with the pitch of the note played and the velocity signal from the keyboardusing theKeyboardandVelocitymodulation knob respectively. For example, thestrength of the impact of the mallet could be made higher for high notes than lownotes by turning theKeyboardmodulation knob to the right. It could also be ad-justed to follow the velocity signal from the keyboard by turning theVelocityknobclockwise.
4.3 The Fork Module
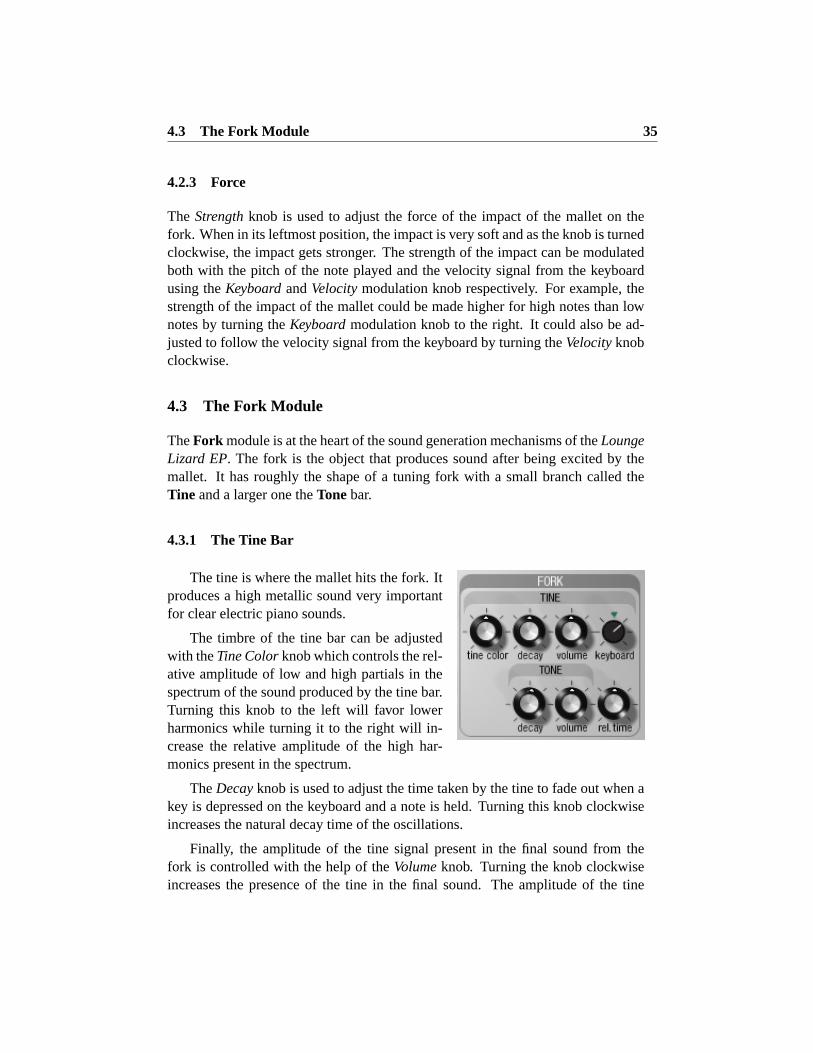
TheFork module is at the heart of the sound generation mechanisms of theLoungeLizard EP. The fork is the object that produces sound after being excited by themallet. It has roughly the shape of a tuning fork with a small branch called theTine and a larger one theTonebar.
4.3.1 The Tine Bar
The tine is where the mallet hits the fork. Itproduces a high metallic sound very importantfor clear electric piano sounds.
The timbre of the tine bar can be adjustedwith theTine Colorknob which controls the rel-ative amplitude of low and high partials in thespectrum of the sound produced by the tine bar.Turning this knob to the left will favor lowerharmonics while turning it to the right will in-crease the relative amplitude of the high har-monics present in the spectrum.
TheDecayknob is used to adjust the time taken by the tine to fade out when akey is depressed on the keyboard and a note is held. Turning this knob clockwiseincreases the natural decay time of the oscillations.
Finally, the amplitude of the tine signal present in the final sound from thefork is controlled with the help of theVolumeknob. Turning the knob clockwiseincreases the presence of the tine in the final sound. The amplitude of the tine

4.4 The Pickup Module 36
signal can be modulated with the pitch of the note played using theKeyboardknob.Turning this knob to the left will increase the presence of the tine in low notes whiledecreasing it for high notes. Turning this knob to the right has the opposite effectand increases the presence of the tine in high notes while decreasing it in low notes.In its center position the volume of the tine is uniform across the whole range ofthe keyboard.
4.3.2 The Tone Bar
The tone bar is the biggest part of the fork, it is connected to the tine and starts tooscillate when the mallet hits the tine.
TheDecayknob controls the time necessary for the oscillations of the tone barto fade out when a key is depressed and a note is held. Turning this knob clockwiseincreases the decay time.
TheVolumeknob sets the amplitude of the signal from the tone bar present inthe final sound. Turning this knob clockwise results in a louder sound from thetone bar.
4.3.3 The Release Time
TheRel. Timeknob applies to both the tone and tine bars and is used to control thedecay time of the fork oscillations when a key is released and dampers are appliedon the fork. Turning this knob clockwise increases this release time. Note that thisparameter is different from theDecayparameter on the tone and tine bar settingswhich determine the decay time of the tone and tine oscillations when there isno damper applied to the fork. The characteristics of the noise produced by thedampers when they are applied on the fork are adjusted in theDamper module aswill be described in section 4.5.
4.4 The Pickup Module
The Pickup module simulates the way a magnetic coil captures the sound of thefork in an electric piano.
The position of the pick up relative to the tine bar is a very important parameterin determining the tone of the instrument. Indeed, the shape of the signal measuredby the pick up strongly depends on how it is positioned with respect to the tine bar.This geometric parameter is fully adjustable on theLounge Lizard EP for a widerange of tonal colors.

4.5 The Damper Module 37
The Symmetryknob is used to adjust the verticalposition of the pickup relative to the tine bar. In itsleftmost position, the pick up is right in front of thetine producing more harmonics in the sound. Turningthe knob to the left, moves the pick above the the tineresulting in a more mellow tone. Note that movingthe pickup below the tine has the same effect on thespectrum of the sound as moving it above by the sameamount.
TheDistanceknob sets the horizontal distance be-tween the pick up and the tine bar. Turning this knob clockwise, increases thisdistance and moves the pickup away from the tine. Note that the sound becomesmore distorted (overdriven) as the pickup is moved closer to the tine.
TheLounge Lizard EPuses two different types of pickups in order to expandthe tonal possibilities of the instrument. TheR-Wswitch is used to select the typeof pickup types used byLounge Lizard EP. In theR position,Lounge Lizard EPuses a model of electro-dynamic pickups such as found in RhodesTM pianos. IntheW position, the model used is that of an electro-static pickups such as found inWurlitzerTM pianos.
The Input knob is used to adjust the amount of signal from the fork going intothe pick up which will affect the amount of distortion applied to the signal by thepickup. As the knob is turned clockwise, the amount of input signal increases.The Outputknob controls the amount of signal from the pick up and sent to theeffect section. As the knob is turned clockwise, this amount increases. Note thattheOutputsignal can be modulated with the pitch of the note played by using theKeyboardknob. Turning this knob to the left will increase the output amplitudeof low notes relative to high notes while turning the knob to the right will havethe opposite effect and increase the relative amplitude of high notes. In its centerposition, the output amplitude is uniform across the entire keyboard.
One can obtain different sounds with different settings of theInput andOutputparameters. For example, a small amount of input with higher amount of outputwill produce a cleaner sound then a large amount of input with small output value.
4.5 The Damper Module
The Damper module simulates the production of noise when dampers are raisedfrom or applied on the fork when a key is depressed or released. This gives a morerealistic and lively sound.

4.6 The Tremolo Module 38
TheToneknob is used to adjust the stiffness of the dampers.When in its leftmost position, the dampers are soft producing amore mellow sound. Turning the knob clockwise increases thestiffness of the dampers and the center frequency of the noiseproduced by the damper.
TheAmountknob is used to set the amplitude (volume) ofthe damper noise present in the final sound. Turning the knobclockwise increases the presence of the damper noise in thefinal sound.
Finally, theBalanceknob is used to control the amount of noise introduced bythe dampers at the beginning or end of a note when the dampers are either liftedfrom the fork or applied on the fork. When turned to the left, in theAtk position,noise will be introduced in the sound during the attack phase of notes while in therel position, noise will be added during the release phase of notes. In its centerposition, an equal amount of noise will be added both during the attack and releasephases of notes.
Note that theDamper module responds to the sustain pedal signal via theDamper MIDI Control Change message (CC#64). In order forLounge LizardEP to respond to a sustain pedal, simply set your synth or MIDI controller to sendits sustain pedal signal via this MIDI Control Change message.
4.6 The Tremolo Module
The Tremolo module, introduces low frequencyamplitude modulation, or tremolo, in the sound. Thisis an effect extensively used with electric pianos. Theeffect is switchedonor off using theOnbutton.
TheShapeswitch enables one to select the shapeof the wave that creates the tremolo. The trianglewave gives a more regular (smoother) tremolo whilethe soft square wave gives a more chopped effect (likethe tremolo on RhodesTM suitcase pianos).
Thestereobutton is used to determine if the tremolo is mono or stereo. Whenthe button is depressed, the tremolo ison and in stereo mode. In this mode, thesound bounces with a 180 degrees phase from left to right. When the button isits off position, the tremolo is in mono mode and is the same on the left and rightchannels.

4.7 The EQ module 39
The Depth is used to set the amount of modulation in the amplitude of thesignal. In its leftmost position, the amplitude is not modulated and turning theknob clockwise gradually increases the amplitude of the modulation.
The Speedknob controls the frequency of the modulation. Turning the knobclockwise increases this frequency and results in a faster modulation rate. Notethat this knob is active only when theSyncfunction isoff.
The Syncdrop-down menu is used to synchronize the speed of the tremoloeffect with the source and tempo set in theClock module. One can choose froma list of values determining the rate at which the tremolo synchronizes when thesync function ison. Sync values range from 1/8 of a quarter note (a thirty-secondnote) to 16 quarter notes (4 whole notes) where the duration of the quarter noteis determined by the value (in BPM) appearing in theTempodisplay of theClockmodule. Each value can be set to a triplet (t) or a doted note (d).
4.7 The EQ module
The EQ module provides equalization overthe low, mid, and high frequency bands and isswitchedonor off using theOnbutton. It is com-posed of a low shelf filter, a peak filter, and a highshelf filter in series.
The functioning of the low shelf filter is il-lustrated in Figure 11. The filter applies a gainfactor to frequency components located below acutoff frequency while leaving those above un-changed. The cutoff frequency of the filter is adjusted using theFreqknob and thegain amount is controlled with theGainknob.
The high frequency content of the signal is controlled with a high shelf filterthat works in the opposite manner as the low shelf filter as illustrated in Figure 11.The filter will multiply a gain factor to components located above a cutoff fre-quency while leaving those below unchanged. Again use theFreqandGainknobsto adjust the cutoff frequency and gain of the filter.
The mid frequency content of the signal is adjusted using a peak filter as illus-trated in Figure 12. The filter applies a gain factor to frequency components in aband located around the cutoff frequency of the filter. The cutoff frequency of thefilter is adjusted with theFreq knob while the gain coefficient is varied with theGainknob.

4.8 The Keyboard Module 40
Amplitude (dB)
0dB
Freq Frequency (Hz)
Amplitude (dB)
0dB
Frequency (Hz)Freq
Gain = −30 dB
Gain = 10 dB
Gain = 20 dB
Gain = 30 dB Gain = 30 dB
Gain = 20 dB
Gain = 10 dB
Gain = −30 dB
Figure 11: Low and high shelf filters.
Amplitude (dB)
0dB
Gain = 20 dB
Gain = 10 dB
Frequency (Hz)Freq
Gain = 30 dB
Gain = 30 dB
Figure 12: Peak filter.
4.8 The Keyboard Module
TheKeyboard module controls how theLounge Lizard EPvoices respond to theevents coming from an external MIDI keyboard or from a MIDI sequencer. Thecontrols in theTransposesection are used to fix the pitch of the keyboard whilethose in theMicro-Tuningsection are used to set the temperament of the keyboard.
4.8.1 Tuning
The reference pitch of the keyboard is displayed in thePitch display of the trans-pose section. The default reference note of the keyboard is A4 (set at 440 Hz) butcan be changed in theRef. Notebutton of the Micro-Tuning section. The pitch of

4.9 The Clock Module 41
the reference note (in Hertz) is adjusted using theTuneknob. Its value can also betransposed by a certain number of octaves or semi-tones using theOctaveor Semidrop-down menus.
One interesting feature ofLounge Lizard EPisthat it can be tuned using different temperaments us-ing Scala micro-tuning files. Temperament files areloaded by using theTuning File file loading buttonwhen the selector switch on the left of the button isadjusted to itstuning file position. By default, onWindows systems,Lounge Lizard EPwill look forScala files in the c:\Program Files\AAS\Lounge Lizard. On Mac OS systems,Lounge Lizard EPwill look on the system disk in Library:Application Support:Applied Acoustics Systems: Lounge lizard: Scala. Note that one Scala file (Con-cert Stretch.scl) is installed by default in these folders. The reference note that willbe used as the base note for the scale described in the Scala file is adjusted fromtheRef. Notebutton.
When the selector switch is adjusted to itsStretchposition, no tuning files areused to tune the keyboard andLounge Lizard EPuses and equal temperament. Thetemperament can still be tuned, however, by using theStretchknob. In its centerposition, the octaves will be just. Turning the knob to the left will reduce theinterval while turning it to the right will increase it.
Note that the settings of theKeyboard module are not saved with a preset.In other words, they remain the same when switching from one preset to another.When the application is started, the settings of the module when the applicationwas last closed will be loaded.
4.9 The Clock Module
This module is used to control the tempo of thedifferent effects of the output section as well as thatof the amplitude modulation of theTremolo module.The Sourcedrop down menu is used to determineif the sync signal comes from an external source orfrom the internal clock of the module. TheTempodisplay indicates the value of thetempo in BPM (beats per minute). WhenLounge Lizard EPis used as a plug-in ina host sequencer and theExt source is chosen, the clock signal will be that sent bythe host sequencer while in standalone mode the clock will be that received froman external MIDI clock.

4.10 The Recorder Module 42
When theInt source is chosen, the tempo is determined by the value of theTempodisplay. The tempo can also be changed by clicking repeatedly on theTappad which will update the value of the tempo in theTempodisplay.
Note that the settings of theClock module are saved with presets. In orderfor theClock module to remain in a specific state even when loading new presets,click on theLock icon in the upper left corner of the module.
4.10 The Recorder Module
This module is used to record the output ofLoungeLizard EP to a stereo 16-bit wave or aiff file. TheFile button, is used to choose the name and locationof the destination file. One should always use thisbefore starting a recording. TheRecordand Stopbuttons are used to start or stop the recording. Notethat the sampling rate of the recorded file will be that at whichLounge Lizard EPwas operating when the recording started.
4.11 The Multi-Effect Section
Lounge Lizard EPis equipped with a configurableMulti-Effect module. Themodule is composed of two different sub-modules,Effect A andEffect B, followedby aReverbmodule. The sub-modules can be organized in different configurationsand synced to an external source or the signal from theClock module. Each effectsub-module can be set to a different effect using theTypedrop-down menu. Theeffect list includes chorus (mono and stereo), flanger (mono and stereo), vibrato,digital delay, ping pong delay, tape delay, phaser, auto wah, wah wah, notch filterand distortion. All the effects share the same interface except for the labels underthe control knobs which vary depending on the effect chosen.
Note that the settings of the different modules of the output stage are savedwith presets. In order for the effects to remain with the same settings even whenloading new presets, click on theLock icon at the top of the module.
4.11 The Multi-Effect Section 43
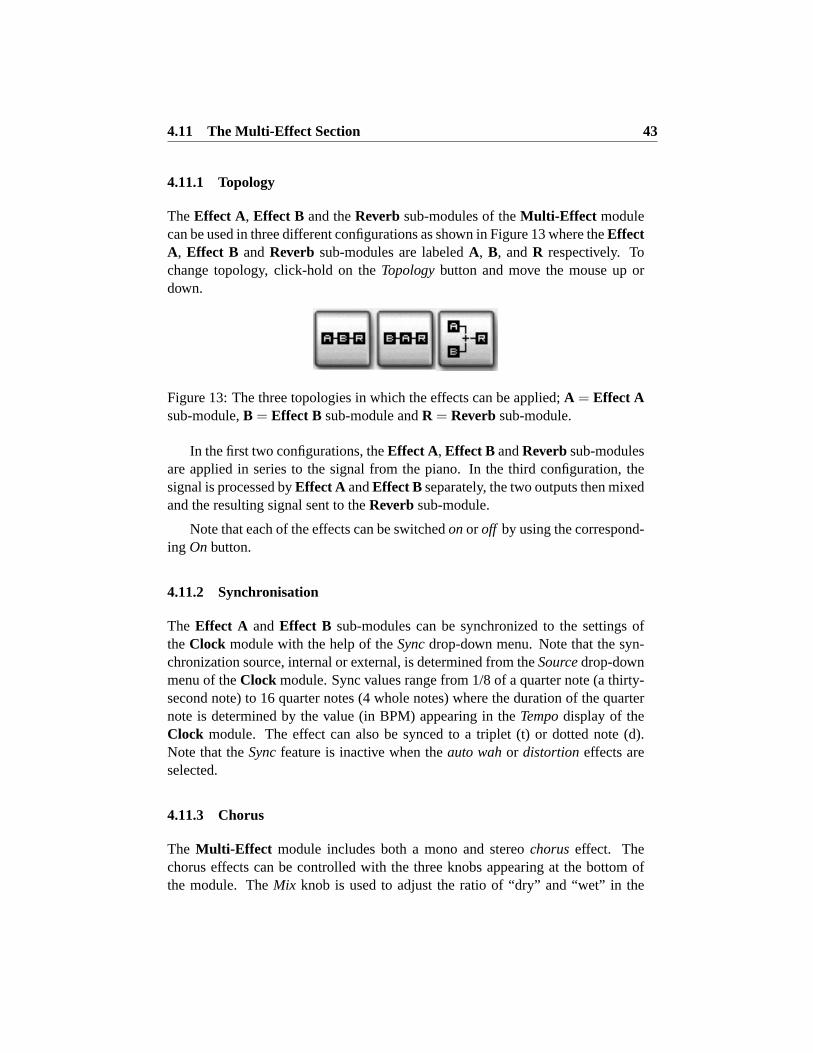
4.11.1 Topology
TheEffect A, Effect B and theReverb sub-modules of theMulti-Effect modulecan be used in three different configurations as shown in Figure 13 where theEffectA, Effect B andReverb sub-modules are labeledA, B, andR respectively. Tochange topology, click-hold on theTopologybutton and move the mouse up ordown.
Figure 13: The three topologies in which the effects can be applied;A = Effect Asub-module,B = Effect B sub-module andR = Reverbsub-module.
In the first two configurations, theEffect A, Effect B andReverbsub-modulesare applied in series to the signal from the piano. In the third configuration, thesignal is processed byEffect A andEffect B separately, the two outputs then mixedand the resulting signal sent to theReverbsub-module.
Note that each of the effects can be switchedonor off by using the correspond-ing Onbutton.
4.11.2 Synchronisation
The Effect A andEffect B sub-modules can be synchronized to the settings oftheClock module with the help of theSyncdrop-down menu. Note that the syn-chronization source, internal or external, is determined from theSourcedrop-downmenu of theClock module. Sync values range from 1/8 of a quarter note (a thirty-second note) to 16 quarter notes (4 whole notes) where the duration of the quarternote is determined by the value (in BPM) appearing in theTempodisplay of theClock module. The effect can also be synced to a triplet (t) or dotted note (d).Note that theSyncfeature is inactive when theauto wahor distortion effects areselected.
4.11.3 Chorus
The Multi-Effect module includes both a mono and stereochoruseffect. Thechorus effects can be controlled with the three knobs appearing at the bottom ofthe module. TheMix knob is used to adjust the ratio of “dry” and “wet” in the

4.11 The Multi-Effect Section 44
output signal of the module. When the knob is adjusted in the left position, onlythe original or “dry” signal is sent to the output while in the right position only theprocessed or “wet” signal is sent to the output. In its center position there will beequal amounts of “dry” and “wet” signal in the output signal. TheDepthknob isused to control the amplitude of the effect while theRateknob is used to fix themodulation frequency of the effect if theSyncfunction isoff.
4.11.4 Flanger
The Multi-Effect module includes both a mono and stereo flange effect. Theflanger effects can be controlled with the three knobs appearing at the bottom ofthe module. TheMix knob is used to adjust the ratio of “dry” and “wet” in theoutput signal of the module. When the knob is adjusted in the left position, onlythe original or “dry” signal is sent to the output while in the right position only theprocessed or “wet” signal is sent to the output. In its center position there will beequal amounts of “dry” and “wet” signal in the output signal. TheDepthknob isused to control the amplitude of the effect while theRateknob is used to fix themodulation frequency of the effect if theSyncfunction isoff.
4.11.5 Vibrato
The vibrato effect introduces a periodic low frequency pitch modulation in thesignal.
TheRateknob is used to set the frequency of the vibrato effect when theSyncfunction isoff. TheDepthknob enables one to control the depth of the effect, orin other words the amplitude of the frequency variations. In its leftmost position,there is no vibrato and turning the knob clockwise increases the amount of pitchvariation. TheMix knob is used to determine the proportion of “dry” and “wet”signals in the output signal from the effect. In its leftmost position, the output is“dry”, turning the knob clockwise increases the amount of “wet” signal until, inits center position, there is only “wet” signal. Note that turning further the knobclockwise has no effect.
4.11.6 Delay
The Multi-Effect module includes 3 different types of delay effects:Ping Pong,Digital andTape Delay. TheDigital delay consists in a standard delay line withfeedback. The tape delay is similar but also includes a low-pass filtering effect in

4.11 The Multi-Effect Section 45
order to simulate the attenuation of high frequencies in analog tape delays. ThePing Pongdelay is based on two delay lines resulting in a signal traveling fromone channel to the other, each time attenuated by a coefficient.
TheWetknob is used to adjust the amount of “wet” signal present in the outputsignal from the effect. When the knob is adjusted in the left position, only theoriginal or “dry” signal is sent to the output. Turning this knob clockwise increasesthe amount of processed or “wet” signal sent to the output. TheFeedbackknob isused to adjust the amount of signal re-injected into the delay lines or in other wordthe amount of feedback introduced in the line. In its leftmost position, there is nosignal re-introduced and the effect module only delays the input signal. Turningthis knob clockwise increases the amount of signal reflected back at the end of theline. Finally theTimeknob controls the length of the delay lines and therefore thedelay between echoes.
4.11.7 Phaser
The “phasing” effect colors a signal by removing frequency bands from its spec-trum. The effect is obtained by changing the phase of the incoming signal andadding this new signal to the original.
The phaser effects can be controlled with the three knobs appearing at the bot-tom of the module. TheMix knob is used to adjust the ratio of “dry” and “wet”in the output signal of the module. When the knob is adjusted in the left position,only the original or “dry” signal is sent to the output while in the right positiononly the processed or “wet” signal is sent to the output. In its center position therewill be equal amounts of “dry” and “wet” signal in the output signal. TheDepthknob is used to control the amplitude of the effect while theRateknob is used tofix the modulation frequency of the effect when theSyncfunction isoff.
4.11.8 Wah
The Multi-Effect module includes 2 different types of wah effects: wah wah, andauto wah. Both of them are based on a specially designed bandpass filter with a12 dB/oct slope. In the wah wah effect, the center frequency of the bandpass filtervaries at a certain rate. In the case of the auto-wah, the variations of the centerfrequency is controlled by the amplitude envelope of the incoming signal.
TheFreqknob is used to control the central frequency of the filter. Turning thisknob clockwise increases the center frequency. In the case of theWah Waheffect,the center frequency will oscillate around the value fixed by theFreq knob while

4.11 The Multi-Effect Section 46
with the Auto Waheffect, the setting of theFreq will fix the starting point of thevalue of the center frequency.
TheDepthknob controls the excursion of the center frequency of the filter. Inthe case of theWah Waheffect, this excursion is applied around the value fixed bytheFreqknob while inAuto Wayeffect the value of the center frequency increasesfrom the value fixed by theFreq knob. Turning this knob clockwise increases theexcursion of the center frequency.
Finally, theRateknob controls the frequency or rate of the modulation of thecenter frequency of the filter. In the case of theWah Waheffect, turning this knobclockwise increases the rate of the modulation if theSyncfunction isoff. In thecase of theAuto Wahfilter, this knob controls the time constant of the envelopefollower. Turning this knob clockwise decreases the time constant, or in otherwords the reaction time, of the envelope follower.
4.11.9 Notch Filter
The notch filter does essentially the opposite of a band-pass filter. It attenuates thefrequencies in a band located around the center frequency and leaves those outsideof this band unchanged. As was the case for theWah Waheffect, the filter is basedon a filter having a 12 dB/oct slope and can be modulated.
The Freq knobs is used to control the central frequency of the filter. Turningthis knob clockwise increases the center frequency. TheDepthknob controls theexcursion of the center frequency of the filter around its center frequency. Turningthis knob clockwise increases the excursion of the center frequency. Finally, theRateknob controls the frequency or rate of the modulation of the center frequencyof the filter. Turning this knob clockwise increases the rate of the modulation if theSyncfunction isoff.
4.11.10 Distortion
TheDistortion module implements a simple distortion or overdrive effect such asthat found in distortion pedals for example.
ThePreknob is a gain control used to adjust the level of the signal at the inputof theDistortion effect and hence the amount of saturation introduced in the signal.The color of the output signal from the distortion algorithm can be adjusted usingtheToneknob. In its leftmost position, high frequencies will be attenuated in thesignal while in its rightmost position low frequencies will be filtered out from thesignal. In its center position, the signal will be left unchanged. Finally, thePost

4.11 The Multi-Effect Section 47
knob is used to control the amplitude of the signal at the output of theDistortioneffect.
4.11.11 Reverb
The Reverb module is used to recreate the effect of reflections of sound on thewalls of a room or hall. These reflections add space to the sound and make itwarmer, deeper, as well as more realistic since we always listen to instruments in aroom and thus with a room effect.
The Reverbdrop down menu is used to choose between different reverb al-gorithms representing different types of rooms or halls. Each algorithm can beadjusted with the knobs located at the bottom of the module. TheMix knob is usedto set the relative amount of “dry” and “wet” signal which is related to the prox-imity of the sound source. TheDecayis used to control the reverberation time ofthe room. In a real room, the reverberation time is not constant across the wholefrequency range because the walls of the hall are generally more absorbent at highfrequencies which results in a shorter reverberation time for these frequencies. Thiseffect is controlled with theColor knob which sets the reverberation time of highfrequencies relatively to the value of theDecayknob.

Toolbar 48
5 Toolbar
The toolbar at the top of theLounge Lizard EPinterface allows you to monitorimportant information related to your current set-up.
5.1 Program Display
Displays the number and name of the program currently loaded in the synthesisengine. The+ and− buttons on the left of the program number, or alternativelythe + and− keys on the computer keyboard, are used to navigate upwards anddownwards in the program list. The complete list of 128 programs can be viewedby using theH button located on the left of the program number. When the presetassociated with the current program is different from the version saved in the presetlibrary, the preset icon to the left of the buttons changes color in order to indicatethat saving is necessary in order not to lose the changes that have been applied.
5.2 MIDI map
Displays the name of the currently opened MIDI map. For more information onMIDI maps, please refer to Section 6.2.
5.3 CPU meter
Displays the percentage of the total CPU resources currently used byLounge LizardEP.
5.4 Value Display
Displays the value of the currently selected control on the interface. The valuesrange from 0 to 127 for knobs and 0 or 1 for buttons depending on whether theyare in theiron or off position. For some controls, the value is displayed in theappropriate units.
Audio and MIDI Settings 49
6 Audio and MIDI Settings
This chapter explains how to select the audio and MIDI devices used byLoungeLizard EPas well as how to create and edit MIDI links and MIDI maps. Whenreferring to commands that are different on Windows and Mac OS systems, thecommands are listed in the following order: Windows command/Mac OS com-mand.
6.1 Audio Settings
6.1.1 Selecting a Audio Device
To select the audio device used byLounge Lizard EP:
• Go to theAudio menu and choose theAudio Settingsoptions. A list of theaudio devices installed on your computer will appear in theAudio Configu-ration window.
• Click on the audio device you wish to use and click on theOK button.
6.1.2 Audio Control Panel
To launch the audio configuration panel, chooseAudio Control Panel under theAudio menu. This command allows you to select the bit depth sample rate (22.05,44.1, 48, or 96 kHz) and buffer size, which affects how quicklyLounge Lizard EPresponds to the control information it receives. The smaller the buffer size, theshorter the latency, and vice versa.
On Windows systems using ASIO drivers, this command opens the controlpanel provided with the driver and the content of the dialog depends on the driver.Some sound cards also require that you close all programs before making changesto the buffer size or sampling rate. If you discover this is the case with your soundcard, please refer to the manufacturer’s documentation for details on configuring itfor optimum performance. Most sound card manufacturers also update their driversregularly. It is strongly recommended that you visit your sound card manufacturer’swebsite regularly to ensure you are using the most up to date drivers and supportsoftware.
On Mac OS systems, this command launches theAudio MIDI Setup configu-ration application.

6.2 MIDI Settings 50
6.2 MIDI Settings
6.2.1 Selecting a MIDI Device
To select the MIDI device used byLounge Lizard EP:
• Go to theMIDI menu and choose theMIDI Settings option. A list of theMIDI devices installed on your computer will appear in theMIDI Configu-ration window.
• Select the MIDI device you want to use and click on theOK button.
6.2.2 Creating MIDI Links
Every control on theLounge Lizard EPinterface can be manipulated by an externalMIDI controller. In most cases this is much more convenient than using the mouse,especially if you want to move many controllers at once. For example, you canmap the motion of a knob on the interface to a real knob on a knob box or to themodulation wheel from your keyboard. As you use the specified MIDI controllers,you will see the controls move on theLounge Lizard EPinterface just as if you hadused the mouse.
To assign a MIDI link to a controller:
• On the interface, right-click/Control-click on a control (knob, button), a con-textual menu appears. SelectLearn MIDI Link .
• Move a knob or slider on your MIDI controller (this can be a keyboard, aknob box, or any device that sends MIDI). This will link the control of theLounge Lizard EPto the MIDI controller you just moved.
MIDI links can also be created by right-clicking/Control-clicking on a controland choosing theAdd MIDI Link command which will open theAdd MIDI Linkwindow.
6.2.3 Editing MIDI Links
MIDI links can be edited in the MIDI Links window, which lists all the currentlyavailable MIDI links.

6.2 MIDI Settings 51
• To edit the MIDI link, right-click/Control-click again on the control andchooseEdit MIDI Link to open the MIDI links window. You can also usetheEdit MIDI Link command from theMIDI menu.
• Click on the MIDI link you wish to modify and then on theEdit button tolaunch theEDIT MIDI Link window.
• Specify the MIDI controller number and MIDI channel of the physical con-troller you wish to link to the parameter in the corresponding drop-downmenus.
• You can also adjust theMinimum Value andMaximum Value of the con-troller, which are used to limit the range of MIDI controllers. TheMinimumValue slider is used to determine the position on theLounge Lizard EPcon-trol which corresponds to the minimum value sent by the MIDI controller;the Maximum Value slider determines the position which corresponds tothe maximum value sent by the MIDI controller. The leftmost position ofthe slider corresponds to theLounge Lizard EPcontrol minimum position(left position for a knob) while the rightmost position of the slider corre-sponds to theLounge Lizard EPcontrol maximum position (right positionfor a knob).
• Note that the range of a knob can be inverted by setting the value ofMaxi-mum Value to a smaller value than that ofMinimum Value .
• Click on theOK button and the link appears in the list of controllers linkedto the control.
• Click on theOK button again to confirm the change and to leave the MIDILinks window.
• Note that theMinimum Value andMaximum Value of a MIDI link can alsobe set by right/control clicking on the corresponding control and selectingtheSet MIDI Link Minimum Value or Set MIDI Link Maximum Valuecommand. The value corresponding to the control position will then be savedas the minimum or maximum value of the MIDI link.
6.2.4 Deleting MIDI Links
• To remove a MIDI link, right-click/Control-click again on the control andchooseForget MIDI Link or choose theForget MIDI Link command fromtheMIDI menu.
6.2 MIDI Settings 52
• MIDI links can also be removed from the MIDI Links window by clickingon the MIDI link to be removed to select it, then by clicking on theRemovebutton and theOK button to confirm the change.
6.2.5 Creating a MIDI Map
A set of MIDI links can be saved into a MIDI map by using theSave MIDI LinkAs from the File menu. Different MIDI maps corresponding to different MIDIcontrollers can thereby be saved forLounge Lizard EP. A MIDI map can be loadedby double clicking on the corresponding MIDI connector icon that appears in thebrowser when a MIDI map is saved. Furthermore a MIDI map can be loadedautomatically when an instrument is launched.
• To assign a default MIDI map, right-click/Control-click on the MIDI mapicon and choose theMIDI Link Info command. In theEdit InformationWindow, select theSet as default MIDI Links option.
6.2.6 Empty MIDI Map
The factory MIDI maps include a MIDI map calledNo MIDI link . As its namesuggest this map is empty. Loading this map deactivates all the MIDI links.
It is possible to reload the original version of this MIDI map by importingthe factory MIDI maps file as explained in Section 2.9 in case it was modified bymistake.
6.2.7 Defining a Default MIDI map
It is possible to define a default MIDI map that will be loaded automatically whenLounge Lizard EPis launched.
• First select a MIDI map by clicking on its icon in the browser and choosetheMIDI Link Info command from theEdit or the Ctrl-I/Apple-I keyboardshortcut. One can also right-click/control-click on the MIDI map icon andchoose theMIDI Link Info command.
• To change the default MIDI map select theMark As Default option.

6.3 Latency Settings 53
6.2.8 MIDI Program Changes
MIDI program changes can be used to switch between programs while playing.Lounge Lizard EP will change the number of the current program used by the syn-thesis engine to the number corresponding to the MIDI program change receivedby the application.
6.3 Latency Settings
The latency is the time delay between the moment you send a control signal toyour computer (for example when you hit a key on your MIDI keyboard) and themoment when you hear the effect. Roughly, the latency will be equal to the du-ration of the buffers used by the application and the sound card to play audio andMIDI. To calculate the total time required to play a buffer, just divide the numberof samples per buffer by the sampling frequency. For example, 256 samples playedat 48 kHz represent a time of 5.3 ms. Doubling the number of samples and keepingthe sampling frequency constant will double this time while changing the samplingfrequency to 96 kHz and keeping the buffer size constant will reduce the latency to2.7 ms.
It is of course desirable to have as little latency as possible.Lounge Lizard EPhowever requires a certain amount of time to be able to calculate sound samples ina continuous manner. This time depends on the power of your computer, the presetplayed, the sampling rate, and the number of voices of polyphony used. Note thatit will literally take twice as much CPU power to process audio at a sampling rateof 96 kHz as it would to process the same data at 48 kHz, simply because you needto calculate twice as many samples in the same amount of time.
Depending on your machine you should choose, for a given sampling fre-quency, the smallest buffer size that allows you to keep real-time for a reasonablenumber of voices of polyphony. To adjust these parameters:
• Launch theAudio Control Panel
• Choose the sampling frequency and the audio format (16, 24, 32 bits)
• Adjust the buffer size
Note that this might not be possible on Mac OS or with ASIO drivers on Win-dows.
In order to optimize the resources allocated to the calculation of audio byLounge Lizard EP, it is possible to decrease the ratio of resources devoted to the

6.3 Latency Settings 54
calculation of graphics for the interface in favor of audio related calculations. Toadjust this ratio, choose thePreferencescommand under theEdit menu and adjustthe Performanceslider to the desired value betweenbetter audio performanceandsmoother graphics. This setting may have little noticeable effect on recentcomputers.

Using theLounge Lizard EPas a Plug-In 55
7 Using theLounge Lizard EPas a Plug-In
Lounge Lizard EPis available in VST, DXi, AudioUnit and RTAS (for Mac OSonly) formats and integrates seamlessly into the industry most popular multi-trackrecording and sequencing environments as a virtual instrument plug-in. The plug-in versions will work exactly the same way as the standalone version, except forthe audio, MIDI, and latency configurations that will be taken care of by the hostsequencer. FurthermoreLounge Lizard EPworks as any other plug-in in theseenvironments so we recommend that you refer to your sequencer documentation incase you have problems runningLounge Lizard EPas a plug-in. We review heresome general points to keep in mind when using a plug-in version ofLounge LizardEP.
7.1 Window Size
The size of theLounge Lizard EPwindow is fixed when it is used as a plug-in.
7.2 Audio and MIDI parameters
WhenLounge Lizard EPis used as a plug-in, the audio and MIDI ports, samplingrate, buffer size, and audio format are determined by the host sequencer.
7.3 Automation
Lounge Lizard EPsupports automation functions of host sequencers. Automationcan usually be done by using MIDI links and recording MIDI events, or by record-ing the motion of controls on the interface.
7.4 Multiple Instances
Multiple instances ofLounge Lizard EPcan be launched simultaneously in a hostsequencer.
7.5 Saving Projects
When saving a project in a host sequencer, the program list is saved with the projectin order to make sure that the instrument will be in the same state as when you

7.6 MIDI channel 56
saved the project when you re-open it even if the preset library of the instrumentwas modified. MIDI links are also saved.
Note that the default program list (the same as that loaded in standalone mode)appears whenLounge Lizard EP is opened in a new project or if a new instance ofthe plug-in is opened in an existing project. To change the default program list, usetheSave All Programscommand from thePrograms menu in an instance of theinstrument which displays the desired program list.
7.6 MIDI channel
Make sure that the MIDI controller, sequencer andLounge Lizard EPall use thesame MIDI channel. If you are not certain of the channel used by your controlleror sequencer, set the MIDI channel ofLounge Lizard EPto Omni.
7.7 MIDI program change
MIDI program changes are supported in the plug-in versions ofLounge Lizard EP.When a MIDI program change is received by the application, the current programused by the synthesis engine is changed to that having the same number as that ofthe MIDI program change message.
7.8 Performance
Using a plug-in in a host sequencer requires CPU processing for both applications.The load on the CPU is even higher when multiple instances of a plug-in or nu-merous different plug-ins are used. To decrease CPU usage, remember that youcan use thefreezeof bounce to track functions of the host sequencer in order torender to audio the part played by a plug-in instead of recalculating it every time itis played.

Quick reference to commands and shortcuts 57
8 Quick reference to commands and shortcuts
File Menu
Command Windows Mac OS Description
New Folder. . . Apple+Shift+N New Folder in theBrowser
Open Preset Ctrl+O Apple+Option+O Open the selected preset
Save Preset Ctrl+S Apple+S Save the current preset
Save Preset As. . . Save the current presetunder a new name
Save MIDI Links Ctrl+Shift+S Apple+Shift+S Save the currentMIDI links
Save MIDI Links As. . . Save the current MIDIlinks under a new name
Import. . . Import a .lls file
Export. . . Export a .lls file
Restore Factory Library . . . Restore factory libraryand programs.Everything else in thebrowser is deleted.
Exit (Quit on Mac) Quit the application

Quick reference to commands and shortcuts 58
Edit Menu
Command Windows Mac OS Description
Undo Ctrl+Z Apple+Z Undo last command
Redo Ctrl+Y Apple+Shift+Z Redo last command
Copy Ctrl+C Apple+C Copy selected item
Paste Ctrl+V Apple+V Paste
Delete Del Delete selected item
Info. . . Ctrl-I Apple+I Edit information about aselected item (browser)
Compare Compare modifiedpreset with originalsettings
Preferences Display the Edit GeneralPreferences window

Quick reference to commands and shortcuts 59
Audio
Command Windows Mac OS Description
Audio Settings Display the Audio Settingswindow
Audio Control Panel Display the Latency Settingswindow if DirectSound is used,the ASIO control panel whenASIO drivers are used and theAudi MIDI setup configurationtool on Mac OS systems

Quick reference to commands and shortcuts 60
MIDI
Command Windows Mac OS Description
MIDI Settings Display the MIDI Settingswindow
Learn MIDILink MIDI link learn modefor the last controltouched
Add MIDI Link Enables one to add a MIDI linkon the last controlled touched
Forget MIDILink Drop a MIDI link
Set MIDI LinkMinimum Value
Limit the value of aMIDI link to aminimum value
Set MIDI LinkMaximum Value
Limit the value of aMIDI link to amaximum value
Edit MIDIlinks Display the Edit MIDIlinks window
Edit ProgramChanges. . .
Associate presets withMIDI program changes
All Notes Off Send an all note offsignal

Quick reference to commands and shortcuts 61
Programs Menu
Command Windows Mac OS Description
Locate Program in Browser Ctrl-L Apple-L Locate the current program inthe browser and select it
Rename Program Ctrl-R Apple-R Rename the current program inthe program list
Switch to Program Ctrl-P Apple-P Change the current program
Save All Programs Save the entire program listincluding modifications toprograms. The list will be inexactly the same state the nexttime you open the application

Quick reference to commands and shortcuts 62
Help Menu
Command Windows Mac OS Description
About Lounge Lizard EP . . . Display the About LoungeLizard EP window
User Manual F1 Display the user manual
Authorize Lounge Lizard EP . . . Display the Authorizationwindow. Active only if theapplication has not beenauthorized.
Visit www.applied-acoustics.com . . . Launch the browser and go tothe AAS website.
Join the user forum . . . Launch the browser and go tothe AAS forum.
Get support . . . Launch the browser and go tothe support section of the AASwebsite.

License Agreement 63
9 License Agreement
IMPORTANT! CAREFULLY READ ALL THE TERMS AND CONDITIONS OFTHIS AGREEMENT BEFORE OPENING THIS PACKAGE. OPENING THISPACKAGE INDICATES YOUR ACCEPTANCE OF THESE TERMS AND CON-DITIONS. IF YOU DO NOT AGREE WITH THE TERMS AND CONDITIONSOF THIS AGREEMENT, PROMPTLY RETURN THE UNOPENED PACKAGEAND ALL COMPONENTS THERETO TO THE PARTY FROM WHOM IT WASACQUIRED, FOR A FULL REFUND OF ANY CONSIDERATION PAID.
This software program, any printed materials, any on-line or electronic doc-umentation, and any and all copies of such software program and materials (the“Software”) are the copyrighted work of Applied Acoustics Systems DVM Inc.(“AAS”), its subsidiaries, licensors and/or its suppliers.
1. LICENSE TO USE. The Licensee is granted a personal, non-exclusive andnon-transferable license to install and to use one copy of the Software ona single computer solely for the personal use of the Licensee. Use of theSoftware is subject to this Agreement.
2. RESTRICTIONS ON USE. The Licensee may not nor permit third partiesto (i) make copies of any portion of the Software, other than as expresslypermitted under this Agreement; (ii) modify, translate, disassemble, decom-pile, reverse engineer or create derivative and/or competitive products basedon any portion of the Software; (iii) provide use of the Software in a net-work, timesharing, interactive cable television, multiple CPU service bureauor multiple user arrangement to users not individually licensed by AAS,other than as expressly permitted by the terms of this license. The Soft-ware is licensed to you as a single product. Its component parts may not beseparated for use on more than one computer.
3. OWNERSHIP. AAS retains title to the Software, including but not limited toany titles, computer code, themes, objects dialog concepts, artwork, anima-tions, sounds, audio effects, methods of operation, moral rights, any relateddocumentation and “applets” incorporated into the Software. AAS retainsownership of and title to all intellectual property rights in the Software,underlying technology, related written materials, logos, names and othersupport materials furnished either with the Software or as a result of thisAgreement, including but not limited to trade secrets, patents, trademarksand copyrights therein. Licensee shall not remove or alter any copyright orother proprietary rights notices contained on or within the Software and shall

License Agreement 64
reproduce such notices on all copies thereof permitted under this Agreementor associated documentation.
4. LIMITED WARRANTY. Except for the foregoing, THE SOFTWARE ISprovided “AS IS” without warranty or condition of any kind. AAS disclaimsall warranties or conditions, written or oral, statutory, express or implied,including but not limited to the implied warranties of merchantable qualityor fitness for a particular purpose, title and non-infringement of rights ofany other person. AAS does not warrant that THE SOFTWARE will meetthe Licensee’s requirements or that the operation of the software will beuninterrupted or ERROR-FREE.
5. LIMITATION OF LIABILITY. TO THE MAXIMUM EXTENT PERMIT-TED BY APPLICABLE LAW, IN NO EVENT WILL AAS BE LIABLE TOTHE LICENSEE OR ANY THIRD PARTY FOR ANY INDIRECT, SPE-CIAL, CONSEQUENTIAL, INCIDENTAL OR EXEMPLARY DAMAGESWHATSOEVER, INCLUDING BUT NOT LIMITED TO LOSS OF REV-ENUE OR PROFIT, LOST OR DAMAGED DATA, BUSINESS INTER-RUPTION OR ANY OTHER PECUNIARY LOSS WHETHER BASED INCONTRACT, TORT OR OTHER CAUSE OF ACTION, EVEN IF AASHAS BEEN ADVISED OF THE POSSIBILITY OF SUCH DAMAGES,EXCEPT IN RELATION TO GROSS NEGLIGENCE OR WILFUL BREACHOF THIS AGREEMENT BY AAS. NO AAS AGENT, REPRESENTATIVEOR DEALER IS AUTHORIZED TO EXTEND, MODIFY OR ADD TOTHIS WARRANTY ON BEHALF OF AAS. THE TOTAL LIABILITY OFAAS FOR DAMAGES, WHETHER IN CONTRACT OR TORT, UNDEROR RELATED IN ANY WAY TO THIS AGREEMENT SHALL BE LIM-ITED TO THE LICENSE FEES ACTUALLY PAID BY LICENSEE TOAAS, OR IF NO FEES WERE PAID, AAS’ LIST PRICE FOR THE SOFT-WARE COVERED BY THIS LICENSE. THE EXCLUSION OF IMPLIEDWARRANTIES AND/OR THE LIMITATION OF LIABILITY IS NOT PER-MITTED IN SOME JURISDICTIONS, AND SOME OR ALL OF THESEEXCLUSIONS MAY THEREFORE NOT APPLY.
6. TERMINATION. This License also shall extend to the Software and anyupdates or new releases thereof obtained by the Licensee, if any, subject toany changes to this License made by AAS from time to time and providedto the Licensee, provided AAS is under a separate obligation to provide toLicensee such updates or upgrades and Licensee continues to have a validlicense which is in effect at the time of receipt of each such update or newrelease. This License shall remain in effect until terminated. The Licensee

License Agreement 65
may terminate this Agreement at any time, upon notification to AAS. ThisAgreement will terminate immediately without notice from AAS if the Li-censee fails to comply with any provision of this License. Any such termina-tion by AAS shall be in addition to and without prejudice to such rights andremedies as may be available, including injunction and other equitable reme-dies. Upon receipt of notice of termination from AAS, the Licensee must (a)immediately cease to use the Software; (b) destroy all copies of the Software,as well as copies of all documentation, specifications and magnetic media re-lating thereto in Licensee’s possession or control; and (c) return all originalversions of the Software and associated documentation. The provisions ofSections 1, 3, and 5 shall survive the termination of this Agreement.
7. GOVERNING LAW. This Agreement shall be governed by and construed inaccordance with the laws of the Province of Quebec, without regard to theUnited Nations Convention On Contracts for the International Sale of Goodsand conflict of laws provisions, if applicable, and the parties hereby irrev-ocably attorn to the jurisdiction of the courts of that province. Les partiessont d’accorda ce que cette convention soit redigee en langue anglaise. Theparties have agreed that this agreement be drafted in the English language.
8. SEVERABILITY. If any of the above provisions are held to be illegal, in-valid or unenforceable, such provision shall be severed from this Agreementand this Agreement shall not be rendered inoperative but the remaining pro-visions shall continue in full force and effect.
9. ENTIRE AGREEMENT. This Agreement is the entire agreement betweenAAS and the Licensee relating to the Software and: (i) supersedes all prior orcontemporaneous oral or written communications, proposals and representa-tions with respect to its subject matter; and (ii) prevails over any conflictingor additional terms of any quote, order, acknowledgement, or similar com-munication between the parties during the term of this Agreement except asotherwise expressly agreed by the parties. No modification to the Agreementwill be binding, unless in writing and signed by a duly authorized represen-tative of each party.
10. NON-WAIVER. No delay or failure to take any action or exercise any rightsunder this Agreement shall constitute a waiver or consent unless expresslywaived or consented to in writing by a duly authorized representative ofAAS. A waiver of any event does not apply to any other event, even if inrelation to the same subject-matter.

Index
architecture, 28ASIO drivers, 49audio, 49
configuration, 15, 49device, 49format, 49
auto wah, 42, 45
browser, 15, 19customizing, 25hide, 24resize, 24
buffer size, 49, 53buttons
tweaking, 32
challenge key, 8, 9chorus, 42, 43clock, 41commands, 57community, 17compare, 22contact, 17
damper, 37sustain pedal, 38
databasebackup, 26restoring, 26
default MIDI map, 52delay, 42
digital, 44ping pong, 44tape, 44
digital delay, 42display, 32distortion, 42, 46documenting presets, 24
driver, 49
edit, 22effect, 42
auto wah, 45chorus, 43delay, 44distortion, 46flanger, 44notch filter, 46phaser, 45reverb, 47sync, 43vibrato, 44wah wah, 45
EQ, 39export, 25
factory presets, 15, 26flanger, 44folder
copying, 23creating, 23deleting, 24renaming, 23
fork, 35forum, 17
getting started, 14
help, 17
import, 25installation, 8
keyboard, 40tuning, 40
knobs, 32tweaking, 32
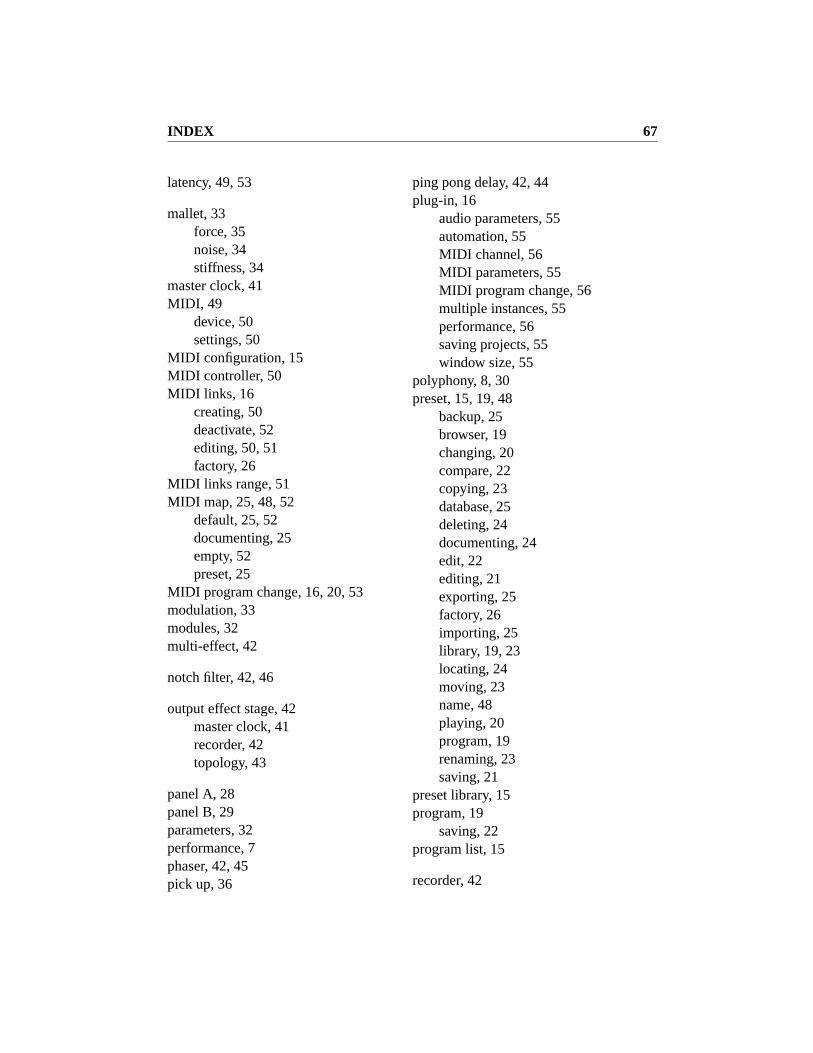
INDEX 67
latency, 49, 53
mallet, 33force, 35noise, 34stiffness, 34
master clock, 41MIDI, 49
device, 50settings, 50
MIDI configuration, 15MIDI controller, 50MIDI links, 16
creating, 50deactivate, 52editing, 50, 51factory, 26
MIDI links range, 51MIDI map, 25, 48, 52
default, 25, 52documenting, 25empty, 52preset, 25
MIDI program change, 16, 20, 53modulation, 33modules, 32multi-effect, 42
notch filter, 42, 46
output effect stage, 42master clock, 41recorder, 42topology, 43
panel A, 28panel B, 29parameters, 32performance, 7phaser, 42, 45pick up, 36
ping pong delay, 42, 44plug-in, 16
audio parameters, 55automation, 55MIDI channel, 56MIDI parameters, 55MIDI program change, 56multiple instances, 55performance, 56saving projects, 55window size, 55
polyphony, 8, 30preset, 15, 19, 48
backup, 25browser, 19changing, 20compare, 22copying, 23database, 25deleting, 24documenting, 24edit, 22editing, 21exporting, 25factory, 26importing, 25library, 19, 23locating, 24moving, 23name, 48playing, 20program, 19renaming, 23saving, 21
preset library, 15program, 19
saving, 22program list, 15
recorder, 42

INDEX 68
redo, 22registration, 8, 9release, 37release time, 36response key, 9, 12reverb, 42, 47
sampling rate, 8, 49shortcuts, 57signal flow, 28standalone mode, 14sustain pedal, 38sync, 43synchronization, 41, 42system requirements, 7
tape delay, 42tine, 35tone, 36toolbar, 48tremolo, 38tuning, 40
undo, 22unlocking, 8user library, 17
vibrato, 42, 44
wah wah, 42, 45website, 17