
LOAN DOCUMENT - apps.dtic.mil · Situation: Air travel causes dehydration and fatigue. • Ensure...
90
LOAN DOCUMENT PHOTOGRAPH THIS SHEET LEVEL INVENTORY CMthheMJ Hisk Mfrtößf&am'r imSas &&'* DOCUMENT ©ENTJFICATION v. ' I DISTRIBUTION STATEMENT A Approved for Public Release Distribution Unlimited DISTRIBUTION STATEMENT .«tMHlH 1MB NTIS one «AC UNANNOUNCED JUSTIFICATION DISTRIBUTION/ AVAILABILITY CODES DISTRIBUTION AVAILABILITY ANDAK SPECIAL ft'l DATE ACCESSIONED DISTRIBUTION STAMP DATE RETURNED 20000203 082 DATE RECEIVED IN DTIC REGISTERED OR CERTIFIED NUMBER PHOTOGRAPH THIS SHEET AND RETURN TO DTIC-FDAC H A N D L E Iw I T H C A R E umhin mm a.v II \m ml ITOQC IS EXHAUSTED. D ^ 70 * Tjnc QUALITY INSPECTED DOCUMENT PROCESSING SHEET ,T%A LOAN DOCUMENT
-
Upload
nguyendien -
Category
Documents
-
view
214 -
download
0
Transcript of LOAN DOCUMENT - apps.dtic.mil · Situation: Air travel causes dehydration and fatigue. • Ensure...

LOAN DOCUMENT PHOTOGRAPH THIS SHEET
LEVEL INVENTORY
CMthheMJ Hisk Mfrtößf&am'r imSas &&'* DOCUMENT ©ENTJFICATION
v. '
I
DISTRIBUTION STATEMENT A Approved for Public Release
Distribution Unlimited
DISTRIBUTION STATEMENT
.«tMHlH 1MB NTIS
one «AC UNANNOUNCED JUSTIFICATION
DISTRIBUTION/
AVAILABILITY CODES
DISTRIBUTION AVAILABILITY ANDAK SPECIAL
ft'l
DATE ACCESSIONED
DISTRIBUTION STAMP
DATE RETURNED
20000203 082 DATE RECEIVED IN DTIC REGISTERED OR CERTIFIED NUMBER
PHOTOGRAPH THIS SHEET AND RETURN TO DTIC-FDAC
H A N D L E
Iw I T H
C A R E
umhin mm a.v II \m ml ITOQC IS EXHAUSTED. D™^70*
Tjnc QUALITY INSPECTED
DOCUMENT PROCESSING SHEET
,T%A LOAN DOCUMENT

•# l---->'
Caribbean Risk management Leaders Guide
fL §^^^^?^^^^iw^^s<
w- S Yitiiljf
, VAtwnMia«i«MMi%#0
"I -+!
«PSF
^
■■"-■'i'"; : .1
go* I ■ . »iws'mi.. V ,4vi>«..? ''
,\
W"00'
V .^ • ,V SS3": . NX 0-

Haiti Profile geography
Size © 28,000 square kilometers
Topography • Defined by five mountain ranges © Divided into three regions: northern, central, and
southern • No navigable rivers
Climate • Tropical • Wet season: February through May ® Dry season: November through January © Temperature: 15°C to 25°C winter; 25°C to 35°C summer
Transportation and Communication Ports I • Port-au-Prince: leading commercial port • Cap-Haitien: mostly cj-uise-ship traffic © Miragoane, Les Cayes; Fort Liberte, Gonaives, and
Jeremie: all lesser ports Railroads
© One rail line, used only for transport of sugarcane Roads
© More than 3,700 kilometers: 17 percent paved, 27 percent improved gravel, and 56 percent unimproved dirt
© Two paved highways link northern and southern regions © Paved highway links Port-au-Prince with Santo
Domingo, Dominican Republic Airports
© One international airport at Port-au-Prince © Eleven other airfields of varying quality
Telecommunications • Telephone service highly concentrated in Port-au-Prince • Extremely limited in rural areas

,AA FAX @002
FOR SWRTHOR INFORMATION C0NCEMOT5DISTRIBUTION CALI (703) 767-0040
PLEASE CHECK THE APPROPRIATE BLOCK BELOW:
n _____^ copies nre bcini forwarded. Indicate whether Statement A. B. C. D. E, F. or X applies.
E« DISTRIBUTION STATEM ENT A! APPROVED FOR PÜDLIC RELEASE: DISTRIBUTION IS UNLIMITED
D DISTRIBUTION STATEMENT B; DISTRIBUTION AUTHORIZED TO U.S. 0OVERNMENT AGENCIES
ONLY; (Indicate Reason »nd Dale). OTHER REQUESTS FOR THIS DOCUMENT SHALL BE REFERRED TO (Indicate Controlling DoD Office).
D DISTRIBUTION STATEMENT C: DISTRIBUTION AUTHORIZED TO U.S. GOVERNMENT AGENCIES AND
THEIR CONTRACTORS; (Indict« Reason ond Data). OTHER REQUESTS FOR THIS DOCUMENT SHALL BE REFERRED TO (Indicate Controlling D«D Office).
D DISTRIBUTION STATEMENT D; DISTRIBUTION AUTHORIZED TO DoD AND U.S. DoD CONTRACTORS
ONLY; (Indicate Rcnion ond Duie). OTHER REQUESTS SHALL BE REFERRED TO (Indicate Controlling DoD Office).
D DISTRIBUTION STATEMENT E: DISTRIBUTION AUTHORIZED TO DoD COMPONENTS ONLY; (Indicate
Reason und Data). OTHER REQUESTS SHALL BE REFERRED TO (Indicate Controlling DoD Office).
□ DISTRIBUTION STATEMENT F: FURTHER DISSEMINATION ONLY AS DIRECTED BV (Indicate Controlling DoD Office and Date) or HIGHER
DoD AUTHORITY.
O DISTRIBUTION STATEMENT X; DISTRIBUTION AUTHORIZED TOLS GOVERNMENT AGENCIES
AND PRIVATE INDIVIDUALS OR ENTERPRISES ELIGIBLE TO OBTAIN EXPORT-CONTROLLED TECHNICAL DATA IN ACCORDANCE WITH U>D DIRECTIVE 5230.25. WITHHOLDING OF UNCLASSIFIED TECHNICAL DAT \FROM PUBLIC DISCLOSURE, 6 Nov 1994 (indicole duie of dejerroinaiion). CONTROLLING DoD OFFICE IS (Indicate Controlling DoD Office),
Lj This document was previously forwarded to DTICon (dste) and the AD number Is
Lj (n accordance with provision« of DoD instructions, the doeument requeued Is not supplied because:
LJ ll will be published at» later data. (Enter approximate dace, if known).
□ Other. (Give Reason)
DoD Dlracllva 5230.2«, "Olatrlbuflon Stalam.nt« on Technical DoeumanU," WHjrJI.eonlalna aaven distribution «Momenta, as described biitflv above. Technical Document» mult bo aaalgnod distribution xbtomenta.
/ Print or Typo Name
AMhortiod SienaturaOaliL^ Tehwhon» Numbsr

Foreword It is imperative that safety be a strong combat-power multiplier for America's Army in the Caribbean. The current challenge of reduced force structure and funding further amplifies the need for leaders to focus on safety to protect their limited human and material resources. History has taught us that, over the long haul, accidents cause more casualties and damage more equipment than hostile action. Army leaders have learned this lesson well and have integrated force protection into their decision-making process.
The importance of the accident-prevention component of force protection is clear. The sustained tempo of Army operations, the lethality of moderh equipment, and the logistical demands of power projection all require increased risk management. Leaders and individual soldiers must make solid risk-management decisions every day, in everything they do, whatever and wherever their mission may be.
The diverse environments and mission objectives that our forces face have become extremely complex. The risk-management process has become the commander's key to protecting the force. This quick-reference guide is a tool intended to assist commanders, planners, and leaders at all levels in accident prevention and force protection.
THOMAS W. GARRETT Brigadier General, USA Director of Army Safety

Protecting the environment aleo protects the force
We must protect the environment wherever we find ourselves—at home and abroad. Doing so has a double payoff: The actions we take to protect the environment will also protect the force. For example, actions such as dumping POL products into a waterway, ignoring field sanitation principles, causing needless maneuver damage, and burning hazardous waste all threaten not only the environment but also the health of soldiers. Sick soldiers, in turn, degrade combat readiness.
Every leader, at every level, is responsible for ensuring that protecting the environment becomes an integral part of planning and executing operations. A by-product of doing so will be increased force protection.

Table of Contents
Section I Safety Alerts 1
Section II Risk Management....; 5
Section III Aviation Operations \ 11
Section IV Ground Operations .L 19
Section V Port Operations 51
Section VI Survivability Positions.. 67
Section VII Accident Reporting 81

t
Section I Safety Alerts
Recent experience in both combat and humanitarian operations highlighted certain1 unsafe situations, some
of which led to accidents. This section offers both general and specific suggestions on ways to control hazards before they cause an accident.
Deployment Situation: Individuals abandon safety in an effort to perform mission. • If standards do not exist, establish them. • Establish a command climate from the outset that
promotes safety. Begin by establishing a safety network, designating safety personnel.- • Enforce standards; require all personnel to perform to
standard in all operations.
Situation: Improper loading and reporting of loads. • Train load teams to standard. • Transportation officers and unit commanders must ensure

that secondary loads are secured to prevent motion-induced damage. • Ensure vehicles have required tiedown shackles. • Transportation officers and unit commanders at all levels
must ensure that AUEL/LOGMARS data reflect actual "as shipped" weight, not "as published" weights. • Shippers must provide accurate LOGMARS data and
segregate and placard hazardous cargo.
Situation: Personnel work in port without hardhats, back vehicles without ground guides, and speed in work areas. • Enforce standards.
Human Factors ~ Situation: Air travel causes dehydration and fatigue. • Ensure that arriving troops are given the opportunity to
rehydrate and rest before being assigned duties.
Situation: Soldiers perform strenuous manual labor. • Remind soldiers to ayoid strains and lifting injuries by
lifting with their legs, not their backs.
Aviation Operations ~ Situation: Aviation units have problems maintaining standardization. \ • Deploy standardization and safety personnel with the
unit. • Establish a deployment library and take essential
maintenance, operational, and training regulations and safety publications.
Situation: NVG operations. • Operate according to the crawl-before-you-walk,
walk-before-you-run philosophy, especially in an unfamiliar environment. • Conduct detailed planning and mission briefings
regardless of pilot experience. • Establish all crewmember duties. • Identify crew coordination requirements, especially

during critical phases of the mission. • Remind crews that continuous scanning is a must and
that the pilot on the controls must stay outside. • Require that all crewmembers assist in obstacle clearance. • Remind aircrews that airspeeds must be adjusted
downward during low illumination and visibility conditions and in areas of little or no contrast (go low, go slow).
Situation: Failure to establish Emergency Helicopter Instrument Recovery Procedures (EHIRP). • Establish EHIRP for area of operation. • Include EHIRP in mission briefings (unit SOP). • Spell out crew duties and cre\y coordination requirements. • Conduct unannounced IMC during checkrides.
Situation: Failure to conduct area operation surveys. • Survey area of operation, and establish hazard maps and
restricted flight areas as first order of business. • Brief hazards and obstacles for every mission. • Brief all crewmembers on their responsibility for scanning
to detect hazards and obstacles and to inform pilot on controls.
Situation: Uncommanded launch of ordnance from aircraft. • Ensure that aircraft are downloaded or in a safe area
when performing inspections or maintenance on weapons systems. • Ensure that weapons are oriented away from other
aircraft, troops, and facilities. I
Ground Operations ~ Situation: Vehicle operations result in accidents. • Caution soldiers to drive defensively. • Remind drivers to clear all sides before turning. • Caution drivers to use extra care when operating off
improved roads. • Train soldiers on rollover procedures in the vehicles in
which they operate; practice rollover drills.

• Enforce safety belt requirements. • Remind drivers that driving too fast for conditions is a
primary cause of accidents. • Train drivers of M915 series vehicles in braking
procedures. • Train crews on vehicular fire drills; practice drills. • Caution drivers that roads, bridges, and overpasses may
not be posted with weightor height restrictions. • Require safety briefings for senior occupants as well as
vehicle drivers. • Require the use of 10-ifoot inflator cage for inflating and
deflating split-rim tires.
Situation: Not enough attention to weapons safety. • Remind soldiers to hajndle all weapons as though loaded. • Caution soldiers not to play with knives. • Do not allow target practice and blank ammunition to be
mixed. ! • Ensure that M16A2 aijamunition is not fired in the
M16A1 rifle. • Caution soldiers to handle ammo boxes with gloves and
not to burn ammo boxes; Some are treated with dangerous PCE
Situation: Unsafe fuel handling and burning. • Use FM 21-10 for guidance on proper fuel mixtures. • Ensure that fuel is noi used as a substitute for cleaning
solvents. • Prohibit the burning of aerosol cans and unopened MRE
packages; they will explode. • Train soldiers in the process of burning human waste.
Situation: Eye exposure to sunlight reduces night vision. • Enforce the wear of Ballistic Laser Protection System
(BLPS). The sunglasses will reduce the adverse effects of sunlight on night vision. The sunglasses and clear lejis will also protect against eye injury. I. • If BLPSs are not available, allow soldiers to weajr
sunglasses during the day to protect against night vision degradation.

Sectirinll Bisk Management
i
Risk management is the process of making operations safer without compromising the mission. Accident
experience shows that mission-stopper accidents occur when victims are ignorant of hazards and countermeasures or when directed countermeasures are ignored. The greatest effort should be in hazard identification and countermeasure enforcement. This section provides leaders guidance on integrating the risk management approach into unit operations.
Rules Four rules guide the risk management process: • Integrate risk management into planning. Risk
management begins with planning and readily complements current Army processes. • Accept no unnecessary risks. The leader who has the

authority to accept a risk has the responsibility to protect his soldiers from unnecessary risks. An unnecessary risk is one that, if eliminated, still allows mission accomplishment. • Make risk decisions at the proper level. Make risk
decisions at a level consistent with the commander's guidance. The leader responsible for the mission should make the risk decisions. • Accept risks if benefits outweigh potential losses.
Leaders must take necessary risks to accomplish the mission. Leaders must understand that risk-taking requires a decision-making process that balances mission benefits with potential losses.
Process There are five steps to the risk-management process. • Step 1—Identify the hazards. The hazards are the
potential sources of danger that could be encountered while performing a task or mission. For example, a river crossing is anticipated while conducting a foot patrol. Factors that determine hazards are wafer depth and current, hypothermia, fatigue, debjis on and under wafer, change in conditions caused by weather, and swimming ability of the soldiers. There could be other, less obvious hazards that
RISK ASSESSMENT MATRIX
Moderate
HAZARD PROBABILITY
Catastrophic I EXTREMELY -r~- hr HIGH i —
HIGH
.EDIUM LOW -9

would become apparent during planning. Leaders should seek to identify all these hazards before the operation. • Step 2—Assess the hazards. Identified hazards must be
assessed to determine their cumulative effect on the mission or objective. Each of the hazards is analyzed to determine the probability of its causing a problem and the severity of the consequences should such a problem occur. Exercising judgment on how to eliminate or reduce hazards to lessen the overall risk is inherent in the risk assessment process. This step concludes with a risk assessment that describes the impact of the combined hazards. The result is a statement that quantifies the risk associated with the operation: high, medium, or low. • Step 3—Make a risk decision. Leaders are expected to
weigh the risk against the benefits of performing an operation; however, the mentality is more often mission-first. Keep in mind that unnecessary risk can be a hindrance to mission accomphshment. Risk decisions are made at a level of command that corresponds to the degree of risk. As such, guidance should be established as to who makes which risk decisions. For example, high-risk squad actions may be elevated to the company commander for acceptance or denial. A brigade commander may direct that company-level risk decisions be made by the company commander if the risk is low, battaUon commander if the risk is medium, and brigade commander if the risk is high or extremely high. In the case of battalion-level decisions, the chain may go from battalion to brigade to division. • Step 4—Implement controls. The controls established as
a result of the first three steps are implemented in step four. Included is leader action to reduce or eliminate hazards. Integrate specific controls into plans, orders, SOPs, training performance standards, and rehearsals. Knowledge of controls down to the individual soldier is essential. • Step 5—Supervise. Supervision in this sense goes
beyond ensuring that people do what is expected of them. It includes following up during and after an action to ensure that all went according to plan, reevaluating the plan or

making adjustments as required to accommodate unforeseen issues, and incorporating lessons learned for future use.
Integration techniques Two techniques are critical to maintaining mission focus:
1. Individual/leader risk management (focuses on individual through company-level command thought processes to recognize hazardsand take action to reduce risk). Use FM 22-100: Military Leadership problem solving, decision making, and planning process. Identify the problem (hazard), gather information, develop courses of action, analyze and compare actions, make a decision, make a plan, and implement thq plan. Memory aids such as METT-T and checklists hejp promote consistency.
2. Command echelons ^isk management. This technique uses the FM 101-5: Staff Organization and Operations Manual military decision-tnaking process. This process integrates safety and risk assessment into operational decisions normally associated with battalion and higher planning and operations. |he commander directs the staff to identify necessary risks arjd risk controls as "considerations affecting the possible courses of action." Staff officers use memory aids such as METfT-T to promote consistency. The final commander's estimate and concept addresses significant risk acceptance^ eliminations, and controls. Implement these decisions directly into applicable areas of OPLANS (ORDERS). Commanders must ensure dissemination and enforcement of risk decisions and controls down to soldier l|vel.
Basic METT-T hazards The following METT-T hazards are provided to provoke thought about issues to consider in your risk management actions. They are not all-inclusive.
Mission • Multinational operations in support of Caribbean
8

contingency • Accelerated mobilizations with short preparations • Combined task force working with other nations • Command relationships • Contingency mission assignments with mission orders • 24-hour operations • Joint/coalition force missions; more complex
D Boundaries/sectors n Communications n Coordination
Enemy (Environment) • Congested bivouac, port, and limited staging areas • Significant lifestyle difference^; poverty and lack of basic
food and medical resources • Roads heavily used by pedestrians and beasts of burden • Little civilian compliance with established driving
procedures, and no defensive driving awareness • High temperatures /humidity; tropical conditions • Thunderstorms with flash floods and extreme mud • Scorpions, centipedes, sea snakes, spiders, bugs • High winds and hurricane threats
Terrain • Tropical
° Flash floods possible j D Subject to drought and floods D Rainy seasons are April through July and October through"
November D Poor wheeled vehicle off-road mobility/stability D Undefined trail boundaries D Hurricanes ° Scorpions, centipedes, spiders, bugs
• Mountain ranges plateaus D Poorly surfaced roads D Off-road vehicle travel poor to impossible D Limited water sources D Scorpions, centipedes, spiders o Falling rocks

Troops • Assessment of training proficiency on complex tasks
involving: D Field sanitation teams D NBC training; riot control agents D Maintenance D Heat-injury detection/prevention training a Night operations training D Physical fitness training D Pilot/operator training on local conditions D Leadership training
• Troop acclimatization • Water availability • Troop morale, stress, esprit, discipline • Troop fatigue (quality and quantity of rest) • Command climate and leadership quality • Equipment status (increased maintenance requirements
and long combat service support lines of communication) • NBC equipment heat stress and visibility/mobility
degradation • Personal protective/safety equipment availability
(goggles, work gloves, sunscreens, chapstick, eye ointment, canteens, helmets, ear protection, specialized equipment, and plastic bags to store individual clothing in for protection from bugs, etc.) \
Time • Little time for preparations (activations and mobilizations) • Initial pace intense
10

SectiohlH Aviation Operations
This section addresses areas of concern in aviation operations. Listed under each area are actions to take to
reduce the hazards. j
Area Operation Survey • Survey area of operation, and establish hazard maps and
restricted flight areas as first order of business. • Brief hazards and obstacles for every mission. • Brief all crewmembers on their responsibility for
scanning to detect hazards and obstacles and to inform pilot on controls. • Develop an Aviator's Procedure Guide for the area of
operation. • Establish EHIRP for area of operation. • Include EHIRP in mission briefings (unit SOP). • Spell out crew duties and crew coordination
requirements.
11

All Aircraft Maintenance • Use caution when touching aircraft surfaces or metal
tools that have been exposed to the sun. Wear gloves and use mats or pads when practical to prevent burns and blisters.
• Inspect seals, tires, and such frequently for blisters and other signs of deterioration. • Inspect vibration isolators frequently and replace where
cracking or permanent set is excessive. • Inspect and clean flaps, control hinges, pulleys, bearings,
worm gears, cowl slides, and landing gear regularly to arrest corrosive action. • Inspect dead air spaces in fuselage at regular intervals
for accumulation of dirt. Remove accumulated dirt to prevent change in aircraft weight and balance. • Clean instrument filters thoroughly at regular intervals.
Replace worn out filters promptly. • Leave canopy partly open, except during rain storms, to
permit circulation of air within the flight compartment. • Install protective covejrs and dust excluder plugs on all
engine openings, vents, air intakes, exhaust outlets, breathers, propeller hubs and feathering domes, cowls, and other vital openings to prevent entry of dirt and dust. Keep aircraft pointed into wind when not being serviced or prepared for flight. f
• Make all possible ground checks before starting engine. Inspect controls for freedom of movement to ensure no binding exists. • Run up engines on a hard surface such as a landing mat
or a dirt- and dust-free area to prevent sandblasting.
Depth perception at night • Drop chem light stick on ground before landing to
overcome illusion that aircraft is higher above ground than it actually is. '■ • Remind pilots that radar altimeters provide the only
12 ..,..■■,

effective reference to properly gauge altitude. • Monitor shadows cast by near objects such as landing
gear or skid shadows during hover. • Survey flying area for areas of low contrast and
definition, particularly where terrain rises and falls.
NVG operations • Operate according to the craWl-before-you-walk,
walk-before-you-run philosophy, especially in an unfamiliar environment. • Conduct detailed planning arid mission briefings
regardless of pilot experience. • Establish all crewmember duties. • Identify crew coordination requirements, especially
during critical phases of mission. ; • Remind crews that continuous scanning is a must and
that the pilot on the controls must stay outside. • Require that all crewmembers. assist in obstacle clearance. • Remind aircrews that airspeeds must be adjusted
downward during low illumination and visibility conditions and in areas of little or no contrast (go low, go slow).
Wire strikes j • PIC—Conduct thorough hazard and obstacle briefing
before each mission. • Aircrews—
D Conduct thorough, detailed mission planning as a crew. D Wire strikes are more likely when crew becomes
disoriented. D Mark all known wires on hazard maps. D Ensure maximum crew coordination in searching out
and calling out wires. D Go slow when you go low.
• Aviation safety officers—Promote wire strike prevention awareness in safety briefings.
13

Flying in MOPP gear • Aircrews—
D Because the M24 and M43 protective masks reduce visibility, constantly scan in all directions.
D Wearing the M24 mask for extended periods causes breathing resistance. Concentrate on breathing slowly. • Commanders—Provide contamination-free areas where
aircrews can rest.
Survival equipment • Have a survival kit in each aircraft.
High intensity radio transmission area (HIRTA) • Mission planning should include consideration of
potential effects of an electromagnetic environment. • Report suspected instances of electromagnetic
interference. • Review classified HIRTA guidance information
(CDRAVSCOM message, AMSAV-E, 091845Z Jan 89).
Helicopters Brownout • Ensure crews are familiar with procedures in aircraft
operator's manual and chapter 2, FM 1-202: Environmental Flight. • As a minimum—
o Taxiing. Get helicopter airborne and through ETL as quickly as possible.
D Takeoff. Running takeoff is preferred for wheel-type helicopter. Otherwise, maximum performance takeoff is recommended.
D Landing. Running landing when terrain permits with minimum touchdown roll. Approach to touchdown should be made using approach angle greater than angle used for normal approaches. Approach angle should be compatible with available power. Be prepared to go around if grjpund contact is lost.
14

Maintenance • Wipie oil and grease off engine decks and cowling-covered
parts. • Make sure all filters and air cleaners are inspected and
clean. • Lubricate main and tail rotors ^after every flight or at least
daily as per appropriate TM. • Replace damaged sealant around windows, doors, and
chin bubbles. • Remove oil cooler compartment access panel daily, and
clean caked dirt off fan's inner lip. ■ • Keep windows clean and covered when aircraft are
parked. • Don't let covers touch windshield. Protect windows with
styrofoam, newspaper, cardboard, or other nonabrasive material—then attach cover. • Add oil and hydraulic fluid directly from original .
unopened containers to help stop dirt from getting into helicopter's lubrication and hydraulic systems. Dispose of partially used containers. • Wipe off excess grease every time lubricant is applied.
Grease attracts dust and dirt, formmg a paste that grinds and wears lubricated parts. • Inspect blades after every flight. High winds combined
with dirt landing pads can sandblast paint off blades. • Slow erosion by covering leading edge of main rotor
blades with an erosion prevention tape applied in accordance with TB1-1500-200-20-28: Rotor Blade Erosion Protection.
Pressure/density altitude; weight and balance; wind • Compute density altitude (DA) before weight and
balance. • Always assume DA to be a little higher than calculated. • Study DA tables in operator's manual. • Remember that helicopter performance can be affected as
soon as 1 hour after sunrise because of temperature extremes
15

affecting DA. • Consider the effect wind direction has on aircraft control
during takeoff and landing. Forward arming and refueling points (FARP) • Ensure fuel and ammunition handlers are familiar with
FM10-68 and FM1-104 procedures. • Use extreme care when handling engine fuel at
temperatures above 120 degrees to prevent possible sparks and explosion. Open gasoline drums with bronze or other nonsparking tools. • Look for and correct improper grounding points,
deteriorated or leaking hoses, leaking nozzles, incorrect sampling procedures, improper storing or dumping of waste POL products, lack of personal equipment for refueling personnel, no water at refueling site, unserviceable fire extinguishers, and no controlled access into/out of refuel points. • Keep gasoline drums covered and, where possible,
maintain storage temperature below 120 degrees. • Remember that fuel expands in hot temperatures. • Ensure fuel does not become contaminated by dirty
nozzles and other unclean equipment. • Consider positive control of air traffic and ground traffic
around refueling sites to reduce potential of midair/ground collisions. • Keep camouflage materials (netting/foliage) far from
rotor blade systems to prevent FOD.
Warning: High-frequency radios will not be operated within 100 feet of aircraft being armed and/or refueled.
caution! At 111 degrees R, white phosphorous (WP) tends to liquefy, affecting ballistics of WP rounds.
• Enforce requirement for at least two qualified personnel to arm an aircraft. • Ensure weapons are on safe before arming.
16

• Ensure guns are oriented away from unit assets during rearming. • Require cleaning and lubrication of turret weapon
systems to prevent jamming. ; • Require inspections of grounding/bonding systems. • Static electricity: Be aware of fire hazard possibility
from static electricity and that connecting the nozzle bonding wire before opening the fuel cap will prevent a static arc from occurring in the presence of fuel vapor and significantly reduce the fire hazard.
Lasers [ •■ • When in doubt, require wearing of laser safety eyewear. • Treat handheld laser devices ajs if they were a loaded
weapon. • Do not aim laser rangefindersfor target designators at
nontarget personnel, vehicles, or passing aircraft. • Do not place hands in front of any laser device. • When using binoculars or image magnification devices in
area of lasers, ensure proper filter is being used. • Do not perform maintenance work on laser systems until
power is off and residual charge in any power supply capacitors has been bled off. • When maintenance must be performed on "on line" laser
systems, output must be blocked or enclosed.
APU starting procedures • Under normal operating conditions, start APU only when
performing preflight cockpit equipment checks or during parking and shutdown sequence, as specified in the operator's manual. • As APU is not flight certified, do not start in flight or
during ground taxi, except in emergency.
Visual scan • Function as a total crew, exercising guidance in
appropriate ATM.
17

• Do not stop scanning to focus attention inside or outside aircraft. Scan stop of more than 3 seconds is risky. If pilot on controls must stop scanning, transfer controls; if pilot not on controls decides to stop scanning, announce decision.
Foreign object damage • Ensure that bivouac areas are clear of aircraft approach
paths, landing pads, and departure paths to prevent loose items from being affected by rotor wash and injuring personnel or damaging aircraft. • Require that FOD checks be performed following
maintenance to reduce the possibility of loose items being ingested by aircraft engines. • Ensure that approach/hover/departure is high enough
not to affect loose debris in damaged areas. Avoid areas littered with items such as. metal roofing sheets or plywood, which could become airborne and fly through the rotor system or injure personnel in the area. • Recon unimproved landing and pickup zones for FOD
prior to use.
18

SectiohIV Ground Opera!
This section addresses areas of concern in ground operations. Listed under each area are actions leaders
should take to reduce the hazards.
All Vehlcl PMCS • Stress that daily PMCS is critical. • Ensure that operators know that, in severe environmental
conditions, they must perform daily PMCS even if equipment is not used. • Stress that drivers must perform special requirements
covered in the "Operating Under Unusual Conditions" section of their respective operators manual. • Ensure that chock blocks are used as required.
Off-road driving • Ensure drivers refer to appropriate vehicle operator's
19

manual for "Operating Under Unusual Conditions." • Provide instruction in vehicle control in strong wind
conditions, particularly on narrow, winding mountain roads. • Ensure that wheeled-vehicle drivers receive handsron
training in driving in mud and rocky terrain to include the following:
D Use low gear (or low range) to pull slowly out of mud. D Increase traction in mud by placing boards, brush, or
similar material under the wheels. D When driving through mud, select a low gear, roll onto
the soft area at a medium speed for the selected gear, and carefully maintain a steady throttle until reaching solid ground.
n Brake gradually or allow vehicle to roll to halt. Stop on downhill slope when possible. (Abrupt stops may cause vehicle to sink into mud and become stuck.)
D Cross shallow ditches by shifting into low gear or range and proceed slowly.
D Enter ditches obliquely so that one wheel leaves the ditch as the other wheel on the same axle enters it.
D Do not attempt to straddle large boulders; they will damage axles and other low parts of the vehicle.
P Drive slowly in rocky terrain, and carry an extra spare tire.
° Remove stones between tires to prevent breaking sidewall D FM 21-305 provides additional guidance.
Built-up areas/local driving • Provide instruction on local driving customs and practices. • Stress need for constant alertness and always to expect
drivers of civilian vehicles, to do the unexpected.
Speed • Establish and enforce safe speed limits for various
vehicles, roads, and envirqnmental conditions.
Safety belts • Enforce the use of safety belts.
20

Driver selection • Paii* an experienced driver with an inexperienced one to
provide Supervision and hands-on training.
Rollovers • Practice rollover crew drills. • Instruct drivers on conditions that can lead to rollovers:
steep slopes, ditches, sharp curves, etc. • Enforce use of safety belts by crew and passengers. • Ensure equipment is secure to; prevent injury from falling
or shifting equipment or cargo. j • Enforce posted and briefed speed limits. • Remind drivers to slow down.in limited visibility, on
rough terrain, and during inclement weather. • Caution drivers to avoid steep slopes and narrow trails.
(Leaders must also keep this in mind when planning vehicle moves.) • Remind drivers to give special care to tires, tracks, and
suspension inspections. • Caution drivers to drive at moderate speed and make
wide turns at slow speed to maintain vehicle control (especially critical in off-road driving).
Backing • Ensure drivers use ground guides (see ground-guiding
section on page 48).
Passengers/cargo transport • Supervise cargo loading to ensure load is secured and
weight is correctly distributed (especially when traveling over off-road terrain). • Enforce wear of safety belts and helmets. • Use fixed seating in truck cargo beds. • In cargo beds without fixed seating, instruct passengers
to remain seated within truck body.
21

Crew coordination • Stress importance of maintaining crew communication. • Remind drivers and track commanders to warn crews and
passengers when they are about to cross a ditch, climb an obstacle, or take any action likely to catch occupants off balance.
Tracked Vehicles Hatches and latches • Make sure safety pins are present, operational, and used. • Require daily PMCS checks to ensure hatches and doors
are functioning correctly. • Notify crew of hatches and doors that are unserviceable. • Ensure helmets are worn. • Ensure bad latches and pins are replaced immediately. • Require crews to cheqk hatch, latch, and pin function
before and after mission.
Turrets • Remind crews to maintain proper communications
between crewmembers at all times. • Brief and train crewmembers and passengers about
turret hazards. . • Advise crew and passengers on the tactical situation so
they can anticipate turret movements. • Stress importance pf announcing "power" before
traversing turret. • Remind crews to turni turret power off before leaving
turret station.
Fires • Practice crew drills for emergency fire escape. • Require complete electrical inspection in accordance
with appropriate operators manual (no loose connections, no frayed or worn wires, and no wires that run over hot or sharp objects). • Ensure that fuel systems are inspected for leaks,iand
22

ensure lines do not run over sharp objects or rub, which can cause breaks or tears. • Train/supervise crew activities involving ammunition. • Require inspection of fire extinguisher bottles to ensure
they have been tested/weighed and properly connected to discharge lines and external pull handles. • Require inspection of fire extinguishers and refresher
instruction for crewmembers in proper extinguisher operation.
General • Ensure soldiers get help to mount equipment and
vehicles and to load heavy objects, i • Require that head protection be worn in and around
vehicles. • Stress hazards of slippery footgear and slippery vehicle
surfaces. • Emphasize use of gloves (protection from extremely hot
surfaces) and maintaining three points of contact while moving about the vehicle/equipment. • Do not allow soldiers to jump from vehicles.
Water Safety General • Perform risk assessment of water operations. Consider
time of operation (day vs. night), location, current speed, depth of water, entry and exit routes, and bottom topography of body of water involved. • Ensure personnel are trained in water safety. Ensure
appropriate publications on water operations are available and followed. • Identify nonswimmers in the unit. Provide appropriate
training required for the situation. • Ensure availability of sufficient flotation devices and
lifesaving, communication, and first-aid equipment for the operation. • Conduct thorough inspection of all equipment. Predip
23

necessary equipment to detect leaks. Inspect flotation devices for serviceability.
Convoy Checklists ~
The following checklists are for use by commanders, liaison team members, convoy planners, and unit safety personnel to ensure that convoys are professionally and safely planned. Route selection Ask the convoy commander or convoy planner these questions. • Has map reconnaissance been completed? • Has a physical reconnaissance been made of the entire
route? • Can all vehicles clear bridges, underpasses, tunnels, and
other clearance and weight limits? If not, have alternate routes been selected? • Can all vehicles maintain minimum speed limits? If not,
have alternate routes beer^ selected? • Have urban or potentially congested areas been identified? • To avoid congestion, have alternate routes been selected? • Has convoy movement been planned to avoid peak
traffic periods? • Have alternate routes, been selected for vehicles
transporting oxygen, acetylene, or other compressed gases? • Have strip maps of the entire route been prepared and
issued to drivers? • Does each convoy vehiqle have at least one strip map? • Have traffic control ppints been established at hazardous
locations?
Start and release points Ask the convoy commander or convoy planner at battalion level these questions. • Is adequate space available for vehicle organization and
lineup at start point? • Is sufficient space available for maneuvering of yehicles,
sequential lineup of vehicles, and march units and serials?
24

• Has arrival time a,t release point been established? • Is adequate space available for safe vehicle release?
Controllgd-access highways If convoy movement will take place on controlled-access highways (those where entry and exit is permitted only at specific points), ask the convoy commander or convoy planner these questions. • Have halt areas been identified along the route? • Has a 15-minute halt been scheduled after the first hour,
and 10-minute halts every 2 hours thereafter? • Are all halts planned in designated rest areas or off-road
assembly areas? • Have all halt areas been physically reconned to ensure
sufficient capacity? • Are halt areas shown on strip maps? • Are halts scheduled to avoid overloading of halt areas? • Do areas for meal halts contain the following?
o Sufficient areas for cooking and eating? D Waste disposal facilities? ^Latrines?
• Do bivouac sites contain the fqllowing? ^Sufficient area for cooking, eating, and sleeping? °Waste disposal facilities? ^Latrines? D Area for vehicle maintenance? D Security for cargo?
Conventional highways Ask the convoy commander or convoy planner these questions. • Have halt areas been identified along the route? • Has a 15-minute halt been scheduled after the first hour,
and 10-minute halts every 2 hours thereafter? • Are halt times adjusted to permit halts at safe locations?
^Location is away from urban or heavily congested areas. ^Terrain permits vehicles to completely clear highway
25

traffic lanes. D Location avoids curves or reverse sides of hills (blind
spots from approaching vehicles). • ^Location permits minimum of 3 feet between parked
vehicles. • Are halt areas shown on strip maps?
Convoy organization Ask the convoy commander or convoy planner these questions. • Are convoys of more than 20 vehicles separated
into serials? • Are serials divided into march units if required? • Is convoy element size based on capacity of halt/bivouac
areas? • Have the following personnel been designated and
briefed? DCommanders for each serial and march unit. n Pace setter. D Trail party. D Claims officer. D Drivers and assistant drivers. D Vehicle recovery personnel.
• Are vehicles transporting troops not the last vehicle in a serial or march unit? • Are empty vehicles or those carrying general cargo used
as buffers (i.e., last vehicle in convoy)? • Are recovery and medical vehicles near the rear of the
convoy? • Is the convoy organized initially with 5 minutes between
march units and 10 minutes between serials? • Have adjustments to time gaps been identified and
planned for? • Are convoy and convpy element commanders positioned
for best convoy control? . . [ ' • Has convoy operation during periods of darkness been
avoided? • Are the following proper vehicle intervals planned?
26

^Controlled access highway: 220 yards, n Rural conventional highway? 150 yards. °Urban conventional highway: 50 yards.
• Is trie convoy commander checklist completed?
* Convoy lD and communications Ask the convoy commander or convoy planner these questions. • Are lead, rear, and element command vehicles correctly
identified? • Are flags and signs correctly mounted on each vehicle? • Is each convoy identified by a-.convoy clearance number? • Has method of communication been decided? • Has radio equipment (ideally, 2-way radio in first and last
vehicle of each serial and unit) been checked and assigned to vehicles? • Have signal operating instructions been provided to
vehicles with radios and the liaison team? • Have personnel been briefed on visual and audio signals? • Have road signs and messages been constructed and
placed as required?
Logistical support Ask the convoy commander or convoy planner these questions. • Are medical personnel scheduled and posted in rear of
convoy? • Are sufficient food and mess personnel and facilities
available? • Do all personnel have proper clothing and equipment? • Has weather briefing been obtained for duration of
convoy operation? • Have provisions been made for obtaining weather
updates? • Is special equipment available based on weather
requirements? • Have effects of weather been considered and planned for
27

(routes, halts, meals, and bivouacs)?
Convoy personnel briefing Ask ONLY the convoy commander whether leaders have given drivers the following instructions. • Permit emergency halts only on roadside of controlled
access highways. • Permit only guards and maintenance personnel on traffic
side of convoy during halts on conventional highways. • Caution personnel to remain clear of areas between
vehicles during halts. • Require that drivers and assistant drivers perform
vehicle operator maintenance and check cargo security at every stop. • Have guards stand 50 yards behind departing convoy to
warn traffic on conventional highways. • Require that assistant drivers remain awake and alert. • Ensure that reflectors,and warning devices are in place
before beginning maintenance. • Require use of warning lights during periods of darkness
or low visibility. • Stress that convoy begins only at convoy commander's
signal. • Establish that, in case,,of accident, main column does not
stop to provide assistance« Next following vehicle provides immediate assistance to accident vehicle. • Establish that the first officer or NCO at accident scene
takes charge.
Refueling and maintenance halts • Ask the convoy planner these questions. a 3i! • Are sufficient supplies of diesel, mogas, and oil available
for refueling? • Are refueling halts planned for bivouacs? ; • If not, is refueling planned for noon meal halt? \ • Have vehicle operator maintenance checks been
scheduled for every halt? Who inspects the drivers for signs of fatigue? What is the plan for driver changes? 28

• Are sufficient maintenance vehicles and equipment available in rear of convoy? • Are spare vehicles available for emergencies? • Are all vehicle refuelers properly equipped and trained?
Vehicle preparation Ask the convoy planner these questions. • Have participating units been notified as much in
advance as possible? • Have all vehicles been inspected in vehicle assembly
area? • Have all spot corrections been made on vehicles? • Does the loading and unloading plan include—
^Designation of persons to execute plan? nUmes and locations for loading and unloading? ^Orders not to load troops in vehicles with motor fuel or
hazardous cargo?
Driver preparation Ask the unit or convoy commander these questions. • Are all drivers qualified in assigned vehicles? • Are drivers and assistant drivers assigned to each
vehicle? • Do all drivers have government drivers license OF 346? • If not, have arrangements been made to test drivers or
obtain alternate drivers? • Are experienced drivers being« used to the maximum
extent possible? • If not, are less-experienced drivers scheduled for
training? • Have drivers and assistant drivers been scheduled to
split driving periods? • Have all drivers received adequate rest prior to
departure?
General precautions and procedures Check these items yourself or ask the convoy commander.
29

• Are warning lights on first and last vehicle? • Is a basic convoy warning kit in each vehicle? • Are fire extinguishers and first aid kits in each vehicle? • Are vehicles carrying hazardous material marked? • Do road guards have safety warning equipment? • Are medical, maintenance, wrecker, and recovery
vehicles marked? • Are accident procedures for the convoy established, to
include— °Trail officer designated to supervise care of injured and
disposition of damaged vehicles? ^Notification of convoy commander, safety officer, and
civilian police of accidents? ^Reporting of accidents IAW AR 385-40?
Combqt Soldiering Parachuting • Brief all jumpers on drop zone (DZ) conditions. • Limit rucksack weight to jumper's capability; excess
weight will increase the probability of a weak exit and a towed jumper. • Ensure that jumpers use appropriate wraps and ties to
secure rucksack, weapon container, and any other exposed equipment to prevent injury and entanglement with the static line. • Ensure that jumpers who wear corrective lenses wear
them while jumping. • Review reserve parachute activation procedures and
ensure jumpers know what method to use. • Review procedures fqr jumping with weapons exposed. • Ensure ONLY red cabon lights are used 30 minutes before
and during night jumps. Use of white lights will destroy night vision. • Rehearse actions on DZ. • Review parachute landing fall techniques and emergency
procedures. !
• Conduct aircraft crash drills. • Use door bundles forjextra equipment and ammunition.
30

• Stress exit interval, door position, and correct exit procedures. • Review crossloading plan.
Rappellihg/fast rope • Use trained rappellmaster. • Conduct briefing with aircrew* • Inspect all equipment. • Keep rucksacks under 50 pounds. • Require use of helmets and gloves. • Prohibit cutting of ropes except in an emergency—and
only after visual confirmation that rope is clear. Landing zone selection • When selecting helicopter landing sites, pick areas that
minimize the amount of dust and debris that might be disturbed and that are clear of powerlines, trees, brush, or other obstacles. Mark unmovable obstacles.
Weapons Handling • Do not tolerate horseplay. • Ensure weapons are kept on safe. • Remind soldiers to consider weapons loaded at all times
and to check chamber often. • Instruct soldiers to load only on command or IAW an SOR • Remind soldiers to know then) target and their allies. • Control ammo. • Highlight danger of "cookoffs/' • Rehearse immediate-action drills for misfire/weapons
malfunction. • Remind soldiers to clear for backblast when firing
anti-armor weapons. • Ensure that soldiers receive correct ammunition for the
weapon system. Refer to the operator's manual when in doubt.
31

Maintenance • Establish weapons lubrication policy. • Require that weapons, ammo, and magazines be kept
clean. • Require that muzzles be covered to prevent clogging. • Conduct headspace and timing in accordance with IM.
Caution soldiers not to rely on memory, to always verify.
Lasers • Use only trained personnel to operate/handle lasers. • Caution personnel to fire lasers only at designated targets
and to never fire at surfaces such as glass, mirrors, and windows. • Ensure laser safety filters are installed on binoculars and
other optical devices when observing laser operations. • Ensure eye protection is available and worn. • Ensure laser safety procedures are established and
implemented for each device being used. • Conduct safety briefings on all Class II and higher lasers,
specifying the needed eye<protection and viewing limitations.
Fratricide General • Always ensure positive target identification. • Ensure task standards are followed (i.e., weapons
handling, powder-charge preparation, fire and maneuver). • Ensure warnings andireports are timely and accurate. • Ensure soldiers are well trained in land navigation.
Reconnoiter when possible. • Anticipate the effects pi stress and fatigue on soldiers. • Anticipate the effects of battle (limited visibility,
unsynchronized actions, chaos and confusion). i
Mission • Conduct rehearsals with leaders and soldiers. • Know and physicallysidentify all attachments, i
32

• Know the commander's intent • Keep plans simple and synchronized. • Conduct a fratricide risk assessment.
Combatants • Know and be able to positively identify the enemy
(uniforms, weapons, special markings). • Know the effects of terrain and weather in offering
advantages to combatant operations. • Know equipment capabilities of combatants.
Terrain and weather i • Know and use OCOKA factor!. • Know navigation obstacles and enhancements. • Become familiar with the operational terrain; reconnoiter
when possible. • Identify battlefield hazards. • Determine the impact of potential battlefield obscuration. • Anticipate the effects of weather.
i
Troops and equipment • Ensure that soldiers are physically fit and well
conditioned. • Ensure that soldiers are proficient in combat ID and ROE. • Train in all collective and individual tasks. • Determine readiness of attachments. • Train to standard on NVGs and land navigation
equipment. • Ensure redundancy in communications equipment. • Know weapons systems' capabilities.
Time • Control the pace of the operation. • Develop sleep/work plans for continuous operations. • Provide sufficient preparation time.
33

Other prevention methods • Conduct crew and battle drills. • Enforce assembly area procedures. • Use training devices when possible. • Use distinctive/thermal markings when tactically sound. • Use navigation aids.
NBC Operations MOPP • Caution soldiers that PMCS is critical. • Remind soldiers that amyl acetate (banana oil) vapor is
toxic and flammable. Checking the seal of the protective mask should be done in a well-ventilated area away from heat and flames. • Increase WBGT by 1ft degrees for operations in MOPP.
Increase water consumption correspondingly. • Practice drinking while wearing mask. • Remind soldiers that command drinking policy is even
more important when in MOPP. • Plan additional time to conduct operations (up to 6 times
longer). Rotate personnel more often. • Allow personnel to loosen protective clothing as situation
permits. • Employ buddy system to check for heat injuries. Ensure
leaders are included. • Delegate tasks to subordinates to reduce stress and
fatigue. (Experience shows that leaders are most likely to suffer adverse effects of operating in MOPP.)
■i i
M43 protective mask • Do not expose bloweu or battery pack to temperatures
above 160 degrees. • Do not allow battery pack or blower to remain in contact
with hot metal surfaces. • Remind personnel that prong-type Ml 7 mask inserts can
cause injuries.
34

Night vision Pevlces" Preparation for use • Ensure soldiers get adequate rest and eat well-balanced
meals. • Advise soldiers to avoid use of tobacco, alcohol, and
self-medication. (They impair night vision.) • Remind users to avoid bright light, including sunlight,
and to wear sunglasses when outside.
Driving • Warn drivers against overconfidence and to avoid normal
tendency to overdrive capabilities pf goggles. • Remind users to continuouslymse scanning techniques. • Remind users that effectiveness is greatly reduced in
dust, haze, fog, smoke, and rain. Slow down. • Remind users to keep light sources outside the field of
view of goggles.
Personnel • Ensure eye guards are in place to prevent recoil injury. • Caution soldiers that haste will cause accidents.
Equipment damage • Ensure personnel are property trained in maintenance
and use. • Remind users to avoid pointing goggles into the wind if
possible. • Ensure that users remove all dust, dirt and mud from
goggles after use. • Remind users to keep carrying case closed unless
removing or replacing items. • Remind users to protect optics from light sources, intense
heat, direct sunlight, dust, dirt, mud, and sand.
Ammunition and Explosives General precautions • Expose to ammunition and explosives only the minimum
35

number of people and amount of equipment necessary. • Handle ammunition carefully. Containers must not be
tumbled, dropped, thrown, rolled, or dragged (unless designed for dragging). • Make provisions to evaluate and, if necessary, segregate
damaged ammunition. • Don't use sparking metallic tools on explosives; take
precautions to reduce static electricity discharge. • Determine if your area of operations is susceptible to
electrical storms and establish lightning protection procedures. • Do not allow soldiers, to collect dud rounds for souvenirs.
Duds of any type should not be disturbed; they should be marked and arrangements made with EOD for disposal. • Monitor suspension/restriction notices. Suspended lots
should be visibly marked and physically separated from serviceable unit basic load (UBL). • Do not remove ammunition from its packaging until you
have to. Ammunition containers provide protection from hazards such as moisture and static electricity. • Wear leather gloves when working with banding
materials or wooden boxes. • Keep the area within 50 feet of ammunition clear of
vegetation, refuse, empty packing materials, and other hazards that could cause 4 fire to spread to the ammunition. • Keep water barrels/tubs at locations where WP/PWP
ammunition is kept. These barrels/tubs are used to immerse leaking WP/PWP rounds and for first-aid for WP/PWP burns. • Store ammunition in dugouts /depressions below ground
level to reduce exposure to heat.
Unexploded ordnance (UXO) • Brief soldiers on dangers of UXO. • Establish procedures for marking and handling UXO. • Do not allow soldiers to collect dud rounds, boijriblets, or
suspected UXO for souvenirs. • Have NCOs perform shakedown inspections while in
36

cantonment areas. • Be a constant reminder to personnel that UXO can kill. • Be alert while crossing terrain and areas where prior
fighting or training may have taken place. • Remind soldiers: If you don't know what it is, don't mess
with it! Fire precautions • Keep all flammable materials and all flame- or
spark-producing devices away from ammunition and explosives. This includes matches, lighted cigarettes, petroleum products, and vehicles with leaking fluids. • Ensure fire extinguishers are present wherever
ammunition is handled, stored, or transported. • In case of fire, evacuate the area to a distance of at least
400 meters and take cover. • Clearly post "Add no water" signs to
ammunition-containing materials (such as thermite or triethyl aluminum (TEA/TPA)) that react violently with water. These fires can be smothered with sand or earth.
Loading precautions • Ensure vehicle brakes are set, engine is turned off, and at
least one wheel is chocked to prevent movement in either direction during loading and unloading. • Ensure ammunition weight is evenly distributed and the
load is secured to prevent movement. • Ensure vehicles and trailers loaded with ammunition are
parked at least 50 feet from vehicles and trailers loaded with flammable liquids. • Ensure tailgates and safety straps are secured.
Storage precautions • Protect ammunition, particularly unpackaged
ammunition, from direct sun. However, tarpaulins or other covers placed directly on ammunition could cause deterioration, so a ventilation space must be provided. • Disperse ammunition to minimize loss in the event of
37

fire, accidental explosion, or nonfriendly actions. • Conform to quantity-distance standards for storage of
ammunition and explosives. • Ensure that ammunition of unknown origin and captured
ammunition is examined, evaluated, and classified by qualified personnel and stored in a designated collection point. • When storing ammunition, use earthen barriers and
heavily constructed buildings to prevent propagation and to protect personnel and materiel from the effects of an explosion. • Store ammunition containing white phosphorous (WP)
in an upright position (WI? liquifies at high temperatures and ballistics will be affected by horizontal storage).
. . '- i. .
■ ; ! ■■ ■ *■. "
Pyrotechnics • Ensure soldiers know?that simulatqr, flash powder ignites
instantly and explosively and that simulators should not be exposed to intense heat and direct sunlight. Remind them never to cut open or hand?ignite these devices and to mark but not to touch duds and;seek EOD guidance for handling and disposal. • Remind soldiers, wluje training, not to throw or detonate
simulators, flares, or smoke devices near troops, tents, vehicles, or flammable or combustible materials. • Remind soldiers to always roll down sleeves and wear
gloves and helmets when using simulators. Q Warn soldiers not to drop or mishandle ATWESS or
Hoffman device cartridges. • Ensure that all crews are in vehicle when using Hoffman
and be sure to clear to the fear when using ATWESS. • Remind soldiers to beware of missile hazards when
simulators are used on rocky terrain.
Maintenance * General, .. ..<.-.■■ , r ,u ■-. ■ * ■■ < :■■ • Enforce maintenance discipline by ensuring thaf
operator/crew PMCS is performed correctly. 38

• Ensure that current maintenance and equipment publications are accessible to equipment operators, mechanics, and leaders.
Hand and power tools • Ensure that hand and power tools are inspected and
tested before use. • Ensure that continued periodic inspections are conducted
to assure safe operating condition and proper maintenance. Track checks • Ensure proper PMCS is conducted.; • Ensure that vehicle suspension is checked for excessive
wear and loose, broken, or missing-bolts before, during, and after operation. • Ensure that tracks are lubed often to flush out dirt-grease
mixture.
Tire checks • Ensure that tires are checked often for cuts and wear. • Be aware that the combination of heat and rough ground
shortens tire life.
Tire repair ' >< - f *■ <- • Insist that mechanics always use a tire cage. • Remind mechanics to use proper tools, to keep hands out
of the cage while inflating, and to use a 10-foot extension. • Remind mechanics to use the buddy system when lifting,
removing, and installing large tires.
Batteries • Remind personnel to keep air vents on caps clean to
allow gas release and avoid pressure buildup. • Ensure that personnel check levels often. Battery
electrolyte water evaporates faster in extremely hot weather. • Ensure personnel adjust battery electrolyte levels during
the day. (When batteries cool, levels will lower slightly and overflow will be avoided.)
39

• Require the use of slave cables. Only as a last resort should jumper cables be used. Remind personnel to beware of sparks as jumper cables are attached around the battery's gaseous vapors. • Ensure mechanics adjust voltage regulators to lowest
setting possible to avoid overcharging. • Require use of face shields, goggles, aprons, and gloves
when servicing batteries.
Recovery operations • Remind recovery personnel to use a braking vehicle
when required by FM 20-22 and to always use correct hookup procedures. • Caution personnel not to position themselves between
vehicles due to the chance*of being pinned between the vehicles. • Ensure that all vehicles are equipped for self-recovery as
appropriate (tow ropes /cables and rope ladders, pierced steel planking or other traction material to place under tires). • Caution soldiers to keep hands and clothing at least 5 feet
from winch when rewinding cable after recovery operations. • Enforce safe towing speeds. • Match driver to mission. • Fabricate ground support devices for outrigger support
in soft soil. |
Eye protection • Require goggles for work under vehicles. • Require goggles for working with or around batteries.
POL • Remind personnel to pse extreme care when changing
hot lubricants (they can burn). I • Take care to prevent sand/dust water contamination of
POL.
Radiators/coolant
40

• Remind personnel to use caution when removing radiator caps from hot vehicles and to check radiator fluids often to avoid overheating. (Use hand to remove cap only if cool to touch. Turn cap slowly to release pressure.) • Remind personnel to keep radiators and airflow areas
clean and free of debris to avoid rupture of radiators. • Require that radiator caps be tested often. (Caps control
radiator pressure.)
Grounding • Ensure that portable electric power tools and power
generation equipment are properly grounded (see grounding section on next page).
Communications Antennas • Remind personnel that, when erecting RC-292/OE254
antennas, they must stay twice the distance from powerlines as the length of the antenna. • Stress that soldiers have been killed by falling antenna
head sections. • Require that personnel wear eye protection, head
protection, and gloves when erecting antennas. • Allow no substitutes for antenna mast sections
(camouflage poles have been a fatal alternative). • If, for any reason, an assembled antenna head must be
left on the ground, ensure it is guarded to prevent others from walking into it. Tip protectors are a must.
Power lines • Identify power lines in operational areas to all soldiers. • Tie down antennas when in areas of power lines (antenna
tip should be no lower than 7 feet to preclude eye injuries). Use tip protectors at all times. • Warn soldiers never to throw WD1 over power lines.
Electrical storms
41

• If possible, do not operate radios, telephones, or switchboards during electrical storms. • Disconnect electrical equipment from power sources and
antennas if the situation permits. • If equipment must be used, converse as little as possible.
Return calls after the storm.
Grounding • Ensure that all electrical equipment is grounded (see next
section).
Grounding General • Remind personnel that care must be given to preventing
static electricity. • Ensure that personnel know grounding procedures (FM
20-31). • Instruct personnel to dig/drive ground rods to a depth
of 6 feet. • Remind personnel to keep soil moist around grounding
rods to increase conductivity and to keep ground rods, straps, and connections free of paint and oils.
Fuel Handling General • Establish a waste POL point. • Strictly enforce no-smoking rules. • Post no-smoking signs around the area of operation, and
prohibit presence of matches and lighters in vehicle- maintenance areas.
Fire extinguishers • Have extinguishers of correct type available and ready.
Extinguishers fastened in brackets are not considered readily available. • Ensure that extinguishers are in good operating condition
and that operators know how to use them.
42

Flame- and spark-producing equipment • Avoid having open flames, stoves, electrical tools,
catalytic converters, and other similar potentially hazardous equipment in petroleum storage, transfer, and operating areas. • Keep all possible sources of vapor ignition away from
fuel storage, transfer, and operating areas. • In case of fire in a tank compartment, stop fuel flow and
close the manhole cover. • Do not drag hoses across the rear deck of combat vehicles
or near their exhaust systems. Armor plates and exhaust pipes become hot during operation and could damage hoses or cause a fire. • Do not drive near a fire until it is safe to do so. • Do not use equipment without flame or spark arresters
on or near petroleum storage or handling areas.
Explosion-proof equipment • Use only authorized equipment and explosion-proof
lights and flashlights in petroleum hazard areas. • Ensure that all equipment is in good operating
condition.
Clothing • Avoid wearing wool and synthetic clothing or
combinations while engaged in petroleum operations. (Electrostatic charges will build up.) • Instruct crews to bond themselves to equipment by
placing both bare hands on it for at least 10 seconds before beginning any fuel operation such as fuel circulation or sampling, regardless of what materials are in their clothing. (Remind them to use extra caution in cold weather.) • Ensure crews wear fuel-resistant or rubber gloves and
protective clothing to keep fufcl off their skin. Warn them to wash immediately with soap and water if they get any fuel on their skin. • Remind crews to remove fuel-soaked clothes immediately
43

in the following manner: n Wet clothes with water before removing them. a If no water is available, person should ground himself by
holding a piece of grounded equipment with both hands for a moment before removing clothes. This grounding action reduces the danger of a static spark igniting the fuel-soaked clothes. • Coordinate with QM launcify to wash clothing with an
antistatic additive to reduce static electricity.
Bonding and grounding equipment • Properly bond and ground all equipment before engaging
in any petroleum operations (see grounding section on page 42). • Remind personnel to ground themselves by touching a
large metal object before handling fuel hoses and nozzles. • Ensure that bonding and grounding equipment is
inspected and tested regularly.
Notched-handled nozzles • Do not use nozzles with notched, stay-open handles. If
such nozzles must be used, they must be modified so that they'must be held open by hand to operate.
Spills and leaks • Avoid spills and leaks. Use drainage tubes or containers
to catch leaking or spilling product. • Dispose of collected products properly. • Immediately clean up spills and leaks.
Inspections • Frequently inspect petroleum storage, handling, and
working areas to ensure safety requirements are met. • Correct any potentially hazardous condition immediately. • Perform weekly fuel sample checks.
44

Ventilation • Make sure that work areas have sufficient ventilation. • Avoid breathing fuel vapors. Stay on the windward side
of open storage hatches while engaged in fuel-handling operations.
Tank vehicle operations • Ensure that crews maintain required distances between
vehicles while engaged in fuel-handling operations or when vehicles are parked. • Remind crews to—
D Use ground guides when backing a vehicle. o Chock wheels of parked vehicles to prevent movement in
either direction. D Use tire chains on fuel tankers when more traction is
needed on ice or snow. Further remind crews to remove chains when they hit dry pavement.
n Not fill vehicles to full capacity (allow for expansion). a Keep tank hatches open during refueling to allow vapors
to escape. ° Close hatches immediately after refueling. ° Use bottom loading when possible.
Bivouac Sleeping locations • Establish a designated sleeping area. If the tactical
situation permits, mark perimeter with engineer tape and/or chem lights. • Post unit perimeter security personnel equipped with
lights for signaling. Ensure they have been thoroughly briefed on their duties and responsibilities. • Ensure vehicles are not parked where they can roll
toward sleeping personnel or on an incline without chock blocks and parking brakes locked. Dismount points
45

• Establish dismount points beyond which vehicles may not move without ground guides. • Use current challenge and password. • Know the chain of command.
Ground guiding • Require all vehicles to use ground guides, especially
during periods of darkness and reduced visibility. • Require tracked vehicles to use at least two ground
guides when backing or moving within or through an assembly area at any time. • Remind vehicle operators that they must be able to see
ground guides at all times.
Tents • Ensure that all personnel fueling or operating tent stoves
or lanterns are properly trained and supervised. • Ensure that stove pipes extend above the top of tents, that
spark arresters are in use, and that tents are checked regularly. • Ensure that stoves are not operated at full/max capacity. • Ensure operable fire extinguishers are accessible and that
operators are assigned and knowledgeable. • Require that electrical circuits be routinely inspected for
possible overload condition. • Ensure that personnel prevent stove fuel containers and
fuel hoses from leaking and require immediate cleanup of any spills. • Establish and enforce smoking areas. • Use tent liners as added insulation from heat and cold. • If rebar is used to stake tents, cover the stakes to protect
personnel from being cut on the sharp edges.
Wind • Ensure sufficient anchorage is provided for tents in sandy
and high-wind conditions.
46

Mess Operations Sanitation • Ensure all food waste is properly disposed of. If buried,
do so daily and at least 30 meters from food preparation areas. • Ensure food preparation area is at least 100 meters from
latrines and 50 meters from incinerators. • Ensure food is protected from contamination. • Monitor food handlers and other soldiers to ensure
sanitation standards are maintained.
Fire/explosion • Ensure kitchen fuel storage area is at least 15 meters from
working area and is marked as a hazard area. • Ensure operable fire extinguishers are accessible (with
designated operators) in mess-tent area and at stove-lighting and fuel-storage areas. • Ensure all personnel fueling/operating stoves, immersion
heaters, and burners are properly trained. • Make operators aware that increased heat will add
pressure to fuel tanks and fuel cans and that particular attention should be given M2 burners. • Keep mess-tent exits marked and clear of obstructions.
Cuts/burns • Remind personnel to—
D Keep knives sharp, and use the right knife for the job D Not use knives or other sharp implements to open tray
packs (use modified can opener and P38). n Tut heated tray packs and cans to right or left when
opening to prevent burns from squirting hot juices.
Materiel Handling ~ Lift/cany procedures • Enforce use of correct technique:
D Never carry a load heavier than can be managed with ease.
47

D When in doubt, get assistance. o Bend from hips and knees, not just the waist. D Cany heavy objects close to body. D Avoid sudden movements; move slowly and deliberately. D Do not carry unbalanced loads.
Slips, trips, and falls • Supervise operations. • Ensure that areas are clear of obstructions and hazards,
and remind personnel to use care when vision is obstructed by objects being carried. • Caution personnel not to jump or step from cargo
vehicles while carrying loads; tell them to use a ramp or get help. • Remind personnel to use care when carrying loads over
rough surfaces.
Ground Guiding General • Train drivers in the correct use of ground guides and all
personnel in how to perform as ground guides. • Stress importance of ground guides when traveling cross
country during periods of limited visibility. • Remind drivers to always use one or more ground guides
while backing. • Equip ground guides with suitable lights during periods
of limited visibility/darkness. • Caution ground guides to observe obstacles to prevent
falling down.
Construction Equipment operation • Remind operators that construction equipment may be
very unstable off road. • Ensure operators and supervisors check outriggers for
stability. This is especially critical in soil where a surface crust exists.
48

• Ensure safety belts are worn at all times when operating equipment. • Ensure rollover protection systems are installed, and erect
sun umbrellas on slow-speed equipment such as rollers and compactors. • Establish operator/crew equipment rollover drills. • Ensure ground guides are used at construction sites and
in congested areas and bivouac locations. • Ensure all prime movers and trailer brake systems are
fully operational on equipment haulers and other M915 series vehicles. • Rehearse braking and downhill driving procedures with
all operators. • Appoint a site safety supervisor for large earthwork or
building construction sites. • Ensure helmets or hardhats are worn on construction
sites. • Control vehicle, pedestrian, and troop access to sites. • When excavating, ensure excavation walls are reinforced
to prevent cave-ins. • Ensure all personnel on the site know what to do in case
of flash floods. • Ensure all electrical equipment is grounded, and ground
and bond when transferring fuel (see section on grounding). • Ensure safety equipment (goggles, gloves, welding
masks, aprons, dust respirators, etc.) is available and used. • Ensure personnel do not shortcut safety procedures due
to heat discomfort. • Ensure all hazards are considered during both design
and construction. • Establish policies and procedures for recovery of
equipment. • Ensure gloves are worn when working with metal tools
and materials exposed to heat from the sun. • Emphasize need for spill control. Remind personnel to
remove contaminated soil from operational areas at once because of extreme fire and vapor hazards in hot, dry conditions.
49

Combat Engineer Demolitions • Ensure proper procedures and tools are used when
working with demolitions (i.e., crimper, flak jacket, helmet, and nonsparking tools). • Ensure that items having potential for static electric
charges are grounded and that anti-static laundry additives, anti-static sprays, and individual grounding are used. • Ensure demolitions are stored properly. Provide shade
and ventilation, separate and sandbag-sensitive initiation components, and protect emplaced demolitions (especially blasting caps) from direct heat. • When detonating explosives, make sure survivable safe
distance or cover is used. • Ensure that explosives are kept away from food and eyes
and that personnel clean hands after handling explosives. Landmines • Ensure that only the AN/PSS-ll/12 mine detector is
used. • Ensure that soldiers are aware of mines by improving
their mine-recognition skills. • Maintain dispersion between soldiers and vehicles. • Remind all personnel that pressure and tension release
anti-handling devices must have firm bases/anchors. • Ensure that static electric charges are checked for and
grounded. • Protect stored mines and fuses (shade and ventilate). • When detonating landmines, comply with proper
survivable distance and cover.
Wire obstacles • Ensure proper equipment is used and proper clothing is
worn (barbed-wire gloves, sleeves rolled down) when constructing wire obstacles.
50

Section V Port Operations
Preparation Proper preparation of both troops and equipment is essential. The following lessons learned from other deployments show how the pressure to deploy can overwhelm Army shipping performance and safety standards. Sound planning now can prevent similar occurrences.
Situation: Secondary loads not properly secured. Secondary loads were piled, scattered, or haphazardly placed in vehicles. Loose cargo fell from the vehicles as they were being loaded on heavy-equipment transports after being offloaded from ships.
Recommendation: Transportation officers and unit commanders must ensure that secondary loads are secured to prevent motion-induced damage.
51

Situation: Secondary load weights not reflected in LOGMARS/AUEL data. Logistics applications of marking and reading symbols (LOGMARS) labels reflected only empty vehicle weights. Cargo trucks, ammunition carriers, and even combat vehicles were loaded with every conceivable secondary load, but none of these loads Were reflected in the automated unit equipment list (ALtEL). In some cases, 5-ton trailers were loaded with as much as 10 tons of cargo. Ammunition carriers were full of ammunition, fuel tankers were loaded above design capacity with fuel, and main battle tanks were stuffed with main rounds, .50-caliber ammunition, hand grenades, and other explosives and supplies. In numerous cases, the weight of the secondary loads exceeded the reported weight of the vehicle by three or four times.
Recommendation: Transportation officers and unit commanders at all levels must ensure that AUEL/LOGMARS data reflect actual "as shipped" weight, not "as published" weights.
Situation: Secondary loads of hazardous materials not reflected in LOGMARS data. LOGMARS labels gave no indication that ammunition carriers were full of ammunition; maintenance trucks were loaded with oil, grease, and oxygen and acetylene tanks; or HMMWVs were carrying stinger missiles. Also, most tanks and personnel carriers were loaded with boxes of ammunition and other explosives. Some of these boxes were damaged to the extent that the ammunition and other explosives were scattered all over the interior of the vehicles. In some cases, full fuel cans were lying loose among the explosives. No attempt had been made to segregate hazardous materials. In addition, vehicles loaded with ammunition and other explosives were parked surrounded by fuel tankers. This was true both on piers and in ships.
This situation was due in large part to the lack of secondary
52

load data. As a result of the lack of data, the automated systems could not be used to prepare dangerous-goods manifests. Also, stow planners and cargo supervisors were unable to maintain segregation of hazardous materials.
Recommendation: Shippers must provide accurate LOGMARS data and segregate hazardous cargo.
Preparation checklist Use the following checklist to prepare for deployment: • Start each day with a safety briefing to combat
mission-itis and establish safety awareness. • Establish a vehicle loading plan for sea shipment. Make
sure nested vehicles (those carried in the backs of other vehicles) are included in the load plan. Include nested vehicles and blocking and bracing material requirements for all general cargo. • Do not overgross prime mover carrying a nested vehicle.
Make sure AUEL reflects the prime carrier and its nested vehicle or built-up actual height, length, and weight. • Always block, brace, and tie down both nested vehicles
and general cargo. • Make sure nested vehicles have all lifting shackles in
place in case they must be de-nested. • Inspect shackle support and supporting vehicle structure
to make sure it is in good shape and that welds on shackle bracket are sound. • Check each vehicle for condition of all lifting shackles,
proper size of shackle, and proper size of shackle pin and cotter key. • Always carry extra shackles for unit vehicles. (Shackles
often disappear, and, without shackles, the vehicle may not be shipped.) • Identify lifting shackles by painting the word "LIFT" next
to them. Paint "TIEDOWN OI^LY" next to tiedown shackles. • Establish ammunition turn-in procedures and enforce
penalties fqr violations. • Turn in all ammo and munitions. • Check each vehicle for loose rounds or pyrotechnics and
53

for munitions tucked into storage compartments. • Check pack pockets and gear pockets for loose rounds;
turn them all in. • Inspect unit gear to ensure no ammunition or other
explosives are inadvertently packed away. • Establish standard for inspections and retention of war
souvenirs. • Inspect each war souvenir for hazards and Department
of Agriculture appropriateness. • Check for critters and kill them. • Identify "sensitive class" unit cargo and make sure
AUEL reflects this status. • Identify hazardous classes of cargo, and eliminate
compatibility problems. Make sure unit AUEL accurately reflects which vehicles contain sensitive or hazardous cargo. • Do not leave loose items in vehicle cabs. During a long,
rough sea voyage, items could beat themselves and the inside of the vehicle to pieces. • Be mindful that your vehicle may be loaded on deck and
not down in a dry hold. The best way to check your load plan is to ask yourself, "If this truck were under a constant stream of sea water, would my load plan still be okay?" • Block and brace equipment in the back of trucks to the
maximum extent possible. Ships ramps sometimes exceed 45 degrees. Loose gear will tumble out. • Tie down, block, and brace all cargo. A sea voyage is
twice as rough as a road march; so don't pack for a road march. • Use plastic to wrap radios in racks located inside
vehicles and tracks. • Adjust vehicle fuel loads so that vehicles arrive at port
with tanks no more than three-quarters full. Always check with the departure port Army terminal unit for the latest in-county standards for fuel tank levels and 5-gallon fuel-can levels. Drain fuel from generator sets before packing. • If fuel tankers must be purged, make sure that all hoses
are also drained.
54

• Do not drain POL tanks and hoses onto ground. Use proper fuel drain cans and dispose of drainings per unit SOP. • Ensure that vehicles containing compressed gas cylinders
(other than a fire extinguisher) are placarded on both sides of the vehicle with standard hazardous cargo placards (available from division/corps transportation officer). • Remove oxygen and acetylene cylinders from wreckers
and maintenance vehicles. Build bottle racks in a trailer, and secure all battalion acetylene bottles in the racks.
CAUTION: Do not overgrass the trailer, stencil unit designation on each bottle. Properly placard the trailer.
• Make sure gas cylinder bottles have caps and that caps are secured. • Inspect all vehicles for fuel, oil, and other leaks. Correct
them. • Ensure that any vehicle with a brake problem has a big
steering wheel placard stating "CAUTION, NO BRAKES. DO NOT DRIVE. MOVE WITH TOW BAR ONLY." • At the start of each day, go over standard ground-guide
safety procedures and hand and arm signals. Stress ground guide use in the motor pool and vehicle preparation areas. • Ensure drinking water is available in vehicle preparation
areas.
Movement to Port Movement liaison team Experience during deployment shows that the transition from field to port is more effectively accomplished if a liaison team is created to perform the following functions: • Ensure the safe and timely processing of unit assets from
field assembly areas through marshalling areas to the port in accordance with the port-call message. Allow for adequate driver rest. • Set the tone for the move by emphasizing the
55

commander's safety standards at each phase of the movement sequence. • Perform risk assessment of movement operations, and
present the command group with options to eliminate movement to port risks. • Provide a single point of contact for all safety and
operational questions concerning equipment preparation standards for sea shipment. • Maintain liaison with port operating elements regarding
equipment preparation, U.S. Customs, Department of Agriculture standards, and the port-call message. • Resolve movement to port problems before departure to
port. • Provide a seaport element to make final vehicle shipment
decisions; for example, with one space left on the ship, do you send the A Company or the B Company vehicle? • Keep the command group and participating units
informed. • Establish controlled environments in which soldiers are
cared for and accounted for from start point through their time at the seaport of debarkation (SPOD). • Maintain unit integrity of personnel at the port. • Organize maintenance assets to assist the Port Support
Activity (PSA) in repairing vehicles in the marshalling and port areas to ensure serviceability and readiness for sea shipment.
The movement liaison team should consist of a team leader, an assistant team leader, an NCOIC, and an administrative NCO. For communication, the team Will require— • Hand-held brick-style radios. • Secure fax. • Published FM frequency. • Dedicated phone line at base and port. • Dedicated utility helicopter reserved for
maintenance/parts flights or command and control missions.
The liaison team leader should be located at the assembly area during vehicle preparation and at the port during the
56

movement to port phase. The liaison team should develop a marshalling area plan that covers— • Receiving convoys. • Refueling and/or defueling vehicles to Coast Guard limit.
Arrange for excess fuel storage. • Performing unit/direct support maintenance before
staging. • Providing final technical inspection to ensure that all
vehicles are ready for sea shipment. • Pre-staging vehicles by unit or by type. • Messing and sleeping areas. • Latrine facilities. • Administrative support. • Personnel control so the area does not become a giant
parts /supply opportunity. • Quick spot-check by port personnel of vehicle
preparation and LOGMARS labels to make sure that if any last-minute problems are found, they can be corrected in the assembly or marshalling area.
Rail Operations
In some cases, units may convoy to a railhead and then use train transportation to get to their final destination. Railhead operations require the application of risk management to identify potential problem areas and to develop appropriate countermeasures. The following information is provided to assist in that effort.
Safety personnel • A senior NCO should be appointed whose only duties
are safety. • Conduct, safety briefings with all personnel involved
prior to the start of operations daily and prior to the start of each new phase of work. • Ensure that an ambulance with a qualified medic or
combat lifesaver and radio, are^.at all raü operations.
57

• Driver should know route to field hospital and medevac call signs and frequency. Medics should have their complete first aid kit.
Ground guides • Ensure training is provided to all drivers in proper use of
ground guides, and to all personnel in how to act as ground guides. • Ensure ground guides are used when in congested areas;
two ground guides should be used when backing or when vision is restricted. • Remind drivers to keep ground guides in view at all
times. • Instruct ground guides never to walk backward and
never to be on the same rail car as a moving vehicle. • If rail operations are performed at night, ensure ground
guides use flashlights or chem lights. • Load teams will—
D Not climb on top of any Vehicles loaded on rail cars (extreme high voltage shock hazard).
° Be provided with gloves and correct tools for the job. D Be provided with instruction in proper use of took. ° Inspect tools, blocking, lashing, spanners, and towbars for
serviceability before use. D Require all gun turrets to be in the locked position and
gun tubes to be in travel lock. o Prohibit sleeping on, in, or around rail cars.
Power lines • All antennas will be removed and stored inside tracked
vehicles. • All antennas will be removed or tied down on wheeled
vehicles; a ball tip protector will be used.
Drivers • Only qualified drivers will be allowed to operate any
type of equipment.
58

Arrival at Port Seaports are traditionally busy, congested, and confusing places. As the unit's vehicles arrive at the seaport, port personnel will give them a quick visual inspection to identify those with obvious problems. The LOGMARS label will be scanned, and all hazardous and sensitive cargo will be separated out of the main vehicle flow and sent to hazardous and sensitive vehicle staging areas. The remaining vehicles will be sent to other vehicle staging areas, where port personnel will again check vehicles and scan LOGMARS labels. Drivers and assistant drivers will be sent out of the staging areas to an assembly area for transport off terminal.
It is important that vehicles arrive precisely at the time specified in the port-call message and that everyone knows what to do upon arrival. The following checklists should help.
Leader checklist • Carry enough water for your troops. Estimate one day
on terminal, although actual time should be less. • Explain the unit's terminal control plan to the driving
and supervisory teams, to include— D Where drivers and other unit personnel should assemble
after parking their vehicles. D Water point location. D Latrine locations. D Trashcan locations for MRE packages, etc.
• Stress unit integrity, NCO control, "don't wander around" philosophy. • Unit key control officer must coordinate with port
operators on availability and location of key control NCO/officer. If possible, get a radio from Transportation Terminal Unit to ensure commqn communications and quick response by key control team. • Explain how troops will depart the terminal and when
and where they will be transported. • Have a final check team go through the unit's vehicles
59

after all the troops are assembled to check for mistakes, oversights, items left behind, shackles, lights or radios left on, etc. • Before departing the terminal, perform a rollcall
accountability check. • Allow only essential personnel to enter staging areas
while staging areas are filling. • Do not allow drivers to fill out forms in vehicle staging
areas during in-flow of vehicles. Doing so keeps drivers and assistant drivers in these areas while port personnel are trying to flow cargo rapidly into the same area. This mass of troops presents both a safety and a control problem. • Do not plan to do nesting at the port. Any nesting should
be accomplished at the assembly area in the field or at the marshalling area. • Milvans and conexes must be certified as either
hazardous or nonhazardous. This is usually done at the pack-out in the assembly area, where the certifications are put on the conexes and milvans. En route to the port, the certifications sometimes blow off. So, have the unit transportation officer/NCO at port to replace certificates. Otherwise, port personnel will have to open the conex/milvan to determine its classification. • Personnel who will go aboard the ship during the
load-out will need the following equipment: D Pre-boarding ship safety briefing D Helmet or hardhat D Hearing protection (earmuffs or earplugs) o Canteen
Driver checklist • Keep an alert heads-up focus. • Turn on driving lights in terminal. • Use ground guide for all tracked vehicles and when
backing vehicles 2.5 tons and larger and any other vehicles in which visibility dictates the need. Ground guides should not walk backwards when guiding any vehicle. • Keep proper distances between vehicles.
60

• Keep vehicles free from hanging materials such as chains or ropes that could snag qn a cleat or tiedown fitting and yank cargo off a truck. • Report vehicles with maintenance problems to port
reception personnel. • Secure radio whip antennas upon entering terminal.
Remove antennas from tracked vehicles and store inside hull. • Put main gun of tanks and fighting vehicles in travel lock
position. • Obey terminal speed limit. • Don't leave personal or military items in your vehicle. • Anything left in the vehicle cab should be wrapped,
blocked, and braced inside the cab. Make sure vehicle windows are rolled up. • Make sure all vehicle locks are locked. • When driving in the vicinity of the port helipad—
a Remember, aircraft have right of way. D Make sure your antenna is down, a Look for ground direction from air traffic control (ATC)
personnel. a Proceed only when ATC personnel wave you forward, a Dim your lights.
Supercarqos
Supercargos are teams of soldiers who accompany, supervise, guard, and maintain unit equipment aboard the ship. An essential part of their job is to monitor and correct equipment lashings and tiedowns for security. They also provide key control, note items that cannot be repaired en route, and brief the port commander at the Seaport of Debarkation (SPOD) on vehicle conditions and any peculiar aspects of the cargo.
The size of the supercargo team dedicated to a ship must be consistent with the team's role in guarding and maintaining the equipment en route, the resources available on the ship, and the additional costs required to equip and sustain the team en route. FM 55-65: Strategic Deployment by Surface
61

Transportation is a good reference for supercargo team composition, function, planning, and operations.
The following rules are intended to help supercargos do their job safely and effectively:
Rule #1: The Captain is the ultimate authority on the ship. His or her word is absolute law and must be obeyed by every individual.
Rule «2: The First Mate is the Captain's right-hand man. If you have a problem, go to the First Mate. Before the ship sails, the First Mate should brief supercargo officers and NCOs on the following: • General safety requirements. • Fire and lifeboat drill and stations. • Life preserver requirements. • Restricted deck areas. • Situations requiring immediate notification of the ship's
crew (fire, ship taking water, etc.) and what to do in such cases. • Layout of ship, including emergency escape hatches. • Whistle signals and their meaning (collision warning
whistle, abandon ship whistle, etc.). • Ship's policy on alcohol. • Chain of command. • Call signs for ship's officers (for use when ship's
brick-style radios are issued to supercargos).
Supercargo OIC/NCOIC The following guidance will enable you to perform your job as supercargo OIC/NCOIC safely and efficiently. • Provide the First Mate a manifest of the supercargo team
(full name, rank, SSN, unit, place of birth, and citizenship). Also leave a copy with the Division Gl. • Check with mate before ship sails to verify if additional
information is required. • If the supercargo team has brick-style radios, ensure that
there is no frequency interference with the ship's brick-style radios. • Provide team call signs to mate.
62

• Ask the mate for the ship's normal schedule for meals and when and where he wants the team to eat. • Publish a daily, by-name roster of duties and specific
locations where the duties will be performed. If a team member does not show up for lunch, you will know where to start looking. • Start each morning with a safety briefing based on
lessons learned from the previous day's activities. Be sure to call on each team member and solicit comments. Encourage the reporting of specific problems (oil or anti-freeze on decks, sharp projections, etc.) or potential problems so corrective action can be taken. • Brief team members on expected weather conditions for
the next 24 hours so they can dress appropriately. • Establish a buddy system for hold checking and make
sure each team going into a hold has a radio and checks into and out of the hold on the supercargo radio net. Record reported discrepancies for next day's briefing and planning of proper corrective actions. DO NOT let supercargo team members go into holds alone without a radio. If the member falls and is injured, he will not be missed until the next team accountability time (breakfast, lunch, dinner, etc.). • Decks in holds are always greasy and slippery. Boots pick
up this oil and distribute it on ladders and walkways. Require team members to periodically wash the soles of their boots to remove accumulated grease and oil. In addition, ask the mate if work boots must be removed in crew quarters and mess areas (make sure supercargo team has clean sneakers). • An essential part of your duties is to check aircraft and
vehicle lashings to make sure they are properly tightened but not over-tightened. Find out what the First Mate's standards are, then ask him for a class on how to properly break and tighten the various types of chain tiedowns. • Make sure you have the correct shipping TM for the
aircraft on board and the latest TWX messages on aircraft tiedown procedures. • Drill your supercargo team on lifeboat and abandon-ship
63

procedures. • Before boarding the ship, determine which team
members can swim. Take only supercargos who can swim. • Absolutely forbid and ruthlessly suppress horseplay. • There are many locations on a vessel from which it is
easy to fall overboard. Identify these areas through team feedback and soliciting information from the crew. • As soon as the ship's blowers are turned off, you will hear
vehicles running in each hold. (Longshoremen often forget to shut vehicles off during the loading rush.) It is imperative to check all the holds for running vehicles because—
°They fill the hold with carbon monoxide. °lhey will eventually run out of fuel and cause delays
during offloading. D Vehicle ignition sparks and hot exhaust could ignite fumes
from another vehicle. • Pay special attention to vehicles loaded on ramps and on
the deck. Not only are the walking areas in these locations treacherous, but also loose lashings and missing chocks could result in losing a vehicle over the side, or having the vehicle break loose on the ramp and hit the ship's watertight doors at the bottom of the ramps. • Get team members to stow all supercargo gear as soon
as possible after consultation with the First Mate.
Abandoning ship Nobody likes the idea of abandoning ship, but it is sometimes necessary. Preplanned survival procedures increase the chances for successful rescue. Records show that, even in the worst cases, it takes at least 15 to 30 minutes for a sinking ship to fully submerge. This affords valuable time for preparation. The following pointers should be remembered: • Wear as much warm clothing as possible. Cover head,
neck, hands, and feet. • Put immersion suit on, if you have one, over warm
clothing. • If prone to seasickness, take preventive medicine in a
64

dose recommended by the manufacturer. Vomiting removes body fluids and makes you more prone to hypothermia. • If possible, avoid jumping into the water. Climb aboard
a davit-launched raft or boat on the embarkation deck. If this is not possible, use pilot ladders or lower yourself into the water by a rope or fire hose. • If possible, do not jump from higher than 16 feet into the
water. Minimize the shock of sudden cold immersion by lowering yourself gradually into the water. If jumping into the water cannot be avoided, keep your elbows at your sides, and cover your nose and mouth with one hand while holding your wrist or elbow firmly with the other hand. • Once in the water, locate lifeboats, liferafts, survivors, or
floating objects. Violent shivering and pain are natural body reflexes, but not dangerous. However, you must take action as quickly as possible before you lose full use of your hands. Be sure to take precautions such as buttoning up clothing, turning on signal lights, and locating the whistle on your life jacket. • Swim only to reach a nearby craft, a fellow survivor, or a
floating object. Swimming increases the rate of body-heat loss by pumping out warm water between your body and the layers of clothing. Regardless of the intensity of the pain, remain as still as possible. Pain will not kill you, but heat loss can. • Body position in the water is very important in
conserving heat. Float as still as possible with your legs together, elbows close to your side and arms folded across the front of your life jacket. Keep your head and neck out of the water. Huddle closely with other survivors. • Board a raft or a floating platform as soon as possible.
You lose body heat faster in water than in air. Avoid wind chill by huddling close to other occupants. • Certain drown-proofing techniques (relaxing in the water
and allowing your head to submerge between breaths) should not be used in cold water. If you are in cold water and are not wearing a life jacket, tread water only as much as necessary to keep your head out of the water.
65

• Keep a positive attitude about your survival and rescue. The will to live does make a difference.
66

Section VI Survivability Positions
Commander's Responsibility • Protect troops • Improve and maintain unit survivability continuously • Provide materials • Supervise construction • Inspect periodically • Plan and select fighting position sites • Get technical advice from engineers as required
References: FM 5-103 and FM 5-34, chapter 4
Do's and Don'ts • Do ensure adequate material is available • Don't fail to supervise • Do dig down as much as possible • Don't use sand for structural support • Do maintain, repair, and improve positions continuously • Don't use sandbags for structural support • Do inspect and test position safety daily, after heavy rain,
and after receiving direct and indirect fires • Don't forget to camouflage • Do revet excavations in sandy soil (see page 71, step 2) • Don't drive vehicles within 6 feet of a position • Do interlock sandbags for double-wall construction and
corners • Don't take shortcuts • Do check stabilization of wall bases • Don't put soldiers in marginally safe bunkers • Do fill sandbags approximately 75 percent • Don't overfill sandbags • Do construct to standard • Don't build above ground unless absolutely necessary • Do use common sense • Don't forget lateral bracing on stringers
67

Summary Of Materials In a combat situation, it may be necessary to improvise construction of a survivability position by using materials not normally associated with the construction. Some examples of field-expedient material are:
Wall revetment • Sheet metal • Corrugated sheet metal • Plastic sheeting • Plywood • Air mat panels • Air Force air load pallets
Wall construction (building up) • Sand grid material • 55-gallon drums filled
with sand • Expended artillery shells
filled with sand • Shipping boxes/packing
material • Prefabricated concrete
traffic barriers
Overhead cover stringers • Single pickets • Double pickets • Railroad rails • T'beams • 2-inch-diameter pipe
and larger
• Timbers 2"x4", 4"x4" and larger • Reinforced concrete
beams • 55-gallon drums cut
longitudinally in half • Large diameter
pipe/culverts cut in half • Precast concrete panels
6-8 inches thick • Airfield panels • Air Force air load pallets • Shipping pallets
Stand-alone positions • Prefab, concrete catch
basins, valve pits, utility boxes • Military vans • Connexes or shipping
containers • Large diameter
pipe/culvert • Steel water tanks • Other storage tanks
(cleaned and ventilated) • Vehicle hulks
NOTE: All positions require a minimum of 18 inches dry sand overhead cover (double thickness for wet sand).
68

Types Off Position»
One-Man Fighting Position
Two-Man Fighting Position
•2**" /
69

Crew-Served Fighting Position
Top view
Command Bunker Roof paper
Approx
frame '
Pictorial
For additional bunker designs, see appendix B of FM 5-103: Survivability. A variety of positions can be made with locally procured material.
70

Preconstructlon Phase
Determine the level of protection required through IPB, OCOKA, and METT-T. See page 78 for a summary of protection levels for common threat weapons systems.
Construction Sequence Step 1: Excavate earth
• Slope walls 1:4 (for every 4 feet in depth, slope back 1 foot). • Pile dirt at least 1 foot back
from the edge of excavation or 1/4 of the cut, whichever is greater.
CsDepth of cut
Short picket
Barbed wire
Step 2: Install revetment • Use sheeting material and
pickets to revet walls to prevent cave-in. • Pickets/posts must be tied
back. • Drive pickets at least 1/3 C
into ground. Di is equal to or greater than H D2 is equal to H + 2 feet
Step 3: Install floor drains and HG sumps (seasonal, optional) • Slope floor from rear to front. • Pallets may be used for floor
cover.. • Install l'xl' rock sump the
length of the position. • Install hand-grenade sump
on front wall, minimum 5" wide, 30° angle.
Floor drain«) or graded toward *un
Drainage sump Not to« than !
71

Step 4: Install supports for overhead stringers (bearing plates) • Setback from the edge
of the excavation must be at least 1 foot (or 1/4C, whichever is greater). • Supports can be
timbers, pipes, or concrete beams. • Supports should be dug
in approximately 1/2 height.
Minimum 1'
-A
Round logs imbedded Vt diameter
Step 5: Install stringers • Stringers can be 2"x4",
2"x6"/or4"x4"/pipe/ pickets • Use charts on pages 76
and 77 for stringer spacing • PL = position length • SL = support length =
position length + depth of cut • L = span of stringer • h = stringer spacing
Stringer Lateral bracing
oinnger v
E*= DC JÜC S
Q Excavation
£ IZ
72

Step 6: Install overhead cover (OHO and camouflage • Use plastic or a poncho for
waterproof layer. • Use at least 18" of sandbags
with sand for cushion layer. • Use plywood or sheeting
mat for dust-proof layer (could be boxes or plastic panel). • Use surrounding topsoil
and desert lightweight camouflage screen system (LCSS).
-Camouflage layer ; Waterproof layer
Cushion layer
Cover ^^. d| (tandbegewWiioil) >^
2n4tMnoan I ' proof ley«
L> span of stringer (4 feet) h - stringer spacing (16 inches) d . depth of cover (1 Vifeet)
This will stop air burst, contact burst and small arms.
3 layers
Waterproof layer Support log,
or pipes Excavation
k ' Revetment' V. /
Rock caliber - 2 x she« caliber
2x82 -164mm or 614" rock size
Built-up positions • Only when absolutely necessary (e.g., bedrock prevents
excavation). • Refer to page 68 for appropriate construction and
structural material. • Don't use sandbags as structural support (e.g., sandbag
wall supporting OHC). • Consult FM 5-103 for above-ground bunkers and shelters. • Camouflage with surrounding top soil. Slope to blend in
with terrain. 73
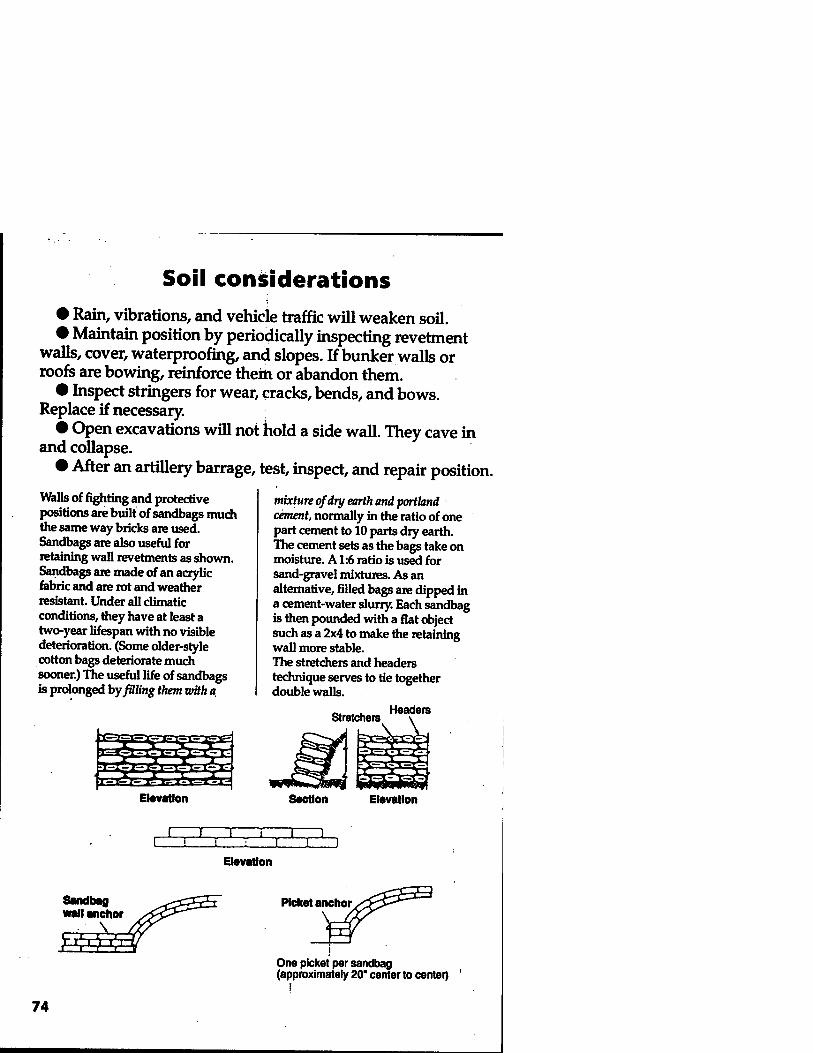
Soil considerations • Rain, vibrations, and vehicle traffic will weaken soil. • Maintain position by periodically inspecting revetment
walls, cover, waterproofing, and slopes. If bunker walls or roofs are bowing, reinforce them or abandon them. • Inspect stringers for wear, cracks, bends, and bows.
Replace if necessary. • Open excavations will not hold a side wall. They cave in
and collapse. • After an artillery barrage, test, inspect, and repair position.
Walls of fighting and protective positions are built of sandbags much the same way bricks are used. Sandbags are also useful for retaining wall revetments as shown. Sandbags are made of an acrylic fabric and are rot and weather resistant. Under all climatic conditions, they have at least a two-year lifespan with no visible deterioration. (Some older-style cotton bags deteriorate much sooner.) The useful life of sandbags is prolonged by filing them with a
TRlä-l^fc-Ffc-l- fc-V triirx-K »-*?»-ill-lS-i* r- i-:? J-^I-T£ i-i^- Tm ~rm 'i " "T*
mixture of dry earth and portland cement, normally in the ratio of one part cement to 10 parts dry earth. The cement sets as the bags take on moisture. A 1:6 ratio is used for sand-gravel mixtures. As an alternative, filled bags are dipped in a cement-water slurry. Each sandbag is then pounded with a flat object such as a 2x4 to make the retaining wall more stable. The stretchers and headers technique serves to tie together double walls.
St ratchets Headers
Ü» Elevation Section Elevation
r~~T
Sandbag wall anchor
i i T~n ■ i
Elevation
Picket anchor
V
One picket per sandbag (approximately 20" center to center)
74

Loose-sand design L = span of stringer (6 feet) h = stringer spacing d = depth of cover C = depth of cut PL = position length SL = support length = PL + C
Lateral bracing can be 2"x4", sandbags, ammo can, or any field expedient. Lateral bracing prevents "rolling" of overhead cover.
Lateral bracing Stringer v
Design to use if stringers are-
s'pickets L = 6' d = 2' C = 5' PL=6' SL=11' 8' "U" shaped pickets (open side down) h = 5" center to center spacing (from chart) U shaped picket is 3" wide PL = 6'xl2" = 72"long 7275" c toe spacing = 14.4 rounded up = 15 +1 pickets 16 pickets required
4x4's L = 6' d = 2' C = 5' PL = 6' SL=11' 4x4 stringers h = 10" center to center spacing (from chart) PL = 6' x 12" = 72" long 72710" = 7.2" rounded up = 8 +1 9 stringers required
%dt) ■^f 1-inch plywood fool
1/4 cut or 1 loot, whichever is largw
L-»panof «ringer (4test) hxtringw (pacing (16 inchn) d«d*pthofcowr(116fMt)
75
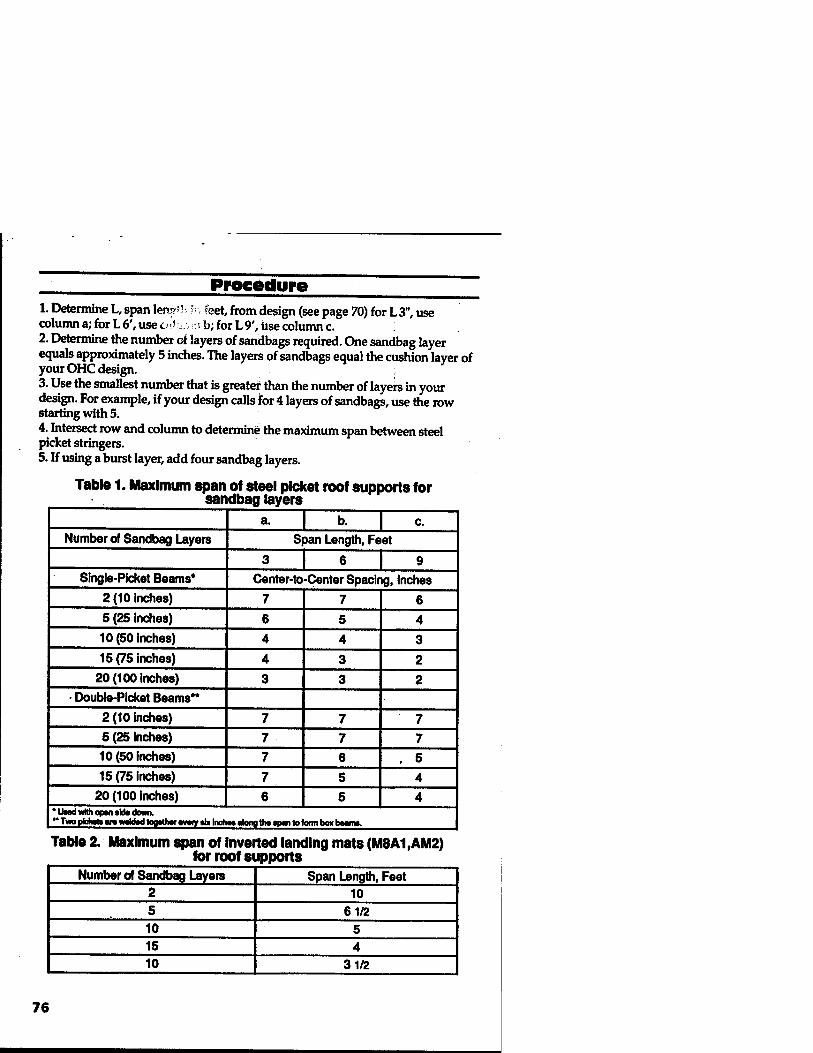
_____ Procedure 1. Determine L, span lens«? h feet, from design (see page 70) for L 3", use column a; for L 6', use o:>' u • js b; for L 9', Use column c. 2. Determine the number of layers of sandbags required. One sandbag layer equals approximately 5 inches. The layers of sandbags equal the cushion layer of your OHC design. 3. Use the smallest number that is greater than the number of layers in your design. For example, if your design calls for 4 layers of sandbags, use the row starting with 5. 4. Intersect row and column to determine the maximum span between steel picket stringers. 5. If using a burst layer, add four sandbag layers.
Table 1. Maximum span of steel picket roof supports for sandbag layers
a. b. c.
Number of Sandbag Layers Span Length, Feet
3 6 9 Single-Picket Beams* Center-to-Center Spacing, Inches
2 (10 inches) 7 7 6 5 (25 inches) 6 5 4 10 (50 inches) 4 4 3 15 (75 inches) 4 3 2
20 (100 inches) 3 3 2 • Double-Picket Beams'*
2 (10 inches) 7 7 7 5 (25 inches) 7 7 7 10 (50 inches) 7 6 . 5
15 (75 inches) 7 5 4 20 (100 inches) 6 5 4
* UMd with opm tkto down. ** Two pic_toara«nkMtog_Mr«v«yiixlnchM «long ft» span to term box bean».
Table 2. Maximum span of Inverted landing mats (M8A1.AM2) for roof supports
Number of Sandbag Layers Span Length, Feet 2 10 5 61/2 10 5 15 4 10 31/2
76

bS 1 2iT
8
ü
SJ Bi- ll 5-8
»-o ~ -o~ _NC —.to co* «fc.CC tCC *ta* ion co to
CM * CO * 583 O *- ID CO z
s
" T- CM CM v- CM CM
Ü — So CM co A(M IO —CM Ifl CM CO N CO
p u. £ e 01 *• C C K T- *- CO j^. J^ . ce t ee
• o (0 '3 * CM a 1
u
1
CM ^ CO <* *- CO CO CM CO CO «0 *
a 3
X 5 s 1 — * 00 — Ml CO CM CO ID CO
6 z IU -1
M Se ee « . tec Sec *» *" T-
K IU
O (0 CO «0 CM <* CM #
►» u • o) io to O CO IO «- CO * CM CO *
• e <o CO «*
• ,_ (o
O z
I c
8 1 z < + !
— CD «• 8 — 10 CO —CO CO *- CO to CO Q. w CM
Se SC I 1 « <0 * CO to «— IS z IU s
»- * CM * *- * * CM «• * CM *
u — §
«co "".co O CO * CO
Se tie (Or-*- N »- *- i ee i ee 1 in co «> co io io i M (o * ID ID
IB z IU o
^ * £ * T- * * W- * <» CM *
yioioP' STION *ioSr 5"io 5" CM m CM IO CM IO CO *- IO CO T- CM IO CO CM IO CO
T- <- r- CM T- T- CM »»»»»- *- T- T-
-JS- <K!Z Sg=. CO CO CO «0 CO CO
5SU1 X X X X X X
i EN 10 CO * ID 10 CO
. — © CM
SSS SS! ■*• fcSfc- SCC (D T- *- »f f 1-r IO u> © IO IO o
CO z *- CM i f «r- CM * *
s CO
u — — — —CM — CM O —CO CO — *- IO — CM <0
IS
1 a »» u
t w CM O IO O IO IO CO CO ▼- «Of
CM o v- «- *- CM CO ' M CM CO CM CM * *
X 3
z u •-
1 — — /sioi So — CM CD »coco it * (i K K. o in <o to co to to
CM * * *- «» * i 3
no» *n« z III
*" a z
(0
u S § u
»- CM *- CM * *
z 4 9 a 10 CM
IU t- z IU
* § OOtt * to to *" • «- CO CO <- * * CM * * r- *• * *- CO *• CO *■
Ü I A „^ u
6 «CM CO 5" So —.CO CO —CO D — CO CO — * CO
a »7 10 ID to ID O (0 01 o to • to (O
IS z * £ * * *- CO * CO *
IU«*
IU o 5* £Tm S* ^ CM CO ^TlO IO Y io to to a> CM to en N «AM «!".». CM IO CO CM IO CO
*- »- -ISC — <Är "^ 5=ui
z£«
* ID
X X
« a K X
CO X
to
X
CM CM « ■• * ID
See Sec o
t « » t W » E ;
77

Weapon-Fighting Positions
Positions may be hasty or deliberate, depending on time and material availability. Positions may be dug by hand or mechanically. Table 4 shows required thicknesses for protection against direct and indirect fire.
Table 4. Material thickness (cm/In) required to protect against direct and Indirect fire
DIRECT FIRE . INDIRECT „FIRE (Mast exploding SO feet away)
Material Small Caliber (7.62 mm)
HE-Shaped Charge Mortar Mortar/Rocket/
HE Shell
85mm (RPG7)
107- 120mm (RCLR)
(SAGGER) 82mm 120mm
122mm 152mm
Concrete 30(12) 76(30) 91(36) 10(4) 13(5) 15(6) Gravel, small rocks, bricks.rubble 51(20) 61(24) 91(36) 25(10) 46(18) 51(20)
Soil, sand 107(42) 198(78) 244(96) 30(12) 51(20) 76(30) Timber 91(36) 229(90) 274(108) 20(8) 30(12) 36(14) Snow (tamped) 183(72) 396(156) None 152(60) 152(60) 152(60)
Table 5. Characteristics of Indh/ldual-flghtlng positions
TYPE OF POSITION ESTIMATED
CONSTRUCTION TIME W/HAND-TOOLS (man-hours)
NUCLEAR WEAPONS
HASTY Crater . 0.2 Fair Skirmisher's trench 0.5 Fair Prone position 1.0 Fair
DELIBERATE One-soldier position 3.0 Fair One-soldier position
with 1 1/2 ft overhead cover 8.0 Good
Two-soldier position 6.0 Fair Two-soldier position
with 1 1/2 ft overhead cover 11.0 Good
LAW position 3.0 Fair
Notes: 1. All deliberate positions provide protection from medium artillery no closer than 30 feet.
2. All positions provide no protection from indirect fire blasts or direct hits from indirect fire.
78
J

inspection Checklist
GO 00
• Site location tactically sound
• Low profile maintained
• Materials of structural quality (standard construction material)
n
String«»
^T~~ Support
1V4 m»+
I Support I
Excavation-walls sloped
• Setback for overhead—mirumum of 1 foot or 1/4 depth of cut
• Stringer o Firmly on a structural
support o Spacing calculated using ,
charts (on pages 76 and 77) o2"x4" or 2"x6" stringers
used on edge; the strength is in the depth of the lumber
p Lateral bracing emplaced along supports (see diagram on page 75)
Vfe Depth of cut
• Supports o Stringers firmly on
supports • Supports extend past the
excavation by1 /2 the depth of cut
79

Sandbag „--- wail anchor .sC<~^-
l
On« pick* par sandbag (approximately 20* eantw to cantar)
• Revetments o Construction o Sheeting supported
by pickets o Pickets tied back
• Overhead cover o Structural layer o Dust layer—plywood
or panels o Cushion layer at least
18" deep • Waterproof layer in
place (also repels liquid chemicals)
o Burst layer at least 18" deep (if used)
o Camouflage in place
# Sandbag o Sandbags are filled
approximately 75 percent
• Bags lapped if single walls
o Double walls tied together
o Base of height supported or walls curved
GO GO
POC: U.S. Army Engineer School, Department of Military Engineering, ATTN: ATSE-ME, Fort Leonard Wood, MO 65473
80

Section VII Accident Reporting
Normal accident notification, investigation, and reporting have been waived for Caribbean operations.
Abbreviated accident report forms (Abbreviated Aviation Accident Report (AAA Report) and Abbreviated Ground Accident Report (AGAR)) will be used as indicated below. These forms can be obtained from your command safety office forward.
Notification and reporting summary Aviation accidents/incidents
Abbreviated Aviation Acddtnt Report (AAA Rtport)
Only when Commander determines DA Form 2397 investigation/report not feasible. Submit as soon as conditions/ situation permits—do not exceed 30 calendar days.
AAA Report replaces DA Form 2397 as report form. Submit as soon as conditions/situation permits—do not exceed 30 calendar days. AAA Report replaces PRAM as report I form. Submit as soon as practical— do not exceed 10 calendar days.
Accident Class
E Ttlophonic Notification
All Immediate—to USASC or Safety Rep Forward. Serves as PRAM; no hardcopy followup required
C
D,E,t FOD
Immediate—to USASC or Safety Rep Forward. Serves as PRAM; no hardcopy followup required. Not applicable (unless safety-of-flight issue involved/
suspected).
Ground accidents Accident Class
A&B
Telephonic Notification
Immediate—to USASC or Safety Rep Forward.
C 6 D Not applicable.
Abbreviated Ground Accident Report (AGAR)
On duty: Only when Commander determines DA Form 285 investigation/ report not feasible. Submit as time permits—do not exceed 30 calendar days. Off duty: AGAR replaces DA Form 285 as report form. Submit as time permits—do not exceed 30 calendar days. AGAR replaces DA Form 285 as report form. Submit as time permits—do not exceed 30 calendar days.
81

Telephonic notification
• Notification will be immediate, through the chain of command, to the immediate commander of all personnel involved and to the U.S. Army Safety Center (USASC) or the USASC-designated point of contact (Safety Rep Forward). • Notification methods include radio-teletyped message
(via Defense Data Network—DDN), telephone (USASC phone numbers: DSN 558-2660/3410, commercial 205-255-2660/3410), or other immediate means. • Notification of aviation accidents will include PRAM
information. Notification of ground accidents will include the following:
o Unit. • Time/date of accident. • Location of accident (coordinates). • Name, rank, SSN, and MOS/job series of persons(s)
involved. • On/off duty. • Component (RA, USAR, ARNG, civilian). • What was the victim doing? • What were the injuries? • What materiel/property damage occurred? o What was estimated accident classification? (Class A =
$1,000,000 or more, Class B = $200,000 to $999,999). • What happened?
Report transmission
Methods for transmission of accident report forms should be dictated by available resources (electronically, by message, by mail, by telefax (if time sensitive), or hand carried. When time sensitive safety-of-use issues are involved or suspected, telefax the report to USASC (DSN 558-9136, commercial 205-255-9136).
USASC addresses • Mail: Commander, U.S. Army Safety Center, ATTN:
82

CSSC-DA, Fort Rucker, Alabama 36362-5363. • Message: CDR USASC FT RUCKER AL
83