Loading Cisco Options Package (COP) Files on the Cisco ...€¦ · to upgrade and install software,...
26
CHAPTER 1-1 Cisco Unified Communications Manager Configuration Guide for the Cisco TelePresence System OL-21851-01 1 Loading Cisco Options Package (COP) Files on the Cisco TelePresence System Revised: June 9, 2015, OL-21851-01 Contents This chapter contains the following sections: • Understanding COP Files, page 1-1 • Distinguishing Between the Cisco TelePresence Touch 12 and the Cisco Unified IP Phone in Unified CM, page 1-2 • Understanding COP File Naming Convention, page 1-2 • Understanding Contents of the COP File, page 1-3 • Using COP Files to Upgrade From the IP Phone to a Cisco TelePresence Touch 12, page 1-3 • Configuring the Directory on the Cisco TelePresence Touch 12, page 1-22 • Setting the Idle Display Default (“Home”) Screen, page 1-24 • Related Information, page 1-25 Understanding COP Files Before you can use the Cisco TelePresence Touch 12, you must install a Cisco Options Package (COP) file to Cisco Unified Communications Manager (Unified CM). The COP file is a zipped file that contains the codec and control device (for example, Cisco TelePresence Touch 12 or Cisco Unified IP Phone) image files, and a loads file that lists the contents of the COP file. For more information, see the “Understanding Contents of the COP File” section on page 1-3. The COP file is the default method of file distribution for all releases 1.8.0 and beyond, whether your system uses either a Cisco TelePresence Touch 12 or a Cisco Unified IP Phone for call control. Systems that are running Cisco TelePresence System software release 1.7.4 or 1.7.5 can use a COP file to upgrade and install software, even though the Cisco TelePresence Touch 12 is not supported on any releases prior to 1.8.0. Systems that are running Cisco TelePresence System software releases 1.8.0 and above must use a COP file to upgrade and install their software.
Transcript of Loading Cisco Options Package (COP) Files on the Cisco ...€¦ · to upgrade and install software,...

Cisco Unified Communications Manager ConfOL-21851-01
C H A P T E R 1
Loading Cisco Options Package (COP) Files on the Cisco TelePresence SystemRevised: June 9, 2015, OL-21851-01
ContentsThis chapter contains the following sections:
• Understanding COP Files, page 1-1
• Distinguishing Between the Cisco TelePresence Touch 12 and the Cisco Unified IP Phone in Unified CM, page 1-2
• Understanding COP File Naming Convention, page 1-2
• Understanding Contents of the COP File, page 1-3
• Using COP Files to Upgrade From the IP Phone to a Cisco TelePresence Touch 12, page 1-3
• Configuring the Directory on the Cisco TelePresence Touch 12, page 1-22
• Setting the Idle Display Default (“Home”) Screen, page 1-24
• Related Information, page 1-25
Understanding COP FilesBefore you can use the Cisco TelePresence Touch 12, you must install a Cisco Options Package (COP) file to Cisco Unified Communications Manager (Unified CM). The COP file is a zipped file that contains the codec and control device (for example, Cisco TelePresence Touch 12 or Cisco Unified IP Phone) image files, and a loads file that lists the contents of the COP file. For more information, see the “Understanding Contents of the COP File” section on page 1-3.
The COP file is the default method of file distribution for all releases 1.8.0 and beyond, whether your system uses either a Cisco TelePresence Touch 12 or a Cisco Unified IP Phone for call control.
Systems that are running Cisco TelePresence System software release 1.7.4 or 1.7.5 can use a COP file to upgrade and install software, even though the Cisco TelePresence Touch 12 is not supported on any releases prior to 1.8.0. Systems that are running Cisco TelePresence System software releases 1.8.0 and above must use a COP file to upgrade and install their software.
1-1iguration Guide for the Cisco TelePresence System

Chapter 1 Loading Cisco Options Package (COP) Files on the Cisco TelePresence SystemDistinguishing Between the Cisco TelePresence Touch 12 and the Cisco Unified IP Phone in Unified CM
After you use a COP file to upgrade your system, carry out all subsequent upgrades by using the COP file. Perform the upgrade by specifying the file name in Unified CM and omitting all file extensions.
Note Specifying a codec image file with a specific file extension, or specifying a file that is not included in a COP file, might result in the system reporting a version mismatch.
Find the COP file in the “Download” section of the Cisco support site for your product, located at the following URL:
http://www.cisco.com/cisco/web/support/index.html
Distinguishing Between the Cisco TelePresence Touch 12 and the Cisco Unified IP Phone in Unified CM
You do not register the Cisco TelePresence Touch 12 in Unified CM. This configuration method differs from the configuration for a Cisco TelePresence system that uses a Cisco Unified IP Phone for call control, where you register both the codec and Cisco Unified IP Phone in Unified CM. With a system that uses a Cisco TelePresence Touch 12 device, you only register the codec in Unified CM.
To upgrade your system, specify the name of the COP file, with no file types or extensions, in the Unified CM Administration interface. You can specify the name in either of the following fields:
• Unified CM Device Defaults Load Information field—Specifies this file for all devices of the same type
• Device Phone Load Name field—Specifies this file for a single device.
Note If your system is running a CTS version earlier than 1.7.4, you first specify the file name with an .sbn or .SPA extension, then you specify the file name with no extension. For detailed steps, see the “Upgrading From Cisco TelePresence Software Releases Prior to CTS 1.7.4” section on page 1-12.
Unified CM automatically extracts the codec and Cisco TelePresence Touch 12 files from the COP file and applies them to your Cisco TelePresence system.
For more information, see the “Upgrading From Cisco TelePresence Software Releases 1.7.4 and Above” section on page 1-5 and “Upgrading From Cisco TelePresence Software Releases Prior to CTS 1.7.4” section on page 1-12.
Understanding COP File Naming ConventionThe COP file uses the following naming convention:
CTS.r-r-r-bbbR-K9.Pv.cop.sgn
where:
• r-r-r is the Cisco TelePresence System (CTS) software release
• bbb is the build name
• v specifies the hardware version
1-2Cisco Unified Communications Manager Configuration Guide for the Cisco TelePresence System
OL-21851-01

Chapter 1 Loading Cisco Options Package (COP) Files on the Cisco TelePresence SystemUnderstanding Contents of the COP File
The Pv variable differs depending on the contents of the COP file and the codec that is used by the system.
Understanding Contents of the COP FileThe COP file can contain multiple files, including any of the following types of files:
• Codec image files
• Cisco TelePresence Touch 12 image files
• MIDlet files
For the purpose of understanding how COP files are used with the Cisco TelePresence Touch 12, assume that the COP file contains three files: a loads file, a codec image file, and a Cisco TelePresence Touch 12 image file.
The loads file lists the file names of the specific codec and Cisco TelePresence Touch 12 image files. It contains the following entries:
• <copname>: The COP file name.
• <ctsmainImage>: The codec image file name.
• <ctsdevImage>: The Cisco TelePresence Touch 12 image file name.
Using COP Files to Upgrade From the IP Phone to a Cisco TelePresence Touch 12
Note Do not physically connect the Touch 12 to the system until you complete the software upgrade procedure. The Touch 12 requires software version 1.8 or higher.
The following sections describe how to upgrade your system from a Cisco Unified IP Phone to a Cisco TelePresence Touch 12:
• Determining the Type of Codec Used by Your System, page 1-3
• Kit and Parts List, page 1-5
• Upgrading From Cisco TelePresence Software Releases 1.7.4 and Above, page 1-5
• Upgrading From Cisco TelePresence Software Releases Prior to CTS 1.7.4, page 1-12
• Connecting the Cisco TelePresence Touch 12 to the System, page 1-20
Caution The display used in this product contains mercury. Dispose of according to local, state, and federal laws.
Determining the Type of Codec Used by Your System
Note See the “Understanding COP Files” section on page 1-1 before working with COP files.
1-3Cisco Unified Communications Manager Configuration Guide for the Cisco TelePresence System
OL-21851-01

Chapter 1 Loading Cisco Options Package (COP) Files on the Cisco TelePresence SystemUsing COP Files to Upgrade From the IP Phone to a Cisco TelePresence Touch 12
The following installation instructions specify loading an .sbn or .SPA file in Unified CM before you specify the COP file name with no extensions. The file extension depends on the type of codec you use in your system. To determine the type of file you specify, use the following guide:
Codec Example 1
If your codec looks like the one in Figure 3-1, use the .sbn file. The following systems use this codec:
• Cisco TelePresence System 500-37 (PID: CTS-500-37)
• Cisco TelePresence System 1000 (PID: CTS-1000)
• Cisco TelePresence System 1100 (PID: CTS-1100)
• Cisco TelePresence System 1300-65 (PID: CTS-1300)
• Cisco TelePresence System 3000 (PID: CTS-3000)
• Cisco TelePresence System 3010 (PID: CTS-3010)
• Cisco TelePresence System 3200 (PID: CTS-3200)
• Cisco TelePresence System 3210 (PID: CTS-3210)
Figure 3-1 Codec CTS-CODEC-PRI-G2 or CTS-CODEC-PRIM
Codec Example 2
If your codec looks like the one in Figure 3-2, use the .SPA file. The following systems use this codec:
• Cisco TelePresence System 500-32 (PID: CTS-500-32)
• Cisco TelePresence System TX1300 47 (PID: CTS-1300-47)
• Cisco TelePresence System TX1310-65 (PID: CTS-TX1310-65)
• Cisco TelePresence System TX9000 (PID: CTS-TX9000)
• Cisco TelePresence System TX9200 (PID: CTS-TX9200)
Figure 3-2 Codec CTS-CODEC-SING-G1 or CTS-CODEC-PRI-G2R
3430
2434
3023
1-4Cisco Unified Communications Manager Configuration Guide for the Cisco TelePresence System
OL-21851-01

Chapter 1 Loading Cisco Options Package (COP) Files on the Cisco TelePresence SystemUsing COP Files to Upgrade From the IP Phone to a Cisco TelePresence Touch 12
Kit and Parts ListTable 3-1 lists kits to order to upgrade your system from a Cisco Unified IP Phone to a Cisco TelePresence Touch 12 (Touch 12).
Upgrading From Cisco TelePresence Software Releases 1.7.4 and AboveTo load the COP files to Unified CM and upgrade your codec and Touch 12 software for systems that are running CTS software version 1.7.4 and above, complete the following steps.
Step 1 Copy the COP file to a Secure File Transfer Protocol (SFTP) server that is accessible by Unified CM.
Step 2 Log in to the Unified CM administration interface (GUI).
Step 3 From the Navigation drop-down menu, on the top right of the GUI, select Cisco Unified OS Administration.
Table 3-1 Cisco TelePresence Touch 12 Upgrade Kit and Parts List
Kit Number CTS
CTS-CTRL-DV12-A • Cisco TelePresence System 500-32 (PID: CTS-500-32)
• Cisco TelePresence System TX1300 47 (PID: CTS-1300-47)
• Cisco TelePresence System TX1310 65 (PID: CTS-TX1310-65)
• Cisco TelePresence System TX9000 (PID: CTS-TX9000)
• Cisco TelePresence System TX9200 (PID: CTS-TX9200)
Includes the Touch 12 device, part number CTS-CTRL-DV12.
CTS-CTRL-DV12-B • Cisco TelePresence System 1000 (PID: CTS-1000)
• Cisco TelePresence System 1100 (PID: CTS-1100)
• Cisco TelePresence System 1300-65 (PID: CTS-1300)
• Cisco TelePresence System 3000 (PID: CTS-3000)
• Cisco TelePresence System 3010 (PID: CTS-3010)
• Cisco TelePresence System 3200 (PID: CTS-3200)
• Cisco TelePresence System 3210 (PID: CTS-3210)
Includes:
• CTS-CTRL-DV12—Touch 12 device
• AIR-PWRINJ4—The Power injector for the Touch 12
• CTS-JUMPER-CORD—This cord connects the power injector to the power distribution unit (PDU) for your system. The PDU end of the cord uses a IEC 60320 C19 connector to connect to the PDU.
CTS-CTRL-DV12-C Cisco TelePresence System 500-37 (PID: CTS-500-37)
CTS-CTRL-DV12-C contains the same parts as the CTS-CTRL-DV12-B; however the CTS-JUMPER-CORD is removed and replaced with a country-specific power cord. This change is required because a Cisco TelePresence System 500-37 does not ship with a PDU.
1-5Cisco Unified Communications Manager Configuration Guide for the Cisco TelePresence System
OL-21851-01
Chapter 1 Loading Cisco Options Package (COP) Files on the Cisco TelePresence SystemUsing COP Files to Upgrade From the IP Phone to a Cisco TelePresence Touch 12
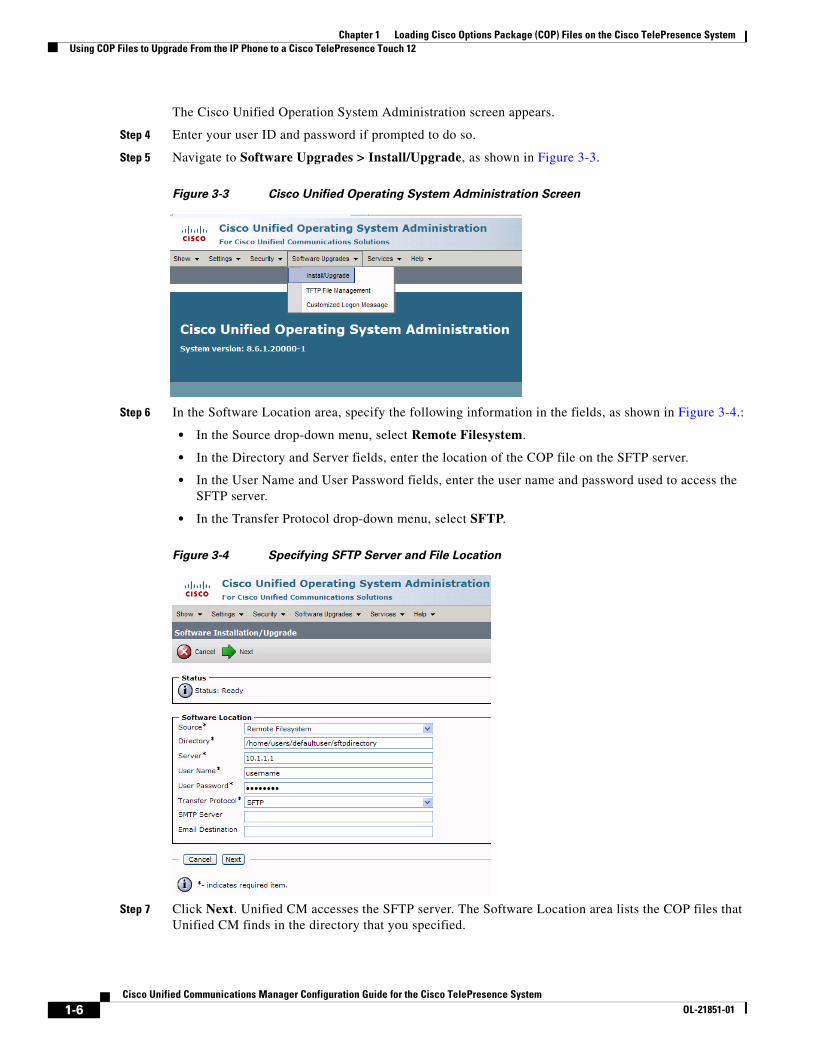
The Cisco Unified Operation System Administration screen appears.
Step 4 Enter your user ID and password if prompted to do so.
Step 5 Navigate to Software Upgrades > Install/Upgrade, as shown in Figure 3-3.
Figure 3-3 Cisco Unified Operating System Administration Screen
Step 6 In the Software Location area, specify the following information in the fields, as shown in Figure 3-4.:
• In the Source drop-down menu, select Remote Filesystem.
• In the Directory and Server fields, enter the location of the COP file on the SFTP server.
• In the User Name and User Password fields, enter the user name and password used to access the SFTP server.
• In the Transfer Protocol drop-down menu, select SFTP.
Figure 3-4 Specifying SFTP Server and File Location
Step 7 Click Next. Unified CM accesses the SFTP server. The Software Location area lists the COP files that Unified CM finds in the directory that you specified.
1-6Cisco Unified Communications Manager Configuration Guide for the Cisco TelePresence System
OL-21851-01

Chapter 1 Loading Cisco Options Package (COP) Files on the Cisco TelePresence SystemUsing COP Files to Upgrade From the IP Phone to a Cisco TelePresence Touch 12
Step 8 In the Options/Upgrades drop-down menu, choose the COP file that you want to install from the available file names, as shown in Figure 3-5.
Figure 3-5 Specifying the File To Be Used After Installing the COP File
Step 9 Click Next.
The Unified CM GUI shows the COP file being installed, as shown in Figure 3-6.
Figure 3-6 COP File Installation
Step 10 After installation completes, verify the file validity by completing the following steps:
a. Make a note of the information in the File Checksum Details area. This value is circled in Figure 3-7.
1-7Cisco Unified Communications Manager Configuration Guide for the Cisco TelePresence System
OL-21851-01

Chapter 1 Loading Cisco Options Package (COP) Files on the Cisco TelePresence SystemUsing COP Files to Upgrade From the IP Phone to a Cisco TelePresence Touch 12
Figure 3-7 File Checksum Details Area
b. Log in to the SFTP server and enter the following command:
c. md5sum filename.cop.sgn
where:
filename is the file name of the COP file on the SFTP server.
d. Make a note of the checksum value that displays as a result of the md5sum command.
e. Compare the MD5 Hash Value that displays in this area to the MD5 checksum value that you find in the COP file on the server and make sure that they match to ensure that the file is not corrupted.
f. If the values match, continue to the next step; if the values do not match, retry the file installation.
Step 11 Click Next to begin installation.
The installation log shows the installation progress.
After the .loads, codec and Touch 12 files are extracted, the interface shows Complete in the Installation Status window, as shown in Figure 3-7.
1-8Cisco Unified Communications Manager Configuration Guide for the Cisco TelePresence System
OL-21851-01
Chapter 1 Loading Cisco Options Package (COP) Files on the Cisco TelePresence SystemUsing COP Files to Upgrade From the IP Phone to a Cisco TelePresence Touch 12
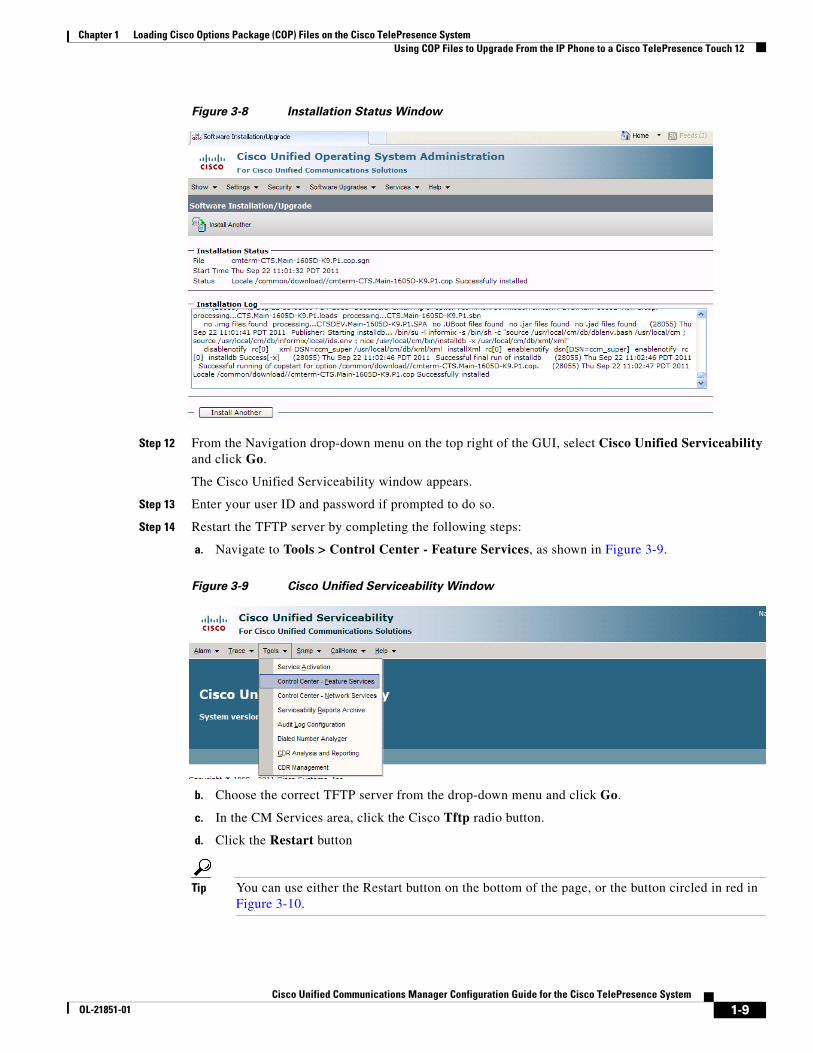
Figure 3-8 Installation Status Window
Step 12 From the Navigation drop-down menu on the top right of the GUI, select Cisco Unified Serviceability and click Go.
The Cisco Unified Serviceability window appears.
Step 13 Enter your user ID and password if prompted to do so.
Step 14 Restart the TFTP server by completing the following steps:
a. Navigate to Tools > Control Center - Feature Services, as shown in Figure 3-9.
Figure 3-9 Cisco Unified Serviceability Window
b. Choose the correct TFTP server from the drop-down menu and click Go.
c. In the CM Services area, click the Cisco Tftp radio button.
d. Click the Restart button
Tip You can use either the Restart button on the bottom of the page, or the button circled in red in Figure 3-10.
1-9Cisco Unified Communications Manager Configuration Guide for the Cisco TelePresence System
OL-21851-01

Chapter 1 Loading Cisco Options Package (COP) Files on the Cisco TelePresence SystemUsing COP Files to Upgrade From the IP Phone to a Cisco TelePresence Touch 12
Figure 3-10 Restart Button in Features Services Page
Step 15 From the Navigation drop-down menu on the top right of the GUI, select Cisco Unified CM Administration and click Go.
The Cisco Unified CM Administration window appears.
Step 16 To apply the software to all devices of a specified type, complete the following steps:
Note To load the software per device, rather than apply it as a default, continue to Step 17.
a. Navigate to Device > Device Settings > Device Defaults.
b. Locate the system to which you want to apply a default codec image.
c. Apply the 1.8.0 codec image file as the default image file for all systems of a specified type by completing the following steps:
1. In the Load Information field, enter the name of the COP file, removing the cmterm- in front of the file name.
In the example in Figure 3-11, the administrator specified a default codec file image of CTS.1-8-0-123R-K9.P2 for all Cisco TelePresence 500-32 systems.
Figure 3-11 Specifying the Default Codec File Image for All Systems of a Specified Type
2. Click Save to save your changes.
d. Navigate to Device > Phone.
e. Search and access the device type for which you want to apply the new codec image file by completing the following steps:
1. In the Find Phone Where area, choose the Device Type and begins with drop-down choices.
2. Enter the device type for the endpoint; for example, Cisco TelePresence 500-32.
3. Click Find. An example results screen is shown in Figure 3-12.
1-10Cisco Unified Communications Manager Configuration Guide for the Cisco TelePresence System
OL-21851-01

Chapter 1 Loading Cisco Options Package (COP) Files on the Cisco TelePresence SystemUsing COP Files to Upgrade From the IP Phone to a Cisco TelePresence Touch 12
Figure 3-12 Results Screen After Device Type Search
4. Select the check box on the left side of the page to select all devices.
Tip This check box is circled in red in Figure 3-12.
5. Click Apply Config to Selected to apply the configuration to all selected devices.
f. Continue to Step 18.
Step 17 To load the software for a specific device, complete the following steps:
a. Navigate to Device > Phone.
b. Search and access your device by completing the following steps:
1. Use the drop-down choices to specify a valid search term, or leave the fields blank to find all devices.
2. Click Find.
3. Click the hypertext link in the Device Name (Line) row that corresponds to your device.
Step 18 Apply the codec file image to your system by completing the following steps:
a. In the Phone Load Name field, enter the name of the COP file, removing the cmterm-in front of the file name.
In the example in Figure 3-13, the administrator specified a file name of CTS.1-8-0-123R-K9.P2.
1-11Cisco Unified Communications Manager Configuration Guide for the Cisco TelePresence System
OL-21851-01

Chapter 1 Loading Cisco Options Package (COP) Files on the Cisco TelePresence SystemUsing COP Files to Upgrade From the IP Phone to a Cisco TelePresence Touch 12
Figure 3-13 Phone Load Name Field
b. Click Save.
c. Click Apply Config.
Step 19 Connect the Touch 12 to the system as described in the “Connecting the Cisco TelePresence Touch 12 to the System” section on page 1-20.
Upgrading From Cisco TelePresence Software Releases Prior to CTS 1.7.4To load the .sbn or .SPA and COP files to Unified CM and upgrade your codec and Touch 12 software in systems that are running CTS software versions that are lower than 1.7.4, complete the following steps.
Step 1 Copy the COP file to a Secure File Transfer Protocol (SFTP) server that is accessible by Unified CM.
Step 2 Log in to the Unified CM Administration interface.
Step 3 From the Navigation drop-down menu, on the top right of the GUI, select Cisco Unified OS Administration. The Cisco Unified Operation System Administration screen appears.
Step 4 Enter your user ID and password if prompted to do so.
Step 5 Navigate to Software Upgrades > Install/Upgrade.
Figure 3-14 Cisco Unified Operating System Administration Screen
1-12Cisco Unified Communications Manager Configuration Guide for the Cisco TelePresence System
OL-21851-01

Chapter 1 Loading Cisco Options Package (COP) Files on the Cisco TelePresence SystemUsing COP Files to Upgrade From the IP Phone to a Cisco TelePresence Touch 12
Step 6 In the Software Location window, specify the following information in the fields, as shown in Figure 3-15:
• In the Source drop-down menu, select Remote Filesystem.
• In the Directory and Server fields, enter the location of the COP file on the SFTP server.
• In the User Name and User Password fields, enter the user name and password used to access the SFTP server.
• In the Transfer Protocol drop-down menu, select SFTP.
•
Figure 3-15 Specifying SFTP Server and File Location
Step 7 Click Next.
Unified CM accesses the SFTP server. The Software Location area lists the COP files that Unified CM finds in the directory that you specified.
1-13Cisco Unified Communications Manager Configuration Guide for the Cisco TelePresence System
OL-21851-01

Chapter 1 Loading Cisco Options Package (COP) Files on the Cisco TelePresence SystemUsing COP Files to Upgrade From the IP Phone to a Cisco TelePresence Touch 12
Step 8 Choose the COP file that you want to install from the available file names in the Options/Upgrades drop-down menu, as shown in Figure 3-16.
Figure 3-16 Specifying the COP File
Step 9 Click Next.
The Unified CM GUI shows the COP file being installed, as shown in Figure 3-17.
Figure 3-17 COP File Installation
1-14Cisco Unified Communications Manager Configuration Guide for the Cisco TelePresence System
OL-21851-01

Chapter 1 Loading Cisco Options Package (COP) Files on the Cisco TelePresence SystemUsing COP Files to Upgrade From the IP Phone to a Cisco TelePresence Touch 12
Step 10 After installation completes, verify the file validity by completing the following steps:
a. Make a note of the information in the File Checksum Details window, as shown in Figure 3-18.
Figure 3-18 File Checksum Details Window
b. Log in to the SFTP server and enter the following command:
c. md5sum filename.cop.sgn
where filename is the file name of the COP file on the SFTP server.
d. Make a note of the checksum value that displays as a result of the md5sum command.
e. Compare the MD5 Hash Value that displays in this area to the MD5 checksum value that you find in the COP file on the server and make sure that they match to ensure that the file is not corrupted.
f. If the values match, continue to the next step; if the values do not match, retry the file installation.
Step 11 Click Next to begin installation.
The installation log shows the installation progress.
After the .loads, codec and Touch 12 files are extracted, the interface shows Complete in the Installation Status window, as shown in Figure 3-19.
1-15Cisco Unified Communications Manager Configuration Guide for the Cisco TelePresence System
OL-21851-01

Chapter 1 Loading Cisco Options Package (COP) Files on the Cisco TelePresence SystemUsing COP Files to Upgrade From the IP Phone to a Cisco TelePresence Touch 12
Figure 3-19 Installation Status Window
Step 12 From the Navigation drop-down menu on the top right of the GUI, select Cisco Unified Serviceability and click Go.
The Cisco Unified Serviceability window appears, as shown in Figure 3-20.
Step 13 Enter your user ID and password if prompted to do so.
Figure 3-20 Cisco Unified Serviceability Window
Step 14 Restart the TFTP server by completing the following steps:
a. Navigate to Tools > Control Center - Feature Services.
b. Choose the correct TFTP server from the drop-down menu and click Go.
c. In the CM Services window click the Cisco TFTP radio button.
d. Click the Restart button.
Tip You can use either the Restart button on the bottom of the page or the button circled in red in Figure 3-21.
1-16Cisco Unified Communications Manager Configuration Guide for the Cisco TelePresence System
OL-21851-01

Chapter 1 Loading Cisco Options Package (COP) Files on the Cisco TelePresence SystemUsing COP Files to Upgrade From the IP Phone to a Cisco TelePresence Touch 12
Figure 3-21 Restart Button in Features Services Page
Step 15 From the Navigation drop-down menu on the top right of the GUI, select Cisco Unified CM Administration and click Go.
The Cisco Unified CM Administration window appears.
Step 16 To apply the software to all devices of a specified type, complete the following steps:
Note To load the software per device, rather than apply it as a default, continue to Step 17.
a. Navigate to Device > Device Settings > Device Defaults.
b. Locate the system to which you want to apply a default codec image.
c. Apply the 1.8.0 codec image file as the default image file for all systems of a specified type by completing the following steps:
1. In the Load Information field, enter the name of the COP file, making the following changes:
• If your system uses the codec shown in Figure 3-1, append a file type of .sbn.
In the example in Figure 3-22, the administrator specified a default codec file image of CTS.1-8-0-123R-K9.P1.sbn for all CTS 1100 systems. The original COP file name was cmterm-CTS.1-8-0-123R-K9.P1.
Figure 3-22 Specifying the Default .sbn File Image for All Systems of a Specified Type
• If your system uses the codec shown in Figure 3-2, append a file type of .SPA.
In the example in Figure 3-23, the administrator specified device a default codec file image of CTS.1-8-0-123R-K9.P2.SPA for all CTS 500-32 systems. The original COP file name was cmterm-CTS.1-8-0-123R-K9.P2.
1-17Cisco Unified Communications Manager Configuration Guide for the Cisco TelePresence System
OL-21851-01

Chapter 1 Loading Cisco Options Package (COP) Files on the Cisco TelePresence SystemUsing COP Files to Upgrade From the IP Phone to a Cisco TelePresence Touch 12
Figure 3-23 Specifying the Default .SPA File Image for All Systems of a Specified Type
2. Click Save to save your changes.
d. Navigate to Device > Phone.
e. Search and access the device type for which you want to apply the new codec image file by completing the following steps:
1. In the Find Phone Where area, choose the Device Type and begins with drop-down choices.
2. Enter the device type for the endpoint; for example, Cisco TelePresence 500-32.
3. Click Find. An example results screen is shown in Figure 3-24.
Figure 3-24 Results Screen After Device Type Search
4. Select the check box on the left side of the page to select all devices.
Tip This check box is circled in red in Figure 3-24.
5. Click Apply Config to Selected to apply the configuration to all selected devices.
f. Continue to Step 18.
1-18Cisco Unified Communications Manager Configuration Guide for the Cisco TelePresence System
OL-21851-01

Chapter 1 Loading Cisco Options Package (COP) Files on the Cisco TelePresence SystemUsing COP Files to Upgrade From the IP Phone to a Cisco TelePresence Touch 12
Step 17 To load the software for a specific device, complete the following steps:
a. Navigate to Device > Phone.
b. Search and access your device by completing the following steps:
1. Use the drop-down choices to specify a valid search term, or leave the fields blank to find all devices.
2. Click Find.
3. Click the hypertext link in the Device Name (Line) row that corresponds to your device.
Step 18 Apply the codec file image to your system by completing the following steps:
a. If your system uses the codec shown in Figure 3-1, append a file type of .sbn.
In the example in Figure 3-25, the administrator specified a default codec file image of CTS.1-8-0-123R-K9.P1.sbn for all the specified system. The original COP file name was cmterm-CTS.1-8-0-123R-K9.P1.
Figure 3-25 Specifying an .sbn File Image for a Specific System
b. If your system uses the codec shown in Figure 3-2, append a file type of .SPA.
In the example in Figure 3-26, the administrator specified a codec file image of CTS.1-8-0-123R-K9.P2.SPA. The original COP file name was cmterm-CTS.1-8-0-123R-K9.P2.
1-19Cisco Unified Communications Manager Configuration Guide for the Cisco TelePresence System
OL-21851-01

Chapter 1 Loading Cisco Options Package (COP) Files on the Cisco TelePresence SystemUsing COP Files to Upgrade From the IP Phone to a Cisco TelePresence Touch 12
Figure 3-26 Specifying an .SPA File Image for a Specific System
c. Click Save.
d. Click Apply Config to apply the configuration to this device.
The codec shuts down, applies the .SPA codec file as its boot file, and reboots.
Step 19 Apply the COP (Loads) file to the codec, which in turn allows the Touch 12 file to be installed by the Touch 12, by completing the following steps:
a. Redo Step 15 through Step 17 in this section, making the following changes:
b. In the Load Information field (for all devices of a specified type) or the Phone Load Name field (for a single device), enter the name of the COP file, omitting all file types.
In the examples in Figure 3-23 and Figure 3-26, you would change the file name from CTS.1-8-0-123R-K9.P2.SPA to CTS.1-8-0-123R-K9.P2. In the examples in Figure 3-22 and Figure 3-25, you would change the file name from CTS.1-8-0-123R-K9.P1.sbn to CTS.1-8-0-123R-K9.P1.
c. Click Save.
d. Click Apply Config.
Step 20 Connect the Touch 12 to the system as described in the “Connecting the Cisco TelePresence Touch 12 to the System” section on page 1-20.
Connecting the Cisco TelePresence Touch 12 to the SystemFor systems that use the codec shown in Figure 3-1, connect the Touch 12 device, by completing the following tasks:
Step 1 Connect one Ethernet cable between the “Network Uplink Input RJ-45” port on the rear of the Touch 12 and the connection labeled “To AP” on the PoE unit.
Step 2 Connect one Ethernet cable between the “To Phone” connection on the codec and the connection labeled “To Switch” on the PoE unit, as shown in Figure 3-27.
Step 3 Connect one end of the power cord to the PoE unit and plug the other end into a wall outlet.
1-20Cisco Unified Communications Manager Configuration Guide for the Cisco TelePresence System
OL-21851-01

Chapter 1 Loading Cisco Options Package (COP) Files on the Cisco TelePresence SystemUsing COP Files to Upgrade From the IP Phone to a Cisco TelePresence Touch 12
Figure 3-27 Cisco TelePresence Touch Connections with Power over Ethernet Unit
Note After you connect the Touch device, you should see a series of circled numbers on the lower left side of the Touch display. The numbers change to check marks as the device is starting. If the circled numbers do not change to check marks or you receive a message on the Touch device that it could not register to the codec, disconnect the Touch device, wait 5 minutes, then reconnect it.
For systems that use the codec shown in Figure 3-2, connect the Touch 12 by doing the following:
Step 1 Connect the other side of the Ethernet cable to the “To Phone” connection on the system codec.
Step 2 Connect one side of the Ethernet cable that is supplied with the Touch 12 to the “Network Uplink Input RJ-45” port on the rear of the device, as shown in Figure 3-28.
Wall Outlet
To AP To Switch
PoE Unit
Codec
Cisco Touch
2098
24
1-21Cisco Unified Communications Manager Configuration Guide for the Cisco TelePresence System
OL-21851-01

Chapter 1 Loading Cisco Options Package (COP) Files on the Cisco TelePresence SystemConfiguring the Directory on the Cisco TelePresence Touch 12
Figure 3-28 Cisco TelePresence Touch Connection
Note After you connect the Touch device, you should see a series of circled numbers on the lower left side of the Touch display. The numbers change to check marks as the device is starting. If the circled numbers do not change to check marks or you receive a message on the Touch device that it could not register to the codec, disconnect the Touch device, wait 5 minutes, then reconnect it.
Configuring the Directory on the Cisco TelePresence Touch 12
Note The Cisco TelePresence Touch 12 requires Unified CM 8.5.1 or higher.
To use the directory service for the Cisco TelePresence Touch 12, you must make the following changes in Cisco Unified Communications Manager (Unified CM):
1. Enable Cisco User Data Services (UDS) on systems running a minimum of Unified CM 8.6(2).
2. Configure the User Search Limit to 500.
Tip The Cisco TelePresence Touch 12 still functions if you do not enable User Data Services in Unified CM 8.6(1) or higher, but you cannot access the directory.
Go to the following sections to configure the directory:
• Enabling User Data Services, page 1-23
• Configuring the Search User Limit, page 1-23
2098
25
Cisco Touch
Codec
1-22Cisco Unified Communications Manager Configuration Guide for the Cisco TelePresence System
OL-21851-01

Chapter 1 Loading Cisco Options Package (COP) Files on the Cisco TelePresence SystemConfiguring the Directory on the Cisco TelePresence Touch 12
Enabling User Data ServicesTo enable Cisco User Data Services:
Step 1 Log in to the Cisco Unified CM Administration interface.
Step 2 From the Navigation drop-down menu on the top right of the Unified CM Administration interface, select Cisco Unified Serviceability and click Go.
The Cisco Unified Serviceability window appears, as shown in Figure 3-29.
Figure 3-29 Cisco Unified Serviceability Window
Step 3 Enter your user ID and password if prompted to do so.
Step 4 Navigate to Tools > Control Center—Feature Services.
Step 5 Select the Unified CM server from the drop-down menu and click Go.
Step 6 Scroll to the CM Services window and click the Cisco User Data Services radio button, as shown in Figure 3-30.
Figure 3-30 Cisco User Data Services
Step 7 Click Restart to save your changes and start the service.
Step 8 Proceed to Configuring the Search User Limit.
Configuring the Search User LimitTo configure the Search User Limit to 500:
1-23Cisco Unified Communications Manager Configuration Guide for the Cisco TelePresence System
OL-21851-01
Chapter 1 Loading Cisco Options Package (COP) Files on the Cisco TelePresence SystemSetting the Idle Display Default (“Home”) Screen
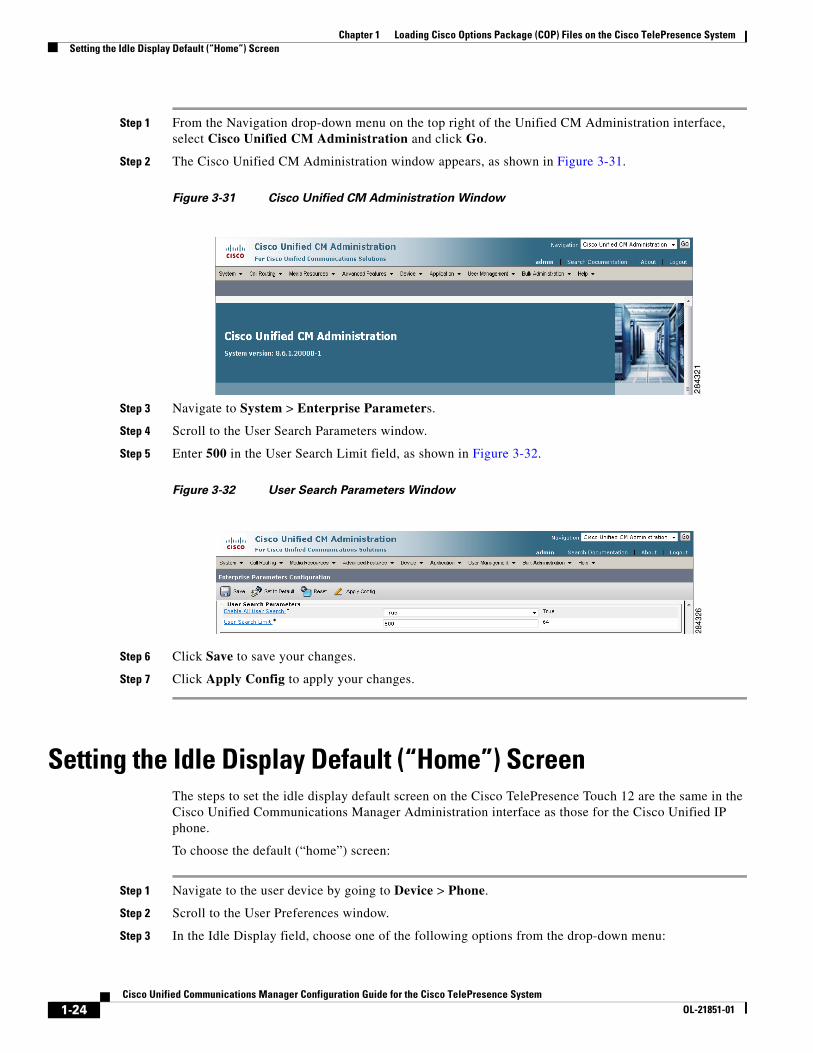
Step 1 From the Navigation drop-down menu on the top right of the Unified CM Administration interface, select Cisco Unified CM Administration and click Go.
Step 2 The Cisco Unified CM Administration window appears, as shown in Figure 3-31.
Figure 3-31 Cisco Unified CM Administration Window
Step 3 Navigate to System > Enterprise Parameters.
Step 4 Scroll to the User Search Parameters window.
Step 5 Enter 500 in the User Search Limit field, as shown in Figure 3-32.
Figure 3-32 User Search Parameters Window
Step 6 Click Save to save your changes.
Step 7 Click Apply Config to apply your changes.
Setting the Idle Display Default (“Home”) ScreenThe steps to set the idle display default screen on the Cisco TelePresence Touch 12 are the same in the Cisco Unified Communications Manager Administration interface as those for the Cisco Unified IP phone.
To choose the default (“home”) screen:
Step 1 Navigate to the user device by going to Device > Phone.
Step 2 Scroll to the User Preferences window.
Step 3 In the Idle Display field, choose one of the following options from the drop-down menu:
1-24Cisco Unified Communications Manager Configuration Guide for the Cisco TelePresence System
OL-21851-01

Chapter 1 Loading Cisco Options Package (COP) Files on the Cisco TelePresence SystemRelated Information
• Default Detailed
• Manual
• Directory
• Favorites
• Default Simple
Step 4 Optional. Check the box at the top of the User Preferences window to allow the user to change preferences, as shown in Figure 3-33.
Figure 3-33 Set User Preferences - Idle Display “Home” Screen
Tip Only two preferences are allowed to be changed by the user on the Cisco TelePresence Touch 12 when you check the “Allow User to change Preferences” box: Auto Answer (on or off) and Ringtone.
Step 5 Click Apply Config then click Save.
Related InformationSee the following documentation for more information:
• Cisco TelePresence Command-Line Interface Reference Guide
• Cisco Unified Serviceability Administration Guide
• Disaster Recovery System Administration Guide
• Installing and Configuring the Cisco TelePresence Touch 12
• Cisco TelePresence Touch
1-25Cisco Unified Communications Manager Configuration Guide for the Cisco TelePresence System
OL-21851-01

Chapter 1 Loading Cisco Options Package (COP) Files on the Cisco TelePresence SystemRelated Information
1-26Cisco Unified Communications Manager Configuration Guide for the Cisco TelePresence System
OL-21851-01