
Load DynamiX Enterprise 5 - Virtual Instruments€¦ · · 2017-08-21The basic workflow described...
46
Load DynamiX Enterprise 5.4 Quick Start Guide Storage Performance Analytics
Transcript of Load DynamiX Enterprise 5 - Virtual Instruments€¦ · · 2017-08-21The basic workflow described...

Load DynamiX Enterprise 5.4
Quick Start Guide
Storage Performance A
nalytics

www.virtualinstruments.com
Load DynamiX Enterprise Quick Start Guide 2 © 2008-2017 Virtual Instruments, Inc. All rights reserved.
TableofContents
TheNeedandMethodologyforStorageTesting......................................................................4
Introduction...........................................................................................................................5
HOWTOGETSUPPORT...........................................................................................................6
LOADDYNAMIXENTERPRISEOVERVIEW................................................................................7
DEPLOYMENT.........................................................................................................................8
KEYTERMINOLOGY...............................................................................................................10
USERS....................................................................................................................................11
FIRSTTASKS...........................................................................................................................12Loginasadministrator........................................................................................................................................................12Changetheadministrator’sUserIDandPassword.................................................................................................13CreateaNewUser..................................................................................................................................................................15GettingHelp...............................................................................................................................................................................16WorkloadSourcesforTesting&Validation................................................................................................................16Preparingtorunaworkload.............................................................................................................................................17Addinganappliance..............................................................................................................................................................18CreatingaTestBed................................................................................................................................................................20LOADDYNAMIXENTERPRISEWORKLOADS............................................................................22UnderstandingRealProductionWorkloads...............................................................................................................23WorkloadDataImporter.....................................................................................................................................................23RunaWorkload.......................................................................................................................................................................26AnalyzingWorkloadResults..............................................................................................................................................29UsingaTDEWorkload..........................................................................................................................................................31RunningaWorkload..............................................................................................................................................................35WorkloadResults....................................................................................................................................................................36WorkloadsincludedinLoadDynamiXEnterpriseReleases................................................................................38TEMPLATESandREPORTS......................................................................................................39CreatingaTemplate...............................................................................................................................................................39CreatingaReport....................................................................................................................................................................42NEXTSTEPS...........................................................................................................................45AddMoreAppliancesandTestBeds..............................................................................................................................45AddMoreWorkloads............................................................................................................................................................45CreateIterationSuites..........................................................................................................................................................45CreateCompositeWorkloads............................................................................................................................................45AddMoreUsers.......................................................................................................................................................................45

www.virtualinstruments.com
Load DynamiX Enterprise Quick Start Guide 4 © 2008-2017 Virtual Instruments, Inc. All rights reserved.
The Need and Methodology for Storage Testing Change in a production storage environment is inevitable, and that change can be either planned (e.g. technology change, vendor replacement, firmware upgrade) or unexpected (e.g. application change, user behavior change, outages). Any time a change occurs, there is a potential for performance degradation, as the performance of a storage infrastructure is highly dependent on the characteristics of the storage workloads running on it. The most reliable way to de-risk these changes is to measure the performance impact of these changes against your own workloads, because different organizations will have different workload characteristics, especially in a shared SAN / NAS environment where multiple applications coexist.
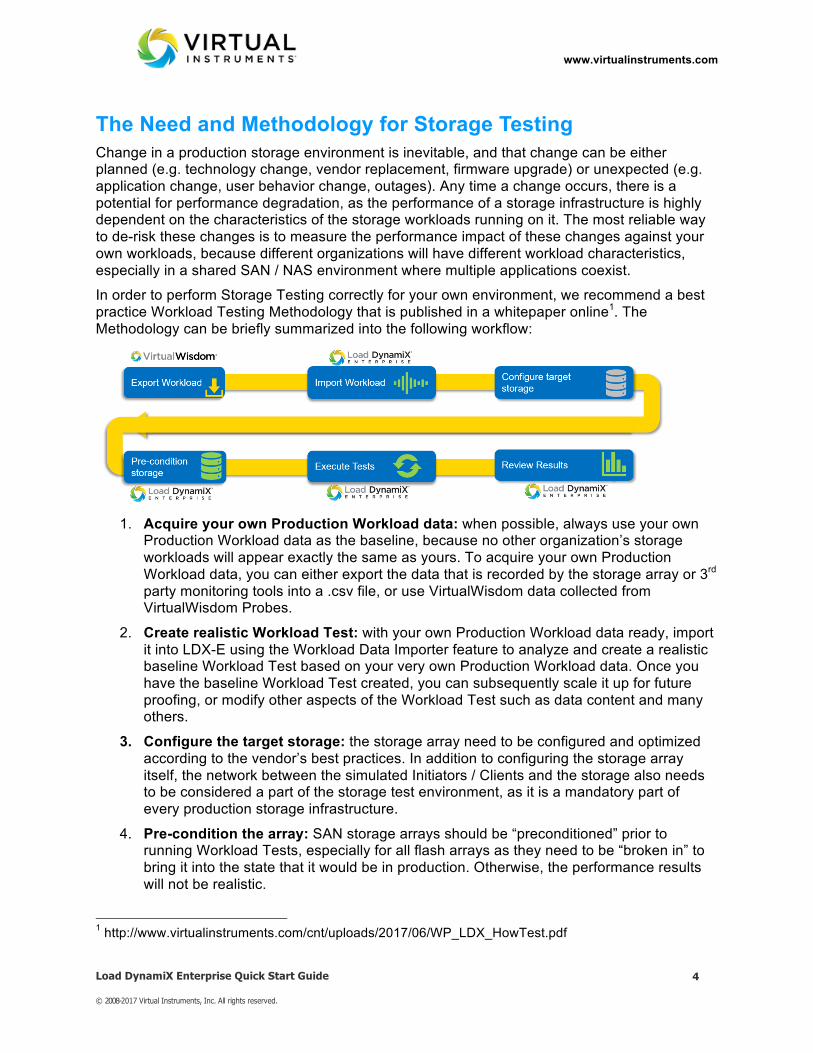
In order to perform Storage Testing correctly for your own environment, we recommend a best practice Workload Testing Methodology that is published in a whitepaper online1. The Methodology can be briefly summarized into the following workflow:
1. Acquire your own Production Workload data: when possible, always use your own
Production Workload data as the baseline, because no other organization’s storage workloads will appear exactly the same as yours. To acquire your own Production Workload data, you can either export the data that is recorded by the storage array or 3rd party monitoring tools into a .csv file, or use VirtualWisdom data collected from VirtualWisdom Probes.
2. Create realistic Workload Test: with your own Production Workload data ready, import it into LDX-E using the Workload Data Importer feature to analyze and create a realistic baseline Workload Test based on your very own Production Workload data. Once you have the baseline Workload Test created, you can subsequently scale it up for future proofing, or modify other aspects of the Workload Test such as data content and many others.
3. Configure the target storage: the storage array need to be configured and optimized according to the vendor’s best practices. In addition to configuring the storage array itself, the network between the simulated Initiators / Clients and the storage also needs to be considered a part of the storage test environment, as it is a mandatory part of every production storage infrastructure.
4. Pre-condition the array: SAN storage arrays should be “preconditioned” prior to running Workload Tests, especially for all flash arrays as they need to be “broken in” to bring it into the state that it would be in production. Otherwise, the performance results will not be realistic.
1 http://www.virtualinstruments.com/cnt/uploads/2017/06/WP_LDX_HowTest.pdf

www.virtualinstruments.com
Load DynamiX Enterprise Quick Start Guide 5 © 2008-2017 Virtual Instruments, Inc. All rights reserved.
5. Run Workload Tests: start by running the baseline Workload Test to make sure the test results are as expected. Once the baseline results are confirmed, perform subsequent Workload Tests by scaling up the load or modifying other parameters such as block sizes and deduplication ratio, and carefully track the configuration and test results from each Workload Test Run.
6. Analyze Workload Test Results: with all Workload Test Runs completed and their results identified, create a Report that compares the KPIs from each Test Run and use the data as one of input for change confirmation.
Introduction Load DynamiX Enterprise is the leading Storage Performance Analytics and Performance Validation Solution in the market today. Load DynamiX Enterprise allows customers to acquire workload profiles directly from live production storage environments, and recreate those workloads in the lab for planning, evaluation, optimization and problem resolution or troubleshooting.
Understanding the real application IO workloads has traditionally been one of the most challenging barriers to storage performance validation. The ability to do this marks a major step forward in enabling organizations to perform storage validation across their critical applications.
Whether you work at a storage or network technology vendor or at an enterprise IT organization, Load DynamiX (LDX) will simplify your storage testing and evaluation process and empower you with an unprecedented level of insight into your application workloads.

www.virtualinstruments.com
Load DynamiX Enterprise Quick Start Guide 6 © 2008-2017 Virtual Instruments, Inc. All rights reserved.
LDX-E Iteration Explorer
Load DynamiX Enterprise (LDX-E) is a web based analytics and performance validation management appliance. It is easy to deploy and available as either physical or virtual appliance that provides customers with:
• Production workload acquisition and characterization • Easy to use workload characterization and modeling
• Automated Storage array performance profiling
• Advanced Storage and workload analytics and reporting
• An enterprise class test and lab management
HOW TO GET SUPPORT Should you require support at any time send an email to: [email protected]
www.virtualinstruments.com
Load DynamiX Enterprise Quick Start Guide 7 © 2008-2017 Virtual Instruments, Inc. All rights reserved.
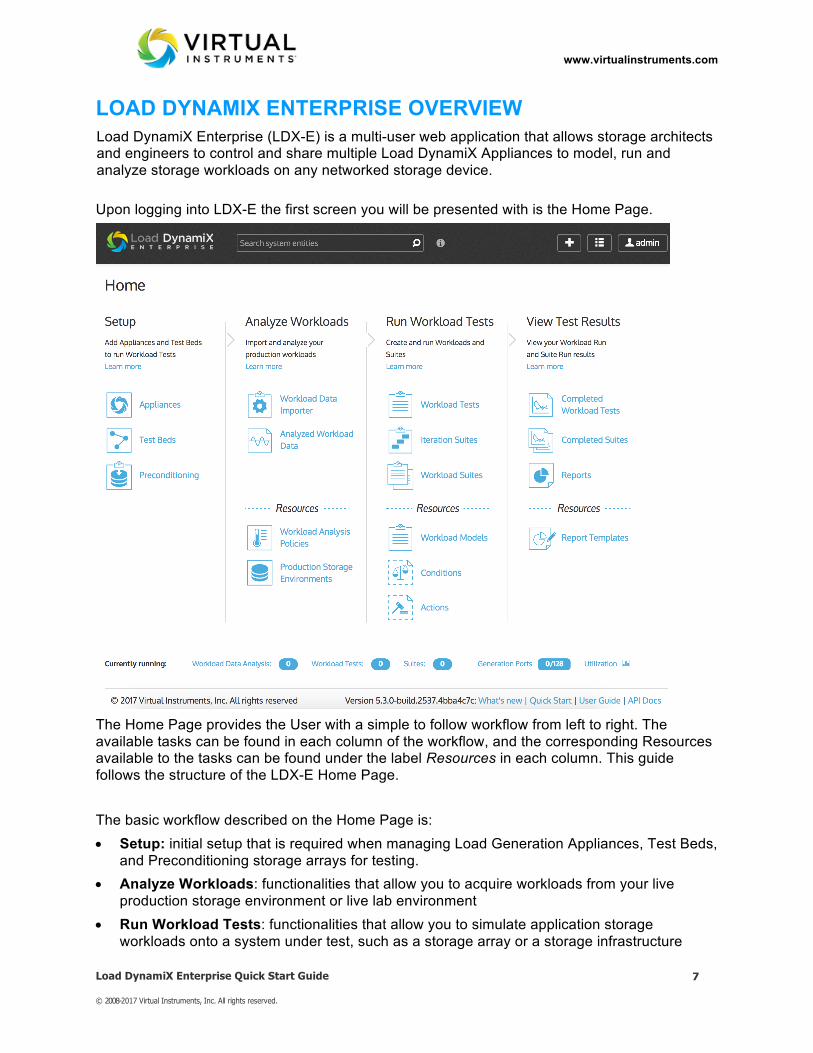
LOAD DYNAMIX ENTERPRISE OVERVIEW Load DynamiX Enterprise (LDX-E) is a multi-user web application that allows storage architects and engineers to control and share multiple Load DynamiX Appliances to model, run and analyze storage workloads on any networked storage device. Upon logging into LDX-E the first screen you will be presented with is the Home Page.
The Home Page provides the User with a simple to follow workflow from left to right. The available tasks can be found in each column of the workflow, and the corresponding Resources available to the tasks can be found under the label Resources in each column. This guide follows the structure of the LDX-E Home Page. The basic workflow described on the Home Page is: • Setup: initial setup that is required when managing Load Generation Appliances, Test Beds,
and Preconditioning storage arrays for testing. • Analyze Workloads: functionalities that allow you to acquire workloads from your live
production storage environment or live lab environment • Run Workload Tests: functionalities that allow you to simulate application storage
workloads onto a system under test, such as a storage array or a storage infrastructure

www.virtualinstruments.com
Load DynamiX Enterprise Quick Start Guide 8 © 2008-2017 Virtual Instruments, Inc. All rights reserved.
• View Test Results: functionalities that allow you to view the results of Workload Tests and Suites
The title bar is displayed at the top of every screen to enable easy and quick access to the LDX-E capabilities such as the product wide search, the new items menu , and a shortcut that pulls down the dashboard . You can also jump back to the Home Page by clicking on Home in the bread crumbs displayed underneath the title bar.
In addition to online help, at the bottom of page you’ll find the footer with links to What’s new in a release, the Quick Start and this User Guide in pdf and the API docs.
This Quick Start Guide is intended to help you get started with Load DynamiX Enterprise (LDX-E). You will be shown:
1. How LDX-E is typically deployed in a network environment.
2. How to administer LDX-E and add user accounts.
3. How to add Load DynamiX Load Generation appliances to LDX-E.
4. How to configure a production storage environment to analyze production workloads or a test bed on which to run a storage workload.
5. How to create and configure an LDX-E predefined workload, run it and analyze results.
6. How to import a TDE Workload, run it and analyze results.
7. How to generate reports of your results.
To read about detail functions and other advanced features such as Iteration Suites, click on the User Guide at the footer of every LDX-E screen. You can also view the What’s new, Quick Start Guide and API documentation from the same location.
DEPLOYMENT Load DynamiX Enterprise Server should be deployed in an environment with one or more Load Generation Appliances and networked storage devices.
DeploymentNotes:1. The LDX-E Server must be on the same network as the Load Generation Appliances
admin ports.
2. The Load Generation Appliance test ports must be on a different network than the admin ports so that test traffic, which often consumes a large percentage of line rate, does not

www.virtualinstruments.com
Load DynamiX Enterprise Quick Start Guide 9 © 2008-2017 Virtual Instruments, Inc. All rights reserved.
flood the admin network which is used for LDX-E Project control (start/stop/data collection).
3. Load DynamiX Enterprise requires 2 IP addresses:
• Required: Load DynamiX Enterprise Management Network
i. This is the IP address of the LDX-E VM that provides the web interface
• Required: Citrix Xen / VMware ESXi Management Network
i. This is the IP address of the Citrix Xen / VMware ESXi management access
• Optional: LDX-E Appliance IPMI
i. This is the IP address of the physical LDX-E Appliance’s IPMI port

www.virtualinstruments.com
Load DynamiX Enterprise Quick Start Guide 10 © 2008-2017 Virtual Instruments, Inc. All rights reserved.
KEY TERMINOLOGY LDX Term Definition
Actions per second Load profile metric, which helps assess scalability Actions per Second, appears in load profile specification and charts. Generally analogous to IOPS, which includes reads / writes and all protocol commands.
Analysis Policy An analysis policy defines how to analyze data coming from the Workload Data Importer, or Workload sensors and which workloads to automatically create. These policies are provides out of the box and can be edited by users.
Application Workload
An application workload is designed to emulate the behavior of that specific type of application in terms that are relevant to that workload as opposed to the protocol it uses.
Composite Workload
A special Workload that is created by combining multiple Workloads together to run as one larger, complex workload in which each individual Workload can have its own unique I/O characteristics.
Load DynamiX Load Generation Appliance
Virtual or physical 2U appliance that is used to emulate the protocol clients and generate I/O traffic based on workload models and access patterns that have been configured by Load DynamiX Enterprise or TDE software
Load DynamiX Enterprise (LDX-E)
An easy-to-use software platform with a web-based graphical user interface (GUI) that is used to (1) characterize and create workload models, (2) configure and administer tests, and (3) analyze results. It runs on a VM on a physical appliance.
Iteration An iteration is a workload test that is that forms part of an Iteration suite. Each iteration runs with a set of parameters that are part of a bigger iteration suite.
Iteration Suite An iteration suite is a data driven workload suite that tests all the permutations of a workload against a set of parameter values provided. It is ideal for testing performance using different blocks for example.
Production Storage Environment
The production storage environment associates a sensor with a specific production environment configuration. The values entered in the production storage environment provide the basis for some of the workload calculations.
Protocol Workload A protocol workload allows you to describe a workload in protocol terms whether its read/write ratio’s or command mix for example.
TDE (Test Development Environment)
Load DynamiX client application for designing and executing tests as well as validating test results. Included in all appliances.
TDE Workload TDE Workloads (formerly known as projects) are tests and all the resources created by the Load DynamiX TDE, Enterprise, or the Load DynamiX API to run tests
Test Beds A test environment associated with a Workload (i.e. Workload, Composite Workload, or Imported TDE Workload) runs on.
Test Network The network on which devices are to be tested when connected to physical ports on the Load DynamiX Appliance, or virtual ports, for LDX-V.
Workload Data Importer
The workload data importer enables users to import text based CSV (Comma separated values) that contains workload performance data that can be analyzed by LDX-E with a supported Analysis Policy
Workload Model A Workload simulates application behavior against a storage array that can be user-configured in many dimensions via parameter options to represent storage traffic on a network
Workload Parameters
The configurable information associated with a workload such as duration of the test
Workload Suite A collection of Workloads that are intended to be executed simultaneously or serially for batch execution of tests such as Regression
Workload Test An instantiation of an executed Workload and its output (statistics, log files, pcap data, etc)

www.virtualinstruments.com
Load DynamiX Enterprise Quick Start Guide 11 © 2008-2017 Virtual Instruments, Inc. All rights reserved.
USERS LDX-E supports two different user profiles: administrator and user.
AdministratorThe Administrator of Load DynamiX Enterprise will use Load DynamiX Enterprise to:
• Manage Users • Manage User Groups • Manage System Resources • Manage User capabilities
The Administrator has full access to Load DynamiX Enterprise, including all functions performed by Users.
UsersThe Load DynamiX Enterprise User will utilize Load DynamiX Enterprise to: • Acquire, Analyze or Execute Workloads, Workload Suites, and Iteration Suites • View Results of Workload Profiles or Workload Tests • Define Test Environments by adding appliances and test beds • Define Conditions and Actions for tests • Import TDE Workloads and Workload Suites from Load DynamiX Test-Development-
Environment (TDE) • Generate Templates and Reports to analyze the results of tests runs

www.virtualinstruments.com
Load DynamiX Enterprise Quick Start Guide 12 © 2008-2017 Virtual Instruments, Inc. All rights reserved.
FIRST TASKS
Log in as administrator The administrator credentials are:
• User name: admin
• Email address: [email protected]
• Password: welcome
When logging in for the first time, the first page that will be seen is the End User License Agreement (EULA). Scroll to the bottom of the EULA and click the Accept button. Once the EULA has been accepted then the Dashboard page will appear.

www.virtualinstruments.com
Load DynamiX Enterprise Quick Start Guide 13 © 2008-2017 Virtual Instruments, Inc. All rights reserved.
The Dashboard that appears highlights the primary workflow for using LDX-E to setup your test environment, acquire Production Workload Data, run Workload Tests, and view your Workload Test Results.
This quick-start guide, along with the User Guide and What’s New, is accessible in the lower right hand corner of the Dashboard.
Although an administrator can utilize the functionality in this dashboard, you will most likely want to create a new user account and log-in as that user before performing most of the actions on this dashboard.
Change the administrator ’s User ID and Password The administrator should change their User ID (Email address) and Password by:
1. Editing a user from the admin dropdown menu by clicking on Users:

www.virtualinstruments.com
Load DynamiX Enterprise Quick Start Guide 14 © 2008-2017 Virtual Instruments, Inc. All rights reserved.
2. Click on the Edit button for the admin user:
3. Change the Email and Password fields:
4. Click Update.

www.virtualinstruments.com
Load DynamiX Enterprise Quick Start Guide 15 © 2008-2017 Virtual Instruments, Inc. All rights reserved.
Notes:
• The Delete User button is not enabled for the admin user.
• To change the admin user's password back to the default, click Reset.
Create a New User Administrator access should be reserved for managing appliances, resources, groups and user accounts. You will want to create one or more user account for your users to perform day-to-day operations in LDX-E. To create a new user in LDX-E:
1. Log-in as admin
2. Choosing Edit from the admin dropdown menu.
3. Click on Users.
4. Click the New User button:
5. Enter the information for new user:
(any user name, email address and minimum 6 character password are acceptable)
6. Click Create User. 7. Log out as admin.
(from the admin dropdown menu)

www.virtualinstruments.com
Load DynamiX Enterprise Quick Start Guide 16 © 2008-2017 Virtual Instruments, Inc. All rights reserved.
Notes:
• When logging in for the first time, a new user will see the Load DynamiX Enterprise End User License Agreement (EULA).
Getting Help LDX-E provides context sensitive help and tips throughout the product by hovering over a button, interface object or the information icon
Additional Help on each of the major areas within LDX-E can be found straight on the Home page by clicking on the Learn more links. In addition to the What’s new, this Quick Start Guide, the User Guide and API documentation can be found in the footer of every page.
The Generate “Learn more” link, for example, contains information explaining Workloads, and Workload Suites and their relationship to Test Beds.
It also provides embedded links directly to functionality such as creating Test Beds and executing Workloads.
Workload Sources for Testing & Validation
LDX-E provides you multiple ways to create Workloads to use in testing and validation.
1. Use, clone and run existing Example Workloads. Example workloads provide indicative examples of generic application behavior.
2. Use, clone and configure specific values onto the out of the box workload models. This allows you to select a particular protocol and using sliders configure the behavior to match your desired workloads.
3. Use an existing TDE Workload (formerly known as a Project). Existing TDE users can connect to LDX-E and save TDE Workloads directly into LDX-E for use by the wider community.
4. Use the Workload Data Importer to create workloads based on production behavior, using data from VirtualWisdom or .csv output storage appliances. Using data from VirtualWisdom provides the most accurate representation of real-life workload behavior and support the creation of temporal workloads that vary IOPs over time as per the observed behavior in production.
www.virtualinstruments.com
Load DynamiX Enterprise Quick Start Guide 17 © 2008-2017 Virtual Instruments, Inc. All rights reserved.
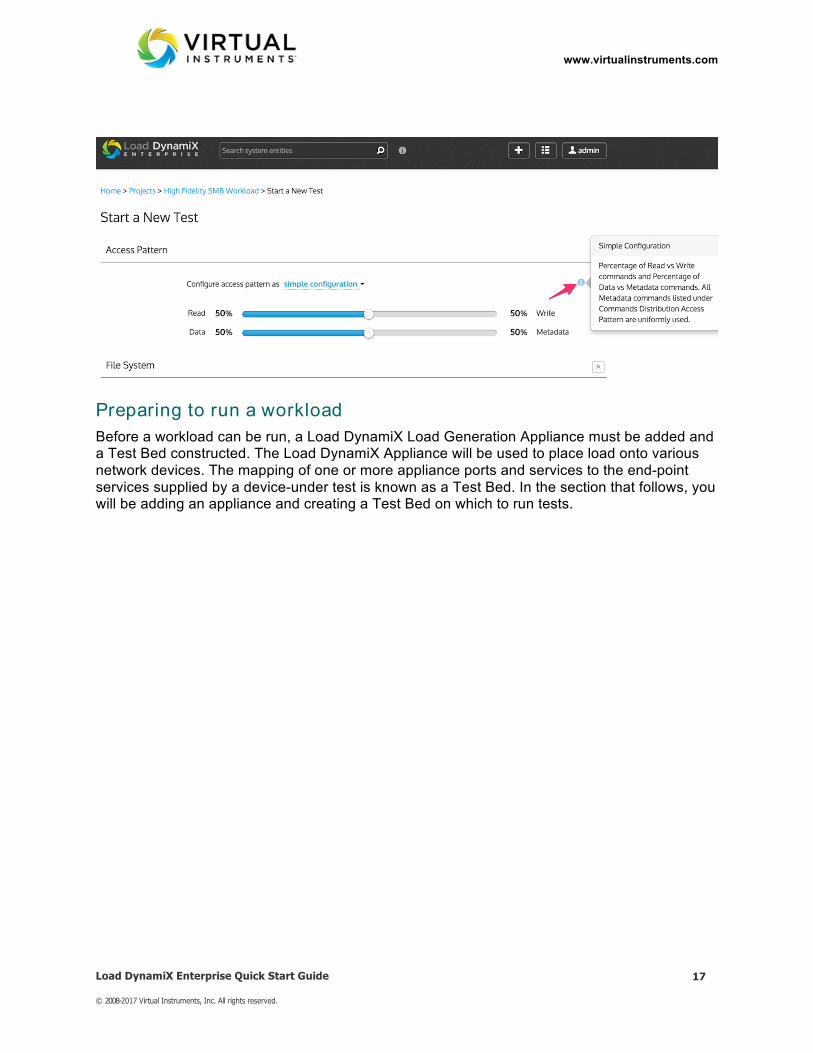
Preparing to run a workload Before a workload can be run, a Load DynamiX Load Generation Appliance must be added and a Test Bed constructed. The Load DynamiX Appliance will be used to place load onto various network devices. The mapping of one or more appliance ports and services to the end-point services supplied by a device-under test is known as a Test Bed. In the section that follows, you will be adding an appliance and creating a Test Bed on which to run tests.

www.virtualinstruments.com
Load DynamiX Enterprise Quick Start Guide 18 © 2008-2017 Virtual Instruments, Inc. All rights reserved.
Adding an appliance To add an appliance to LDX-E:
1. Select Add Appliance from the New Item Menu drop-down menu (or follow the dashboard appliances link and choose Add Appliance)

www.virtualinstruments.com
Load DynamiX Enterprise Quick Start Guide 19 © 2008-2017 Virtual Instruments, Inc. All rights reserved.
2. Fill in the information for the appliance:
• Provide a user-friendly Name for the Appliance.
• Provide the IP Address of the Appliance.
• Optionally provide a Description of the Appliance or its intended use.
• Optionally provide a Tag to facilitate searching.
• Choose whether or not to list the Appliance publicly.
3. Click Create Appliance to add the Appliance.
4. Confirm that the appliance appears in the appliances list by selecting “Appliances” from the dashboard.
Notes:
• Each of the Appliance Ports is listed along with their capacity and current state.

www.virtualinstruments.com
Load DynamiX Enterprise Quick Start Guide 20 © 2008-2017 Virtual Instruments, Inc. All rights reserved.
Creating a Test Bed The mapping of one or more appliance ports and services to the end-point services supplied by a device-under test is known as a Test Bed. Appliances are made available for testing via Test Beds. To create a Test Bed for you appliance:
1. Select Create Test Bed from scratch from the drop-down menu (or follow the dashboard appliances link and choose New Test Bed, Create from scratch)
2. Gather the information you will need for your Test Bed:
• Which appliance will be generating load?
• What devices will be loaded?
• What ports will be made available from the appliance?
• What services (LUNs, etc.) will be made available from the device?
• Who should have access to this Test Bed?
For this example the following information was gathered:
• Appliance: “FC” at 192.168.212.29
• Device: 50:0a:09:81:88:7c:cc:78
• Port: 0 (8G)
• Service: LUN1
• Access: Everyone (Public)

www.virtualinstruments.com
Load DynamiX Enterprise Quick Start Guide 21 © 2008-2017 Virtual Instruments, Inc. All rights reserved.
3. Fill in the form to match your information:
4. Click Create Test Bed to create a new Test Bed:
Note: In this example the client is FC and we wired the services into the Test Bed from left-to-right:
• Select the appliance port on the client.
• Press the (+) button to add a destination service.
• Choose from the available service addresses.
• Choose the LUN.
www.virtualinstruments.com
Load DynamiX Enterprise Quick Start Guide 22 © 2008-2017 Virtual Instruments, Inc. All rights reserved.
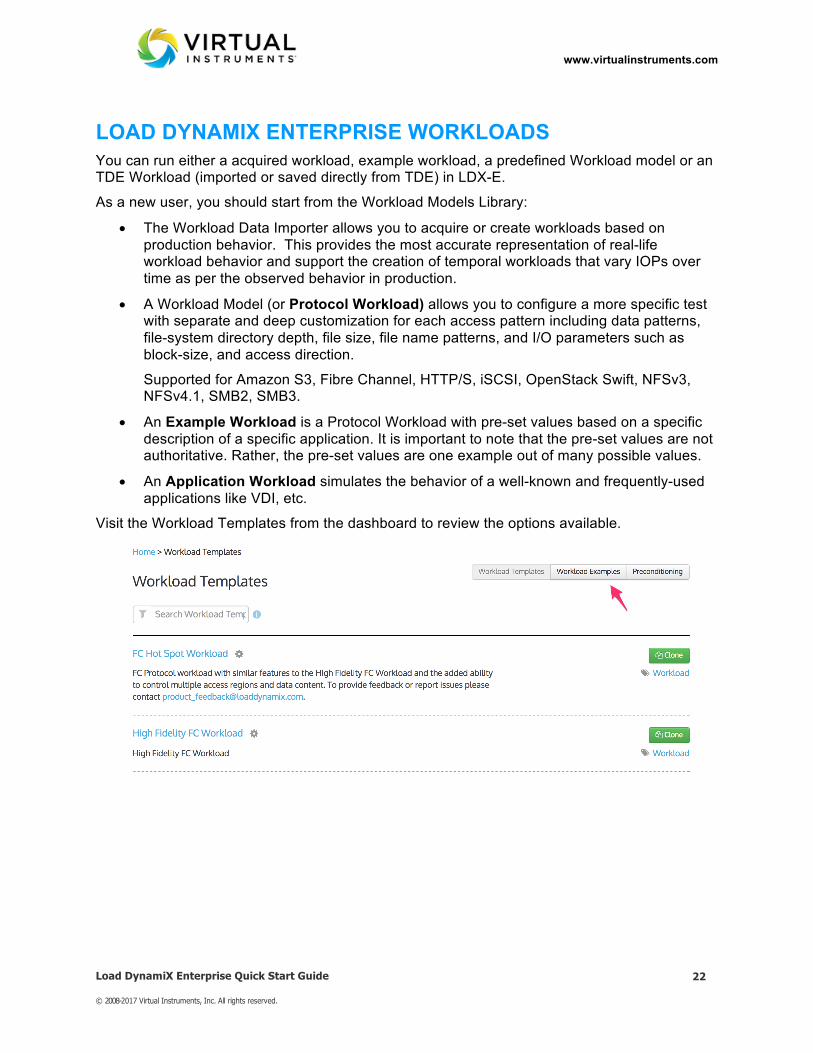
LOAD DYNAMIX ENTERPRISE WORKLOADS You can run either a acquired workload, example workload, a predefined Workload model or an TDE Workload (imported or saved directly from TDE) in LDX-E.
As a new user, you should start from the Workload Models Library:
• The Workload Data Importer allows you to acquire or create workloads based on production behavior. This provides the most accurate representation of real-life workload behavior and support the creation of temporal workloads that vary IOPs over time as per the observed behavior in production.
• A Workload Model (or Protocol Workload) allows you to configure a more specific test with separate and deep customization for each access pattern including data patterns, file-system directory depth, file size, file name patterns, and I/O parameters such as block-size, and access direction.
Supported for Amazon S3, Fibre Channel, HTTP/S, iSCSI, OpenStack Swift, NFSv3, NFSv4.1, SMB2, SMB3.
• An Example Workload is a Protocol Workload with pre-set values based on a specific description of a specific application. It is important to note that the pre-set values are not authoritative. Rather, the pre-set values are one example out of many possible values.
• An Application Workload simulates the behavior of a well-known and frequently-used applications like VDI, etc.
Visit the Workload Templates from the dashboard to review the options available.

www.virtualinstruments.com
Load DynamiX Enterprise Quick Start Guide 23 © 2008-2017 Virtual Instruments, Inc. All rights reserved.
Understanding Real Production Workloads Understanding real application IO workloads has traditionally been one of the most challenging barriers to storage performance validation. The workload acquisition and analysis capabilities in LDX-E make it possible to understand and simulate your mission critical applications behavior across your entire infrastructure.
Workload IO data can be ingested by the Workload Data Importer from two sources:
• From the data collected by VirtualWisdom, which collects real-time workload data from VirtualWisdom Probes placed in a production network
• From the data collected by storage or compute vendors
The quick start guide will focus on the Workload Data Importer, for a detailed overview of sensors, configuring Production Storage Environments and analysis policies please see the “Acquire” section of the LDX-E User Guide.
Workload Data Importer The Workload Data Importer is designed to import and analyze workload data from storage infrastructures. The workload data can be exported from storage vendor monitoring tools or server utilities such IOStat as Comma Separated Variable (CSV) text files. The data is analyzed to detect workload IO profiles to understand the workload characteristics in terms of IOPs, Throughput, Read/Write ratio etc.
The first step is to choose the infrastructure grouping the data belongs to. In LDX-E this grouping is known as a Production Storage Environment (PSE). This allows you to import multiple workload data sets and associate them to the same infrastructure. If you don’t have a Production Storage Environment configured you use can use the pre-defined sample Production Storage Environment.

www.virtualinstruments.com
Load DynamiX Enterprise Quick Start Guide 24 © 2008-2017 Virtual Instruments, Inc. All rights reserved.
It is recommended that you be descriptive in naming, description and tagging as it makes it easier to find the data later on. To add new tags simply type in the tag line and it will automatically convert the text to a tag.
ImportingaWorkloadDataFileThe Workload Data Importer is designed to import and process CSV based text files. It’s capable of parsing, extracting values and calculating new values from a combination of values if required.
To select the file to import you simply drag the file into the section on the Workload Data Importer screen or click on the “select a file to upload” link which take you into a standard file open dialog.
The importer will upload the file and filter the list of Analysis Policies to those that match the file.
LDX-E provides a number of policies out of the box for storage and infrastructure monitoring tools. An Analysis policy allows you to select the workload type you wish to create from the Workload data. Typically will be a summary, temporal or composite workload. A Temporal workload varies the IOPs over time according to the patterns observed in the data. A Summary workload uses a set level of IOPs, Latency or Throughput based on either the average or maximum values observed. Select the Analysis Policy that will create the type of workload(s) you are interested in. If there isn’t a policy that meets your needs please contact LDX support.

www.virtualinstruments.com
Load DynamiX Enterprise Quick Start Guide 25 © 2008-2017 Virtual Instruments, Inc. All rights reserved.
SpecifyingWorkloadstoCreateThe Analysis Policy specifies the type of analysis to perform and which workloads can be created. The user can choose to manually create individual workloads directly within the Workload Data Importer. Once the parameters are set click on at any time and it will take you to Production Workload Analysis screen where you see and analyze the results.
VisualizingtheProductionWorkloadDatawhileusingWorkloadDataImporterThe Production Workload Data Analysis screen displays the workload’s IO Profile like IOPs, throughput, latency, read/write ratio, command mix, block size etc. The data and analysis available in the Production Workload Data will be covered in depth in the Production Workload Data section. It is the same for both Workload Data Importer and Workload Sensors via Acquisition Profiles. During a Workload Data Import the data will be displayed in real-time on the charts as its parsed.

www.virtualinstruments.com
Load DynamiX Enterprise Quick Start Guide 26 © 2008-2017 Virtual Instruments, Inc. All rights reserved.
Run a Workload 1. Click Create Workload from Library from the drop-down menu (or click Workload
Library from the Dashboard's Workload menu):
2. Select Clone on the workload that best matches your needs:
3. Give your derived workload a new name and click Clone.

www.virtualinstruments.com
Load DynamiX Enterprise Quick Start Guide 27 © 2008-2017 Virtual Instruments, Inc. All rights reserved.
Notes: Across the top of the Workloads page there are tools to help you find and manage Workloads:
• Search Workloads: search the Workload list for a specific Workload by keyword
• Show: All Workloads or My Workloads
• Sort by: Created at, Name or Updated at (highest to lowest or lowest to highest)
• Collapse All or Expand All: Display minimal (collapse) or all (expand) information about the Workload
• Delete Selected
• Tag Selected
• Export Selected
• Select All or None
There are also tools for each Workload:

www.virtualinstruments.com
Load DynamiX Enterprise Quick Start Guide 28 © 2008-2017 Virtual Instruments, Inc. All rights reserved.
• Edit: Change the parameters of the Workload.
• Export: Download the Workload as an Automation Configuration zip-file
4. Click the Start button for your new workload-derived Workload to configure it.
5. Select a test bed under “Run it on” by pulling down “Specify a test bed”.
6. Select the links from the test bed that are appropriate.
7. Adjust the access pattern, file-system, I/O, load and duration according to your testing needs and click Start.

www.virtualinstruments.com
Load DynamiX Enterprise Quick Start Guide 29 © 2008-2017 Virtual Instruments, Inc. All rights reserved.
8. You should see a progress bar and statistics similar to that of the TDE-derived Workload shown earlier:
Analyzing Workload Results As the workload executes, or after it is done, the complete set of charts and logs are available for analysis from the All Charts area. An example of the Network Bandwidth graph from the All Charts area is show below:

www.virtualinstruments.com
Load DynamiX Enterprise Quick Start Guide 30 © 2008-2017 Virtual Instruments, Inc. All rights reserved.
To run a Workload that is more specific or more customized than the default LDX-E protocol workloads, or to run a Workload given by Load DynamiX Professional Services or Support, you should use an imported TDE Workload.
When designing a TDE Workload you should be aware that the primary parameters that can be adjusted within LDX-E are duration, conditions, actions, and the values defined in the TDE User Parameter Map.

www.virtualinstruments.com
Load DynamiX Enterprise Quick Start Guide 31 © 2008-2017 Virtual Instruments, Inc. All rights reserved.
Using a TDE Workload
UploadTDEWorkloadtoLDX-EfromTDEThe most efficient way to import a TDE Workload into LDX-E is to do it from TDE itself, if you have access to TDE.
1. Open TDE, and specify the LDX-E access information
2. Select a TDE Workload from the Project List, and double-click on it to open the TDE
Workload in TDE

www.virtualinstruments.com
Load DynamiX Enterprise Quick Start Guide 32 © 2008-2017 Virtual Instruments, Inc. All rights reserved.
3. Once the TDE Workload is opened, click on Save Project to LDX-E
4. Once saved, the TDE Workload will automatically appear in the LDX-E’s Workload Tests
list
UploadTDEWorkloadtoLDX-EbyimportingtheTDEWorkload.zipfileIf you do not have access to TDE, you can still upload a TDE Workload by importing the TDE Workload .zip file.

www.virtualinstruments.com
Load DynamiX Enterprise Quick Start Guide 33 © 2008-2017 Virtual Instruments, Inc. All rights reserved.
1. Click Import Workload / TDE Test from the pull-down menu or select Workloads from the Dashboard's Workloads menu and click Import Workload(s):
2. Export the Workload from the TDE:
• Using the TDE, open the Workload to be imported
• Click Generate Automation File in the Workload dropdown menu (this will create an AutomationConfig folder in the Workload folder by default)
• Open your Workload folder and zip (compress) the AutomationConfig folder.

www.virtualinstruments.com
Load DynamiX Enterprise Quick Start Guide 34 © 2008-2017 Virtual Instruments, Inc. All rights reserved.
3. Drag the resulting AutomationConfig.zip file into LDX-E (or use the +Select Files button)
4. Click Import to import the Workload

www.virtualinstruments.com
Load DynamiX Enterprise Quick Start Guide 35 © 2008-2017 Virtual Instruments, Inc. All rights reserved.
Running a Workload To run the LDX-E Workload built by importing from the TDE:
1. Select Workloads from the Dashboard
2. Identify the Workload that is to be executed:
• Delete Selected
• Tag Selected
• Export Selected
• Select All or None
There are also tools for each Workload:
3. Click Start. 4. Choose a Test Bed on which to execute the test
(or run “as-is” if the test network was configured in the TDE)
5. Click Start

www.virtualinstruments.com
Load DynamiX Enterprise Quick Start Guide 36 © 2008-2017 Virtual Instruments, Inc. All rights reserved.
Workload Results After a Workload is started, it will run for its designated duration. During the run a timeline and load statistics graph and the standard KPI charts will be displayed:

www.virtualinstruments.com
Load DynamiX Enterprise Quick Start Guide 37 © 2008-2017 Virtual Instruments, Inc. All rights reserved.
Users can also select from a broad set of charts and graphs for both client and server by scrolling down to the All Charts section of the page. An examples of the HTTP Content-Encodings chart is shown below:

www.virtualinstruments.com
Load DynamiX Enterprise Quick Start Guide 38 © 2008-2017 Virtual Instruments, Inc. All rights reserved.
Workloads included in Load DynamiX Enterprise Releases Load DynamiX Enterprise provides High-Fidelity Protocol Workload models that emulate specific protocol behavior, Example Workloads that are pre-configured to emulate different sorts of Applications characteristics and based on the High-Fidelity Protocol Workload models, and Application Workloads. See the User Guide for information related to each.

www.virtualinstruments.com
Load DynamiX Enterprise Quick Start Guide 39 © 2008-2017 Virtual Instruments, Inc. All rights reserved.
TEMPLATES and REPORTS
Creating a Template Load DynamiX Enterprise allows you to easily share the results of your tests by creating a reusable report template as the basis for generating reports. To create a Template:
1. Click Create Report Template from the pull-down menu or select Report Templates from the Dashboard's Analyze menu and click New Report Template:
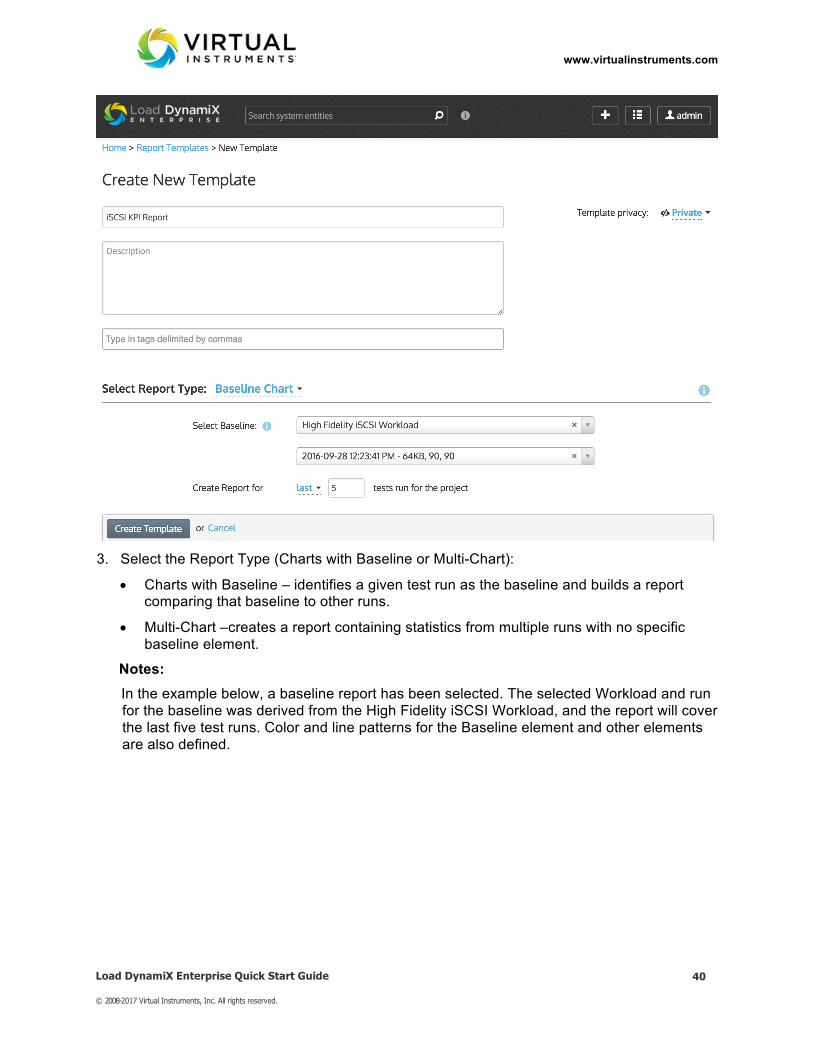
2. Fill in the fields as appropriate to your needs:
Notes: • The tags and description are optional fields.
• Make the template policy public to make this template available to others.
www.virtualinstruments.com
Load DynamiX Enterprise Quick Start Guide 40 © 2008-2017 Virtual Instruments, Inc. All rights reserved.
3. Select the Report Type (Charts with Baseline or Multi-Chart):
• Charts with Baseline – identifies a given test run as the baseline and builds a report comparing that baseline to other runs.
• Multi-Chart –creates a report containing statistics from multiple runs with no specific baseline element.
Notes: In the example below, a baseline report has been selected. The selected Workload and run for the baseline was derived from the High Fidelity iSCSI Workload, and the report will cover the last five test runs. Color and line patterns for the Baseline element and other elements are also defined.

www.virtualinstruments.com
Load DynamiX Enterprise Quick Start Guide 41 © 2008-2017 Virtual Instruments, Inc. All rights reserved.
4. Add a and configure the baseline chart:
5. Add statistics of interest to the baseline chart:
6. Choose the type of chart and then click Reload chart preview to preview the chart:

www.virtualinstruments.com
Load DynamiX Enterprise Quick Start Guide 42 © 2008-2017 Virtual Instruments, Inc. All rights reserved.
7. Enter a chart title and click Create Template
Creating a Report To run a report using a defined template:
1. Create or open a template and click New Report:

www.virtualinstruments.com
Load DynamiX Enterprise Quick Start Guide 43 © 2008-2017 Virtual Instruments, Inc. All rights reserved.
2. Fill in the details and click Create Report.

www.virtualinstruments.com
Load DynamiX Enterprise Quick Start Guide 44 © 2008-2017 Virtual Instruments, Inc. All rights reserved.
3. To find this report again, select Reports Generated from the dashboard and locate the
report:

www.virtualinstruments.com
Load DynamiX Enterprise Quick Start Guide 45 © 2008-2017 Virtual Instruments, Inc. All rights reserved.
NEXT STEPS
Add More Appliances and Test Beds Build up the repository of Load DynamiX Appliances and Test Beds that can be used to execute Workloads.
Add More Workloads Build up the repository of Load DynamiX Projects that can be executed.
Create Iteration Suites Define a set of parameters to perform a full permutation iteration on to profile the performance of the storage array.
Create Composite Workloads Take multiple workloads and combine them into a single Composite Workload to simulate application workloads where multiple I/O characteristics often coexist.
Add More Users Add Users to Load DynamiX Enterprise so that the Load DynamiX resources are available to more Users.
Note: Users may request an account directly from the log-in screen; however, the admin user must approve these accounts.
To have a user register:

www.virtualinstruments.com
Load DynamiX Enterprise Quick Start Guide 46 © 2008-2017 Virtual Instruments, Inc. All rights reserved.
1. Fill in the user name, user email address, and password.
2. Click Register. 3. A request will be sent to the Administrator who must Approve the request.
Notes:
• Password must be a minimum of six characters
• The e-mail address will become the user’s ID for logging in • These requests show up in the admin user's Users list for approval
• The admin user can add users directly via the New User button in the admin pull-down menu