Load Balancing VMware App Volumes - F5 Networks · INTEGRATION GUIDE Load Balancing VMware App...
26
INTEGRATION GUIDE Load Balancing VMware App Volumes Manager 1 INTEGRATION GUIDE Load Balancing VMware App Volumes
Transcript of Load Balancing VMware App Volumes - F5 Networks · INTEGRATION GUIDE Load Balancing VMware App...
INTEGRATION GUIDE
Load Balancing VMware App Volumes Manager
1
INTEGRATION GUIDE
Load Balancing VMware App
Volumes

INTEGRATION GUIDE
Load Balancing VMware App Volumes Manager
2
Version History
Date Version Author Description Compatible Versions
May 2018 2.1 Matt Mabis Documentation Update and Monitor
Changed.
VMware App Volumes 2.x (1)
Oct 2017 2.0 Matt Mabis Updated/Revised Documentation VMware App Volumes 2.x (1)
Feb 2015 1.0 Justin Venezia Initial Document with How-To
Configure F5 LTM with VMware App
Volumes
VMware App Volumes 2.x (1)
(2)
NOTES:
(1) App Volumes 3.x is being developed however only for Horizon Cloud, this document is only applicable for
AppVolumes 2.x
(2) This Document contained a different persistence method used (Cookie) that is not recommended anymore. This 2.0
and above document contains a new method of persistence recommended by VMware and F5.

INTEGRATION GUIDE
Load Balancing VMware App Volumes Manager
3
Contents
Version History .................................................................................................................................................. 2
Overview ............................................................................................................................................................ 4
Prerequisites ...................................................................................................................................................... 5
Create a Client SSL Profile ................................................................................................................................. 6
SSL Client Profile Configuration ..................................................................................................................... 7
Create a Server SSL Profile ................................................................................................................................ 8
SSL Server Profile Configuration .................................................................................................................... 9
Create HTTP Profile ......................................................................................................................................... 10
HTTP Profile Configuration .......................................................................................................................... 11
Create Persistence Profile ............................................................................................................................... 12
Persistence Profile Configuration ................................................................................................................ 13
Create Monitor ................................................................................................................................................ 14
Monitor Configuration................................................................................................................................. 15
Create Pool ...................................................................................................................................................... 16
Pool Configuration ....................................................................................................................................... 17
Create a Port 443 Virtual Server ...................................................................................................................... 18
Create a Port 80 Redirect Virtual Server (Optional) ........................................................................................ 22
Testing and Validation ..................................................................................................................................... 26
References ....................................................................................................................................................... 26

INTEGRATION GUIDE
Load Balancing VMware App Volumes Manager
4
Overview
VMware App Volumes is a system that delivers applications to desktops and remote hosted applications via virtual
disks. Applications are containerized and bundled in “AppStacks” then delivered by attaching a portable standard disk
system (Such as VMDK or VHD) file to a virtual machine. App Volumes Manager provides the IT administrator a way
for centrally managing and deploying applications without having to modify the specific desktops or individual
applications. Applications delivered using App Volumes will provide a native feeling and upgrades/updates can be done
with AppStacks in Real-time providing a seamless operation without disrupting users.
All Applications are delivered/provisioned during login time and from the user’s perspective have a persistent desktop
experience. Users can also be provided a Writable Volume to allow for extended persistence options where users can
install their own applications and have them persisted across sessions. In upcoming editions AppVolumes will have
Computer and User based AppStack assignments which allows for further flexibility.
This document provides step-by-step instructions for setting up the App Volumes Manager(s) within an LTM
configuration. It is highly recommended to follow VMware Best Practices for deploying out Multiple App Volumes
Managers for Scalability and Redundancy.

INTEGRATION GUIDE
Load Balancing VMware App Volumes Manager
5
Prerequisites The following are prerequisites for this solution and must be complete before proceeding with the configuration. Step-by-
step instructions for prerequisites are outside the scope of this document, see the BIG-IP documentation on
support.f5.com for specific instructions.
1. F5 recommends running this configuration using BIG-IP LTM version 12.x and 13.x, however it should run
on earlier editions of BIG-IP LTM.
2. Create/import an SSL Certificate that contains the load-balanced FQDN that will be used for VMware App
Volumes
3. Upload the following to the BIG-IP system:
o The SSL Certificate must be uploaded to the BIG-IP.
o The Private Key used for the load-balanced FQDN certificate.
o The Primary CA or Root CA for the SSL Certificate you uploaded to the BIG-IP.
4. Ensure the new FQDN for App Volumes Manager Servers is in DNS with both forward and reverse records,
and points to the Virtual Server IP address on the BIG-IP that will be used for load balancing the App
Volumes Servers.
5. You must have deployed at least a single instance of App Volumes Manager.
INTEGRATION GUIDE
Load Balancing VMware App Volumes Manager
6
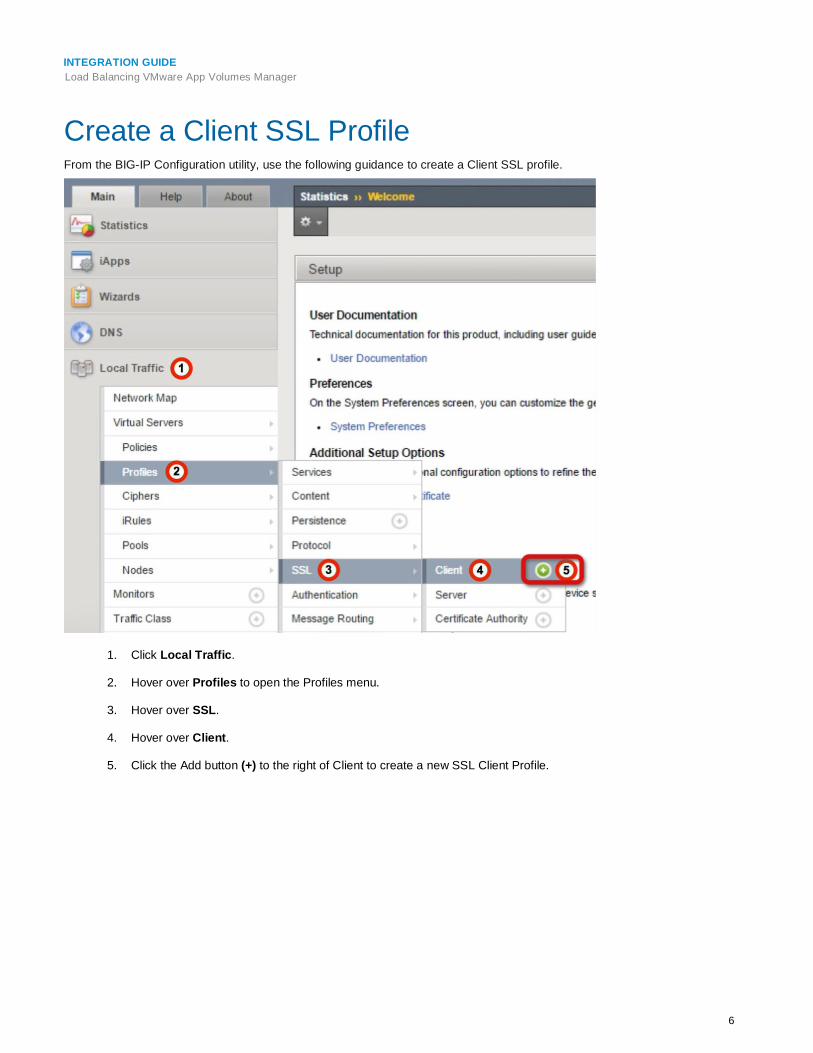
Create a Client SSL Profile From the BIG-IP Configuration utility, use the following guidance to create a Client SSL profile.
1. Click Local Traffic.
2. Hover over Profiles to open the Profiles menu.
3. Hover over SSL.
4. Hover over Client.
5. Click the Add button (+) to the right of Client to create a new SSL Client Profile.
INTEGRATION GUIDE
Load Balancing VMware App Volumes Manager
7
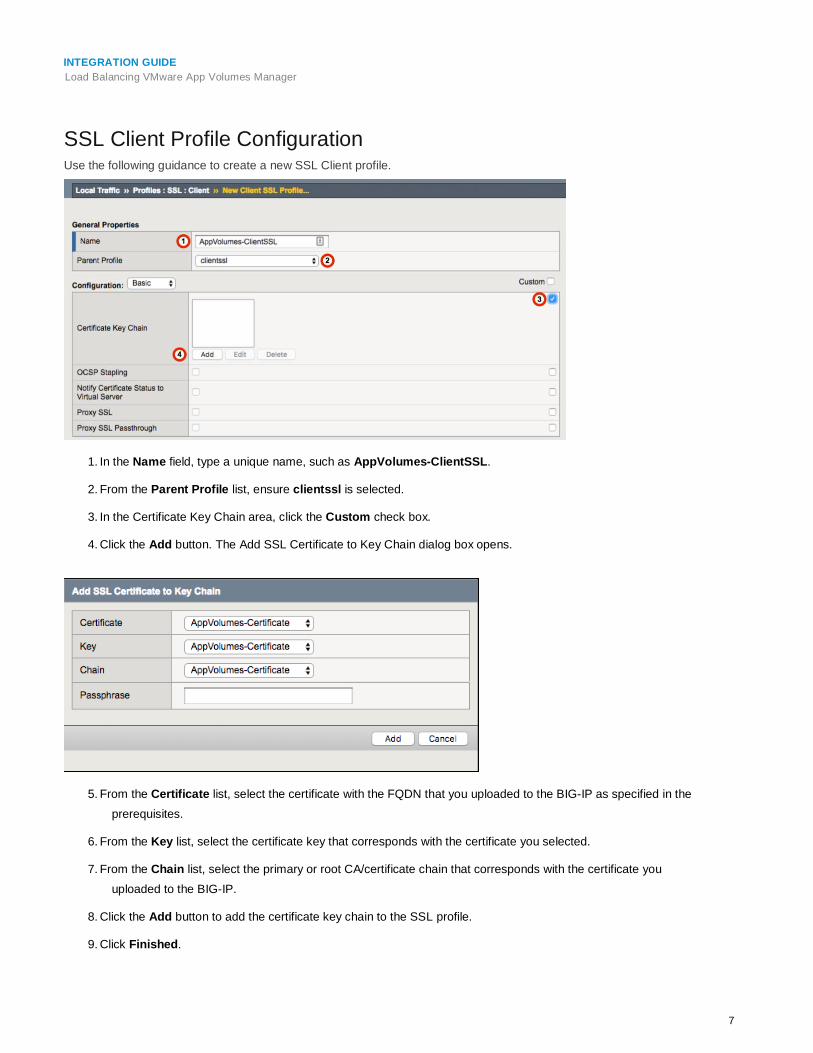
SSL Client Profile Configuration Use the following guidance to create a new SSL Client profile.
1. In the Name field, type a unique name, such as AppVolumes-ClientSSL.
2. From the Parent Profile list, ensure clientssl is selected.
3. In the Certificate Key Chain area, click the Custom check box.
4. Click the Add button. The Add SSL Certificate to Key Chain dialog box opens.
5. From the Certificate list, select the certificate with the FQDN that you uploaded to the BIG-IP as specified in the
prerequisites.
6. From the Key list, select the certificate key that corresponds with the certificate you selected.
7. From the Chain list, select the primary or root CA/certificate chain that corresponds with the certificate you
uploaded to the BIG-IP.
8. Click the Add button to add the certificate key chain to the SSL profile.
9. Click Finished.

INTEGRATION GUIDE
Load Balancing VMware App Volumes Manager
8
Create a Server SSL Profile From the BIG-IP Configuration utility, use the following guidance to create a Server SSL profile.
1. Click Local Traffic.
2. Hover over Profiles to open the Profiles menu.
3. Hover over SSL.
4. Hover over Server.
5. Click the Add button (+) to the right of Client to create a new SSL Server Profile.

INTEGRATION GUIDE
Load Balancing VMware App Volumes Manager
9
SSL Server Profile Configuration Use the following guidance to create a new SSL Server profile.
1. In the Name field, type a unique name, such as AppVolumes-ServerSSL.
2. From the Parent Profile list, ensure serverssl is selected.
3. Click Finished.

INTEGRATION GUIDE
Load Balancing VMware App Volumes Manager
10
Create HTTP Profile The next task is to create an HTTP Profile, use the following guidance.
1. From the Menu bar, click Services (you may need to click Local Traffic > Profiles first).
2. Click HTTP from the list.
3. Click the Create button in the upper right hand corner of the HTTP Profiles table.
INTEGRATION GUIDE
Load Balancing VMware App Volumes Manager
11
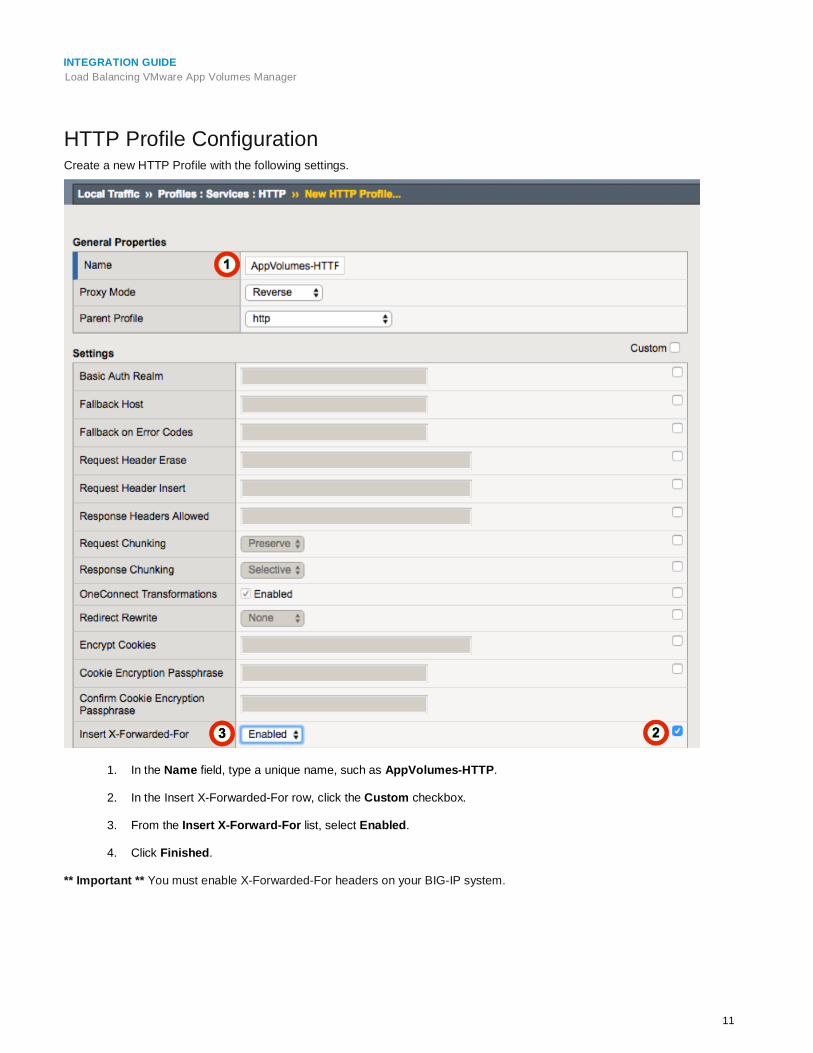
HTTP Profile Configuration Create a new HTTP Profile with the following settings.
1. In the Name field, type a unique name, such as AppVolumes-HTTP.
2. In the Insert X-Forwarded-For row, click the Custom checkbox.
3. From the Insert X-Forward-For list, select Enabled.
4. Click Finished.
** Important ** You must enable X-Forwarded-For headers on your BIG-IP system.
INTEGRATION GUIDE
Load Balancing VMware App Volumes Manager
12
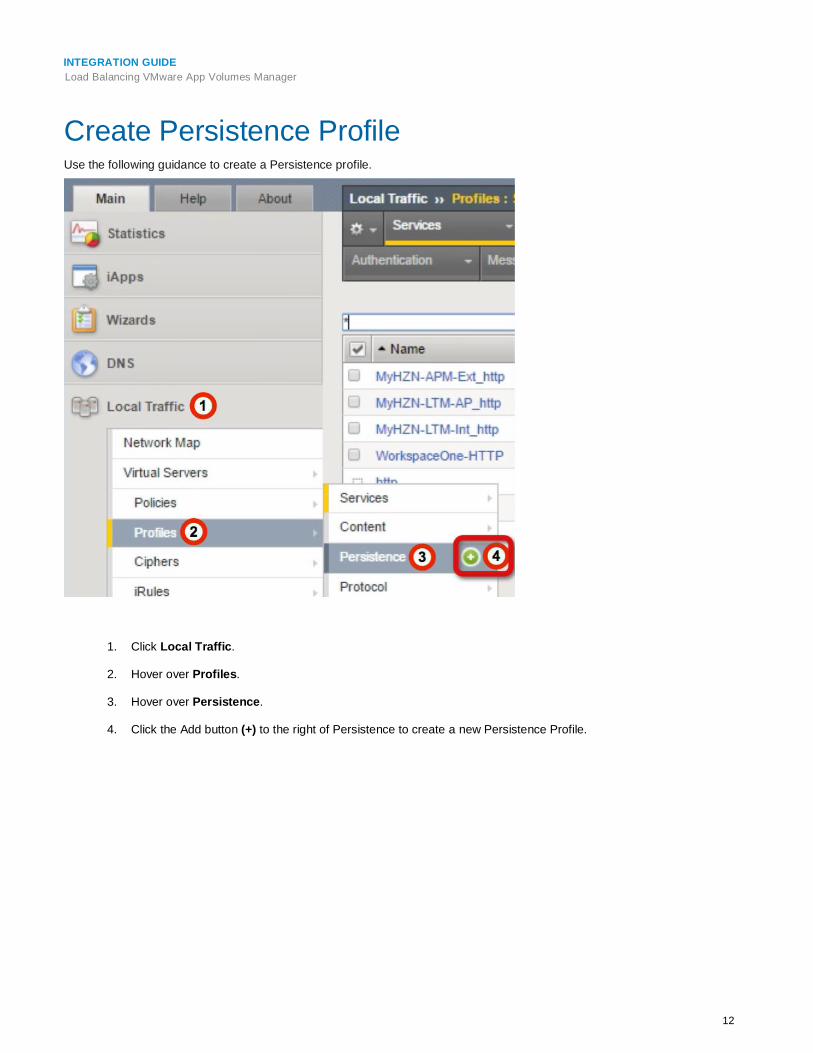
Create Persistence Profile Use the following guidance to create a Persistence profile.
1. Click Local Traffic.
2. Hover over Profiles.
3. Hover over Persistence.
4. Click the Add button (+) to the right of Persistence to create a new Persistence Profile.

INTEGRATION GUIDE
Load Balancing VMware App Volumes Manager
13
Persistence Profile Configuration Create a Persistence Profile with the following settings.
1. From the Name field, type a unique name such as AppVolumes-Persistence.
2. From the Persistence Type list, select Source Address Affinity.
3. Check the Custom checkbox for Mirror Persistence
4. Check the Custom checkbox for Match Across Services
5. Check the Custom checkbox for Match Across Virtual Servers
6. Check the Enable checkbox for Mirror Persistence
7. Click Finished.

INTEGRATION GUIDE
Load Balancing VMware App Volumes Manager
14
Create Monitor The next task is to create the Monitor for the BIG-IP Appliance to validate when the webserver is available. Use the
following guidance to create a health monitor on the BIG-IP system.
1. Click Local Traffic.
2. Hover over Monitors.
3. Click the Add button (+) to the right of Monitors to create a new health monitor.

INTEGRATION GUIDE
Load Balancing VMware App Volumes Manager
15
Monitor Configuration Create a Monitor with the following settings. In previous guides the monitor configuration used the /login page VMware
recommends now using the /health_check page to validate server availability.
1. In the Name field, type a unique name such as AppVolumes-Monitor.
2. From the Type list, select HTTPS.
3. Set the Interval to 30 Seconds
4. Set the Timeout to 15 Seconds
5. In the Send String field, type (Change the FQDN-For-AppVolumes to your FQDN)
GET /health_check HTTP/1.1\r\nHost: FQDN-FOR-AppVolumes\r\nConnection: Close\r\n\r\n
6. In the Receive String field, type
200 OK
7. Click Finished.

INTEGRATION GUIDE
Load Balancing VMware App Volumes Manager
16
Create Pool The next task is to create the App Volumes Managers load balancing pool for the BIG-IP Appliance to monitor.
1. Click Local Traffic.
2. Hover over Pools.
3. Hover over Pool List.
4. Click the Add button (+) to the right of Pool List to create a new Pool.
INTEGRATION GUIDE
Load Balancing VMware App Volumes Manager
17
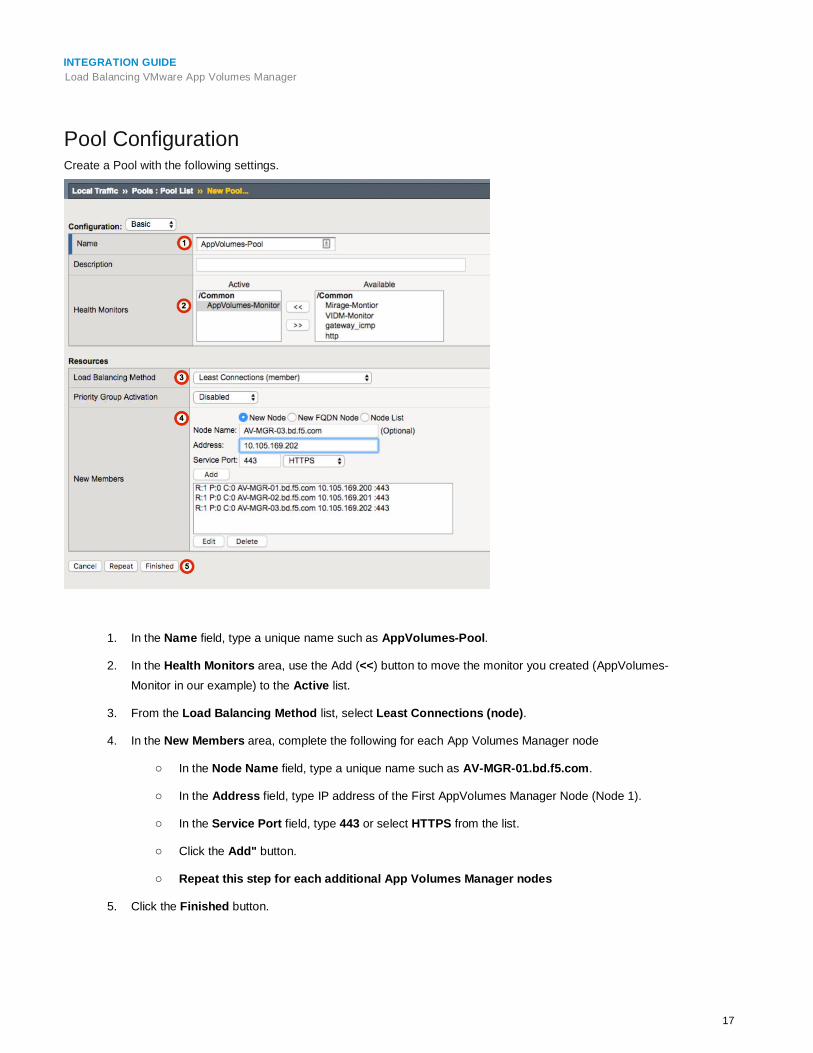
Pool Configuration Create a Pool with the following settings.
1. In the Name field, type a unique name such as AppVolumes-Pool.
2. In the Health Monitors area, use the Add (<<) button to move the monitor you created (AppVolumes-
Monitor in our example) to the Active list.
3. From the Load Balancing Method list, select Least Connections (node).
4. In the New Members area, complete the following for each App Volumes Manager node
o In the Node Name field, type a unique name such as AV-MGR-01.bd.f5.com.
o In the Address field, type IP address of the First AppVolumes Manager Node (Node 1).
o In the Service Port field, type 443 or select HTTPS from the list.
o Click the Add" button.
o Repeat this step for each additional App Volumes Manager nodes
5. Click the Finished button.

INTEGRATION GUIDE
Load Balancing VMware App Volumes Manager
18
Create a Port 443 Virtual Server The next task is to create a Virtual Server.
1. Click Local Traffic.
2. Hover over Virtual Servers.
3. Hover over Virtual Server List.
4. Click the Add button (+) to the right of Virtual Server List to create a new Virtual Server.

INTEGRATION GUIDE
Load Balancing VMware App Volumes Manager
19
Virtual Server General Properties Section
Use the following guidance to configure the General Properties of the virtual server.
1. In the Name field, type a unique name such as AppVolumes-VS.
2. In the Destination Address/Mask field, type the IP Address you want to use for the virtual server.
3. In the Service Port field, type 443 or select HTTPS from the list.

INTEGRATION GUIDE
Load Balancing VMware App Volumes Manager
20
Virtual Server Configuration Section
Use the following guidance to configure the Configuration section of the virtual server.
1. From the Protocol Profile (Client) list, select tcp-wan-optimized.
2. From the Protocol Profile (Server) list, select tcp-lan-optimized.
3. From the HTTP Profile list, select the HTTP profile you created (AppVolumes-HTTP in our example).
4. From the SSL Profile (Client) list, select the Client SSL profile you created (AppVolumes-ClientSSL in
our example).
5. From the SSL Profile (Server) list, select the Server SSL profile you created (AppVolumes-ServerSSL in
our example).
6. From the Source Address Translation list, select Auto Map.
INTEGRATION GUIDE
Load Balancing VMware App Volumes Manager
21
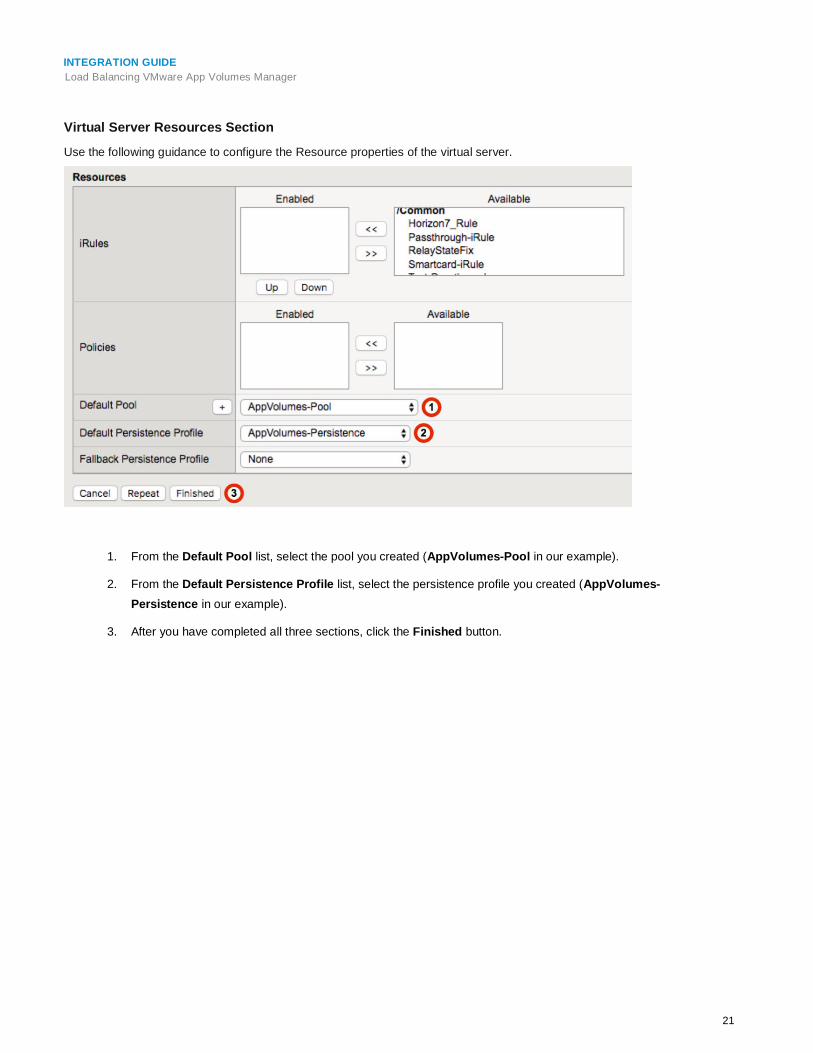
Virtual Server Resources Section
Use the following guidance to configure the Resource properties of the virtual server.
1. From the Default Pool list, select the pool you created (AppVolumes-Pool in our example).
2. From the Default Persistence Profile list, select the persistence profile you created (AppVolumes-
Persistence in our example).
3. After you have completed all three sections, click the Finished button.

INTEGRATION GUIDE
Load Balancing VMware App Volumes Manager
22
Create a Port 80 Redirect Virtual Server (Optional) After you configure the Port 443 virtual server, you can create another virtual server that redirects any port 80 traffic to
the newly created Port 443 virtual server. AppVolumes Manager can run on Port 80 as well as 443 but any production
deployment should only use a secured port.
1. Click Local Traffic.
2. Hover over Virtual Servers.
3. Hover over Virtual Server List.
4. Click the Add button (+) to the right of Virtual Server List to create a new Virtual Server.

INTEGRATION GUIDE
Load Balancing VMware App Volumes Manager
23
Virtual Server General Properties Section
Use the following guidance to configure the General Properties of the virtual server.
1. In the Name field, type a unique name such as AppVolumes-VS-Redirect.
2. In the Destination Address/Mask field, type the same IP Address you used for the HTTPS (port 443)
virtual server.
3. In the Service Port field, type 80 or select HTTP from the list.

INTEGRATION GUIDE
Load Balancing VMware App Volumes Manager
24
Virtual Server Configuration Section
Use the following guidance to configure the Configuration section of the virtual server.
1. From the Protocol Profile (Client) list, select tcp-wan-optimized.
2. From the Protocol Profile (Server) list, select tcp-lan-optimized.
3. From the HTTP Profile list, select the HTTP profile you created (AppVolumes-HTTP in our example).
4. From the Source Address Translation list, select Auto Map.

INTEGRATION GUIDE
Load Balancing VMware App Volumes Manager
25
Virtual Server Resources Section
Under the Resource properties of the Virtual Server, enter the following settings.
1. In the iRules area, use the Add (<<) button to move the redirect iRule (_sys_https_redirect) to the Active
list.
2. After you have completed all three sections, click the Finished button.

INTEGRATION GUIDE
Load Balancing VMware App Volumes Manager
26
Testing and Validation Conduct testing by accessing the App Volumes Manager through its web interface as well as testing App
Volumes Agent connectivity.
• App Volumes-enabled desktops will have applications provisioned and de-provisioned on login/logoff, as well as computer startup and shut down.
• App Volumes Manager access through the web interface should be accessible.
• Check the BIG-IP pool member statistics to ensure the App Volume Manager and Agent sessions are being equally distributed between the App Volume pool members.
References Dale Carter – Senior Solutions Architect at VMware
Jeremy Wheeler – Consulting Architect at VMware
Justin Venezia – Senior Architect, End User Computing Office of the CTO at VMware
Stephane Asselin – Lead Product Architect, at VMware