Little House on the Prairie® · Free Paern Dnla Aailale 6615 3 roada e York Tel. 800 3-567...
7
Free Paern Download Available 6/6/15 1384 Broadway New York, NY 10018 Tel. (800) 223-5678 • andoverfabrics.com Little House on the Prairie® BY KATHY HALL Prairie Life Quilt Design: Heidi Pridemore Quilt Size: 63" x 75" andoverfabrics.com LITTLE HOUSE ON THE PRAIRIE® and associated character names and trademarks are owned and licensed by Friendly Family Productions, LLC. All rights reserved. ©2015 Friendly Family Productions, LLC
Transcript of Little House on the Prairie® · Free Paern Dnla Aailale 6615 3 roada e York Tel. 800 3-567...

Free Pattern Download Available
6/6/15
1384 Broadway New York, NY 10018Tel. (800) 223-5678 • andoverfabrics.com
Little House on the Prairie®BY KATHY HALL
Prairie LifeQuilt Design:Heidi Pridemore
Quilt Size: 63" x 75"
andoverfabrics.com
LITTLE HOUSE ON THE PRAIRIE® and associated character names and trademarks are owned and licensed by Friendly Family Productions, LLC. All rights reserved. ©2015 Friendly Family Productions, LLC

Free Pattern Download Available at www.andoverfabrics.com 6/6/15
Prairie LifeFeaturing Andover Fabrics new Collection: Little House on the Prairie by Kathy HallRunner designed by Heidi Pridemore
Quilt finished 63" x 75"
Cutting DirectionsYardage Fabric
Fabric Requirements
Fabric A Fabric B Fabric C Fabric DFabric E Fabric FFabric GFabric HFabric IFabric JFabric KFabric LFabric MFabric NFabric OFabric PFabric QFabric RFabric SFabric TBacking
Page 2 of 7
blocksblocksblocksblocksblocks, centerblocks, centerblocks, centerblocks, centerblocksborders, centerborderscentercentercentercentercentercentercentercentercenter, binding
⅜ yard⅓ yard½ yard½ yard¾ yard⅔ yard1 yard1 ¼ yards⅞ yard1 ¼ yards1 ½ yards¼ yard⅞ yard¼ yard⅛ yard⅛ yard⅛ yard¼ yard⅛ yard⅞ yard4 yards
7953-R7956-N7958-RL7956-RL7957-NR7949-K7955-T1867-C37953-T1867-N187954-RN7924-L7923-L7949-N7955-N7956-TL1867-LN11867-L1867-R77955-R7957-RO
Note: Read assembly directions before cutting patches. Borders are cut to exact length required plus ¼” seam allowance. WOF designates the width of fabric from selvedge to selvedge (approximately 42” wide).
Fabric A Cut (2) 4 ½” x WOF strips. Sub-cut the strips into (18) 4 ½” squares.
Fabric B Cut (2) 4 ½” x WOF strips. Sub-cut the strips into (36) 1 ½” x 4 ½” strips.
Fabric C Cut (2) 6 ½” x WOF strips. Sub-cut the strips into (36) 1 ½” x 6 ½” strips.
Fabric D Cut (2) 8 ½” x WOF strips. Sub-cut the strips into (36) 1 ½” x 8 ½” strips.
Fabric E Cut (2) 10 ½” x WOF strips. Sub-cut the strips into (36) 1 ½” x 10 ½” strips. See instructions to cut (1) bonnet from the remaining fabric.
Fabric F Cut (2) 6 ½” x WOF strips. Sub-cut the strips into (36) 1 ½” x 6 ½” strips. See instructions to cut (1) under skirt.
Fabric G Cut (2) 8 ½” x WOF strips. Sub-cut the strips into (36) 1 ½” x 8 ½” strips. See instructions to cut (1) dress.
Fabric H Cut (2) 10 ½” x WOF strips. Sub-cut the strips into (36) 1 ½” x 10 ½” strips. Cut (1) 17 ½” x 28” strip for the sky.
Fabric I Cut (2) 12 ½” x WOF strips. Sub-cut the strips into (36) 1 ½” x 12 ½” strips.
Fabric J Cut (4) 2” x WOF strips. Sew the strips together end to end, with diagonal seams, and cut (2) 2” x 72 ½” strips. Cut (4) 2” x WOF strips. Sew the strips together end to end, with diagonal seams, and cut (2) 2” x 63 ½” strips. Cut (3) 1 ½” x WOF strips. Sew the strips together end to end, with diagonal seams, and cut (2) 1 ½” x 46 ½” strips. Cut (2) 1 ½” x 36 ½” WOF strips. Cut (2) 1 ½” x 38 ½” WOF strips. Cut (2) 1 ½” x 28 ½” WOF strips. See instructions to cut (2) boots. Fabric K Cut (2) 3 ½” x 50” LOF strips. Cut (2) 3 ½” x 38” LOF strips.
Fabric L See instructions to cut (3) clouds.
Fabric M Cut (1) 24” x 28” strip for the ground.

Prairie Life
Free Pattern Download Available at www.andoverfabrics.com 6/6/15
Making the Quilt1.
2.
3.
4.
5.
6.
7.
8.Diagram 1
Diagram 4 Diagram 5
Diagram 6
Diagram 2
Page 3 of 7
Fabric N See instructions to cut grass pieces.
Fabric O See instructions to cut grass pieces. Fabric P See instructions to cut the sleeve and cuff.
Fabric Q See instructions to cut (1) arm and leg.
Fabric R See instructions to cut the hair.
Fabric S See instructions to cut the bow and belt.
Fabric T Cut (7) 2 ½” x WOF strips for the binding. See instructions to cut the bow.
Backing Cut (2) 71” x WOF strips. Sew the strips together and trim to make (1) 71” x 83” backing.
Block Assembly Place the 24” x 28” Fabric M strip on a table right side up. Place the 17 ½” x 28” Fabric H strip on the table right side up, over-lapping the bottom of the Fabric M strip about 1 ½” (Diagram 1).
Place pins through both layers of fabric to mark the edges of the bottom and top fabric (Diagram 2).
Take a fabric pencil and draw a gentle curved line on the top fabric, staying between the pins. Note: The curve does not have to be very wavy. The wavier the curve, the harder it is to sew.
Cut one the drawn line, through both fabrics (Diagram 3). Un-pin the scraps from the fabric and discard.
Pick up both pieces of fabric and place them right sides together. Note: The edges will not line up as they are mirror images of each other (Diagram 4). Slowly sew them together, easing the curves together as you go to make the background strip (Diagram 5). Trim the background strip to measure 26 ½” x 38 ½”.
M
H
Following the manufacturer’s instructions, trace the listed number of each template onto the paper side of the fusible web. Roughly cut out each template about ⅛” outside the drawn lines.
Press each template onto the wrong side of the fabrics as listed on the templates. Cut out each template on the drawn lines.
Refer to the Quilt Photo to arrange and press the clouds, grasses and the components of the little girl onto the background strip (Diagram 6).
Diagram 3
Prairie Life
Free Pattern Download Available at www.andoverfabrics.com 6/6/15Page 4 of 7
9.
14.
15.
10.
11.
12.
13.
Diagram 7
Diagram 9
Diagram 10
Diagram 11
J J
J
J
Finish the raw edges of each shape with a decorative stitch such as a buttonhole or satin stitch.
Sew (1) 1 ½” x 38 ½” Fabric J strip to each side of the background strip. Sew (1) 1 ½” x 28 ½” Fabric J strip to the top and to the bottom of the background strip to make the Center Block (Diagram 7).
Center (1) 3 ½” x 50” Fabric K strip on one side of the Center Block and pin in place. Start sewing the strip a ¼” from the top edge of the Center Block and stop a ¼” from the bottom edge. DO NOT TRIM THE EXCESS. Repeat with the opposite side.
Repeat Step 12 to sew (1) 3 ½” x 38” Fabric K strip to the top and to the bottom of the Center Block, making sure to stop and start ¼” away from each end of the Center Block. To miter each corner, fold the Center Block on a diagonal, wrong side together. This should line up the strips from adjacent sides (Diagram 8).
Starting at the sewn seam (represented by the arrow in Diagram 8), draw a 45-degree line to the edge of the fabric. Sew on the drawn line. Trim the excess fabric leaving a ¼” seam. Repeat this step with the remaining corners (Diagram 9).
K K
K
K
Diagram 8
Sew (1) 1 ½” x 4 ½” Fabric B strip to the top and to the bottom of (1) 4 ½” Fabric A square. Sew (1) 1 ½” x 6 ½” Fabric F strip to each side of the Fabric A square to make (1) FAB block (Diagram 10).
Quilt To
p
Folded on
the Diag
onal
A
B
B
F F
Sew (1) 1 ½” x 6 ½” Fabric C strip to the top and to the bottom of the FAB block. Sew (1) 1 ½” x 8 ½” Fabric G strip to each side of the FAB block (Diagram 11).
A
B
B
FG G
C
C
F
Prairie Life
Free Pattern Download Available at www.andoverfabrics.com 6/6/15Page 5 of 7
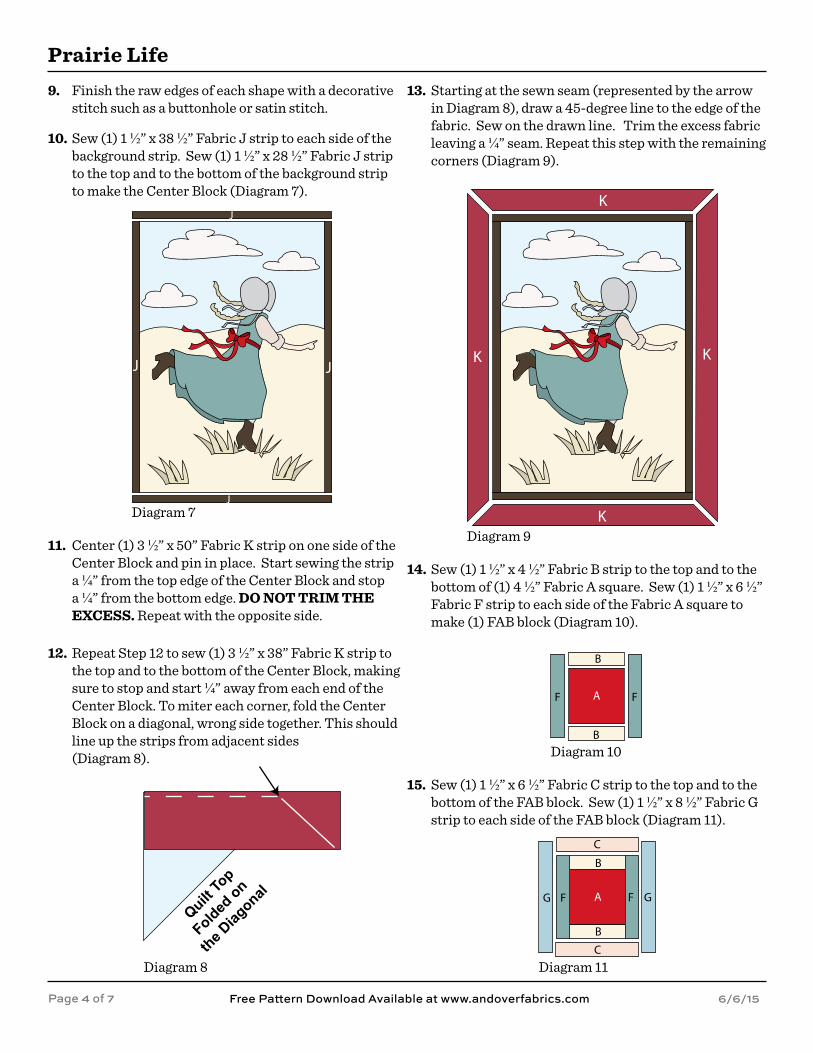
16.
17.
18.
19.
20.
21.
22.
23.
24.
25.
Quilt Layout
Finishing the QuiltLayer and quilt as desired.
Bind as desired.
Quilt Top Assembly: (Refer to the Quilt Layout when assembling the quilt top.)
Diagram 12
Diagram 13
AG GH H
C
C
D
D
F F
B
B
AG GHI IH
C
C
D
DE
E
F F
B
B
Sew (1) 1 ½” x 8 ½” Fabric D strip to the top and to the bottom of the FAB block. Sew (1) 1 ½” x 10 ½” Fabric H strip to each side of the FAB block (Diagram 12).
Sew (1) 1 ½” x 10 ½” Fabric E strip to the top and to the bottom of the FAB block. Sew (1) 1 ½” x 12 ½” Fabric I strip to each side of the FAB block to make (1) A Block (Diagram 13).
Repeat Steps 14-17 to make (18) A Blocks total.
Sew (1) 1 ½” x 46 ½” Fabric J strip to each side of the Center Block. Sew (1) 1 ½” x 36 ½” Fabric J strip to the top and to the bottom of the Center Block.
Sew (4) A blocks together to make (1) strip. Repeat to make a second strip. Pay attention to the orientation of the A blocks. Sew (1) strip to each side of the Center Block.
Sew (5) A blocks together to make (1) strip. Repeat to make a second strip. Pay attention to the orientation of the A blocks. Sew the strips to the top and to the bottom of the Center Block to make the quilt top.
Sew (1) 2” x 72 ½” Fabric J strip to each side of the quilt top. Sew (1) 2” x 63 ½” Fabric J strip to the top and to the bottom of the quilt top.
Sew the (7) 2 ½” x WOF Fabric T strips together, end to end with a 45-degree seams, to make the binding. Fold this long strip in half lengthwise with wrong sides together and press.
J J
J
J
J J
J
J

Prairie Life
Free Pattern Download Available at www.andoverfabrics.com 6/6/15
Prairie Life TemplatesENLARGE 400%
Right CloudFabric L
BraidsFabric R
Arm and LegFabric Q
BootsFabric J
Sleeve andCu�
Fabric P
DressFabric G
Under DressFabric F
GrassDark-Fabric OLight-Fabric N
BonnetFabric E
Belt and BowDark Red-Fabric S
Red- Fabric T
Middle CloudFabric L
Left CloudFabric L
Page 6 of 7

Little House on the Prairie®BY KATHY HALL
Free Pattern Download Available1384 Broadway New York, NY 10018
Tel. (800) 223-5678 • andoverfabrics.com
Fabrics shown are 25% of actual size.
A recognized leader in the quilting industry,Andover Fabrics features designs by a wide variety of talented fabric artists. Catering to the tastes of creative and dedicated quilters, Andover has a style for every look — authentic reproductions, romantic florals, exotic Orientals, ethnic influence, whimsical, funky, playful or basic. Collections are supported with "free-to-use" patterns on their website.
About Our Fabrics
7926-L 7926-Y 7925-L 7925-R
7924-L 7923-G 7923-L 7952-B 7952-K
7952-T 7951-B 7951-G 7951-R 7950-C
7950-E 7950-Y 7949-B 7949-E 7949-G
7949-K
7948-B 7948-R 7948-Y 7947-B 7947-K
7947-N 7958-NL 7958-RL 7958-TL 7957-NR
7957-RO 7957-TK 7956-N 7956-RL 7956-TL
7955-N 7955-R 7955-T 7954-N 7954-RN
7954-TK 7953-N 7953-R 7953-T
1867-R71867-N181867-L1867-LN11867-C3
7949-N 7949-P 7949-T 7949-Y
1 1/4 yds1 1/4 yds
1 1/2 yds
1/3 yd
1/2 yd
1/2 yd
3/4 yd
7/8 yd
7/8 yd
1/8 yd1/8 yd
1/8 yd
1/8 yd 7/8 yd
1/4 yd
1/4 yd
1/4 yd
3/8 yd
2/3 yd
1 yd
4 yds
Blend with fabrics from Dimples by
Andover Fabrics
(includes backing)
(includes binding)
7924-B