Why a gold-plated Nano will do little for Tata’s failing car _ Firstpost.pdf

Little British Car Co. Rear Tube Shock Conversion Kit Installation Instructions
© 2005 Little British Car Co.�
MGB Tube Rear Shock Absorber Conversion Kit
Installation Instructions
IntroductionThank you for purchasing the Little British Car Co. Tube Rear Shock Absorber Conversion Kit. Many MG experts consider this conversion the single biggest improvement that can be made to the handling of the MGB. We at Little British Car Co. want you to enjoy the improved driving experience this kit will provide, but we also want you to have the satisfaction of having installed it yourself in a safe an easy manner. To that end, please read all the instructions beforehand and observe the safety measures we recommend.
Before You Start
Check Your MGB ModelThe installation kit is suitable for both MGB chrome and rubber bumper models but installation is slightly different for the two types. Some rubber bumper models may have been converted to look like chrome bumper cars. In general, cars built after 1974½ with serial numbers higher than 36301 (roadster) or 361101 (GT) were originally rubber bumper cars. Check for RustInstalling this kit requires the removal of the U-bolts retaining the rear leaf springs. If there is an excessive amount of rust on these bolts, they may be hard to remove and require cutting, they may break during removal or the threads may strip when applying torque during reinstallation. The nuts retaining the U-bolts are Nyloc self-locking nuts. Good engineering practices recommend that these nuts are not reused after removal and are replaced with new ones.
Little British Car Co.293�� Aranel, Farmington Hills, MI 48334-28�5, USA
Tel: 248 489 0022 or 800 637 9640 Fax: 248 489 9665
On the web at: www.LBCarCo.com E-mail: [email protected]

Little British Car Co. Rear Tube Shock Conversion Kit Installation Instructions
© 2005 Little British Car Co. 2
The rubber pads that fit over and under the leaf spring deteriorate with age and can be the cause of knocking noises and a hard ride. New pads are inexpensive and worthwhile installing while the U-Bolts are removed.
U-Bolts LBC Co Part # 266-560 4 requiredLock Nuts NF 3/8” x 24 LBC Co Part # 310-240 8 requiredRubber Pad set LBC Co Part # 281-598 1 required
Note that no shock absorber is intended to limit the upward and lower movements of the back axle and that it will be damaged if required to do so. For this reason, MG fitted a bump stop and check strap to each rear side of the vehicle. While under the car, it is worth checking for the presence of both. If the bump stop is missing it is available under LBC Co Part # 266-530.
The condition of each check strap should also be inspected (see picture page 6). If either is stretched or close to failure so that it does not limit the downward movement of the axle, the new shock absorbers may be short lived. The correct straps are:
Chrome Bumper: LBC Co Part # 267-565 8.25” (21 cm) approx. between fixing holes.Rubber Bumper: LBC Co Part # 267-615 9.5” (24 cm) approx. between fixing holes.Also available: LBC Co Part # 267-610 9” (23 cm) approx. between fixing holes.
The check straps require a sleeve in the top fixing hole. If that is missing it is available under LBC Co Part # 267-655.
Have the Right Tools at HandThe following tools are recommended:
Wheel Chocks Floor Jack 2 Jack Stands Work Light
Socket and open wrenches:9/16 inch5/8 inch11/16 inch3/4 inch or 19 mmSizes given are A/F (across flats)
Working procedureNote: All photographs show the left hand side of the car. The instructions will be easier to follow if part identification is started on that side of the vehicle.
Little British Car Co. Rear Tube Shock Conversion Kit Installation Instructions
© 2005 Little British Car Co.3
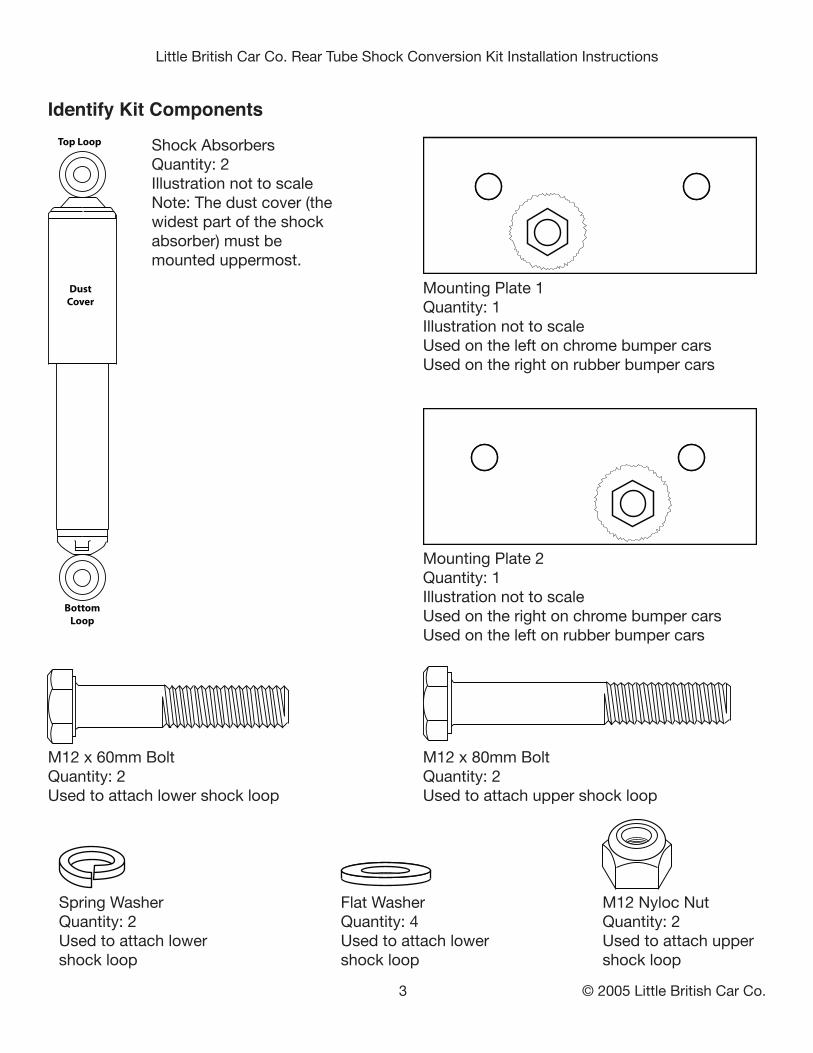
Identify Kit ComponentsTop Loop
DustCover
BottomLoop
Shock AbsorbersQuantity: 2Illustration not to scaleNote: The dust cover (thewidest part of the shockabsorber) must bemounted uppermost.
Mounting Plate �Quantity: �Illustration not to scaleUsed on the left on chrome bumper carsUsed on the right on rubber bumper cars
Mounting Plate 2Quantity: �Illustration not to scaleUsed on the right on chrome bumper carsUsed on the left on rubber bumper cars
M�2 x 60mm BoltQuantity: 2Used to attach lower shock loop
Spring WasherQuantity: 2Used to attach lowershock loop
Flat WasherQuantity: 4Used to attach lowershock loop
M�2 Nyloc NutQuantity: 2Used to attach uppershock loop
M�2 x 80mm BoltQuantity: 2Used to attach upper shock loop

Little British Car Co. Rear Tube Shock Conversion Kit Installation Instructions
© 2005 Little British Car Co. 4
InstallationSafety FirstChock the front wheels so the car cannot roll in either direction. The rear of the car will be elevated throughout the installation procedure and there will be no braking from either the handbrake or engine.
Slacken the rear wheel-nuts a little. Raise the rear of the car by using a floor jack under the differential gearbox. Place an axle stand each side of the car, under each spring, just forward of the shock absorber bracket, which is located at the lowest point of each spring.
Lower the floor jack so that all the weight of the car is on the axle stands, this will prevent the springs from releasing when their retaining bolts are removed. Maintain the floor jack in place and raised under the differential gearbox as a safety measure.
Removing the old shock absorbersRemove the rear wheel-nuts and wheels. TIP: If you have wire wheels, have some rag or paper handy to cover the greasy splined hubs. You will be brushing past both sides of them during this installation.
Remove the shock absorber lower link arm retaining bolts using a 3/4 inch A/F wrench. TIP: This nut is often very difficult to remove. You can leave it attached if necessary and take the whole shock absorber, link arm and bracket into the workshop. You can then remove the bracket by using a hacksaw between the nut and its lock washer so that you do not damage the bracket. The link arm will be spoiled but it will not be needed again.
From inside the wheel arches, remove the shock absorber upper fixing bolts. The old shock absorbers can now be removed from the car. The bolts usually require a 5/8 inch A/F and the nuts an 11/16 inch A/F wrench.
Retain the fixing bolts, washers and nuts. They will be required to attach the mounting plates for the new shock absorbers.

Little British Car Co. Rear Tube Shock Conversion Kit Installation Instructions
© 2005 Little British Car Co.5
Installing the New Shock AbsorbersRemove the nuts retaining the shock absorber brackets using a 9/16 inch A/F wrench. Remove the brackets.
Place the right bracket to the left hand side of the car and the left hand bracket to the right side.
If you intend to replace the U-Bolts and/or spring pads, do so now.
Attached the swapped brackets so that they point downward, with the lower link arm mounting hole toward the front as shown here for the left side. It is recommended that new lock nuts be used to mount the brackets. If a torque wrench is available, tighten to 25-30 ft-lbs (34-40 N-m).TIP: On some vehicles, the exhaust pipe will limit the clearance necessary for the 60 mm bolt to be inserted through the shock absorber bottom eye and into the left bracket (see page 6). If this seems likely, loosely attach the bottom eye of the left shock absorber before proceeding to the next step.
The shock absorber mounting plates must now be fitted in the same locations and using the same fasteners as the old shock absorbers. Even if your old shock absorbers were mounted with the fixing nuts in the wheel arches, attach the mounting plates by passing the bolts through the wheel arch and fixing the plates with the spring washers and nuts on the inside. This is because the bolts may protrude slightly further than they did before and could damage a wide tire. It is also better not to place the threaded section of the bolts in the wheel arches where the potential for corrosion is greater. Make sure that the mounting plates are installed on the correct side and orientation for your car as shown here.
Chrome Bumper
Tow
ard fro
nt
Tow
ard fro
ntLeft side plate Right side plate
Rubber Bumper
Tow
ard fro
nt
Tow
ard fro
nt
Left side plate Right side plate

Little British Car Co. Rear Tube Shock Conversion Kit Installation Instructions
© 2005 Little British Car Co. 6
For each shock absorber, pass the M12 x 80 mm bolt through the spring washer and upper loop of the shock absorber and screw it into the nut welded to the mounting plate. Tighten with a 19 mm A/F (preferred) or 3/4 inch wrench.
TIP: On some vehicles, cables will limit the clearance necessary for the 80 mm bolt to be inserted through the shock absorber top eye and into the right mounting plate. If this seems likely, loosely attach the top eye of the shock absorber before fully installing the right mounting plate.
Attach the bottom ends of the shock absorbers by passing an M12 X 60 mm bolt through a large flat washer, the loop of a shock absorber, the lower shock link bracket and a second flat washer. Use a nyloc nut, finger tight at first, to secure the assembly.Check that the shock absorbers, mounting brackets and plates are all correctly secured and oriented before tightening the nyloc nut, as the nut should not be removed and reused. Tighten the nyloc nut using two 19 mm A/F (preferred) or 3/4 inch wrenches.
Final ChecksRaise the floor jack and move the axle stands just forward of the front spring shackles, using wooden blocks if deemed necessary to spread the load. Lower the floor jack so that the rear axle hangs on the springs, fully extending them.Verify that the check straps are taut. If not, replace them (see page 2) otherwise the shock absorber will be checking the axle’s downward movement and may become damaged.