
Liquidity Management OBIEE Setup Oracle Banking Liquidity ...€¦ · Before uploading...
35
Liquidity Management OBIEE Setup Oracle Banking Liquidity Management Release 14.0.0.0.0 [November] [2017]
Transcript of Liquidity Management OBIEE Setup Oracle Banking Liquidity ...€¦ · Before uploading...

Liquidity Management OBIEE Setup
Oracle Banking Liquidity Management
Release 14.0.0.0.0
[November] [2017]

Table of Contents 1. Starting BI Server ................................................................................................................................................ 3
1.2 Upload OBIEE Reports ................................................................................................................... 4
2.REPORT CREATION ......................................................................................................................................... 8 2.1 Analysis Creation ............................................................................................................................ 8
3 .PROMPT CREATION ...................................................................................................................................... 16
4.Dashboard creation ............................................................................................................................................. 20
5. RPD Creation in OBIEE 12c ............................................................................................................................. 22 5.1 RPD Deployment Steps: ................................................................................................................ 33

3 | P a g e
1. Starting BI Server 1. Login to putty or any Linux client
2. Navigate to the path where the BIP is installed and open bin folder under the bitools folder
(For ex: /scratch/oracle/Oracle/Middleware/Oracle_Home/user_projects/domains/bi/bitools/bin)
3. Run ./start.sh or start.cmd
4. Wait until all the servers are up and running.
Open browser and go to http://<localhost>:<port>/analytics/login.jsp

4 | P a g e
Enter Username and Password and Sign in into BI Publisher Administration Console.
1.2 Upload OBIEE Reports Open browser and go to OBIEE Consolehttp://<host>:<port>/analytics/login.jsp
1. Enter Username and Password and Sign in into BI Publisher Administration Console.
2. Click on Catalog tab at the upper right corner of the page and click on the Shared
Folder on the left hand side.

5 | P a g e
3. Click on Unarchive at the bottom left corner of the page.

6 | P a g e
4. Browse the Reports folder of the OSDC Package to find the files
obiee_reports.catalog
5. The reports will be uploaded to the OBIEE Server.

7 | P a g e
6. Upload the rpd file to OBIEE Server
Before uploading obiee_reports.rpd in OBIEE server, rpd file should be reconfigured to
point to the schema created for OBLM. Refer Chapter 5: RPD Creation in OBIEE 12c
Copy the obiee_reports.rpd file to linux box and run the ./datamodel.sh to upload the rpd
file.
For Example:
Say you have copied the obiee_reports.rpd file to
/scratch/Deployments/bi/osdc/obiee_reports.rpd, run the below ./datamodel.sh command, this
will ask for rpd password, give the password as weblogic1
/scratch/obiee12c/Middleware/Oracle_Home/user_projects/domains/bi1/bitools/bin
./datamodel.sh uploadrpd -I /scratch/Deployments/bi/osdc/obiee_reports.rpd -SI ssi -U
weblogic -P weblogic123
Running this command will ask for rpd password, rpd password is: weblogic1

8 | P a g e
2.REPORT CREATION To create new report in OBIEE server we need to create analysis and prompt.
2.1 Analysis Creation To create Analysis click New Analysis
Then following image will appear

9 | P a g e
In the select subject rea you will be seeing the created RPD, which will be appear after deploying the
created RPD in the server
After this select the Create Direct Database query, following screen will appear

10 | P a g e
In the connection pool give the name in the rpd physical layer connection pool name given while creating
rpd.In my case OBLMTESTDB is the connection pool name.

11 | P a g e
In sql statement block give the query to generate report.
Query format should be like this for where condition.
(str.customer_id in (@{PV_Customer}['@']{'allvalues'}) or '(All Column Values)' in
(@{PV_Customer}['@']{'(All Column Values)'}))
AND ( temp.acc_str_id in (@{PV_Acc_Str_Id}['@']{'allvalues'}) or '(All Column Values)' in
(@{PV_Acc_Str_Id}['@']{'(All Column Values)'}))
Then click on validate sql and retrieve Column.
Now the result of the column will be shown below in the same screen

12 | P a g e
In the criteria page result column will be generated. Click the result next to the criteria to see the result
Now the report will be generated like below and Click on Save to save it in the right top corner and give a
name for the Report it is called Analysis.
You can edit the report by clicking the edit in the result page. To Rename the column name you should
edit in the criteria page itself.

13 | P a g e
In the following image in the criteria page, click on the symbol before fx.
In the column properties you can rename the column and can do formatting option there.
After clicking the column properties following image will appear .in this select column format and in
column heading you can rename it and by clicking the A symbol in the right side you can format the
column. And select the repeat in the value suppression.
To remove un wanted column from the result go to result page click on edit symbol following image will
appear. In the excluded Row you can drag and drop the unwanted column and use in the future if needed.
If you want to permanently delete the column. Click on the setting button in the column to be deleted then
select remove column

14 | P a g e
To change the Date format for the date column go to setting column properties.In that select data
format.if you want to override the format ,unselect the override default data format and in date format you
will be seeing the list of date format and select anyone from the list or if you to override your own format
select the custom from the date format and give the format which you want in the custom date format

15 | P a g e

16 | P a g e
Now creating of analysis completed. Next we need to create Prompt for the report.
3 .PROMPT CREATION Prompt is like giving inputs to the where condition.so we need to create prompt for the report. To create
prompt for the report NewDashboard prompt

17 | P a g e
After selecting dashboard prompt select subject area page will appear with the following image. This will
display the name of the RPD which we have created. From this we need to select the one of the rpd to
create prompt for the report you’re going to do.
Select anyone from this for the report. After selecting the report following page will appear
Click the green color plus button to create where condition filed from which table the field should be
taken. Select column prompt
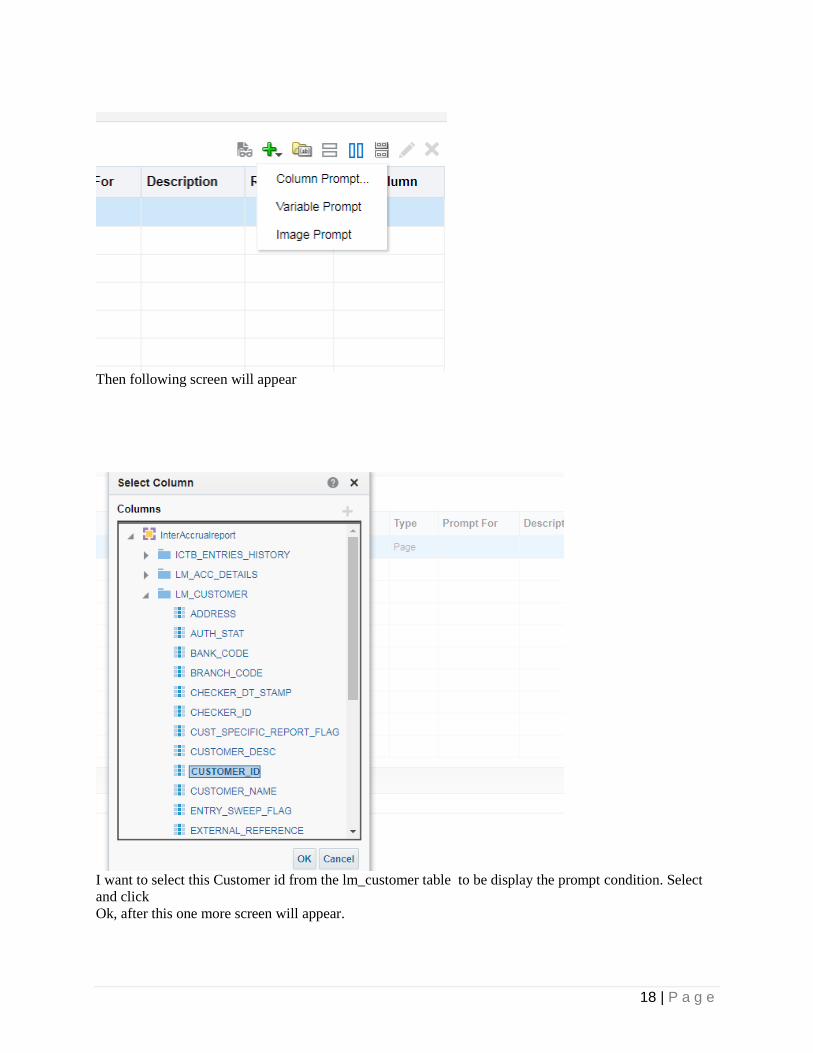
18 | P a g e
Then following screen will appear
I want to select this Customer id from the lm_customer table to be display the prompt condition. Select
and click
Ok, after this one more screen will appear.

19 | P a g e
In the above screen you edit label name by selecting custom label option and select the set a variable to
presentation variable so that the value which we are passing will be given to the where condition in the
query and display the result. In choice list value select the include all column values so that you can select
all list of value at same time
Now selected value will be shown in the same page below. If you want it to display it one by one select
the icon next to the plus icon

20 | P a g e
Now it is changed to like above. Now Save it and give Name for it. Its called prompt. Give a name like
ending with prompt.
4.Dashboard creation
After completion of this we need to create Dashboard for the report, we need to drag and drop the created
analysis and prompt in the same dashboard.
Go to NewDashboard in top right corner. Following screen appear in the left side of the screen created
analysis and prompt will be displayed. Now drag the prompt in the top and analysis in the below of the
prompt.

21 | P a g e
Then click on Run in the top right corner. Then report will be created like below
If you to edit the report click on the setting button in the top right corner now you can edit the dashboard
which will be having analysis and prompt like below
click on xyzedit .Now you can edit the report. You can add the more report on the same dashboard
page itself

22 | P a g e
Add one more page to show the all the reports in the same dashboard itself. Creation of reports completed
in the OBIEE server
5. RPD Creation in OBIEE 12c
Step 1
Run the RPD from the path
Scratch\OBIEERPD\bi\bitools\bin\admintool.cmd
To create RPD in the OBIEE Administration tool click, Run the obiee Admin tool and click on the
File->New Repository. Now the following page will appear

23 | P a g e
Give the name for the rpd in the Name field and browse the location to save the RPD.
Keep the imported metadata to be selected in YES model.
If we click on yes ,then we need to give the data source connection while creating RPD itself.
Step 2
Give the username and password for the RPD. We need open the Rpd with this name, whenever we want
to open the RPD.

24 | P a g e
The Click on Next to give Database connection.
Step 3
Change the connection type to oci 10g/11g and give data source name
<host_name>:<port_no>/<service_name>
Then user name and password.
Then click on next.
Step

25 | P a g e
4
Step 5
Unselect the key and foreign keys select the tables in the relational sources. Click on next.Search for your
DB name
Now select the tables to be imported and click on the > image
Step 6

26 | P a g e
Then click on Finish.
Now you will be seeing the RPD have created with three layers.
In the presentation layer you will be seeing the selected tables. if you want to import more tables click on
the connection pool name right click on it, import metadata then the same process will be followed from
step 4
Now in the Presentation layer we can import the necessary table for the report creation. We can use one

27 | P a g e
table for only one report. In this case we need take copy of the same table by right click on the table name
then
New objectAlias.
Now following page will appear give the new name for the alias table in Name field.
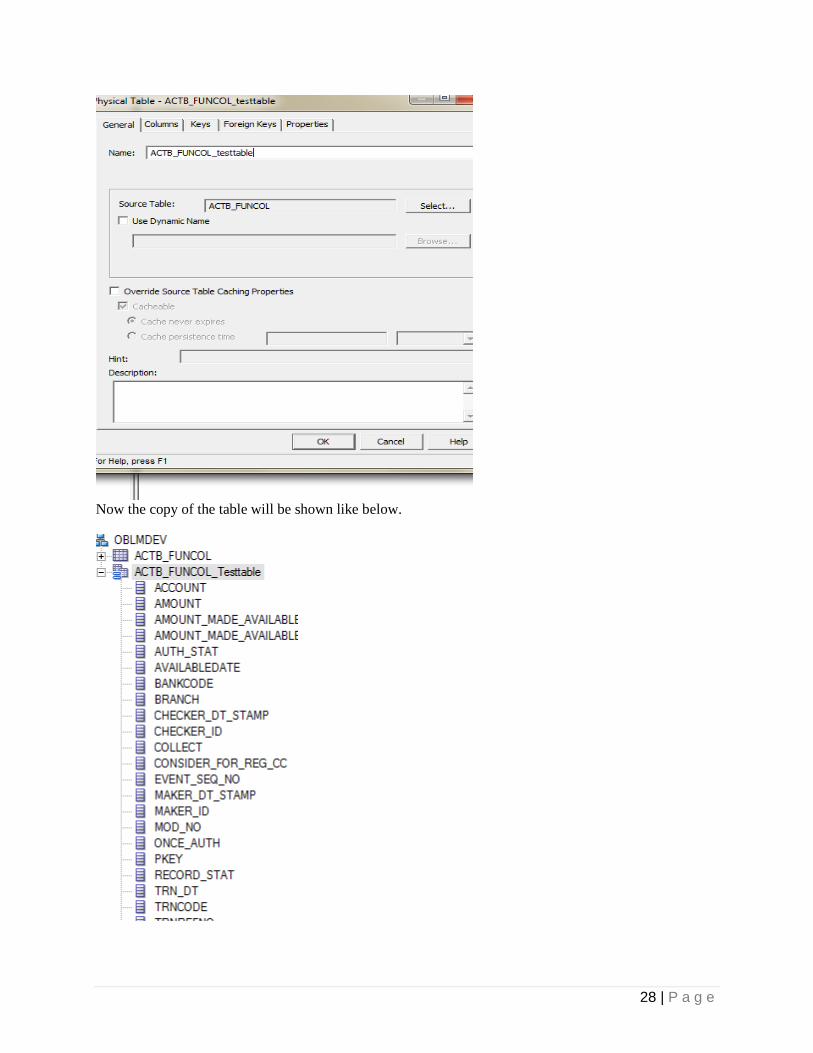
28 | P a g e
Now the copy of the table will be shown like below.

29 | P a g e
If the same table is used more than once for different report, we need to create alias table like above.
Import the tables and join the table accordingly to our repot. Select the tables to join in the physical layer.
Right click on physical display folder -> Physical Diagram-> Selected Objects only,
Now make the join to the tables based on our requirement
Click on the new join in the following image first icon
Select the column name in the both table like below and click ok.

30 | P a g e
Click on customer ID from the both table and click on ok.
Similarly Join other tables as shown in diagram using New foreign key
Now go to file click on save
31 | P a g e
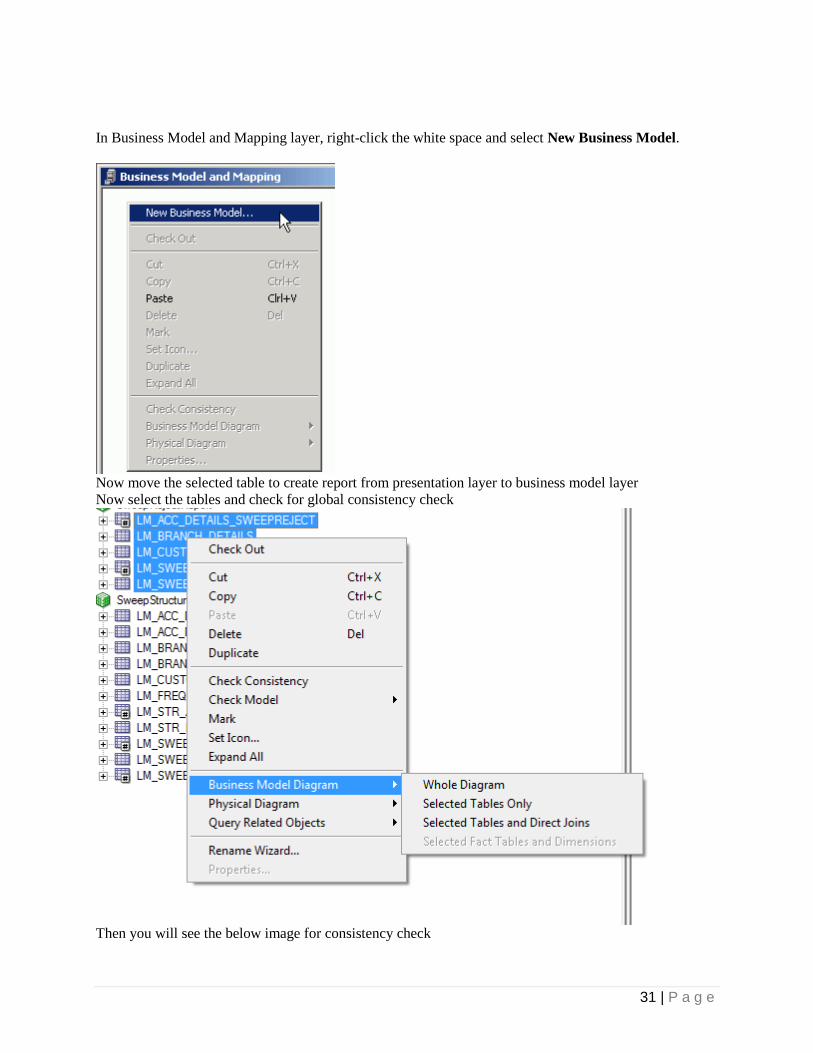
In Business Model and Mapping layer, right-click the white space and select New Business Model.
Now move the selected table to create report from presentation layer to business model layer
Now select the tables and check for global consistency check
Then you will see the below image for consistency check

32 | P a g e
Click yes and check global consistency check. If the tables are joined correctly with the primary keys,
then screen will appear like this below with warning. Close
this.
Select File > Check Global Consistency.

33 | P a g e
You should receive a message indicating that the repository is consistent and asking if you want to make
it available for queries.
Click Yes to make the Pc business model available for queries. The Consistency Check Manager displays.
If the Consistency Check Manager displays any Error messages, edit the repository to correct the
inconsistencies and run the consistency check again. If you see only Warning and Best Practices
messages, you can ignore the messages for now and click Close.
Now the completed the necessary table to create the report in OBIEE server. The moved tables will be
displayed in the obiee report.
5.1 RPD Deployment Steps: Open the following shipment media directory for RPD files. For the modules where modularity has been
done, the RPDs will be under the path in the browsed path which have given while creating RPD
Deploy the RPD in the server installed path. In my case datamodel.cmd is in the following path.
For windows machine the following command to be used for deployment.
datamodel.cmd uploadrpd -I <TEMPDIR_DASH>/RPD_File_Name.rpd –SI ssi -U<adminUserName>
2 For Linux machine
datamodel.sh uploadrpd -I <TEMPDIR_DASH>/RPD_File_Name.rpd –SI ssi -U<adminUserName>
Example
Say you have copied the obiee_reports.rpd file to /scratch/Deployments/bi/osdc/obiee_reports.rpd in
Linux box, run the below ./datamodel.sh command, this will ask for rpd password, give the password as
weblogic1 or the password that you have saved during the rpd creation.
/scratch/obiee12c/Middleware/Oracle_Home/user_projects/domains/bi1/bitools/bin
./datamodel.sh uploadrpd -I /scratch/Deployments/bi/osdc/obiee_reports.rpd -SI ssi -U weblogic -P
weblogic123
Running this command will ask for rpd password, rpd password is: weblogic1 or the password
that you have saved during the rpd creation.

34 | P a g e
Liquidity Management OBIEE Setup Oracle Banking Liquidity Management Version 14.0.0.0.0 [November] [2017] Oracle Financial Services Software Limited Oracle Park Off Western Express Highway Goregaon (East) Mumbai, Maharashtra 400 063 India Worldwide Inquiries: Phone: +91 22 6718 3000 Fax:+91 22 6718 3001 www.oracle.com/financialservices/ Copyright © 2017, Oracle and/or its affiliates. All rights reserved. Oracle and Java are registered trademarks of Oracle and/or its affiliates. Other names may be trademarks of their respective owners. U.S. GOVERNMENT END USERS: Oracle programs, including any operating system, integrated software, any programs installed on the hardware, and/or documentation, delivered to U.S. Government end users are "commercial computer software" pursuant to the applicable Federal Acquisition Regulation and agency-specific supplemental regulations. As such, use, duplication, disclosure, modification, and adaptation of the programs, including any operating system, integrated software, any programs installed on the hardware, and/or documentation, shall be subject to license terms and license restrictions applicable to the programs. No other rights are granted to the U.S. Government. This software or hardware is developed for general use in a variety of information management applications. It is not developed or intended for use in any inherently dangerous applications, including applications that may create a risk of personal injury. If you use this software or hardware in dangerous applications, then you shall be responsible to take all appropriate failsafe, backup, redundancy, and other measures to ensure its safe use. Oracle Corporation and its affiliates disclaim any liability for any damages caused by use of this software or hardware in dangerous applications. This software and related documentation are provided under a license agreement containing restrictions on use and disclosure and are protected by intellectual property laws. Except as expressly permitted in your license agreement or allowed by law, you may not use, copy, reproduce, translate, broadcast, modify, license, transmit, distribute, exhibit, perform, publish or display any part, in any form, or by any means. Reverse engineering, disassembly, or decompilation of this software, unless required by law for interoperability, is prohibited. The information contained herein is subject to change without notice and is not warranted to be error-free. If you find any errors, please report them to us in writing. This software or hardware and documentation may provide access to or information on content, products and services from third parties. Oracle Corporation and its affiliates are not responsible for and expressly disclaim all warranties of any kind with respect to third-party content, products, and services. Oracle Corporation and its affiliates will not be responsible for any loss, costs, or damages incurred due to your access to or use of third-party content, products, or services.

35 | P a g e