Lpic 2 linux professional institute certification study guide
Linux 102 Examination
Modular Training Notes
Leading Edge Business SolutionsThis manual was written for Leading Edge Business Solutions
http://www.ledge.co.za/ as part of their Linux training programme.
This document is protected by copyright. This document may be redistributed under the terms of the GNU free documention licence. See the “Legal notices” section for details.
102letter.odm, 2 March 2006

2 LPI 102 Course Notes
LPIC topicsLPIC topic 1.105.1 — Manage/Query kernel and kernel modules at runtime [4].....................18LPIC topic 1.105.2 — Reconfigure, build, and install a custom kernel and kernel modules [3]. .
24LPIC topic 1.106.1 — Boot the system [3]................................................................................34LPIC topic 1.106.2 — Change runlevels and shutdown or reboot system [3]..........................39LPIC topic 1.107.2 — Manage printers and print queues [1]....................................................43LPIC topic 1.107.3 — Print files [1]..........................................................................................46LPIC topic 1.107.4 — Install and configure local and remote printers [1]...............................50LPIC topic 1.108.1 — Use and manage local system documentation [4].................................55LPIC topic 1.108.1 — Use and manage local system documentation [3].................................60LPIC topic 1.108.5 — Notify users on systemrelated issues [1]..............................................63LPIC topic 1.109.1 — Customize and use the shell environment [5].......................................66LPIC topic 1.109.2 — Customize or write simple scripts [3]....................................................72LPIC topic 1.111.1 — Manage users and group accounts and related system files [4]............85LPIC topic 1.111.2 — Tune the user environment and system environment variables [3].......96LPIC topic 1.111.3 — Configure and use system log files to meet administrative and security
needs [3].........................................................................................................................100LPIC topic 1.111.4 — Automate system administration tasks by scheduling jobs to run in the
future [4].........................................................................................................................106LPIC topic 1.111.5 — Maintain an effective data backup strategy [3]...................................110LPIC topic 1.111.6 — Maintain system time [4].....................................................................119LPIC topic 1.112.1 — Fundamentals of TCP/IP [4]................................................................124LPIC topic 1.112.3 — TCP/IP configuration and troubleshooting [7]....................................138LPIC topic 1.112.4 — Configure Linux as a PPP client [3]....................................................152LPIC topic 1.113.1 — Configure and manage inetd, xinetd, and related services [4]............160LPIC topic 1.113.2 — Operate and perform basic configuration of sendmail [4]..................167LPIC topic 1.113.3 — Operate and perform basic configuration of Apache [4].....................176LPIC topic 1.113.4 — Properly manage the NFS, smb, and nmb daemons [4]......................182LPIC topic 1.113.5 — Setup and configure basic DNS services [4].......................................190LPIC topic 1.113.7 — Set up secure shell (OpenSSH) [4]......................................................196LPIC topic 1.114.1 — Perform security administration tasks [4]...........................................204LPIC topic 1.114.2 — Setup host security [3].........................................................................221LPIC topic 1.114.3 — Setup user level security [1]................................................................226
Table of Contents1 Foreword.................................................................................................................................10
1.1 About these notes............................................................................................................121.2 Revisions and bugs..........................................................................................................12
LPI 102 Course Notes 3
1.3 Copyright notice .............................................................................................................121.4 GNU Free Documentation License.................................................................................12
2 Kernel modules.......................................................................................................................18LPIC topic 1.105.1 — Manage/Query kernel and kernel modules at runtime [4]2.1 Kernel modules................................................................................................................182.2 Module information.........................................................................................................192.3 Inserting modules............................................................................................................192.4 modprobe, modules.conf and depmod............................................................................212.5 Unloading modules..........................................................................................................222.6 Review.............................................................................................................................22
3 Rebuilding the kernel..............................................................................................................24LPIC topic 1.105.2 — Reconfigure, build, and install a custom kernel and kernel
modules [3]3.1 The kernel........................................................................................................................243.2 Obtaining the kernel .......................................................................................................253.3 Kernel patches.................................................................................................................273.4 Compiling a kernel..........................................................................................................273.5 Choosing options for your kernel....................................................................................293.6 Review.............................................................................................................................30
4 Booting Linux.........................................................................................................................34LPIC topic 1.106.1 — Boot the system [3]4.1 Kernel boot parameters...................................................................................................344.2 LILO................................................................................................................................364.3 GRUB..............................................................................................................................364.4 Boot messages.................................................................................................................374.5 Review.............................................................................................................................37
5 Change runlevels.....................................................................................................................39LPIC topic 1.106.2 — Change runlevels and shutdown or reboot system [3]5.1 init and telinit...................................................................................................................395.2 shutdown.........................................................................................................................405.3 inittab...............................................................................................................................405.4 Review.............................................................................................................................41
6 Print queues.............................................................................................................................43LPIC topic 1.107.2 — Manage printers and print queues [1]6.1 lpd, lpr, lpq and lprm.......................................................................................................436.2 Troubleshooting...............................................................................................................446.3 Review.............................................................................................................................45
7 Postscript.................................................................................................................................46LPIC topic 1.107.3 — Print files [1]7.1 What is postscript............................................................................................................467.2 mpage..............................................................................................................................47
4 LPI 102 Course Notes
7.3 Review.............................................................................................................................48
8 Printer setup............................................................................................................................50LPIC topic 1.107.4 — Install and configure local and remote printers [1]8.1 lpd and printcap...............................................................................................................508.2 apsfilter............................................................................................................................528.3 magicfilter.......................................................................................................................53
9 Documentation........................................................................................................................55LPIC topic 1.108.1 — Use and manage local system documentation [4]9.1 man pages........................................................................................................................559.2 /usr/share/doc...................................................................................................................579.3 Review.............................................................................................................................58
10 Internet Documentation.........................................................................................................60LPIC topic 1.108.1 — Use and manage local system documentation [3]10.1 Linux documentation project.........................................................................................6010.2 Mailing lists...................................................................................................................6010.3 Newsgroups...................................................................................................................6110.4 Vendor web sites...........................................................................................................6110.5 Third party web sites.....................................................................................................6210.6 Review...........................................................................................................................62
11 System Notification...............................................................................................................63LPIC topic 1.108.5 — Notify users on systemrelated issues [1]11.1 Login Messages.............................................................................................................63
11.1.1 /etc/issue11.1.2 /etc/motd
11.2 Instant messaging..........................................................................................................6411.3 Review...........................................................................................................................64
12 Bash customisation...............................................................................................................66LPIC topic 1.109.1 — Customize and use the shell environment [5]12.1 Bash profile(s)...............................................................................................................6612.2 Variables........................................................................................................................6712.3 Functions (and aliases)..................................................................................................6812.4 Keyboard handling and inputrc.....................................................................................6912.5 Review...........................................................................................................................70
13 Scripting................................................................................................................................72LPIC topic 1.109.2 — Customize or write simple scripts [3]13.1 Introduction...................................................................................................................7213.2 Permissions and executables.........................................................................................7313.3 Basic syntax of a shell script.........................................................................................7313.4 Script communication....................................................................................................74
13.4.1 Positional parameters 13.4.2 Redirection review
LPI 102 Course Notes 5
13.5 Quoting in bash.............................................................................................................7513.5.1 Full quoting '...'13.5.2 Partial quoting "..."13.5.3 Command substitution and backticks
13.6 Keywords and builtin commands*...............................................................................7713.7 Arithmetic expansion and evaluation............................................................................78
13.7.1 expr13.7.2 let*13.7.3 Arithmetic expansion using $((...))
13.8 Control structures..........................................................................................................7913.8.1 test13.8.2 &&, ||13.8.3 if ... then ... fi13.8.4 case ... esac13.8.5 The for ... do loop13.8.6 while ... do13.8.7 Loop control commands*
13.9 Review...........................................................................................................................83
14 Users and Groups..................................................................................................................85LPIC topic 1.111.1 — Manage users and group accounts and related system files [4]14.1 Users..............................................................................................................................8514.2 The passwd file..............................................................................................................86
14.2.1 PAM14.2.2 User commands
14.3 Passwords and the shadow password file......................................................................8914.3.1 The shadow password file14.3.2 Password commands
14.4 Groups...........................................................................................................................9114.4.1 /etc/group14.4.2 /etc/gshadow14.4.3 Group commands
14.5 Review...........................................................................................................................93
15 The Environment...................................................................................................................96LPIC topic 1.111.2 — Tune the user environment and system environment variables [3]15.1 /etc/skel..........................................................................................................................9615.2 Profiles...........................................................................................................................9615.3 Environment variables...................................................................................................9715.4 Review...........................................................................................................................99
16 System logs.........................................................................................................................100LPIC topic 1.111.3 — Configure and use system log files to meet administrative and
security needs [3]16.1 Syslog..........................................................................................................................100
16.1.1 syslogd

6 LPI 102 Course Notes
16.1.2 syslog.conf16.2 Related tools................................................................................................................103
16.2.1 logger16.2.2 tail16.2.3 Log rotation
16.3 Review.........................................................................................................................104
17 Scheduling jobs ..................................................................................................................106LPIC topic 1.111.4 — Automate system administration tasks by scheduling jobs to run in
the future [4]17.1 The cron daemon.........................................................................................................106
17.1.1 Crontab17.1.2 Cron directories17.1.3 Permissions
17.2 at..................................................................................................................................10817.3 Review.........................................................................................................................108
18 Backup strategy...................................................................................................................110LPIC topic 1.111.5 — Maintain an effective data backup strategy [3]18.1 Backup and system recovery.......................................................................................110
18.1.1 Backup definitions18.1.2 Backup policy and disaster recovery18.1.3 Backup tools18.1.4 Backup solutions18.1.5 Partition and filesystem recovery tools
18.2 Review.........................................................................................................................117
19 System time.........................................................................................................................119LPIC topic 1.111.6 — Maintain system time [4]19.1 Setting the clock..........................................................................................................11919.2 Time zones..................................................................................................................12119.3 Network time protocol (NTP).....................................................................................12119.4 Review.........................................................................................................................122
20 TCP/IP.................................................................................................................................124LPIC topic 1.112.1 — Fundamentals of TCP/IP [4]20.1 IP and other animals....................................................................................................12420.2 IP addressing...............................................................................................................12520.3 ICMP – Internet Control Message Protocol................................................................12820.4 TCP – Transmission Control Protocol........................................................................12820.5 UDP – User datagram protocol...................................................................................12920.6 Client applications.......................................................................................................129
20.6.1 ping20.6.2 traceroute20.6.3 DNS query tools20.6.4 telnet
LPI 102 Course Notes 7
20.6.5 whois20.6.6 ftp
20.7 Review.........................................................................................................................136
21 TCP/IP configuration..........................................................................................................138LPIC topic 1.112.3 — TCP/IP configuration and troubleshooting [7]21.1 System start up scripts.................................................................................................13821.2 Configuring IP.............................................................................................................14121.3 Configuring name resolution.......................................................................................14421.4 DHCP client ...............................................................................................................14621.5 Network troubleshooting.............................................................................................147
21.5.1 netstat21.5.2 Troubleshooting with ping21.5.3 Troubleshooting with traceroute21.5.4 Troubleshooting with tcpdump21.5.5 Troubleshooting with “host”
21.6 Review.........................................................................................................................150
22 PPP client............................................................................................................................152LPIC topic 1.112.4 — Configure Linux as a PPP client [3]22.1 Point to point protocol.................................................................................................15222.2 pppd configuration......................................................................................................15422.3 wvdial..........................................................................................................................15622.4 ADSL and ISDN.........................................................................................................15722.5 Review.........................................................................................................................158
23 inetd and xinetd...................................................................................................................160LPIC topic 1.113.1 — Configure and manage inetd, xinetd, and related services [4]23.1 inetd – the internet super server..................................................................................16023.2 xinetd – extended inetd................................................................................................16223.3 tcpwrappers – host based access control.....................................................................16323.4 Simple services ...........................................................................................................164
23.4.1 telnet23.4.2 ftp – File transfer protocol23.4.3 pop3 – Post office protocol version 3
23.5 Review.........................................................................................................................166
24 Sendmail..............................................................................................................................167LPIC topic 1.113.2 — Operate and perform basic configuration of sendmail [4]24.1 How Sendmail works..................................................................................................16724.2 Sendmail configuration...............................................................................................16824.3 Sendmail queue control...............................................................................................17124.4 Troubleshooting...........................................................................................................17224.5 Review.........................................................................................................................174
25 Apache................................................................................................................................176LPIC topic 1.113.3 — Operate and perform basic configuration of Apache [4]
8 LPI 102 Course Notes
25.1 Running Apache..........................................................................................................17625.2 Configuration...............................................................................................................17825.3 Review.........................................................................................................................181
26 File servers..........................................................................................................................182LPIC topic 1.113.4 — Properly manage the NFS, smb, and nmb daemons [4]26.1 NFS server ..................................................................................................................18226.2 NFS client....................................................................................................................18326.3 Samba server...............................................................................................................18426.4 Review.........................................................................................................................188
27 Caching DNS server............................................................................................................190LPIC topic 1.113.5 — Setup and configure basic DNS services [4]27.1 Name resolution in brief..............................................................................................19027.2 BIND...........................................................................................................................190
27.2.1 BIND version 427.2.2 BIND version 827.2.3 Domain registration27.2.4 Zone files*
27.3 Review.........................................................................................................................195
28 Secure shell.........................................................................................................................196LPIC topic 1.113.7 — Set up secure shell (OpenSSH) [4]28.1 All about SSH..............................................................................................................196
28.1.1 Alice and Bob28.1.2 SSH protocol
28.2 SSH server...................................................................................................................19728.3 SSH client....................................................................................................................19828.4 Review.........................................................................................................................202
29 Security administration.......................................................................................................204LPIC topic 1.114.1 — Perform security administration tasks [4]29.1 Security policy.............................................................................................................20429.2 Password ageing..........................................................................................................20529.3 Setuid and setgid files..................................................................................................20529.4 TCP wrappers..............................................................................................................20629.5 Firewalls......................................................................................................................206
29.5.1 TCP, UDP, ICMP and IP29.5.2 iptables29.5.3 ipchains
29.6 Security updates..........................................................................................................21729.7 Socket..........................................................................................................................21829.8 Review.........................................................................................................................219
30 Host security.......................................................................................................................221LPIC topic 1.114.2 — Setup host security [3]30.1 Miscellaneous security notes.......................................................................................221

LPI 102 Course Notes 9
30.1.1 Shadow passwords30.1.2 Root mail30.1.3 Syslog30.1.4 nologin
30.2 Disabling unused services...........................................................................................22330.3 Review.........................................................................................................................224
31 User limits...........................................................................................................................226LPIC topic 1.114.3 — Setup user level security [1]31.1 Process limits...............................................................................................................22631.2 More limits..................................................................................................................22731.3 Review.........................................................................................................................228
32 Glossary..............................................................................................................................230
33 Index....................................................................................................................................232
101 LPI 102 Course Notes Foreword
1 ForewordSee the amazing new paradoxical Linux powered vacuum cleaner! It's Linux, but it sucks!
(I made it up)
This course material relates to the Linux Professionals Institute’s LPI 102 examination (release 2). This course is intended to provide you with the basic skills required for operating and administering Linux systems. This document is a set of training notes for the course. At every good training course the student should come away with some paper in his hand, to file in the company filing cabinet. A really excellent course will include some knowledge and practical ability in the student's head as well. We hope to achieve at least the first with these notes. The second is up to the instructor.
Goal of this course
This course aims to equip you with the knowledge to be able to pass the LPI 102 examination (release 2). We hope that in the course of doing this course you will acquire the skills that go with an understanding of how Linux works.
Target audience
This course is aimed at ...• People who have already written the LPIC 101 exam, as part of the LPIC Level 1
certification.• People who wish to write the LPIC 102 exam, as part of the LPIC Level 1 certification.• People who are familiar with Linux and wish to acquire more advanced skills and fill the
gaps in their understanding.• People who want to run network servers on Linux.
Prerequisites for taking this course
People wishing to take this course will probably fit the following profile• You should have a firm understanding of Linux. Writing and passing the LPIC 101
examination or an equivalent qualification is recommended.• You are a system administrator or hold a similar technical position (or you would like a job
like that).• You are interested in technical things and the fascinating little details that make your
computer behave strangely.• You want to know how things work – specifically how Linux works, and be willing to
spend some time finding out.• You have practical administrative experience with computer systems.• You already have some practical familiarity with using Linux. You have probably installed
Linux and have used it without gaining a complete understanding of many functions.
1 Foreword LPI 102 Course Notes 11
We recommend that this course be followed by professional people who have completed their secondary education, and possibly an additional qualification. It is preferable that you already hold a position in which you can use Linux on a day to day basis.
What you need for this course
You will need the following in order to complete this course.• A dedicated computer to work on outside of course contact time. As part of the course, the
existing data on this computer will most likely be destroyed. If you do not have an appropriate computer, you should consider buying a laptop, or at least a new hard disk for an existing computer.
• Committed time for six working weeks:• Lecture, tutorial and review time: 2 hours per week (excluding travel time).• Selfstudy and practice time: minimum of 2 hours per day, Monday to Friday.
Flow of instruction
Each section in the notes is structured as an independent entity. Each section covers a single LPIC topic. Each section is structured as follows:• LPIC objectives (with the weighting noted)• Introductory material• Detailed material• Review material (quiz questions and assignments).Some of the sections are more demanding than others, and the certification does not weight all of the sections equally.
Typographic conventions
Command names and example of command are printed in boldface. So for example, ls la is used for printing a list of files in the current directory, and pwd prints the current working directory.Syntax explanations are shown like this.
ls [directory-name]
In this particular case, it means that you can tell ls to list a particular directory.Interactive command sessions are shown in a block like this
# This is an interactive session# What was typed is shown in boldface.foo:~ $ su - jackPassword:[jack@foo jack]$ ls[jack@foo jack]$ ls -a. .. .bash_logout .bash_profile .bashrc .emacs .gtkrc .kde [jack@foo jack]$ pwd/home/jack
The student is encouraged to try these example commands on her1 computer, as the results
1 And when we say “her”, we mean “his” if the student happens to be male.
121 LPI 102 Course Notes Foreword
may differ from one system to the next. Often the output shown is incomplete, and a valuable learning experience awaits the person bold enough to retype the bold text.
1.1 About these notesThese notes have been written with the LPI's objectives and criteria for approved training materials in mind. We have designed them to be modular, so that a course following LPI objectives can easily be built up from a selection of topics.Printed copies of this and other manuals can be purchased from Leading Edge Business Solutions (Pty) Ltd – see www.ledge.co.za. We offer training courses based on this material. The contact address for queries related to these notes is [email protected].
1.2 Revisions and bugsGentle reader, we hope that these notes provide a wonderful learning experience for you. In this process we trust that you will be kind enough to point out to us the typos, stylistic faults and gross errors in the text. If you make changes to these notes, or produce them in an alternative format, we would appreciate it if you would send us a copy of your revisions.
Known bugs
OpenOffice.org suffers from a confusion of its bullets and numbering system which affects this document. The subdocument is correctly numbered and bulletted, but this does not reflect in the master document. If you know how to fix this, please do let us know.
1.3 Copyright notice Copyright © 2004 Andrew McGill and Leading Edge Business Solutions (Pty) Ltd (www.ledge.co.za). This copyright applies to the entire text of this document, being the master document and the subdocuments.Permission is granted to copy, distribute and/or modify this document under the terms of the GNU Free Documentation License, Version 1.2 published by the Free Software Foundation; with the Invariant Sections being the “About these notes”, the FrontCover Texts being the text “This manual was written for Leading Edge Business Solutions http://www.ledge.co.za/ as part of their Linux training programme.”, and no BackCover Texts. A copy of the license is included in the section entitled "GNU Free Documentation License".
1.4 GNU Free Documentation LicenseVersion 1.2, November 2002 Copyright (C) 2000,2001,2002 Free Software Foundation, Inc.59 Temple Place, Suite 330, Boston, MA 021111307 USAEveryone is permitted to copy and distribute verbatim copies of this license document, but changing it is not allowed.
0. PREAMBLE
The purpose of this License is to make a manual, textbook, or other functional and useful document "free" in the

1 Foreword LPI 102 Course Notes 13
sense of freedom: to assure everyone the effective freedom to copy and redistribute it, with or without modifying it, either commercially or noncommercially. Secondarily, this License preserves for the author and publisher a way to get credit for their work, while not being considered responsible for modifications made by others.
This License is a kind of "copyleft", which means that derivative works of the document must themselves be free in the same sense. It complements the GNU General Public License, which is a copyleft license designed for free software.
We have designed this License in order to use it for manuals for free software, because free software needs free documentation: a free program should come with manuals providing the same freedoms that the software does. But this License is not limited to software manuals; it can be used for any textual work, regardless of subject matter or whether it is published as a printed book. We recommend this License principally for works whose purpose is instruction or reference.
1. APPLICABILITY AND DEFINITIONS
This License applies to any manual or other work, in any medium, that contains a notice placed by the copyright holder saying it can be distributed under the terms of this License. Such a notice grants a worldwide, royaltyfree license, unlimited in duration, to use that work under the conditions stated herein. The "Document", below, refers to any such manual or work. Any member of the public is a licensee, and is addressed as "you". You accept the license if you copy, modify or distribute the work in a way requiring permission under copyright law.
A "Modified Version" of the Document means any work containing the Document or a portion of it, either copied verbatim, or with modifications and/or translated into another language.
A "Secondary Section" is a named appendix or a frontmatter section of the Document that deals exclusively with the relationship of the publishers or authors of the Document to the Document's overall subject (or to related matters) and contains nothing that could fall directly within that overall subject. (Thus, if the Document is in part a textbook of mathematics, a Secondary Section may not explain any mathematics.) The relationship could be a matter of historical connection with the subject or with related matters, or of legal, commercial, philosophical, ethical or political position regarding them.
The "Invariant Sections" are certain Secondary Sections whose titles are designated, as being those of Invariant Sections, in the notice that says that the Document is released under this License. If a section does not fit the above definition of Secondary then it is not allowed to be designated as Invariant. The Document may contain zero Invariant Sections. If the Document does not identify any Invariant Sections then there are none.
The "Cover Texts" are certain short passages of text that are listed, as FrontCover Texts or BackCover Texts, in the notice that says that the Document is released under this License. A FrontCover Text may be at most 5 words, and a BackCover Text may be at most 25 words.
A "Transparent" copy of the Document means a machinereadable copy, represented in a format whose specification is available to the general public, that is suitable for revising the document straightforwardly with generic text editors or (for images composed of pixels) generic paint programs or (for drawings) some widely available drawing editor, and that is suitable for input to text formatters or for automatic translation to a variety of formats suitable for input to text formatters. A copy made in an otherwise Transparent file format whose markup, or absence of markup, has been arranged to thwart or discourage subsequent modification by readers is not Transparent. An image format is not Transparent if used for any substantial amount of text. A copy that is not "Transparent" is called "Opaque".
Examples of suitable formats for Transparent copies include plain ASCII without markup, Texinfo input format, LaTeX input format, SGML or XML using a publicly available DTD, and standardconforming simple HTML, PostScript or PDF designed for human modification. Examples of transparent image formats include PNG, XCF
141 LPI 102 Course Notes Foreword
and JPG. Opaque formats include proprietary formats that can be read and edited only by proprietary word processors, SGML or XML for which the DTD and/or processing tools are not generally available, and the machinegenerated HTML, PostScript or PDF produced by some word processors for output purposes only.
The "Title Page" means, for a printed book, the title page itself, plus such following pages as are needed to hold, legibly, the material this License requires to appear in the title page. For works in formats which do not have any title page as such, "Title Page" means the text near the most prominent appearance of the work's title, preceding the beginning of the body of the text.
A section "Entitled XYZ" means a named subunit of the Document whose title either is precisely XYZ or contains XYZ in parentheses following text that translates XYZ in another language. (Here XYZ stands for a specific section name mentioned below, such as "Acknowledgements", "Dedications", "Endorsements", or "History".) To "Preserve the Title" of such a section when you modify the Document means that it remains a section "Entitled XYZ" according to this definition.
The Document may include Warranty Disclaimers next to the notice which states that this License applies to the Document. These Warranty Disclaimers are considered to be included by reference in this License, but only as regards disclaiming warranties: any other implication that these Warranty Disclaimers may have is void and has no effect on the meaning of this License.
2. VERBATIM COPYING
You may copy and distribute the Document in any medium, either commercially or noncommercially, provided that this License, the copyright notices, and the license notice saying this License applies to the Document are reproduced in all copies, and that you add no other conditions whatsoever to those of this License. You may not use technical measures to obstruct or control the reading or further copying of the copies you make or distribute. However, you may accept compensation in exchange for copies. If you distribute a large enough number of copies you must also follow the conditions in section 3.
You may also lend copies, under the same conditions stated above, and you may publicly display copies.
3. COPYING IN QUANTITY
If you publish printed copies (or copies in media that commonly have printed covers) of the Document, numbering more than 100, and the Document's license notice requires Cover Texts, you must enclose the copies in covers that carry, clearly and legibly, all these Cover Texts: FrontCover Texts on the front cover, and BackCover Texts on the back cover. Both covers must also clearly and legibly identify you as the publisher of these copies. The front cover must present the full title with all words of the title equally prominent and visible. You may add other material on the covers in addition. Copying with changes limited to the covers, as long as they preserve the title of the Document and satisfy these conditions, can be treated as verbatim copying in other respects.
If the required texts for either cover are too voluminous to fit legibly, you should put the first ones listed (as many as fit reasonably) on the actual cover, and continue the rest onto adjacent pages.
If you publish or distribute Opaque copies of the Document numbering more than 100, you must either include a machinereadable Transparent copy along with each Opaque copy, or state in or with each Opaque copy a computernetwork location from which the general networkusing public has access to download using publicstandard network protocols a complete Transparent copy of the Document, free of added material. If you use the latter option, you must take reasonably prudent steps, when you begin distribution of Opaque copies in quantity, to ensure that this Transparent copy will remain thus accessible at the stated location until at least one year after the last time you distribute an Opaque copy (directly or through your agents or retailers) of that edition to the public.
1 Foreword LPI 102 Course Notes 15
It is requested, but not required, that you contact the authors of the Document well before redistributing any large number of copies, to give them a chance to provide you with an updated version of the Document.
4. MODIFICATIONS
You may copy and distribute a Modified Version of the Document under the conditions of sections 2 and 3 above, provided that you release the Modified Version under precisely this License, with the Modified Version filling the role of the Document, thus licensing distribution and modification of the Modified Version to whoever possesses a copy of it. In addition, you must do these things in the Modified Version:
A. Use in the Title Page (and on the covers, if any) a title distinct from that of the Document, and from those of previous versions (which should, if there were any, be listed in the History section of the Document). You may use the same title as a previous version if the original publisher of that version gives permission. B. List on the Title Page, as authors, one or more persons or entities responsible for authorship of the modifications in the Modified Version, together with at least five of the principal authors of the Document (all of its principal authors, if it has fewer than five), unless they release you from this requirement. C. State on the Title page the name of the publisher of the Modified Version, as the publisher. D. Preserve all the copyright notices of the Document. E. Add an appropriate copyright notice for your modifications adjacent to the other copyright notices. F. Include, immediately after the copyright notices, a license notice giving the public permission to use the Modified Version under the terms of this License, in the form shown in the Addendum below. G. Preserve in that license notice the full lists of Invariant Sections and required Cover Texts given in the Document's license notice. H. Include an unaltered copy of this License. I. Preserve the section Entitled "History", Preserve its Title, and add to it an item stating at least the title, year, new authors, and publisher of the Modified Version as given on the Title Page. If there is no section Entitled "History" in the Document, create one stating the title, year, authors, and publisher of the Document as given on its Title Page, then add an item describing the Modified Version as stated in the previous sentence. J. Preserve the network location, if any, given in the Document for public access to a Transparent copy of the Document, and likewise the network locations given in the Document for previous versions it was based on. These may be placed in the "History" section. You may omit a network location for a work that was published at least four years before the Document itself, or if the original publisher of the version it refers to gives permission. K. For any section Entitled "Acknowledgements" or "Dedications", Preserve the Title of the section, and preserve in the section all the substance and tone of each of the contributor acknowledgements and/or dedications given therein. L. Preserve all the Invariant Sections of the Document, unaltered in their text and in their titles. Section numbers or the equivalent are not considered part of the section titles. M. Delete any section Entitled "Endorsements". Such a section may not be included in the Modified Version. N. Do not retitle any existing section to be Entitled "Endorsements" or to conflict in title with any Invariant Section. O. Preserve any Warranty Disclaimers.
If the Modified Version includes new frontmatter sections or appendices that qualify as Secondary Sections and contain no material copied from the Document, you may at your option designate some or all of these sections as invariant. To do this, add their titles to the list of Invariant Sections in the Modified Version's license notice. These titles must be distinct from any other section titles.
You may add a section Entitled "Endorsements", provided it contains nothing but endorsements of your Modified Version by various partiesfor example, statements of peer review or that the text has been approved by an organization as the authoritative definition of a standard.

161 LPI 102 Course Notes Foreword
You may add a passage of up to five words as a FrontCover Text, and a passage of up to 25 words as a BackCover Text, to the end of the list of Cover Texts in the Modified Version. Only one passage of FrontCover Text and one of BackCover Text may be added by (or through arrangements made by) any one entity. If the Document already includes a cover text for the same cover, previously added by you or by arrangement made by the same entity you are acting on behalf of, you may not add another; but you may replace the old one, on explicit permission from the previous publisher that added the old one.
The author(s) and publisher(s) of the Document do not by this License give permission to use their names for publicity for or to assert or imply endorsement of any Modified Version.
5. COMBINING DOCUMENTS
You may combine the Document with other documents released under this License, under the terms defined in section 4 above for modified versions, provided that you include in the combination all of the Invariant Sections of all of the original documents, unmodified, and list them all as Invariant Sections of your combined work in its license notice, and that you preserve all their Warranty Disclaimers.
The combined work need only contain one copy of this License, and multiple identical Invariant Sections may be replaced with a single copy. If there are multiple Invariant Sections with the same name but different contents, make the title of each such section unique by adding at the end of it, in parentheses, the name of the original author or publisher of that section if known, or else a unique number. Make the same adjustment to the section titles in the list of Invariant Sections in the license notice of the combined work.
In the combination, you must combine any sections Entitled "History" in the various original documents, forming one section Entitled "History"; likewise combine any sections Entitled "Acknowledgements", and any sections Entitled "Dedications". You must delete all sections Entitled "Endorsements."
6. COLLECTIONS OF DOCUMENTS
You may make a collection consisting of the Document and other documents released under this License, and replace the individual copies of this License in the various documents with a single copy that is included in the collection, provided that you follow the rules of this License for verbatim copying of each of the documents in all other respects.
You may extract a single document from such a collection, and distribute it individually under this License, provided you insert a copy of this License into the extracted document, and follow this License in all other respects regarding verbatim copying of that document.
7. AGGREGATION WITH INDEPENDENT WORKS
A compilation of the Document or its derivatives with other separate and independent documents or works, in or on a volume of a storage or distribution medium, is called an "aggregate" if the copyright resulting from the compilation is not used to limit the legal rights of the compilation's users beyond what the individual works permit. When the Document is included in an aggregate, this License does not apply to the other works in the aggregate which are not themselves derivative works of the Document.
If the Cover Text requirement of section 3 is applicable to these copies of the Document, then if the Document is less than one half of the entire aggregate, the Document's Cover Texts may be placed on covers that bracket the Document within the aggregate, or the electronic equivalent of covers if the Document is in electronic form. Otherwise they must appear on printed covers that bracket the whole aggregate.
8. TRANSLATION

1 Foreword LPI 102 Course Notes 17
Translation is considered a kind of modification, so you may distribute translations of the Document under the terms of section 4. Replacing Invariant Sections with translations requires special permission from their copyright holders, but you may include translations of some or all Invariant Sections in addition to the original versions of these Invariant Sections. You may include a translation of this License, and all the license notices in the Document, and any Warranty Disclaimers, provided that you also include the original English version of this License and the original versions of those notices and disclaimers. In case of a disagreement between the translation and the original version of this License or a notice or disclaimer, the original version will prevail.
If a section in the Document is Entitled "Acknowledgements", "Dedications", or "History", the requirement (section 4) to Preserve its Title (section 1) will typically require changing the actual title.
9. TERMINATION
You may not copy, modify, sublicense, or distribute the Document except as expressly provided for under this License. Any other attempt to copy, modify, sublicense or distribute the Document is void, and will automatically terminate your rights under this License. However, parties who have received copies, or rights, from you under this License will not have their licenses terminated so long as such parties remain in full compliance.
10. FUTURE REVISIONS OF THIS LICENSE
The Free Software Foundation may publish new, revised versions of the GNU Free Documentation License from time to time. Such new versions will be similar in spirit to the present version, but may differ in detail to address new problems or concerns. See http://www.gnu.org/copyleft/.
Each version of the License is given a distinguishing version number. If the Document specifies that a particular numbered version of this License "or any later version" applies to it, you have the option of following the terms and conditions either of that specified version or of any later version that has been published (not as a draft) by the Free Software Foundation. If the Document does not specify a version number of this License, you may choose any version ever published (not as a draft) by the Free Software Foundation.

182 LPI 102 Course Notes Kernel modules
2 Kernel modulesBasically, I want people to know that when they use binaryonly modules, it's THEIR problem. I want people to know that in their bones, and I want it shouted out from the rooftops. I want people to wake up in a cold sweat every once in a while if they use binaryonly modules.
– Linus Torvalds on linuxkernel
LPIC topic 1.105.1 — Manage/Query kernel and kernel modules at runtime [4]Weight: 4Objectives
Candidates should be able to manage and/or query a kernel and kernel loadable modules. This objective includes using commandline utilities to get information about the currently running kernel and kernel modules. It also includes manually loading and unloading modules as appropriate. It also includes being able to determine when modules can be unloaded and what parameters a module accepts. Candidates should be able to configure the system to load modules by names other than their file name.
Key files, terms and utilities include/lib/modules/kernelversion/modules.dep Kernel module interdependencies/etc/modules.conf & /etc/conf.modules modprobe configuration file (new and old)depmod Determine module dependenciesinsmod Insert a module into the kernellsmod List kernel modulesrmmod Remove an installed kernel modulemodinfo Show information about a kernel modulemodprobe Install modules and their dependencies (or remove)uname Unix name, and kernel version number.
2.1 Kernel modulesThe Linux kernel started out as a big monolithic thing that did all of the necessary kernel functions. The wise academics said that this was the wrong way to do things, since it made it more or less impossible to add functionality while the system was running, unless you resort to ugly hacks. So, in the course of time, the loadable kernel module was introduced. It’s an ugly hack, and it works very well.There are now modules that support the following types of thing (and a whole lot more than this too):• Filesystems (e.g. ext3, reiserfs, vfat, jfs, xfs)• Character and block devices (tapes, mice, serial ports, hardware sensors)• Network adapters from various manufacturers and of various sorts
2 Kernel modules LPI 102 Course Notes 19
• Bus protocols (USB, Firewire, ISA PnP)There are a couple of consequences to the Linux approach to modules:• Kernel modules are “object files”, exactly like what is produced when compiling a C
program. The linking part of compiling a C program is what happens when a module is loaded. Somehow, the kernel manages to support unlinking of these linkedin objects too.
• Modules must be compiled with the same options as the kernel they are part of, since they are simply pluggable parts of the same monolithic program.
• Modules from one kernel version will not work with other kernel versions.• Modules will rely on other parts of the kernel to be present – possibly on other modules
(introducing dependencies).
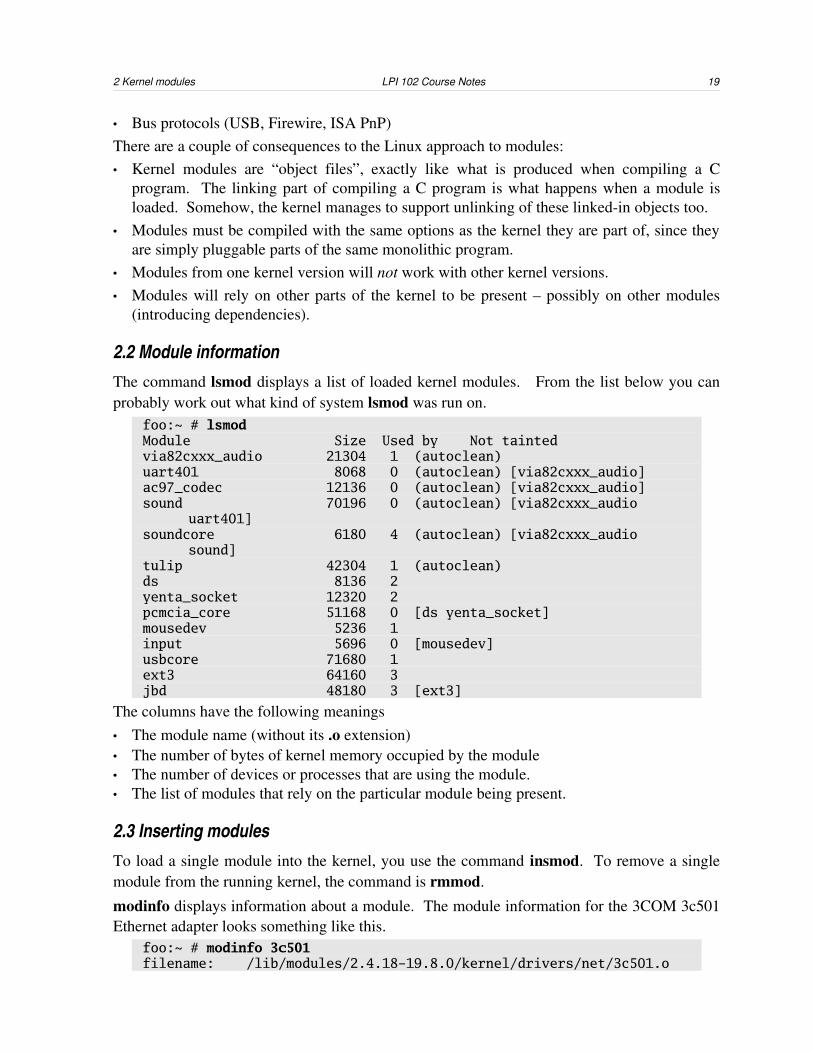
2.2 Module informationThe command lsmod displays a list of loaded kernel modules. From the list below you can probably work out what kind of system lsmod was run on.
foo:~ # lsmodModule Size Used by Not taintedvia82cxxx_audio 21304 1 (autoclean)uart401 8068 0 (autoclean) [via82cxxx_audio]ac97_codec 12136 0 (autoclean) [via82cxxx_audio]sound 70196 0 (autoclean) [via82cxxx_audio
uart401]soundcore 6180 4 (autoclean) [via82cxxx_audio
sound]tulip 42304 1 (autoclean)ds 8136 2yenta_socket 12320 2pcmcia_core 51168 0 [ds yenta_socket]mousedev 5236 1input 5696 0 [mousedev]usbcore 71680 1ext3 64160 3jbd 48180 3 [ext3]
The columns have the following meanings• The module name (without its .o extension)• The number of bytes of kernel memory occupied by the module• The number of devices or processes that are using the module.• The list of modules that rely on the particular module being present.
2.3 Inserting modulesTo load a single module into the kernel, you use the command insmod. To remove a single module from the running kernel, the command is rmmod.
modinfo displays information about a module. The module information for the 3COM 3c501 Ethernet adapter looks something like this.
foo:~ # modinfo 3c501filename: /lib/modules/2.4.18-19.8.0/kernel/drivers/net/3c501.o
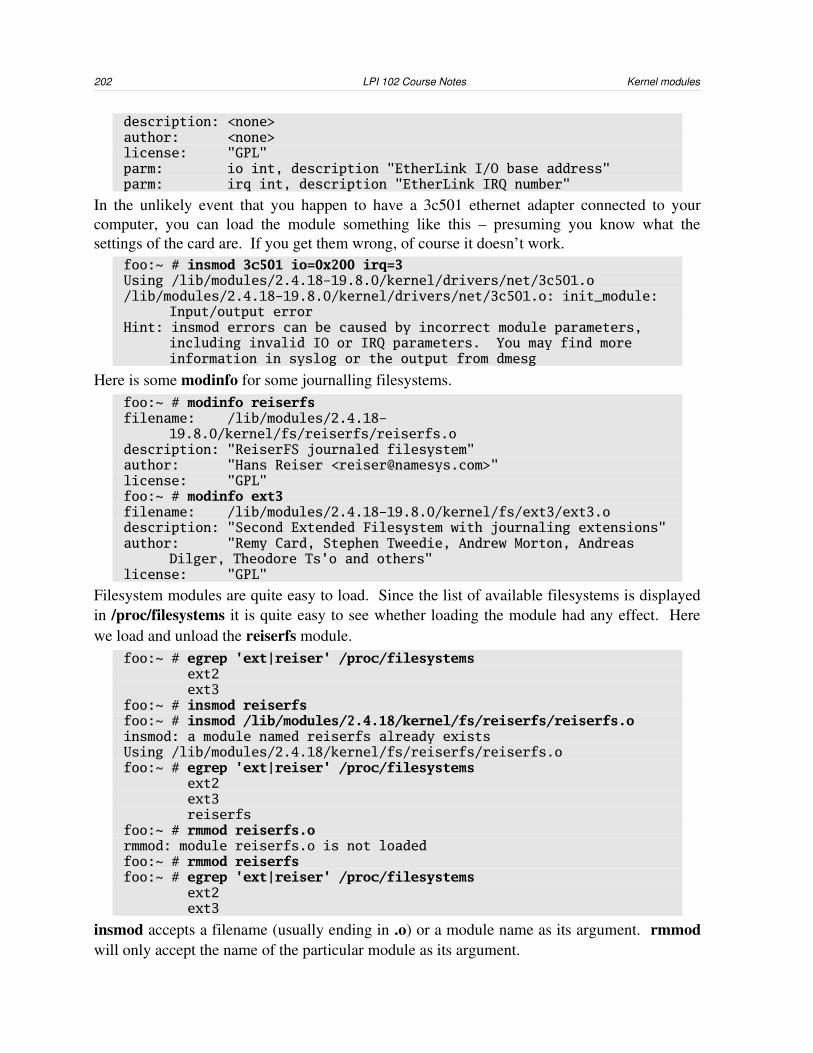
202 LPI 102 Course Notes Kernel modules
description: <none>author: <none>license: "GPL"parm: io int, description "EtherLink I/O base address"parm: irq int, description "EtherLink IRQ number"
In the unlikely event that you happen to have a 3c501 ethernet adapter connected to your computer, you can load the module something like this – presuming you know what the settings of the card are. If you get them wrong, of course it doesn’t work.
foo:~ # insmod 3c501 io=0x200 irq=3Using /lib/modules/2.4.18-19.8.0/kernel/drivers/net/3c501.o/lib/modules/2.4.18-19.8.0/kernel/drivers/net/3c501.o: init_module:
Input/output errorHint: insmod errors can be caused by incorrect module parameters,
including invalid IO or IRQ parameters. You may find more information in syslog or the output from dmesg
Here is some modinfo for some journalling filesystems.foo:~ # modinfo reiserfsfilename: /lib/modules/2.4.18-
19.8.0/kernel/fs/reiserfs/reiserfs.odescription: "ReiserFS journaled filesystem"author: "Hans Reiser <[email protected]>"license: "GPL"foo:~ # modinfo ext3filename: /lib/modules/2.4.18-19.8.0/kernel/fs/ext3/ext3.odescription: "Second Extended Filesystem with journaling extensions"author: "Remy Card, Stephen Tweedie, Andrew Morton, Andreas
Dilger, Theodore Ts'o and others"license: "GPL"
Filesystem modules are quite easy to load. Since the list of available filesystems is displayed in /proc/filesystems it is quite easy to see whether loading the module had any effect. Here we load and unload the reiserfs module.
foo:~ # egrep 'ext|reiser' /proc/filesystems ext2 ext3foo:~ # insmod reiserfsfoo:~ # insmod /lib/modules/2.4.18/kernel/fs/reiserfs/reiserfs.oinsmod: a module named reiserfs already existsUsing /lib/modules/2.4.18/kernel/fs/reiserfs/reiserfs.ofoo:~ # egrep 'ext|reiser' /proc/filesystems ext2 ext3 reiserfsfoo:~ # rmmod reiserfs.ormmod: module reiserfs.o is not loadedfoo:~ # rmmod reiserfsfoo:~ # egrep 'ext|reiser' /proc/filesystems ext2 ext3
insmod accepts a filename (usually ending in .o) or a module name as its argument. rmmod will only accept the name of the particular module as its argument.
2 Kernel modules LPI 102 Course Notes 21
insmod is limited in that it does not handle module dependencies. If a module requires another module in order to be loaded, insmod will simply refuse to load it. In order to automatically load the required modules you require modprobe together with depmod and modules.conf.
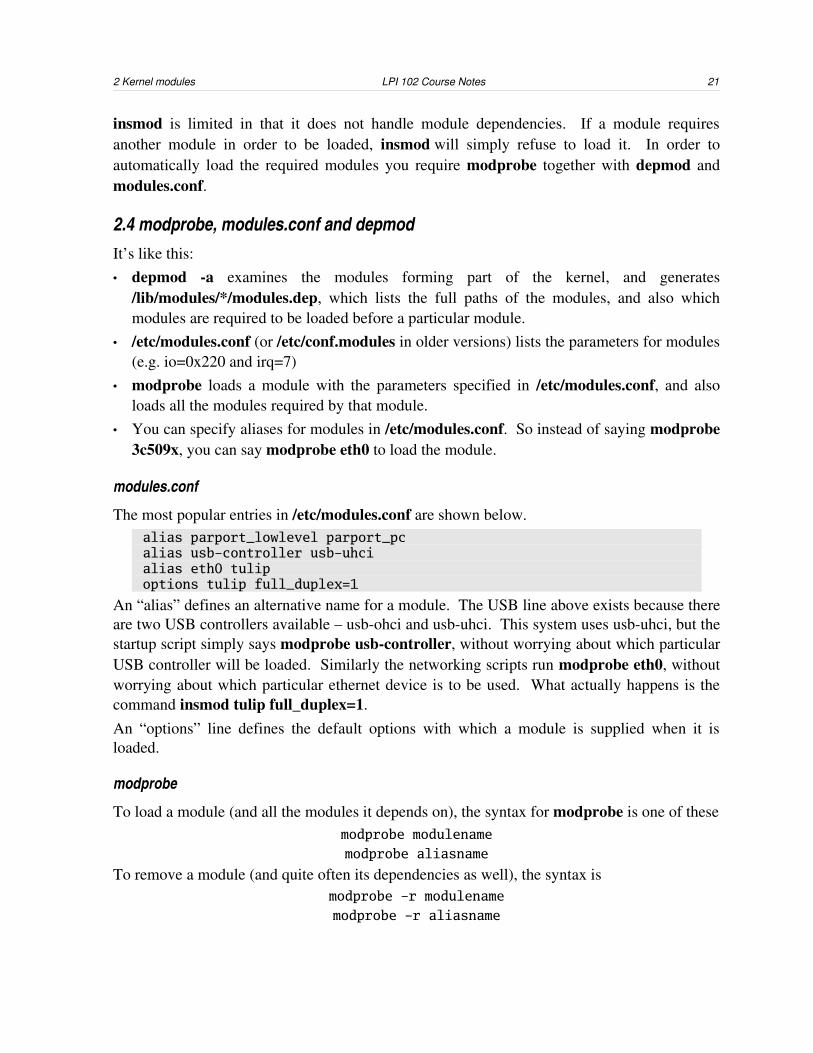
2.4 modprobe, modules.conf and depmodIt’s like this:• depmod a examines the modules forming part of the kernel, and generates
/lib/modules/*/modules.dep, which lists the full paths of the modules, and also which modules are required to be loaded before a particular module.
• /etc/modules.conf (or /etc/conf.modules in older versions) lists the parameters for modules (e.g. io=0x220 and irq=7)
• modprobe loads a module with the parameters specified in /etc/modules.conf, and also loads all the modules required by that module.
• You can specify aliases for modules in /etc/modules.conf. So instead of saying modprobe 3c509x, you can say modprobe eth0 to load the module.
modules.conf
The most popular entries in /etc/modules.conf are shown below.alias parport_lowlevel parport_pcalias usb-controller usb-uhcialias eth0 tulipoptions tulip full_duplex=1
An “alias” defines an alternative name for a module. The USB line above exists because there are two USB controllers available – usbohci and usbuhci. This system uses usbuhci, but the startup script simply says modprobe usbcontroller, without worrying about which particular USB controller will be loaded. Similarly the networking scripts run modprobe eth0, without worrying about which particular ethernet device is to be used. What actually happens is the command insmod tulip full_duplex=1.An “options” line defines the default options with which a module is supplied when it is loaded.
modprobe
To load a module (and all the modules it depends on), the syntax for modprobe is one of thesemodprobe modulename
modprobe aliasname
To remove a module (and quite often its dependencies as well), the syntax ismodprobe -r modulename
modprobe -r aliasname
222 LPI 102 Course Notes Kernel modules
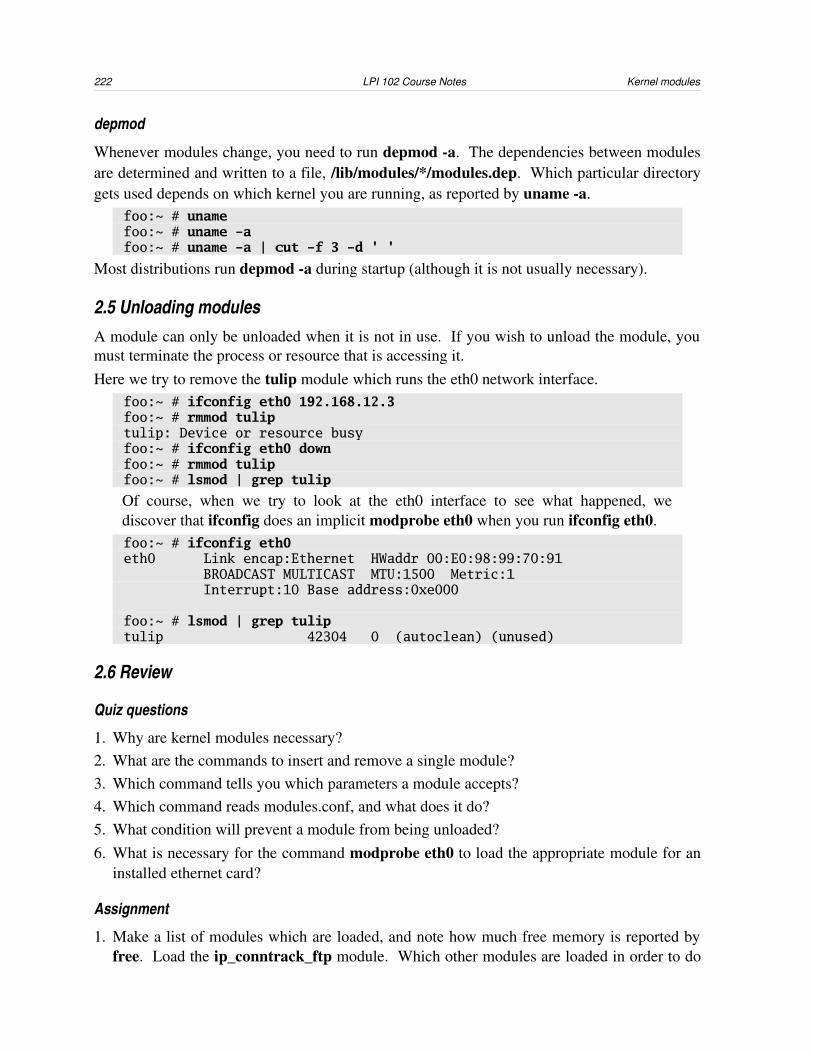
depmod
Whenever modules change, you need to run depmod a. The dependencies between modules are determined and written to a file, /lib/modules/*/modules.dep. Which particular directory gets used depends on which kernel you are running, as reported by uname a.
foo:~ # unamefoo:~ # uname -afoo:~ # uname -a | cut -f 3 -d ' '
Most distributions run depmod a during startup (although it is not usually necessary).
2.5 Unloading modulesA module can only be unloaded when it is not in use. If you wish to unload the module, you must terminate the process or resource that is accessing it. Here we try to remove the tulip module which runs the eth0 network interface.
foo:~ # ifconfig eth0 192.168.12.3foo:~ # rmmod tuliptulip: Device or resource busyfoo:~ # ifconfig eth0 downfoo:~ # rmmod tulipfoo:~ # lsmod | grep tulip
Of course, when we try to look at the eth0 interface to see what happened, we discover that ifconfig does an implicit modprobe eth0 when you run ifconfig eth0.foo:~ # ifconfig eth0eth0 Link encap:Ethernet HWaddr 00:E0:98:99:70:91 BROADCAST MULTICAST MTU:1500 Metric:1 Interrupt:10 Base address:0xe000
foo:~ # lsmod | grep tuliptulip 42304 0 (autoclean) (unused)
2.6 Review
Quiz questions
1. Why are kernel modules necessary?2. What are the commands to insert and remove a single module?3. Which command tells you which parameters a module accepts?4. Which command reads modules.conf, and what does it do?5. What condition will prevent a module from being unloaded?6. What is necessary for the command modprobe eth0 to load the appropriate module for an
installed ethernet card?
Assignment
1. Make a list of modules which are loaded, and note how much free memory is reported by free. Load the ip_conntrack_ftp module. Which other modules are loaded in order to do

2 Kernel modules LPI 102 Course Notes 23
this? Make a list of the configurable parameters that these modules accept. Remove the ip_conntrack_ftp module and all the other modules you loaded. How much memory is now reported free?
2. Make a list of all the kernel modules which can be loaded on your system (not those available for loading, but those which can be loaded). How does loading these modules affect the free memory on your system as reported by free?
Answers to quiz questions
1. Expanding the capabilities of the kernel once it is already running.2. inmod and rmmod. modprobe and modprobe r may affect multiple modules.
3. modinfo4. modprobe and depmod. depmod a creates modules.dep in the modules directory.5. Modules which are in use cannot be unloaded.6. An entry in modules.conf saying “alias eth0 e100” (specifying the appropriate module).
You may have to run depmod a as well,.

243 LPI 102 Course Notes Rebuilding the kernel
3 Rebuilding the kernel“I tell you the truth, unless a kernel of wheat falls to the ground and dies, it remains only a single seed. But if it dies, it produces many seeds.”
– Jesus, John 12:24
LPIC topic 1.105.2 — Reconfigure, build, and install a custom kernel and kernel modules [3]Weight: 3Objectives
Candidates should be able to customize, build, and install a kernel and kernel loadable modules from source This objective includes customizing the current kernel configuration, building a new kernel, and building kernel modules as appropriate. It also includes installing the new kernel as well as any modules, and ensuring that the boot manager can locate the new kernel and associated files (generally located under /boot, see objective 1.102.2 for more details about boot manager configuration).
Key files, terms and utilities include/usr/src/linux/* The Linux kernel source directory/usr/src/linux/.config Your options for compiling the kernel (modules and features)/lib/modules/kernelversion/* Where modules get installed/boot/* Where the kernel gets installedmake Make output files up to date with source filesmake targets: Things that you use as arguments to make• config Console mode configuration editing .config• menuconfig ncurses mode configuration editing .config• xconfig Graphical configuration editing .config• oldconfig Like make config, but ask only about new features• modules Compile binary modules• install Install the kernel image in /boot for booting• modules_install Install kernel modules in /lib/modules/*/• depmod (not a make target, but needed after installing modules)
3.1 The kernelThe kernel is the core of the operating system. It is the first “process” to start and provides many of the services required by other software “user land” applications.The kernel facilitates four basic types of services:1. creation and management of processes,2. the filesystem/s,3. communication with hardware, and

3 Rebuilding the kernel LPI 102 Course Notes 25
4. a means to start the systemThe kernel provides these facilities in two broad functional groups, these are the autonomous and responsive functions. Examples of autonomous functions are the allocation of memory and CPU time to processes, undertaken without any special request being directed at the kernel. The allocation of other system resources, such as the use of hardware, is usual responsive and the the requesting process never have final control over this resource. All requests against this resource are still directed through the kernel and the kernel may deny any request from a user land process. For example, a process has obtained read access to a file does not read data directly from the disk, but rather requests the kernel to read the file though a suitable function call. The kernel only complies with the request after it has determined the validity of the request. Requests directed to the kernel from processes are often called system calls and the set of services exposed by the kernel forms the kernel’s application program interface (API).Here are some examples of system calls.• fork – fork creates a copy of the parent process that differs only in process ID and parent
process ID. An example of the use of this system call is a web server where the server forks a copy of itself to deal with each new request.
• exec – exec request the kernel to replace the present process with a new process loaded from a file. The regular method of starting new processes on Linux is for the parent to fork and exec.
• kill – The kill system call requests the kernel to send a signal to another process. This is the system call implemented by the kill command line program.
• open – convert a file name into a file descriptor for reading and writing. Before any file is read or written, it is “opened”.
• read – read data from a file descriptor.• write – write data to a file descriptor.• close – close an open file descriptor.• exit – terminates the current process.The system call interface acts as an abstraction of the hardware, such that, a process does not need to know the specifics of the hardware on which it is running or how that hardware has been configured. An example of this is that all network devices look the same to a process irrespective of the underlying hardware. Similarly, all files look the same to processes, irrespective of the underlying filesystem.The kernel configures the CPU to provide insulation between processes, so that processes do not interfere with each other. It is expected of a well designed and implemented kernel that even delinquent processes will not excessively interfere with the correct functioning of other processes.
3.2 Obtaining the kernel The Linux source code is distributed from The Linux Kernel Archives at http://www.kernel.org/ Either the complete source can be downloaded, or depending on how
263 LPI 102 Course Notes Rebuilding the kernel
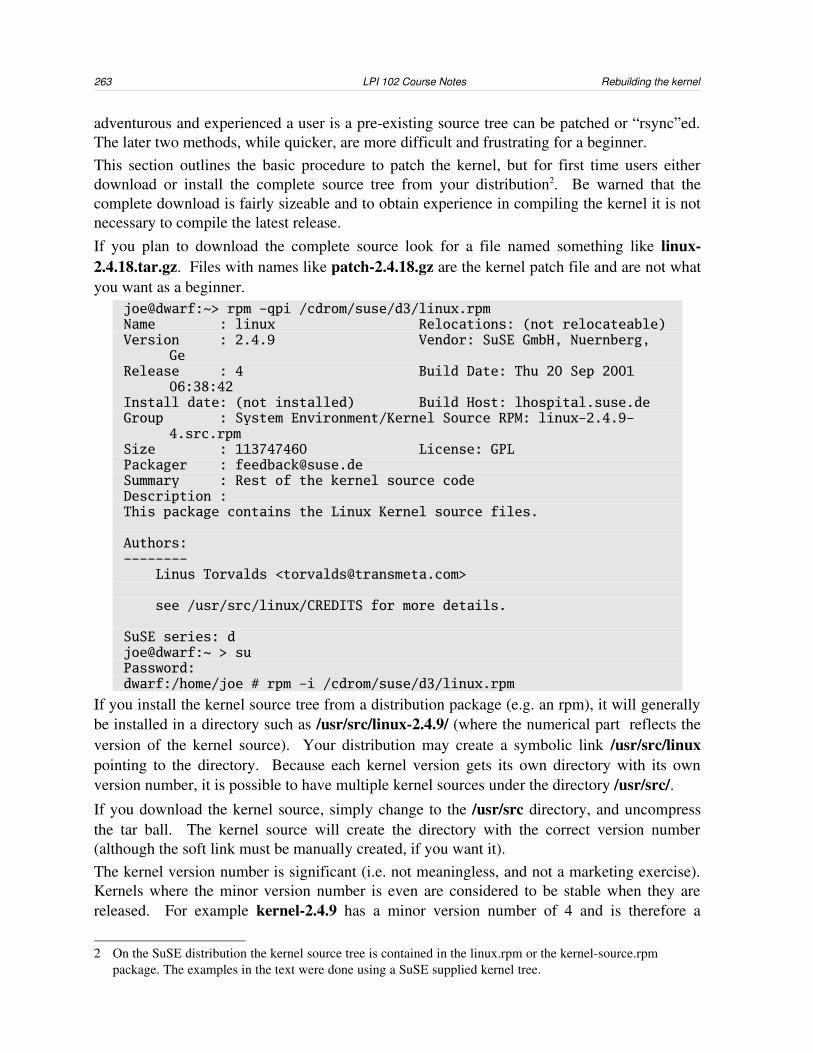
adventurous and experienced a user is a preexisting source tree can be patched or “rsync”ed. The later two methods, while quicker, are more difficult and frustrating for a beginner. This section outlines the basic procedure to patch the kernel, but for first time users either download or install the complete source tree from your distribution2. Be warned that the complete download is fairly sizeable and to obtain experience in compiling the kernel it is not necessary to compile the latest release. If you plan to download the complete source look for a file named something like linux2.4.18.tar.gz. Files with names like patch2.4.18.gz are the kernel patch file and are not what you want as a beginner.
joe@dwarf:~> rpm -qpi /cdrom/suse/d3/linux.rpmName : linux Relocations: (not relocateable)Version : 2.4.9 Vendor: SuSE GmbH, Nuernberg,
GeRelease : 4 Build Date: Thu 20 Sep 2001
06:38:42Install date: (not installed) Build Host: lhospital.suse.deGroup : System Environment/Kernel Source RPM: linux-2.4.9-
4.src.rpmSize : 113747460 License: GPLPackager : [email protected] : Rest of the kernel source codeDescription :This package contains the Linux Kernel source files.
Authors:-------- Linus Torvalds <[email protected]>
see /usr/src/linux/CREDITS for more details.
SuSE series: djoe@dwarf:~ > suPassword:dwarf:/home/joe # rpm -i /cdrom/suse/d3/linux.rpm
If you install the kernel source tree from a distribution package (e.g. an rpm), it will generally be installed in a directory such as /usr/src/linux2.4.9/ (where the numerical part reflects the version of the kernel source). Your distribution may create a symbolic link /usr/src/linux pointing to the directory. Because each kernel version gets its own directory with its own version number, it is possible to have multiple kernel sources under the directory /usr/src/.If you download the kernel source, simply change to the /usr/src directory, and uncompress the tar ball. The kernel source will create the directory with the correct version number (although the soft link must be manually created, if you want it).The kernel version number is significant (i.e. not meaningless, and not a marketing exercise). Kernels where the minor version number is even are considered to be stable when they are released. For example kernel2.4.9 has a minor version number of 4 and is therefore a
2 On the SuSE distribution the kernel source tree is contained in the linux.rpm or the kernelsource.rpm package. The examples in the text were done using a SuSE supplied kernel tree.
3 Rebuilding the kernel LPI 102 Course Notes 27
member of a stable series of kernel releases. The 9 indicates that it is the ninth member of the series, because bugs are found in the stable kernels and features are often back ported to stable kernels requiring an additional new release in the series. Kernels with odd minor version numbers, for example 2.5.xx, are the unstable or development kernel. Experimenting with almost any kernel is fairly safe, but on a production system you should use only the latest stable release of the kernel.
3.3 Kernel patchesIf you have a copy of the kernel source, you can install a series of patches to bring the source code up to date with the latest release. It is bad ideaTM to patch nonstandard kernels – the patches may already be installed, or may be in conflict with other code. Some distributions (e.g. SuSE and Mandrake) routinely ship nonstandard kernels that have nonstandard features included. If the kernel is not the standard “Linus” kernel, patches to update you to the next release are likely to fail.To patch the source do the following:1. Visit http://www.kernel.org/ and obtain the latest stable patch.2. Clean the source and backup your present source tree. If the patch fails or requires some
manual intervention, having a copy of your source tree is always nice.dwarf:/usr/src/linux # make cleandwarf:/usr/src/linux # cd ..dwarf:/usr/src # tar czf linux-2.4.9.tar.gz linux-2.4.9
Don't be tempted to use make backup in /usr/src/linux – this might not really do what you want. In particular it will destroy your configuration files.
3. To patch the kernel to the next version, you install the patch something like this (assuming that the patch is in your home directory):dwarf:/usr/src # zcat ~/patch-2.4.10.gz | patch -p0 -s
4. If there are errors, it is now your job to fix all the places that patch program failed to correctly patch a file. This is done by searching for *.rej files (rejected patches), examining their content, fixing the problem and then attempting to reapply the the rejected file as follows:dwarf:/usr/src/linux/fs # patch -p0 < rejectedFile.rej
3.4 Compiling a kernelOnce you have an installed kernel source tree, you can build it by following the following steps:1. Log in as root3 and switch to the root directory of the kernel source that compile. This is
usually cd /usr/src/linux.2. If you have previously compiled a kernel in this same directory, you need to clear out the
intermediate files to ensure that you get what you are expecting. To clean out the files, you can do one of the following.
3 Strictly, you do not have to compile the kernel as root – if you change the ownership of the kernel files, you can compile as a regular user, although make install and make modules_install will fail if you are not root.
283 LPI 102 Course Notes Rebuilding the kernel
• make distclean – This target returns the source tree to it original state, removing all intermediate files. All files generated by any of the other targets are removed, including the configuration file .config.
• make mrproper – This is almost a complete distclean except that files named *.rej, *.orig or *.bak which may have been generated by faulty patches are left untouched. If the source tree has been badly damaged as the result of the application of an inappropriate patch, then delete the source tree and reinstall it from the backup or an original.
3. Run one of the following commands to interactively choose which kernel options and modules should be compiled, and which should be omitted.dwarf:/usr/src/linux # make configdwarf:/usr/src/linux # make xconfigdwarf:/usr/src/linux # make menuconfig
Probably the easiest one to use is make menuconfig, which works in a console, and does not require X windows. All of the above commands generate a file named .config in the kernel source directory. .config is a text file which you can also edit manually.
4. Once you have configured your options, you must determine the dependencies between the various components you have enabled.dwarf:/usr/src/linux # make dep
The dep target relies on the presence of the .config file generated by make config.5. If you skipped the last step for some reason, or if you have previously compiled a kernel
with different options, you will want to remove the intermediate files:dwarf:/usr/src/linux # make clean
6. Build the kernel image that gets loaded into memory at boot time using one of the following.dwarf:/usr/src/linux # make bzImagedwarf:/usr/src/linux # make zImagedwarf:/usr/src/linux # make zlilo
The most often used one of these is bzImage.7. At this point, you have a bootable kernel image, which you could install. However, your
system would probably not work, since most systems rely heavily on loadable module support. To compile the modules and install them in /lib/modules/2.4.9 (or your particular kernel version).dwarf:/usr/src/linux # make modulesdwarf:/usr/src/linux # make modules_install
Newer versions of the kernel Makefile will automatically run depmod to compute intermodule dependencies. If your modules don’t work when you reboot, it’s because you didn’t run depmod, and you were supposed to.
8. Lastly, the new kernel image must be copied into place and lilo configured.dwarf:/usr/src/linux # cp arch/i386/boot/bzImage /boot/vmlinuzdwarf:/usr/src/linux # cp arch/i386/boot/System.map /boot/vmlinuzdwarf:/usr/src/linux # mk_initrddwarf:/usr/src/linux # lilo

3 Rebuilding the kernel LPI 102 Course Notes 29
The mk_initrd step is to ensure that your initial root disk which loads modules essential to your systems operation does exactly that.If your system is sufficiently similar to the kernel maintainer’s system, the following may install a bootable kernel.dwarf:/usr/src/linux # make install
The following section contains suggestions on how you can determine which kernel options are necessary.
General guidelines
• Keep a copy of the standard kernel which was installed with your system.• Keep a copy of a clean source tree.• Keep a copy of a working .config or you will have to going through all those menu options
again. Most distributions install a copy of the default .config in /proc/config.gz, or in /boot/config.
• After copying your .config file from its backup location, always run one of the make config commands. If you don't execute make menuconfig (or similar) then certain of the targets required for rebuilding the kernel will not be available.
3.5 Choosing options for your kernelThe number of options available when compiling the kernel is mind boggling and is also constantly changing (upwards). The best we can do in terms of describing the options is to offer suggestions as to how you can build your first kernel. Execute make menuconfig after preparing as described above. 1. The selections in menuconfig are arranged by
category, and to make good selections, you require some knowledge of the hardware you are running. Use the lsmod command to see which modules are installed on your running system, use the command lspci to see what is installed on the PCI bus, find the documentation that came with the computer or open the computer and look at the numbers on the chips on your hardware.
2. Configure only what you really need. The biggest advantage to compiling the kernel yourself is that you can remove all that bloat included with your distribution’s standard kernel – things that are included just in case. Although it does not affect performance to build every kernel module available, it will increase the amount of time it takes to get the modules built.
3. When in doubt, accept the defaults if in doubt and read the help text if you suspect the option may be necessary. You could also search at your favourite search engine for more information on the particular option, e.g. CONFIG_EXPERIMENTAL.
303 LPI 102 Course Notes Rebuilding the kernel
3.6 Review
Quiz questions
1. What is the order in which the following commands should be issued:make modulesmake modules_installmake config make installmake bzImagemake dep
2. What is the difference between a modular kernel and a static kernel?3. If you are using the lilo boot loader, what steps are necessary to ensure that the system
boots up with a newly compiled kernel?4. What is the effect in terms of performance and kernel size when you include an an
unnecessary module when compiling the kernel?
Assignment
Your company has appointed you to install their new mail and web server. It is required the a custom system be configured to perform this task where attention must be paid to removing all unnecessary options. Consider the computer that you are using to be the new company computer. To achieve better performance and security you must compile a customised kernel without using loadable modules.Download and extract the latest stable kernel source. This is a clean source tree, so just run make menuconfig.The following configuration settings are suggested. Change the configuration as needed to reflect the hardware that you have installed. Whatever you do, you should have a working bootable system at the end. The computer used is considered to be a entry level computer – IDE disks, PCI cards, ethernet networking. In the example below the kernel with be compiled with module support but it is recommend that you compile everything into the kernel on your first attempt. As an exercise later you can compile the kernel with some components as modules.Initial options• Code maturity level options – should be set to not prompt for experimental code.• Loadable module support – should be enabled.• Select the correct processor family (compare to /proc/cpuinfo). This will enable the
optimal use of that processor’s command set. Turn off Symmetric multiprocessor support (unless you really have one).
In the “General Setup” section turn everything off except for the following:• Networking support• PCI support – chances are you actually do have PCI hardware. Even if your computer has
it, supporting older ISA hardware is not necessary for your mail server.
3 Rebuilding the kernel LPI 102 Course Notes 31
• ELF executables – most programs are ELF executables on Linux.• System V IPC – chances are your mail server needs it• Sysctl support – chances are that something will fail without this.Disable the following sections entirely:• Binary emulation of other systems• Memory Technology Devices• Parallel port supportingUnder “Plug and Play configuration”, disable ISA Plug and Play support.Disable all block devices except the floppy disk and the loopback device.Disable RAID and LVMDisable Cryptography if it is included in your kernel (it’s a mail server!)Under networking enable only the following options• Packet socket – this option may not appear to be entirely necessary but it makes it possible
to run a network sniffer and debug situations where people have trouble communicating with the server.
• Unix domain sockets• TCP/IP networkingDisable telephony support.Under ATA/IDE/MFM/RLL support, enable the following options:• Enhanced IDE/MFM/RLL disk/cdrom/tape/floppy support• Include IDE/ATA2 DISK support}• Use multimode by default• Include IDE/ATAPI CDROM support – provided you have an CDROM installed.• SCSI emulation support – actually, don’t enable this – but you would if you had an IDE CD
writer on your mail server.• Generic PCI IDE chipset• Generic PCI busmaster DMA• Use PCI DMA by default when availableAlso determine the chipset installed on your motherboard and build it into the kernel, if it is treated specially. Deselect support for all the other chipsets that you are not using.Turn off support for the following:• SCSI support• Fusion MPT device support • IEEE 1394 (FireWire) support• I2O device supportUnder “Network Device Support” enable only the network card that is actually installed in your computer. Generally this device will be found under Ethernet 10/100.Turn off support for all of these:• Amateur Radio• IrDA• ISDN
323 LPI 102 Course Notes Rebuilding the kernel
• Old CDROM• Input coreUnder Character devices select these options.• Virtual terminal – this is a must – don't consider not setting this or else you will not be
using your system at all.• Console on virtual terminal – enable this, or else kernel messages will not be visible at
bootup.• Standard/generic serial support – even if you don't think that you will ever need to use the
serial ports. Serial ports on mail servers tend to attract modems and mice, and can be quite useful.
• Mice – turn on PS/2 support. This will make it possible to use gpm in console mode, which is always nice.
Turn Multimedia devices off, unless you are setting up a musical mail server.In the Filesystem support options turn the following options on:• /proc• Second extended fs support• If you have a CDROM installed also turn on ISO 9660 support and Microsoft Joliet
CDROM extensions.• Support for the filesystem which is running on your root and boot partitions.• Enable Native Language Support for the default only.In the console drivers section enable VGA text console, but no other drivers. The VGA text driver is entirely necessary if you are planning to connect a monitor to your mail server. Turn off support for –• Sound cards• USB• Kernel hackingNow that you have completely specified all the kernel options that you want exit making sure that you save your configuration. It is also a very good idea to copy the file .config to a safe place as this contains the configuration you just generated.Complete the kernel and module build. (If your kernel is compiled without modules, the last two steps are entirely redundant, of course.)
dwarf:/usr/src/linux # make depdwarf:/usr/src/linux # make cleandwarf:/usr/src/linux # make bzImagedwarf:/usr/src/linux # make modulesdwarf:/usr/src/linux # make modules_install
Finally copy the new image from arch/i386/boot/bzImage to /boot and configure lilo appropriately. As this image is one of our own it can be renamed in the copy to anything that you like which also help to make sure that you don't destroy your present working kernel.
dwarf:/usr/src/linux # cp i386/boot/bzImage /boot/viper
Edit /etc/lilo.conf (or /etc/grub.conf if your boot loader is GRUB) and add adding the lines required to provide the option to boot your new kernel.
3 Rebuilding the kernel LPI 102 Course Notes 33
Your /etc/lilo.conf may look something like this. (If it’s GRUB, you’re on your own.)boot=/dev/hdaread-onlyprompttimeout=100# End LILO global Sectionimage = /boot/viper root = /dev/hda6 label = Viperimage = /boot/vmlinuz root = /dev/hda6 label = linux
Remember to run lilo (or if it’s GRUB, remember to do nothing at all).dwarf:~ # lilo -v
Test whether all functions necessary for your mail server work correctly – you should be able to start the mail program (sendmail or postfix or similar) and connect to it from outside your own computer.If you completed the assignment without difficulty you can repeat it, but with loadable module support. Alternatively, you can experiment with configuring as many functions as possible in modules. You will discover an interesting and valuable truth if you make your root filesystem’s filesystem type a module. Once you have discovered this truth, make an appropriate initial root disk using mkinitrd.
Answers to quiz questions
1. This ordermake config make depmake bzImagemake modulesmake modules_installmake install
2. A modular kernel allows you to load additional capabilities into the running kernel. A static kernel has only the capabilities included at compiletime.
3. If there is an entry in lilo.conf pointing to your new kernel, you must also run lilo.4. Compiling additional modules takes time, but does not affect the performance of the
running kernel. The kernel size is unaffected, unless you choose to load the additional modules.
344 LPI 102 Course Notes Booting Linux
4 Booting Linux“Repeated reboots of the system failed to solve the problem...”
– /usr/share/games/fortune/bofhexcuses
LPIC topic 1.106.1 — Boot the system [3]Weight: 3Objective
Candidates should be able to guide the system through the booting process. This includes giving commands to the boot loader and giving options to the kernel at boot time, and checking the events in the log files.
Key files, terms, and utilities includedmesg Show kernel message buffer/var/log/messages All messages/etc/conf.modules or /etc/modules.conf Aliases and configuration for modprobeLILO Linux loaderGRUB Grand Unified Boot Loader
4.1 Kernel boot parametersLILO and GRUB both allow you to edit the command line that is passed to the kernel when it boots. Kernel boot parameters are used to override the hardware configuration parameters that would be detected by the kernel.The parameters supplied to the kernel as it boots are a single word, or in the format name=value, or name=value1,value2,value3. Each name identifies which part of the kernel receives the option. The default kernel command line specifies the root filesystem, and often specifies ro, meaning that the root filesystem should be mounted readonly.
foo:~ $ cat /proc/cmdlinero root=/dev/hda1 apm=off
The bootparam(7) man page discusses the boot parameters in some detail, and the file /usr/src/linux/Documentation/kernelparameters.txt is the more complete reference.
% man bootparam% less /usr/src/linux/Documentation/kernel-parameters.txt
Kernel command line parameters which are not used by the kernel are passed to the init process (usually /sbin/init). The following parameters can be used:
• single – boot into single user mode (usually requiring the root password)• emergency – boot into a shell (but newer versions of init require the root password)• 1, 2, 3, 4, 5, 6 – boot into a specific runlevel. that were not picked up by the kernel and were not interpreted as environment variables are then passed onto process one, which is usually the init program. The most common argument that

4 Booting Linux LPI 102 Course Notes 35
is passed to the init process is the word `single' which instructs init to boot the computer in single user mode, and not launch all the usual daemons. Check the manual page for the version of init installed on your system to see what arguments it accepts.The following boot parameters are quite useful. • root=/dev/hda1 – change the root filesystem during bootup.
• init=/sbin/init – by default, after the kernel boots up, it will run /sbin/init. If you want to run something different, you can. A common troubleshooting parameter is init=/bin/bash which runs an interactive shell instead of /sbin/init.
• mem=32M – limit the amount of memory to the amount specified. The kernel does not attempt to check if this corresponds with the amount of memory actually present in the machine. You will use the mem parameter when the kernel. mem=nopentium specifies that the kernel should not use 4Mb page tables for allocating memory
• noinitrd – don't execute /linuxrc on the initial root disk image supplied by the boot loader. The initial root disk will usually load modules required for booting (e.g. filesystem support). There will be times when you want to avoid this behaviour.
Various devices can be configured with IO and IRQ settings if they are compiled into the kernel. The most common format is
device=irq,iobase
so if you have a AHA152x SCSI controller (in your ISA bus), you may specify its settings like this
aha152x=0x340,11
The vga=value parameter changes the display mode of a VGA adapter – usually to a higher resolution graphics mode. This parameter is actually handled by the boot loader, rather than by the kernel. Here is a table of the VESA graphics modes that will enable you to experiment with your BIOS's graphics support.
Color depth 640x480 800x600 1024x768 1280x1024
8 bits – 256 colours 769 771 773 775
15 bits – 32768 colours 784 787 790 793
16 bits – 65535 colours 785 788 791 794
24 bits – 16.7 Million colours 786 789 792 795
The rdev command (and the commands related to it) can be used to modify a kernel image so that it does not require boot time options for any of these –• root device (rdev /boot/vmlinuz "/dev/hda7 ")• VGA video mode (vidmode /boot/vmlinuz "788")• Read only vs. readwrite root filesystem (rootflags ...)
364 LPI 102 Course Notes Booting Linux
4.2 LILOLILO (LInux LOader) is a basic system program which boots your Linux system. LILO loads the Linux kernel from a floppy or a hard drive, boots the kernel and passes control of the system to the kernel. LILO can also boot other operating systems. The installation of LILO is covered in the LPIC 101 course. To control booting using LILO, you have to interrupt the boot up process using one or all of the following techniques.• Press Shift – to obtain a prompt, you have to press Shift before LILO begins booting if
there is no timeout specified in lilo.conf. • Enter a password – lilo.conf can specify that a password must be entered in order to change
the boot parameters.LILO allows you to configure the boot sequence in the following ways:• Select a kernel to boot or a boot image to load – either by typing it's name (press Tab to see
a list), or by selecting it from a menu.• Add options to the kernel command line (you can't remove option that are already there)LILO can look like this at times.
LILO: linux root=/dev/fd0 rw init=/bin/bash
4.3 GRUBGRUB (Grand Unified Boot Loader) is a boot loader capable of booting into most free operating systems – Linux, FreeBSD, NetBSD, GNU Mach, and others as well as most commercial operating systems. With GRUB it is possible to boot a system provided you know the parameters you want to pass to the kernel and the location of the kernel image (and, of course the initrd image).Because of GRUB's emphasis on being cross platform, it does not follow the Linux convention on hard disk and partition naming. GRUB disks and partitions are numbered according to the BIOS –• (fd0) – /dev/fd0• (hd0) – /dev/hda (usually, otherwise the first SCSI disk)• (hd0,1) – /dev/hda2 (the second partition of the first disk)
To boot Linux, it is required that GRUB know where its files are (root), where the kernel is found (kernel), and (usually) where the initial root disk is (initrd), containing vital system modules (e.g. for a filesystem or a SCSI controller). The boot command tells GRUB to boot.
root (hd0,0) # source of grub files is /dev/hda1
kernel /boot/vmlinuz root=/dev/hda1 # load a kernelinitrd /boot/initrd # load an initial root diskboot # boot up
These commands usually appear in /etc/grub.conf, but they can be typed in when the system boots. Newer versions of GRUB print helpful menus, but you may need to know the following keypresses:
4 Booting Linux LPI 102 Course Notes 37
• p – enter a password• c – start the GRUB command line (type GRUB configuration yourself)• e – edit a GRUB configuration line line• a – modify kernel arguments before booting• o – open a new line for configuration commands• d – remove the selected line from the configuration• b – boot the system• Escape – return to the menuThe commands to boot another operating system (e.g. DOS) which has its boot loader at the start of a partition are these (although this is not part of the LPIC requirements).
rootnoverify (hd0,0) # /dev/hda1makeactive # modify the partition tableschainloader +1 # use the chain loaderboot # boot now
4.4 Boot messagesWhen the Linux kernel boots, each subsystem is initialised in a predetermined order. The messages generated by each subsystem are generally displayed on the console. The messages are recorded in two places in addition to this. • The kernel message buffer – the kernel keeps 16k of messages, which can be displayed by
the dmesg command.
• The syslogd records kernel messages to /var/log/messages. These are also timestamped.% dmesg% less /var/log/messages% tail -f /var/log/messages
4.5 Review
Quiz questions
1. How does one select the kernel to load in LILO?2. How does one modify the kernel boot parameters in LILO?3. How does one select the kernel to load in GRUB?4. How does one modify the kernel boot parameters in GRUB?5. What is the difference between LILO and GRUB?6. What resources allow you to debug the booting process?7. Which log file is relevant to the booting process?8. Which kernel parameter allows you to boot with an interactive shell?
Assignments
1. Boot your system with /bin/bash instead of /sbin/init. Change your root password using passwd.mount / -o remount,rw # make root disk writeable

384 LPI 102 Course Notes Booting Linux
mount -a # mount other partitions, like /procpasswd # change the root passwordumount -a # unmount other partitionsmount / -o remount,ro # mount again read-only, as expected by
initecho $$ # B.T.W. what's the PID of /sbin/init?exec /sbin/init # boot the system
2. See how syslog is configured on your system by examining /etc/syslog.conf. Make a list of the log files that may contain information generated during the boot process.
3. Read the log files generated during booting and find out what the first logged message is when you boot up.
4. Install GRUB on a floppy, but without a configuration file.mv /etc/grub.conf /etc/grub.conf.crashmysystemgrub-install /dev/fd0
Now boot your system using the floppy disk, and pass the appropriate root, kernel, initrd parameters to GRUB. Make notes on how you did this.
Answers to quiz questions
1. Either the first kernel is loaded, or the one marked as default, or the one entered on the command line during booting.
2. Choose an image and type any additional kernel parameters after the image name.3. The default keyword selects the entry that is used. You can select the entry name, or
modify the “kernel” line when booting.4. You edit the commands which will be run, or manually enter the commands as they would
appear in the configuration file.5. LILO relies on the position of files on the disk, while GRUB understands various
filesystems, and dynamically locates the kernel.6. Kernel boot messages (dmesg) and syslog boot messages. You can also press Shift+PgUp.
7. /var/log/messages8. “init=/bin/bash” or “single” or “1”.

5 Change runlevels LPI 102 Course Notes 39
5 Change runlevelsWee Willie Winkie runs through the town,Upstairs and downstairs in his nightgown,Rapping at the window, crying through the lock,“Are the children in their beds, for now it's eight o'clock?”
– Mother Goose, on runlevels
LPIC topic 1.106.2 — Change runlevels and shutdown or reboot system [3]Weight: 3Objective
Candidates should be able to manage the runlevel of the system. This objective includes changing to single user mode, shutdown or rebooting the system. Candidates should be able to alert users before switching runlevel, and properly terminate processes. This objective also includes setting the default runlevel.
Key files, terms, and utilities includeshutdown Schedule a shutdown (maybe reboot too)init init initialised everything/etc/inittab inittab configures init
5.1 init and telinitinit runs all the processes that run on your Linux system. The collection of processes started by init is the runlevel, and each runlevel corresponds to the scripts /etc/rc.d/rc?.d/S* (with the ? replaced by a number from 0 to 6).
When you change the runlevel, init runs a script which stops all the extra processes in the current runlevel, and starts the required processes from the new runlevel. To see the current and previous runlevel, the command is runlevel.
linux:~ # runlevelN 5linux:~ # init 3linux:~ # tail -1 /var/log/messagesJun 2 09:55:08 linux init: Switching to runlevel: 3linux:~ # runlevel5 3linux:~ # ps -C kdm PID TTY TIME CMD
The effect of changing to runlevel 3, was to stop kdm (which was running). When we change back to runlevel 5, kdm is started.linux:~ # init 5linux:~ # ps -C kdm PID TTY TIME CMD 2991 ? 00:00:00 kdm 2995 ? 00:00:00 kdm
405 LPI 102 Course Notes Change runlevels
5.2 shutdownshutdown is for shutting down your system.
linux:~ # shutdownUsage: shutdown [-akrhfnc] [-t secs] time [warning message] -a: use /etc/shutdown.allow -k: don't really shutdown, only warn. -r: reboot after shutdown. -h: halt after shutdown. -z: shutdown using software suspend. -f: do a 'fast' reboot (skip fsck). -F: Force fsck on reboot. -n: do not go through "init" but go down real
fast. -c: cancel a running shutdown. -t secs: delay between warning and kill signal. ** the "time" argument is mandatory! (try "now") **
The reason to use shutdown, rather than init 6 to reboot or init 0 is so that the shutdown can happen at a time determined by the administrator.
linux:~ # dateMon Jun 2 10:12:49 SAST 2003linux:~ # shutdown -r -t 10 10:14 # reboot at 10:14 AMBroadcast message from root (pts/0) (Mon Jun 2 10:13:02 2003):The system is going DOWN for reboot in 1 minute!
<Press Ctrl+C to kill shutdownShutdown cancelled.linux:~ # shutdown -r -t 10 10:14Broadcast message from root (pts/0) (Mon Jun 2 10:13:11 2003):The system is going DOWN for reboot in 1 minute!
A little bit later...Broadcast message from root (pts/0) (Mon Jun 2 10:14:11 2003):The system is going down for reboot NOW!
At this point, shutdown exits, but the current runlevel has changed to 6, as if telinit t 10 6 had been run (which is more or less what happened). At this point, the system is busy shutting down. (Hey, you can reboot a system when logged in remotely!)linux:~ # runlevel5 6linux:~ # Read from remote host 192.168.1.191: Connection reset by
peerConnection to 192.168.1.191 closed.
5.3 inittabWhen /sbin/init is started by the kernel, it reads /etc/inittab to determine the startup sequence. These are the lines that determine the startup behaviour of your system.
The initdefault specification specifies the default runlevel at startup (unless overridden by kernel parameters). Remember that the meaning of runlevels is not uniform between distributions.# 0 - halt

5 Change runlevels LPI 102 Course Notes 41
# 1 - Single user mode (for maintenance, e.g. reiserfsck)# 2 - Multiuser, without NFS# 3 - Full multiuser mode# 4 - unused# 5 - X11# 6 - reboot (Do NOT set initdefault to this)id:5:initdefault:
Before thinking about runlevels, init runs the sysinit script.# System initialization.si::sysinit:/etc/rc.d/rc.sysinit
For the actual runlevel which is chosen, a script is run – in this case /etc/rc.d/rc 5.l0:0:wait:/etc/rc.d/rc 0l1:1:wait:/etc/rc.d/rc 1l2:2:wait:/etc/rc.d/rc 2l3:3:wait:/etc/rc.d/rc 3l4:4:wait:/etc/rc.d/rc 4l5:5:wait:/etc/rc.d/rc 5l6:6:wait:/etc/rc.d/rc 6
And when you are in runlevel 2 ,3 , 4 and 5, init makes sure that the following programs are always running (mingetty handles terminal login, and mgetty handles modem dialin access.)1:2345:respawn:/sbin/mingetty --noclear tty12:2345:respawn:/sbin/mingetty tty23:2345:respawn:/sbin/mingetty tty34:2345:respawn:/sbin/mingetty tty45:2345:respawn:/sbin/mingetty tty56:2345:respawn:/sbin/mingetty tty6s0:2345:respawn:/sbin/mgetty -x 3 ttyS0
5.4 Review
Quiz questions
1. How do you schedule a reboot in one hour from now?2. Which parameter in which file changes the default runlevel of your system?3. What is the purpose of single user mode?4. What mechanism is used to alert users of an impending shutdown?5. How does init terminate processes (i.e. which signals)?
Assignments
1. Switch to single user mode and modify your root password. Check which processes are running in single user mode. After this switch to multiuser mode again.
2. Schedule a shutdown which will occur in 1 minute. Once the shutdown has started, cancel it. Observe the effect that this has on a) a user who is logged in at a console b)a user who is logged in using X
425 LPI 102 Course Notes Change runlevels
c) a user who is logged in using ssh or telnet 3. Configure your system with a different default runlevel (e.g. boot multiuser without X).
Document the steps you took to do this.
Answers to quiz questions
1. Using shutdown (or at if you care to).
2. initdefault in /etc/inittab3. System maintenance without interference by other users and programs4. Console broadcast5. First TERM (polite) then KILL (forced)

6 Print queues LPI 102 Course Notes 43
6 Print queuesLine printer paper is strongest at the perforations.
LPIC topic 1.107.2 — Manage printers and print queues [1]Weight: 1Objective
The candidate should be able to manage print queues and user print jobs. This objective includes monitoring print server and user print queues and troubleshooting general printing problems.
Key files, terms, and utilities includelpc line printer controllpq show the line printer queuelprm remove jobs from the line printer queuelpr line printer submit a job/etc/printcap lpd configuration file
6.1 lpd, lpr, lpq and lprmOriginally, most printing on Unix systems was done with line printers. The “lp” of “line printer”' has survived into the new millennium, even though it is now rather difficult to get access to a genuine line printer. The unix printing system consists of a few components:lpd – lpd is the queue manager. It sits patiently in the background waiting for someone to want something printed. Print jobs that are submitted to lpd are queued, and printed in more or less the order in which they were requested. lpd is configured by the file /etc/printcap, which names the printers connected to the machine, and describes the filters and parameters for each printer.lpr – lpr is used to add jobs to the printer queue. The standard method of printing a postscript file is the command lpr. If you have a second printer named lp1, you can print to it with lpr P lp1.
lpr filename.pslpr -P lp1 filename.ps
lpq, lprm – these commands are used to control the print queue. lpq displays a list of jobs for the default printer, and lpq P lp1 will display the list for a printer named jerry. lprm will remove a print job from the queue. It is possible to remove a job based on its job id, or alternatively, to remove all jobs for a user.
foo:~ $ lpq -P lp1lp1 is readyno entriesfoo:~ $ lpr -P lp1 < /etc/passwdfoo:~ $ lpq -P lp1
446 LPI 102 Course Notes Print queues
lp1 is ready and printingRank Owner Job File(s) Total Sizeactive donaldd 1214 (stdin) 2048 bytesfoo:~ $ lpr -P lp1 < /etc/passwdfoo:~ $ lpr -P lp1 < /etc/passwdfoo:~ $ lpq -P lp1lp1 is ready and printingRank Owner Job File(s) Total Sizeactive donaldd 1214 (stdin) 2048 bytes1st donaldd 1215 (stdin) 2048 bytes2nd donaldd 1216 (stdin) 2048 bytesfoo:~ $ lprm -P lp1 1216 1215foo:~ $ lpq -P lp1lp1 is ready and printingRank Owner Job File(s) Total Sizeactive donaldd 1214 (stdin) 2048 bytesfoo:~ $ lprm -P lp1 1214foo:~ $ lpq -P lp1lp1 is readyno entries
lpc – the lpc command provides a mechanism to talk the lpd process while it is running. In some implementations, lpc can be used to adjust the priority of messages, and to restart the print system. The most common use of lpc is to show the status of all printers.
# lpc help # your lpc may have more
Commands may be abbreviated. Commands are:
exit help quit status ?# lpc statuslp0: printer is on device 'parallel' speed -1 queuing is enabled printing is enabled no entries daemon presentlp1: printer is on device 'lpd' speed -1 queuing is enabled printing is enabled no entries daemon present# lpc restart # hit lpd with a big hammer# lpc topq # make a job jump the queue
6.2 TroubleshootingMy job does not print –• Check if it is in the print queue at all using lpq a. It may be in the wrong printer queue.• Check for additional information on the status of the printer using lpc status• The most common cause of printing problems is that printer is not accepting data (e.g. it is
turned off, or it has no paper, or its buffer is full.)

6 Print queues LPI 102 Course Notes 45
The printer is spewing gobbledegook –• Remove the offending job from the queue using lprm.• You generally cannot interrupt a job for which printing has already begun without
repercussions. Since the computer does not know that the printer has lost power or that the data in its buffer has been reset, it continues to send the job to the printer. To see if any process is sending stuff to the printer use lsof /dev/lp0. Usually this will be cat, or a process named parallel for CUPS.
And if you get a problem not described here, then read the system log files.
6.3 Review
Quiz questions
1. Which command line parameter to lpr, lpq and lprm specifies the printer to be used?2. How do you determine which printers are attached to a system?3. Which command shows a list of print jobs to be printed?4. When can a print job be stopped with lprm?
Assignments
1. Unplug your printer cable, and then print /etc/passwd multiple times using a2ps (you may print something else if you choose). List the jobs in the print queue. Remove all the jobs from the queue, and then plug in the printer cable again. What processes are running and which are accessing the parallel port? How does your implementation of lpd spool jobs to the printer? What happens if you power off the printer during printing or data transfer and later power it up again? How do you handle the problem? Hint: lsof /dev/lp0 lists programs accessing the printer.
2. Install two different lpr implementations and compare their behaviour when printing to a locally connected printer. Choose from the classic lpr, lprng (LPR next generation) and CUPS (Common Unix Printing System).
Answers to quiz questions
1. Pprintername (without a space for some versions of lpr)
2. lpc status3. lpq Pprintername4. A print job can be removed if printing has not already started.
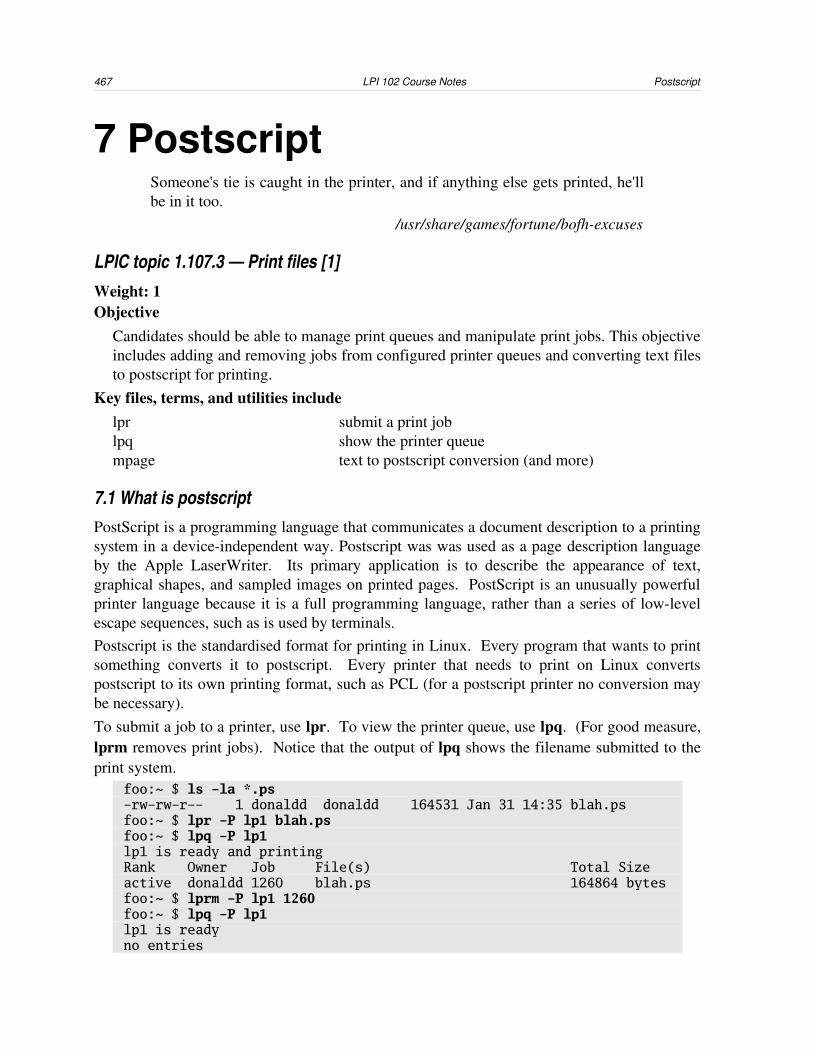
467 LPI 102 Course Notes Postscript
7 PostscriptSomeone's tie is caught in the printer, and if anything else gets printed, he'll be in it too.
/usr/share/games/fortune/bofhexcuses
LPIC topic 1.107.3 — Print files [1]Weight: 1Objective
Candidates should be able to manage print queues and manipulate print jobs. This objective includes adding and removing jobs from configured printer queues and converting text files to postscript for printing.
Key files, terms, and utilities includelpr submit a print joblpq show the printer queuempage text to postscript conversion (and more)
7.1 What is postscriptPostScript is a programming language that communicates a document description to a printing system in a deviceindependent way. Postscript was was used as a page description language by the Apple LaserWriter. Its primary application is to describe the appearance of text, graphical shapes, and sampled images on printed pages. PostScript is an unusually powerful printer language because it is a full programming language, rather than a series of lowlevel escape sequences, such as is used by terminals. Postscript is the standardised format for printing in Linux. Every program that wants to print something converts it to postscript. Every printer that needs to print on Linux converts postscript to its own printing format, such as PCL (for a postscript printer no conversion may be necessary). To submit a job to a printer, use lpr. To view the printer queue, use lpq. (For good measure, lprm removes print jobs). Notice that the output of lpq shows the filename submitted to the print system.
foo:~ $ ls -la *.ps-rw-rw-r-- 1 donaldd donaldd 164531 Jan 31 14:35 blah.psfoo:~ $ lpr -P lp1 blah.psfoo:~ $ lpq -P lp1lp1 is ready and printingRank Owner Job File(s) Total Sizeactive donaldd 1260 blah.ps 164864 bytesfoo:~ $ lprm -P lp1 1260foo:~ $ lpq -P lp1lp1 is readyno entries

7 Postscript LPI 102 Course Notes 47
7.2 mpageIf you send ASCII text straight to your printer, it will probably print, but will use a lot of paper. It will also print the text against the left margin, in the default font. mpage converts ASCII text to multiple pages of postscript, organising it into columns and fitting many pages onto a single sheet (in smaller type). You can also change the font and other important details.
mpage x shows the default values for the various settings in brackets. In the example below, mpage generates 4 pages per sheet, in the updown layout, and formats the output for “Letter” size paper (rather than A4 or something similar).foo:~ $ mpage -x mpage - print multiple pages on postscript, version 2.5.2pre August
1999
mpage [-1248acEfHlkoOrRStvxX] [-b papersize] [-Btextboxmargin] [-C [encodingfile]] [-da|p] [-D dateformat] [-F fontname] [-h header] [-I indent] [-j pagespec] [-L lines] [-msheetmargin] [-Mpagemargin] [-p[prprog]] [-P[printer]] [-s tabstop] [-W width] [-X [header]] [-z printcmd] [-Z
quearg] [file...]]
-1, -2, -4, -8 Pages per sheet (4) -D strftime format for date specs
-da Force ascii input format -dp Force postscript input format
-a Toggle across/updown layout (u) -l Toggle portrait/landscape (p)
-f Toggle folding long lines (off) -o Toggle printing outlines (on)
-r Reverse printing, last->first sheet -v Toggle verbose output, (on)
-F Text font to be used (Courier) -C Character encoding filename
-E Print every second and third page -O Print every 1st and 4th
page -s Define tabstop width (8) -k kill on %TRailer is PS
file -b papersize (Letter), use l of ? to get a list of sizes
mpage can print 1, 2, 4 or 8 pages per sheet.% mpage /etc/services # default behaviour% mpage /etc/services > services.ps% gv services.ps # default is ...% cat /etc/profile | mpage -1 | gv -
The output of mpage is postscript, which can be sent to lpr for printing. mpage accepts the P option like lpr for specifying the printer. If P is given, the output is automatically printed.% mpage -8 /etc/protocols | lpr% mpage -8 -Plp0 /etc/protocols% lpq -Plp0
Formatting options allow you to change the font (F). The font name must be the

487 LPI 102 Course Notes Postscript
name of a PostScript font.% mpage -1 -F Helvetica /etc/inittab | gv -% mpage -1 -F Times /etc/inittab | gv -
To send the output to particular printer, you use the P option. The first example here is incorrect – mpage undestands that you wish to print to the default printer, in particular the files lp1 and /etc/protocols.foo:~ $ mpage -8 -P lp1 /etc/protocolsmpage: cannot open lp1mpage: No such file or directory
Here's the right way to do it ...foo:~ $ mpage -8 -Plp1 /etc/protocolsfoo:~ $ lpq -P lp1lp1 is ready and printingRank Owner Job File(s) Total Sizeactive donaldd 1259 (stdin) 26624 bytes
mpage H prints headers for each file printed. These examples also illustrate the use of the c option to concatenate multiple files onto a single sheet.foo:~ $ mpage -H /etc/p* - | gv -foo:~ $ mpage -c -H /etc/p* - | gv -
mpage b is used to print to a specific type of paper. Here are just a few of the paper sizes that mpage supports.foo:~ $ mpage -blMpage knows about the following paper types:Type Points Wide Points High-------------- ----------- -----------Letter 612 792Legal 612 1008A4 596 842A4Small 595 842foo:~ $ mpage -b A4 -H -2 -c /etc/h* | gv -foo:~ $ mpage -b A5 -H -2 -c /etc/h* | gv -
While mpage is most often used for formatting text output, it can also be used to format postscript output, and reduce the amount of paper used in printing. Here we generate two postscript files using mpage – but we could have used two arbitrary postscript files.
foo:~ $ mpage -1 -H /etc/hosts.allow > hosts.allow.psfoo:~ $ mpage -1 -H /etc/hosts > hosts.psfoo:~ $ mpage -2c hosts*.ps | gv -
7.3 Review
Quiz questions
1. What is postscript?2. Which command removes a print job from the queue?3. How does one specify that mpage or lpr must print to a specific printer?
4. When printing to a specific printer with mpage, the error message “cannot open lp2” is

7 Postscript LPI 102 Course Notes 49
displayed. What is wrong?5. What is the command to print a text file using 4 pages per sheet on A4 paper, with
headings?
Assignments
1. If you have access to a Windows system, set up an Apple LaserWriter printer driver which writes to a file. To what extent are files generated by Windows compatible with the Linux printing system, e.g. with gv (for viewing), pstopdf (for converting to PDF) and lpr for your printer?
2. Generate a document from another application (not mpage) and print it two pages per sheet using mpage. What are the options to mpage that you had to use?
3. Investigate the a2ps utility and compare it to mpage. Why would you use a2ps rather than mpage to print /etc/profile?
4. How does enscript compare to a2ps? What additional functionality does it offer?
Answers to quiz questions
1. A document formatting language with backward syntax (commands after parameters).2. lprm3. Pprinter4. If you run mpage P lp2 then you have specified the printer as “” and the file to print as
lp2.
5. mpage 4 H filename (although the heading is not going to be that useful in this context).
508 LPI 102 Course Notes Printer setup
8 Printer setupSnow White has become a camera buff. She spends hours and hours shooting pictures of the seven dwarfs and their antics. Then she mails the exposed film to a cut rate photo service. It takes weeks for the developed film to arrive in the mail, but that is all right with Snow White. She clears the table, washes the dishes and sweeps the floor, all the while singing “Someday my prints will come.”
/usr/share/games/fortune/art
LPIC topic 1.107.4 — Install and configure local and remote printers [1]Weight: 1Objective
Candidate should be able to install a printer daemon, install and configure a print filter (e.g.: apsfilter, magicfilter). This objective includes making local and remote printers accessible for a Linux system, including postscript, nonpostscript, and Samba printers.
Key files, terms, and utilities includelpd Line printer daemon/etc/printcap Configuration for lpd and lpr/etc/apsfilter/* Configuration for apsfilter/var/lib/apsfilter/*/ apsfilter perprinter filters/etc/magicfilter/*/ Configuration for magicfilter/var/spool/lpd/*/ Printer output spool directories
8.1 lpd and printcapPrinting under Linux is usually handled by lpd – the line printer daemon. Jobs are submitted to lpd via the lpr command. Of course, if lpd is not running, your printing does not happen. There are a number of competing implementations for Linux printing:• The original BSD lpr – the objectives of this chapter are focused on this software. Not all
distributions use the original lpr – many have now migrated to LPRng and CUPS.• LPRng (LPR next generation) – this is largely compatible with the original lpr
implementation, but adds some extra functionality, such as its own filtering and format conversion.
• CUPS (Common Unix Printing System) – CUPS does away with lpd and replaces it with cupsd. Printing to remote CUPS printers from a CUPS client does not require configuration, except perhaps to specify the CUPS server. CUPS provides a web based interface for configuration and control of printers, in addition to the command line interface via lpq, lprm and lpc.
The standard method of installing a printer under Linux is to modify /etc/printcap. Each printer connected to your system and each network printer has an entry in /etc/printcap. Each

8 Printer setup LPI 102 Course Notes 51
printer is described by a single line, but usually the lines end in a backslash and continue over multiple lines.The format of the lines in /etc/printcap is
printername:setting1=value1:setting2=value2:setting3=value3
The first field is the name of the printer. Quite often multiple names are given, separated by a pipe (e.g. lp0|hplj4). Here are the common entries for printing • lp=devicename – the name of the output device – often something like lp=/dev/lp0• sd=/spool/directory – the directory for temporary files queued for printing.• af=accountingfile – the name of the file containing printer accounting data for the printer.• if=inputfiltercommand – the name of the file which is the input filter for this printer.
This is usually related to apsfilter or magicfilter.• lf=logfile – the name of the error log file• mx#maximumprintkb – the maximum size of a printed file, e.g. mx#2048 or mx#0 (no
limit)• sh – suppress header – don't print a banner page about who printed the job and what they
were printing it for.Remote printing• rm=hostname – connect to a remote unix print server.• rp=printername – print to a specific printer on the remote machine, e.g. rp=lp• of=outputfiltercommand – the name of the file which is the output filter for this printer.
The output filter will usually convert from postscript to an appropriate format (if the input filter didn't), or connect to a network device (e.g. for Windows printing).
Local printers
A fairly minimal printcap entry for a local printer could look like this. There is no input filter or output filter, so output jobs submitted to this printer must be in the correct format (e.g. PCL for a HP LaserJet). apsfilter and magicfilter translate various formats to the printer's own local format.
lp|hplj4:\ :lp=/dev/lp0:\ :sd=/var/spool/lp:\ :mx#0:\ :lf=/var/spool/lp/hp-log:
Remote printers
A minimal configuration for a remote printer, connected at 192.168.0.175 with the name lp. There is no limit on job sizes, and no banners are shown.
lp1|remote printer:\ :sd=/var/spool/lp1:\ :rm=192.168.0.175:\ :rp=lp:\ :sh:mx#0:

528 LPI 102 Course Notes Printer setup
Here is a printer entry for a remote printer used by LPRng. The cm entry is a comment, which determines which filtering is applied by the input filter “/usr/lib/lpdfilter/bin/if”.
hplaserjet:\ :cm=lpdfilter drv=upp method=auto color=yes:\ :lp=/dev/lp0:\ :sd=/var/spool/lpd/hplaserjet:\ :lf=/var/spool/lpd/hplaserjet/log:\ :af=/var/spool/lpd/hplaserjet/acct:\ :if=/usr/lib/lpdfilter/bin/if:\ :la@:\ :tr=:cl:lk:sh:
Windows printers via samba
If you have a printer shared by a Windows server via SMB networking, you connect to it using smbclient and print using the P option.
% smbclient -hUsage: smbclient service <password> [options]Version 2.2.7 -N don't ask for a password -n netbios name. Use this name as my netbios name -P connect to service as a printer -I dest IP use this IP to connect to -E write messages to stderr instead of
stdout -U username set the network username -W workgroup set the workgroup name% smbclient //server/epson password -U guest -N -P < data.dat
To print to this printer via the lpr printing system we require an entry in printcap and a script. The printcap entry runs the script as the output filter4.
lp2|smb-remote:\ :lp=/dev/null:sh:\ :sd=/var/spool/lp2:\ :of=/usr/local/bin/smbprint-epson:
The corresponding contents of the script would be this.#! /bin/bash# /usr/local/bin/smbprint-epson# Print to the epson printer on the server ... smbclient //server/epson/ password -U guest -N -P
This arrangement assumes that you will configure an input filter (“if” in printcap) which will transform the data you want to print into something suitable for the printer.
8.2 apsfilterapsfilter makes it possible to print various data formats without having to manually convert to the particular printer's print format. apsfilter first converts the input data to postscript, and then converts postscript to the printer's own print language, usually using the ghostscript
4 You do not have to run the script as the output filter – you could run it as the input filter, provided you also make sure you handle the input format conversion correctly.

8 Printer setup LPI 102 Course Notes 53
program. As a result, apsfilter supports all the printers for which ghostscript can produce output.To configure apsfilter, the program apsfilterconfig is used. The directory /var/lib/apsfilter contains the settings configured by apsfilterconfig. Once the filter has been configured with apsfilterconfig the printcap entry for the printer is modified so that apsfilter is called as part of the printing sequence.
lp|PS;r=300x300;q=high;c=gray;p=a4;m=auto:\ :if=/etc/apsfilter/basedir/bin/apsfilter:\ :lp=/dev/lp0:\ :sd=/var/spool/lpd/lp:\ :lf=/var/spool/lpd/lp/log:\ :af=/var/spool/lpd/lp/acct:\ :mx#0:sh:
The program apsfilter is configured as the input filter (“if”). It relies on the name of the printer to configure some of its settings. It is possible to pass further configuration settings to apsfilter via parameters to lpr.
This is the example from apsfilter.org on how submit options to apsfilter (and also demonstrating how apsfilter can convert a number of formats to printable output).% lpr -C high:duplex:32bpp:present:glossy ascii-file.gz \
LaTeX.dvi.bz2 picture.gif xfig-file.fig.Z
8.3 magicfiltermagicfilter is a customisable and extendable printer filter. It examines the provided input files to determine what their format is, and handles them appropriately. magicfilter is intended to be used as an input filter for LPD – configured as “if” in printcap. Because the input filter parameter for printcap cannot be given with arguments, a separate script is used for each printer.By convention, the scripts for magicfilter are in the directory /etc/magicfilter, and are named after the printer. printcap entries may look like this –
pencil|lp|PostScript|ljet4|HP LaserJet 4:\ :lp=/dev/lp1:sd=/var/spool/lpd/pencil:sh:mx#0:\ :if=/usr/sbin/printers/ljet4: crayon|dj550c|color|HP DeskJet 550C:\ :lp=/dev/lp2:sd=/var/spool/lpd/crayon:sh:mx#0:\ :if=/usr/sbin/printers/dj550c:
Depending on the version and configuration of your installation of magicfilter, /usr/sbin/printers may be /etc/magicfilter or some other location. A magicfilter printcap entry may look something like this too
lp|hplj4l|HP Laserjet 4L:\ :lp=/dev/lp1:sd=/var/spool/lpd/hplj4l:\ :sh:pw#80:pl#72:px#1440:mx#0:\ :if=/etc/magicfilter/ljet4l-filter:\ :af=/var/log/lp-acct:lf=/var/log/lp-errs:
548 LPI 102 Course Notes Printer setup
Whatever their location, the actual script files are interpreted by the magicfilter program, as shown by the “#!” at the top of the file.
#!/usr/sbin/magicfilter
Quiz questions
1. What must appear in /etc/printcap for a postscript printer connected at /dev/lp0?2. In what format are files which are submitted to lpr?3. What does apsfilter do?4. What does magicfilter do?5. How does one print to a windows printer from the command line?6. What is /etc/magicfilter, and what would you expect to find there?
Assignments
1. If you are running LPRng or CUPS, install the original BSD printing system, and set up your printer using either apsfilter or magicfilter.
Answers to quiz questions
1. If the printer is named hplj, then something like hplj:lp=/dev/lp0:sd=/var/spool/hplj:2. Usually postscript, but other formats may be converted to postscript.3. apsfilter converts various input formats to the printer's native format.4. magicfilter is a script language to convert various input formats to a printer's native format.5. cat rawprintdata | smbclient //server/hplj bigsecret U guest P 6. It's the conventional configuration directory for magicfilter, and contains a magicfilter
script for each printer that requires one.
9 Documentation LPI 102 Course Notes 55
9 DocumentationArnold's Laws of Documentation:(1) If it should exist, it doesn't.(2) If it does exist, it's out of date.(3) Only documentation for useless programs transcends the first two laws.
– /usr/share/games/fortune/definitions
LPIC topic 1.108.1 — Use and manage local system documentation [4]Weight: 4Objective
Candidates should be able to use and administer man and the material in /usr/share/doc/. This objective includes finding relevant man pages, searching man page sections, finding commands and man pages related to them, and configuring access to man sources and the man system. It also includes using system documentation stored in /usr/share/doc/ and determining what documentation to keep in /usr/share/doc/.
Key files, terms, and utilities includeman system manual pagesapropos search for manual page keywordswhatis show available man pages and their titlesMANPATH path for man pages
9.1 man pagesFor most commands that you can type on a Linux system there is a man page. Man pages are useful if you need detailed information about a command. A man page is an electronic document with a number of sections:• NAME – the name of the command, and a very short description• SYNOPSIS – command line usage• DESCRIPTION – all about the command• OPTIONS – detailed information about each option the command accepts• FILES – which files are relevant to this program• SEE ALSO – other sources of information, including other man pages• BUGS – things that byte• AUTHOR – who was responsible for the man page, or alternatively, for the programIn practice, few man pages have all these sections. The syntax for man is one of these.
man [section] pagename
If you don't specify the section number, then the first man page found is used. Here are some examples of using man:
$ man man$ man cd
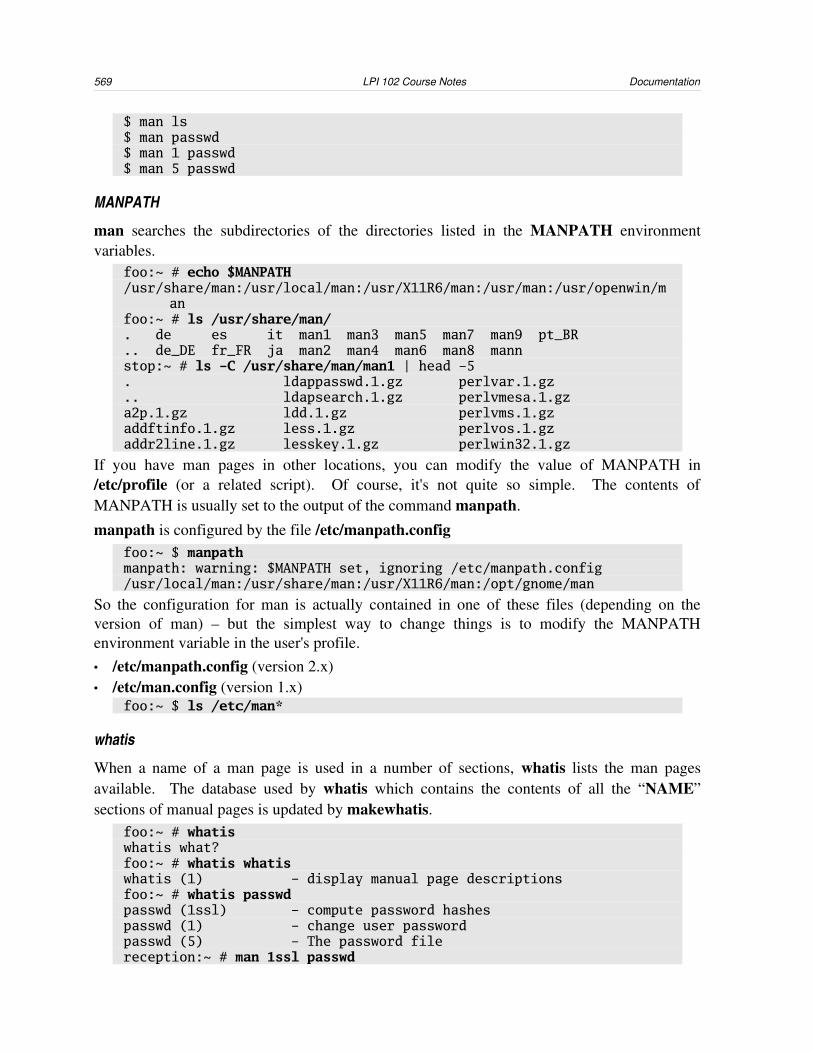
569 LPI 102 Course Notes Documentation
$ man ls$ man passwd$ man 1 passwd$ man 5 passwd
MANPATH
man searches the subdirectories of the directories listed in the MANPATH environment variables.
foo:~ # echo $MANPATH/usr/share/man:/usr/local/man:/usr/X11R6/man:/usr/man:/usr/openwin/m
anfoo:~ # ls /usr/share/man/. de es it man1 man3 man5 man7 man9 pt_BR.. de_DE fr_FR ja man2 man4 man6 man8 mannstop:~ # ls -C /usr/share/man/man1 | head -5. ldappasswd.1.gz perlvar.1.gz.. ldapsearch.1.gz perlvmesa.1.gza2p.1.gz ldd.1.gz perlvms.1.gzaddftinfo.1.gz less.1.gz perlvos.1.gzaddr2line.1.gz lesskey.1.gz perlwin32.1.gz
If you have man pages in other locations, you can modify the value of MANPATH in /etc/profile (or a related script). Of course, it's not quite so simple. The contents of MANPATH is usually set to the output of the command manpath.
manpath is configured by the file /etc/manpath.config foo:~ $ manpathmanpath: warning: $MANPATH set, ignoring /etc/manpath.config/usr/local/man:/usr/share/man:/usr/X11R6/man:/opt/gnome/man
So the configuration for man is actually contained in one of these files (depending on the version of man) – but the simplest way to change things is to modify the MANPATH environment variable in the user's profile.• /etc/manpath.config (version 2.x)• /etc/man.config (version 1.x)
foo:~ $ ls /etc/man*
whatis
When a name of a man page is used in a number of sections, whatis lists the man pages available. The database used by whatis which contains the contents of all the “NAME” sections of manual pages is updated by makewhatis.
foo:~ # whatiswhatis what?foo:~ # whatis whatiswhatis (1) - display manual page descriptionsfoo:~ # whatis passwdpasswd (1ssl) - compute password hashespasswd (1) - change user passwordpasswd (5) - The password filereception:~ # man 1ssl passwd

9 Documentation LPI 102 Course Notes 57
Reformatting passwd(1ssl), please wait...foo:~ # man 1 passwdReformatting passwd(1), please wait...foo:~ # man 5 passwdReformatting passwd(5), please wait...foo:~ # whatis thematrixthematrix: nothing appropriate.
apropos
You can search the “NAME” sections of man pages for text of your choice using apropos. apropos searches for text in a similar way to grep i pattern (case insensitive, word boundaries don't matter).
foo:~ $ aproposapropos what?foo:~ $ apropos aproposapropos (1) - search the manual page names and descriptionsfoo:~ $ apropos printerfoo:~ $ apropos profilefoo:~ $ apropos passwdfoo:~ $ apropos cdfoo:~ $ apropos motdfoo:~ $ man -k motdfoo:~ $ apropos .
When you are searching for specific documentation, it can be quite useful to filter the output of apropos through grep to clarify what you meant.
foo:~ $ apropos cd | grep -w cdfoo:~ $ apropos scanner | grep -i USB
9.2 /usr/share/docThis directory is contains all manner of documentation for your system, including:• Package documentation – each installed package installs its documentation in its own
directory, either under /usr/share/doc or under /usr/share/doc/packages (SuSE). Generally distributions package the original README, ChangeLog and COPYING files, and quite often the “contrib” directory (scripts and extensions which can be useful with a given program).
• HOWTOs – how to do various things – /usr/share/doc/howto – but not always installed.• FAQs – frequently asked questions can also appear, but these are generally not the ones you
want.• Books – when you install the NAG (network administrator guide) and SAG (System
Administration Guide) and other books from the Linux Documentation Project, they may be installed at /usr/share/doc/books.
Here is what /usr/share/doc looks like on a SuSE system.fred@suse:~> ls /usr/share/docRELEASE_NOTES.de.html howto selfhtml susetourRELEASE_NOTES.en.html packages support-db vnc-3.3.3r2RELEASE_NOTES.hu.html sdb susehilffred@suse:~> ls -C /usr/share/doc/packages/ | head -5

589 LPI 102 Course Notes Documentation
3ddiag kdebase3 sambaDirectFB kdegames3 samba-vscanImageMagick kdegraphics3 saneMPlayer kdegraphics3-scan sashNVIDIA_GLX kdelibs3 saxfred@suse:~ $ less /usr/share/doc/packages/*/README
On a Debian system, we see documentation for each installed package –fred@debian:~$ ls -C /usr/share/doc | head -5adduser info makedev syslinuxapt ipchains man-db sysvinitapt-utils iptables manpages tarat klogd mawk taskselbase-config lbxproxy mbr tcpdfred@debian:~ $ less /usr/share/doc/*/README
/usr/share/doc on RedHat systems looks quite similar, but contains the version number of each package.
desktop@redhat:~ $ ls -C /usr/share/doc/ | head -54Suite-0.11.1 libgnomeui-2.0.3GConf-1.0.9 libgtop2-2.0.0GConf2-1.2.1 libjpeg-6bHTML libmrproject-0.6ImageMagick-5.4.7 libogg-1.0desktop@redhat:~ $ less /usr/share/doc/*/README
9.3 Review
Quiz questions
1. What type of documentation is found in /usr/share/doc?
2. What is the difference between apropos and whatis?
3. What is MANPATH, and what is its function?
4. How and why would a system administrator make changes to MANPATH?
Assignments
1. Read the man pages for man, apropos and whatis. Which of these refer to MANPATH?2. Find and read the documentation on the fileutils project. How recent are the changes
included in your installation, and what were they? Are there any outstanding problems with fileutils? How many contributors are there to the fileutils project?
3. Read all the documentation in /usr/share/doc :), or alternatively find the Coffee HOWTO, and make notes on its contents.
4. Run the command info info, and then browse the info pages using the command info.
Answers to quiz questions
1. The documentation for installed software that is not part of the man page system. 2. whatis searches for man page names, and apropos searches the man page descriptions for

9 Documentation LPI 102 Course Notes 59
keywords.3. MANPATH is an environment variable which specifies where to search for man pages.4. The administrator would make changes to include man pages stored in nondefault
locations. This is a matter of editing /etc/man.config or manpath.config.
6010 LPI 102 Course Notes Internet Documentation
10 Internet DocumentationThe Internet? Yes, I've heard of it. I intend to finish reading it some day.
– things nobody ever said
LPIC topic 1.108.1 — Use and manage local system documentation [3]Weight: 3Objective
Candidates should be able to find and use Linux documentation. This objective includes using Linux documentation at sources such as the Linux Documentation Project (LDP), vendor and thirdparty websites, newsgroups, newsgroup archives, and mailing lists.
Key files, terms, and utilities includenot applicable
10.1 Linux documentation projectThe Linux Documentation Project (LDP) is a loosely knit team of volunteers who provide documentation for Linux. The LDP only has documents which are licences under a open source license. On the Linux documentation project site (www.tldp.org or www.linuxdoc.org), you will find the following types of document:• HOWTOs – a HOWTO is a step by step explanation of how to perform a specific task, such
as installing Linux or making Coffee.• Guides – a longish book with broad coverage of a subject, e.g. the Network Administration
Guide. Guides aim to cover the entire subject, rather than just how to perform a specific task.
• man pages – man pages for the components you install are probably included in your system, but the Linux Documentation Project has man pages for all manner of components, including those you do not have installed.
• FAQs – a FAQ (Frequently Asked Questions) is a list of questions which are frequently asked in mailing list postings – along with the answers to these questions. The idea is that you shouldn't ask them.
Most of the material on the Linux Documentation project is widely available. Most Linux distributions include the Linux Documentation Project's material, but it is not necessarily installed by default.
10.2 Mailing listsA number of different types of mailing lists are available for Linux.• Project mailing lists (e.g. the Linux kernel, Gnome, KDE, textutils ...)• Distributionspecific mailing lists
10 Internet Documentation LPI 102 Course Notes 61
• Linux User Groups (LUGs) often run a mailing list for discussion of Linux related issues.A list of Linux lists can be found at http://www.linux.org/docs/lists.html, with a large number administered by [email protected] – however this material is not entirely up to date – distribution vendors tend to rearrange their sites frequently.• Debian – http://www.debian.org/MailingLists/subscribe• Mandrake – http://www.linuxmandrake.com/en/flists.php3• Redhat – http://www.redhat.com/mailman/listinfo/• SuSE – http://www.suse.de/us/private/support/mailinglists/index.htmlThe name of the list usually indicates the topic which it deals with. It is helpful to understand the meaning of a list name, since posting offtopic questions is generally not helpful.
10.3 NewsgroupsThe original development of Linux was done via newsgroups, rather than mailing lists. Currently many newsgroups are overrun by lesser mortals, and all the good stuff is on the mailing lists. Well, almost. Here are a couple of Linux newsgroups which have played a role in the development of Linux.• comp.os.linux.advocacy – general discussion (heated argument) about Linux versus other
operating systems.• comp.os.linux.announce – Linux announcements – but you can do better on
http://slashdot.org/• comp.os.linux.answers – distribution of FAQs HOWTOs and READMEs (not very active)• comp.os.linux.apps – linux applications discussion• comp.os.linux.development.apps – programming and porting• comp.os.linux.development.system – Linux kernel and device drivers and modules• comp.os.linux.hardware – hardware compatibility, support, etc.• comp.os.linux.networking – networking and communication• comp.os.linux.setup – installation and configuration• comp.os.linux.x – using X windows with Linux – see also http://www.xfree86.org/• comp.os.linux.misc – everything else• alt.os.linux – Linux flamesGoogle Groups http://groups.google.com has a complete archive of newsgroup postings (formerly managed by dejanews.com).Since the LPIC only covers Linux on 80386 architecture, you will probably not want to know about these groups.• comp.os.linux.m68k – Linux on the m68k architecture• comp.os.linux.alpha – Linux on the alpha platform• comp.os.linux.powerpc – Linux on the Power PC
10.4 Vendor web sitesThese are the web sites of the major Linux distributions.• http://www.redhat.com/ – Red Hat Linux
6210 LPI 102 Course Notes Internet Documentation
• http://www.suse.com/ – SuSE Linux• http://www.linuxmandrake.com/ – Mandrake Linux• http://www.slackware.com/ – Slackware• http://www.debian.org/ – Debian• http://www.connectiva.com/ – Connectiva Linux• http://www.turbolinux.com/ – TurboLinux
10.5 Third party web sitesYou can find interesting information on Linux at the following sites. These are not strictly tied to any particular distribution or software package.• http://www.lwn.net/ (Linux Weekly News)• http://www.linuxtoday.com/• http://www.linuxplanet.com/• http://www.linuxcentral.com/• http://www.theregister.co.uk/And of course there's always• http://www.google.com/ – Search engine
10.6 Review
Quiz questions
1. Name three Linux distributions and their web sites2. Name three Linux newsgroups.
Assignments
1. Join a LUG mailing list and see what kind of discussion takes place.2. Browse the websites mentioned in the text, and make notes about their contents.
Answers to quiz questions
1. Refer to text. Here are a few that are quite interesting as well: http://www.openwrt.org, http://www.ubuntulinux.org, http://www.knoppix.net.
2. Refer to text.
11 System Notification LPI 102 Course Notes 63
11 System NotificationLPIC topic 1.108.5 — Notify users on systemrelated issues [1]Weight: 1ObjectiveCandidates should be able to notify the users about current issues related to the system. This objective includes automating the communication process, e.g. through logon messages. Key files, terms and utilities include
/etc/issue Logon banner/etc/issue.net Telnet logon banner/etc/motd Message of the day
11.1 Login MessagesWhen a user is presented with a shell login, it appears something like the following:
Welcome to SuSE Linux 8.2 (i586) - Kernel 2.4.20-4GB-athlon (tty1)
bar login:
The message above bar login: is generated from a file called /etc/issue. After successfully logging in a second message is displayed:
Last login: Mon May 10 1900 01:00:30 from consoleOne cheer for Linux!
The message “One cheer for Linux!” is the contents of the file /etc/motd, which stands for message of the day.
11.1.1 /etc/issue/etc/issue is a plain text file presented before the login prompt. It can be used as a means of identification or to give users an instruction regarding logging in. If the console program (in our case mingetty) supports it \char sequences can be used.Example:
foo@bar:~> cat /etc/issue
Welcome to SuSE Linux 8.2 (i586) - Kernel \r (\l).
The \r is translated into the kernel version, and the \l to the terminal line.The following characters can be used:
\d current day
\l line on which mingetty is running
\m machine architecture (uname m)
\n machine's network node hostname (uname n)
6411 LPI 102 Course Notes System Notification
\o domain name
\r operating system release (uname r)
\t current time
\s operating system name
\u the number of users which are currently logged in
\U the number of users which are currently logged in followed by “users”
\v operating system version (uname v)
For network logins there is a separate file called /etc/issue.net. In fact, it is only used by telnet when a new connection is established. You can leave out sensitive information such as the system kernel version in the network logon banner.
11.1.2 /etc/motdThe message of the day file appears immediately after login whether remote or local. This file, as its name implies was intended as a means of communication between the system administrator and the users. The file is a plain text file and can be easily edited. Some system administrators like to have a joke or a quote of some sort in the message of the day. A popular source of quotes is the fortune database.
bar:~ $ cat /etc/motdThe message of the day service has been discontinued
11.2 Instant messagingThe wall command5 can be used to send an instant message to all the consoles on the system. The shutdown command also sends a warning to all the consoles.
wall can be used as follows:bar:/ # echo "scheduled maintenance at 15:00 today" | wall
Broadcast Message from root@bar (/dev/pts/5) at 03:03 ...
scheduled maintenance at 15:00 today
11.3 Review
Quiz questions
1. Who can view the message of the day?2. Under what circumstances is the file /etc/issue.net displayed?
5 wall is not part of the LPI objectives.

11 System Notification LPI 102 Course Notes 65
Assignment
1. Change the login banner /etc/issue to show the number of the tty being used and the time of day, e.g. “You are logging in at terminal 1 at 16:00”.
2. Install the fortune program. Write a script to set the message of the day to the output of the fortune program. Set up a cron job to run this script every 5 minutes. Is there a better way of doing this?
Answers to quiz questions
1. Anyone who logs in successfully.2. Before a telnet login.
6612 LPI 102 Course Notes Bash customisation
12 Bash customisationH@ppy, Sn33zy, D0p3y, D0c, 6rumpy, 5l33py and /bin/bashful
– The 31337 dwarves
LPIC topic 1.109.1 — Customize and use the shell environment [5]Weight: 5Objective
Candidate should be able to customize shell environments to meet users' needs. This objective includes setting environment variables (e.g. PATH) at login or when spawning a new shell. It also includes writing bash functions for frequently used sequences of commands.
Key files, terms, and utilities include~/.bash_profile The preferred user profile for bash~/.bash_login Another name for the same thing~/.profile Profile for any shell (including bash)~/.bashrc Bash rc file~/.bash_logout When you exit a login shell~/.inputrc User's readline configuration filefunction (Bash builtin command) Declare a commandexport Add an environment variable to the export listenv Show exported variablesset (Bash builtin command) Show environment and settingsunset (Bash builtin command) Remove an environment variable
12.1 Bash profile(s)When bash is running an interactive shell, there are two modes in which it can operate• A login shell (as when bash gets started by a /bin/login)• A regular shell (default)The scripts run during startup and shutdown sequence for a login shell are as follows:1. /etc/profile 2. ~/.bash_profile, or ~/.bash_login or ~/.profile (in that order)3. Interactive session4. ~/.bash_logout (if it exists)For a regular session (e.g. a bash session in an xterm, or simply running bash from the command line) the startup and shutdown sequence is more straightforward:1. ~/.bashrc (user's bash configuration)2. Interactive sessionIn the bash profile, you have the opportunity to do pretty much anything you can do at the command line, including.
12 Bash customisation LPI 102 Course Notes 67
• Set environment variables (e.g. PATH, WINDOWMANAGER)• Define aliases• Define functions• Read include files. You may want your ~/.bash_profile to read your ~/.bashrc to yield a
consistent environment.Each of these topics is discussed in its own section below.
12.2 VariablesThe following environment variables are commonly modified in profile scripts.• PS1 – the level 1 prompt.
foo:~ $ echo $PS1\h:\w \$[jack@foo jack]$ echo $PS1[\u@\h \W]\$
The backslash receives special treatment in the PS1 prompt:\W – working directory (only the last part)\w – working directory\u – user name\h – host name
• HISTSIZE – the number of history command lines that bash keeps in $HISTFILE.
• MAILCHECK – how often bash checks whether the mail file $MAIL has changed. When the mail file changes, bash prints a message “you have new mail”.
The following variables, which are exported to other applications also appear in profile scripts.• PATH – the directories which bash and other applications search when you run a new
program.foo:~ $ echo $PATH/home/jack/bin:/bin:/usr/bin:/usr/X11R6/bin:/usr/local/bin
• DISPLAY – the X display on which output is displayed. This is generally set automatically by the X initialisation scripts, but it must be in the export list.
• PAGER – some applications default to using more rather than less as the pager if the PAGER environment variable is unset.
• LANG – the language to use for multilingual applications.[jack@foo jack]$ echo $LANGen_GB.UTF-8
To modify an environment variable, the syntax isVARIABLENAME="value"
Note that you must quote the value assigned to the variable if it contains spaces. To add a variable to the export list so that it is available to applications, the command is export which can be used on its own, or together with an assignment to the variable:
export VARIABLENAME
export VARIABLENAME="value"

6812 LPI 102 Course Notes Bash customisation
To remove an environment variable, the command is unset, as in unset VARIABLENAME
Setting and clearing a variable:[jack@foo jack]$ set | grep AA[jack@foo jack]$ AAVARIABLE="A value, not exported"[jack@foo jack]$ set | grep AAAAVARIABLE='A value, not exported'[jack@foo jack]$ env | grep AA[jack@foo jack]$ export AAVARIABLE[jack@foo jack]$ env | grep AAAAVARIABLE=A value, not exported[jack@foo jack]$ AAVARIABLE="A new value"[jack@foo jack]$ env | grep AAAAVARIABLE=A new value[jack@foo jack]$ unset AAVARIABLE[jack@foo jack]$ env | grep AA[jack@foo jack]$ set | grep AA[jack@foo jack]$ AAVARIABLE=[jack@foo jack]$ set | grep AAAAVARIABLE=[jack@foo jack]$ env | grep AA
12.3 Functions (and aliases)Aliases and functions enable you to customise the behaviour of commands, without modifying the commands themselves. You can also create new commands.
Aliases
It is not unusual for distributions (and administrators) to try to protect their users from problems by presenting them with custom commands – aliases. An alias allows you to change what the user actually runs when the command is entered.
alias dir='ls -l'alias cp='cp -i'alias mv='mv -i'alias rm='rm -i'alias cd..='cd ..'alias ppp='/usr/sbin/pppd -detach'
Functions
Functions can do things that external scripts cannot do:• Modify shell environment variables• Refer to environment variables which are in the export list• Change the working directoryTo define a bash function, the syntax is:
function functionname(){
whatever the function does, using $1 $2 $3, etc as supplied as command line arguments
}
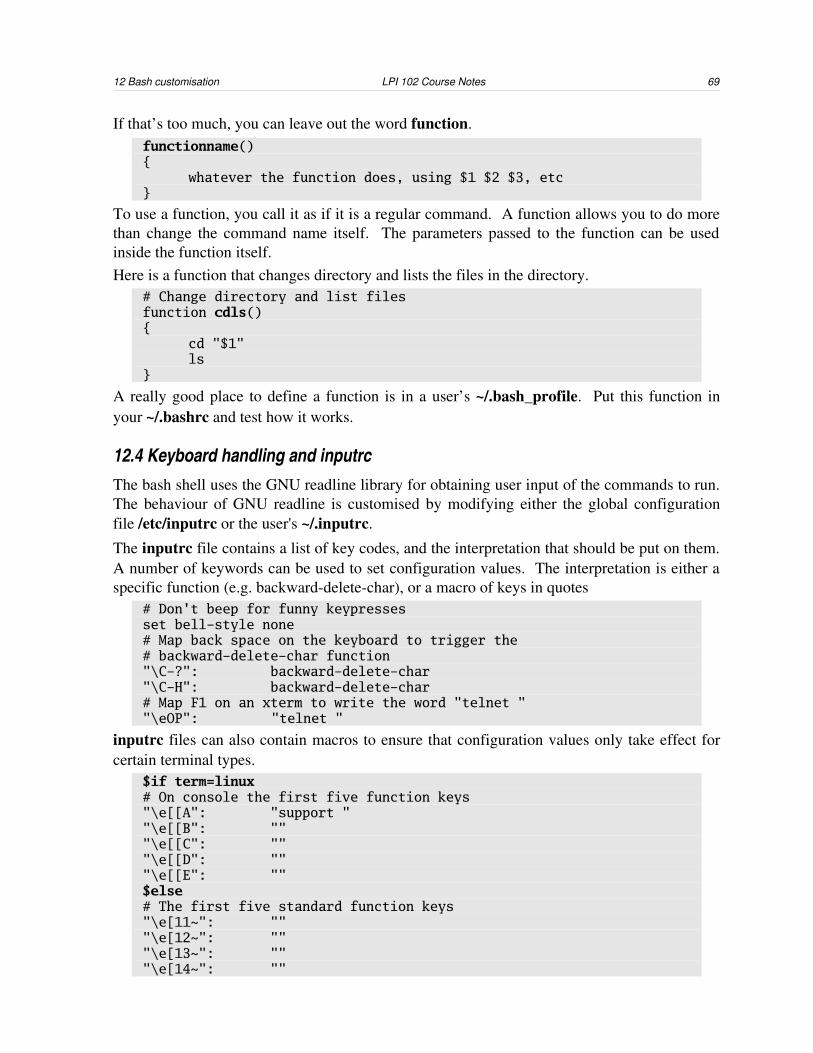
12 Bash customisation LPI 102 Course Notes 69
If that’s too much, you can leave out the word function. functionname(){
whatever the function does, using $1 $2 $3, etc }
To use a function, you call it as if it is a regular command. A function allows you to do more than change the command name itself. The parameters passed to the function can be used inside the function itself. Here is a function that changes directory and lists the files in the directory.
# Change directory and list filesfunction cdls(){
cd "$1"ls
}
A really good place to define a function is in a user’s ~/.bash_profile. Put this function in your ~/.bashrc and test how it works.
12.4 Keyboard handling and inputrcThe bash shell uses the GNU readline library for obtaining user input of the commands to run. The behaviour of GNU readline is customised by modifying either the global configuration file /etc/inputrc or the user's ~/.inputrc.
The inputrc file contains a list of key codes, and the interpretation that should be put on them. A number of keywords can be used to set configuration values. The interpretation is either a specific function (e.g. backwarddeletechar), or a macro of keys in quotes
# Don't beep for funny keypressesset bell-style none# Map back space on the keyboard to trigger the # backward-delete-char function"\C-?": backward-delete-char"\C-H": backward-delete-char# Map F1 on an xterm to write the word "telnet ""\eOP": "telnet "
inputrc files can also contain macros to ensure that configuration values only take effect for certain terminal types.
$if term=linux# On console the first five function keys"\e[[A": "support ""\e[[B": """\e[[C": """\e[[D": """\e[[E": ""$else# The first five standard function keys"\e[11~": """\e[12~": """\e[13~": """\e[14~": ""
7012 LPI 102 Course Notes Bash customisation
"\e[15~": ""$endif
12.5 Review
Quiz questions
1. How do you access function parameters within a function? 2. At which point are the files .bashrc, .bash_profile and .bash_login read?3. What must you do to set an environment variable so that it is available to the shell when the
login session is active, but not to applications run from the shell?4. What form does the contents of ~/.inputrc take?
5. What is the purpose of the set bash builtin, and how does it differ from env?
6. How would you go about adding the directory /usr/local/sbin to the PATH environment variable for root?
Assignments
1. Edit your own .inputrc and assign useful macro values to F1 to F4 for both the Linux console and for xterm. If you don't have any ideas of your own, you can use these values for network diagnosis:F1 – “telnet ”F2 – “ping ”F3 – “traceroute ”F4 – “nslookup ”You can quite easily find out the key code generated by a certain key stroke by typing Ctrl+V (quote), followed by the key. The initial escape character is then quoted, and the remaining part of the escape sequence can be seen.
2. Modify your own profile script to include the directory ~/bin in your path specification. Check that it works.
3. Write a function named nettest which will traceroute, nslookup and ping a named machine, and make this available to both login shells and regular shells.
4. Investigate the use of the CDPATH environment variable (start by finding it in the bash man page).
5. Write a bash function for your .bashrc which will write the name of the file you are editing to a log file every time your run vi. Here’s a tip – name the function “vi”, and use the full pathname of “vi” when you run it, or use the command builtin.
Answers to quiz questions
1. $1, $2, $3 ... or $@ $* (and $#, if you care to know how many there were)2. .bash_login is read for login sessions. .bash_profile is read if .bash_login doesn't exist.
.basrc is read for nonlogin interactive sessions.3. If the variable is called VAR, what you must not do is export VAR. (You can remove it
12 Bash customisation LPI 102 Course Notes 71
from the list with export n VAR, if you really need to.)
4. It's text – most lines are of the form keypress: action. Conditional lines start with $, and the keyword set may be used to set options.
5. set shows all environment variables, including those not in the export list. For good measure, it shows function definitions. env is a standalone program which shows only variables from the export list.
6. Add PATH=$PATH:/usr/local/sbin to /root/.bashrc and /root/.bash_profile.
7213 LPI 102 Course Notes Scripting
13 ScriptingQ. How many Unix hacks does it take to change a light bulb?A. Let's see, can you use a shell script for that or does it need a C program?
/usr/share/games/fortune/cookie
This chapter is about simple scripting. Some extra material not suggested in the LPIC topic is included in this chapter. If you are studying this material exclusively for the purpose of LPIC certification, you may want to ignore the extra material, since the weighting of the topic is not that heavy.
LPIC topic 1.109.2 — Customize or write simple scripts [3]Weight: 3Objectives
Candidate should be able to customize existing scripts, or write simple new (ba)sh scripts. This objective includes using standard sh syntax (loops, tests), using command substitution, testing command return values, testing of file status, and conditional mailing to the superuser. This objective also includes making sure the correct interpreter is called on the first (#!) line of scripts. This objective also includes managing location, ownership, execution and suidrights of scripts.
Key files, terms and utilities includewhile do something while a condition existsfor do something for each value given on the command linetest check whether a condition is truechmod change permissions (+x to execute)
13.1 IntroductionA clear understanding of shell scripting and in particular bash scripting is required to effectively maintain and extend a Linux installation. The system boot process is entirely based on scripts – see the directories /etc/init.d. Shell scripting is the core to the Unix philosophy of breaking tasks into may smaller specialized tasks. Scripts forming the glue that joins these specialized tasks into a greater functional whole. The boot process is an excellent example of this. Bash scripts are useful for the following applications:• Tools exist which do a part of the job you require but need to be combined with other
executables to complete a task. • A task is repetitive. Especially if consistency in the way the task is to be done is required.• Only simple logic decisions need be made in the script. Complex or heavily mathematic
logic is performed in executables called by the script. • To provide “memory” to systems that have no mechanism of maintaining state on a
persistent media storage device (e.g. iptables firewall configuration script).

13 Scripting LPI 102 Course Notes 73
Shells scripts are not suited to: • Resourceintensive tasks – where speed or I/O performance are critical. Consider using a
compiled language such. • Systems requiring complex data structures and/or mathematics. This means anything
beyond 32 bit signed integers and basic strings. Don't even consider shell scripts where computation may need to be performed on real numbers. Rather use Perl, Python or another high level scripting language.
• Crossplatform platform portability. For this you need patience or a portable language, perhaps Python, or ANSI C.
• Any largescale mission critical application. A script of more than 1000 lines will be very difficult to maintain. Bash is the glue between systems and should not be used to engineer an entire system.
• Situations where the source must remain hidden (proprietary systems).
13.2 Permissions and executablesFor a file to be executable it must have the execute mode set for the user that wishes to execute the script. The execute mode can be set with the chmod command.
foo@bar:~> ls -l param-rw-r--r-- 1 foo users 125 2003-05-17 11:17 paramfoo@bar:~> chmod u+x param #allow the user to executefoo@bar:~> ls -l param-rwxr--r-- 1 foo users 125 2003-05-17 11:17 paramfoo@bar:~> chmod g+x param #allow the group to executefoo@bar:~> ls -l param-rwxr-xr-- 1 foo users 125 2003-05-17 11:17 paramfoo@bar:~> chmod o+x param #allow the anyone to executefoo@bar:~> ls -l param-rwxr-xr-x 1 foo users 125 2003-05-17 11:17 param
The setuid executable mode is represented by the symbol s in the output of ls. Suid executables allow a program to change user while it is executing. There are many executables on a Linux system which necessarily have suid permission. As an example, a non root user would not be able to use the passwd command to change his/her password in /etc/shadow if the passed command were not able to set its UID to root.
foo@bar:~> ls -l `which passwd`-rwsr-xr-x 3 root shadow 73680 2003-03-17 17:39
/usr/bin/passwd
13.3 Basic syntax of a shell scriptA shell script is a series of shell commands placed in a file. bash includes a number of control structures which make shell scripting quite powerful.This “Hello World” script uses the builtin command echo to send a number of messages to standard output:
#!/bin/bash

7413 LPI 102 Course Notes Scripting
#***********************************************************************#
## Program: hello.sh# Written by: A N Onymous# Date: 1 January 2002## Displays a rather unhelpful message on the screen. Program
developed # to provide an introduction to bash scripting. ##*******************************************************************
****#echo 'A command is terminated at the end of a line.'echo 'A ; also terminates commands.' ; echo 'Another echo on this
line.'echo 'Unnecessary ; are harmless.' ; exit 0
Note:• Lines beginning with a “#” are comments and are not executed.• The first line, which is a comment to bash instructs the kernel to use /bin/bash as the
command interpreter for this script. #!/usr/bin/perl would cause the script to be interpreted by perl. This line is affectionately known as the “shebang” and is not always necessary for bash scripts, but it is by far a good idea.
• Note than one command can be used on a line if a semicolon “;” separates them. That is a new line and a semicolon are equivalent.
• exit 0, this causes the script to exit with a return code of zero. We will discuss return code under conditional execution.
13.4 Script communicationThere are a number of ways for scripts to send and receive information.• Positional parameters (command line arguments).• Environment variables.• Return code. An integer returned by a script to indicate the result of its execution. Will be
discussed under control structures.• File descriptors. Every bash script has a number of “pseudo files” (streams) open. The
three default streams are: standard input (stdin), standard output (stdout) and standard error (stderr). Scripts commonly redirect the default streams to read and write files.
13.4.1 Positional parameters The positional parameters $1, $2 etc are passed to the script simply by typing arguments after the scripts name on the command line. For example:
foo@bar:~> cat param#!/bin/bash#this is param
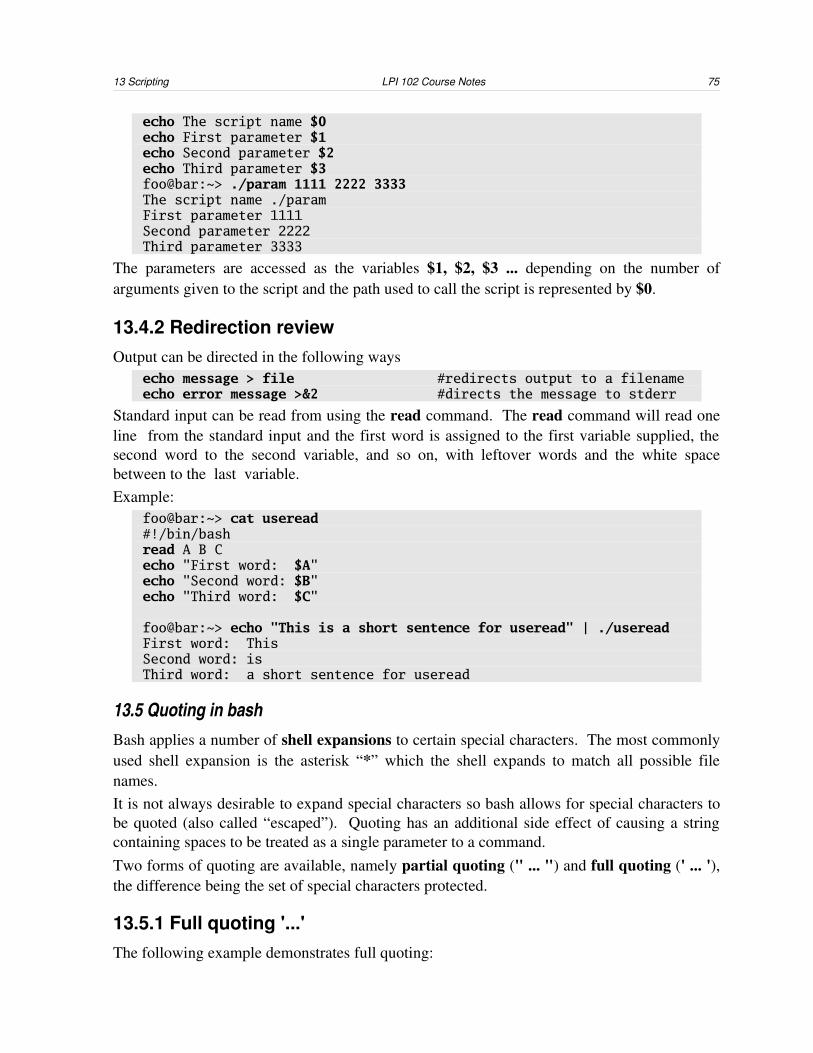
13 Scripting LPI 102 Course Notes 75
echo The script name $0echo First parameter $1echo Second parameter $2echo Third parameter $3foo@bar:~> ./param 1111 2222 3333The script name ./paramFirst parameter 1111Second parameter 2222Third parameter 3333
The parameters are accessed as the variables $1, $2, $3 ... depending on the number of arguments given to the script and the path used to call the script is represented by $0.
13.4.2 Redirection reviewOutput can be directed in the following ways
echo message > file #redirects output to a filenameecho error message >&2 #directs the message to stderr
Standard input can be read from using the read command. The read command will read one line from the standard input and the first word is assigned to the first variable supplied, the second word to the second variable, and so on, with leftover words and the white space between to the last variable.Example:
foo@bar:~> cat useread#!/bin/bashread A B Cecho "First word: $A"echo "Second word: $B"echo "Third word: $C"
foo@bar:~> echo "This is a short sentence for useread" | ./usereadFirst word: ThisSecond word: isThird word: a short sentence for useread
13.5 Quoting in bashBash applies a number of shell expansions to certain special characters. The most commonly used shell expansion is the asterisk “*” which the shell expands to match all possible file names. It is not always desirable to expand special characters so bash allows for special characters to be quoted (also called “escaped”). Quoting has an additional side effect of causing a string containing spaces to be treated as a single parameter to a command. Two forms of quoting are available, namely partial quoting (" ... ") and full quoting (' ... '), the difference being the set of special characters protected.
13.5.1 Full quoting '...'The following example demonstrates full quoting:
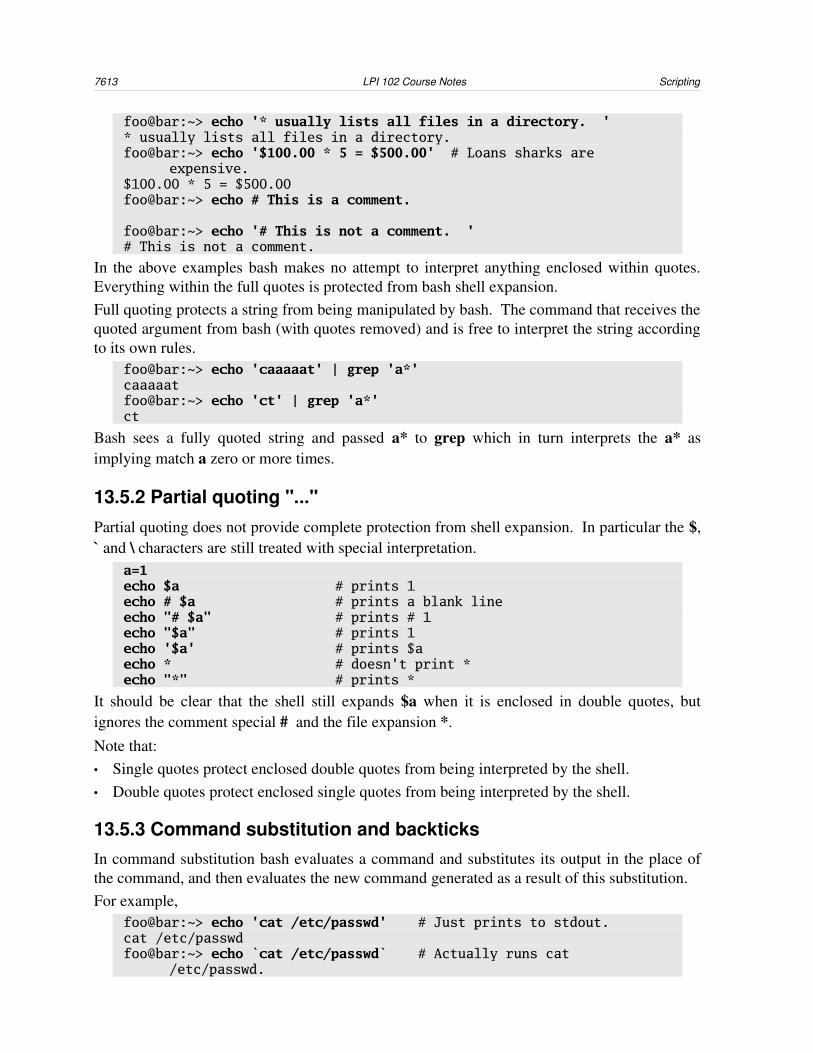
7613 LPI 102 Course Notes Scripting
foo@bar:~> echo '* usually lists all files in a directory. '* usually lists all files in a directory.foo@bar:~> echo '$100.00 * 5 = $500.00' # Loans sharks are
expensive. $100.00 * 5 = $500.00foo@bar:~> echo # This is a comment.
foo@bar:~> echo '# This is not a comment. '# This is not a comment.
In the above examples bash makes no attempt to interpret anything enclosed within quotes. Everything within the full quotes is protected from bash shell expansion.Full quoting protects a string from being manipulated by bash. The command that receives the quoted argument from bash (with quotes removed) and is free to interpret the string according to its own rules.
foo@bar:~> echo 'caaaaat' | grep 'a*'caaaaatfoo@bar:~> echo 'ct' | grep 'a*'ct
Bash sees a fully quoted string and passed a* to grep which in turn interprets the a* as implying match a zero or more times.
13.5.2 Partial quoting "..."Partial quoting does not provide complete protection from shell expansion. In particular the $, ` and \ characters are still treated with special interpretation.
a=1echo $a # prints 1echo # $a # prints a blank lineecho "# $a" # prints # 1echo "$a" # prints 1 echo '$a' # prints $aecho * # doesn't print * echo "*" # prints *
It should be clear that the shell still expands $a when it is enclosed in double quotes, but ignores the comment special # and the file expansion *. Note that:• Single quotes protect enclosed double quotes from being interpreted by the shell. • Double quotes protect enclosed single quotes from being interpreted by the shell.
13.5.3 Command substitution and backticksIn command substitution bash evaluates a command and substitutes its output in the place of the command, and then evaluates the new command generated as a result of this substitution.For example,
foo@bar:~> echo 'cat /etc/passwd' # Just prints to stdout.cat /etc/passwdfoo@bar:~> echo `cat /etc/passwd` # Actually runs cat
/etc/passwd.
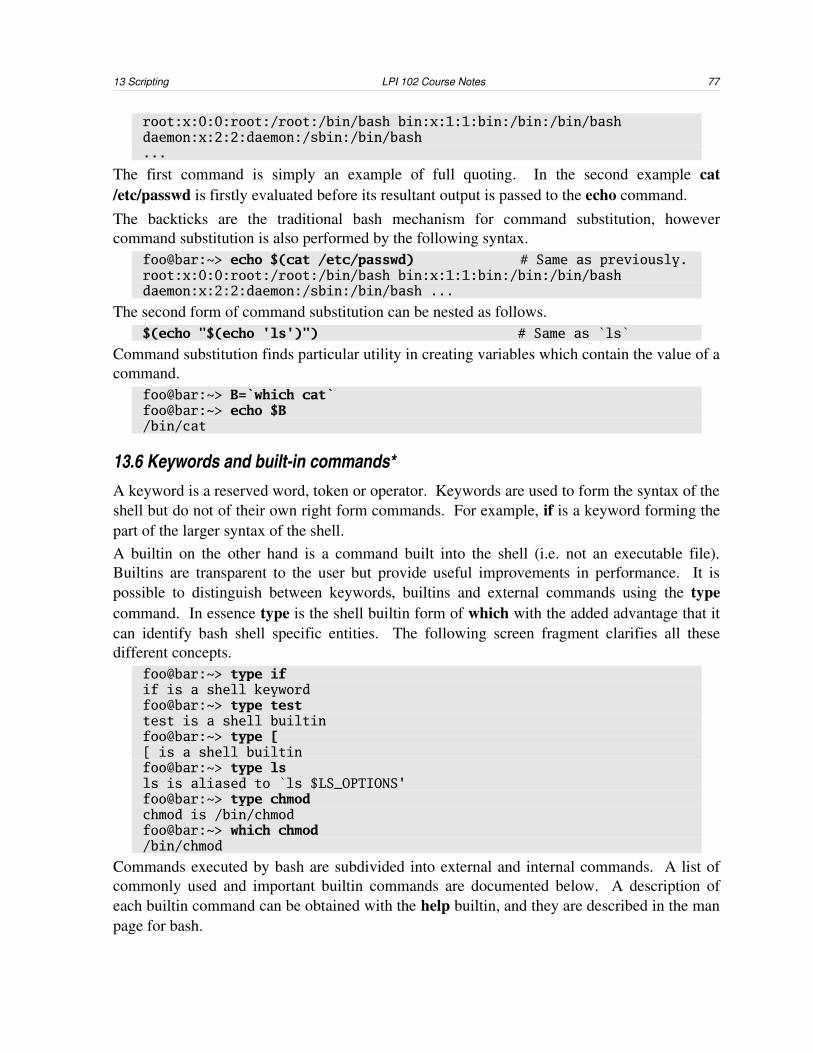
13 Scripting LPI 102 Course Notes 77
root:x:0:0:root:/root:/bin/bash bin:x:1:1:bin:/bin:/bin/bashdaemon:x:2:2:daemon:/sbin:/bin/bash...
The first command is simply an example of full quoting. In the second example cat /etc/passwd is firstly evaluated before its resultant output is passed to the echo command.The backticks are the traditional bash mechanism for command substitution, however command substitution is also performed by the following syntax.
foo@bar:~> echo $(cat /etc/passwd) # Same as previously. root:x:0:0:root:/root:/bin/bash bin:x:1:1:bin:/bin:/bin/bashdaemon:x:2:2:daemon:/sbin:/bin/bash ...
The second form of command substitution can be nested as follows.$(echo "$(echo 'ls')") # Same as `ls`
Command substitution finds particular utility in creating variables which contain the value of a command.
foo@bar:~> B=`which cat`foo@bar:~> echo $B/bin/cat
13.6 Keywords and builtin commands*A keyword is a reserved word, token or operator. Keywords are used to form the syntax of the shell but do not of their own right form commands. For example, if is a keyword forming the part of the larger syntax of the shell. A builtin on the other hand is a command built into the shell (i.e. not an executable file). Builtins are transparent to the user but provide useful improvements in performance. It is possible to distinguish between keywords, builtins and external commands using the type command. In essence type is the shell builtin form of which with the added advantage that it can identify bash shell specific entities. The following screen fragment clarifies all these different concepts.
foo@bar:~> type ifif is a shell keywordfoo@bar:~> type testtest is a shell builtinfoo@bar:~> type [[ is a shell builtinfoo@bar:~> type lsls is aliased to `ls $LS_OPTIONS'foo@bar:~> type chmodchmod is /bin/chmodfoo@bar:~> which chmod/bin/chmod
Commands executed by bash are subdivided into external and internal commands. A list of commonly used and important builtin commands are documented below. A description of each builtin command can be obtained with the help builtin, and they are described in the man page for bash.

7813 LPI 102 Course Notes Scripting
13.7 Arithmetic expansion and evaluationBash is capable of doing integer arithmetic, that is all variables and constants must be integer and the results produced are also only integer. There are a number of alternative means for doing arithmetic. These are:• expr• let• $(( ))
13.7.1 exprEvaluate expression expr preforms both arithmetic and some string evaluations on any given set of arguments. The command expr considers each of it parameters as either a number, operator or string. Operations may be arithmetic, comparisons, strings or logical. The following examples should clarify the use of expr.
answer=`expr 1 + 2` # answer is 3, as expected. answer=`expr 2 \* 3` # answer is now 3. REMEMBER TO ESCAPE *. answer=`expr "1 + 2"` # echo $answer produces 1 + 2.answer=`expr 1+2` # echo $answer produces 1+2.
The use of expr in this manner is an example of arithmetic expansion.As an aside to arithmetic expansion the following string operations may also be performed using expr. The substr operator extracts a part of a message.
foo@bar:~> message="The cat sat on the mat."foo@bar:~> expr substr "$message" 5 3catfoo@bar:~> expr substr "$message" 5 6cat sa
The match operator prints out the number of characters that match the string.foo@bar:~> expr match $message "The"3foo@bar:~> expr match "$message" '.*cat"7foo@bar:~> expr match "$message ".*"23foo@bar:~> expr match "$message "cat"0
13.7.2 let*The shell builtin let provides a means to perform variable evaluation. As the let is a bash builtin the process of calcuating the resut of an expression is consider evalutation. In effect, and unlike expr, let takes only a single argument as the following code fragment demonstrates.
let a=1+2 ; echo $a # echo $a produces 3.
let a=$a+1 ; echo $a # echo $a produces 4.
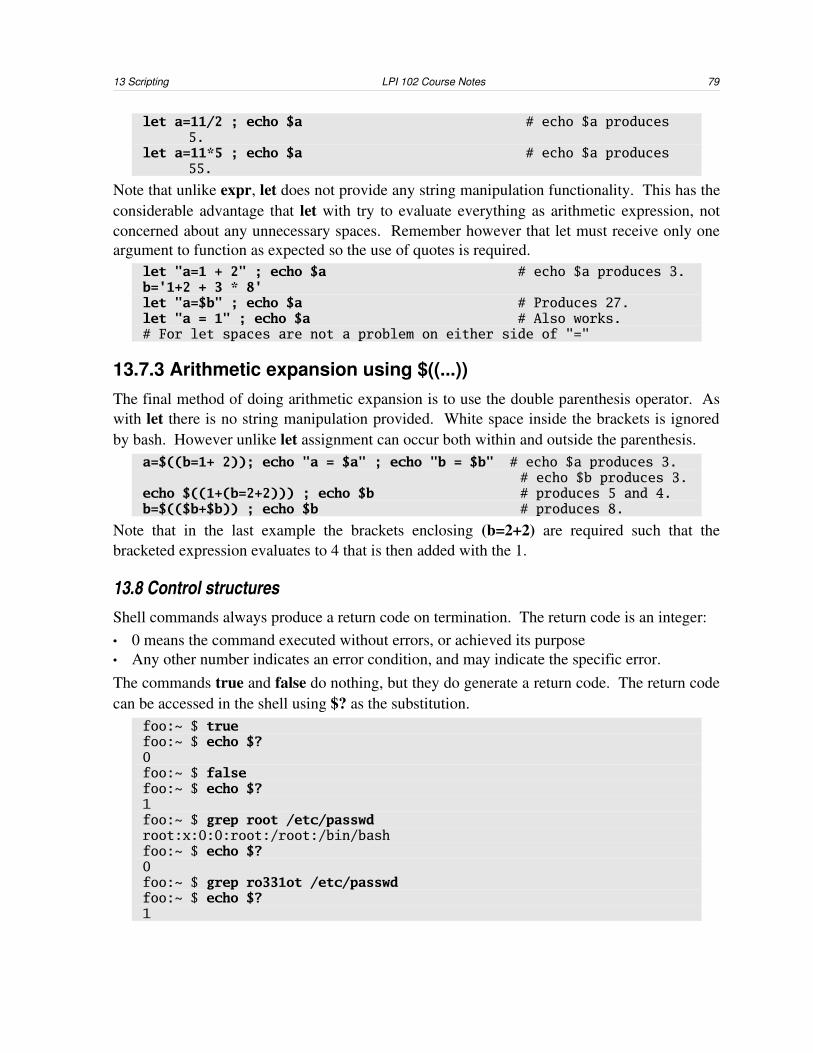
13 Scripting LPI 102 Course Notes 79
let a=11/2 ; echo $a # echo $a produces 5.
let a=11*5 ; echo $a # echo $a produces 55.
Note that unlike expr, let does not provide any string manipulation functionality. This has the considerable advantage that let with try to evaluate everything as arithmetic expression, not concerned about any unnecessary spaces. Remember however that let must receive only one argument to function as expected so the use of quotes is required.
let "a=1 + 2" ; echo $a # echo $a produces 3. b='1+2 + 3 * 8'let "a=$b" ; echo $a # Produces 27. let "a = 1" ; echo $a # Also works. # For let spaces are not a problem on either side of "="
13.7.3 Arithmetic expansion using $((...))The final method of doing arithmetic expansion is to use the double parenthesis operator. As with let there is no string manipulation provided. White space inside the brackets is ignored by bash. However unlike let assignment can occur both within and outside the parenthesis.
a=$((b=1+ 2)); echo "a = $a" ; echo "b = $b" # echo $a produces 3. # echo $b produces 3.
echo $((1+(b=2+2))) ; echo $b # produces 5 and 4. b=$(($b+$b)) ; echo $b # produces 8.
Note that in the last example the brackets enclosing (b=2+2) are required such that the bracketed expression evaluates to 4 that is then added with the 1.
13.8 Control structuresShell commands always produce a return code on termination. The return code is an integer:• 0 means the command executed without errors, or achieved its purpose• Any other number indicates an error condition, and may indicate the specific error.The commands true and false do nothing, but they do generate a return code. The return code can be accessed in the shell using $? as the substitution.
foo:~ $ truefoo:~ $ echo $?0foo:~ $ falsefoo:~ $ echo $?1foo:~ $ grep root /etc/passwdroot:x:0:0:root:/root:/bin/bashfoo:~ $ echo $?0foo:~ $ grep ro331ot /etc/passwdfoo:~ $ echo $?1

8013 LPI 102 Course Notes Scripting
13.8.1 testIn the shell, conditional testing of variables is handled by an external program, or at least a shell builtin. The command test (see man test) and the equivalent builtin [ ... ] provide a number of tests which are used for conditional execution in scripts.test implements three basic classes of test, namely1. String comparisons
test "$STRING1" = "$STRING2" # ok if two strings are equal[ "$STRING1" = "$STRING2" ] # ok if two strings are equal[ "$STRING1" != "$STRING2" ] # ok if two strings are not
equal[ -z "$STRING1" ] # ok if $STRING1 is empty[ "$STRING1" ] # ok if $STRING1 is non-empty[ $STRING1 = $STRING2 ] # syntax error (sometimes)
2. Numeric comparisonstest integer1 -eq integer2 # ok if numbers are equal[ $A -eq $B ] # ok if A=B[ $A -gt $B ] # ok if A>B[ $A -lt $B ] # ok if A<B[ $A -ge $B ] # ok if A>=B[ $A -le $B ] # ok if A<=B[ $A -ne $B ] # ok if A not equal to B
3. File tests test -e $FILE # ok if file exists[ -e $FILE ] # ok if file exists[ -d $FILE ] # ok if file is a directory[ -f $FILE ] # ok if file is a regular filenames[ -r $FILE ] # ok if file is a readable[ -s $FILE ] # ok if file size greater than 0
There are a number of file tests not listed here for examining the type, size, permissions and ownership of files.
13.8.2 &&, ||The && (and) and || (or) operators work in the sense of:
• Do this right && I'll give you a lollipopcp money wallet && echo Give him a lollipop
• Do this right || else cp lollipop customer || echo Sorry, lollipop failure
Most commands return sensible values, so you can do things like this in a script. If tar returns an error code (non zero), then a mail is sent to the administrator
tar -cvzf etcbackup.tar /etc >& etcbackup.log || cat etcbackup.log | mail -s "Backup failed" root
13.8.3 if ... then ... fiA if/then construct in bash is formed as follows, where command can be any valid list of bash
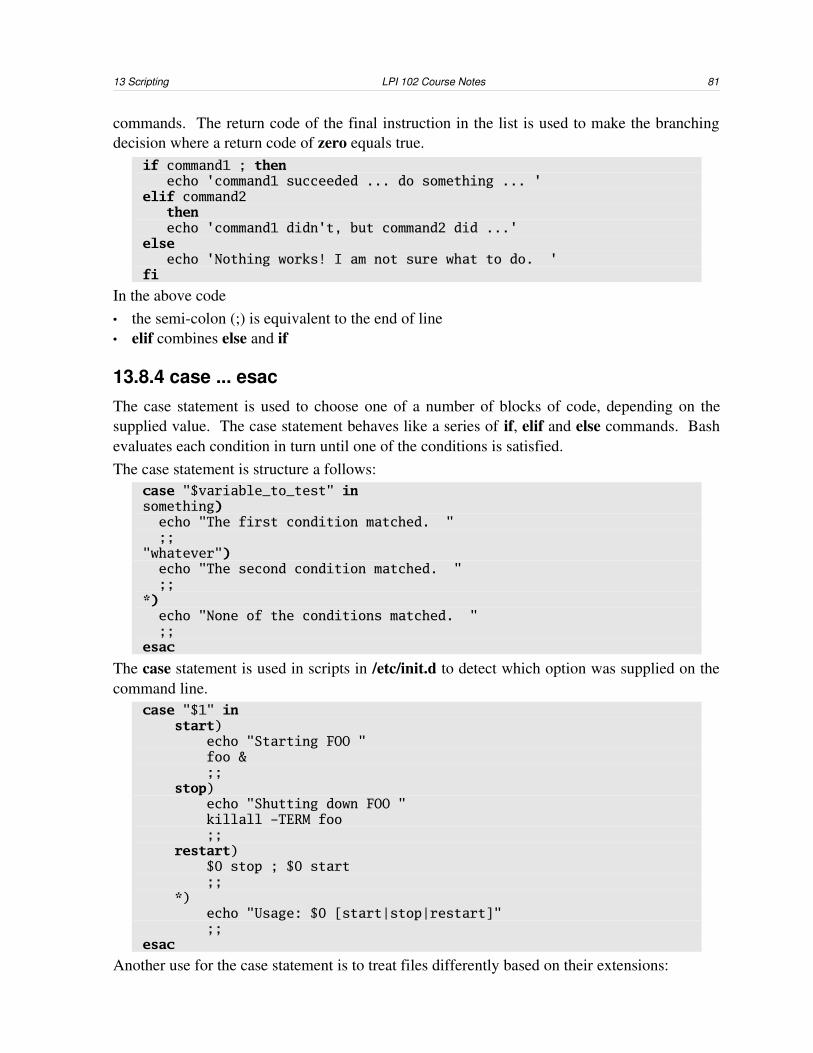
13 Scripting LPI 102 Course Notes 81
commands. The return code of the final instruction in the list is used to make the branching decision where a return code of zero equals true.
if command1 ; then echo 'command1 succeeded ... do something ... 'elif command2 then echo 'command1 didn't, but command2 did ...'else echo 'Nothing works! I am not sure what to do. 'fi
In the above code• the semicolon (;) is equivalent to the end of line• elif combines else and if
13.8.4 case ... esacThe case statement is used to choose one of a number of blocks of code, depending on the supplied value. The case statement behaves like a series of if, elif and else commands. Bash evaluates each condition in turn until one of the conditions is satisfied. The case statement is structure a follows:
case "$variable_to_test" insomething) echo "The first condition matched. " ;;"whatever") echo "The second condition matched. " ;;*) echo "None of the conditions matched. " ;;esac
The case statement is used in scripts in /etc/init.d to detect which option was supplied on the command line.
case "$1" in start) echo "Starting FOO " foo & ;; stop) echo "Shutting down FOO " killall -TERM foo ;; restart) $0 stop ; $0 start ;; *) echo "Usage: $0 [start|stop|restart]" ;;esac
Another use for the case statement is to treat files differently based on their extensions:
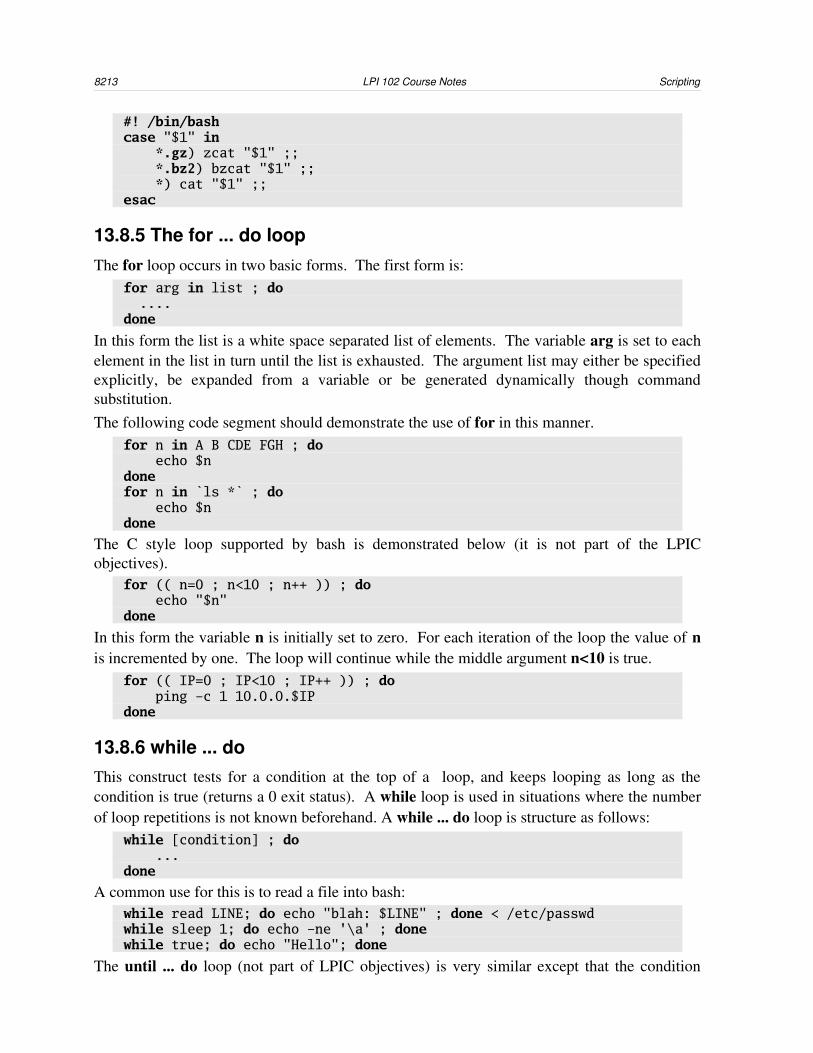
8213 LPI 102 Course Notes Scripting
#! /bin/bashcase "$1" in *.gz) zcat "$1" ;; *.bz2) bzcat "$1" ;; *) cat "$1" ;;esac
13.8.5 The for ... do loopThe for loop occurs in two basic forms. The first form is:
for arg in list ; do ....done
In this form the list is a white space separated list of elements. The variable arg is set to each element in the list in turn until the list is exhausted. The argument list may either be specified explicitly, be expanded from a variable or be generated dynamically though command substitution. The following code segment should demonstrate the use of for in this manner.
for n in A B CDE FGH ; do echo $ndonefor n in `ls *` ; do echo $ndone
The C style loop supported by bash is demonstrated below (it is not part of the LPIC objectives).
for (( n=0 ; n<10 ; n++ )) ; do echo "$n"done
In this form the variable n is initially set to zero. For each iteration of the loop the value of n is incremented by one. The loop will continue while the middle argument n<10 is true.
for (( IP=0 ; IP<10 ; IP++ )) ; do ping -c 1 10.0.0.$IPdone
13.8.6 while ... doThis construct tests for a condition at the top of a loop, and keeps looping as long as the condition is true (returns a 0 exit status). A while loop is used in situations where the number of loop repetitions is not known beforehand. A while ... do loop is structure as follows:
while [condition] ; do ...done
A common use for this is to read a file into bash:while read LINE; do echo "blah: $LINE" ; done < /etc/passwdwhile sleep 1; do echo -ne '\a' ; donewhile true; do echo "Hello"; done
The until ... do loop (not part of LPIC objectives) is very similar except that the condition
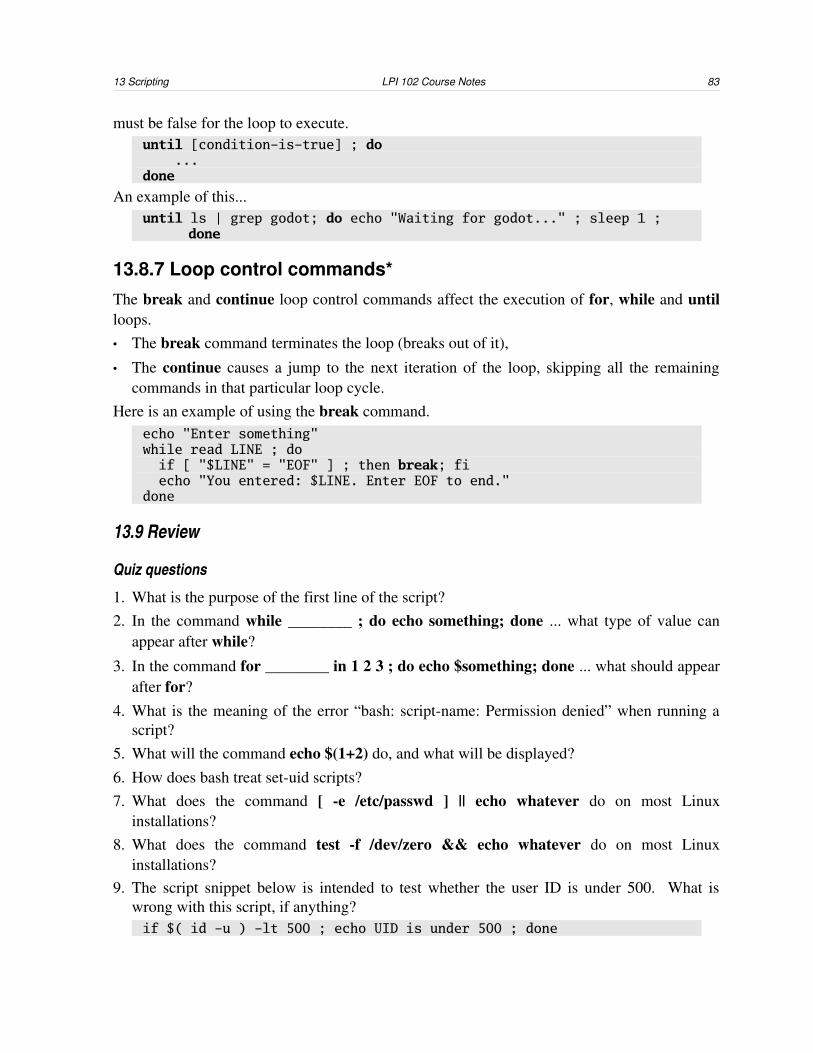
13 Scripting LPI 102 Course Notes 83
must be false for the loop to execute.until [condition-is-true] ; do ...done
An example of this...until ls | grep godot; do echo "Waiting for godot..." ; sleep 1 ;
done
13.8.7 Loop control commands*The break and continue loop control commands affect the execution of for, while and until loops.• The break command terminates the loop (breaks out of it),
• The continue causes a jump to the next iteration of the loop, skipping all the remaining commands in that particular loop cycle.
Here is an example of using the break command.echo "Enter something"while read LINE ; do if [ "$LINE" = "EOF" ] ; then break; fi echo "You entered: $LINE. Enter EOF to end."done
13.9 Review
Quiz questions
1. What is the purpose of the first line of the script?2. In the command while ________ ; do echo something; done ... what type of value can
appear after while?
3. In the command for ________ in 1 2 3 ; do echo $something; done ... what should appear after for?
4. What is the meaning of the error “bash: scriptname: Permission denied” when running a script?
5. What will the command echo $(1+2) do, and what will be displayed?6. How does bash treat setuid scripts?7. What does the command [ e /etc/passwd ] || echo whatever do on most Linux
installations?8. What does the command test f /dev/zero && echo whatever do on most Linux
installations?9. The script snippet below is intended to test whether the user ID is under 500. What is
wrong with this script, if anything?if $( id -u ) -lt 500 ; echo UID is under 500 ; done

8413 LPI 102 Course Notes Scripting
Assignment
1. What will the following script do?#! /bin/bashwhile sleep 600; do netstat -ant | grep '0\.0\.0\.0:25.*LISTEN' || echo "Oops" | mail -s "Oops" rootdone
Find a better way of doing the same thing.2. Write a script to test multiplication tables. Generate two random numbers A and B, and
calculate the product of the numbers (A*B). Ask the user what A / B is, and test whether the answer supplied is correct. You can use B=$((RANDOM % 20 + 1)) to generate the random numbers.
3. Write a script to manipulate users' .forward files. The script is to be run by root and must accept two parameters – a user name, and an email address. The script must create a file named .forward in the user's home directory, and enter the email address in the file. If no email address is given, the script must remove the .forward file from the user's home directory. For bonus points, have the script show the previous contents of the .forward file if it existed, and explain each step it takes.
Answers to quiz questions
1. To tell the kernel which interpreter to use for a script.2. A command or a number of commands.3. A variable name, without a $.4. The script is not executable.5. Same as echo `1+2` attempt to run the command “1+2”, and print “bash: 1+2: command
not found” and a blank line.6. setuid scripts are run as regular scripts. Bash does not set its UID.7. Nothing (it exists)8. Nothing (it's not a file)9. Missing [ ... ], missing then, done instead of fi.

14 Users and Groups LPI 102 Course Notes 85
14 Users and Groupsusers, n. pl. idiotgroup, n. many users
– system administrator’s dictionary
LPIC topic 1.111.1 — Manage users and group accounts and related system files [4]Weight: 4Objective
Candidate should be able to add, remove, suspend and change user accounts. Tasks include to add and remove groups, to change user/group info in passwd/group databases. The objective also includes creating special purpose and limited accounts.
Key files, terms, and utilities includechage Change password aging and expiry information for a usergpasswd Set a group passwordgroupadd Create a new groupgroupdel Delete a groupgroupmod Change group detailsgrpconv Create gshadow from group file containing passwordsgrpunconv Convert gshadow to group file with passwordspasswd Change a user’s passwordpwconv Convert from regular passwords to shadow passwordspwunconv Convert from shadow passwords to regular passwordsuseradd Add a useruserdel Delete a user, and maybe his files toousermod Change a user’s details/etc/passwd The user and password database/etc/shadow The actual password part of the password database/etc/group User groups database/etc/gshadow Passwords for groups when using shadow passwords
14.1 UsersThe term “user” refers to an account on the machine which allows access to some specific services. As far as Linux is concerned, each user is a number – the user ID. The name is used to establish the user’s identity at login. Some users on the system represent real people who will log onto the machine in some way or another. Other users are system accounts which allow certain programs (normally daemons) to run with limited permissions on the machine.The password database provides some basic properties to users such as a home directory and a shell. What you set these properties to determines the services that the user may use, as well as affecting the overall security of the machine.
8614 LPI 102 Course Notes Users and Groups
As far as the kernel is concerned, a user is simply a number assigned to processes and files. Groups are also numbers assigned to processes and files. When you log in, your user ID is determined, and then associated with all the processes you start. In the regular course of events6, the login process reads the file /etc/passwd to translate your login name into the appropriate user ID, and /etc/shadow to check whether the password you enter is correct. The login process also notes the group given in /etc/passwd and the supplementary groups listed in /etc/group. It then starts the configured shell with the correct UID, GID and supplementary groups. After logging in, various other programs refer to /etc/passwd and /etc/group. For example ls uses the files to display the appropriate names for file owners and file groups, and su and sg work similarly to login.So, a user is then:• An entry in /etc/passwd (name, home directory, shell)
• An entry in /etc/shadow (password and expiry information)
• A home directory owned by the user (usually under /home). A user will also accumulate files in other places, such as mail in /var/mail and files in /tmp.
14.2 The passwd fileThe file /etc/passwd is the default database of Unix users on the system. The file has the following format:
name:X:UID:GID:Comment:home:shellField DescriptionLogin name The users name, case sensitive, usually lowercase, must be
uniqueX Encrypted password. Most systems store passwords in in
/etc/shadow and “x” is used to indicate this.UID A user identification number. Normally UIDs for non system
users are 500 and above. If the UID is duplicated the two users are effectively duplicate logins for the same account.
GID Group identification number. This is set to the ID of a valid group in /etc/group. Files created by the user are assigned to the group named here (by default).
Comment The comment field can contain any information, usually the user's full name. There is a standard for inserting other information separated by commas, such as the user’s room number.
Home The user's home directory, normally /home/username. In the case of a system account this will normally be where certain of the daemon's files are installed like /usr/local/daemonname.
Shell User command interpreter. When you log in, this is the
6 With the advent of PAM (pluggable authentication modules), the regular course of events can change, and the source of authentication data may be anything from a LDAP database to a Windows domain controller.
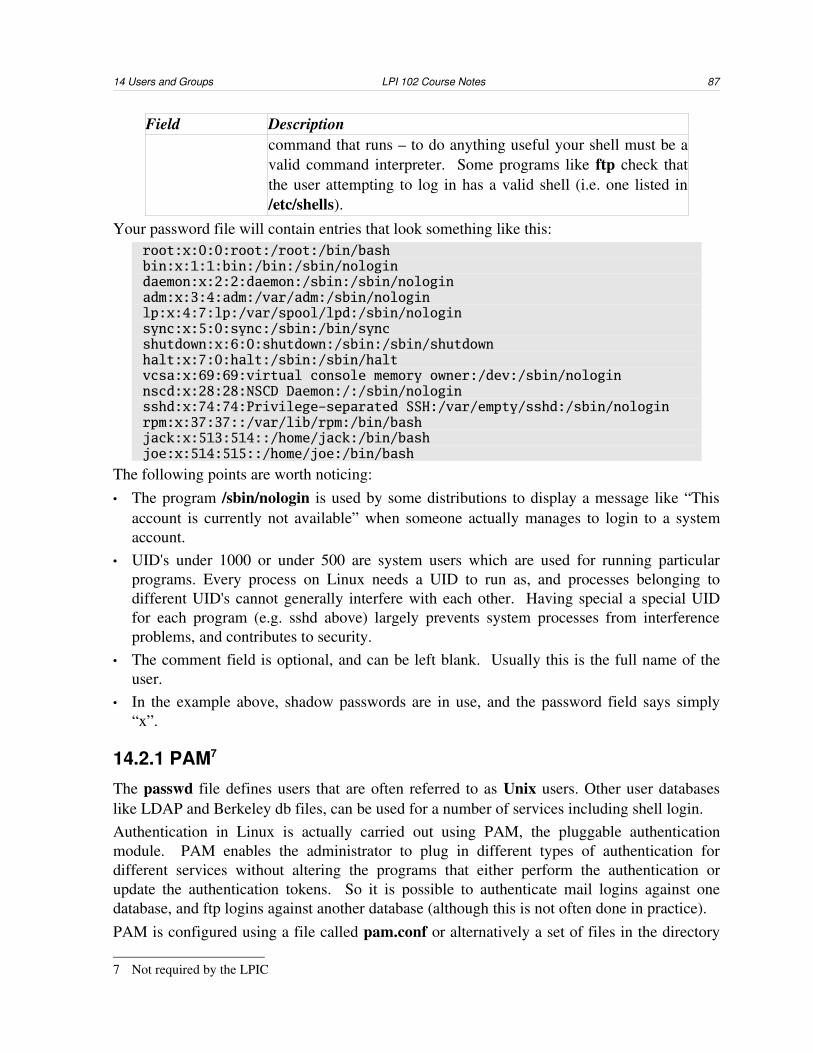
14 Users and Groups LPI 102 Course Notes 87
Field Descriptioncommand that runs – to do anything useful your shell must be a valid command interpreter. Some programs like ftp check that the user attempting to log in has a valid shell (i.e. one listed in /etc/shells).
Your password file will contain entries that look something like this:root:x:0:0:root:/root:/bin/bashbin:x:1:1:bin:/bin:/sbin/nologindaemon:x:2:2:daemon:/sbin:/sbin/nologinadm:x:3:4:adm:/var/adm:/sbin/nologinlp:x:4:7:lp:/var/spool/lpd:/sbin/nologinsync:x:5:0:sync:/sbin:/bin/syncshutdown:x:6:0:shutdown:/sbin:/sbin/shutdownhalt:x:7:0:halt:/sbin:/sbin/haltvcsa:x:69:69:virtual console memory owner:/dev:/sbin/nologinnscd:x:28:28:NSCD Daemon:/:/sbin/nologinsshd:x:74:74:Privilege-separated SSH:/var/empty/sshd:/sbin/nologinrpm:x:37:37::/var/lib/rpm:/bin/bashjack:x:513:514::/home/jack:/bin/bashjoe:x:514:515::/home/joe:/bin/bash
The following points are worth noticing:• The program /sbin/nologin is used by some distributions to display a message like “This
account is currently not available” when someone actually manages to login to a system account.
• UID's under 1000 or under 500 are system users which are used for running particular programs. Every process on Linux needs a UID to run as, and processes belonging to different UID's cannot generally interfere with each other. Having special a special UID for each program (e.g. sshd above) largely prevents system processes from interference problems, and contributes to security.
• The comment field is optional, and can be left blank. Usually this is the full name of the user.
• In the example above, shadow passwords are in use, and the password field says simply “x”.
14.2.1 PAM7
The passwd file defines users that are often referred to as Unix users. Other user databases like LDAP and Berkeley db files, can be used for a number of services including shell login.Authentication in Linux is actually carried out using PAM, the pluggable authentication module. PAM enables the administrator to plug in different types of authentication for different services without altering the programs that either perform the authentication or update the authentication tokens. So it is possible to authenticate mail logins against one database, and ftp logins against another database (although this is not often done in practice).PAM is configured using a file called pam.conf or alternatively a set of files in the directory
7 Not required by the LPIC
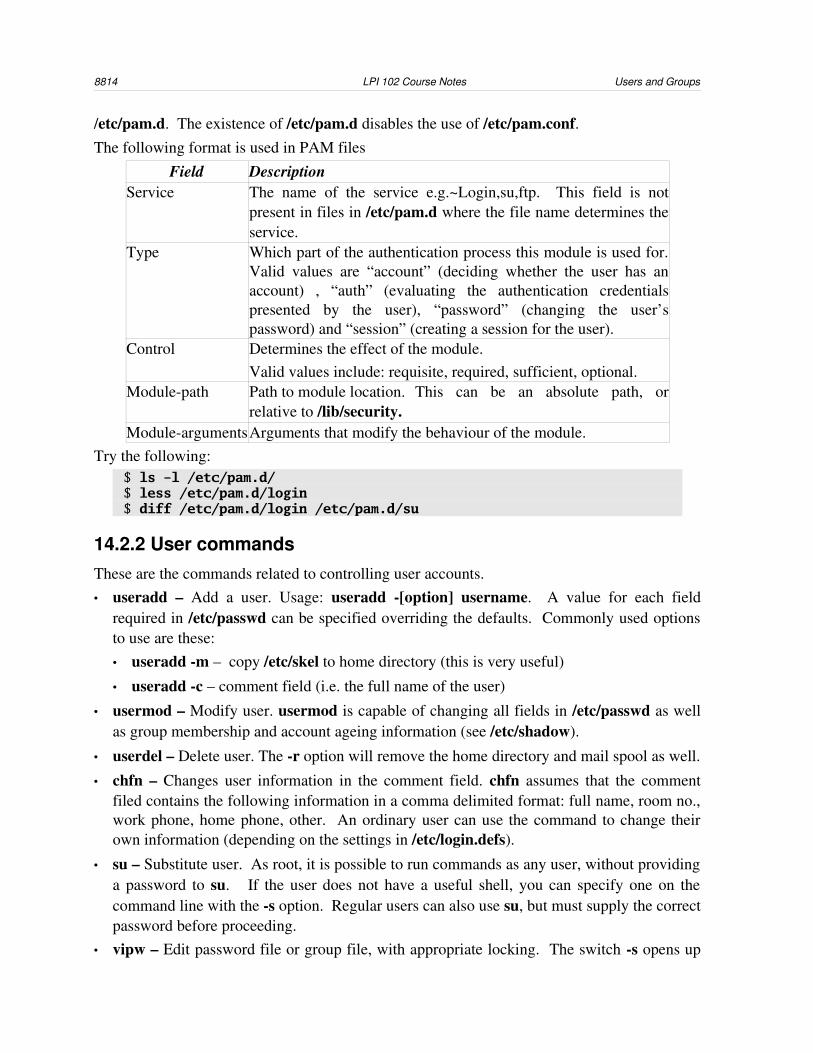
8814 LPI 102 Course Notes Users and Groups
/etc/pam.d. The existence of /etc/pam.d disables the use of /etc/pam.conf.The following format is used in PAM files
Field DescriptionService The name of the service e.g.~Login,su,ftp. This field is not
present in files in /etc/pam.d where the file name determines the service.
Type Which part of the authentication process this module is used for. Valid values are “account” (deciding whether the user has an account) , “auth” (evaluating the authentication credentials presented by the user), “password” (changing the user’s password) and “session” (creating a session for the user).
Control Determines the effect of the module. Valid values include: requisite, required, sufficient, optional.
Modulepath Path to module location. This can be an absolute path, or relative to /lib/security.
ModuleargumentsArguments that modify the behaviour of the module.Try the following:
$ ls -l /etc/pam.d/$ less /etc/pam.d/login$ diff /etc/pam.d/login /etc/pam.d/su
14.2.2 User commandsThese are the commands related to controlling user accounts.• useradd – Add a user. Usage: useradd [option] username. A value for each field
required in /etc/passwd can be specified overriding the defaults. Commonly used options to use are these:• useradd m – copy /etc/skel to home directory (this is very useful)
• useradd c – comment field (i.e. the full name of the user)
• usermod – Modify user. usermod is capable of changing all fields in /etc/passwd as well as group membership and account ageing information (see /etc/shadow).
• userdel – Delete user. The r option will remove the home directory and mail spool as well.
• chfn – Changes user information in the comment field. chfn assumes that the comment filed contains the following information in a comma delimited format: full name, room no., work phone, home phone, other. An ordinary user can use the command to change their own information (depending on the settings in /etc/login.defs).
• su – Substitute user. As root, it is possible to run commands as any user, without providing a password to su. If the user does not have a useful shell, you can specify one on the command line with the s option. Regular users can also use su, but must supply the correct password before proceeding.
• vipw – Edit password file or group file, with appropriate locking. The switch s opens up

14 Users and Groups LPI 102 Course Notes 89
the shadow file rather than the regular file.Try the following:
# useradd -m bob -c "Bob Cratchit" # passwd bob# ls -a /home/bob/# ls -a /etc/skel # vipw# su - bob$ chfn$ exit
Now change Bob's shell to /bin/true# vipw# su - bob# su -s /bin/bash – bob
Change the shell back to /bin/bash and experiment with locking and unlocking bob's account# passwd -s /bin/bash bob# passwd -l bob# passwd -u bob
14.3 Passwords and the shadow password fileThe original Unix password file contained an encrypted version of each plain text password. Authentication was possible, because the same encrypted text would be obtained when encrypting the password supplied in a login attempt. However, with faster computers it became possible to guess the correct password for a user by brute force, so the encrypted passwords were moved from passwd and group to shadow and gshadow.
14.3.1 The shadow password fileThe /etc/shadow password file is not only the location of the user's encrypted password, but also contains password aging information. With this file the administrator can control how often a user must change passwords as well as being able to suspend accounts.Like passwd the shadow file is an ascii text file containing colon “:” separated fields.
Name:Password:Last-changed:May-change:Must-change-warn:Expire:Disabled:Reserved
The details of the fields are these.• Name – Login name. This must be a login name listed in /etc/passwd• Password – Encrypted password, or * for no password. If there is no password, it is not
possible to login as this user. This is not the same as a blank password field, which means that the password is an empty string.
• Last changed – Days since Jan 1, 1970 that the password was last changed. This value is set by the passwd command.
• May Change – Days that must elapse since last password change before the password may be changed. The default value is 0.

9014 LPI 102 Course Notes Users and Groups
• Must Change Warn – Days since last password update after which the password must be changed. Default is 99999 days.
• Warning – Days before password is to expire that user is warned The default is 7 days.
• Expire – Days after password expires that account is disabled. Normally blank i.e. passwords never expire.
• Disabled – Days since Jan 1, 1970 that account is disabled. Normally blank i.e. never.
• Reserved – A reserved field (not used) (there must always be a reserved field, just in case though).
Note that the password is stored in encrypted format. The encrypted password is generated using the crypt routine (see man crypt). The crypt routine is a one way encryption algorithm and therefore it is not analytically possible to derive the password from the encrypted password. The PAM system when authenticating a user will encrypt the password and then compare the crypt with that in /etc/shadow.
PAM can be configured to encrypt passwords using MD5 hashing instead of the crypt function. This allows users to usefully specify longer passwords than 8 characters, although the encrypted passwords may not work on another Unix system.Here is what the shadow password file looks like in real life.
foo:~# cat /etc/shadowroot:$1$RBAjCEM7$/P85Bvo1ZzHx/aa9gjJTz.:12083:0:99999:7:::daemon:*:12083:0:99999:7:::bin:*:12083:0:99999:7:::sys:*:12083:0:99999:7:::sync:*:12083:0:99999:7:::nobody:*:12083:0:99999:7:::sshd:!:12084:0:99999:7:::fred:$1$Rf5XafZU$wpNEtTRGMlLQNKljX3P7D1:12084:0:99999:7:::george:$1$SjzIzZHa$8qKKn/sW1kXzxWtY7JSo51:12137:0:99999:7:::
You may wonder when did george's password change?foo:~# date -d "1 jan 1970 + 12137 days"Wed Mar 26 00:00:00 SAST 2003
Notes about this system:• The shadow file does not list the UID's of users, but only the names• There is no valid password for system users which will encrypt to “*” or “!” – this makes it
rather difficult for them to log in, which is the point.• The system shown is using MD5 passwords – the “$1$” gives that away.• The passwords can be changed, have not expired, and if they did, the users would receive 7
days notice of it when they log in.
14.3.2 Password commandsThese are the commands for changing passwords.• passwd – The passwd command edits /etc/shadow. The primary use of passwd is to

14 Users and Groups LPI 102 Course Notes 91
change passwords – either by the user, or by root.root can use passwd change the password of a specified user. All other users can run passwd without any arguments to change their own password. passwd can also be used to change the account aging information in the shadow file (see man 1 passwd)
• pwconv, pwunconv – pwconv creates an /etc/shadow from /etc/passwd and an optionally existing /etc/shadow. pwunconv creates passwd from passwd and shadow and then removes shadow.
Try the following# useradd -m bob# passwd bob# su - bob$ passwd $ vipw$ man passwd
Force Bob to change his password in 5 days.# vi /etc/shadow
Here is an example of using pwconv and pwunconv. In the process of doing this, the account expiry information may be lost.
foo:~# cd /etcfoo:/etc# cat passwdfoo:/etc# ls -la shadow* passwd* group* gshadow*foo:/etc# pwunconvfoo:/etc# grpunconvfoo:/etc# cat passwdfoo:/etc# ls -la shadow* passwd* group* gshadow*foo:/etc# pwconvfoo:/etc# grpunconvfoo:/etc# cat passwdfoo:/etc# ls -la shadow* passwd* group* gshadow*
14.4 GroupsEach Unix user belongs to at least one group. This is known as the initial group or default group. Membership of this group is indicated by the GID field in /etc/passwd. User can belong to other groups as well, these are known as supplemental groups. A group is defined by the /etc/group file, which lists the members of the group by name.
14.4.1 /etc/groupThe file has the following format:
name:X:GID:users
The fields are
Field Description Comment
Name Group name
X Optional encrypted Normally an X when shadow group

9214 LPI 102 Course Notes Users and Groups
Field Description Comment
password passwords are used.
GID Numerical group ID The unique ID for this group.
Users Users belonging to the group.
A comma separated list of users. The users who have the group as their initial group are not listed.
The password is used when a user runs the sg command to set his group. Any user that provides the correct password to sg can become a member of the group.
14.4.2 /etc/gshadowThe /etc/gshadow file contains group password and group administrators. The file has the following format:
name:crypt:admin:users
Field Description Comment
Name Group name
crypt The group’s encrypted password
Normally an * which means no password used, if there is no group password the sg command cannot be used.
admin List of admin users Admin users can be defined for a group, these users are allowed to add users to the group and to remove users from the group, and also to change the group password.
Users Users belonging to the group A comma separated list of users.
The group file looks something like this most of the time. Just as there are system users, there are also system groups.
foo@bar:~$ cat /etc/grouproot:x:0:rootbin:x:1:root,bin,daemondaemon:x:2:sys:x:3:tty:x:5:disk:x:6:lp:x:7:wwwadmin:x:8:kmem:x:9:wheel:x:10:uucp:x:14:uucp,fax,root,fnet,joedialout:x:16:root,joe,tom,dick,harry,fred,mary,elizabeth,bethusers:x:100:boneheads:x:102:fred,joe

14 Users and Groups LPI 102 Course Notes 93
14.4.3 Group commandsThese are the commands used for group administration.• groupadd – groupadd creates a new group. The group ID’s 099 are used for system
accounts, 100 upwards for groups of human users. • groupmod – Modify group i.e. can change the name or GID of a group. To change the
membership of the group you use gpasswd.
• groupdel – Delete a group.
• grpck – Checks the integrity of the /etc/group file.
• newgrp and sg – Can be used to change your group permissions, a kind of group version of su. This is of course only possible if the target group has a password, or is one of your supplemental groups.
• gpasswd – This command allows you to administer /etc/group and /etc/gshadow. In general use: gpasswd group
to change a group password, or gpasswd -A admin1,admin2 -M member1, member2 group
to add administrators or members to a group. Users defined as group administrators can use gpasswd to set the password.
• grpconv, grpunconv – grpconv creates /etc/gshadow from group and an optionally existing /etc/gshadow. grpunconv creates /etc/group from /etc/group and /etc/gshadow and then removes /etc/gshadow.
• vigr – Opens the /etc/group file in the vi editor. vigr creates a lock file so that other commands that modify /etc/group cannot make conflicting changes. vigr s modifies /etc/gshadow.
Commands to manipulate groups ...# groupadd myusers # vigr # protected vi /etc/group# grep myusers /etc/gshadow # gpasswd -A bob myusers# su - bob$ gpasswd myusers$ gpasswd -a student myusers# vigr# less /etc/gshadow
14.5 Review
Quiz questions
1. What are shadow passwords?2. What are group passwords used for?3. What happens to the user's session if you delete a user who is logged in from the password

9414 LPI 102 Course Notes Users and Groups
file?4. Under what circumstances would you create a group with a password?5. What steps are necessary to create a user manually?6. Which directory contains a template for a new user's home directory?7. Which switch to useradd sets the user's shell?
8. What is the difference between /etc/shadow and /etc/gshadow?9. How do you suspend a user account?10.What are accounts with a UID of under 500 used for? How does one create one of these?11.From left to right, what are the fields in /etc/passwd and /etc/shadow?12.When would you use the grpconv command?
Assignment
1. Convert your system from using shadow passwords to using clear hashed passwords in group and passwd. Is it possible to delete the shadow and gshadow files at this point? What happens about suspended accounts if you do this?
2. Reverse the process from the previous assignment.3. Create a new user named jkrqf with a shell of /dev/null, together with a default home
directory. Change all of the user's details using usermod, namely his name, UID, comment, home directory and password, being sure to move the files. Check that your changes took effect.
4. Create a 3 new users named hewey, dewey and lewey and a group named ducks, by manually editing the relevant files, and manually copying the skeleton directory. (This is more practice with cp and chown than anything else.) Log in as each of these users and check the group membership using the id command.
Answers to quiz questions
1. Encrypted password readable only by root in shadow and gshadow.2. You can become a member of the group on the fly if you know the password.3. Nothing, except that ls begins to display UIDs rather than the name of the user.4. For a group project.5. Edit passwd and shadow, and set the password using passwd. Create the home directory
(e.g. from skel), and change its ownership.
6. /etc/skel 7. s 8. Users vs. groups.9. passwd l user
10.System accounts. Use useradd u 480 or similar.11.See man (5) passwd and man (5) shadow.

14 Users and Groups LPI 102 Course Notes 95
12.When you have readable encrypted passwords in /etc/group, or when you want to use the extended group administration features.
9615 LPI 102 Course Notes The Environment
15 The Environment“She sells sea shells on the sea shore...”“He bashes key slashes on the key board...”
– Unix environmentalism
LPIC topic 1.111.2 — Tune the user environment and system environment variables [3]Weight: 3Objectives
Candidate should be able to modify global and user profiles. This includes setting environment variables, maintaining skel directories for new user accounts and setting command search path with the proper directory.
Key files, terms and utilities includeenv Show exported environment variablesexport Add an environment variable to the export listset Show settingsunset Remove an environment variable/etc/profile Global profile/etc/skel Skeleton for new users' home directories
15.1 /etc/skelWhen you create a new user using useradd m or adduser, the home directory that the user receives is a copy of the files in /etc/skel. The files are, however, owned by the user, and can be further customised as necessary.
bar:~ $ ls -a /etc/skel
If you change the contents of a file in /etc/skel, all new users will receive a copy of the changed file.
bar:~ $ ls -a /etc/skel. .. .bash_logout .bash_profile .bashrc .emacs .gtkrc .kdebar:~ $ cp /etc/inputrc /etc/skel/.inputrcbar:~ $ vi /etc/skel/.inputrc
15.2 ProfilesThe global profile is stored in /etc/profile. This script is always executed, in addition to the profile scripts in the user's home directory when a new login session is created. Changes to this file therefore affect all users.The profile set the initial conditions for shell sessions, and may execute scripts. Initial conditions include the values of aliases, shell functions and environment variables.
foo@bar:~> less ~/.profilefoo@bar:~> less /etc/profile

15 The Environment LPI 102 Course Notes 97
foo@bar:~> less ~/etc/.profile
15.3 Environment variablesEnvironment variables play a major role in the initial conditions of the shell. When a new process is started, it receives a copy of all the exported environment variables. Many processes are customised by the contents of environment variables.A list of environment variables can be displayed using the env command8.
foo@bar:~> envPWD=/home/fooPS1=\u@\h:\w\$USER=fooMAIL=/var/mail/fooLOGNAME=fooSHLVL=1SHELL=/bin/bashHOME=/home/fooTERM=xtermPATH=/usr/local/bin:/usr/bin:/bin:/usr/bin/X11:/usr/games_=/usr/bin/env
The export builtin shows a list of variables which are exported. The output is similar to env, but the format is different9.
foo@bar:~> exportdeclare -x HOME="/home/foo"declare -x LOGNAME="foo"declare -x MAIL="/var/mail/foo"declare -x OLDPWDdeclare -x
PATH="/usr/local/bin:/usr/bin:/bin:/usr/bin/X11:/usr/games"declare -x PS1="\\u@\\h:\\w\\\$ "declare -x PWD="/home/foo"declare -x SHELL="/bin/bash"declare -x SHLVL="1"declare -x TERM="xterm"declare -x USER="foo"
Variables in bash can be created by using an assignment statement, e.g. NAME=VALUE. The environment variables you create can be accessed in the shell using the syntax $NAME – also in double quotes.Once a variable exists, it can be added to the export list with the export builtin – either after assigning a value to it (export NAME), or as part of the assignment (export NAME=VALUE).
foo@bar:~> VAR="30 people did a course"foo@bar:~> echo $VAR30 people did a coursefoo@bar:~> set | grep ^VAR
8 The stated purpose of the env command is to run a command in a modified environment i.e. with some or all of the environment variables set to a different value. You can do this directly in bash, e.g. “A=B command”. env is however quite useful for displaying environment variables.
9 The example here is cooked – how can you tell?
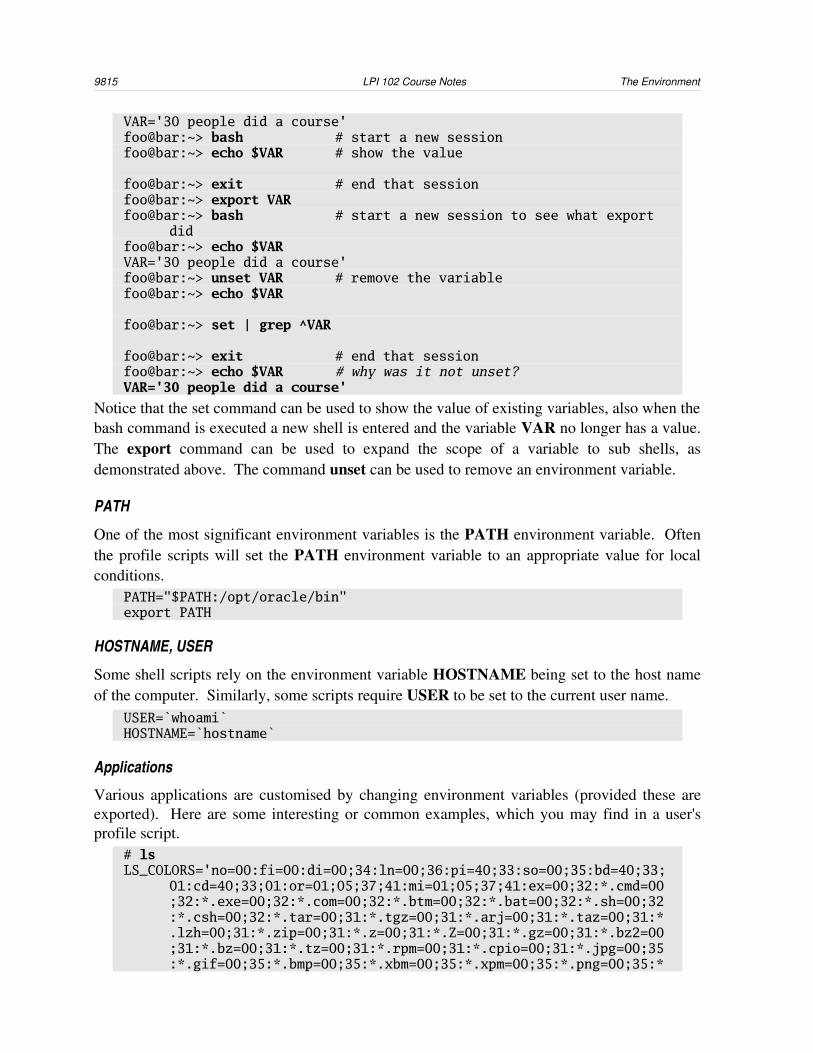
9815 LPI 102 Course Notes The Environment
VAR='30 people did a course'foo@bar:~> bash # start a new sessionfoo@bar:~> echo $VAR # show the value
foo@bar:~> exit # end that sessionfoo@bar:~> export VARfoo@bar:~> bash # start a new session to see what export
didfoo@bar:~> echo $VARVAR='30 people did a course'foo@bar:~> unset VAR # remove the variablefoo@bar:~> echo $VAR
foo@bar:~> set | grep ^VAR
foo@bar:~> exit # end that sessionfoo@bar:~> echo $VAR # why was it not unset?VAR='30 people did a course'
Notice that the set command can be used to show the value of existing variables, also when the bash command is executed a new shell is entered and the variable VAR no longer has a value. The export command can be used to expand the scope of a variable to sub shells, as demonstrated above. The command unset can be used to remove an environment variable.
PATH
One of the most significant environment variables is the PATH environment variable. Often the profile scripts will set the PATH environment variable to an appropriate value for local conditions.
PATH="$PATH:/opt/oracle/bin"export PATH
HOSTNAME, USER
Some shell scripts rely on the environment variable HOSTNAME being set to the host name of the computer. Similarly, some scripts require USER to be set to the current user name.
USER=`whoami`HOSTNAME=`hostname`
Applications
Various applications are customised by changing environment variables (provided these are exported). Here are some interesting or common examples, which you may find in a user's profile script.
# lsLS_COLORS='no=00:fi=00:di=00;34:ln=00;36:pi=40;33:so=00;35:bd=40;33;
01:cd=40;33;01:or=01;05;37;41:mi=01;05;37;41:ex=00;32:*.cmd=00;32:*.exe=00;32:*.com=00;32:*.btm=00;32:*.bat=00;32:*.sh=00;32:*.csh=00;32:*.tar=00;31:*.tgz=00;31:*.arj=00;31:*.taz=00;31:*.lzh=00;31:*.zip=00;31:*.z=00;31:*.Z=00;31:*.gz=00;31:*.bz2=00;31:*.bz=00;31:*.tz=00;31:*.rpm=00;31:*.cpio=00;31:*.jpg=00;35:*.gif=00;35:*.bmp=00;35:*.xbm=00;35:*.xpm=00;35:*.png=00;35:*
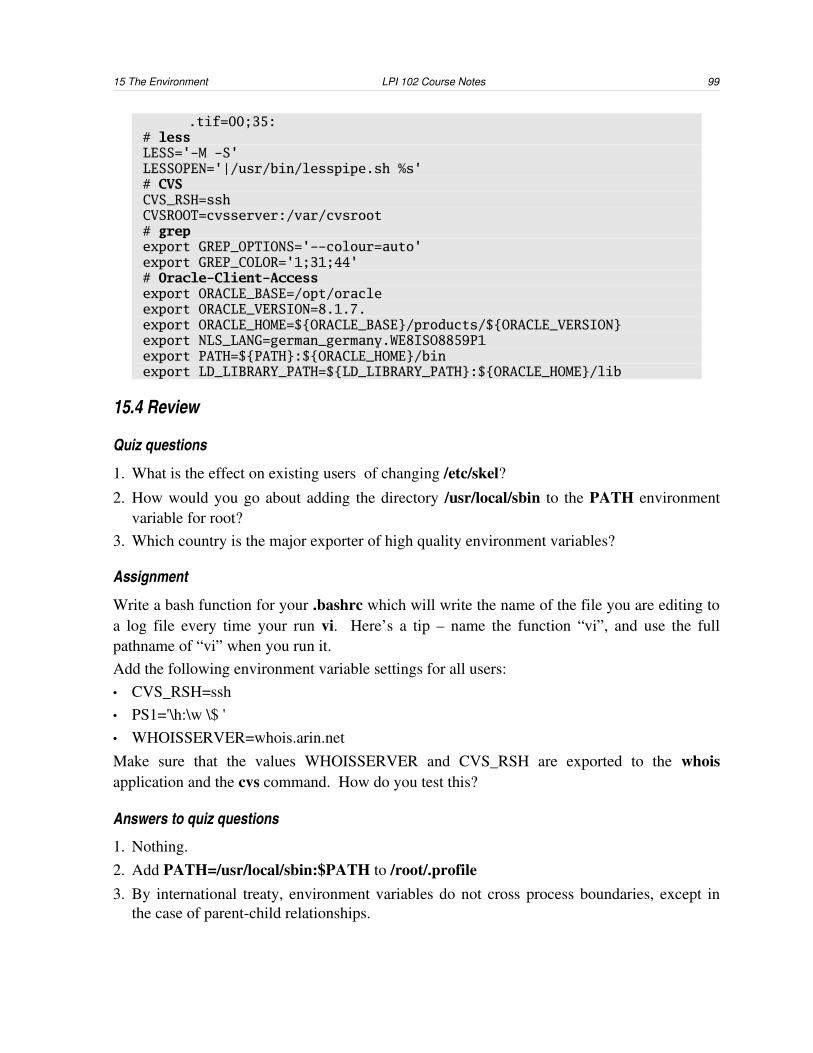
15 The Environment LPI 102 Course Notes 99
.tif=00;35:# lessLESS='-M -S'LESSOPEN='|/usr/bin/lesspipe.sh %s'# CVSCVS_RSH=sshCVSROOT=cvsserver:/var/cvsroot# grepexport GREP_OPTIONS='--colour=auto'export GREP_COLOR='1;31;44'# Oracle-Client-Access export ORACLE_BASE=/opt/oracle export ORACLE_VERSION=8.1.7. export ORACLE_HOME=${ORACLE_BASE}/products/${ORACLE_VERSION} export NLS_LANG=german_germany.WE8ISO8859P1 export PATH=${PATH}:${ORACLE_HOME}/bin export LD_LIBRARY_PATH=${LD_LIBRARY_PATH}:${ORACLE_HOME}/lib
15.4 Review
Quiz questions
1. What is the effect on existing users of changing /etc/skel?2. How would you go about adding the directory /usr/local/sbin to the PATH environment
variable for root?3. Which country is the major exporter of high quality environment variables?
Assignment
Write a bash function for your .bashrc which will write the name of the file you are editing to a log file every time your run vi. Here’s a tip – name the function “vi”, and use the full pathname of “vi” when you run it.Add the following environment variable settings for all users:• CVS_RSH=ssh• PS1='\h:\w \$ '• WHOISSERVER=whois.arin.netMake sure that the values WHOISSERVER and CVS_RSH are exported to the whois application and the cvs command. How do you test this?
Answers to quiz questions
1. Nothing.2. Add PATH=/usr/local/sbin:$PATH to /root/.profile3. By international treaty, environment variables do not cross process boundaries, except in
the case of parentchild relationships.
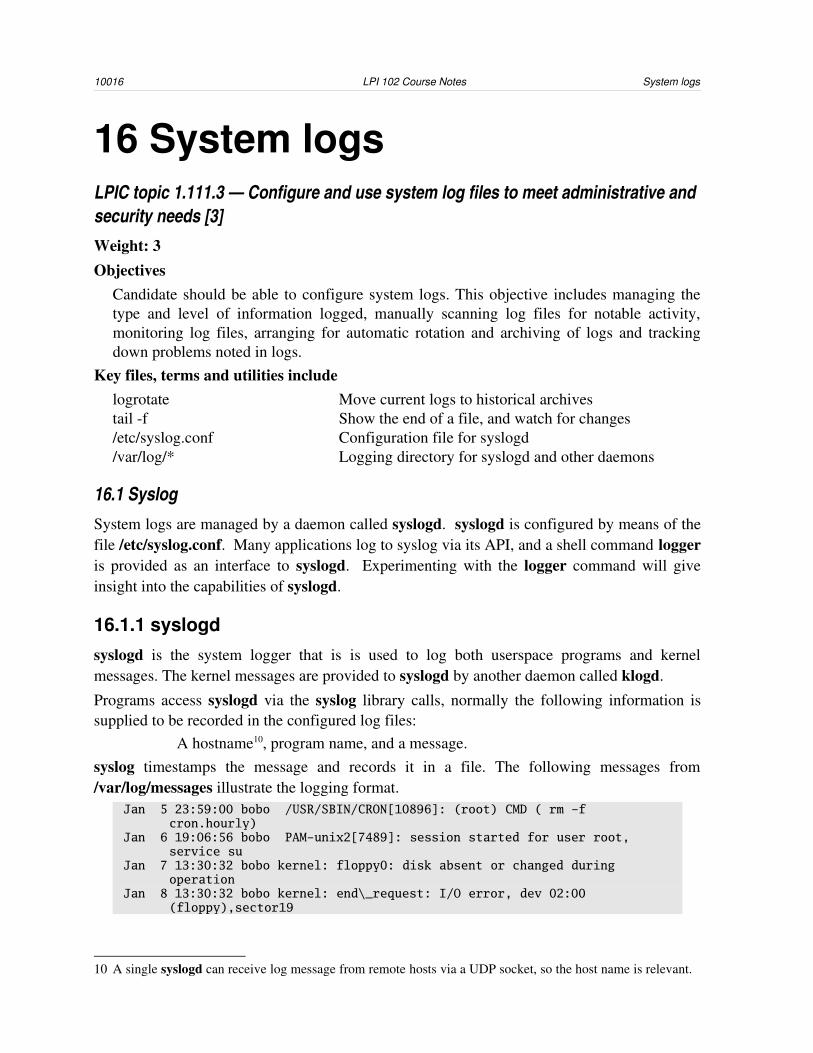
10016 LPI 102 Course Notes System logs
16 System logsLPIC topic 1.111.3 — Configure and use system log files to meet administrative and security needs [3]Weight: 3Objectives
Candidate should be able to configure system logs. This objective includes managing the type and level of information logged, manually scanning log files for notable activity, monitoring log files, arranging for automatic rotation and archiving of logs and tracking down problems noted in logs.
Key files, terms and utilities includelogrotate Move current logs to historical archivestail f Show the end of a file, and watch for changes/etc/syslog.conf Configuration file for syslogd/var/log/* Logging directory for syslogd and other daemons
16.1 SyslogSystem logs are managed by a daemon called syslogd. syslogd is configured by means of the file /etc/syslog.conf. Many applications log to syslog via its API, and a shell command logger is provided as an interface to syslogd. Experimenting with the logger command will give insight into the capabilities of syslogd.
16.1.1 syslogdsyslogd is the system logger that is is used to log both userspace programs and kernel messages. The kernel messages are provided to syslogd by another daemon called klogd.
Programs access syslogd via the syslog library calls, normally the following information is supplied to be recorded in the configured log files:
A hostname10, program name, and a message. syslog timestamps the message and records it in a file. The following messages from /var/log/messages illustrate the logging format.
Jan 5 23:59:00 bobo /USR/SBIN/CRON[10896]: (root) CMD ( rm -f cron.hourly)
Jan 6 19:06:56 bobo PAM-unix2[7489]: session started for user root, service su
Jan 7 13:30:32 bobo kernel: floppy0: disk absent or changed during operation
Jan 8 13:30:32 bobo kernel: end\_request: I/O error, dev 02:00 (floppy),sector19
10 A single syslogd can receive log message from remote hosts via a UDP socket, so the host name is relevant.
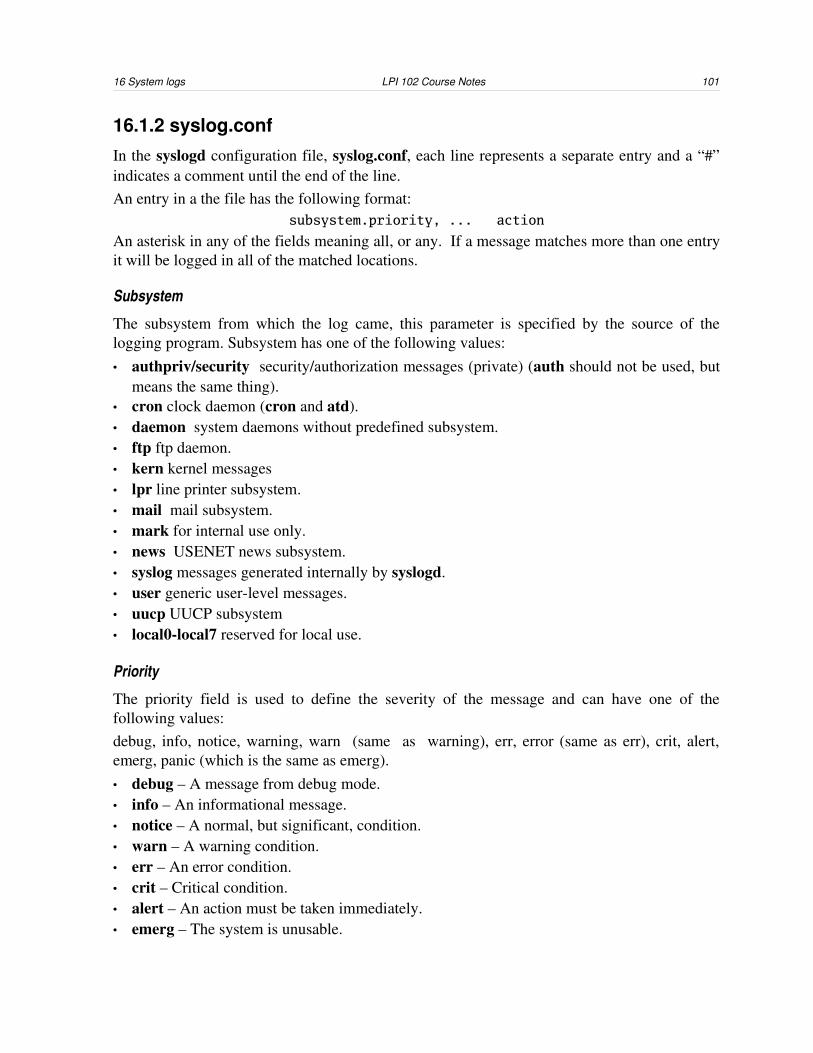
16 System logs LPI 102 Course Notes 101
16.1.2 syslog.confIn the syslogd configuration file, syslog.conf, each line represents a separate entry and a “#” indicates a comment until the end of the line.An entry in a the file has the following format:
subsystem.priority, ... action
An asterisk in any of the fields meaning all, or any. If a message matches more than one entry it will be logged in all of the matched locations.
Subsystem
The subsystem from which the log came, this parameter is specified by the source of the logging program. Subsystem has one of the following values: • authpriv/security security/authorization messages (private) (auth should not be used, but
means the same thing).• cron clock daemon (cron and atd).• daemon system daemons without predefined subsystem.• ftp ftp daemon.• kern kernel messages• lpr line printer subsystem.• mail mail subsystem.• mark for internal use only.• news USENET news subsystem.• syslog messages generated internally by syslogd.• user generic userlevel messages.• uucp UUCP subsystem• local0local7 reserved for local use.
Priority
The priority field is used to define the severity of the message and can have one of the following values:debug, info, notice, warning, warn (same as warning), err, error (same as err), crit, alert, emerg, panic (which is the same as emerg).• debug – A message from debug mode.• info – An informational message.• notice – A normal, but significant, condition.• warn – A warning condition.• err – An error condition.• crit – Critical condition.• alert – An action must be taken immediately.• emerg – The system is unusable.

10216 LPI 102 Course Notes System logs
Action
This field specifies where the message must be logged. This field can be of the following types:Plain file, Named Pipe, Terminal, Remote machine, List of users.• Plain file – The absolute path to a plain file which will be used as a log. syslogd normally
sync’s the file to disk after a message is written to it in order to prevent loss of data in a system crash. The sync can be omitted if the filename is prefixed with a “”. This can improve system performance and is desirable for low priority messages, particularly if there are a lot of them.
• Named Pipe – A named pipe is specified by prepending the file name with a pipe symbol. This feature can be useful for debugging purposes.
• Terminal – syslog uses special techniques for handling terminals, if /dev/tty* or /dev/console is specified as the file name.
• Remote machine – A remote machine is specified using @hostname. syslogd is capable of sending messages to remote machines. syslogd r causes syslogd listen for message from remote machines.
• List of users – user names can be specified, in which case the message will appear on their terminal, an “*” in the action field means that all loggedin users receive the message.
Example
A sample of /etc/syslog.conf#send messages from the kernal of warning priority to #the conole on line 10 try alt+F10 to see themkern.warn;*.err;authpriv.none /dev/tty10
*.emerg *#send all messages of emergency priority to all users (like wall)
# enable this, if you want that root is informed# immediately, e.g. of logins#*.alert root
# all email-messages in one filemail.* -/var/log/mailmail.info -/var/log/mail.infomail.warn -/var/log/mail.warnmail.err /var/log/mail.err# !! note the use of – for all but error messages
# Warnings in one file*.=warn;*.=err -/var/log/warn*.crit /var/log/warn
# save the rest in one file*.*;mail.none;news.none -/var/log/messages
# enable this, if you want to keep all messages
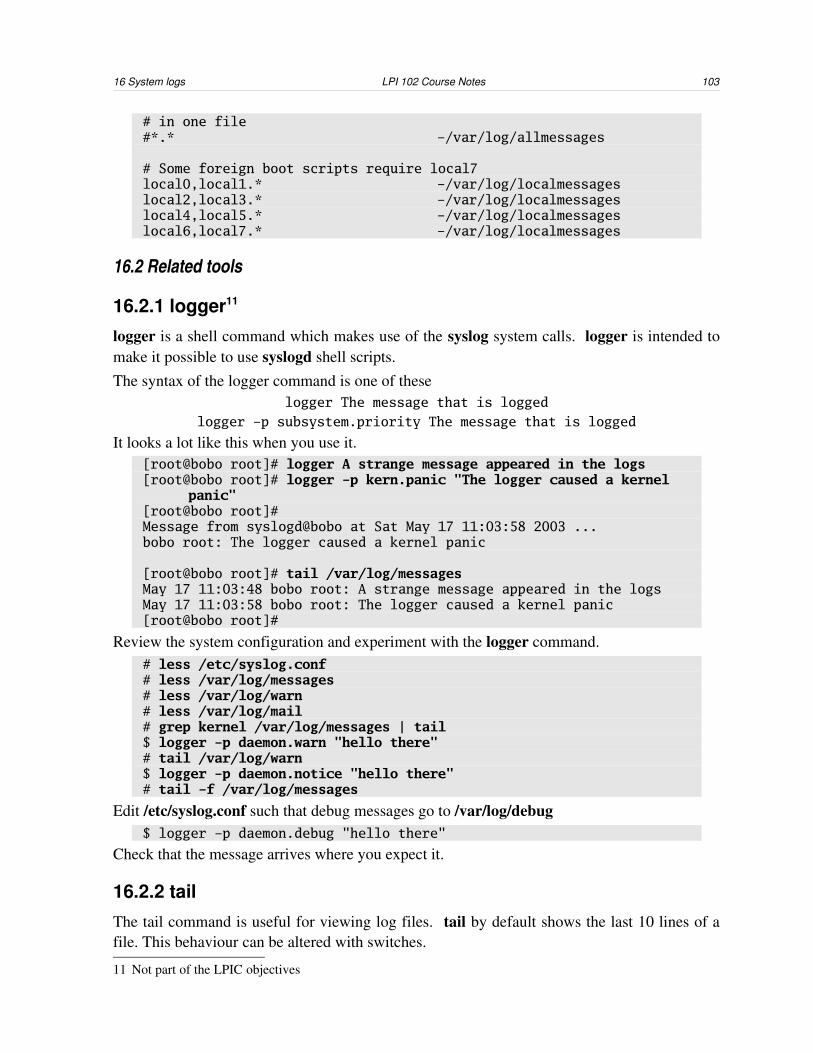
16 System logs LPI 102 Course Notes 103
# in one file#*.* -/var/log/allmessages
# Some foreign boot scripts require local7local0,local1.* -/var/log/localmessageslocal2,local3.* -/var/log/localmessageslocal4,local5.* -/var/log/localmessageslocal6,local7.* -/var/log/localmessages
16.2 Related tools
16.2.1 logger11
logger is a shell command which makes use of the syslog system calls. logger is intended to make it possible to use syslogd shell scripts.The syntax of the logger command is one of these
logger The message that is logged
logger -p subsystem.priority The message that is logged
It looks a lot like this when you use it.[root@bobo root]# logger A strange message appeared in the logs[root@bobo root]# logger -p kern.panic "The logger caused a kernel
panic"[root@bobo root]#Message from syslogd@bobo at Sat May 17 11:03:58 2003 ...bobo root: The logger caused a kernel panic
[root@bobo root]# tail /var/log/messagesMay 17 11:03:48 bobo root: A strange message appeared in the logsMay 17 11:03:58 bobo root: The logger caused a kernel panic[root@bobo root]#
Review the system configuration and experiment with the logger command.# less /etc/syslog.conf# less /var/log/messages# less /var/log/warn# less /var/log/mail# grep kernel /var/log/messages | tail$ logger -p daemon.warn "hello there"# tail /var/log/warn$ logger -p daemon.notice "hello there"# tail -f /var/log/messages
Edit /etc/syslog.conf such that debug messages go to /var/log/debug$ logger -p daemon.debug "hello there"
Check that the message arrives where you expect it.
16.2.2 tailThe tail command is useful for viewing log files. tail by default shows the last 10 lines of a file. This behaviour can be altered with switches.
11 Not part of the LPIC objectives
10416 LPI 102 Course Notes System logs
tail filenametail -20 filename
The first will display the last 10 lines, and the second displays the last 20 lines of the file.tail -f filename
tail will initially display the last 10 lines of the file, however tail f does not exit and will display lines added to the file after the command is run. To interrupt tail f use Ctrl+C.
tail -f /var/log/messagestail -f /var/log/messages | grep kernel
The key F in less selects the “follow” mode similar to tail f.
16.2.3 Log rotationLog rotation involves removing the current contents of log files and storing them as archives. This has to be done carefully, since new messages are being logged all the time. There are two ways to do this:• To make a copy of the log file, and then remove the contents of the file. Programs which
are appending to the file are not affected.• Stop the program which is logging to the file, rearrange the logs, and then restart the
program so that it starts writing to a new, clean file.On most systems logs are rotated regularly to avoid unwieldy files or disk space being eaten away. There is normally a script in cron.daily that rotate is a tool to manage the size of log files. The configuration file is /etc/logrotate.conf which tells the script which log files to monitor and how large they should be. Log rotation configuration is also stored in /etc/logrotate.d.When a log is found to have exceeded its maximum size it is compressed, given a new name, and a fresh log file is started. The daemon responsible for the logging is also reloaded to ensure logging to the new file proceeds smoothly.The compressed logfile is normally logfilenamedate.gz, e.g. messages is compressed to messages19910201.gz
16.3 Review
Quiz questions
1. Which file configures the system logger?2. Which file controls archiving of older logs.3. How do you monitor a log file for activity?4. What programs can be used to view a log file?5. Which program produced the following log message?
May 17 10:04:43 bobo rc.sysinit: Initializing USB keyboard: succeeded
6. Which command line option to syslogd configures it to listen to remote log messages?7. What are the security risks of logging to log files?
16 System logs LPI 102 Course Notes 105
Assignment
Configure syslogd to log all debug messages to /var/log/debug. Edit /etc/logrotate.conf or a file in /etc/logrotate.d and add /var/log/debug as a log file to be rotated if it grows beyond 5Mb.
Answers to quiz questions
1. /etc/syslog.conf 2. /etc/logrotate.conf 3. tail f /var/log/logfile
4. less. You can also use cat, vi, head, tail, grep, more.
5. rc.sysinit 6. r – if the capability is compiled in.7. If a machine is compromised, log files it can write to may be altered or removed. Log files
that can be read may contain information useful to an attacker.
10617 LPI 102 Course Notes Scheduling jobs
17 Scheduling jobs “We always run on schedule”
– British Rail
LPIC topic 1.111.4 — Automate system administration tasks by scheduling jobs to run in the future [4]Weight: 4Objective
The candidate should be able to use cron or anacron to run jobs at regular intervals and to use at to run jobs at a specific time. Tasks include managing cron and at jobs and configuring user access to cron and at services.
Key files, terms, and utilities includeat Run a task at a specific timeatq Show the queued jobsatrm Remove a queued jobcrontab Edit cron jobs/etc/anacrontab Jobs run every so many days/etc/at.deny Who can’t use at/etc/at.allow Who can use at/etc/crontab System cron jobs/etc/cron.allow Who can use cron/etc/cron.deny Who can’t use cron/var/spool/cron/* User cron jobs
17.1 The cron daemonCron is a daemon which wakes up once every minute to execute tasks that have been scheduled. Jobs can be scheduled to run on the minute, hour, day of month, or month. Each job is a oneline shell script, and runs as specific user.
17.1.1 CrontabThe file /etc/crontab is the main configuration file for cron.Each line in crontab specifies a schedule for a certain task to be executed.A crontab entry has the following format:
min hour day-of-month month day-of-week user command
Where:• min is the minute(s) to execute the command. A numerical value between 059.
• hour is the hour(s) to execute the command. A numerical value between 023.
• dayofmonth is the day(s) of the month to execute the command. A numerical value
17 Scheduling jobs LPI 102 Course Notes 107
between 131.• month is the month(s)of the year to execute the command. A numerical value between 0
12 or names such as Jan, Feb, etc.• dayofweek is the days(s) of the week to execute the command. A numerical value
between 07 (Sunday is 0 and 7) or names such as Mon, Tue, Wed, etc.• user is the user the command must be executed as.
• command is the command line to execute.Each of the time fields above can have the these values:• * meaning every minute, hour, day etc.• */x where “x” is a number meaning every “x” minutes, hours, or days etc.• a comma separated list eg 8,10,12• a range as in MonFriExample crontab entries:
0 0 * * * root /usr/bin/updatedb #run updatedb at midnight every day
*/15 8-16 * * mon-fri mail fetchmail # run fetchmail as user mail every
# 15 min weekdays 8am to 4pm0 3 1,10,20 * * root dump -5uf /dev/st0 / # Do a dump on the 1st 10th and
20th
Each user has their own crontab in /var/spool/cron/tab/username. This can be edited using crontab e which brings up the file in the vi editor. User crontabs have the same format as the /etc/crontab file, except the username field is not present.
17.1.2 Cron directoriesScripts contained in these directories are executed by cron on an hourly, daily and monthly basis respectively. These scripts are triggered by entries in /etc/crontab.• /etc/cron.hourly/*• /etc/cron.daily/*• /etc/cron.monthly/*
17.1.3 PermissionsThe following files control access for crontab:• The allow file – /var/spool/cron/allow or /etc/cron.allow• The deny file – /var/spool/cron/deny or /etc/cron.denyIf the allow file exists your user name must appear in it to use the crontab command. If the deny file exists, your user name must not appear in it. If neither file is present, either everyone or nobody will be able to use crontab (depending on compile time options).

10817 LPI 102 Course Notes Scheduling jobs
17.2 atat is a command that queues jobs to be done at a specified time. The at command relies on the atd daemon to perform the task.
at is used in this manner:at [ -f script ] HH:MM
The f option indicates that the commands are to be read from a file instead of stdin. The time can be specifed in the extended posix format.Other commands in the at suite include:
• atq lists the user's pending jobs, unless the user is the superuser: in that case, everybody's jobs are listed. The format of the output lines (one for each job) is: Job number, date, hour, job class.
• atrm deletes jobs, identified by their job number.
• batch executes commands when system load levels permit; in other words, when the load average drops below 0.8, or the value specified in the invocation of atrun.
Here are a list of the files used by at:• /var/spool/atjobs – currently queued jobs.• /var/spool/atspool – jobs in process.• /proc/loadavg – when the machine is busy, at jobs may be postponed (see also the output
of uptime).• /var/run/utmp – who is logged in (or who is running at jobs).• /etc/at.allow – who can use at.• /etc/at.deny – who can't use at.
17.3 Review
Quiz questions
1. What is the key difference between cron and anacron?
2. How does at differ from cron?
3. What are the fields in /etc/crontab from left to right?4. When are the following cron jobs run?
* * * * * /usr/local/bin/cronjob10 * * * * /usr/local/bin/cronjob2* 0 * * * /usr/local/bin/cronjob315 14 1 * * /usr/local/bin/cronjob4
5. Under what circumstances would the text in the previous question appear?6. How does one specify the command to be run by at, and how does one specify the time at
which it is run?7. Which files control access to the cron and at services?

17 Scheduling jobs LPI 102 Course Notes 109
cron exercise
1. Investigate the cron files:# /etc/init.d/cron status# vi /etc/crontab$ crontab -e
2. Create an entry using crontab to run updatedb as root every 2 minutes, and then try the following:$ top# ls -l /var/spool/cron
at exercise
1. Install at and ensure atd is running2. Run the following commands
$ echo "mail -s hello root" | at 11:30$ atq$ atrm 1$ echo "mail -s hello root" | at 11:32$ atq
Answers to quiz questions
1. cron works on regular times, anacron on the interval between jobs.
2. at runs jobs once, cron repetitively.3. minute, hour, day of month, month, day of week, user, command, arguments ...4. Every minute, on the hour, every minute from 00h00 to 00h59, at 14h15 on the first day of
each month.5. crontab l or crontab e for a user – there is no user name.6. Command as standard input. Time on command line.7. /etc/cron.{allow,deny} or /var/spool/cron/{allow,deny}, and /etc/at.{allow,deny}, but
dependant on compiletime options.

11018 LPI 102 Course Notes Backup strategy
18 Backup strategy“He who does not plan for failure, plans to fail....”
– Itold Yaso12
LPIC topic 1.111.5 — Maintain an effective data backup strategy [3]Weight: 3Objective
Candidate should be able to plan a backup strategy and backup filesystems automatically to various media. Tasks include dumping a raw device to a file or vice versa, performing partial and manual backups, verifying the integrity of backup files and partially or fully restoring backups.
Key files, terms and utilities includecpio archiver with list of files on standard inputdd direct dumpdump backup a filesystem (ext2)restore restore from a “dump” backuptar tape archive program
18.1 Backup and system recovery
18.1.1 Backup definitionsThere are a few terms used to describe different types of backup in this document.• Full backup – by this we mean a backup of the entire filesystem of the machine or set of
machines in question is backed up.• Partial backup – a backup of a part of the file system.• Incremental backup – a backup of files that have changed since some specified previous
backup.
18.1.2 Backup policy and disaster recoveryEvery system needs a backup policy which would form part of a disaster recovery plan. Most corporations have some sort of disaster recovery policy – particularly with systems that form part of their financial system.A simple backup policy addresses four issues: • what to backup• how often to backup• the backup type • how to store the backup (including the issue of where).
12 Bu’tcha dinnae wanna listen

18 Backup strategy LPI 102 Course Notes 111
What to backup
There are a number of approaches to deciding what to backup. Simplistically speaking, you need to backup anything that can change after installation and that contains information that you need. Whether or not you need to backup the entire system as is (a full backup) or just the data that changed since installation (partial backup), would depend upon the difficulty and time involved in: reinstalling, applying any patches needed and loading all incremental and/or all partial backups.It boils down to a cost vs risk debate: 1. Calculate how the long will it take to reinstall using each method.2. Calculate the cost of reinstallation considering labour and downtime costs. 3. Compare this to the cost of the backup technique over the mean time to failure. Here we go:
Monthly baseline + incremental backups
Full backup every time
1. Time to reinstall – based on number of tapes that must be read, plus some initial time.
1 hour setup, 3 tapes at 2 hours each
7 hours
1 hour setup, 1 tape at 2 hours
3 hours
2. Cost of reinstallation. Labour at R500 per hour, lost production at R5000 per hour.
7 * R5500.00R38500.00
3 * R5500.00R16500.00
3. Cost of backups during this time.Number of tapes per monthNumber of monthsCost of tapesTotal cost over period
3 tapes120 months
R100.00 per tapeR36 000.00
10 tapes120 months
R100.00 per tapeR120 000.00
In this case, it is preferable to make a baseline backup and incremental backups, as the cost of the media far outweighs the benefit of being able to recover from failure faster. Factoring in the reuse of tapes is left as an exercise to the reader.
How often to backup
This decision needs to be made for every type of backup that you make. Here again the cost issue plays a role. The relevant comparison is the cost of one days lost production vs the cost of additional backups and the risk of failure.
How and where to store the data
Various media are available to us. The factors which determine which media should be used are cost of media, capacity, and reliability. The storage location of the media also needs to be considered, one would want to minimise the risks of storing all backups in one place.

11218 LPI 102 Course Notes Backup strategy
18.1.3 Backup toolsA few backup tools have been selected here. Some fullfill different services to the others. The type of tool you will use may depend on the size of the system involved, the backup media and the skill of the user performing the backup (or the ability of the automated backup).
mt
mt controls a magnetic tape. By default, it will use the device /dev/tape, although you should make this a link to /dev/st0 or similar. mt provides a mechanism to rewind, retension, eject and erase a tape.
mt rewind # rewind /dev/tapemt -f /dev/ht0 eject # eject /dev/ht0mt erase # erase the tape
mt also provides a number of positioning and tape control commands.
tar and cpio
Tar stands for tape archiver. Tar is a well known and widely used archiving tool, orginally designed for tapes. The tool is quite often used to send compressed files over the internet.
Review of tar command
tar has three main functions:
Create Create a new archive tar c or tar create
Extract Extract files from an archive tar x or tar extract
List List contents of archive or test the archive
tar t or tar list
The following supplementary options that are commonly used together with the main options.
File Use a file name instead of stdin or stdout tar [c or x]f filename or tar create file=filename
Verbose Display information while processing archive
tar v or tar verbose
Use gzip Use gzip compression while either extracting, listing or creating an archive
tar z or tar gzip
Use bzip2 Use bzip2 compression while either extracting, listing or creating an archive
tar j or tar –bzip2(tar I in some versions of tar)
Example13
tar -zcvf tarfile.tar.gz /usr/local/
This command will create a gzipped tar archive called tarfile.tar.gz of all the files in /usr/local
13 What do you think happens if you run the command tar czf tarfile.tar.gz? What is included in the archive?
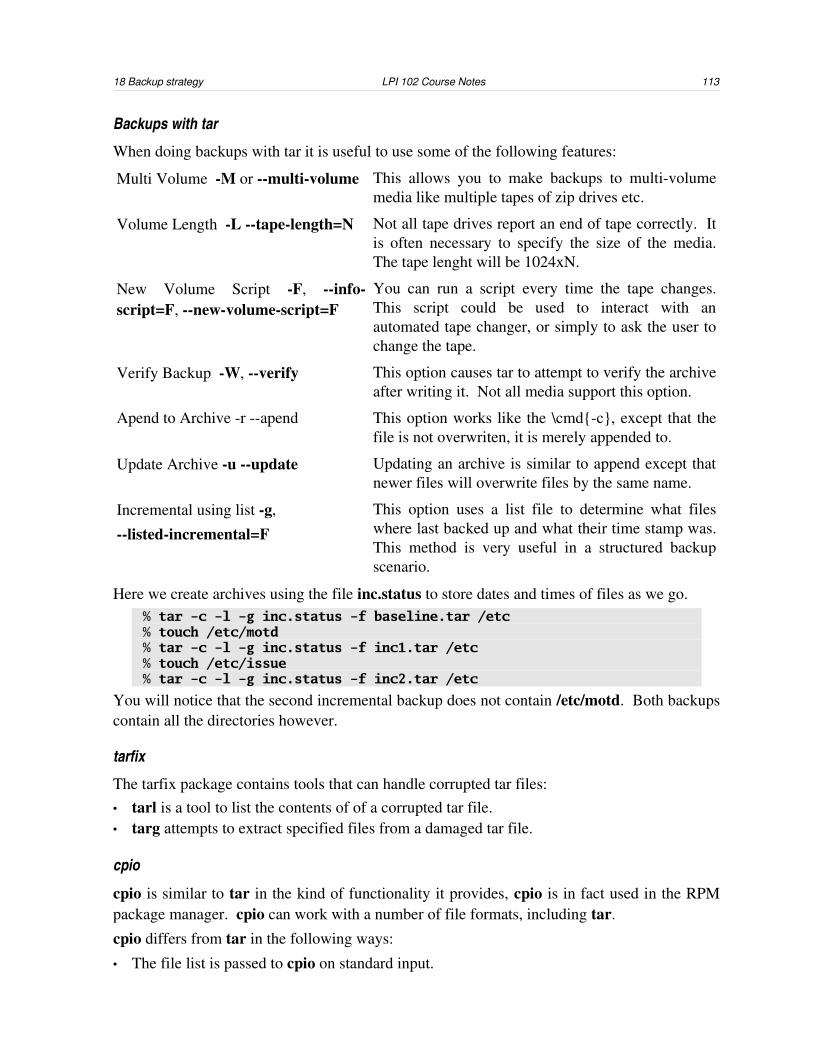
18 Backup strategy LPI 102 Course Notes 113
Backups with tar
When doing backups with tar it is useful to use some of the following features:
Multi Volume M or multivolume This allows you to make backups to multivolume media like multiple tapes of zip drives etc.
Volume Length L tapelength=N Not all tape drives report an end of tape correctly. It is often necessary to specify the size of the media. The tape lenght will be 1024xN.
New Volume Script F, infoscript=F, newvolumescript=F
You can run a script every time the tape changes. This script could be used to interact with an automated tape changer, or simply to ask the user to change the tape.
Verify Backup W, verify This option causes tar to attempt to verify the archive after writing it. Not all media support this option.
Apend to Archive r apend This option works like the \cmd{c}, except that the file is not overwriten, it is merely appended to.
Update Archive u update Updating an archive is similar to append except that newer files will overwrite files by the same name.
Incremental using list g,
listedincremental=FThis option uses a list file to determine what files where last backed up and what their time stamp was. This method is very useful in a structured backup scenario.
Here we create archives using the file inc.status to store dates and times of files as we go.% tar -c -l -g inc.status -f baseline.tar /etc% touch /etc/motd% tar -c -l -g inc.status -f inc1.tar /etc% touch /etc/issue% tar -c -l -g inc.status -f inc2.tar /etc
You will notice that the second incremental backup does not contain /etc/motd. Both backups contain all the directories however.
tarfix
The tarfix package contains tools that can handle corrupted tar files:• tarl is a tool to list the contents of of a corrupted tar file.• targ attempts to extract specified files from a damaged tar file.
cpio
cpio is similar to tar in the kind of functionality it provides, cpio is in fact used in the RPM package manager. cpio can work with a number of file formats, including tar.
cpio differs from tar in the following ways:
• The file list is passed to cpio on standard input.
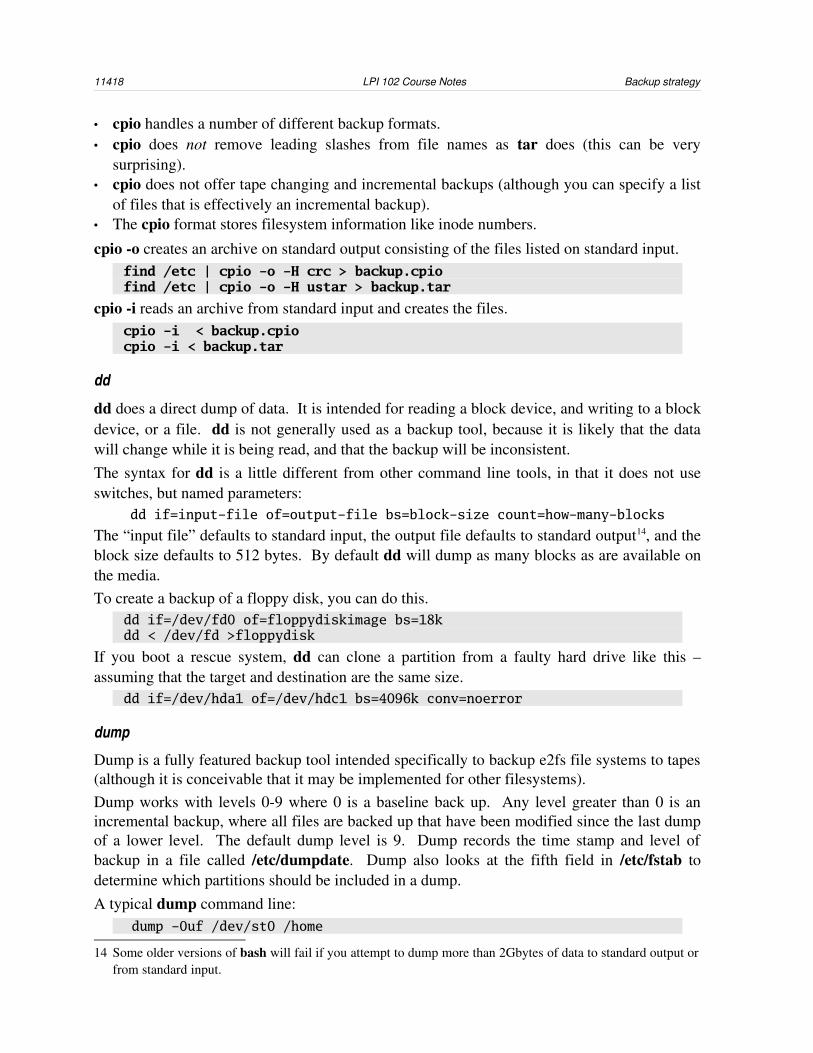
11418 LPI 102 Course Notes Backup strategy
• cpio handles a number of different backup formats.• cpio does not remove leading slashes from file names as tar does (this can be very
surprising).• cpio does not offer tape changing and incremental backups (although you can specify a list
of files that is effectively an incremental backup).• The cpio format stores filesystem information like inode numbers.
cpio o creates an archive on standard output consisting of the files listed on standard input.find /etc | cpio -o -H crc > backup.cpiofind /etc | cpio -o -H ustar > backup.tar
cpio i reads an archive from standard input and creates the files.cpio -i < backup.cpiocpio -i < backup.tar
dd
dd does a direct dump of data. It is intended for reading a block device, and writing to a block device, or a file. dd is not generally used as a backup tool, because it is likely that the data will change while it is being read, and that the backup will be inconsistent.The syntax for dd is a little different from other command line tools, in that it does not use switches, but named parameters:
dd if=input-file of=output-file bs=block-size count=how-many-blocks
The “input file” defaults to standard input, the output file defaults to standard output14, and the block size defaults to 512 bytes. By default dd will dump as many blocks as are available on the media.To create a backup of a floppy disk, you can do this.
dd if=/dev/fd0 of=floppydiskimage bs=18kdd < /dev/fd >floppydisk
If you boot a rescue system, dd can clone a partition from a faulty hard drive like this – assuming that the target and destination are the same size.
dd if=/dev/hda1 of=/dev/hdc1 bs=4096k conv=noerror
dump
Dump is a fully featured backup tool intended specifically to backup e2fs file systems to tapes (although it is conceivable that it may be implemented for other filesystems). Dump works with levels 09 where 0 is a baseline back up. Any level greater than 0 is an incremental backup, where all files are backed up that have been modified since the last dump of a lower level. The default dump level is 9. Dump records the time stamp and level of backup in a file called /etc/dumpdate. Dump also looks at the fifth field in /etc/fstab to determine which partitions should be included in a dump.A typical dump command line:
dump -0uf /dev/st0 /home
14 Some older versions of bash will fail if you attempt to dump more than 2Gbytes of data to standard output or from standard input.

18 Backup strategy LPI 102 Course Notes 115
This will perform a baseline dump on the first SCSI tape of the /home partition.
Some useful options to dump include:
B No. of 1k blocks per volume. Useful on tapes that don't correctly report endofmedia.
F Script to execute when changing tapes.
Restore
Restore is used to extract a dump backup.restore -xf /dev/st0 /home/student
This will only extract from the dump on /dev/st0 the named home directory. When restoring from a full backup onto a pristine system, the r (rebuild file system) option can be used.
18.1.4 Backup solutionsApart from taper (taper T file f backupfile.tar), a number of packaged backup solutions exist. More than simply making a copy of your data, these tools may provide management of the backup process as well as tracking tapes with a database to make it easy to determine which tape has the latest version of a certain file.
Amanda
The Advanced Maryland Automatic Network Disk Archiver is a sophisticated backup management tool. Amanda is free software and makes use of the dump command to perform the actual backups.
Arkeia
Arkeia is a commercial backup solution from Knox software. Arkeia has a pleasant easy to use Java client to manage the server which actually performs the tapebackups. Arkeia is designed to work with tapes in a large system environment.
mkcdrec
This tool creates a complete image of your filesystem onto CDs. This is useful for a full backup, especially if it can be contained on a single CD. The image that mkcdrec creates is a bootable system that can reinstall the system as it was.
18.1.5 Partition and filesystem recovery toolsIf you have a corrupted system, it is not always necessary to resort to backups (although it is by far preferable to have a backup available).
badblocks
badblocks finds bad (unreliable) blocks on a specified partition. It is normally used like this:badblocks /dev/sda3 > badblocklist
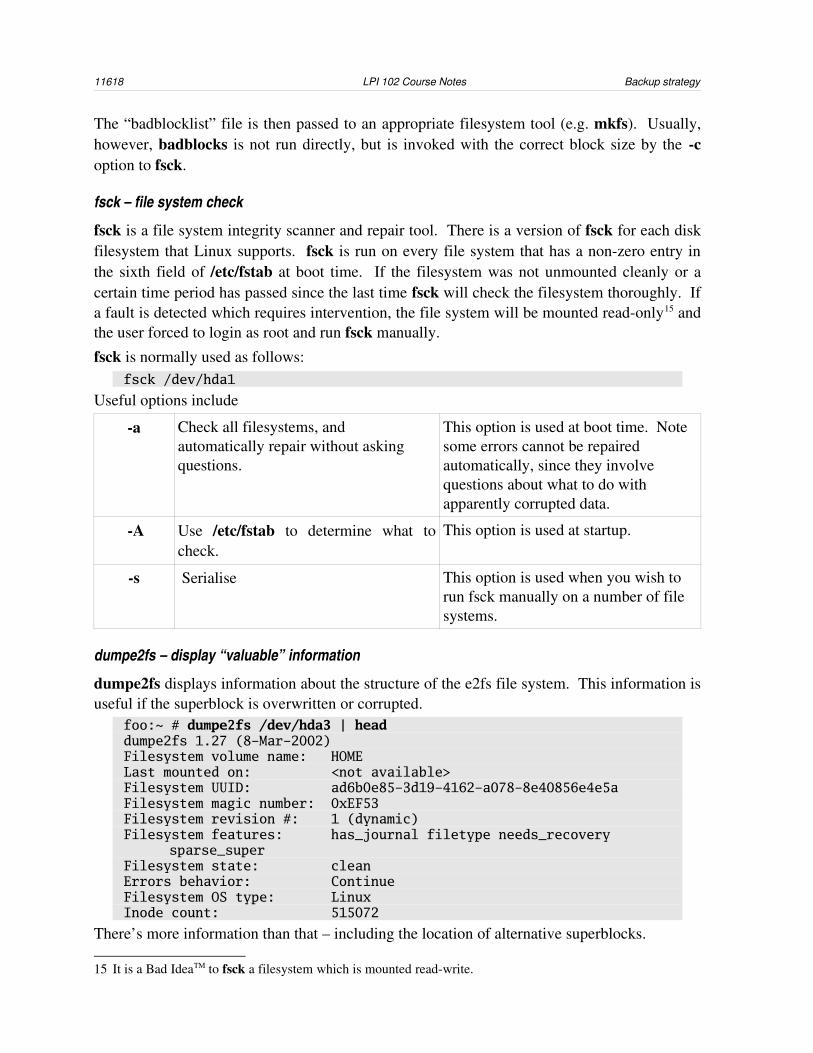
11618 LPI 102 Course Notes Backup strategy
The “badblocklist” file is then passed to an appropriate filesystem tool (e.g. mkfs). Usually, however, badblocks is not run directly, but is invoked with the correct block size by the c option to fsck.
fsck – file system check
fsck is a file system integrity scanner and repair tool. There is a version of fsck for each disk filesystem that Linux supports. fsck is run on every file system that has a nonzero entry in the sixth field of /etc/fstab at boot time. If the filesystem was not unmounted cleanly or a certain time period has passed since the last time fsck will check the filesystem thoroughly. If a fault is detected which requires intervention, the file system will be mounted readonly15 and the user forced to login as root and run fsck manually.
fsck is normally used as follows:fsck /dev/hda1
Useful options include
a Check all filesystems, and automatically repair without asking questions.
This option is used at boot time. Note some errors cannot be repaired automatically, since they involve questions about what to do with apparently corrupted data.
A Use /etc/fstab to determine what to check.
This option is used at startup.
s Serialise This option is used when you wish to run fsck manually on a number of file systems.
dumpe2fs – display “valuable” information
dumpe2fs displays information about the structure of the e2fs file system. This information is useful if the superblock is overwritten or corrupted.
foo:~ # dumpe2fs /dev/hda3 | headdumpe2fs 1.27 (8-Mar-2002)Filesystem volume name: HOMELast mounted on: <not available>Filesystem UUID: ad6b0e85-3d19-4162-a078-8e40856e4e5aFilesystem magic number: 0xEF53Filesystem revision #: 1 (dynamic)Filesystem features: has_journal filetype needs_recovery
sparse_superFilesystem state: cleanErrors behavior: ContinueFilesystem OS type: LinuxInode count: 515072
There’s more information than that – including the location of alternative superblocks.
15 It is a Bad IdeaTM to fsck a filesystem which is mounted readwrite.
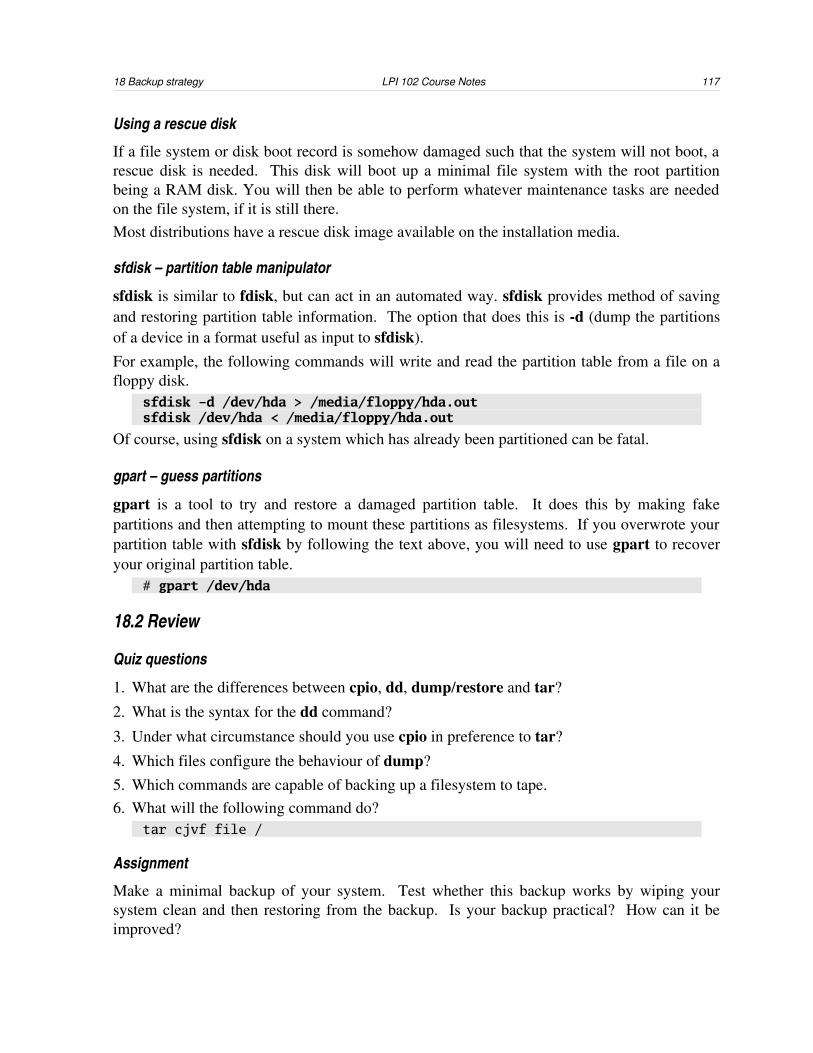
18 Backup strategy LPI 102 Course Notes 117
Using a rescue disk
If a file system or disk boot record is somehow damaged such that the system will not boot, a rescue disk is needed. This disk will boot up a minimal file system with the root partition being a RAM disk. You will then be able to perform whatever maintenance tasks are needed on the file system, if it is still there.Most distributions have a rescue disk image available on the installation media.
sfdisk – partition table manipulator
sfdisk is similar to fdisk, but can act in an automated way. sfdisk provides method of saving and restoring partition table information. The option that does this is d (dump the partitions of a device in a format useful as input to sfdisk). For example, the following commands will write and read the partition table from a file on a floppy disk.
sfdisk -d /dev/hda > /media/floppy/hda.outsfdisk /dev/hda < /media/floppy/hda.out
Of course, using sfdisk on a system which has already been partitioned can be fatal.
gpart – guess partitions
gpart is a tool to try and restore a damaged partition table. It does this by making fake partitions and then attempting to mount these partitions as filesystems. If you overwrote your partition table with sfdisk by following the text above, you will need to use gpart to recover your original partition table.
# gpart /dev/hda
18.2 Review
Quiz questions
1. What are the differences between cpio, dd, dump/restore and tar?
2. What is the syntax for the dd command?
3. Under what circumstance should you use cpio in preference to tar?
4. Which files configure the behaviour of dump?5. Which commands are capable of backing up a filesystem to tape.6. What will the following command do?
tar cjvf file /
Assignment
Make a minimal backup of your system. Test whether this backup works by wiping your system clean and then restoring from the backup. Is your backup practical? How can it be improved?

11818 LPI 102 Course Notes Backup strategy
Answers to quiz questions
1. cpio takes a list of files from standard input, while tar takes its list of files as command line parameters. dd reads any form of data, while dump reads only a filesystem. You can also compare the number of letters in each command (2 for dd, 3 for tar, 4 for cpio and dump and 7 for restore).
2. dd if=inputfile of=outputfile (and more)
3. You would use cpio to read a cpio archive (duh). cpio has a copypass function that you may like to use for copying. For certain types of media errors, cpio can be more robust.
4. /etc/fstab (and /etc/dumpdate, to a small extent)5. tar, cpio, dd, dump6. Create a bzip2 compressed tar archive named './file' containing all files in the filesystem
(including /proc). It will print file names as it proceeds.
19 System time LPI 102 Course Notes 119
19 System timetime flies you cannot they pass by at such irregular intervals
– a punctuation puzzle
LPIC topic 1.111.6 — Maintain system time [4]Weight: 4Objective
Candidate should be able to properly maintain the system time and synchronize the clock over NTP. Tasks include setting the system date and time, setting the BIOS clock to the correct time in UTC, configuring the correct timezone for the system and configuring the system to correct clock drift to match NTP clock.
Key files, terms, and utilities includedate Show or set the system software clockhwclock Manipulate the hardware clockntpd Network Time Protocol Daemonntpdate Set clock via NTP protocol/usr/share/zoneinfo Time zone definition files/etc/timezone Text version of current timezone on some distributions/etc/localtime Local time zone selection/etc/ntp.conf ntpd configuration file/etc/ntp.drift The rate at which your clock drifts from the real time
19.1 Setting the clockWhen Linux boots up, it obtains the current system time from the battery backedup hardware clock, and sets the system clock, which is maintained by the CPU. The system clock is used as the time reference for all applications.
date
The program date is used to access the system clock, and it can also be used to set it.bar:~ $ dateWed Jun 18 15:51:09 SAST 2003
The date command will also display the date in a particular format – the format is described in a parameter starting “+”.bar:~ $ date '+%D %T'06/18/03 15:51:20bar:~ $ date '+%H:%M:%S %Y/%m/%d'15:51:44 2003/06/18
You can display a different date to the current datefoo:~ $ date -d 'yesterday'Tue Jun 17 15:53:47 SAST 2003

12019 LPI 102 Course Notes System time
foo:~ $ date -d '2 months ago'Fri Apr 18 15:53:52 SAST 2003foo:~ $ date -d '16 jun 2001'Sat Jun 16 00:00:00 SAST 2001foo:~ $ date -d '16 jun 2001 12:55:01'Sat Jun 16 12:55:01 SAST 2001foo:~ $ date -d '16 jun 1965 12:55:01'date: invalid date `16 jun 1965 12:55:1'foo:~ $ date -u -d '1 jan 2039'date: invalid date `1 jan 2039'
You may wonder why date can't display dates before 1960, or much after 18 January 2038 or so (your implementation's limits may vary). The reason for this is that the beginning of time, according to many Linux applications, was 00h00, 1 January 1970 (GMT). The internal representation of time in these applications is the number of seconds that have passed since then (since Unix time began), and only 32 significant bits are allowed.date can display the date of a particular file too.
foo:~ $ date -r /lib/ld.soMon Oct 30 13:52:51 SAST 2000
hwclock
The hwclock command manipulates the hardware clock – the same clock that the BIOS setup program will allow you to adjust. When you change the system clock using date the hardware clock is not affected.
foo:~ # hwclockFri 27 Jun 2003 14:01:24 SAST -0.462635 secondsfoo:~ # hwclock --helphwclock - query and set the hardware clock (RTC)
Usage: hwclock [function] [options...]
Functions: --set set the rtc to the time given with --date --hctosys set the system time from the hardware clock --systohc set the hardware clock to the current system time --adjust adjust the rtc to account for systematic drift since the clock was last set or adjusted
Options: --utc the hardware clock is kept in coordinated universal
time --localtime the hardware clock is kept in local time --directisa access the ISA bus directly instead of /dev/rtc --date specifies the time to which to set the hardware
clock --noadjfile do not access /etc/adjtime. Requires the use of either --utc or –localtime
There are two ways to use the hardware clock. The hardware clock can either be set to local time in your current time zone, or it can be set to UTC. It is preferable to set the hardware clock to UTC, since this means that when you visit another timezone, you only configure your
19 System time LPI 102 Course Notes 121
time zone, and not your system clock too.When you boot your system, the value of the hardware clock is copied to the system clock using one of the following commands:
hwclock --hctosys --utc # BIOS clock is UTChwclock --hctosys --localtime # BIOS clock is local time
To configure your distribution to use the correct one of these you will need to modify one of the following files to set the system time with the appropriate offset (depending on which distribution it is)
/etc/sysconfig/clock # Redhat, newer SuSE – HWCLOCK value/etc/rc.config # SuSE – GMT value/etc/defaults/rcS # Debian – UTC value
19.2 Time zonesCommands that need to manipulate the time on Linux refer to the file /etc/localtime to find out the time zone the machine is in.
foo:~ $ strace -e open date...open("/etc/localtime", O_RDONLY) = 3Tue Jul 8 14:44:35 SAST 2003
/etc/localtime is either a symbolic link, or a copy of a file in /usr/share/zoneinfo. This is usually set during installation.
foo:~ $ ls -F /usr/share/zoneinfo/Africa/ Cuba GMT+0 Kwajalein Pacific/ W-SUAmerica/ EET GMT-0 Libya Poland WETAntarctica/ EST GMT0 MET Portugal ZuluArctic/ EST5EDT Greenwich MST ROC iso3166.tabAsia/ Egypt HST MST7MDT ROK posix/Atlantic/ Eire Hongkong Mexico/ Singapore posixrulesAustralia/ Etc/ Iceland Mideast/ SystemV/ right/Brazil/ Europe/ Indian/ NZ Turkey zone.tabCET Factory Iran NZ-CHAT UCTCST6CDT GB Israel Navajo US/Canada/ GB-Eire Jamaica PRC UTCChile/ GMT Japan PST8PDT Universal
If your timezone is SAST (South African Standard Time), the contents of /etc/localtime will have been set by the timezone compiler zic something like the following.
% zic -l "Africa/Johannesburg"
19.3 Network time protocol (NTP)The hardware and software clocks used in computers are not entirely accurate. Either the clock runs too fast or too slow, or it is just a little unpredictable because of changes in temperature and other operating conditions. Without adjustment, a PC's clock will drift from the real time by around 1 second per day. The network time protocol allows you to synchronise your computer's clock to UTC (Universal coordinated time) using a reliable time source.
12219 LPI 102 Course Notes System time
ntpdate
The simplest way to use NTP is to query a time server using ntpdate. ntpdate queries the time server and adjusts the local clock before exiting.
bar:~ # ntpdate -?usage: ntpdate [-bBdqsuv] [-a key#] [-e delay] [-k file] [-p
samples] [-o version#] [-r rate] [-t timeo] [-U username] server ...
bar:~ # ntpdate tick.mikom.csir.co.za 8 Jul 13:10:08 ntpdate[3946]: step time server 146.64.58.41 offset
38.278329 secbar:~ # ntpdate tick.mikom.csir.co.za 8 Jul 13:10:11 ntpdate[3947]: adjust time server 146.64.58.41
offset 0.020943 sec
Notice that the first time, the clock was stepped (a big jump). The second time the time was it was simply adjusted (a small jump)16.bar:~ # ntpdate tick.mikom.csir.co.za 8 Jul 13:16:20 ntpdate[4048]: adjust time server 146.64.58.41
offset 0.024110 sec
To see the value on the remote clock, ntpdate q (query) can be used:bar:~ # ntpdate -q tick.mikom.csir.co.zaserver 146.64.58.41, stratum 1, offset -13.503067, delay 0.07750 8 Jul 14:06:29 ntpdate[23340]: step time server 146.64.58.41 offset
-13.503067 sec
(x)ntpd17
Time is a continuous and steady stream so xntpd updates the clock in small quantities.
To configure xntpd, the following is sufficient for /etc/ntpd.conf:server 132.199.176.10 # some NTP server's IP addressdriftfile /etc/ntp.drift # remember the drift of the local clock
The server line tells xntpd which server it should consult as a reference of the time. The driftfile line tells xntpd to record the drift of your system clock every hour. When xntpd is started (e.g. after a power failure), the drift file is used to determine the initial adjustment for the clock.
user@foo:~ > cat /etc/ntp.drift-112.950
19.4 Review
Quiz questions
1. What is the command to set the system time to 15h55.2. What command would you use to set the system clock to 6:44 pm 23 January 2004?
16 The ntpdate documentation explains that the adjustment is actually 50% larger than the measured difference in time. This will tend to keep a badly drifting clock more accurate. This is noted as a bug.
17 xntpd is “extended” ntpd. However, xntpd is the only implementation of the latest edition of the time protocol.

19 System time LPI 102 Course Notes 123
3. If the BIOS clock is stored in UTC format, how does one set it?4. Does ntpd adjust the hardware or not?5. Which file sets the system's time zone, and how does one change to another time zone?6. How are changes written to /etc/ntp.drift, and under what circumstances are the contents of
this file used?7. What information appears in the directory /usr/share/zoneinfo?
Assignment
1. Set up your computer to use UTC rather than local time for the hardware clock. Reboot and see whether the change has taken effect as you expected. (If your computer is already set up for UTC, change to local time instead.)
2. Change your system's timezone. Does the change survive rebooting?3. Use ntpdate q to measure the difference between your system's time and the real time.
Record this value. Set up a NTP daemon to keep your clock synchronised with the real time and ensure that it is in the startup sequence. After running NTP for a few hours, use ntpdate q again to measure the difference between your time and the real time again.
Answers to quiz questions
1. date set 15:552. date set '20040123 06:44'3. hwclock systohc4. ntp only adjusts the system clock5. /etc/localtime – link to or copy a file from /usr/share/zoneinfo6. The ntp server writes to the drift file hourly. In the case of a reboot, the drift file is used to
determine the initial adjustment for the clock.7. Definitions for timezones across the world.
12420 LPI 102 Course Notes TCP/IP
20 TCP/IP/* * [...] Note that 120 sec is defined in the protocol as the maximum * possible RTT. I guess we'll have to use something other than TCP * to talk to the University of Mars. * PAWS allows us longer timeouts and large windows, so once implemented * ftp to mars will work nicely. */
– from /usr/src/linux/net/inet/tcp.c, concerning RTT [retransmission timeout]
LPIC topic 1.112.1 — Fundamentals of TCP/IP [4]Weight: 4Objective
Candidates should demonstrate a proper understanding of network fundamentals. This objective includes the understanding of IPaddresses, network masks and what they mean (i.e. determine a network and broadcast address for a host based on its subnet mask in “dotted quad” or abbreviated notation or determine the network address, broadcast address and netmask when given an IPaddress and number of bits). It also covers the understanding of the network classes and classless subnets (CIDR) and the reserved addresses for private network use. It includes the understanding of the function and application of a default route. It also includes the understanding of basic Internet protocols (IP, ICMP, TCP, UDP) and the more common TCP and UDP ports (20, 21, 23, 25, 53, 80, 110, 119, 139, 143, 161).
Key files, terms, and utilities include/etc/services TCP and UDP service numbersftp File transfer protocoltelnet Connect to a TCP servicehost DNS query programping Network table tennis programdig DNS query program (verbose)traceroute Network routing path discoverywhois Query IP and DNS allocations
20.1 IP and other animalsNetworks connect computers. Connected networks form an internet, or in the case of the worldwide network, the Internet. The Internet Protocol (IP) provides a way for computers on the Internet to communicate with each other.

20 TCP/IP LPI 102 Course Notes 125
IP capabilities
Any machine connected to the Internet can send an IP packet to any other machine on the Internet18. To communicate with any given machine, all that is required is the IP address of the destination, and a common understanding of the protocol to be used.The most commonly used IP protocols are these:• ICMP – Internet control message protocol. ICMP packets transmit information about
network problems and adjustments. As an example, when TCP or UDP packets are dropped, an ICMP packet is sent to the sender which explains the reason (if it gets through).
• UDP – User datagram protocol19. A UDP packet which is transmitted is simply sent into the network towards its destination address. If it arrives, the other side may choose to respond, or not respond, depending on the contents of the packet that was sent.
• TCP – Transmission Control Protocol. TCP provides a “reliable” network connection stream. telnet and ftp both rely on TCP.
Other IP protocols do exist, but are not as commonly used as TCP, UDP and ICMP. An example of another IP protocol is GRE, Generic Routing Encapsulation, which is used for tunnelling other protocols via IP routers.
20.2 IP addressing
Dotted quad
An IP address is 4 bytes long, or 32 bits. The four bytes of the IP address are usually written in dotted quad notation, ie. four numbers (in the range 0 to 255, inclusive) separated by dots –
192.168.33.12
Network mask
The network mask is associated with IP addresses, and indicates how many bits of the IP address is shared with the rest of the local network (subnet). A very common subnet is that the first 24 bits are the same in the subnet:
255.255.255.0
If you were to write that in binary, it would look something like this11111111.11111111.11111111.00000000
To indicate the number of bits in the network mask, the following format is used:network.address/bits
So the following are equivalent representations for the network 192.168.44.0255:192.168.44.0/255.255.255.0
192.168.44.0/24
Broadcast address and network address
The first numerical address in the subnet is the network address, and the last address in the
18 Well, that's the big idea, anyhow.19 Sometimes incorrectly called Unreliable Delivery Protocol.
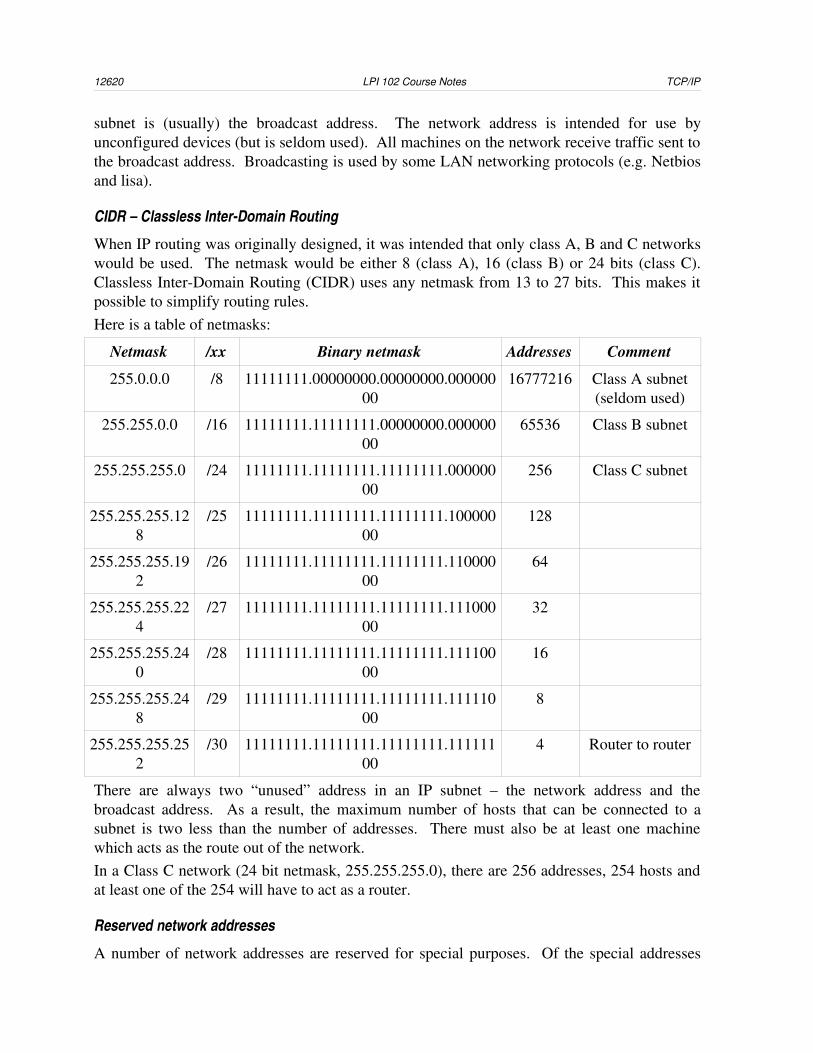
12620 LPI 102 Course Notes TCP/IP
subnet is (usually) the broadcast address. The network address is intended for use by unconfigured devices (but is seldom used). All machines on the network receive traffic sent to the broadcast address. Broadcasting is used by some LAN networking protocols (e.g. Netbios and lisa).
CIDR – Classless InterDomain Routing
When IP routing was originally designed, it was intended that only class A, B and C networks would be used. The netmask would be either 8 (class A), 16 (class B) or 24 bits (class C). Classless InterDomain Routing (CIDR) uses any netmask from 13 to 27 bits. This makes it possible to simplify routing rules.Here is a table of netmasks:
Netmask /xx Binary netmask Addresses Comment
255.0.0.0 /8 11111111.00000000.00000000.00000000
16777216 Class A subnet (seldom used)
255.255.0.0 /16 11111111.11111111.00000000.00000000
65536 Class B subnet
255.255.255.0 /24 11111111.11111111.11111111.00000000
256 Class C subnet
255.255.255.128
/25 11111111.11111111.11111111.10000000
128
255.255.255.192
/26 11111111.11111111.11111111.11000000
64
255.255.255.224
/27 11111111.11111111.11111111.11100000
32
255.255.255.240
/28 11111111.11111111.11111111.11110000
16
255.255.255.248
/29 11111111.11111111.11111111.11111000
8
255.255.255.252
/30 11111111.11111111.11111111.11111100
4 Router to router
There are always two “unused” address in an IP subnet – the network address and the broadcast address. As a result, the maximum number of hosts that can be connected to a subnet is two less than the number of addresses. There must also be at least one machine which acts as the route out of the network.In a Class C network (24 bit netmask, 255.255.255.0), there are 256 addresses, 254 hosts and at least one of the 254 will have to act as a router.
Reserved network addresses
A number of network addresses are reserved for special purposes. Of the special addresses

20 TCP/IP LPI 102 Course Notes 127
listed in RFC 3330, the following are used quite commonly. Address Block Present Use
Reference -----------------------------------------------------------------
-- 0.0.0.0/8 "This" Network [RFC1700, page
4] 10.0.0.0/8 Private-Use Networks
[RFC1918] 127.0.0.0/8 Loopback [RFC1700, page
5] 169.254.0.0/16 Link Local
-- 172.16.0.0/12 Private-Use Networks
[RFC1918] 192.168.0.0/16 Private-Use Networks
[RFC1918] 224.0.0.0/4 Multicast
[RFC3171]
Example IP's and netmasks
The table shows the IP addresses and netmasks, together with the expected network and broadcast addresses.
Example IP address
Example netmask
Network address
Network and bits in mask
Broadcast address
Number of
machines
The following three netmasks represent Class C (/24), class B(/16) and class A(/8) networks.
192.168.6.12 255.255.255.0 192.168.6.0 192.168.6.0/24 192.168.6.255 253
172.16.24.12 255.255.0.0 172.16.0.0 172.16.0.0/16 172.16.255.255 65534
10.251.22.33 255.0.0.0 10.0.0.0 10.0.0.0/8 10.255.255.255 16777214
The following two machines are alone on a small subnet. This arrangement is commonly used by routers.
192.168.44.1 255.255.255.252 192.168.44.0 192.168.44.0/30 192.168.44.3 2
192.168.44.2 255.255.255.252 192.168.44.0 192.168.44.0/30 192.168.44.3 2
192.168.44.61 255.255.255.252 192.168.44.60 192.168.44.0/30 192.168.44.63 2
192.168.44.62 255.255.255.252 192.168.44.60 192.168.44.0/30 192.168.44.63 2
Routing and the default gateway
If the destination a machine is talking to is not on the local subnet, the IP packet is sent to a chosen machine on the local subnet. This machine acts as a router, and is responsible for delivering the packet to it's destination, or at least to the next hop.The kernel maintains a routing table, which contains routing information for each network that requires special treatment. An entry in the routing table specifies the following elements:• The destination network and netmask

12820 LPI 102 Course Notes TCP/IP
• The gateway which handles traffic for this network • The device to which the traffic should be sent (e.g. eth0 or ppp0)A machine which is not acting as a router usually specifies two routing entries:• A route for the local network • A default gateway which handles all other traffic
foobar:~ $ route -nKernel IP routing tableDestination Gateway Genmask Flags Metric Ref Use
Iface10.0.0.0 0.0.0.0 255.255.255.0 U 0 0 0
eth00.0.0.0 10.0.0.1 0.0.0.0 UG 0 0 0
eth0
The first entry above specifies that the subnet 10.0.0.0/24 is local on the ethernet interface eth0. The second entry specifies that the default gateway is 10.0.0.1 (reachable via eth0).
20.3 ICMP – Internet Control Message ProtocolICMP facilitates communication of other protocols. ICMP messages have the following specific functions:• Flow control – ICMP messages are sent to tell the sender of data that it is sending faster
than the data can be processed. When these are received, the sender should slow down.• Unreachable networks and computers – Computers and networks may be disconnected, or
there may be no route to reach them (they are unreachable). When packets cannot be delivered, ICMP messages are sent that indicate the error.
• Host and network redirection – ICMP messages are sent to modify routing tables on hosts when better routes exist (e.g. another router on the same subnet).
20.4 TCP – Transmission Control ProtocolA TCP connection is similar to a telephone call between to two machines. The data transmitted by each machine is relayed to the other in the order it is sent. A TCP connection works something like this:1. A server listens on a chosen port for an incoming TCP request.2. The client requests a connection to the server. If the server is listening on the port, the
connection is accepted.3. The client and the server now send data to each other, peer to peer, until one of them closes
the connection.The file /etc/services contains a list of standard services and their associated port numbers.
$ egrep '\b(20|21|23|25|53|80|110|119|139|143)/tcp' /etc/servicesftp-data 20/tcp # File Transfer [Default Data]ftp 21/tcp # File Transfer [Control]telnet 23/tcp # Telnetsmtp 25/tcp mail # Simple Mail Transferdomain 53/tcp # Domain Name Server

20 TCP/IP LPI 102 Course Notes 129
http 80/tcp # World Wide Web HTTPwww 80/tcp # World Wide Web HTTPwww-http 80/tcp # World Wide Web HTTPpop3 110/tcp # Post Office Protocol - Version 3nntp 119/tcp # Network News Transfer Protocolnetbios-ssn 139/tcp # NETBIOS Session Serviceimap 143/tcp imap2 # Internet Message Access Protocol
The telnet application is designed for remote control via a TCP connection. You can, however, connect to any TCP service using the telnet application.
20.5 UDP – User datagram protocolUDP provides an unreliable message delivery service – if your packet gets lost in the network, that's too bad. It is used for services which require either a fast response, where the overhead of setting up a connection cannot be justified.A UDP session works something like this:1. A server listens on a chosen port for an incoming UDP request.2. The client sends a UDP packet to the server. If the server is listening on the port, the packet
is passed to the appropriate application. If the server is not listening, an ICMP message is returned.
3. Usually the server sends back a response to the UDP packet it received, but this is not necessary.
The entries in /etc/services list entries for both UDP and TCP.$ egrep '\b(53|161)/udp' /etc/servicesdomain 53/udp # Domain Name Serversunrpc 111/udp rpcbind # SUN Remote Procedure Callsnmp 161/udp # SNMP
Some of the more famous protocols that use UDP are these:• 53/UDP – DNS – Domain name service. A DNS server translates network names into IP
addresses.• 111/UDP – Sun RPC, including NFS. Port 111 is used by the RPC portmapper, which
allocates TCP and UDP ports for RPC services as required.• 161/UDP – SNMP – Simple Network Management Protocol. SNMP is commonly used for
administering and monitoring routers.
20.6 Client applicationsThe applications discussed in this subsection are standard equipment on TCP/IP networks.
20.6.1 pingA ping20 is a quantum of happiness. The ping application sends pings (ICMP echo request) to remote IP based hosts, and reports how long it takes for them to respond with a pong (ICMP echo reply). In its default mode of operation, ping transmits ping packets until it is interrupted
20 It don't mean a thing if it 'aint got that ping.
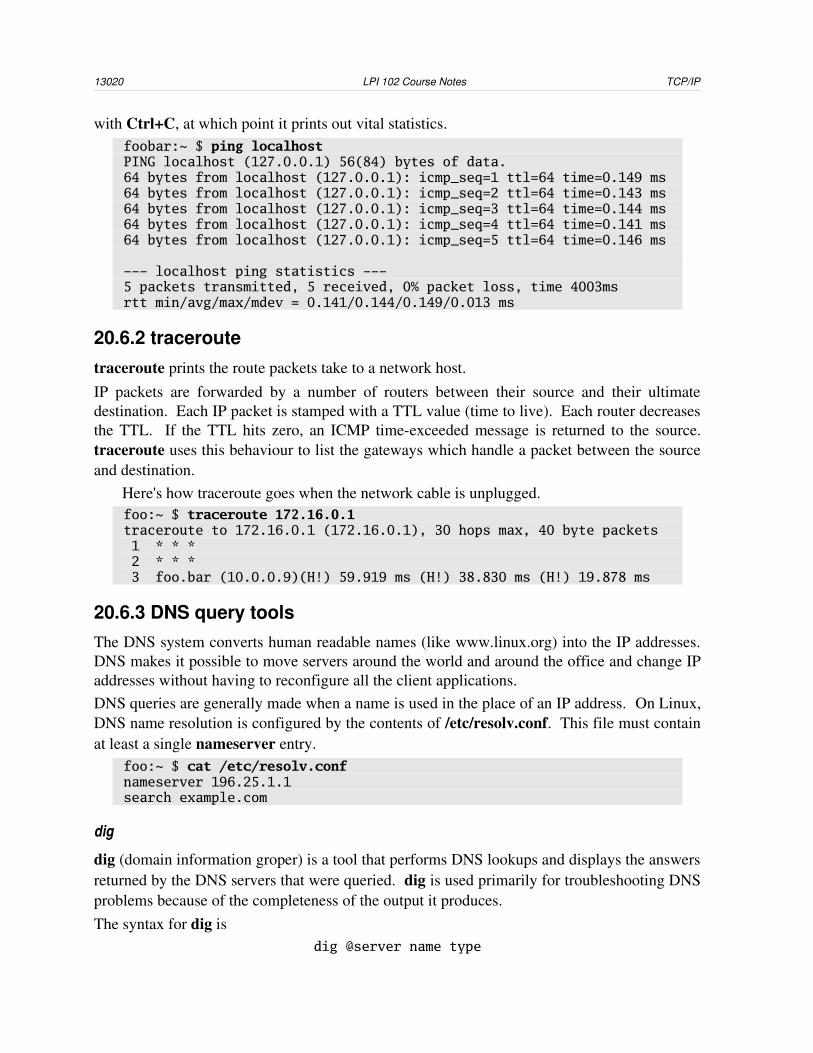
13020 LPI 102 Course Notes TCP/IP
with Ctrl+C, at which point it prints out vital statistics.foobar:~ $ ping localhostPING localhost (127.0.0.1) 56(84) bytes of data.64 bytes from localhost (127.0.0.1): icmp_seq=1 ttl=64 time=0.149 ms64 bytes from localhost (127.0.0.1): icmp_seq=2 ttl=64 time=0.143 ms64 bytes from localhost (127.0.0.1): icmp_seq=3 ttl=64 time=0.144 ms64 bytes from localhost (127.0.0.1): icmp_seq=4 ttl=64 time=0.141 ms64 bytes from localhost (127.0.0.1): icmp_seq=5 ttl=64 time=0.146 ms
--- localhost ping statistics ---5 packets transmitted, 5 received, 0% packet loss, time 4003msrtt min/avg/max/mdev = 0.141/0.144/0.149/0.013 ms
20.6.2 traceroutetraceroute prints the route packets take to a network host.IP packets are forwarded by a number of routers between their source and their ultimate destination. Each IP packet is stamped with a TTL value (time to live). Each router decreases the TTL. If the TTL hits zero, an ICMP timeexceeded message is returned to the source. traceroute uses this behaviour to list the gateways which handle a packet between the source and destination.
Here's how traceroute goes when the network cable is unplugged.foo:~ $ traceroute 172.16.0.1traceroute to 172.16.0.1 (172.16.0.1), 30 hops max, 40 byte packets 1 * * * 2 * * * 3 foo.bar (10.0.0.9)(H!) 59.919 ms (H!) 38.830 ms (H!) 19.878 ms
20.6.3 DNS query toolsThe DNS system converts human readable names (like www.linux.org) into the IP addresses. DNS makes it possible to move servers around the world and around the office and change IP addresses without having to reconfigure all the client applications.DNS queries are generally made when a name is used in the place of an IP address. On Linux, DNS name resolution is configured by the contents of /etc/resolv.conf. This file must contain at least a single nameserver entry.
foo:~ $ cat /etc/resolv.confnameserver 196.25.1.1search example.com
dig
dig (domain information groper) is a tool that performs DNS lookups and displays the answers returned by the DNS servers that were queried. dig is used primarily for troubleshooting DNS problems because of the completeness of the output it produces.The syntax for dig is
dig @server name type

20 TCP/IP LPI 102 Course Notes 131
but dig graciously accepts its parameters in any order. type indicates what type of DNS record is to be searched for (and may be in lower case, and the default type is A). If you don't specify @server, then the servers listed in /etc/resolv.conf are used.DNS records include these:• A – Address record (e.g. dig www.google.com a). These are used for machines on the
internet.• NS – name server records (e.g. dig ns microsoft.com). Name servers answer DNS queries
for a DNS zone. There is are multiple DNS servers for a single domain so that name resolution works even if one DNS server fails.
• MX – Mail exchanger record (e.g. dig iana.org mx). Mail exchangers accept mail for the domain.
• PTR – Pointer record (e.g. dig ptr 1.0.0.127.inaddr.arpa or dig x 127.0.0.1). DNS does backwards lookups as well as forward lookups. It's a bit messy when you look at the details.
• SOA – start of authority record (dig soa ledge.co.za) The SOA record contains interesting information about how secondary DNS servers should synchronise with their primary DNS server, and also the hostname on which the authoritative information for the domain is found, along with the email address of the person who administers the DNS server.
Here are some things to do with dig:% dig soa ledge.co.za% dig ns ledge.co.za% dig ns ledge.co.za @ns2.ledge.co.za% dig a www.ledge.co.za @ns2.ledge.co.za% dig mx ledge.co.za% dig a ledge.co.za% dig any ledge.co.za
host
host is a simple DNS lookup utility It displays less detail than dig, which can be good, because dig displays everything. The syntax for using host is
host [-t type] name server
You can try these commands to get a feel for the host command.foobar:~ $ hostUsage: host [-aCdlrTwv] [-c class] [-n] [-N ndots] [-t type] [-W
time] [-R number] hostname [server]foobar:~ $ host www.ledge.co.zafoobar:~ $ host www.ledge.co.za ns2.ledge.co.zafoobar:~ $ host -t soa ledge.co.zafoobar:~ $ host -t ns ledge.co.zafoobar:~ $ host -t ns ledge.co.za ns2.ledge.co.zafoobar:~ $ host -t mx ledge.co.zafoobar:~ $ host ledge.co.zafoobar:~ $ host -t any ledge.co.zafoobar:~ $ host www.microsoft.com
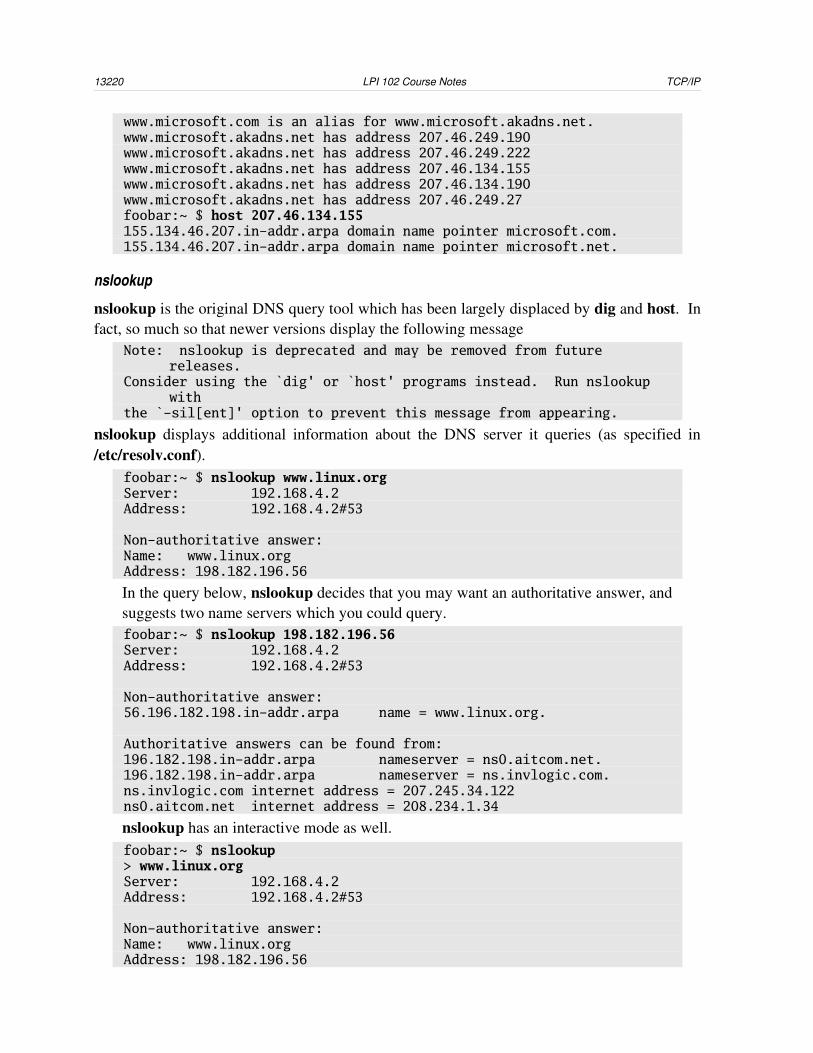
13220 LPI 102 Course Notes TCP/IP
www.microsoft.com is an alias for www.microsoft.akadns.net.www.microsoft.akadns.net has address 207.46.249.190www.microsoft.akadns.net has address 207.46.249.222www.microsoft.akadns.net has address 207.46.134.155www.microsoft.akadns.net has address 207.46.134.190www.microsoft.akadns.net has address 207.46.249.27foobar:~ $ host 207.46.134.155155.134.46.207.in-addr.arpa domain name pointer microsoft.com.155.134.46.207.in-addr.arpa domain name pointer microsoft.net.
nslookup
nslookup is the original DNS query tool which has been largely displaced by dig and host. In fact, so much so that newer versions display the following message
Note: nslookup is deprecated and may be removed from future releases.
Consider using the `dig' or `host' programs instead. Run nslookup with
the `-sil[ent]' option to prevent this message from appearing.
nslookup displays additional information about the DNS server it queries (as specified in /etc/resolv.conf).
foobar:~ $ nslookup www.linux.orgServer: 192.168.4.2Address: 192.168.4.2#53
Non-authoritative answer:Name: www.linux.orgAddress: 198.182.196.56
In the query below, nslookup decides that you may want an authoritative answer, and suggests two name servers which you could query.foobar:~ $ nslookup 198.182.196.56Server: 192.168.4.2Address: 192.168.4.2#53
Non-authoritative answer:56.196.182.198.in-addr.arpa name = www.linux.org.
Authoritative answers can be found from:196.182.198.in-addr.arpa nameserver = ns0.aitcom.net.196.182.198.in-addr.arpa nameserver = ns.invlogic.com.ns.invlogic.com internet address = 207.245.34.122ns0.aitcom.net internet address = 208.234.1.34
nslookup has an interactive mode as well.foobar:~ $ nslookup> www.linux.orgServer: 192.168.4.2Address: 192.168.4.2#53
Non-authoritative answer:Name: www.linux.orgAddress: 198.182.196.56

20 TCP/IP LPI 102 Course Notes 133
> 198.182.196.56Server: 192.168.4.2Address: 192.168.4.2#53
Non-authoritative answer:56.196.182.198.in-addr.arpa name = www.linux.org.
Authoritative answers can be found from:196.182.198.in-addr.arpa nameserver = ns.invlogic.com.196.182.198.in-addr.arpa nameserver = ns0.aitcom.net.ns.invlogic.com internet address = 207.245.34.122ns0.aitcom.net internet address = 208.234.1.34> server 207.245.34.122Default server: 207.245.34.122Address: 207.245.34.122#53> set type=MX> linux.orgServer: 207.245.34.122Address: 207.245.34.122#53
linux.org mail exchanger = 10 mail.linux.org.> exit
20.6.4 telnettelnet allows remote control of computers by enabling you to log in over the network. Computers running telnet servers generally behave in the same way whether you log in at the console, or via the telnet protocol.
foobar:~ $ telnet sunnyTrying 172.18.18.16...Connected to sunny.Escape character is '^]'.Debian GNU/Linux 3.0 sunny.ledge.co.zasunny login: georgePassword:Last login: Mon Jul 28 20:05:56 2003 from foobar.ledge.co.za on
pts/1Linux sunny 2.4.18 #1 Sat May 31 16:43:45 SAST 2003 sparc unknownYou have new mail.george@sunny:~$ whoamigeorgegeorge@sunny:~$ exitConnection closed by foreign host.foobar:~ $ whoamijoesoap
Because the telnet application simply establishes a TCP connection21, it is quite useful for general TCP debugging and fault finding. When using telnet for this purpose, it is often necessary to use the escape character – Ctrl+] – to reach the telnet prompt, followed by q for quit.
21 The telnet client sends information like the TERM environment variable to the server using the “Out of band” feature of TCP. This information is ignored by most applications except telnet servers.
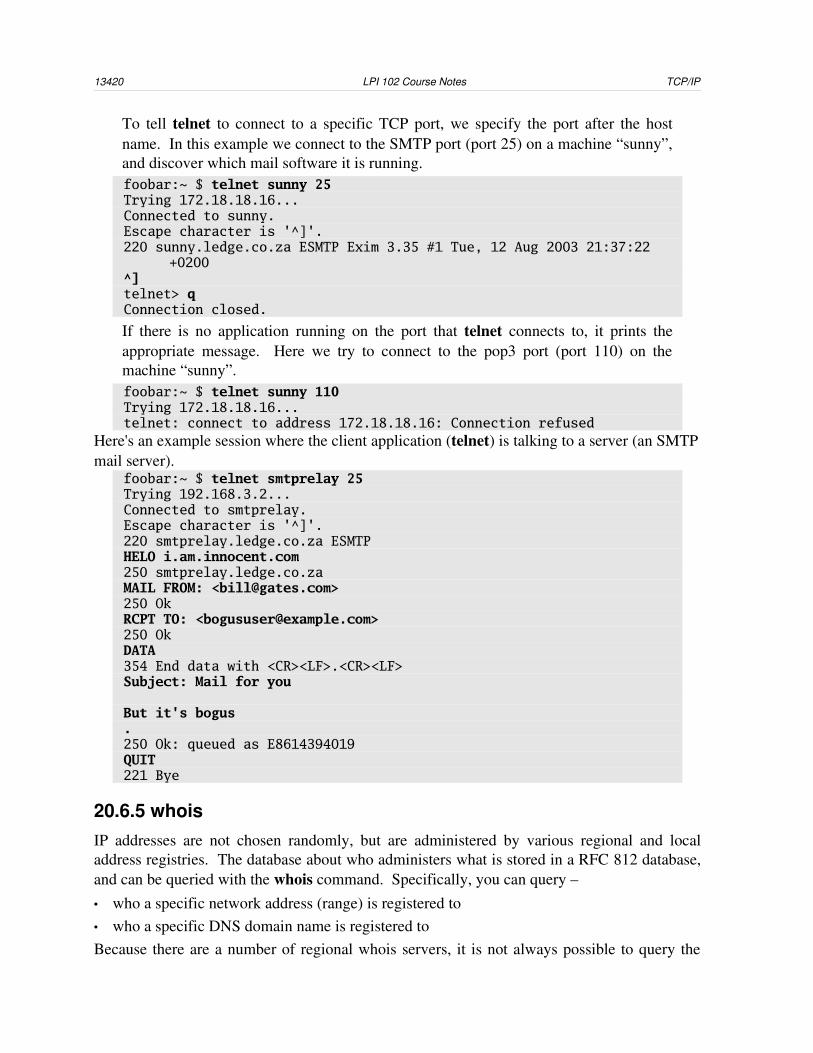
13420 LPI 102 Course Notes TCP/IP
To tell telnet to connect to a specific TCP port, we specify the port after the host name. In this example we connect to the SMTP port (port 25) on a machine “sunny”, and discover which mail software it is running.foobar:~ $ telnet sunny 25Trying 172.18.18.16...Connected to sunny.Escape character is '^]'.220 sunny.ledge.co.za ESMTP Exim 3.35 #1 Tue, 12 Aug 2003 21:37:22
+0200^]telnet> qConnection closed.
If there is no application running on the port that telnet connects to, it prints the appropriate message. Here we try to connect to the pop3 port (port 110) on the machine “sunny”.foobar:~ $ telnet sunny 110Trying 172.18.18.16...telnet: connect to address 172.18.18.16: Connection refused
Here's an example session where the client application (telnet) is talking to a server (an SMTP mail server).
foobar:~ $ telnet smtprelay 25Trying 192.168.3.2...Connected to smtprelay.Escape character is '^]'.220 smtprelay.ledge.co.za ESMTPHELO i.am.innocent.com250 smtprelay.ledge.co.zaMAIL FROM: <[email protected]>250 OkRCPT TO: <[email protected]>250 OkDATA354 End data with <CR><LF>.<CR><LF>Subject: Mail for you
But it's bogus.250 Ok: queued as E8614394019QUIT221 Bye
20.6.5 whoisIP addresses are not chosen randomly, but are administered by various regional and local address registries. The database about who administers what is stored in a RFC 812 database, and can be queried with the whois command. Specifically, you can query –• who a specific network address (range) is registered to• who a specific DNS domain name is registered toBecause there are a number of regional whois servers, it is not always possible to query the

20 TCP/IP LPI 102 Course Notes 135
correct whois server the first time round. Some versions of whois automatically select which whois server is to be queried. If yours does not, you will have to specify which server to query on the command line for many queries.
whois google.comwhois -h whois.arin.net 192.168.1.1whois -h whois.internic.net example.comwhois -h whois.crsnic.net microsoft.com
20.6.6 ftpThe file transfer protocol is used to transfer files between machines on the internet – one running a FTP server, and the other running the FTP client program, ftp. It is not the only file transfer protocol, but it is the only one which is standard equipment on machines with TCP/IP.To use FTP you supply a user name and password for the FTP server. The user name “anonymous” is given special treatment – any password is valid. With many FTP servers you can use “ftp” instead of “anonymous”.
ftp > open ftp.linux.org> user anonymous> pass [email protected]> cd pub> pwd> cd linux> pwd> ls> get README> bye
Here we do more or less the same thing, using a couple of ftp features:
• Commands can be abbreviated to the shortest unique prefix – i.e. instead of mget, we can use the first two letters, mg.
• If we send a password ending in an @ sign, the FTP client sends our host name.• FTP operates in a number of modes, most notably binary and ascii (selected by the
commands of the same name). In binary mode, no translation is done on data. In ascii mode the ftp server translates the text into the character set of the client (this is only sometimes desirable).
• prompt turns off prompting “Are you sure?” for each file. hash prints a hash mark for each 4kb downloaded (this varies between FTP clients).ftp ftp.linux.org> user ftp> pass me@> cd pub/linux> bin> prompt> hash> mg READ*> bye
Here's a list of the more commonly used FTP commands.

13620 LPI 102 Course Notes TCP/IP
help help on using ftp (a list of commands)open connect to remote ftpls list contents of remote directorycd change remote working directorypwd print working directory on remote machinecdup change remote working directory to parent directorylcd change local working directory (on client side)ascii set ASCII transfer typebinary set binary transfer typeget receive filemget get multiple filesdelete delete remote filemdelete delete multiple filesmkdir make directory on the remote machineput send one filemput send multiple filesprompt force interactive prompting on (m)ultiple commandsrename rename filermdir remove directory on the remote machineclose terminate ftp sessionbye terminate ftp session and exit
20.7 Review
Quiz questions
1. What is a Class B subnet?2. What does 192.168.44.2/24 signify?3. In the network 172.16.0.128/25, what are the network and broadcast addresses?4. How many bits are in the subnet mask 255.255.255.240?5. Name three ranges of IP address reserved for private use.6. Explain the purpose of ICMP, UDP and TCP, and how they relate to IP.7. What does the file /etc/services contain?
8. Explain the operation of ping, telnet, traceroute and dig.9. Which protocols use TCP ports 25, 80 and 110?
Assignment
1. Set up your computer's IP address using DHCP.2. Investigate the following IP addresses using ping, whois, traceroute and dig
207.46.249.27 (one of the servers for www.microsoft.com)216.239.57.99 (www.google.com)192.0.34.166 (www.example.com)192.0.34.162 (www.iana.org)
3. Log on to a server using telnet. Read the man page for login, and see if you can find out why it is not possible to log in as root via telnet.
20 TCP/IP LPI 102 Course Notes 137
4. Find and download a copy of the latest Linux kernel source at ftp.kernel.org using the command line FTP client. Time how long this takes.
Answers to quiz questions
1. One with a netmask of 255.255.0.0 /16.2. An IP address in 192.168.44.2 with a netmask of 255.255.255.0.3. Network is 172.16.0.128, broadcast is 172.16.0.255.4. 8 + 8 + 8 + 4 = 285. 10.0.0.0/8, 172.16.0.0/12, 192.168.0.0/166. All are subprotocols of IP. ICMP is a helper protocol for control messages. UDP is for
unassured transmissions, and TCP is for twoway streams.7. A list of TCP and UDP port numbers, and the names of the protocols which use them.8. Ping sends packets to test a network. Telnet makes TCP connections. Traceroute tests
network routing. Dig queries DNS servers.9. 25 is SMTP, 80 is HTTP, 110 is POP3.
13821 LPI 102 Course Notes TCP/IP configuration
21 TCP/IP configurationHow much work would a network net if a network could net work?
(a 21st century woodchuck)
LPIC topic 1.112.3 — TCP/IP configuration and troubleshooting [7]Weight: 7Objective
Candidates should be able to view, change and verify configuration settings and operational status for various network interfaces. This objective includes manual and automatic configuration of interfaces and routing tables. This especially means to add, start, stop, restart, delete or reconfigure network interfaces. It also means to change, view or configure the routing table and to correct an improperly set default route manually. Candidates should be able to configure Linux as a DHCP client and a TCP/IP host and to debug problems associated with the network configuration.
Key files, terms, and utilities include/etc/HOSTNAME or /etc/hostnameSystem network name/etc/hosts Names for other hosts on the network (substitute for DNS)/etc/networks Network names/etc/host.conf Overall resolver configuration/etc/resolv.conf Resolver settings (e.g. DNS server and domain suffix)/etc/nsswitch.conf Name services switch (in which order are names resolved)ifconfig Network interface configuration and displayroute Network routes configuration and displaydhcpcd, dhcpclient, pump DHCP clients (Dynamic Host Configuration Protocol)host DNS query toolhostname (domainname, dnsdomainname) Set or query the host namenetstat Show network statusping Network connectivity testingtraceroute Network routing testingtcpdump Network packet sniffer (show all network traffic)the network scripts run during system initialization. Somewhere in /etc ...
21.1 System start up scriptsEach distribution uses slightly different configuration scripts for configuring networking. In all cases, the following can be configured:• The host name (usually /etc/hostname or /etc/HOSTNAME)• For each network interface, the IP address, network mask and broadcast address• The default gateway and additional routing
21 TCP/IP configuration LPI 102 Course Notes 139
Redhat
For Redhat machines, the authoritative source of the host name and other network settings is /etc/sysconfig/network.
[root@foobary root]# cat /etc/sysconfig/networkNETWORKING=yesGATEWAYDEV=""HOSTNAME=foobar.example.comGATEWAY="192.168.1.1"
The interface configuration is in the directory for network scripts, /etc/sysconfig/networkscripts/. Each interface is configured by a script ifcfginterfacename. For example, eth0 is configured by /etc/sysconfig/networkscripts/ifcfgeth0 and ppp0 is configured by /etc/sysconfig/networkscripts/ifcfgppp0.
Configuration of fixed parameters on Redhat.[root@foobar root]# cd /etc/sysconfig/network-scripts[root@foobar network-scripts]# cat ifcfg-eth0DEVICE=eth0BROADCAST=192.168.1.255IPADDR=192.168.1.100NETMASK=255.255.255.0NETWORK=192.168.1.0ONBOOT=no
If eth0 is configured by DHCP, then the configuration file is simpler.[root@foobar tmp]# cd /etc/sysconfig/network-scripts[root@foobar network-scripts]# cat ifcfg-eth0 DEVICE=eth0BOOTPROTO=dhcpONBOOT=yes
Redhat supplies ifup to configure network interfaces, and ifdown to deactivate them.[root@foobar network-scripts]# ifdown eth0[root@foobar network-scripts]# ifup eth0
Network parameters are mostly read by /etc/init.d/network (i.e. when you run service network restart).
SuSE 7.x and before
Older versions of SuSE store network configuration parameters in the global configuration file /etc/rc.config. Some editions of SuSE stored additional information in /etc/rc.config.d. Routing information is stored in /etc/routes.conf
The configuration for a static IP address looks like this.suseold:/etc # grep ^IFCONFIGsuseold:/etc # egrep '^(IFCONFIG|NETDEV)' /etc/rc.configNETDEV_0="eth0"NETDEV_1=""NETDEV_2=""NETDEV_3=""IFCONFIG_0="192.168.0.100 broadcast 192.168.0.255 netmask
255.255.255.0 up"
14021 LPI 102 Course Notes TCP/IP configuration
IFCONFIG_1=""IFCONFIG_2=""IFCONFIG_3=""
For dhcp, the settings areIFCONFIG_0="dhcpclient"
Routing is specified in /etc/route.conf.suseold:/etc # cat route.conf0.0.0.0 192.168.0.1 0.0.0.0 eth0
The host name is set from the contents of /etc/rc.config.suseold:/etc # grep HOSTNAME /etc/rc.configFQHOSTNAME="suseold.example.com"
SuSE 8.0+
From version 8.0, SuSE stores network configuration parameters in a very similar way to redhat. /etc/sysconfig/network/
The configuration for a static IP address looks like this.suse8:~ # cd /etc/sysconfig/network/suse8:/etc/sysconfig/network # cat ifcfg-eth0BOOTPROTO='static'BROADCAST='192.168.0.255'IPADDR='192.168.0.100'MTU=''NETMASK='255.255.255.0'NETWORK='192.168.0.0'REMOTE_IPADDR=''STARTMODE='onboot'UNIQUE=''WIRELESS='no'
Routing is specified in /etc/sysconfig/network/routes.suse8:/etc/sysconfig/network # cat routesdefault 192.168.0.1 - -
The host name is set from the contents of /etc/HOSTNAME.suse8:/etc/sysconfig/network # cat /etc/HOSTNAMEsuse8.example.com
Debian – /etc/network
Debian stores networking parameters in the directory /etc/network. The most significant file in this directory is /etc/network/interfaces, which specifies the parameters for the available network interfaces.
Configuration of fixed parameters on Debian.debian:~# cd /etc/network/debian:/etc/network# cat interfacesauto loiface lo inet loopback
auto eth0

21 TCP/IP configuration LPI 102 Course Notes 141
iface eth0 inet static address 192.168.0.100 broadcast 192.168.0.255 netmask 255.255.255.0
gateway 192.168.0.1
If eth0 is configured by DHCP, then the interfaces file contains less detail:debian:/etc/network# cat interfaces
Like Redhat, Debian supplies an ifup and ifdown command to activate and deactivate network interfaces.
debian:~# ifdown eth0debian:~# ifup eth0
hostname and HOSTNAME
The name of the computer is usually stored in the file /etc/hostname (or /etc/HOSTNAME). This is set as the system host name during the boot sequence and it determines the contents of the HOSTNAME environment variable. The host name of a machine does not include the domain part (e.g. example.com). The fully qualified host name is determined by the resolver library. Usually this means that an entry in /etc/hosts determines the fully qualified host name (depending on hosts.conf or nsswitch.conf, as described later).
foobar:~ $ cd /etc/foobar:/etc $ cat HOSTNAMEfoobar.example.comfoobar:/etc $ cat hostnamecat: hostname: No such file or directoryfoobar:/etc $ hostnamefoobarfoobar:/etc $ hostname -ffoobar.example.comfoobar:/etc $ grep `hostname` /etc/hosts10.0.0.3 foobar.example.com foobarfoobar:/etc $ hostname barfoofoobar:/etc $ hostnamebarfoo
21.2 Configuring IP
ifconfig
ifconfig is used to configure the network interfaces controlled by the kernel. The bootup sequence will call ifconfig to set up the initial configuration. After this ifconfig is only used for debugging and system tuning.ifconfig without any further parameters displays the current interfaces and their settings. If you have a network card configured, you will two interfaces. eth0 is the first ethernet interface. lo is the loopback interface, which is used for when the machine needs to talk to
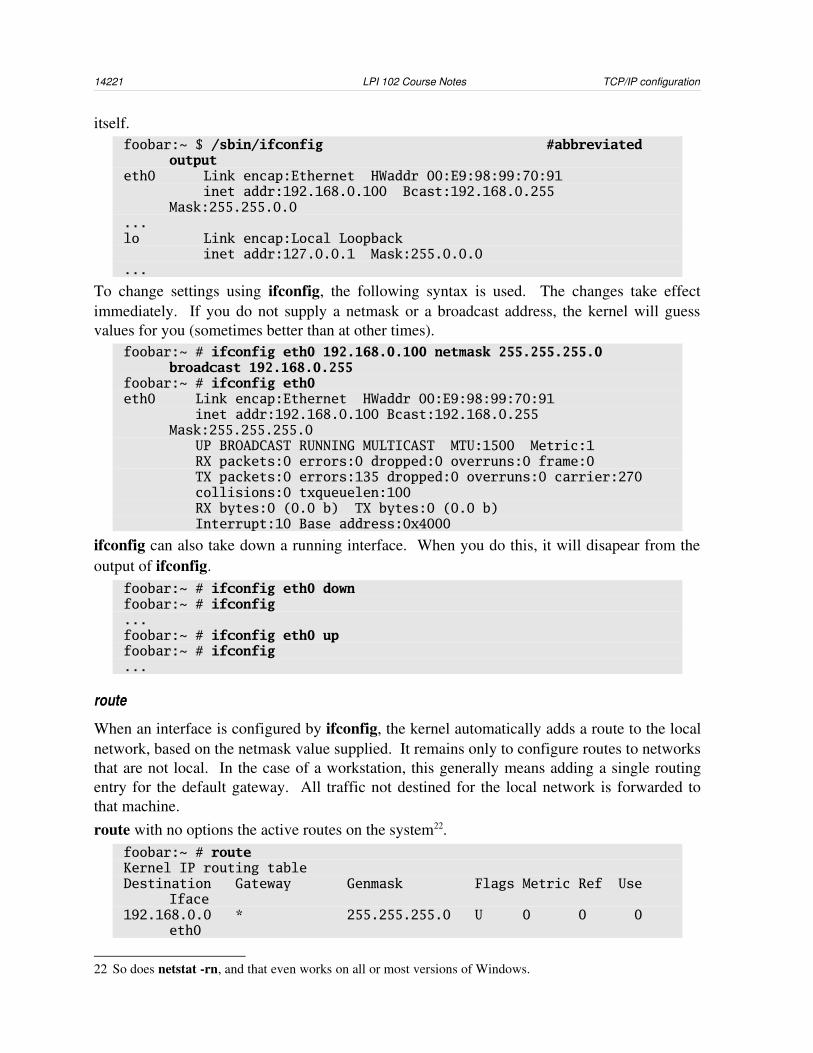
14221 LPI 102 Course Notes TCP/IP configuration
itself.foobar:~ $ /sbin/ifconfig #abbreviated
outputeth0 Link encap:Ethernet HWaddr 00:E9:98:99:70:91 inet addr:192.168.0.100 Bcast:192.168.0.255
Mask:255.255.0.0...lo Link encap:Local Loopback inet addr:127.0.0.1 Mask:255.0.0.0...
To change settings using ifconfig, the following syntax is used. The changes take effect immediately. If you do not supply a netmask or a broadcast address, the kernel will guess values for you (sometimes better than at other times).
foobar:~ # ifconfig eth0 192.168.0.100 netmask 255.255.255.0 broadcast 192.168.0.255
foobar:~ # ifconfig eth0eth0 Link encap:Ethernet HWaddr 00:E9:98:99:70:91 inet addr:192.168.0.100 Bcast:192.168.0.255
Mask:255.255.255.0 UP BROADCAST RUNNING MULTICAST MTU:1500 Metric:1 RX packets:0 errors:0 dropped:0 overruns:0 frame:0 TX packets:0 errors:135 dropped:0 overruns:0 carrier:270 collisions:0 txqueuelen:100 RX bytes:0 (0.0 b) TX bytes:0 (0.0 b) Interrupt:10 Base address:0x4000
ifconfig can also take down a running interface. When you do this, it will disapear from the output of ifconfig.
foobar:~ # ifconfig eth0 downfoobar:~ # ifconfig...foobar:~ # ifconfig eth0 upfoobar:~ # ifconfig...
route
When an interface is configured by ifconfig, the kernel automatically adds a route to the local network, based on the netmask value supplied. It remains only to configure routes to networks that are not local. In the case of a workstation, this generally means adding a single routing entry for the default gateway. All traffic not destined for the local network is forwarded to that machine.route with no options the active routes on the system22.
foobar:~ # routeKernel IP routing tableDestination Gateway Genmask Flags Metric Ref Use
Iface192.168.0.0 * 255.255.255.0 U 0 0 0
eth0
22 So does netstat rn, and that even works on all or most versions of Windows.

21 TCP/IP configuration LPI 102 Course Notes 143
route add
To add a route the command is route add, with the following syntax:route add [-net | -host] DEST [gw GATEWAY] [netmask MASK] [dev DEVICE]
The kernel adds a route to the destination host or the network with the given netmask, via the specific gateway, which is directly reachable on the device. The usage of route add is one of the following:• route add default ... – set the default route• route add host ... – set up a route to a specific host• route add net ... – set up a route to a networkThis changes the route for outgoing packets. Whether packets will return to you or not depends on the routing tables on the remote machine and intermediate routers.
Here we say that the route to the world is via the gateway 192.168.0.1, connected to eth0.foobar:~ # route add default gw 192.168.0.1 dev eth0foobar:~ # routeKernel IP routing tableDestination Gateway Genmask Flags Metric Ref Use
Iface192.168.0.0 * 255.255.255.0 U 0 0 0
eth0default 192.168.0.1 0.0.0.0 UG 0 0 0
eth0
To add a route to a single host, you use the host switch. Here we adjust our routing table so that packets destined for the host 192.168.0.62 will be submitted to the gateway 192.168.0.4 for further processing.foobar:~ # route add -host 192.168.0.62 gw 192.168.0.4 dev eth0foobar:~ # route -nKernel IP routing tableDestination Gateway Genmask Flags Metric Ref Use
Iface192.168.0.62 192.168.0.4 255.255.255.255 UGH 0 0 0
eth0192.168.0.0 0.0.0.0 255.255.255.0 U 0 0 0
eth00.0.0.0 192.168.0.1 0.0.0.0 UG 0 0 0
eth0
To add a route to a network the net switch is used.foobar:~ # route add -net 172.16.88.0 netmask 255.255.255.0 gw
192.168.0.5 dev eth0foobar:~ # route -nKernel IP routing tableDestination Gateway Genmask Flags Metric Ref Use
Iface192.168.0.62 192.168.0.4 255.255.255.255 UGH 0 0 0
eth0192.168.0.0 0.0.0.0 255.255.255.0 U 0 0 0
eth0
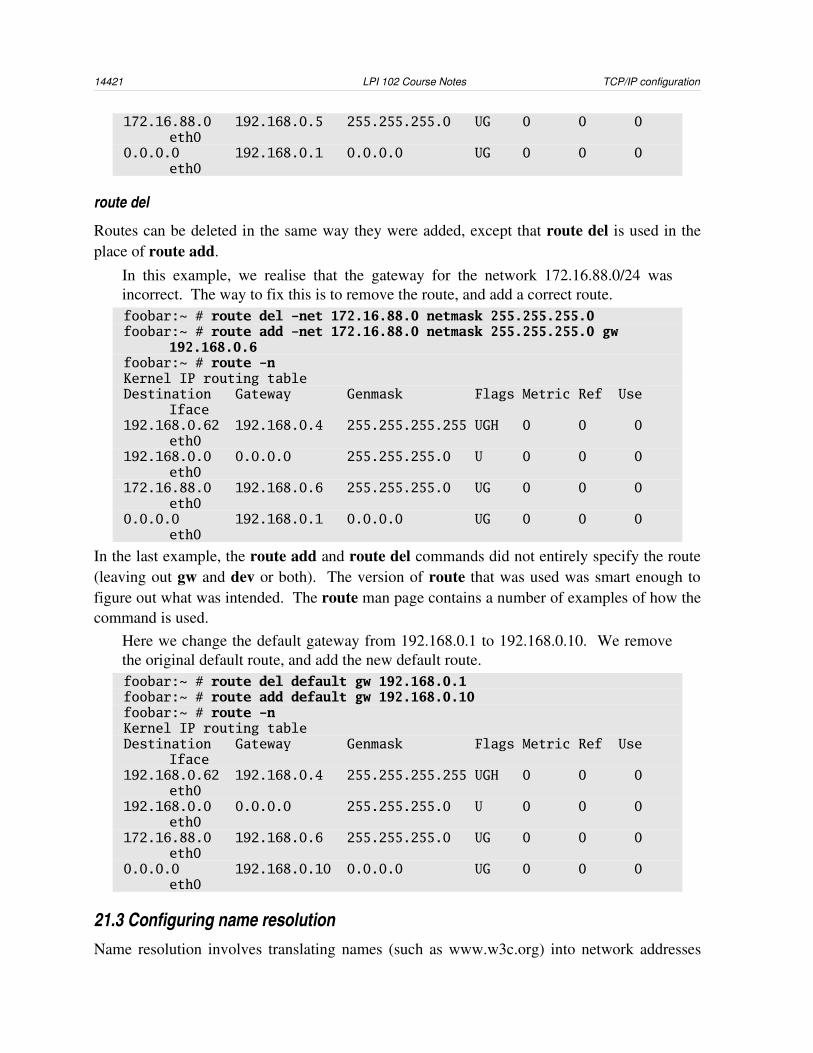
14421 LPI 102 Course Notes TCP/IP configuration
172.16.88.0 192.168.0.5 255.255.255.0 UG 0 0 0 eth0
0.0.0.0 192.168.0.1 0.0.0.0 UG 0 0 0 eth0
route del
Routes can be deleted in the same way they were added, except that route del is used in the place of route add.
In this example, we realise that the gateway for the network 172.16.88.0/24 was incorrect. The way to fix this is to remove the route, and add a correct route.foobar:~ # route del -net 172.16.88.0 netmask 255.255.255.0foobar:~ # route add -net 172.16.88.0 netmask 255.255.255.0 gw
192.168.0.6foobar:~ # route -nKernel IP routing tableDestination Gateway Genmask Flags Metric Ref Use
Iface192.168.0.62 192.168.0.4 255.255.255.255 UGH 0 0 0
eth0192.168.0.0 0.0.0.0 255.255.255.0 U 0 0 0
eth0172.16.88.0 192.168.0.6 255.255.255.0 UG 0 0 0
eth00.0.0.0 192.168.0.1 0.0.0.0 UG 0 0 0
eth0
In the last example, the route add and route del commands did not entirely specify the route (leaving out gw and dev or both). The version of route that was used was smart enough to figure out what was intended. The route man page contains a number of examples of how the command is used.
Here we change the default gateway from 192.168.0.1 to 192.168.0.10. We remove the original default route, and add the new default route.foobar:~ # route del default gw 192.168.0.1foobar:~ # route add default gw 192.168.0.10foobar:~ # route -nKernel IP routing tableDestination Gateway Genmask Flags Metric Ref Use
Iface192.168.0.62 192.168.0.4 255.255.255.255 UGH 0 0 0
eth0192.168.0.0 0.0.0.0 255.255.255.0 U 0 0 0
eth0172.16.88.0 192.168.0.6 255.255.255.0 UG 0 0 0
eth00.0.0.0 192.168.0.10 0.0.0.0 UG 0 0 0
eth0
21.3 Configuring name resolutionName resolution involves translating names (such as www.w3c.org) into network addresses
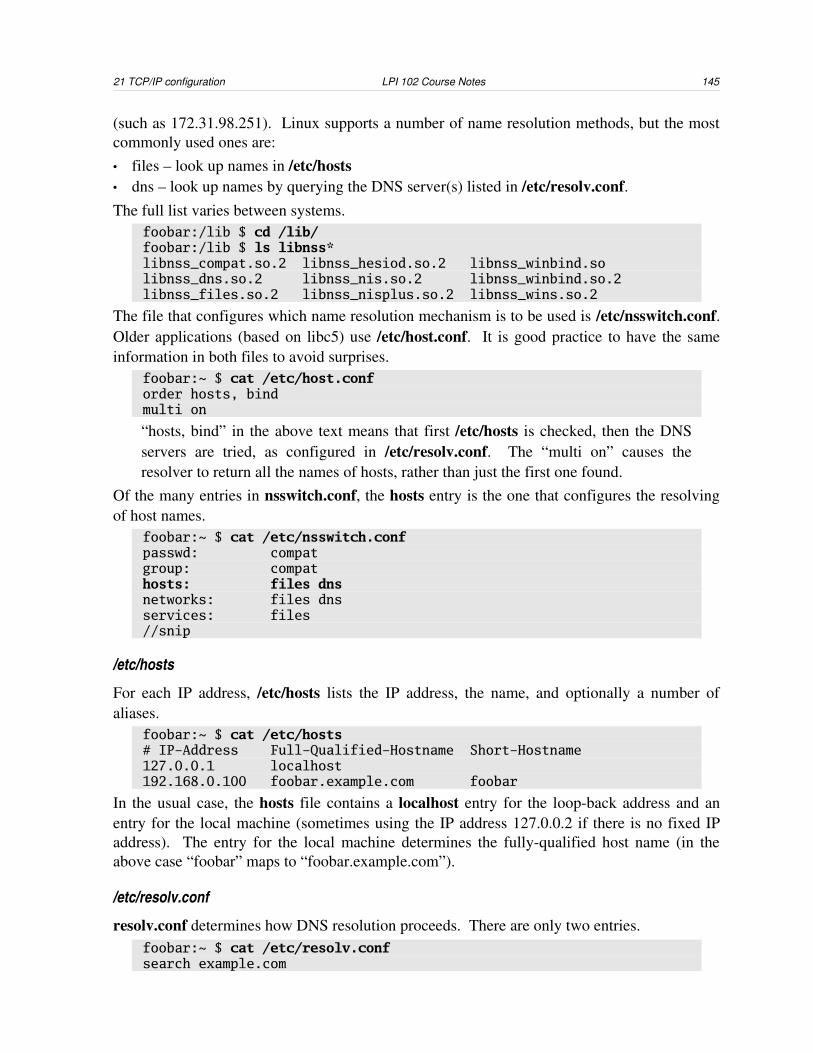
21 TCP/IP configuration LPI 102 Course Notes 145
(such as 172.31.98.251). Linux supports a number of name resolution methods, but the most commonly used ones are:• files – look up names in /etc/hosts• dns – look up names by querying the DNS server(s) listed in /etc/resolv.conf.The full list varies between systems.
foobar:/lib $ cd /lib/foobar:/lib $ ls libnss*libnss_compat.so.2 libnss_hesiod.so.2 libnss_winbind.solibnss_dns.so.2 libnss_nis.so.2 libnss_winbind.so.2libnss_files.so.2 libnss_nisplus.so.2 libnss_wins.so.2
The file that configures which name resolution mechanism is to be used is /etc/nsswitch.conf. Older applications (based on libc5) use /etc/host.conf. It is good practice to have the same information in both files to avoid surprises.
foobar:~ $ cat /etc/host.conforder hosts, bindmulti on
“hosts, bind” in the above text means that first /etc/hosts is checked, then the DNS servers are tried, as configured in /etc/resolv.conf. The “multi on” causes the resolver to return all the names of hosts, rather than just the first one found.
Of the many entries in nsswitch.conf, the hosts entry is the one that configures the resolving of host names.
foobar:~ $ cat /etc/nsswitch.confpasswd: compatgroup: compathosts: files dnsnetworks: files dnsservices: files//snip
/etc/hosts
For each IP address, /etc/hosts lists the IP address, the name, and optionally a number of aliases.
foobar:~ $ cat /etc/hosts# IP-Address Full-Qualified-Hostname Short-Hostname127.0.0.1 localhost192.168.0.100 foobar.example.com foobar
In the usual case, the hosts file contains a localhost entry for the loopback address and an entry for the local machine (sometimes using the IP address 127.0.0.2 if there is no fixed IP address). The entry for the local machine determines the fullyqualified host name (in the above case “foobar” maps to “foobar.example.com”).
/etc/resolv.conf
resolv.conf determines how DNS resolution proceeds. There are only two entries.foobar:~ $ cat /etc/resolv.confsearch example.com
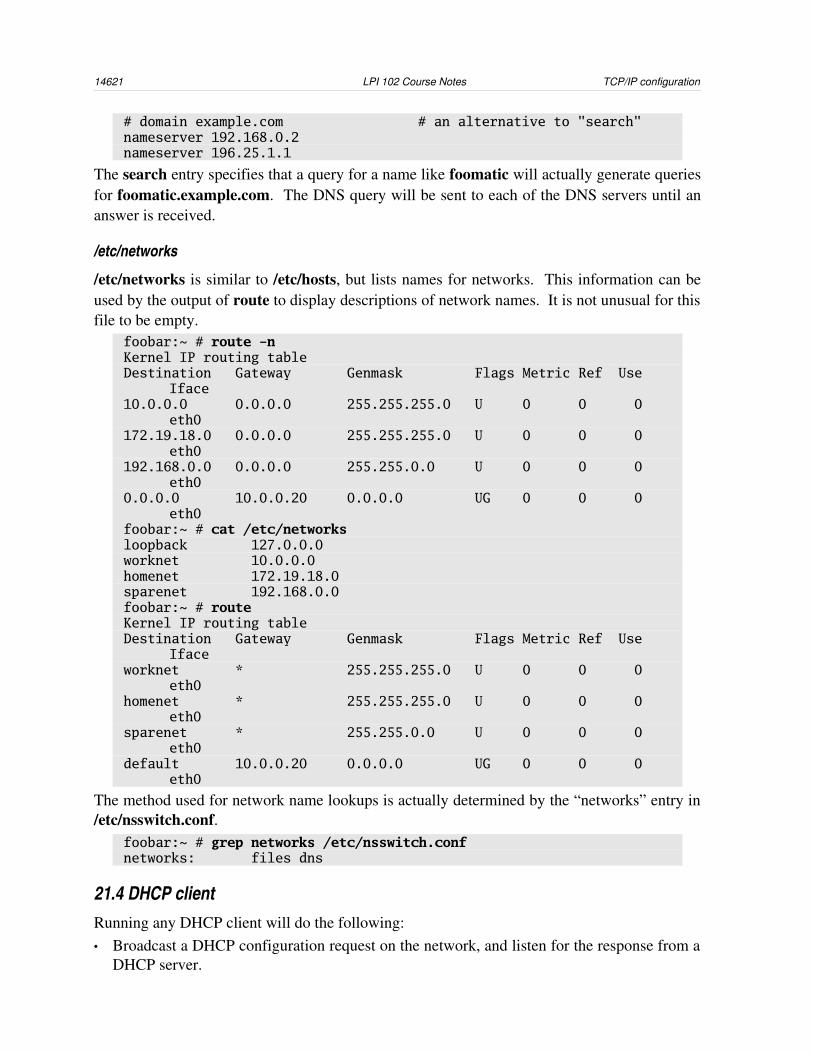
14621 LPI 102 Course Notes TCP/IP configuration
# domain example.com # an alternative to "search"nameserver 192.168.0.2nameserver 196.25.1.1
The search entry specifies that a query for a name like foomatic will actually generate queries for foomatic.example.com. The DNS query will be sent to each of the DNS servers until an answer is received.
/etc/networks
/etc/networks is similar to /etc/hosts, but lists names for networks. This information can be used by the output of route to display descriptions of network names. It is not unusual for this file to be empty.
foobar:~ # route -nKernel IP routing tableDestination Gateway Genmask Flags Metric Ref Use
Iface10.0.0.0 0.0.0.0 255.255.255.0 U 0 0 0
eth0172.19.18.0 0.0.0.0 255.255.255.0 U 0 0 0
eth0192.168.0.0 0.0.0.0 255.255.0.0 U 0 0 0
eth00.0.0.0 10.0.0.20 0.0.0.0 UG 0 0 0
eth0foobar:~ # cat /etc/networksloopback 127.0.0.0worknet 10.0.0.0homenet 172.19.18.0sparenet 192.168.0.0foobar:~ # routeKernel IP routing tableDestination Gateway Genmask Flags Metric Ref Use
Ifaceworknet * 255.255.255.0 U 0 0 0
eth0homenet * 255.255.255.0 U 0 0 0
eth0sparenet * 255.255.0.0 U 0 0 0
eth0default 10.0.0.20 0.0.0.0 UG 0 0 0
eth0
The method used for network name lookups is actually determined by the “networks” entry in /etc/nsswitch.conf.
foobar:~ # grep networks /etc/nsswitch.confnetworks: files dns
21.4 DHCP client Running any DHCP client will do the following:• Broadcast a DHCP configuration request on the network, and listen for the response from a
DHCP server.

21 TCP/IP configuration LPI 102 Course Notes 147
• Set up the interface address and network mask (ifconfig), routing (route add default gw) and DNS resolution (/etc/resolv.conf) according to the information received from the DHCP server.
In order to test these, you will require a DHCP server. Generally only one of the three programs will be included in any given distribution.
dhcpcd – DHCP client daemon
This program runs in the background, and keeps the DHCP server informed about the fact that you are still using the IP address assigned to you.
By default, dhcpcd sends out a query on eth0.foobar:~ # dhcpcdfoobar:~ # cat /var/lib/dhcpcd/dhcpcd-eth0.infoIPADDR=10.10.1.25NETMASK=255.255.255.0NETWORK=10.10.1.0BROADCAST=10.10.1.255GATEWAY=10.10.1.3DNS=10.10.1.3DHCPSID=10.10.1.5DHCPGIADDR=0.0.0.0DHCPSIADDR=0.0.0.0DHCPCHADDR=00:E0:98:99:70:91DHCPSHADDR=00:D0:B7:A8:49:AEDHCPSNAME=''LEASETIME=864060RENEWALTIME=432030REBINDTIME=756052INTERFACE='eth0'CLASSID='Linux 2.4.18-4GB i586'CLIENTID=00:E0:98:99:70:91
You can shut down the running dhcpcd with the k switch. When you do this, the interface configured by DHCP will be shut down.foobar:~ # dhcpcd -k
dhclient
dhclient runs as a daemon (similar to dhcpcd). The list of interfaces which are controlled by DHCP is configured by the file /etc/dhclient.conf.
pump
pump also runs as a daemon, and can configure network interfaces using DHCP or BOOTP (on which DHCP is based). It is configured by /etc/pump.conf.
21.5 Network troubleshootingWhen there is trouble with the network, you can use the diagnosis and configuration commands to see which parts of the network are configured correctly, and how the network is
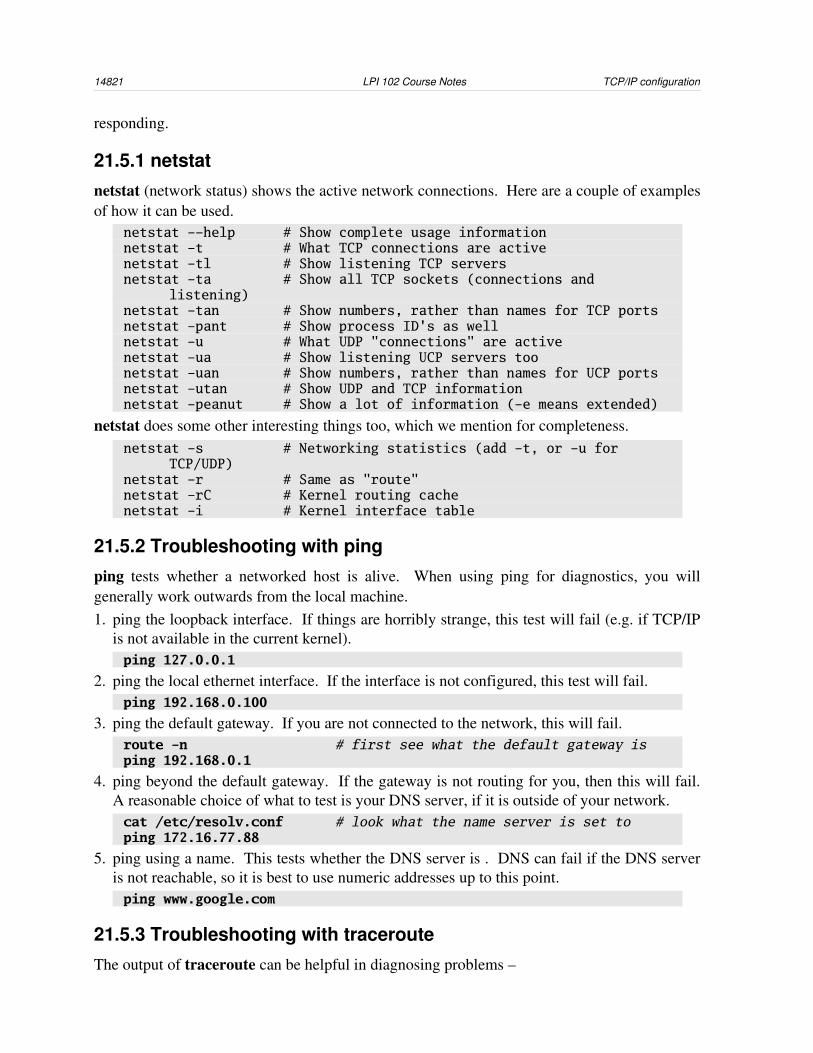
14821 LPI 102 Course Notes TCP/IP configuration
responding.
21.5.1 netstatnetstat (network status) shows the active network connections. Here are a couple of examples of how it can be used.
netstat -–help # Show complete usage informationnetstat -t # What TCP connections are activenetstat -tl # Show listening TCP serversnetstat -ta # Show all TCP sockets (connections and
listening)netstat -tan # Show numbers, rather than names for TCP portsnetstat -pant # Show process ID's as wellnetstat -u # What UDP "connections" are activenetstat -ua # Show listening UCP servers toonetstat -uan # Show numbers, rather than names for UCP portsnetstat -utan # Show UDP and TCP informationnetstat -peanut # Show a lot of information (-e means extended)
netstat does some other interesting things too, which we mention for completeness.netstat -s # Networking statistics (add -t, or -u for
TCP/UDP)netstat -r # Same as "route"netstat -rC # Kernel routing cachenetstat -i # Kernel interface table
21.5.2 Troubleshooting with pingping tests whether a networked host is alive. When using ping for diagnostics, you will generally work outwards from the local machine.1. ping the loopback interface. If things are horribly strange, this test will fail (e.g. if TCP/IP
is not available in the current kernel).ping 127.0.0.1
2. ping the local ethernet interface. If the interface is not configured, this test will fail.ping 192.168.0.100
3. ping the default gateway. If you are not connected to the network, this will fail.route -n # first see what the default gateway isping 192.168.0.1
4. ping beyond the default gateway. If the gateway is not routing for you, then this will fail. A reasonable choice of what to test is your DNS server, if it is outside of your network.cat /etc/resolv.conf # look what the name server is set toping 172.16.77.88
5. ping using a name. This tests whether the DNS server is . DNS can fail if the DNS server is not reachable, so it is best to use numeric addresses up to this point.ping www.google.com
21.5.3 Troubleshooting with tracerouteThe output of traceroute can be helpful in diagnosing problems –

21 TCP/IP configuration LPI 102 Course Notes 149
• Identifying the source of the problem when remote routers and links that are not working.• Identifying the delay introduced by each link in the routing chain (e.g. link congestion, or
asymmetric routing.)• Determining who is providing IP connectivity to a specific network (e.g. when abuse
reports are unattended).• Reading the reverse DNS names of the links on the routing chain.
21.5.4 Troubleshooting with tcpdumptcpdump is a network sniffer.• The network interface card is switched to promiscuous mode. In this mode, it reads traffic
not only for its own media address, but also packets for other hosts.• Each packet that is displayed is checked according to the command line filter. The sniffer
ignores packets that do not match the filter.• The network packet that was received is disassembled, and information is displayed.The syntax for tcpdump can include fairly complex packet selection. For troubleshooting it is sufficient to be able to use it to monitor a host, or a specific protocol.
Monitor the networktcpdump
Monitor packets from a specific machine, listening on a specific interface.tcpdump -i eth0 host 192.168.0.110
Monitor POP3 traffic (port 110)tcpdump -i eth0 port 110 # monitor pop3
traffic
Filter expressions can be combined with “and”. To monitor all smtp traffic from a host, the command will be.tcpdump host 192.168.0.110 and port 25
21.5.5 Troubleshooting with “host”The host program can diagnose DNS errors. If a server is not responding, this may be caused by a DNS failure – the host name cannot be converted to a network address, so the machine cannot be located.
host -t a www.example.comhost -t ns example.comhost -t a www.example.com a.iana.orghost -t a www.example.com b.iana.orghost -t soa example.com a.iana.orghost -t soa example.com b.iana.org
As illustrated, a procedure for diagnosing DNS errors is to start by querying your name server configured in /etc/resolv.conf. This should be able to tell what the name servers for a particular domain are. Each of these name servers should give you identical results when you query them directly.
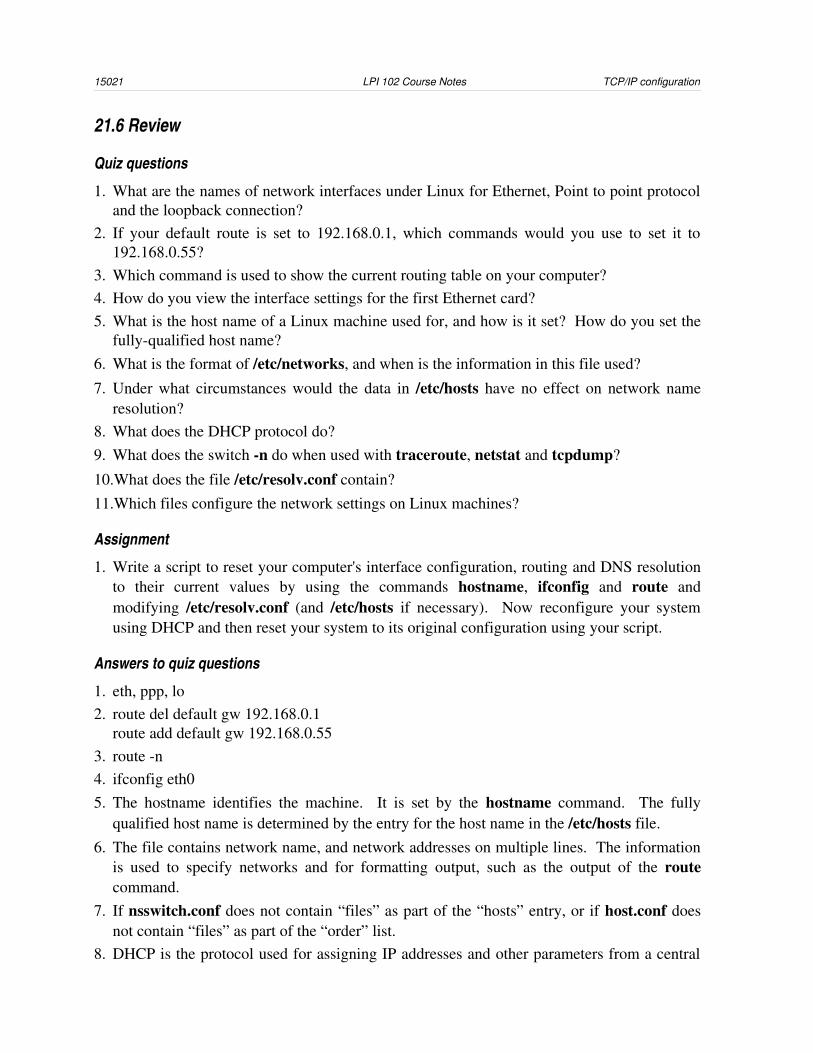
15021 LPI 102 Course Notes TCP/IP configuration
21.6 Review
Quiz questions
1. What are the names of network interfaces under Linux for Ethernet, Point to point protocol and the loopback connection?
2. If your default route is set to 192.168.0.1, which commands would you use to set it to 192.168.0.55?
3. Which command is used to show the current routing table on your computer?4. How do you view the interface settings for the first Ethernet card?5. What is the host name of a Linux machine used for, and how is it set? How do you set the
fullyqualified host name?6. What is the format of /etc/networks, and when is the information in this file used?
7. Under what circumstances would the data in /etc/hosts have no effect on network name resolution?
8. What does the DHCP protocol do?9. What does the switch n do when used with traceroute, netstat and tcpdump?
10.What does the file /etc/resolv.conf contain?11.Which files configure the network settings on Linux machines?
Assignment
1. Write a script to reset your computer's interface configuration, routing and DNS resolution to their current values by using the commands hostname, ifconfig and route and modifying /etc/resolv.conf (and /etc/hosts if necessary). Now reconfigure your system using DHCP and then reset your system to its original configuration using your script.
Answers to quiz questions
1. eth, ppp, lo2. route del default gw 192.168.0.1
route add default gw 192.168.0.553. route n4. ifconfig eth05. The hostname identifies the machine. It is set by the hostname command. The fully
qualified host name is determined by the entry for the host name in the /etc/hosts file.6. The file contains network name, and network addresses on multiple lines. The information
is used to specify networks and for formatting output, such as the output of the route command.
7. If nsswitch.conf does not contain “files” as part of the “hosts” entry, or if host.conf does not contain “files” as part of the “order” list.
8. DHCP is the protocol used for assigning IP addresses and other parameters from a central

21 TCP/IP configuration LPI 102 Course Notes 151
cerver.9. It prevents network numbers from being converted to names.10.Parameters controlling the usage of DNS servers.11.Depending on distribution, the files include: /etc/sysconfig/network,
/etc/sysconfig/networkscripts/* (Redhat), /etc/network/* (Debian)
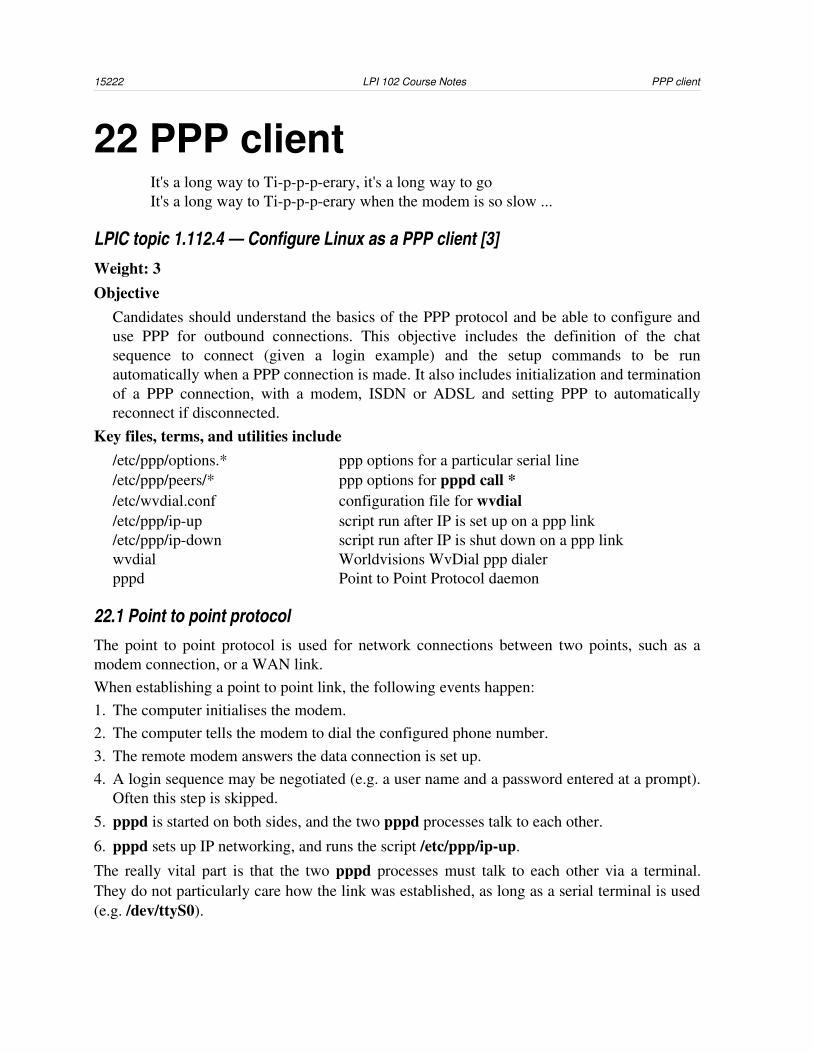
15222 LPI 102 Course Notes PPP client
22 PPP clientIt's a long way to Tippperary, it's a long way to goIt's a long way to Tippperary when the modem is so slow ...
LPIC topic 1.112.4 — Configure Linux as a PPP client [3]Weight: 3Objective
Candidates should understand the basics of the PPP protocol and be able to configure and use PPP for outbound connections. This objective includes the definition of the chat sequence to connect (given a login example) and the setup commands to be run automatically when a PPP connection is made. It also includes initialization and termination of a PPP connection, with a modem, ISDN or ADSL and setting PPP to automatically reconnect if disconnected.
Key files, terms, and utilities include/etc/ppp/options.* ppp options for a particular serial line/etc/ppp/peers/* ppp options for pppd call */etc/wvdial.conf configuration file for wvdial/etc/ppp/ipup script run after IP is set up on a ppp link/etc/ppp/ipdown script run after IP is shut down on a ppp linkwvdial Worldvisions WvDial ppp dialerpppd Point to Point Protocol daemon
22.1 Point to point protocolThe point to point protocol is used for network connections between two points, such as a modem connection, or a WAN link. When establishing a point to point link, the following events happen:1. The computer initialises the modem.2. The computer tells the modem to dial the configured phone number.3. The remote modem answers the data connection is set up.4. A login sequence may be negotiated (e.g. a user name and a password entered at a prompt).
Often this step is skipped.5. pppd is started on both sides, and the two pppd processes talk to each other.
6. pppd sets up IP networking, and runs the script /etc/ppp/ipup.
The really vital part is that the two pppd processes must talk to each other via a terminal. They do not particularly care how the link was established, as long as a serial terminal is used (e.g. /dev/ttyS0).
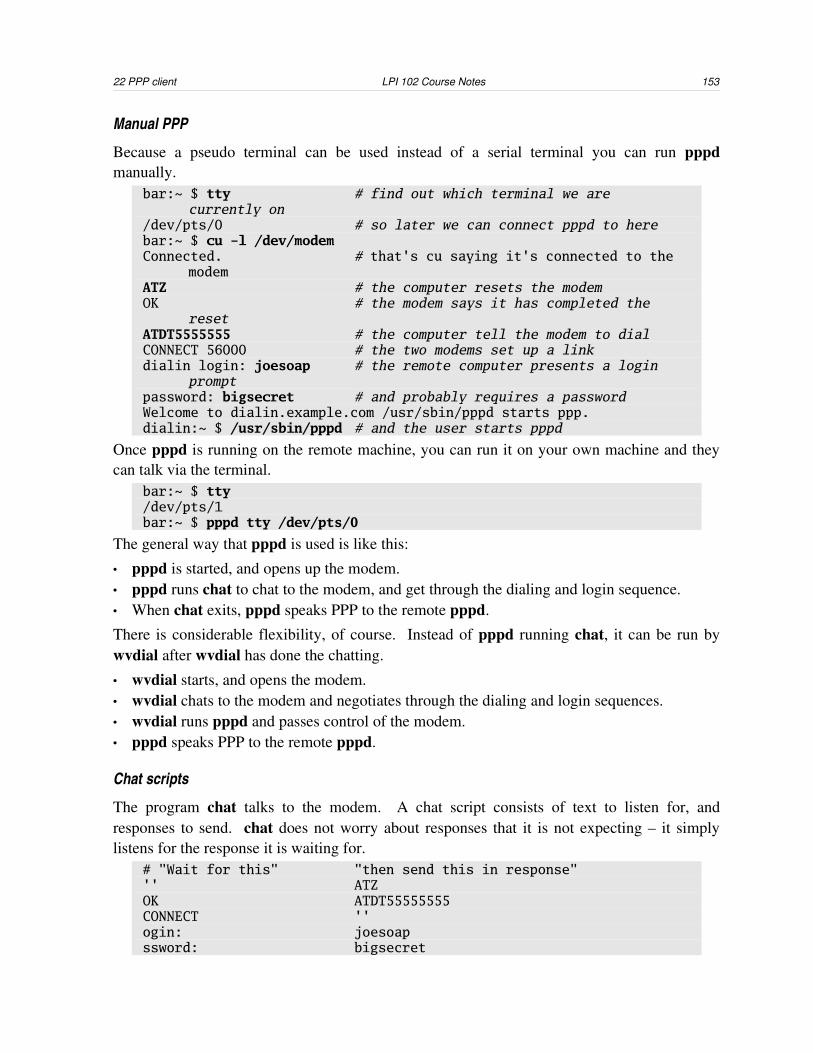
22 PPP client LPI 102 Course Notes 153
Manual PPP
Because a pseudo terminal can be used instead of a serial terminal you can run pppd manually.
bar:~ $ tty # find out which terminal we are currently on
/dev/pts/0 # so later we can connect pppd to herebar:~ $ cu -l /dev/modemConnected. # that's cu saying it's connected to the
modemATZ # the computer resets the modemOK # the modem says it has completed the
resetATDT5555555 # the computer tell the modem to dialCONNECT 56000 # the two modems set up a linkdialin login: joesoap # the remote computer presents a login
promptpassword: bigsecret # and probably requires a passwordWelcome to dialin.example.com /usr/sbin/pppd starts ppp.dialin:~ $ /usr/sbin/pppd # and the user starts pppd
Once pppd is running on the remote machine, you can run it on your own machine and they can talk via the terminal.
bar:~ $ tty/dev/pts/1bar:~ $ pppd tty /dev/pts/0
The general way that pppd is used is like this:
• pppd is started, and opens up the modem.• pppd runs chat to chat to the modem, and get through the dialing and login sequence.• When chat exits, pppd speaks PPP to the remote pppd.
There is considerable flexibility, of course. Instead of pppd running chat, it can be run by wvdial after wvdial has done the chatting.
• wvdial starts, and opens the modem.• wvdial chats to the modem and negotiates through the dialing and login sequences.• wvdial runs pppd and passes control of the modem.• pppd speaks PPP to the remote pppd.
Chat scripts
The program chat talks to the modem. A chat script consists of text to listen for, and responses to send. chat does not worry about responses that it is not expecting – it simply listens for the response it is waiting for.
# "Wait for this" "then send this in response"'' ATZOK ATDT55555555CONNECT ''ogin: joesoapssword: bigsecret

15422 LPI 102 Course Notes PPP client
Although the prompt is actually something like “dialin login: ”, chat is happy to receive the “ogin:” part of that. This avoid problem with machines that insist on using “Login” instead of “login” and strange links that scramble the first few characters received.chat scripts usually have instructions on how to handle failure in the conversation.
# These are generally at the top of the chat scriptABORT BUSYABORT 'NO CARRIER'TIMEOUT 60
It is quite popular for systems to initiate PPP without a login sequence23. When running like this, sending of authentication information is handled by the pppd processes. The chat script ends as soon as the modems are connected.
ABORT BUSY ABORT 'NO CARRIER' TIMEOUT 60'' ATZOK ATDT55555555CONNECT ''
(You will also notice that chat allows flexibility in its script formatting).
To start pppd with a specific chat script, you may invoke it something like this. /usr/sbin/pppd connect 'chat -f /etc/ppp/chat-script' /dev/ttyS0
115200
You will have to read about pppd configuration to understand this, which is the topic of the next section.wvdial chat can be used in the place of chat f /etc/ppp/chatscript.
22.2 pppd configurationpppd options are used in the following order
• /etc/ppp/options – global options• ~/.ppprc – each user can have his own options when running pppd. • /etc/ppp/options.ttyS0 – options for the particular serial line is use (e.g. ttyS0). If the
device is /dev/pts/0, the options file is /etc/ppp/options.pts.0.• Command line options – you can pass options on the command line to pppd.• /etc/ppp/peers/peername – this is used if you start pppd with pppd call peernameThe following PPP options are useful when dialing an ISP.• noipdefault – this prevents pppd from suggesting the local IP address to the server.• noauth – PPP is a peer to peer system, and this tells pppd that the ISP does not have to
provide authentication credentials to you when you dial up.• crtscts – use hardware flow control for the modem.• lock – create lock files when using the modem. This prevents interference from other
programs.• modem – when this option is present, pppd plays with the DTR signal to the modem and
listens to the Carrier Detect signal from the modem. For modems without serious bugs this is the correct behaviour.
23 This is known as AutoPPP.

22 PPP client LPI 102 Course Notes 155
• defaultroute – once the connection has been established, the remote peer is set as the default gateway.
• persist – if this option is present, pppd will automatically reconnect if the connection is broken. The default for the related option that sets the number of reconnection attempts is maxfail 10.
• idle 180 – if no IP packets are sent or received for 180 seconds, the connection is terminated. You still pay for the last 180 seconds of the call, of course.
PPP authentication
The peer that you are connecting to will generally require PPP authentication, even if you provided a correct user name and password at a login prompt. The authentication files for pppd are /etc/ppp/chapsecrets (for CHAP authentication) and /etc/ppp/papsecrets (for PAP authentication).You must identify which line in the secrets file is to be used, either by using the name option or the user option. If you don't supply any details, it is equivalent to using “pppd name $HOSTNAME”.
If you start pppd with the name option ...pppd name "wvdial"
You will need an entry in your secrets file like this ... (which is what wvdial actually uses)"[email protected]" wvdial "bigsecret"
Alternatively you can use the user option:pppd user "[email protected]"
And have the following secrets file ..."[email protected]" * "bigsecret"
Disconnecting a dialup
Disconnecting a PPP connection is as simple as killing the pppd process with a signal of your choice. Most of the following approaches will work:
kill -INT `cat /var/run/ppp0.pid`killall pppdkillall -HUP pppdifconfig ppp0 downifdown ppp0 # redhat and clones only ...
You can also disconnect the modem's power, telephone or data connection (provided it is not an internal modem).
ipup and ipdown
When pppd has established an IP connection, it runs the script /etc/ppp/ipup with details of the configuration. Similarly, when the connection has been disconnected /etc/ppp/ipdown runs with the same details.
INTERFACE=$1

15622 LPI 102 Course Notes PPP client
DEVICE=$2SPEED=$3LOCALIP=$4REMOTEIP=$5IPPARAM=$6
In addition, pppd sets environment variables which allow automatic configuration of DNS, namely $USEPEERDNS, $DNS1 and $DNS2. The script supplied by most distributions sets up your ISP's DNS servers in your /etc/resolv.conf. The scripts can be modified, although they usually contain a great deal of code and call /etc/ppp/ipup.local for any sitespecific actions (ipdown.local can also be used). A common use for this script is to notify somebody on a remote network that the system has dialled up (e.g. to set up dynamic DNS records) ...
#! /bin/bashLOCALIP=$4IPFILE=/var/run/lastipLASTIP=`cat $IPFILE`[ "$IP" = "$LASTIP" ] && exitUSER=anotherdialupuser ; PASS=bigsecretURL="https://$USER:[email protected]/nic/update?system=dyndns
"URL="$URL&hostname=$USER.dyndns.org&myip=$LOCALIP&backmx=NO&offline=
NO"wget -q -O - "$URL" && echo $IP > $IPFILE
22.3 wvdialwvdial is a PPP dialer which has a little bit of intelligence. The two most helpful things that wvdial does for you is that it automates the chat script, and correctly handles the setting up of authentication parameters in /etc/ppp/chapsecrets and /etc/ppp/papsecrets.
/etc/wvdial.conf specifies the details about which device to use, the telephone number to dial, the user name and password to present, and miscellaneous init strings and options.
bar:~ # cat /etc/wvdial.conf[Dialer Defaults]Modem = /dev/modemBaud = 57600Init1 = ATZInit2 = ATQ0 V1 E1 S0=0 &C1 &D2 +FCLASS=0Dial Command = ATDTIdle Seconds = 180Phone = 5550000Username = ispuser533Password = guessmeStupid mode = 1Idle Seconds = 180
[Dialer work]Phone = 5552345Username = geraldPassword = i81apple
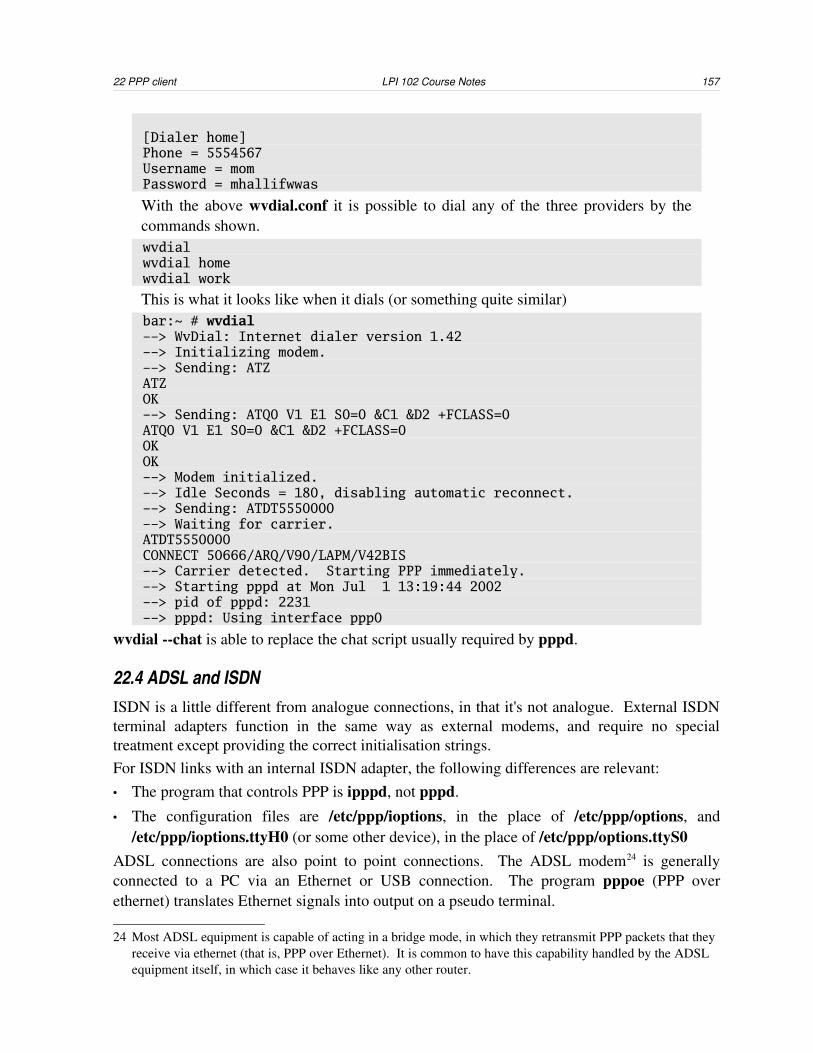
22 PPP client LPI 102 Course Notes 157
[Dialer home]Phone = 5554567Username = momPassword = mhallifwwas
With the above wvdial.conf it is possible to dial any of the three providers by the commands shown.wvdialwvdial homewvdial work
This is what it looks like when it dials (or something quite similar)bar:~ # wvdial--> WvDial: Internet dialer version 1.42--> Initializing modem.--> Sending: ATZATZOK--> Sending: ATQ0 V1 E1 S0=0 &C1 &D2 +FCLASS=0ATQ0 V1 E1 S0=0 &C1 &D2 +FCLASS=0OKOK--> Modem initialized.--> Idle Seconds = 180, disabling automatic reconnect.--> Sending: ATDT5550000--> Waiting for carrier.ATDT5550000CONNECT 50666/ARQ/V90/LAPM/V42BIS--> Carrier detected. Starting PPP immediately.--> Starting pppd at Mon Jul 1 13:19:44 2002--> pid of pppd: 2231--> pppd: Using interface ppp0
wvdial chat is able to replace the chat script usually required by pppd.
22.4 ADSL and ISDNISDN is a little different from analogue connections, in that it's not analogue. External ISDN terminal adapters function in the same way as external modems, and require no special treatment except providing the correct initialisation strings.For ISDN links with an internal ISDN adapter, the following differences are relevant:• The program that controls PPP is ipppd, not pppd.
• The configuration files are /etc/ppp/ioptions, in the place of /etc/ppp/options, and /etc/ppp/ioptions.ttyH0 (or some other device), in the place of /etc/ppp/options.ttyS0
ADSL connections are also point to point connections. The ADSL modem24 is generally connected to a PC via an Ethernet or USB connection. The program pppoe (PPP over ethernet) translates Ethernet signals into output on a pseudo terminal.
24 Most ADSL equipment is capable of acting in a bridge mode, in which they retransmit PPP packets that they receive via ethernet (that is, PPP over Ethernet). It is common to have this capability handled by the ADSL equipment itself, in which case it behaves like any other router.
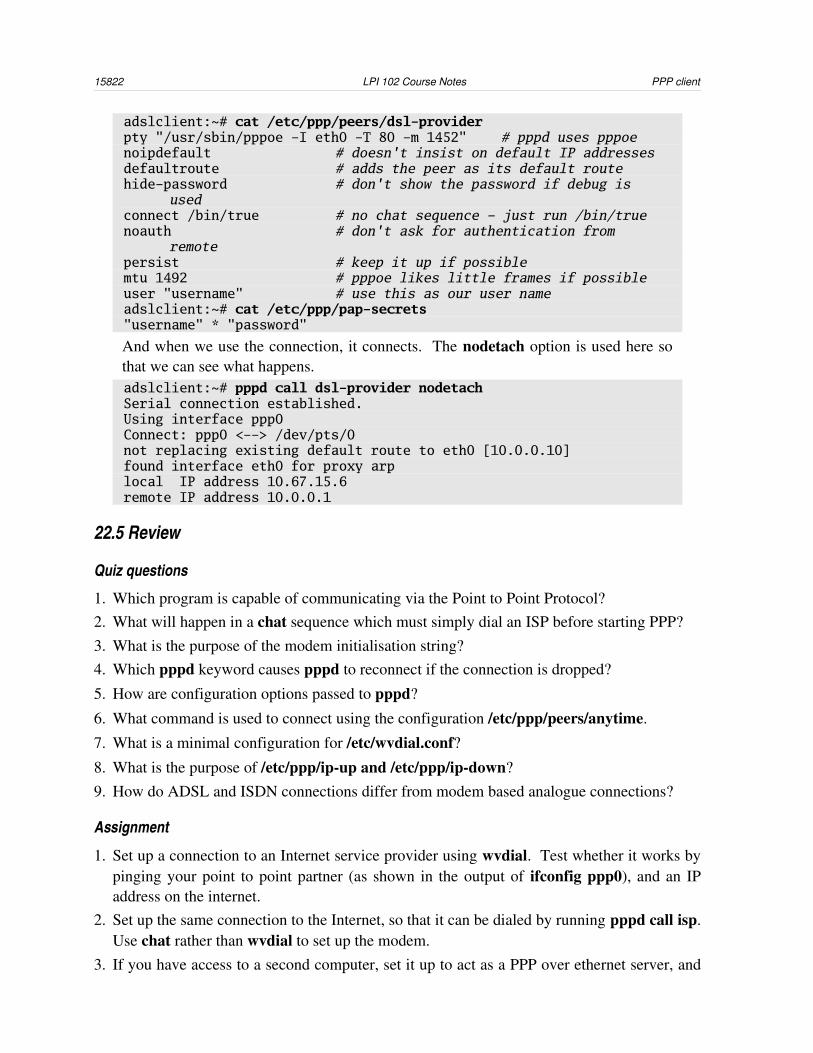
15822 LPI 102 Course Notes PPP client
adslclient:~# cat /etc/ppp/peers/dsl-providerpty "/usr/sbin/pppoe -I eth0 -T 80 -m 1452" # pppd uses pppoenoipdefault # doesn't insist on default IP addressesdefaultroute # adds the peer as its default routehide-password # don't show the password if debug is
usedconnect /bin/true # no chat sequence – just run /bin/truenoauth # don't ask for authentication from
remotepersist # keep it up if possiblemtu 1492 # pppoe likes little frames if possibleuser "username" # use this as our user nameadslclient:~# cat /etc/ppp/pap-secrets"username" * "password"
And when we use the connection, it connects. The nodetach option is used here so that we can see what happens.adslclient:~# pppd call dsl-provider nodetachSerial connection established.Using interface ppp0Connect: ppp0 <--> /dev/pts/0not replacing existing default route to eth0 [10.0.0.10]found interface eth0 for proxy arplocal IP address 10.67.15.6remote IP address 10.0.0.1
22.5 Review
Quiz questions
1. Which program is capable of communicating via the Point to Point Protocol?2. What will happen in a chat sequence which must simply dial an ISP before starting PPP?3. What is the purpose of the modem initialisation string?4. Which pppd keyword causes pppd to reconnect if the connection is dropped?
5. How are configuration options passed to pppd?
6. What command is used to connect using the configuration /etc/ppp/peers/anytime.
7. What is a minimal configuration for /etc/wvdial.conf?8. What is the purpose of /etc/ppp/ipup and /etc/ppp/ipdown?9. How do ADSL and ISDN connections differ from modem based analogue connections?
Assignment
1. Set up a connection to an Internet service provider using wvdial. Test whether it works by pinging your point to point partner (as shown in the output of ifconfig ppp0), and an IP address on the internet.
2. Set up the same connection to the Internet, so that it can be dialed by running pppd call isp. Use chat rather than wvdial to set up the modem.
3. If you have access to a second computer, set it up to act as a PPP over ethernet server, and
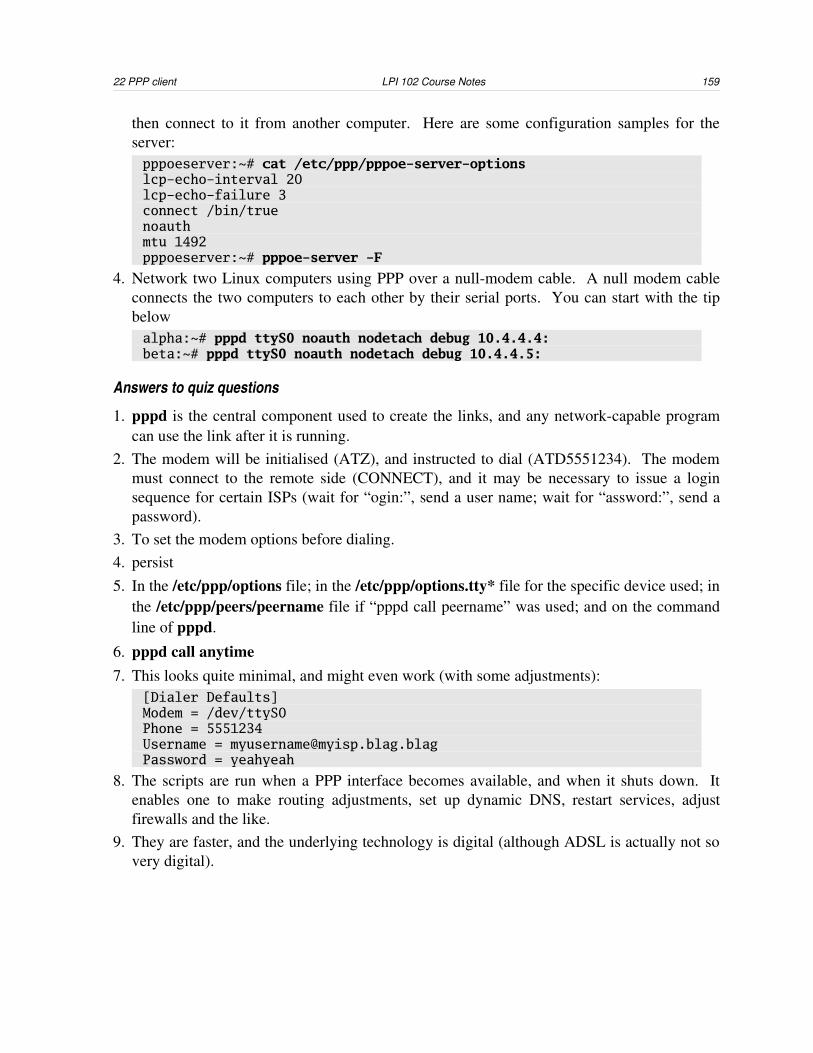
22 PPP client LPI 102 Course Notes 159
then connect to it from another computer. Here are some configuration samples for the server:pppoeserver:~# cat /etc/ppp/pppoe-server-optionslcp-echo-interval 20lcp-echo-failure 3connect /bin/truenoauthmtu 1492pppoeserver:~# pppoe-server -F
4. Network two Linux computers using PPP over a nullmodem cable. A null modem cable connects the two computers to each other by their serial ports. You can start with the tip below alpha:~# pppd ttyS0 noauth nodetach debug 10.4.4.4:beta:~# pppd ttyS0 noauth nodetach debug 10.4.4.5:
Answers to quiz questions
1. pppd is the central component used to create the links, and any networkcapable program can use the link after it is running.
2. The modem will be initialised (ATZ), and instructed to dial (ATD5551234). The modem must connect to the remote side (CONNECT), and it may be necessary to issue a login sequence for certain ISPs (wait for “ogin:”, send a user name; wait for “assword:”, send a password).
3. To set the modem options before dialing. 4. persist5. In the /etc/ppp/options file; in the /etc/ppp/options.tty* file for the specific device used; in
the /etc/ppp/peers/peername file if “pppd call peername” was used; and on the command line of pppd.
6. pppd call anytime 7. This looks quite minimal, and might even work (with some adjustments):
[Dialer Defaults]Modem = /dev/ttyS0Phone = 5551234Username = [email protected] = yeahyeah
8. The scripts are run when a PPP interface becomes available, and when it shuts down. It enables one to make routing adjustments, set up dynamic DNS, restart services, adjust firewalls and the like.
9. They are faster, and the underlying technology is digital (although ADSL is actually not so very digital).

16023 LPI 102 Course Notes inetd and xinetd
23 inetd and xinetd“Ashley was talking about daemons forking children – it really didn't sound very healthy to me!”
– Jeanine
LPIC topic 1.113.1 — Configure and manage inetd, xinetd, and related services [4]Weight: 4Objective
Candidates should be able to configure which services are available through inetd, use tcpwrappers to allow or deny services on a hostbyhost basis, manually start, stop, and restart Internet services, configure basic network services including telnet and ftp. Set a service to run as another user instead of the default in inetd.conf.
Key files, terms, and utilities include/etc/inetd.conf inetd configuration file/etc/hosts.allow tcp wrappers access control (allowed hosts)/etc/hosts.deny tcp wrappers access control (denied hosts)/etc/services services list/etc/xinetd.conf xinetd configuration file/etc/xinetd.log xinetd configuration file (2)
23.1 inetd – the internet super serverA program can listen on a chosen TCP or UDP port. When a service request can come in, it can respond appropriately. Traditionally, Linux servers offer many services, and it would be wasteful to load a number of servers into memory which are not going to be used most of the time. To solve this problem, a single server, inetd listens for connections for a number of server. After accepting the connection, inetd starts the appropriate server.
The configuration file for inetd is /etc/inetd.conf. This file lists all the ports on which inetd listens, and the programs which are started when a connection is received.
foobar:~# cat /etc/inetd.conf#port type protocol wait user program program argumentsftp stream tcp nowait root /usr/sbin/tcpd /usr/sbin/proftpdpop3 stream tcp nowait root /usr/sbin/tcpd /usr/sbin/ipop3dpop3s stream tcp nowait root /usr/sbin/tcpd /usr/sbin/ipop3dimap2 stream tcp nowait root /usr/sbin/tcpd /usr/sbin/imapdimap3 stream tcp nowait root /usr/sbin/tcpd /usr/sbin/imapdtftp dgram udp wait nobody /usr/sbin/tcpd /usr/sbin/in.tftpd
/boot
In detail, the fields from left to right are:• service_name – the name of the service which is being offered. inetd determines which
port it will open by consulting /etc.services.
• sock_type – the type of socket that will be used. For TCP, this must be “stream”, and for
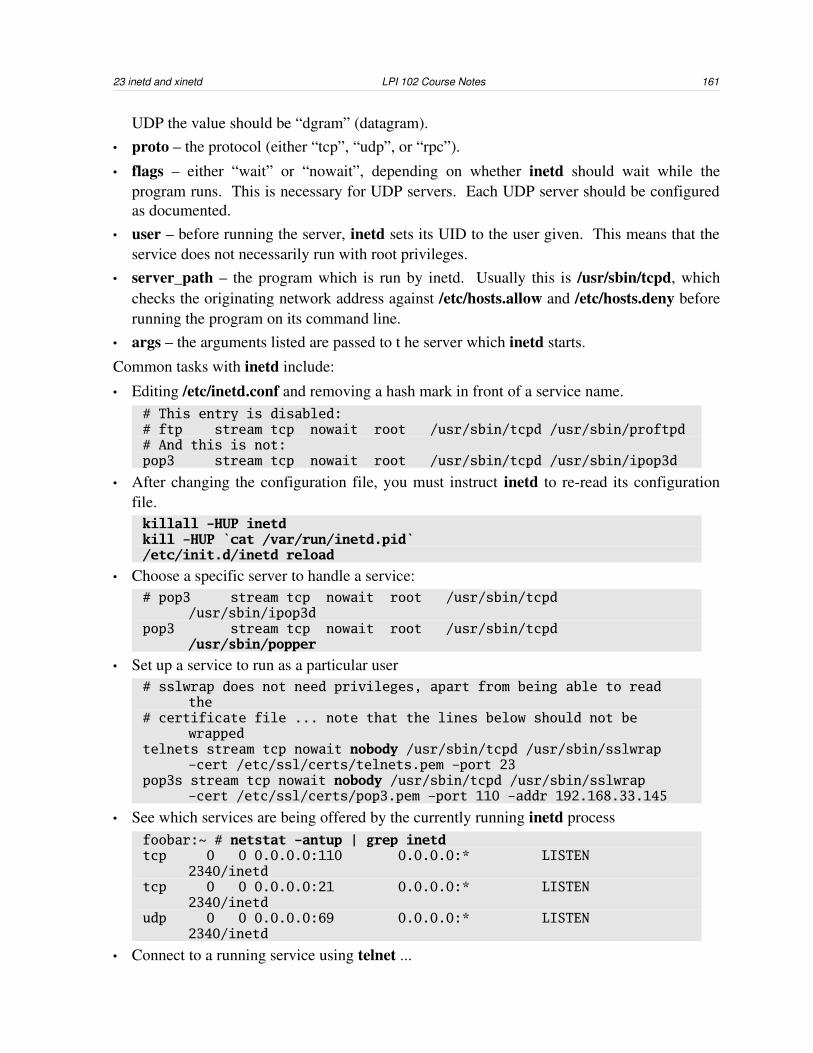
23 inetd and xinetd LPI 102 Course Notes 161
UDP the value should be “dgram” (datagram).• proto – the protocol (either “tcp”, “udp”, or “rpc”).
• flags – either “wait” or “nowait”, depending on whether inetd should wait while the program runs. This is necessary for UDP servers. Each UDP server should be configured as documented.
• user – before running the server, inetd sets its UID to the user given. This means that the service does not necessarily run with root privileges.
• server_path – the program which is run by inetd. Usually this is /usr/sbin/tcpd, which checks the originating network address against /etc/hosts.allow and /etc/hosts.deny before running the program on its command line.
• args – the arguments listed are passed to t he server which inetd starts.
Common tasks with inetd include:
• Editing /etc/inetd.conf and removing a hash mark in front of a service name.# This entry is disabled:# ftp stream tcp nowait root /usr/sbin/tcpd /usr/sbin/proftpd# And this is not:pop3 stream tcp nowait root /usr/sbin/tcpd /usr/sbin/ipop3d
• After changing the configuration file, you must instruct inetd to reread its configuration file.killall -HUP inetdkill -HUP `cat /var/run/inetd.pid`/etc/init.d/inetd reload
• Choose a specific server to handle a service:# pop3 stream tcp nowait root /usr/sbin/tcpd
/usr/sbin/ipop3dpop3 stream tcp nowait root /usr/sbin/tcpd
/usr/sbin/popper
• Set up a service to run as a particular user# sslwrap does not need privileges, apart from being able to read
the# certificate file ... note that the lines below should not be
wrappedtelnets stream tcp nowait nobody /usr/sbin/tcpd /usr/sbin/sslwrap
-cert /etc/ssl/certs/telnets.pem -port 23pop3s stream tcp nowait nobody /usr/sbin/tcpd /usr/sbin/sslwrap
-cert /etc/ssl/certs/pop3.pem -port 110 -addr 192.168.33.145
• See which services are being offered by the currently running inetd processfoobar:~ # netstat -antup | grep inetdtcp 0 0 0.0.0.0:110 0.0.0.0:* LISTEN
2340/inetdtcp 0 0 0.0.0.0:21 0.0.0.0:* LISTEN
2340/inetdudp 0 0 0.0.0.0:69 0.0.0.0:* LISTEN
2340/inetd
• Connect to a running service using telnet ...
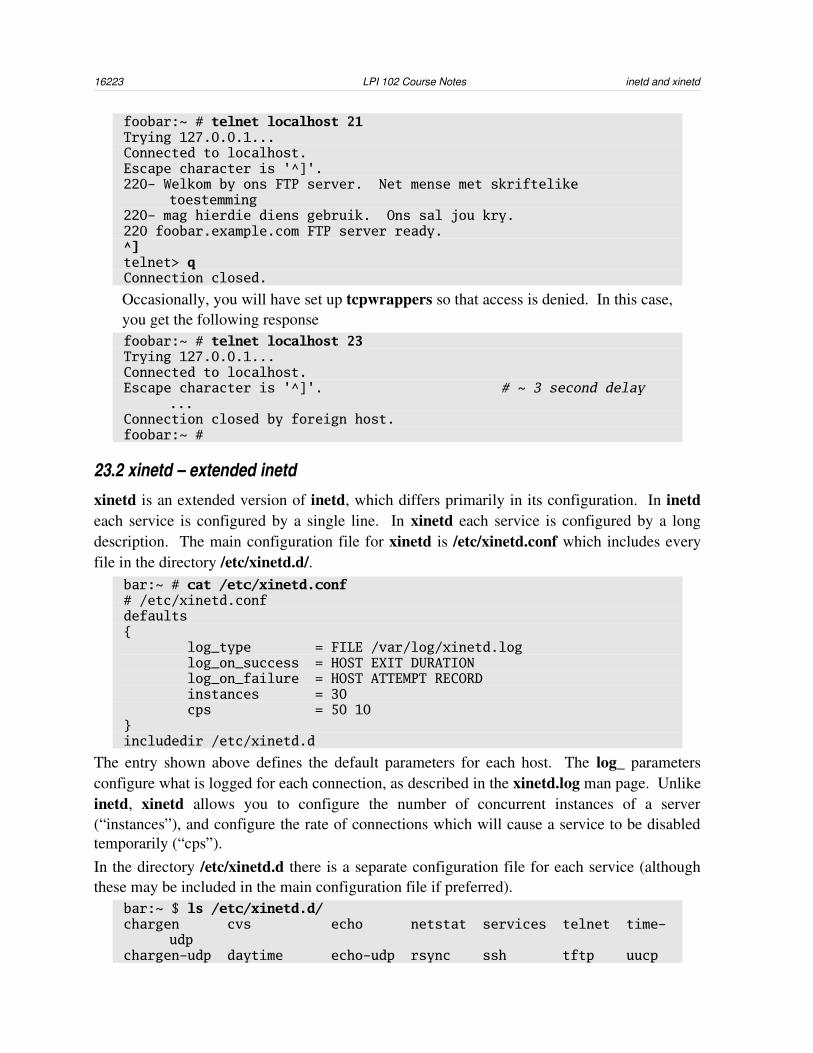
16223 LPI 102 Course Notes inetd and xinetd
foobar:~ # telnet localhost 21Trying 127.0.0.1...Connected to localhost.Escape character is '^]'.220- Welkom by ons FTP server. Net mense met skriftelike
toestemming 220- mag hierdie diens gebruik. Ons sal jou kry. 220 foobar.example.com FTP server ready.^]telnet> qConnection closed.
Occasionally, you will have set up tcpwrappers so that access is denied. In this case, you get the following responsefoobar:~ # telnet localhost 23Trying 127.0.0.1...Connected to localhost.Escape character is '^]'. # ~ 3 second delay
...Connection closed by foreign host.foobar:~ #
23.2 xinetd – extended inetdxinetd is an extended version of inetd, which differs primarily in its configuration. In inetd each service is configured by a single line. In xinetd each service is configured by a long description. The main configuration file for xinetd is /etc/xinetd.conf which includes every file in the directory /etc/xinetd.d/.
bar:~ # cat /etc/xinetd.conf# /etc/xinetd.confdefaults{ log_type = FILE /var/log/xinetd.log log_on_success = HOST EXIT DURATION log_on_failure = HOST ATTEMPT RECORD instances = 30 cps = 50 10}includedir /etc/xinetd.d
The entry shown above defines the default parameters for each host. The log_ parameters configure what is logged for each connection, as described in the xinetd.log man page. Unlike inetd, xinetd allows you to configure the number of concurrent instances of a server (“instances”), and configure the rate of connections which will cause a service to be disabled temporarily (“cps”).In the directory /etc/xinetd.d there is a separate configuration file for each service (although these may be included in the main configuration file if preferred).
bar:~ $ ls /etc/xinetd.d/chargen cvs echo netstat services telnet time-
udpchargen-udp daytime echo-udp rsync ssh tftp uucp
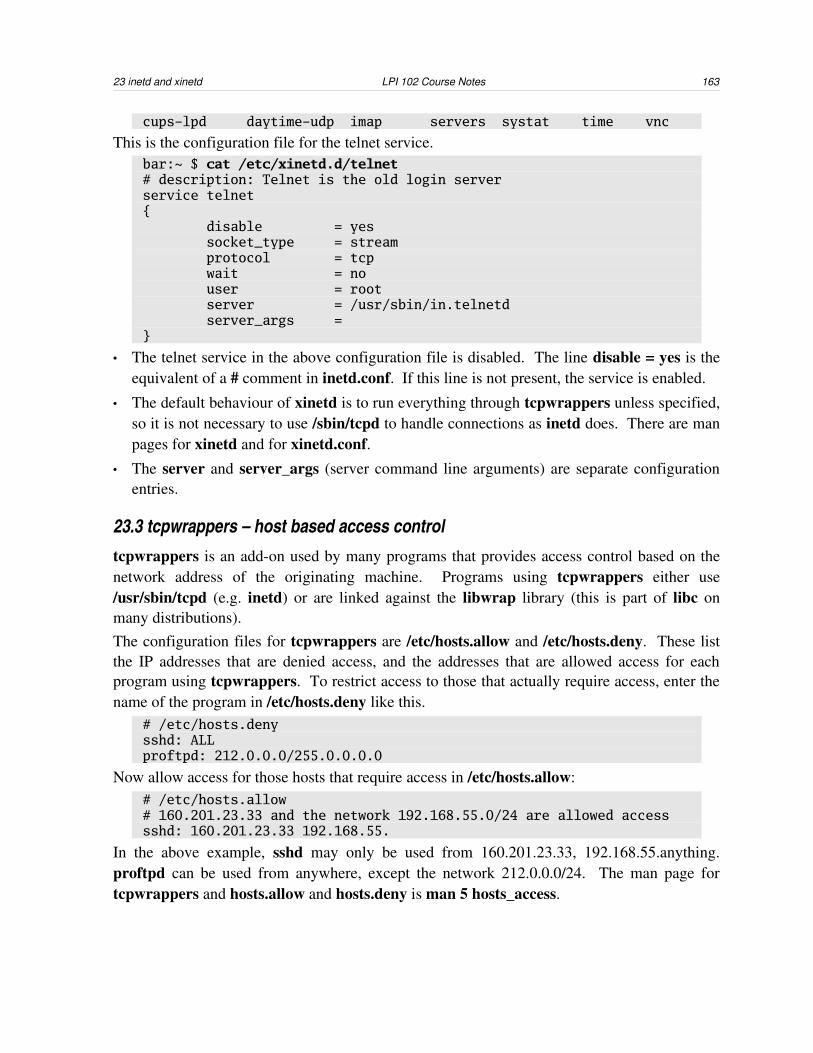
23 inetd and xinetd LPI 102 Course Notes 163
cups-lpd daytime-udp imap servers systat time vnc
This is the configuration file for the telnet service.bar:~ $ cat /etc/xinetd.d/telnet# description: Telnet is the old login server service telnet{ disable = yes socket_type = stream protocol = tcp wait = no user = root server = /usr/sbin/in.telnetd server_args =}
• The telnet service in the above configuration file is disabled. The line disable = yes is the equivalent of a # comment in inetd.conf. If this line is not present, the service is enabled.
• The default behaviour of xinetd is to run everything through tcpwrappers unless specified, so it is not necessary to use /sbin/tcpd to handle connections as inetd does. There are man pages for xinetd and for xinetd.conf.
• The server and server_args (server command line arguments) are separate configuration entries.
23.3 tcpwrappers – host based access controltcpwrappers is an addon used by many programs that provides access control based on the network address of the originating machine. Programs using tcpwrappers either use /usr/sbin/tcpd (e.g. inetd) or are linked against the libwrap library (this is part of libc on many distributions). The configuration files for tcpwrappers are /etc/hosts.allow and /etc/hosts.deny. These list the IP addresses that are denied access, and the addresses that are allowed access for each program using tcpwrappers. To restrict access to those that actually require access, enter the name of the program in /etc/hosts.deny like this.
# /etc/hosts.denysshd: ALLproftpd: 212.0.0.0/255.0.0.0.0
Now allow access for those hosts that require access in /etc/hosts.allow:# /etc/hosts.allow# 160.201.23.33 and the network 192.168.55.0/24 are allowed accesssshd: 160.201.23.33 192.168.55.
In the above example, sshd may only be used from 160.201.23.33, 192.168.55.anything. proftpd can be used from anywhere, except the network 212.0.0.0/24. The man page for tcpwrappers and hosts.allow and hosts.deny is man 5 hosts_access.
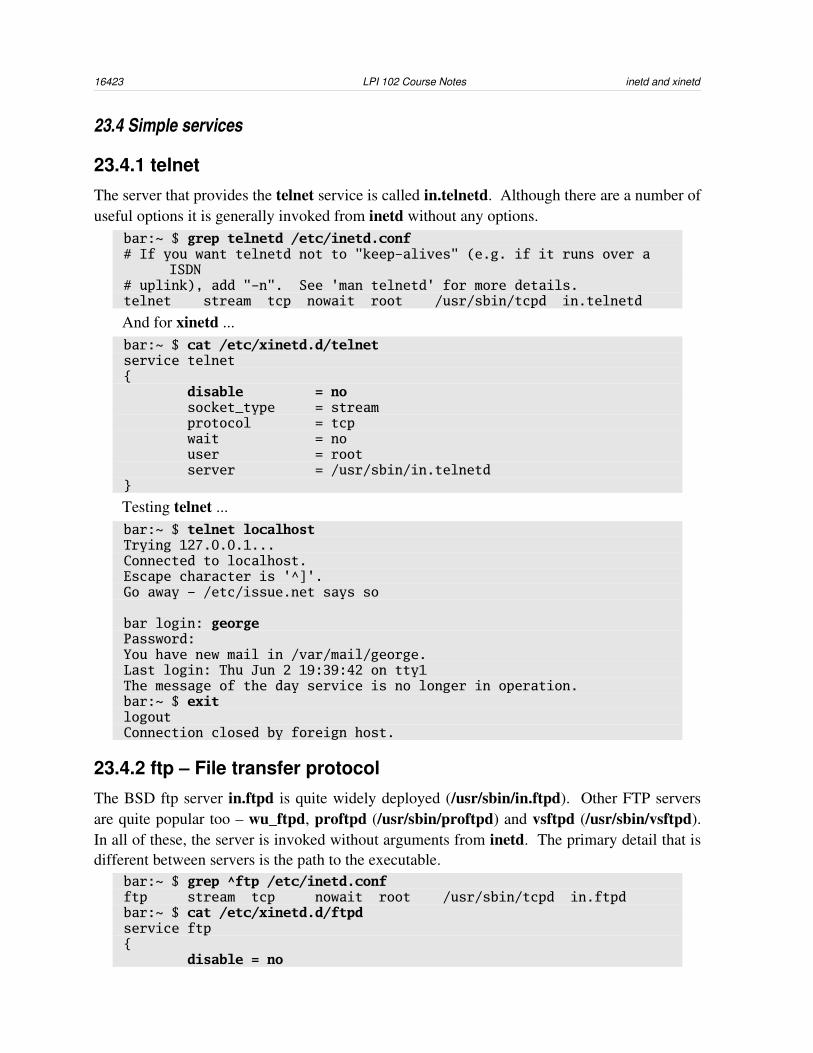
16423 LPI 102 Course Notes inetd and xinetd
23.4 Simple services
23.4.1 telnetThe server that provides the telnet service is called in.telnetd. Although there are a number of useful options it is generally invoked from inetd without any options.
bar:~ $ grep telnetd /etc/inetd.conf# If you want telnetd not to "keep-alives" (e.g. if it runs over a
ISDN# uplink), add "-n". See 'man telnetd' for more details.telnet stream tcp nowait root /usr/sbin/tcpd in.telnetd
And for xinetd ...bar:~ $ cat /etc/xinetd.d/telnetservice telnet{ disable = no socket_type = stream protocol = tcp wait = no user = root server = /usr/sbin/in.telnetd}
Testing telnet ...bar:~ $ telnet localhostTrying 127.0.0.1...Connected to localhost.Escape character is '^]'.Go away – /etc/issue.net says so
bar login: georgePassword:You have new mail in /var/mail/george.Last login: Thu Jun 2 19:39:42 on tty1The message of the day service is no longer in operation.bar:~ $ exitlogoutConnection closed by foreign host.
23.4.2 ftp – File transfer protocolThe BSD ftp server in.ftpd is quite widely deployed (/usr/sbin/in.ftpd). Other FTP servers are quite popular too – wu_ftpd, proftpd (/usr/sbin/proftpd) and vsftpd (/usr/sbin/vsftpd). In all of these, the server is invoked without arguments from inetd. The primary detail that is different between servers is the path to the executable.
bar:~ $ grep ^ftp /etc/inetd.confftp stream tcp nowait root /usr/sbin/tcpd in.ftpdbar:~ $ cat /etc/xinetd.d/ftpdservice ftp{ disable = no

23 inetd and xinetd LPI 102 Course Notes 165
socket_type = stream wait = no user = root server = /usr/sbin/in.ftpd nice = 10}
The configuration files for the BSD FTP server are:• /etc/ftpusers – a list of users who cannot log in via FTP (e.g. root)• /etc/shells – if the user's shell is not listed here, they cannot log in via FTP.
• /etc/ftpchroot – if the user's name is listed here, they cannot change directory out of their home directory.
To add a user for FTP you can do something like this:# You can make sure that /bin/true is in /etc/shells some other waygrep true /etc/shells || echo /bin/true >> /etc/shells# Let's create a user named usernameUSER=usernameuseradd -s /bin/true $USERmkdir /home/$USERchown $USER /home/$USER
Some distributions include a program named nologin which displays a friendly message when a console login is attempted with FTP credentials.
23.4.3 pop3 – Post office protocol version 3A POP3 server which authenticates against the Linux password database is very straightforward to set up. Popular POP3 servers include qpopper (by Qualcomm), and ipop3d.
george@example:~> cat /etc/xinetd.d/qpopper# qpopper - pop3 mail daemonservice pop3{ disable = yes socket_type = stream protocol = tcp wait = no user = root server = /usr/sbin/popper server_args = -s flags = IPv4}george@example:~> grep ^pop3 /etc/inetd.confpop3s stream tcp nowait root /usr/sbin/tcpd
/usr/sbin/popper
The executable for ipop3d is generally /usr/sbin/ipop3d.
16623 LPI 102 Course Notes inetd and xinetd
23.5 Review
Quiz questions
1. How does disable an inetd service?
2. How does one disable an xinetd service?3. How would you deny access to your ssh server from all hosts except 192.168.3.3?4. How do you make changes to inetd.conf or xinetd.conf take effect?
5. How does the /etc/services file relate to the inetd.conf and xinetd.conf files?
6. How is logging configured for xinetd?
Assignment
1. Set up a telnet server, an FTP server and a POP3 server. Use the appropriate client software to test access to each of these.
2. Set up a user account that can only use telnet and POP3. Set up a user account that can only use FTP and POP3.
Answers to quiz questions
1. Traditionally, you place a # on the line which defines the service in inetd.conf, and then killall HUP inetd
2. You add “disable = yes” to the “service” section for the service in /etc/xinetd.d/*.
3. Add “sshd: ALL” to /etc/hosts.deny, and add “sshd: 192.168.3.3” to /etc/hosts.allow.
4. killall HUP xinetd inetd
5. The services file defines the port numbers that (x)inetd services use.
6. Using the log_ parameters in xinetd.conf.

24 Sendmail LPI 102 Course Notes 167
24 Sendmail“A most convincing proof that computer software has evolved by random chance is the Sendmail configuration file. In fact, any random change is likely to improve the readability of this file ...”
– http://lunch.za.net/evolution
LPIC topic 1.113.2 — Operate and perform basic configuration of sendmail [4]Weight: 4Objective
Candidate should be able to modify simple parameters in sendmail configuration files (including the "Smart Host" parameter, if necessary), create mail aliases, manage the mail queue, start and stop sendmail, configure mail forwarding and perform basic troubleshooting of sendmail. The objective includes checking for and closing open relay on the mail server. It does not include advanced custom configuration of Sendmail.
Key files, terms, and utilities include/etc/sendmail.cf Sendmail configuration file/etc/aliases or /etc/mail/aliases email aliases and forwarding/etc/mail/* Sendmail configuration database files~/.forward Forwarding for a user accountmailq Mail queue displaysendmail The sendmail command, for sending mailnewaliases Update the aliases database
24.1 How Sendmail worksSendmail is the default means of transporting mail in many Linux distributions. Sendmail is a mail transfer agent (MTA). This means that Sendmail is capable receiving mail and passing it to another mail server, or local delivery agent. BSD was developed at The University of California at Berkley to facilitate interoperability between a number of different mail formats and between network layouts (many of which are now no longer in use). Despite its antiquity Sendmail is still one of the most popular MTAs on the internet.1. As its name implies, Sendmail is used from the client's point of view for sending mail, not
receiving mail. A mail client does not collect mail from a Sendmail server but only transmits mail via a Sendmail server. (Collection is often handled by a POP3 server or an IMAP server).
2. Sendmail acts as a standalone server using TCP/IP and listens for connections on port 25. The protocol used is SMTP, simple mail transport protocol.
3. Sendmail will wake up periodically and transmit any mail which is waiting to be sent on the local machine (in the /var/spool/mqueue directory).
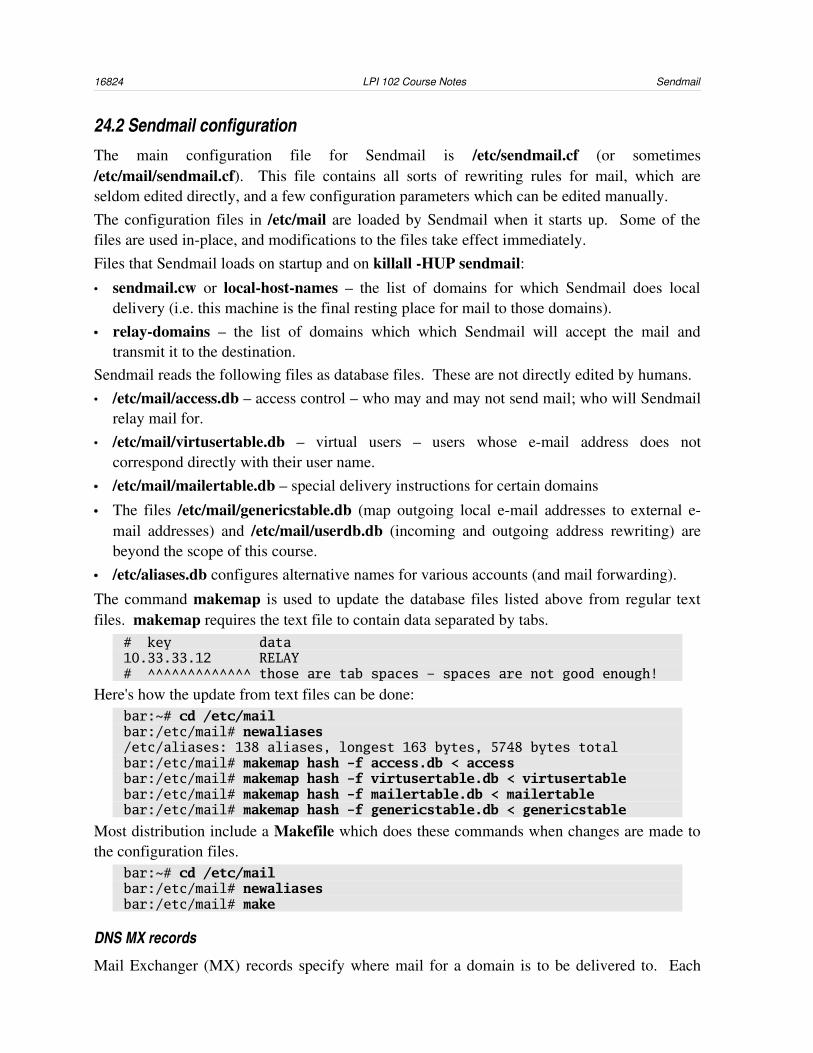
16824 LPI 102 Course Notes Sendmail
24.2 Sendmail configurationThe main configuration file for Sendmail is /etc/sendmail.cf (or sometimes /etc/mail/sendmail.cf). This file contains all sorts of rewriting rules for mail, which are seldom edited directly, and a few configuration parameters which can be edited manually.The configuration files in /etc/mail are loaded by Sendmail when it starts up. Some of the files are used inplace, and modifications to the files take effect immediately.Files that Sendmail loads on startup and on killall HUP sendmail:• sendmail.cw or localhostnames – the list of domains for which Sendmail does local
delivery (i.e. this machine is the final resting place for mail to those domains).• relaydomains – the list of domains which which Sendmail will accept the mail and
transmit it to the destination.Sendmail reads the following files as database files. These are not directly edited by humans.• /etc/mail/access.db – access control – who may and may not send mail; who will Sendmail
relay mail for.• /etc/mail/virtusertable.db – virtual users – users whose email address does not
correspond directly with their user name.• /etc/mail/mailertable.db – special delivery instructions for certain domains
• The files /etc/mail/genericstable.db (map outgoing local email addresses to external email addresses) and /etc/mail/userdb.db (incoming and outgoing address rewriting) are beyond the scope of this course.
• /etc/aliases.db configures alternative names for various accounts (and mail forwarding).
The command makemap is used to update the database files listed above from regular text files. makemap requires the text file to contain data separated by tabs.
# key data10.33.33.12 RELAY# ^^^^^^^^^^^^^ those are tab spaces – spaces are not good enough!
Here's how the update from text files can be done:bar:~# cd /etc/mailbar:/etc/mail# newaliases/etc/aliases: 138 aliases, longest 163 bytes, 5748 bytes totalbar:/etc/mail# makemap hash -f access.db < accessbar:/etc/mail# makemap hash -f virtusertable.db < virtusertablebar:/etc/mail# makemap hash -f mailertable.db < mailertablebar:/etc/mail# makemap hash -f genericstable.db < genericstable
Most distribution include a Makefile which does these commands when changes are made to the configuration files.
bar:~# cd /etc/mailbar:/etc/mail# newaliasesbar:/etc/mail# make
DNS MX records
Mail Exchanger (MX) records specify where mail for a domain is to be delivered to. Each
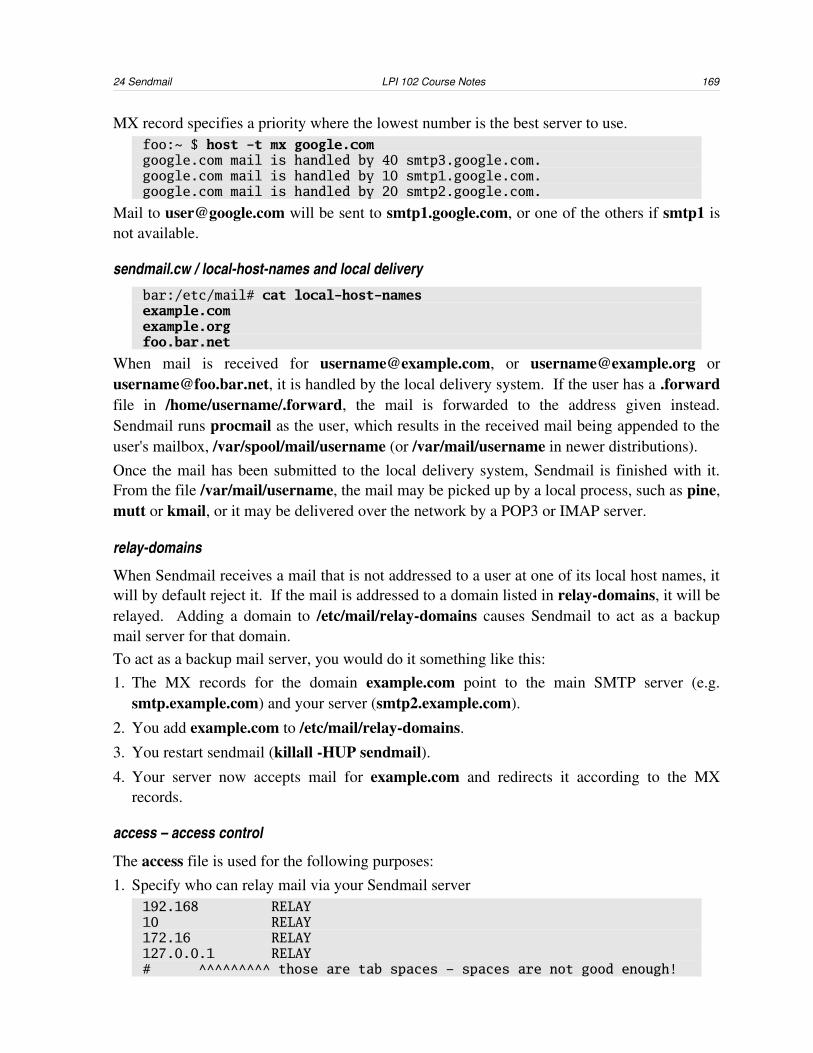
24 Sendmail LPI 102 Course Notes 169
MX record specifies a priority where the lowest number is the best server to use. foo:~ $ host -t mx google.comgoogle.com mail is handled by 40 smtp3.google.com.google.com mail is handled by 10 smtp1.google.com.google.com mail is handled by 20 smtp2.google.com.
Mail to [email protected] will be sent to smtp1.google.com, or one of the others if smtp1 is not available.
sendmail.cw / localhostnames and local delivery
bar:/etc/mail# cat local-host-namesexample.comexample.orgfoo.bar.net
When mail is received for [email protected], or [email protected] or [email protected], it is handled by the local delivery system. If the user has a .forward file in /home/username/.forward, the mail is forwarded to the address given instead. Sendmail runs procmail as the user, which results in the received mail being appended to the user's mailbox, /var/spool/mail/username (or /var/mail/username in newer distributions).Once the mail has been submitted to the local delivery system, Sendmail is finished with it. From the file /var/mail/username, the mail may be picked up by a local process, such as pine, mutt or kmail, or it may be delivered over the network by a POP3 or IMAP server.
relaydomains
When Sendmail receives a mail that is not addressed to a user at one of its local host names, it will by default reject it. If the mail is addressed to a domain listed in relaydomains, it will be relayed. Adding a domain to /etc/mail/relaydomains causes Sendmail to act as a backup mail server for that domain.To act as a backup mail server, you would do it something like this: 1. The MX records for the domain example.com point to the main SMTP server (e.g.
smtp.example.com) and your server (smtp2.example.com).
2. You add example.com to /etc/mail/relaydomains.
3. You restart sendmail (killall HUP sendmail).4. Your server now accepts mail for example.com and redirects it according to the MX
records.
access – access control
The access file is used for the following purposes:1. Specify who can relay mail via your Sendmail server
192.168 RELAY10 RELAY172.16 RELAY127.0.0.1 RELAY# ^^^^^^^^^ those are tab spaces – spaces are not good enough!

17024 LPI 102 Course Notes Sendmail
This means that anyone with a network address beginning with the prefixes given can relay mail via the Sendmail server.
2. Specify source network addresses and email addresses from which mail will be rejected.192.168.0.55 550 You have a virus61.56.224 550 AME-NET blocked for spam +27 11 555 [email protected] 550 We don't like your newsletter thank you# ^^^^ those are tab spaces!
3. Specify source network addresses and email addresses which are accepted without further checks (e.g. to override a DNS blacklisting...)# juta.co.za was running an open relay ...196.35.178.165 OK# ^^ that's a tab space – spaces are not good enough!
aliases – mail forwarding and alternative names
/etc/aliases gives the names of user accounts that are forwarded to other users. It is common to have an alias for postmaster and other accounts that are used for particular purposes.
postmaster: rootabuse: rootroot: gerald
With the above aliases, mail for postmaster@ any domain and abuse@ any domain is forwarded to the local user gerald.
After editing the aliases file, the command newaliases must be run.
virtusertable – virtual users
The virtusertable specifies users that do not necessarily have a user account on your machine, and is commonly used for hosting multiple mail domains on a single machine.
[email protected] [email protected] [email protected] [email protected] [email protected]@example.com [email protected]# ^^^^^^^^^^^^^^^ those are tab spaces!
Mail for fred and info are delivered to the user account user001. Mail for joe is delivered to user002. The last line causes mail for any other user at example.com to be delivered to user003 (this overrides aliases).
mailertable – domain specific delivery rules
The mailertable contains rules for how delivery to particular domains is handled. Entries in the mailertable.db file override MX records that Sendmail uses by default.
# forward all mail for example.org to internal SMTP server 192.168.3.3
example.org smtp:[192.168.3.3]# send all smtp mail via our ISP's name server. smtp:[smtp.isp.example.net]# ^^^^^^^^^^^^^^^^^^^^^^^^^them there thangs are tab spaces
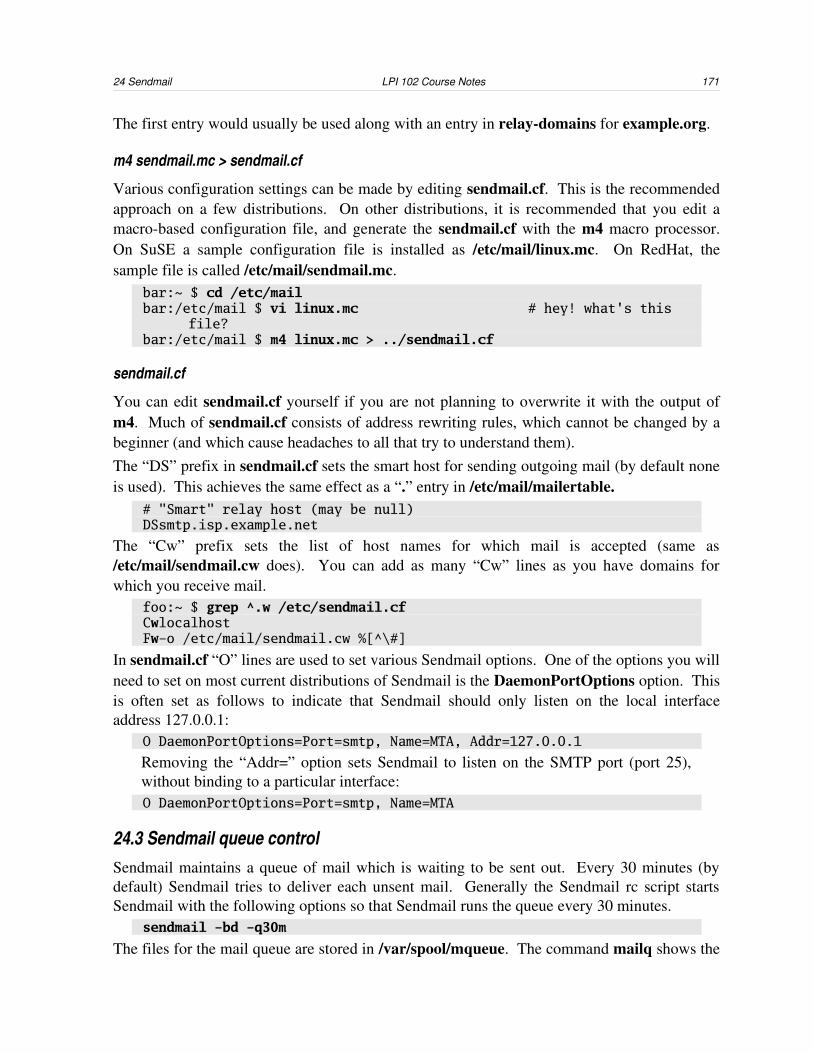
24 Sendmail LPI 102 Course Notes 171
The first entry would usually be used along with an entry in relaydomains for example.org.
m4 sendmail.mc > sendmail.cf
Various configuration settings can be made by editing sendmail.cf. This is the recommended approach on a few distributions. On other distributions, it is recommended that you edit a macrobased configuration file, and generate the sendmail.cf with the m4 macro processor. On SuSE a sample configuration file is installed as /etc/mail/linux.mc. On RedHat, the sample file is called /etc/mail/sendmail.mc.
bar:~ $ cd /etc/mailbar:/etc/mail $ vi linux.mc # hey! what's this
file?bar:/etc/mail $ m4 linux.mc > ../sendmail.cf
sendmail.cf
You can edit sendmail.cf yourself if you are not planning to overwrite it with the output of m4. Much of sendmail.cf consists of address rewriting rules, which cannot be changed by a beginner (and which cause headaches to all that try to understand them). The “DS” prefix in sendmail.cf sets the smart host for sending outgoing mail (by default none is used). This achieves the same effect as a “.” entry in /etc/mail/mailertable.
# "Smart" relay host (may be null)DSsmtp.isp.example.net
The “Cw” prefix sets the list of host names for which mail is accepted (same as /etc/mail/sendmail.cw does). You can add as many “Cw” lines as you have domains for which you receive mail.
foo:~ $ grep ^.w /etc/sendmail.cfCwlocalhostFw-o /etc/mail/sendmail.cw %[^\#]
In sendmail.cf “O” lines are used to set various Sendmail options. One of the options you will need to set on most current distributions of Sendmail is the DaemonPortOptions option. This is often set as follows to indicate that Sendmail should only listen on the local interface address 127.0.0.1:
O DaemonPortOptions=Port=smtp, Name=MTA, Addr=127.0.0.1
Removing the “Addr=” option sets Sendmail to listen on the SMTP port (port 25), without binding to a particular interface:O DaemonPortOptions=Port=smtp, Name=MTA
24.3 Sendmail queue controlSendmail maintains a queue of mail which is waiting to be sent out. Every 30 minutes (by default) Sendmail tries to deliver each unsent mail. Generally the Sendmail rc script starts Sendmail with the following options so that Sendmail runs the queue every 30 minutes.
sendmail -bd -q30m
The files for the mail queue are stored in /var/spool/mqueue. The command mailq shows the
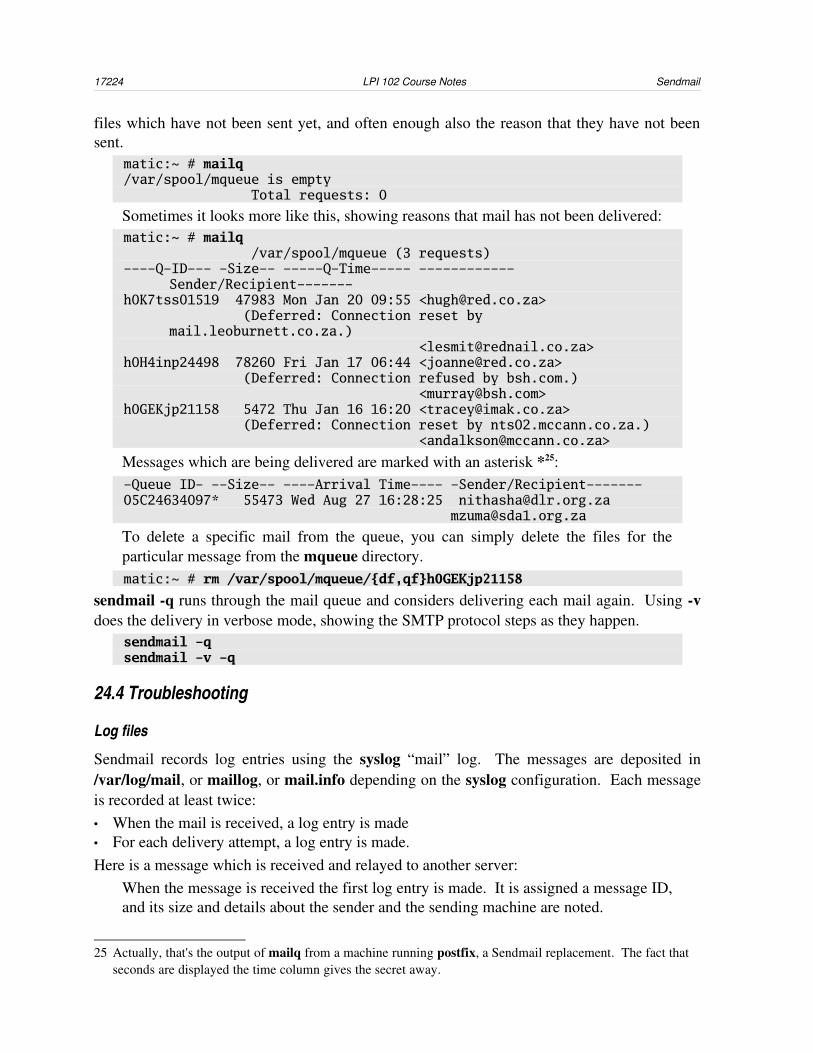
17224 LPI 102 Course Notes Sendmail
files which have not been sent yet, and often enough also the reason that they have not been sent.
matic:~ # mailq/var/spool/mqueue is empty Total requests: 0
Sometimes it looks more like this, showing reasons that mail has not been delivered:matic:~ # mailq /var/spool/mqueue (3 requests)----Q-ID--- -Size-- -----Q-Time----- ------------
Sender/Recipient-------h0K7tss01519 47983 Mon Jan 20 09:55 <[email protected]> (Deferred: Connection reset by
mail.leoburnett.co.za.) <[email protected]>h0H4inp24498 78260 Fri Jan 17 06:44 <[email protected]> (Deferred: Connection refused by bsh.com.) <[email protected]>h0GEKjp21158 5472 Thu Jan 16 16:20 <[email protected]> (Deferred: Connection reset by nts02.mccann.co.za.) <[email protected]>
Messages which are being delivered are marked with an asterisk *25:-Queue ID- --Size-- ----Arrival Time---- -Sender/Recipient-------05C24634097* 55473 Wed Aug 27 16:28:25 [email protected] [email protected]
To delete a specific mail from the queue, you can simply delete the files for the particular message from the mqueue directory.matic:~ # rm /var/spool/mqueue/{df,qf}h0GEKjp21158
sendmail q runs through the mail queue and considers delivering each mail again. Using v does the delivery in verbose mode, showing the SMTP protocol steps as they happen.
sendmail -qsendmail -v -q
24.4 Troubleshooting
Log files
Sendmail records log entries using the syslog “mail” log. The messages are deposited in /var/log/mail, or maillog, or mail.info depending on the syslog configuration. Each message is recorded at least twice:• When the mail is received, a log entry is made• For each delivery attempt, a log entry is made.Here is a message which is received and relayed to another server:
When the message is received the first log entry is made. It is assigned a message ID, and its size and details about the sender and the sending machine are noted.
25 Actually, that's the output of mailq from a machine running postfix, a Sendmail replacement. The fact that seconds are displayed the time column gives the secret away.
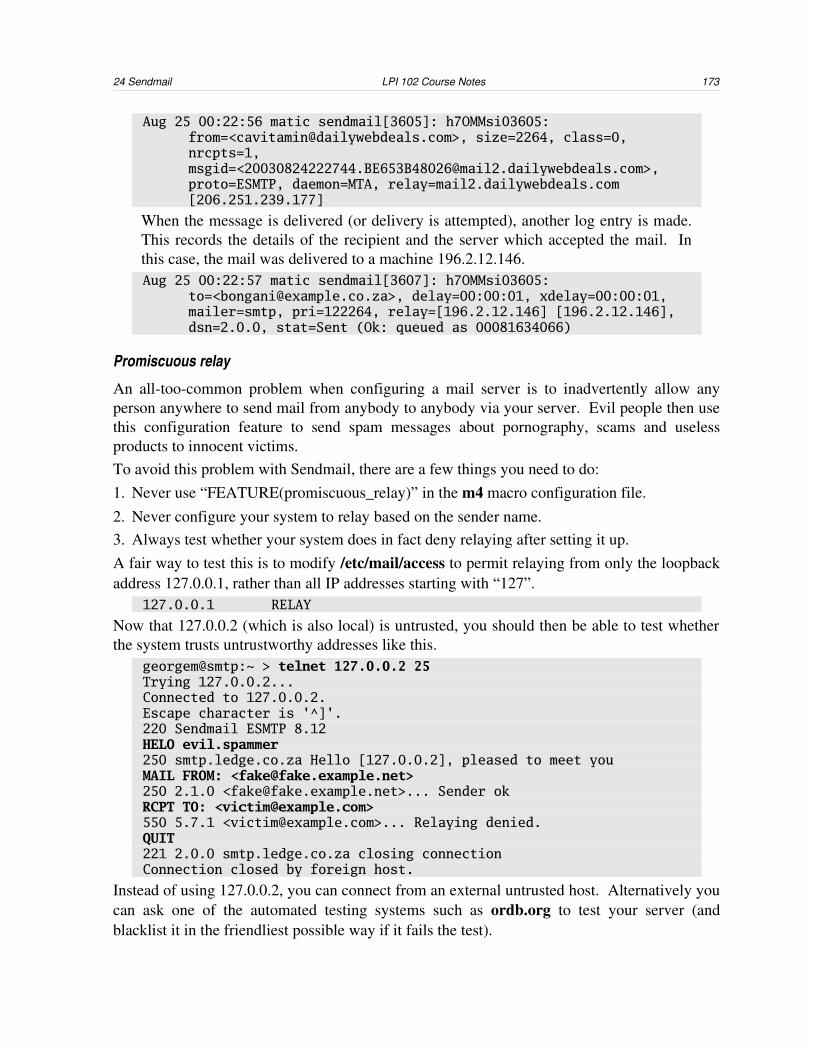
24 Sendmail LPI 102 Course Notes 173
Aug 25 00:22:56 matic sendmail[3605]: h7OMMsi03605: from=<[email protected]>, size=2264, class=0, nrcpts=1, msgid=<[email protected]>, proto=ESMTP, daemon=MTA, relay=mail2.dailywebdeals.com [206.251.239.177]
When the message is delivered (or delivery is attempted), another log entry is made. This records the details of the recipient and the server which accepted the mail. In this case, the mail was delivered to a machine 196.2.12.146.Aug 25 00:22:57 matic sendmail[3607]: h7OMMsi03605:
to=<[email protected]>, delay=00:00:01, xdelay=00:00:01, mailer=smtp, pri=122264, relay=[196.2.12.146] [196.2.12.146], dsn=2.0.0, stat=Sent (Ok: queued as 00081634066)
Promiscuous relay
An alltoocommon problem when configuring a mail server is to inadvertently allow any person anywhere to send mail from anybody to anybody via your server. Evil people then use this configuration feature to send spam messages about pornography, scams and useless products to innocent victims. To avoid this problem with Sendmail, there are a few things you need to do:1. Never use “FEATURE(promiscuous_relay)” in the m4 macro configuration file.2. Never configure your system to relay based on the sender name.3. Always test whether your system does in fact deny relaying after setting it up.A fair way to test this is to modify /etc/mail/access to permit relaying from only the loopback address 127.0.0.1, rather than all IP addresses starting with “127”.
127.0.0.1 RELAY
Now that 127.0.0.2 (which is also local) is untrusted, you should then be able to test whether the system trusts untrustworthy addresses like this.
georgem@smtp:~ > telnet 127.0.0.2 25Trying 127.0.0.2...Connected to 127.0.0.2.Escape character is '^]'.220 Sendmail ESMTP 8.12HELO evil.spammer250 smtp.ledge.co.za Hello [127.0.0.2], pleased to meet youMAIL FROM: <[email protected]>250 2.1.0 <[email protected]>... Sender okRCPT TO: <[email protected]>550 5.7.1 <[email protected]>... Relaying denied. QUIT221 2.0.0 smtp.ledge.co.za closing connectionConnection closed by foreign host.
Instead of using 127.0.0.2, you can connect from an external untrusted host. Alternatively you can ask one of the automated testing systems such as ordb.org to test your server (and blacklist it in the friendliest possible way if it fails the test).
17424 LPI 102 Course Notes Sendmail
24.5 Review
Quiz questions
1. What is Sendmail, and what does it do?2. What steps will you take to to cause all mail addressed to the address sales to be delivered
to george?3. How do you restart Sendmail after configuration changes? Which configuration changes
require that Sendmail be restarted?4. How do you view the contents of the mail queue?5. How do you remove a message from the queue if you do not wish to send it?6. Which parameter controls where outgoing mail is sent, and in what ways can it be set?
Assignment
1. Install Sendmail, and configure it to accept mail for a domain such as fake.example.net. Use the command sendmail bv [email protected] to verify how mail will be delivered.
2. Configure your Sendmail to listen to connections on its real network interface, rather than only the loopback interface. Verify that you have done this correctly with netstat lt.
3. Send a mail manually using SMTP.telnet localhost 25HELO fraudulent.comMAIL FROM: <[email protected]>RCPT TO: <[email protected]>DATAFrom: [email protected]: [email protected]: Bogusly typed by meSubject: LPIC is easy
I told you it was..QUIT
4. Check that your mail server does not relay mail from the local network. Now modify the access table so that it does accept and relay for the local network.
5. Add a mailbox user using useradd with a shell of /dev/null. Send a test mail to this user. Set up a mail client to send mail via SMTP and receive mail via POP3 (e.g. kmail, evolution or balsa). Test whether you can send mail from the user to the user.
6. Send a mail to [email protected] and document the effect that this has on the mail queue, and the mail logs.
7. Configure your server to be a backup mail server for the domain other.example.com. Attempt to deliver this mail another SMTP server on your network.

24 Sendmail LPI 102 Course Notes 175
Answers to quiz questions
1. A mail server – MTA – message transfer agent. It transfers electronic mail it receives to the recipient.
2. Add “sales: george” to /etc/aliases, and run newaliases.3. killall HUP sendmail will work, as should /etc/init.d/sendmail reload. Restarting sendmail
is only necessary for changes to text files, and not for changes to database files.4. mailq5. rm /var/spool/mqueue/{q,d}f$MESSAGEID6. The “smarthost” parameter. It can be set by editing sendmail.cf (search for “^DS”). One
can achieve the same effect with an entry in /etc/mailertable.
17625 LPI 102 Course Notes Apache
25 Apacheapache n. 1: any member of Athapaskan tribes that migrated to the SW desert (from Arizona to Texas and south into Mexico); fought a losing battle from 1861 to 1886 with the US and were resettled in Oklahoma 2: a Parisian gangster 3: the language of the Apache people.
Wordnet ™
LPIC topic 1.113.3 — Operate and perform basic configuration of Apache [4]Weight: 4Objective
Candidates should be able to modify simple parameters in Apache configuration files, start, stop, and restart httpd, arrange for automatic restarting of httpd upon boot. Does not include advanced custom configuration of Apache.
Key files, terms, and utilities includeapachectl Apache stopper starterhttpd Apache executablehttpd.conf Configuration file for Apache
25.1 Running ApacheThe Apache web server is a HTTP/1.1 (RFC 2616) compliant web server that runs on a variety of platforms including Windows, Netware, OS2 and most flavours of UNIX. Apache was derived from the NCSA HTTP server with patches applied (hence the name).A configured Apache installation will consist of the following:• The Apache executable, httpd. Current versions of Apache implement many of the server's
features using dynamically loaded modules from /usr/lib/modules.
• The configuration file httpd.conf26 (in a subdirectory of /etc, typically apache or httpd or httpd/conf).
• Documents which can be downloaded from the Apache server via HTTP. Typically a number of HTML documents and images are stored in a directory named the DocumentRoot. The exact directory varies across distributions. Redhat uses /var/www/htdocs, SuSE uses /svr/www/htdocs or /usr/local/httpd/htdocs, and Debian woody uses /var/www.
Starting and stopping
The startup script for Apache starts it as follows:httpd -f /etc/httpd/httpd.conf
26 For Apache versions older than 1.3 the files srm.conf (namespace management) and access.conf (directory based access control) are included by httpd.conf. See http://httpd.apache.org/info/threeconfigfiles.html

25 Apache LPI 102 Course Notes 177
That's true, except sometimes the executable is not called httpd (like NCSA httpd) but apache.apache -f /etc/httpd/httpd.conf
The apachectl program is used to start and stop Apache. banana:~# apachectl helpusage: /usr/sbin/apachectl (start|stop|restart|fullstatus|status|
graceful|configtest|help)
start - start httpdstop - stop httpdrestart - restart httpd if running by sending a SIGHUP or start
if not runningfullstatus - dump a full status screen; requires lynx and mod_status status - dump a short status screen; requires lynx and
mod_statusgraceful - do a graceful restart by sending a SIGUSR1 or start configtest - do a configuration syntax testhelp - this screen
If you modify httpd.conf, the correct thing to do is apachectl restart. If you made errors in the configuration, it is possible that Apache will fail to start, so apachectl configtest is a wise check.To make Apache start when the system starts, you use your distributionspecific procedure to make the link in the correct runlevel script (/etc/init.d/apache or httpd):
chkconfig --add apache # Redhat, SuSE
update-rc.d apache start # Debianinsserv apache # SuSE <
8.0cd /etc/rc2.d ; ln -s ../init.d/apache S80apache # anything
Log files
Each time a URL is requested from the HTTP server, an entry is made in the access log file (e.g. /var/log/apache/access.log).
165.165.134.47 - - [28/Aug/2003:14:55:17 +0200] "GET /software/squint/ HTTP/1.0" 200 15166 "http://freshmeat.net/search/?q=squid+log+analyze§ion=projects" "Mozilla/4.0 (compatible; MSIE 5.5; Windows NT 5.0)"
165.165.134.47 - - [28/Aug/2003:14:55:17 +0200] "GET /software/squint/images/spacer.gif HTTP/1.0" 404 227 "http://ledge.co.za/software/squint/" "Mozilla/4.0 (compatible; MSIE 5.5; Windows NT 5.0)"
These log entries mean that 165.165.134.47 loaded the page “/software/squint/” (15166 bytes) after being referred there by freshmeat.net (as the result of a search for a squid log analyser). The user is using Microsoft Internet Explorer version 5.5 on Windows 2000. A subsequent request for “spacer.gif” failed (404 result code).
Errors are logged to a separate file, usually named error.log (e.g. /var/log/httpd/error.log)

17825 LPI 102 Course Notes Apache
[Fri Aug 15 06:37:00 2003] [error] [client 196.25.228.122] File does not exist: /usr/local/httpd/htdocs/default.ida
[Fri Aug 15 06:44:46 2003] [error] [client 66.196.65.40] File does not exist: /usr/local/httpd/htdocs/robots.txt
The first error was generated by a request from a Windows server infected with the Code red or Nimda worm, and the second was generated by a web crawler.
25.2 ConfigurationThe general form of configuration directives in httpd.conf is ...
<DirectiveName> ConfigurationItem AnotherConfigItem Value SomethingElse Value1 Value2 Value3 Value4</DirectiveName>
Global options
The first part of httpd.conf contains configuration items for the entire server.
• Listen 80 – listen on TCP port 80 (www service) for incoming HTTP requests.#Listen 192.168.0.3:80Listen 80
• ServerRoot – the current directory when the server runs. All configuration files are relative to this directory.
• LoadModule ... – a number of dynamic modules can be loaded.LoadModule access_module modules/mod_access.soLoadModule auth_module modules/mod_auth.soLoadModule auth_anon_module modules/mod_auth_anon.so...
• AddModule ... – each of the modules which is loaded is initialised in a preset order:AddModule mod_access.cAddModule mod_auth.c# AddModule mod_auth_anon.c...
• User and Group – after starting to listen on port 80, httpd changes its privileges to a user and group.User wwwGroup nogroup
• Servername sets the name which your server identifies itself as. This name is used in error reports and when the server sends a redirection.ServerName www.example.com
If the server's IP address is 172.18.45.231 then URLs like http://172.18.45.231/subdir will be redirected to http://www.example.com/subdir/ (note the extra slash).
Main server configuration
The second part of httpd.conf contains configuration items for server itself.

25 Apache LPI 102 Course Notes 179
• DocumentRoot sets the directory from which the server looks for documents. Symbolic links and aliases can be used to reach files outside this directory.# DocumentRoot "/var/www" # debian# DocumentRoot "/var/www/htdocs" # redhatDocumentRoot "/usr/local/httpd/htdocs"
• Directory specific access control. The Directory scope indicates whether the server should read files in a particular directory when they are requested. The directory given is relative to the root directory of the operating system (e.g. /). There are usually a number of Directory scopes.
This Directory scope specifies that authentication is required for the root directory and all its subdirectories.<Directory /> AuthUserFile /etc/httpd/passwd AuthGroupFile /etc/httpd/group Options -FollowSymLinks +Multiviews AllowOverride None
This is generally followed by a Directory specification for the DocumentRoot directory. This particular one allows the generation of index pages for directories, forbids the server to follow symbolic links, allows SHTML include files and enables MultiViews (whatever those are). The AllowOverride line allows .htaccess files to contain Apache configuration directives.<Directory "/usr/local/httpd/htdocs"> Options Indexes -FollowSymLinks +Includes MultiViews AllowOverride All</Directory>
• Userdir allows you to name the subdirectory for a user's personal files. This is often public_html. UserDir public_html
<Directory /home/*/public_html> AllowOverride FileInfo AuthConfig Limit Options MultiViews Indexes SymLinksIfOwnerMatch IncludesNoExec</Directory>
The URL http://server/~user/page.html corresponds to the file /home/user/public_html/page.html
• DirectoryIndex sets the name of files which the server looks for instead of showing a directory listing.DirectoryIndex index.php index.html index.htm default.htm
• ErrorLog sets the name of the log file for errors. This includes missing pages, permission problems and errors generated by scripts.ErrorLog /var/log/httpd/error_log
• CustomLog sets the name of the file to which access logs are written. This example logs to access_log in the “combined” format.CustomLog /var/log/httpd/access_log combined

18025 LPI 102 Course Notes Apache
• ScriptAlias sets the directory of the cgibin scripts. Executables in this directory are run when the corresponding URL is accessed.ScriptAlias /cgi-bin/ "/usr/local/httpd/cgi-bin/"
The URL http://server/cgibin/script.pl runs /usr/local/httpd/cgibin/script.pl and displays the output.
Virtual hosts
An optional third part of httpd.conf can contain configuration for virtual hosts.It is common for a single Apache server to operate a number of separate web sites. HTTP requests include the name of the site that was requested, so the server can serve different configured sites based on the given name. The NameVirtualHost directive less Apache that a particular IP address and port are used for virtual hosts.
# NameVirtualHost 172.19.122.2:80 NameVirtualHost *
Each virtual host is then defined in a VirtualHost section. The configuration is inherited from the main server configuration, except where an item changed.
<VirtualHost *> DocumentRoot /home/www/dummy-host.example.com ServerName dummy-host.example.com ServerAlias www.dummy-host.example.com ErrorLog /var/log/httpd/dummy-host.example.com-error_log CustomLog /var/log/httpd/dummy-host.example.com-access_log
common</VirtualHost><VirtualHost *> DocumentRoot /home/www/secure.example.com ServerName secure.example.com</VirtualHost>
Apache can also serve different sites based on the destination IP address. In this case, you simply omit the NameVirtualHost directive.
Authentication
The directives below instruct Apache to consult the file in a particular directory, and allow the authentication configuration and the Limit directive to appear in the file.
<Directory /usr/local/httpd/htdocs/secretfiles/> AllowOverride AuthConfig Limit</Directory>
The .htaccess file looks like this.# /usr/local/httpd/htdocs/secretfiles/.htaccess AuthUserFile /usr/local/httpd/htdocs/secretfiles/.htpasswdAuthGroupFile /dev/nullAuthName "Secret files"AuthType Basic<Limit GET POST> require valid-user
25 Apache LPI 102 Course Notes 181
</Limit>
Notice that everywhere full path names are used. This is necessary since path names are not relative to the file in which they appear, but are relative to the ServerRoot. The actual .htpasswd file is generated using the htpasswd utility.
25.3 Review
Quiz questions
1. What is the purpose of a web server?2. Why is apachectl configtest necessary?
3. What does the DocumentRoot configuration parameter specify?
4. When you change DocumentRoot, what else in the configuration file will you change simultaneously?
5. What is the ServerName directive set to?
Assignment
1. On your server configure the server name and the document root to custom values (e.g. example.net and /home/example). What is the effect of the change? Which parameters do you have to change to make it work as a web site?
2. Set up two name based virtual hosts with different web pages for www.example.com and www.example.org. Test the behaviour of the web server using fake entries in /etc/hosts.
3. Set up authentication for a subdirectory on your web server. Allow read access to a user named guest with a password of 823kk, and to a user named admin with a password of 513aj.
4. Create a web site for yourself, and find a way to make it publicly accessible (preferably on your own Apache server, or someone else's).
Answers to quiz questions
1. To answer HTTP requests.2. Apache will not start or restart if there are errors in the configuration file.3. The directory at which the server begins to look for files requested by the client.4. The “Directory” permissions.5. The name by which your web server wishes to be known.
18226 LPI 102 Course Notes File servers
26 File serversThe steady state of disks is full.
– Ken Thompson, quoted in /usr/share/games/fortunes/computers
LPIC topic 1.113.4 — Properly manage the NFS, smb, and nmb daemons [4]Weight: 4Objective
Candidate should know how to mount remote filesystems using NFS, configure NFS for exporting local filesystems, start, stop, and restart the NFS server. Install and configure Samba using the included GUI tools or direct edit of the /etc/smb.conf file (Note: this deliberately excludes advanced NT domain issues but includes simple sharing of home directories and printers, as well as correctly setting the nmbd as a WINS client).
Key files, terms, and utilities include/etc/exports NFS server configuration file/etc/fstab File system table (network file systems too)/etc/smb.conf Samba configuration filemount Mount a file system (network file systems too)umount Unmount a file system (network file systems too)
26.1 NFS server NFS, the Network File System, was originally developed by Sun Microsystems and is considered to be the UNIX native file sharing protocol. NFS provides a way to integrate disks on physically separate servers into a single file system. The NFS protocol connects machines, rather than users. The NFS server shares files together with their ownership and permission information. The NFS client machine is trusted to implement access controls27.NFS can work together with a name service, known as NIS or Network Information Service. NIS distributes a central user database across the network. The alternative is to manually synchronise password files between computers.NFS uses Sun RPC (Remote Procedure Call). Sun RPC negotiates procedure calls via the port mapper (portmap, port 111), and so does NFS.
rpc.nfsd and rpc.mountd
The NFS server is implemented in two parts28:• rpc.nfsd – the NFS server process• rpc.mountd – the process which handles NFS mount requests.
For a working NFS server the two servers and also portmap must be started by the init scripts.
27 Actually, NFS clients are not fully trusted. An NFS client can do whatever the server permits if it chooses to.28 So that if it breaks you can keep both ...

26 File servers LPI 102 Course Notes 183
/etc/exports – configuration file for NFS server
The exports file lists the directories which the NFS server shares, the machines which may use those directories, and the options for each machine. Each line in /etc/exports has the syntax:
/share/path host(option,option)
The host machines which may access the share may be given as IP addresses or host names (e.g. DNS entries or hosts files entries). For host names, asterisks may be used (e.g. *.example.com). For IP addresses you can append a netmask or the number of bits (e.g. 172.16.0.0/12 or 172.16.0.0/255.240.0.0).The options determine how the client connection is handled:• ro – read only. rw – read/write. When a NFS share is readonly, the client can not write
changes to the NFS share.• secure, insecure – “secure” in this case means that the NFS server checks that the process
on the client is running with root privileges. This prevents regular users on the client machine from bypassing file system permissions.
• root_squash, no_root_squash, all_squash – by default, root on the client system is root on the server system. root_squash tells the server to treat root on the client as if it were nobody. all_squash maps all users to nobody.foobar:~ $ cat /etc/exports# Directory Exported to which clients .../ trusted(rw,no_root_squash)/projects proj*.example.com(rw)/usr *.example.com(ro) 192.168.5.0/24(rw)/cdrom (ro,insecure,all_squash)
After making changes to /etc/exports, you should signal rpc.mountd and rpc.nfsd to take note of the changes. Either of these will do the trick:
killall -HUP rpc.mountd rpc.nfsdexportfs -r
26.2 NFS clientThe mount command connects a NFS client to an NFS server. The syntax for mounting NFS is:
mount server:/share/dir /where/to/mount/it -o option,option
It is not generally necessarily to specify mount t nfs (file system type).mount nfsserver.example.com:/projects /mnt
Commonly used options when mounting a share from an NFS server are ...• soft – by default, the kernel will lock up hard and put a process into disk wait state (D)
when the NFS server reports errors. With soft the kernel reports NFS errors to the program after no response for the number of seconds indicated by the timeout parameter, e.g. timeo=60.
• hard – when the NFS server does not respond, the process using it is in disk wait state, and

18426 LPI 102 Course Notes File servers
can only by interrupted if the file system was mounted with the intr option.
• async – changes are written to the NFS server in the background.
• nolock – don't start the NFS lock daemon.
Here we mount the directory /data from a NFS server named “baa”:foo:~ # mount baa:/data /mnt/ -o intr,rwfoo:~ # mountbaa:/data on /mnt type nfs (rw,intr,addr=10.0.0.10)
/etc/fstab – filesystem table
Entries in /etc/fstab follow the pattern given to the mount command. The first column contains the source of the data (server:directory), the second column the mount point, the third column “nfs” and the option column contains the mount options required.
foo:~ # grep : /etc/fstab# what where type options ...nfs:/suse/suse8.2 /distrib nfs defaults 0
0nfs2:/home/stuff /stuff nfs soft,intr,timeo=15,rw 0
0server:/home/foo /var/foo nfs soft,intr,timeo=15,noauto,rw,user 0
0baa:/data /mnt/data nfs soft,intr,timeo=30,noauto,rw,user 0
0 10.7.3.44:/home /mnt/topaz nfs soft,intr,rw,noauto 0
0
All the regular fstab mount options apply. The “user” option for example indicates that any user can mount the share.
26.3 Samba serverComputers running Microsoft operating systems support file and printer sharing using the SMB protocol (server message block). This protocol has grown into something of a standard over time. Samba is a suite of programs for UNIX that implement the SMB protocol.SMB file sharing has been implemented on a number of Microsoft operating systems:• Windows for Workgroups – SMB server and client software were included with Windows
for Workgroups for peer to peer file sharing. TCP/IP networking required Trumpet Winsock (Windows sockets).
• Windows 95/98/ME – These operating systems are similar to Windows for Workgroups in functionality, but have native support for TCP/IP. Some new features were introduced into the SMB protocol – encrypted passwords and domain logon authentication (requiring a Windows NT server).
• Windows NT/2000 – Windows NT introduced the concept of a machine login to support multiuser functionality. Windows 2000 added a number of additional complexities that are not discussed in this text.
26 File servers LPI 102 Course Notes 185
SMB protocol
The SMB protocol was originally run on Netbeui, but can be run on TCP/IP or SPX/IPX. The SAMBA implementation runs on TCP/IP only. The SMB protocol relies on the Nebios protocol to translate host names into network addresses, and this protocol is implemented by the SAMBA suite.SMB is a clientdriven protocol – the client makes a request and the server responds. SMB shares are accessed by supplying a user name and password. SMB servers support one of two different file sharing modes – share level access control and user level access control. In share level access control, authentication to access a share is via a password only. In user level access control the client supplies a user name and a password when accessing a machine. Directories can individually be shared with either readonly or readwrite permissions. The client requests to login to a share and supplies a user name and password.When connected to the server, it behaves in a similar way to file systems on the local machine. Files can be copied, renamed, opened, deleted and transmogrified at will.
Netbios name resolution and WINS
Windows machines send broadcast queries to the network broadcast address to determine which machines are connected to the network. A machine appointed as the “browse master” responds to these queries and provides a list of machines (and users) on the network. Periodically the machines have an election to determine the master browser which caches the list of machines on the network.Using subnet broadcasts is impractical in large networks, because of traffic considerations, and because network broadcasts are limited to a single subnet. In addition, the machine that wins the election is not always the most capable machine on the network. To solve these problems, a Windows Internet Name Server (WINS) is used to translate Netbios names into IP addresses. This feature enables widows machines to “find” each other fairly reliably.Name resolution for SMB, either via WINS or via network broadcasts is implemented by nmbd.For Netbios name resolution to work, one of the following must be true:• Your Samba server is on the same subnet as your Windows client. The Windows client
must have WINS disabled, and the Samba server must be configured with wins support = no and wins server = "".
• The Samba server must act as a WINS server (wins support = yes), and the Windows client must specify the Samba server as its WINS server.
• The Windows clients must have the same setting for WINS server as the Samba server (wins server = x.x.x.x).
smb.conf – Samba configuration file
The configuration file for samba is smb.conf (usually in /etc/samba, or /etc in older versions). This file is documented by a comprehensive man page. After changing this file, Samba must
18626 LPI 102 Course Notes File servers
be reloaded for the changes to take effect (usually killall HUP smbd is sufficient).In the configuration file, the settings for each share are listed after the share name, in the format shown. The [global] section defines options that are applicable to the server. [homes] defines the settings for the sharing of each user's home directory. The [printers] section defines the settings for print sharing by smbd.Samba shares each user's home directory as a share of the same name as the user. The actual configuration for these shares is set in the [homes] section. In this configuration, only user himself can connect to his home directory, and new files and directories are created with the given permissions.
[homes] comment = Home Directories valid users = %S browseable = No read only = No create mask = 0640 directory mask = 0750
Unix permissions and ownership for the files in the share still apply. If there are problems accessing files in the user's home directory, these may be files to which the user does not have access to under his Unix user ID.If the [printers] share is present, it sets the details for the use of the printers configured on your Samba server. Using a printer share is quite similar to using a file share, except that after uploading a file, the file is printed (usually via lpr).
[printers] comment = All Printers path = /var/tmp printable = Yes create mask = 0600 browseable = No
Samba users
If encrypt passwords = no in the [global] configuration section, then Samba checks that the user anme and password supplied by clients matches the user authentication data. Samba expects the client computers to pass passwords unencrypted over the network. Although Windows machines can be configured to do this by changing a registry entry, it is far more common for Samba to store an unencrypted version of the password in /etc/samba/smbpasswd. The more commonly used setting is encrypt passwords = yes.There are two steps in setting up a user account to access a Samba server.1. The Unix user must exist (e.g. created with useradd). Samba does not require that the user
have an executable shell (i.e. /dev/null is okay).
2. The user's password must be set with smbpasswd. For Samba to work, you do not have to set the password for this user using passwd29.
The command smbpasswd updates the file smbpasswd with the user name and password that
29 Samba may modify the Unix password for you if the “unix password sync” option is enabled.

26 File servers LPI 102 Course Notes 187
will be used.foo:~ # smbpasswd -hWhen run by root: smbpasswd [options] [username] [password]otherwise: smbpasswd [options] [password]options: -h print this usage message -a add user -d disable user -e enable user -m machine trust account -n set no password -x delete userfoo:~ # useradd bernadettefoo:~ # mkdir ~bernadette; chown bernadette ~bernadettefoo:~ # smbpasswd -a bernadetteNew SMB password:Retype new SMB password:Added user bernadette.foo:~ # cat /etc/samba/smbpasswdbernadette:502:C187B8085FE1D9DFAAD3B435B51404EE:A9F0DD57E1EDAB5BB55A
9AC0A99C15EC:[UX ]:LCT-3F539773:
Windows GUI configuration
To connect to a share on a Samba server, you can enter \\server\sharename in the path of Windows Explorer, or after net use on the command line, or in the “Run” box. A Samba server can also be accessed via the Network Neighbourhood browser in Windows 95 and higher.There are a few prerequisites to making this work.• The Windows client must be set up to support Windows File Sharing over TCP (“Client for
Microsoft Windows”). Networking between the two systems must be correctly configured, with particular reference to the broadcast address if no WINS server is used.
• The configuration of WINS or the lack thereof must correspond on the client and server.• The log on user name on the Windows client must be set. Windows NT and derivatives
allow you to set the user name which will be used to connect to the server. Earlier versions of Windows use the logon user name in all cases. If you do not know what it is, the connection will not succeed.
• The user must exist as a Unix user on the Samba server.• The user must exist in smbpasswd on the Samba server.Once the connection is established, the user must be able to access the files contained in the share according to the Unix permissions (i.e. su username s /bin/sh c 'ls la /home/sharename' succeeds, and reading and writing of files as the user is possible).
18826 LPI 102 Course Notes File servers
26.4 Review
Quiz questions
1. What command would you use to mount a the directory /home/myself on a NFS server named nfsserver at the directory /mnt/nfs?
2. Which NFS mount option will ensure that you can kill a process using the NFS server if you are disconnected from the NFS server?
3. What is the syntax of the exports file?4. Who will be able to use the NFS share, and what will they be able to do?
/etc 192.168.3.0/28(ro,insecure,all_squash)
5. What can one do to make changes to the NFS server configuration take effect?6. How does one create a new share on a Samba server?7. How does one configure nmbd to act as a WINS client?
8. What entry in fstab would cause the share //pcpool/games to be mounted automatically at boot time on the directory /games using the user name fred with the password flint?
9. How do you unmount a SMB filesystem?
Assignment
1. Set up a NFS server sharing its /home directory, with a number of users (hewey, dewey and lewey if you can't think of any names). Set up a NFS client machine which mounts its home directory from the NFS server. Manually synchronise /etc/passwd and /etc/shadow from the server to the client and log in on the client and the server simultaneously as one of the users.
2. Set up a Samba server on the NFS client that shares the home directories you set up previously. Test whether you can connect to the Samba server first using smbclient and then using Windows.
3. Create a folder which has read and write access for all users. Save a file in this share as one user, and then try to alter it as another user. If this does not succeed, correct your configuration so that it does.
4. Create a unix group on the Samba server named accounts. Make hewey and dewey (or two other users) members of this group. Create a shared directory to which only these users can connect.
Answers to quiz questions
1. mount nfsserver:/home/myself /mnt/nfs 2. soft3. Exported directoryname, then a list of the machines that may mount it.4. A machine in the subnet 192.168.3.0 – 192.168.3.15 can mount it. They will be able to
read (but not write) files in /etc which can be read by the user nobody.

26 File servers LPI 102 Course Notes 189
5. exportfs r6. Modify smb.conf, adding a new section, specifying (at a minimum) the directory name to
share.7. If the WINS server is 192.168.43.22, then with the parameter “wins server =
192.168.43.22” in smb.conf.8. One like this:
# what where type options //pcpool/games /games smbfs username=fred,password=flint 0 0
9. umount /mountpoint

19027 LPI 102 Course Notes Caching DNS server
27 Caching DNS serverDNS is a bind.
LPIC topic 1.113.5 — Setup and configure basic DNS services [4]Weight: 4Objective
Candidate should be able to configure hostname lookups and troubleshoot problems with local cachingonly name server. Requires an understanding of the domain registration and DNS translation process. Requires understanding key differences in configuration files for bind 4 and bind 8.
Key files, terms, and utilities include/etc/hosts Static name resolution file/etc/resolv.conf DNS name resolution configuration/etc/nsswitch.conf Name resolution selection/etc/named.boot (v.4) or /etc/named.conf (v.8) Configuration files for BIND.
27.1 Name resolution in briefName resolution involves translating a name like www.example.com into a network address like 172.31.52.222. In Linux systems the process works like this:1. Look at the “hosts” entry in /etc/nsswitch.conf. Look up the name using each of the
methods listed, and return the first set of results found. The usual entry is “hosts: files dns”.2. “Files”: Look up the name in /etc/hosts. If it is found, we're done, otherwise go on to DNS.
3. “DNS”: Open up the DNS configuration file /etc/resolv.conf. bar:~ $ cat /etc/resolv.confsearch example.co.zanameserver 196.25.1.1
The system sends a DNS query for the name to the configured DNS server. If the name is not found, it may be changed (possibly adding the search path, or the domain).
If the local machine is running a caching DNS server, you would configure the resolver to query the local DNS server.
bar:~ $ cat /etc/resolv.confsearch example.co.zanameserver 127.0.0.1
27.2 BINDThe Berkeley Internet Name Daemon is standard equipment for much of the Internet, although alternative DNS servers do exist. DNS servers operate in two roles – providing authoritative information for domains which are delegated to them, and answering queries which require querying other DNS servers. A DNS server which has no DNS domains delegated to it is called a caching DNS server. DNS information is cached, and queries are performed
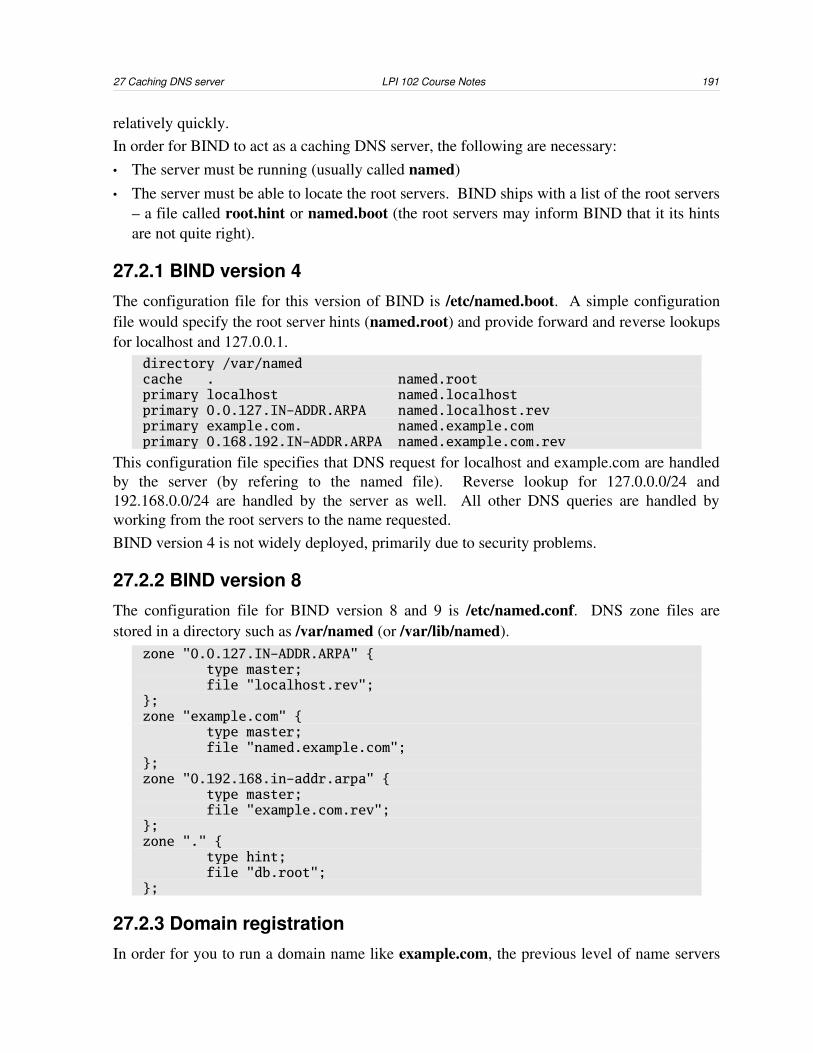
27 Caching DNS server LPI 102 Course Notes 191
relatively quickly.In order for BIND to act as a caching DNS server, the following are necessary:• The server must be running (usually called named)• The server must be able to locate the root servers. BIND ships with a list of the root servers
– a file called root.hint or named.boot (the root servers may inform BIND that it its hints are not quite right).
27.2.1 BIND version 4The configuration file for this version of BIND is /etc/named.boot. A simple configuration file would specify the root server hints (named.root) and provide forward and reverse lookups for localhost and 127.0.0.1.
directory /var/namedcache . named.rootprimary localhost named.localhostprimary 0.0.127.IN-ADDR.ARPA named.localhost.revprimary example.com. named.example.comprimary 0.168.192.IN-ADDR.ARPA named.example.com.rev
This configuration file specifies that DNS request for localhost and example.com are handled by the server (by refering to the named file). Reverse lookup for 127.0.0.0/24 and 192.168.0.0/24 are handled by the server as well. All other DNS queries are handled by working from the root servers to the name requested.BIND version 4 is not widely deployed, primarily due to security problems.
27.2.2 BIND version 8The configuration file for BIND version 8 and 9 is /etc/named.conf. DNS zone files are stored in a directory such as /var/named (or /var/lib/named).
zone "0.0.127.IN-ADDR.ARPA" { type master; file "localhost.rev";};zone "example.com" { type master; file "named.example.com";};zone "0.192.168.in-addr.arpa" { type master; file "example.com.rev";};zone "." { type hint; file "db.root";};
27.2.3 Domain registrationIn order for you to run a domain name like example.com, the previous level of name servers

19227 LPI 102 Course Notes Caching DNS server
(e.g. those for .com) must know where your name servers are. The name servers for each top level domain is administered by an organisation. Some samples are shown here.
Domain Purpose Administered by
. The root servers iana.org – don't ask for chages
.com Commercial entities internic.net
.net Network stuff
.edu US educational institutions
.mil US military
.org Nonprofit organisations
.gov US government The US government
.za South Africa SA govt? Mike Lawrie? Randy Bush?
.au Australia
.fi Finland
.uk United Kingdom
.de Germany (Deutschland)
.ru Russia
You can apply to the administrator to register a subdomain. Each top level domain has its own standards and criteria. Some will not register a subdomain, but will direct you to an existing subdomain. Usually they will require some form of payment before delegating a subdomain to you. The top level domain for South Africa is za and a number of subdomains exist which may register subdomains in turn. These are a few subdomains used in South Africa, and the organisations that administer them.
Domain Purpose Administered by
.co.za Commercial and general Uniforum, see www.co.za
.org.za Non commercial organisations Internet Solutions, see www.org.za
.za.org Free for all plig.net, see www.za.org
.za.net Free for all plig.net, see www.za.net
.alt.za Alternative Alan Barrett
.ac.za Academic institutions TENET
.gov.za Government SITA
.lunch.za.net Not quite the leading edge Leading Edge Business Solutions

27 Caching DNS server LPI 102 Course Notes 193
27.2.4 Zone files*DNS zone files as used by BIND zone are standardised in RFC 1035. A zone file specifies details which apply under a particular zone. A number of abbreviations and syntax conventions are followed in a zone file:• Each line is in the form
name class time-to-live type details
“name” is the name of the record (e.g. mail, www or benedict). “class” is almost always the Internet class “IN”. If the class is left blank, “IN” is assumed. “timetolive” is the number of seconds for which the record should be remembered by DNS servers (or hours “H”, days “D” or weeks “W”). “type” is SOA, NS, A, TXT, CNAME, MX and similar. “details” differs from one record type to the next.
• A semicolon is used as the comment character (“;”)• Lines can be continued using parentheses ( ... ).• From BIND version 9, the zone file must start with “$TTL ...”, setting the default time to
live for records that do not have one, e.g. “$TTL 1D” for 1 day.• The domain name is automatically appended to each name in the zone file, except for “A”
records and where the name ends with a dot. So for example, “mail” may become “mail.example.com”, but “mail.example.com.” is left unchanged30.
• The “@” sign is replaced with the full name of the domain where it occurs. The DNS administrator's email address is therefore written with a dot (.) in the place of an “@”.
• If the name is omitted, the previous name is used.The most often used types of Internet records that appear in a zone file are these:• SOA – Start of authority – every zone file starts with a SOA record. In this record you can
read which is the primary name server for the domain, the email address of the DNS administrator, and the time at which the record was last changed.$TTL 1Dgoogle.com. IN SOA ns1.google.com. dns-admin.google.com. (
2003090402 7200 1800 1038800 60 )
• NS – Name server – The names of name server for the zone is listed in the zone file. Every zone must have name servers.google.com. 4D IN NS ns1.google.com.google.com. 4D IN NS ns2.google.com.google.com. 4D IN NS ns3.google.com.google.com. 4D IN NS ns4.google.com.
• A – Address record – Each of the hosts in the domain is listed (e.g. www, ftp, zachary, mail)google.com. 300 IN A 216.239.51.100
30 As a side effect of this feature “mail.example.com” becomes “mail.example.com.example.com” in the example.com zone file.

19427 LPI 102 Course Notes Caching DNS server
google.com. 300 IN A 216.239.53.100www.google.com. 300 IN A 216.239.37.99smtp1.google.com. 3600 IN A 216.239.33.25
• MX – Mail exchanger – A mail exchanger record determines where mail is delivered for a particular domain. The DNS name of a server which can handle mail for a domain is given. MX records have a priority. Mail is delivered to the mail server with the lowest priority or the backup mail servers are tried.google.com. 300 IN MX 10 smtp1.google.com.google.com. 300 IN MX 20 smtp2.google.com.google.com. 300 IN MX 40 smtp3.google.com.
• CNAME – Canonical name (alias) – A CNAME record points to an A record, similarly to MX records and NS records. A CNAME is treated as a regular host.smtp.google.com. 600 IN CNAME smtp8.google.com.
• PTR – Pointer record (for reverse lookups) – these records occur only in inaddr.arpa zone files. For example, the zone file for the zone 233.22.196.inaddr.arpa zone contains the following reverse entries for 196.22.233.34 and above:34.233.22.196.in-addr.arpa. 8H IN PTR pe.ledge.co.za.35.233.22.196.in-addr.arpa. 8H IN PTR jhb.ledge.co.za.36.233.22.196.in-addr.arpa. 8H IN PTR dbn.ledge.co.za.37.233.22.196.in-addr.arpa. 8H IN PTR pta.ledge.co.za.38.233.22.196.in-addr.arpa. 8H IN PTR pmb.ledge.co.za.39.233.22.196.in-addr.arpa. 8H IN PTR ct.ledge.co.za.
So the zone file for “google.com” looks something like this:$TTL 4D@ 1D SOA ns1 dns-admin ( 2003090402 ; Last modified (twice) on 2003-09-
04 7200 ; Refresh interval 1800 ; Retry interval 1038800 ; Expiry interval 60 ) ; Minimum TTL NS ns1 NS ns2 NS ns3 NS ns4 300 MX 10 smtp1 300 MX 20 smtp2 300 MX 40 smtp3 300 A 216.239.51.100 300 A 216.239.53.100www 300 A 216.239.37.99smtp1 1H A 216.239.33.25smtp 600 CNAME smtp8ns1 4D A 216.239.32.10ns4 4D A 216.239.38.10... and so forth ...
To make named reload its zone files, you need to signal it with a HUP signal, or use ndc reload (or rndc reload for BIND 9).

27 Caching DNS server LPI 102 Course Notes 195
27.3 Review
Quiz questions
1. If you see the error “ping: unknown host www.example.com”, what does this mean? Which files will you consult to see if name resolution is working correctly?
2. What is the format of a line in the hosts file?3. If you are running a DNS on your own machine, which file will you set up to indicate this?4. What are the configuration files for BIND 4 and BIND 8? How do these files differ?5. What is the purpose of a DNS zone file?6. After setting up DNS servers for “random5138.com” serving “A” records for a web site
“www.random5138.com”, what step is necessary to make the rest of the world be able to connect to your site?
Assignment
1. Set up a caching DNS server using BIND. Test whether it works by using it as the name server from another machine.
2. Make your DNS server authoritative for the domain random1882.com. Add A records and MX records pointing to an SMTP server. Create a CNAME record for www.random1882.com pointing to www.google.com.
Answers to quiz questions
1. The resolver could not determine an IP address for the name given. /etc/resolv.conf should list the correct DNS servers. Configuring hosts.conf and nsswitch.conf can cause DNS resolution not to be used.
2. ipaddress realname alias1 alias2 (etc)3. /etc/resolv.conf should say “nameserver 127.0.0.1”
4. named.boot and named.conf. They differ a lot. named.boot contains only zone definitions, while named.conf contains zone definitions and more advanced options.
5. The file lists the contents of the DNS zone.6. You need to request the registrars of the .com domain to add NS records for
“random5138.com” pointing to your DNS servers. This generally involves paying money.

19628 LPI 102 Course Notes Secure shell
28 Secure shellSSH, abbr. Sharm El Sheikh, Egypt – Ophira
(Airport code)
LPIC topic 1.113.7 — Set up secure shell (OpenSSH) [4]Weight: 4Objective
The candidate should be able to obtain and configure OpenSSH. This objective includes basic OpenSSH installation and troubleshooting, as well as configuring sshd to start at system boot.
Key files, terms, and utilities include/etc/hosts.allow tcpwrappers configuration used by sshd/etc/hosts.deny tcpwrappers configuration used by sshd/etc/nologin if this is here, there's no login/etc/ssh/sshd_config sshd configuration file/etc/ssh_known_hosts identities of people we know/etc/sshrc login autorun commandsshd ssh serversshkeygen generate keys for authentication
28.1 All about SSH
28.1.1 Alice and BobIn stories about encryption, Alice (A) and Bob (B) need to communicate with each other in public. Alice and Bob's relationship suffers interference from the malevolent Eve (E), who is intent on monitoring and manipulating communication between them. Encryption with private and public keys can be understood as a padlock and key. Anyone with a padlock can lock a message (encryption), but the lock can only be opened with the key (decryption). Having the key enables unlocking, and having the padlock enables locking. Private and public keys are done using a number of mechanisms:• RSA – RSA is named after Ronald Rivest, Adi Shamir, and Leonard Adleman who
invented RSA encryption in 1977. RSA encryption and authentication take place without sharing of private keys. A person uses only their own private key or the peer's public key. Using RSA anyone can send an encrypted message or verify a signed message, and only someone with the correct private key can decrypt or sign a message.
• DSA – Digital Signature Algorithm – fast key generation, slower key verification.
28.1.2 SSH protocolA regular TCP connection as used by telnet and rsh is functional and useful, but it has a

28 Secure shell LPI 102 Course Notes 197
number of security problems. ssh guards against the following threats:
• Network sniffing – A regular telnet session can be observed down to the user names and passwords using a sniffer like tcpdump or ngrep. This applies even if you are on a switched network.
• Maninthemiddle attacks – On the Internet, you do not know for sure who is responding to your packets. A machine between the client and the server can impersonate both the client and the server, and modify and observe traffic at will.
The SSH protocol incorporates a number of techniques to guard against the attacks that are possible for telnet and rsh.
1. Encryption – the traffic between the SSH client and server is encrypted. It is not possible to decrypt the traffic without knowledge of the encryption key.
2. Identity checks – the server must prove its identity to the client by demonstrating that it has the private key corresponding to its public key. Client authentication can also be via public and private keys.
3. DiffieHellman key exchange – key exchange is done in such a way that the encryption keys cannot be intercepted by a man in the middle.
ssh has a number of weaknesses in its operation.
• Identity – Confirming the identity of the machine that you are connected to is problematic. ssh addresses the problem by storing the public key of each machine that it has talked to in the past. If the cryptographic fingerprint changes, then it produces a large and significant warning ... although users may ignore it. The problem also remains that when the initial session is established, it may be with the maninthemiddle.
• Key changes – There is no legitimate way for a server to change its public key.
• Security problems – ssh is a complex application. OpenSSH versions prior to version 2.9 suffered from a number of errors in their implementation of the SSH version 1 protocol. Remote root exploits exist for these versions (some of which were incorporated into internet worms)31.
28.2 SSH serverThe SSH server, sshd is standard equipment on most installations.
sshd_config
Common default configurations of sshd in /etc/ssh/sshd_config can be made more secure by editing the configuration file:Protocol version – OpenSSH has the distinction of being able to support all versions of the ssh protocol. You should not support the SSH version 1 protocol. The protocol itself suffers from a number of flaws, and can be used as the vector for a network based attack. (Client software for protocol version 2 is available for most operating systems.)Password authentication – Password based authentication increases your vulnerability to
31 Around the same time a remote root exploit for most telnet servers was discovered.
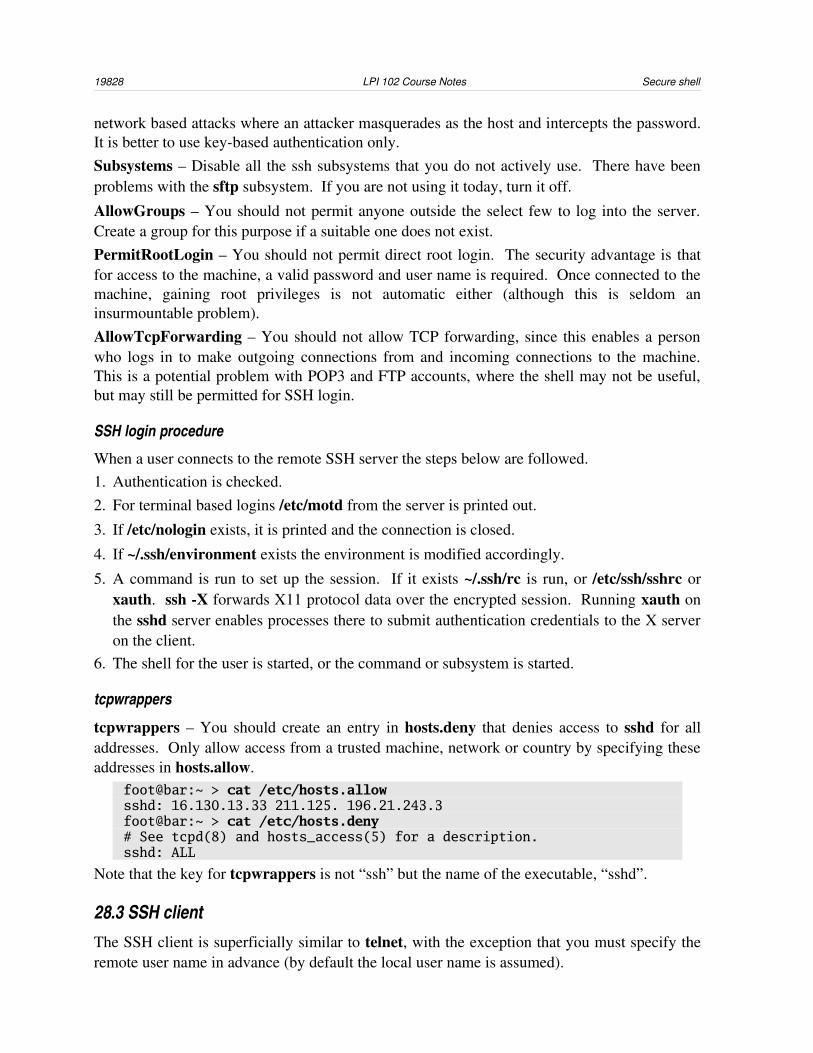
19828 LPI 102 Course Notes Secure shell
network based attacks where an attacker masquerades as the host and intercepts the password. It is better to use keybased authentication only.Subsystems – Disable all the ssh subsystems that you do not actively use. There have been problems with the sftp subsystem. If you are not using it today, turn it off.
AllowGroups – You should not permit anyone outside the select few to log into the server. Create a group for this purpose if a suitable one does not exist.PermitRootLogin – You should not permit direct root login. The security advantage is that for access to the machine, a valid password and user name is required. Once connected to the machine, gaining root privileges is not automatic either (although this is seldom an insurmountable problem).AllowTcpForwarding – You should not allow TCP forwarding, since this enables a person who logs in to make outgoing connections from and incoming connections to the machine. This is a potential problem with POP3 and FTP accounts, where the shell may not be useful, but may still be permitted for SSH login.
SSH login procedure
When a user connects to the remote SSH server the steps below are followed.1. Authentication is checked. 2. For terminal based logins /etc/motd from the server is printed out.
3. If /etc/nologin exists, it is printed and the connection is closed.
4. If ~/.ssh/environment exists the environment is modified accordingly.
5. A command is run to set up the session. If it exists ~/.ssh/rc is run, or /etc/ssh/sshrc or xauth. ssh X forwards X11 protocol data over the encrypted session. Running xauth on the sshd server enables processes there to submit authentication credentials to the X server on the client.
6. The shell for the user is started, or the command or subsystem is started.
tcpwrappers
tcpwrappers – You should create an entry in hosts.deny that denies access to sshd for all addresses. Only allow access from a trusted machine, network or country by specifying these addresses in hosts.allow.
foot@bar:~ > cat /etc/hosts.allowsshd: 16.130.13.33 211.125. 196.21.243.3foot@bar:~ > cat /etc/hosts.deny# See tcpd(8) and hosts_access(5) for a description.sshd: ALL
Note that the key for tcpwrappers is not “ssh” but the name of the executable, “sshd”.
28.3 SSH clientThe SSH client is superficially similar to telnet, with the exception that you must specify the remote user name in advance (by default the local user name is assumed).
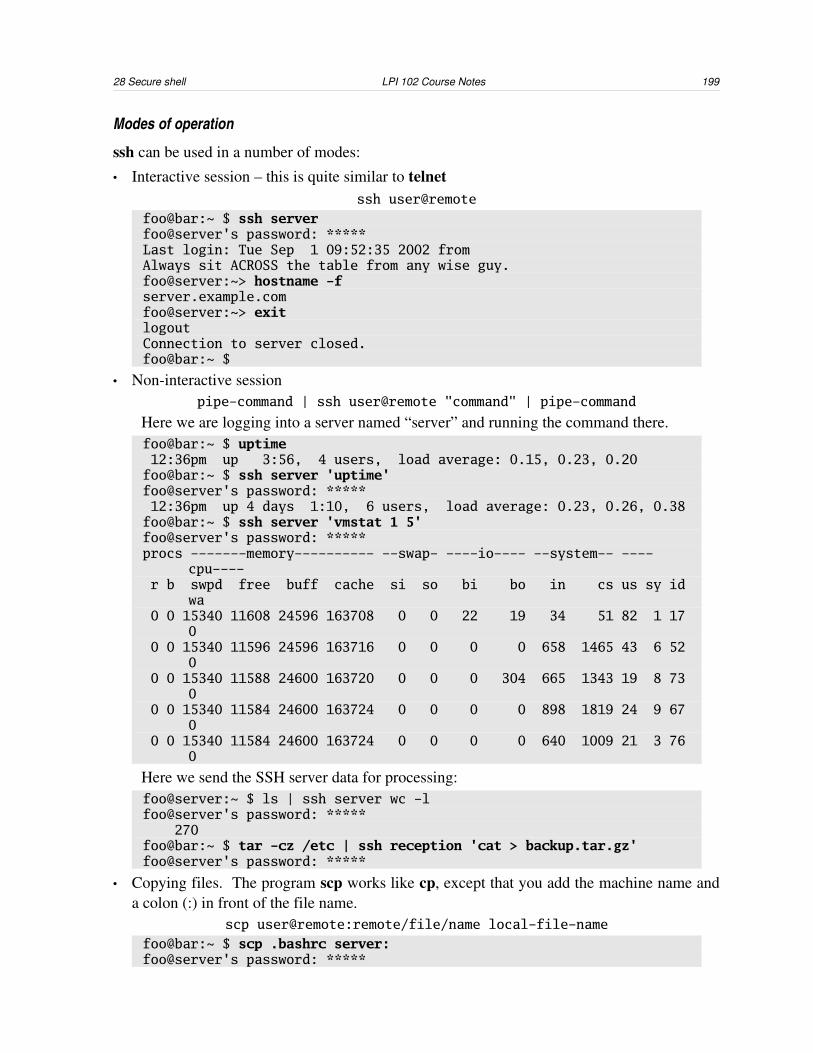
28 Secure shell LPI 102 Course Notes 199
Modes of operation
ssh can be used in a number of modes:
• Interactive session – this is quite similar to telnetssh user@remote
foo@bar:~ $ ssh serverfoo@server's password: *****Last login: Tue Sep 1 09:52:35 2002 from Always sit ACROSS the table from any wise guy.foo@server:~> hostname -fserver.example.comfoo@server:~> exitlogoutConnection to server closed.foo@bar:~ $
• Noninteractive sessionpipe-command | ssh user@remote "command" | pipe-command
Here we are logging into a server named “server” and running the command there.foo@bar:~ $ uptime 12:36pm up 3:56, 4 users, load average: 0.15, 0.23, 0.20foo@bar:~ $ ssh server 'uptime'foo@server's password: ***** 12:36pm up 4 days 1:10, 6 users, load average: 0.23, 0.26, 0.38foo@bar:~ $ ssh server 'vmstat 1 5'foo@server's password: *****procs -------memory---------- --swap- ----io---- --system-- ----
cpu---- r b swpd free buff cache si so bi bo in cs us sy id
wa 0 0 15340 11608 24596 163708 0 0 22 19 34 51 82 1 17
0 0 0 15340 11596 24596 163716 0 0 0 0 658 1465 43 6 52
0 0 0 15340 11588 24600 163720 0 0 0 304 665 1343 19 8 73
0 0 0 15340 11584 24600 163724 0 0 0 0 898 1819 24 9 67
0 0 0 15340 11584 24600 163724 0 0 0 0 640 1009 21 3 76
0
Here we send the SSH server data for processing:foo@server:~ $ ls | ssh server wc -lfoo@server's password: ***** 270foo@bar:~ $ tar -cz /etc | ssh reception 'cat > backup.tar.gz'foo@server's password: *****
• Copying files. The program scp works like cp, except that you add the machine name and a colon (:) in front of the file name.
scp user@remote:remote/file/name local-file-name
foo@bar:~ $ scp .bashrc server:foo@server's password: *****
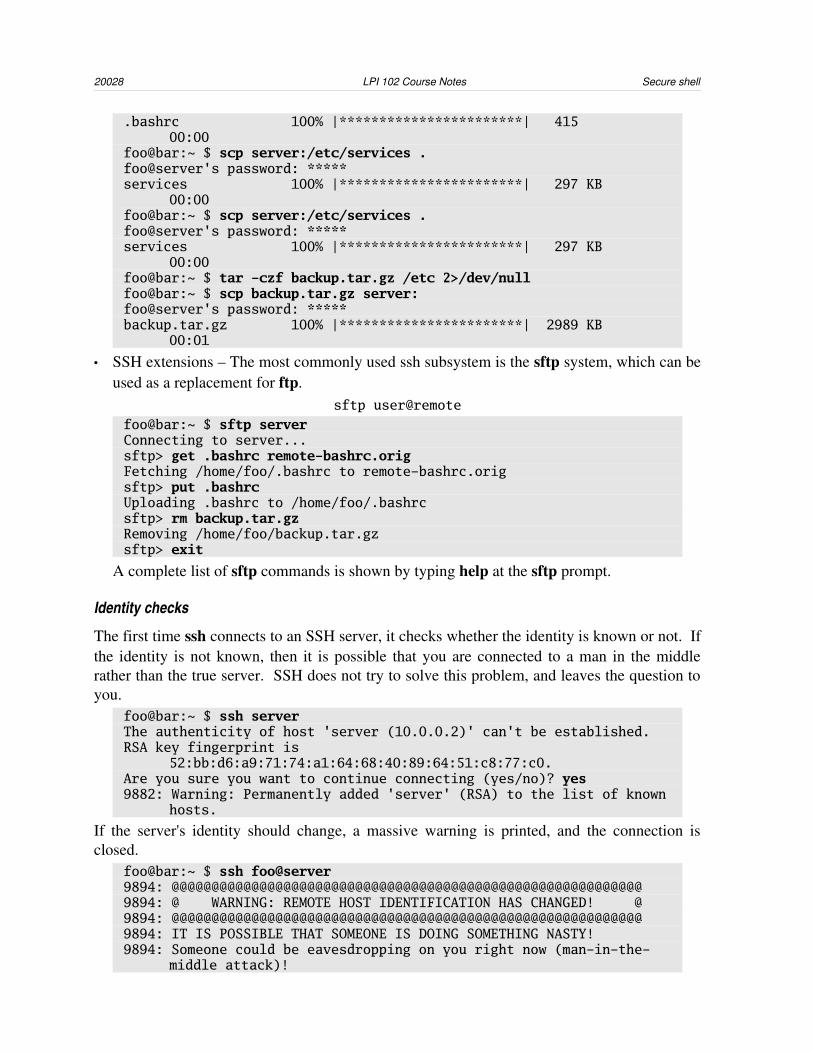
20028 LPI 102 Course Notes Secure shell
.bashrc 100% |***********************| 415 00:00
foo@bar:~ $ scp server:/etc/services .foo@server's password: *****services 100% |***********************| 297 KB
00:00foo@bar:~ $ scp server:/etc/services .foo@server's password: *****services 100% |***********************| 297 KB
00:00foo@bar:~ $ tar -czf backup.tar.gz /etc 2>/dev/nullfoo@bar:~ $ scp backup.tar.gz server:foo@server's password: *****backup.tar.gz 100% |***********************| 2989 KB
00:01
• SSH extensions – The most commonly used ssh subsystem is the sftp system, which can be used as a replacement for ftp.
sftp user@remote
foo@bar:~ $ sftp serverConnecting to server...sftp> get .bashrc remote-bashrc.origFetching /home/foo/.bashrc to remote-bashrc.origsftp> put .bashrcUploading .bashrc to /home/foo/.bashrcsftp> rm backup.tar.gzRemoving /home/foo/backup.tar.gzsftp> exit
A complete list of sftp commands is shown by typing help at the sftp prompt.
Identity checks
The first time ssh connects to an SSH server, it checks whether the identity is known or not. If the identity is not known, then it is possible that you are connected to a man in the middle rather than the true server. SSH does not try to solve this problem, and leaves the question to you.
foo@bar:~ $ ssh serverThe authenticity of host 'server (10.0.0.2)' can't be established.RSA key fingerprint is
52:bb:d6:a9:71:74:a1:64:68:40:89:64:51:c8:77:c0.Are you sure you want to continue connecting (yes/no)? yes9882: Warning: Permanently added 'server' (RSA) to the list of known
hosts.
If the server's identity should change, a massive warning is printed, and the connection is closed.
foo@bar:~ $ ssh foo@server9894: @@@@@@@@@@@@@@@@@@@@@@@@@@@@@@@@@@@@@@@@@@@@@@@@@@@@@@@@@@@9894: @ WARNING: REMOTE HOST IDENTIFICATION HAS CHANGED! @9894: @@@@@@@@@@@@@@@@@@@@@@@@@@@@@@@@@@@@@@@@@@@@@@@@@@@@@@@@@@@9894: IT IS POSSIBLE THAT SOMEONE IS DOING SOMETHING NASTY!9894: Someone could be eavesdropping on you right now (man-in-the-
middle attack)!

28 Secure shell LPI 102 Course Notes 201
9894: It is also possible that the RSA host key has just been changed.
9894: The fingerprint for the RSA key sent by the remote host is52:bb:d6:a9:72:74:a1:64:68:40:89:64:51:c8:77:c0.9894: Please contact your system administrator.9894: Add correct host key in /home/foo/.ssh/known_hosts to get rid
of this message.9894: Offending key in /home/foo/.ssh/known_hosts:1229894: RSA host key for server has changed and you have requested
strict checking.9894: Host key verification failed.
SSH client risks
Apart from inadvertently talking to a man in the middle, there are a number of security risks using the SSH client• If you forward your X display to the remote host (using ssh X) then you can tunnel the
display data over an encrypted connection. The drawback side is that root on the remote server can pop up a window on your X server and log your keystrokes.
• If you are running sshagent with agent forwarding the server to which you connect may use your key on your behalf.
• The default protocols that are used are (firstly) protocol version 1, then protocol version 2. You can change this globally by editing the ssh_config file.
Keybased authentication
The procedure for logging into a remote machine using a key is as follows:Generate the key with sshkeygen t dsa. (RSA keys can be generated with sshkeygen t rsa). You should supply the key with a nice unguessable password. The password can be quite complex without compromising the functionality of ssh, since you can use sshagent to store the decoded key.
foo@bar:~ $ ssh-keygen -t rsaGenerating public/private rsa key pair.Enter file in which to save the key (/home/foo/.ssh/id_rsa):Enter passphrase (empty for no passphrase):Enter same passphrase again:Your identification has been saved in /home/foo/.ssh/id_rsa.Your public key has been saved in /home/foo/.ssh/id_rsa.pub.The key fingerprint is:c2:f7:40:cb:80:18:1f:26:f4:fe:db:d1:7a:fc:4e:60 foo@bar
Log into the remote host, and append your public key to .ssh/authorized_keys (note the American spelling). You can do this using console based cut and paste. To be sure that permissions are set correctly set umask 077 before creating the .ssh directory or the authorized_keys file. If the permissions on the authorized_keys*32 files are incorrect, they are ignored by the sshd server.
foo@bar:~ $ ssh server 'cat >> .ssh/authorized_keys' <
32 Some versions of ssh use authorized_keys2 and known_hosts2 for ssh protocol version 2, as opposed to version 1.

20228 LPI 102 Course Notes Secure shell
.ssh/id_rsa.pub
To store a decoded version of your key in memory, you use sshagent. When you run sshagent it produces a shell script displaying its own settings. To add a key, you use sshadd. The unlocked key remains available to ssh while sshagent runs and the SSH_AUTH_SOCK environment variables are set in your session. To use sshagent in a onceoff fashion, you would do something like this:
foo@bar:~ $ eval $(ssh-agent)foo@bar:~ $ ssh-add .ssh/id_dsafoo@bar:~ $ ssh user@remotefoo@bar:~ $ killall ssh-agent
You can also ask sshagent to run a particular command for you. foo@bar:~ $ ssh-agent bash -ibash-2.05 $ ssh-addEnter passphrase for /home/foo/.ssh/id_dsa: *****Identity added: /home/foo/.ssh/id_dsa (/home/foo/.ssh/id_dsa)bash-2.05 $ ssh server 'uptime;who|wc -l' 1:30pm up 0:25, 6 users, load average: 0.00, 0.05, 0.19 6bash-2.05 $ exitexitfoo@bar:~ $
A useful application of sshagent is to begin an X Windows session33 with an sshagent available for caching keys for ssh sessions:
exec ssh-agent startx
Client side troubleshooting
Occasionally a SSH connection fails. ssh v verbosely prints information about the connection as it proceeds.
foo@bar:~ $ ssh -v serverOpenSSH_3.5p1, SSH protocols 1.5/2.0, OpenSSL 0x0090609f10009: debug1: Reading configuration data /home/foo/.ssh/config10009: debug1: Connecting to server [10.0.0.32] port 22.10009: debug1: Connection established.10009: debug1: identity file /home/foo/.ssh/id_dsa type 210009: debug1: SSH2_MSG_KEXINIT sent10009: debug1: SSH2_MSG_KEXINIT received... etc, etc ... many screens of it ...
28.4 Review
Quiz questions
1. What makes ssh different to telnet?2. How do you configure sshd to allow access only from trusted IP addresses?
3. What is the effect of /etc/nologin on sshd?
33 If you are using KDE you should experiment with typing fish://user@sshserver/ in the “Run Command” window or browser location bar.
28 Secure shell LPI 102 Course Notes 203
4. In which file does the AllowGroups directive appear?5. What does ~/.ssh/known_hosts do?6. How do you install a key on a remote host account?
Assignment
1. Create a ssh key for yourself which is protected with a password. Load the key into a running sshagent process and then use this key to log in to a server.
2. Set up a SSH server to use only SSH protocol 2. Disable login as root, and only allow logins using key based authentication. Allow access to this server only from your workstation.
3. rsync is used for copying files while conserving bandwidth. Use rsync to make a copy of a directory on a remote system, such as this example.rsync -a -v -e ssh root@server:/etc ~/server-backups/
After running the rsync once, run it again to see the improvement in performance.
Answers to quiz questions
1. Encryption, and verification of who you are talking to. Better suited for scripts.2. Using tcpwrappers – hosts.allow and hosts.deny.3. Only root can login when the file exists.4. /etc/ssh/sshd_config
5. It lists the public keys of machines that have been contacted using ssh.
6. Append your id_rsa.pub to the remote authorized_keys file, making sure the permissions are 0600 for the file and 0700 for the directory.

20429 LPI 102 Course Notes Security administration
29 Security administrationKaufman's Law: A policy is a restrictive document to prevent a recurrence of a single incident, in which that incident is never mentioned.
/usr/share/fortune/fortunes2
LPIC topic 1.114.1 — Perform security administration tasks [4]Weight: 4Objective
Candidates should know how to review system configuration to ensure host security in accordance with local security policies. This objective includes how to configure TCP wrappers, find files with SUID/SGID bit set, verify packages, set or change user passwords and password aging information, update binaries as recommended by CERT, BUGTRAQ, and/or distribution's security alerts. Includes basic knowledge of ipchains and iptables.
Key files, terms, and utilities include/proc/net/ip_fwchains ipchains status/proc/net/ip_fwnames ipchains chain names /proc/net/ip_masquerade ipchains masquerading statusfind find type f perm 4001 finds files with setuid bitsipchains ipchains sets up firewall rulespasswd set password and password ageingsocket create TCP connectionsiptables iptables sets up stateful firewall rules
29.1 Security policyThe site security handbook, RFC 2196, details the contents of a security policy. The following approach to designing a security policy is suggested.• Identify what you are trying to protect.• Determine what you are trying to protect it from.• Determine how likely the threats are.• Implement measures which will protect your assets in a costeffective manner• Review the process continuously and make improvements each time a weakness is found.In setting goals for a security policy, you will have the following tradeoffs:• services offered versus security provided• ease of use versus security• cost of security versus risk of lossIn order to verify whether a system conforms to a security policy, you need the policy, and you need to be able to determine:1. Network services (e.g. SMTP, RPC, POP3):
a) Identify what network services are offered by a server (netstat and (x)inetd.conf).
29 Security administration LPI 102 Course Notes 205
b) Identify which users can use the service (e.g. a POP3 user may have access to the FTP service).
c) Identify what authentication method is required to use the service (e.g. user name and password, cryptographic key, etc.)
d) Identify which networks and hosts can use the service (i.e. TCP wrappers and firewall based access control).
e) Identify whether the service offers only the required features (e.g. for a web server directory listing, personal home directories and the proxy function may be unnecessary).
2. List the processes that are running (pstree or ps ax).3. Evaluate the software that is installed (use package management commands and find set
uid and setgid programs).A machine is made to comply with the security policy by eliminating network services, stopping processes and removing software not allowed by the security policy.
29.2 Password ageingUser accounts can be disabled in one of the following ways:• The password was not changed during the grace period after the warning time.• The account expiry date has passed• The administrator suspends the account manually.The mechanisms for this are discussed in the section on users and groups.
29.3 Setuid and setgid filesWhen an executable with the setuid bit set runs, it can choose to set its user ID to the user that owns the file on the filesystem. The setgid bit allows the program to set its group ID. An attacker who gains control of a non root account will generally search for a buggy setuid program which will run code of his choice and elevate his privileges. The number of these programs should therefore be limited as far as possible.The find command can be used to find files according to their permissions.
find perm 2001 finds files which have at least the setgid bit and the worldexecutable bit set. foo:~ $ find /usr/bin -perm -2001 | xargs ls -ld-rwxr-sr-x 1 root tty 10340 Mar 14 02:42
/usr/bin/wall-rwxr-sr-x 1 root tty 8384 Mar 14 02:42
/usr/bin/write
find perm 4001 finds files which have at least the setuid bit and the worldexecutable bit set. foo:~ $ find /usr/bin -perm -4001 | xargs ls -ld-rwsr-xr-x 1 root root 35436 Mar 14 02:31 /usr/bin/at-rwsr-xr-x 1 root shadow 58668 Mar 17 17:39
/usr/bin/chage-rwsr-xr-x 3 root shadow 73680 Mar 17 17:39
/usr/bin/chfn
20629 LPI 102 Course Notes Security administration
-rwsr-xr-x 3 root shadow 73680 Mar 17 17:39 /usr/bin/chsh
-rwsr-xr-x 1 root root 23032 Mar 14 02:15 /usr/bin/crontab
-rwsr-xr-x 1 root root 4648 Mar 17 16:23 /usr/bin/mandb
-rwsr-xr-x 1 root root 23836 Mar 17 17:39 /usr/bin/newgrp
-rwsr-xr-x 3 root shadow 73680 Mar 17 17:39 /usr/bin/passwd
-rwsr-xr-x 1 root root 268768 Mar 18 19:37 /usr/bin/ssh
You can search the entire disk for risky executables.foo:~ $ find / -type f -perm +7000 -perm -001 2>/dev/null > execlistfoo:~ $ xargs ls -ld < execlist
29.4 TCP wrappersAccess to network services that run from inetd and xinetd can be restricted by TCP wrappers. Many other applications also filter new connections through the TCP wrappers library. The files /etc/hosts.deny and /etc/hosts.allow (in that order) determine if a particular source address can connect to a service. It is important to check whether the the restrictions actually do apply by testing from a number of IP addresses. It is easy to make errors in the process.• Occasionally, applications are compiled without support for the TCP wrappers library.
This is an error that you need to test.• If the entries in the files are incorrect, the restrictions do not take effect.
# hosts.deny designed to failftp: ALLssh: ALL
# hosts.allow designed to failftp: 10.0.22.3ssh: 10.0.22.3
29.5 FirewallsFirewalls regulate connections between your server or network and the outside world. The most simplest way of doing this is to regulate who can speak to whom and which protocols may be used.A network packet filter is analogous to a physical filter. Some network packets pass through the filter, and others are blocked by the filter. Some filters are capable of modifying packets in transit. Traffic passes through the filter in two directions. This is true even for a simple server – packets are sent, and packets are received in response.There are a few categories of filter:• No filter: Router – Packets pass through from one interface to another without any
modification (except a change to the TTL). This is what you get by running echo 1 > /proc/sys/net/ipv4/ip_forward
29 Security administration LPI 102 Course Notes 207
• Packet filter (e.g. ipchains) – Each packet that passes through the filter is evaluated independently of all other packets. This is a fairly quick process, but it is not possible to guard against certain probes. The nmap ACK probe may pass through the filter if the source port is set correctly: acknowledging TCP data (TCP ACK) even though there was never a connection will result in the protected server sending a TCP RST if the port is listening, or no response if the port is closed.This functionality is included on most modern routers. Linux has this functionality implemented with ipchains.
• Stateful packet filter (netfilter) – A stateful packet filter tracks the connections that packets passing through the firewall belong to. This makes it possible to discriminate between packets which belong to an existing connection, and packets which do not. This makes writing packet filtering rules simpler.The Linux stateful inspection framework is netfilter and the tool used to configure it is called iptables.
• Content filtering – Content filtering involves searching the data transferred for malicious content, such as viruses. This generally involves the use of proxy servers. Netfilter can divert traffic to a filtering proxy, but it does not include the proxy itself.
29.5.1 TCP, UDP, ICMP and IPBoth iptables and ipchains filter network traffic based on the properties of packets of data that they handle. Packets can be discriminated between based on these properties. • s source IP address and d destination IP address – every IP packet has a source IP address
(chosen by the sender) and a destination IP address. When the first packet of a conversation is sent, these addresses are as expected. The reply packet naturally has the source and destination reversed (it is returning to the original source).
• p protocol – you will deal mostly with UDP, TCP and ICMP packets.
• sport source port and dport destination port (in ipchains, the port is listed after the IP address)
• TCP flags (e.g. SYN y or syn).
• Interface (i ininterface, o outinterface for both ipchains and iptables, and ininterface, outinterface for iptables.)
29.5.2 iptables
Tables and chains
The iptables “filter” table contains three default chains which filter all the traffic passing through the machine. Each chain contains a list of rules, which are processed in order from top to bottom. When a packet matches a rule, the action that you specify is taken. A packet may be allowed or rejected.These are the chains in the default table t filter.

20829 LPI 102 Course Notes Security administration
• INPUT – The INPUT chain decides which packets should be seen by processes running on the netfilter machine. This is where protection for the firewall goes.
• OUTPUT – The OUTPUT chain determines what packets may be sent from the netfilter machine. For a server it can be quite useful to restrict the traffic that the machine may send out. This will interfere with the communications of a back door process.
• FORWARD – The FORWARD chain applies to packets that would pass through the netfilter machine. (The FORWARD chain is consulted for packets that have been mangled by NAT as well, but more on this later.)
The chains relate to processes on the local machine as illustrated in the diagram.You can create your own chains as the target for iptables rules. These can be used for optimisation and to avoid duplication of rules.
Jump targets
There are a few straightforward things a netfilter firewall can do in response to a packet:• j ACCEPT – The packet is accepted, and if it signals a new connection, the information
for this connection is added to the connection tracking table (cat /proc/net/ip_conntrack).• j DROP – The packet is discarded. The entropy of the universe increases.
• j REJECT – An error message is sent back to the originator of the packet. The default is to send an ICMP message, although it is possible to send a tcpreset message for TCP connections (meaning that the connection is not listening).
There are a number of slightly more esoteric actions you can take in response to a received packet.• j LOG – This makes a kernel log message describing the packet. This is most often used
to make a note of traffic that was blocked.• j MARK – The packet can be tagged for special treatment in other parts of the networking
subsystem. This is used by the clever people to do bandwidth and routing control.
Command syntax
The iptables command can do the following:
• iptables t table – this selects a particular table for the iptables command, i.e. nat, mangle
Illustration 1: iptables filtering rules
OUTPUTrules
INPUTrules
FORWARDrules
Userspaceprocess

29 Security administration LPI 102 Course Notes 209
or filter. The default is filter.
• iptables A somechain [rule] j ACTION – add rules to the end of a chain. Most rules specify a number of properties of the packet, and an action to jump to (e.g. j DROP)iptables -A INPUT -j DROP
• iptables I somechain [rule] j ACTION – inserts rules at the front of the chain.
• iptables F [somechain] – remove all rules from the chain. If no chain name is given, all the rules in the table are removed.
• iptables P somechain ACTION – each chain can have a policy which is the last rule in the chain. The policy remains in place even when the chain is flushed.
• iptables L [somechain] – list rules in a chain and its policy, or list for all the chains in the table.iptables -Liptables -L -v -niptables -t nat -L -v -n
When adding rules to chains the order of the parameters is significant. For example, if you want to use dport 25, you must first specify p tcp (protocol TCP).
iptables -A INPUT -p tcp --dport 25 -j ACCEPT
Rules can refer to kernel modules, e.g. m state. Most modules accept additional parameters, which must come after the m parameter.
iptables -A FORWARD -m state --state ESTABLISHED,RELATED -j ACCEPT
Packet matching
The iptables command is used to set up new rules. To get a taste for how it works you can block all packets on your own machine:
ping -c 1 localhost # ping myselfiptables -F # Flush the -f filter tableiptables -A INPUT -j REJECT # Add a rule with no conditionsping -c 1 localhost # try it againiptables -F # Flush the -f filter table
Each rule specifies a condition and a jump target. Rules can refer to the packet and metainformation about the packet. The jump target is generally j ACCEPT or j DROP. To see how the rules work, it is useful to use the j LOG target.
• IP – For all IP packets, you can consider the interface that was used for the packet (ininterface xxx, outinterface xxx) and the source (source) and destination (dest) address contained in the packet:iptables -F iptables -A INPUT --in-interface eth0 -j LOGiptables -A OUTPUT --destination www.google.com -j LOGiptables -A INPUT --source www.google.com -j LOGping -c 3 www.google.com
• TCP – If you want to match a TCP packet, you can specify any of the IP options (destination address, source address), and additionally a number of TCPspecific options (destination port, source port and TCP flags).

21029 LPI 102 Course Notes Security administration
Log one side of a TCP stream, then log both sides.iptables -F iptables -A INPUT --protocol tcp --dport 80 -j LOGlynx -dump http://localhost/iptables -A OUTPUT --protocol tcp --sport 80 -j LOGlynx -dump http://localhost/
Log only the first packet of the TCP stream.iptables -Fiptables -A INPUT --protocol tcp --dport 80 --syn -j LOGlynx -dump http://localhost/
• m state state X,Y,Z – The stateful inspection part is activated by using the “state” module. Loading this module causes the kernel to track all connections and to attempt to assign new packets to a connection. This provides you the ability to distinguish between NEW, ESTABLISHED and INVALID connections. Packets which are RELATED to an existing connection (such as ICMP packets) are also tracked.
Allowing only ESTABLISHED and RELATED packets to arrive at your machine constitutes a fairly effective personal firewall system:iptables -F iptables -P OUTPUT ACCEPTiptables -P INPUT DROPiptables -A INPUT --in-interface lo -j ACCEPTiptables -A INPUT -m state --state ESTABLISHED,RELATED -j ACCEPTiptables -A INPUT -p tcp --dport 80 -m state --state NEW -j ACCEPT
• m limit – The limit modules restricts the rate at which a rule may match traffic. One of the most useful combinations is to combine the limit rule with the LOG target.
Here we log random packets.iptables -F INPUTiptables -A INPUT -m limit -j LOG
The default limit is three per hour, but to allow the first five. iptables -F INPUTiptables -A INPUT -m limit --limit 3/hour --limit-burst 5 -j LOG
Network address translation
NAT (formerly called IP masquerading) enables you to change the address(es) of a packet in transit. A regular IP packet is identified by two parts: a source address and a destination address. NAT extends the stateful inspection capabilities and specifies how each connection should be translated in transit. Each connection tracked with:• Source IP address and port number• Destination IP address and port number• NAT Source IP address and port number• NAT Destination IP address and port numberThe main reasons to do NAT are ...
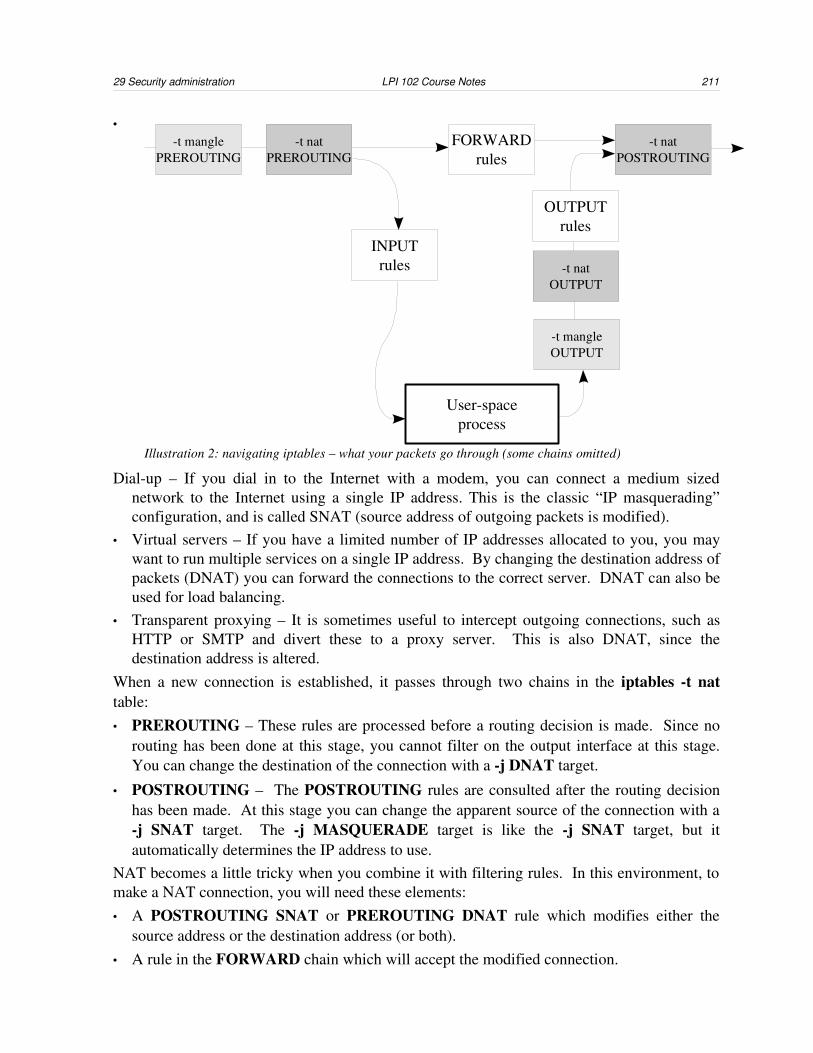
29 Security administration LPI 102 Course Notes 211
•
Dialup – If you dial in to the Internet with a modem, you can connect a medium sized network to the Internet using a single IP address. This is the classic “IP masquerading” configuration, and is called SNAT (source address of outgoing packets is modified).
• Virtual servers – If you have a limited number of IP addresses allocated to you, you may want to run multiple services on a single IP address. By changing the destination address of packets (DNAT) you can forward the connections to the correct server. DNAT can also be used for load balancing.
• Transparent proxying – It is sometimes useful to intercept outgoing connections, such as HTTP or SMTP and divert these to a proxy server. This is also DNAT, since the destination address is altered.
When a new connection is established, it passes through two chains in the iptables t nat table:• PREROUTING – These rules are processed before a routing decision is made. Since no
routing has been done at this stage, you cannot filter on the output interface at this stage. You can change the destination of the connection with a j DNAT target.
• POSTROUTING – The POSTROUTING rules are consulted after the routing decision has been made. At this stage you can change the apparent source of the connection with a j SNAT target. The j MASQUERADE target is like the j SNAT target, but it automatically determines the IP address to use.
NAT becomes a little tricky when you combine it with filtering rules. In this environment, to make a NAT connection, you will need these elements:• A POSTROUTING SNAT or PREROUTING DNAT rule which modifies either the
source address or the destination address (or both).• A rule in the FORWARD chain which will accept the modified connection.
Illustration 2: navigating iptables – what your packets go through (some chains omitted)
Userspaceprocess
OUTPUTrules
INPUTrules
FORWARDrules
t manglePREROUTING
t natPREROUTING
t natPOSTROUTING
t natOUTPUT
t mangleOUTPUT
21229 LPI 102 Course Notes Security administration
• Packet forwarding must be enabled (usually).• The connection tracking module must be loaded (ip_conntrack). Usually the kernel
module loader will take care of this. If the connection uses an unusual protocol that transmits IP addresses (such as FTP), then a supporting kernel module must be loaded too (e.g. ip_conntrack_ftp)
IP masquerade
To hide your entire network behind a dialup gateway, this is the code:modprobe ip_conntrack_ftpiptables -t nat -A POSTROUTING -o ppp0 -j MASQUERADEecho 1 > /proc/sys/net/ipv4/ip_forward
The MASQUERADE target differs from the SNAT target in that you do not have to specify the revised IP address. The MASQUERADE target is used in the POSTROUTING chain rather than the PREROUTING chain. The reason is that an output interface has been chosen at that point.
Firewall script
An iptables firewall is traditionally implemented by a script which contains a number of iptables commands. Having a script allows the firewall to be configured when the system starts up.
A firewall script will generally start with the values that may be used further down.#!/bin/bashOUTSIDE_IF=eth0 # external interfaceOUTSIDE_IPADDR=10.35.224.51 # IP address of external interfaceINSIDE_IF=eth1 # Interface for our own networkINSIDE_IPADDR=192.168.1.100 # INSIDE_NET=192.168.1.0/24 # Our own networkTCPSERVERS="25 80"
After this, the existing chains and rules are flushed and removed.iptables -Fiptables -Xiptables -t nat -Fiptables -t nat -X
The overall policy for the firewall is given. These will apply if no rule matches, and also when iptables F is issued.iptables -P FORWARD DROPiptables -P OUTPUT ACCEPTiptables -P INPUT ACCEPT
Specific exceptions are listed for each chain. iptables -A INPUT -m state --state ESTABLISHED,RELATED -j ACCEPTiptables -A INPUT --in-interface lo -j ACCEPTiptables -A INPUT --in-interface $INSIDE_IF -j ACCEPT
The for ... do shell syntax can be used to create rules which differ only in one detail. These rules accept all traffic destined for either the web server or the mail server, regardless of the source.
29 Security administration LPI 102 Course Notes 213
for PORT in $TCPSERVERS; do iptables -A INPUT -p tcp --dport $TCPSERVERS \
-m state --state NEW -j ACCEPTdone
And some miscellaneous rules ...iptables -A INPUT -p icmp --icmp-type echo-request -j ACCEPTiptables -A INPUT -j DROP
Here we allow all the “inside” machines to send packets to the OUTSIDE_, but only replies to return. This is not a particularly good firewall.iptables -A FORWARD -m state --state ESTABLISHED,RELATED -j ACCEPTiptables -A FORWARD -m state --state NEW -i $INSIDE_IF -j ACCEPTiptables -A FORWARD -j DROP
The NAT rules below rules do outgoing IP address masquerading for the internal network, and redirect SMTP and DNS requests to the local server. Since these connections are permitted by the FORWARD chain and the INPUT chain, no further rules are necessary. iptables -t nat -A POSTROUTING --source $INSIDE_NET -o $OUTSIDE_IF \
-j MASQUERADE# Or we could have said ...# iptables -t nat -A POSTROUTING --source $INSIDE_NET -o $OUTSIDE_IF
\# -j SNAT --to $OUTSIDE_IPADDRiptables -t nat -A PREROUTING -i $INSIDE_IF -p tcp --dport 25 \
-j DNAT --to $INSIDE_IPADDR:25iptables -t nat -A PREROUTING -i $INSIDE_IF -p udp --dport 53 \
-j DNAT --to $INSIDE_IPADDR:53
Kernel tweaks
The Linux kernel has a number of adjustable IP parameters34 which can affect the security of your machine and network. The default settings of these are generally appropriate for a workstation which is not running any services, but they can be improved for a server and a firewall machine.The parameters are adjusted by writing values to files in the directory /proc/sys/net/ipv4. The document for these settings is Documentation/filesystems/proc.txt in the kernel source tree.These parameters apply to IP packets in general:• ip_forward – If you have configured proxies rather than a network filtering, then you do
not need to enable IP forwarding. This makes it a little harder to probe the internal parts of your network.
• icmp_echo_ignore_* – You can configure your system to ignore broadcast pings, or all pings.
• tcp_syncookies – This helps the server to face a TCP SYN denial of service attack. If your system detects that it is receiving too many TCP connections, it switches into a mode where it sends syn cookies to the apparent sender of the connection request. If the sender is really trying to communicate, the connection will continue.
34 These are not part of netfilter or ipchains, but show up in the /proc filesystem.
21429 LPI 102 Course Notes Security administration
• ip_always_defrag – IP fragments can make your firewall very complex. It is a good idea™ to defragment (assemble all fragments into a single packet) before processing the packet.
• ipfrag_time – This is the time in seconds to keep an IP fragment in memory. Newer kernels have this instead of ip_always_defrag.
• ip_conntrack_max – This value should be set to reflect the number of concurrent connections your server will be tracking.
• icmp_* – the files icmp_destunreach_rate, icmp_echoreply_rate, icmp_paramprob_rate and icmp_timeexceed_rate determine the rate at which ICMP packets are sent out (in packets per 100 ms).
• ip_local_port_range – When an outgoing connection is made, a local port number is allocated. By setting this range judiciously, even ipchains can be made to discriminate between outgoing and incoming connections (for a single host or IP masquerading). The default range is 10244999.
There are also settings for the interfaces on the machine.• conf/*/accept_redirects – If you are not routing, the default for this value is “yes” which
can be unhealthy for security. If you do accept redirects, you should only accept them from gateways by setting the secure_redirects flag.
• conf/*/accept_source_route – Routers are configured to accept source routing by default. Source routing allows connections that explicitly specify your router as the gateway. Usually this is a bad idea.
• conf/*/rp_filter – The kernel includes code to determine whether the packet which it has received could have originated on the network it was received from. Turning this option on makes spoofing internal traffic harder. If you would like to know when these packets arrive, you can turn on conf/*/log_martians.
• conf/*/bootp_relay – This will configure the kernel to route packets that appear to be BOOTP packets. For a firewall, this would be a bad idea.
• conf/*/proxy_arp – Turning off proxy arp is a good idea (unless you are planning to act as a PPP server or use strange routing).
• conf/*/flush – When you write a 1 to this file you cancel all the redirected routes.
Many distributions apply settings from /etc/sysctl.conf on startup. You can modify this file or add lines to your firewall script to apply the tunable parameters.
echo "1" > ip_forwardcd /proc/sys/net/ipv4for F in conf/*/rp_filter ; do echo "1" > $F ; donefor F in conf/*/proxy_arp ; do echo "0" > $F ; donefor F in conf/*/accept_redirects ; do echo "0" > $F ; donefor F in conf/*/accept_source_route ; do echo "0" > $F ; donefor F in conf/*/rp_filter ; do echo "1" > $F ; donefor F in conf/*/log_martians ; do echo "1" > $F ; donefor F in conf/*/bootp_relay ; do echo "0" > $F ; donefor F in conf/*/flush ; do echo "1" > $F ; done

29 Security administration LPI 102 Course Notes 215
29.5.3 ipchainsThe design of ipchains is simpler than iptables, and as a result it is harder to achieve comparable results. ipchains rules can use packet matching based on properties of an individual packet, but you cannot perform any state tracking. This means that an explicit rule must be written to match reply packets of established and related connections. When a firewall protects a single machine this does not matter much, but a firewall that protects a network is harder to implement.
The behaviour of ipchains when handling forwarded packets is that the packet passes through the input chain, the forward and the output chain. (Note also that the names of the chains are also written in lower case, unlike iptables!)
Command syntax
The ipchains command can do the following:
• ipchains A somechain [rule] j ACTION – add rules to the end of a chain. Most rules specify a number of properties of the packet, and an action to jump to (e.g. j DENY, j REJECT or j ACCEPT)ipchains -A input -j DROPipchains -A output -j DROP
• ipchains I somechain [rule] j ACTION – inserts a rule at the front of a chain.
• ipchains F [somechain] – remove all rules from the chain. If no chain name is given, all rules are removed.
• ipchains P somechain ACTION – each chain can have a policy which is the last rule in the chain. The policy remains in place even when the chain is flushed.
• ipchains L [somechain] – list rules in a chain and its policy, or list for all the chains.ipchains -Lipchains -L -v -n
ipchains firewall
Here's an ipchains based firewall that could be used to protect a server running as a HTTP
Illustration 3: ipchains filtering style – when forwarding, “input” and “output” are consulted
Userspaceprocess
forwardrules
inputrules
outputrules
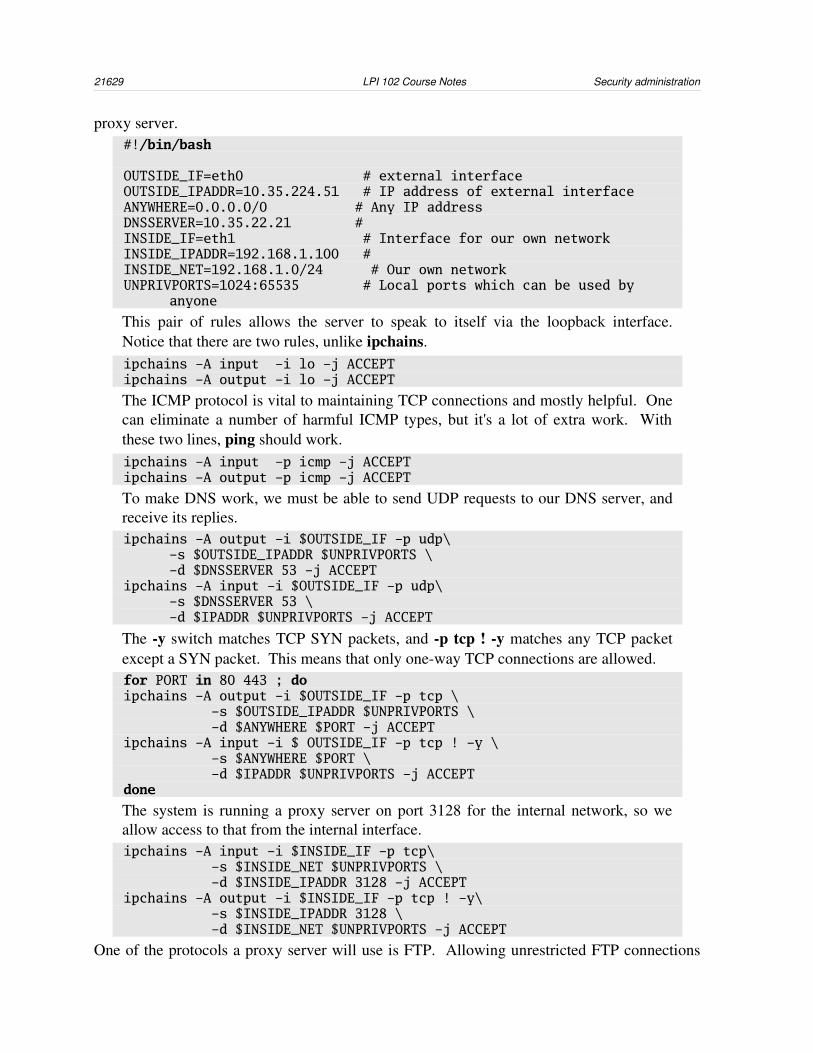
21629 LPI 102 Course Notes Security administration
proxy server.#!/bin/bash
OUTSIDE_IF=eth0 # external interfaceOUTSIDE_IPADDR=10.35.224.51 # IP address of external interfaceANYWHERE=0.0.0.0/0 # Any IP addressDNSSERVER=10.35.22.21 # INSIDE_IF=eth1 # Interface for our own networkINSIDE_IPADDR=192.168.1.100 # INSIDE_NET=192.168.1.0/24 # Our own networkUNPRIVPORTS=1024:65535 # Local ports which can be used by
anyone
This pair of rules allows the server to speak to itself via the loopback interface. Notice that there are two rules, unlike ipchains.ipchains -A input -i lo -j ACCEPTipchains -A output -i lo -j ACCEPT
The ICMP protocol is vital to maintaining TCP connections and mostly helpful. One can eliminate a number of harmful ICMP types, but it's a lot of extra work. With these two lines, ping should work.ipchains -A input -p icmp -j ACCEPTipchains -A output -p icmp -j ACCEPT
To make DNS work, we must be able to send UDP requests to our DNS server, and receive its replies.ipchains -A output -i $OUTSIDE_IF -p udp\
-s $OUTSIDE_IPADDR $UNPRIVPORTS \-d $DNSSERVER 53 -j ACCEPT
ipchains -A input -i $OUTSIDE_IF -p udp\-s $DNSSERVER 53 \-d $IPADDR $UNPRIVPORTS -j ACCEPT
The y switch matches TCP SYN packets, and p tcp ! y matches any TCP packet except a SYN packet. This means that only oneway TCP connections are allowed.for PORT in 80 443 ; doipchains -A output -i $OUTSIDE_IF -p tcp \ -s $OUTSIDE_IPADDR $UNPRIVPORTS \ -d $ANYWHERE $PORT -j ACCEPTipchains -A input -i $ OUTSIDE_IF -p tcp ! -y \ -s $ANYWHERE $PORT \ -d $IPADDR $UNPRIVPORTS -j ACCEPTdone
The system is running a proxy server on port 3128 for the internal network, so we allow access to that from the internal interface.ipchains -A input -i $INSIDE_IF -p tcp\ -s $INSIDE_NET $UNPRIVPORTS \ -d $INSIDE_IPADDR 3128 -j ACCEPTipchains -A output -i $INSIDE_IF -p tcp ! -y\ -s $INSIDE_IPADDR 3128 \ -d $INSIDE_NET $UNPRIVPORTS -j ACCEPT
One of the protocols a proxy server will use is FTP. Allowing unrestricted FTP connections
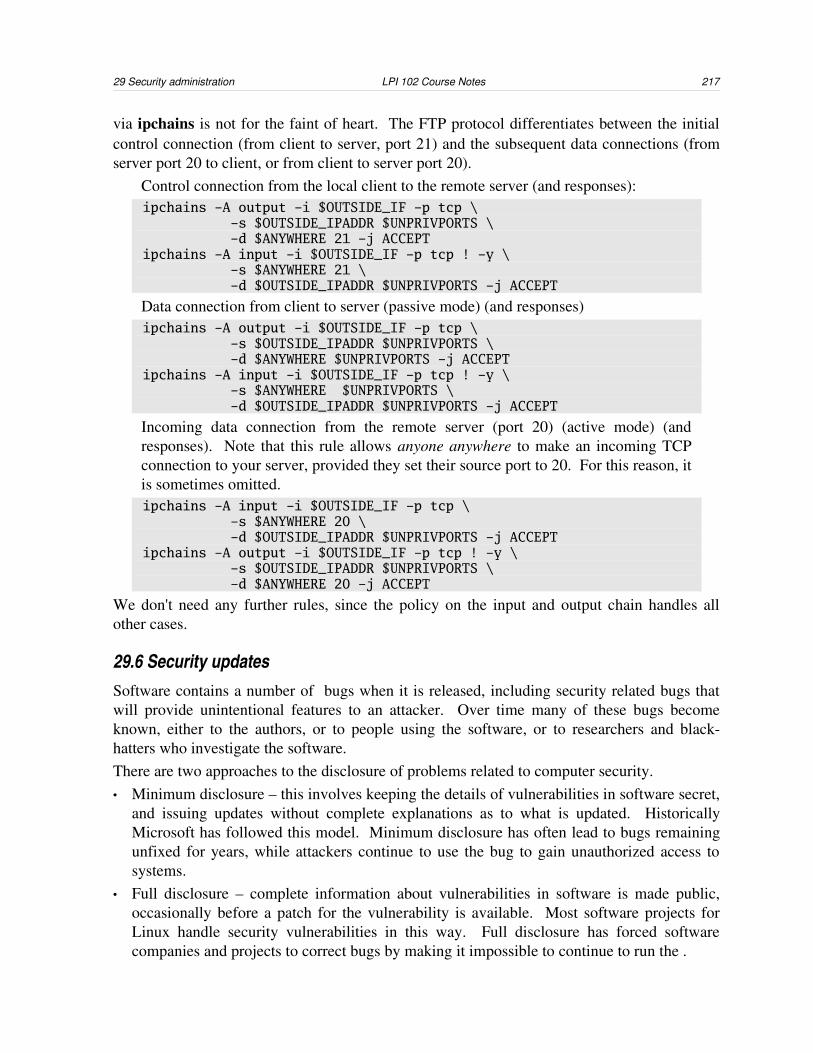
29 Security administration LPI 102 Course Notes 217
via ipchains is not for the faint of heart. The FTP protocol differentiates between the initial control connection (from client to server, port 21) and the subsequent data connections (from server port 20 to client, or from client to server port 20).
Control connection from the local client to the remote server (and responses):ipchains -A output -i $OUTSIDE_IF -p tcp \ -s $OUTSIDE_IPADDR $UNPRIVPORTS \ -d $ANYWHERE 21 -j ACCEPTipchains -A input -i $OUTSIDE_IF -p tcp ! -y \ -s $ANYWHERE 21 \ -d $OUTSIDE_IPADDR $UNPRIVPORTS -j ACCEPT
Data connection from client to server (passive mode) (and responses)ipchains -A output -i $OUTSIDE_IF -p tcp \ -s $OUTSIDE_IPADDR $UNPRIVPORTS \ -d $ANYWHERE $UNPRIVPORTS -j ACCEPTipchains -A input -i $OUTSIDE_IF -p tcp ! -y \ -s $ANYWHERE $UNPRIVPORTS \ -d $OUTSIDE_IPADDR $UNPRIVPORTS -j ACCEPT
Incoming data connection from the remote server (port 20) (active mode) (and responses). Note that this rule allows anyone anywhere to make an incoming TCP connection to your server, provided they set their source port to 20. For this reason, it is sometimes omitted.ipchains -A input -i $OUTSIDE_IF -p tcp \ -s $ANYWHERE 20 \ -d $OUTSIDE_IPADDR $UNPRIVPORTS -j ACCEPTipchains -A output -i $OUTSIDE_IF -p tcp ! -y \ -s $OUTSIDE_IPADDR $UNPRIVPORTS \ -d $ANYWHERE 20 -j ACCEPT
We don't need any further rules, since the policy on the input and output chain handles all other cases.
29.6 Security updatesSoftware contains a number of bugs when it is released, including security related bugs that will provide unintentional features to an attacker. Over time many of these bugs become known, either to the authors, or to people using the software, or to researchers and blackhatters who investigate the software.There are two approaches to the disclosure of problems related to computer security.• Minimum disclosure – this involves keeping the details of vulnerabilities in software secret,
and issuing updates without complete explanations as to what is updated. Historically Microsoft has followed this model. Minimum disclosure has often lead to bugs remaining unfixed for years, while attackers continue to use the bug to gain unauthorized access to systems.
• Full disclosure – complete information about vulnerabilities in software is made public, occasionally before a patch for the vulnerability is available. Most software projects for Linux handle security vulnerabilities in this way. Full disclosure has forced software companies and projects to correct bugs by making it impossible to continue to run the .
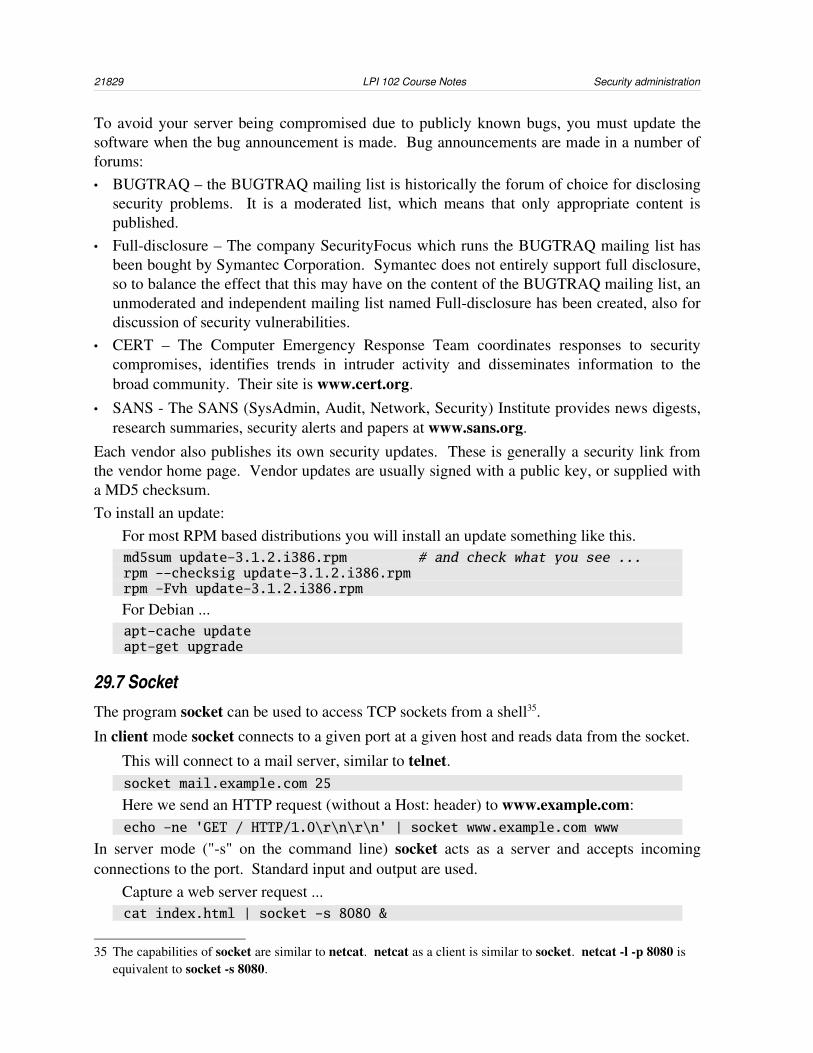
21829 LPI 102 Course Notes Security administration
To avoid your server being compromised due to publicly known bugs, you must update the software when the bug announcement is made. Bug announcements are made in a number of forums:• BUGTRAQ – the BUGTRAQ mailing list is historically the forum of choice for disclosing
security problems. It is a moderated list, which means that only appropriate content is published.
• Fulldisclosure – The company SecurityFocus which runs the BUGTRAQ mailing list has been bought by Symantec Corporation. Symantec does not entirely support full disclosure, so to balance the effect that this may have on the content of the BUGTRAQ mailing list, an unmoderated and independent mailing list named Fulldisclosure has been created, also for discussion of security vulnerabilities.
• CERT – The Computer Emergency Response Team coordinates responses to security compromises, identifies trends in intruder activity and disseminates information to the broad community. Their site is www.cert.org.
• SANS The SANS (SysAdmin, Audit, Network, Security) Institute provides news digests, research summaries, security alerts and papers at www.sans.org.
Each vendor also publishes its own security updates. These is generally a security link from the vendor home page. Vendor updates are usually signed with a public key, or supplied with a MD5 checksum.To install an update:
For most RPM based distributions you will install an update something like this.md5sum update-3.1.2.i386.rpm # and check what you see ...rpm --checksig update-3.1.2.i386.rpmrpm -Fvh update-3.1.2.i386.rpm
For Debian ...apt-cache updateapt-get upgrade
29.7 SocketThe program socket can be used to access TCP sockets from a shell35.
In client mode socket connects to a given port at a given host and reads data from the socket.
This will connect to a mail server, similar to telnet.socket mail.example.com 25
Here we send an HTTP request (without a Host: header) to www.example.com:echo -ne 'GET / HTTP/1.0\r\n\r\n' | socket www.example.com www
In server mode ("s" on the command line) socket acts as a server and accepts incoming connections to the port. Standard input and output are used.
Capture a web server request ...cat index.html | socket -s 8080 &
35 The capabilities of socket are similar to netcat. netcat as a client is similar to socket. netcat l p 8080 is equivalent to socket s 8080.
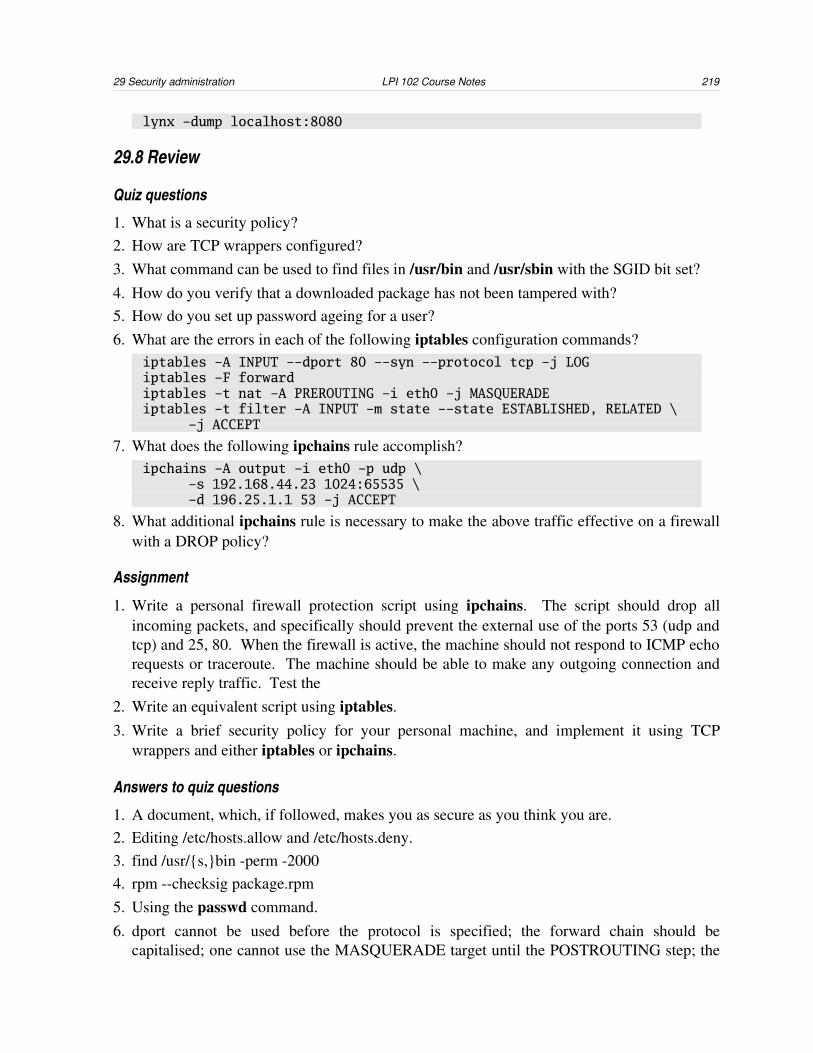
29 Security administration LPI 102 Course Notes 219
lynx -dump localhost:8080
29.8 Review
Quiz questions
1. What is a security policy?2. How are TCP wrappers configured?3. What command can be used to find files in /usr/bin and /usr/sbin with the SGID bit set?4. How do you verify that a downloaded package has not been tampered with?5. How do you set up password ageing for a user?6. What are the errors in each of the following iptables configuration commands?
iptables -A INPUT --dport 80 --syn --protocol tcp -j LOGiptables -F forwardiptables -t nat -A PREROUTING -i eth0 -j MASQUERADEiptables -t filter -A INPUT -m state --state ESTABLISHED, RELATED \
-j ACCEPT
7. What does the following ipchains rule accomplish? ipchains -A output -i eth0 -p udp \
-s 192.168.44.23 1024:65535 \-d 196.25.1.1 53 -j ACCEPT
8. What additional ipchains rule is necessary to make the above traffic effective on a firewall with a DROP policy?
Assignment
1. Write a personal firewall protection script using ipchains. The script should drop all incoming packets, and specifically should prevent the external use of the ports 53 (udp and tcp) and 25, 80. When the firewall is active, the machine should not respond to ICMP echo requests or traceroute. The machine should be able to make any outgoing connection and receive reply traffic. Test the
2. Write an equivalent script using iptables.3. Write a brief security policy for your personal machine, and implement it using TCP
wrappers and either iptables or ipchains.
Answers to quiz questions
1. A document, which, if followed, makes you as secure as you think you are.2. Editing /etc/hosts.allow and /etc/hosts.deny.3. find /usr/{s,}bin perm 20004. rpm checksig package.rpm5. Using the passwd command.6. dport cannot be used before the protocol is specified; the forward chain should be
capitalised; one cannot use the MASQUERADE target until the POSTROUTING step; the

22029 LPI 102 Course Notes Security administration
list of possible states must be given as a single parameter with no spaces.7. UDP DNS lookups packets generated by nonroot processes at 192.168.44.23 are permitted
to 196.25.1.1 53.ipchains -A output -i eth0 -p udp \
-s 192.168.44.23 1024:65535 \-d 196.25.1.1 53 -j ACCEPT
8. Similar rules for the input and forward chains.
30 Host security LPI 102 Course Notes 221
30 Host securityA debugged program is one for which you have not yet found the conditions that make it fail.
— Jerry Ogdin
LPIC topic 1.114.2 — Setup host security [3]Weight: 3Objective
Candidate should know how to set up a basic level of host security. Tasks include syslog configuration, shadowed passwords, set up of a mail alias for root's mail and turning off all network services not in use.
Key files, terms, and utilities include/etc/inetd.conf or /etc/inet.d/* services offered by inetd or xinetd/etc/nologin if present only root can log in/etc/passwd user database/etc/shadow encrypted passwords of users/etc/syslog.conf system logging configuration
30.1 Miscellaneous security notes
30.1.1 Shadow passwordsMost current distributions set up shadow passwords by default. If you have /etc/passwd and /etc/group with encrypted passwords in them, you should use pwconv and grpconv to convert to shadow passwords. This prevents an attacker from running a dictionary based attack to obtain increased privileges. You can always reverse the process with pwunconv and grpunconv.
30.1.2 Root mailA lot of important mail is sent by default to the user root. Apart from messages generated by cron and various installation programs, /etc/aliases contains a number of email redirections.• Mail for various system accounts is redirected to root, e.g. “ftp”, “uucp” and “news”.• RFC2142 specifies mailbox names for common roles, including “postmaster”, “security”,
“abuse” and “hostmaster”. For most of these mail is redirected to root for default installations of Linux.
Because root seldom logs in and reads mail, you should redirect these mails to someone who cares – a regular user.
foobar:~ $ vi /etc/aliases# It is probably best to not work as user root and redirect all# email to "root" to the address of a HUMAN who deals with this
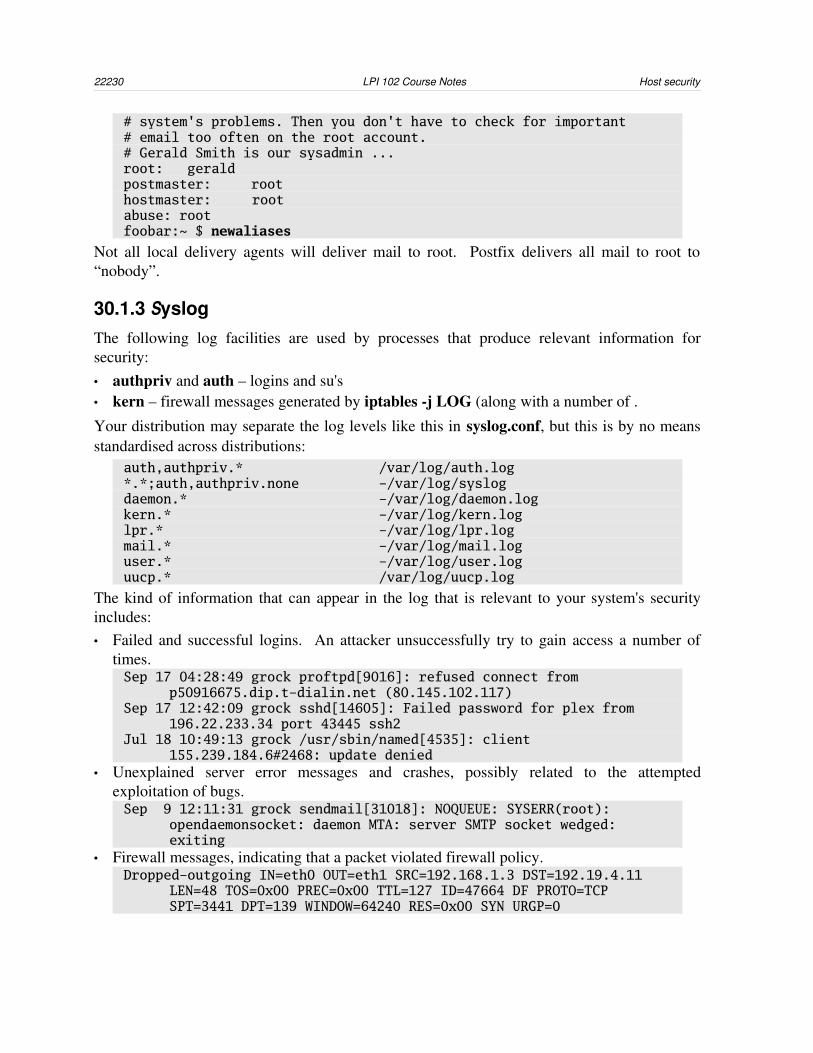
22230 LPI 102 Course Notes Host security
# system's problems. Then you don't have to check for important# email too often on the root account.# Gerald Smith is our sysadmin ...root: geraldpostmaster: roothostmaster: rootabuse: rootfoobar:~ $ newaliases
Not all local delivery agents will deliver mail to root. Postfix delivers all mail to root to “nobody”.
30.1.3 SyslogThe following log facilities are used by processes that produce relevant information for security:• authpriv and auth – logins and su's• kern – firewall messages generated by iptables j LOG (along with a number of .
Your distribution may separate the log levels like this in syslog.conf, but this is by no means standardised across distributions:
auth,authpriv.* /var/log/auth.log*.*;auth,authpriv.none -/var/log/syslogdaemon.* -/var/log/daemon.logkern.* -/var/log/kern.loglpr.* -/var/log/lpr.logmail.* -/var/log/mail.loguser.* -/var/log/user.loguucp.* /var/log/uucp.log
The kind of information that can appear in the log that is relevant to your system's security includes:• Failed and successful logins. An attacker unsuccessfully try to gain access a number of
times.Sep 17 04:28:49 grock proftpd[9016]: refused connect from
p50916675.dip.t-dialin.net (80.145.102.117)Sep 17 12:42:09 grock sshd[14605]: Failed password for plex from
196.22.233.34 port 43445 ssh2Jul 18 10:49:13 grock /usr/sbin/named[4535]: client
155.239.184.6#2468: update denied• Unexplained server error messages and crashes, possibly related to the attempted
exploitation of bugs.Sep 9 12:11:31 grock sendmail[31018]: NOQUEUE: SYSERR(root):
opendaemonsocket: daemon MTA: server SMTP socket wedged: exiting
• Firewall messages, indicating that a packet violated firewall policy.Dropped-outgoing IN=eth0 OUT=eth1 SRC=192.168.1.3 DST=192.19.4.11
LEN=48 TOS=0x00 PREC=0x00 TTL=127 ID=47664 DF PROTO=TCP SPT=3441 DPT=139 WINDOW=64240 RES=0x00 SYN URGP=0

30 Host security LPI 102 Course Notes 223
30.1.4 nologinIf you create a file named /etc/nologin its contents are displayed when a nonroot user tries to log in.
foobar:~ # echo "Login disabled during maintenance" > /etc/nologinfoobar:~ # telnet localhostConnected to localhostEscape character is '^]'.
foobar login: realuserPassword: realpasswordLogin disabled during maintenance
Login incorrect
The nologin file is usually removed by boottime scripts. While it is present telnet, rlogin, login and ftp will not allow login except for root. sshd refuses logins too.
30.2 Disabling unused servicesIt is good practice to limit the number of services on your server to the absolute minimum. The rationale for this is that the fewer the points of attack, the less likely it is that the attack will succeed.In addition to minimising the services offered, each service should be configured to offer the minimum functionality to an attacker:• Unused features should be disabled, either at compile time, or by configuration.• Access to the service should be limited to networks that need it.• Services which are only occasionally used should be disabled, and only enabled on demand.• Authentication should be required where this is appropriate.
inetd and xinetd
To disable a service which is offered via inetd, you comment out the relevant line in /etc/inetd.conf.
With this configuration file, FTP is disabled, and SSH is enabled.# inetd.conf# ftp stream tcp nowait root /usr/sbin/tcpd vsftpdssh stream tcp nowait root /usr/sbin/sshd -i
You must also send a signal to inetd to tell it to reload the configuration filekillall -1 inetdkill -HUP $( cat /var/run/inetd.pid )
To disable a service offered by xinetd you add the parameter disabled = yes to the configuration file.
foobar:~ $ cat /etc/xinetd.d/echoservice echo{ type = INTERNAL id = echo-stream
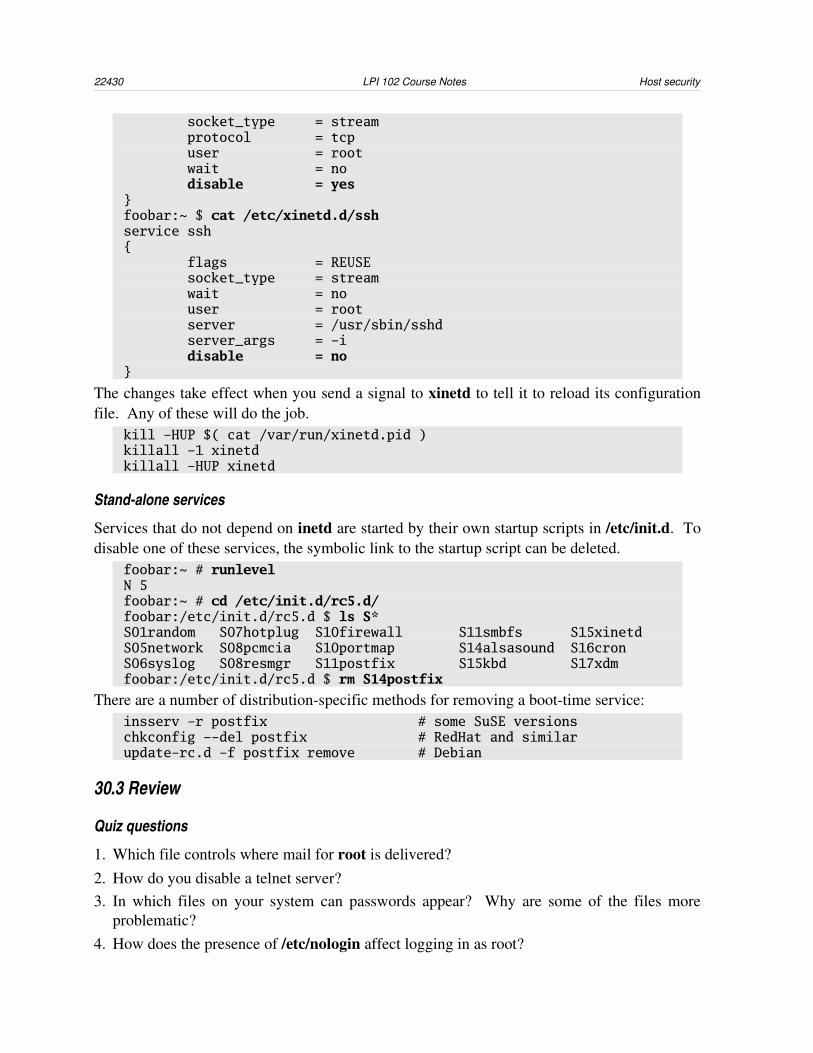
22430 LPI 102 Course Notes Host security
socket_type = stream protocol = tcp user = root wait = no disable = yes}foobar:~ $ cat /etc/xinetd.d/sshservice ssh{ flags = REUSE socket_type = stream wait = no user = root server = /usr/sbin/sshd server_args = -i disable = no}
The changes take effect when you send a signal to xinetd to tell it to reload its configuration file. Any of these will do the job.
kill -HUP $( cat /var/run/xinetd.pid )killall -1 xinetdkillall -HUP xinetd
Standalone services
Services that do not depend on inetd are started by their own startup scripts in /etc/init.d. To disable one of these services, the symbolic link to the startup script can be deleted.
foobar:~ # runlevelN 5foobar:~ # cd /etc/init.d/rc5.d/foobar:/etc/init.d/rc5.d $ ls S*S01random S07hotplug S10firewall S11smbfs S15xinetdS05network S08pcmcia S10portmap S14alsasound S16cronS06syslog S08resmgr S11postfix S15kbd S17xdmfoobar:/etc/init.d/rc5.d $ rm S14postfix
There are a number of distributionspecific methods for removing a boottime service:insserv -r postfix # some SuSE versionschkconfig --del postfix # RedHat and similarupdate-rc.d -f postfix remove # Debian
30.3 Review
Quiz questions
1. Which file controls where mail for root is delivered?2. How do you disable a telnet server?3. In which files on your system can passwords appear? Why are some of the files more
problematic?4. How does the presence of /etc/nologin affect logging in as root?
30 Host security LPI 102 Course Notes 225
Assignment
1. Install a FTP server, telnet server, NFS server and Samba. Now disable all of the server you do not use.
2. Set up syslogd to log all messages to a console /dev/tty8.
3. Determine what effect the presence of /etc/nologin has on the each of these – existing login sessions, SMTP, POP3, FTP, SSH, Telnet, console login.
Answers to quiz questions
1. /etc/aliases and /root/.forward2. Uninstall the software (i.e. delete the executable file in.telnetd). 3. /etc/passwd and /etc/shadow. Hashed passwords in /etc/passwd can be read by any local
user.4. Not at all.

22631 LPI 102 Course Notes User limits
31 User limitsGenius has its limits, but stupidity is not handicapped in this way.
LPIC topic 1.114.3 — Setup user level security [1]Weight: 1Objective
Candidate should be able to configure user level security. Tasks include limits on user logins, processes, and memory usage.
Key files, terms, and utilities includequota show user's disk usageusermod change a user's details in the password database
31.1 Process limitsThe Linux kernel supports limits on the amount of resources a program can allocate. The limits of a process are inherited by all the processes it creates.Resource limits are configured with a soft limit and a hard limit. If additional resources are required, a user can request additional space, up to the hard limit using ulimit. This is part of the shell, and is documented in the bash man page.
foobar:~ $ help ulimitulimit: ulimit [-SHacdflmnpstuv] [limit] Ulimit provides control over the resources available to
processes started by the shell.
-S use the `soft' resource limit -H use the `hard' resource limit -a all current limits are reported -c the maximum size of core files created -d the maximum size of a process's data segment -f the maximum size of files created by the shell -l the maximum size a process may lock into memory -m the maximum resident set size -n the maximum number of open file descriptors -p the pipe buffer size -s the maximum stack size -t the maximum amount of cpu time in seconds -u the maximum number of user processes -v the size of virtual memory
One way to set the process limits is add a number of calls to ulimit in /etc/profile.TMOUT=3600 # set the shell idle timeout[ `whoami` = 'root' ] || { ulimit -c 20000 # hard/soft: no coredumps > 20mb ulimit -S -n 250 # softlimit: no more than 250 file
descriptors
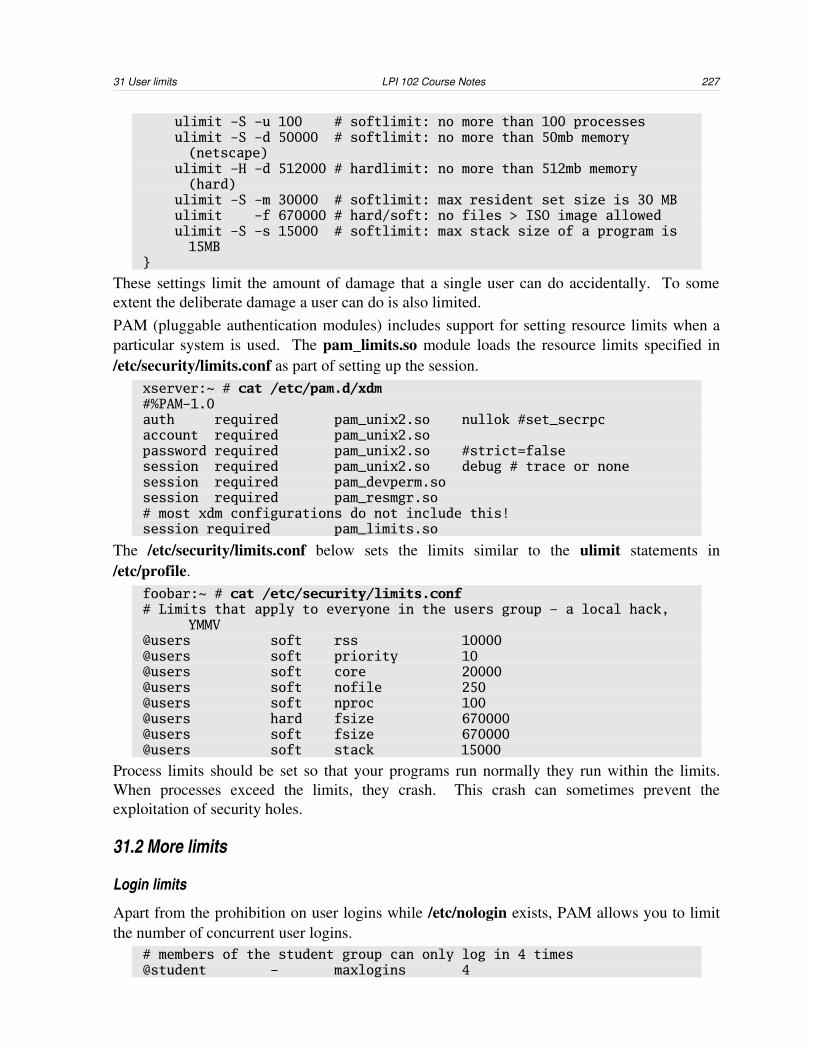
31 User limits LPI 102 Course Notes 227
ulimit -S -u 100 # softlimit: no more than 100 processes ulimit -S -d 50000 # softlimit: no more than 50mb memory
(netscape) ulimit -H -d 512000 # hardlimit: no more than 512mb memory
(hard) ulimit -S -m 30000 # softlimit: max resident set size is 30 MB ulimit -f 670000 # hard/soft: no files > ISO image allowed ulimit -S -s 15000 # softlimit: max stack size of a program is
15MB}
These settings limit the amount of damage that a single user can do accidentally. To some extent the deliberate damage a user can do is also limited. PAM (pluggable authentication modules) includes support for setting resource limits when a particular system is used. The pam_limits.so module loads the resource limits specified in /etc/security/limits.conf as part of setting up the session.
xserver:~ # cat /etc/pam.d/xdm#%PAM-1.0auth required pam_unix2.so nullok #set_secrpcaccount required pam_unix2.sopassword required pam_unix2.so #strict=falsesession required pam_unix2.so debug # trace or nonesession required pam_devperm.sosession required pam_resmgr.so# most xdm configurations do not include this!session required pam_limits.so
The /etc/security/limits.conf below sets the limits similar to the ulimit statements in /etc/profile.
foobar:~ # cat /etc/security/limits.conf# Limits that apply to everyone in the users group – a local hack,
YMMV@users soft rss 10000@users soft priority 10@users soft core 20000@users soft nofile 250@users soft nproc 100@users hard fsize 670000@users soft fsize 670000@users soft stack 15000
Process limits should be set so that your programs run normally they run within the limits. When processes exceed the limits, they crash. This crash can sometimes prevent the exploitation of security holes.
31.2 More limits
Login limits
Apart from the prohibition on user logins while /etc/nologin exists, PAM allows you to limit the number of concurrent user logins.
# members of the student group can only log in 4 times@student - maxlogins 4

22831 LPI 102 Course Notes User limits
usermod limits
The usermod command allows you to set an expiry date for an account.usermod -e 2005-06-19 joe # expire joe's account in June
2005
After e you give the date on which the user account will be disabled, in the format YYYYMMDD.
Disk quotas and security
An angle of attack for a malicious user user is to fill up your server's disk space with useless junk. Setting quotas for disk space prevents this attack. So set quotas for users and groups! Quota related commands include ...• edquota – edit a user's quota• quota – show current quotas• repquota – report on all quotas
31.3 Review
Quiz questions
1. When limits are set with ulimit what enforces these limits?
2. Where are ulimit parameters set?
3. What kind of command is ulimit?4. How can you limit user logins?5. Why would you want to limit the number of processes a user can run?6. How are quotas relevant to security?7. What limits can the usermod command set?
Assignment
Determine the smallest values for each configurable process for your login session as a regular user. Configure these limits in /etc/profile and then in /etc/security/limits.conf. Test whether the limits are applied for a graphical login using xdm and a console login.
Answers to quiz questions
1. Process limits, enforced by the kernel.2. During login, by the PAM library or the profile script.3. A bash builtin command.4. “username maxlogins 4” in /etc/security/limits.conf. To do this indirectly, you can limit
the number of processes the user can run.5. You may have a computer with finite resources.6. Limiting the amount of disk space for a user can prevent certain types of attack (e.g. filling

31 User limits LPI 102 Course Notes 229
up the disk)7. You can change the group of a user, and thereby make group quotas or process limits apply.
23032 LPI 102 Course Notes Glossary
32 GlossaryThis glossary defines some terms which may be unfamiliar to the uninitiated. Some glossary terms are defined in the LPI 101 course notes, and are not repeated.• 0x00c0ffee• 1024• about• ASCII• argument• bash• BIOS• bleeding edge• boot• buffer• bus• cat• character• client• CLUE• CMOS• comment• console• CPU• database
• default• display• distribution• DMA• DNS• DOS• environment• execute• FAQ• field• filesystem• font• foobar• fortune• geometry• GPL• group• home directory• host• HOWTO
• I/O• IDE• interrupt• journal• Kernel• LBA• library• Linux• LPI• LPIC• LUN• make• man pages• media• metacharacter• modem• mount• network
address• NIC
• ownership• package• parallel• parameter• PCI• peripheral• permission• pipe• PnP• ppp• proc• process• protocol• rc• recursive• resources• root• rwx• script• SCSI
• serial• server• setuid• shell• source code• ssh• standard input,
outut and error• swapfile• switch• syntax• tab space• terminal• text• timeout• tree• variable• verbose• wildcard• zzz
Terms
authentication To prove you are who you say you are. This is frequently done by providing a correct user name and password, and sometimes by cryptographic keys.
authorisation Once you have authenticated yourself, you should be allowed to to specific things.
backup A copy of your data, for just in case you lose your originals. Actually, backups are for when you lose your originals. Never make backups on /dev/null.
broadcast To send network traffic to everyone. command line A command that is typed in the shell is a command line. The boottime
options are also a command line (/proc/cmdline).dependencies One thing requiring another, such as a X based program requiring the X11
client library, or a kernel module requiring a specific kernel version.firewall A device to selectively block network traffic. On Linux, firewalls are
frequently implemented using iptables or ipchains.module Modules in Linux are generally kernel modules, which are compiled code
which can be installed into a running Linux kernel.pipeline Sending the input of one process to another.

32 Glossary LPI 102 Course Notes 231
ls | grep file | cat > outputscripting To write a script that performs a task.encryption To scramble a message with the intention that it should be unreadable to
outside parties.log Many events are written to log files as they occur, and these are mostly in the
directory /var/log, e.g. /var/log/messages. Real logs grow on trees and are made of wood. Printing out your logs will use many trees.
That's all for now folks ... all the good stuff is in the 101 glossary.

23233 LPI 102 Course Notes Index
33 Index5
550 response, 170A
A, 193A records, 131abuse, 221ACCEPT, 208access, 169access.db, 168access.log, 177account, 85adduser, 96alias, 67, 68aliases, 170, 221aliases.db, 168Alice, 196AllowTcpForwarding, 198Amanda, 115apache authentication, 180apachectl, 177Apple LaserWriter, 46apropos, 57apsfilter, 52apsfilterconfig, 53aptcache, 218aptget, 218arithmetic expansion, 79Arnold's Laws of
Documentation, 55async, 184at, 108atq, 108atrm, 108Authentication, 87autonomous functions, 25
Bbackticks, 76backup, 110backup policy, 110badblocks, 115bash scripting, 72
bash_logout, 66bash_profile, 66bashrc, 66batch, 108BIND version 4, 191BIND version 8, 191Bob, 196bofh, 46bootparam man page, 34break, 83broadcast address, 125bugtraq, 218builtin commands, 77builtin, 77bye, 136bzImage, 28
Ccase, 81CERT, 218chainloader in GRUB, 37chat, 153chat scripts, 154chfn, 88chkconfig, 177, 224chmod, 73CIDR, Classless Inter
Domain Routing, 126class A, B and C networks,
126close, 25CNAME, 194co.za, 192Code red , 178coffee, 58command substitution, 76comment, 87comments, 74conf.modules, 21config target, 28CONNECT, 154Connectiva Linux, 62
continue, 83COPYING, 57core, 226cpio, 113cron, 106crontab, 106CUPS, 45, 50CVS_RSH, 99CVSROOT, 99
Ddate, 119day of week, 107dd, 114Debian, 61default gateway, 127dependencies, 28depmod, 21dev,
lp0, 45st0, 115
dhclient, 147DHCP, 146dhcpcd, 147DiffieHellman key
exchange, 197dig, 130disable xinetd, 224disaster recovery, 110DISPLAY, 67distclean target, 28dmesg, 37DNAT, 211DNS, 130DNS troubleshooting, 149documentation directory, 57DocumentRoot, 179domain registration, 191done, 82dotted quad, 125drift file, 123driftfile, 122

33 Index LPI 102 Course Notes 233
DROP, 208DSA, 196dump, 114dumpe2fs, 116
Eemergency boot option, 34encrypt passwords, 186env, 68, 97error.log, 177esac, 81escaped, 75ESTABLISHED, 210Eve, 196exec, 25executable permissions, 73exit, 25, 74expiry date, account, 228export, 68, 97exports, 183expr, 78ext3, 20
FFAQs, 57, 60fi, 80find perm, 205Firewall script, 212firewalls, 206fish, 202for, 82fork, 25fortune, 64FORWARD chain, 208FQHOSTNAME, 140fsck, 116fstab, 114, 184ftp, 125, 135ftpchroot, 165ftpusers, 165full backup, 110full disclosure, 217full name, 87full quoting, 75function, 67, 68
Ggenericstable.db, 168gobbledegook, 45Google, 61gpart, 117gpasswd, 93GRE, Generic Routing
Encapsulation, 125GREP_OPTIONS, 99group, 86, 91, 93groupadd, 93groupdel, 93groupmod, 93grpck, 93grpconv, 93, 221grpunconv, 93, 221gshadow, 92, 93Guides, 60gv, 47
Hhash, 135home directory, 86host command, 131hostmaster, 221HOSTNAME, 98, 138hosts, 190hosts file, 145hosts.allow, 161, 163hosts.deny, 161, 163, 198HOWTOs, 57, 60htaccess, 180htpasswd, 181HTTP, 176httpd, 176httpd.conf, 176, 178hwclock, 120
IICMP, 125, 128idle timeout, 226if, 80ifcfgeth0, 139, 140ifconfig, 22, 141, 155ifdown, 139, 141, 155
ifup, 139, 141inaddr.arpa, 131, 132in.ftpd, 164include files, 67incremental backup, 110inetd, 160, 223inetd.conf, 160info, 58init, 39init.d, 72, 177init=/bin/bash, 35initdefault, 40inittab, 40INPUT chain, 208inputrc, 69insmod, 19insserv, 177, 224interfaces debian, 140Internet, 124INVALID, 210ioptions, 157IP masquerade, 210, 212ip_conntrack, 212ip_forward, 213ipup and ipdown, 155ipup.local, 156IP, Internet Protocol, 124ipchains, 207, 215ipop3d, 161ipppd, 157iptables, 207issue, 63issue.net, 64
KKDE, 202kernel, 24kernel message buffer, 37kernel modules, 18kernel patches, 27Kernel tweaks, 213kernelparameters.txt, 34kernel.org, 25kill, 25klogd, 100

23433 LPI 102 Course Notes Index
LLANG, 67LD_LIBRARY_PATH, 99less, using like tail, 104LESSOPEN, 99let, 78libnss, 145LILO, 36limits.conf, 227Linux Documentation
Project, 60Linux User Groups (LUGs),
61linux.mc, 171local printers, 51localhostnames, 168, 169localtime, 121LOG, 208logger, 103login, 66, 85login shell, 66logon banner, 64logrotate, 104logrotate.conf, 104logrotate.d, 104lp, line printer, 43lpc, 44lpd, 43lpq, 43, 46lpr, 43, 46lprm, 43LPRng, 50LS_COLORS, 98lsmod, 19, 29lspci, 29
Mm4, 171magicfilter, 53mail queue, 171mailertable, 170mailertable.db, 168mailing lists, 60maillog, 172mailq, 171
make, 27, 168Makefile, 168makemap, 168makewhatis, 56man in the middle, 197man pages, 55, 60Mandrake, 61manpath, 56manpath.config, 56match, 78md5sum, 218menuconfig target, 28messages, 37, 100mingetty, 41mk_initrd, 29mkcdrec, 115modinfo, 19modprobe, 21modules, 18, 28modules_install target, 28modules.conf, 21modules.dep, 21monolithic kernel, 18motd, 64, 198mount, 183mpage, 47mput, 136mqueue, 167, 171mrproper target, 28mt, 112MTA, 167MX, 194MX records, 131, 168
Nnamed, 191named pipe, 102named.boot, 191named.conf, 191named.root, 191NAT, 210ndc, 194Netbeui, 185netmask, 125netstat, 148
network address, 125network addresses, reserved,
126network debian, 140network mask, 125Network time protocol
(NTP), 121networkscripts, 139networks file, 146newaliases, 168, 170newgrp, 93newsgroups, 61NFS, 182ngrep, 197Nimda, 178NIS, 182nmbd, 185NO CARRIER, 154no_root_squash, 183nologin, 198, 223NS, 193NS records, 131nslookup, 132nsswitch.conf, 145, 190ntp.drift, 122ntpd, 122ntpd.conf, 122ntpdate, 122
Oopen, 25open relay, 173OpenSSH, 197options.ttyS0, 154OUTPUT chain, 208
PPAM, 87pam_limits.so, 227pam.conf, 87partial backup, 110partial quoting, 76passwd, 86, 90password ageing, 205PATH, 67, 98PCL, 46

33 Index LPI 102 Course Notes 235
ping, 129ping troubleshooting, 148POP3, 165popper, 161, 165portmap, 182positional parameters, 74postmaster, 221POSTROUTING, 211postscript, 46PPP authentication, 155PPP, point to point protocol,
152ppp/peers, 154pppd, 153pppoe, 157PREROUTING, 211print sharing, 186printcap, 43, 50private key, 196proc,
cmdline, 34filesystems, 20modules.conf, 21
process limits, 226profile, 66, 96, 226proftpd, 161, 164promiscuous relay, 173proprietary systems, 73proxy_arp, 214PS1, 67PTR, 194PTR records, 131public key, 196pump, 147pwconv, 91, 221pwd, 135pwunconv, 91, 221
Qqpopper, 165quotas, 228quoting, 75
Rrc.config, 139rc.config.d, 139
rc.sysinit, 41rdev, 35read, 25, 75README, 57Redhat, 61redirection, 75reiserfs, 20REJECT, 208RELATED, 210RELAY, 168relay check, 173relaydomains, 168, 169remote machine, logging,
102remote printing, 51rescue disk, 117resolv.conf, 130, 145, 149,
156, 190responsive functions, 25restore, 115return code, 79RFC,
2142, 2212196, 2042616, 1763330, 127812, 134
rmmod, 19, 22rndc, 194root servers, 191root_squash, 183root= boot option, 35route, 142routes.conf, 139RPC, 182rpc.mountd, 182rpc.nfsd, 182RSA encryption, 196runlevel, 39, 224
Ssamba, 52, 184SANS, 218scp, 199ScriptAlias, 180
security, 221semicolon, 74sendmail, 167sendmail.cf, 168, 171sendmail.cw, 169sendmail.mc, 171service, 139set, 68setgid, 205setuid, 205sfdisk, 117sftp, 200sg, 92, 93shadow, 86shebang, 74shell scripting, 72shells, 165shutdown, 40, 64single boot option, 34skel, 96Slackware, 62SMB, 184smb.conf, 185smbclient, 52smbd, 186smbpasswd, 186smtp, 167, 173SNAT, 211sniffer, 197SOA, 193SOA record, 131socket, 218software updates, 217spam, 173SSH_AUTH_SOCK, 202ssh_config, 201sshadd, 202sshagent, 202sshkeygen, 201sshd_config, 197sshrc, 198sslwrap, 161stack, 226stateful inspection, 210stateful packet filter, 207

23633 LPI 102 Course Notes Index
su, 88substr, 78Sun Microsystems, 182SuSE, 61sync, 102sysconfig, 139sysctl.conf, 214sysinit, 41syslog, 222syslog.conf, 101syslogd, 37, 100system call, 25
Ttail, 103taper, 115tar, review, 112tarfix, 113targ, 113tarl, 113TCP, 125, 128TCP wrappers, 206tcp_syncookies, 213tcpd, 161, 163tcpdump, 197tcpdump troubleshooting, 149tcpwrappers, 163telnet, 125, 133, 164, 199terminal, logging to, 102test, 80time zones, 121tldp.org, 60traceroute, 130traceroute troubleshooting,
148tradeoffs in security, 204
transparent proxy, 211TTL, 193tunable parameters, 214TurboLinux, 62type, 77
UUDP, 125, 129UID's, 87ulimit, 226unset, 98until, 83updaterc.d, 177, 224USER, 85, 98useradd, 88, 96, 186userdb.db, 168userdel, 88usermod, 88
Vversion number, 26vga boot option, 35vigr, 93vipw, 88virtual hosts, 180virtual servers, 211virtusertable, 170virtusertable.db, 168vmlinuz, 36vsftpd, 164
Wwall, 64WAN, 152whatis, 56which, 77while, 82whois, 134
Windows, 184, 187windows printers, 52WINS, 185write, 25wu_ftpd, 164wvdial, 153, 156wvdial chat, 157wvdial.conf, 156
Xxauth, 198xconfig target, 28xinetd, 162, 223xinetd.conf, 162xinetd.d, 162xntpd, 122
Zza, 192zic, 121zone file, 194zone files, 193zoneinfo, 121
..inputrc, 69
((fd0), 36(hd0), 36
&&& shell and, 80
||| shell or, 80
$$?, 79$1, $2, etc, 74