Link's 3D Printed Wooden Sword - Adafruit Industries · PDF fileLink's 3D Printed Wooden Sword...
20
Link's 3D Printed Wooden Sword Created by Ruiz Brothers Last updated on 2015-04-29 03:20:08 PM EDT
Transcript of Link's 3D Printed Wooden Sword - Adafruit Industries · PDF fileLink's 3D Printed Wooden Sword...

Link's 3D Printed Wooden SwordCreated by Ruiz Brothers
Last updated on 2015-04-29 03:20:08 PM EDT
23444
67
88
111213
1617181919
Guide Contents
Guide ContentsOverview
Project ExpectationsPartsTools & Supplies
3D PrintingClean Up
AssemblySkinny sticksGlue PartsHiltPommel
StainingSandingMultilayer wood stainMore LayersWood Filler
© Adafruit Industries https://learn.adafruit.com/links-3d-printed-wooden-sword Page 2 of 20

OverviewLink from the Legend of Zelda, sports an iconic wooden sword used to thwart off enemies. In thisproject we're 3D printing his sword in bambooFill.
BambooFill is filament from Colorfabb that uses recycled bamboo fibres mixed with PHA/PLA. Itprints just like PLA so it works pretty good on most FDM 3D Printers.
In this tutorial we'll walk you through the process of 3D printing, assembling and finishing the swordusing post-processing techniques.
The grip overlay was printed in Ninjaflex flexable filament. We used the grass and caramel colorsand the change filament option to make a multi colored part.
It’s really squishy and slips right on the dowel. The feel is really nice and grippy!
© Adafruit Industries https://learn.adafruit.com/links-3d-printed-wooden-sword Page 3 of 20

Project Expectations
This project is geared towards makers who have basic 3D printing skills and access to a 3D printer.The 3D parts were designed for medium build platforms. You can also edit our files for smallerprinters. Printing these parts can take up to 18 hours and about 1 full spool of material.
Parts
Below is a full list of parts needed to build this project. Be sure to check out the featured products onthe right sidebar.
Bamboo Filament (http://adafru.it/2475)Ninjaflex Filament (http://adafru.it/enm)3D Printer (http://adafru.it/duF)Blue tape (http://adafru.it/2416)
Tools & Supplies
You'll need a couple of hand tools and accessories to assist you in the build.
Flush diagonal cutter (http://adafru.it/dxQ)Knife jimmy (http://adafru.it/2414), Spatula (http://adafru.it/cUv) or PaletteKnife (http://adafru.it/ewf)
© Adafruit Industries https://learn.adafruit.com/links-3d-printed-wooden-sword Page 4 of 20

Skinny Sticks (http://adafru.it/f3g) 5 3/4' x 1/4'
© Adafruit Industries https://learn.adafruit.com/links-3d-printed-wooden-sword Page 5 of 20

3D PrintingDownload STLs
http://adafru.it/f3R
Printing a 600mm sword is a bit too big to print in one piece so the sword was broken up into fourpieces.
We used the Printrbot Plus to print this project because it has a max z-height of 250mm- which isperfect for printing really tall things like swords. You can also edit our source files to fit the parts onsmaller printers.
swordTop.stl
swordBtm.stl
swordGuard.stl
swordEnd.stl
@230 PLA15% Infill0.2 Layer Height3 Shells60mm/s Print Speed120mm/s Travel Speed
swordTop.stl = 6 hours
swordBtm.stl = 4 hours
swordGuard.stl = 3 hours
swordEnd.stl = 2 hours
© Adafruit Industries https://learn.adafruit.com/links-3d-printed-wooden-sword Page 6 of 20

Clean Up
Retration pieces and blobs left over from printing are easy to clean up. Most of the rectractionpieces peel off by hand. You can then use a metal flat end like the iJimmy to smooth out edges. Useflush cutters to remove any blobs from the surface of the parts.
© Adafruit Industries https://learn.adafruit.com/links-3d-printed-wooden-sword Page 7 of 20
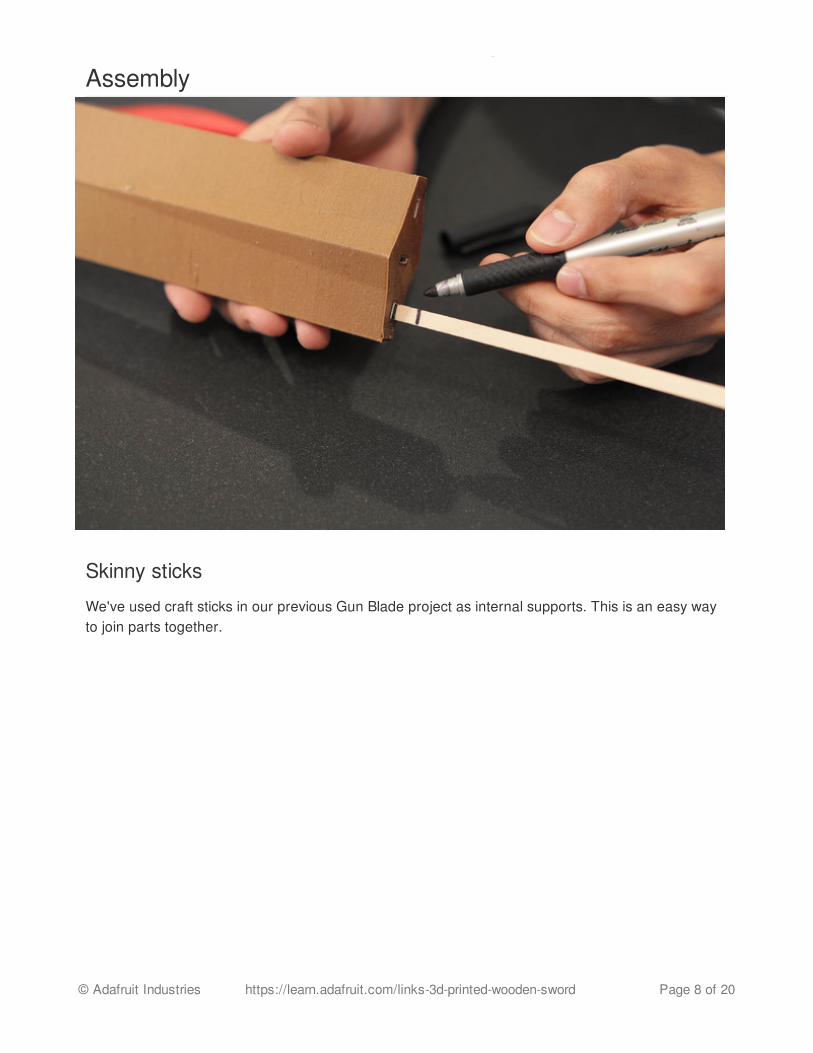
Assembly
Skinny sticks
We've used craft sticks in our previous Gun Blade project as internal supports. This is an easy wayto join parts together.
© Adafruit Industries https://learn.adafruit.com/links-3d-printed-wooden-sword Page 8 of 20

These sticks are inserted into the slots and marked for measurement - these need to be cut downso everything fits and looks flush.
© Adafruit Industries https://learn.adafruit.com/links-3d-printed-wooden-sword Page 9 of 20

The tolerances for the slots are going to vary depending on your printer, but you can trim off thesticks corners to fit them into place - just try not to break them by jamming them in, because thatcould be bad!
The cross guard has two slots that go near the bottom of the blade. These sticks help to align theblade while keeping them from rotating.
© Adafruit Industries https://learn.adafruit.com/links-3d-printed-wooden-sword Page 10 of 20

Glue Parts
You can use E6000 adhesive to permanently bond the parts together.
© Adafruit Industries https://learn.adafruit.com/links-3d-printed-wooden-sword Page 11 of 20

You don't have to glue the sword if you plan to travel with it. Just make sure the tolerences are tightenough so the blades don't fall apart while in battle.
Hilt
To make the hilt of the sword, we’re using a 7/8th wooden dowel - those are just the right diameterfor a grip, so we can use real wood with our 3D printed wood…which is like, meta.
Allow the glue to fully cure for about a full day.�
© Adafruit Industries https://learn.adafruit.com/links-3d-printed-wooden-sword Page 12 of 20

Pommel
The pommel has an opening in the bottom and fits into the dowel. You’ll need to cut the hilt down tosize to fit your hands - we measured ours so that it can fit two hands.
© Adafruit Industries https://learn.adafruit.com/links-3d-printed-wooden-sword Page 13 of 20

You can insert the dowel into the printed parts and mark them to get the measurement of the hilt.
So there you have it, extruding wooden filament to make wooden cosplay props. Again, this isBambooFill - Bamboo PLA filament from the guys at Colorfab.
© Adafruit Industries https://learn.adafruit.com/links-3d-printed-wooden-sword Page 14 of 20

© Adafruit Industries https://learn.adafruit.com/links-3d-printed-wooden-sword Page 15 of 20

Staining
BambooFill is real wood, so we can use wood stains to finish off the parts!
Any wood stain should work, but the MinWax brand worked for our tests. You can find these at yourlocal hardware shop.
You can stain with different colors or even layer them on top to create a multilayer stain.
© Adafruit Industries https://learn.adafruit.com/links-3d-printed-wooden-sword Page 16 of 20

Sanding
We’ll start off by sanding all of the parts down with a 320 grit sand paper. Make sure to get into all ofthe small spaces.
You’ll notice that sanding brings out the chalky white characteristics of the PLA, but it darkens uponce we apply the stain.
© Adafruit Industries https://learn.adafruit.com/links-3d-printed-wooden-sword Page 17 of 20

Multilayer wood stain
We’ll start off with a dark walnut for the first layer. Stir and use a cloth to apply a textured stroke toadd those wood grain patterns. Don’t apply a lot of pressure, just gently glide the cloth across parts.Fold the cloth into a small shape that can fit around smaller pieces.
© Adafruit Industries https://learn.adafruit.com/links-3d-printed-wooden-sword Page 18 of 20

More Layers
Let it dry for about 5 minutes and then use an 80 grit sand paper to remove any blotches. This alsohelps to get that weathered look. After applying a second coat of a red oak color, we’ll sand it downagain and then apply a small amount of green. Once applied, quickly wipe it off. This will give it justa hint of green in the wood. To finish off, switch back to the 320 grit sand paper.
Wood Filler
Just like real wood, you can you fillers to plug in gaps. Wood putty worked great for filling in the toppart of the blade tip. Apply after staining, let it dry and then sand off any left overs.
© Adafruit Industries https://learn.adafruit.com/links-3d-printed-wooden-sword Page 19 of 20

You can really see a difference when compared to an unfinished part. Definitely worth the effort topost process wooden prints.
© Adafruit Industries Last Updated: 2015-04-29 03:20:09 PM EDT Page 20 of 20