Line Follower Programming Guide - TETRIX® Robotics
7
82 Line Follower Programming Guide (LabVIEW ™ for LEGO ® MINDSTORMS ® ): Part 1 Introduction: In this guide, the Ranger Bot will be programmed to move forward until it senses a line and then stop. This guide is for use with the LabVIEW ™ for LEGO ® MINDSTORMS ® programming language. Getting Started: 1. Launch LabVIEW for LEGO MINDSTORMS. 2. Press Create Program to open the New Program dialog window. 3. Select Robot Project from the Templates menu and Ranger from the Robot Project menu. Press Create. 4. Type "Line Follower" in the Robot Project Name field of the Specify Robot Project Path dialog window. Then press Create. Extensions TETRIX ® Getting Started Guide
Transcript of Line Follower Programming Guide - TETRIX® Robotics
82
Line Follower Programming Guide (LabVIEW™ for LEGO® MINDSTORMS®): Part 1
Introduction:
Inthisguide,theRangerBotwillbeprogrammedtomoveforwarduntilitsensesalineandthenstop.ThisguideisforusewiththeLabVIEW™forLEGO®MINDSTORMS®programminglanguage.
Getting Started:
1.LaunchLabVIEWforLEGOMINDSTORMS.
2.PressCreate ProgramtoopentheNewProgramdialogwindow.
3.SelectRobot ProjectfromtheTemplatesmenuandRangerfromtheRobot Projectmenu.PressCreate.
4.Type"LineFollower"intheRobot Project NamefieldoftheSpecifyRobotProjectPathdialogwindow.ThenpressCreate.
ExtensionsTETRIX®GettingStartedGuide
83
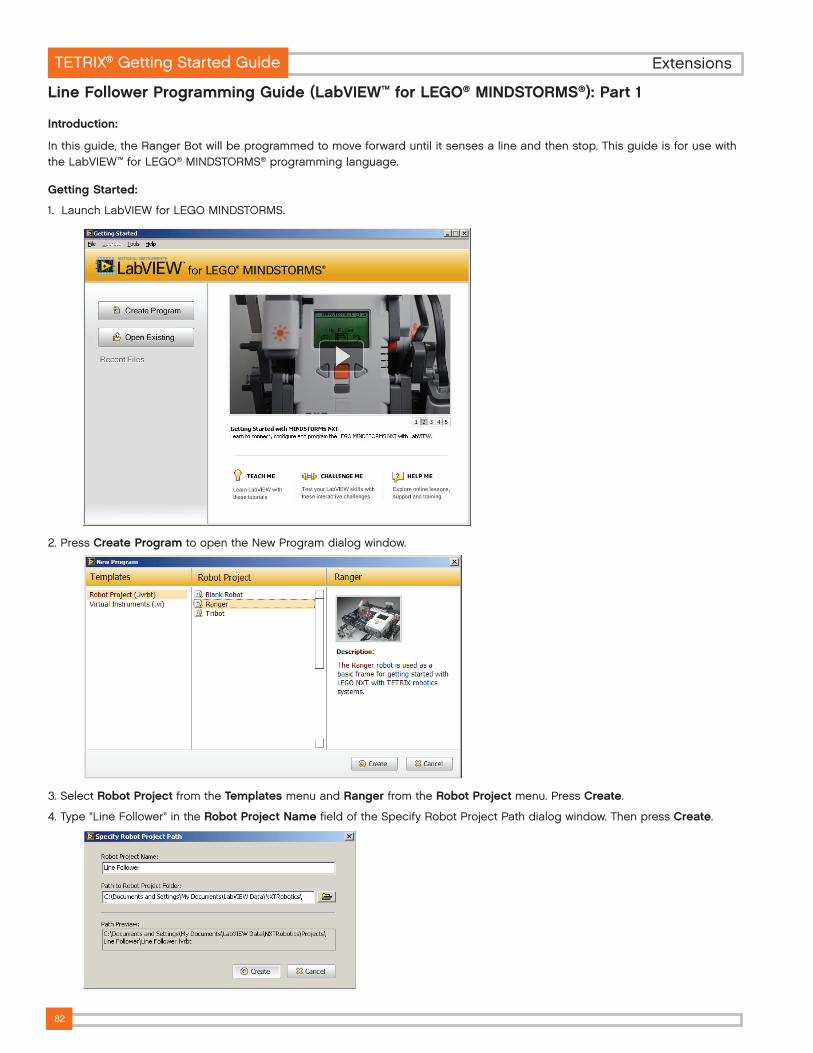
The Robot Project Center:
5.OnceaRobotProjectnameandpathhavebeencreated,theRobotProjectCenterwillopen.
6.ClickNew VI.
a.Select VI for NXT targetfromtheselectionwindow.
b.Inthe Specify VI Name dialogwindow,type"linefollowerprogram,"thenpressCreate.
7.PressCtrl-Eonthekeyboardtoopenandswitchtotheblockdiagramifitisn’talreadyopen.Thisiswherethecodeiswritten.
Note: Bydefault,theblockdiagramiswhiteandthefrontpanelisgray.
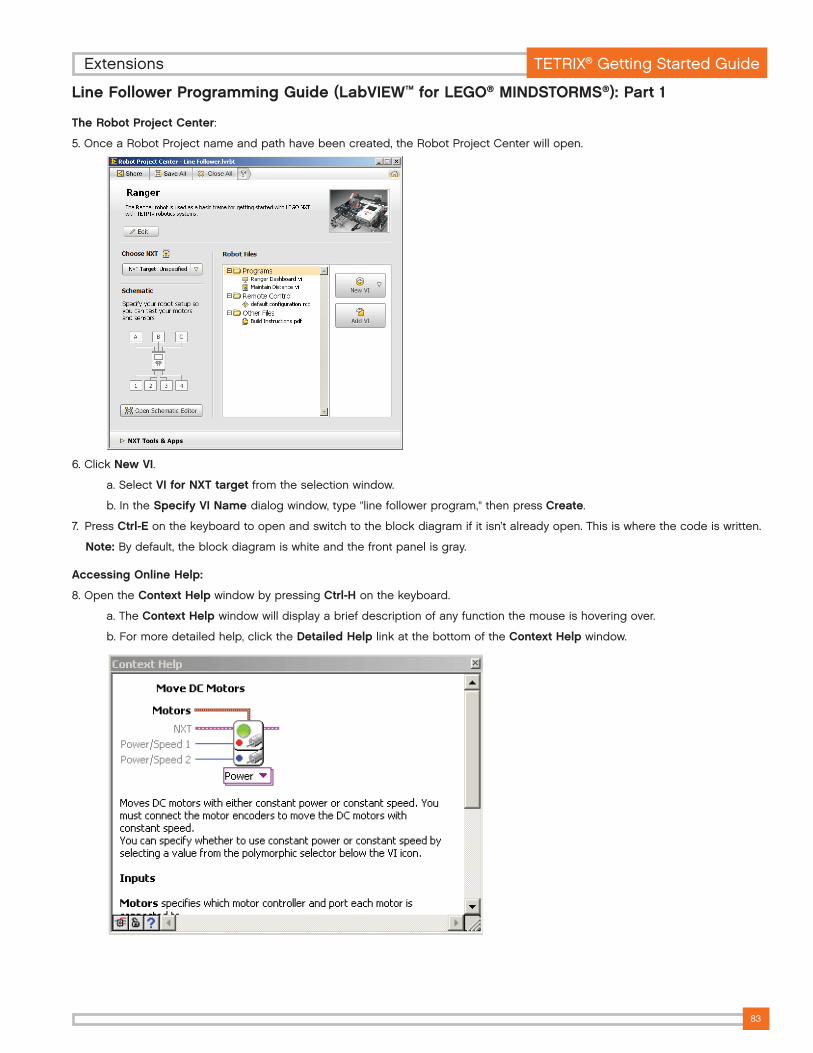
Accessing Online Help:
8.Openthe Context HelpwindowbypressingCtrl-H onthekeyboard.
a.TheContext Help windowwilldisplayabriefdescriptionofanyfunctionthemouseishoveringover.
b.Formoredetailedhelp,clickthe Detailed HelplinkatthebottomoftheContext Helpwindow.
Line Follower Programming Guide (LabVIEW™ for LEGO® MINDSTORMS®): Part 1
TETRIX®GettingStartedGuideExtensions
84
Line Follower Programming Guide (LabVIEW™ for LEGO® MINDSTORMS®): Part 1
Programming the Robot to Move:
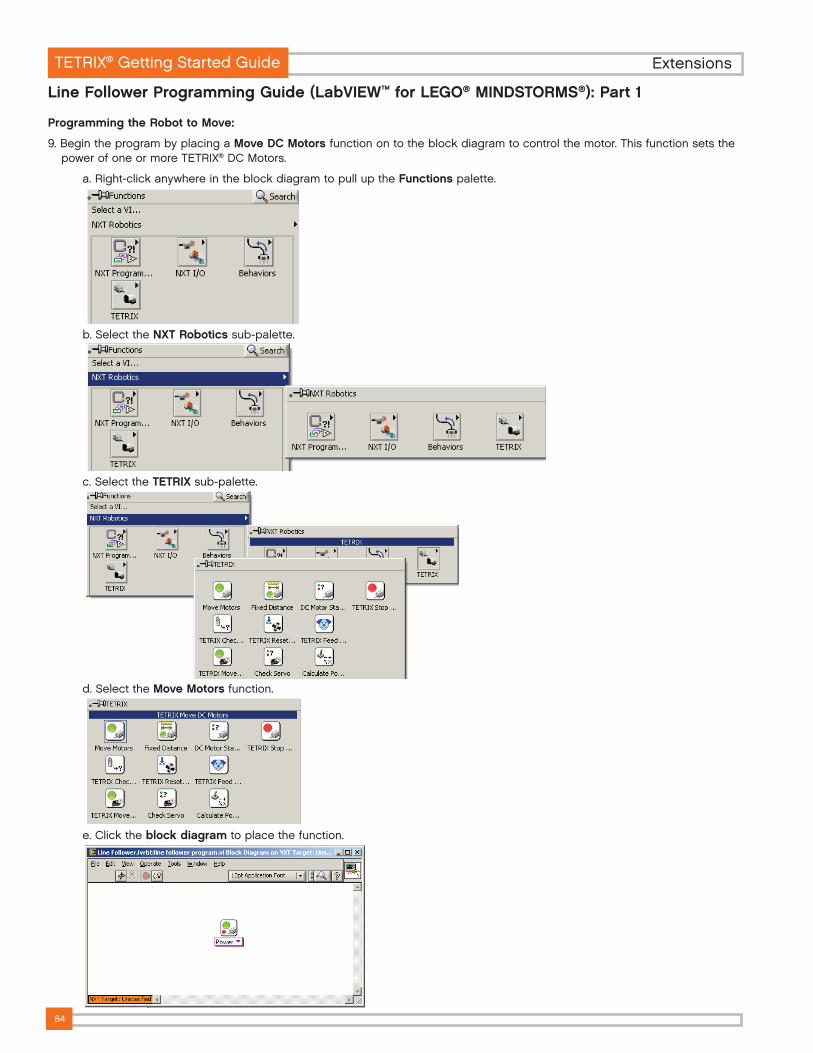
9.BegintheprogrambyplacingaMove DC Motors functionontotheblockdiagramtocontrolthemotor.ThisfunctionsetsthepowerofoneormoreTETRIX®DCMotors.
a.Right-clickanywhereintheblockdiagramtopulluptheFunctionspalette.
b.SelecttheNXT Roboticssub-palette.
c.SelecttheTETRIXsub-palette.
d.SelecttheMove Motorsfunction.
e.Clicktheblock diagramtoplacethefunction.
ExtensionsTETRIX®GettingStartedGuide
85
Line Follower Programming Guide (LabVIEW™ for LEGO® MINDSTORMS®): Part 1
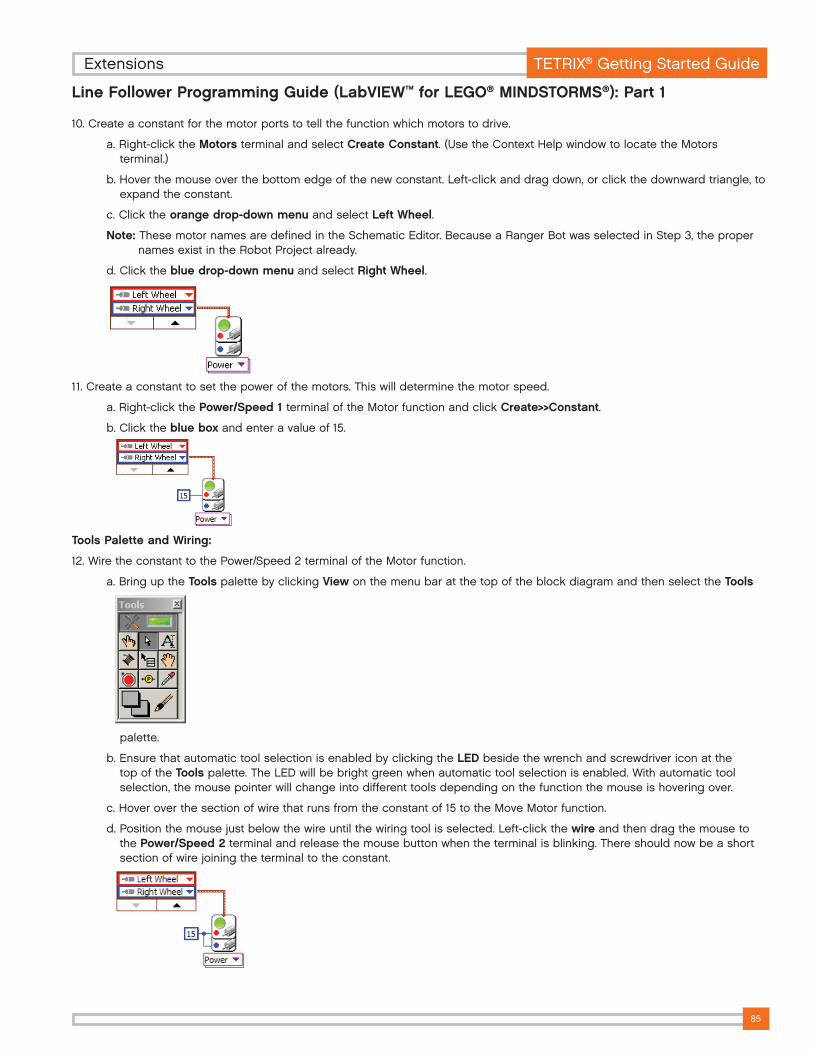
10.Createaconstantforthemotorportstotellthefunctionwhichmotorstodrive.
a.Right-clicktheMotorsterminalandselectCreate Constant.(UsetheContextHelpwindowtolocatetheMotorsterminal.)
b.Hoverthemouseoverthebottomedgeofthenewconstant.Left-clickanddragdown,orclickthedownwardtriangle,toexpandtheconstant.
c.Clickthe orange drop-down menuandselectLeft Wheel.
Note: ThesemotornamesaredefinedintheSchematicEditor.BecauseaRangerBotwasselectedinStep3,thepropernamesexistintheRobotProjectalready.
d.Clicktheblue drop-down menuandselectRight Wheel.
11.Createaconstanttosetthepowerofthemotors.Thiswilldeterminethemotorspeed.
a.Right-clickthePower/Speed 1terminaloftheMotorfunctionandclickCreate>>Constant.
b.Clicktheblue boxandenteravalueof15.
Tools Palette and Wiring:
12.WiretheconstanttothePower/Speed2terminaloftheMotorfunction.
a.BringuptheToolspalettebyclickingViewonthemenubaratthetopoftheblockdiagramandthenselecttheTools
palette.
b.EnsurethatautomatictoolselectionisenabledbyclickingtheLEDbesidethewrenchandscrewdrivericonatthetopoftheToolspalette.TheLEDwillbebrightgreenwhenautomatictoolselectionisenabled.Withautomatictoolselection,themousepointerwillchangeintodifferenttoolsdependingonthefunctionthemouseishoveringover.
c.Hoveroverthesectionofwirethatrunsfromtheconstantof15totheMoveMotorfunction.
d.Positionthemousejustbelowthewireuntilthewiringtoolisselected.Left-clickthewireandthendragthemousetothePower/Speed 2terminalandreleasethemousebuttonwhentheterminalisblinking.Thereshouldnowbeashortsectionofwirejoiningtheterminaltotheconstant.
TETRIX®GettingStartedGuideExtensions

86
Reading Sensors:
13.PlaceaSensorfunctiontoreadwhentheLightSensordetectstheblackline.
a.UndertheNXTI/Opalette,selecttheSensorfunctionandclickthe block diagramtoplaceittotherightoftheMove Motorsfunction.
b.Clickthedrop-down menuatthebottomofthefunctionandselectRead Light>>LED On.
i.Toselectthedrop-downmenu,clicktheOperatetoolontheToolspalette.
ii.Or,enableautomatictoolselectionandtheOperatetoolwillbeselectedwhenthemousehoversoverthedrop-downhandle.
c.Right-clickonthePort terminalandselectCreate>>Constant.
d.Clickthedrop-down menuontheconstantandselectPort 3.
e.PlaceaLess?functionfromtheNXT Programming>>Comparisonpalette.
f.WiretheScaled ValueterminalfromtheSensorfunctiontotheX terminaloftheLess?function.
g.Right-clicktheY terminalandselectCreate>>Constant.
h.Changethevalueoftheconstantto50.
Line Follower Programming Guide (LabVIEW™ for LEGO® MINDSTORMS®): Part 1
ExtensionsTETRIX®GettingStartedGuide
87
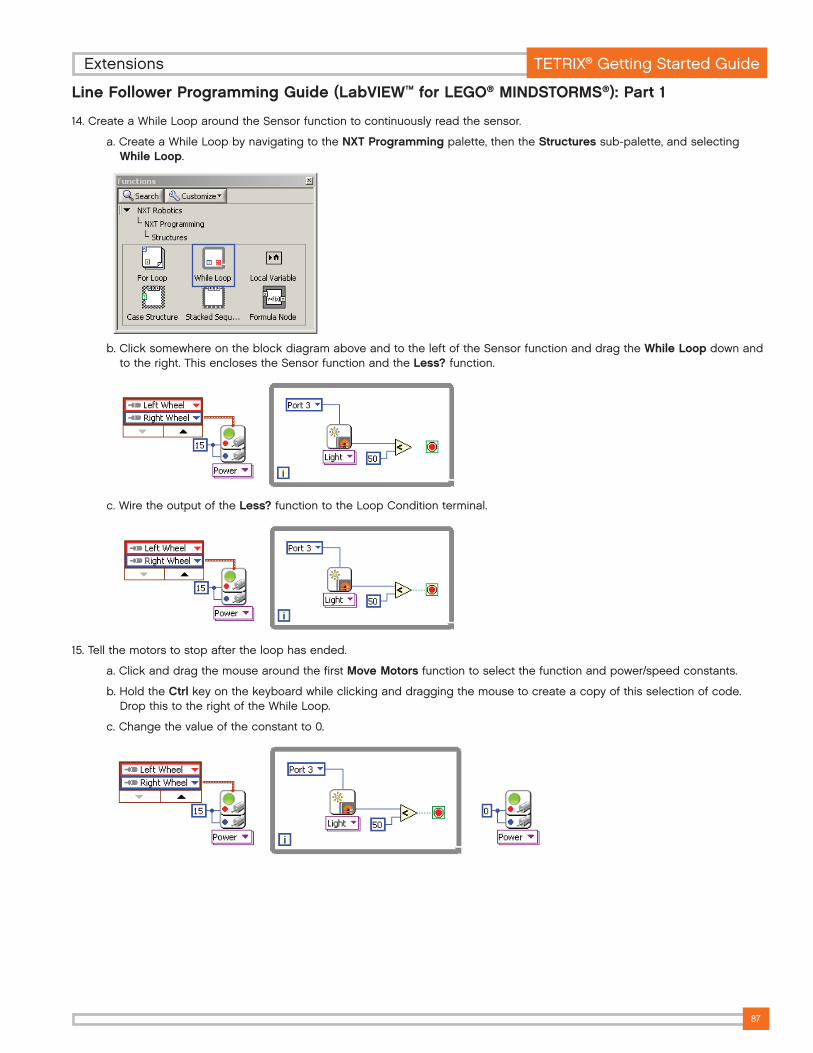
14.CreateaWhileLooparoundtheSensorfunctiontocontinuouslyreadthesensor.
a.CreateaWhileLoopbynavigatingtotheNXT Programmingpalette,thentheStructuressub-palette,andselectingWhile Loop.
b.ClicksomewhereontheblockdiagramaboveandtotheleftoftheSensorfunctionanddragtheWhile Loopdownandtotheright.ThisenclosestheSensorfunctionandtheLess? function.
c.WiretheoutputoftheLess?functiontotheLoopConditionterminal.
15.Tellthemotorstostopaftertheloophasended.
a.ClickanddragthemousearoundthefirstMove Motorsfunctiontoselectthefunctionandpower/speedconstants.
b.HoldtheCtrlkeyonthekeyboardwhileclickinganddraggingthemousetocreateacopyofthisselectionofcode.DropthistotherightoftheWhileLoop.
c.Changethevalueoftheconstantto0.
Line Follower Programming Guide (LabVIEW™ for LEGO® MINDSTORMS®): Part 1
TETRIX®GettingStartedGuideExtensions
88
Line Follower Programming Guide (LabVIEW™ for LEGO® MINDSTORMS®): Part 1
Completing the Program:
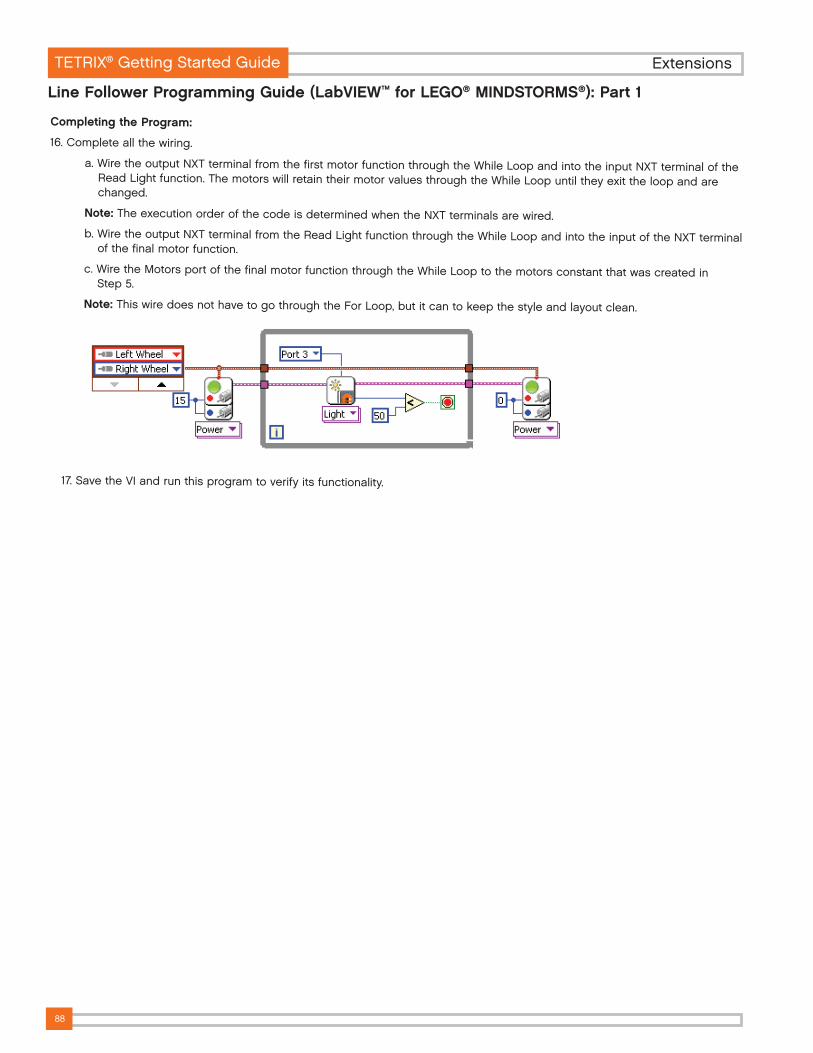
16. Complete all the wiring.
a. Wire the output NXT terminal from the first motor function through the While Loop and into the input NXT terminal of the Read Light function. The motors will retain their motor values through the While Loop until they exit the loop and are changed.
Note: The execution order of the code is determined when the NXT terminals are wired.b. Wire the output NXT terminal from the Read Light function through the While Loop and into the input of the NXT terminal
of the final motor function.
c. Wire the Motors port of the final motor function through the While Loop to the motors constant that was created in Step 5.
Note: This wire does not have to go through the For Loop, but it can to keep the style and layout clean.
17. Save the VI and run this program to verify its functionality.
ExtensionsTETRIX® Getting Started Guide