Lexmark C54x-X54x Color Product Study...
75
Lexmark C54x/X54x Color Product Study Guide
Transcript of Lexmark C54x-X54x Color Product Study...

Lexmark C54x/X54x
Color Product Study Guide

THIS PAGE INTENTIONALLY LEFT BLANK
Lexmark C54x/X54x Color Product Study Guide Rev 2.6
For Training Purposes Only 9/15/2009
Revision Notes: This document was revised to include two new models in the C54x and X54x product line. As of October 6, 2009, the C546dtn and X546dtn replace the C544dtn and X544dtn in Lexmark’s product line-up. The C544n/dn/dw and X544n/dn/dw models have not been replaced, however, and are available as part of the family line.
Edition: September 2009 Revision: 2.6 The following paragraph does not apply to any country where such provisions are inconsistent with local law: LEXMARK INTERNATIONAL, INC. PROVIDES THIS PUBLICATION “AS IS” WITHOUT WARRANTY OF ANY KIND, EITHER EXPRESS OR IMPLIED, INCLUDING, BUT NOT LIMITED TO, THE IMPLIED WARRANTIES OF MERCHANTABILITY OR FITNESS FOR A PARTICULAR PURPOSE. Some states do not allow disclaimer of express or implied warranties in certain transactions; therefore, this statement may not apply to you.
This publication could include technical inaccuracies or typographical errors. Changes are periodically made to the information herein; these changes will be incorporated in later editions. Improvements or changes in the products or the programs described may be made at any time.
Comments may be addressed to Lexmark International, Inc., Department 352X/008-4, 740 West New Circle Road, Lexington, Kentucky 40550, U.S.A or e-mail at [email protected]. Lexmark may use or distribute any of the information you supply in any way it believes appropriate without incurring any obligation to you.
References in this publication to products, programs, or services do not imply that the manufacturer intends to make these available in all countries in which it operates. Any reference to a product, program, or service is not intended to state or imply that only that product, program, or service may be used. Any functionally equivalent product, program, or service that does not infringe any existing intellectual property right may be used instead. Evaluation and verification of operation in conjunction with other products, programs, or services, except those expressly designated by the manufacturer, are the user’s responsibility.
Lexmark and Lexmark with diamond design are trademarks of Lexmark International, Inc., registered in the United States and/or other countries.
PCL® is a registered trademark of the Hewlett-Packard Company.
All other trademarks are the property of their respective owners. © 2008 Lexmark International, Inc. All rights reserved. UNITED STATES GOVERNMENT RIGHTS This software and any accompanying documentation provided under this agreement are commercial computer software and documentation developed exclusively at private expense.

Lexmark C54x/X54x Color Product Study Guide Rev 2.6
For Training Purposes Only 9/15/2009
THIS PAGE INTENTIONALLY LEFT BLANK
Lexmark C54x/X54x Color Product Study Guide Rev 2.6
For Training Purposes Only 9/15/2009
Table of Contents
TECHNICAL INFORMATION ......................................................................................... 1
LEXMARK C540, C543, C544 AND C546DTN SPECIFICATIONS...................................................................1 C540, C543, C544 AND C546DTN PRINT SPEED.......................................................................................1 C540, C543, C544 AND C546DTN MEDIA OPTIONS...................................................................................2 C540, C543, C544 AND C546DTN MEDIA SOURCES AND CAPACITIES .......................................................3 C540, C543 AND C544 SUPPLY ITEMS .....................................................................................................4
Toner Cartridges ..............................................................................................................................4 C540, C543, C544 and C546dtn Photoconductor / Imaging Unit / Developer ................................5 C540, C543, C544 and C546dtn Waste Toner Bottle......................................................................6
LEXMARK X543, X544 AND X546DTN MFP SPECIFICATIONS .....................................................................7 X544 AND X546DTN MFP FAX SPECIFICATIONS ........................................................................................7 X543, X544 AND X546DTN MFP SCANNER SPECIFICATIONS .....................................................................8 X543, X544 AND X546DTN MFP PRINT AND COPY SPEED.........................................................................9 X543, X544 AND X546DTN MFP MEDIA OPTIONS .....................................................................................9 X54X MFP MEDIA SOURCES AND CAPACITIES.........................................................................................10 X54X MFP SUPPLY ITEMS ......................................................................................................................11
X54x MFP Toner Cartridges ..........................................................................................................11 X543, X544 and X546dtn MFP Photoconductor / Imaging Unit / Developer .................................12 X543. X544 and X546dtn MFP Waste Toner Bottle ......................................................................13
THEORY OF OPERATION ........................................................................................... 14
X544 AND X546DTN MFP FAX SYSTEM ..................................................................................................14 X543, X544 AND X546DTN MFP SCANNER SYSTEM................................................................................15 C54X/X54X ELECTROPHOTOGRAPHIC PROCESS......................................................................................19
Charge ...........................................................................................................................................20 Expose ...........................................................................................................................................21 Develop ..........................................................................................................................................22 1st Transfer .....................................................................................................................................23 2nd Transfer ....................................................................................................................................24 Fuse ...............................................................................................................................................25 Clean/Erase ...................................................................................................................................26 EP Process Key Components........................................................................................................27
PAPER TRANSPORT SYSTEM ...................................................................................................................29 X54x Paper Transport System Key Components Diagram ...........................................................30
Lexmark C54x/X54x Color Product Study Guide Rev 2.6
For Training Purposes Only 9/15/2009
X54x Print Engine Paper Path .......................................................................................................32 C54x Paper Transport System Key Components Diagram ...........................................................33 C54x Print Engine Paper Path .......................................................................................................35 C54x/X54x Paper Jam Locations...................................................................................................36
OPERATOR PANEL..................................................................................................... 37
X54X PANEL BUTTONS ...........................................................................................................................37 X54X CUSTOMER MENU..........................................................................................................................41 X54X SERVICE MENUS............................................................................................................................42 C54X PANEL BUTTONS...........................................................................................................................43 C54X CUSTOMER MENU .........................................................................................................................44 C54X SERVICE MENUS ...........................................................................................................................45
PRINT QUALITY DIAGNOSTIC TIPS .......................................................................... 46
GENERAL TERMINOLOGY ........................................................................................................................46 PRINT QUALITY RULES OF THUMB ...........................................................................................................47
C54x/X54x Diagnostic Steps .........................................................................................................48 Backgrounding.........................................................................................................................48 Blurred or Fuzzy Print..............................................................................................................48 Mottle (2mm – 5mm Speckles)................................................................................................48 Half Color Page .......................................................................................................................48 Residual Image (Ghosting)......................................................................................................49
PAPER TRANSPORT DIAGNOSTIC TIPS .................................................................. 50
PAPER RULES OF THUMB........................................................................................................................50
X544, X546DTN FAX DIAGNOSTIC TIPS.................................................................... 51
FAX RULES OF THUMB ............................................................................................................................51 Fax Send Problems........................................................................................................................51 Fax Receive Problems...................................................................................................................52 Other problems ..............................................................................................................................52
C54X/X54X POTENTIAL FIELD ISSUES..................................................................... 54
LIGHT NON-UNIFORM PRINT / “MOTTLED” APPEARANCE ..........................................................................54 “MILKY” APPEARANCE ON PAPER...........................................................................................................55 COPIES TOO DARK IN TEXT/MONO MODE – X54X ONLY.......................................................................56 FINE LINE DETAIL MISSING/LIGHT IN MONO MODE – X54X ONLY ............................................................57 230.31 PAPER JAM ................................................................................................................................58
Lexmark C54x/X54x Color Product Study Guide Rev 2.6
For Training Purposes Only 9/15/2009
SPECIAL PROCEDURES ............................................................................................ 59
MIRRORED NVRAM ...............................................................................................................................59 Controller Board / Operator Panel Replacement ...........................................................................59
MOTOR DETECT – CONTROLLER BOARD REPLACEMENT ..........................................................................59 SCANNER MANUAL REGISTRATION – X54X ONLY...................................................................................60 ITU INSTALLATION (NEW) .......................................................................................................................60 PRINTHEAD REPLACEMENT .....................................................................................................................60 HIGH VOLTAGE POWER SUPPLY (HVPS) REMOVAL.................................................................................60 CLEANING THE MFP DOCUMENT GLASS – X54X ONLY...........................................................................61 UPDATING PRINTER/SCANNER CODE.......................................................................................................62
CIRCUIT BOARD LOCATION...................................................................................... 63
LEXMARK C546DTN/X546DTN OVERVIEW............................................................... 64
LEXMARK REWARDS PROGRAM ............................................................................. 65
WHAT IS THE LEXMARK REWARDS PROGRAM?........................................................................................65 WHAT COUNTRIES ARE PARTICIPATING IN THIS PROGRAM? .......................................................................65 WHAT CARTRIDGES ARE ELIGIBLE? .........................................................................................................65 HOW ARE THE REWARD CARTRIDGES ORDERED?.....................................................................................65 WHAT IF THE CUSTOMER HAS QUESTIONS ABOUT THE PROGRAM? ............................................................66

Lexmark C54x/X54x Color Product Study Guide Rev 2.6
For Training Purposes Only 9/15/2009
THIS PAGE INTENTIONALLY LEFT BLANK
Lexmark C54x/X54x Color Product Study Guide Rev 2.6
For Training Purposes Only 9/15/2009 1
Technical Information
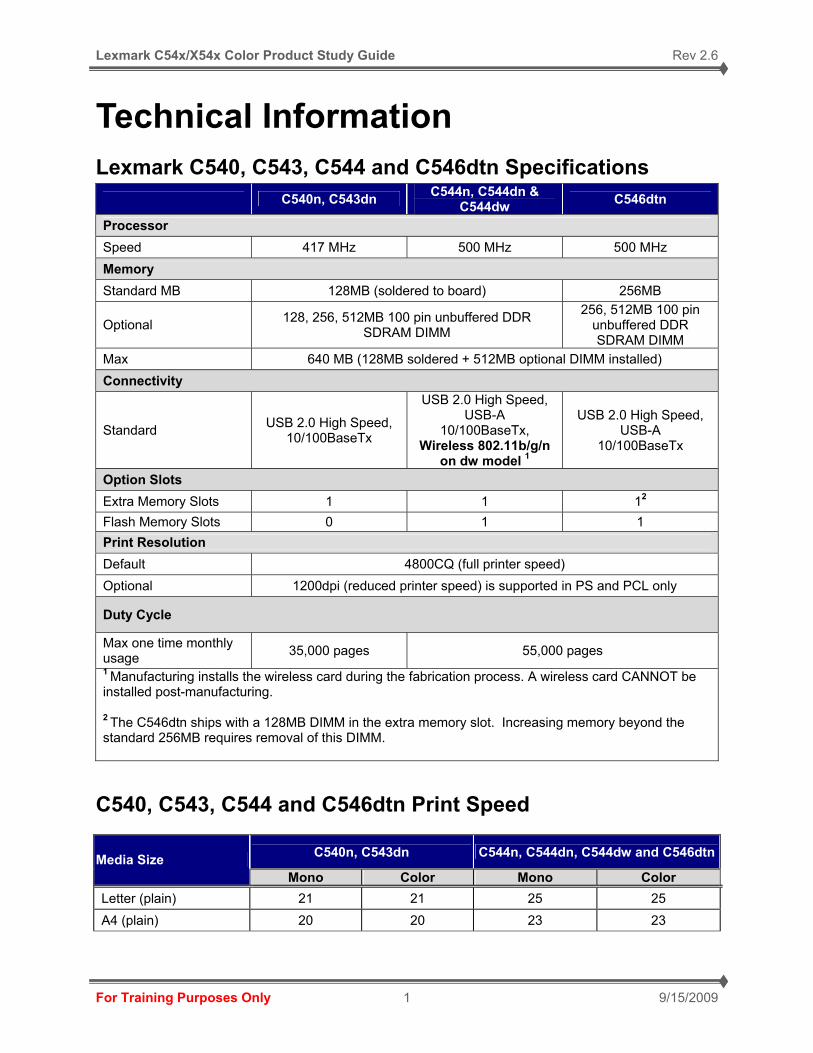
Lexmark C540, C543, C544 and C546dtn Specifications C540n, C543dn C544n, C544dn &
C544dw C546dtn
Processor Speed 417 MHz 500 MHz 500 MHz Memory Standard MB 128MB (soldered to board) 256MB
Optional 128, 256, 512MB 100 pin unbuffered DDR SDRAM DIMM
256, 512MB 100 pin unbuffered DDR SDRAM DIMM
Max 640 MB (128MB soldered + 512MB optional DIMM installed) Connectivity
Standard USB 2.0 High Speed, 10/100BaseTx
USB 2.0 High Speed, USB-A
10/100BaseTx, Wireless 802.11b/g/n
on dw model 1
USB 2.0 High Speed, USB-A
10/100BaseTx
Option Slots Extra Memory Slots 1 1 12 Flash Memory Slots 0 1 1 Print Resolution Default 4800CQ (full printer speed) Optional 1200dpi (reduced printer speed) is supported in PS and PCL only
Duty Cycle
Max one time monthly usage 35,000 pages 55,000 pages 1 Manufacturing installs the wireless card during the fabrication process. A wireless card CANNOT be installed post-manufacturing.
2 The C546dtn ships with a 128MB DIMM in the extra memory slot. Increasing memory beyond the standard 256MB requires removal of this DIMM.
C540, C543, C544 and C546dtn Print Speed
C540n, C543dn C544n, C544dn, C544dw and C546dtnMedia Size Mono Color Mono Color
Letter (plain) 21 21 25 25 A4 (plain) 20 20 23 23
Lexmark C54x/X54x Color Product Study Guide Rev 2.6
For Training Purposes Only 9/15/2009 2
C540, C543, C544 and C546dtn Media Options
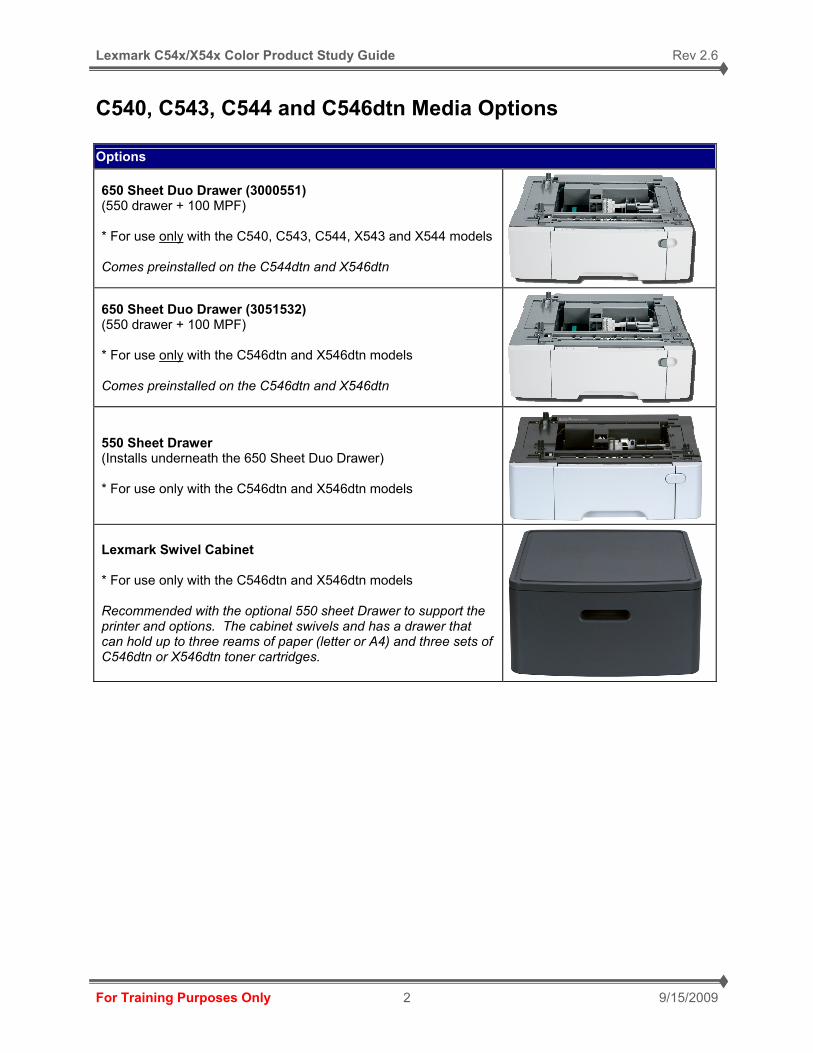
Options
650 Sheet Duo Drawer (3000551) (550 drawer + 100 MPF) * For use only with the C540, C543, C544, X543 and X544 models Comes preinstalled on the C544dtn and X546dtn
650 Sheet Duo Drawer (3051532) (550 drawer + 100 MPF) * For use only with the C546dtn and X546dtn models Comes preinstalled on the C546dtn and X546dtn
550 Sheet Drawer (Installs underneath the 650 Sheet Duo Drawer) * For use only with the C546dtn and X546dtn models
Lexmark Swivel Cabinet * For use only with the C546dtn and X546dtn models Recommended with the optional 550 sheet Drawer to support the printer and options. The cabinet swivels and has a drawer that can hold up to three reams of paper (letter or A4) and three sets of C546dtn or X546dtn toner cartridges.
Lexmark C54x/X54x Color Product Study Guide Rev 2.6
For Training Purposes Only 9/15/2009 3
C540, C543, C544 and C546dtn Media Sources and Capacities
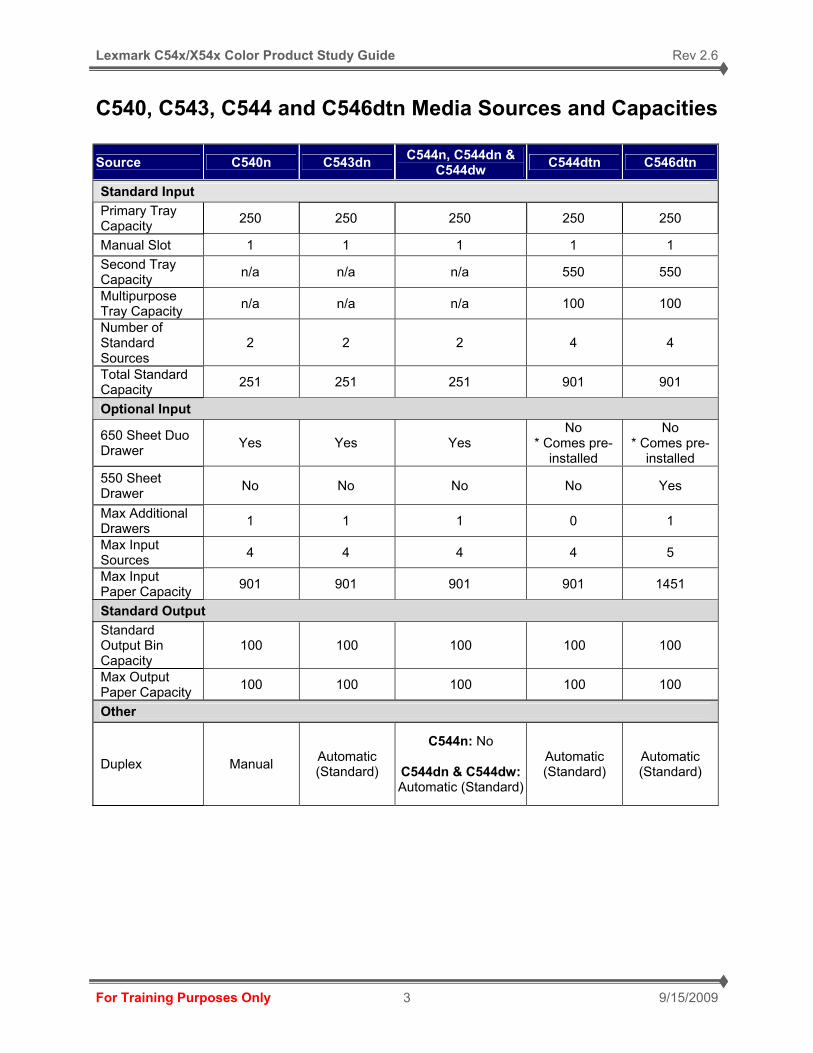
Source C540n C543dn C544n, C544dn & C544dw C544dtn C546dtn
Standard Input Primary Tray Capacity 250 250 250 250 250
Manual Slot 1 1 1 1 1 Second Tray Capacity n/a n/a n/a 550 550
Multipurpose Tray Capacity n/a n/a n/a 100 100
Number of Standard Sources
2 2 2 4 4
Total Standard Capacity 251 251 251 901 901
Optional Input
650 Sheet Duo Drawer Yes Yes Yes
No * Comes pre-
installed
No * Comes pre-
installed 550 Sheet Drawer No No No No Yes
Max Additional Drawers 1 1 1 0 1
Max Input Sources 4 4 4 4 5
Max Input Paper Capacity 901 901 901 901 1451
Standard Output Standard Output Bin Capacity
100 100 100 100 100
Max Output Paper Capacity 100 100 100 100 100
Other
Duplex Manual Automatic (Standard)
C544n: No
C544dn & C544dw: Automatic (Standard)
Automatic (Standard)
Automatic (Standard)
Lexmark C54x/X54x Color Product Study Guide Rev 2.6
For Training Purposes Only 9/15/2009 4
C540, C543 and C544 Supply Items Toner Cartridges
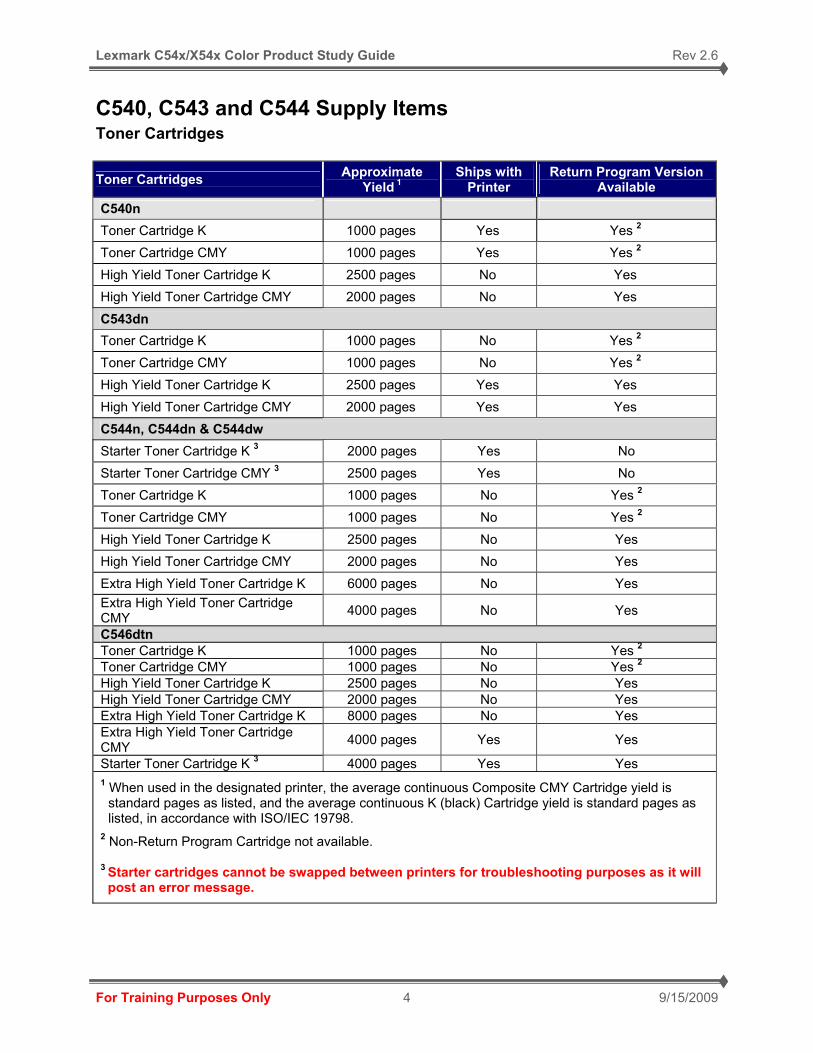
Toner Cartridges Approximate Yield 1
Ships with Printer
Return Program Version Available
C540n Toner Cartridge K 1000 pages Yes Yes 2
Toner Cartridge CMY 1000 pages Yes Yes 2 High Yield Toner Cartridge K 2500 pages No Yes High Yield Toner Cartridge CMY 2000 pages No Yes
C543dn Toner Cartridge K 1000 pages No Yes 2
Toner Cartridge CMY 1000 pages No Yes 2 High Yield Toner Cartridge K 2500 pages Yes Yes High Yield Toner Cartridge CMY 2000 pages Yes Yes C544n, C544dn & C544dw Starter Toner Cartridge K 3 2000 pages Yes No Starter Toner Cartridge CMY 3 2500 pages Yes No Toner Cartridge K 1000 pages No Yes 2 Toner Cartridge CMY 1000 pages No Yes 2 High Yield Toner Cartridge K 2500 pages No Yes High Yield Toner Cartridge CMY 2000 pages No Yes Extra High Yield Toner Cartridge K 6000 pages No Yes Extra High Yield Toner Cartridge CMY 4000 pages No Yes
C546dtn Toner Cartridge K 1000 pages No Yes 2 Toner Cartridge CMY 1000 pages No Yes 2 High Yield Toner Cartridge K 2500 pages No Yes High Yield Toner Cartridge CMY 2000 pages No Yes Extra High Yield Toner Cartridge K 8000 pages No Yes Extra High Yield Toner Cartridge CMY 4000 pages Yes Yes
Starter Toner Cartridge K 3 4000 pages Yes Yes 1 When used in the designated printer, the average continuous Composite CMY Cartridge yield is
standard pages as listed, and the average continuous K (black) Cartridge yield is standard pages as listed, in accordance with ISO/IEC 19798.
2 Non-Return Program Cartridge not available. 3 Starter cartridges cannot be swapped between printers for troubleshooting purposes as it will post an error message.
Lexmark C54x/X54x Color Product Study Guide Rev 2.6
For Training Purposes Only 9/15/2009 5
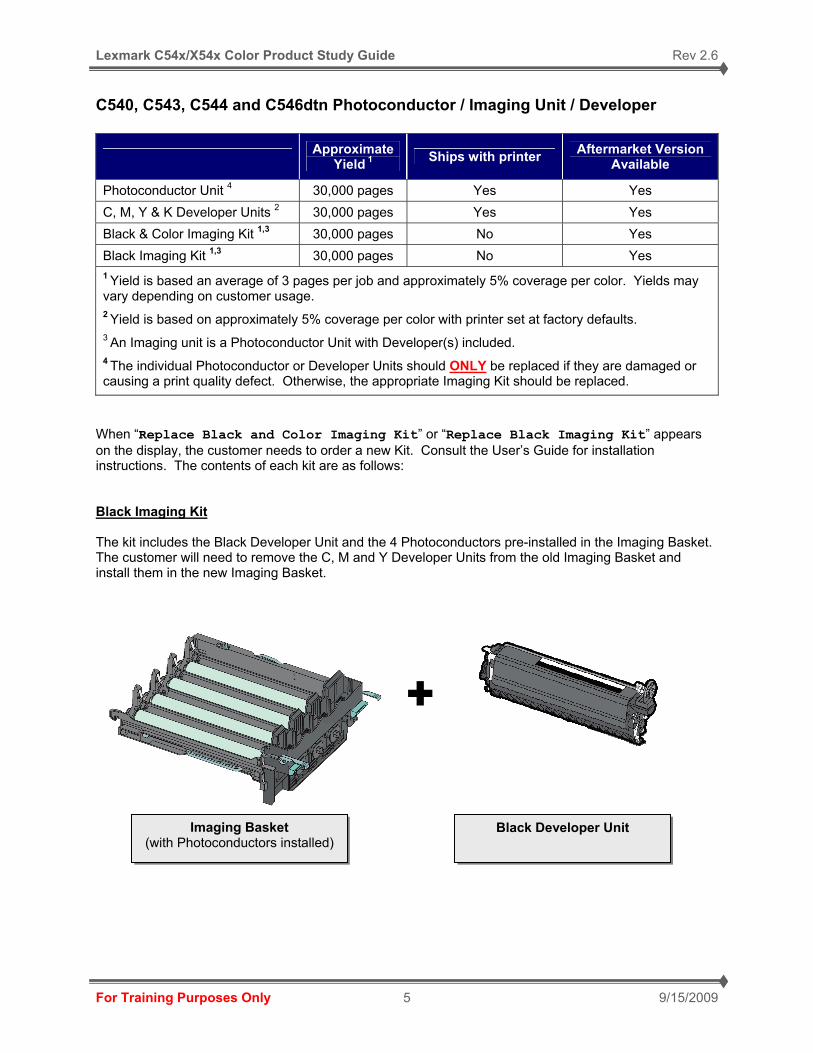
C540, C543, C544 and C546dtn Photoconductor / Imaging Unit / Developer
Approximate Yield 1 Ships with printer Aftermarket Version
Available
Photoconductor Unit 4 30,000 pages Yes Yes C, M, Y & K Developer Units 2 30,000 pages Yes Yes Black & Color Imaging Kit 1,3 30,000 pages No Yes Black Imaging Kit 1,3 30,000 pages No Yes 1 Yield is based an average of 3 pages per job and approximately 5% coverage per color. Yields may vary depending on customer usage. 2 Yield is based on approximately 5% coverage per color with printer set at factory defaults. 3 An Imaging unit is a Photoconductor Unit with Developer(s) included. 4 The individual Photoconductor or Developer Units should ONLY be replaced if they are damaged or causing a print quality defect. Otherwise, the appropriate Imaging Kit should be replaced.
When “Replace Black and Color Imaging Kit” or “Replace Black Imaging Kit” appears on the display, the customer needs to order a new Kit. Consult the User’s Guide for installation instructions. The contents of each kit are as follows: Black Imaging Kit The kit includes the Black Developer Unit and the 4 Photoconductors pre-installed in the Imaging Basket. The customer will need to remove the C, M and Y Developer Units from the old Imaging Basket and install them in the new Imaging Basket.
Imaging Basket (with Photoconductors installed)
Black Developer Unit
Lexmark C54x/X54x Color Product Study Guide Rev 2.6
For Training Purposes Only 9/15/2009 6
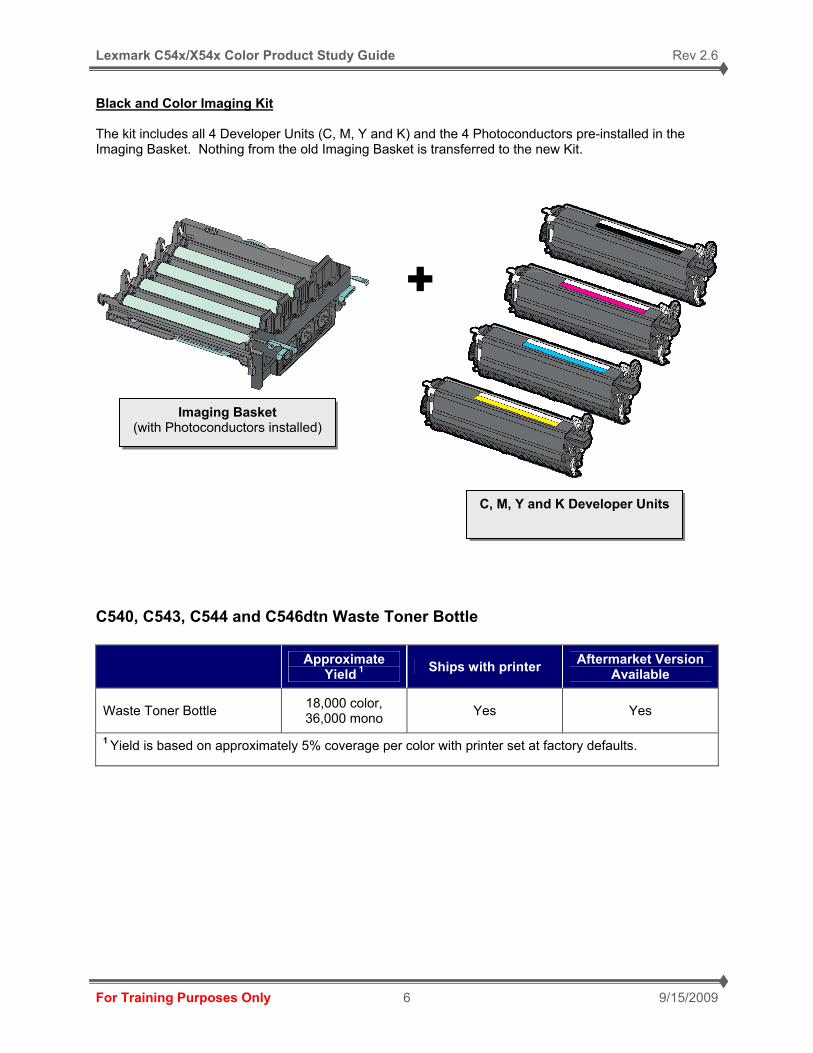
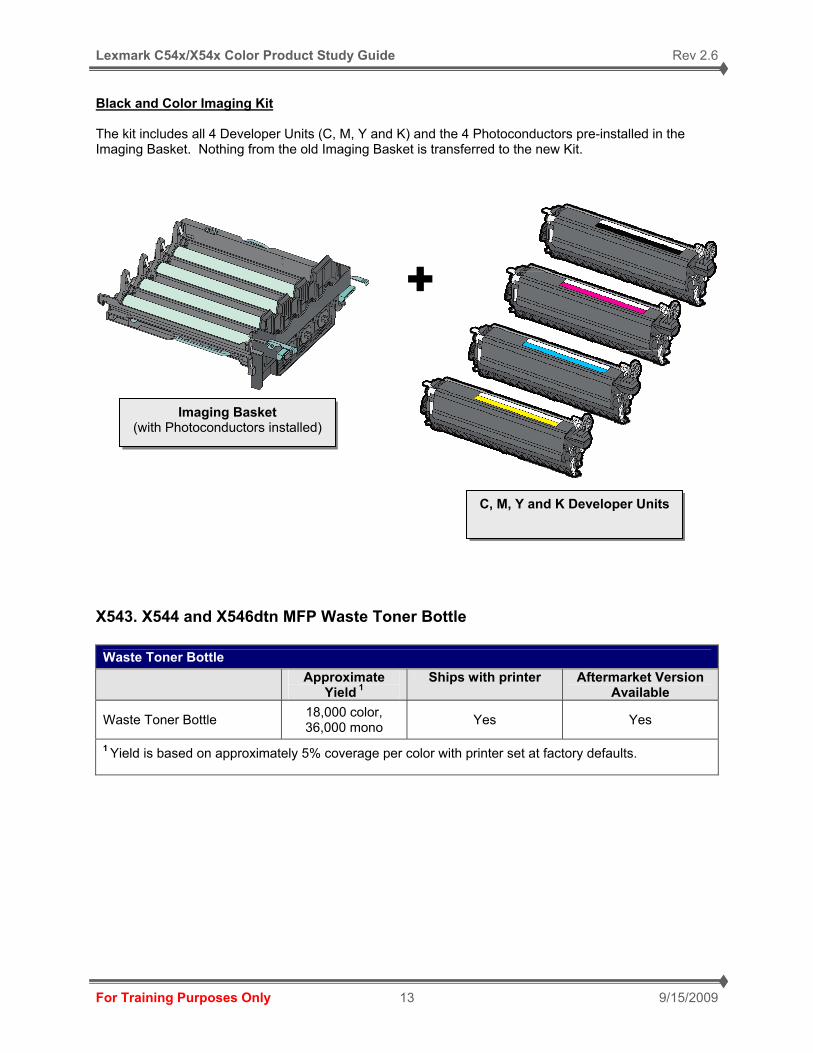
Black and Color Imaging Kit The kit includes all 4 Developer Units (C, M, Y and K) and the 4 Photoconductors pre-installed in the Imaging Basket. Nothing from the old Imaging Basket is transferred to the new Kit. C540, C543, C544 and C546dtn Waste Toner Bottle
Approximate Yield 1 Ships with printer Aftermarket Version
Available
Waste Toner Bottle 18,000 color, 36,000 mono Yes Yes
1 Yield is based on approximately 5% coverage per color with printer set at factory defaults.
Imaging Basket (with Photoconductors installed)
C, M, Y and K Developer Units
Lexmark C54x/X54x Color Product Study Guide Rev 2.6
For Training Purposes Only 9/15/2009 7
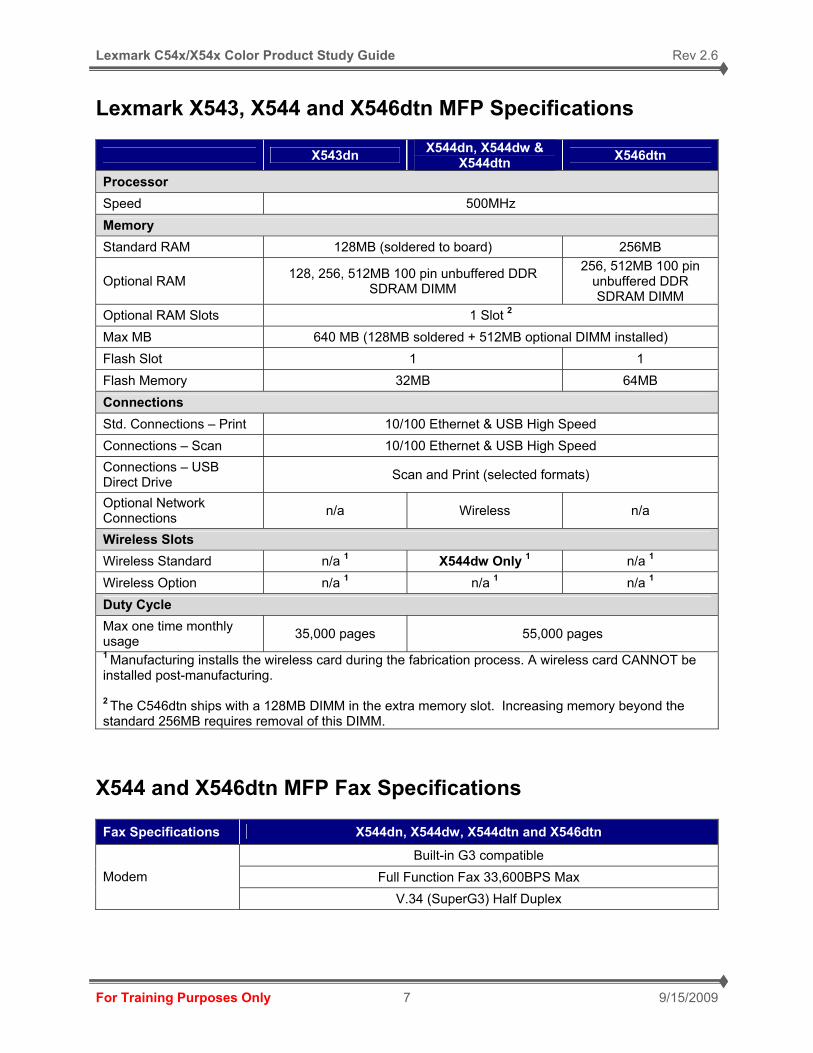
Lexmark X543, X544 and X546dtn MFP Specifications
X543dn X544dn, X544dw & X544dtn X546dtn
Processor Speed 500MHz Memory Standard RAM 128MB (soldered to board) 256MB
Optional RAM 128, 256, 512MB 100 pin unbuffered DDR SDRAM DIMM
256, 512MB 100 pin unbuffered DDR SDRAM DIMM
Optional RAM Slots 1 Slot 2 Max MB 640 MB (128MB soldered + 512MB optional DIMM installed) Flash Slot 1 1 Flash Memory 32MB 64MB Connections Std. Connections – Print 10/100 Ethernet & USB High Speed Connections – Scan 10/100 Ethernet & USB High Speed Connections – USB Direct Drive Scan and Print (selected formats)
Optional Network Connections n/a Wireless n/a
Wireless Slots Wireless Standard n/a 1 X544dw Only 1 n/a 1 Wireless Option n/a 1 n/a 1 n/a 1 Duty Cycle Max one time monthly usage 35,000 pages 55,000 pages 1 Manufacturing installs the wireless card during the fabrication process. A wireless card CANNOT be installed post-manufacturing. 2 The C546dtn ships with a 128MB DIMM in the extra memory slot. Increasing memory beyond the standard 256MB requires removal of this DIMM.
X544 and X546dtn MFP Fax Specifications Fax Specifications X544dn, X544dw, X544dtn and X546dtn
Built-in G3 compatible Full Function Fax 33,600BPS Max Modem
V.34 (SuperG3) Half Duplex
Lexmark C54x/X54x Color Product Study Guide Rev 2.6
For Training Purposes Only 9/15/2009 8
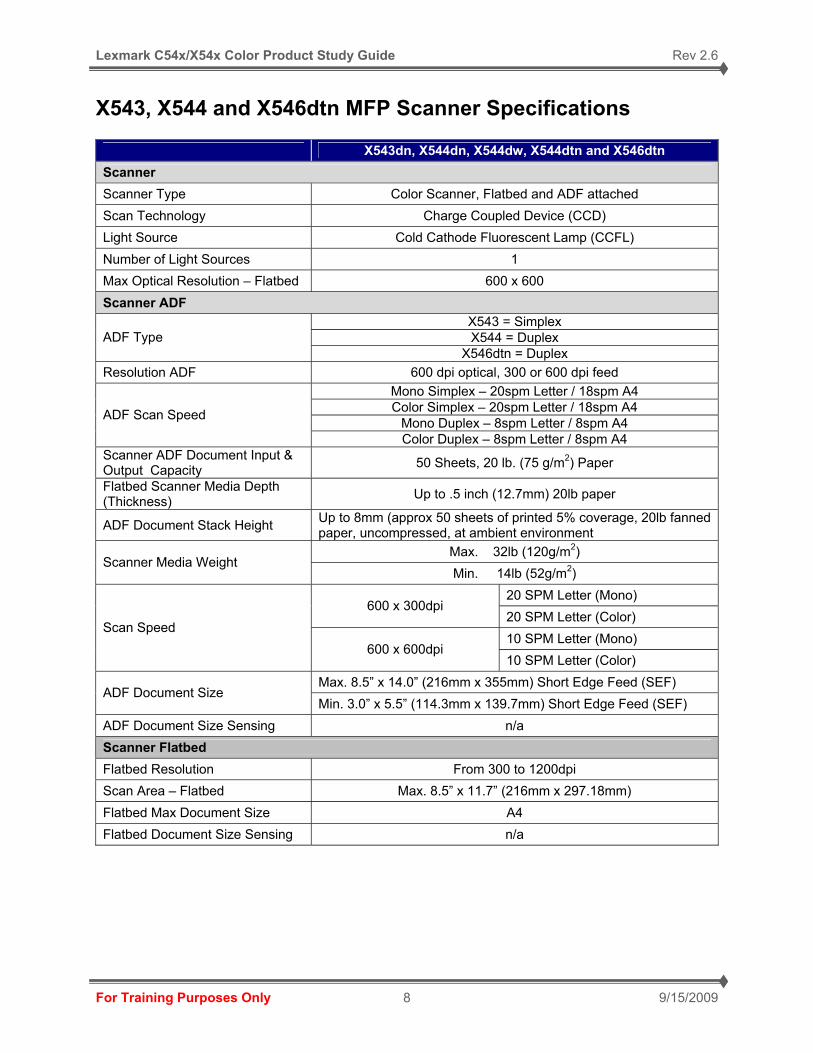
X543, X544 and X546dtn MFP Scanner Specifications X543dn, X544dn, X544dw, X544dtn and X546dtn Scanner Scanner Type Color Scanner, Flatbed and ADF attached Scan Technology Charge Coupled Device (CCD) Light Source Cold Cathode Fluorescent Lamp (CCFL) Number of Light Sources 1 Max Optical Resolution – Flatbed 600 x 600 Scanner ADF
X543 = Simplex X544 = Duplex ADF Type
X546dtn = Duplex Resolution ADF 600 dpi optical, 300 or 600 dpi feed
Mono Simplex – 20spm Letter / 18spm A4 Color Simplex – 20spm Letter / 18spm A4
Mono Duplex – 8spm Letter / 8spm A4 ADF Scan Speed
Color Duplex – 8spm Letter / 8spm A4 Scanner ADF Document Input & Output Capacity 50 Sheets, 20 lb. (75 g/m2) Paper
Flatbed Scanner Media Depth (Thickness) Up to .5 inch (12.7mm) 20lb paper
ADF Document Stack Height Up to 8mm (approx 50 sheets of printed 5% coverage, 20lb fanned paper, uncompressed, at ambient environment
Max. 32lb (120g/m2) Scanner Media Weight
Min. 14lb (52g/m2) 20 SPM Letter (Mono)
600 x 300dpi 20 SPM Letter (Color) 10 SPM Letter (Mono)
Scan Speed 600 x 600dpi
10 SPM Letter (Color) Max. 8.5” x 14.0” (216mm x 355mm) Short Edge Feed (SEF)
ADF Document Size Min. 3.0” x 5.5” (114.3mm x 139.7mm) Short Edge Feed (SEF)
ADF Document Size Sensing n/a Scanner Flatbed Flatbed Resolution From 300 to 1200dpi Scan Area – Flatbed Max. 8.5” x 11.7” (216mm x 297.18mm) Flatbed Max Document Size A4 Flatbed Document Size Sensing n/a
Lexmark C54x/X54x Color Product Study Guide Rev 2.6
For Training Purposes Only 9/15/2009 9
X543, X544 and X546dtn MFP Print and Copy Speed
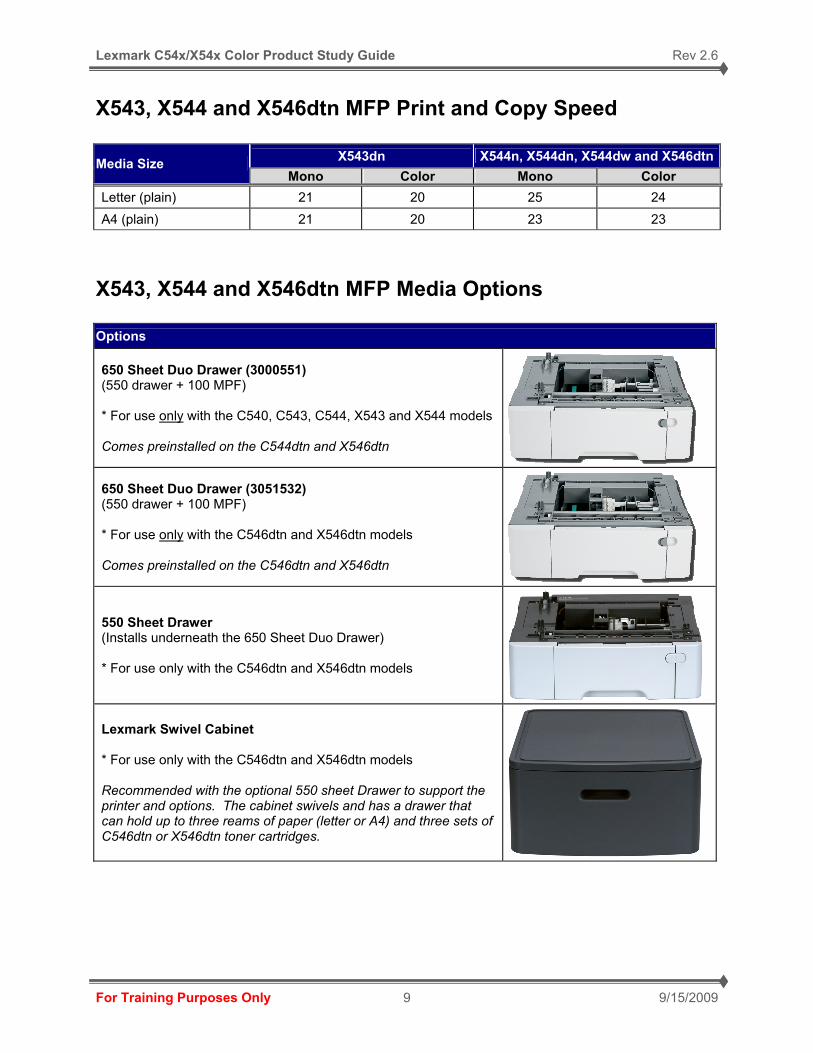
X543, X544 and X546dtn MFP Media Options
X543dn X544n, X544dn, X544dw and X546dtnMedia Size Mono Color Mono Color
Letter (plain) 21 20 25 24 A4 (plain) 21 20 23 23
Options
650 Sheet Duo Drawer (3000551) (550 drawer + 100 MPF) * For use only with the C540, C543, C544, X543 and X544 models Comes preinstalled on the C544dtn and X546dtn
650 Sheet Duo Drawer (3051532) (550 drawer + 100 MPF) * For use only with the C546dtn and X546dtn models Comes preinstalled on the C546dtn and X546dtn
550 Sheet Drawer (Installs underneath the 650 Sheet Duo Drawer) * For use only with the C546dtn and X546dtn models
Lexmark Swivel Cabinet * For use only with the C546dtn and X546dtn models Recommended with the optional 550 sheet Drawer to support the printer and options. The cabinet swivels and has a drawer that can hold up to three reams of paper (letter or A4) and three sets of C546dtn or X546dtn toner cartridges.
Lexmark C54x/X54x Color Product Study Guide Rev 2.6
For Training Purposes Only 9/15/2009 10
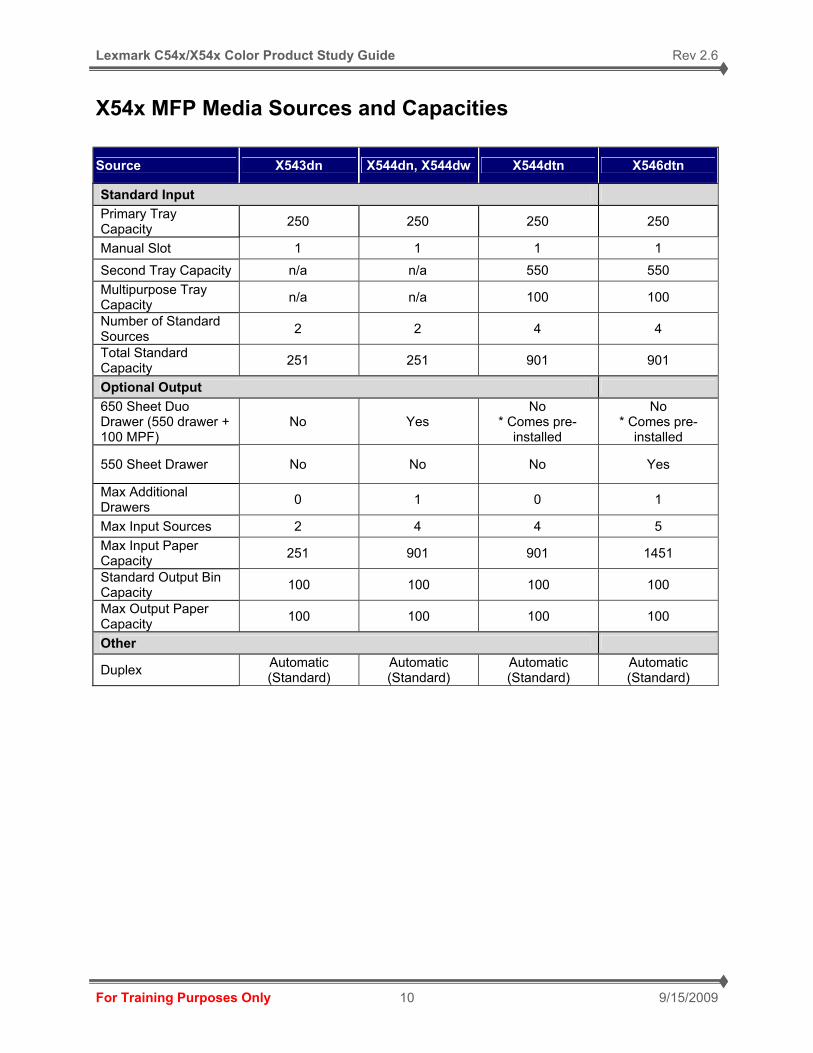
X54x MFP Media Sources and Capacities
Source X543dn X544dn, X544dw X544dtn X546dtn
Standard Input Primary Tray Capacity 250 250 250 250
Manual Slot 1 1 1 1 Second Tray Capacity n/a n/a 550 550 Multipurpose Tray Capacity n/a n/a 100 100
Number of Standard Sources 2 2 4 4
Total Standard Capacity 251 251 901 901
Optional Output 650 Sheet Duo Drawer (550 drawer + 100 MPF)
No Yes No
* Comes pre-installed
No * Comes pre-
installed
550 Sheet Drawer No No No Yes
Max Additional Drawers 0 1 0 1
Max Input Sources 2 4 4 5 Max Input Paper Capacity 251 901 901 1451
Standard Output Bin Capacity 100 100 100 100
Max Output Paper Capacity 100 100 100 100
Other
Duplex Automatic (Standard)
Automatic (Standard)
Automatic (Standard)
Automatic (Standard)
Lexmark C54x/X54x Color Product Study Guide Rev 2.6
For Training Purposes Only 9/15/2009 11
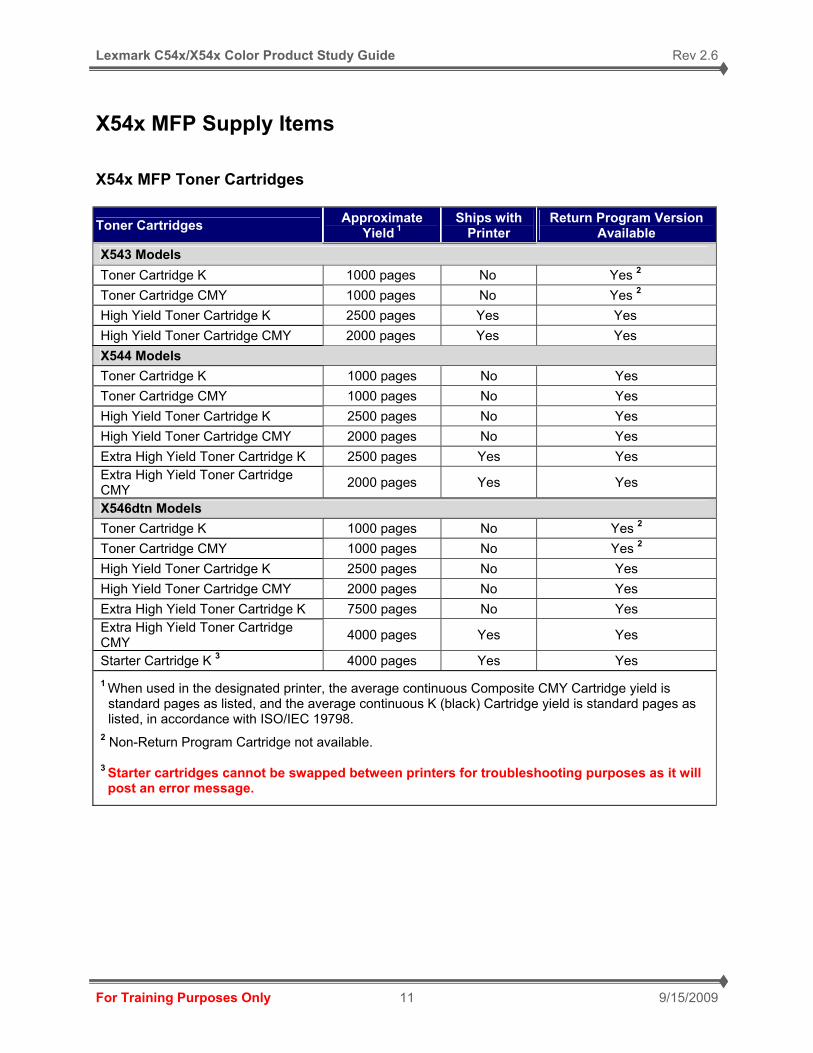
X54x MFP Supply Items X54x MFP Toner Cartridges
Toner Cartridges Approximate Yield 1
Ships with Printer
Return Program Version Available
X543 Models Toner Cartridge K 1000 pages No Yes 2
Toner Cartridge CMY 1000 pages No Yes 2 High Yield Toner Cartridge K 2500 pages Yes Yes High Yield Toner Cartridge CMY 2000 pages Yes Yes X544 Models Toner Cartridge K 1000 pages No Yes Toner Cartridge CMY 1000 pages No Yes High Yield Toner Cartridge K 2500 pages No Yes High Yield Toner Cartridge CMY 2000 pages No Yes Extra High Yield Toner Cartridge K 2500 pages Yes Yes Extra High Yield Toner Cartridge CMY 2000 pages Yes Yes
X546dtn Models Toner Cartridge K 1000 pages No Yes 2 Toner Cartridge CMY 1000 pages No Yes 2 High Yield Toner Cartridge K 2500 pages No Yes High Yield Toner Cartridge CMY 2000 pages No Yes Extra High Yield Toner Cartridge K 7500 pages No Yes Extra High Yield Toner Cartridge CMY 4000 pages Yes Yes
Starter Cartridge K 3 4000 pages Yes Yes 1 When used in the designated printer, the average continuous Composite CMY Cartridge yield is
standard pages as listed, and the average continuous K (black) Cartridge yield is standard pages as listed, in accordance with ISO/IEC 19798.
2 Non-Return Program Cartridge not available. 3 Starter cartridges cannot be swapped between printers for troubleshooting purposes as it will post an error message.
Lexmark C54x/X54x Color Product Study Guide Rev 2.6
For Training Purposes Only 9/15/2009 12
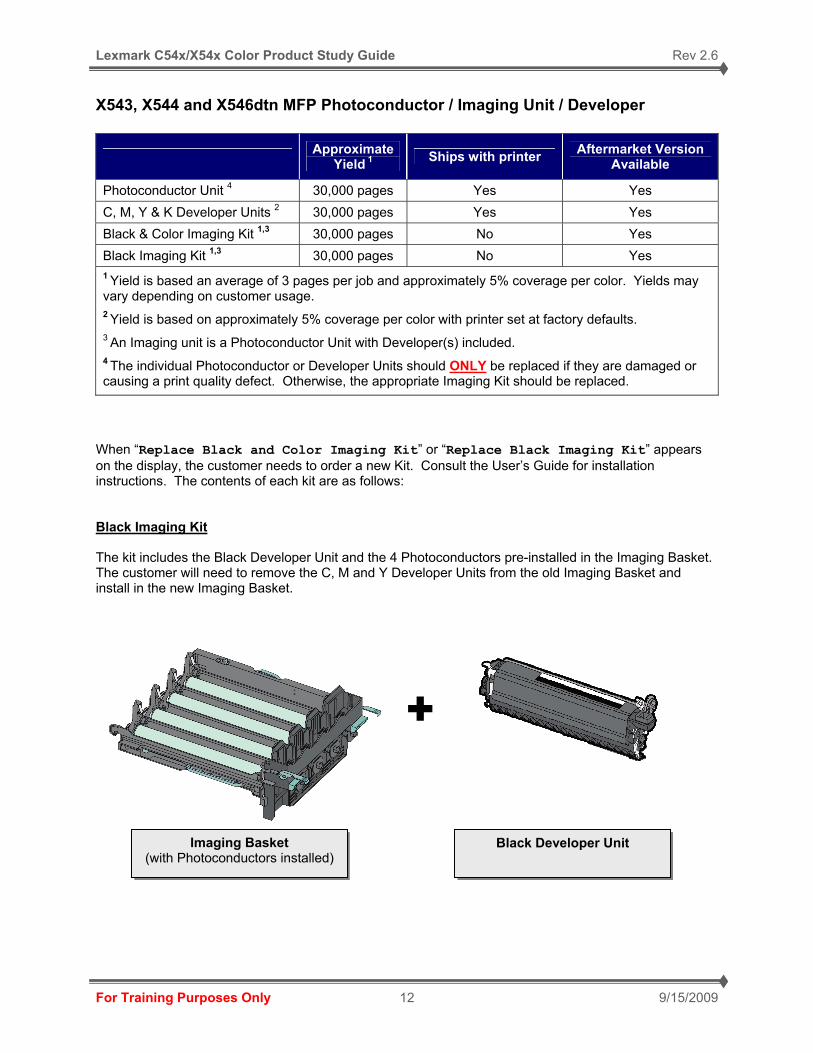
X543, X544 and X546dtn MFP Photoconductor / Imaging Unit / Developer
Approximate Yield 1 Ships with printer Aftermarket Version
Available
Photoconductor Unit 4 30,000 pages Yes Yes C, M, Y & K Developer Units 2 30,000 pages Yes Yes Black & Color Imaging Kit 1,3 30,000 pages No Yes Black Imaging Kit 1,3 30,000 pages No Yes 1 Yield is based an average of 3 pages per job and approximately 5% coverage per color. Yields may vary depending on customer usage. 2 Yield is based on approximately 5% coverage per color with printer set at factory defaults. 3 An Imaging unit is a Photoconductor Unit with Developer(s) included. 4 The individual Photoconductor or Developer Units should ONLY be replaced if they are damaged or causing a print quality defect. Otherwise, the appropriate Imaging Kit should be replaced.
When “Replace Black and Color Imaging Kit” or “Replace Black Imaging Kit” appears on the display, the customer needs to order a new Kit. Consult the User’s Guide for installation instructions. The contents of each kit are as follows: Black Imaging Kit The kit includes the Black Developer Unit and the 4 Photoconductors pre-installed in the Imaging Basket. The customer will need to remove the C, M and Y Developer Units from the old Imaging Basket and install in the new Imaging Basket.
Imaging Basket (with Photoconductors installed)
Black Developer Unit
Lexmark C54x/X54x Color Product Study Guide Rev 2.6
For Training Purposes Only 9/15/2009 13
Black and Color Imaging Kit The kit includes all 4 Developer Units (C, M, Y and K) and the 4 Photoconductors pre-installed in the Imaging Basket. Nothing from the old Imaging Basket is transferred to the new Kit. X543. X544 and X546dtn MFP Waste Toner Bottle Waste Toner Bottle Approximate
Yield 1 Ships with printer Aftermarket Version
Available
Waste Toner Bottle 18,000 color, 36,000 mono Yes Yes
1 Yield is based on approximately 5% coverage per color with printer set at factory defaults.
Imaging Basket (with Photoconductors installed)
C, M, Y and K Developer Units
Lexmark C54x/X54x Color Product Study Guide Rev 2.6
For Training Purposes Only 9/15/2009 14
Theory of Operation
X544 and X546dtn MFP Fax System The three basic units of a fax are the scanner (for reading the image), the control circuit, and the printer.
• The scanner splits the image into a fine grid, and then reads the brightness (white/black) of each cell. The scanner consists of a lamp that illuminates the original document with uniform light and a charged coupled device (CCD) that reads the light reflected from the image. The white/black information is converted to a digital signal: bright cells become 1, dark cells 0.
• The digital signal from a scanned image is subjected to digital to analog conversion (modulation) by the control circuit to enable transmission over an analog telephone line. After conversion, the data is sent as an analog signal. The sound audible during transmission is image data that has become an analog signal.
• The analog signal arriving over the telephone line is then subjected to analog to digital conversion (demodulation) by the control circuit of the receiving fax machine, and restored to a digital signal.
• The black/white information obtained from the analog to digital conversion is sent to the printer, where black cells are reproduced on the paper at the positions where they were on the original.
See the picture on the following page for a graphical representation of the fax theory of operation.
Lexmark C54x/X54x Color Product Study Guide Rev 2.6
For Training Purposes Only 9/15/2009 15
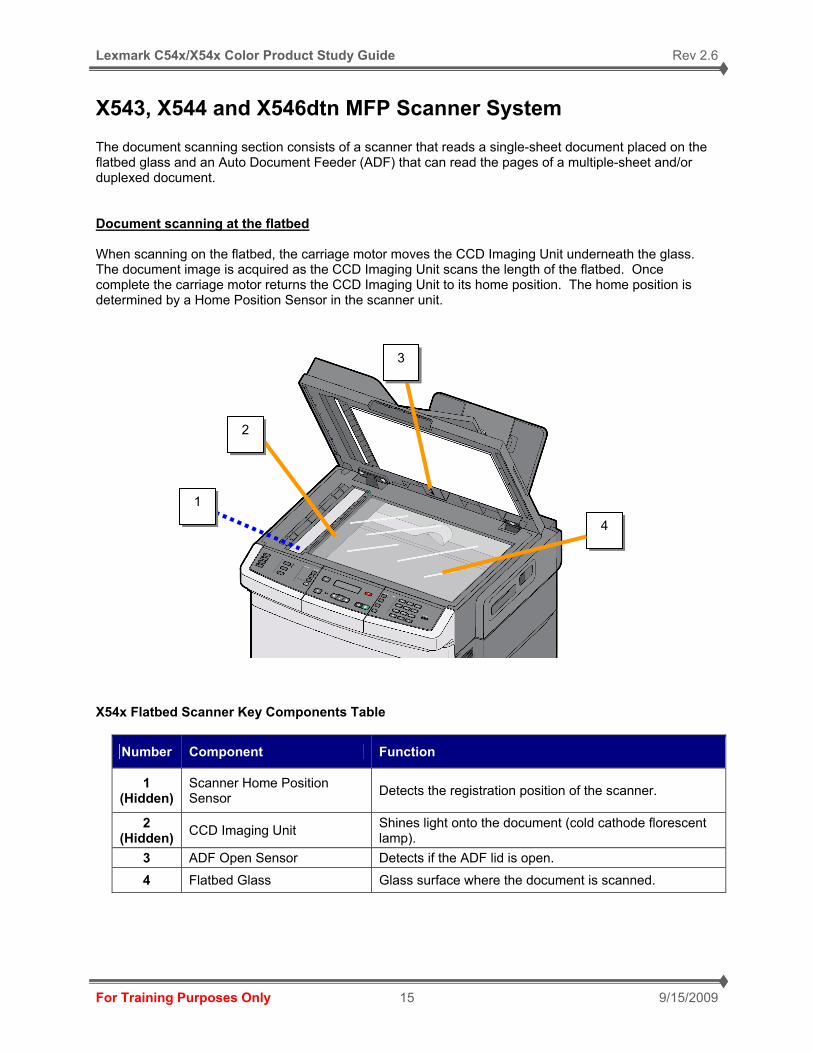
X543, X544 and X546dtn MFP Scanner System The document scanning section consists of a scanner that reads a single-sheet document placed on the flatbed glass and an Auto Document Feeder (ADF) that can read the pages of a multiple-sheet and/or duplexed document. Document scanning at the flatbed When scanning on the flatbed, the carriage motor moves the CCD Imaging Unit underneath the glass. The document image is acquired as the CCD Imaging Unit scans the length of the flatbed. Once complete the carriage motor returns the CCD Imaging Unit to its home position. The home position is determined by a Home Position Sensor in the scanner unit.
X54x Flatbed Scanner Key Components Table
Number Component Function
1 (Hidden)
Scanner Home Position Sensor Detects the registration position of the scanner.
2 (Hidden) CCD Imaging Unit Shines light onto the document (cold cathode florescent
lamp). 3 ADF Open Sensor Detects if the ADF lid is open.
4 Flatbed Glass Glass surface where the document is scanned.
2
3
4
1
Lexmark C54x/X54x Color Product Study Guide Rev 2.6
For Training Purposes Only 9/15/2009 16
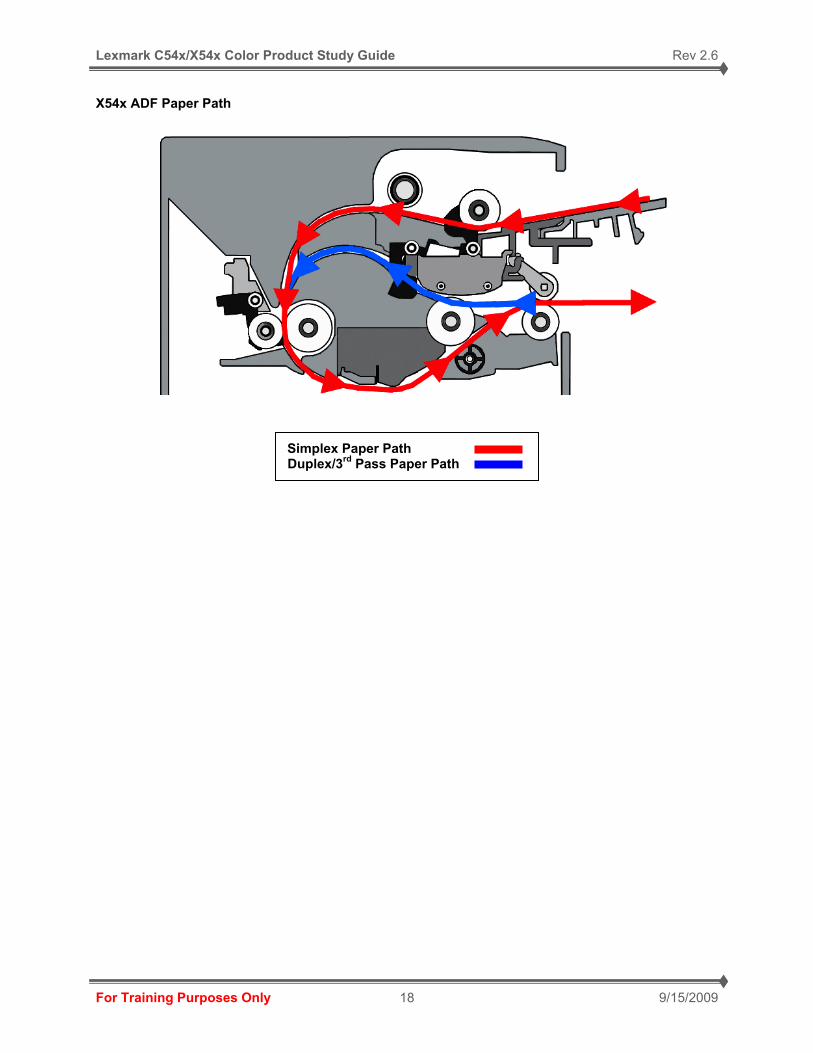
X543, X544 and X546dtn MFP Document Scanning at the ADF (Auto Document Feeder) When scanning, the MFP will default to the flatbed scanner unless the Paper Present Sensor on the ADF detects the presence of media. If media is detected, the ADF Pick Roll feeds the media into the ADF. As it the media moves into the ADF, it actuates the Document Sensor. The Document Sensor determines the first side of the document to be scanned and signals the flatbed Carriage Motor to move the CCD Imaging Unit to the ADF scan area. Once the CCD reaches the ADF scan area, a calibration is performed on the CCD. The media advances toward the ADF Scan Sensor near the takeaway roll. If the paper does not reach the ADF Scan Sensor in the predetermined length of time, a jam error will post on the operator panel. Once the media does reach the sensor, the ADF Motor and ADF Scan Sensor ensure that the media is traveling at the correct speed through the Scan Area. The speed is determined by several factors including the image DPI. When the media reaches the scan area, the image acquisition process initiates. As the training edge of the media passes the ADF Scan Sensor, a signal is sent to the Controller that the end of the media is near. The image acquisition process will continue for the predetermined amount of time depending on the image DPI and paper size. If the scan job is only simplex, the media continues to the Exit Roller and exits the ADF. If the scan job is duplex, a solenoid on the ADF actuates as the tailing edge of the media reaches the reverse point in the ADF. This solenoid moves a Diverter Gate to the down position, and engages a reversing gear on the Exit Roll. The reversed Exit Roll pulls the paper back into the ADF and the Transport Roll moves the media to the Duplex Sensor. When the Duplex Sensor actuates, it signals the Controller that this is the second side of the media to scan and to stop the turning of the Exit Roll. The Transport Roll continues to move the media toward the Take Away roll and the ADF Scan Sensor. Like the first pass of the media, the image acquisition process is repeated for the second side of the media. Once the trailing edge of the media reaches the reverse point the second time, the solenoid moves the Diverter Gate to the down position, and reverses the Exit Roll. The paper goes back into the ADF unit for a third time, however, no imaging occurs. This pass is to turn the paper over so the original side is facing up. When the media’s trailing edge reaches the reverse point in the third pass, the solenoid does not actuate the Diverter Gate. The media continues to the Exit Roller and exits the ADF. See the X54x ADF Components and ADF Paper Path images located on the following two pages.
Lexmark C54x/X54x Color Product Study Guide Rev 2.6
For Training Purposes Only 9/15/2009 17
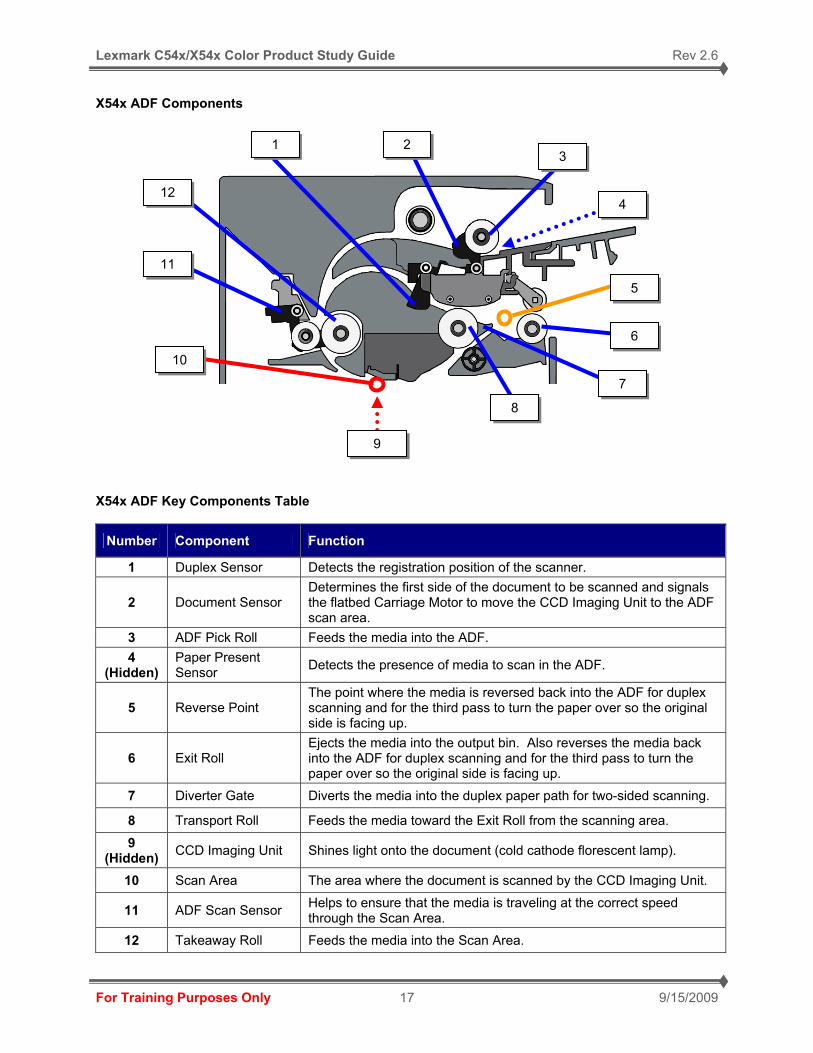
X54x ADF Components X54x ADF Key Components Table
Number Component Function
1 Duplex Sensor Detects the registration position of the scanner.
2 Document Sensor Determines the first side of the document to be scanned and signals the flatbed Carriage Motor to move the CCD Imaging Unit to the ADF scan area.
3 ADF Pick Roll Feeds the media into the ADF. 4
(Hidden) Paper Present Sensor Detects the presence of media to scan in the ADF.
5 Reverse Point The point where the media is reversed back into the ADF for duplex scanning and for the third pass to turn the paper over so the original side is facing up.
6 Exit Roll Ejects the media into the output bin. Also reverses the media back into the ADF for duplex scanning and for the third pass to turn the paper over so the original side is facing up.
7 Diverter Gate Diverts the media into the duplex paper path for two-sided scanning.
8 Transport Roll Feeds the media toward the Exit Roll from the scanning area.
9 (Hidden) CCD Imaging Unit Shines light onto the document (cold cathode florescent lamp).
10 Scan Area The area where the document is scanned by the CCD Imaging Unit.
11 ADF Scan Sensor Helps to ensure that the media is traveling at the correct speed through the Scan Area.
12 Takeaway Roll Feeds the media into the Scan Area.
1 2 3
4
5
6
7
8
9
10
11
12
Lexmark C54x/X54x Color Product Study Guide Rev 2.6
For Training Purposes Only 9/15/2009 18
X54x ADF Paper Path
Simplex Paper Path Duplex/3rd Pass Paper Path
Lexmark C54x/X54x Color Product Study Guide Rev 2.6
For Training Purposes Only 9/15/2009 19
C54x/X54x Electrophotographic Process This color laser printer uses the Electrophotographic process (EP Process) to image toner onto the media via a tandem (in-line) system. This system contains four color cartridge assemblies (cyan, yellow, magenta, and black). The Electrophotographic Process steps are as follows:
• Charge – Photoconductor Drum surface is charged with electricity from the Bias Charge Roll,
• Expose – the laser (printhead) exposes the photoconductor with light and creates a Latent Image on the surface,
• Develop – while in contact with each other, toner from the Developer Roll adheres to the latent image on the surface of the photoconductor. This happens because of a difference in charge potential between the two surfaces,
• 1st Transfer – an electrical charge is sent to each of the four 1st Transfer Rolls inside the ITU (Transfer Belt). Due to the difference in charge potential, toner is transferred from the Photoconductor to the surface of the ITU as it passes each photoconductor.
• 2nd Transfer – the media passes in between the Transfer Roller and ITU surfaces. An electrical charge is sent to the Transfer Roller to create a difference in charge potential. Because of this difference in charge, toner is transferred from the ITU to the surface of the media.
• Fuse – Toner is bonded permanently to the media by heat and pressure.
• Clean/Erase – The Photoconductor and ITU Belt surfaces are cleaned of residual toner. This printer does not have erase lamps.
If a component fails, it is important to recognize at which step the failure took place. By knowing this, you can determine the source of the problem. Understanding the EP Process is the key to troubleshooting print quality problems. The next few pages illustrate the various EP Process steps with a cross-sectional of an X54x printer. The C54x printer has the same components, however, it does not have the Scanner Unit.
Lexmark C54x/X54x Color Product Study Guide Rev 2.6
For Training Purposes Only 9/15/2009 20
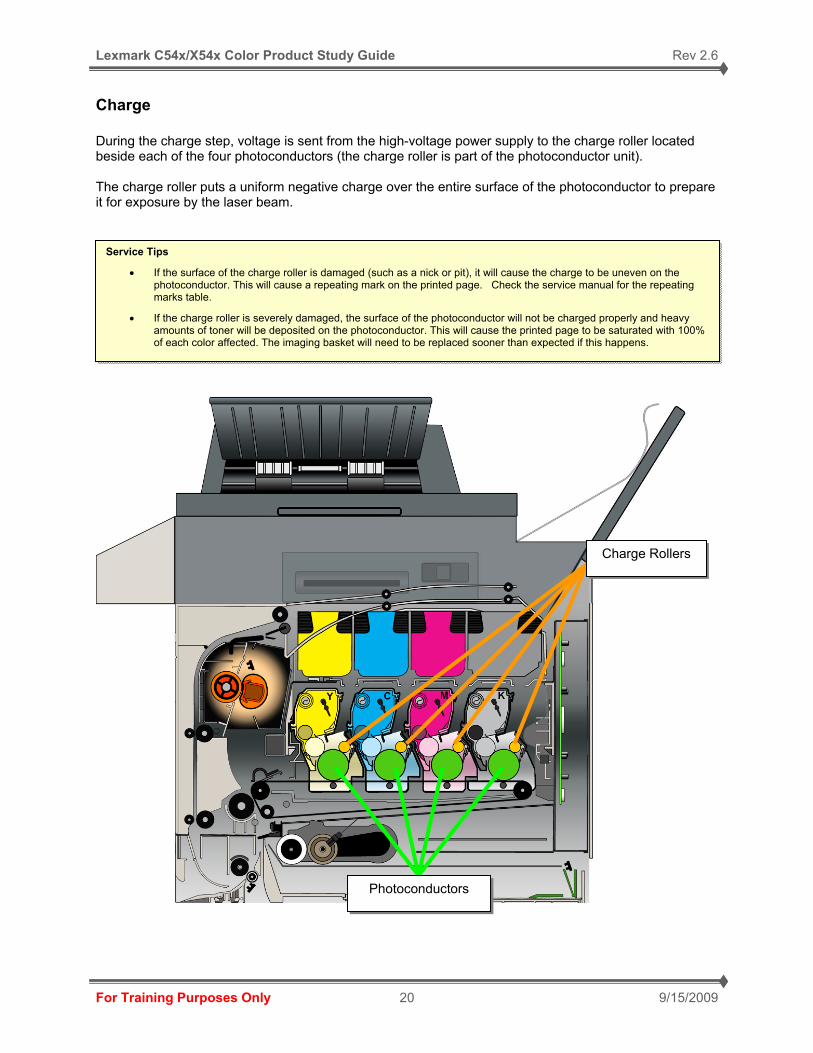
Charge During the charge step, voltage is sent from the high-voltage power supply to the charge roller located beside each of the four photoconductors (the charge roller is part of the photoconductor unit). The charge roller puts a uniform negative charge over the entire surface of the photoconductor to prepare it for exposure by the laser beam.
Service Tips
• If the surface of the charge roller is damaged (such as a nick or pit), it will cause the charge to be uneven on the photoconductor. This will cause a repeating mark on the printed page. Check the service manual for the repeating marks table.
• If the charge roller is severely damaged, the surface of the photoconductor will not be charged properly and heavy amounts of toner will be deposited on the photoconductor. This will cause the printed page to be saturated with 100% of each color affected. The imaging basket will need to be replaced sooner than expected if this happens.
Charge Rollers
Photoconductors
Lexmark C54x/X54x Color Product Study Guide Rev 2.6
For Training Purposes Only 9/15/2009 21
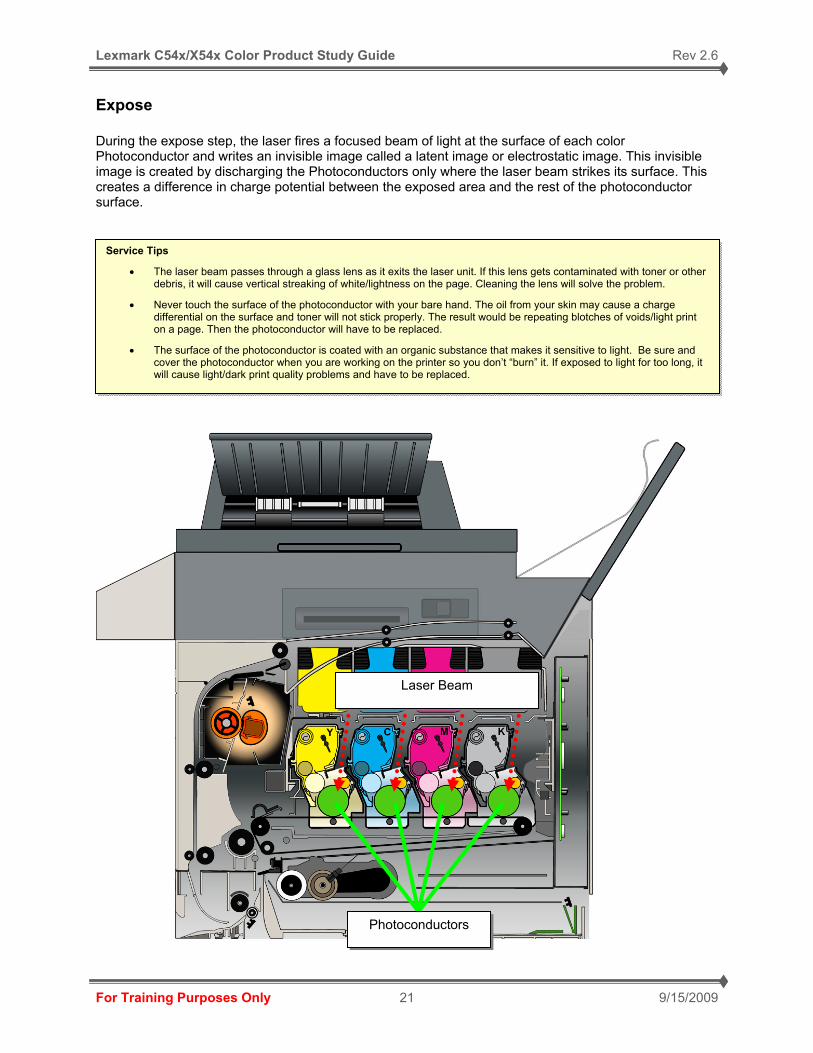
Expose During the expose step, the laser fires a focused beam of light at the surface of each color Photoconductor and writes an invisible image called a latent image or electrostatic image. This invisible image is created by discharging the Photoconductors only where the laser beam strikes its surface. This creates a difference in charge potential between the exposed area and the rest of the photoconductor surface.
Service Tips
• The laser beam passes through a glass lens as it exits the laser unit. If this lens gets contaminated with toner or other debris, it will cause vertical streaking of white/lightness on the page. Cleaning the lens will solve the problem.
• Never touch the surface of the photoconductor with your bare hand. The oil from your skin may cause a charge differential on the surface and toner will not stick properly. The result would be repeating blotches of voids/light print on a page. Then the photoconductor will have to be replaced.
• The surface of the photoconductor is coated with an organic substance that makes it sensitive to light. Be sure and cover the photoconductor when you are working on the printer so you don’t “burn” it. If exposed to light for too long, it will cause light/dark print quality problems and have to be replaced.
Laser Beam
Photoconductors
Lexmark C54x/X54x Color Product Study Guide Rev 2.6
For Training Purposes Only 9/15/2009 22
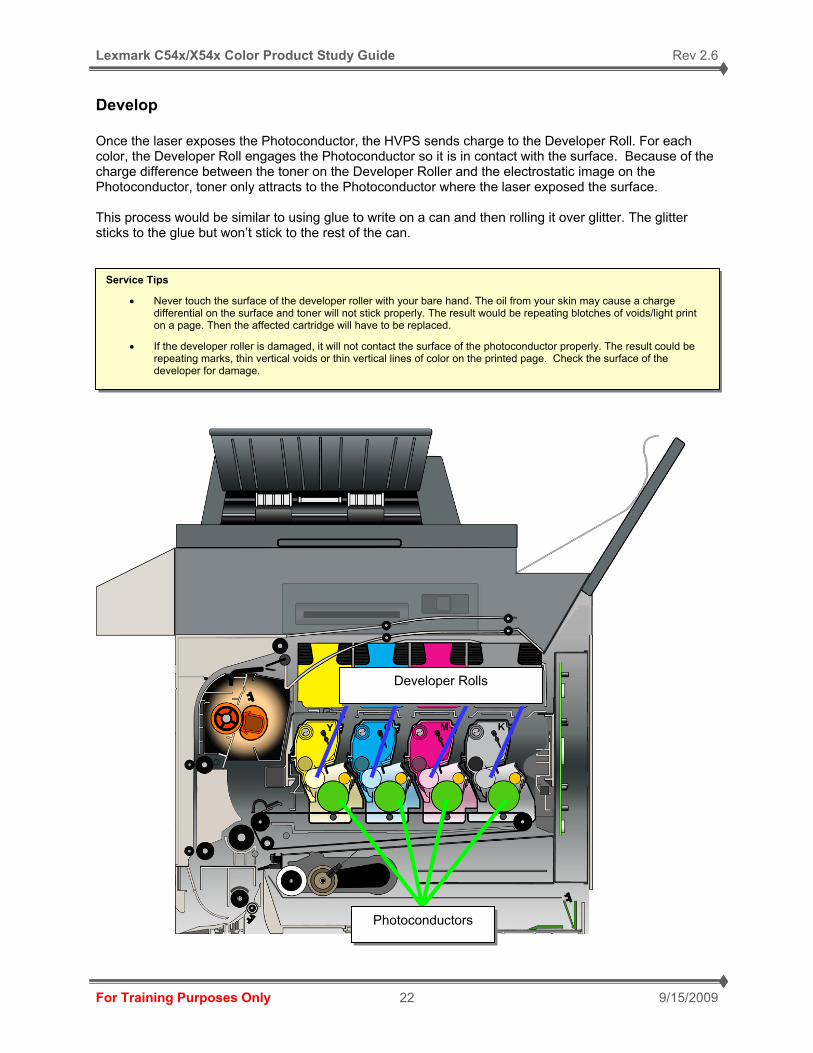
Develop Once the laser exposes the Photoconductor, the HVPS sends charge to the Developer Roll. For each color, the Developer Roll engages the Photoconductor so it is in contact with the surface. Because of the charge difference between the toner on the Developer Roller and the electrostatic image on the Photoconductor, toner only attracts to the Photoconductor where the laser exposed the surface. This process would be similar to using glue to write on a can and then rolling it over glitter. The glitter sticks to the glue but won’t stick to the rest of the can.
Service Tips
• Never touch the surface of the developer roller with your bare hand. The oil from your skin may cause a charge differential on the surface and toner will not stick properly. The result would be repeating blotches of voids/light print on a page. Then the affected cartridge will have to be replaced.
• If the developer roller is damaged, it will not contact the surface of the photoconductor properly. The result could be repeating marks, thin vertical voids or thin vertical lines of color on the printed page. Check the surface of the developer for damage.
Developer Rolls
Photoconductors
Lexmark C54x/X54x Color Product Study Guide Rev 2.6
For Training Purposes Only 9/15/2009 23
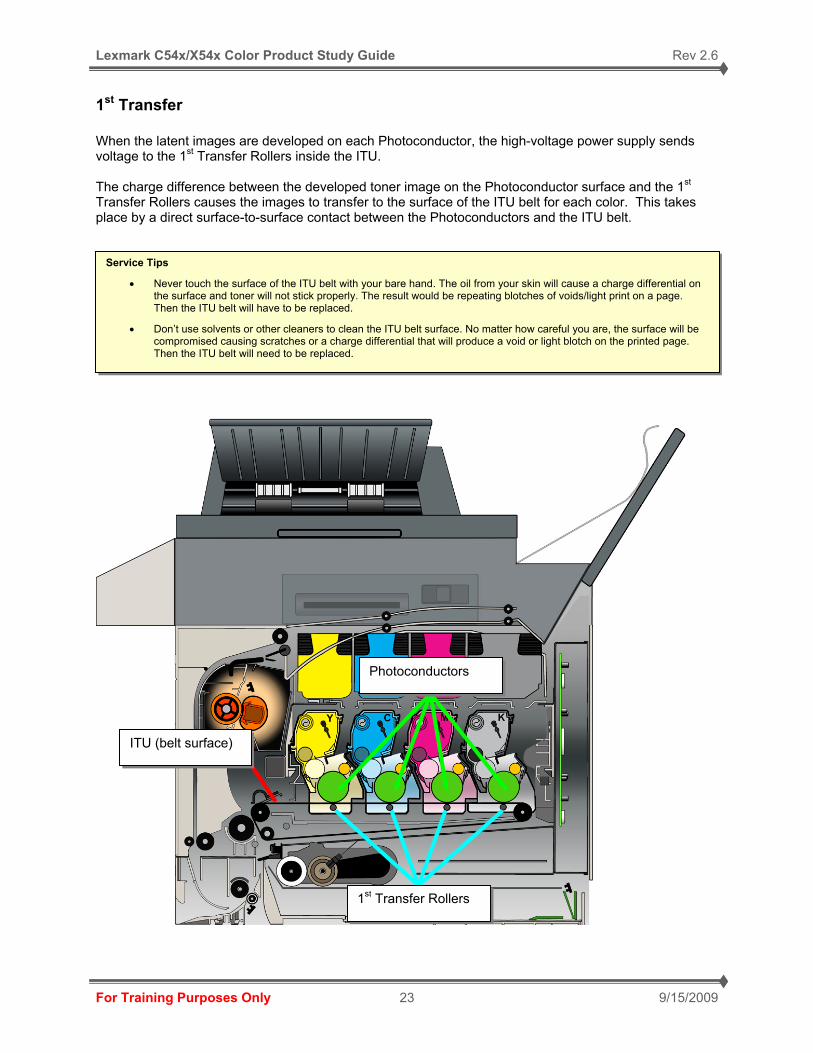
1st Transfer When the latent images are developed on each Photoconductor, the high-voltage power supply sends voltage to the 1st Transfer Rollers inside the ITU. The charge difference between the developed toner image on the Photoconductor surface and the 1st Transfer Rollers causes the images to transfer to the surface of the ITU belt for each color. This takes place by a direct surface-to-surface contact between the Photoconductors and the ITU belt.
Service Tips
• Never touch the surface of the ITU belt with your bare hand. The oil from your skin will cause a charge differential on the surface and toner will not stick properly. The result would be repeating blotches of voids/light print on a page. Then the ITU belt will have to be replaced.
• Don’t use solvents or other cleaners to clean the ITU belt surface. No matter how careful you are, the surface will be compromised causing scratches or a charge differential that will produce a void or light blotch on the printed page. Then the ITU belt will need to be replaced.
1st Transfer Rollers
ITU (belt surface)
Photoconductors

Lexmark C54x/X54x Color Product Study Guide Rev 2.6
For Training Purposes Only 9/15/2009 24
2nd Transfer Once the four planes of color are transferred to the ITU from the Photoconductors, the image is carried towards the Transfer Roll (this is part of the ITU assembly). The media is picked from the input source and timed to pass between the ITU Belt and Transfer Roll when the image on the Belt reaches the second transfer area. The high voltage power supply sends voltage to the Transfer Roll to create a positive charge. As the media passes between the ITU and Transfer Roll, the entire image is transferred to the media due to the charge differential between the negative toner on the ITU Belt and the positive Transfer Roller.
Service Tips
• If the transfer roller has nicks, pits or flat spots on it, the surface doesn’t come into contact with the media and transfer unit properly. This will cause voids or lights spots on the page or repeating voids/light areas, because the toner can’t be fully transferred due to the charge difference in the areas of damage.
• If the transfer roller does not engage the transfer unit, or does not have voltage coming from the high voltage power supply, the toner will not fully transfer from the transfer unit; the entire page will be very light or blank. Any toner that does transfer will be due to a “contact” transfer instead of a “charge” transfer. Check the high-voltage power supply contacts to the transfer roller.
Transfer Roller (2nd transfer)
ITU (belt surface)
Lexmark C54x/X54x Color Product Study Guide Rev 2.6
For Training Purposes Only 9/15/2009 25
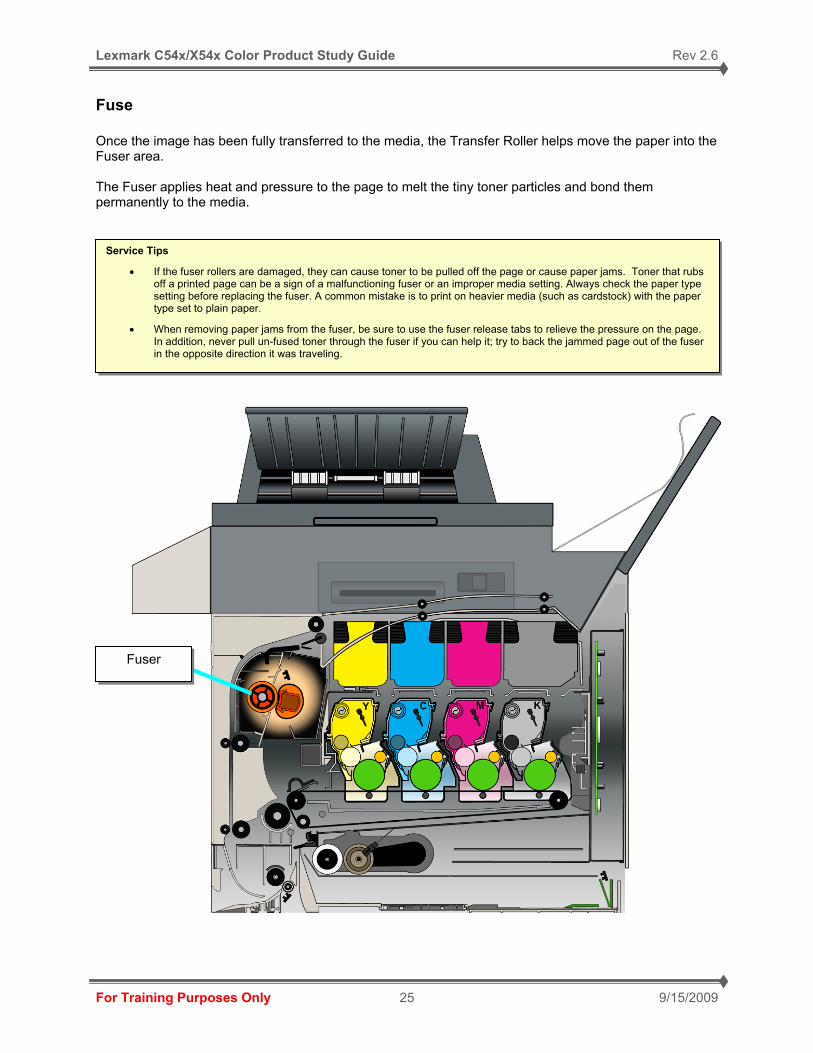
Fuse Once the image has been fully transferred to the media, the Transfer Roller helps move the paper into the Fuser area. The Fuser applies heat and pressure to the page to melt the tiny toner particles and bond them permanently to the media.
Service Tips
• If the fuser rollers are damaged, they can cause toner to be pulled off the page or cause paper jams. Toner that rubs off a printed page can be a sign of a malfunctioning fuser or an improper media setting. Always check the paper type setting before replacing the fuser. A common mistake is to print on heavier media (such as cardstock) with the paper type set to plain paper.
• When removing paper jams from the fuser, be sure to use the fuser release tabs to relieve the pressure on the page. In addition, never pull un-fused toner through the fuser if you can help it; try to back the jammed page out of the fuser in the opposite direction it was traveling.
Fuser
Lexmark C54x/X54x Color Product Study Guide Rev 2.6
For Training Purposes Only 9/15/2009 26
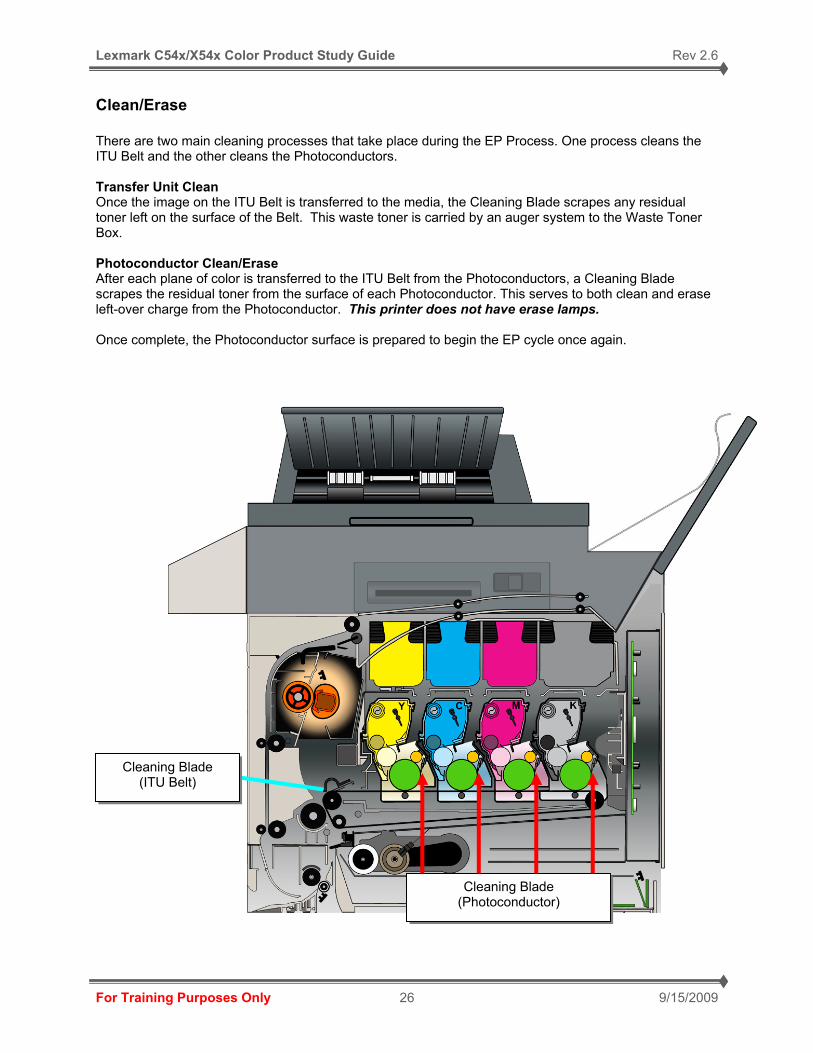
Clean/Erase There are two main cleaning processes that take place during the EP Process. One process cleans the ITU Belt and the other cleans the Photoconductors. Transfer Unit Clean Once the image on the ITU Belt is transferred to the media, the Cleaning Blade scrapes any residual toner left on the surface of the Belt. This waste toner is carried by an auger system to the Waste Toner Box. Photoconductor Clean/Erase After each plane of color is transferred to the ITU Belt from the Photoconductors, a Cleaning Blade scrapes the residual toner from the surface of each Photoconductor. This serves to both clean and erase left-over charge from the Photoconductor. This printer does not have erase lamps. Once complete, the Photoconductor surface is prepared to begin the EP cycle once again.
Cleaning Blade (ITU Belt)
Cleaning Blade (Photoconductor)
Lexmark C54x/X54x Color Product Study Guide Rev 2.6
For Training Purposes Only 9/15/2009 27
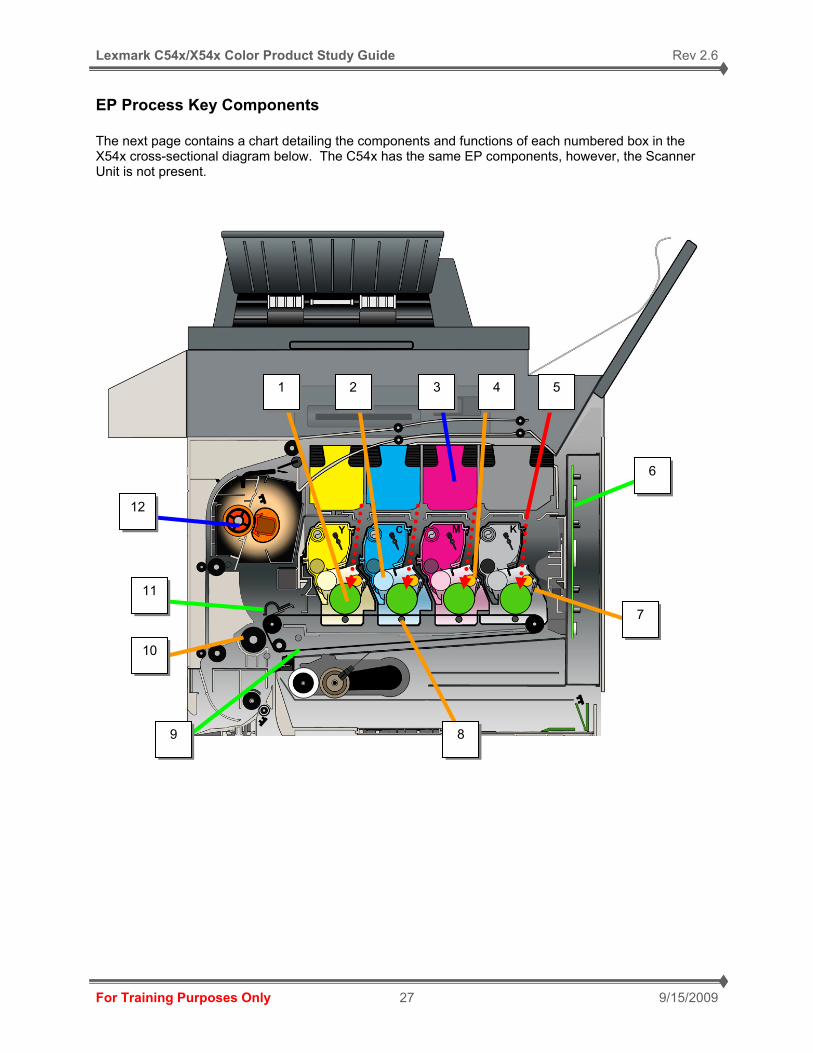
EP Process Key Components The next page contains a chart detailing the components and functions of each numbered box in the X54x cross-sectional diagram below. The C54x has the same EP components, however, the Scanner Unit is not present.
3 2 1 5 4
11
8 9
10
12
7
6
Lexmark C54x/X54x Color Product Study Guide Rev 2.6
For Training Purposes Only 9/15/2009 28
C54x/X54x EP Process Key Components Table
Number Component Function
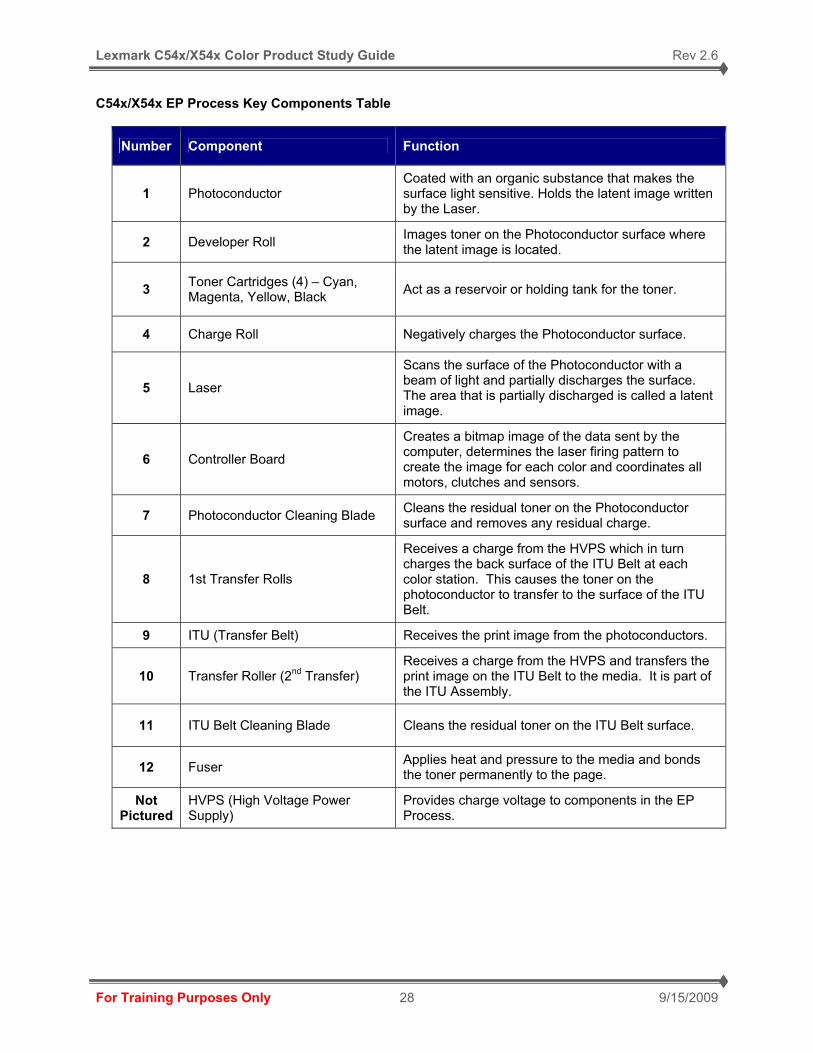
1 Photoconductor Coated with an organic substance that makes the surface light sensitive. Holds the latent image written by the Laser.
2 Developer Roll Images toner on the Photoconductor surface where the latent image is located.
3 Toner Cartridges (4) – Cyan, Magenta, Yellow, Black Act as a reservoir or holding tank for the toner.
4 Charge Roll Negatively charges the Photoconductor surface.
5 Laser
Scans the surface of the Photoconductor with a beam of light and partially discharges the surface. The area that is partially discharged is called a latent image.
6 Controller Board
Creates a bitmap image of the data sent by the computer, determines the laser firing pattern to create the image for each color and coordinates all motors, clutches and sensors.
7 Photoconductor Cleaning Blade Cleans the residual toner on the Photoconductor surface and removes any residual charge.
8 1st Transfer Rolls
Receives a charge from the HVPS which in turn charges the back surface of the ITU Belt at each color station. This causes the toner on the photoconductor to transfer to the surface of the ITU Belt.
9 ITU (Transfer Belt) Receives the print image from the photoconductors.
10 Transfer Roller (2nd Transfer) Receives a charge from the HVPS and transfers the print image on the ITU Belt to the media. It is part of the ITU Assembly.
11 ITU Belt Cleaning Blade Cleans the residual toner on the ITU Belt surface.
12 Fuser Applies heat and pressure to the media and bonds the toner permanently to the page.
Not Pictured
HVPS (High Voltage Power Supply)
Provides charge voltage to components in the EP Process.
Lexmark C54x/X54x Color Product Study Guide Rev 2.6
For Training Purposes Only 9/15/2009 29
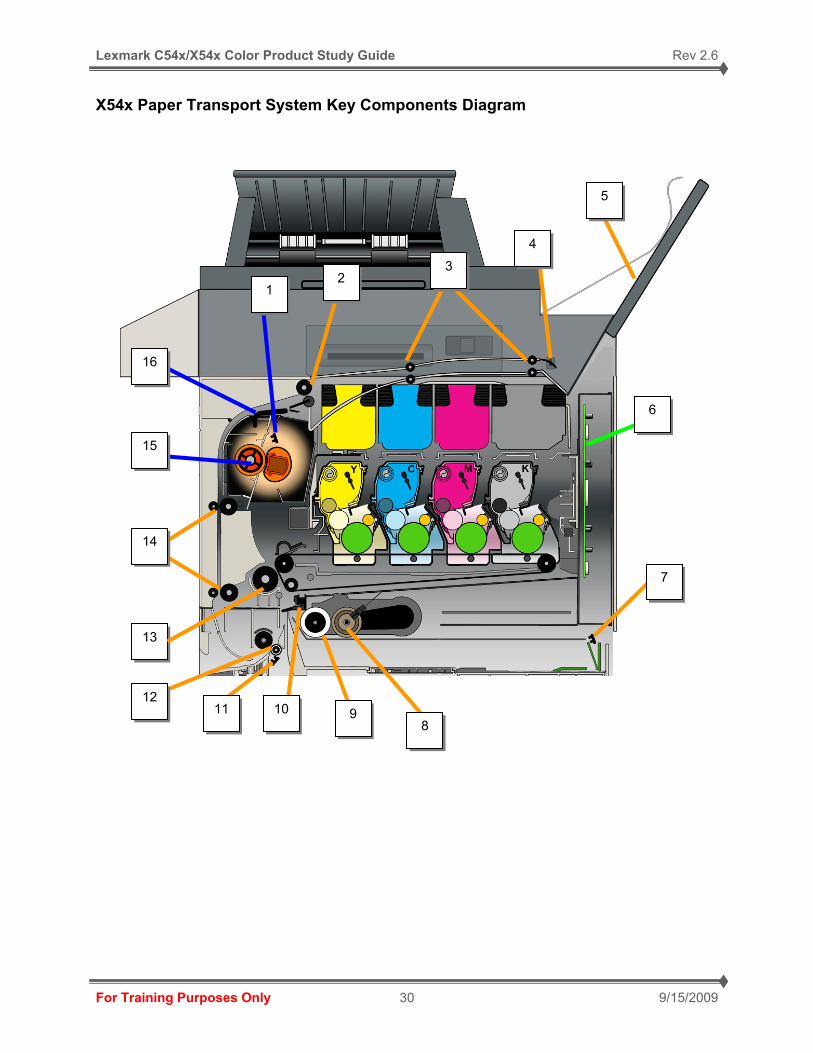
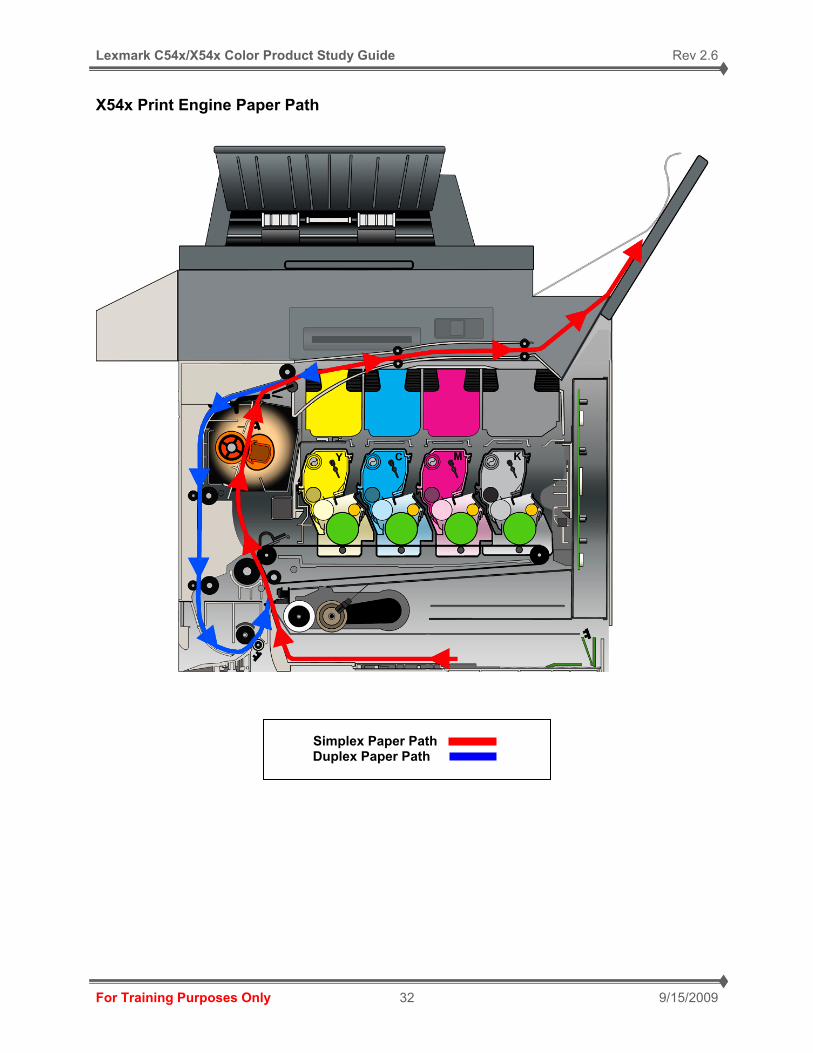
Paper Transport System The C54x and X54x printers have a “C” shaped paper path. Paper is fed from the bottom of the printer from the paper tray or manual feed and travels upward through the front cover. The paper path is identical for both the C54x and X54x printers except the location of the output bin All models of the C54x and X54x printers come standard with a duplex unit installed except the C540 series. The duplex unit is built into the front cover and Tray 1. The duplex unit is not an optional device that can be purchased and installed on other models. The duplex unit uses a “peek-a-boo” method to feed the media into the duplex unit once the first side has been completed. Note: If the printer is in the process of duplexing and a sheet of paper is loaded into the Manual Feeder, a jam will occur. Unlike most printers, the C54x and X54x do not have registration rollers due to the short paper path in the printer. Instead, the printer uses an encoder wheel to time the paper entering the EP Process at the right moment. The encoder wheel is located in the middle of the Autocompensator Assembly.
Lexmark C54x/X54x Color Product Study Guide Rev 2.6
For Training Purposes Only 9/15/2009 30
X54x Paper Transport System Key Components Diagram
2 1
6
4
9 12
15
7
3
11 10
14
13
16
5
8
Lexmark C54x/X54x Color Product Study Guide Rev 2.6
For Training Purposes Only 9/15/2009 31
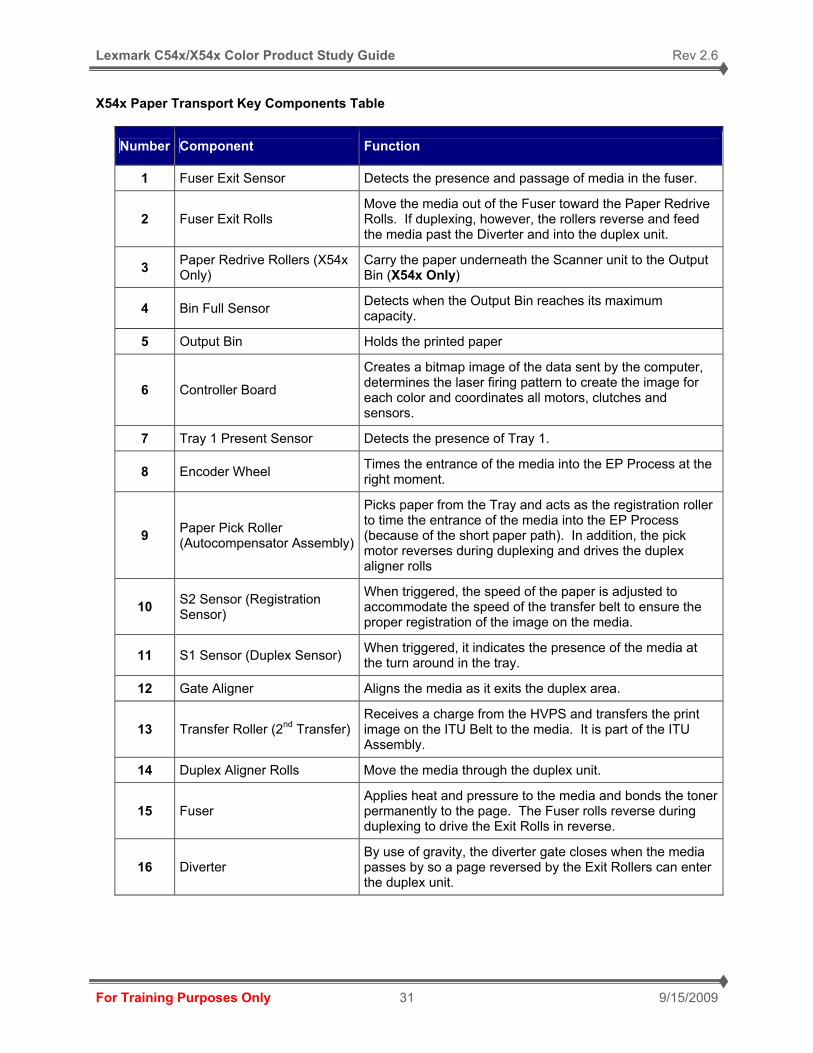
X54x Paper Transport Key Components Table
Number Component Function
1 Fuser Exit Sensor Detects the presence and passage of media in the fuser.
2 Fuser Exit Rolls Move the media out of the Fuser toward the Paper Redrive Rolls. If duplexing, however, the rollers reverse and feed the media past the Diverter and into the duplex unit.
3 Paper Redrive Rollers (X54x Only)
Carry the paper underneath the Scanner unit to the Output Bin (X54x Only)
4 Bin Full Sensor Detects when the Output Bin reaches its maximum capacity.
5 Output Bin Holds the printed paper
6 Controller Board
Creates a bitmap image of the data sent by the computer, determines the laser firing pattern to create the image for each color and coordinates all motors, clutches and sensors.
7 Tray 1 Present Sensor Detects the presence of Tray 1.
8 Encoder Wheel Times the entrance of the media into the EP Process at the right moment.
9 Paper Pick Roller (Autocompensator Assembly)
Picks paper from the Tray and acts as the registration roller to time the entrance of the media into the EP Process (because of the short paper path). In addition, the pick motor reverses during duplexing and drives the duplex aligner rolls
10 S2 Sensor (Registration Sensor)
When triggered, the speed of the paper is adjusted to accommodate the speed of the transfer belt to ensure the proper registration of the image on the media.
11 S1 Sensor (Duplex Sensor) When triggered, it indicates the presence of the media at the turn around in the tray.
12 Gate Aligner Aligns the media as it exits the duplex area.
13 Transfer Roller (2nd Transfer) Receives a charge from the HVPS and transfers the print image on the ITU Belt to the media. It is part of the ITU Assembly.
14 Duplex Aligner Rolls Move the media through the duplex unit.
15 Fuser Applies heat and pressure to the media and bonds the toner permanently to the page. The Fuser rolls reverse during duplexing to drive the Exit Rolls in reverse.
16 Diverter By use of gravity, the diverter gate closes when the media passes by so a page reversed by the Exit Rollers can enter the duplex unit.
Lexmark C54x/X54x Color Product Study Guide Rev 2.6
For Training Purposes Only 9/15/2009 32
X54x Print Engine Paper Path
Simplex Paper Path Duplex Paper Path
Lexmark C54x/X54x Color Product Study Guide Rev 2.6
For Training Purposes Only 9/15/2009 33
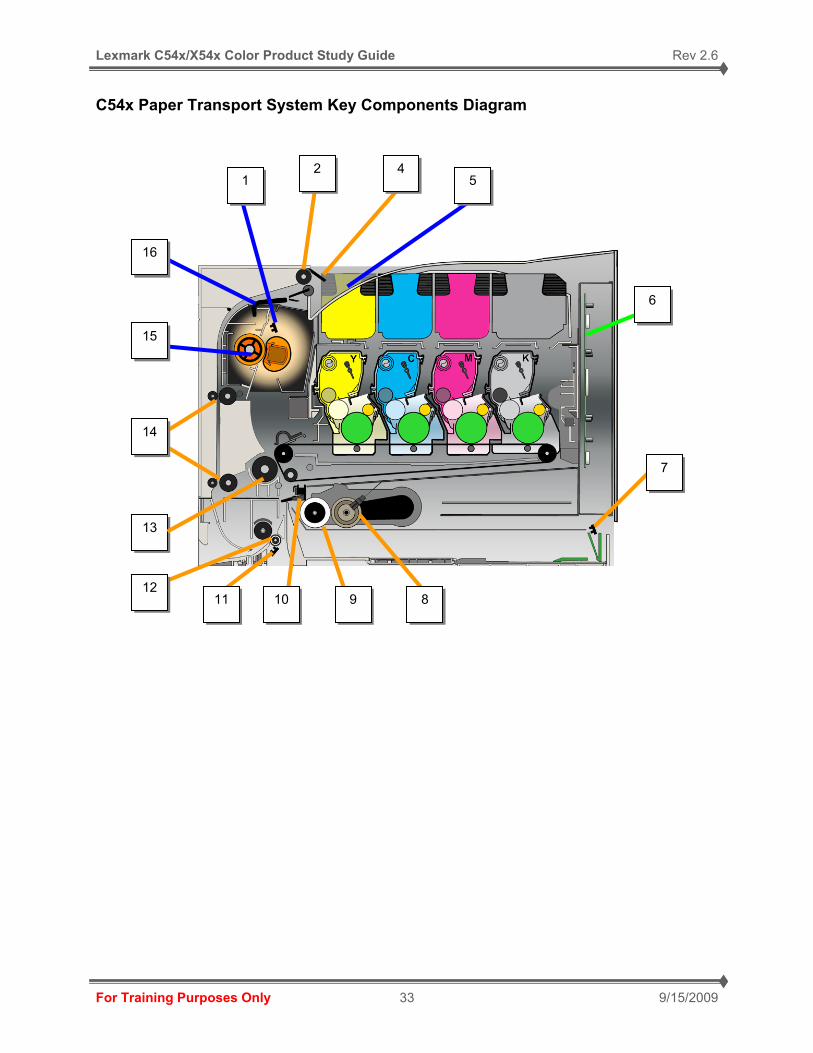
C54x Paper Transport System Key Components Diagram
2 1
6
5
9 12
15
7
11 10
14
13
16
4
8
Lexmark C54x/X54x Color Product Study Guide Rev 2.6
For Training Purposes Only 9/15/2009 34
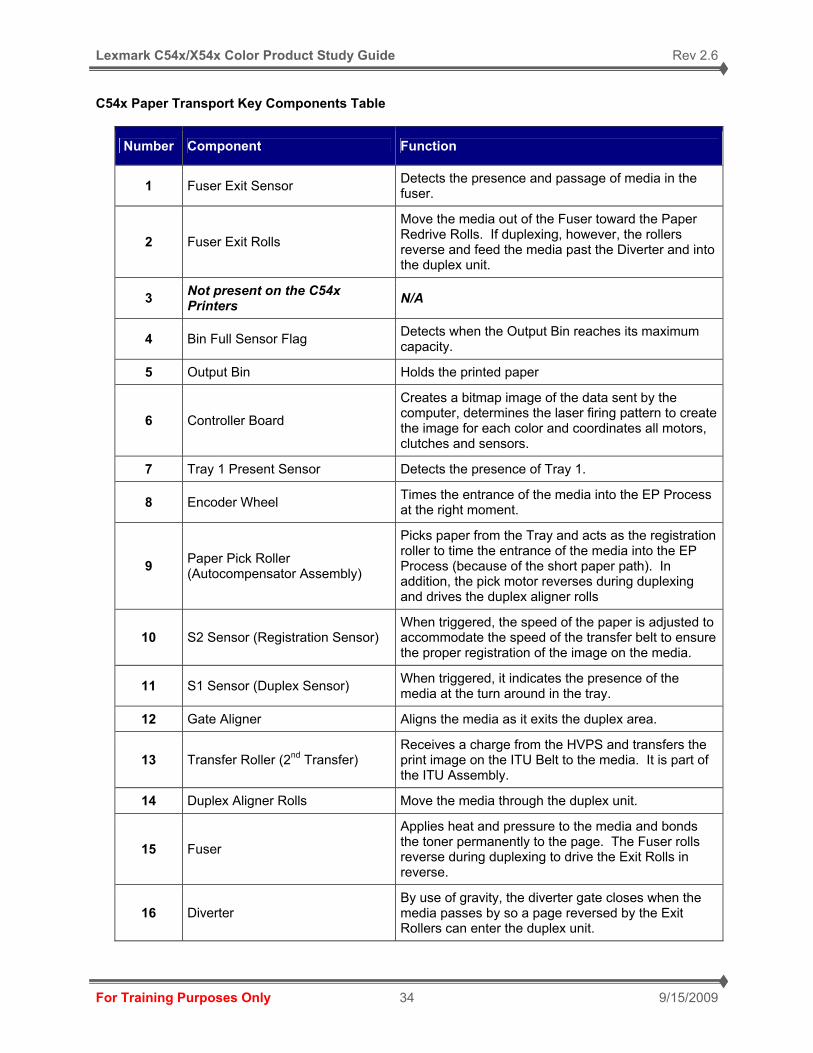
C54x Paper Transport Key Components Table
Number Component Function
1 Fuser Exit Sensor Detects the presence and passage of media in the fuser.
2 Fuser Exit Rolls
Move the media out of the Fuser toward the Paper Redrive Rolls. If duplexing, however, the rollers reverse and feed the media past the Diverter and into the duplex unit.
3 Not present on the C54x Printers N/A
4 Bin Full Sensor Flag Detects when the Output Bin reaches its maximum capacity.
5 Output Bin Holds the printed paper
6 Controller Board
Creates a bitmap image of the data sent by the computer, determines the laser firing pattern to create the image for each color and coordinates all motors, clutches and sensors.
7 Tray 1 Present Sensor Detects the presence of Tray 1.
8 Encoder Wheel Times the entrance of the media into the EP Process at the right moment.
9 Paper Pick Roller (Autocompensator Assembly)
Picks paper from the Tray and acts as the registration roller to time the entrance of the media into the EP Process (because of the short paper path). In addition, the pick motor reverses during duplexing and drives the duplex aligner rolls
10 S2 Sensor (Registration Sensor) When triggered, the speed of the paper is adjusted to accommodate the speed of the transfer belt to ensure the proper registration of the image on the media.
11 S1 Sensor (Duplex Sensor) When triggered, it indicates the presence of the media at the turn around in the tray.
12 Gate Aligner Aligns the media as it exits the duplex area.
13 Transfer Roller (2nd Transfer) Receives a charge from the HVPS and transfers the print image on the ITU Belt to the media. It is part of the ITU Assembly.
14 Duplex Aligner Rolls Move the media through the duplex unit.
15 Fuser
Applies heat and pressure to the media and bonds the toner permanently to the page. The Fuser rolls reverse during duplexing to drive the Exit Rolls in reverse.
16 Diverter By use of gravity, the diverter gate closes when the media passes by so a page reversed by the Exit Rollers can enter the duplex unit.
Lexmark C54x/X54x Color Product Study Guide Rev 2.6
For Training Purposes Only 9/15/2009 35
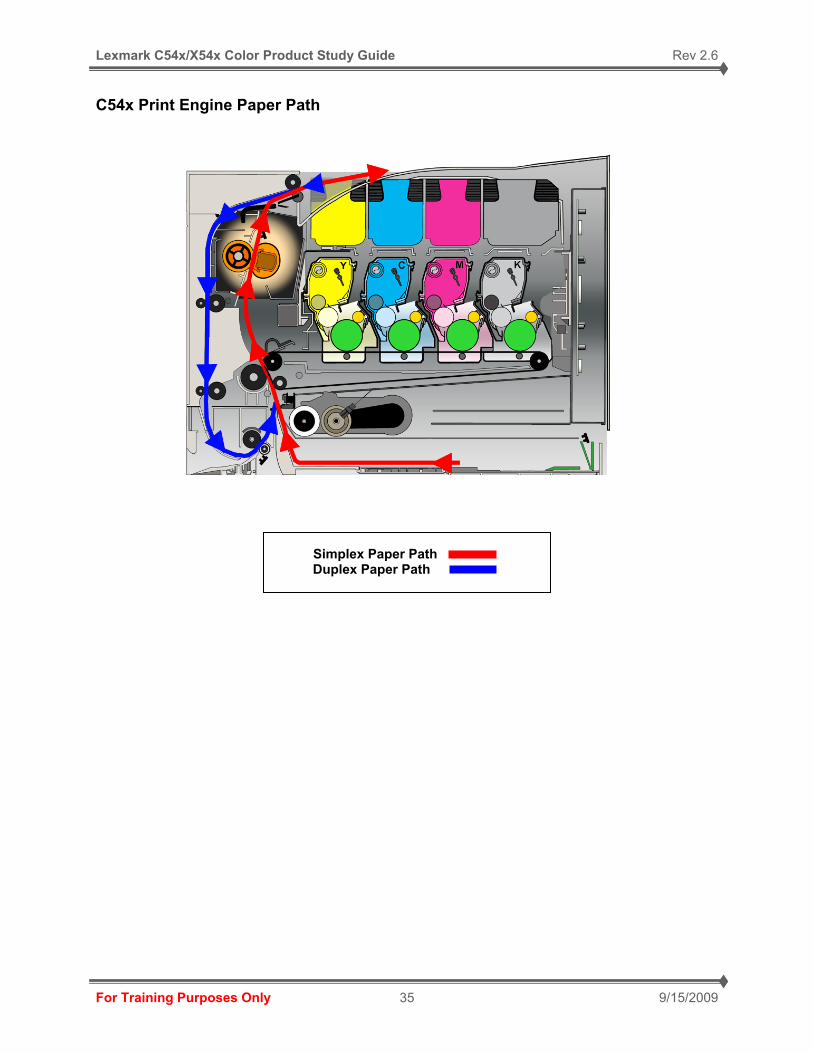
C54x Print Engine Paper Path
Simplex Paper Path Duplex Paper Path
Lexmark C54x/X54x Color Product Study Guide Rev 2.6
For Training Purposes Only 9/15/2009 36
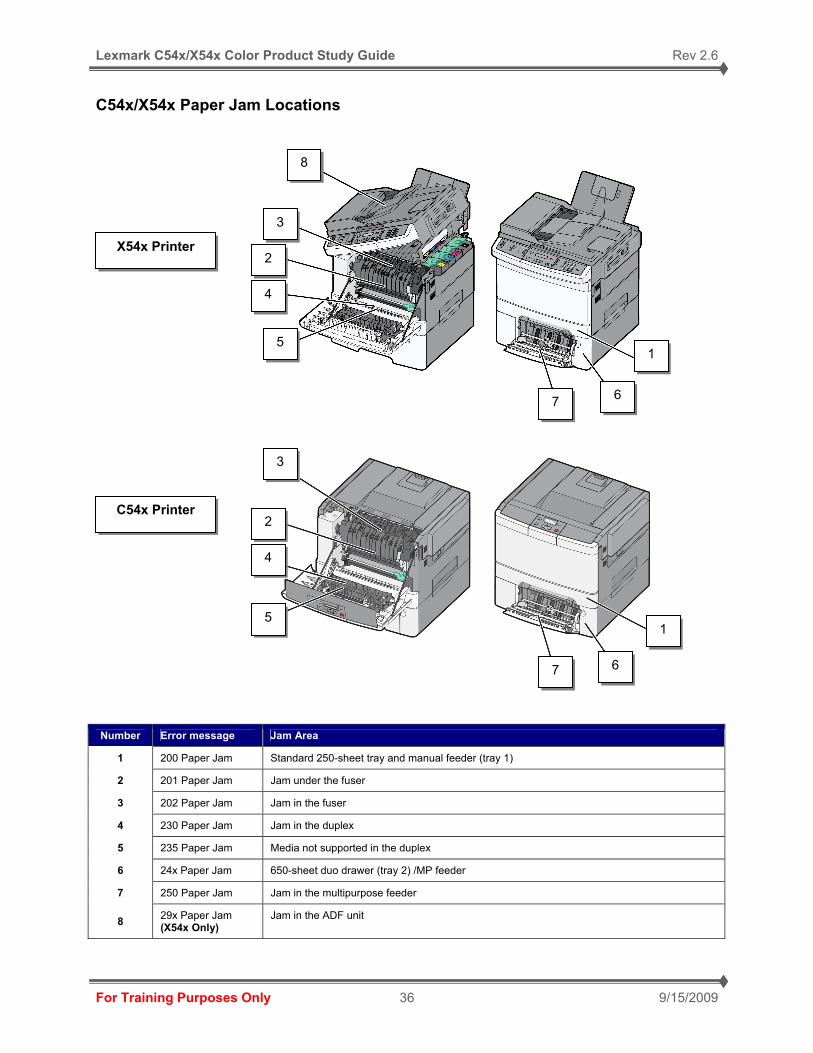
C54x/X54x Paper Jam Locations
Number Error message Jam Area
1 200 Paper Jam Standard 250-sheet tray and manual feeder (tray 1)
2 201 Paper Jam Jam under the fuser
3 202 Paper Jam Jam in the fuser
4 230 Paper Jam Jam in the duplex
5 235 Paper Jam Media not supported in the duplex
6 24x Paper Jam 650-sheet duo drawer (tray 2) /MP feeder
7 250 Paper Jam Jam in the multipurpose feeder
8 29x Paper Jam (X54x Only)
Jam in the ADF unit
6
1
7
5
4
2
3
8
3
2
4
5
7 6
1
X54x Printer
C54x Printer
Lexmark C54x/X54x Color Product Study Guide Rev 2.6
For Training Purposes Only 9/15/2009 37
Operator Panel
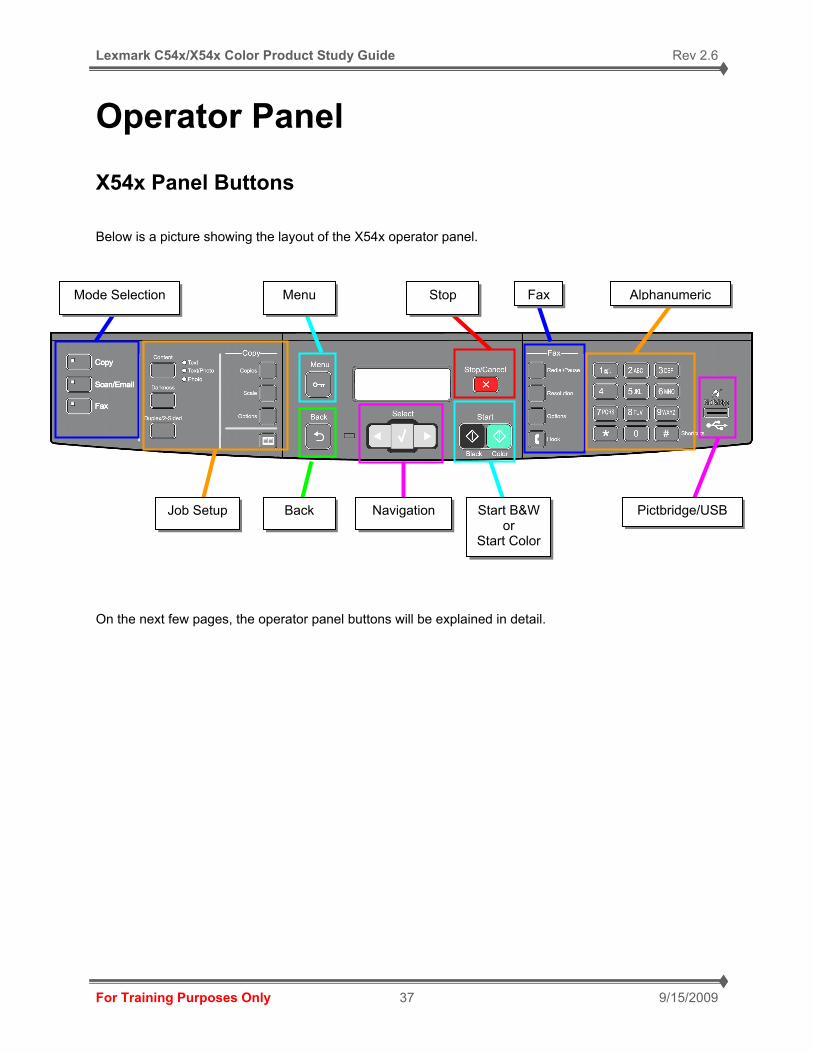
X54x Panel Buttons Below is a picture showing the layout of the X54x operator panel. On the next few pages, the operator panel buttons will be explained in detail.
Mode Selection
Job Setup
Menu
Back Navigation Start B&W or
Start Color
Stop Fax Alphanumeric
Pictbridge/USB

Lexmark C54x/X54x Color Product Study Guide Rev 2.6
For Training Purposes Only 9/15/2009 38
Button Function Copy
Selecting this option enables copy mode.
Scan / Email
Selecting this enables scan and scan to Email mode.
Fax
Selecting this option puts the MFP into fax mode. Fax models only.
Content
This setting is used to enhance output quality. Choose from Text, Text/Photo, or Photo. The current content setting is displayed by the LEDs to the right.
Darkness
This adjusts the darkness level of the output.
Duplex
Press this to output a copy job with printing on both sides of the output sheet.
Copies
Press the Copies button to enter the number of copies to print.
Scale
Press the Scale button to change the size of the copied document to fit onto the currently selected paper size.
Options
Press the Options button to change Original Size, Paper Source, Paper Saver, and Collate settings.
Address Book
Press this key to enter the address book.
Lexmark C54x/X54x Color Product Study Guide Rev 2.6
For Training Purposes Only 9/15/2009 39
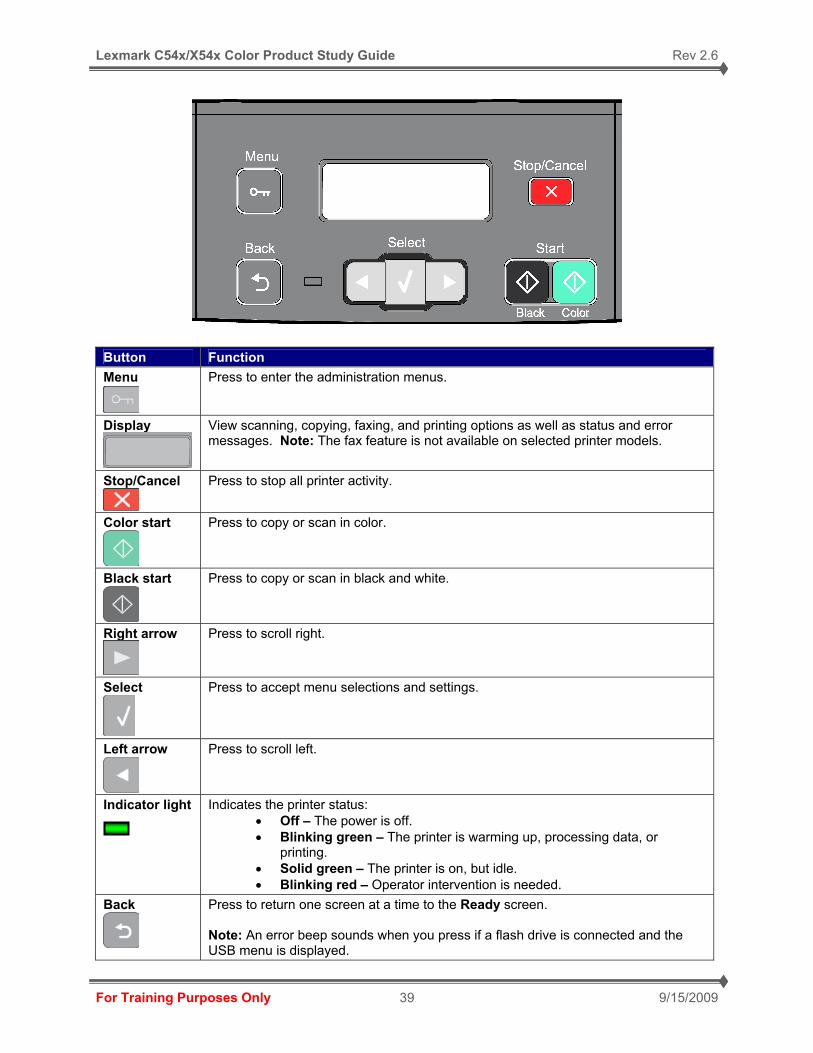
Button Function Menu
Press to enter the administration menus.
Display
View scanning, copying, faxing, and printing options as well as status and error messages. Note: The fax feature is not available on selected printer models.
Stop/Cancel
Press to stop all printer activity.
Color start
Press to copy or scan in color.
Black start
Press to copy or scan in black and white.
Right arrow
Press to scroll right.
Select
Press to accept menu selections and settings.
Left arrow
Press to scroll left.
Indicator light
Indicates the printer status: • Off – The power is off. • Blinking green – The printer is warming up, processing data, or
printing. • Solid green – The printer is on, but idle. • Blinking red – Operator intervention is needed.
Back
Press to return one screen at a time to the Ready screen. Note: An error beep sounds when you press if a flash drive is connected and the USB menu is displayed.
Lexmark C54x/X54x Color Product Study Guide Rev 2.6
For Training Purposes Only 9/15/2009 40
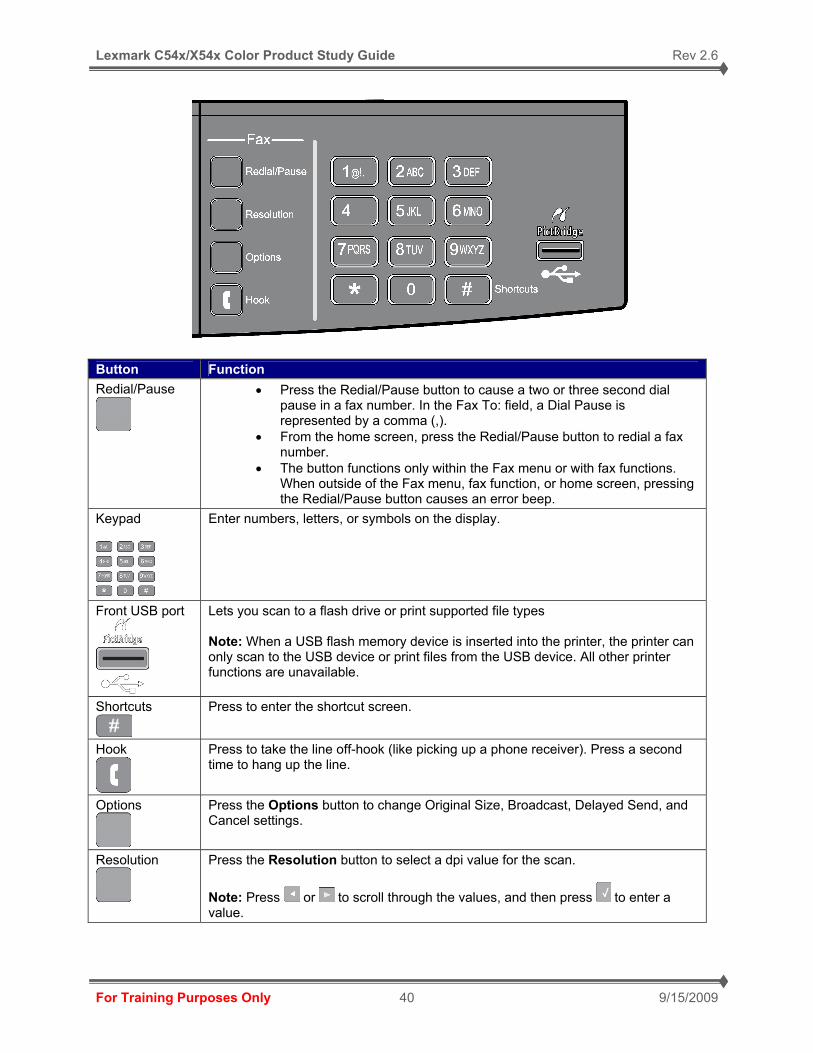
Button Function Redial/Pause
• Press the Redial/Pause button to cause a two or three second dial pause in a fax number. In the Fax To: field, a Dial Pause is represented by a comma (,).
• From the home screen, press the Redial/Pause button to redial a fax number.
• The button functions only within the Fax menu or with fax functions. When outside of the Fax menu, fax function, or home screen, pressing the Redial/Pause button causes an error beep.
Keypad
Enter numbers, letters, or symbols on the display.
Front USB port
Lets you scan to a flash drive or print supported file types Note: When a USB flash memory device is inserted into the printer, the printer can only scan to the USB device or print files from the USB device. All other printer functions are unavailable.
Shortcuts
Press to enter the shortcut screen.
Hook
Press to take the line off-hook (like picking up a phone receiver). Press a second time to hang up the line.
Options
Press the Options button to change Original Size, Broadcast, Delayed Send, and Cancel settings.
Resolution
Press the Resolution button to select a dpi value for the scan. Note: Press or to scroll through the values, and then press to enter a value.
Lexmark C54x/X54x Color Product Study Guide Rev 2.6
For Training Purposes Only 9/15/2009 41
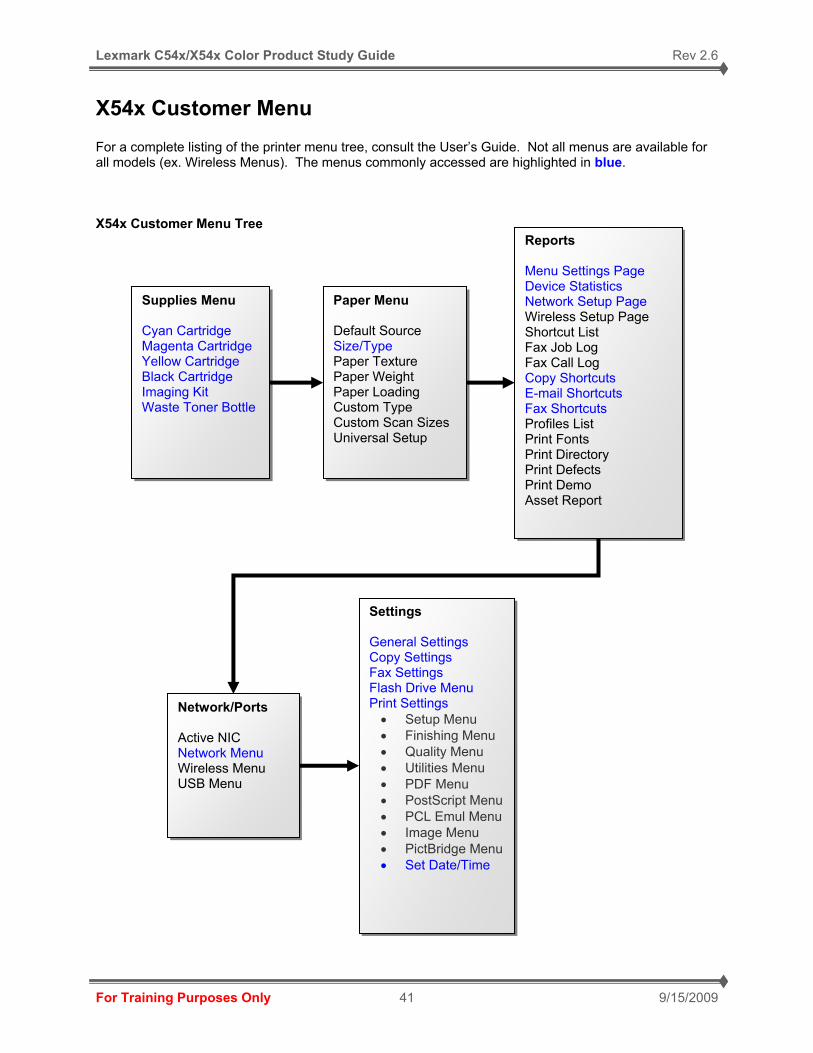
Supplies Menu Cyan Cartridge Magenta Cartridge Yellow Cartridge Black Cartridge Imaging Kit Waste Toner Bottle
Paper Menu Default Source Size/Type Paper Texture Paper Weight Paper Loading Custom Type Custom Scan Sizes Universal Setup
Reports Menu Settings Page Device Statistics Network Setup Page Wireless Setup Page Shortcut List Fax Job Log Fax Call Log Copy Shortcuts E-mail Shortcuts Fax Shortcuts Profiles List Print Fonts Print Directory Print Defects Print Demo Asset Report
Network/Ports Active NIC Network Menu Wireless Menu USB Menu
Settings General Settings Copy Settings Fax Settings Flash Drive Menu Print Settings • Setup Menu • Finishing Menu • Quality Menu • Utilities Menu • PDF Menu • PostScript Menu • PCL Emul Menu • Image Menu • PictBridge Menu • Set Date/Time
X54x Customer Menu For a complete listing of the printer menu tree, consult the User’s Guide. Not all menus are available for all models (ex. Wireless Menus). The menus commonly accessed are highlighted in blue. X54x Customer Menu Tree
Lexmark C54x/X54x Color Product Study Guide Rev 2.6
For Training Purposes Only 9/15/2009 42
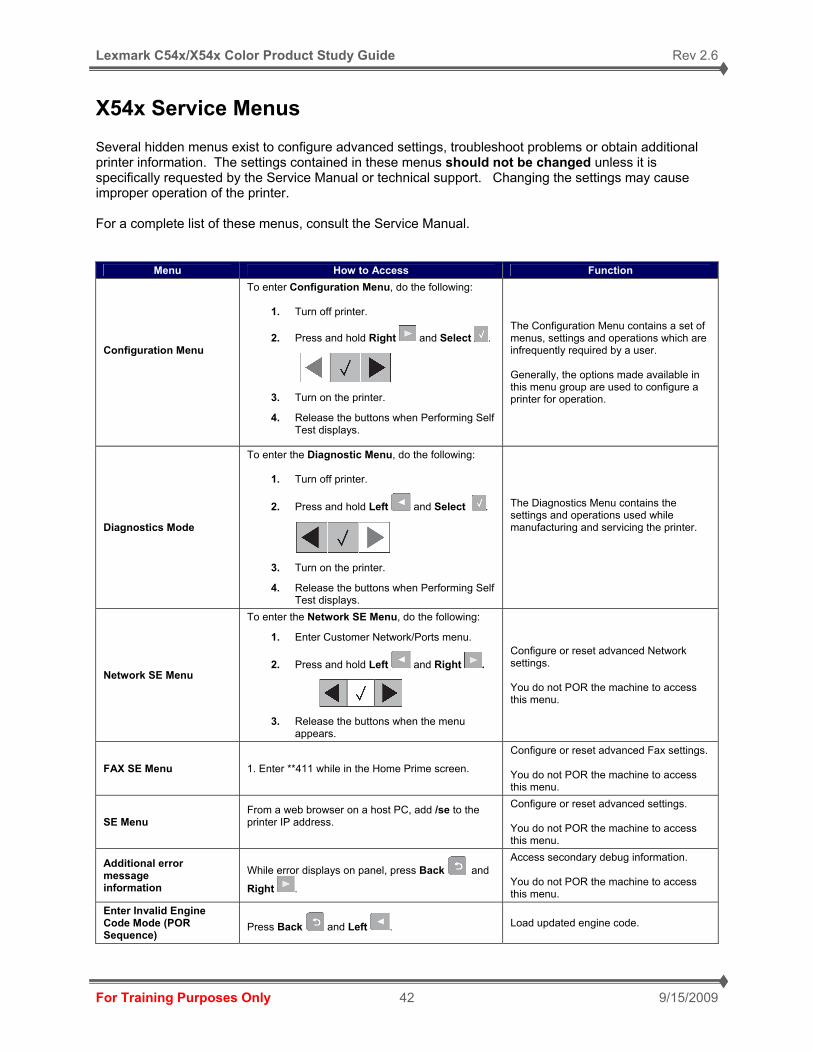
X54x Service Menus Several hidden menus exist to configure advanced settings, troubleshoot problems or obtain additional printer information. The settings contained in these menus should not be changed unless it is specifically requested by the Service Manual or technical support. Changing the settings may cause improper operation of the printer. For a complete list of these menus, consult the Service Manual.
Menu How to Access Function
Configuration Menu
To enter Configuration Menu, do the following:
1. Turn off printer.
2. Press and hold Right and Select .
3. Turn on the printer.
4. Release the buttons when Performing Self Test displays.
The Configuration Menu contains a set of menus, settings and operations which are infrequently required by a user. Generally, the options made available in this menu group are used to configure a printer for operation.
Diagnostics Mode
To enter the Diagnostic Menu, do the following:
1. Turn off printer.
2. Press and hold Left and Select .
3. Turn on the printer.
4. Release the buttons when Performing Self Test displays.
The Diagnostics Menu contains the settings and operations used while manufacturing and servicing the printer.
Network SE Menu
To enter the Network SE Menu, do the following:
1. Enter Customer Network/Ports menu.
2. Press and hold Left and Right .
3. Release the buttons when the menu appears.
Configure or reset advanced Network settings. You do not POR the machine to access this menu.
FAX SE Menu 1. Enter **411 while in the Home Prime screen.
Configure or reset advanced Fax settings. You do not POR the machine to access this menu.
SE Menu From a web browser on a host PC, add /se to the printer IP address.
Configure or reset advanced settings. You do not POR the machine to access this menu.
Additional error message information
While error displays on panel, press Back and
Right .
Access secondary debug information. You do not POR the machine to access this menu.
Enter Invalid Engine Code Mode (POR Sequence)
Press Back and Left . Load updated engine code.
Lexmark C54x/X54x Color Product Study Guide Rev 2.6
For Training Purposes Only 9/15/2009 43
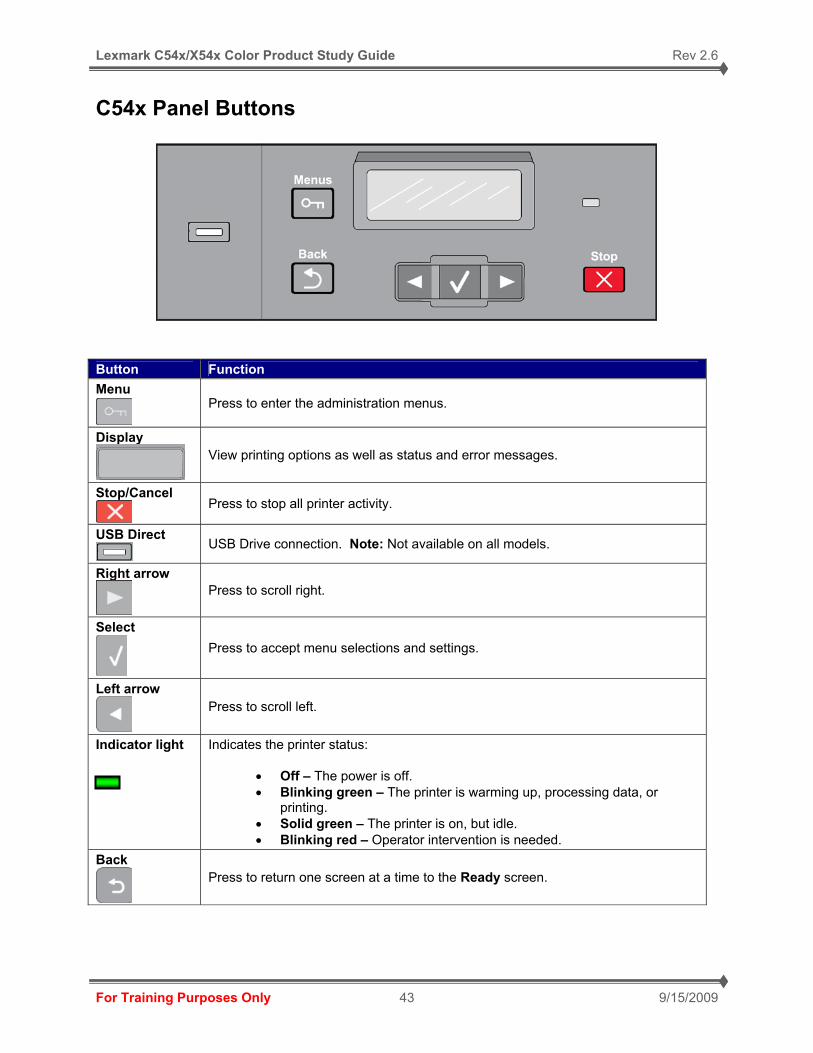
C54x Panel Buttons
Button Function Menu
Press to enter the administration menus.
Display
View printing options as well as status and error messages.
Stop/Cancel
Press to stop all printer activity.
USB Direct
USB Drive connection. Note: Not available on all models.
Right arrow
Press to scroll right.
Select
Press to accept menu selections and settings.
Left arrow
Press to scroll left.
Indicator light
Indicates the printer status:
• Off – The power is off. • Blinking green – The printer is warming up, processing data, or
printing. • Solid green – The printer is on, but idle. • Blinking red – Operator intervention is needed.
Back
Press to return one screen at a time to the Ready screen.
Lexmark C54x/X54x Color Product Study Guide Rev 2.6
For Training Purposes Only 9/15/2009 44
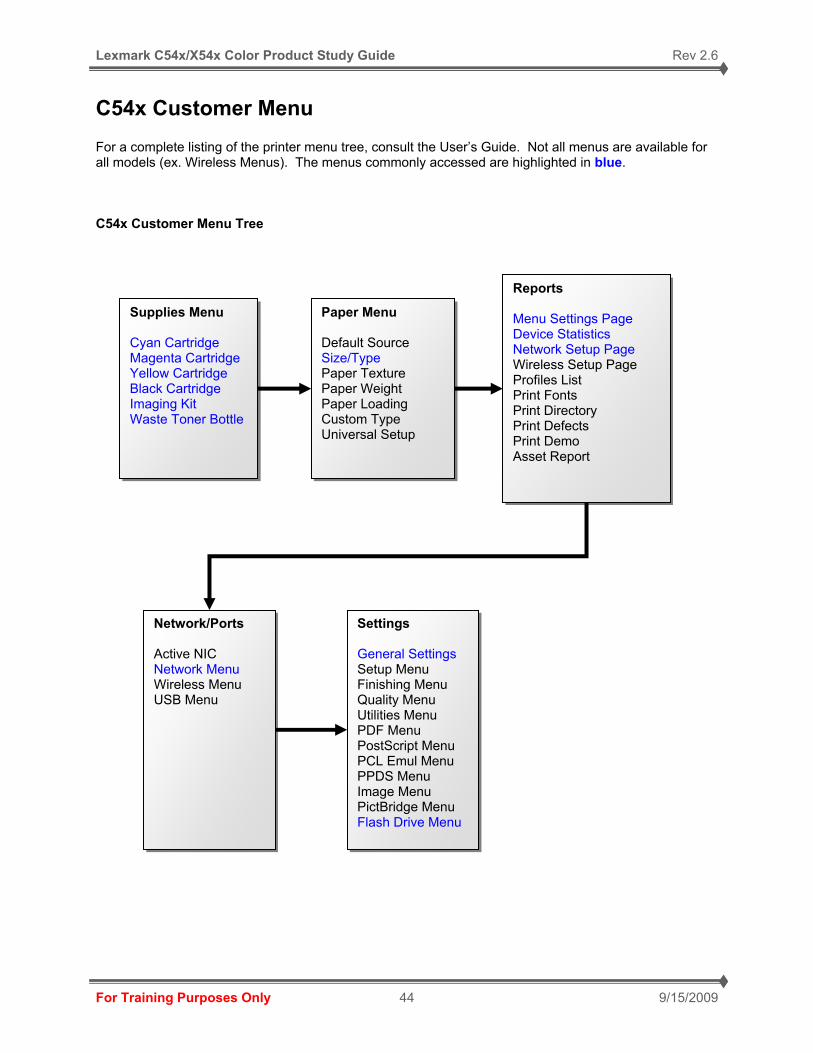
C54x Customer Menu For a complete listing of the printer menu tree, consult the User’s Guide. Not all menus are available for all models (ex. Wireless Menus). The menus commonly accessed are highlighted in blue. C54x Customer Menu Tree
Supplies Menu Cyan Cartridge Magenta Cartridge Yellow Cartridge Black Cartridge Imaging Kit Waste Toner Bottle
Paper Menu Default Source Size/Type Paper Texture Paper Weight Paper Loading Custom Type Universal Setup
Reports Menu Settings Page Device Statistics Network Setup Page Wireless Setup Page Profiles List Print Fonts Print Directory Print Defects Print Demo Asset Report
Network/Ports Active NIC Network Menu Wireless Menu USB Menu
Settings General Settings Setup Menu Finishing Menu Quality Menu Utilities Menu PDF Menu PostScript Menu PCL Emul Menu PPDS Menu Image Menu PictBridge Menu Flash Drive Menu
Lexmark C54x/X54x Color Product Study Guide Rev 2.6
For Training Purposes Only 9/15/2009 45
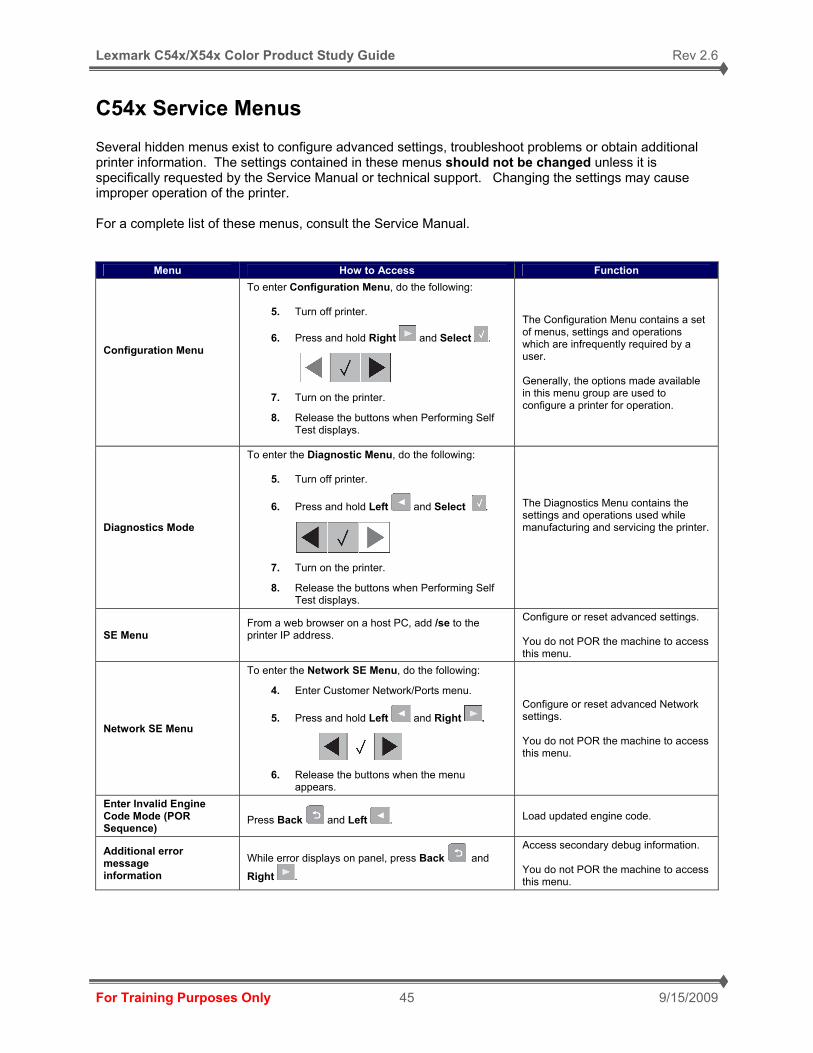
C54x Service Menus Several hidden menus exist to configure advanced settings, troubleshoot problems or obtain additional printer information. The settings contained in these menus should not be changed unless it is specifically requested by the Service Manual or technical support. Changing the settings may cause improper operation of the printer. For a complete list of these menus, consult the Service Manual.
Menu How to Access Function
Configuration Menu
To enter Configuration Menu, do the following:
5. Turn off printer.
6. Press and hold Right and Select .
7. Turn on the printer.
8. Release the buttons when Performing Self Test displays.
The Configuration Menu contains a set of menus, settings and operations which are infrequently required by a user. Generally, the options made available in this menu group are used to configure a printer for operation.
Diagnostics Mode
To enter the Diagnostic Menu, do the following:
5. Turn off printer.
6. Press and hold Left and Select .
7. Turn on the printer.
8. Release the buttons when Performing Self Test displays.
The Diagnostics Menu contains the settings and operations used while manufacturing and servicing the printer.
SE Menu From a web browser on a host PC, add /se to the printer IP address.
Configure or reset advanced settings. You do not POR the machine to access this menu.
Network SE Menu
To enter the Network SE Menu, do the following:
4. Enter Customer Network/Ports menu.
5. Press and hold Left and Right .
6. Release the buttons when the menu appears.
Configure or reset advanced Network settings. You do not POR the machine to access this menu.
Enter Invalid Engine Code Mode (POR Sequence)
Press Back and Left . Load updated engine code.
Additional error message information
While error displays on panel, press Back and
Right .
Access secondary debug information. You do not POR the machine to access this menu.
Lexmark C54x/X54x Color Product Study Guide Rev 2.6
For Training Purposes Only 9/15/2009 46
Print Quality Diagnostic Tips
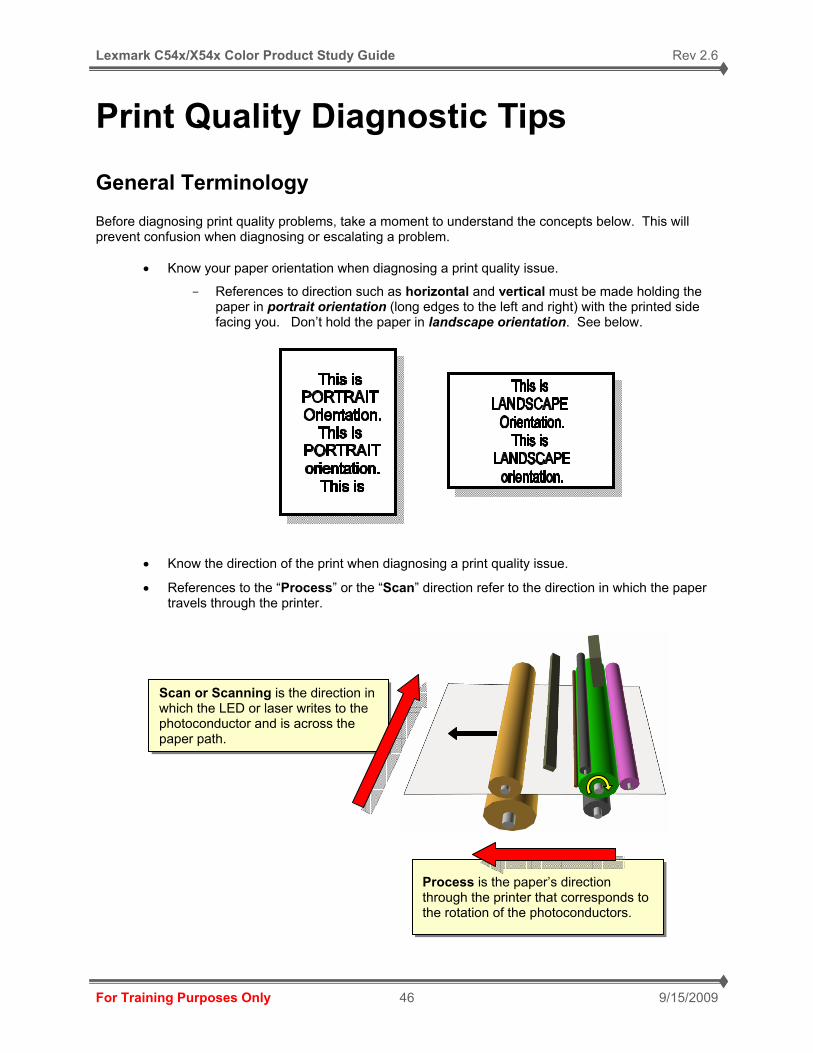
General Terminology Before diagnosing print quality problems, take a moment to understand the concepts below. This will prevent confusion when diagnosing or escalating a problem.
• Know your paper orientation when diagnosing a print quality issue.
- References to direction such as horizontal and vertical must be made holding the paper in portrait orientation (long edges to the left and right) with the printed side facing you. Don’t hold the paper in landscape orientation. See below.
• Know the direction of the print when diagnosing a print quality issue.
• References to the “Process” or the “Scan” direction refer to the direction in which the paper travels through the printer.
Process is the paper’s direction through the printer that corresponds to the rotation of the photoconductors.
Scan or Scanning is the direction in which the LED or laser writes to the photoconductor and is across the paper path.
Lexmark C54x/X54x Color Product Study Guide Rev 2.6
For Training Purposes Only 9/15/2009 47
Print Quality Rules of Thumb If you encounter print quality problems, follow the tips below. Following these simple rules may solve the problem easily and quickly.
• Always run a new Settings/Configuration page showing the:
- Page Count – Is it time for a maintenance kit?
- Supply Life – are any of the supplies low or exhausted?
- Firmware/Code Levels – Are the code levels old/obsolete?
- Media Settings – does the printer media settings match what’s in the Trays?
• Always check the Media Type and Size used.
- Is the media used within the printer’s manufacturing specification?
- Are the printer and/or Driver set correctly for the paper type/size?
• Always print the printer’s Self Test pages.
- How does the print vary from what is expected?
• Try reseating the supplies.
- Check for damage as you reseat them.
• For tricky problems, think about the EP Process Steps. Eliminate the components/areas that couldn’t cause the problem until you are finally left with what could.
Starter cartridges cannot be swapped between printers for troubleshooting purposes as it will post an error message.

Lexmark C54x/X54x Color Product Study Guide Rev 2.6
For Training Purposes Only 9/15/2009 48
C54x/X54x Diagnostic Steps Backgrounding
• Some background problems can be caused by rough papers, non-Lexmark toner cartridges or if the media texture is set to the rough setting.
• Some slick or coated papers may also cause background problems.
• Some problems occur with printers that run a large amount of graphics in a humid environment.
Blurred or Fuzzy Print • Blurred or fuzzy print is usually caused by a problem in the EP drive assembly or in the
transfer belt assembly. Check the EP drive assembly and transfer belt assembly for correct operation.
• Blurred print can also be caused by incorrect feeding from one of the input paper sources, media trays, or duplex paper path.
• Check the high voltage spring contacts to ensure they are not bent, corroded, or damaged. Replace the high voltage power supply as necessary.
Mottle (2mm – 5mm Speckles)
• Keep running prints through, and the problem normally clears up. If the problem persists, replace the developer cartridge.
Half Color Page • A photoconductor unit is not properly seated. Reset the specific photoconductor unit.

Lexmark C54x/X54x Color Product Study Guide Rev 2.6
For Training Purposes Only 9/15/2009 49
Residual Image (Ghosting) • Install a new print cartridge, if available. Residual image can be caused by the
photoconductor, cleaning blade, and other parts inside the print cartridge.

Lexmark C54x/X54x Color Product Study Guide Rev 2.6
For Training Purposes Only 9/15/2009 50
Paper Transport Diagnostic Tips
Paper Rules of Thumb Paper jams and feed problems occur for numerous reasons. Sometimes, failure of the equipment is the cause or it can be the result of other external factors. Before replacing parts for a feed problem, ask these questions:
• Is the customer using a supported media type? This is a common problem. Check the printer specifications if you are not sure.
• Is the customer using a supported media size? Check the printer specifications of you are not sure.
• Is the customer using a supported media weight? This is a common problem. Check the printer specifications of you are not sure.
• Have you tried printing with a fresh ream of paper? Paper that is left out of the package for periods of time can dry out or absorb moisture.
• Have you tried printing from a different input source? This will help narrow down the cause of some problems.
• Is too much paper loaded in the Tray? Make sure the stack height does not exceed the indicated maximum height.
• Is the paper in the Tray wrinkled, creased, damp, or curled? Paper will not feed properly if it is damaged. Try a fresh ream of paper.
• Are different media types and/or weights loaded in the Tray? This will cause misfeeds.
• Is the relative humidity too high? Too low? This can affect the media and/or printer and its ability to feed properly. Check the printer specifications to see if it is located in an ambient environment.
• Is the paper loaded properly in the Tray or option? This is a common problem. Reposition the paper in the Tray or option to make sure that is loaded properly. The paper guides should be flush against the media, but not too tight.
• Are the feed rollers worn because it is time for a maintenance kit? Check the page count of the printer to see if it is time for a maintenance kit to be installed.
• Are there any obstructions in the paper path? If paper, staples, paper clips or other items are left in the printer, they can prevent the media from feeding properly.
Save yourself time and effort and always check these external influences before spending time troubleshooting a supposed equipment failure.
Lexmark C54x/X54x Color Product Study Guide Rev 2.6
For Training Purposes Only 9/15/2009 51
X544, X546dtn Fax Diagnostic Tips
Fax Rules of Thumb Because a fax is composed of multiple stages, pinpointing the issue can be difficult.
• First, try using the copy function.
- If the copy function prints are normal, the problem is likely in the telephone line or receiving fax – NOT the sending Fax machine.
- Try sending the fax again to see if the telephone line may be the problem.
If there is no improvement, contact the telephone company.
- If the copy function's printing tests are abnormal, try printing test pages from the printer and scanner unit separately via a computer.
Fax Send Problems
• Problems with print quality at the receiving fax, such as corrupt images, lines in the image, top/bottom cut off.
- If the copy function is normal
Cause: Degraded telephone line connection caused by noise or a problem in receiving fax's printer.
Corrective action: Determine whether the problem is in the telephone line or at the receiving fax by trying the copy function on the printer at the receiving fax.
Note: If the telephone line condition is degraded, white horizontal lines, missing rows, and/or cut-off top/bottom may occur.
Note: Branch connections or incoming call (call waiting) may also cause image corruption.
- If the copy function is faulty
Cause: Dirt or a problem in scanner.
Corrective action: Clean the flatbed glass, or repair the scanner. If the original is being sent from the ADF, try printing a copy with the original placed on the flatbed glass. If this solves the problem, the problem is in the ADF.
• Unable to Dial
- Cause: A bad connection. Incorrect setup of dial type and/or line type.
- Corrective action: Check the connection. Reset the dial type and/or line type to correct settings.
Note: If the telephone line condition is degraded, white horizontal lines, missing rows, and/or cut-off top or bottom may occur.
Note: Branch connections or incoming calls (call waiting) may also cause image corruption.
Lexmark C54x/X54x Color Product Study Guide Rev 2.6
For Training Purposes Only 9/15/2009 52
Fax Receive Problems
• Problem with the print quality, such as corrupt images, lines in the image, or the top or bottom is cut off.
- If the copy function is normal
Cause: Degraded telephone line connection caused by noise, etc. or a problem with the sending fax's scanner.
Corrective action: Determine whether the problem is in telephone line or at the sending fax by trying the copy function at the sending fax.
Note: If the telephone line condition is degraded, white horizontal lines, missing rows, and/or cut-off top/bottom may occur. Branch connections or an incoming call (call waiting) may also cause image corruption.
- If the copy function is faulty
Cause: Dirt or a problem in the printer.
Corrective action: Clean all the parts of printer, or repair the printer.
• Does not emit the response signal
- Cause: Bad connection. Incorrect setup of the dial type, line type, and/or reception mode.
- Corrective action: Check the connection. Reset the dial type, line type, and/or receive mode to the correct settings.
Note: If a call is made to the fax from a telephone, and the fax does not emit its ringing sound, a telephone line problem is highly probable.
Other problems
• Branch connection (parallel connection)
- During fax reception, if the handset of another telephone on a branch connection is lifted, the received image may be corrupted or a transmission error may occur.
- Branch connections may also interfere with caller identification, call waiting, and the receiving operation of connected telephones.
• Call waiting
- If a call comes in during fax sending or reception, the image may be corrupted.
• DSL (Digital Subscriber Line)
- DSL uses existing telephone lines to deliver high speed transmission. Because the line is used for voice and data transmission, various problems may occur.
- Problems such as noise during spoken conversation, low sound volume, and misdialing are possible.
- Replacing the splitter (line filter) may improve the problem.

Lexmark C54x/X54x Color Product Study Guide Rev 2.6
For Training Purposes Only 9/15/2009 53
• Electrical noise
- If electronic equipment (televisions, computers, microwaves, etc.) or devices equipped with motors are located near a fax, the noise generated from the equipment may degrade the line condition.
- A telephone line can act as an antenna and may absorb electric waves generated from wireless or broadcasting equipment.
- Because fax data is audio data, the line quality affects the quality of the image data.
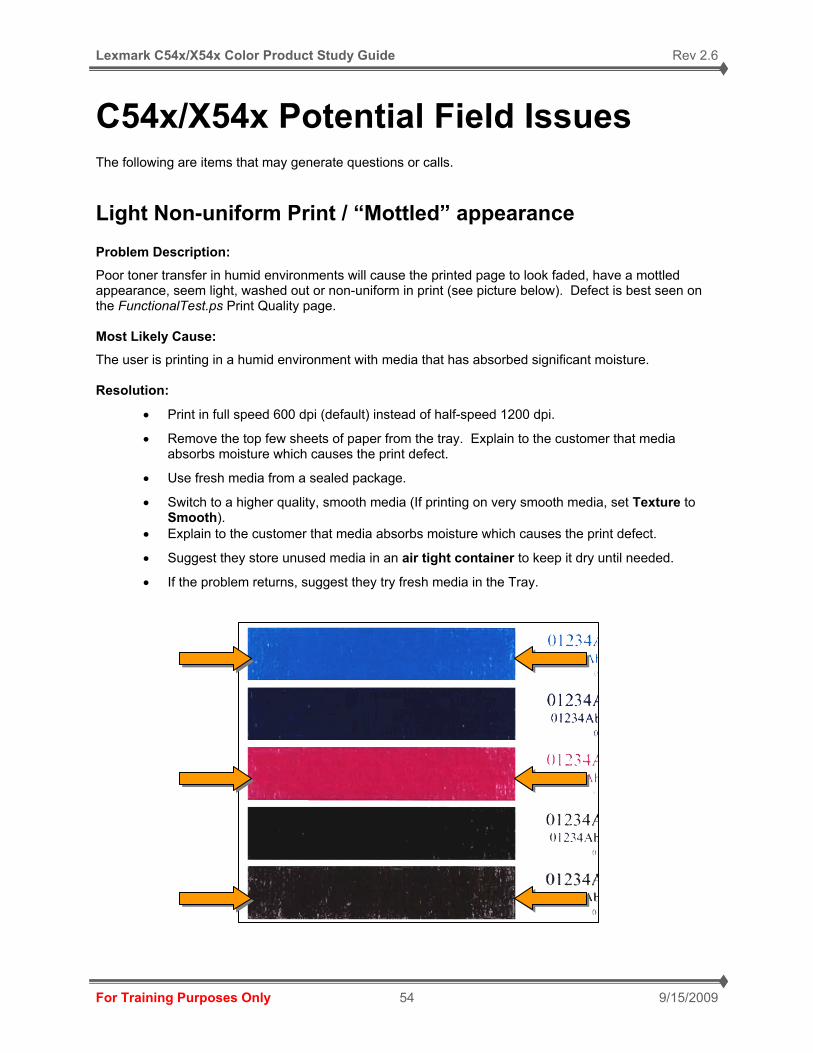
Lexmark C54x/X54x Color Product Study Guide Rev 2.6
For Training Purposes Only 9/15/2009 54
C54x/X54x Potential Field Issues The following are items that may generate questions or calls.
Light Non-uniform Print / “Mottled” appearance Problem Description:
Poor toner transfer in humid environments will cause the printed page to look faded, have a mottled appearance, seem light, washed out or non-uniform in print (see picture below). Defect is best seen on the FunctionalTest.ps Print Quality page. Most Likely Cause:
The user is printing in a humid environment with media that has absorbed significant moisture. Resolution:
• Print in full speed 600 dpi (default) instead of half-speed 1200 dpi.
• Remove the top few sheets of paper from the tray. Explain to the customer that media absorbs moisture which causes the print defect.
• Use fresh media from a sealed package.
• Switch to a higher quality, smooth media (If printing on very smooth media, set Texture to Smooth).
• Explain to the customer that media absorbs moisture which causes the print defect.
• Suggest they store unused media in an air tight container to keep it dry until needed.
• If the problem returns, suggest they try fresh media in the Tray.
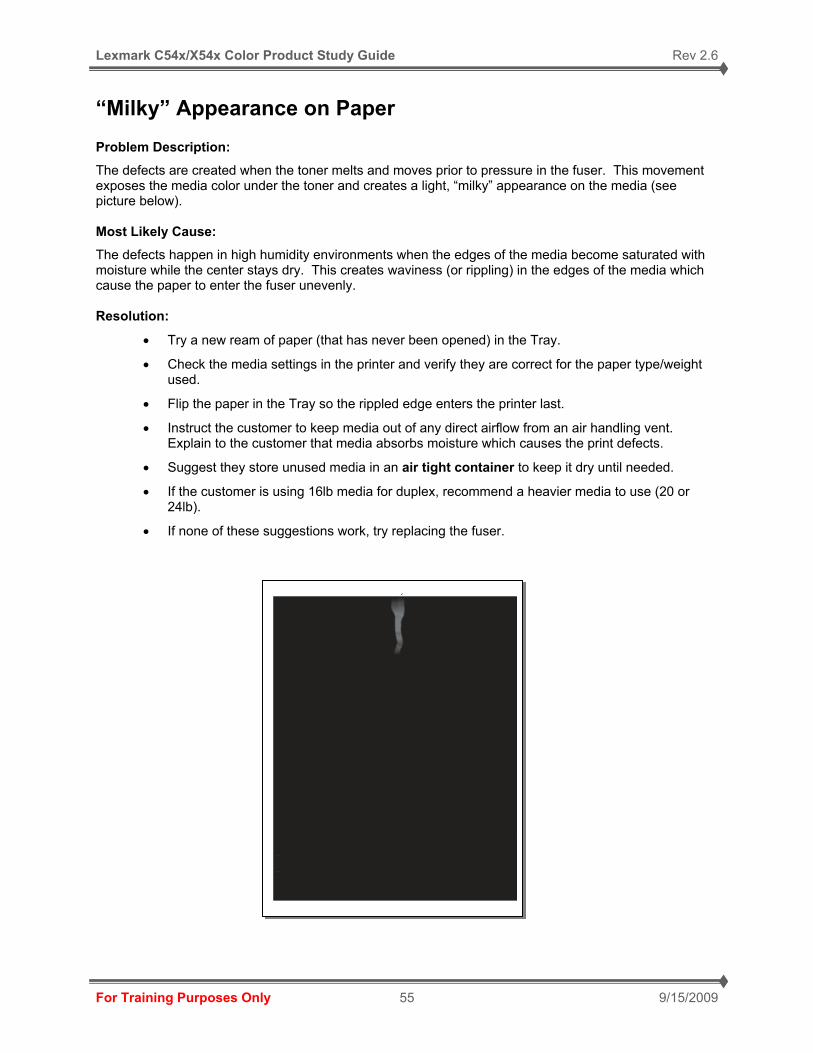
Lexmark C54x/X54x Color Product Study Guide Rev 2.6
For Training Purposes Only 9/15/2009 55
“Milky” Appearance on Paper Problem Description:
The defects are created when the toner melts and moves prior to pressure in the fuser. This movement exposes the media color under the toner and creates a light, “milky” appearance on the media (see picture below). Most Likely Cause:
The defects happen in high humidity environments when the edges of the media become saturated with moisture while the center stays dry. This creates waviness (or rippling) in the edges of the media which cause the paper to enter the fuser unevenly. Resolution:
• Try a new ream of paper (that has never been opened) in the Tray.
• Check the media settings in the printer and verify they are correct for the paper type/weight used.
• Flip the paper in the Tray so the rippled edge enters the printer last.
• Instruct the customer to keep media out of any direct airflow from an air handling vent. Explain to the customer that media absorbs moisture which causes the print defects.
• Suggest they store unused media in an air tight container to keep it dry until needed.
• If the customer is using 16lb media for duplex, recommend a heavier media to use (20 or 24lb).
• If none of these suggestions work, try replacing the fuser.
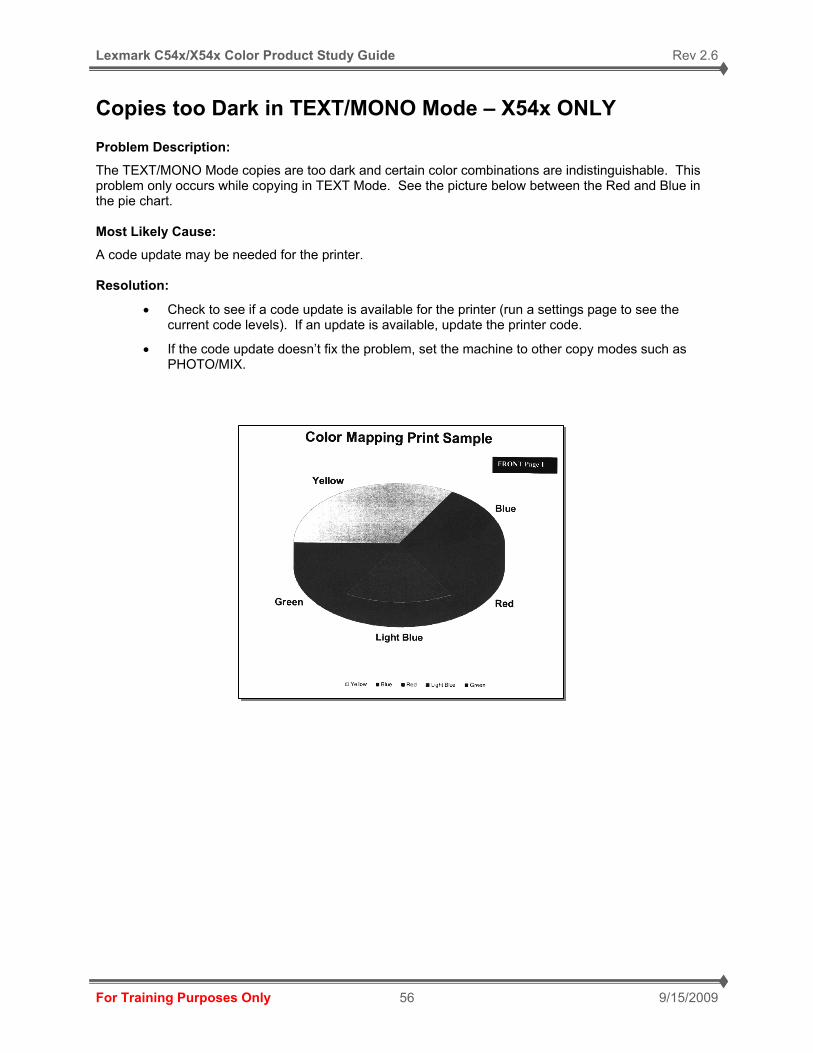
Lexmark C54x/X54x Color Product Study Guide Rev 2.6
For Training Purposes Only 9/15/2009 56
Copies too Dark in TEXT/MONO Mode – X54x ONLY Problem Description:
The TEXT/MONO Mode copies are too dark and certain color combinations are indistinguishable. This problem only occurs while copying in TEXT Mode. See the picture below between the Red and Blue in the pie chart. Most Likely Cause:
A code update may be needed for the printer. Resolution:
• Check to see if a code update is available for the printer (run a settings page to see the current code levels). If an update is available, update the printer code.
• If the code update doesn’t fix the problem, set the machine to other copy modes such as PHOTO/MIX.
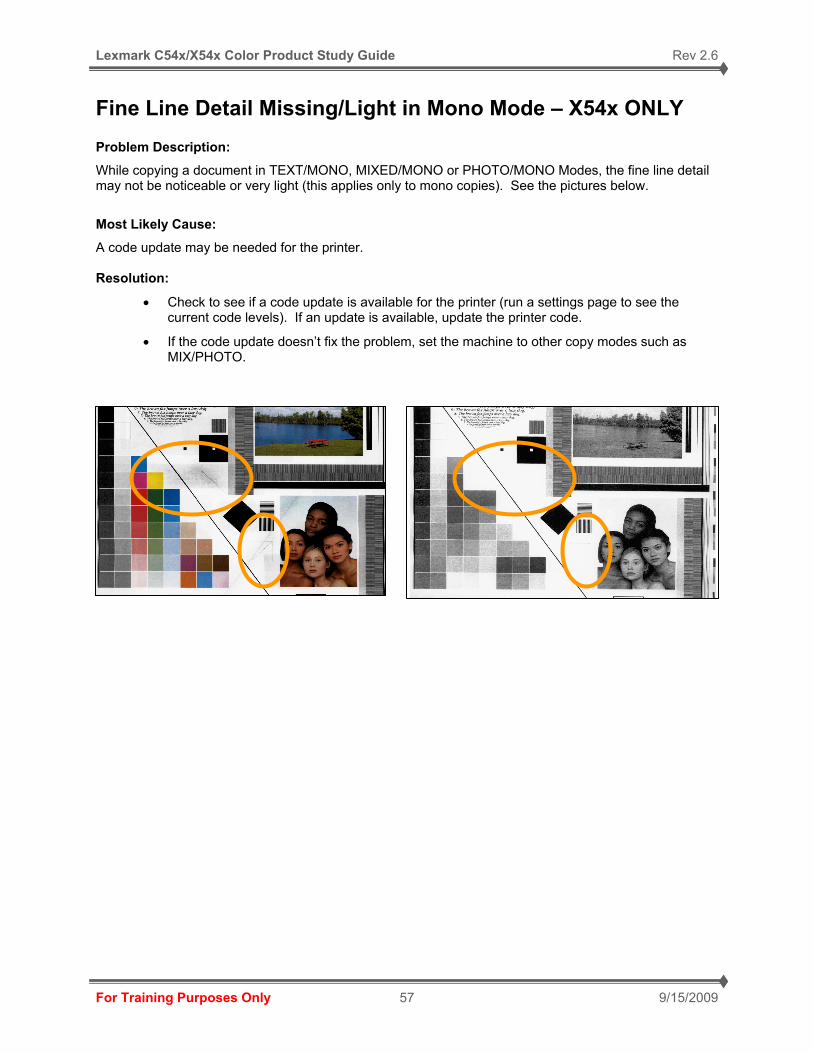
Lexmark C54x/X54x Color Product Study Guide Rev 2.6
For Training Purposes Only 9/15/2009 57
Fine Line Detail Missing/Light in Mono Mode – X54x ONLY Problem Description:
While copying a document in TEXT/MONO, MIXED/MONO or PHOTO/MONO Modes, the fine line detail may not be noticeable or very light (this applies only to mono copies). See the pictures below.
Most Likely Cause:
A code update may be needed for the printer. Resolution:
• Check to see if a code update is available for the printer (run a settings page to see the current code levels). If an update is available, update the printer code.
• If the code update doesn’t fix the problem, set the machine to other copy modes such as MIX/PHOTO.
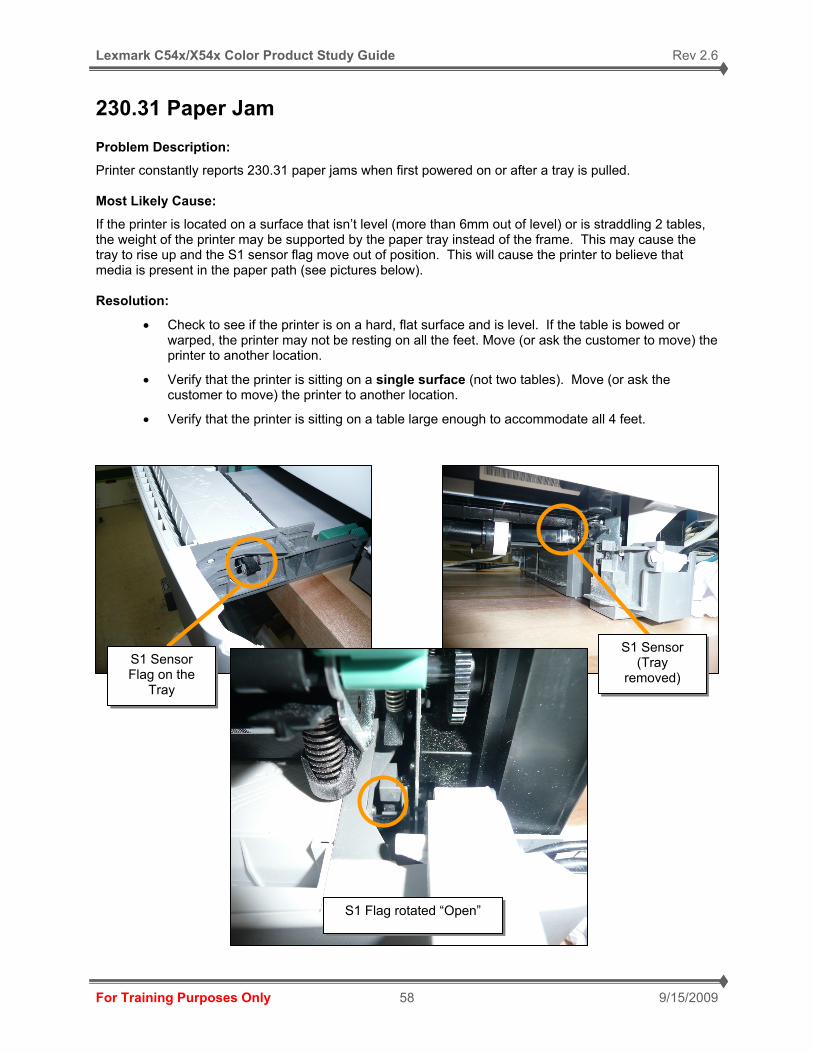
Lexmark C54x/X54x Color Product Study Guide Rev 2.6
For Training Purposes Only 9/15/2009 58
230.31 Paper Jam Problem Description:
Printer constantly reports 230.31 paper jams when first powered on or after a tray is pulled. Most Likely Cause:
If the printer is located on a surface that isn’t level (more than 6mm out of level) or is straddling 2 tables, the weight of the printer may be supported by the paper tray instead of the frame. This may cause the tray to rise up and the S1 sensor flag move out of position. This will cause the printer to believe that media is present in the paper path (see pictures below). Resolution:
• Check to see if the printer is on a hard, flat surface and is level. If the table is bowed or warped, the printer may not be resting on all the feet. Move (or ask the customer to move) the printer to another location.
• Verify that the printer is sitting on a single surface (not two tables). Move (or ask the customer to move) the printer to another location.
• Verify that the printer is sitting on a table large enough to accommodate all 4 feet.
S1 Sensor Flag on the
Tray
S1 Sensor (Tray
removed)
S1 Flag rotated “Open”
Lexmark C54x/X54x Color Product Study Guide Rev 2.6
For Training Purposes Only 9/15/2009 59
Special Procedures
Mirrored NVRAM Controller Board / Operator Panel Replacement
Warning! Observe all ESD precautions while handling electrostatic-discharge sensitive parts.
Warning! When replacing any one of the following components:
• Operator panel assembly
• Controller board
Only replace ONE component at a time. Replace the required component and perform a POR before replacing a second component listed above. If this procedure is not followed, the printer will be rendered inoperable. Never replace both of the components listed above without a POR after installing each one or the printer will be rendered inoperable. These two components mirror the critical NVRAM settings for the printer. If you have not already done so, complete the online course Mirrored NVRAM from Lexmark’s online learning site.
Warning! Never install and remove components listed above as a method of troubleshooting components. Once a component has been installed in a printer, it cannot be used in another printer. It must be returned to the manufacturer.
Motor Detect – Controller Board Replacement This menu initiates an automatic motor detection process that should be performed whenever the controller board is replaced. To run Motor Detect:
1. Select MISC TESTS in the Diag Menu, and press Select .
2. Remove Cartridge. Press Select appears.
3. Select Motor Detect. Note: Do not press Select yet.
4. Remove all toner cartridges and the imaging unit.
5. Close the front cover.
6. If you press Select before closing the front cover, a message appears: Close Cover. Press Select.
7. Press Select . Motor Detection In Progress… appears.
8. The motor detection process takes about 10 seconds, and stops automatically. Detect Complete. Rebooting… appears, and the printer performs a POR (Power On Reset).
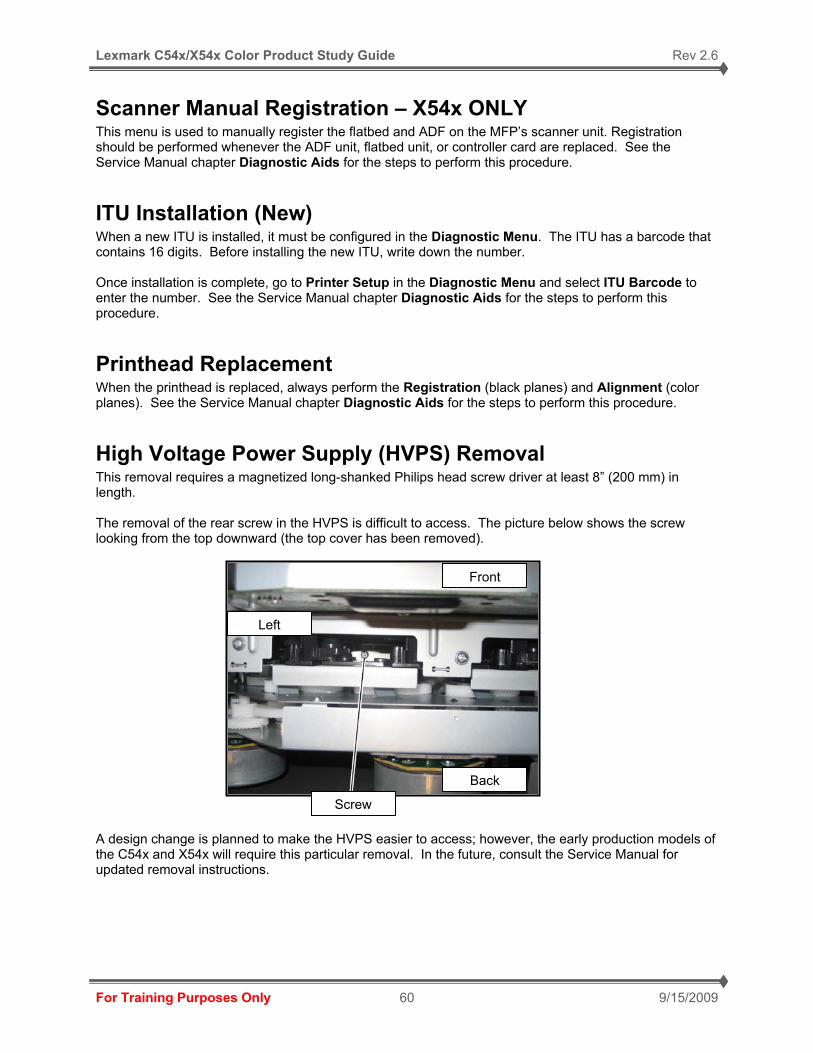
Lexmark C54x/X54x Color Product Study Guide Rev 2.6
For Training Purposes Only 9/15/2009 60
Scanner Manual Registration – X54x ONLY This menu is used to manually register the flatbed and ADF on the MFP’s scanner unit. Registration should be performed whenever the ADF unit, flatbed unit, or controller card are replaced. See the Service Manual chapter Diagnostic Aids for the steps to perform this procedure.
ITU Installation (New) When a new ITU is installed, it must be configured in the Diagnostic Menu. The ITU has a barcode that contains 16 digits. Before installing the new ITU, write down the number. Once installation is complete, go to Printer Setup in the Diagnostic Menu and select ITU Barcode to enter the number. See the Service Manual chapter Diagnostic Aids for the steps to perform this procedure.
Printhead Replacement When the printhead is replaced, always perform the Registration (black planes) and Alignment (color planes). See the Service Manual chapter Diagnostic Aids for the steps to perform this procedure.
High Voltage Power Supply (HVPS) Removal This removal requires a magnetized long-shanked Philips head screw driver at least 8” (200 mm) in length. The removal of the rear screw in the HVPS is difficult to access. The picture below shows the screw looking from the top downward (the top cover has been removed).
A design change is planned to make the HVPS easier to access; however, the early production models of the C54x and X54x will require this particular removal. In the future, consult the Service Manual for updated removal instructions.
Back
Front
Left
Screw
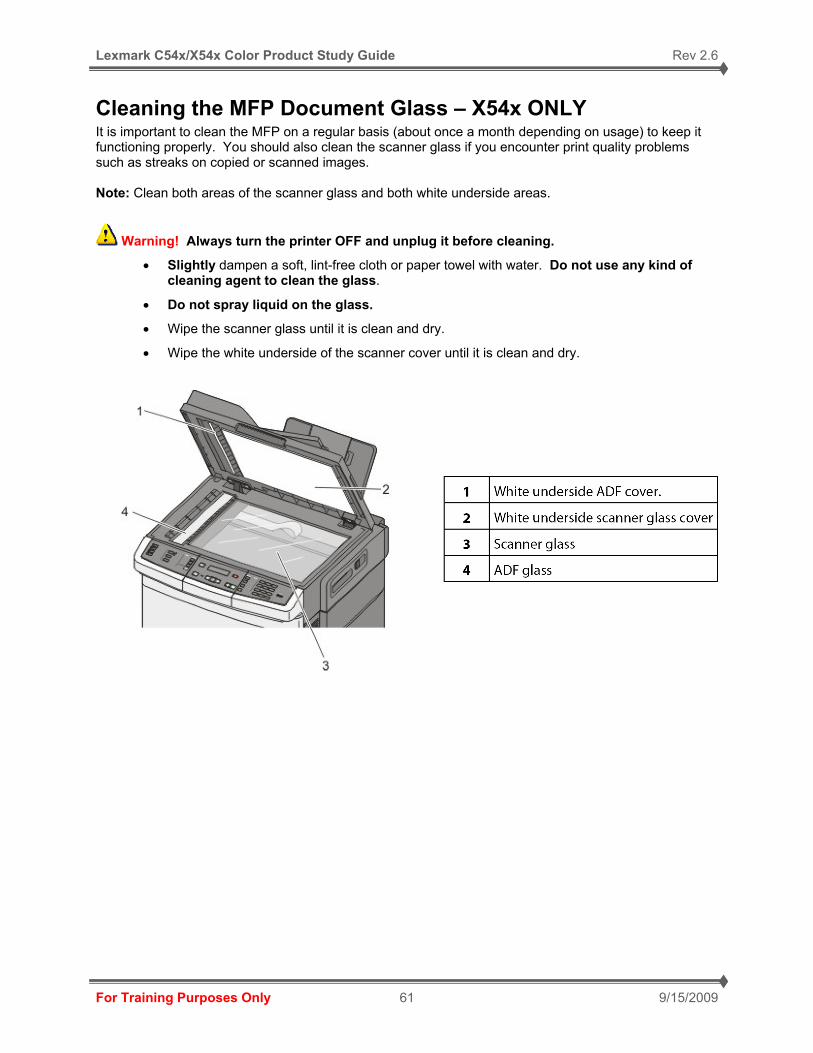
Lexmark C54x/X54x Color Product Study Guide Rev 2.6
For Training Purposes Only 9/15/2009 61
Cleaning the MFP Document Glass – X54x ONLY It is important to clean the MFP on a regular basis (about once a month depending on usage) to keep it functioning properly. You should also clean the scanner glass if you encounter print quality problems such as streaks on copied or scanned images. Note: Clean both areas of the scanner glass and both white underside areas.
Warning! Always turn the printer OFF and unplug it before cleaning.
• Slightly dampen a soft, lint-free cloth or paper towel with water. Do not use any kind of cleaning agent to clean the glass.
• Do not spray liquid on the glass.
• Wipe the scanner glass until it is clean and dry.
• Wipe the white underside of the scanner cover until it is clean and dry.
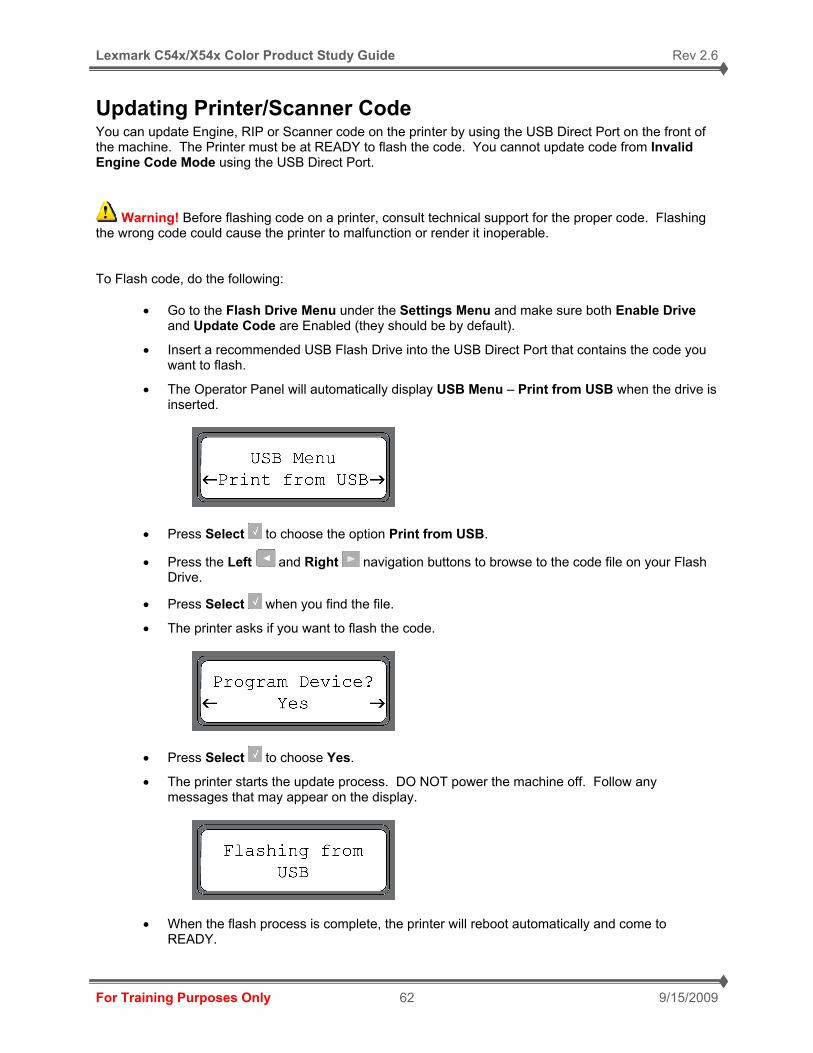
Lexmark C54x/X54x Color Product Study Guide Rev 2.6
For Training Purposes Only 9/15/2009 62
Updating Printer/Scanner Code You can update Engine, RIP or Scanner code on the printer by using the USB Direct Port on the front of the machine. The Printer must be at READY to flash the code. You cannot update code from Invalid Engine Code Mode using the USB Direct Port.
Warning! Before flashing code on a printer, consult technical support for the proper code. Flashing the wrong code could cause the printer to malfunction or render it inoperable. To Flash code, do the following:
• Go to the Flash Drive Menu under the Settings Menu and make sure both Enable Drive and Update Code are Enabled (they should be by default).
• Insert a recommended USB Flash Drive into the USB Direct Port that contains the code you want to flash.
• The Operator Panel will automatically display USB Menu – Print from USB when the drive is inserted.
• Press Select to choose the option Print from USB.
• Press the Left and Right navigation buttons to browse to the code file on your Flash Drive.
• Press Select when you find the file.
• The printer asks if you want to flash the code.
• Press Select to choose Yes.
• The printer starts the update process. DO NOT power the machine off. Follow any messages that may appear on the display.
• When the flash process is complete, the printer will reboot automatically and come to READY.
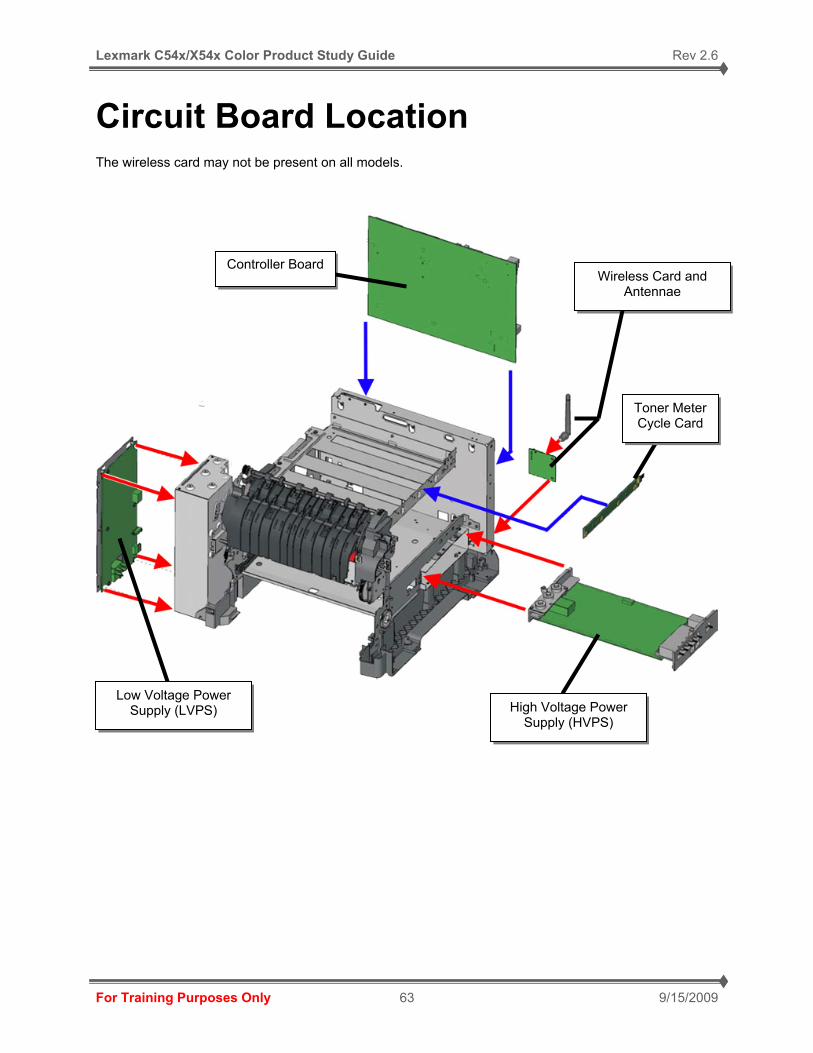
Lexmark C54x/X54x Color Product Study Guide Rev 2.6
For Training Purposes Only 9/15/2009 63
Circuit Board Location The wireless card may not be present on all models.
Controller Board
Low Voltage Power Supply (LVPS)
Toner Meter Cycle Card
High Voltage Power Supply (HVPS)
Wireless Card and Antennae
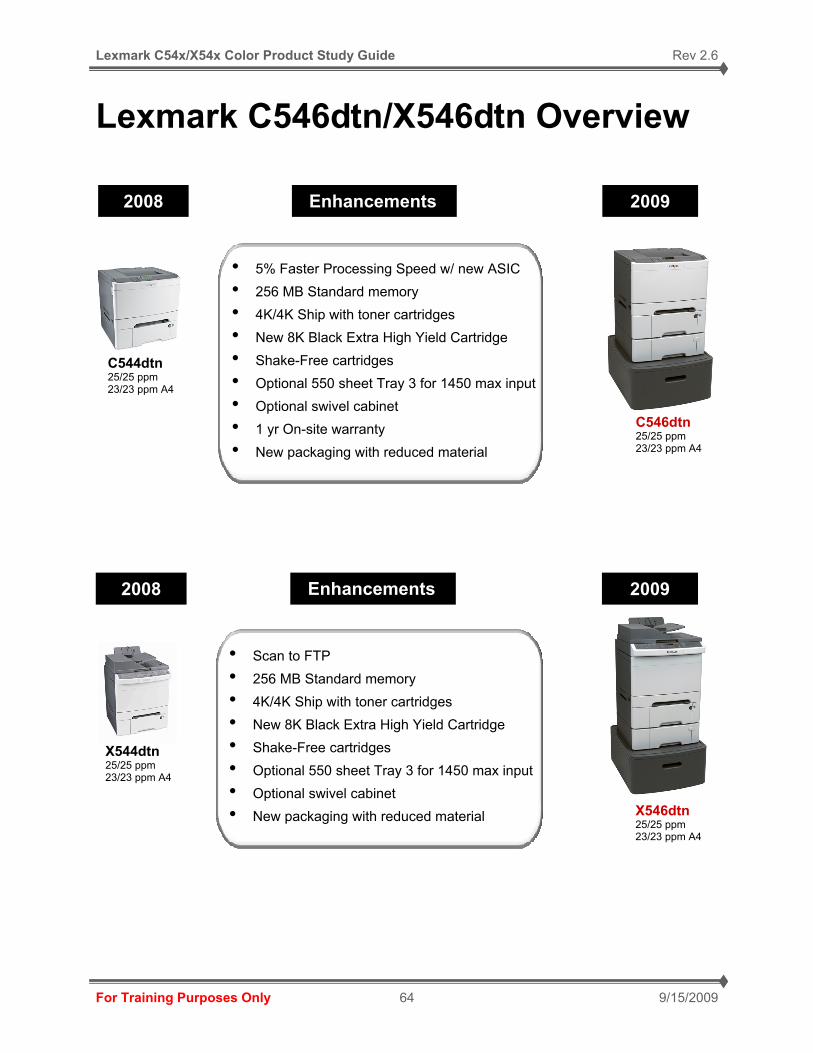
Lexmark C54x/X54x Color Product Study Guide Rev 2.6
For Training Purposes Only 9/15/2009 64
Lexmark C546dtn/X546dtn Overview
• 5% Faster Processing Speed w/ new ASIC • 256 MB Standard memory • 4K/4K Ship with toner cartridges • New 8K Black Extra High Yield Cartridge • Shake-Free cartridges • Optional 550 sheet Tray 3 for 1450 max input • Optional swivel cabinet • 1 yr On-site warranty • New packaging with reduced material
C544dtn 25/25 ppm 23/23 ppm A4
2009
C546dtn 25/25 ppm 23/23 ppm A4
Enhancements 2008
• Scan to FTP • 256 MB Standard memory • 4K/4K Ship with toner cartridges • New 8K Black Extra High Yield Cartridge • Shake-Free cartridges • Optional 550 sheet Tray 3 for 1450 max input• Optional swivel cabinet • New packaging with reduced material
X544dtn 25/25 ppm 23/23 ppm A4
2009
X546dtn 25/25 ppm 23/23 ppm A4
Enhancements 2008

Lexmark C54x/X54x Color Product Study Guide Rev 2.6
For Training Purposes Only 9/15/2009 65
Lexmark Rewards Program
What is the Lexmark Rewards Program? It is a simple program that rewards the customer for choosing the best quality and most reliable inks and toners available for their Lexmark printer. As a member, they will receive one free toner cartridge for every 10 Return Program cartridges used in a printer and then returned to Lexmark. Each printer accrues rewards, and to participate, the customer only needs to register the printer through a custom web portal. This program is our way of giving back to valued customers and facilitating an easy way for our customers to do something good for the environment.
What countries are participating in this program? • AP – Australia, New Zealand, Singapore
• EMEA – Austria, Belgium, Denmark, Finland, France, Germany, Ireland, Italy, Netherlands, Norway, Portugal, Spain, Sweden, Switzerland, United Kingdom
• LAD – Brazil, Puerto Rico
• NA – US, Canada
What cartridges are eligible? The C54x and X54x Standard, High Yield and Extra High Yield Return Program cartridges are eligible for Rewards credit when returned to Lexmark.
How are the Reward cartridges ordered? Earned rewards are ordered through LexmarkRewards.com. The Rewards are shipped to customer free of charge and an Email sent to customer confirming shipment
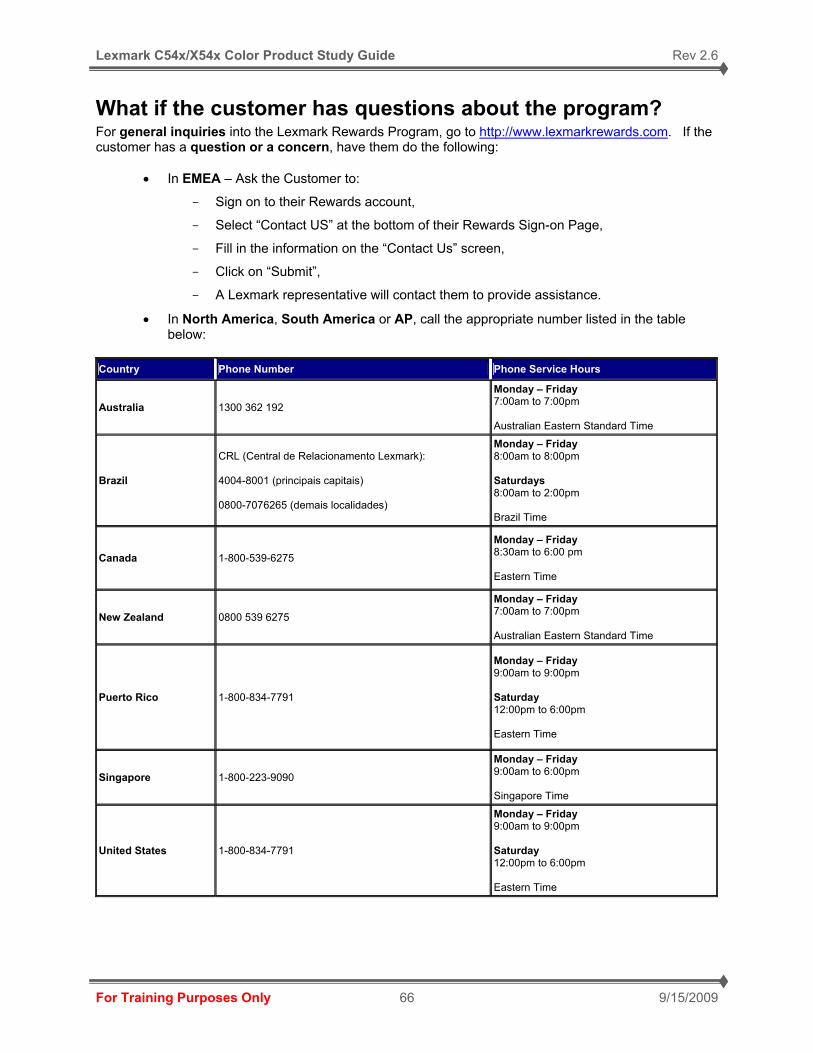
Lexmark C54x/X54x Color Product Study Guide Rev 2.6
For Training Purposes Only 9/15/2009 66
What if the customer has questions about the program? For general inquiries into the Lexmark Rewards Program, go to http://www.lexmarkrewards.com. If the customer has a question or a concern, have them do the following:
• In EMEA – Ask the Customer to:
- Sign on to their Rewards account,
- Select “Contact US” at the bottom of their Rewards Sign-on Page,
- Fill in the information on the “Contact Us” screen,
- Click on “Submit”,
- A Lexmark representative will contact them to provide assistance.
• In North America, South America or AP, call the appropriate number listed in the table below:
Country Phone Number Phone Service Hours
Australia 1300 362 192
Monday – Friday 7:00am to 7:00pm Australian Eastern Standard Time
Brazil
CRL (Central de Relacionamento Lexmark): 4004-8001 (principais capitais) 0800-7076265 (demais localidades)
Monday – Friday 8:00am to 8:00pm Saturdays 8:00am to 2:00pm Brazil Time
Canada 1-800-539-6275
Monday – Friday 8:30am to 6:00 pm Eastern Time
New Zealand 0800 539 6275
Monday – Friday 7:00am to 7:00pm Australian Eastern Standard Time
Puerto Rico 1-800-834-7791
Monday – Friday 9:00am to 9:00pm Saturday 12:00pm to 6:00pm Eastern Time
Singapore 1-800-223-9090
Monday – Friday 9:00am to 6:00pm Singapore Time
United States 1-800-834-7791
Monday – Friday 9:00am to 9:00pm Saturday 12:00pm to 6:00pm Eastern Time

Lexmark C54x/X54x Color Product Study Guide Rev 2.6
For Training Purposes Only 9/15/2009 67
THIS PAGE INTENTIONALLY LEFT BLANK