Lets Get Started - RFgenportal.rfgen.com/docs/Lets_Get_Started5.pdf · (Applications, Users, Menus,...
18
LET’S GET STARTED Version 5 A Quick-Start Guide to Development RFgen’s powerful interactive development environment eases the burdens of almost any development effort by allowing developers to focus on the end results rather than the means to accomplish them.
Transcript of Lets Get Started - RFgenportal.rfgen.com/docs/Lets_Get_Started5.pdf · (Applications, Users, Menus,...

LET’S GET STARTED
Version 5 A Quick-Start Guide to Development
RFgen’s powerful interactive development environment eases the
burdens of almost any development effort by allowing
developers to focus on the end results rather than the means to
accomplish them.
LET’S GET STARTED
© Copyright 2013, The DataMAX Software Group, Inc., All Rights Reserved
LET’S GET STARTED A Q U I C K - S T A R T G U I D E T O D E V E L O P M E N T
INTRODUCTION
The Mobile Development Studio provides an intuitive, yet powerful, interactive development environment (IDE). An application can literally be developed and become fully functional within minutes. The Mobile Development Studio has simplified the development phase and promotes a rapid deployment cycle for solutions.
This document provides simple exercises which can be performed by almost anyone. Developers should especially find this technical memo useful, because the purpose of this document is to immerse the reader into the IDE of the Mobile Development Studio. The objects introduced and addressed in this publication are Applications, Menus, and Users.
OVERVIEW
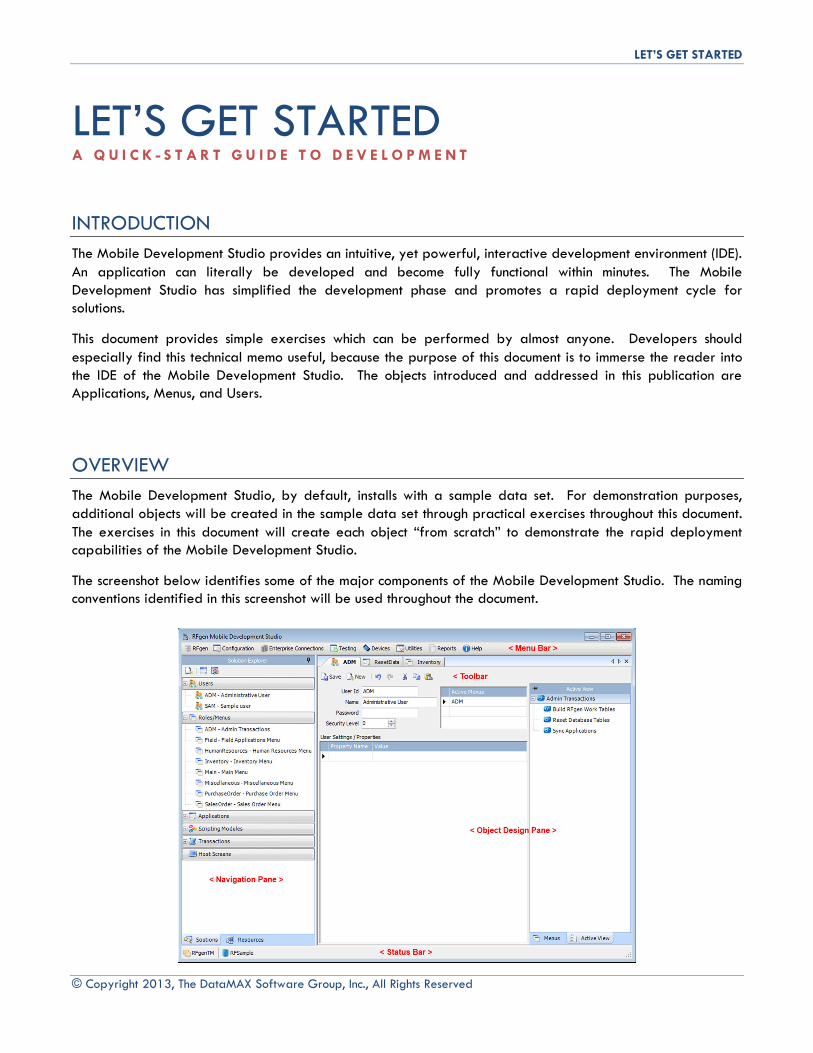
The Mobile Development Studio, by default, installs with a sample data set. For demonstration purposes, additional objects will be created in the sample data set through practical exercises throughout this document. The exercises in this document will create each object “from scratch” to demonstrate the rapid deployment capabilities of the Mobile Development Studio.
The screenshot below identifies some of the major components of the Mobile Development Studio. The naming conventions identified in this screenshot will be used throughout the document.
LET’S GET STARTED
© Copyright 2013, The DataMAX Software Group, Inc., All Rights Reserved
MASTER DATABASE
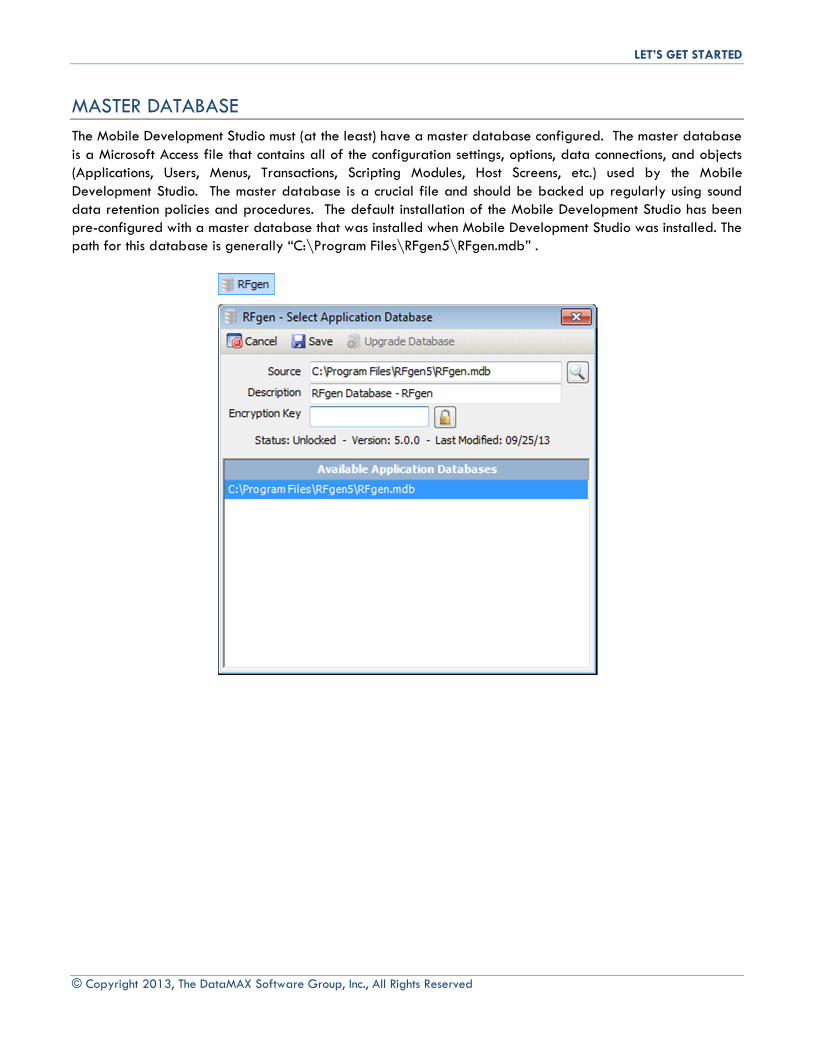
The Mobile Development Studio must (at the least) have a master database configured. The master database is a Microsoft Access file that contains all of the configuration settings, options, data connections, and objects (Applications, Users, Menus, Transactions, Scripting Modules, Host Screens, etc.) used by the Mobile Development Studio. The master database is a crucial file and should be backed up regularly using sound data retention policies and procedures. The default installation of the Mobile Development Studio has been pre-configured with a master database that was installed when Mobile Development Studio was installed. The path for this database is generally “C:\Program Files\RFgen5\RFgen.mdb” .
LET’S GET STARTED
© Copyright 2013, The DataMAX Software Group, Inc., All Rights Reserved
DATABASE CONNECTION
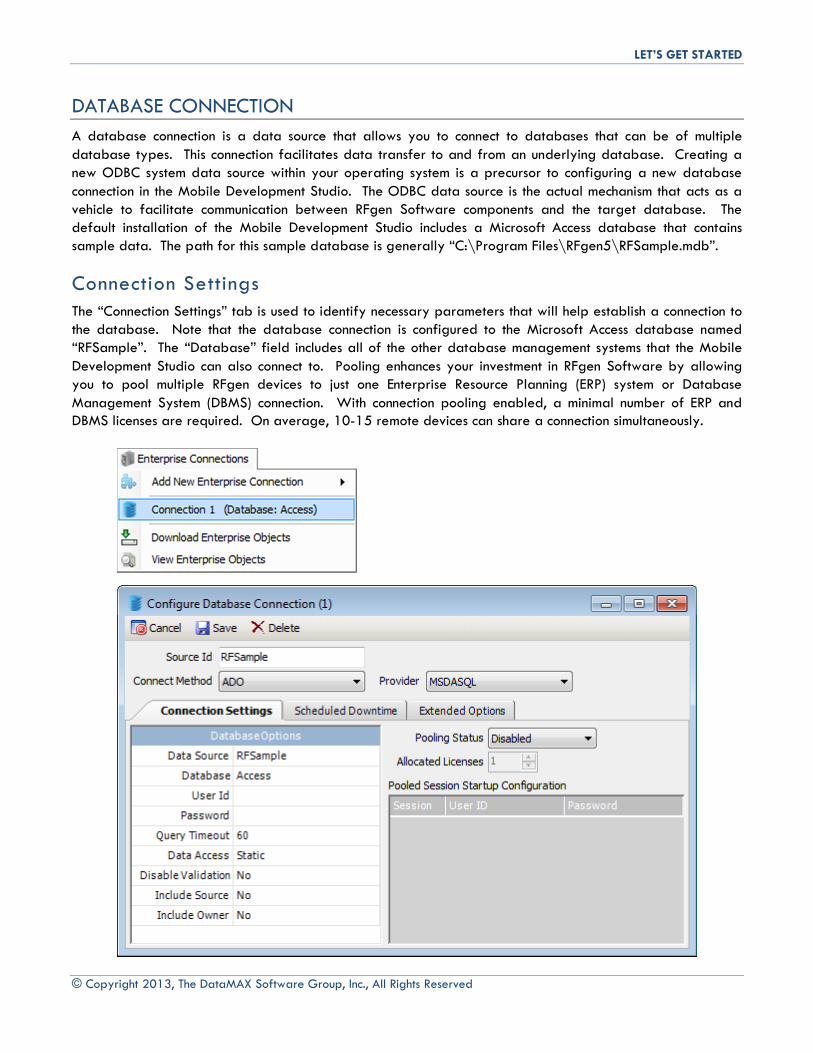
A database connection is a data source that allows you to connect to databases that can be of multiple database types. This connection facilitates data transfer to and from an underlying database. Creating a new ODBC system data source within your operating system is a precursor to configuring a new database connection in the Mobile Development Studio. The ODBC data source is the actual mechanism that acts as a vehicle to facilitate communication between RFgen Software components and the target database. The default installation of the Mobile Development Studio includes a Microsoft Access database that contains sample data. The path for this sample database is generally “C:\Program Files\RFgen5\RFSample.mdb”.
Connection Settings The “Connection Settings” tab is used to identify necessary parameters that will help establish a connection to the database. Note that the database connection is configured to the Microsoft Access database named “RFSample”. The “Database” field includes all of the other database management systems that the Mobile Development Studio can also connect to. Pooling enhances your investment in RFgen Software by allowing you to pool multiple RFgen devices to just one Enterprise Resource Planning (ERP) system or Database Management System (DBMS) connection. With connection pooling enabled, a minimal number of ERP and DBMS licenses are required. On average, 10-15 remote devices can share a connection simultaneously.
LET’S GET STARTED
© Copyright 2013, The DataMAX Software Group, Inc., All Rights Reserved
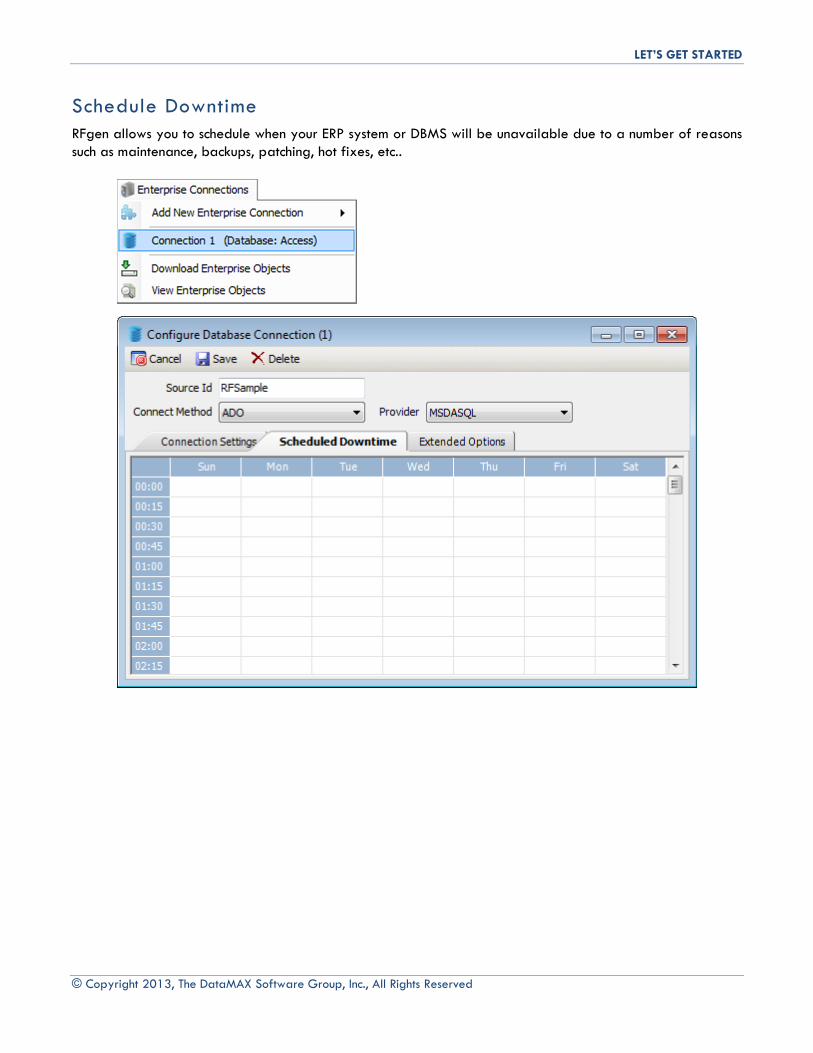
Schedule Downtime RFgen allows you to schedule when your ERP system or DBMS will be unavailable due to a number of reasons such as maintenance, backups, patching, hot fixes, etc..
LET’S GET STARTED
© Copyright 2013, The DataMAX Software Group, Inc., All Rights Reserved
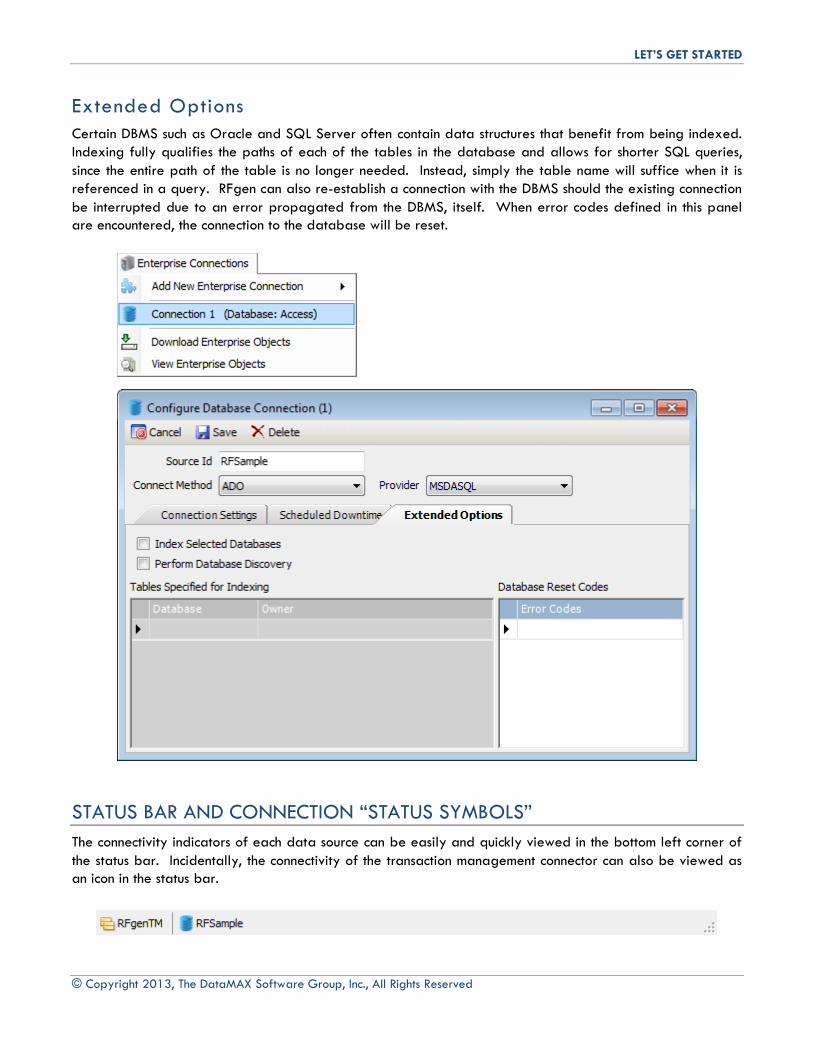
Extended Options Certain DBMS such as Oracle and SQL Server often contain data structures that benefit from being indexed. Indexing fully qualifies the paths of each of the tables in the database and allows for shorter SQL queries, since the entire path of the table is no longer needed. Instead, simply the table name will suffice when it is referenced in a query. RFgen can also re-establish a connection with the DBMS should the existing connection be interrupted due to an error propagated from the DBMS, itself. When error codes defined in this panel are encountered, the connection to the database will be reset.
STATUS BAR AND CONNECTION “STATUS SYMBOLS”
The connectivity indicators of each data source can be easily and quickly viewed in the bottom left corner of the status bar. Incidentally, the connectivity of the transaction management connector can also be viewed as an icon in the status bar.
LET’S GET STARTED
© Copyright 2013, The DataMAX Software Group, Inc., All Rights Reserved
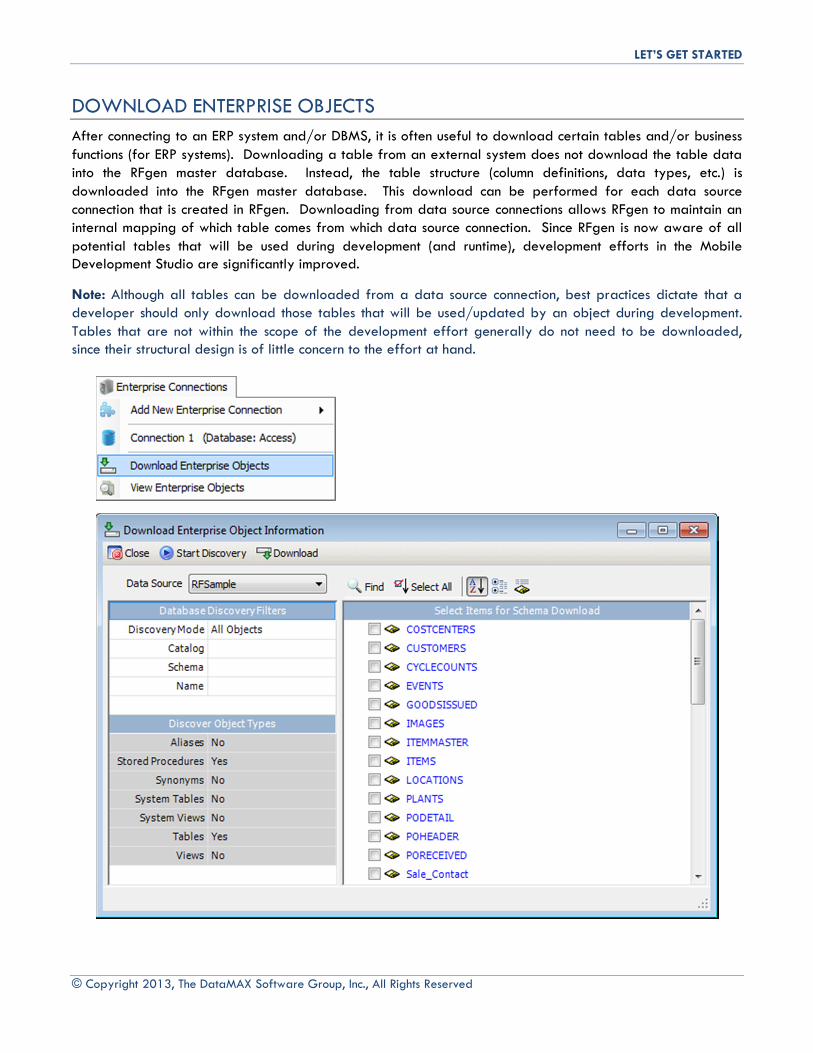
DOWNLOAD ENTERPRISE OBJECTS
After connecting to an ERP system and/or DBMS, it is often useful to download certain tables and/or business functions (for ERP systems). Downloading a table from an external system does not download the table data into the RFgen master database. Instead, the table structure (column definitions, data types, etc.) is downloaded into the RFgen master database. This download can be performed for each data source connection that is created in RFgen. Downloading from data source connections allows RFgen to maintain an internal mapping of which table comes from which data source connection. Since RFgen is now aware of all potential tables that will be used during development (and runtime), development efforts in the Mobile Development Studio are significantly improved.
Note: Although all tables can be downloaded from a data source connection, best practices dictate that a developer should only download those tables that will be used/updated by an object during development. Tables that are not within the scope of the development effort generally do not need to be downloaded, since their structural design is of little concern to the effort at hand.
LET’S GET STARTED
© Copyright 2013, The DataMAX Software Group, Inc., All Rights Reserved
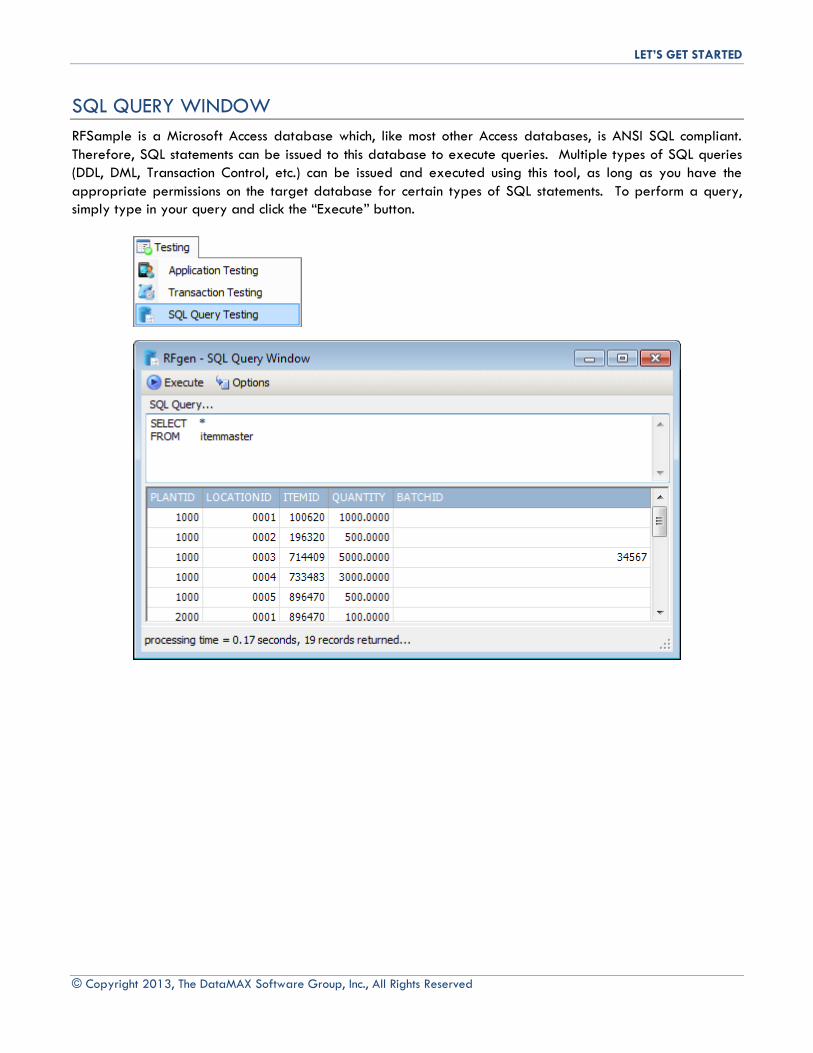
SQL QUERY WINDOW
RFSample is a Microsoft Access database which, like most other Access databases, is ANSI SQL compliant. Therefore, SQL statements can be issued to this database to execute queries. Multiple types of SQL queries (DDL, DML, Transaction Control, etc.) can be issued and executed using this tool, as long as you have the appropriate permissions on the target database for certain types of SQL statements. To perform a query, simply type in your query and click the “Execute” button.

LET’S GET STARTED
© Copyright 2013, The DataMAX Software Group, Inc., All Rights Reserved
EXERCISE 1: CREATING AN APPLICATION
An application is the primary object used in RFgen to collect user input. Applications often include user input validation which serves to minimize erroneous values in the various prompts of the application. The goal of this exercise is to create a basic application that is linked to a downloaded table. The “ITEMMASTER” table has been downloaded from the RFSample database as a prerequisite to this exercise.
Procedure 1. In the navigation pane, right-click the “Applications” group and select “Add New Application…” from the
context menu.
2. In the object design pane, provide an “Application Id”, “Description”, and “Project Group” for the new application.
3. In the “Link To” drop-down, select “ITEMMASTER” as the table that you will link this application to.
4. Click on the “Properties” sub-tab. Select an image for the “Image Id” property of this form.
5. Click on the “Toolbox” sub-tab. Double-click or click and drag each of the fields from the “ITEMMASTER” group, in the “Toolbox” to the application to create prompts.
LET’S GET STARTED
© Copyright 2013, The DataMAX Software Group, Inc., All Rights Reserved
Procedure ( c o n t i nu ed )
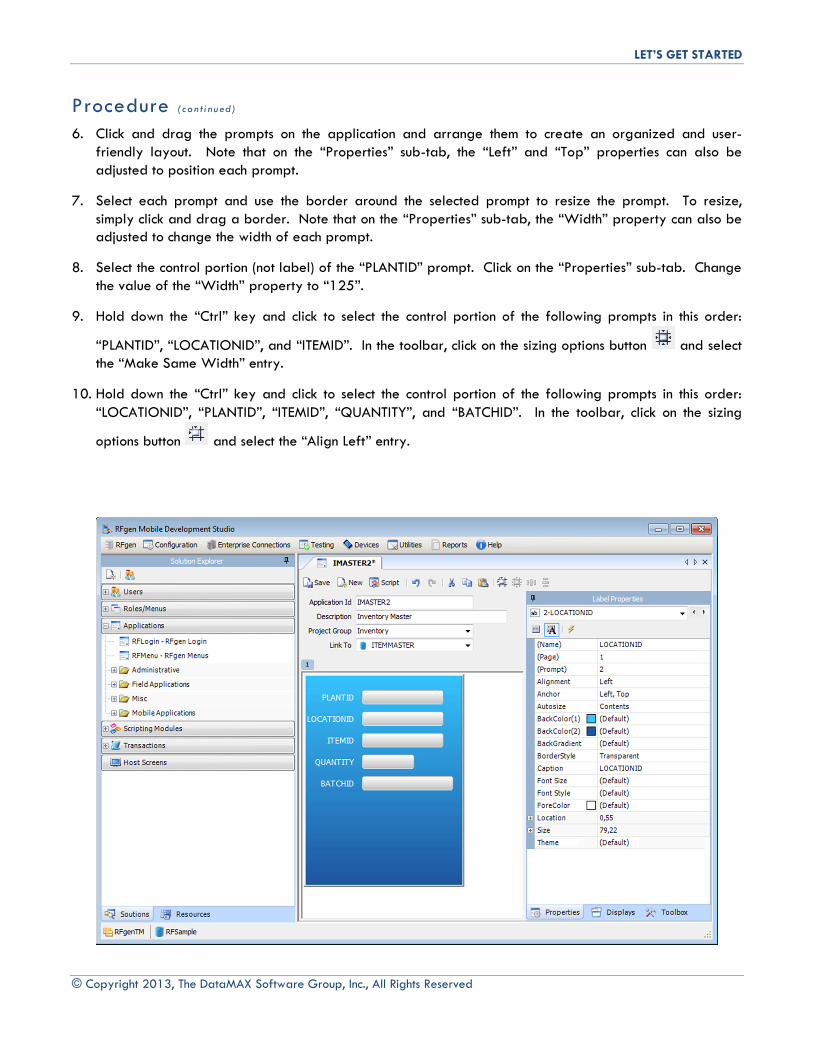
6. Click and drag the prompts on the application and arrange them to create an organized and user-friendly layout. Note that on the “Properties” sub-tab, the “Left” and “Top” properties can also be adjusted to position each prompt.
7. Select each prompt and use the border around the selected prompt to resize the prompt. To resize, simply click and drag a border. Note that on the “Properties” sub-tab, the “Width” property can also be adjusted to change the width of each prompt.
8. Select the control portion (not label) of the “PLANTID” prompt. Click on the “Properties” sub-tab. Change the value of the “Width” property to “125”.
9. Hold down the “Ctrl” key and click to select the control portion of the following prompts in this order:
“PLANTID”, “LOCATIONID”, and “ITEMID”. In the toolbar, click on the sizing options button and select the “Make Same Width” entry.
10. Hold down the “Ctrl” key and click to select the control portion of the following prompts in this order: “LOCATIONID”, “PLANTID”, “ITEMID”, “QUANTITY”, and “BATCHID”. In the toolbar, click on the sizing
options button and select the “Align Left” entry.
LET’S GET STARTED
© Copyright 2013, The DataMAX Software Group, Inc., All Rights Reserved
Procedure ( c o n t i nu ed )
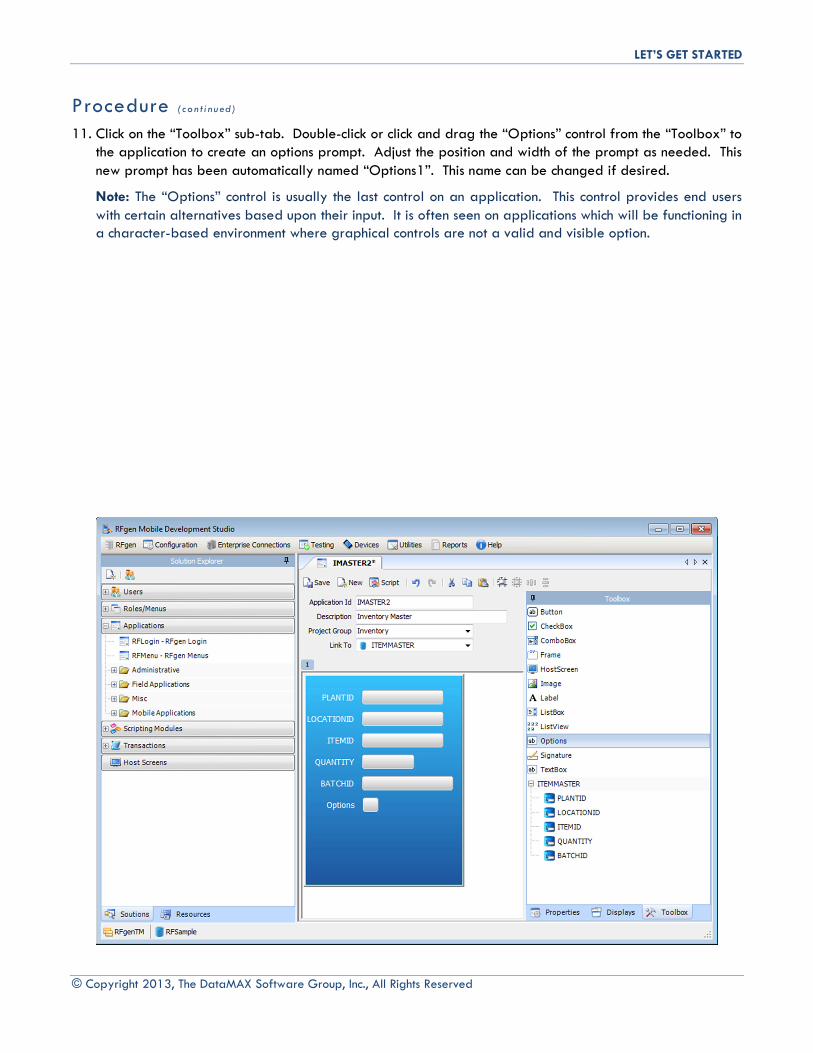
11. Click on the “Toolbox” sub-tab. Double-click or click and drag the “Options” control from the “Toolbox” to the application to create an options prompt. Adjust the position and width of the prompt as needed. This new prompt has been automatically named “Options1”. This name can be changed if desired.
Note: The “Options” control is usually the last control on an application. This control provides end users with certain alternatives based upon their input. It is often seen on applications which will be functioning in a character-based environment where graphical controls are not a valid and visible option.
LET’S GET STARTED
© Copyright 2013, The DataMAX Software Group, Inc., All Rights Reserved
Procedure ( c o n t i nu ed )
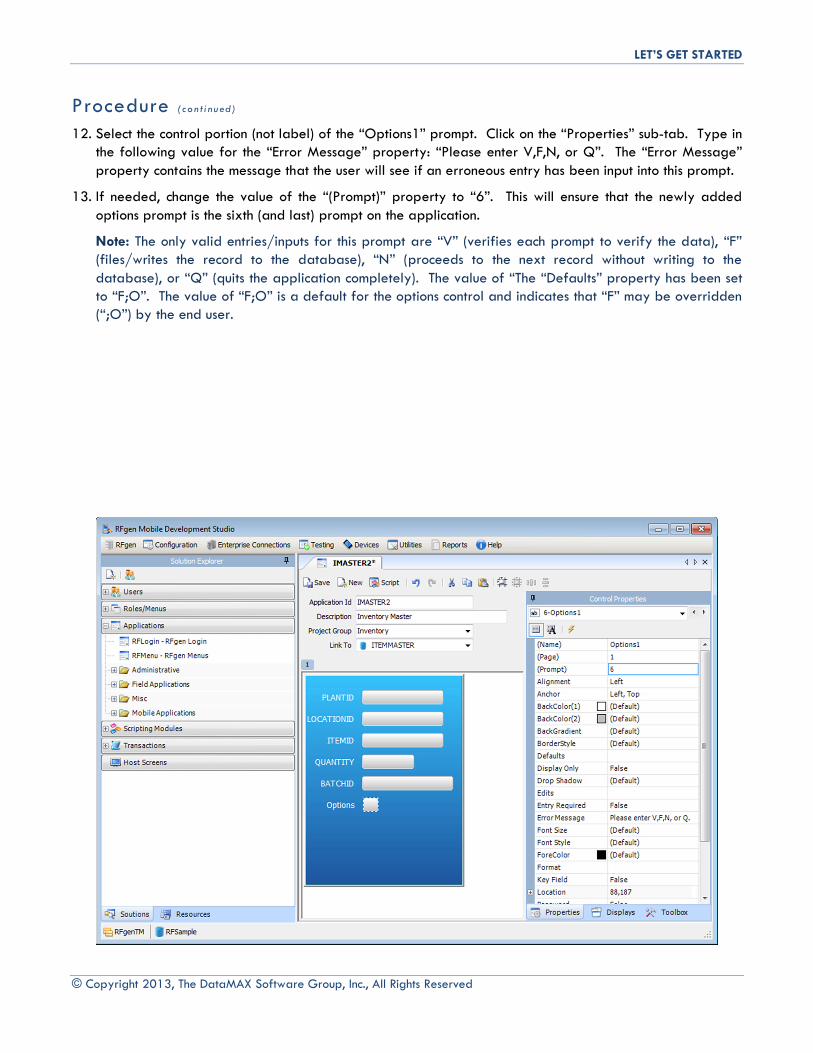
12. Select the control portion (not label) of the “Options1” prompt. Click on the “Properties” sub-tab. Type in the following value for the “Error Message” property: “Please enter V,F,N, or Q”. The “Error Message” property contains the message that the user will see if an erroneous entry has been input into this prompt.
13. If needed, change the value of the “(Prompt)” property to “6”. This will ensure that the newly added options prompt is the sixth (and last) prompt on the application.
Note: The only valid entries/inputs for this prompt are “V” (verifies each prompt to verify the data), “F” (files/writes the record to the database), “N” (proceeds to the next record without writing to the database), or “Q” (quits the application completely). The value of “The “Defaults” property has been set to “F;O”. The value of “F;O” is a default for the options control and indicates that “F” may be overridden (“;O”) by the end user.
LET’S GET STARTED
© Copyright 2013, The DataMAX Software Group, Inc., All Rights Reserved
Procedure ( c o n t i nu ed )
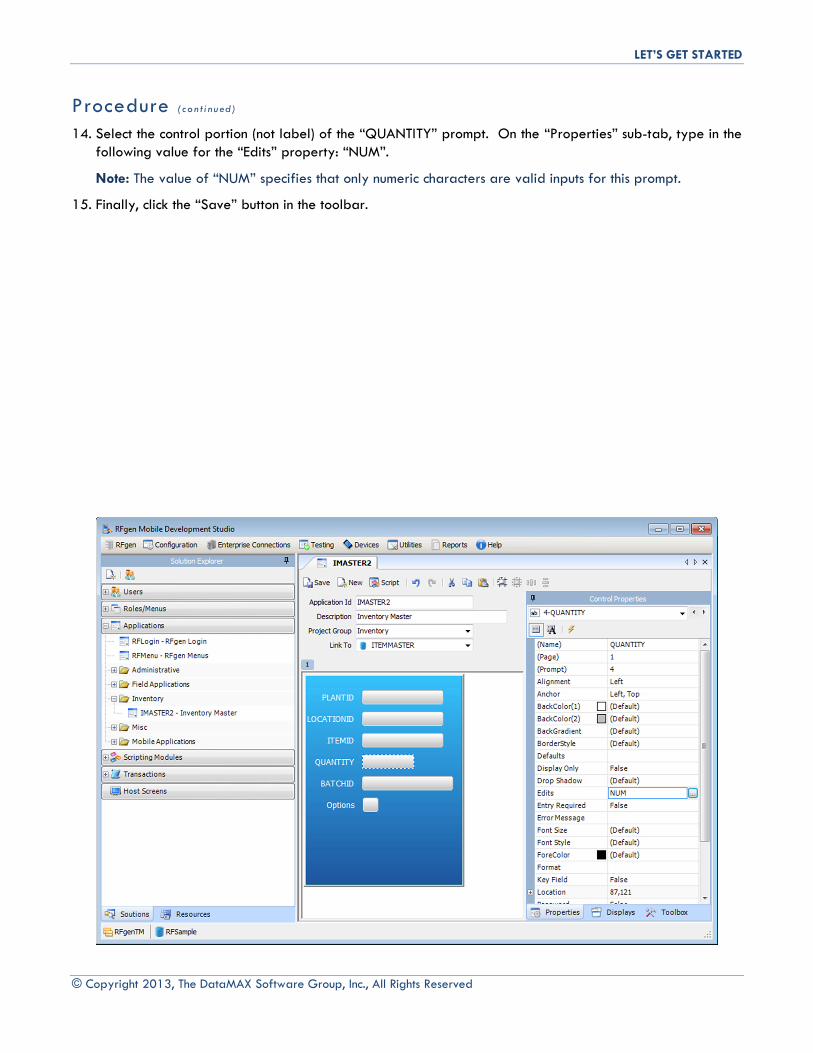
14. Select the control portion (not label) of the “QUANTITY” prompt. On the “Properties” sub-tab, type in the following value for the “Edits” property: “NUM”.
Note: The value of “NUM” specifies that only numeric characters are valid inputs for this prompt.
15. Finally, click the “Save” button in the toolbar.
LET’S GET STARTED
© Copyright 2013, The DataMAX Software Group, Inc., All Rights Reserved
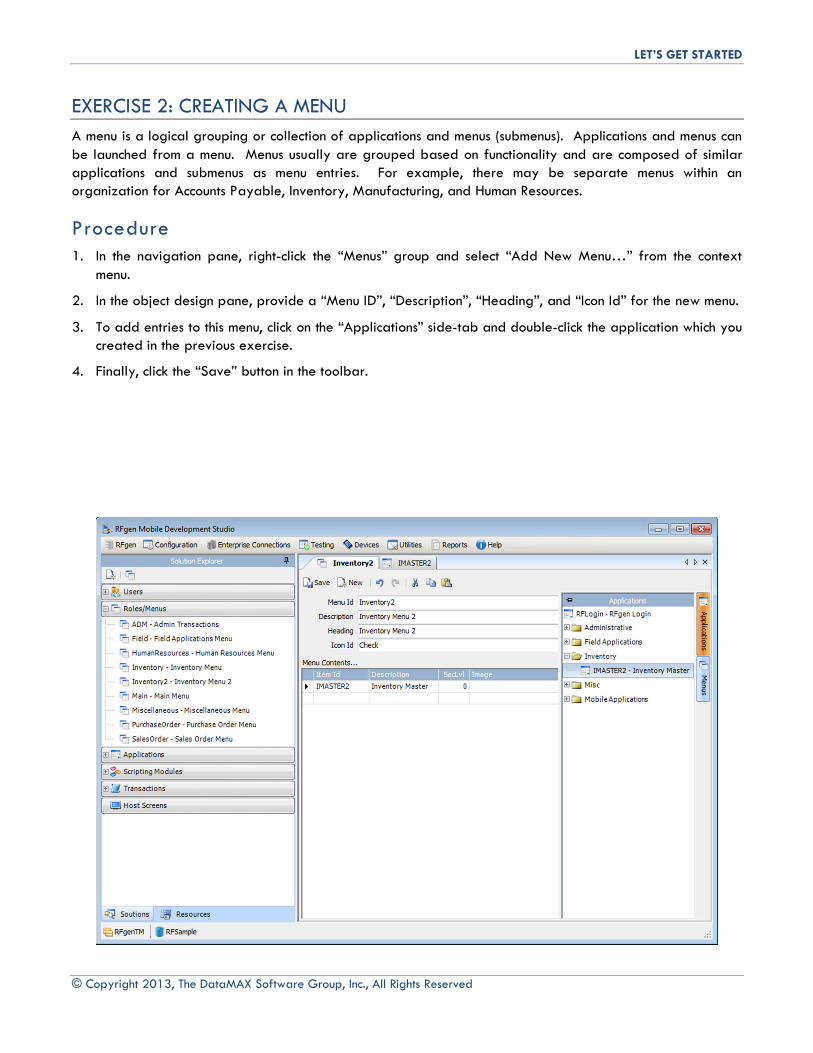
EXERCISE 2: CREATING A MENU
A menu is a logical grouping or collection of applications and menus (submenus). Applications and menus can be launched from a menu. Menus usually are grouped based on functionality and are composed of similar applications and submenus as menu entries. For example, there may be separate menus within an organization for Accounts Payable, Inventory, Manufacturing, and Human Resources.
Procedure 1. In the navigation pane, right-click the “Menus” group and select “Add New Menu…” from the context
menu.
2. In the object design pane, provide a “Menu ID”, “Description”, “Heading”, and “Icon Id” for the new menu.
3. To add entries to this menu, click on the “Applications” side-tab and double-click the application which you created in the previous exercise.
4. Finally, click the “Save” button in the toolbar.
LET’S GET STARTED
© Copyright 2013, The DataMAX Software Group, Inc., All Rights Reserved
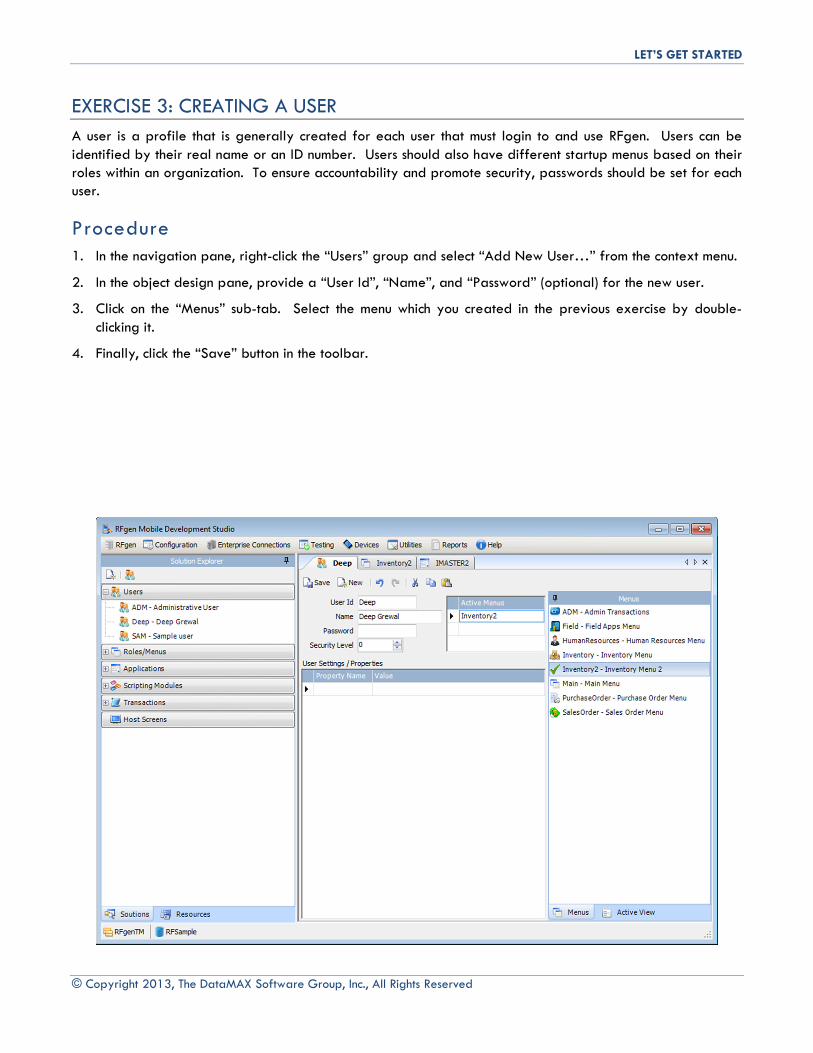
EXERCISE 3: CREATING A USER
A user is a profile that is generally created for each user that must login to and use RFgen. Users can be identified by their real name or an ID number. Users should also have different startup menus based on their roles within an organization. To ensure accountability and promote security, passwords should be set for each user.
Procedure 1. In the navigation pane, right-click the “Users” group and select “Add New User…” from the context menu.
2. In the object design pane, provide a “User Id”, “Name”, and “Password” (optional) for the new user.
3. Click on the “Menus” sub-tab. Select the menu which you created in the previous exercise by double-clicking it.
4. Finally, click the “Save” button in the toolbar.
LET’S GET STARTED
© Copyright 2013, The DataMAX Software Group, Inc., All Rights Reserved
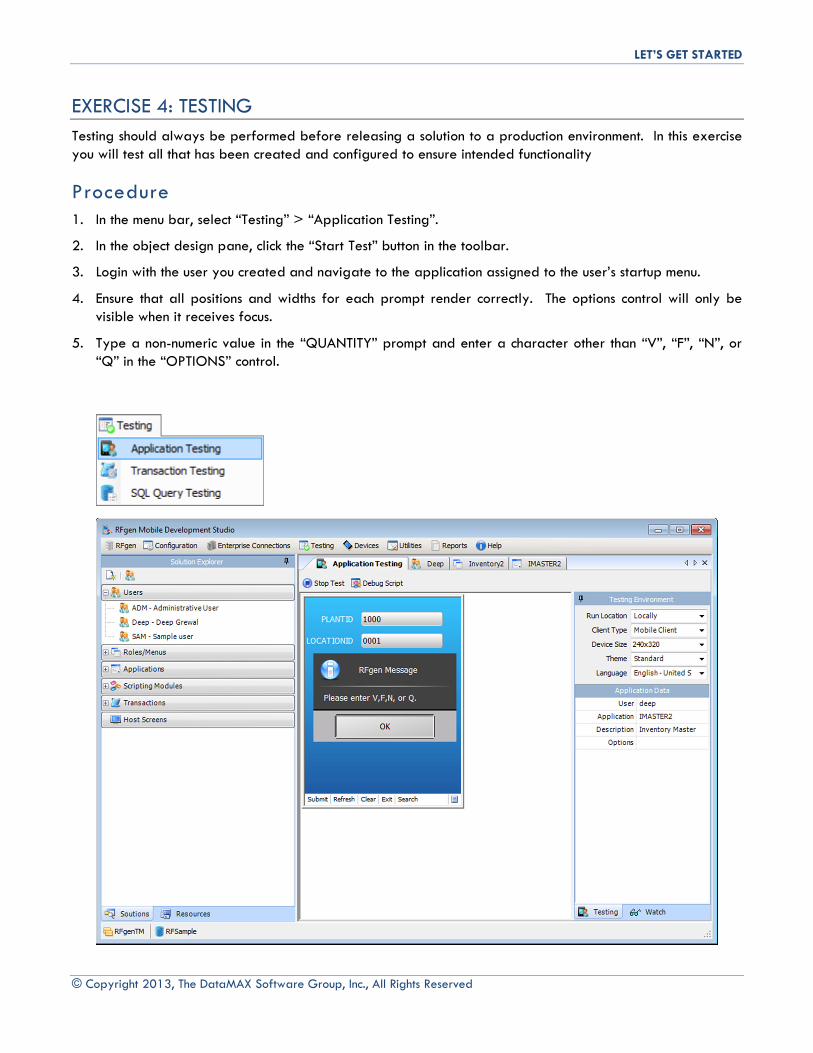
EXERCISE 4: TESTING
Testing should always be performed before releasing a solution to a production environment. In this exercise you will test all that has been created and configured to ensure intended functionality
Procedure 1. In the menu bar, select “Testing” > “Application Testing”.
2. In the object design pane, click the “Start Test” button in the toolbar.
3. Login with the user you created and navigate to the application assigned to the user’s startup menu.
4. Ensure that all positions and widths for each prompt render correctly. The options control will only be visible when it receives focus.
5. Type a non-numeric value in the “QUANTITY” prompt and enter a character other than “V”, “F”, “N”, or “Q” in the “OPTIONS” control.
LET’S GET STARTED
© Copyright 2013, The DataMAX Software Group, Inc., All Rights Reserved
NOTE TO THE DEVELOPER
The exercises and subject matter covered in this document take a simplistic and ideal approach to
development. The Mobile Development Studio provides enhanced flexibility and refined control by
implementing Visual Basic for Application (VBA) script. VBA scripting can be implemented to add intricate
logic for solutions that are more elaborate and demanding.
LET’S GET STARTED
© Copyright 2013, The DataMAX Software Group, Inc., All Rights Reserved