LESSON PLAN COVER SHEET - Wise County, Texas FIREARMS COURSE.pdf · LESSON PLAN COVER SHEET...
15
Transcript of LESSON PLAN COVER SHEET - Wise County, Texas FIREARMS COURSE.pdf · LESSON PLAN COVER SHEET...

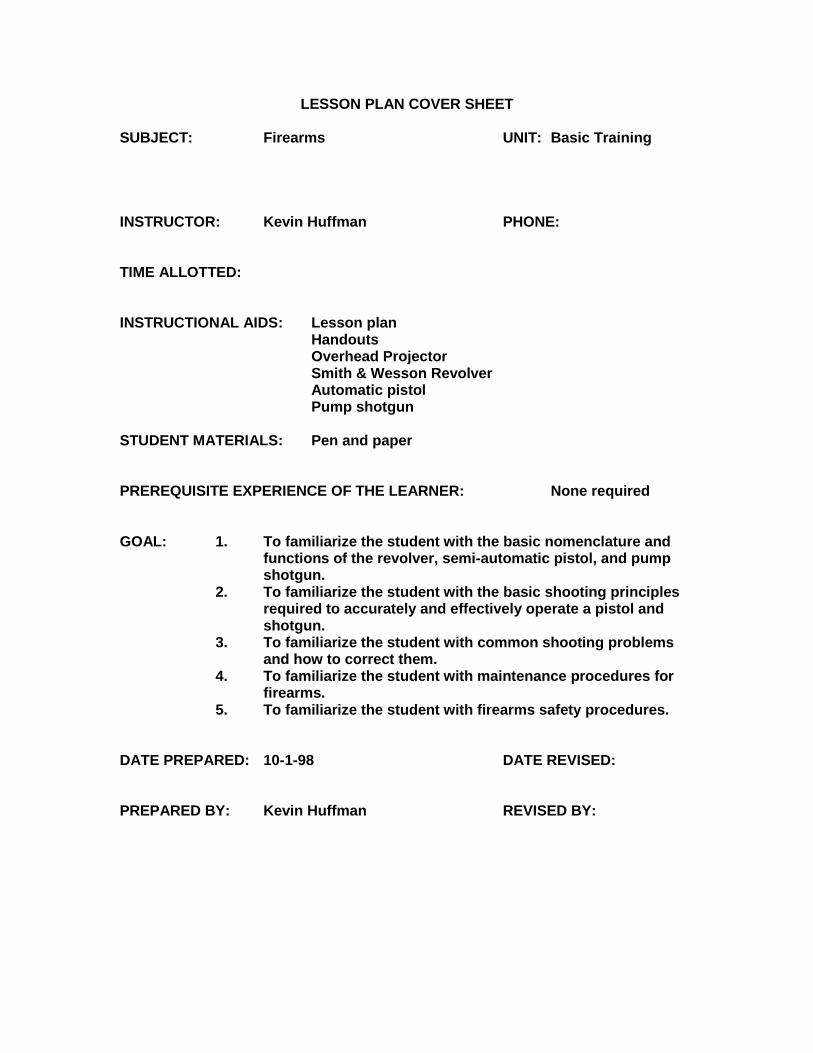
LESSON PLAN COVER SHEET SUBJECT: Firearms UNIT: Basic Training INSTRUCTOR: Kevin Huffman PHONE: TIME ALLOTTED: INSTRUCTIONAL AIDS: Lesson plan Handouts Overhead Projector Smith & Wesson Revolver Automatic pistol Pump shotgun STUDENT MATERIALS: Pen and paper PREREQUISITE EXPERIENCE OF THE LEARNER: None required GOAL: 1. To familiarize the student with the basic nomenclature and
functions of the revolver, semi-automatic pistol, and pump shotgun.
2. To familiarize the student with the basic shooting principles required to accurately and effectively operate a pistol and shotgun.
3. To familiarize the student with common shooting problems and how to correct them.
4. To familiarize the student with maintenance procedures for firearms.
5. To familiarize the student with firearms safety procedures. DATE PREPARED: 10-1-98 DATE REVISED: PREPARED BY: Kevin Huffman REVISED BY:

INSTRUCTOR LESSON PLAN SUBJECT: Firearms UNIT: Basic Training LESSON OBJECTIVES: 1. The student will be able to identify the different parts of a revolver. 2. The student will be able to identify the different parts of an automatic
pistol. 3. The student will be able to identify the different parts of a pump shotgun. 4. The student will be able to list the basic principles of effective shooting. 5. The student will be able to list the most common shooting deficiencies. 6. The student will be able to explain methods of correcting shooting
deficiencies. 7. The student will be able to demonstrate disassembly and cleaning of
various firearms. 8. The student will be able to demonstrate clearing different weapons
malfunctions. 9. The student will be able to identify basic firearms safety procedures. 10. The student will be able to list range safety rules. 11. The student will be able to explain the Wise County Sheriff’s Firearms
Policy. 12. The student will be able to explain the Texas Penal Code Use of Force. 13. The student will be able to demonstrate a proficiency with firearms on the
gun range using live ammunition.
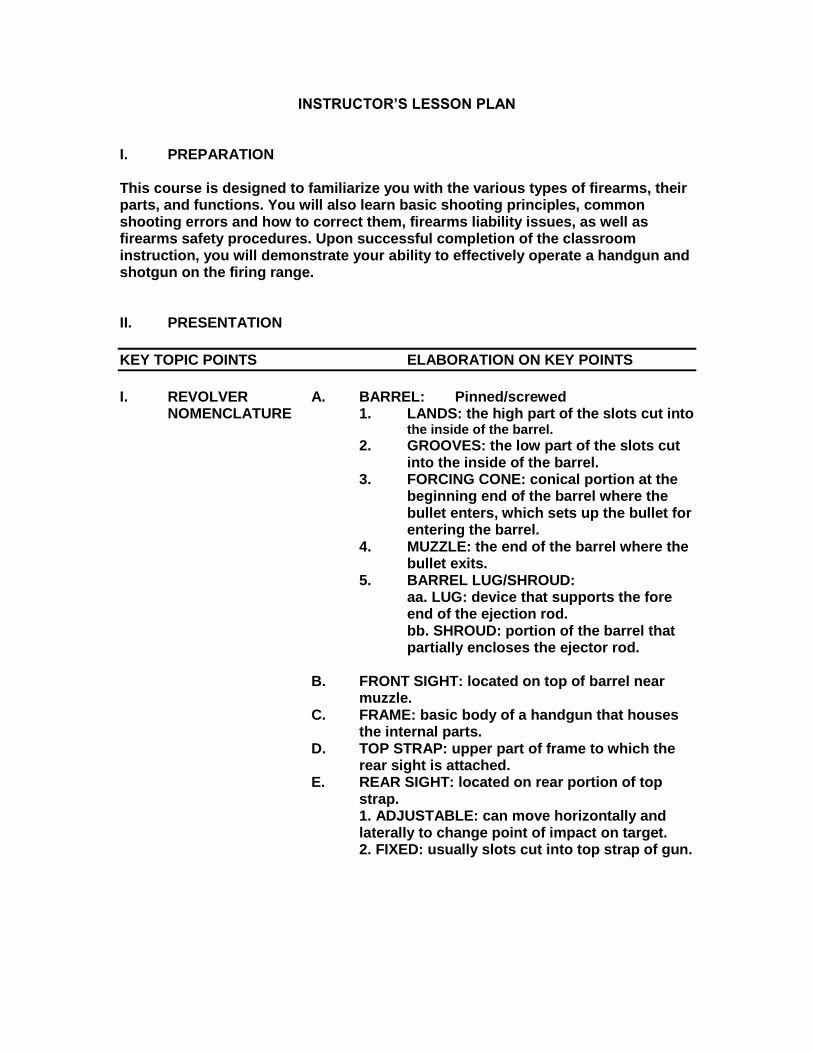
INSTRUCTOR’S LESSON PLAN
I. PREPARATION This course is designed to familiarize you with the various types of firearms, their parts, and functions. You will also learn basic shooting principles, common shooting errors and how to correct them, firearms liability issues, as well as firearms safety procedures. Upon successful completion of the classroom instruction, you will demonstrate your ability to effectively operate a handgun and shotgun on the firing range. II. PRESENTATION
KEY TOPIC POINTS ELABORATION ON KEY POINTS
I. REVOLVER A. BARREL: Pinned/screwed
NOMENCLATURE 1. LANDS: the high part of the slots cut into the inside of the barrel.
2. GROOVES: the low part of the slots cut into the inside of the barrel.
3. FORCING CONE: conical portion at the beginning end of the barrel where the bullet enters, which sets up the bullet for entering the barrel.
4. MUZZLE: the end of the barrel where the bullet exits.
5. BARREL LUG/SHROUD: aa. LUG: device that supports the fore end of the ejection rod. bb. SHROUD: portion of the barrel that partially encloses the ejector rod.
B. FRONT SIGHT: located on top of barrel near
muzzle. C. FRAME: basic body of a handgun that houses
the internal parts. D. TOP STRAP: upper part of frame to which the
rear sight is attached. E. REAR SIGHT: located on rear portion of top
strap. 1. ADJUSTABLE: can move horizontally and
laterally to change point of impact on target. 2. FIXED: usually slots cut into top strap of gun.

KEY TOPIC POINTS ELABORATION ON KEY POINTS
F. HAMMER: portion that usually contains firing
pin or strikes the firing pin when firing the weapon. 1. FIRING PIN: located on the hammer or in the
frame which strikes the cartridge primer. 2. SAFETY BLOCK: usually a steel bar which
stops the hammer from striking the firing pin unless the trigger is pulled.
3. SPUR: rear section of the hammer which is used to draw the hammer back by using the shooter’s thumb.
G. CYLINDER LATCH: located to the rear of the cylinder which unlocks the cylinder so it can be opened.
H. CYLINDER: contains a number of chambers in which the cartridges are placed. 1. CHAMBERS: actually house the cartridges. 2. CRANE/YOKE: holds the cylinder and allows
it to swing out of the frame for loading or unloading.
3. EJECTOR ROD: located at the front of the cylinder which extracts the cartridges from the chambers.
I. TRIGGER GUARD: part of the frame that encloses the trigger.
J. TRIGGER: when pulled, it enables the hammer to rise and fall to strike the firing pin. 1. COMBAT TRIGGER: smooth finish & slightly
larger than standard trigger. 2. TARGET TRIGGER: widest trigger with
grooves for maximum finger placement. K. STOCKS/GRIPS: portion of weapon grasped
with the hand. L. SIDE PLATE: can be removed to allow repair to
inner parts of weapon. M. BACK STRAP: rearward part of grip. N. BUTT: lower part of grip.
KEY TOPIC POINTS ELABORATION ON KEY POINTS
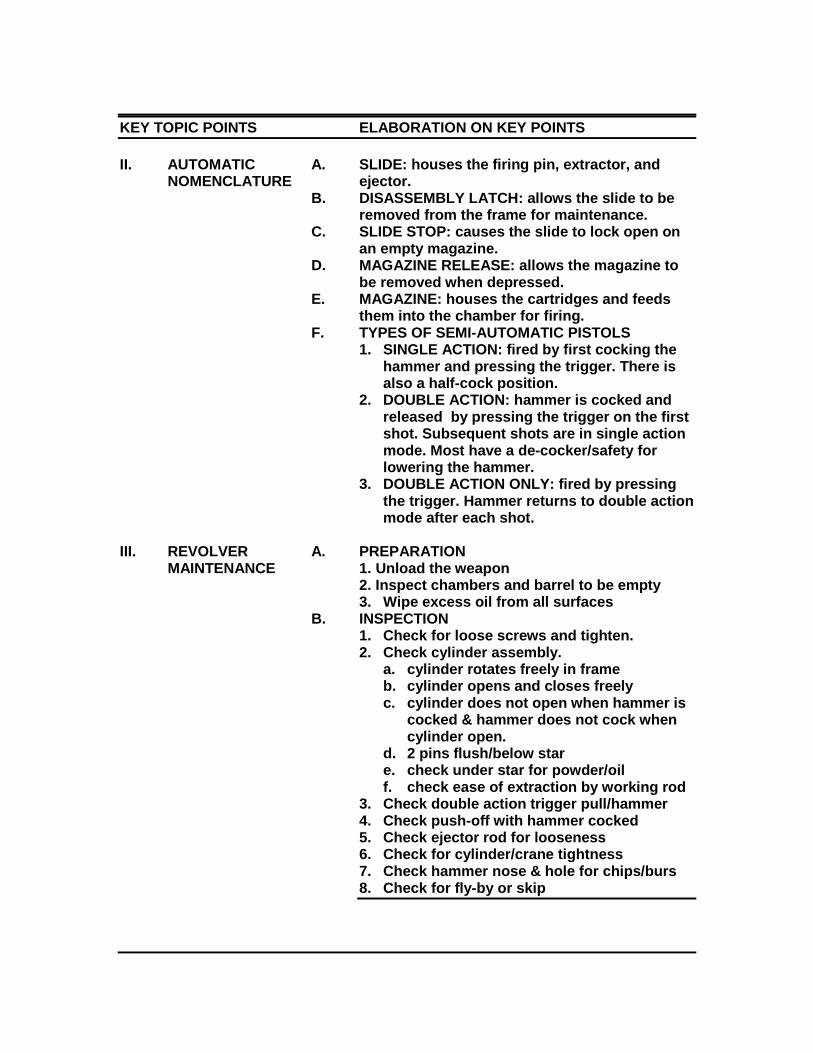
II. AUTOMATIC A. SLIDE: houses the firing pin, extractor, and NOMENCLATURE ejector.
B. DISASSEMBLY LATCH: allows the slide to be removed from the frame for maintenance.
C. SLIDE STOP: causes the slide to lock open on an empty magazine.
D. MAGAZINE RELEASE: allows the magazine to be removed when depressed.
E. MAGAZINE: houses the cartridges and feeds them into the chamber for firing.
F. TYPES OF SEMI-AUTOMATIC PISTOLS 1. SINGLE ACTION: fired by first cocking the
hammer and pressing the trigger. There is also a half-cock position.
2. DOUBLE ACTION: hammer is cocked and released by pressing the trigger on the first shot. Subsequent shots are in single action mode. Most have a de-cocker/safety for lowering the hammer.
3. DOUBLE ACTION ONLY: fired by pressing the trigger. Hammer returns to double action mode after each shot.
III. REVOLVER A. PREPARATION
MAINTENANCE 1. Unload the weapon 2. Inspect chambers and barrel to be empty
3. Wipe excess oil from all surfaces B. INSPECTION
1. Check for loose screws and tighten. 2. Check cylinder assembly.
a. cylinder rotates freely in frame b. cylinder opens and closes freely c. cylinder does not open when hammer is
cocked & hammer does not cock when cylinder open.
d. 2 pins flush/below star e. check under star for powder/oil f. check ease of extraction by working rod
3. Check double action trigger pull/hammer 4. Check push-off with hammer cocked 5. Check ejector rod for looseness 6. Check for cylinder/crane tightness 7. Check hammer nose & hole for chips/burs 8. Check for fly-by or skip

KEY TOPIC POINTS ELABORATION ON KEY POINTS
C. CLEANING
1. Assemble a cleaning kit to include: a. cleaning rod b. bore brushes c. bore solvent d. cleaning jags e. patches f. nylon toothbrush g. stainless steel brush h. lubricant i. gun cloth
2. Steps for cleaning a revolver a. Unload and remove ammo. b. Use rod and bore brush (dry) to clean
bore with one continuous motion. c. Put bore solvent on brush and clean
barrel and cylinders. d. Use a toothbrush and solvent to brush
front and back of cylinder, forcing cone, top strap, and star.
e. Use clean rag to wipe down pistol. f. Use rod and patch holder to remove
solvent from barrel and chambers. g. Lightly oil moving parts of pistol.
IV. SEMI-AUTOMATIC
MAINTENANCE A. PREPARATION & INSPECTION 1. Remove magazine and clear chamber 2. Function check magazines 3. Inspect magazines for cracks/loose floor
plate 4. Check trigger operation in single and double
action mode. 5. Cock hammer and check de-cocking lever. 6. Check muzzle, chamber, and barrel hood. 7. Check slide and frame for cracks. 8. Check extractor for chips. 9. Check sights for looseness. 10. Check inside frame for cracks
(disassembly). 11. Check ejector 12. Check firing pin 13. Check safety 14. Check magazine disconnect (if present).

KEY TOPIC POINTS ELABORATION ON KEY POINTS
B. CLEANING
1. Remove magazine and empty chamber. 2. Follow manufacturer’s guidelines for
disassembly. 3. Clean in same manner as revolver. 4. Lightly lubricate according to
manufacturer’s specifications. 5. Re-assemble as specified by manufacturer.
V. SEMI-AUTOMATIC SAFETY CONSIDERATIONS
A. CARRY CONDITIONS
1. Single action: Condition One-Cocked & Locked.
2. Double action: De-cocked and safety off. 3. Double action only: fully loaded safety off.
B. MODIFICATIONS 1. DO NOT bypass magazine disconnect. 2. DO NOT add trigger shoes. 3. DO NOT allow someone to work on pistol
that is not a factory trained armorer! C. HOME CONSIDERATIONS
1. Keep pistol out of sight 2. Safest method of storage is to separate
ammo from weapon. 3. Use a lock box or cabinet 4. Educate family members 5. DO NOT keep pistol close to bed in firing
mode. D. ACCIDENTAL DISCHARGES
Four steps must occur for the gun to discharge: 1. The weapon must be functional & working 2. It must be loaded 3. It must be pointed at something 4. The trigger must be pressed!! NOTE: Some pistols do not have a firing pin block and may discharge when dropped.

KEY TOPIC POINTS ELABORATION ON KEY POINTS
E. HOT RANGE CONCEPT 1. All weapons on range will be loaded on
command. 2. Once loaded, you must be on the firing line
and under command to withdraw the weapon from its holster.
3. It is the shooters responsibility to keep magazines full.
4. Magazine in weapon may be recharged by withdrawing it from gun while in the holster, then replacing.
5. Muzzle must always be pointed down range when unholstered on the firing line.
F. COLD RANGE CONCEPT
1. All weapons on the range are empty, magazine removed, and slide open.
2. Weapons are only loaded on firing line and under command.
3. Once finished with firing commands, weapons are unloaded before leaving firing line.
VI. STOPPAGES: Anything that interrupts the firing cycle.
A. FAILURE TO FEED: When round fails to chamber completely. 1. Magazine not seated completely 2. Bad ammunition 3. Damaged magazine, follower, spring, lips. 4. Dirty weapon or improperly lubricated.
B. FAILURE TO FIRE: Firing mechanism functions but weapon does not fire. 1. No round in chamber 2. Bad round in chamber 3. Slide out of battery 4. Damaged weapon: Firing pin or hammer
spring. C. FAIL TO EXTRACT: Weapon fires but case
stays in chamber. 1. Debris under extractor (maintenance) 2. Bad ammunition (case rim too small) 3. Broken extractor

KEY TOPIC POINTS ELABORATION ON KEY POINTS
D. FAIL TO EJECT: Weapon fires but case is
caught between bolt face and chamber (stovepipe) 1. Shooter Induced
a. Limp wrist b. Arms not locked
2. Bad Ammunition: No power to operate slide 3. Broken extractor 4. Dirty weapon: improperly lubricated
VI. STOPPAGE CLASSIFICATIONS
A. PHASE I: Non-mechanical stoppages that can be quickly cleared: No round in chamber, bad round, magazine not seated, stovepipe. 1. Failure to feed 2. Failure to fire 3. Failure to eject
B. PHASE II: Non-mechanical stoppages that can be cleared, but require more time. 1. Double feed 2. Two failures to feed 3. Fail to extract
C. PHASE III: Mechanical failures that require an armorer to correct. 1. Breakage 2. Wear
VII. CLEARING A STOPPAGE
A. PHASE I ( 1.5 to 3 seconds) 1. TAP the magazine with the off hand. 2. RACK the slide as chambering a round.
3. BANG Press the trigger B. PHASE II ( use if PHASE I drill does not
Work. 8-12 seconds) 1. RIP magazine out & let it fall. 2. RACK the slide 2+ times to clear malfunction.
3. RELOAD new magazine and chamber round.
C. PHASE III Stoppage with slide stuck forward
1. Release magazine 2. Use web of weapon hand to drive “through”
the grip, forcing the slide to move. 3. Once cleared, reload.

KEY TOPIC POINTS ELABORATION ON KEY POINTS
VIII. PUMP SHOTGUN Repeating shotguns operated by a working slide are NOMENCLATURE called slide action or pump shotguns. Operating cycle
Consists of moving the slide rearward to open action, extract and eject a fired shell, and cock the hammer, and return the slide forward to chamber a new shell and close the action. A. BARREL:
1. smoothbore 2. Length: minimum 18” 3. Coke: amount of constriction at muzzle
B. BREECH BLOCK C. BUTT PLATE D. EJECTION PORT E. FORE-END F. FRONT SIGHT G. LOADING PORT H. MAGAZINE I. MUZZLE J. SAFETY K. SLIDE RELEASE L. RECEIVER M. STOCK N. TRIGGER O. TRIGGER GUARD

KEY TOPIC POINTS ELABORATION ON KEY POINTS
IX. SHOTGUN MAINTENANCE
A. CLEANING 1. Unload weapon of all ammo. 2. Remove barrel retaining nut 3. Lift barrel out of receiver 4. Dry brush barrel several times 5. Use solvent to brush barrel again 6. Clean exterior, bolt, and bolt face with nylon brush 7. Check extractor and firing pin 8. Wipe down weapon with dry cloth 9. Wipe inside barrel with dry patch 10. Re assemble shotgun.
X. SHOOTING PRINCIPLES: Stance, grip, sight picture, trigger control.
A. STANCE: Basically a shooting platform. Always use whatever is comfortable for individual shooter. 1. ISOSCELES: Straight forward, square to target. Body is slightly crouched with both arms forward and locked at elbows at eye level. Recoil is controlled by grip strength. 2. WEAVER: Entire body blades away from target at 45 degree angle. Weapon arm is forward and the elbow is bent downward. Support arm elbow is bent straight to the ground. Recoil is controlled by pushing with weapon
hand and pulling with support hand. 3. MODIFIED: Lower body is bladed at angle away from target. Upper body faces toward target. Weapon arm straight and support arm is flexed.
B. GRIP: Weapon should be placed in the hand so a
straight line is formed with the barrel of the weapon and the forearm. The webbing of the hand should be fully under the tang of the back-strap. The support hand should be placed with its fingers wrapped around the knuckles of the weapon hand and the thumbs locked.
C. SIGHT PICTURE: Should be level on top and equal
distance on sides, placed on target point of impact. Focus should be on the front sight.

KEY TOPIC POINTS ELABORATION ON KEY POINTS
D. TRIGGER CONTROL: The cornerstone of shooting
fundamentals. A steady pressure exerted on the trigger straight to the rear to release the hammer and fire the weapon and immediately allowing the trigger to return so the weapon can be fired again. The finger should continually maintain contact with the trigger. 1. It is the most common problem with shooters 2. If not done correctly, you will not hit what you
aim at. 3. Has to be done properly, even when hurried. 4. Trigger jerk and anticipation of recoil are most
common problems. 5. Once mastered, it must be practiced to the
point where it is a subconscious act. 6. Can be practiced with Ball & Dummy exercises. 7. A shooter’s target will tell whether proper
trigger control is being used. 8. To check for trigger control, shoot from 15-20
yards. 9. The trigger must cause the hammer to fall
without disturbing the proper sight alignment!
KEY TOPIC POINTS ELABORATION ON KEY POINTS
XI. SHOOTING DEFICIENCIES
A. CHARACTERISTICS OF PROBLEM SHOOTER 1. Poor vision
a. some people just do not see well, and for one reason or another, they have not had eyes examined.
b. Master eye confusion: switching eyes randomly. Weapon hand, weak eye shooter.
c. Possible solutions: have eyes checked and corrected. Identify master eye.
2. Weakness of hands 3. Weak wrist, fingers 4. Handicaps 5. Fear/apprehension of firearms 6. Anxiety of failure 7. Fundamental areas
a. trigger jerks, pushes, pulls (finger placement)
b. sighting errors (misalignment, don’t use front sight).
c. improper grip d. body position e. draw problems f. loading problems: drop rounds, magazine
problems, spent case hung under star. g. anticipating recoil
B. PROBLEM AREAS OF WEAPON 1. Revolver
a. trigger pressure b. ejector rod c. cylinder problems d. set screw
2. Semi-automatic pistol a. feeding problems b. weapon maintenance c. shooter error d. ammunition

KEY TOPIC POINTS ELABORATION ON KEY POINTS
XII. LIABILITY ISSUES XIII. RANGE SAFETY
A. Safety rules in themselves never prevented an accident. It is the practice of safety rules to the point where they become automatic that prevents accidents.
B. SHOOTERS MUST KNOW AT ALL TIMES: 1. How the weapon works 2. Whether it is loaded or not 3. Where it is pointing 4. Where their target is 5. What their target is 6. Where the bullet will go 7. Where the bullet will stop
C. W.C.S.O. RANGE RULES D. FIRING LINE COMMANDS
1. I.P.S.C. Model a. “Shooters ready?” b. Pause c. “Standby” d. Command to fire “Shoot” e. Whistle blow means:
“STOP SHOOTING”