Lesson by Lesson Guide - PBworks
39
Motion and Design Page 1 Lesson by Lesson Guide Motion and Design (STC)
Transcript of Lesson by Lesson Guide - PBworks

Motion and Design Page 1
Lesson by Lesson Guide
Motion and Design
(STC)

Motion and Design Page 2
Table of Contents NC Essential Standards and Clarifying Objectives ........................................................................ 3
Essential Question for the Unit ....................................................................................................... 3
Pre-Unit Assessment ....................................................................................................................... 3
Lesson 1 Pre-Unit Assessment - Designing Vehicles: Getting Started .......................................... 5
Lesson 2 - Using Drawings to Record and Build ........................................................................... 7
Lesson 3 - Pulling a Vehicle: Looking at Force ............................................................................ 9
Lesson 4 - Testing the Motion of Vehicles Carrying a Load ....................................................... 11
Lesson 5 - Designing Vehicles to Meet Requirements ................................................................. 13
Lesson 6 - Evaluation Vehicle Design: Looking at Rubber Band Energy ................................... 15
Lesson 7 - Testing the Effects of Rubber Band Energy................................................................ 17
Lesson 8 - Evaluating Vehicle Design: Looking at Friction......................................................... 19
Lesson 9 - Designing and Building a Vehicle with a Sail ............................................................ 21
Lesson 10 - Testing the Effects of Air Resistance on a Vehicle’s Motion ................................... 23
Lesson 11 - Building a Propeller-Driven Vehicle......................................................................... 25
Lesson 12 - Analyzing the Motion and Design of a Propeller-Driven Vehicle ............................ 27
Lesson 13 - Looking at Cost ......................................................................................................... 29
Lesson 14 - Planning Our Final Design Challenge ....................................................................... 31
Lesson 15 - Refining Our Design ................................................................................................. 33
Lesson 16 - Presenting Our Final Design Challenge .................................................................... 35
Lesson 17 Unit Review - Sharing What We Know about Motion and Design ............................ 37

Motion and Design Page 3
NC Essential Standards and Clarifying Objectives
5.P.1 Understand force, motion and the relationship between them.
5.P.1.1 Explain how factors such as gravity, friction, and change in mass affect the motion of
objects.
5.P.1.2 Infer the motion of objects in terms of how far they travel in a certain amount of time and
the direction in which they travel.
5.P.1.3 Illustrate the motion of an object using a graph to show a change in position over a period
of time.
5.P.1.4 Predict the effect of a given force or a change in mass on the motion of an object.
5.P.2 Understand the interactions of matter and energy and the changes that occur.
5.P.2.2 Compare the weight of an object to the sum of the weight of its parts before and after an
interaction.
5.P.2.3 Summarize properties of original materials, and the new materials formed, to
demonstrate that a change has occurred.
Essential Question for the Unit
How do forces and motion affect technological design?
Pre-Unit Assessment
Lesson 1 in the Motion & Design unit is a pre-unit assessment opportunity. In addition to Lesson
1, a formative assessment probe called “Apple on the Desk” is available on page 63 of
Uncovering Student Ideas in Science Volume 3 (Orange Cover), by Page Keeley et al. This probe
elicits students’ ideas about forces and determines if students recognize that balanced forces act
on a stationary object.
Unit Information
It is important for students to experience the concepts presented in Motion & Design through
hands-on investigation. With that said, students should not simply memorize vocabulary terms,
but rather experience concepts then name it. For example, rather than reciting Newton’s First
Law (objects at rest tend to stay at rest, while objects in motion tend to stay in motion) from
memory, students need to experience the spirit of the Law and explain it in their own words. The
formal definition of Newton’s Laws will occur in middle school.
Additionally, students at the elementary level should not memorize formulas such as
rate=distance/time or momentum=mass x velocity. These formulas are abstract for elementary
students and will be introduced and utilized in middle and high school.
On a final note, the NC Essential Standards have placed the study of simple machines at the
middle school level.

Motion and Design Page 4
Lesson 17 includes a review of physical and chemical changes. While this unit focuses on the
relationship of forces and motion, 5th
graders should have an understanding of physical and
chemical changes. Consider the vertical alignment of physical science concepts: Kindergarten
(Investigating Properties) and 1st grade (Pebbles, Sand, and Silt) students have had experiences
identifying properties of objects (color, size, shape, texture, and flexibility) and sorting objects
on the basis of those properties. Second graders have learned about the properties of solids,
liquids (Solids & Liquids) and gases (Air & Weather). Third graders have investigated some
physical and chemical changes in the Changes unit. This learning carried over into 4th
grade as
students study changes to the Earth’s surface (Landforms) and determine if those changes are
physical (also known as mechanical changes) or chemical changes.
Motion and Design Page 5
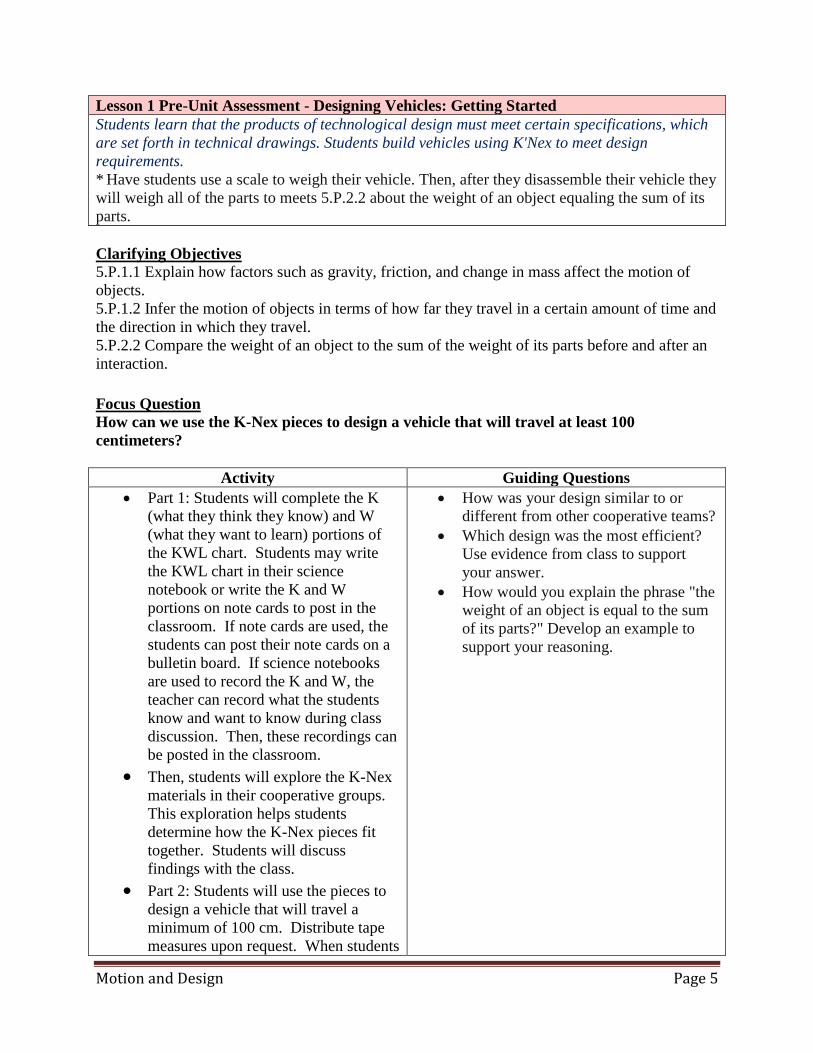
Lesson 1 Pre-Unit Assessment - Designing Vehicles: Getting Started
Students learn that the products of technological design must meet certain specifications, which
are set forth in technical drawings. Students build vehicles using K'Nex to meet design
requirements.
* Have students use a scale to weigh their vehicle. Then, after they disassemble their vehicle they
will weigh all of the parts to meets 5.P.2.2 about the weight of an object equaling the sum of its
parts.
Clarifying Objectives
5.P.1.1 Explain how factors such as gravity, friction, and change in mass affect the motion of
objects.
5.P.1.2 Infer the motion of objects in terms of how far they travel in a certain amount of time and
the direction in which they travel.
5.P.2.2 Compare the weight of an object to the sum of the weight of its parts before and after an
interaction.
Focus Question
How can we use the K-Nex pieces to design a vehicle that will travel at least 100
centimeters?
Activity Guiding Questions
Part 1: Students will complete the K
(what they think they know) and W
(what they want to learn) portions of
the KWL chart. Students may write
the KWL chart in their science
notebook or write the K and W
portions on note cards to post in the
classroom. If note cards are used, the
students can post their note cards on a
bulletin board. If science notebooks
are used to record the K and W, the
teacher can record what the students
know and want to know during class
discussion. Then, these recordings can
be posted in the classroom.
Then, students will explore the K-Nex
materials in their cooperative groups.
This exploration helps students
determine how the K-Nex pieces fit
together. Students will discuss
findings with the class.
Part 2: Students will use the pieces to
design a vehicle that will travel a
minimum of 100 cm. Distribute tape
measures upon request. When students
How was your design similar to or
different from other cooperative teams?
Which design was the most efficient?
Use evidence from class to support
your answer.
How would you explain the phrase "the
weight of an object is equal to the sum
of its parts?" Develop an example to
support your reasoning.

Motion and Design Page 6
test the vehicles, they will determine
the best method to figure out if the
vehicle traveled 100 cm. Share
completed vehicles and design
rationale with the class.
Have groups share findings in a whole
class discussion. This discussion helps
to clarify concepts taught in the lesson
and identify any misunderstandings.
Any additional content for the lesson
can be brought into the discussion at
this time.
Ask students what questions they have
now.
Science Content Words
Use these terms when teaching the lesson:
-force: any push or pull on an object
-motion: an object changing position over time; change in position is measured by distance and
time
-rate/speed: a comparison of distance and time; for example: 25 mph (miles per hour)
-distance: how far an object travels
Integration Hints
- Students will use the tape measure to record various distances the vehicle travels. They can
convert the measurement in the metric system.
- Students might create a list of materials from home that they could use to build a vehicle.
- Students might research and present their findings about the invention of the wheel in ancient
civilizations.
Science Notebook Helper
Students will record the K and W portion of the KWL chart in their science notebooks. They will
record and document how the K-Nex pieces fit together.
The entry includes a focus question, student developed prediction, planning (materials,
procedure, and data collection plan), data, learnings (what the student learned from the
investigation), and next steps/new questions (further questions the student has about the
investigation and next steps to take in completing a further investigation).
Assessment Opportunities
Lesson 1 is a pre-unit assessment opportunity. The formative assessment probe can be used in
addition to Lesson 1. The teacher guide offers some suggestions regarding what to look for in
students’ notebook entries and drawings. (Refer to the Assessment section at the end of Lesson
1.)

Motion and Design Page 7
Lesson 2 - Using Drawings to Record and Build
Students will draw the vehicles they designed in lesson one and learn more about the technical
drawing.
*Students should not alter their vehicles between Lessons 2 and 3.
Clarifying Objectives
5.P.1.2 Infer the motion of objects in terms of how far they travel in a certain amount of time and
the direction in which they travel.
Focus Question
How can we create a two-dimensional technical drawing to represent a three-dimensional
vehicle?
Activity Guiding Questions
Discuss technical drawing and why
they are useful. Use page 7 in the
student guide as an example of a
technical drawing. On graph paper, students will use their
construction from lesson 1 to create an
illustration (technical drawing) of the
vehicle. Students will use the circle
templates to represent the tires. Also,
students can draw the top and side
views and the same sheet of graph
paper or on separate sheets of graph
paper.
If students finish early, read the
selection about “The Race That Wasn’t
Run” beginning on page 9 of the
student book.
Share and discuss technical drawings.
Discuss perspective and have students
construct the vehicle on page 7 of the
student activity book (materials listed
on page 35 of teacher’s guide).
Teacher tip: If students have difficulty
assembling the vehicle, have them
color code a copy of the technical
drawing.
Keep the standard vehicle assembled.
Read “The Race That Wasn’t Run”
from pages 21-23 of the teacher’s guide
Have groups share findings in a whole
class discussion. This discussion helps
to clarify concepts taught in the lesson
How do engineers use technical
drawings? Provide a real life example
in your explanation.
How does the technical drawing you
created represent your vehicle?
What parts of the technical drawing
might make it easy for you to build the
vehicle? What parts might make it
difficult?
How does color help in a drawing?

Motion and Design Page 8
and identify any misunderstandings.
Any additional content for the lesson
can be brought into the discussion at
this time. Ask students questions they have now.
Science Content Words
Use these terms when teaching the lesson:
-technical drawing: a three view drawing
Integration Hints
- Discuss how to determine the number of blocks on the graph paper needed to represent various
parts of the car; find a fraction of blocks colored in for a part of the car as compared to the entire
car (example: there are 28 blocks used for the right front tire and 200 blocks colored in all; the
right front tire blocks are 7/50 of the total colored in drawing)
- Consider informing the art specialist about your students’ work with technical drawing. The art
specialist could reinforce the concept of perspective.
- Technology: Create a model of the vehicle on the computer (could use the Microsoft drawing
tool)
- Additional ideas can be found in the Extensions section at the end of Lesson 2 in the teacher
guide.
Science Notebook Helper
Students will use the focus question in the science notebook entry. Data for the entry includes
pasting the technical drawing in the notebook.
Assessment Opportunities
- Students will complete an accurate technical drawing, including color and labels, in his/her
science notebook.
- You might find the Assessment section at the end of Lesson 2 in the teacher guide helpful.

Motion and Design Page 9
Lesson 3 - Pulling a Vehicle: Looking at Force
Students will study the principle that force applied to an object changes its motion.
*Prepare the paper clips and string prior to this lesson. See the illustration in the Preparation
section of Lesson 3 in the teacher guide. Students should not disassemble their standard vehicles
because they will be used again in Lesson 4.
Clarifying Objectives
5.P.1.1 Explain how factors such as gravity, friction, and change in mass affect the motion of
objects.
5.P.1.3 Illustrate the motion of an object using a graph to show change in position over a period
of time.
5.P.1.4 Predict the effect of a given force or a change in mass on the motion of an object.
Focus Question
What is the effect of force on the motion of the vehicle?
Activity Guiding Questions
Discuss unbalanced forces (tug of
war is an example).
Have a student move from one end
of the room to another. Other
students describe the student’s
motion and change(s) in motion.
Give each group materials listed on
page 26 of the teacher’s guide. For
handout 3-A, you can white out the
sample provided and complete the 1
small washer with the class. Or,
you may have the students complete
the entire chart with their assigned
cooperative group.
Students use lesson 3 instructions in
the student book for investigation
directions.
After the lesson, students share
findings about force (the greater the
force, the greater the change in
speed over the same distance”).
Discuss questions on page 28 of the
teacher’s guide.
Have groups share findings in a
whole class discussion. This
discussion helps to clarify concepts
taught in the lesson and identify any
misunderstandings. Any additional
content for the lesson can be
When did you observe your vehicle
begin to move?
What caused your vehicle to move?
How do pushing and pulling forces
affect the motion of an object?
Did the vehicle move differently when
you changed the weight? Why do you
think this happened?
What made the vehicle stop moving
each time?
What connections can we make
between this investigation and similar
forces in real life?

Motion and Design Page 10
brought into the discussion at this
time. Ask students what questions they
have now.
Science Content Words Use these terms when teaching the lesson:
Force: any push or pull on an object
Motion: an object changing position over time; change in position is measured by
distance and time
Speed/rate: a comparison of distance and time; example: 25 mph
Acceleration: rate of increase of speed or velocity (example: accelerator pedal on a car)
Mass: how much matter an object contains
Integration Hints
- Students can use a scale to weigh the washers. Students can determine how many small
washers are equivalent to one large washer. Let x equal one small washer. Students will write an
expression for the large washer (example: 16x).
- The teacher guide offers addition ideas in the Extensions section located at the end of Lesson 3.
Science Notebook Helper
Students will use the focus question in the science notebook entry. Students will complete
handout 3-A thoroughly and then glue the page into their science notebooks.
Assessment Opportunities
Assess student completion of handout 3-A for accuracy and content.

Motion and Design Page 11
Lesson 4 - Testing the Motion of Vehicles Carrying a Load
Students will test how adding weight (a load) to the vehicles affects the motion.
*Students should not disassemble their vehicles because they will modify the design of their
standard vehicles in Lesson 5.
Clarifying Objectives
5.P.1.1 Explain how factors such as gravity, friction, and change in mass affect the motion of
objects.
5.P.1.4 Predict the effect of a given force or a change in mass on the motion of an object.
Focus Question
How does the addition of a load affect the motion of the vehicle?
Activity Guiding Questions
Show two blocks of wood and ask
students how the vehicle could be
adapted to carry this load
(brainstorm).
Distribute timers. Practice using
the timers (shorter time = higher
speed)
With this investigation, students
will conduct multiple trials of the
investigation. Ask students about
the importance of using multiple
trials.
Distribute 4-A and discuss how to
use the graph to show results.
Handout 4-A is the data/observation
portion of the lesson. Discuss that
the graph is similar to a line plot
graph in organization. Tip: The
graph can be redesigned to include
decimals with half seconds.
Students use the lesson 4 section
from the student book for
directions.
Discuss the results from the lesson.
Then, discuss questions on page 40
of the teacher’s guide.
Have groups share findings in a
whole class discussion. This
discussion helps to clarify concepts
taught in the lesson and identify any
misunderstandings. Any additional
content for the lesson can be
What did you observe when testing
various loads (blocks)?
How did the vehicle move when it was
loaded with two blocks?
How did the motion of the vehicle
change when you removed one block?
How did it change when you removed
both blocks?
When the vehicle carried no blocks,
what was left to influence its motion?
(the weight of the vehicle itself)
How does a load affect the motion of a
vehicle? Provide evidence from your
investigation to support your
explanation.
When could this investigation be
connected to real life situations?
(possible solutions: dump truck,
moving and carrying a load, etc.)
Motion and Design Page 12
brought into the discussion at this
time. Ask students what questions they
have now.
Science Content Words
Use these terms when teaching the lesson:
Motion: an object changing position over time; change in position is measured by
distance and time
Speed/Rate: distance divided by time (or d/t), example: 25 mph
Acceleration: rate of increase of speed or velocity (example: accelerator pedal on a car)
Force: any push or pull on an object
Friction: force that resists motion between two touching surfaces, slows things down and
can also produce heat, acts in the opposite direction of the force
Inertia: the tendency of an object to resist a change in motion or keep doing what it is
doing; note: the greater the mass of an object, the greater the inertia
Momentum: force or speed of movement; mass in motion, example: a moving train has
much more than a moving soccer ball
Integration Hints
- Have students determine the range, median, and mode of the recorded times. Discuss other
ways to display the data.
- Language arts: Research dump trucks and other vehicles that carry loads.
- See additional ideas in the Extensions section near the end of Lesson 4 in the teacher’s guide.
Science Notebook Helper
Students use the focus question to begin the science notebook. Complete the components of a
science notebook (question, prediction, planning, data/observations, learnings, next steps/new
questions) using handout 4-A as the data collection sheet.
Students could also create an expanded chart in their science notebook if they were to investigate
further. For example, students would create a chart to investigate the effects of 10, 12, or 14
small washers.
Assessment Opportunities
Assess understanding with accurate completion of handout 4-A.

Motion and Design Page 13
Lesson 5 - Designing Vehicles to Meet Requirements
Students will build vehicles to meet design specifications.
*This lesson can cover two class sessions. At the end of this lesson, students should remove from
their vehicles all the pieces are not part of the standard vehicle. They will need standard vehicles
in Lesson 6.
Clarifying Objectives
5.P.1.2 Infer the motion of objects in terms of how far they travel in a certain amount of time and
the direction in which they travel.
5.P.1.4 Predict the effect of a given force or a change in mass on the motion of an object.
5.P.2.2 Compare the weight of an object to the sum of the weight of its parts before and after an
interaction.
Focus Question
How can we design a vehicle to meet construction requirements?
Activity Guiding Questions
Students discuss factors that make
vehicles move fast and slow. Post
these factors on a list. Distribute the design challenge. In this
challenge, students have to design a car
to meet specifications related to mass,
distance, and time. This lesson
synthesizes students’ knowledge gained
from previous motion and design
investigations. Have groups share findings in a whole
class discussion. This discussion helps
to clarify concepts taught in the lesson
and identify any misunderstandings.
Any additional content for the lesson
can be brought into the discussion at
this time. Ask students what questions they have
now.
Before building your vehicle, how did
your group prepare?
Did you experience any problems as
you were building your vehicle? How
did you solve them?
How did you test your vehicle to
determine whether it met the
requirements? How did your vehicle
move?
Did you change anything about your
vehicle or the falling-weight system
after you tested it? What change did
you make? Why did you make this
change?
Which one of your group's design ideas
was the most effective? Why? Provide
evidence from your data to support
your explanation.
Why is it important to have several
different ideas for a design? Provide
examples from real life situations (that
extend beyond this investigation).
Science Content Words
Use these terms when teaching the lesson:
Technological Design: using engineering ideas to create a model

Motion and Design Page 14
Speed/Rate: comparison of distance and time; example: 25 mph
Acceleration: rate of increase of speed or velocity (example: accelerator pedal on a car)
Momentum: force or speed of movement; mass in motion, example: a moving train has
much more than a moving soccer ball
Inertia: the tendency of an object to resist a change in motion or keep doing what it is
doing; note: the great the mass of an object, the greater the inertia
Distance: how far an object travels
Velocity: speed with direction (example: 45 mph northeast)
Model: a representation in miniature/smaller form
Test: to determine if an idea works
Motion: an object changing position over time; change in position is measured by
distance and time
Integration Hints
- Mathematics: After reading the “Lunar Rover” selection, discuss the importance of using
metric measurements in science.
- Language Arts: “Lunar Rover: making Tracks on the Moon” selection from page 52 of the
teacher’s guide
- Social Studies: Discuss the economic impact of the Lunar Rover.
- Science extension: Students can design and make their own paper airplanes. After a test flight,
have students change the features of their paper airplanes to make them fly farther.
Science Notebook Helper
Students use the essential question to begin the science notebook. Then, students record their
prediction, planning (materials and procedure), data and observations (including an illustration of
the model designed and a data collection tool), learnings, and next steps/new questions
(questions the student has about the investigation and next steps in completing/continuing the
investigation).
Assessment Opportunities
Assess understanding by monitoring groups throughout the completion of this lesson. Evaluate
the science notebook for individual understanding of concepts. The Assessment section at the
end of Lesson 5 in the teacher guide offers some suggestions:
-Do students understand that the vehicle must meet a design requirement?
-If the vehicle does not initially meet the requirement, does the group make a plan to improve it?
-Are students keeping written records of test results?
-Are students showing improvement in their drawing ability?
-Are drawings clear and easy to read? Do they include color, labels, and pieces drawn in
proportion?

Motion and Design Page 15
Lesson 6 - Evaluation Vehicle Design: Looking at Rubber Band Energy
Students will examine different energy sources to drive their vehicles.
*Standard vehicles are used in this lesson and Lesson 7. Remind student not to modify or
disassemble their vehicles between lessons.
Clarifying Objectives
5.P.1.2 Infer the motion of objects in terms of how far they travel in a certain amount of time and
the direction in which they travel.
5.P.1.4 Predict the effect of a given force or a change in mass on the motion of an object.
Focus Question
How does rubber band energy affect the motion of the vehicle?
Activity Guiding Questions
Students will attach the rubber band to
the car (as shown in the illustration
from page 61 of the teacher’s guide).
Students will then use the handout
questions to explore various ways
rubber band energy affects the motion
of the vehicle. Teacher tip: Prior to distributing
handouts 6-A, hand out the rubber
bands and standard vehicles. An
additional investigation could be added
here with the following inquiry
question: How can the rubber bands be
used to propel the vehicle? Then,
students will have to figure out various
ways that the rubber bands can be
attached to the vehicle to cause the
vehicle to move. After students have
determined the best method to attach
the rubber bands, have a classroom race
and discuss the various strategies used
to attach the rubber bands. Then,
following discussion, complete handout
6-A. Have groups share findings in a whole
class discussion. This discussion helps
to clarify concepts taught in the lesson
and identify any misunderstandings.
Any additional content for the lesson
can be brought into the discussion at
this time. Ask students what questions they have
Have groups share findings in a whole
class discussion. This discussion helps
to clarify concepts taught in the lesson
and identify any misunderstandings.
Any additional content for the lesson
can be brought into the discussion at
this time.
What did you feel in your hand as you
wound the rubber band? Did this
feeling change as your wound the
rubber band tighter? If so, how?
Did the direction in which you wound
the rubber band affect the direction in
which your vehicle traveled? If so,
how?
What did you discover about the ways
in which the rubber band powers the
standard vehicle?

Motion and Design Page 16
now.
Science Content Words
Use these words when teaching the lesson:
Distance: how far an object travels
Speed/rate: comparison of distance and time; example: 25 mph
Energy - Kinetic: energy of motion (moving ball going down a ramp)
Energy - Potential: stored energy (ball positioned at the top of the ramp)
Acceleration: rate of increase of speed or velocity (example: accelerator pedal on a car)
Velocity: speed with direction (example: 45 mph NW)
Momentum: force or speed of movement; mass in motion, example: a moving train has
much more than a moving soccer ball
Tension: the act of stretching or straining (in this investigation: how tight the rubber
bands are)
Inertia: the tendency of an object to resist a change in motion or keep doing what it is
doing; note: the greater the mass of an object, the greater the inertia
Revolutions (as related to this investigation): number of turns of the rubber band around
the axle
Integration Hints
- Students can create a timeline to display the changes in automobile design over time. A
timeline can also be created for telephones, computers, or televisions.
- Additional ideas are available in the Extensions section near the end of Lesson 6 in the teacher
guide.
Science Notebook Helper
Students use the essential question to begin the science notebook. Then, students use handout 6-
A to complete the data section of the notebook entry. If students complete the additional
investigation as described in the teacher tip in the activity section, students can complete an
additional science notebook entry.
Assessment Opportunities
Assess understanding by evaluating the accuracy of handout 6-A.

Motion and Design Page 17
Lesson 7 - Testing the Effects of Rubber Band Energy
Students will investigate how variable amount of energy affect the motion of their vehicles.
*A large floor area is needed to test the motion of the vehicles. Push desks aside or consider
reserving the cafeteria, gym, or other large space that might be available. Standard vehicles will
be used in Lesson 8.
Clarifying Objectives
5.P.1.1 Explain how factors such as gravity, friction, and change in mass affect the motion of
objects.
5.P.1.3 Illustrate the motion of an object using a graph to show change in position over a period
of time.
5.P.1.4 Predict the effect of a given force or a change in mass on the motion of an object.
Focus Question
How will the number of turns of the rubber band around the axle affect the motion of the
vehicle?
Activity Guiding Questions
Students will be using the standard
vehicles and rubber bands from
investigation 6 to collect specific data
in this investigation. Students will examine how the number
of turns of the rubber bands affects the
distance the vehicle travels (use the
lesson 7 section from the student
guide). Students will use the adding
machine tape and colored dots to
display results with the class. Teacher tip: Discuss the importance of
replication in science—scientists need
to be able to get similar results in
various trials. Students will be
conducting at least three trials in this
investigation. Have groups share findings in a whole
class discussion. This discussion helps
to clarify concepts taught in the lesson
and identify any misunderstandings.
Any additional content for the lesson
can be brought into the discussion at
this time. Ask students what questions they have
now.
Have groups share findings in a whole
class discussion. This discussion helps
to clarify concepts taught in the lesson
and identify any misunderstandings.
Any additional content for the lesson
can be brought into the discussion at
this time.
Where does the energy to wind the
rubber band come from? (your muscles,
fueled by sugar in your blood)
Where does the energy to move the
vehicle come from? (rubber band)
How do you store energy in the rubber
band? (wind rubber band around axle)
How do you release the energy stored
in the rubber band? (let go of vehicle)
What happens when the stored energy
in the rubber band is released? (vehicle
gains energy of motion, axle turns)
How does the number of turns on the
rubber band affect the distance the
vehicle travels? (more stored energy
means farther distance)
Why was it important to keep the
number of turns the same for all groups
in the class? (to make fair comparisons)
What might happen if the number of
turns was only 1? 10?

Motion and Design Page 18
What claims can you make about the
effects of the rubber band on the
motion of the vehicle?
Science Content Words In addition to terms introduced in previous lessons, use these terms when teaching the lesson:
Force: any push or pull on an object
Friction: force that resists motion between two touching surfaces and can also produce
heat; acts in the opposite direction of the force
Inertia: the tendency of an object to resist a change in motion or keep doing what it is
doing; note: the greater the mass of an object, the greater the inertia
Momentum: force or speed of movement; mass in motion; example: a moving train has
much more momentum than a moving soccer ball; note: increasing the mass or speed of
the object increases its momentum.
Integration Hints
- Mathematics: Groups can use the tape measures to measure the distances their vehicles travels
when the rubber band is turned around the axle 2, 4, and 8 times. Students can measure the
distance from the starting line to each dot and record the distances in cm on a data table (example
in Extension section of Lesson 7 in teacher guide).
- Additional ideas are available in the Extensions section of Lesson 7 in the teacher guide.
Science Notebook Helper
Students use the essential question to begin the science notebook. Then, students record their
prediction, planning (materials and procedure), data and observations (including an illustration of
the model designed and a data collection tool), learnings, and next steps/new questions
(questions the student has about the investigation and next steps in completing/continuing the
investigation).
Assessment Opportunities
How are students’ predictions in comparison to the actual distance? Do students recognize the
importance of a starting line and ending point when measuring? Are students able to recognize
differences and patterns among data sets?
Motion and Design Page 19
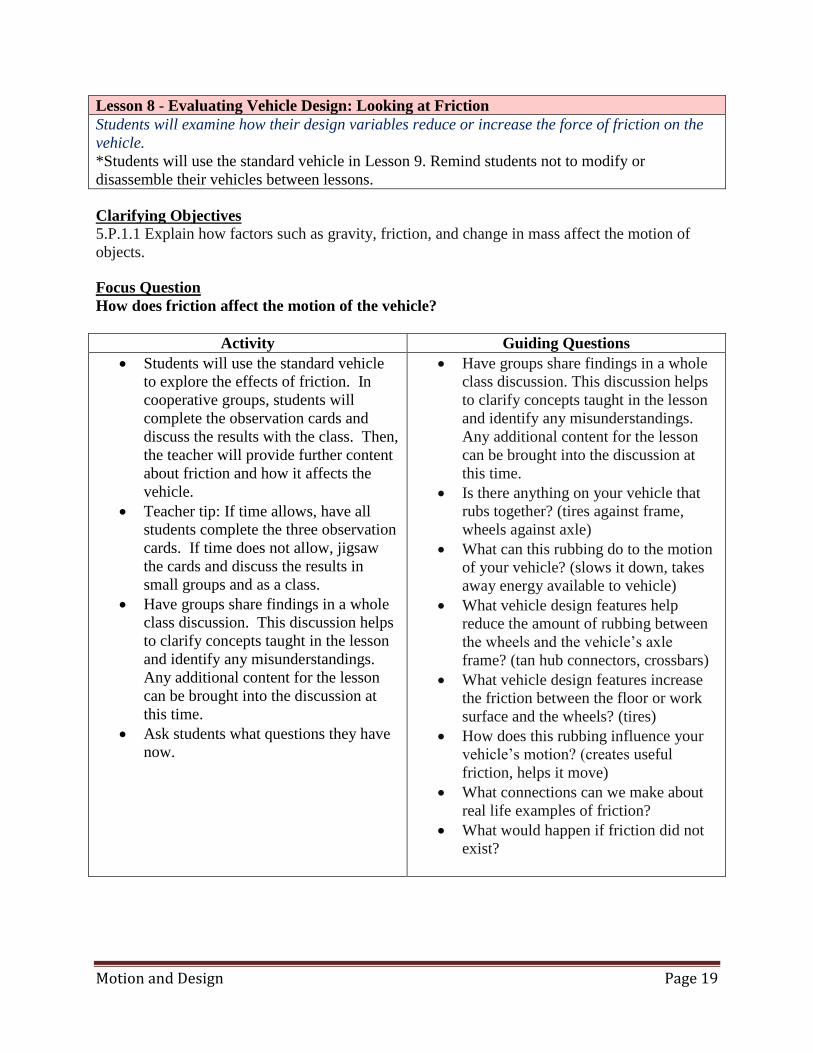
Lesson 8 - Evaluating Vehicle Design: Looking at Friction
Students will examine how their design variables reduce or increase the force of friction on the
vehicle.
*Students will use the standard vehicle in Lesson 9. Remind students not to modify or
disassemble their vehicles between lessons.
Clarifying Objectives 5.P.1.1 Explain how factors such as gravity, friction, and change in mass affect the motion of
objects.
Focus Question
How does friction affect the motion of the vehicle?
Activity Guiding Questions
Students will use the standard vehicle
to explore the effects of friction. In
cooperative groups, students will
complete the observation cards and
discuss the results with the class. Then,
the teacher will provide further content
about friction and how it affects the
vehicle. Teacher tip: If time allows, have all
students complete the three observation
cards. If time does not allow, jigsaw
the cards and discuss the results in
small groups and as a class.
Have groups share findings in a whole
class discussion. This discussion helps
to clarify concepts taught in the lesson
and identify any misunderstandings.
Any additional content for the lesson
can be brought into the discussion at
this time. Ask students what questions they have
now.
Have groups share findings in a whole
class discussion. This discussion helps
to clarify concepts taught in the lesson
and identify any misunderstandings.
Any additional content for the lesson
can be brought into the discussion at
this time.
Is there anything on your vehicle that
rubs together? (tires against frame,
wheels against axle)
What can this rubbing do to the motion
of your vehicle? (slows it down, takes
away energy available to vehicle)
What vehicle design features help
reduce the amount of rubbing between
the wheels and the vehicle’s axle
frame? (tan hub connectors, crossbars)
What vehicle design features increase
the friction between the floor or work
surface and the wheels? (tires)
How does this rubbing influence your
vehicle’s motion? (creates useful
friction, helps it move)
What connections can we make about
real life examples of friction?
What would happen if friction did not
exist?

Motion and Design Page 20
Science Content Words Use these terms when teaching the lesson:
Friction: force that resists motion between two touching surfaces, slows things down and
can also produce heat; acts in the opposite direction of the force Tension: being stretched or strained, i.e. with the rubber band in this investigation Speed: comparison of distance and time; example: 25 miles per hour Inertia: the tendency of an object to resist a change in motion or keep doing what it is
doing; note: the great the mass of an object, the greater the inertia
Integration Hints
- Science extension: Students could conduct an investigation where the rolled a marble down a
ramp. This marble would land on each of the following surfaces: sandpaper, smooth dry erase
board, cardboard, aluminum foil, and clear plastic wrap. Students will examine the effects of
friction on the marble due to each surface.
- Students can research a technological invention, from any period in history, in which friction
was a design consideration. Examples include the bicycle, swings, skis, and roller skates.
- The Extensions section of Lesson 8 in the teacher guide offers additional ideas.
Science Notebook Helper
- Students use the essential question to begin the science notebook. For this investigation, the
observation cards will serve as the data section of the notebook.
Assessment Opportunities
Assess the completed observation cards for understanding of concepts.

Motion and Design Page 21
Lesson 9 - Designing and Building a Vehicle with a Sail
Students will adapt their vehicles to hold a sail and discuss how it might affect their motion.
*This investigation can cover two class sessions. A cardboard sail is added to the standard
vehicle in this lesson. The vehicle with a sail will be used in Lesson 10.
Clarifying Objectives
5.P.1.4 Predict the effect of a given force or a change in mass on the motion of an object.
Focus Question
How will the addition of a sail affect the motion of the vehicle?
Activity Guiding Questions
Students will use the cardboard sail
provided to figure out a way to attach
the sail to the standard vehicle.
Teacher tip: This tip is especially
geared toward teachers who have more
than one science class. Since there are
enough sails for each science group,
remind students that they can bend the
sail but do not fold or tear it. Then,
there will be enough sails for
subsequent classes.
Then, students will complete Self
Assessment A.
Have groups share findings in a whole
class discussion. This discussion helps
to clarify concepts taught in the lesson
and identify any misunderstandings.
Any additional content for the lesson
can be brought into the discussion at
this time.
Ask students what questions they have
now.
Have groups share findings in a whole
class discussion. This discussion helps
to clarify concepts taught in the lesson
and identify any misunderstandings.
Any additional content for the lesson
can be brought into the discussion at
this time.
Compare and contrast the vehicle sail
designs. How are they similar and
different?
Which sail will help the vehicle travel
the farthest? Provide support for your
reasoning.
Science Content Words In addition to terms introduced in previous lessons, use these terms when teaching the lesson:
Air resistance (drag): force of air pushing against the motion of an object
Integration Hints
- Students can compare and contrast the design of various vehicles and strategies used to attach
the sails (verbally or in writing). Note: there is no best solution to this design challenge in order
to prompt diverse approaches and outcomes.
- The Extensions section in Lesson 9 of the teacher guide provides additional ideas.
Motion and Design Page 22
Science Notebook Helper
- Students use the essential question to begin the science notebook. Then, students record their
prediction, planning (materials and procedure), data and observations, learnings, and next
steps/new questions (questions the student has about the investigation and next steps in
completing/continuing the investigation).
- For the data collections sections, students may also provide a sketch of the sail vehicle their
group devised.
Assessment Opportunities
- In this lesson, student Self Assessment A (available in the teacher guide) serves as an
assessment opportunity.

Motion and Design Page 23
Lesson 10 - Testing the Effects of Air Resistance on a Vehicle’s Motion
Students will explore air resistance.
*The vehicle with a sail (designed and built in Lesson 9) is used in this investigation. A large
floor space is needed, so you might reserve the cafeteria, gym, or other available space. Vehicles
can be disassembled at the end of this lesson.
*Solicit the help of an adult volunteer to build the propeller units for Lesson 11. Directions are
available in the Preparation section of Lesson 11 in the teacher guide. The teacher also needs and
axle-driven vehicle for Lesson 11.
Clarifying Objectives
5.P.1.1 Explain how factors such as gravity, friction, and change in mass affect the motion of
objects.
5.P.1.3 Illustrate the motion of an object using a graph to show change in position over a period
of time.
5.P.1.4 Predict the effect of a given force or a change in mass on the motion of an object.
Focus Question
How does the position of a sail influence the motion of the vehicle?
Activity Guiding Questions
Students will explore how the position
of the sail influences the vehicle’s
motion by attaching the sail in two
different ways on the vehicle (example:
vertically and horizontally). Students
will use the three attached rubber bands
to cause the vehicle to move. Then,
students will record their findings in a
data table and draw conclusions about
the sail from the data collected. Teacher tip: Have students brainstorm
methods of organizing data for the
investigation prior to beginning the
investigation. Have groups share findings in a whole
class discussion. This discussion helps
to clarify concepts taught in the lesson
and identify any misunderstandings.
Any additional content for the lesson
can be brought into the discussion at
this time. Ask students what questions they have
now.
Have groups share findings in a whole
class discussion. This discussion helps
to clarify concepts taught in the lesson
and identify any misunderstandings.
Any additional content for the lesson
can be brought into the discussion at
this time.
How does a sail impact the vehicle's
motion?
How does the position of the sail affect
motion?
How does this investigation relate to
real life vehicles with sails? (example:
sailboats)
Science Content Words Use terms introduced in previous lessons.

Motion and Design Page 24
Integration Hints
- Challenge students to use materials other than cardboard to make sails. How does the material
affect the vehicle’s design? Students can predict how each material will affect their vehicle’s
motion. They can run tests to compare actual results with their predictions.
- The Extension section at the end of Lesson 10 in the teacher guide offers additional ideas.
Science Notebook Helper
Students use the essential question to begin the science notebook. Then, students record their
prediction, planning (materials and procedure), data and observations (including a data collection
tool), learnings, and next steps/new questions (questions the student has about the investigation
and next steps in completing/continuing the investigation).
Assessment Opportunities
Evaluate student understanding by monitoring group discussions. Are they measuring distances
accurately and recording their results?
Motion and Design Page 25
Lesson 11 - Building a Propeller-Driven Vehicle
Students will design and build propeller-driven vehicles and compare them to their axle-driven
vehicles.
*Solicit the help of an adult volunteer to build the propeller units for this lesson. Directions are
available in the Preparation section of Lesson 11 in the teacher guide. The propeller-driven
vehicles will be used in Lesson 12. The teacher also needs an axle-driven vehicle for this lesson
and Lesson 12.
Clarifying Objectives
5.P.1.1 Explain how factors such as gravity, friction, and change in mass affect the motion of
objects.
5.P.1.2 Infer the motion of objects in terms of how far they travel in a certain amount of time and
the direction in which they travel.
5.P.1.4 Predict the effect of a given force or a change in mass on the motion of an object.
5.P.2.2 Compare the weight of an object to the sum of the weight of its parts before and after an
interaction.
Focus Question
How does a propeller affect the motion of the vehicle?
Activity Guiding Questions
Students will construct the propeller
vehicle from the technical drawing in
the student guide. If students have
difficulty constructing the vehicle, have
them color code the K-Nex pieces to
get a visual image of the vehicle. Students will then create a data table to
explore how the number of turns of the
propeller affects the distance the
vehicle travels. Hint for students: You
will have to turn the rubber band more
times than with the standard vehicle
investigations. Remind students that they must wear
goggles in this investigation. Have groups share findings in a whole
class discussion. This discussion helps
to clarify concepts taught in the lesson
and identify any misunderstandings.
Any additional content for the lesson
can be brought into the discussion at
this time. Ask students what questions they have
now.
Have groups share reflection on
building the propeller-driven vehicle in
a whole class discussion. This
discussion helps to clarify concepts
taught in the lesson and identify any
misunderstandings. Any additional
content for the lesson can be brought
into the discussion at this time.
In what ways was it easier to build
from the drawing in this lesson than it
was in Lesson 2? In what ways was it
more difficult?
How did you get the vehicle to move?
How did you get the propeller to spin?
What happened to the rubber band as
you wound the propeller?
What happened when you let go of the
propeller? Why do you think this
happened?
How is the use of a rubber band with
the propeller-driven vehicle and the
axle-driven vehicle the same?

Motion and Design Page 26
How is the rubber band used
differently?
Science Content Words In addition to terms introduced in previous lessons, use these terms when teaching the lesson:
Propeller: two or more twisted blades that rotate around a central point or shaft (shaft:
pipe or tube)
Integration Hints
- Students can use a timer to measure how long it takes the propeller to spin down after winding
it various numbers of turns. Students can graph their results.
- Additional ideas are available in the Extensions section of Lesson 11 in the teacher guide.
Science Notebook Helper
Students use the essential question to begin the science notebook. Then, students record their
prediction, planning (materials and procedure), data and observations (including a data collection
tool), learnings, and next steps/new questions (questions the student has about the investigation
and next steps in completing/continuing the investigation).
Assessment Opportunities
Are students more comfortable using a technical drawing to build propeller-driven vehicles? Are
they recording initial observations of the propeller-driven vehicle? Are they able to compare the
propeller-driven vehicle to the axle-driven vehicle built in earlier lessons?
Motion and Design Page 27
Lesson 12 - Analyzing the Motion and Design of a Propeller-Driven Vehicle
Students will evaluate the design of their propeller-driven vehicles.
Clarifying Objectives
5.P.1.1 Explain how factors such as gravity, friction, and change in mass affect the motion of
objects.
5.P.1.2 Infer the motion of objects in terms of how far they travel in a certain amount of time and
the direction in which they travel.
5.P.1.4 Predict the effect of a given force or a change in mass on the motion of an object.
Focus Question
How does a propeller affect the motion of the vehicle?
Activity Guiding Questions
Students will use the propeller vehicle
from the previous lesson. Students will
complete Record Sheet 12-A and
explore how changes in the propeller
vehicle affect its motion. Then,
students will create their own “what if”
questions to share with the class. Have groups share findings in a whole
class discussion. This discussion helps
to clarify concepts taught in the lesson
and identify any misunderstandings.
Any additional content for the lesson
can be brought into the discussion at
this time. Ask students what questions they have
now.
Have groups share findings in a whole
class discussion. This discussion helps
to clarify concepts taught in the lesson
and identify any misunderstandings.
Any additional content for the lesson
can be brought into the discussion at
this time.
How did the propeller affect the
vehicle's motion?
How is air involved in moving the
propeller-driven vehicle?
How can you relate/connect this
investigation to a real life situation? Be
specific.
Science Content Words Use terms introduced in previous lessons, including:
Force
Inertia
Speed
Momentum
Technological design
Technical drawing
Propeller
Integration Hints
- Students can make a connection to North Carolina history by studying how the Wright brothers
powered their aircraft.
- Additional ideas are provided in the Extensions section of Lesson 12 in the teacher guide.
Science Notebook Helper

Motion and Design Page 28
Students use the essential question to begin the science notebook entry. Handout 12-A serves as
the data collection tool for this investigation.
Assessment Opportunities
In addition to reviewing Record Sheet 12-A, you might also consider the following:
- Can students apply an understanding of stored energy to the use of a rubber band to spin
the propeller?
- When evaluating the design of the vehicle, do students identify the features of the
propeller-driven vehicle that affects its function?
- When analyzing design features, do students develop a respect for test results and for
using those results to improve design?

Motion and Design Page 29
Lesson 13 - Looking at Cost
Students will determine the cost of their vehicles and modify the design to reduce the cost.
*This lesson can cover two class sessions. Students should disassemble their vehicles and
inventory the pieces prior to Lesson 14. Future design challenges call for a small electric fan and
a piece of foamboard elevated at one end on a stack of books.
Clarifying Objectives
5.P.1.4 Predict the effect of a given force or a change in mass on the motion of an object.
Focus Question
How can we create a more economical model of the propeller-driven vehicle?
Activity Guiding Questions
Students will use the Looking at Cost
sheet to determine the cost of the
propeller-driven vehicle. Then, students will use this price list to
create a more economical model of the
vehicle that is also efficient. Students
will determine the cost of this new
vehicle by using the Looking at Cost
handout. Discuss the results of the investigation
with the class (use the discussion
questions on page 120 of the teacher’s
guide as a starting point). Have groups share findings in a whole
class discussion. This discussion helps
to clarify concepts taught in the lesson
and identify any misunderstandings.
Any additional content for the lesson
can be brought into the discussion at
this time. Ask students what questions they have
now.
Discuss the results of the investigation with the
class:
How did you reduce the cost of your
vehicle?
How much money did you save?
At any point, did reducing the vehicle’s
cost affect your vehicle’s appearance?
Describe what you did in this situation.
At any point, did reducing the vehicle’s
cost affect its performance? Describe
what you did in this situation.
Have groups share findings in a whole class
discussion. This discussion helps to clarify
concepts taught in the lesson and identify any
misunderstandings. Any additional content for
the lesson can be brought into the discussion at
this time.
Which vehicle was the most efficient
and cost effective? Provide evidence
for your explanation.
What design processes did your team
develop in order to design a more cost
effective vehicle?
What technological design challenges
did your team face when creating your
cost efficient vehicle? Use your
science vocabulary in your
descriptions.

Motion and Design Page 30
Science Content Words Review terms introduced in previous lessons.
Integration Hints
- Ask students to suggest how the design of a product currently on the market could be
changed to reduce cost. How might the changes affect customers’ feelings about buying
the product? What features could be added to the product to increase its appeal without
significantly increasing cost?
Science Notebook Helper
Students use the essential question to begin the science notebook entry. Then, students record
their prediction, planning (materials and procedure), data and observations (including an
illustration of the model designed and a data collection tool—this tool could encompass the
Looking at Cost Record Sheet 13-A as well as a table to show efficiency of the vehicle),
learnings, and next steps/new questions (questions the student has about the investigation and
next steps in completing/continuing the investigation).
Assessment Opportunities
Assess the Looking at Cost Record Sheet 13-A for accurate completion. Also, evaluate student
understanding through class discussion.
Motion and Design Page 31
Lesson 14 - Planning Our Final Design Challenge
Students will work in teams to brainstorm how they will solve a design challenge.
Clarifying Objectives
5.P.1.1 Explain how factors such as gravity, friction, and change in mass affect the motion of
objects.
5.P.1.2 Infer the motion of objects in terms of how far they travel in a certain amount of time and
the direction in which they travel.
5.P.1.3 Illustrate the motion of an object using a graph to show change in position over a period
of time.
5.P.1.4 Predict the effect of a given force or a change in mass on the motion of an object.
5.P.2.2 Compare the weight of an object to the sum of the weight of its parts before and after an
interaction
Focus Question
How can we create a vehicle to meet the specified design requirements?
Note: The focus question provided is general and not directed toward a design card. However,
students can develop their own question to meet their group’s design card.
Activity Guiding Questions
Each cooperative group will receive a
copy of one of the design cards. Teacher tip: Based on your class,
decide if you want to assign design
cards to groups and have each group
select a design card randomly. If
design cards are assigned, you are able
to differentiate based on difficulty level
of the card. Students will use Record Sheet 14-A to
plan their investigation. Have groups share findings in a whole
class discussion. This discussion helps
to clarify concepts taught in the lesson
and identify any misunderstandings.
Any additional content for the lesson
can be brought into the discussion at
this time. Ask students what questions they have
now. Reading selection: "Making the Switch
from Kid's Stuff to Engineering".
Discuss the selection with the class.
How are you planning to meet the
challenge?
What are your ideas so far based on the
criteria on your card?
Which investigations do you plan to
refer back to when completing this
design challenge?
How can this investigation be
connected to real life situations?

Motion and Design Page 32
Science Content Words
In addition to terms introduced in previous lessons, use these terms when teaching the lesson:
- Laws of Motion: three laws, formulated by Sir Isaac Newton, that describe how objects move
in relation to the forces acting on them
- Newton’s First Law (in student-friendly terms): An object at rest tends to stay at rest, and an
object in motion tends to stay in motion with the same direction and speed.
- Newton’s Second Law (in student-friendly terms): It takes more force to accelerate a more
massive object.
- Newton’s Third Law (in student-friendly terms): Forces are found in pairs: for every action
(force), there is an opposite and equal reaction (force).
Integration Hints
- Read “Making the Switch from Kid’s Stuff to Engineering” on page 131-132 of the teacher’s
guide
- See additional ideas in the Extensions section of Lesson 14 in the teacher guide.
Science Notebook Helper
Students use their essential question to begin the science notebook. Then, students record their
prediction and planning (materials and procedure) for the observation.
Note: Sections of Record Sheet 14-A can be cut and pasted into the science notebook for the
planning.
Assessment Opportunities
Lessons 14-16 provide an opportunity to assess how well students apply the concepts, skills, and
attitudes addressed in this unit. Refer to Assessment section at the end of Lesson 16 in the
teacher guide for a detailed summary of strategies you can use to assess students’ work during
these three lessons.
Motion and Design Page 33
Lesson 15 - Refining Our Design
Students will work in teams to build and test their vehicles and refine their design plans.
Clarifying Objectives
5.P.1.1 Explain how factors such as gravity, friction, and change in mass affect the motion of
objects.
5.P.1.2 Infer the motion of objects in terms of how far they travel in a certain amount of time and
the direction in which they travel.
5.P.1.3 Illustrate the motion of an object using a graph to show change in position over a period
of time.
5.P.1.4 Predict the effect of a given force or a change in mass on the motion of an object.
5.P.2.2 Compare the weight of an object to the sum of the weight of its parts before and after an
interaction
Focus Question
How can we create a vehicle to meet the specified design requirements?
Note: In Lesson 15, students test the plan and refine the design from Lesson 14.
Activity Guiding Questions
Students will use Record Sheet 14-A
and construct their vehicle. Then,
students will test their vehicle and
record data. Following the tests,
students will refine the design and
retest. Then, students will use Record Sheet
13-A to determine the total cost of their
vehicle. Have groups share findings in a whole
class discussion. This discussion helps
to clarify concepts taught in the lesson
and identify any misunderstandings.
Any additional content for the lesson
can be brought into the discussion at
this time. Ask students what questions they have
now.
Have groups share findings in a whole class
discussion. This discussion helps to clarify
concepts taught in the lesson and identify any
misunderstandings. Any additional content for
the lesson can be brought into the discussion at
this time.
Science Content Words
In addition to terms introduced in previous lessons, use these terms when teaching the lesson:
- Laws of Motion: three laws, formulated by Sir Isaac Newton, that describe how objects move
in relation to the forces acting on them
- Newton’s First Law (in student-friendly terms): An object at rest tends to stay at rest, and an
object in motion tends to stay in motion with the same direction and speed.
- Newton’s Second Law (in student-friendly terms): It takes more force to accelerate a more
massive object.
Motion and Design Page 34
- Newton’s Third Law (in student-friendly terms): Forces are found in pairs: for every action
(force), there is an opposite and equal reaction (force).
Integration Hints - Students can create invitations or write letters to invite family and friends to their presentation
in Lesson 16.
- Additional ideas are offered in the Extensions section of Lesson 15 in the teacher guide.
Science Notebook Helper
Students will continue working on the same science notebook entry from Lesson 14. Students
have already recorded their question, prediction, and planning. Now, students will record data
and observations (including an illustration of the model designed and a data collection tool),
learnings, and next steps/new questions (questions the student has about the investigation and
next steps in completing/continuing the investigation). In the notebook, students will also note
any alterations made to the plan of the vehicle and/or the vehicle design. Remind students to
glue in Record Sheet 13-A as part of the data section.
Assessment Opportunities
Lessons 14-16 provide an opportunity to assess how well students apply the concepts, skills, and
attitudes addressed in this unit. Refer to Assessment section at the end of Lesson 16 in the
teacher guide for a detailed summary of strategies you can use to assess students’ work during
these three lessons.

Motion and Design Page 35
Lesson 16 - Presenting Our Final Design Challenge
Student teams will present their solutions to their classmates.
Clarifying Objectives
5.P.1.1 Explain how factors such as gravity, friction, and change in mass affect the motion of
objects.
5.P.1.2 Infer the motion of objects in terms of how far they travel in a certain amount of time and
the direction in which they travel.
5.P.1.3 Illustrate the motion of an object using a graph to show change in position over a period
of time.
5.P.1.4 Predict the effect of a given force or a change in mass on the motion of an object.
5.P.2.2 Compare the weight of an object to the sum of the weight of its parts before and after an
interaction
Focus Question
How can we create a vehicle to meet the specified design requirements?
Note: In Lesson 16, students present their findings from Lessons 14 and 15.
Activity Guiding Questions
Students will present their findings
from lessons 14 and 15 to the class.
Students will discuss their design plan,
design, cost, and science content
(including proper terminology). Teacher tips: Refer to these
presentations as an “Engineering
Conference” and have parents attend
the presentations. Have students
develop a visual (chart, table, graph,
etc.) to show and refer to during the
presentation. Also, remind students
that each student needs to speak during
the presentation and equal amount of
time. This reminder allows all students
to have the opportunity to present. Have groups share findings in a whole
class discussion. This discussion helps
to clarify concepts taught in the lesson
and identify any misunderstandings.
Any additional content for the lesson
can be brought into the discussion at
this time. Ask students what questions they have
now.
Students will present their findings from
lessons 14 and 15 to the class. Students will
discuss their design plan, design, cost, and
science content (including proper
terminology).
Students may also compare/contrast designs.
Cooperative student groups will ask higher
order questions of other groups during class
discussion (use Revised Bloom's).

Motion and Design Page 36
Science Content Words
In addition to terms introduced in previous lessons, use these terms when teaching the lesson:
- Laws of Motion: three laws, formulated by Sir Isaac Newton, that describe how objects move
in relation to the forces acting on them
- Newton’s First Law (in student-friendly terms): An object at rest tends to stay at rest, and an
object in motion tends to stay in motion with the same direction and speed.
- Newton’s Second Law (in student-friendly terms): It takes more force to accelerate a more
massive object.
- Newton’s Third Law (in student-friendly terms): Forces are found in pairs: for every action
(force), there is an opposite and equal reaction (force).
Integration Hints
- Students might refer to their science notebook during their presentation by placing the notebook
under a document camera for projection.
- Additional ideas are offered in the Extensions section at the end of Lesson 16 in the teacher
guide.
Science Notebook Helper
- Students can refer to their science notebook entries throughout the presentation.
Assessment Opportunities
Lessons 14-16 provide an opportunity to assess how well students apply the concepts, skills, and
attitudes addressed in this unit. Refer to Assessment section at the end of Lesson 16 in the
teacher guide for a detailed summary of strategies you can use to assess students’ work during
these three lessons.
Motion and Design Page 37
Lesson 17 Unit Review - Sharing What We Know about Motion and Design & a Review of
Physical and Chemical Changes Students will reflect on and discuss what they have learned in the Motion & Design unit. They
also review the concepts about physical and chemical changes.
*You’ll need a broken cookie or a couple broken crackers as a visual of a physical change as
well as physical and chemical changes examples for sorting (available on CMAPP)
Clarifying Objectives
5.P.1.1 Explain how factors such as gravity, friction, and change in mass affect the motion of
objects.
5.P.1.2 Infer the motion of objects in terms of how far they travel in a certain amount of time and
the direction in which they travel.
5.P.1.3 Illustrate the motion of an object using a graph to show a change in position over a period
of time.
5.P.1.4 Predict the effect of a given force or a change in mass on the motion of an object.
5.P.2.2 Compare the weight of an object to the sum of the weight of its parts before and after an
interaction.
5.P.2.3 Summarize properties of original materials, and the new materials formed, to
demonstrate that a change has occurred.
Focus Questions
What have we learned about technological design and the relationships between force and
motion?
What are some examples of physical and chemical changes?
Activity Guiding Questions
Revisit the “What We Know” poster or
note cards from the beginning of the
unit. Have students discuss what they
know is true based on the
investigations. Have students discuss
which statements from the poster or
note cards they would like to change.
Discuss why these statements should be
changed. Revisit the “what we want to know”
poster or note cards. Discuss and
determine if any answers where
uncovered during the unit. Teacher tip: When students are writing
what they now know about motion and
design, have them support their
statement with an investigation that
shows how they know this information. Show students a broken cookie or
When do physical changes occur?
(when the size, shape, or state of matter
of an object changes)
Which type of change is reversible?
(physical)
What causes molecules in matter to
change? (motion, pressure,
temperature)
If a substance changes color, what kind
of change occurred? (chemical – think
burnt marshmallow)
What are some indicators that a
chemical change has occurred? (change
in color, formation of gas
(bubbles,fizzing), and/or appearance of
heat or light)

Motion and Design Page 38
broken crackers and ask them if a
physical or chemical change occurred.
Prompt students to discuss their ideas
then share out with the class. Confirm that a broken cookie/cracker is
a physical change because only the
shape of the cookie/cracker has
changed – the small pieces can still be
recognized as a cookie or cracker. Introduce the sorting activity (resources
available on CMAPP) and have
students spend a few minutes sorting
the examples into piles of chemical
changes and physical changes. Call time and share the StudyJam video
(link available in CMAPP) about
physical and chemical change. At the
conclusion of the video, you might use
the Test Yourself feature to check
students’ understanding. Invite students to review the examples
they sorted and make changes, if
necessary, based on their new learning. Students can record the physical and
chemical change examples on the
record sheet and paste it in their science
notebooks. Prompt students to think of other
examples of physical and chemical
changes. Ask students what questions they might
have.
Science Content Words
In addition to words introduced throughout the unit, use these terms when teaching the lesson:
- physical change: a change in the size, shape, or state of matter (gas, liquid, solid); caused by
motion, pressure, or temperature
- chemical change: substances are altered because their molecules change; a change that is
irreversible; chemical changes are often identified by the production of a gas (bubbles, fizzing),
the appearance of light and/or heat, and a change in color Integration Hints
- The StudyJam video includes a link called “Test Yourself” which can be projected
to engage students in a class discussion
- Students can play the motion and design review game on Quia individually or as a class.

Motion and Design Page 39
Go to www.quia.com, click on the "Visit Quia Web" button, then type in "Carol Wooten" in the
yellow "Find a Teacher" box. Scroll down to Science: Motion and Design Vocabulary.
Science Notebook Helper
- Use the student’s science notebook as evidence of both science skills and content progression
throughout the unit.
- Students can record examples of physical and chemical changes using both drawings and
words.
Assessment Opportunities
- Examine the student’s science notebook for overall understanding of the concepts. When
reviewing the KWL chart from the beginning and end of the unit, consider:
Do students understand that a variety of forces (pushes and pulls) can move objects and
that different forces produce different effects on motion?
How did students demonstrate knowledge of technological design? Did students meet
design requirements?
- Review students’ notebooks/recording sheet to determine if they can classify physical and
chemical changes. Can students offer reasoning as to why a change is physical or chemical?