Leica M8 englisch
72
LEICA M8 Anleitung/Instructions
Transcript of Leica M8 englisch

my point of view LEICA M8
Anleitung/Instructions
Leica Camera AG / Oskar-Barnack-Str. 11 / D-35606 Solms
www.leica-camera.com / [email protected]
Telefon +49 (0) 64 42-208-0 / Telefax +49 (0) 64 42-208-333
Abbildungen in den vorderen und hinteren Umschlagseiten
Illustrations inside front and rear covers
Abbildungen in den vorderen und hinteren Umschlagseiten
Illustrations inside front and rear covers 9315
3VI
II/06
/LX
/B.
Markenzeichen der Leica Camera Gruppe/ Registriertes WarenzeichenTrademark of the Leica Camera Group/ Registered Trademark© 2006 Leica Camera AG
R
R
1.2
1.1
1.16
1.14
1.13a1.13b
1.131.13c
1.14a
1.12
1.211.21a1.21b
1.15
1.2
1.3 1.4 1.5 1.71.6
1.8
1.9
1.20a
1.20
1.34
1.9
1.11
1.191.18
1.17
1.21c
1.28 1.29
1.30
1.31
1.321.33
1.27
1.26
1.251.24
1.23
1.22
1.101.37 1.36 1.35
1.40
1.38
1.39
1.41
1.41a
1.42 1.43
1.46
1.45
1.44

70 / Foreword
Foreword Dear customer
Leica would like to thank you for purchasing the LEICA M8 and congratulate you on your choice. Withthis unique digital view- and rangefinder camera, youhave made an excellent choice.We wish you a great deal of pleasure and successusing your new LEICA M8.In order to make best use of all the opportunitiesoffered by this high performance camera, we recom-mend that you first read these instructions.
This manual has been printed on 100% chlorine free bleachedpaper. The complex manufacturing process eases the burdenon the water system and thus helps to protect our environment.

Safety instructions / 71
This is a Class B product based on the standard of the Voluntary Control Council for Interference fromInformation Technology Equipment (VCCI). If this isused near a radio or television receiver in a domesticenvironment, it may cause radio interference. Install and use the equipment according to theinstruction manual.
FCC Note: (U.S. only)
This equipment has been tested and found to complywith the limits for a Class B digital device, pursuant toPart 15 of the FCC Rules. These limits are designed toprovide reasonable protection against harmful interfer-ence in a residential installation. This equipment gen-erates, uses, and can radiate radio frequency energyand, if not installed and used in accordance with theinstructions, may cause harmful interference to radiocommunications. However, there is no guarantee thatinterference will not occur in a particular installation.If this equipment does cause harmful interference toradio or television reception, which can be determinedby turning the equipment off and on, the user isencouraged to try to correct the interference by oneor more of the following measures:• Reorient or relocate the receiving antenna.• Increase the separation between the equipment and
receiver.• Connect the equipment into an outlet on a circuit
different from that to which the receiver is connected.• Consult the dealer or an experienced radio/TV
technician for help.
FCC Caution:
To assure continued compliance, follow the attachedinstallation instructions and use only shielded inter-face cables with ferrite core when connecting to com-puter or peripheral devices.Any changes or modifications not expressly approvedby the party responsible for compliance could void theuser’s authority to operate this equipment.
Trade Name: LEICAModel No.: LEICA M8Responsible party/Support contact: Leica Camera Inc.
156 Ludlow AvenueNorthvale, New Jersey 07647Tel.: +12017679608Fax: +12017678666e-mail: [email protected]
This device complies with Part 15 of the FCC Rules.Operation is subject to the following two conditions:(1) This device may not cause harmful interference,and (2) this device must accept any interferencereceived, including interference that may cause unde-sired operation.
This Class B digital apparatus complies with CanadianICES-003
LEICA M8
Tested To ComplyWith FCC Standards
FOR HOME OR OFFICE USE
Leica Camera Inc. 1 Pearl Court, Unit A Allendale, New Jersey 07401 Tel.: +1 201 995 0051 232 Fax: +1 201 995 1684 [email protected]

72 / Table of Contents
Table of ContentsForeword . . . . . . . . . . . . . . . . . . . . . . . . . . . . . . . . . . . 70
Warning messages . . . . . . . . . . . . . . . . . . . . . . . . . . . . 74
Legal notes . . . . . . . . . . . . . . . . . . . . . . . . . . . . . . . . . . 74
Disposal of electrical and electronic equipment . . . . . . 74
Scope of delivery . . . . . . . . . . . . . . . . . . . . . . . . . . . . . 75
Designation of parts . . . . . . . . . . . . . . . . . . . . . . . . . . . 76
The displaysIn the viewfinder . . . . . . . . . . . . . . . . . . . . . . . . . . . 78In the top panel LCD . . . . . . . . . . . . . . . . . . . . . . . . 78In the monitor . . . . . . . . . . . . . . . . . . . . . . . . . . . . . 79
Menu itemsIn the main menu . . . . . . . . . . . . . . . . . . . . . . . . . . . 80In the picture parameters menu . . . . . . . . . . . . . . . 80
Quick guidePresets . . . . . . . . . . . . . . . . . . . . . . . . . . . . . . . . . . . 81Taking photographs . . . . . . . . . . . . . . . . . . . . . . . . . 81Viewing pictures . . . . . . . . . . . . . . . . . . . . . . . . . . . . 81Enlarging pictures on the monitor . . . . . . . . . . . . . . 81Deleting pictures . . . . . . . . . . . . . . . . . . . . . . . . . . . 81
Comprehensive instructionsPreparations . . . . . . . . . . . . . . . . . . . . . . . . . . . . . . . . . 82
Attaching the carrying strap . . . . . . . . . . . . . . . . . 82Charging the battery . . . . . . . . . . . . . . . . . . . . . . . 82Inserting the battery into the camera/removing the battery from the camera . . . . . . . . . 84Charge level displays . . . . . . . . . . . . . . . . . . . . . . . 84Inserting and removing the memory card . . . . . . . 85
The most important settings/controlsLeica M lenses . . . . . . . . . . . . . . . . . . . . . . . . . . . . 86Turning the lens type detection on/off . . . . . . . . 86The extension factor . . . . . . . . . . . . . . . . . . . . . . . 87Attaching a lens . . . . . . . . . . . . . . . . . . . . . . . . . . 87Removing a lens . . . . . . . . . . . . . . . . . . . . . . . . . . 87
Switching the camera on and off/the main switch . . . . . . . . . . . . . . . . . . . . . . . . . . . 88Selecting picture taking and review modes . . . . . . 88Review for unlimited time . . . . . . . . . . . . . . . . . . 88Automatic review of last picture . . . . . . . . . . . . . 89
The shutter release button . . . . . . . . . . . . . . . . . . . 89Serial exposures . . . . . . . . . . . . . . . . . . . . . . . . . 90
The shutter speed dial . . . . . . . . . . . . . . . . . . . . . . 91The monitor . . . . . . . . . . . . . . . . . . . . . . . . . . . . . . 92Setting the brightness . . . . . . . . . . . . . . . . . . . . . 92Displaying picture data . . . . . . . . . . . . . . . . . . . . 92The histogram . . . . . . . . . . . . . . . . . . . . . . . . . . . 92
Menu control . . . . . . . . . . . . . . . . . . . . . . . . . . . . . 93PresetsBasics settings for the camera . . . . . . . . . . . . . . . 95Menu language . . . . . . . . . . . . . . . . . . . . . . . . . . 95Date and time . . . . . . . . . . . . . . . . . . . . . . . 95/96Automatic power off . . . . . . . . . . . . . . . . . . . . . 96Button acknowledgement and signal tones . . . . 96
Basic picture settingsResolution . . . . . . . . . . . . . . . . . . . . . . . . . . . . . 97Compression rate/file format . . . . . . . . . . . . . . 97White balance . . . . . . . . . . . . . . . . . . . . . . . . . . 98For automatic or fixed settings . . . . . . . . . . . . 98For direct setting of color temperature . . . . . . 99For manual setting by metering . . . . . . . . . . . . 99
ISO sensitivity . . . . . . . . . . . . . . . . . . . . . . . . . 100Image properties (contrast, sharpness, color saturation) . . . . . . . . . . . . . . . . . . . . . . . . 100Working color space . . . . . . . . . . . . . . . . . . . . 100
Holding the camera correctly . . . . . . . . . . . . . . . . . . . 100
The bright-line frame view- and rangefinder . . . . . . . . 102The frame selector . . . . . . . . . . . . . . . . . . . . . . . . . 102
Distance metering /focusing . . . . . . . . . . . . . . . . . . . 104Superimposed image method (double image) . . . . 104Split image method . . . . . . . . . . . . . . . . . . . . . . . . 104
Exposure metering . . . . . . . . . . . . . . . . . . . . . . . . . . . 105Turning the exposure meter on/off . . . . . . . . . . . 105Exposure modes . . . . . . . . . . . . . . . . . . . . . . . . . 106Aperture priority . . . . . . . . . . . . . . . . . . . . . . . . 106Metering memory lock . . . . . . . . . . . . . . . . . . . 106Exposure compensation . . . . . . . . . . . . . . . . . . 107
Manual exposure setting . . . . . . . . . . . . . . . . . . 107The B setting . . . . . . . . . . . . . . . . . . . . . . . . . . . 108
Exposure meter metering range . . . . . . . . . . . . . . 108Working below the metering range . . . . . . . . . . 108Metering diagram . . . . . . . . . . . . . . . . . . . 108/109

Table of Contents / 73
General information on flash exposure metering and control . . . . . . . . . . . . . . . . . . . . . . . 110Compatible flash units . . . . . . . . . . . . . . . . . . . . . 110Attaching the flash unit . . . . . . . . . . . . . . . . . . . . . 111Flash mode . . . . . . . . . . . . . . . . . . . . . . . . . . . . . . 111The settings for camera-controlled automaticflash mode . . . . . . . . . . . . . . . . . . . . . . . . . . . . . 112The flash exposure control displays in the viewfinder with dedicated flash units . . . . . . . . . 112
In automatic flash mode . . . . . . . . . . . . . . . . . . 112When the flash unit is set to camera control (A) or manual mode (M) . . . . . . . . . . . . 112
Selecting the sync speed/the sync speed range . . 119Selecting the firing moment . . . . . . . . . . . . . . . . . 119
Additional functionsUser/application specific profiles . . . . . . . . . . . . 114Resetting all custom settings . . . . . . . . . . . . . . . . 115
Review mode . . . . . . . . . . . . . . . . . . . . . . . . . . . . . 115Viewing other pictures/“Scrolling” in the memory . . . . . . . . . . . . . . . . . . . . . . . . . . . . . 115Enlarging/selecting the section/simultaneous viewing of several reduced pictures . . . . . . . . . . . 116Deleting pictures . . . . . . . . . . . . . . . . . . . . . . . . . 117Protecting pictures/Clearing delete protection . . 118
Additional functionsChanging the picture numbering . . . . . . . . . . . . . 120Formatting the memory card . . . . . . . . . . . . . . . . 120Taking photographs with the self timer . . . . . . . . 120
Transferring data to a computer . . . . . . . . . . . . . . . . . 121with Windows® XP . . . . . . . . . . . . . . . . . . . . . . .121with Mac® OS X . . . . . . . . . . . . . . . . . . . . . . . . .121with card reading units . . . . . . . . . . . . . . . . . . . .121Data structure on the memory card . . . . . . . . .122
Installation of supplied software . . . . . . . . . . . . . . . . .122
Working with DNG raw data . . . . . . . . . . . . . . . . . . . . .123
Computer remote control of the camera . . . . . . . . . . .123
MiscellaneousSystem accessories for the LEICA M8 . . . . . . . 124Exchangeable lenses . . . . . . . . . . . . . . . . . . . . 124Filters . . . . . . . . . . . . . . . . . . . . . . . . . . . . . . . 124Universal Wideangle Viewfinder M . . . . . . . . . 124
Viewfinder Magnifier M 1.25x . . . . . . . . . . . . . . 124Handgrip M8 . . . . . . . . . . . . . . . . . . . . . . . . . . 124Correction lenses . . . . . . . . . . . . . . . . . . . . . . 124Cases . . . . . . . . . . . . . . . . . . . . . . . . . . . . . . . 124
Spare parts . . . . . . . . . . . . . . . . . . . . . . . . . . . . 124
Precautions and care instructions
General precautions . . . . . . . . . . . . . . . . . . . . 125LCDs . . . . . . . . . . . . . . . . . . . . . . . . . . . . . . . . 125Condensation . . . . . . . . . . . . . . . . . . . . . . . . . 125
Care instructions . . . . . . . . . . . . . . . . . . . . . . . 126For the camera . . . . . . . . . . . . . . . . . . . . . . . . 126For lenses . . . . . . . . . . . . . . . . . . . . . . . . . . . . 126For the battery . . . . . . . . . . . . . . . . . . . . . . . . 127For the charger . . . . . . . . . . . . . . . . . . . . . . . . 127For memory cards . . . . . . . . . . . . . . . . . . . . . . 127Cleaning the sensor . . . . . . . . . . . . . . . . . . . . 128Storage . . . . . . . . . . . . . . . . . . . . . . . . . . . . . . 129
Warning messages . . . . . . . . . . . . . . . . . . . . . . . . . . . 130
Malfunctions and their resolution . . . . . . . . . . . . . . . . 131
Index . . . . . . . . . . . . . . . . . . . . . . . . . . . . . . . . . . . . . . 132
Technical data and descriptions . . . . . . . . . . . . . . . . . 134
Leica Academy . . . . . . . . . . . . . . . . . . . . . . . . . . . . . . 137
Leica on the Internet . . . . . . . . . . . . . . . . . . . . . . . . . . 137
Leica information service . . . . . . . . . . . . . . . . . . . . . . 137
Leica Customer Service . . . . . . . . . . . . . . . . . . . . . . . 137

74 / Warning messages
Warning messages• You should use exclusively the recommended
accessories to prevent faults, short circuits or electric shock.
• Do not expose the unit to moisture or rain.• Do not attempt to remove parts of the body
(covers); specialist repairs can be carried out onlyat authorized service centers.
Legal notes• Please ensure that you observe copyright laws.
The recording and publication of pre-recordedmedia such as tapes, CDs, or other published orbroadcast material may contravene copyright laws.
• This also applies to all of the software supplied.• The SD logo is a registered trademark.• Other names, company or product names referred
to in this manual are trademarks or registeredtrademarks of the relevant companies.
Disposal of electric andelectronic equipment(Applicable in the EU, and other European countrieswith segregated waste collection systems)
This device contains electricaland/or electronic componentsand should therefore not be dis-posed of in general householdwaste! Instead it should be dis-posed of at a recycling collectionpoint provided by the local author-ity. This costs you nothing.
If the device itself contains exchangeable (recharge-able) batteries, these must be removed first and, ifnecessary, also be disposed of according to the rele-vant regulations (see also the respective comments inthis unit’s instructions).Further information on this point is available at yourlocal administration, your local waste collection com-pany, or in the store where you purchased this device.

Scope of delivery / 75
Scope of delivery Before using your LEICA M8 for the first time, pleasecheck that the accessories supplied are complete.
A. BatteryB. ChargerC. USB connecting leadD. Carrying strapE. CD-ROM with instructional PDF, remote control
software LEICA DIGITAL CAPTURE 1.0F. CD-ROM with Capture One LE from Phase One

76 / Designation of parts
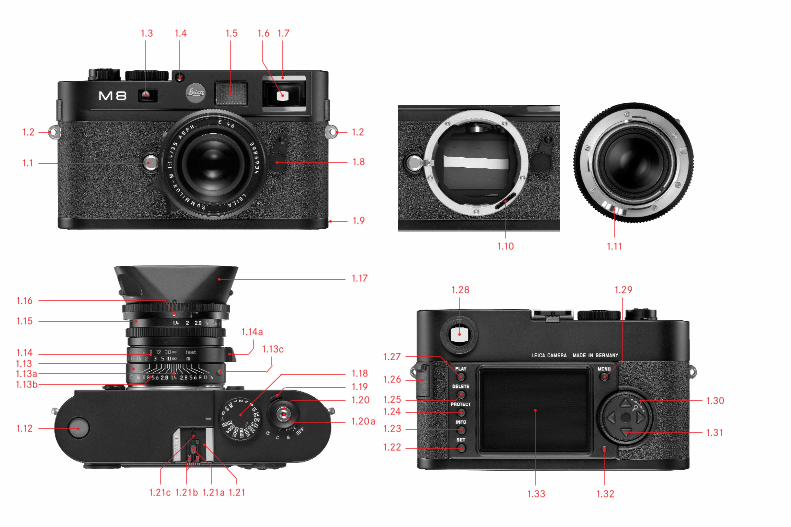
Designation of parts Front view
1.1 Lens release button
1.2 Eyelets for carrying strap
1.3 Distance meter viewing window
1.4 Brightness sensor1
1.5 Bright line illumination window
1.6 Viewfinder window with reflectors for better
visibility of the viewfinder displays in very brightconditions
1.7 Self timer LED
1.8 Frame selector
1.9 Bottom cover retaining clip
Front view of camera bayonet /rear view
of lens bayonet
1.10 Sensor for lens identification code
1.11 6 bit lens identification code
Top view
1.12 LCD
1.13 Fixed ring witha. Index for distance settingb. Depth of focus scale andc. Red index button for changing lenses
1.14 Distance setting ring witha. Finger grip
1.15 Aperture setting ring
1.16 White index point for aperture setting
1.17 Lens hood
1.18 Shutter speed dial with- A detent position for automatic control
1.19 Main switch with detent positions for
– OFF (camera switched off)– S (single pictures)– C (series exposures)– (self timer)
1.20 Shutter release button with a. Thread for cable release
1.21 Flash (hot) shoe with
a. Central (firing) andb. Control contacts, andc. Hole for locking pin
1 Leica M lenses with viewfinder attachments cover the brightnesssensor. Information about the use of these and other lenses canbe found in the sections “The displays/In the viewfinder”, p. 78,and “Leica M lenses”, p. 86.Illustrations inside front and rear covers

Rear view
1.22 SET button for calling up the picture parametermenus/for calling up the sub-menus within themenus/for confirming settings/functionsselected in the sub-menus
1.23 INFO button for displaying image data whenreviewing pictures
1.24 PROTECT button for selecting delete protectionfunction
1.25 DELETE button for selecting delete function
1.26 USB port cover
1.27 PLAY button for switching on (continuous)review mode/for return to full-size picture display
1.28 Viewfinder eyepiece
1.29 MENU button for entering and exiting the mainmenu
1.30 Central setting ring for navigation in menus/setting the selected menu items/functions,scrolling in the memory and for enlarging/reducing the pictures viewed
1.31 Direction buttons for navigation within themenus/for setting the selected menu items/functions and for scrolling through the memory
1.32 LED for indicating picture taking mode/recording data on to the card
1.33 Monitor
View with USB port cover open
1.34 USB port (5-pin, for connecting to computers)
Bottom view
(with bottom cover in place)
1.35 Tripod thread A 1/4, DIN 4503 (1/4”).
1.36 Bottom cover
1.37 Locking toggle for bottom cover
(with bottom cover removed)
1.38 Battery compartment
1.39 Battery locking catch
1.40 Memory card slot
Charger
1.41 Charging bay for battery witha. Contacts
1.42 Green (POWER) LED to indicate mains connection
1.43 Yellow (CHARGE) LED to indicate charging
1.44 2-pin socket for car charging cable
1.45 Unlocking slider for
1.46 Interchangeable mains plugs (Euro/GB/USA)
Designation of parts / 77
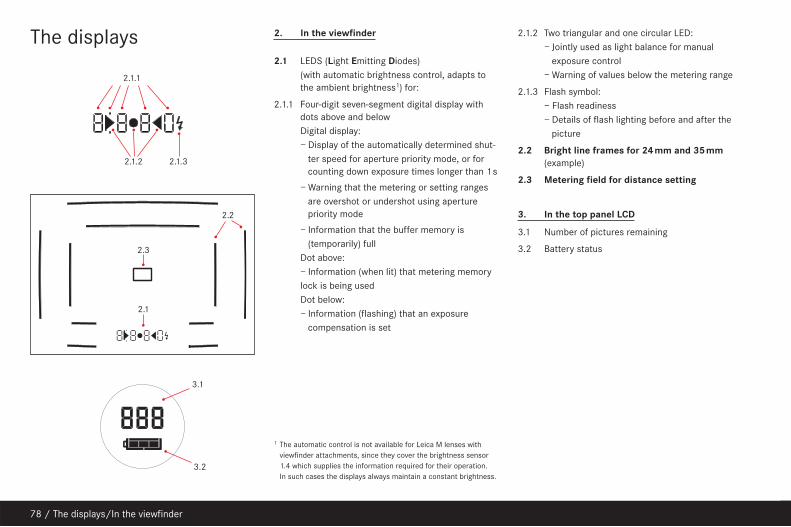
78 / The displays/In the viewfinder
The displays 2. In the viewfinder
2.1 LEDS (Light Emitting Diodes)(with automatic brightness control, adapts tothe ambient brightness1) for:
2.1.1 Four-digit seven-segment digital display withdots above and below Digital display: – Display of the automatically determined shut-
ter speed for aperture priority mode, or forcounting down exposure times longer than 1s
– Warning that the metering or setting ranges are overshot or undershot using aperturepriority mode
– Information that the buffer memory is (temporarily) full
Dot above:– Information (when lit) that metering memory lock is being usedDot below:– Information (flashing) that an exposure
compensation is set
2.1.2 Two triangular and one circular LED:– Jointly used as light balance for manual
exposure control– Warning of values below the metering range
2.1.3 Flash symbol:– Flash readiness– Details of flash lighting before and after the
picture
2.2 Bright line frames for 24mm and 35mm
(example)
2.3 Metering field for distance setting
3. In the top panel LCD
3.1 Number of pictures remaining
3.2 Battery status
1 The automatic control is not available for Leica M lenses withviewfinder attachments, since they cover the brightness sensor1.4 which supplies the information required for their operation. In such cases the displays always maintain a constant brightness.
2.1.1
2.1.32.1.2
3.2
3.1
2.3
2.2
2.1

The displays/In the monitor / 79
4. In the monitor
4.1 At normal review(image/s fill the entire monitor area)
4.1.1 Delete protection symbol (only if set)
4.1.2 Picture number/total number of available pictures
4.1.3 Enlargement level and/or position of sectionshown schematic, for enlarged view only)
4.1.4 Selected picture (for reduced viewing of 4 or 9 pictures only)
4.2 Reviewing with additional information(INFO; reduced picture size)
4.2.1 Picture (if necessary with “Clipping” display1)
4.2.2. Histograma. Luminance (brightness)b. Red/green/blue
(separate display of individual colors)
4.2.3 Delete protection symbol (only if set)
4.2.4 Date/time
4.2.5 Picture number/total number of availablepictures
4.2.6 Picture informationa. Exposure mode and shutter speedb. Focal length2
c. Sensitivityd. Exposure compensatione. Resolutionf. Compression/file formatg. White balancei. User profile numberj. Folder number/file namek. Size and position of section (only if in use)
1 see “The Histogram”, p. 922 Only with the latest M lenses with 6-bit coding, or suitably
converted lenses (see p. 86)
4.1.1
4.2.3 4.2.4 4.2.5
4.1.2
4.1.3
abc
k
efgi
j
d
4.2.6
4.2.2
4.2.1

80 / Menu items
Menu items 5.1 In the main menu
5.1.1 Lens Detection Lens type detection5.1.2 Save User Profile User-specific profile (save)5.1.3 Self timer Self timer delay time5.1.4 Sharpening Sharpening of image5.1.5 Color Saturation Color saturation of image 5.1.6 Contrast Image contrast5.1.7 Monitor Brightness5.1.8 Histogram Graphic to indicate distri-
bution of brightness5.1.9 Picture Numbering5.1.10 Auto Review Automatic replay of last
picture5.1.11 Auto Power Off Automatic power off5.1.12 Flash Sync Firing time of flash5.1.13 Auto Slow Sync Shutter speed with flash 5.1.14 Color Management Working color space5.1.15 Reset Reset all settings (to origi-
nal factory settings)
5.1.16 Sensor Cleaning Shutter opening for clean-ing the sensor
5.1.17 Date5.1.18 Time5.1.19 Acoustic Signal Button acknowledgement
tones5.1.20 Language5.1.21 Format Formatting the memory
card5.1.22 Firmware Firmware version
5.2 In the picture parameters menu
5.2.1 ISO Sensitivity5.2.2 Exp. comp. Exposure compensation5.2.3 White Balance5.2.4 Compression Compression rate/file
format5.2.5 Resolution5.2.6 User Profile User-specific profile
(recall)

Quick guideYou will need the following items:• Camera• Battery (A)• Memory card (not supplied)• Battery charger (B)
Presets
1. Insert the battery (A) into the charger (see p. 83)2. Connect the charger (B) to the mains, to charge
the battery (see p. 83)3. Set the main switch (1.19) to OFF.4. Insert the charged battery into the camera (see
p. 84).5. Insert a memory card (see p. 85).6. Set the main switch (1.19) to S.7. Select the desired language (see p. 95).8. Format the memory card (see p. 120).
Notes:
• This is required generally only if the card has notbeen factory-formatted
• Formatting deletes all data on the memory card.9. Set the date and time (see p. 95/96).
Taking photographs
10. Attach the desired lens to the camera (see p. 87).11. With the viewfinder to the eye, set the focus using
the distance setting ring on the lens (see p. 104).12. Press the shutter release button (1.20) as far as
the first pressure point to activate the cameraexposure metering.
13. Set the exposure using the aperture setting ringon the lens (1.15) and/or the camera shutterspeed dial (1.18) (see p. 107)
14. Press the shutter release button all the way downto take the picture.
Viewing pictures
For automatic brief reviews of the last picture (withinpicture taking mode).The LEICA M8 is factory-set to this function - AutoReview. Various function options can be selected inthe main menu under this item (5.1.10) (see p. 89).
For review without a time limit:1. Select review mode by pressing the PLAY button
(1.27) (see p. 88).2. Press the left or right direction button (1.31) to
view other pictures.
Enlarging pictures in the monitor
Turn the central setting ring (1.30) to the right (clock-wise) to enlarge the picture display (see p. 116).
Deleting pictures
Press the delete button (DELETE, 1.25) and folllowthe instructions in the monitor (1.33) (see p. 117).
Quick guide / 81

82 / Comprehensive instructions/Preparations
Comprehensive instructionsPreparations
Attaching the carrying strap
Charging the battery
The LEICA M8 is powered by a Lithium ion battery (A).
Attention:
• Only the battery type specified and described inthis manual, and/or battery types specified anddescribed by Leica Camera AG, may be used in thiscamera.
• This battery may only be used in the units for whichit is designed and may only be charged exactly asdescribed below.
• Using this battery contrary to the instructions andusing non-specified battery types can result in anexplosion under certain circumstances.
• Never throw batteries into a fire as this can causethem to explode!
• The charger supplied should be used exclusively forcharging this battery type. Do not attempt to use itfor other purposes.
• Ensure that the mains outlet used is freely accessi-ble.
• The charger may not be opened. Repairs may onlybe carried out by authorized workshops.
Notes:
• The battery should be charged before the LEICA M8is used for the first time.
• The battery must have a temperature of 0°-35°C/32°–95°F to be charged (otherwise the charger willnot switch on, or will switch off again).
• Lithium ion batteries can be charged at any time,regardless of their current charge level. If a batteryis only partly discharged when charging starts, it ischarged to full capacity faster.
• The batteries warm up during the charging process.This is normal and not a malfunction.
• If the yellow CHARGE LED (1.43) flashes aftercharging has started, this indicates a charging fault.In this case, disconnect the charging unit from themains and remove the battery. Ensure that theabove temperature conditions are met and thenrestart the charging process. If the problem per-sists, please contact your dealer, the Leica office inyour country or Leica Camera AG.
• A new battery only reaches its full capacity after ithas been fully charged and – by use in the camera –discharged 2 or 3 times. This discharge procedureshould be repeated every 25 cycles. To ensure amaximum service life of the battery, it should not beexposed to constant extremes of temperature (e.g.in a parked car in the summer or winter).
• Even with optimum conditions of use, every batteryhas a limited service life! After several hundredcharging cycles, this becomes noticeable as theoperating times get significantly shorter.!
1 2a 2b
3 4 5

• Defective batteries should be disposed of accordingto the respective instructions (see p. 74).
• The replaceable battery provides power to a back-up battery which is built into the camera. This back-up battery maintains the reference data such as thedate for up to 3 months. If this back-up batterybecomes discharged it must be recharged by insert-ing the replaceable main battery. Once the replace-able battery has been inserted, the full capacity ofthe back-up battery is recovered after about 60hours. This process does not require that the cam-era be switched on.
1. Insert the plug appropriate to the mains supply intothe charger. To do this the unlocking slider (1.45)must bea. pushed upwards (towards the plug),b. held there, andc. the mains plug (1.46) exchanged for the appro-
priate sort
2. Insert the mains plug into a socket.• The green LED (1.42) marked POWER lights up.
3. Insert a battery with its contacts and the endmarked with an arrow facing downwards obliquelyin the charging bay (1.41) of the charger.
4. Then press it downwards until it lies flush in thecharging bay.• When it is in the correct position the yellow
CHARGE LED (1.43) will light up to confirm thatcharging is in progress. After completion ofcharging – about 3 hours – the yellow LED goesout.
5. The charger should then be disconnected from themains. However, there is no risk of overcharging.
6. Remove the battery by pulling its upper faceupwards a little and then pulling it out of the charg-er bay.
The following LED displays indicate that charging isdefective or is not possible:
If a fault cannot be resolved by eliminating the causesstated in the above table, you should contact yourdealer, the Leica office in your country or Leica Cam-era AG.
Comprehensive instructions/Preparations / 83
Green / a. Mains connection –POWER LED not correct
b. Inserted batterycannot be charged
Yellow / Battery is not being a. Battery outside tem-charged perature range speci-
CHARGE LED a. Battery not inserted fied abovecorrectly b. Battery totally dis-
b. Inserted battery charged, pulsed already fully charged precharging will be
carried out first
LED not lit LED flashing

84 / Comprehensive instructions/Preparations
Inserting the battery into the camera/removing
the battery from the camera
1. Set the main switch (1.19) to OFF.
2. Remove the bottom cover (1.36) of the camera. To do this:a. flip up toggle (1.37) in the bottom cover,b. turn it to the left as far as the stop, andc. lift off the bottom cover.
3. Insert the battery into the compartment with itscontacts facing forwards. Press it into the compart-ment (1.38) until the white sprung locking catch(1.39) moves over the battery to hold it in place.
4. Replace the bottom cover. To do this:a. hang it onto the retaining clip (1.9) on the side of
the camerab. swing it down, c. lock it by turning the toggle to the left as far as
the stop, andd. push the toggle back down.
To remove the battery, follow these instructions inreverse order. The white sprung locking catch in thebattery compartment must be pushed to the side tounlock the battery.
Note:
Always switch the camera off before removing thebattery.
A fully charged battery (to the CIPA standard) is suffi-cient for approx. 400 pictures each reviewed for 4s.
Charge level displays (3.2)
The charge level of the battery is displayed in fivestages by the top panel LCD (1.12).
: approx. 75–100%: approx. 50–75%: approx. 25–50%: approx. 5–25%: approx. 0–5%, battery replacement or
recharging necessary
Notes:
• Remove the battery if you will not be using the cam-era for a long period of time. When doing so, turnthe camera off using the main switch first.
• After 3 months out of use, the back-up battery incamera will be exhausted (see also the last noteunder “Charging the battery”, p. 82), and all individ-ual settings must be input again.

Inserting and removing the memory card
The LEICA M8 saves the picture data on an extremelycompact SD (secure digital) card.SD memory cards are small, light and interchangeableexternal storage media. SD memory cards, particular-ly those with a high capacity, allow significantly fasterread/write times and significantly faster recordingand replay of the data. An SD card has a write protec-tion switch, that can be used to prevent unintentionalstorage and deletion of pictures. This switch takes theform of a slider on the non-beveled side of the card; inthe lower position, marked LOCK, the data on the cardis protected.SD memory cards are available from different suppli-ers and with different capacities.
Note:
Do not touch the memory card contacts.
1. Set the main switch (1.19) to OFF.
2. Remove the bottom cover (1.36) of the camera. To do this:a. flip up toggle (1.37) in the bottom cover,b. turn it to the left as far as the stop, andc. lift off the bottom cover.
3. Insert the memory card into the slot (1.40) with thecontacts at the back and with the beveled cornerpointing downwards. Slide it completely into theslot against the spring resistance until you hear itclick into place.
4. Replace the bottom cover. To do this:a. hang it onto the retaining clip (1.9) on the side of
the camerab. swing it down, c. lock it by turning the toggle to the left as far as
the stop, andd. push the toggle back down.
To remove the memory card, switch off the cameraand follow this procedure in reverse order. To release,the card must first be pressed slightly further in – asindicated on the camera bottom.
Notes:
• The range of SD cards available is constantly chang-ing; some cards in certain circumstances may mal-function when used in the LEICA M8. A current listof the cards suitable for use can be found in ourHomepage under:www.leica-camera.de/photography/m_system/m8
• If the memory card cannot be inserted, check thatit is aligned correctly.
• If you remove the bottom cover or take out thememory card, the monitor displays the respectivewarning messages instead of the normal display:– Bottom cover removed– No SD card
• Do not open the bottom cover nor remove thememory card while the red LED (1.32) to the bot-tom right of the monitor (1.33) is flashing, indicatingimage recording and/or data saving to the card.Otherwise the not yet (completely) saved imagedata may be lost.
• As electromagnetic fields, electrostatic charges,and defects on the camera or the card can lead todamage or loss of the data on the memory card, we recommend that you also transfer the data to acomputer and save it there (see p. 121).
• For the same reason, it is recommended that thecard is always stored in its antistatic cover.
Comprehensive instructions/Preparations / 85

86 / Comprehensive instructions/The most important settings
The most important settings / controls
Leica M lenses
Essentially, most Leica M lenses can be used with theLEICA M8. Details on the small number of exceptionsand restrictions can be found in the following notes.Usage is independent of the initial format of therespective camera – whether 18x27mm (sensor size)for the digital LEICA M8 or 24x36mm for the 35mmmodels up to the LEICA M7, and also independent ofthe lens features – with or without the 6-bit coding inthe bayonet (the latest version, see next section).Even without this additional feature, i.e. when usingLeica M lenses without identification, the LEICA M8will supply good pictures in all cases.
Important:
• Cannot be used:
Hologon 15mm f/8,Summicron 50mm f/2 with close focusing.Elmar 90mm f/4 with collapsible tube (productionperiod 1954-1968)
• Can be used, but risks damaging the camera
Lenses with retractable tubes can only be used withtheir tubes extended, i.e. their tubes must never beretracted into the LEICA M8. This is not the case with the current Macro-Elmar-M90mm f/4, whose tube does not protrude into thecamera body even when retracted. It can thereforebe used without any restrictions.
• Can be used, but precise composition is not
possible
The LEICA M8 has bright-line frames for focallengths up to 90mm (see p. 102). Therefore, whenusing longer focal lengths such as the 135mm mod-els, their image field in the camera viewfinder –which is very small to start with – can only be“determined” very imprecisely.
Notes:
• Exposure metering is not possible with:Super-Angulon-M 21mm f/4Super-Angulon-M 21mm f/3.4Elmarit-M 28mm f/2.8 with serial nos. earlier than2 314 921.
• Leica Customer Service can update many Leica Mlenses with the 6-bit coding. Enquire for specificcases to (address, see p. 137).
Turning the lens type detection on/off
The 6-bit coding in the bayonet (1.11) of current LeicaM lenses allows the LEICA M8 to recognize the type oflens. It does this using the sensor in its bayonet (1.10).– This information is used among other things for opti-
mizing the image data. Thus vignetting which can beparticularly noticeable with wide-angle lenses andlarge apertures can be compensated in the respec-tive image data.
– Flash exposure and flash reflector control also usesthe lens data (see “Compatible flash units”, p. 110).
– In addition, the information delivered by this 6-bitcoding is written to the respective EXIF file for thepicture. The picture data shown in the INFO display(see “The monitor”, p. 92) additionally includes thedisplay of the lens focal length (4.2.6b, see p. 79).
When using a lens without 6-bit coding, the recogni-tion function of the camera must always be turned off,to prevent malfunctions.
Setting the function
1. In the main menu (see p. 80/93), select LensDetection (5.1.1) andin the respective sub-menu, select the desiredoption.

The extension factor
The nominal focal lengths of Leica M lenses are basedon the 35mm-format, i.e. on a film format of24x36mm. In comparison, with its 18x27mm, thesensor in the LEICA M8 is somewhat smaller though –by a factor of 0.75. Therefore, when used on theLEICA M8, these lenses have angles of view corre-sponding to lenses with focal lengths that are longerby a factor of 1.33 (1.33 = reciprocal of 0.75). Thishas the respective effects on their perspective, butnot on their depth of field, which, with the LEICA M8,can also be read directly off the lens (see the lensinstructions for more details).The bright-line frame in the viewfinder of the LEICA M8of course always shows the “correct” field of view forthis camera, i.e. it takes account of the increasedfocal length. You can therefore compose your picturesin the normal way, just as for other cameras in theLeica M series (see also “The bright-line view- andrangefinder “, p. 102).
Attaching a lens
1. Hold the lens by the fixed ring (1.13).2. Align the red index button (1.13c) on the lens with
the unlocking button (1.1) on the camera body.3. Then push the lens straight on in this position.4. Turn the lens slightly to the right, and you will hear
and feel it click into place.
Removing a lens
1. Hold the lens by the fixed ring (1.13).2. Press down the release button (1.1) on the camera
body.3. Turn the lens to the left until its red index button
(1.13c) is aligned with the release button.4. Then pull the lens straight off.
Notes:
• To protect the LEICA M8 against ingress of dust etc.into the interior of the camera, it is importantalways to have a lens or a cover attached to thecamera body.
• For the same reason, changing lenses shouldalways be done quickly and in an environment thatis as dust-free as possible.
Comprehensive instructions/The most important settings / 87

88 / Comprehensive instructions/The most important settings
Switching the camera on and off/the main switch
The LEICA M8 is turned on and off using the mainswitch (1.19). This is below the shutter release button(1.20) and is a lever with four detent positions:
a. OFF – Camera is switched off
This is the inactive position – the camera isswitched off.
b. S – Single picture
Pressing the shutter release button (see below)takes only one picture, irrespective of how long it iskept pressed.
c. C – Continuous series of pictures
Pressing the shutter release button (see below)takes up to 10 pictures in succession – as long asthe capacity of the memory card being used and
the camera’s internal buffer memory are sufficient(see “Inserting and removing the memory card”, p. 85).
d. – Self timer
Pressing the shutter release button (see below)starts the pre-set delay time (see p. 120), afterwhich a picture is taken.
Switching on
After switching on, i.e. setting the lever to one of thethree functions S, C or , the LED (1.32) lights upbriefly and the displays in the viewfinder (2.1.1) and onthe top panel LCD (1.12) appear (see p. 78).
Note:
Ready status is achieved approx. 2s after switchingthe camera on.
Switching off
Even if the main switch is not set to OFF, the cameraautomatically switches itself off if an automaticpower-off time is set using menu control (Auto PowerOff, 5.1.11, see p. 93/96) and it is not operated duringthis time.
Note:
When transporting the camera, e.g. in a case, and ifthe camera will not be used for a long time, if shouldbe turned off with the main switch.
Selecting picture taking and review modes
After switching on, the LEICA M8 is always in picturetaking mode, i.e. the monitor (1.33) remains dark –after ready status is achieved (see p. 88) .
To review the pictures, you can choose between twomodes: 1. PLAY Review for unlimited time2. Auto Review Brief review after taking the picture
Review for unlimited time - PLAY
By pressing the PLAY button (1.27) you can switch toreview mode.• The last picture taken appears in the monitor along
with the corresponding displays (see p. 79).However, if the memory card inserted does not con-tain any image files, the following message appearswhen you switch to review mode: No valid image toplay.
1.19 1.20

Automatic review of the last picture - Auto ReviewIn Auto Review mode each picture is shown in themonitor immediately after it has been taken. Thisallows you to quickly and easily check whether thepicture was successful or needs to be taken again.The function permits1. selection of the duration for which the picture is
displayed, and2. review of the picture data, with or without his-
togram (see p. 92).
Setting the function
1. In the main menu (see p. 80(93), select AutoReview (5.1.10),
2. in the respective sub-menu fist select the itemTime, and
3. in the sub-menu that appears subsequently, selectthe desired function or duration: (OFF, 1 Second, 3 Seconds, 5 Seconds, Hold).
4. To select whether the review is presented with orwithout histogram (see p. 92), call up the first sub-menu again,
5. select Histogram,6. and select the desired option (Standard, Without).
From Auto Review mode, you can switch to normal,i.e. unlimited, PLAY review mode at any time.
Note:
If you are taking photographs using the series expo-sure function (see p. 90), the last picture in the seriesis shown first in either review mode. Details of how toselect the other pictures in the series and furtheroptions in the review modes are described in the sec-tions under “Review mode” starting on p. 115.
The shutter release button
The shutter release button (1.20) has three pressurepoints:1. Briefly pressing to the first pressure point activates
the exposure metering and viewfinder displays, and starts a pre-set self timer delay time, if this has been programmed (see p. 120). If the shutterrelease button is let go, the metering system andthe displays remain activated for around a further12s (for more details, refer to the sections under“Exposure metering” on p. 105). If the shutterrelease button is kept at this pressure point, thedisplays remain shown, or if the camera had pre-viously been set to review mode (see p. 115), itswitches back into picture taking mode. If thecamera had previously been in stand-by mode (see p. 88), it will be reactivated and the displaysswitched on.
Comprehensive instructions/The most important settings / 89

90 / Comprehensive instructions/The most important settings
Note:
The shutter release is locked– if the internal buffer memory is (temporarily) full,
e.g. after a series of up to 10 pictures,– if the memory card in use is full and the internal
buffer memory is (temporarily) full, or– if no memory card is inserted and the internal buffer
memory is full.
2. Pressing through to the second pressure pointmemorizes the exposure metering value in aperturepriority mode, i.e. the shutter speed determined bythe camera (for more details, refer to the section“Metering memory lock” on p. 106). After the shut-ter release button has been let go a new meteredvalue can be determined.
3. If the shutter release is pushed fully down, a pic-ture is taken. The data are then sent to the memorycard.
Notes:
• Even if review mode (see “Selecting picture takingand review modes”, p. 88) or menu control (see p. 93) had been activated, pressing the shutterrelease button immediately switches the camera topicture taking mode.
• Menu control allows selection or setting of buttonacknowledgement (feedback) tones (see p. 96).
• To avoid camera shake, the shutter release buttonshould be pressed gently – not jerkily, until theshutter releases with a soft click.
The shutter release button has a standard thread for acable release.
Note:
With cable release the second pressure point is notperceptible.
Serial exposures
Thanks to the integrated shutter cocking motor, theLEICA M8 can be used not only for single pictures –main switch 1.20 set to (S [single]), but also for seriesof pictures – main switch set to (C [continuous]) – forexample to capture sequences of movement in severalstages.Apart from the operation of the shutter release button(1.20), series of pictures are taken in the same way assingle pictures: As long as you hold down the shutterrelease button (provided that the memory card hassufficient capacity), a series of pictures is taken. Ifhowever you only press the shutter release buttonbriefly, this will again result in a single picture.
Pictures can be taken at a maximum of about 2 pic-tures a second and up to 10 in succession. Fordetailed information on the total possible numbers ofpictures, refer to the table on p. 97.
Note:
Regardless of how many pictures have been taken in aseries, the PLAY (see p. 88) and Auto Review (5.1.10,see p. 89) functions initially always show the last pic-ture.
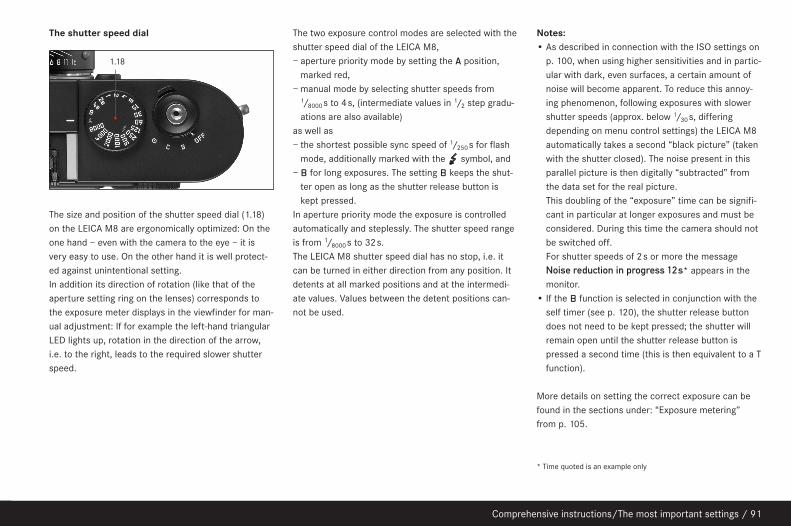
The shutter speed dial
The size and position of the shutter speed dial (1.18)on the LEICA M8 are ergonomically optimized: On theone hand – even with the camera to the eye – it isvery easy to use. On the other hand it is well protect-ed against unintentional setting.In addition its direction of rotation (like that of theaperture setting ring on the lenses) corresponds tothe exposure meter displays in the viewfinder for man-ual adjustment: If for example the left-hand triangularLED lights up, rotation in the direction of the arrow,i.e. to the right, leads to the required slower shutterspeed.
The two exposure control modes are selected with theshutter speed dial of the LEICA M8,– aperture priority mode by setting the A position,
marked red,– manual mode by selecting shutter speeds from
1/8000s to 4s, (intermediate values in 1/2 step gradu-ations are also available)
as well as– the shortest possible sync speed of 1/250s for flash
mode, additionally marked with the symbol, and– B for long exposures. The setting B keeps the shut-
ter open as long as the shutter release button iskept pressed.
In aperture priority mode the exposure is controlledautomatically and steplessly. The shutter speed rangeis from 1/8000s to 32s.The LEICA M8 shutter speed dial has no stop, i.e. itcan be turned in either direction from any position. Itdetents at all marked positions and at the intermedi-ate values. Values between the detent positions can-not be used.
Notes:
• As described in connection with the ISO settings onp. 100, when using higher sensitivities and in partic-ular with dark, even surfaces, a certain amount ofnoise will become apparent. To reduce this annoy-ing phenomenon, following exposures with slowershutter speeds (approx. below 1/30s, differingdepending on menu control settings) the LEICA M8automatically takes a second “black picture” (takenwith the shutter closed). The noise present in thisparallel picture is then digitally “subtracted” fromthe data set for the real picture.This doubling of the “exposure” time can be signifi-cant in particular at longer exposures and must beconsidered. During this time the camera should notbe switched off.For shutter speeds of 2s or more the messageNoise reduction in progress 12s* appears in themonitor.
• If the B function is selected in conjunction with theself timer (see p. 120), the shutter release buttondoes not need to be kept pressed; the shutter willremain open until the shutter release button ispressed a second time (this is then equivalent to a Tfunction).
More details on setting the correct exposure can befound in the sections under: “Exposure metering”from p. 105.
* Time quoted is an example only
Comprehensive instructions/The most important settings / 91
1.18

92 / Comprehensive instructions/The most important settings
The monitor
The LEICA M8 has a large 2.5” liquid crystal colormonitor (1.33). This is for viewing pictures that havebeen recorded on the memory card. It reproduces theentire image plus the selected data and information(see “The displays / In the monitor”, p. 79, and “Dis-playing the picture data”, on this page).
Note:
Most digital system cameras – as distinct from digitalcompact cameras – employ sensors that cannot showa preview picture, since the data can be read only pic-ture by picture and not permanently.Monitor pictures are therefore only available in reviewmode (see p. 115), and must be switched on using the
PLAY button (1.27) or, if the Auto Review function(see p. 89) is activated, are displayed automatically.
To allow undistracted viewing, only the following infor-mation is displayed in the standard setting (i.e. if addi-tional information has not been selected using the
INFO button (see p. 79):1. in the header line, only the picture number (4.1.2),
and2. for deletion-protected pictures (see p. 118) the
respective symbol (4.1.1, ),3. for enlarged and/or displaced images, in addition
at the bottom right a respective symbol (4.1.3, ),that shows – roughly – the position and size of thesection.
Setting the brightness
The brightness of the monitor picture can be adjustedto five different levels using the menu control, so thatyou can select the optimum brightness for any situa-tion, i.e. the ambient lighting conditions.
Setting the functions1. In the main menu (see p. 80/93) select Monitor
brightness (5.1.7), and2. in the sub-menu select the desired one of the five
levels (Low, Medium low, Standard, Medium high,High).
Displaying the picture data
The INFO button (1.23) allows you to select a wholerange of additional picture data (see p. 79) togetherwith a reduced picture size.With menu control (Histogram 5.1.8, see p. 80/93)you can additionally select various histogram options(see next section).
The histogram
The histogram (4.2.2) depicts the brightness distribu-tion in the picture. The horizontal axis shows the tonevalues from black (left) through grey to white (right).The vertical axis depicts the number of pixels of eachbrightness level. This form of presentation – togetherwith the impression of the picture itself – permits anadditional quick and easy assessment of the exposuresetting after taking the picture.The LEICA M8 allows you to choose between four vari-ants of the histogram: Based on either the overallbrightness or separately for the three primary colorsred/green/blue, optionally with or without identifica-tion (red) of the picture areas without definitionbecause they are too bright (clipping).

Note:
The histogram display always refers to the section ofthe picture displayed at that time.
Setting the function
1. In the main menu (see p. 80/93) select Histogram(5.1.8), and
2. in the associated sub-menu select the desired func-tion: (Stand. w/o. Clipping, Stand. w. Clipping, RGB w/o. Clipping, RGB w. Clipping).
Note:
The histogram is not available when simultaneouslyviewing several reduced pictures (see p. 116).
Menu control
Many settings for the LEICA M8 are controlled usingeither of two separate menus (see p. 80). Based onexperience, the menu items are grouped and separatedaccording to which are used most frequently, allowingthem to be called up and set quickly and easily.
Main menu
The main menu comprises 22 items (5.1.1-.22, see p.80) which relate to the camera’s basic settings, savingthe user profiles and secondary functions.
Picture parameters menu
The picture parameters menu comprises 6 items(5.2.1-.6, see p. 80), i.e. the basic settings for picturetaking and the selection of the saved user profiles.
When the camera is switched on, an overview of therespective settings and step-by-step instructions forsetting these functions can be viewed in the monitor(1.33).
Settings are made in the same way in both menus, dif-fering only in how they are accessed and exited.
Setting the menu functions
1. The main menu is called up using the MENU but-ton (1.29); the picture parameters menu using the
SET button (1.22).• On calling up the menu, the first 8 items of the
main menu, and all items of the picture parame-ters menu appear.The function that is currently active is reversedout against a black background with a red bor-der. Along the line to the right, the current set-ting of the functions options is shown.
Comprehensive instructions/The most important settings / 93
A: Predominantly dark pixels,only a few light ones: Underexposure
B: Majority of pixels are ofaverage brightness: Correct exposure
C: Predominantly light pixels,only a few light ones: Overexposure
A B
C

94 / Comprehensive instructions/The most important settings
Notes:
• The picture parameters menu is accessible onlywhen the camera is in picture taking mode (see p. 88).
• If the DELETE or PROTECT functions are acti-vated (see p. 117/118), the main menu cannot beaccessed.
2. You can select the desired menu item either byturning the central setting ring (1.30) or by pressingthe up/down direction buttons (1.31).
3. To set the respective function, first press the SETbutton (in the picture parameters menu, press itagain).• The associated multi-line sub-menu, identified by
a red border, appears to the right of the menuitem. The item selected is highlighted for identifi-cation.
4. You can then select the desired function optioneither by turning the setting ring or by pressing theup/down direction buttons.
5. Save your setting by pressing the SET button onceagain.• The function option thus set is shown on the
right side of the menu line.
6. Exit the main menu by pressing the MENU buttonagain; exit the picture parameters menu bya. pressing the shutter release button (1.20) if you
wish to switch to picture taking mode,or by
b. pressing the PLAY button (1.27) to switch toreview mode.
Notes:
• In the main menu, you can exit a sub-menu at anytime without saving any settings you have made inthem by pressing the MENU button.
• By pressing the shutter release button (1.20) youcan exit either menu at any time and switch directlyto picture taking mode; by pressing the PLAY button(1.27) you can switch to review mode (see also“Selecting picture taking and review modes”, p. 88).
Menu items such as Date (5.1.17) and Time (5.1.18),and the White balance function (5.2.3) require furthersettings. The corresponding explanations, as well asfurther details about the other menu functions, can befound in the relevant sections.

Presets
Basics settings for the camera
Menu language
By factory default, the language used for menu controlis English, i.e. all menu items initially appear with theirEnglish names. German, French, Spanish, Italian,Japanese, and Chinese can all be selected as alterna-tive menu languages.
Setting the function
1. In the main menu (see p. 80/93) select Language(5.1.20), and
2. in the respective sub-menu, select the desired lan-guage.• Apart from a few exceptions (button names,
short designations), all linguistic informationchanges.
Date and time
The date and time are each set using separate menuitems.
Date
There are 3 variations available for the sequence ofthe date.
Setting
1. In the main menu (see p. 80/93) select Date(5.1.17), and
2. call up the sub-menu. It consists of the 2 items,Setting and Sequence.
3. Select Setting.• A further sub-menu appears, containing groups
of figures for the year, month and day, in whichthe currently active group, i.e. the one that canbe set, is identified by a black background andred border.
4. The figures are set using the central setting ring(1.30) or the up and down direction buttons (1.31),while the left and right direction buttons are usedto switch between the groups of figures.
Notes:
• Using the setting ring is normally not only moreconvenient but also significantly faster.
• By pressing the MENU button (1.29) you can returnto the main menu at any time – without saving anychanges you may have selected in the sub-menu.
5. After setting all 3 values, confirm and save bypressing the SET button (1.22).• The list of menu items appears again.
6. To change the way in which the figures are dis-played, select Sequence in the sub-menu.• The three available sequences Day/Month/Year,
Month/Day/Year, and Year/Month/Day appear.7. The preferred option is set and confirmed as
described in points 3 and 4.
Note:
Even when no battery is inserted in the camera or thebattery is flat, the date and time settings are main-tained by a built-in back-up battery for about 3months (see also “Charge level displays”, S. 84). How-ever, after that time the date and time must be setagain as described above.
Comprehensive instructions/Presets / 95
96 / Comprehensive instructions/Presets
Time
The time can either be shown in 24-hour or 12-hourformat.
Setting
Both the two groups of figures and the display formatare set under the Time menu item (5.1.18) using theSetting and View sub-items, essentially as describedfor the Date.
Automatic power off
This function switches the LEICA M8 off automaticallyafter a pre-set time. This switched-off condition isequivalent to setting the main switch to OFF (1.19,see p. 88).You can select, a. whether to activate this function, and if sob. after what period of time the camera should be
switched off.In this way, you can tailor this function to your ownpersonal working methods and also significantlyextend the life of your battery charge.
Setting the function
1. In the main menu (see p. 80/93) select AutoPower Off (5.1.11), and
2. the desired function.
Note:
Even when the camera is in ready status, i.e. thedisplays have gone out after 12s, or the activatedAuto Power Off function has switched it off, it canbe reactivated at any time by pressing the shutterrelease button (1.20).
Button acknowledgement and signal tones
With the LEICA M8, you can decide whether you wantyour settings and other functions and warning mes-sages to be acknowledged by an acoustic signal – twovolumes are available - or whether operation of thecamera should be largely silent.A click or a beep tone is used as an acknowledge-ment, which can be activated individually to confirmpresses of buttons and to indicate a full memory card.
Note:
By factory default, the signal tones are deactivated.
Setting the functions
1. In the main menu (see p. 80/93) select AcousticSignal (5.1.19), and
2. call up the sub-menu (see p. 94). There are threeitems, Volume, Key Click and Attention SD cardfull.
3. Select Volume, and• A further sub-menu appears containing the 3
alternatives Off (no tones at all), High (loud) andLow (quiet).
4. Choose the desired function in this sub-menu.• After confirmation, the initial monitor screen
appears again.5. In the other two sub-menus, choose whether or not
you want to activate the tones for the respectivefunctions.

Basic picture settings
Resolution
The picture data can be recorded at four differentpixel settings, i.e. resolutions. This allows you toadjust the setting precisely to the intended use or tothe available memory card capacity.At the highest resolution (which also means thelargest data volume), which you should select for opti-mum quality for larger prints, of course considerablyfewer pictures can be saved on a card than at the low-est resolution, which is perfectly adequate for sendinga picture by e-mail or for a website.
Note:
Saving in raw data format (DNG, see the next section)is always performed at the highest resolution.
Note:
The details in the table relate to a 1GB memory cardand retention of the same settings. If, on the otherhand, you change the resolution and/or compressionrate, the resulting number of pictures will be different.
Setting the function
1. In the picture parameters menu (see p. 80/93)select Resolution (5.2.5), and
2. in the respective sub-menu, select the desired res-olution.
Compression rate/file format
The picture data is recorded eithera. using one of two different compression rates –
JPG fine/JPG basic,orb. using the DNG file format,orc. using combinations of one of the two compression
rates and DNG, i.e. two files are generated per pic-ture. In these cases the JPG file will always besaved with the respectively selected resolution.
On the one hand this permits a precise match to theintended usage and the available memory card capac-ity, and on the other hand provides security and flexi-bility essential for subsequent decisions on usage.
Setting the function
1. In the picture parameters menu (see p. 80/93)select Compression (5.2.4), and
2. in the respective sub-menu, select the desiredcompression/combination.
Comprehensive instructions/Basic picture settings/ 97
Compression rate/ DNG JPG fine JPG basic DNG+ DNG+file format (low (normal JPG fine1 JPG basic1
compression)1 compression)1
Resolution
(10 MP) 93 276 386 70 75
(6 MP) - 491 687 78 82
(2.5 MP) - >1000 >1000 86 88
(1 MP) - >1000 >1000 90 91
Possible resolutions and resulting numbers of pictures
1 Average values, can differ significantly depending on the subjects.

98 / Comprehensive instructions/Basic picture settings
Notes:
• The standardized DNG (Digital Negative) format isused for uncompressed storage of completelyunprocessed raw picture data.
• If DNG is selected for raw data storage, the resolu-tion is set automatically, and irrespective of theexisting setting (for the respective JPEG format) to
(10 MP) (see previous section).• If simultaneous storage of picture data as DNG and
JPG is selected, the JPEG format for the existingresolution setting is used, i.e. the resolutions of thetwo files can be quite different.
• A high compression rate such as for JPG basic canresult in very fine structures in the subject beinglost or incorrectly reproduced (artifacts; e.g.“stepped” diagonal edges).
• The remaining number of pictures shown in themonitor does not necessarily change after everypicture. This depends on the subject; with JPEG filesvery fine structures result in higher quantities ofdata, homogeneous surfaces in lower quantities.The details in the table are based on an average filesize for the set resolution. The file sizes are oftensmaller, depending on the picture content and thecompression rate, which means that the remainingmemory capacity is then greater than previouslycalculated and displayed.
• For the possible compression rates and the result-ing numbers of pictures, refer to the table in theprevious section.
White balance
In digital photography, white balance ensures neutralrendition of color in any light. It is based on the LEICA M8 being preset to reproduce a particular coloras white.With the LEICA M8, you can choose from nine differ-ent settings:– A For automatic control, which provides neutral
results in most situations,
– Six fixed presets for the most frequent light sources,
– e.g. for indoor pictures with (prevailing)incandescent lamp light,
– e.g. for indoor pictures with (prevailing) lightfrom fluorescent tubes,
– e.g. for outdoor pictures in sunshine,
– e.g. for pictures with (prevailing) electronicflash illumination,
– e.g. for outdoor pictures with cloudy skies,
– e.g. for outdoor pictures with the main sub-ject in shadow,
– For manual setting by measurement, and
– Kelvin setting1 For a directly set value.
Note:
When using an electronic flash unit that satisfies thetechnical requirements of the System Camera Adap-tion (SCA) for the System 3000 and an SCA-3502adaptor (from version 4 onwards), the automatic whitebalance setting (A) will render the correct colors.If however other flash units are used, which are notspecially dedicated to the LEICA M8, the camerawhite balance will not be automatically adjusted, andthe setting should be used.
Setting the function
For automatic or fixed settings
1. In the picture parameters menu (see p. 80/93)select White balance (5.2.3), and
2. in the associated sub-menu select the desired func-tion.
1 All color temperatures are specified in Kelvin.

For direct setting of color temperature
You can directly set values between 2000 and 13100(K1) (from 2000 to 5000K in increments of 100, from5000 to 8000K in increments of 200 and from 8000to 13,100K in increments of 300). This provides youwith a broad scope, covering almost all color tempera-tures that can occur in practice and within which youcan adapt the color reproduction very sensitively tothe existing light color and/or your personal prefer-ences.1. In the picture parameters menu (see p. 80/93)
select White balance (5.2.3) and 2. in the associated sub-menu select the Kelvin
setting option. 3. Use the central setting ring (1.30) or the up/down
direction buttons (1.31) to select the desired value,and
4. confirm your setting by pressing the SET buttononce again.
For manual setting by metering
1. In the picture parameters menu (see p. 80/93)select White balance (5.2.3), and
2. in the respective sub-menu, select the option.3. Press the SET button (1.22).
• The message will
appear in the monitor.4. The actual setting is made by subsequently taking a
picture in which you should aim at a white or neu-tral gray surface in the center of the picture.• Instead of the menu list, the picture just taken
will appear in the monitor, and within it the mes-sage .
However, if the exposure is not assessed as correct orthe surface you aim at is not neutral, this is indicatedby or . In such cases,repeat step 2 with the correct exposure setting orwith a more neutral surface.
A value set in this way remains saved and will be usedfor all subsequent pictures until it is either replacedby a newly metered value or when you use one of theother white balance settings.
WB not setBad exposure
WB is set
at a white surface and release the shutter
Point the cameraAttention
Note:
A white balance setting achieved by metering whichhas already been saved can also be recalled, evenafter the white balance setting had been changed overto one of the other settings. This is done by perform-ing steps 1-3 and (instead of step 4) pressing the SET
button once again.
Comprehensive instructions/Basic picture settings / 99

100 / Comprehensive instructions/Basic picture settings
ISO sensitivity
In traditional photography, the choice of the ISO valuereflects the light sensitivity of the film used. Higherspeed films allow faster shutter speeds and/or small-er apertures and vice versa, at the same brightness.The ISO setting on the LEICA M8 also allows the shut-ter speed/aperture value to be adjusted to meet therequirements of the relevant situation, in five steps.Optimum reproduction quality is achieved by using thelowest setting, ISO 160. The higher sensitivities ISO320, 640, 1250 and 2500 result in increasing “picturenoise”. This effect can be compared to the “graining”that occurs with highly sensitive films.
Setting the function
1. In the picture parameters menu (see p. 80/93)select ISO (5.2.1), and
2. in the associated sub-menu select the desired filmspeed.
Image properties/Contrast, sharpness,
color saturation
One of the many advantages of electronic photogra-phy over traditional photography is that it is very easyto change critical properties of a picture. While photo-graphic software – after recording and transfer to acomputer – provides great scope for doing this, theLEICA M8 itself allows you to influence three of themost important picture properties even before takingthe picture:• The contrast, i.e. the difference between light and
dark sections of the image, determines whether animage has a more “flat” or “brilliant” effect. As aconsequence, the contrast can be influenced byincreasing or reducing this difference, i.e. by lighterreproduction of light sections of the image anddarker reproduction of dark sections.
• Sharp reproduction – at least of the main subject –using the correct distance setting is a prerequisitefor a successfully picture. In turn, the impression ofsharpness of a picture is to a great extent deter-mined by the edge sharpness, i.e. by how small thetransition area between light and dark is at edges inthe picture. The impression of sharpness can thusbe changed by expanding or reducing these areas.
• The color saturation determines whether the colorsin the picture tend to appear as “pale” and pastel-like or “bright” and colorful. While the lighting andweather conditions (hazy/clear) are given as condi-tions for the picture, there is definite scope forinfluencing the reproduction here.
All three picture properties can be adjusted – inde-pendently – to five different levels using the menucontrol, so that you can set the optimum values forany situation and lighting conditions. In the case ofColor Saturation, Black+White can also be selectedas a sixth option.
Note:
If the file format DNG is specified, these settings haveno effect as in this case the image data is alwayssaved in its original form (changes must be made lateron the computer).
Setting the functions
1. In the main menu (see p. 80/93) select Sharpen-ing (5.1.4), or Color Saturation (5.1.5), or Contrast(5.1.6), and
2. in the respective sub-menu select the desired level(Low, Medium Low, Standard, Medium high,High).

Working color space
The requirements in terms of color reproduction differconsiderably for the various possible uses of digitalpicture files. Different color spaces have thereforebeen developed, such as the standard RGB(red/green/blue) that is perfectly adequate for simpleprinting. For more demanding image processing usingappropriate programs, e.g. for color correction,Adobe© RGB has become established as the standardin the relevant sectors. In the professional pre-printingstage, ECI is used extensively.The LEICA M8 permits setting to one of these threecolor spaces: sRGB, Adobe RGB or ECI RGB.
Note:
When using ECI RGB the depiction of the colors in themonitor is paler than when reproduced in reality (i.e.in a print).
Setting the function
In the main menu (see p. 80/93) select Color Man-agement (5.1.14), andin the associated sub-menu select the desired function.
Notes:
• If you want to have your prints produced by majorphotographic laboratories, mini labs or Internet pic-ture services, you should always select the sRGBsetting.
• The Adobe RGB/ECI RGB settings are only recom-mended for professional image processing in com-pletely color-calibrated working environments.
Holding the camera correctly
For sharp, blur-free pictures, the camera should beheld as steadily and comfortably as possible. Toensure suitable secure “three point support” for theLEICA M8, hold the camera with the right hand, withthe index finger on the shutter release button and thethumb behind the rear of the camera body for stabi-lization. The left-hand either supports the lens frombelow, ready for fast focusing adjustments, or isaround the whole camera. Holding the camera againstthe forehead and cheek provides additional support.For portrait format pictures, turn the LEICA M8 to theleft. The hands remain in the same position as for pic-tures in landscape format.However, you can also turn it to the right. In this case,it may be advantageous to release the shutter with thethumb.
Notes:
• As a practical accessory, we recommend the M8Hand Grip which allows you to hold the LEICA M8extremely steadily and to carry it with one hand(order no. 14 471 black, 14 472 silver).
• The LEICA M8 is fitted with an integral sensor whichdetects the position of the camera – horizontal orvertical (both directions) – for each picture. Thisinformation allows the pictures always to be pre-sented upright automatically when subsequentlydisplayed on a computer running the appropriateprograms (not on the camera monitor!).
Comprehensive instructions / 101

102 / Comprehensive instructions/Basic picture settings
The bright-line frame view- and rangefinder
The LEICA M8’s bright-line frame view- and rangefind-er is not only a very high-quality, large, brilliant andbright viewfinder, it is also a highly accurate range-finder coupled to the lens. It has an enlargementfactor of 0.68x.If lenses with nominal focal lengths* of 24, 28 (Elmarit28mm from serial number 2 411 001), 35, 50, 75 and90mm are used, the associated bright-line frames areautomatically mirrored-in in the combinations24+35mm, 28+90mm, 50+75mm.The size of the bright-line frame is matched to the tak-ing format of the LEICA M8 and corresponds to a sen-sor size of around 18x27mm at the shortest settingdistance for each focal length. At longer distances,the camera records more of the subject than can beseen within the bright-line frames.The bright-line frames are linked to the distance set-ting in such a way that parallax – the misalignmentbetween the lens and the viewfinder axes – is auto-matically compensated and the image within bright-line frame and the resulting picture are identical overthe entire distance setting range 0.7m to ∞.
The rectangular distance metering field, which isbrighter than the surrounding image field, is in themiddle of the viewfinder image. All Leica M lensesfrom 16 to 135mm focal length connect with therange finder when used on the LEICA M8.When the exposure meter is turned on, the exposuremeter LEDs and the flash symbol LED appear at thelower edge of the viewfinder image.For more details about setting the distance and expo-sure metering, together with flash mode, refer to therelevant sections on pages 104/105/110.
Note:
When using longer focal lengths than those for whichthere are bright-line frames (90mm, see above), suchas the 135mm models, their image field in the cameraviewfinder – which is very small to start with – canonly be “determined” very imprecisely.
The frame selector
The frame selector (1.8) expands the possibilities ofthe LEICA M8 viewfinder. This built in universal view-finder allows you to call up those bright-line frames atany time, which do not belong to the lens currentlybeing used. You can then see immediately if, forimage composition reasons, it would be better tophotograph the relevant subject using a different focallength.If the lever is swung outwards, that is away from thelens, the frames for 24 and 35mm focal length areshown*.If the lever is moved to its vertical central position, theframes for the focal lengths 50 and 75mm are shown.If the lever is swung inwards, that is towards the lens,the frames for 28 and 90mm focal length are shown*.
* see “The extension factor”, p. 87

Comprehensive instructions / 103
28 mm+ 90 mm50 mm + 75 mm24 mm + 35 mm

104 / Comprehensive instructions
Distance metering/focusing
Due to its large effective metering basis, the range-finder on the LEICA M8 is very precise. The benefits ofthis are particularly noticeable when using wide-anglelenses with their relative steep depth of field.
The rangefinder metering field is visible as a bright,sharply defined rectangle in the center of theviewfinder. If you keep the large viewfinder window(1.6) closed, only the activated bright-line frames andthis metering field remain visible. The focus can be setusing either the superimposed image or split imagemethod:
Superimposed image method (double image)
In a portrait, for example, aim the rangefinder meter-ing field at the eye and turn the distance setting ringon the lens until the contours in the metering field arebrought into line. Then choose your subject trimming.
Split image method
When taking photographs of architecture, for exam-ple, aim the rangefinder metering field at a vertical
edge or another clearly defined vertical line and turnthe distance setting ring on the lens until the contoursof the edge or line can be seen at the limits of themetering field with no misalignment. Then choose yoursubject trimming.In practice, there is often no clear distinction betweenthe two methods. Both can be used very effectively incombination.
Mechanical base width x viewfinder = Effective
(Distance between optical magnification base width
axes of the view- and rangefinder windows)
69.25mm x 0.68 = approx. 47.1mm Double image = out of focus Coincident image = in focus
Interrupted line = out of focus Continuous line = in focus

Exposure metering
On the LEICA M8, exposure metering for the availableambient light is done through the lens with the work-ing aperture and with a strongly concentrated center-weighted characteristic. The light reflected by a brightblade in the first shutter curtain is captured by aphoto diode and measured. This silicon photo diodewith forward-facing convex lens is positioned at thecenter lower edge, on the camera bottom.
The appropriate shutter speed/aperture combinationsfor a correct exposure are displayed by or determinedusing the viewfinder displays. When using aperturepriority mode the aperture is set manually, and theappropriate shutter speed is then set automatically bythe camera. In this mode a digital LED display indi-cates the resulting shutter speed (e.g. 1000)For manual setting of both values, a light balance con-sisting of three red LEDs ( • ) is used to adjust theexposure. When the setting is correct, only the centralcircular LED is lit up.
Turning the exposure meter on/off
The exposure meter is activated by pressing down theshutter release button (1.20) to its first pressurepoint, provided that the camera is switched on withthe main switch (1.19) and the shutter speed dial(1.18) is not set to B.The exposure meter is ready to use when by one ofthe displays in the viewfinder lights up continuously:– For aperture priority mode, the digital LED display of
the shutter speed, – For manual mode, either of the two triangular LEDs,
either individually or in conjunction with the centercircular LED.
If the shutter release button is let go, without activat-ing the shutter, the exposure meter remains turned onfor around 12s more, and the respective LED(s)remain lit for the same time. If the shutter speed dial is set to B, the exposuremeter is disabled.
Notes:
• If the displays go out, the camera is in “standby”mode.
• With very little ambient light, i.e. at the limits of theexposure meter’s range, it can take around 0.2s forthe LEDs to light up.
• If in aperture priority mode, correct exposure can-not be achieved using the available shutter speeds,the shutter speed display gives a warning by flash-ing (for more details, refer to the section under“Aperture priority” on p. 106).
• If, under very low lighting conditions, and in manualmode the exposure meter reading is out of range,the left hand triangular LED gives a warning byflashing. In aperture priority mode the shutterspeed remains displayed. If the required exposureexceeds the longest possible shutter speed of 32s,this display also flashes.
• If the camera is out of use for an extended period oris stored in a case, always switch it off with themain switch. This prevents any power consumption,including that which continues to occur in standbymode after the exposure meter is turned off auto-matically and the display is extinguished. This alsoprevents taking pictures accidentally.
Comprehensive instructions / 105
– 0,5 EV – 1 EV – 2 EV
– 3 EV – 4 EV

106 / Comprehensive instructions
Exposure modes
The LEICA M8 offers the photographer two exposuremodes: Aperture priority and manual setting. Depend-ing on the subject, the situation and individual prefer-ence, these modes allow a choice between a quickerand easier procedure, and the familiar direct selectionof shutter speed and aperture.
Aperture priority
If the shutter speed dial (1.18) is in the A position theelectronics in the camera control the shutter speedautomatically and steplessly in the range 1/8000s to32s, in accordance with the sensitivity setting, themetered brightness and the manually selected aper-ture.The generated shutter speed is displayed digitally inthe camera viewfinder; for better clarity it is displayedin half steps.For shutter speeds longer than 2s the remaining timeis counted down and displayed in seconds after theshutter is released. The actually generated and step-lessly controlled shutter speed can however vary fromthe half step value displayed: If for instance beforereleasing the shutter 16 (as the nearest availablevalue) is shown in the display, but the generated shut-ter speed is in fact longer, as is shown by the count-down after the shutter release starting at 19.
Under extreme lighting conditions the exposure metermay even, based on all the parameters, generate ashutter speed that is outside its working range, i.e.brightnesses that demand an exposure shorter than1/8000s or longer than 32s. In such cases the specifiedminimum or maximum shutter speed is neverthelessused, and these values flash in the viewfinder, as awarning.
Metering memory lock
Important sections of the subject are often to be posi-tioned off center for compositional reasons and theymay also occasionally be brighter or darker than aver-age. However, as described in the section “Exposuremetering” on p. 105; the LEICA M8 metering is strong-ly center-weighted, i.e. concentrated mainly on anarea in the center of the picture and it is calibrated toan average grey scale value.Such subjects and situations can be dealt with easily,even when using aperture priority, by using Meteringmemory lock.
To do this:1. aim the center of the viewfinder image at the
important section of the subject in the first case, orat another detail with average brightness in thesecond,
2. and measure and store it by pressing the shutterrelease button (1.20) to its 2nd pressure point. Foras long as the shutter release button is held downto the pressure point, a red point appears at thetop of the line of figures in the viewfinder as confir-mation, and the shutter speed information does notchange even if the brightness conditions change.
3. Continuing to hold down the shutter release button,move the camera to the final image trimming
4. and then take the picture with the exposure origi-nally calculated.
Changing the aperture setting after completing Meter-ing memory lock does not result in adjustment of theshutter speed, i.e. incorrect exposure would occur.Memory-lock is cancelled when the finger is removedfrom the shutter release button.

Exposure compensation
Exposure meters are calibrated to an average greyscale value (18% reflection), which corresponds to thebrightness of a normal, i.e. average photographic sub-ject. If the actual subject detail does not match thisrequirement, an appropriate exposure compensationcan be performed.Particularly when taking several pictures in succes-sion, e.g. if you want a series of pictures to deliberate-ly have a slightly lower or higher exposure for a partic-ular reason, exposure compensation is a very usefulfunction. Unlike Metering memory lock, once set itremains effective until you (deliberately) reset it (formore details of Metering memory lock, refer to thecorresponding section on p. 106).The LEICA M8 allows exposure compensation in arange of up to ±3EV in 1/3EV steps (EV: ExposureValue).
Setting the function
1. In the picture parameters menu (see p. 80/93)select Exp. comp. (5.2.2), and
2. in the associated sub-menu select the compensa-tion value.
Note:
An exposure compensation value set on the camerainfluences only the metering of the ambient light! Ifwhen using the flash you also wish to make a TTLflash exposure metering compensation – whether inthe same or the contrary sense – you must do thisseparately (on the flash unit itself)! See also the sec-tions on flash mode, from p. 110.
Example of a positive compensation
With very bright subjects, such as snow or a beach,the exposure meter selects a relatively short shutterspeed due to the high level of brightness. As a result,the snow shows up in an average gray and any peoplein the photograph are too dark: Underexposure! Toremedy this problem, the shutter speed needs to belengthened or the aperture stopped up, i.e. a compen-sation setting of e.g. +1.5 EV needs to be made.
Example of a negative compensation
For extremely dark subjects that reflect very littlelight, the exposure meter selects a shutter speed thatis far too long. A black car will appear gray: Overexpo-sure! The shutter speed needs to be shortened or theaperture stopped down, i.e. a compensation setting ofe.g. –1 EV is required.
Manual exposure setting
If the exposure setting is performed entirely manually,the shutter speed dial (1.18) must be clicked to one ofthe marked shutter speeds or to one of the intermedi-ate values.Then: 1. switch the exposure meter on and2. turn the shutter speed dial and/or the aperture
setting ring on the lens – in each case in the direc-tion indicated by the triangular LED that is lit up –until only the circular LED is lit up.
As well as the direction of rotation of the shutterspeed dial and aperture setting ring necessary for cor-rect exposure, the three LEDs in the light balance alsoindicate underexposure, overexposure and correctexposure in the following way:
• underexposure by at least one aperture stop;turning to the right is required
• underexposure by 1/2 an aperture stop; turningto the right is required
• Correct exposure• overexposure by 1/2 an aperture stop; turning to
the left is requiredoverexposure by at least one aperture stop;turning to the left is required
Note:
For exposure times longer than 2s the remaining shut-ter speed is counted down and displayed in secondsafter the shutter is released.
Comprehensive instructions / 107

108 / Comprehensive instructions
The B setting
The B setting keeps the shutter open as long as theshutter release button remains pressed. This allowsexposures of any length.During the course of this, the exposure meter is dis-abled; after the shutter is released however, the digitaldisplay in the viewfinder however gives the cumulativeexposure time in seconds, for guidance.
Notes:
• Long exposure times can lead to very heavy picturenoise.
• To reduce this annoying effect, the LEICA M8 auto-matically takes a second “black picture” (againstthe closed shutter) after any picture with longershutter speeds (from approx. 1/30s, but this canvary as a result of other menu settings. The noisepresent in this parallel picture is then digitally “sub-tracted” from the data set for the real picture.This doubling of the “exposure” time can be signifi-cant in particular at longer exposures and must beconsidered. During this time the camera should notbe switched off.For shutter speeds of 2s or more the messageNoise reduction in progress 12s* appears in themonitor.
* Time quoted is an example only
Exposure meter metering range
At room temperature, normal humidity and ISO160/23°, the metering range corresponds to EV0 to20 or f/1.0 and 1.2s to f/32 and 1/1000s.
Working below the metering range
If under very low lighting conditions and manual modethe exposure meter reading is out of range, the lefthand triangular LED gives a warning by flashing. Inaperture priority mode the shutter speed remains dis-played. If the required shutter speed exceeds thelongest possible shutter speed of 32s, this displayalso flashes.Since exposure metering takes place with the workingaperture, this situation can also be created by stop-ping down the lens.Even if you are below the metering range, the expo-sure meter remains on for around 12s after you letthe shutter release button go. If the lighting condi-tions improve in this time (e.g. through a change inthe subject detail or opening of the aperture), the LEDdisplay changes from flashing into being continuouslylit, indicating that the meter is ready.
Metering diagram
The metering diagram applies to both exposuremodes, aperture priority and manual setting.Information on the metering range of the exposuremeter can be found on the right-hand side of the dia-gram, while information on the working range of thefocal plane shutter and the lenses are on the left.Between them, the exposure values (EV) can be readoff.The metering range of the exposure meter is given onthe right of the diagram in cd/m2 (candela per squaremeter).Above this, the sensitivity settings (SV = Speed Value)are given in ISO values.The left-hand side of the diagram shows the shutterspeeds in seconds (TV = time value). The workingrange of the LEICA M8 focal plane shutter is repre-sented by a shaded area in the adjacent column.When set to B the range has no upper limit.The aperture values (AV) can be read off in the bottomleft.

Example A highlights the relationships between thefilm speed, light intensity (brightness), shutter speedand aperture.From the sensitivity value (ISO 160/23°), first of alltrace the vertical line to its intersection with the hori-zontal line for the given light intensity. In this example,this is 2500cd/m2, which corresponds to the bright-ness in sunshine. The line then runs diagonally as far asthe vertical line for the set aperture and from there hor-izontally to the left until it reaches the necessary shut-ter speed (1/250s). The exposure value (EV 15) can alsobe read off in the diagonal course of the line.Example B shows that in candlelight and with a sensitiv-ity of ISO 640/29° (0.6cd/m2) photographs must betaken with aperture 1.4 and a shutter speed of 1/15s.Aperture 16 on the lens, for example, cannot be usedas the associated shutter speed of 8s is not availableon the shutter speed dial. Because the slowest shutterspeed that can be set on the dial is only 4s, directmetering is no longer possible. Conversion of readingthe correct shutter speed from this diagram is there-fore essential.In aperture priority mode on the other hand, theLEICA M8 automatically controls shutter speeds up to32s, so that in the above example every stop of thelens can be used.
Comprehensive instructions / 109
Metering diagram
0,03
0,063
0,125
0,25
0,5
1
2
4
8
16
32
63
125
250
500
1000
2000
4000
8000
16000
32000
63000
125000
Bv
cd/m2
6/9°
12/
12°
25/
15°
50/
18°
100/
21°
200/
24°
400/
27°
800/
30°
1600
/33
°
3200
/36
°
6400
/39
°
Sv
ISO
60
30
15
8
4
2
1
1/2
1/4
1/8
1/15
1/30
1/60
1/125
1/250
1/500
1/1000
1 1,4 2 2,8 4 5,6 8 11 16 22 32
-5-6
-4
-3
-2
-1
0
1
2
3
4
5
6
7
8
9
10
11
12
13
14
15
16
17
18
19
20
Av Ev
Tv
B
160/
23°
640/
29°
0,6
2500

110 / Comprehensive instructions
General information on flash exposure metering
and control
The LEICA M8 determines the necessary flash powerby firing one or more pre-flashes, fractions of a sec-ond before taking the actual picture. Immediatelyafter this, at the start of exposure, the main flash isfired.All factors that influence the exposure (such as filtersand changes to the aperture setting) are automaticallytaken into account.
Compatible flash units
The following flash units, when used on the LEICA M8,are capable of all the functions described in this man-ual:• The LEICA SF 24D system flash unit (order no.
14 444). With its compact size and design thatmatches the camera, is particularly suitable.Thanks to its permanently attached flash foot withadditional control and signal contacts, which inautomatic mode transfer a range of data and set-tings, it is very easy to use.
• Flash units which satisfy the technical require-ments for System Camera Adaption (SCA) System3000, are fitted with the SCA-3502/35011 adaptor,and which allow guide number control.
Other commercially-available flash units with standardflash foot2, 3 and positive center contact, and whichare fired by the center contact (X-contact, 1.21a), canalso be used. We recommend the use of modernthyristor-controlled electronic flash units.
1 When using adaptor SCA-3502 (from version 4) the white balance(see p. 98) can be set to automatic (A) for correct color reproduc-tion.
2 If flash units not specially dedicated to the LEICA M8 are used,the camera white balance will not be automatically adjusted, andthe setting should be used (see p. 98).
3 The aperture specified on the lens must be manually set on theflash unit.
Flash measurement cells
1.21a

Attaching the flash unit
When attaching a flash unit to the LEICA M8 flashshoe (1.21), you should ensure that the foot of theflash unit is fully inserted and the clamping nut (if fit-ted) is tightened to prevent it accidentally falling out.This is particularly important for flash units with addi-tional control and signal contacts, because if the flashshoe moves from its position in the flash shoe thenecessary contacts can be broken, leading to mal-functions.
Note:
Before attaching the flash, both camera and flash unitmust be turned off.
Flash mode
Fully automatic camera-controlled flash operation isavailable for the LEICA M8 when using system-com-patible flash units as described in the previous sec-tion, and with both exposure modes – aperture priori-ty mode A and manual setting.In addition, an automatic fill-flash control is per-formed with both exposure modes. This means that inorder to ensure a balanced relationship between flashand other lighting at all times, the flash power isreduced by up to 12/3EV as ambient brightnessincreases. If however, the ambient brightness pluseven the shortest possible flash sync speed of 1/250swould cause overexposure, the flash will not be firedin aperture priority mode. In such cases the shutterspeed is governed by the ambient brightness and isshown in the viewfinder.In addition the LEICA M8 permits the use of other,more artistically interesting flash techniques such assynchronization of the flash firing with the secondinstead of with the first shutter curtain and of flasheswith longer shutter speeds than the standard syncspeed of 1/250s. These functions are set using thecamera main menu (for more details, refer to the rele-vant following sections).
In addition the LEICA M8 loads the film speed settingto the flash unit.This allows the flash unit, provided it has receivedsuch information and the aperture manually set onthe lens is also input to the flash unit, automatically toadjust its range values accordingly. The sensitivity set-ting cannot be changed at the flash unit.
Notes:
• The settings and functions described in the follow-ing sections relate exclusively to flash units that aresystem compatible to the LEICA M8.
• An exposure compensation value set on the camera(see p. 107) influences only the metering of theambient light! If when using the flash you also wishto make a TTL flash exposure metering compensa-tion – whether in the same or the contrary sense –you must do this separately (on the flash unit itself)!
• More details of flash use, in particular for otherflash units not specially matched to the LEICA M8and for different flash unit operating modes can befound in the respective instructions.
Comprehensive instructions / 111

112 / Comprehensive instructions/Flash mode
The settings for camera-controlled automatic
flash mode
After the flash unit in use has been switched on andset to the operating mode for GNC (= Guide NumberControl), the following actions on the LEICA M8 arenecessary:1. Before taking each flash picture first perform the
exposure metering by gently pressing the shutterrelease button, so that the display in the viewfindershows the shutter speed or switches over to thelight balance. If this stage is missed out by fullydepressing the shutter release button in one quickmovement, the flash unit will not fire even ifrequired.
2. The shutter speed dial must be set to A, or to flashsync speed (1/250s), or – for special effects to along shutter speed– including B. In aperture prioritymode the camera automatically switches to theflash sync speed, or to the speed range set in themenu (see “Selecting the sync time/the sync timerange”, p. 113).
3. The desired aperture, or the aperture required forthe respective distance to the subject, must be set.
Note:
If the automatically controlled (see “Flash mode”, p. 111)or manually set shutter speed is shorter than 1/250s,the flash will not be triggered.
The flash exposure control displays in the
viewfinder with dedicated flash units
A flash-shaped LED (2.1.3) appears in the LEICA M8viewfinder as confirmation and display of the variousoperating states. This LED appears together with thedisplays for exposure metering for the ambient lightlevel, described in the respective sections.
In automatic flash mode
(flash unit set to Guide Number Control)
• If despite the flash unit being switched on andready for use, does not appear:
Manually set the camera to an shutter speed shorterthan 1/250s. In such cases the LEICA M8 will not firethe flash unit even though it is switched on and readyfor use.• flashes slowly (at 2Hz) before the picture is
taken:The flash unit is not yet ready for use
• is lit up before the picture is taken:The flash unit is ready for use
• remains continuously lit after taking the picture,and the other displays go out:
The flash exposure was successful, the flash unitremains ready for use.
• flashes rapidly after taking the picture (at 4 Hz),and the other displays go out:
The flash exposure was successful, but the flash unitis not yet ready for further use.
• goes out after taking the picture, together withthe other displays:
Underexposure, perhaps due to the choice of toosmall an aperture stop for the subject. If the flashunit is set to a partial discharge power, because ofthe lower power requirement it may be ready for usedespite the flash LED not lighting up.
When the flash unit is set to camera control (A)
or manual mode (M)
• does not appear despite the flash unit beingswitched on and ready for use:
Manually set the camera to a shutter speed shorterthan 1/250s. In such cases the LEICA M8 will not firethe flash unit even though it is switched on andready for use.
• flashes slowly (at 2Hz) before the picture istaken:
The flash unit is not yet ready for use.• is lit up before the picture is taken:The flash unit is ready for use.

Selecting the sync speed/the sync speed range
While the shutter speed used has no influence on thecontrol of the flash exposure (because the flash dura-tion is very much less than this), the reproduction ofthe available light is very strongly influenced by shut-ter speed and aperture setting. A fixed setting of theshortest possible shutter speed for flash operation,the sync speed, in many situations unnecessarilyleads to a greater or lesser underexposure of all partsof the subject not directly lit by the flash.The LEICA M8 allows you to combine flash operationwith the shutter speed generated in aperture prioritymode to subtly change the lighting conditions for therespective subject to suit your ideas on picture com-position. You can choose between five options forthis:1. Lens Dependant
Automatic control of shutter speed depending onthe focal length of the lens used (based on the ruleof thumb for shake-free pictures with a hand-heldcamera = 1/focal length, e.g. 1/60s using the Summicron-M 50mm f/2 ) up to sync speed1/250s.*
* Only when using Leica M lenses with 6-bit coding in the bayonetand lens identification enabled in the menu (see p. 80/86)
2. Off (1/250 )Fixed setting to the shortest possible shutter speedof 1/250s, e.g. for the sharpest possible recording ofmoving subjects and fill-flash.
3. down to 1/30 , 4. down to 1/8, and 5. down to 32secAutomatic control of all shutter speeds from thespecified value down to the sync speed of 1/250s.
Note:
Manual exposure control also allows any shutterspeed can be set down to the sync time of 1/250s.
Setting the function
1. In the main menu (see p. 80/93) select Auto SlowSync (5.1.13) and
2. in the respective sub-menu, select the desiredvariant.
Selecting the firing moment
Flash photographs are illuminated by two lightsources, the available light and the light from theflash. The parts of the subject exclusively or primarilyilluminated by the flash are almost always reproducedextremely sharply (with correct focusing) due to theextremely fast pulse of light. By contrast, all otherparts of the subject – those that are sufficiently illumi-nated by the available light or illuminate themselves –are portrayed with different degrees of sharpness inthe same picture.Whether these parts of the subject are reproducedsharply or “blurred”, and the degree of “blurring”, isdetermined by two independent factors:1. The length of the shutter speed, i.e. for how long
these parts of the subject “act upon” the sensor2. How quickly these parts of the subject – or the
camera itself – are moving during exposure.The longer the shutter speed or the faster this move-ment, the greater the extent to which the two – super-imposed – parts of the picture can differ.
Comprehensive instructions/Flash mode / 113

114 / Comprehensive instructions/Additional functions
With the flash fired at the normal moment, at thebeginning of the exposure, i.e. immediately after the1st shutter curtain has opened the frame completely,this can even lead to apparent contradictions, such asin the picture of the motorcycle (left), which is beingovertaken by its own light tracers.The LEICA M8 gives you a choice between this normalflash firing moment and synchronization with the endof the exposure, i.e. immediately before the 2nd shut-ter curtain begins to close the frame again. In thiscase, the sharp image is located at the end of themovement. In the photograph (right), this flash tech-nique gives a natural impression of movement anddynamics.
This function is available at all camera and flash unitsettings, and in aperture priority mode as well as inmanual shutter speed selection, in the various auto-matic flash modes as well as in manual flash mode;this displays are the same in all cases.
Setting the function
1. In the main menu (see p. 80/93) select Flash Sync(5.1.12) and
2. in the respective sub-menu, select the desiredvariant: 1st Curtain or 2nd Curtain.
Additional functions
User/application specific profiles
On the LEICA M8, any combination of all main and pic-ture parameters menu settings can be permanentlystored, e.g. so that they can be retrieved quickly andeasily for recurring situations / subjects. A total ofthree memory slots are available for these combina-tions - 1 / 2 / 3
Applying settings/Creating a profile
1. Set the desired functions in the main and pictureparameters menus.
2. In the main menu (see p. 80/93) select Save UserProfile (5.1.2), and
3. in the associated sub-menu select the desiredmemory slot.
Selecting a saved profile
1. In the picture parameters menu (see p. 80/93)select User Profile (5.2.6), and
2. in the associated sub-menu select the desired pro-file.

Notes:
In addition to the three memory slots, there is anothersetting – 0, with which you can recall the factorydefault settings at any time. User Profile 0 is there-fore similar to the Reset function (see next section),except that not every setting is reset, particularly notthose set in the three other profiles.If you change one of the settings within a profile, therespective number disappears.
Resetting all custom settings
This function allows you in one operation to delete allprevious user settings in the main and picture param-eters menus and reset them to the factory default set-tings.
Setting the function
1. In the main menu (see p. 80/93) select Reset(5.1.15), and
2. use the SET button (1.22) to call up the associatedsub-menu.
3. Then use the left/right direction button (1.31) toselect the desired function, and
4. confirm your selection by pressing the SET buttononce again.
Note:
Such resetting also deletes any individual profiles thatmay have been specified and saved using Save UserProfile (5.1.2, see p. 114).
Review mode
As described in the sections “Selecting picture andreview modes” (p. 88) and “Automatic review of lastpicture” (p. 89), you can view the pictures you havetaken in the monitor (1.33) on the LEICA M8. This caneither be automatic for a short time immediately aftertaking the picture in Auto Review mode or at anytime, and for an unlimited time, in PLAY mode. Inboth cases, several additional options are availablewhile viewing the pictures.
Notes:
• If no pictures are stored on the card, on pressingthe PLAY button the following message appears onthe monitor:
• Depending on the function previously set, pressingthe PLAY button generates different responses:
No valid image to play
• The LEICA M8 stores pictures in line with the DCFstandards (Design Rule for Camera File System).
• The LEICA M8 can review only pictures taken withcameras of this type.
Additional options when viewing
A. Viewing other pictures/“Scrolling” in the
memory
You can open other saved pictures using the left andright direction buttons (1.31). Pressing the left buttontakes you to the pictures with lower numbers, press-ing the right button takes you to those with highernumbers. Holding the button down (approx. 2s)results in fast scrolling. After the highest and lowestnumbers, the series of pictures begins again in anendless loop, which means you can reach all picturesin either direction.• The picture and file numbers in the monitor change
accordingly.
Comprehensive instructions / 115
Initial situation After pressing the PLAYbutton
a. Full review display of Picture mode, monitor offa picture
b. Review of an enlarged Full review display of the section/several reduced picturepictures (see below)
c. INFO display with any INFO display with full enlargement (see p. 93) review display
d. One of the menu controls Full review display of the (see p. 93), or DELETE last displayed pictureor PROTECT function (seep.117/118) is activated

116 / Comprehensive instructions
B. Enlarging/selecting the section/simultaneous
viewing of several reduced pictures
With the LEICA M8 it is possible to open an enlargedsection of an individual picture in the monitor to studyit more closely, with a free choice of section. Con-versely, you can also view up to 9 pictures simultane-ously in the monitor, e.g. to gain an overview or to findthe picture you are looking for more quickly.
Notes:
• The more the picture is enlarged, the more thereproduction quality in the monitor deteriorates –due to the proportionately lower resolution.
• While an enlarged picture is displayed, the directionbuttons are no longer available to open other pic-tures, instead they are used to “navigate” within thepicture. (Exception: see next note).
Turning the central setting ring (1.30) to the right(clockwise) enlarges the central section. The moreyou turn the ring, the greater the enlargement and thesmaller the section area. Enlargement is possible upto 1:1, i.e. until 1 pixel of the monitor displays 1 pixelof the picture.• The rectangle within the frame (4.1.3/4.2.6k) in the
lower right-hand corner of the monitor symbolizesthe current enlargement.
The four direction buttons (1.31) can be used to selectany position for the section to be enlarged. To do this,press the button (several times) for the direction inwhich you want to shift the section.• In addition to the enlargement, the rectangle within
the frame (4.1.3/4.2.6k) in the lower right-hand cor-ner of the monitor symbolizes the position of thesection displayed.
Note:
You can also switch from an enlarged picture directlyto another picture, which will then be shown at thesame enlargement. To do this press the left or rightdirection button again – keeping the PLAY buttonpressed (1.27)
By turning the setting ring to the left (anticlockwise,starting from normal size), you can simultaneouslyview 4 – or by turning the ring further, 9 – pictures inthe monitor.• Up to 9 reduced images are shown in the monitor
(1.33) including the picture previously being viewedat normal size, which is marked with a red border.
You can use the four direction buttons to navigatefreely among the reduced images, and the relevantimage is marked accordingly. You can then view thisimage at normal size by turning the setting ring to theright.
Note:
When showing 9 pictures, turning the setting dial fur-ther to the right places the red frame around theentire group of pictures, which then allows you to“scroll” more quickly, a block at a time.

C. Deleting pictures
While a picture is displayed in the monitor, you havean opportunity to delete it if you wish to do so. Thiscan be useful, for example if the pictures have already
been saved to other media, if you no longer requirethem or if you need to free up more space on thememory card.The LEICA M8 also offers you the option of deletingsingle pictures, or all pictures at the same time, asrequired.
Notes:
• Deletion can be performed only in review mode,albeit irrespective of whether a picture is shown innormal size or several reduced pictures are shown(not however if the 9-image review is shown with ared frame round the entire block, see p. 116).
For protected pictures, the protection must first becancelled before they can be deleted (see also nextsection).
Important:
Deletion of a pictures is permanent. Pictures cannotsubsequently be recovered.
Procedure
Press the DELETE button (1.25).• The corresponding sub-menu appears in the
monitor display (1.33).
Notes:
• The delete process can be cancelled at any time bypressing the DELETE button again.
• The following controls and their functions are notavailable during the entire delete process: the
MENU (1.29), PROTECT (1.24) and INFO (1.23)buttons.
The first step is to decide• whether you want to protect individual
pictures ,or• all pictures simultaneously .AllDelete
SingleDelete
Subsequent operations are controlled by the menu,i.e. in principle in exactly the same way as describedin the “Menu control” section (on p. 93). After specify-ing the relevant menu display, this is done using theshutter speed dial (1.18), direction buttons (1.31) andthe SET button (1.22).
Note:
If the picture shown is protected (see p. 119), thefunction option cannot be selected in thesub-menu.
When deleting all pictures, to prevent accidental dele-tion there is an intermediate step in which you mustreconfirm that you definitely want to delete all pic-tures on the memory card.
Single
Comprehensive instructions / 117

118 / Comprehensive instructions
Displays after deleting
Deleting individual pictures
After deleting, the preceding picture appears.If there are no more pictures saved on the card, thefollowing message appears: .
Deleting all pictures on the memory card
After deleting, the following message appears:.
However, if one or more pictures were protected, thatpicture or the first of those pictures then appears.
Note:
When a picture is deleted, the subsequent pictures inthe picture counter (4.1.2/4.2.5) are re-numbered asfollows: For example, if you delete picture no. 3, whatwas previously picture no. 4 then becomes no. 3, theprevious no. 5 becomes no. 4 etc. However, this doesnot apply to the file numbering on the memory card(in the INFO display, see p. 79) for the remainingimage files in the folder (4.2.6j), which remainsunchanged.
No valid image to play
No valid image to play
D. Protecting pictures/Clearing delete protection
The pictures stored on the memory card can be pro-tected against accidental deletion. This protection canthen be cleared at any time.
Notes:
• Applying or removing picture protection can be per-formed only in review mode, irrespective of whethera picture is shown in normal size or as one of sever-al reduced pictures (not however if the 9-imagereview is shown with a red frame around the entireblock, see p. 116).
• For details of the different procedures/responseswhen you attempt to delete protected pictures,refer to the previous section.
• If you decide you want to delete them, clear the pro-tection as described below.
• Protection is only effective for the LEICA M8.• Even protected pictures are deleted if the memory
card is reformatted (see next section for details).• On SD memory cards, you can prevent accidental
deletion by sliding the write protection switch onthe card (see p. 85) to the position marked LOCK.
Procedure
Press the PROTECT button (1.24).• The corresponding sub-menu appears in the moni-
tor display (1.33).
Notes:
The setting process can be cancelled at any time bypressing the PROTECT button again.The following controls and their functions are notavailable during the entire setting process: the MENU
(1.29), DELETE (1.25) and INFO (1.23) buttons
Subsequent operations are controlled by the menu,i.e. in principle in exactly the same way as describedin the “Menu control” section (on p. 93). After specify-ing the relevant menu display, this is done in severalsteps using the direction buttons (1.31) and the SET
button (1.22).

The first step is to decide• whether you want to protect individual
pictures ,or• all pictures
simultaneously ,or• whether you want to clear the existing protection
for individual pictures ,or • for all pictures .
Note:
The following functions cannot be performed and themenu text appears in white instead of black to indi-cate this:– Protecting a picture that is already protected, or if
all pictures are already protected.– Unprotecting a picture that is already unprotected,
or if no pictures are already protected.
AllUnprotect
SingleUnprotect
AllProtect
SingleProtect
Displays after protection/clearing protection
After leaving menu control, the original monitor dis-play appears again, with the corresponding symbol
for protected pictures (4.1.1/4.2.3).
Note:
The symbol also appears if a picture that isalready protected is opened.
Comprehensive instructions / 119

120 / Comprehensive instructions
Additional functions
Changing the picture numbering
The LEICA M8 assigns sequential numbers to the pic-tures, in the default factory setting regardless ofwhether the memory card is changed. However, youcan at any time specify thata. the numbering sequence begins anew every time
the memory card is changed, or b. the numbering sequence starts immediately, e.g. to
assign the picture numbers to different events,subjects etc.
Setting the function
1. In the main menu (see p. 80/93) select PictureNumbering (5.1.9),
2. and in the associated sub-menu select the desiredfunction.
Depending on the selected function, the file number-ing starts again from 1 either after the next change ofmemory card - Standard - or from the next picture -Set back now.
Notes:
The change of numbering relates exclusively to the filenames, e.g. L100 0001, which are only shown in the
INFO display (see p. 79).After the memory card has been formatted, the sub-menu can be used to setback the folder number also
Set back folder No. now
Formatting the memory card
It is normally not necessary to format (initialize) amemory card that has already been used. If however acard that has yet to be formatted is inserted for thefirst time, it must be formatted. In such cases theFormat sub-menu appears automatically.Nevertheless, it is recommended that the memorycard be reformatted occasionally, as a certain amountof residual data (info accompanying pictures) can takeup memory capacity.
Important:
When formatting, all information present on the card,including picture files and all other data, e.g. musicfiles, is irretrievably lost. You should therefore make ahabit of transferring all your pictures onto a securebulk storage medium, e.g. the hard drive on your com-puter, as soon as possible.
Notes:
• Do not turn the LEICA M8 off while the memorycard is being formatted.
• If the memory card has been formatted in anotherdevice, such as a computer, you should reformat itin the LEICA M8.
• If the memory card cannot be formatted, you shouldask your dealer or Leica Information Service(address, see p. 137) for advice.
• Even protected pictures (see previous section) aredeleted when formatting the memory card.
Procedure
1. In the main menu (see p. 80/93) select Format(5.1.21).
2. Use the SET button (1.22) to call up the associatedsub-menu.
3. To guard against unintentional settings, you thenhave to confirm in the corresponding sub-menuusing the right direction button (1.31) that you de-finitely want to format the memory card.
Taking photographs with the self timer
You can use the self timer to take a picture with adelay of either 2 or 12s. This can be particularly use-ful, for example in the first case if you want to avoidthe picture being out of focus due to camera shakewhen releasing the shutter or, in the second case, forgroup photographs where you want to appear in thepicture yourself. In such cases we recommend thatthe camera is placed on a tripod.
Setting and using the function
1. Set the main switch (1.19) auf .2. In the main menu (see p. 80/93) select Self timer
(5.1.3) and set the desired delay time in the associ-ated sub-menu.

3. To start the delay time press the shutter releasebutton (1.20) to the first pressure point, see p. 89).• The LED (1.7) on the front of the camera flashes
for the first 10s of a 12s delay time, then it stayslit continuously, to show the progress of thedelay time. The countdown is shown on themonitor at the same time.
While the self timer delay time is running, it can beaborted at any time by pressing the SET button (1.22)– the relevant setting is retained and the function canbe restarted by touching the shutter release buttonagain.
Important:
In self timer mode, the exposure is not set whendepressing the shutter release to the pressure point,but immediately before the picture is taken.
Transferring data to a computer
The LEICA M8 is compatible with the following operat-ing systems:Microsoft® : Windows® XP Apple® Macintosh® : Mac® OS XThe LEICA M8 is equipped with a USB 2.0 interfacefor transferring data to a computer. This allows fastdata transfer to computers with the same kind ofinterface. The computer used must have either a USBport (for direct connection to the LEICA M 8) or a cardreader for SD cards.
Note:
When using a USB connection, note the following:Connecting two or more devices to a computer orconnecting using a hub or extension cables can resultin malfunctions.
Connecting and transferring the data
with Windows® XP
1. Use the supplied USB cable (C) to connect the USBsocket (1.34) on the LEICA M8 to the USB socketon the computer. First the flap (1.26) over the USBsocket on the camera must be pulled downwards toopen it.• A message appears on the Desktop informing
you that the LEICA M8 has been detected as newhardware (only the first time this connection ismade).
2. Double click on this message (first time only).a. A drop-down menu headed “M8 Digital Camera”
will appear for the data transfer wizard.3. Click on “OK” and follow the further instructions by
the wizard to copy pictures in the usual way to afolder of your choice for future access.
Comprehensive instructions / 121

122 / Comprehensive instructions
Connecting and transferring the data
with Mac® OS X
1. Use the supplied USB cable (C) to connect the USBsocket (1.34) on the LEICA M8 to the USB socketon the computer. First the flap (1.26) over the USBsocket on the camera must be pulled downwards toopen it.
2. Use the program “Digital Pictures” to transfer pic-tures from the card to the computer
Important:
• Only use the USB cable (C) supplied.• While data is being transferred from the LEICA M8
to the computer, the connection may not under anycircumstances be broken by removing the USBcable, as otherwise the computer and/or the LEICAM8 may crash, and the memory card may even beirreparably damaged.
• The LEICA M8 cannot be turned off or automaticallyswitch itself off due to a lack of battery power whiledata is being transferred from the camera to thecomputer, as this may cause the computer to crash.For the same reason the battery must never beremoved from the camera whilst the connection isactive. If the battery capacity runs short during datatransfer, the corresponding symbol flashes ( , s. S. 85). In this case, stop the data transfer, switchoff the LEICA M8 (see p. 89) and charge the battery(see p. 83).
Connecting and transferring the data
with card reading units
The picture files can also be transferred to other com-puters using a standard card reader for SD memorycards. Card readers with a USB interface are availablefor computers with a USB interface. If your computeris equipped with a PCMCIA slot (common on portablemodels), plug-in cards with a PCMCIA connection areavailable as an alternative. These devices, and furtherinformation about them, is available from a computeraccessory dealer.
Note:
The LEICA M8 is fitted with an integral sensor whichdetects the position of the camera – horizontal or ver-tical (both directions) – for each picture. This informa-tion allows the pictures automatically always to bepresented upright when subsequently displayed on acomputer running the appropriate programs (not inthe camera monitor!).

Data structure on the memory card
When the data stored on a card is transferred to acomputer, the following folder structure is used:
Up to 9999 pictures can be stored in each of the fold-ers 100LEICA, 101LEICA etc.
Installation of supplied software
Two CD-ROMs are supplied with the LEICA M8. Thesecontain the programs LEICA DIGITAL CAPTURE 1.0 (E)to operate your LEICA M8 from a computer, and Cap-ture One LE from Phase One (F) to professionally con-vert, edit, print, and archive the pictures you take withyour LEICA M8. To start installation, double clickeither on the installation application listed asSetup.exe (“Execute”), or wait for the installation dia-logue to start automatically. If you encounter prob-lems when installing the software, please refer to theHelp file for the software. In many versions of Win-dows the operating system may give a warning that aWindows signature is not available. Please ignore thismessage and continue with the installation.
Sytem requirements
Microsoft® Windows® XP Professional or Home Editionwith Service Pack 1; Mac OS X 10.3
Note:
The serial numbers are printed on the paper sleevesof the CDs.
Working with DNG raw data
If you have selected the standardized and future-proofDNG (Digital Negative) format, you need highly spe-cialized software to convert the saved raw data at thehighest quality, for example using the professional rawdata converter supplied, Capture One LE from PhaseOne (F).Capture One LE offers quality-optimized algorithmsfor digital color editing, enabling both very low noiseand astounding picture resolution.During editing you can make later changes to parame-ters such as white balance, noise reduction, grada-tion, sharpness etc., so as to achieve the highest pic-ture quality.
Computer remote control of the camera
LEICA DIGITAL CAPTURE 1.0 software is supplied onthe CD-ROM E. This enables you to use a computer to1. release the LEICA M8 shutter,2. set functions in the picture parameters menu (see
p. 81/94), and3. save picture data directly on to the computer.
Using LEICA DIGITAL CAPTURE 1.0
1. Connect the LEICA M8 to the computer using theUSB cable supplied (C),
2. switch the camera on (see p. 89), and3. call up the program.
• The respective window will open on your Desk-top.The various functions are listed in a clear andself-explanatory way; the menu items can be setjust as on the camera itself.
Comprehensive instructions / 123

124 / Miscellaneous/System accessories
Miscellaneous
System accessories for the LEICA M8
Exchangable lenses
The Leica M system provides a basis for optimumadaptation to fast and unobtrusive photography. Therange of lenses includes focal lengths from 16 to135mm - for the LEICA M8 this corresponds to effec-tive focal lengths from 21 to 180mm (bright-lineframes for focal lengths ≥ 90mm (effective) areunavailable, see also p. 102) - and speeds up to 1:1.
Filters
UVa filters and circular polarization filters are avail-able for current LEICA M lenses fitted with standardfilter threads.
Universal Wideangle Viewfinder M
The LEICA universal wide-angle viewfinder M is a thor-oughly practical accessory. It can be used withoutrestriction on all analog and digital Leica M modelsand – just like the viewfinder in the camera – showsthe picture area for the wide-angle focal lengths 16,18, 21, 24 and 28mm with mirrored-in bright-lineframes.The viewfinder is equipped with parallax compensa-tion and a vial (spirit level) for exact leveling of thecamera.
Viewfinder Magnifier M 1.25x
The LEICA 1.25x viewfinder magnifier significantlysimplifies picture composition when using focallengths above 35mm. If can be used on all Leica Mmodels and magnifies the central area of the viewfind-er image by a quarter. The 0.68x viewfinder on theLEICA M8 thus becomes a viewfinder with 0.85x.A security chain with snap fasteners prevents loss andcan be used to hang the viewfinder on the carryingstrap’s fastening ring.The viewfinder magnifier is supplied in a leather bag.A loop on the bag allows the viewfinder magnifier tobe stored on the camera’s carrying strap, where it isprotected and ready for use (order no. 12 004).
M8 Hand Grip
As a practical accessory, we recommend the M8 han-dle, which allows you to hold the LEICA M8 extremelysteadily and to carry it with one hand. It is fitted inplace of the standard bottom cover. (order no. 14 471black, 14 472 silver).
Correction lenses
For optimum adaptation of the eye to the camera’sviewfinder, we offer corrective lenses with the follow-ing positive or negative diopter values (spherical):0.5/1/1.5/2/3.
Cases
For the LEICA M8 two neoprene ever-ready cases withdifferent front sections for differently long lenses areavailable, as well as a classical leather ever-readycase with unbuttoning front section, and a Protectorresembling the bottom part of a conventional ever-ready case. As such, this Protector ensures that thecamera body is protected even when photographing.For more extensive camera configurations, the classiccombination case for a camera and up to three lensesor the classic universal case for a camera and up tofive lenses are also available.
Spare parts Order no.
Camera bayonet cover 14 195Carrying strap 14 312Lithium ion battery 14 464Charger, complete (with 3 interchangeable plugs, car charging lead) 14 463USB cable (2m, 4 to 6 pin) 420-200.023-000

Precautions and care instructions
General precautions
Do not use the LEICA M8 in the immediate vicinity ofdevices with powerful magnetic, electrostatic or elec-tromagnetic fields (e.g. induction ovens, microwaveovens, television sets or computer monitors, videogame consoles, cell phones, radio equipment).• If you place the LEICA M8 on or very close to a tele-
vision set, its magnetic field could interfere withpicture recordings.
• The same applies for use in the vicinity of cellphones.
• Strong magnetic fields, e.g. from speakers or largeelectric motors, can damage the stored data or thepictures.
• If due to the effects of electromagnetic fields theLEICA M8 malfunctions, remove the battery andthen switch the camera on again.
Do not use the LEICA M8 in the immediate vicinity ofradio transmitters or high-voltage power lines.• Their magnetic fields can also interfere with picture
recordings.
Protect the LEICA M8 from contact with insect spraysand other aggressive chemicals. Petroleum spirit, thin-ner and alcohol may not be used for cleaning.Certain chemicals and liquids can damage the LEICA M8 body or the surface finish.• As rubber and plastics sometimes emit aggressive
chemicals, they should not remain in contact withthe LEICA M8 extended periods.
Ensure that sand and dust cannot get into the LEICAM8, e.g. on the beach.• Sand and dust can damage the camera and the
memory card. Take particular care when changinglenses and when inserting and removing the card.
Ensure that water cannot get into the LEICA M8, e.g.when it is snowing or raining and on the beach.Moisture can cause malfunctions and even permanentdamage to the LEICA M8 and the memory card.If salt water spray gets onto the LEICA M8, wet a softcloth with tap water, wring it out thoroughly and wipethe camera with it. Then wipe thoroughly with a drycloth.
LCDs
• If the LEICA M8 is exposed to significant tempera-ture fluctuations, condensation can form on themonitor. Wipe it carefully with a soft dry cloth.
• If the LEICA M8 is very cold when it is switched on,the LCDs may at first appear darker than usual. Assoon as the camera warms up, the LCDs will regaintheir normal brightness.
The monitor is manufactured using a high-precisionprocess. This ensures that, of the total of around230,000 pixels, more than 99.995% work correctlyand only 0.005% remain dark or are always light. How-ever, this is not a malfunction and it does not impairthe reproduction of the picture.
Sensor
• Cosmic radiation (e.g. on flights) can cause pixeldefects.
Condensation
If condensation has formed on or in the LEICA M8,you should turn it off and leave it to stand at roomtemperature for around an hour. Once the cameratemperature has adjusted to room temperature, thecondensation will disappear by itself.
Miscellaneous/Precautions and care instructions / 125
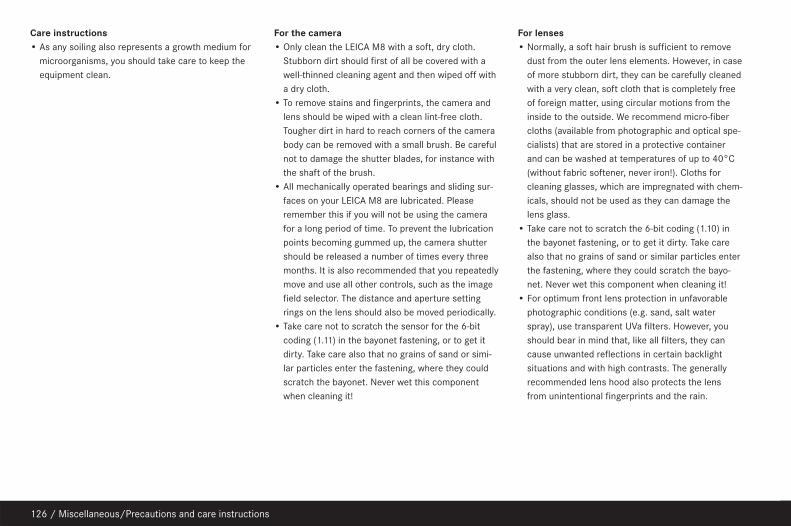
126 / Miscellaneous/Precautions and care instructions
Care instructions
• As any soiling also represents a growth medium formicroorganisms, you should take care to keep theequipment clean.
For the camera
• Only clean the LEICA M8 with a soft, dry cloth.Stubborn dirt should first of all be covered with awell-thinned cleaning agent and then wiped off witha dry cloth.
• To remove stains and fingerprints, the camera andlens should be wiped with a clean lint-free cloth.Tougher dirt in hard to reach corners of the camerabody can be removed with a small brush. Be carefulnot to damage the shutter blades, for instance withthe shaft of the brush.
• All mechanically operated bearings and sliding sur-faces on your LEICA M8 are lubricated. Pleaseremember this if you will not be using the camerafor a long period of time. To prevent the lubricationpoints becoming gummed up, the camera shuttershould be released a number of times every threemonths. It is also recommended that you repeatedlymove and use all other controls, such as the imagefield selector. The distance and aperture settingrings on the lens should also be moved periodically.
• Take care not to scratch the sensor for the 6-bitcoding (1.11) in the bayonet fastening, or to get itdirty. Take care also that no grains of sand or simi-lar particles enter the fastening, where they couldscratch the bayonet. Never wet this componentwhen cleaning it!
For lenses
• Normally, a soft hair brush is sufficient to removedust from the outer lens elements. However, in caseof more stubborn dirt, they can be carefully cleanedwith a very clean, soft cloth that is completely freeof foreign matter, using circular motions from theinside to the outside. We recommend micro-fibercloths (available from photographic and optical spe-cialists) that are stored in a protective containerand can be washed at temperatures of up to 40°C(without fabric softener, never iron!). Cloths forcleaning glasses, which are impregnated with chem-icals, should not be used as they can damage thelens glass.
• Take care not to scratch the 6-bit coding (1.10) inthe bayonet fastening, or to get it dirty. Take carealso that no grains of sand or similar particles enterthe fastening, where they could scratch the bayo-net. Never wet this component when cleaning it!
• For optimum front lens protection in unfavorablephotographic conditions (e.g. sand, salt waterspray), use transparent UVa filters. However, youshould bear in mind that, like all filters, they cancause unwanted reflections in certain backlightsituations and with high contrasts. The generallyrecommended lens hood also protects the lensfrom unintentional fingerprints and the rain.

For the battery
Rechargeable lithium ion batteries generate powerthrough internal chemical reactions. These reactionsare also influenced by the external temperature andhumidity. Very high or low temperatures reduce thelife of the battery.• Always remove the battery if you will not be using
the LEICA M8 for a long period of time. Otherwise,after several weeks the battery could become total-ly discharged, i.e. the voltage is significantlyreduced, as the LEICA M8 uses a low no-load cur-rent (to save the date) even when it is turned off.
• Lithium ion batteries should be stored only in thepartially charged condition, i.e. neither totally dis-charged nor fully charged (the top panel LCD [1.12]shows a value in the range to ). Forvery long storage periods, it should be charged forabout 15 minutes twice a year to prevent completedischarging.
• Always ensure that the battery contacts are cleanand freely accessible. While lithium ion batteries areproof against short circuits, they should still be pro-tected against contact with metal objects such aspaper clips or jewelry. A short-circuited battery canget very hot and cause severe burns.
• If a battery is dropped, check the casing and thecontacts immediately for any damage. Using a dam-aged battery can damage the LEICA M8.
• Batteries have only a limited service life.• Take damaged batteries to a collection point to
ensure correct recycling.• Never throw batteries into a fire as this can cause
them to explode.
For the charger
• If the charger is used in the vicinity of radioreceivers, it can interfere with the reception; makesure there is a distance of at least 1m between thedevices.
• When the charger is in use, it can make a noise(buzzing) – this is quite normal and is not a malfunc-tion.
• When it is not in use, disconnect the charger fromthe mains as otherwise it uses a certain (very small)amount of power even when no battery is inserted.
• Always keep the charger contacts clean, and nevershort circuit them.
For memory cards
• Whilst a picture is being stored or the memory cardis being read, it may not be removed, not may theLEICA M8 be turned off or exposed to vibrations.
• For safety, memory cards should only ever bestored in the antistatic cover supplied.
• Do not store memory cards where they will beexposed to high temperatures, direct sunlight, mag-netic fields or static discharge.
• Do not drop or bend a memory card as this candamage it and result in loss of the stored data.
• Always remove the memory card if you will not beusing the LEICA M8 for a long period of time.
• Do not touch the connections on the rear of thememory card and keep them free of dirt, dust andmoisture.
• It is recommended that the memory card be refor-matted from time to time, as fragmentation occurswhen deleting, which can block some of the memo-ry capacity.
Miscellaneous/Precautions and care instructions / 127

128 / Miscellaneous/Precautions and care instructions
Cleaning the sensor
If any dust or dirt particles should adhere to the sen-sor cover glass, depending on the size of the particlesthis can be identified by dark spots or marks on thepictures.The LEICA M8 can be returned to Leica Camera AGCustomer Service (address: see p. 137) for chargeablecleaning of the sensor; this cleaning is not covered bywarranty. You can also perform the cleaning yourself,using the menu function Sensor cleaning. This allowsaccess to the sensor by keeping the shutter open.
Notes:
• To protect the LEICA M8 against ingress of dust etc.into the interior of the camera, it is importantalways to have a lens or a cover fitted to the camerabody.
• For the same reason, when changing lenses workwithout delay and in an environment that is as dust-free as possible.
Setting the function
1. In the main menu (see p. 80/93) select Sensorcleaning (5.1.16), and• The respective sub-menu appears.
2. providing the battery has sufficient capacity, i.e. atleast 60%, confirm the function in the sub-menu.• A further sub-menu will appear
Note:
If however the battery has insufficient capacity, thewarning message
appears instead, indicating that thefunction is not available, i.e. cannot be selected
3. Press the shutter release button (1.20). The shutteropens and remains open.
Perform the cleaning. Scrupulously comply with thefollowing instructions:
Notes:
• As far as possible, both inspection and cleaning ofthe sensor should be performed in a dust-free envi-ronment to prevent further soiling.
• An 8x or 10x magnifying glass is very useful for theinspection and after cleaning.
• Lightly adhering dust can be blown off the sensorcover glass using clean and, if necessary ionizedgases such as air or nitrogen. It makes sense to usea (rubber) bellows with no brush for this purpose.Special, low pressure cleaning sprays such as “Tete-nal Antidust Professional” can also be used in linewith their specified usage.
yes
sensor cleaning
Battery too low for Attention
• If the particles cannot be removed from the sensorin this way, please refer the matter to your LeicaInformation Service (address: see p. 137).
• If whilst the shutter is open the battery capacityfalls to less than 40%, a warning message
willappear on the monitor. At the same time a sus-tained beep tone will sound, which continues untilthe camera is switched off. Switching the cameraoff will cause the shutter to be closed again. Beabsolutely sure in this case that the shutter widowis clear, i.e. that no object can obstruct the closingmovement of the shutter, otherwise damage mayoccur!
Important
• Leica Camera AG accepts no liability for damagecaused by the user when cleaning the sensor.
• Do not attempt to blow dust particles off the sensorcover glass using your mouth; even tiny droplets ofsaliva can cause marks that are difficult to remove.
• Compressed air cleaners with high gas pressuremay not be used as they can also cause damage.
• Take care to avoid touching the sensor surface withany hard objects during inspection and cleaning.
Battery low Switch off cameraAttention

Ausführliche Anleitung / Wiedergabe-Betrieb / 129
Storage
• If you are not using the LEICA M8 for an extendedperiod of time, we recommend that you:a. switch it off (see p. 88),b. remove the memory card (see p. 85) andc. remove the battery (see p. 84), (after 3 months
the date and time that were entered will be lost,see p. 95).
• A lens works like a magnifying glass if bright sun-light shines on the front of the camera. The cameramust therefore never be set aside in strong sunlightwithout protection. Use the lens cover and keep thecamera in the shade (or immediately put it away inthe case) help to prevent damage to the interior ofthe camera.
• You should preferably store the LEICA M8 in aclosed and padded container so that nothing candamage it and it is protected from dust.
• Store the LEICA M8 in a dry, adequately ventilatedplace, where neither high temperatures nor highhumidity will occur. When used in humid condi-tions, the LEICA M8 should be completely clearedof all moisture before being stored away.
• Photo cases that became wet during use should beemptied to prevent damage to your equipmentcaused by moisture and any leather-tanning residuereleased.
• To prevent fungal growth during use in hot, humidtropical climates, the camera equipment should beexposed to the sun and air as much as possible.Storage in airtight containers or cases is recom-mended only if a desiccant such as silica gel isplaced in the container.
• To prevent the formation of fungus, do not storethe LEICA M8 in a leather case for extended peri-ods of time.
• Note the serial numbers of your LEICA M8(engraved on the accessory shoe) and lenses, asthese are extremely important in case of loss.
Miscellaneous/Precautions and care instructions / 129

130 / Miscellaneous/Warning messages
Warning messages Bottom cover openClose the bottom cover (see p. 84).
No SD cardInsert a memory card (see p. 85).
SD card fullInsert another memory card (see p. 85) or deletepictures you no longer need (see p. 117/118).
SD card protected(protected against deletion)Reset the write protection for the memory card (see p. 85).
No valid image to playNo pictures are saved on the inserted card.In order for playback to take place, pictures first of allneed to be taken or another card with saved picturesinserted (see p. 85).
Data transferPicture data are currently being transferred to the SD card.All other picture processing functions are unavailablewhilst this is in progress.
Error code XXPlease ask you Leica dealer or Leica agent for yourcountry regarding this information (addresses areshown on the warranty card).

Malfunctions and their resolution 1. The LEICA M8 does not respond when
I turn it on.
1.1 Has the battery been correctly inserted?1.2 Does the battery have sufficient charge?
Use a charged battery.1.3 Has the bottom cover been correctly attached?
2. The LEICA M8 turns itself off again as
soon as I turn it on.
2.1 Does the battery have sufficient charge to operate the LEICA M8?Charge the battery or insert a charged battery.
2.2 Is there any condensation? This can occur if theLEICA M8 is moved from a cold place to a warmplace. Wait until the condensation clears.
3. The LEICA M8 shutter refuses to trip.
3.1 Picture data are currently being transferred to thememory card and the intermediate memory isfull.
3.2 The capacity of the memory card is exhausted andthe intermediate memory is full. Delete picturesyou no longer require before taking new ones.
3.3 No memory card has been inserted and the inter-mediate memory is full.
4. I cannot save the picture.
4.1 Is a memory card inserted?4.2 The capacity of the memory card is full.
Delete pictures you no longer require beforetaking new ones.
5. The monitor is too dark or too bright.
5.1 When viewing the monitor image from stronglyangled positions it is always more difficult to see.If it is too pale or too dark although you are look-ing at the monitor full on: Select a differentbrightness.
6. The picture I have just taken is not
shown in the monitor
6.1 When setting the LEICA M8 to picture mode, isthe Auto Review function switched on?
7. I cannot display the picture.
7.1 Is a memory card inserted?7.2 The memory card does not contain any data.
8. Despite being connected to a computer,
I cannot transfer any data.
8.1 Check whether the computer and the camera areconnected correctly.
9. The date and time displays show incorrect
values or are blank.
9.1 The LEICA M8 has not been used for a long peri-od, particularly if the battery has been removed.1. Insert a fully charged battery 2. Set the date and time.
Miscellaneous/Malfunctions and their resolution / 131

132 / Index
Index Page
AccessoriesCases . . . . . . . . . . . . . . . . . . . . . . . . . . . . . . . . . .124Correction lenses . . . . . . . . . . . . . . . . . . . . . . . . .124Exchangeable lenses . . . . . . . . . . . . . . . . . . . . . .124Filters . . . . . . . . . . . . . . . . . . . . . . . . . . . . . . . . . .124Handgrip M8 . . . . . . . . . . . . . . . . . . . . . . . . . . . . 124Universal Wide-angle Viewfinder M . . . . . . . . . . .124Viewfinder magnifier M 1.25x . . . . . . . . . . . . . . .124
Aperture priority mode . . . . . . . . . . . . . . . . . . . . . .106Aperture setting ring . . . . . . . . . . . . . . . . . . . . . . . .76BatteryCharge level displays . . . . . . . . . . . . . . . . . . . . . . .84Charging . . . . . . . . . . . . . . . . . . . . . . . . . . . . . . . . .82Insertion/removal . . . . . . . . . . . . . . . . . . . . . . . . .84
Bright-line frame view- and rangefinder . . . . . . . . .102Care instructions . . . . . . . . . . . . . . . . . . . . . . . . . .125Carrying strap . . . . . . . . . . . . . . . . . . . . . . . . . . . . .82Cases . . . . . . . . . . . . . . . . . . . . . . . . . . . . . . . . . . .124Color saturation, see image propertiesCompression rate . . . . . . . . . . . . . . . . . . . . . . . . . . .97Contrast, see image propertiesCorrection lenses . . . . . . . . . . . . . . . . . . . . . . . . . .124Data structure on the memory card . . . . . . . . . . . .123Deleting pictures . . . . . . . . . . . . . . . . . . . . . . . . . . .117all pictures on the memory card . . . . . . . . . .118/119single pictures . . . . . . . . . . . . . . . . . . . . . . . .118/119
Depth of field scale . . . . . . . . . . . . . . . . . . . . . . . . . .76Designation of parts . . . . . . . . . . . . . . . . . . . . . . . . .76
Page
Displaysin the viewfinder . . . . . . . . . . . . . . . . . . . . . . . . . .78on the monitor . . . . . . . . . . . . . . . . . . . . . . . . . . . .79
Distance setting . . . . . . . . . . . . . . . . . . . . . . . . . . .104Depth of field . . . . . . . . . . . . . . . . . . . . . . . . . . . . .87Metering field . . . . . . . . . . . . . . . . . . . . . . . . . . . .104Rangefinder . . . . . . . . . . . . . . . . . . . . . . . . . . . . .104Setting ring . . . . . . . . . . . . . . . . . . . . . . . . . . . . . . .76Split image method . . . . . . . . . . . . . . . . . . . . . . .104Superimposed image method . . . . . . . . . . . . . . .104
Enlarge, see review mode and viewing picturesExchangeable lenses . . . . . . . . . . . . . . . . . . . .86/124Exposure/Exposure meter . . . . . . . . . . . . . . . . . . .105Aperture priority mode . . . . . . . . . . . . . . . . . . . . .106Manual setting . . . . . . . . . . . . . . . . . . . . . . . . . . .107Metering range . . . . . . . . . . . . . . . . . . . . . . . . . . .108Metering diagram . . . . . . . . . . . . . . . . . . . . . . . .109Working below the metering range . . . . . . . . . .108
Sensitivity . . . . . . . . . . . . . . . . . . . . . . . . . .100/108Switching off . . . . . . . . . . . . . . . . . . . . . . . . . . . .105Switching on . . . . . . . . . . . . . . . . . . . . . . . . . . . . .105
Exposure compensation . . . . . . . . . . . . . . . . . . . . .107Filters . . . . . . . . . . . . . . . . . . . . . . . . . . . . . . . . . . .124Flash operation . . . . . . . . . . . . . . . . . . . . . . . . . . . .111Synchronization . . . . . . . . . . . . . . . . . . . . . . . . . .113
Focusing, see Distance settingFormatting the memory card . . . . . . . . . . . . . . . . .120Frame selector . . . . . . . . . . . . . . . . . . . . . . . . . . . .102Histogram . . . . . . . . . . . . . . . . . . . . . . . . . . . . . . . . .92

Page
Holding the camera correctly . . . . . . . . . . . . . . . . .100Image frequency . . . . . . . . . . . . . . . . . . . . . . . . . . . .90Image properties (contrast, sharpness, color saturation) . . . . . . . . . . . . . . . . . . . . . . . . . .100
Information service, Leica . . . . . . . . . . . . . . . . . . .137Installation of (supplied) software . . . . . . . . . . . . .123Internet/Leica homepage . . . . . . . . . . . . . . . . . . .137ISO sensitivity . . . . . . . . . . . . . . . . . . . . . . . . . . . .100Items supplied . . . . . . . . . . . . . . . . . . . . . . . . . . . . .75Lenses, Leica M . . . . . . . . . . . . . . . . . . . . . . . . . . . .86Attaching and removing . . . . . . . . . . . . . . . . . . . . .87Design . . . . . . . . . . . . . . . . . . . . . . . . . . . . . . . . . .76Use of older lenses . . . . . . . . . . . . . . . . . . . . . . . . .86
Main switch . . . . . . . . . . . . . . . . . . . . . . . . . . . . . . .88Malfunctions and their resolution . . . . . . . . . . . . . .131Memory card, inserting and removing . . . . . . . . . . .85Menu control . . . . . . . . . . . . . . . . . . . . . . . . . . . . . .93Menu items . . . . . . . . . . . . . . . . . . . . . . . . . . . . . . .80Menu language . . . . . . . . . . . . . . . . . . . . . . . . . . . . .95Metering diagram . . . . . . . . . . . . . . . . . . . . . .108/109Monitor . . . . . . . . . . . . . . . . . . . . . . . . . . . . . . . . . . .92Setting the brightness . . . . . . . . . . . . . . . . . . . . . .92Setting the contrast . . . . . . . . . . . . . . . . . . . . . . . .92
Noise reduction . . . . . . . . . . . . . . . . . . . . . . . . . . .108Parts, designation . . . . . . . . . . . . . . . . . . . . . . . . . . .76Power off, automatic . . . . . . . . . . . . . . . . . . . . . . . .88Protecting pictures/Clearing delete protection . . .118
Page
Quick guide . . . . . . . . . . . . . . . . . . . . . . . . . . . . . . .81Raw data . . . . . . . . . . . . . . . . . . . . . . . . . . . . .97/123Recording and review modes . . . . . . . . . . . . . . . . . .88Remote control, of the camera . . . . . . . . . . . . . . . .123Repairs/Leica Customer Service . . . . . . . . . . . . . .137Resetting all custom menu settings . . . . . . . . . . . .115Resolution . . . . . . . . . . . . . . . . . . . . . . . . . . . . . . . .97Review mode . . . . . . . . . . . . . . . . . . . . . . . . . . . . .115Enlarging . . . . . . . . . . . . . . . . . . . . . . . . . . . . . . . .116Four/nine single pictures simultaneously . . . . . .116Selecting the section . . . . . . . . . . . . . . . . . . . . . .116Single pictures . . . . . . . . . . . . . . . . . . . . . . . . . . .115
Sections, Selection of, see review mode . . . .116/115Self timer . . . . . . . . . . . . . . . . . . . . . . . . . . . . . . . .120Sensitivity . . . . . . . . . . . . . . . . . . . . . . . . . . .100/108Setting . . . . . . . . . . . . . . . . . . . . . . . . . . . . . . . . .100
Series exposures . . . . . . . . . . . . . . . . . . . . . . . . . . .90Sharpness, see image propertiesShutter, see Shutter release button and Technical Data
Shutter release button, see also Shutter and Technical Data . . . . . . . . . . . . . . . . . .89
Shutter speed dial . . . . . . . . . . . . . . . . . . . . . . . . . .91Software, installing . . . . . . . . . . . . . . . . . . . . . . . . .123Sounds (button acknowledge (response) tones) . . .96Spare parts . . . . . . . . . . . . . . . . . . . . . . . . . . . . . . .124Speed/aperture combination, see Exposure setting and Metering diagram
Page
Storing the LEICA M8 . . . . . . . . . . . . . . . . . . . . . . .129Switching on/off . . . . . . . . . . . . . . . . . . . . . . . . . . .88Technical data . . . . . . . . . . . . . . . . . . . . . . . . . . . .134Time and date . . . . . . . . . . . . . . . . . . . . . . . . . .95/96Transferring data to a computer . . . . . . . . . . . . . . .121USB connection . . . . . . . . . . . . . . . . . . . . . . . . . . .121Viewfinder . . . . . . . . . . . . . . . . . . . . . . . . . . . . . . .102Bright-line frames . . . . . . . . . . . . . . . . . . . . . . . . .102Detachable viewfinderUniversal Wide-angle Viewfinder M . . . . . . . . . .124Viewfinder magnifier M 1.25x . . . . . . . . . . . . . .124
Displays . . . . . . . . . . . . . . . . . . . . . . . . . . . . . . . . .78Viewing the picture (in picture mode, immediately after taking)
with the Auto Review function (automatic review) . . . . . . . . . . . . . . . . . . . . . . .89
with the PLAY function . . . . . . . . . . . . . . . .88/115Volume, setting the button acknowledge (response) tones . . . . . . . . . . . . . . . . . . . . . . . . . .96
Warning messages . . . . . . . . . . . . . . . . . . . . . .74/130White balance . . . . . . . . . . . . . . . . . . . . . . . . . . . . . .98
Index / 133

134 / Technical data and descriptions
Technical data anddescriptions
Camera type Compact digital view- and rangefind-er system camera.Lens attachment Leica M bayonet with additionalsensor for 6-bit coding.Lens system Leica M lenses from 16 to 135mm
Picture format/image sensor 3936 x 2626 pixels(10.5 MPixel) CCD chip, active area 18 x 27mm,extension factor 1.33.Resolution Adjustable, DNGTM: 3916 x 2634, JPEG: 3936 x 2630/2952 x 1972/1968 x 1315/1312 x 876 pixels.Data formats DNGTM (raw data), 2 JPEG compres-sion levels.File size DNG™: 10,31 MByte, JPEG:10.35/5.8/2.5/1.1 Mbyte.Color spaces Adobe® RGB, sRGB, ECI RGB.White balance Automatic, manual, 6 presets, colortemperature entry.Storage medium SD cards up to 4GB, larger SDcards with firmware update.Menu languages German, English, French, Spanish,Italian, Japanese, Chinese.Compatibility Mac® OS X, Windows® XP.
Exposure metering Exposure metering throughthe lens (TTL), strongly center-weighted with workingaperture. Center-weighted TTL metering for flash light-ing with system-compatible SCA-3000/2 standardflash units.Measurement principle Metered by light reflectedby a bright blade in the first shutter curtain.Metering range (at ISO 160/23°) At room temperatureand normal humidity, this corresponds to EV0 to 20 orf/1 and 1.2s to f/ 32 and 1/1000s. Flashing of the lefttriangular LED in the viewfinder indicates values belowthe metering range.Measurement cell for available light (continuouslight measurement) Silicon photo diode with collec-tion lens, positioned at the center in the camera bot-tom.Sensitivity range ISO 160/23°, 320/26°,640/29°, 1250/32° or ISO 2500/35°, manual set-ting using the menu.Exposure mode Optionally automatic control ofshutter speed – with corresponding digital display -with manual aperture pre-selection (aperture prioritymode), or manual settings of shutter speed and aper-ture and adjustment using LED light balance.

Flash exposure control
Flash unit connection Via accessory shoe withcenter and control contacts.Synchronization Optionally triggered at the first orsecond shutter curtain.Flash synchronization speed = 1/250s; slowershutter speeds possible.Flash exposure metering (with SCA-3501/3502adaptor, or SCA-3000 standard flash unit such asLEICA SF 24D). Control with center-weighted TTL-pre-flash metering.Flash measurement cell 2 silicon photo diodeswith collection lens on the camera bottom.Flash exposure compensation ±31/3 EV in 1/3 EVsteps settable on the SCA-3501/3502 adaptor. Onthe LEICA SF 24D ±3EV in 1/3 EV steps or 0 to –3EVin 1EV steps can be set using computer control.Displays in flash mode Readiness: by the flashsymbol LED in the viewfinder being constantly lit; con-firmation of success: By the LED remaining lit or flash-ing rapidly for a while after taking the picture; under-exposure display by the LED going out for a while.
Viewfinder
Viewfinder principle Large, bright bright-line framerange- and viewfinder with automatic parallax com-pensation.Eyepiece Adjusted to –0.5 dptr. Correction lensesfrom –3 to +3 dpt. available.Framing By projection of pairs of bright-line frames:For 24 and 35mm, or for 28 and 90mm, or for 50 and75mm. Automatic projection when lens is attached.Frame selector can be used to select any of thebright-line frame pairs.Parallax compensation The horizontal and verticaldifference between the viewfinder and the lens isautomatically compensated according to the relevantdistance setting, i.e. the bright-line frames automatic-ally align with the subject detail recorded by the lens.Matching of viewfinder and actual picture The sizeof the bright-line frame corresponds to an image sizeof 18 x 27mm at the shortest setting distance foreach focal length. At infinity setting, depending on thefocal length, approx. 9% (28mm) to 23% (90m) moreof the view is recorded than indicated by the corre-sponding bright-line frame.Enlargement (for all lenses) 0.68x. Wide base rangefinder Split or superimposedimage rangefinder shown as a bright field in the cen-ter of the viewfinder image.Effective base width 47.1mm (mechanical basewidth 69.25mm x viewfinder enlargement 0.68x).
Displays
Viewfinder (lower edge) LED symbol for flash sta-tus, four-digit seven segment LED digital display withupper and lower points, display brightness adapted toexternal brightness, for: warning of exposure compen-sation, automatically generated shutter speed foraperture priority mode, indication for use of Meteringmemory lock, warning of being above or below meter-ing range in aperture priority mode and countdown ofshutter speeds slower than 2sLED light balance with two triangular and one centralcircular LED for manual setting of exposures. The tri-angular LEDs give the direction of rotation of the aper-ture setting ring and shutter speed dial to adjust theexposure. Also for warning of when the meteringrange is overshot or undershot.On the top panel Monochrome LCD for framecounter (number of pictures remaining) and batterystatus (5-step).On the rear panel 2.5” monitor (color-TFT LCD)with 230,000 pixels, displays see p. 78.
Technical data and descriptions / 135

136 / Technical data and descriptions
Shutter and release
Shutter Microprocessor-controlled metal bladefocal plane shutter with vertical movement.Shutter speeds In aperture priority mode (A) step-lessly from 32s to 1/8000s. Using manual setting 4s to1/8000s in half steps, B for long exposures of any dura-tion (together with self timer T function, i.e. firstrelease = shutter opens, second release = shuttercloses), (1/250s) shortest shutter speed for flashsynchronization.Shutter cocking By integral motor, low-noise sys-tem.Series exposures approx. 2 pictures/s, approx. 10 pictures in sequence.Shutter release button Three steps: Exposuremetering on – memory lock (in aperture prioritymode) – shutter release. Integrated standard cablerelease thread.Self timer Delay optionally 2 or 12s (menu setting),indicated by flashing LED on front of camera and cor-responding display on the monitor.
Switching the camera on/off Using the mainswitch on the camera top panel, selectable automaticswitch-off of the camera electronics after about2/5/10 minutes, reactivation by touching the shutterrelease button.Power supply 1 lithium ion battery, nominal voltage3.7V, capacity 1900mAh. Capacity data is shown inthe display on the left of the top panel, when the shut-ter is held open (for sensor cleaning with Clean Sen-sor); in addition, low capacity is indicated by anacoustic warning.Charger Input: 100–240 V AC, 50/60Hz, automaticswitching; Output: 4.2V CD, max. 750mA.
Camera body
Material All-metal body of magnesium die-casting,KTL dip painted, synthetic leather covering. Top paneland bottom cover brass, black lacquered or silverchromium plated.Frame selector Brass, black lacquered or silverchromium plated, allows the bright-line frame pairs tobe manually displayed at any time (e.g. to comparedetail).Tripod socket Stainless steel 1/4” DIN tapped sock-et in bottom cover, in line with the center of the lens.Operating conditions 0 to +40°CInterface 5-pin mini-USB 2.0 High-Speed socket forquick data transfer.Dimensions (width x depth x height) 138.6mm x36.9mm x 80.2mmWeight approx. 590g (incl. battery)
Scope of delivery
Battery charger 100–240V with 3 mains plug adap-tors (Euro, UK, USA), lithium ion battery, USB cable,carrying strap, CD-ROM with user manual as PDF,Remote Control Software LEICA DIGITAL CAPTURE1.0, CD-ROM with Capture One LE from Phase One.
Subject to changes to design, manufacture and range.

Leica Academy
As well as outstanding high-performance products for taking, reproducing and viewing photographs, formany years we have also been offering the specialservices of the Leica Akademie, with practical seminarsand training courses, which are intended to share ourknowledge about the world of photography, projectionand magnification with both beginners and advancedphotographic enthusiasts.The contents of the courses, which are run by atrained team of experts in the modern, well-equippedtraining suite at our Solms factory and in the nearbyGut Altenberg, vary from general photography toareas of special interest and offer a range of sug-gestions, information and advice for your own work.More detailed information and the current LeicaAcademy brochure are available from:
Leica Camera AGLeica AkademieOskar-Barnack-Str. 11D-35606 SolmsPhone: +49 (0) 6442-208-421Fax: +49 (0) [email protected]
Leica on the Internet
Current information about products, news, events andthe Leica company is available on our homepage onthe Internet at:
http://www.leica-camera.com
Leica information service
The Leica information service can provide you with ananswer to any technical questions relating to the Leicarange either in writing, on the telephone or by e-mail.
Leica Camera AGInformations ServicePostfach 1180D-35599 SolmsPhone: +49 (0) 6442-208-111Fax: +49 (0) [email protected]
Leica Customer Service
Leica AG’s Customer Service center, or the repairservice of the Leica national offices (see the WarrantyCard for an address list), is available to assist you inmaintaining your Leica equipment or in case of dam-age. Please contact your nearest authorised Leicadealer.
Leica Camera AGCustomer ServiceSolmser Gewerbepark 8D-35606 SolmsPhone: +49 (0) 6442-208-189Fax: +49 (0) [email protected]
Service / 137

my point of view LEICA M8
Anleitung/Instructions
Leica Camera AG / Oskar-Barnack-Str. 11 / D-35606 Solms
www.leica-camera.com / [email protected]
Telefon +49 (0) 64 42-208-0 / Telefax +49 (0) 64 42-208-333
Abbildungen in den vorderen und hinteren Umschlagseiten
Illustrations inside front and rear covers
Abbildungen in den vorderen und hinteren Umschlagseiten
Illustrations inside front and rear covers