Cell (ppt. lecturers for Biology,7th Edition)lecturers by Chris Romero

GUIDE
LECTURER GUIDE TO THE VIRTUAL CLASSROOM
Table of Contents
INTRODUCTION 2
1. PRE VIRTUAL CLASSROOM DELIVERY 2
1.1 HARDWARE & SYSTEM REQUIREMENTS 2 1.2 VIRTUAL CLASSROOM SETUP IN BRIGHTSPACE 3 1.3 TECHNICAL CHECK 7 1.4 UPLOADING SLIDES 8
2. VIRTUAL CLASSROOM DELIVERY 9
2.1 COLLABORATE ULTRA LAYOUT 9 2.2 MEDIA SPACE 9 2.3 COLLABORATE PANEL 10
2.3.1 SHARING CONTENT 11 2.3.2 SECONDARY CONTENT AND INTERACTIONS 13
3. POST VIRTUAL CLASSROOM DELIVERY 15
3.1 RECORDING AND SHARING THE SESSION 15 3.2 USEFUL TIPS AND FURTHER INFORMATION 16

2
Introduction
A virtual classroom (VC) is an online environment that enables lecturers and students to communicate synchronously (in real-time) using a number of methods i.e. audio, video, text chat, interactive whiteboard, application sharing, instant polling etc. There are three steps to consider when preparing for the virtual classroom delivery as outlined in the diagram below.
This lecturer’s guide will focus on these three steps with the use of Collaborate Ultra, the virtual classroom tool currently available in UCD.
1. Pre Virtual Classroom Delivery
1.1 Hardware & System Requirements
Before delivering a VC make sure you have the following:
1. Desktop/laptop with a reliable Internet connection (28.8 kbps speed or more-preferably
broadband) and 20 MB free disk space
2. Web browser –it is recommended you use the Google Chrome browser for delivery as it
supports complete functionality.
3. Headset with a microphone
4. Webcam
Go here for a complete overview of the system requirements

3
1.2 Virtual Classroom Setup in Brightspace
Collaborate Ultra is the UCD supported virtual classroom tool which has been integrated with UCD
VLE (Brightspace). You need to take the following steps to set it up a virtual classroom in Brightspace:
Login to UCD Brightspace: https://brightspace.ucd.ie/
1. Open your Brightspace module and navigate to the My Learning page. 2. Create a new unit titled ‘Virtual Classroom’ or select an existing unit within your module
where you wish to add the link to the VC 3. Click the drop arrow for Existing Activities and select External Learning Tools
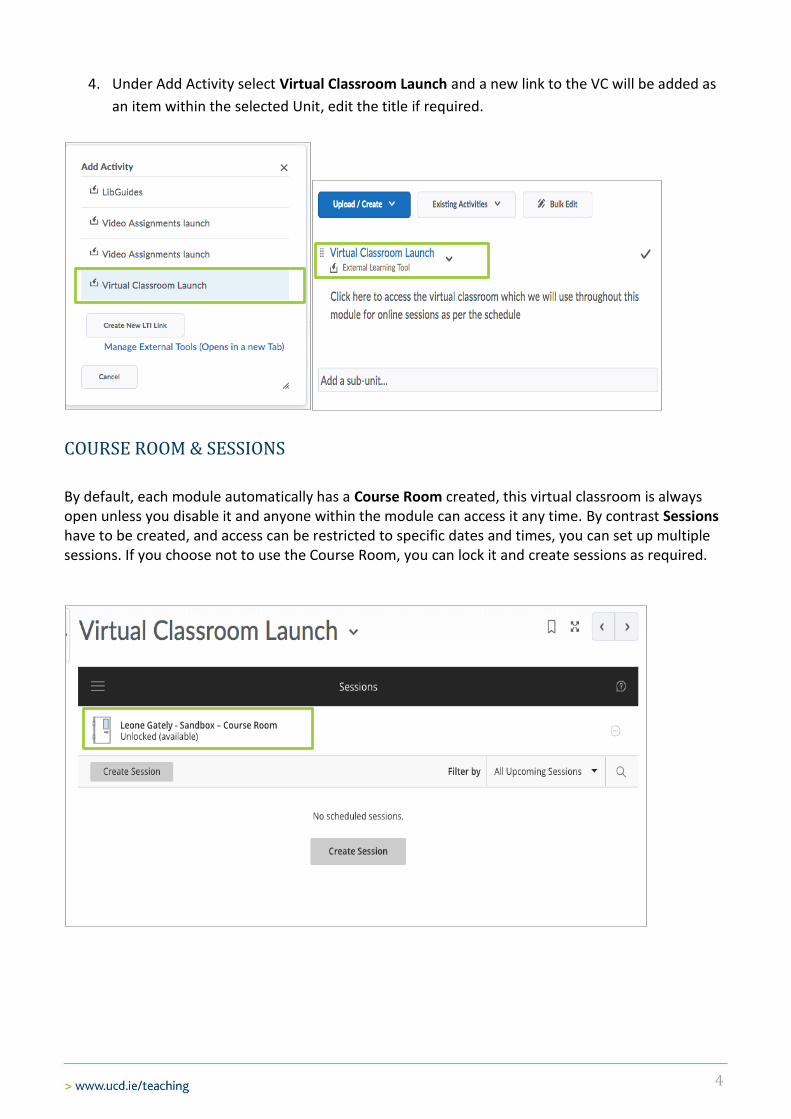
4
4. Under Add Activity select Virtual Classroom Launch and a new link to the VC will be added as
an item within the selected Unit, edit the title if required.
COURSE ROOM & SESSIONS
By default, each module automatically has a Course Room created, this virtual classroom is always open unless you disable it and anyone within the module can access it any time. By contrast Sessions have to be created, and access can be restricted to specific dates and times, you can set up multiple sessions. If you choose not to use the Course Room, you can lock it and create sessions as required.

5
5. To make any changes to the Course Room, click on Session Options and select the appropriate
option.
6. To create a new session, click Create
Session and a scheduling window will
open, within the Event Details section,
enter the session name, select Guest
Access (if you will be inviting
participants from outside of UCD).
Select a start and end date if applicable
or select No End (Open Session) session
to keep room open for entire semester.
Select Repeat Session to create multiple
iterations of the same session. Enter a
description of the session if required
and save.

6
You need one session for your module use the automatically created Course
Room, if you need scheduled sessions lock the room and create multiple
sessions.
7. Once the session is created, in the Session
Settings, review the Default Attendee Role
(your students should be joining as
Participants). You can choose to Allow
Recording Downloads and set Moderator and
Participant Permissions. The following
Participant options are selected by default.
Click on the check mark next to each option if
you do not want students in the session to be
allowed to: share their audio, share their
video, post chat messages, draw on
whiteboard and share files. When you have
reviewed all session settings, click save.
*Note: that the enable session telephony
option is not currently available in UCD.

7
1.3 Technical Check
Before starting a virtual classroom please make sure your camera and microphone are set up. Check if your headset is connected to your device (check audio settings both for the speakers and microphone).
In order to check these within the tool, launch the session and go to the Collaborate Panel.
Select Settings start the set up
Here you can manually adjust the volume of
your speakers and a microphone
Exit the settings
Session Menu enables to:
• record the session
• report any issues
•exit and finish the session
Media Space
Collaborate Panel

8
1.4 Uploading Slides
It is important to upload all presentations prior to the start of the session. To upload Power Point slides/PDF to collaborate ultra go to collaborate panel and select share files.
You can share the following files:
• For presentations: only ppt, pptx – but not PowerPoint Shows (pps, ppsx)
• PDF documents
• Images – only jpg, jpeg, png and gif
Select Share Files
Drag and drop or select + to add files for sharing

9
2. Virtual Classroom Delivery
2.1 Collaborate Ultra Layout To access your virtual classroom from within your Brightspace module go to module tools menu, virtual classroom, select the session title and join the session. Then familiarise yourself with the layout of the tool i.e. Media Space, Session Menu and the Collaborate Panel.
Make sure you record all your sessions (Start Recording in the Session Menu); join the session a minimum 15 minutes before it commences.
2.2 Media Space – is the space that allows you to share content with your students. At the bottom you will find some useful tools as follows which you can use while delivering in the virtual classroom.
Your Status and Feedback - an engagement tool that allows your students to use emoticons to provide you with some feedback on your class. Student feedback can be then seen in the Attendee section of the Collaborate Panel.
It is recommended you upload your picture to your profile and set your status. Encourage students to do the same to personalise their learning.
Raising Hand – you can raise a hand if someone else is presenting
Microphone – when transmitting it is
green, to mute select the icon
Video- switches on your webcam and enables you to stream video
10
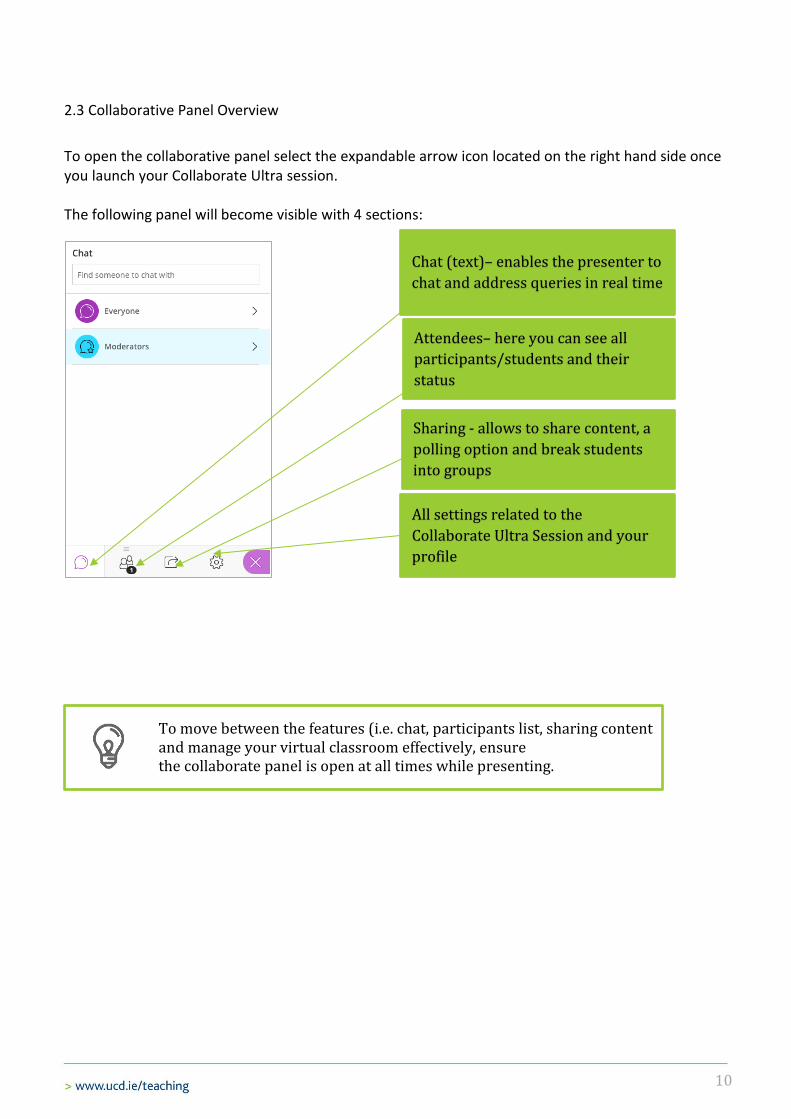
2.3 Collaborative Panel Overview
To open the collaborative panel select the expandable arrow icon located on the right hand side once you launch your Collaborate Ultra session. The following panel will become visible with 4 sections:
To move between the features (i.e. chat, participants list, sharing content and manage your virtual classroom effectively, ensure the collaborate panel is open at all times while presenting.
Chat (text)– enables the presenter to
chat and address queries in real time
Attendees– here you can see all
participants/students and their
status
Sharing - allows to share content, a
polling option and break students
into groups
All settings related to the
Collaborate Ultra Session and your
profile
11
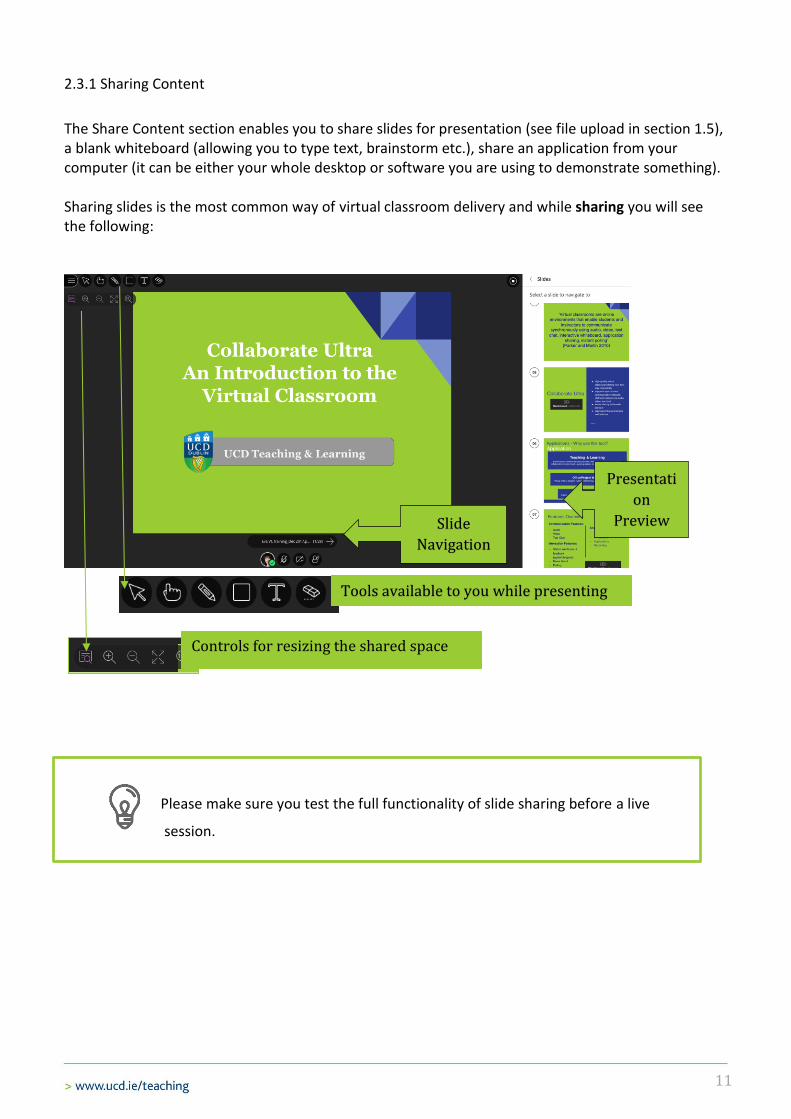
2.3.1 Sharing Content
The Share Content section enables you to share slides for presentation (see file upload in section 1.5), a blank whiteboard (allowing you to type text, brainstorm etc.), share an application from your computer (it can be either your whole desktop or software you are using to demonstrate something). Sharing slides is the most common way of virtual classroom delivery and while sharing you will see the following:
Please make sure you test the full functionality of slide sharing before a live
session.
Controls for resizing the shared space
Tools available to you while presenting
Presentati
on
Preview Slide
Navigation
12
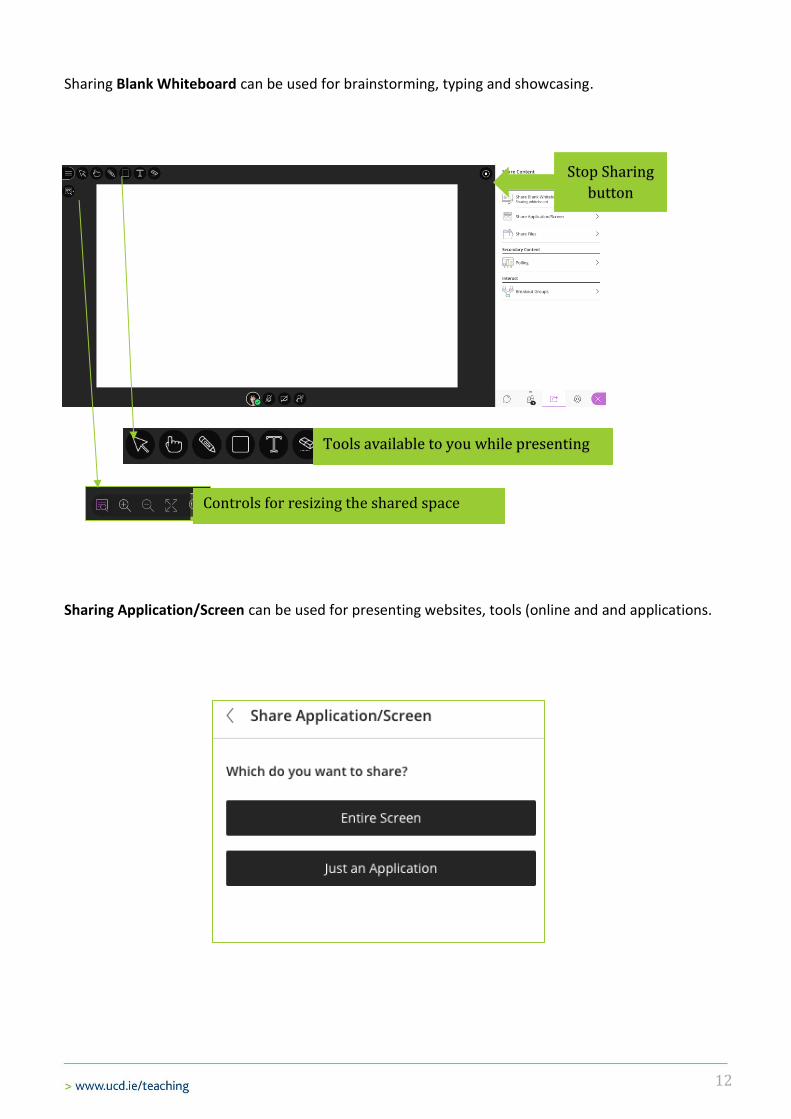
Sharing Blank Whiteboard can be used for brainstorming, typing and showcasing.
Sharing Application/Screen can be used for presenting websites, tools (online and and applications.
Controls for resizing the shared space
Tools available to you while presenting
Stop Sharing
button
13
2.3.2. Secondary Content and Interactions
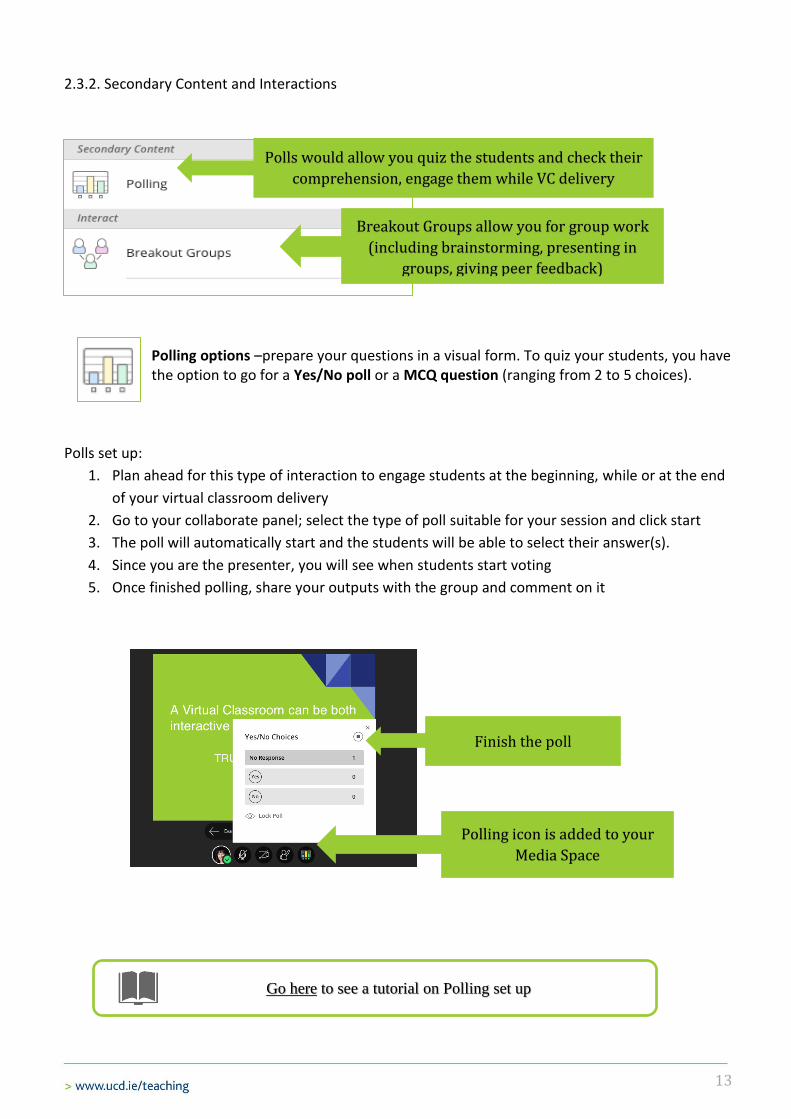
Polling options –prepare your questions in a visual form. To quiz your students, you have the option to go for a Yes/No poll or a MCQ question (ranging from 2 to 5 choices).
Polls set up:
1. Plan ahead for this type of interaction to engage students at the beginning, while or at the end
of your virtual classroom delivery
2. Go to your collaborate panel; select the type of poll suitable for your session and click start
3. The poll will automatically start and the students will be able to select their answer(s).
4. Since you are the presenter, you will see when students start voting
5. Once finished polling, share your outputs with the group and comment on it
Polling icon is added to your
Media Space
Finish the poll
Go here to see a tutorial on Polling set up
Polls would allow you quiz the students and check their
comprehension, engage them while VC delivery
Breakout Groups allow you for group work
(including brainstorming, presenting in
groups, giving peer feedback)

14
Breakout Groups –are ideal for facilitating group activities and collaboration. Breakout rooms have their own private audio, video, whiteboard, application sharing etc. so the collaboration that takes place in a breakout room is independent of the main room (and other breakout rooms).
Breakout Groups set up:
Set up the breakout group
in the Collaborate Panel and once
ready click start
Once you start the group work you can go between the groups and monitor what individual groups are doing and provide them with feedback and support if needed.
Go here to see a tutorial on Breakout Groups in Collaborate Ultra
Name the groups and add
more groups
You can drag and drop the
students to assign them to a
group
Decide how will you
assign the students to
the groups
Move between the groups here
Finish the Group Breakout

15
3. Post the Virtual Classroom Delivery
3.1 Recording and Sharing the session
Once you finish delivering your virtual classroom session stop your recording in the session menu (top left hand side).
All virtual classroom recordings will be available via Brightspace via module tools/virtual classroom/session menu/recordings. See the side panel below, click into recordings. The recordings are generated after you close the session, they may take a few minutes to become available depending on the length of session.
Opposite the title of the recording select the three dots which provides access to the following recording options; watch/download/edit name/delete or copy link. It is recommended that you copy the link and make it available to your students via your module content area as appropriate. The link to the session can also be shared with the attendees if they were logged in as guests.

16
3.2 Useful Tips and Further Information
• It is recommended that your session aims and objectives are clearly defined while planning
your session
• Establish VC protocols with your students (how you will communicate with them,
interaction patterns, the flow of your VC)
• Your first VC session should be an introductory one and remember to build your students’
confidence around the use of the tool gradually
• Have a contingency plan for technical issues (both for you and your students)
• Start the VC on time and check if all students can hear you
• Keep the session on track in terms of timing and your objectives
• Breakout Groups/Polls – use these interactive tools to maintain full participation of your
students
• Conclude your session with the whole group (thank for participation) and arrange next
steps for your groups
• Evaluate your session after your VC delivery and reflect on how well it went and what could
be improved
Useful Links
• Familiarize yourself with the Collaborate Ultra Tools further information available via Bb Collaborate website (https://goo.gl/6KkYHV)
• UCD IT Services for technical support go to: https://www.ucd.ie/itservices/ourservices/educationaltechnologies/virtuallearning-brightspace/virtualclassroom/or email: mailto:[email protected]
Further Reading
• Christopher, D.,2014. The Successful Virtual Classroom; First chapter available online https://goo.gl/UTfJbT
• Rajendra Prasad1,M., Manjula, B., Bapuji, V., 2013. Virtual Classroom Pedagogy: New Tendency in Higher Education Institutions. International Journal of Information and Computation Technology. ISSN 0974-2239 Volume 3, Number 7 (2013), pp. 671-676 https://goo.gl/7BYwcz
• McKinnie, R., 2008. Best Practices for Delivering Virtual Classroom Training https://goo.gl/Z8inZS