Learning selenium sample
33
-
Upload
minnu-dinu -
Category
Software
-
view
41 -
download
1
Transcript of Learning selenium sample


Learning SeleniumHands-on tutorials to create a robust and maintainabletest automation framework.
Roy de Kleijn
This book is for sale at http://leanpub.com/LearningSelenium
This version was published on 2014-02-02
This is a Leanpub book. Leanpub empowers authors and publishers with the Lean Publishingprocess. Lean Publishing is the act of publishing an in-progress ebook using lightweight tools andmany iterations to get reader feedback, pivot until you have the right book and build traction onceyou do.
©2012 - 2014 Roy de Kleijn
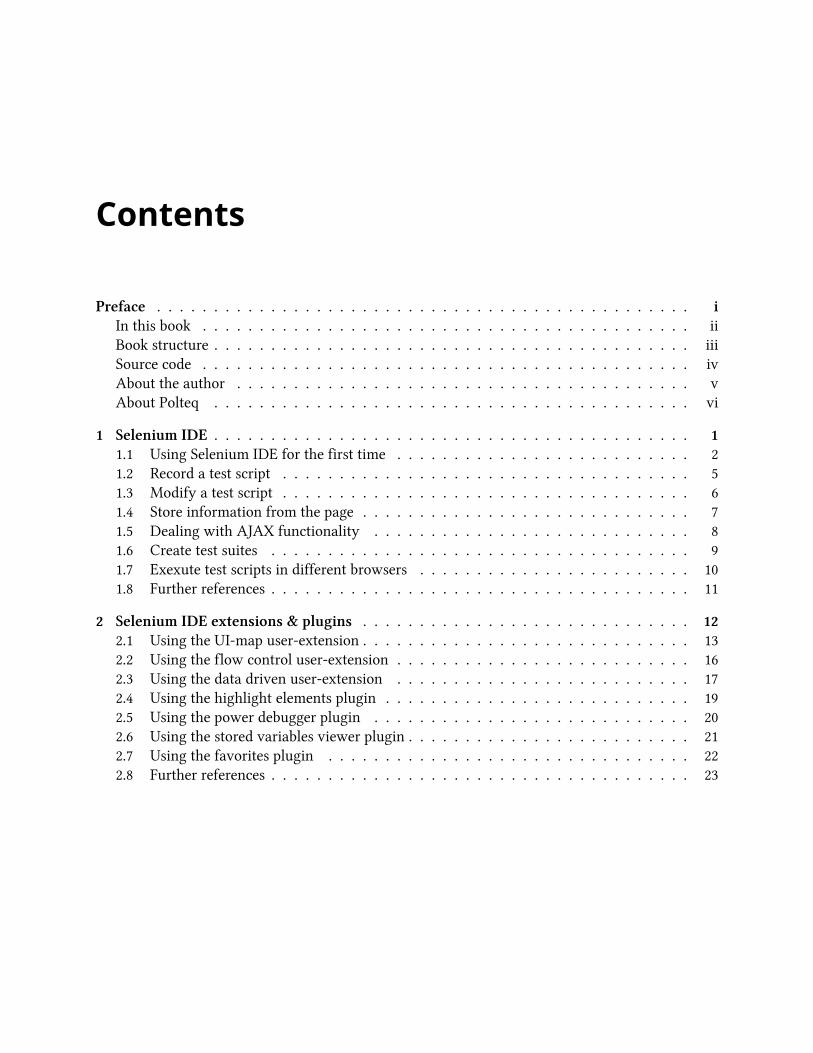
Tweet This Book!Please help Roy de Kleijn by spreading the word about this book on Twitter!
The suggested hashtag for this book is #LearningSelenium.
Find out what other people are saying about the book by clicking on this link to search for thishashtag on Twitter:
https://twitter.com/search?q=#LearningSelenium
Contents
Preface . . . . . . . . . . . . . . . . . . . . . . . . . . . . . . . . . . . . . . . . . . . . . . . iIn this book . . . . . . . . . . . . . . . . . . . . . . . . . . . . . . . . . . . . . . . . . . . iiBook structure . . . . . . . . . . . . . . . . . . . . . . . . . . . . . . . . . . . . . . . . . . iiiSource code . . . . . . . . . . . . . . . . . . . . . . . . . . . . . . . . . . . . . . . . . . . ivAbout the author . . . . . . . . . . . . . . . . . . . . . . . . . . . . . . . . . . . . . . . . vAbout Polteq . . . . . . . . . . . . . . . . . . . . . . . . . . . . . . . . . . . . . . . . . . vi
1 Selenium IDE . . . . . . . . . . . . . . . . . . . . . . . . . . . . . . . . . . . . . . . . . . 11.1 Using Selenium IDE for the first time . . . . . . . . . . . . . . . . . . . . . . . . . . 21.2 Record a test script . . . . . . . . . . . . . . . . . . . . . . . . . . . . . . . . . . . . 51.3 Modify a test script . . . . . . . . . . . . . . . . . . . . . . . . . . . . . . . . . . . . 61.4 Store information from the page . . . . . . . . . . . . . . . . . . . . . . . . . . . . . 71.5 Dealing with AJAX functionality . . . . . . . . . . . . . . . . . . . . . . . . . . . . 81.6 Create test suites . . . . . . . . . . . . . . . . . . . . . . . . . . . . . . . . . . . . . 91.7 Exexute test scripts in different browsers . . . . . . . . . . . . . . . . . . . . . . . . 101.8 Further references . . . . . . . . . . . . . . . . . . . . . . . . . . . . . . . . . . . . . 11
2 Selenium IDE extensions & plugins . . . . . . . . . . . . . . . . . . . . . . . . . . . . . 122.1 Using the UI-map user-extension . . . . . . . . . . . . . . . . . . . . . . . . . . . . . 132.2 Using the flow control user-extension . . . . . . . . . . . . . . . . . . . . . . . . . . 162.3 Using the data driven user-extension . . . . . . . . . . . . . . . . . . . . . . . . . . 172.4 Using the highlight elements plugin . . . . . . . . . . . . . . . . . . . . . . . . . . . 192.5 Using the power debugger plugin . . . . . . . . . . . . . . . . . . . . . . . . . . . . 202.6 Using the stored variables viewer plugin . . . . . . . . . . . . . . . . . . . . . . . . . 212.7 Using the favorites plugin . . . . . . . . . . . . . . . . . . . . . . . . . . . . . . . . 222.8 Further references . . . . . . . . . . . . . . . . . . . . . . . . . . . . . . . . . . . . . 23
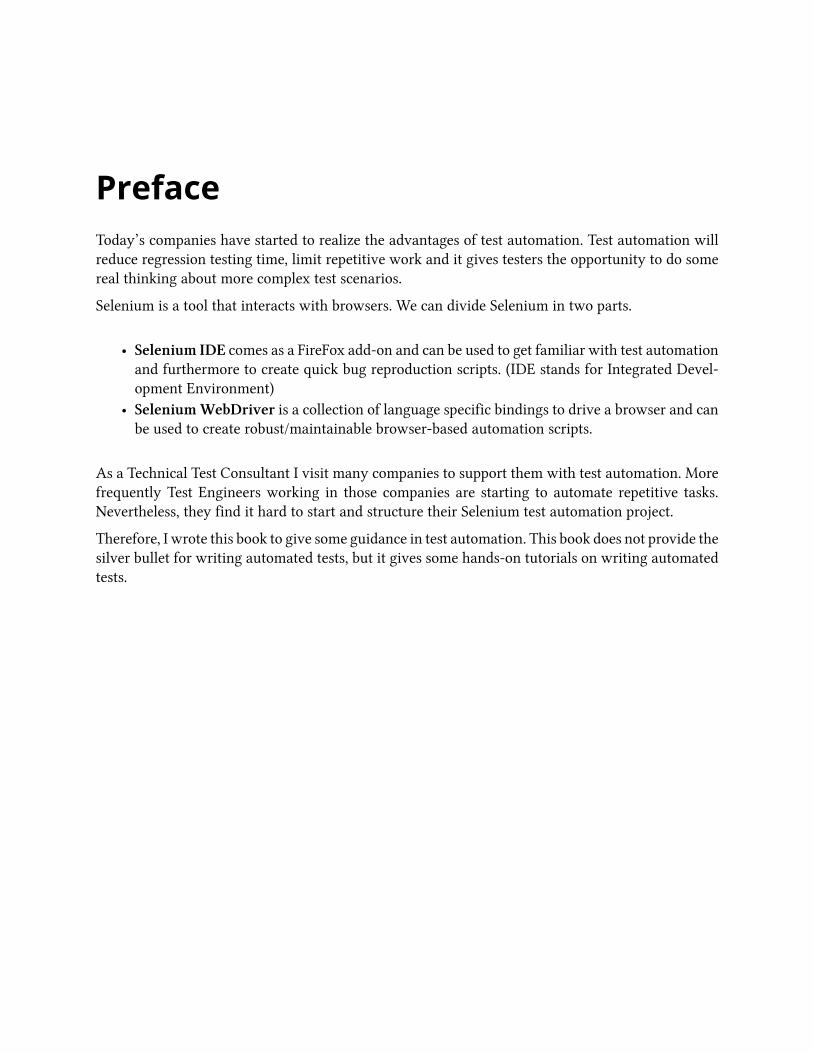
PrefaceToday’s companies have started to realize the advantages of test automation. Test automation willreduce regression testing time, limit repetitive work and it gives testers the opportunity to do somereal thinking about more complex test scenarios.
Selenium is a tool that interacts with browsers. We can divide Selenium in two parts.
• Selenium IDE comes as a FireFox add-on and can be used to get familiar with test automationand furthermore to create quick bug reproduction scripts. (IDE stands for Integrated Devel-opment Environment)
• SeleniumWebDriver is a collection of language specific bindings to drive a browser and canbe used to create robust/maintainable browser-based automation scripts.
As a Technical Test Consultant I visit many companies to support them with test automation. Morefrequently Test Engineers working in those companies are starting to automate repetitive tasks.Nevertheless, they find it hard to start and structure their Selenium test automation project.
Therefore, I wrote this book to give some guidance in test automation. This book does not provide thesilver bullet for writing automated tests, but it gives some hands-on tutorials on writing automatedtests.
Preface ii
In this book
Chapter 1, Selenium IDE: Selenium IDE is a great tool to get familiar with test automation. Thischapter describes how you can start implementing recorded scripts.
Chapter 2, Selenium IDE extensions & plugins: Selenium IDE has some shortcomings. Some of themcan be easily resolved by installing plugins or applying extensions, these are discussed in this chapter.
Chapter 3, Locators: Selenium is using a locator mechanism to identify elements of a web application.This chapter demonstrates some useful locator strategies.
Chapter 4, Implementing a Testing Framework: In order to execute testscripts we have to implementa testing framework. This chapter describes the basic usage of a testing framework.
Chapter 5, Interact with the Browser: Selenium can simulate all kinds of user actions. This chapterdemonstrates the most frequently used Selenium WebDriver API calls to interact with the browser.
Chapter 6, Advanced browser interaction: This chapter will describe more advanced browserinteractions, such as drag and drop and synchronization solutions.
Chapter 7, Improved assertions: In chapter 4 we implemented a testing framework. This frameworkwill provide some ways of making assertions, although they may not be sufficient. This chapter willintroduce a more flexible way of making assertions.
Chapter 8, Advanced Testing Framework Usage: In chapter 4 we implemented a basic testingframework. This framework can be enriched with data providers, grouping tests and listeners, thesetopics will be covered in this chapter.
Chapter 9, Make your Test Maintainable: Maintainability challenges will increase with the numberof tests implemented. This chapter will introduce some design patterns to make your tests moremaintainable and easier to read.
Chapter 10, Test Results: This section will be filled in shortly.
Chapter 11, Selenium Grid: Functional testing is slow! So ideally we would like to execute multipletests all at once. This chapter introduces Selenium Grid which allows you to run multiple tests allat once and execute those tests against different browsers.
Chapter 12, Measuring Client-Side Performance: Web applications are becoming more complexthese days, mostly because of A-synchronous communication. This chapter describes some waysof measuring client-side performance.
Chapter 13, Testing over a proxy: This section will be filled in shortly.
Preface iii
Book structure
We will use a demo website to explain the examples. The website can be found onhttp://selenium.polteq.com/testshop/, it represents an E-commerce website.
Each chapter includes tutorials about the chapters topic. Most tutorials have an In Practice sectiondemonstrating a working example.
Every chapter ends with a Further references section pointing you to other references.

Preface iv
Source code
All the source code will be available on GitHub in the following repository:https://github.com/roydekleijn/testshop
Preface v
About the author
Roy de Kleijn is a Technical Test Consultant at Polteq where heworks with clients on test process andautomation, mainly in agile teams, and develops and presents training in Selenium/WebDriver. Heis especially interested in web technology, new programming languages and knowledge transfermethods. He publishes Selenium-related tutorials at http://selenium.polteq.com and test-relatedarticles at http://rdekleijn.nl.
Do not hesitate to contact Roy in case you have questions, suggestions or improvements related tothis book.
• E-mail: [email protected]• Skype: roy.de.kleijn
Preface vi
About Polteq
Polteq, quality in testing services. This describes the services and courses of Polteq best. Polteq isan independent provider of (inter)national testing services and market leader in the Netherlands.Our professionals can fulfil the role of test engineer or test manager within your organization.Furthermore Polteq is specialized in supporting organizations to improve their testing processes, testautomation, managing test outsourcing and providing training sessions (including certification).
By flexible and self-reliant anticipation of the developments within the IT industry and by offeringour professionals room for personal development, Polteq is capable of continuously innovatingthe testing profession, of operating on national and international markets as a trend setter, and,consequently, of consolidating its role as a top-class expert, pioneer and market leader.
All employees chose Polteq to fully focus themselves on the testing craft in a small (100+ profession-als), flexible and informal company with an open working culture, where everyone is appreciatedand respected. All colleagues know each other and this forms a unique bond of professionals.
To ensure the high quality of service, Polteq finds that continuous education for all its employees andthe sharing of knowledge and experience are a must. Not only the development of testing methodsand techniques are of importance but also the development of personal and communication skills.

1 Selenium IDESelenium IDE (Integrated Development Environment) is a tool that we can use to develop automatedtest scripts. It has record-and-playback functionality, but we can also write the test scripts ourselvesby manually entering the commands. It comes with a browser context menu with the mostfrequently used Selenium commands. It saves test execution time and is a good way to get familiarwith test automation.
This chapter will explain the main functionality of Selenium IDE.
Selenium IDE 2
1.1 Using Selenium IDE for the first time
Selenium IDE comes as a Firefox plug-in and has an easy-to-use user interface. Although theinterface is very intuitive the most frequently used parts are explained in this section.
Prerequisites
As we are going to use Selenium IDE for the first time, the first thing we have to do is to make surethat Firefox and Selenium IDE are installed properly.
1. Go to http://getfirefox.com and install Firefox.2. Go to http://seleniumhq.org/download/ in the Firefox browser and install Selenium IDE.3. Restart Firefox if requested.
In practice
We can now open Selenium IDE by using the following actions:
1. Open Firefox2. Open Selenium IDE, via the Tools menu.
Selenium IDE 3
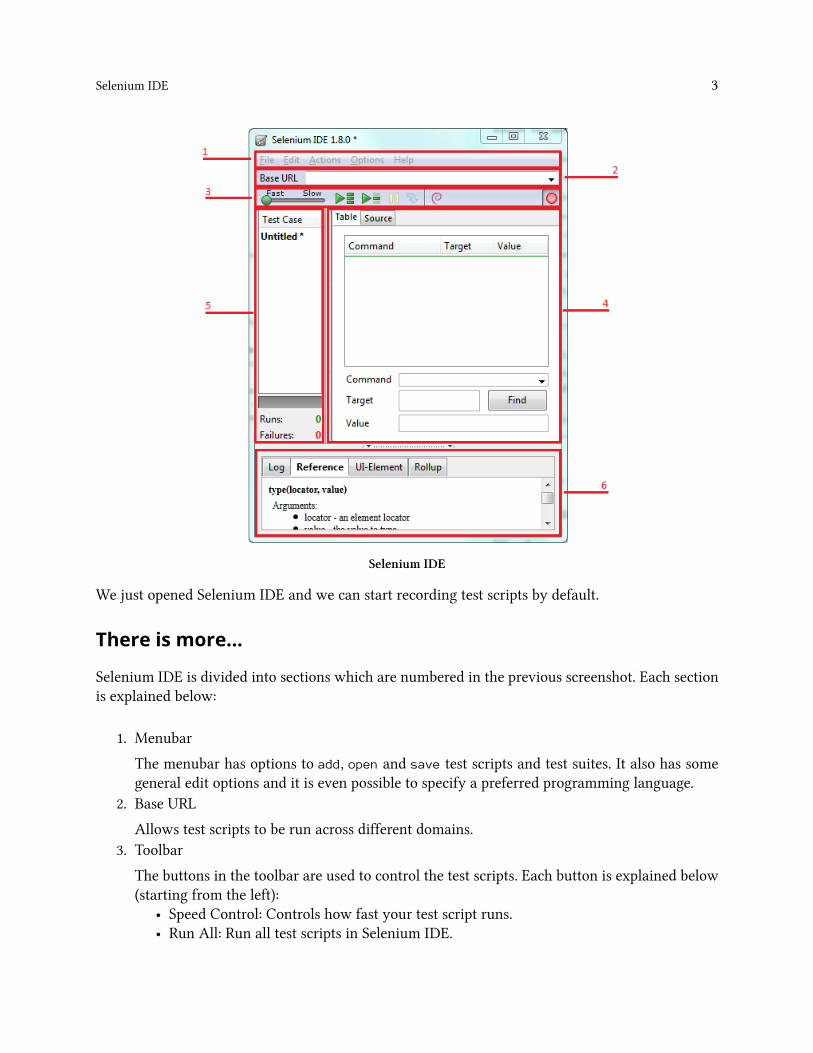
Selenium IDE
We just opened Selenium IDE and we can start recording test scripts by default.
There is more…
Selenium IDE is divided into sections which are numbered in the previous screenshot. Each sectionis explained below:
1. Menubar
The menubar has options to add, open and save test scripts and test suites. It also has somegeneral edit options and it is even possible to specify a preferred programming language.
2. Base URL
Allows test scripts to be run across different domains.3. Toolbar
The buttons in the toolbar are used to control the test scripts. Each button is explained below(starting from the left):
• Speed Control: Controls how fast your test script runs.• Run All: Run all test scripts in Selenium IDE.

Selenium IDE 4
• Run: Run a single test script in Selenium IDE.• Pause/Resume: Pause a running test script.• Step: Step through the test script once it has been paused.• Apply Rollup Rules: This allows us to group a sequence of actions into a single action.• Record: The record button. It will be enabled when Selenium IDE is recording.
4. test script pane
The test script commands are displayed in the test script pane. There is one tab which showsus the script in the three-column table format. The other tab shows us the script in a preferredlanguage.
The Command, Target and value textfields are corresponding to the three-column tablestructure. It is possible to edit the values by clicking on a specific row. Those three fieldsare explained below:
• Command: This select box has a list of all the Selenium commands. It is possible to typeinto it to use the auto complete functionality or use it as a dropdown. Some referenceinformation is shown in the reference pane at the bottom once a specific action isselected.
• Action: The first parameter specified for a command in the Reference tab of the bottompane always goes in the Target field.
• Value: If a second parameter is specified by the Reference tab, it always goes in the Valuefield.
5. Test suite pane
Shows the test scripts in the current test-suite along with the results.6. Log/Reference pane
The bottom pane is used for four different functions divided in separate tabs, like: Log,Reference, UI-Element, and Rollup information. Each function is explained below:
• Log: Error messages and information messages are shown while the test is running.• Reference: Displays the documentation of the command actually selected.• UI-Element: Displays the UI-element mappings actually in use.• Rollup: Shows rollup rules.
Selenium IDE 5
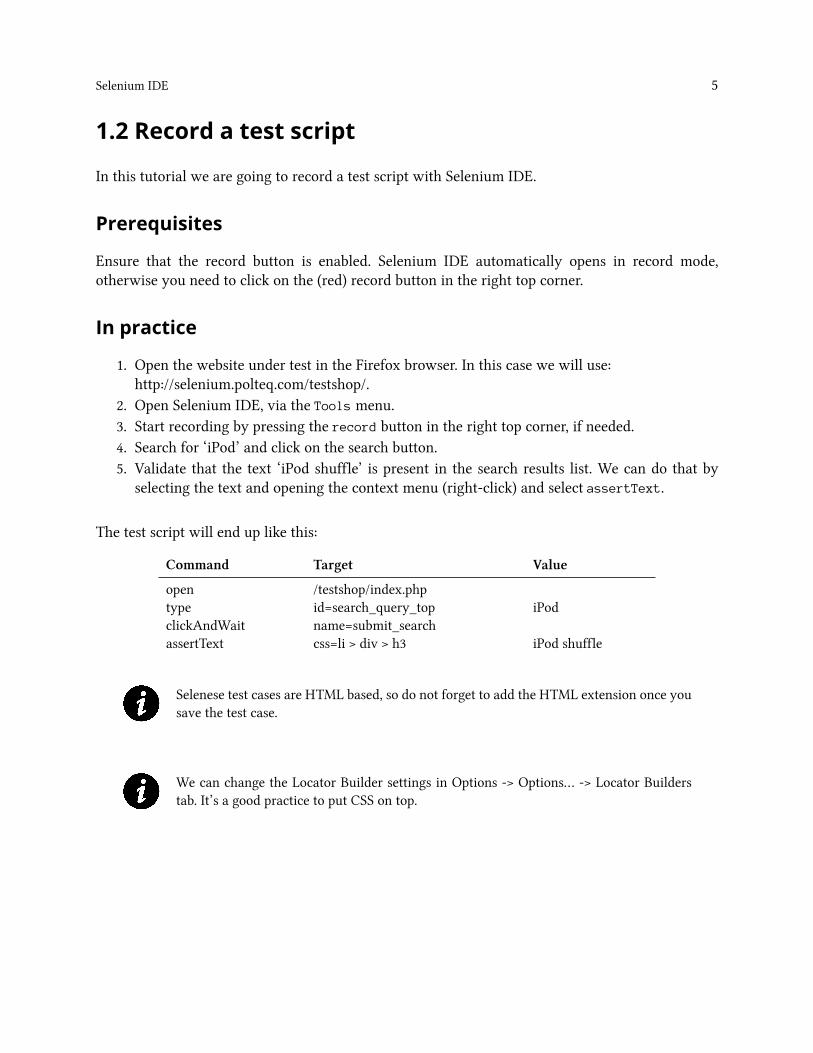
1.2 Record a test script
In this tutorial we are going to record a test script with Selenium IDE.
Prerequisites
Ensure that the record button is enabled. Selenium IDE automatically opens in record mode,otherwise you need to click on the (red) record button in the right top corner.
In practice
1. Open the website under test in the Firefox browser. In this case we will use:http://selenium.polteq.com/testshop/.
2. Open Selenium IDE, via the Tools menu.3. Start recording by pressing the record button in the right top corner, if needed.4. Search for ‘iPod’ and click on the search button.5. Validate that the text ‘iPod shuffle’ is present in the search results list. We can do that by
selecting the text and opening the context menu (right-click) and select assertText.
The test script will end up like this:
Command Target Value
open /testshop/index.phptype id=search_query_top iPodclickAndWait name=submit_searchassertText css=li > div > h3 iPod shuffle
Selenese test cases are HTML based, so do not forget to add the HTML extension once yousave the test case.
We can change the Locator Builder settings in Options -> Options… -> Locator Builderstab. It’s a good practice to put CSS on top.

Selenium IDE 6
1.3 Modify a test script
In this tutorial we will modify a test script by adding some commands manually.
Prerequisites
We can use the test script created in the previous tutorial, but now we want to change the languagewithout recording the test again.
In practice
1. Open the previous recorded test script.2. Select the row where we want to put an extra command.3. Ensure that record mode is enabled.4. Click on a specific language.5. Disable record mode.
The test script will end up like this:
Command Target Value
open /testshop/click css=img[alt=”en”]type id=search_query_top iPodclickAndWait name=submit_searchassertText css=li > div > h3 iPod shuffle
We just added an extra command to our previous recorded test script.
Selenium IDE 7
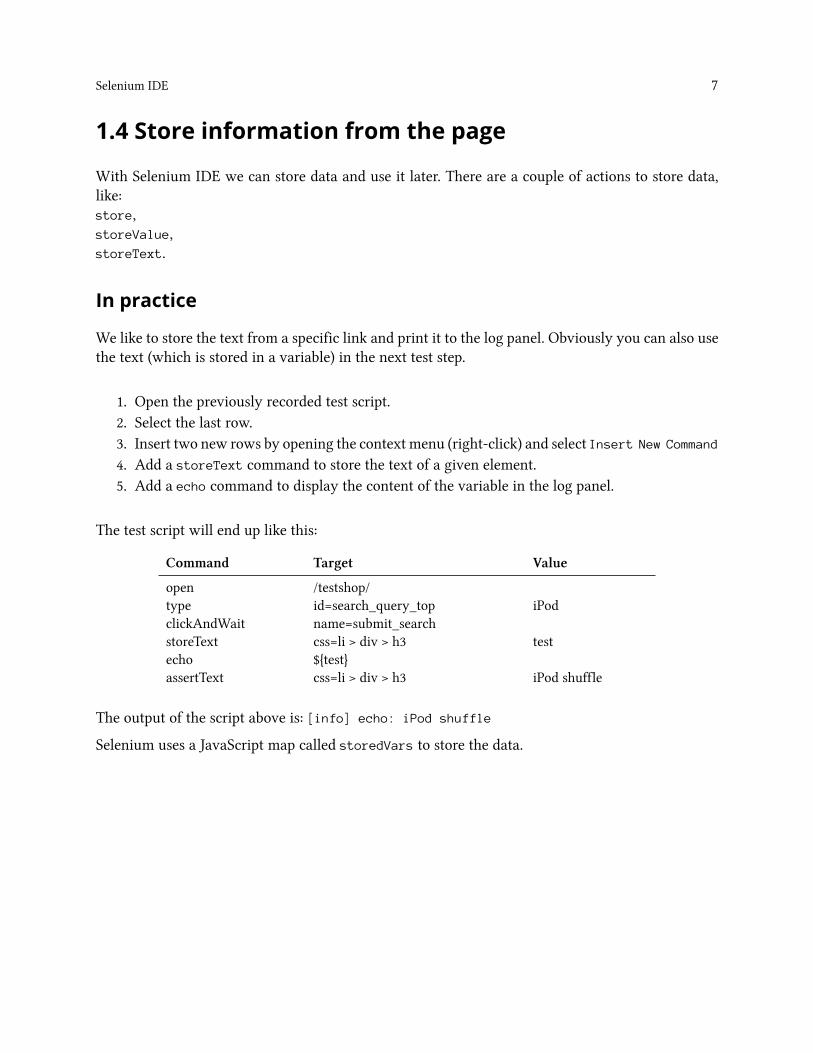
1.4 Store information from the page
With Selenium IDE we can store data and use it later. There are a couple of actions to store data,like:store,storeValue,storeText.
In practice
We like to store the text from a specific link and print it to the log panel. Obviously you can also usethe text (which is stored in a variable) in the next test step.
1. Open the previously recorded test script.2. Select the last row.3. Insert two new rows by opening the context menu (right-click) and select Insert New Command
4. Add a storeText command to store the text of a given element.5. Add a echo command to display the content of the variable in the log panel.
The test script will end up like this:
Command Target Value
open /testshop/type id=search_query_top iPodclickAndWait name=submit_searchstoreText css=li > div > h3 testecho ${test}assertText css=li > div > h3 iPod shuffle
The output of the script above is: [info] echo: iPod shuffle
Selenium uses a JavaScript map called storedVars to store the data.
Selenium IDE 8
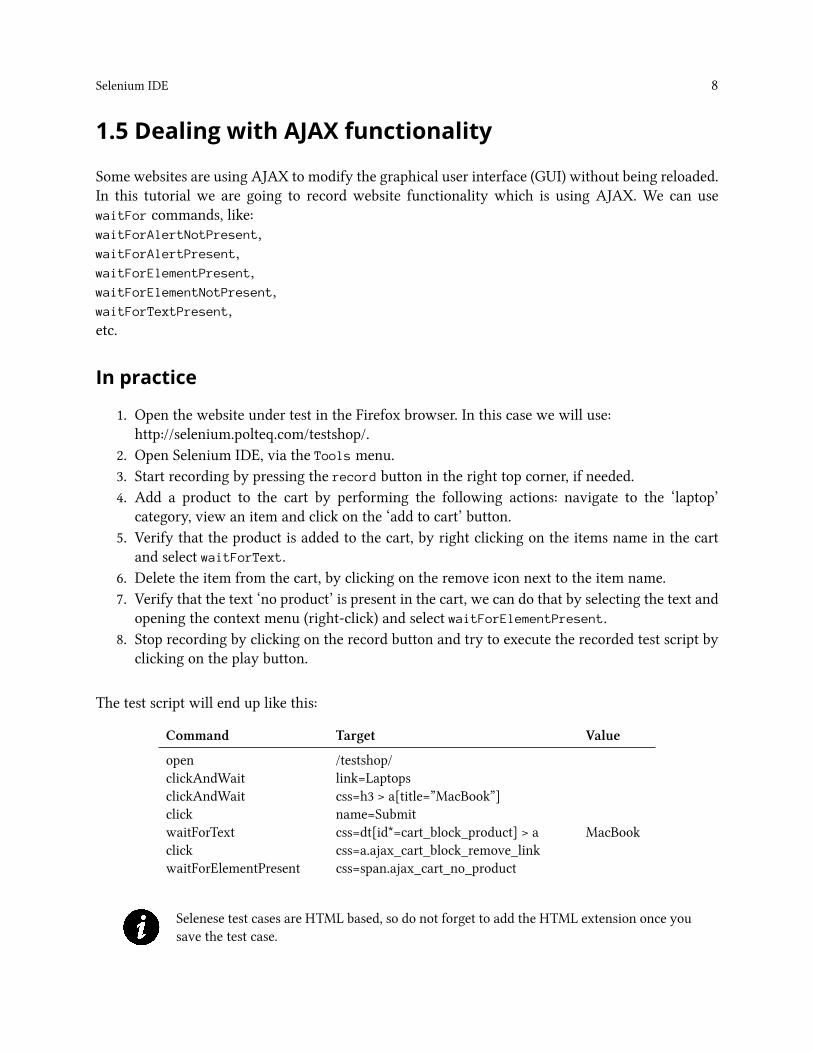
1.5 Dealing with AJAX functionality
Some websites are using AJAX to modify the graphical user interface (GUI) without being reloaded.In this tutorial we are going to record website functionality which is using AJAX. We can usewaitFor commands, like:waitForAlertNotPresent,waitForAlertPresent,waitForElementPresent,waitForElementNotPresent,waitForTextPresent,etc.
In practice
1. Open the website under test in the Firefox browser. In this case we will use:http://selenium.polteq.com/testshop/.
2. Open Selenium IDE, via the Tools menu.3. Start recording by pressing the record button in the right top corner, if needed.4. Add a product to the cart by performing the following actions: navigate to the ‘laptop’
category, view an item and click on the ‘add to cart’ button.5. Verify that the product is added to the cart, by right clicking on the items name in the cart
and select waitForText.6. Delete the item from the cart, by clicking on the remove icon next to the item name.7. Verify that the text ‘no product’ is present in the cart, we can do that by selecting the text and
opening the context menu (right-click) and select waitForElementPresent.8. Stop recording by clicking on the record button and try to execute the recorded test script by
clicking on the play button.
The test script will end up like this:
Command Target Value
open /testshop/clickAndWait link=LaptopsclickAndWait css=h3 > a[title=”MacBook”]click name=SubmitwaitForText css=dt[id*=cart_block_product] > a MacBookclick css=a.ajax_cart_block_remove_linkwaitForElementPresent css=span.ajax_cart_no_product
Selenese test cases are HTML based, so do not forget to add the HTML extension once yousave the test case.
Selenium IDE 9
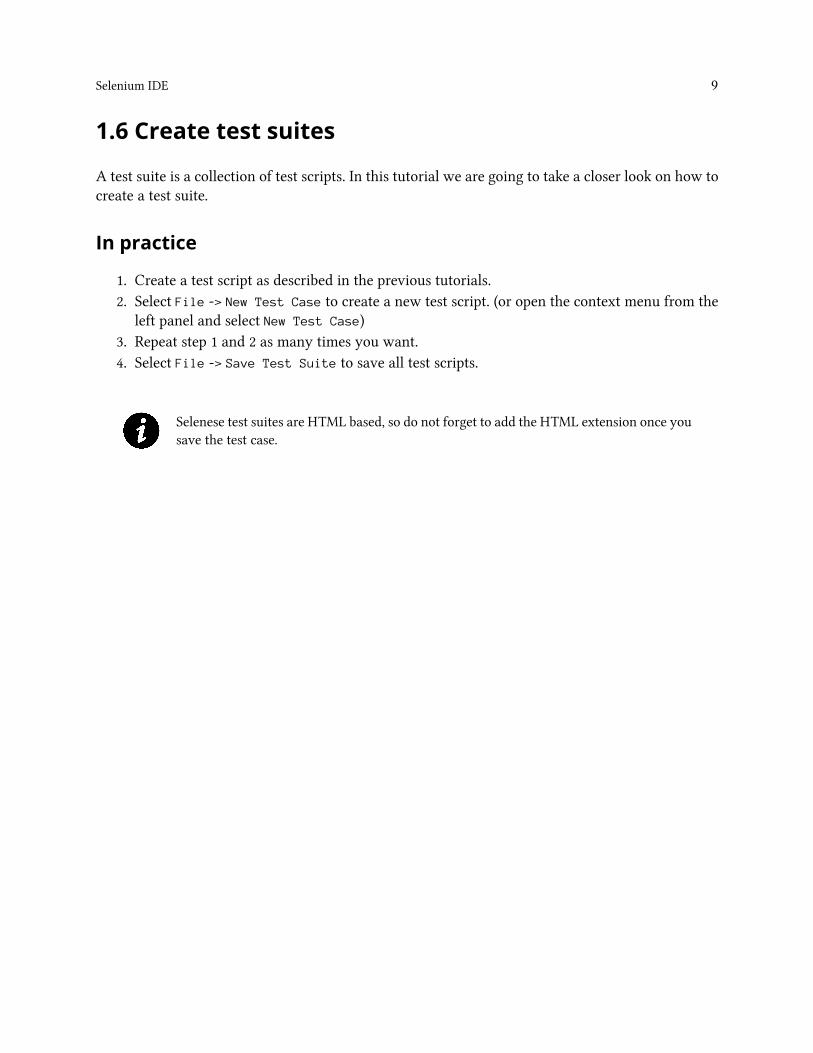
1.6 Create test suites
A test suite is a collection of test scripts. In this tutorial we are going to take a closer look on how tocreate a test suite.
In practice
1. Create a test script as described in the previous tutorials.2. Select File -> New Test Case to create a new test script. (or open the context menu from the
left panel and select New Test Case)3. Repeat step 1 and 2 as many times you want.4. Select File -> Save Test Suite to save all test scripts.
Selenese test suites are HTML based, so do not forget to add the HTML extension once yousave the test case.

Selenium IDE 10
1.7 Exexute test scripts in different browsers
In this tutorial we are going to execute test scripts in different browsers.
Prerequisites
It is necessary to download the Selenium standalone server, IEDriverServer and chromedriver.(http://code.google.com/p/selenium/downloads/list)
In practice
1. We need to start Selenium standalone server by entering the following command in thecommandline:
1 java -jar selenium-server-standalone-2.39.0.jar -Dwebdriver.ie.driver=IEDriverSe\
2 rver.exe -Dwebdriver.chrome.driver=chromedriver.exe`
2. We need to enable WebDriver Playback in Selenium IDE. Options -> Options... ->WebDriver tab and check Enable WebDriver Playback
3. Specify in which browser we like to run our test scripts Options -> Options... -> WebDriver
tab and specify the browser in the textfield. (chrome, firefox, internet explorer and so on)
Now you can run your test script with WebDriver in the specified browser.
Selenium IDE 11
1.8 Further references
All the Selenium IDE commands are explained on the following location:http://release.seleniumhq.org/selenium-core/1.0.1/reference.html

2 Selenium IDE extensions & pluginsSelenium IDE (Integrated Development Environment) can be enriched with user-extensions, suchas: logical statements and data driven testing. It also allows us to create our own actions, assertionsand even your own locator strategies. Those extensions are written in JavaScript and will be loadedon IDE’s start up.
As of Selenium IDE version 1.0.4 Selenium can also be extended through its own plugin system.They will mainly add new functionality to Selenium IDE, such as: extra buttons in the toolbar.
Selenium IDE extensions & plugins 13
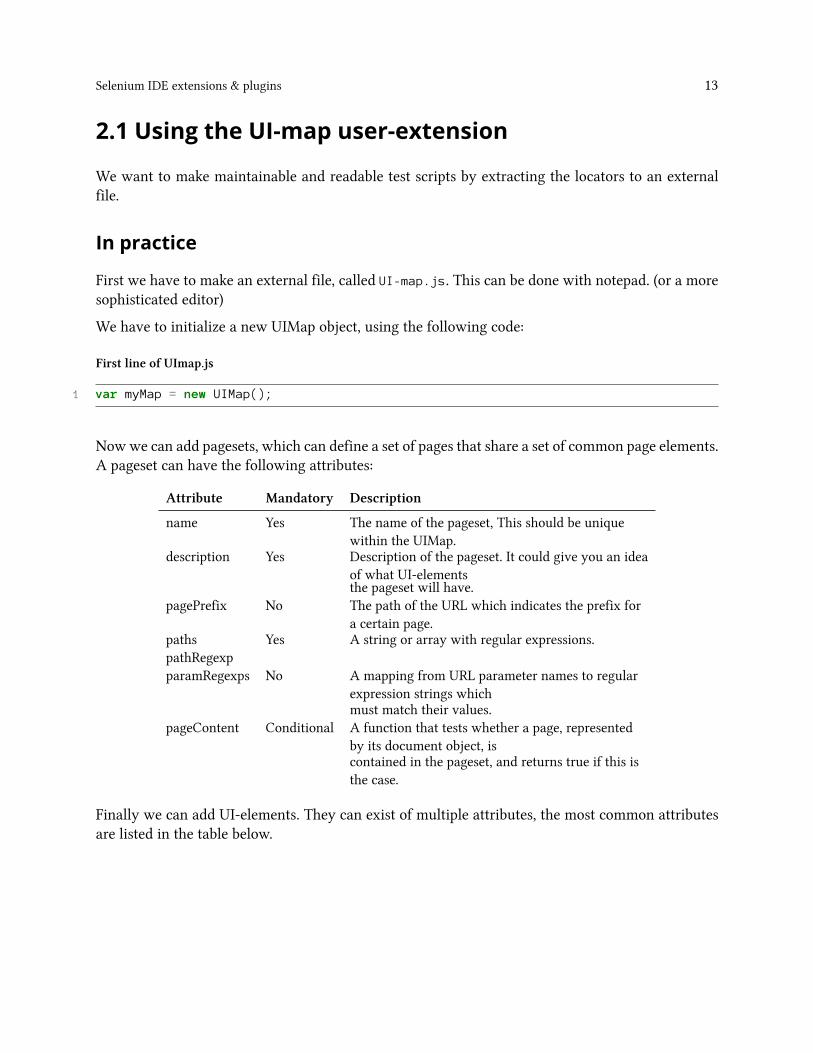
2.1 Using the UI-map user-extension
We want to make maintainable and readable test scripts by extracting the locators to an externalfile.
In practice
First we have to make an external file, called UI-map.js. This can be done with notepad. (or a moresophisticated editor)
We have to initialize a new UIMap object, using the following code:
First line of UImap.js
1 var myMap = new UIMap();
Nowwe can add pagesets, which can define a set of pages that share a set of common page elements.A pageset can have the following attributes:
Attribute Mandatory Description
name Yes The name of the pageset, This should be uniquewithin the UIMap.
description Yes Description of the pageset. It could give you an ideaof what UI-elementsthe pageset will have.
pagePrefix No The path of the URL which indicates the prefix fora certain page.
paths Yes A string or array with regular expressions.pathRegexpparamRegexps No A mapping from URL parameter names to regular
expression strings whichmust match their values.
pageContent Conditional A function that tests whether a page, representedby its document object, iscontained in the pageset, and returns true if this isthe case.
Finally we can add UI-elements. They can exist of multiple attributes, the most common attributesare listed in the table below.
Selenium IDE extensions & plugins 14
Attribute Mandatory Description
name Yes Name of the elementdescription Yes Description of the element. This is used for
documentation purposes.args No A list of arguments that will modify the getLocator()
method.locatorgetLocator Yes Either a fixed locator string, or a function that returns
a locator string givena set of arguments.
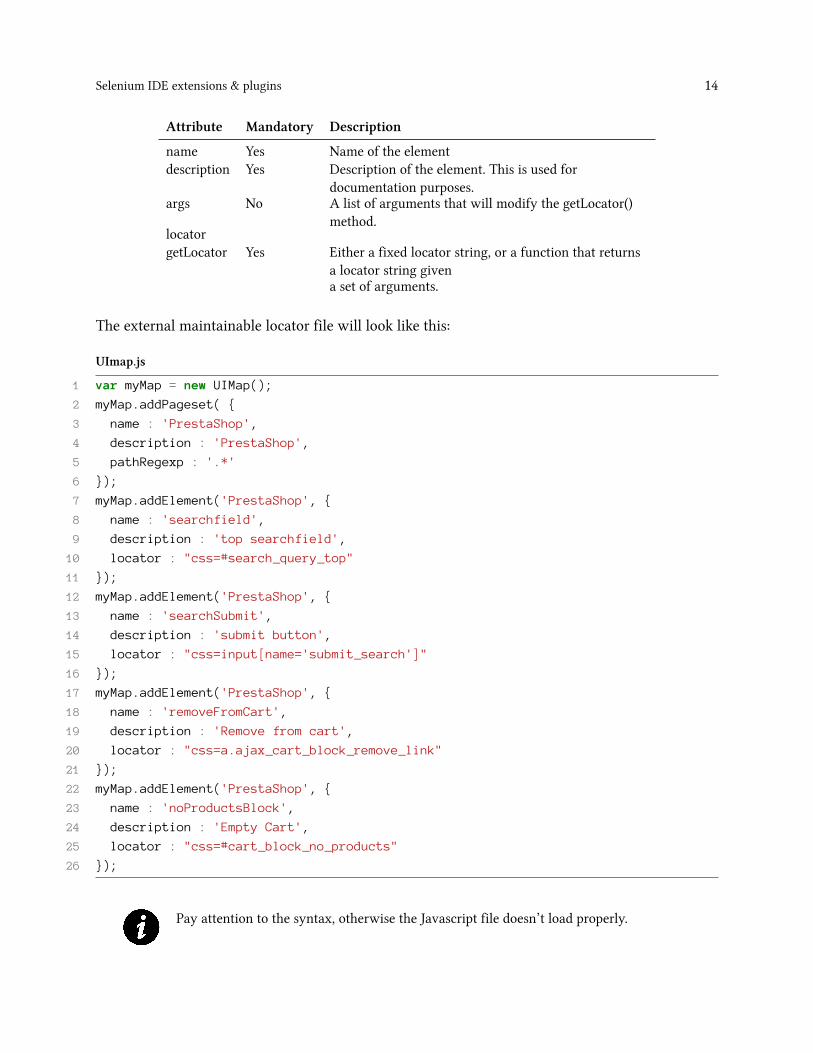
The external maintainable locator file will look like this:
UImap.js
1 var myMap = new UIMap();
2 myMap.addPageset( {
3 name : 'PrestaShop',
4 description : 'PrestaShop',
5 pathRegexp : '.*'
6 });
7 myMap.addElement('PrestaShop', {
8 name : 'searchfield',
9 description : 'top searchfield',
10 locator : "css=#search_query_top"
11 });
12 myMap.addElement('PrestaShop', {
13 name : 'searchSubmit',
14 description : 'submit button',
15 locator : "css=input[name='submit_search']"
16 });
17 myMap.addElement('PrestaShop', {
18 name : 'removeFromCart',
19 description : 'Remove from cart',
20 locator : "css=a.ajax_cart_block_remove_link"
21 });
22 myMap.addElement('PrestaShop', {
23 name : 'noProductsBlock',
24 description : 'Empty Cart',
25 locator : "css=#cart_block_no_products"
26 });
Pay attention to the syntax, otherwise the Javascript file doesn’t load properly.

Selenium IDE extensions & plugins 15
After creating the external file we can embed it in Selenium IDE.
1. Open Selenium IDE by selecting Selenium IDE from the Tools menu in Firefox.2. Open the Options window by clicking Options -> Options...
3. Set the location of the UI-map, using the Browse... button.4. Click on OK to confirm the modifications and reopen Selenium IDE to make changes effect.5. The target textfield has been changed to a selectbox with the locators from the UI-map.
Selenium IDE - changed Target field
We made the locators known in Selenium IDE following the previous steps. We are now able toselect locators by their meaningful name.

Selenium IDE extensions & plugins 16
2.2 Using the flow control user-extension
We want to add conditional statements to our tests. This tutorial will show different ways of usingconditional statements.
Prerequisites
We have to make the flow-control user-extension available in Selenium IDE by loading the fileinto the IDE. The flow-control user-extension can be downloaded from the following location:http://wiki.openqa.org/display/SEL/flowControl
In practice
This user-extension provides a couple of logical functions, like: label, goto, gotoIf and while loops.We can define points in our tests to navigate to. We can place the label command in front of aselection of code.
Command Target Value
label name_of_label
There are twoways to navigate to the labelled selection of code.We canmake a conditional statementor we can just jump to that selection. The first table shows the goto command and the second tableshows a conditional statement.
Command Target Value
gotolabel name_of_label
Command Target Value
gotoIf Conditional statement name_of_label
We have also the ability to make a conditional loop, a while-loop.
Command Target Value
while Conditional statement//Script within the while-loopendWhile

Selenium IDE extensions & plugins 17
2.3 Using the data driven user-extension
There are several reasons for implementing data driven testing. Imagine we have to test a Telecomapplication, where we need unique phone numbers for every test. Or we have to test an insuranceapplication, where we need unique policy numbers for every test. Or we have to test a bankingapplication, where we need unique account numbers for every test cycle. For those reasons it couldbe extremely useful to populate the test with test data from an external file. This can be done withthe data driven user-extension.
Prerequisites
We have to make the flow-control, include and datadriven user-extension available in SeleniumIDE by loading the file into the IDE. The user-extensions can be downloaded from the followinglocation: http://wiki.openqa.org/display/SEL/datadriven
In practice
The first thing we need to do is creating an XML file with test data, which can be used in the tests.The test data in the XML file is written as a key/value structure and will look like this:
datadriven.xml
1 <testdata>
2 <vars key1="value1" key2="value2"/>
3 </testdata>
Once we have the XML with test data, we can build or modify our tests. We have to load the XMLfile and walk through the test data rows. For each row we have to execute the test. The script willlook like this:
Command Target Value
loadTestData pathToXmlFile
While !testdata.EOF()NextTestData//Script within the while-loopendWhile
pathToXmlFile must start with file://<drive>:/<path> on Windows computers.
pathToXmlFile must start with file:///<drive>:/<path> on Mac computers.
Selenium IDE extensions & plugins 18
The user-extensions are loaded into the core of Selenium. The script will load an XML file from apreferred location and execute the script for every single line of test data in the XML. We can callthe keys from the test script itself, like this ${key1} and ${key2}
It’s currently not supported to run tests which are using extensions in other browsers. Makesure that you disabled WebDriver Playback: Options -> Options... -> WebDriver tab anduncheck Enable WebDriver Playback
Selenium IDE extensions & plugins 19
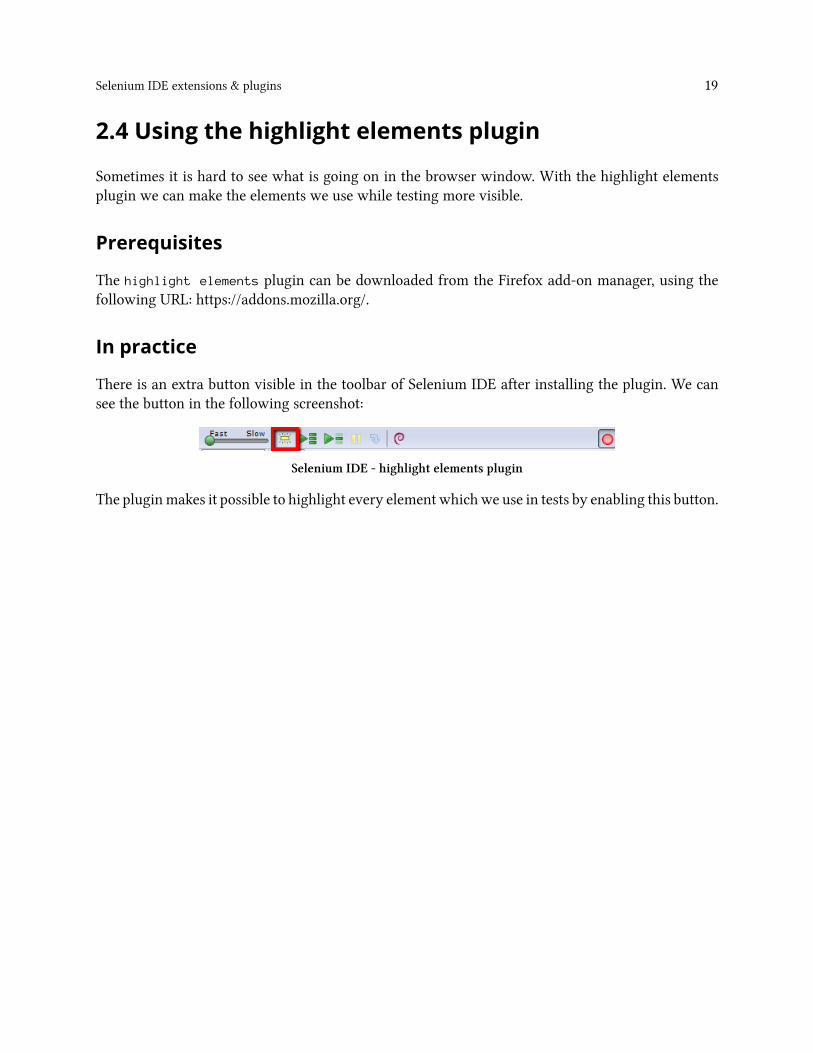
2.4 Using the highlight elements plugin
Sometimes it is hard to see what is going on in the browser window. With the highlight elementsplugin we can make the elements we use while testing more visible.
Prerequisites
The highlight elements plugin can be downloaded from the Firefox add-on manager, using thefollowing URL: https://addons.mozilla.org/.
In practice
There is an extra button visible in the toolbar of Selenium IDE after installing the plugin. We cansee the button in the following screenshot:
Selenium IDE - highlight elements plugin
The pluginmakes it possible to highlight every element whichwe use in tests by enabling this button.
Selenium IDE extensions & plugins 20
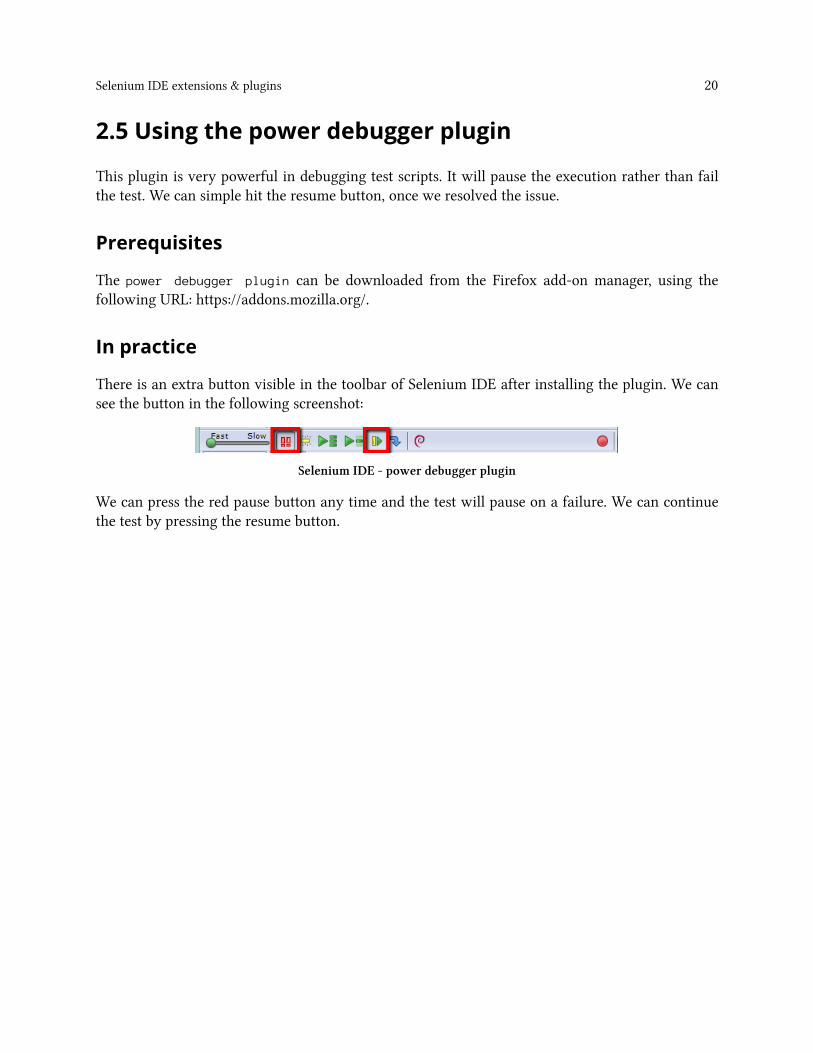
2.5 Using the power debugger plugin
This plugin is very powerful in debugging test scripts. It will pause the execution rather than failthe test. We can simple hit the resume button, once we resolved the issue.
Prerequisites
The power debugger plugin can be downloaded from the Firefox add-on manager, using thefollowing URL: https://addons.mozilla.org/.
In practice
There is an extra button visible in the toolbar of Selenium IDE after installing the plugin. We cansee the button in the following screenshot:
Selenium IDE - power debugger plugin
We can press the red pause button any time and the test will pause on a failure. We can continuethe test by pressing the resume button.

Selenium IDE extensions & plugins 21
2.6 Using the stored variables viewer plugin
Selenium IDE provides the capability to store values in variables while running the test. The storevariables viewer plugin makes it possible to display the values in the logging panel.
Prerequisites
The stored variables viewer plugin can be downloaded from the Firefox add-on manager, usingthe following URL: https://addons.mozilla.org/.
In practice
There will be an extra tab in the logging panel at the bottom of Selenium IDE. The extra tab isdisplayed in the following screenshot:
Selenium IDE - stored variables viewer plugin
Selenium IDE extensions & plugins 22
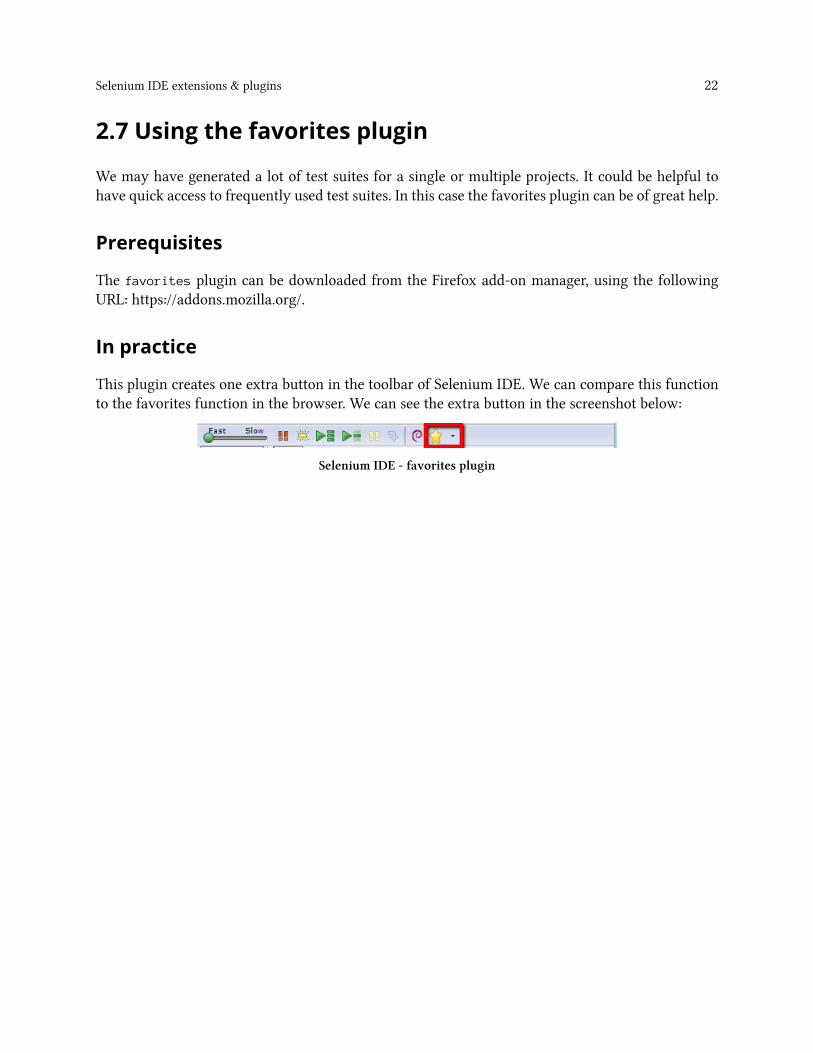
2.7 Using the favorites plugin
We may have generated a lot of test suites for a single or multiple projects. It could be helpful tohave quick access to frequently used test suites. In this case the favorites plugin can be of great help.
Prerequisites
The favorites plugin can be downloaded from the Firefox add-on manager, using the followingURL: https://addons.mozilla.org/.
In practice
This plugin creates one extra button in the toolbar of Selenium IDE. We can compare this functionto the favorites function in the browser. We can see the extra button in the screenshot below:
Selenium IDE - favorites plugin

Selenium IDE extensions & plugins 23
2.8 Further references
More plugins are listed on the following location: http://docs.seleniumhq.org/download/
More extentions are listed on the following location:http://wiki.openqa.org/display/SEL/Contributed+User-Extensions