Learning Online Network with CAPA - uni-frankfurt.de · Learning Online Network with CAPA...
91
Learning Online Network with CAPA Author’s Tutorial And Manual January 6, 2009 LON-CAPA Group Michigan State University 1
-
Upload
truongdang -
Category
Documents
-
view
217 -
download
1
Transcript of Learning Online Network with CAPA - uni-frankfurt.de · Learning Online Network with CAPA...

Learning Online Network with CAPA
Author’s Tutorial And Manual
January 6, 2009
LON-CAPA Group
Michigan State University
1

CONTENTS 2
Contents
1 Introduction to LON-CAPA 51.1 About This Manual . . . . . . . . . . . . . . . . . . . . . . . . . . . . . . . . 51.2 Login as Course Author . . . . . . . . . . . . . . . . . . . . . . . . . . . . . 51.3 Author Remote Control . . . . . . . . . . . . . . . . . . . . . . . . . . . . . 6
2 Creating Content Using LON-CAPA 72.1 Description of the Construction Space . . . . . . . . . . . . . . . . . . . . . . 72.2 How to Create New Content Pages . . . . . . . . . . . . . . . . . . . . . . . 72.3 How to Edit Existing Content Pages . . . . . . . . . . . . . . . . . . . . . . 82.4 Creating Online Problems Using LON-CAPA . . . . . . . . . . . . . . . . . 92.5 Problem Types . . . . . . . . . . . . . . . . . . . . . . . . . . . . . . . . . . 92.6 Foils . . . . . . . . . . . . . . . . . . . . . . . . . . . . . . . . . . . . . . . . 92.7 Radio Response Problems . . . . . . . . . . . . . . . . . . . . . . . . . . . . 92.8 Option Response Problems . . . . . . . . . . . . . . . . . . . . . . . . . . . . 92.9 String Response Problems . . . . . . . . . . . . . . . . . . . . . . . . . . . . 102.10 Numerical Response Problems . . . . . . . . . . . . . . . . . . . . . . . . . . 102.11 Formula Response Problems . . . . . . . . . . . . . . . . . . . . . . . . . . . 102.12 Math Response Problems . . . . . . . . . . . . . . . . . . . . . . . . . . . . . 112.13 Creating Radio Response Problems . . . . . . . . . . . . . . . . . . . . . . . 12
2.13.1 Randomization . . . . . . . . . . . . . . . . . . . . . . . . . . . . . . 142.14 Option Response Problems . . . . . . . . . . . . . . . . . . . . . . . . . . . . 15
2.14.1 Option Response Problems with Concept Groups . . . . . . . . . . . 152.14.2 Example: Concept Group . . . . . . . . . . . . . . . . . . . . . . . . 152.14.3 Example: Matching Problem . . . . . . . . . . . . . . . . . . . . . . . 162.14.4 Creating Option Problems . . . . . . . . . . . . . . . . . . . . . . . . 162.14.5 Simple Option Response: No Concept Groups . . . . . . . . . . . . . 18
2.15 Custom Response Problems . . . . . . . . . . . . . . . . . . . . . . . . . . . 182.16 Creating a String Response Problem . . . . . . . . . . . . . . . . . . . . . . 192.17 Creating Numerical Response and Formula Response Problems . . . . . . . . 212.18 Dynamically Generated Plots . . . . . . . . . . . . . . . . . . . . . . . . . . 222.19 Specifying Curves to Plot . . . . . . . . . . . . . . . . . . . . . . . . . . . . 252.20 Color Selection . . . . . . . . . . . . . . . . . . . . . . . . . . . . . . . . . . 282.21 General Problem Editing . . . . . . . . . . . . . . . . . . . . . . . . . . . . . 28
2.21.1 Adding Picture . . . . . . . . . . . . . . . . . . . . . . . . . . . . . . 28
3 Printing Your Resources 283.1 Printing from Construction Space . . . . . . . . . . . . . . . . . . . . . . . . 283.2 Printing a Subdirectory of Problems . . . . . . . . . . . . . . . . . . . . . . 293.3 Tips for Improving Print Output . . . . . . . . . . . . . . . . . . . . . . . . 29
3.3.1 TeXsize attribute . . . . . . . . . . . . . . . . . . . . . . . . . . . . . 303.3.2 TeXwidth attribute . . . . . . . . . . . . . . . . . . . . . . . . . . . . 313.3.3 TeXDropEmptyColumns attribute . . . . . . . . . . . . . . . . . . . . 313.3.4 Image TeX attributes . . . . . . . . . . . . . . . . . . . . . . . . . . . 313.3.5 TeX Type attribute . . . . . . . . . . . . . . . . . . . . . . . . . . . . 323.3.6 TeX Itemgroup attribute . . . . . . . . . . . . . . . . . . . . . . . . . 333.3.7 TeX Item Group Width attribute . . . . . . . . . . . . . . . . . . . . 33

CONTENTS 3
3.3.8 TeX Layout attribute . . . . . . . . . . . . . . . . . . . . . . . . . . . 333.4 Troubleshooting PDF Errors . . . . . . . . . . . . . . . . . . . . . . . . . . . 34
4 Publishing Your Resources 354.1 What is Metadata? . . . . . . . . . . . . . . . . . . . . . . . . . . . . . . . . 354.2 Publishing A Resource . . . . . . . . . . . . . . . . . . . . . . . . . . . . . . 35
5 Creating A Course: Maps and Sequences 375.1 Creating Sequences . . . . . . . . . . . . . . . . . . . . . . . . . . . . . . . . 385.2 Creating a Simple .sequence With The Simple Editor . . . . . . . . . . . . . 385.3 Creating a Simple .sequence With The Advanced Editor . . . . . . . . . . . 395.4 Page Maps . . . . . . . . . . . . . . . . . . . . . . . . . . . . . . . . . . . . . 425.5 Creating a Course: Top-level Sequence . . . . . . . . . . . . . . . . . . . . . 42
6 Numerical Response And Formula Response Questions 436.1 The Parts of a Numerical Response Problem . . . . . . . . . . . . . . . . . . 436.2 Simple Numerical Response Answer . . . . . . . . . . . . . . . . . . . . . . . 466.3 Simple Script Usage . . . . . . . . . . . . . . . . . . . . . . . . . . . . . . . . 46
6.3.1 Variables in Scripts . . . . . . . . . . . . . . . . . . . . . . . . . . . . 476.3.2 Variables in the Text Block . . . . . . . . . . . . . . . . . . . . . . . 476.3.3 Variables in the Answer Block . . . . . . . . . . . . . . . . . . . . . . 47
6.4 Calling Functions . . . . . . . . . . . . . . . . . . . . . . . . . . . . . . . . . 486.4.1 Numerical Response Randomization . . . . . . . . . . . . . . . . . . . 48
6.5 Dynamic, Randomized Problems: Putting It All Together . . . . . . . . . . . 486.6 Units, Format . . . . . . . . . . . . . . . . . . . . . . . . . . . . . . . . . . . 496.7 For More Information . . . . . . . . . . . . . . . . . . . . . . . . . . . . . . . 496.8 Formula Response . . . . . . . . . . . . . . . . . . . . . . . . . . . . . . . . . 50
6.8.1 Sample Specifications . . . . . . . . . . . . . . . . . . . . . . . . . . . 506.8.2 Formula Notes . . . . . . . . . . . . . . . . . . . . . . . . . . . . . . 516.8.3 Example Formula Response . . . . . . . . . . . . . . . . . . . . . . . 51
7 Tags Used in XML Authoring 517.1 Response Tags . . . . . . . . . . . . . . . . . . . . . . . . . . . . . . . . . . . 51
7.1.1 numericalresponse . . . . . . . . . . . . . . . . . . . . . . . . . . . . . 527.1.2 imageresponse . . . . . . . . . . . . . . . . . . . . . . . . . . . . . . . 527.1.3 optionresponse . . . . . . . . . . . . . . . . . . . . . . . . . . . . . . 527.1.4 radiobuttonresponse . . . . . . . . . . . . . . . . . . . . . . . . . . . 537.1.5 dataresponse . . . . . . . . . . . . . . . . . . . . . . . . . . . . . . . 537.1.6 externalresponse . . . . . . . . . . . . . . . . . . . . . . . . . . . . . 537.1.7 Attributes For All Response Tags . . . . . . . . . . . . . . . . . . . . 54
7.2 responseparam and parameter . . . . . . . . . . . . . . . . . . . . . . . . . . 547.3 Foil Structure Tags . . . . . . . . . . . . . . . . . . . . . . . . . . . . . . . . 547.4 Hint Tags . . . . . . . . . . . . . . . . . . . . . . . . . . . . . . . . . . . . . 557.5 Input Tags . . . . . . . . . . . . . . . . . . . . . . . . . . . . . . . . . . . . . 557.6 Output Tags . . . . . . . . . . . . . . . . . . . . . . . . . . . . . . . . . . . . 557.7 Internal Tags . . . . . . . . . . . . . . . . . . . . . . . . . . . . . . . . . . . 597.8 Scripting Tags . . . . . . . . . . . . . . . . . . . . . . . . . . . . . . . . . . . 597.9 Structure Tags . . . . . . . . . . . . . . . . . . . . . . . . . . . . . . . . . . 60

CONTENTS 4
8 <script> Tag 618.1 Supported script functions . . . . . . . . . . . . . . . . . . . . . . . . . . . . 618.2 Script Variables . . . . . . . . . . . . . . . . . . . . . . . . . . . . . . . . . . 638.3 Table: LON-CAPA functions . . . . . . . . . . . . . . . . . . . . . . . . . . . 638.4 Table: CAPA vs. LON-CAPA function differences . . . . . . . . . . . . . . . 69
9 Bridge Task 739.1 Introduction to Bridge Task . . . . . . . . . . . . . . . . . . . . . . . . . . . 749.2 Bridge Task Features . . . . . . . . . . . . . . . . . . . . . . . . . . . . . . . 749.3 Creating Bridge Task . . . . . . . . . . . . . . . . . . . . . . . . . . . . . . . 759.4 Bridge Task XML Editing . . . . . . . . . . . . . . . . . . . . . . . . . . . . 76
9.4.1 .Task Headers . . . . . . . . . . . . . . . . . . . . . . . . . . . . . . . 779.4.2 .Task Parameter and Variable . . . . . . . . . . . . . . . . . . . . . . 779.4.3 .Task Questions and Criteria . . . . . . . . . . . . . . . . . . . . . . . 799.4.4 .Task Finishing Up . . . . . . . . . . . . . . . . . . . . . . . . . . . . 81
9.5 Bridge Task Edit Mode . . . . . . . . . . . . . . . . . . . . . . . . . . . . . . 819.5.1 Introductions . . . . . . . . . . . . . . . . . . . . . . . . . . . . . . . 829.5.2 Questions and Criteria . . . . . . . . . . . . . . . . . . . . . . . . . . 839.5.3 Parameter and Variable . . . . . . . . . . . . . . . . . . . . . . . . . 859.5.4 Edit Mode Finishing Up . . . . . . . . . . . . . . . . . . . . . . . . . 86
9.6 Setting Up a Bridge Task . . . . . . . . . . . . . . . . . . . . . . . . . . . . 879.6.1 Bridge Task and Slots . . . . . . . . . . . . . . . . . . . . . . . . . . 889.6.2 Bridge Task and Conditional Resources . . . . . . . . . . . . . . . . . 88
9.7 Handing In Bridge Task Files . . . . . . . . . . . . . . . . . . . . . . . . . . 89
10 Appendix: Symbols in Tex 8910.1 Greek Symbols . . . . . . . . . . . . . . . . . . . . . . . . . . . . . . . . . . 8910.2 Other Symbols . . . . . . . . . . . . . . . . . . . . . . . . . . . . . . . . . . 90

1 INTRODUCTION TO LON-CAPA 5
Figure 1: LON-CAPA Log in screen
1 Introduction to LON-CAPA
LON-CAPA is a web-based interface that helps to organize and present your course website,deliver and manage problems, and manage student enrollment. All author functions aredone through a web browser (Netscape 4.x or higher, a recent Mozilla, or IE 5+ required).
At this time, you should have:
• developed your objectives for your course.
• developed your problems for input into LON-CAPA and determined the appropriatequestion formats.
1.1 About This Manual
Throughout this manual, keywords and phrases literally present on the computer screen willbe referred to in bold type. Function names and scripts will be shown in a typewriter
font.Much of this document can be used as a tutorial that will introduce you to the authoring
system.For additional help, visit our FAQ at http://help.loncapa.org/.
1.2 Login as Course Author
To begin using LON-CAPA, you first need to log in to your account on LON-CAPA. Openyour web browser and navigate to your local LON-CAPA URL. You will be presented witha log in screen.
Fill in the Username and Password boxes with your information. Then press the Loginbutton. This will take you to your LON-CAPA User Roles menu.

1 INTRODUCTION TO LON-CAPA 6
Figure 2: Author Remote Control
Note: Your Username and Password will be given to you by your system administrator.Both are case sensitive, so make sure you type them with the correct case.
1.3 Author Remote Control
The Author Remote Control will automatically load whenever you log in to LON-CAPA asthe course instructor. The Author Remote Control is a separate window in your browser,and is automatically sized and placed in the upper left of the screen. The Remote Controlis a tool that allows you to switch between functions and roles within LON-CAPA.
When you move your mouse over the buttons in the remote, the sixteen gray boxes willshow a reminder of what that button does.
• ROLES (CHOOSE ROLE) allows you to select which user role to assume for thissession.
• COM (COMMUNICATION) allows you to access the communication functions inthe system.
• CUSR (USER ROLES) brings up a page that allows you to create new users andchange user privileges.
• CSTR (CONSTRUCT) displays the construction space for your account.

2 CREATING CONTENT USING LON-CAPA 7
• RES (RESOURCE SPACE) allows you to browse the LON-CAPA network direc-tory.
• SRC (SEARCH LIBRARY) brings up a screen that lets you search the LON-CAPAresources using multiple criteria.
• PREF (PREFERENCES) brings up a screen that allows you to change some pref-erences.
• EXIT (LOGOUT) will log you out of the LON-CAPA system.
2 Creating Content Using LON-CAPA
LON-CAPA provides three types of resources for organizing your course website. LON-CAPA refers to these resources as Content Pages, Problems, and Maps. Maps may be eitherof two types: Sequences or Pages. You will use these LON-CAPA resources to build theoutline, or structure, for the presentation of your course to your students.
• A Content Page displays course content. It is essentially a conventional HTML page.These resources use the extension “.html”.
• A Problem resource represents problems for the students to solve, with answers storedin the system. These resources are stored in files that must use the extension “.prob-lem”.
• A Sequence is a type of Map which is used to link other resources together. The usersof this resource can use directional buttons on their remote or the NAV button to followthe sequence. Sequences are stored in files that must use the extension “.sequence”.Sequences can contain other sequences and pages.
• A Page is a type of Map which is used to join other resources together into one HTMLpage. For example, a page of problems will appears as a problem set. These resourcesare stored in files that must use the extension “.page”.
2.1 Description of the Construction Space
The Construction Space is the section of LON-CAPA where you create and manage yourcourse resources. The figure explains what each button does.
2.2 How to Create New Content Pages
Content Pages are HTML documents that display the course information you are present-ing.
Many users use tools such as Dreamweaver to create web pages. To upload HTML filesgenerated with such tools, you can use the Browse button in the Construction Space, locateyour HTML file, and use the Upload File button to create a content page in LON-CAPA.Remember to upload any graphics your generated web pages may have included.
To create new Content Pages, do the following:

2 CREATING CONTENT USING LON-CAPA 8
Figure 3: Construction SpaceContents of the Construction Space:
Button Name Description
Publish this Resource Opens the Resource Publishing window.List Directory Lists the contents of the current working directory
Copy Type a new name in the entry box to make a copy the current resourceBrowse Helps you select a file to upload
Upload File Uploads the selected file to your Construction SpaceRetrieve Old Version Load an older version of a resource if you have multiple versions
Delete Deletes the current resourceRename Type a new name in the associated entry box to rename a resource
New Subdirectory Type a name in the entry box to create a new directory
1. Click the CSTR button on the LON-CAPA remote. Your web page will change toyour Construction Space.
2. In the Location bar of your browser, type in the full URL of the new Content Page.Make sure the last part of the URL ends with “.html”, for example,http://(your library server)/priv/username/new resource.html .Press the Return or Enter key.
3. Type the content into the editor, OR copy and paste HTML source code obtainedthrough the use of some other HTML authoring program into the editor.
4. Optionally, click the View button to preview your Content Page.
5. Finally, click the Save this button OR click the Save and then attempt to cleanHTML button.
Repeat this process as many times as necessary to create your Content Pages.If you’re following this as a tutorial, create at least one content page, which we’ll use later
as raw material. Visit the FAQ at http://help.lon-capa.org/ if you get “unmatched tag”warnings.
2.3 How to Edit Existing Content Pages
You may edit any Content Pages that have been created.To edit Content Pages:
1. Click the CSTR button on the LON-CAPA Remote. Your web page will change toyour Construction Space.
2. Click on the link for the name of the Content Page to edit. The Content Page editorwill load and display the current edition of the Content Page.

2 CREATING CONTENT USING LON-CAPA 9
3. Press the Edit button. Edit the HTML code, or copy and paste HTML source codeinto the editor.
4. Finally, click the Save this button OR click the Save and then attempt to cleanHTML button. If you do not do this, your work will not be saved.
Once you’ve saved your page, you can click the View button to preview your Content Page.
2.4 Creating Online Problems Using LON-CAPA
If you’re following this as a tutorial, create one of each of these problem types now. We’llbe using them later as raw material to assemble maps and sequences.
While several problem types are listed here, in LON-CAPA all problems are actuallythe same. All problems are written in XML, which can be obtained and edited with theEditXML button. The problem types listed in this manual are just templates. As yourknowledge advances, you may wish to play with the XML representation directly to see whatyou can do.
2.5 Problem Types
In this manual we will cover five basic types of problems: Radio Response, Option Response,String Response, Numerical Response, and Formula Response. You will need to identifywhich types of problem you want to use and create appropriate questions for your course.
The problem editor gives you a testing area where you can try your problems out, withseveral different randomizations by varying the Random Seed. If you answer a problemcorrectly and can no longer enter new answers, you can get the answer field back by hittingthe Reset Submissions button.
2.6 Foils
In the LON-CAPA system, a Foil is the statement after the drop-down box or radio buttonin a Radio Response or Option Response problem. Foils do not need to be text; they can beimages or other resources.
2.7 Radio Response Problems
Radio Response problems present a list of foils with buttons. The student can select oneof these statements by clicking the appropriate radio button.
2.8 Option Response Problems
Option Response problems present foils to the student with drop-down boxes. The studentcan select the matching choice for the foils from a list of choices. Optionally, the foils may bebundled into Concept Groups and the system will select one foil from each group to displayto the student.
By default, the list of options is presented in front of the foils. Using the optional<drawoptionlist /> tag, the list of options can be embedded into the foil.

2 CREATING CONTENT USING LON-CAPA 10
Figure 4: Formula Response Problem
2.9 String Response Problems
String Response problems allow the student to submit a string of characters for the answer.Examples of String Response questions are vocabulary tests, short answers and chemicalformulas.
Note that it is easy to abuse String Response problems. For instance, consider thequestion “Who wrote ’Huckleberry Finn’?” If you tell the system the answer is “MarkTwain”, and a student answers “Twain”, the system will mark it wrong. If they answer“Samuel Clemens”, then the student will definitely get it wrong. There is some room forflexibility in the string processing, but it can be difficult to get it all correct. Before you usea String Response problem, be sure you can easily characterize correct answers.
2.10 Numerical Response Problems
Numerical Response problems are answered by entering a number and (optionally) a unit,such as 2.5 m/sˆ2. Tolerance and required significant digits can be specified as well.
2.11 Formula Response Problems
Formula Response problems ask the student to type in a formula as an answer. If theanswer is 2x2 + 4, the student is allowed to type “2*x*x+4”, “x*x + x*x + 4”, “2*xˆ2 +14 - 10”, or any other equivalent expression. Formula Response problems have many of thesame characteristics of Numerical Response problems, including the ability to run scripts,dynamically generate answers, etc.

2 CREATING CONTENT USING LON-CAPA 11
2.12 Math Response Problems
Math Response is a way to have a problem graded based on an algorithm that is executedinside of a computer algebra system. The use of this response type is generally discouraged,since the responses will not be analyzable by the LON-CAPA statistics tools.
Which computer algebra system is to be used is specified in the cas argument of themathresponse tag; currently, only Maxima is available. LON-CAPA sets up two arrays insidethe computer algebra system: RESPONSE and LONCAPALIST. RESPONSE contains thestudent input by component, for example, if ”3,42,17” is entered, RESPONSE[2] would be42. LONCAPALIST contains the arguments passed in the args of mathresponse.
The answerdisplay is what is displayed when the problem is in ”Show Answer” mode.The following example illustrates this.
<problem>
<script type="loncapa/perl">
$a1 = random(-6,6,4);
$a2 = random(-6,6,4);
$n1 = random(3,11,2);
$n2 = random(2,10,2);
$function = "$a1*cos($n1*x)+$a2*sin($n2*x)";
$example=&xmlparse(’An example would be <m eval="on">$(sin($n1\cdot x)+cos($n2\cdot x))/\sqrt2$</m>’);
</script>
<startouttext />
Give an example of a function
<ol>
<li>
which is orthogonal to <algebra>$function</algebra> with respect to the
scalar product
<m>
\[<g \mid h> =
\frac1\pi \int_-\pi^\pidx g(x) \cdot h(x)\]
</m>
</li>
<li>
whose norm is 1.
</li>
</ol>
<endouttext />
<mathresponse answerdisplay="$example" cas="maxima" args="$function">
<answer>
overlap:integrate((RESPONSE[1])*(LONCAPALIST[1]),x,-%pi,%pi)/%pi;
norm:integrate((RESPONSE[1])*(RESPONSE[1]),x,-%pi,%pi)/%pi;
is(overlap=0 and norm=1);
</answer>
<textline readonly="no" size="50" />
<hintgroup showoncorrect="no">

2 CREATING CONTENT USING LON-CAPA 12
<mathhint name="ortho" args="$function" cas="maxima">
<answer>
overlap: integrate((LONCAPALIST[1])*(RESPONSE[1]),x,-%pi,%pi)/%pi;
is(not overlap = 0);
</answer>
</mathhint>
<mathhint name="norm" args="$function" cas="maxima">
<answer>
norm: integrate((RESPONSE[1])*(RESPONSE[1]),x,-%pi,%pi)/%pi;
is(not norm = 1);
</answer>
</mathhint>
<hintpart on="norm">
<startouttext />
The function you have provided does not have a norm of one.
<endouttext />
</hintpart>
<hintpart on="ortho">
<startouttext />
The function you have provided is not orthogonal.
<endouttext />
</hintpart>
</hintgroup>
</mathresponse>
<postanswerdate>
<startouttext />
<p>
Note that with respect to the above norm, <m>$\cos(nx)$</m> is perpendicular
to <m>$\sin(nx)$</m> and perpendicular to <m>$\cos(mx)$</m> for
<m>$n\ne m$</m>.
</p>
<endouttext />
</postanswerdate>
</problem>
2.13 Creating Radio Response Problems
To create a Radio Response problem, create a new resource as described in section 2.2.This is a “problem” resource so the URL must end in “.problem”. You should see a screenas in figure 5. You will need to specify the question text and foil statements.
1. In the drop-down option box, select Radio Response Problem, and click the NewProblem button.
2. Click the Edit button above the sample problem to enter edit mode. You should seean editing screen.

2 CREATING CONTENT USING LON-CAPA 13
Figure 5: Creating A New Problem Resource
Figure 6: Radio Response Creation Form

2 CREATING CONTENT USING LON-CAPA 14
9.
Figure 7: Hint Element
3. In the Text Block at the top of the problem, remove the sample text and type thequestion for your problem. Ex: “What is two plus two?”
4. Locate the Response: One of N statements element. In the Max Number ofShown Foils text box, place the number of foils you wish to display to the student.
5. Locate Foil 1. Remove the text that is in the text box and put the correct answer forthe problem in the Text Block. For example, “Four.” Make sure this is set to truein the Correct Option field.
6. Below it, you will see Foil 2. Remove the text in the text box and put an incorrectanswer for the problem. Ex: “Purple.” Make sure this is set to false in the CorrectOption field.
7. Repeat the previous step until you’ve filled in all of the other incorrect answers youwish to offer the students.
8. Once you’ve filled in all of the incorrect answers, change the Correct Options on theother foils to Unused.
10. Scroll down to the Hint element. Type some text that will help students when theyanswer incorrectly. You may delete the hint by selecting Yes from the Delete drop-down box.
11. Click the Submit Changes button located at the top of the frame. If you do not dothis, your changes will not be saved.
The Correct Option drop down box controls whether or not a given answer will be acceptedas a correct answer. If it is set to true, that answer will be considered a correct answer. Anynumber of foils can be marked true, but only one will be shown to any given student. If itis set to false, it will be considered an incorrect answer. If it is set to Unused, the systemwill not use that foil.
2.13.1 Randomization
LON-CAPA will randomize the choices presented to each student and the order they arepresented in. If you wish to present each student the same choices, make sure the MaximumNumber of Shown Foils box contains the number of incorrect answers, which will forcethem to all be displayed.

2 CREATING CONTENT USING LON-CAPA 15
Figure 8: Option Response Problem
2.14 Option Response Problems
2.14.1 Option Response Problems with Concept Groups
Each Option Response problem can have three parts:
1. The Concept Groups
2. The options for the students to select, by default “True” and “False”
3. The hint for the student
Each Concept Group has some number of foils representing questions which are conceptu-ally related. Option Response Problem Templates are available for 4 and 8 Concept Groups.When the Option Response problem is presented to a student, the LON-CAPA system willrandomly select one foil from each Concept Group and present it to the student. In orderto receive credit for the problem, the student must select the corresponding option from thedrop-down box for each given foil.
2.14.2 Example: Concept Group
A Concept Group may contain the following True/False questions:
• “Mark Twain” is the pen name of Samuel Clemens.
• Mark Twain wrote “The Call of the Wild”.
• Mark Twain wrote “Huckleberry Finn”.
• Mark Twain spent most of his life in the Congo.
For each foil, the author marks it true or false. When the student logs on and attemptsto answer this question, the student will see only one of the four choices for that ConceptGroup. They then go on to do the remaining three to seven Concept Groups in this questionbefore submitting their answer.

2 CREATING CONTENT USING LON-CAPA 16
2.14.3 Example: Matching Problem
Option Response problems can be used as matching problems.For example, you might want to ask the student to match musical compositions with
their composers. You could create an Option Response problem with 4 Concept Groups,and place the following four foil groups each in its own concept group:
• Claire de Lune, Ballade (Debussy)
• The Pastoral Symphony, The Ninth Symphony (Beethoven)
• Sleeping Beauty Suite, The Dance of the Sugar Plum Fairies (Tchaikovsky)
• Slavonic Dances, New World Symphony (Dvorak)
You could then add the following options to the option list:
• Debussy
• Beethoven
• Schubert
• Tchaikovsky
• Dvorak
The same answers can be used more than once, or not at all, as you see fit. It is conventionalto place such a warning in the Text Block describing the problem to the students.
2.14.4 Creating Option Problems
To create an Option Response problem, create a new resource as described in section 2.2.This is a “problem” resource so the URL must end in “.problem”. You should see a screenas in figure “Option Response Editor”.
1. In the drop-down option box as seen in figure 5, select Option Response Problemwith N Concept Groups, where N is the number of Concept Groups you wish theproblem to have, and click the New Problem button.
2. Click the Edit button above the sample problem to enter edit mode. You should seethe Option Response page open up.
3. Replace the text in the Text Block with text that explains the conditions for yourproblem.
4. Locate the Max Number of Shown Foils element and type a number from 1 to 8to display that number of questions. You cannot display more than one foil from eachconcept group, so this option will only reduce the number of foils displayed, if it is lessthan the number of concept groups in your Option Response problem.

2 CREATING CONTENT USING LON-CAPA 17
Figure 9: Option Response Editor
5. Now you must define the options the students can select. For each option you wish toadd to the Option Response question, type the option into the Add new Option boxin the Select Options section, then hit the Save Changes button. If you do not hitthe Save Changes button, your option will not be selectable below. (You can deleteunwanted options in the last step.)
6. Now, you need to define the question foils. Look for the foil with the name “One”.Type the question into the text box and select the correct option for that questionfrom the Correct Option drop-down menu. Click Submit Changes to save thisquestion foil. Repeat this step for all remaining foils.
7. Locate the foils that are not being used. In their Delete menus, set the value toYes. Once you’ve set the Delete menu value correctly for all the foils, click the SaveChanges button.
8. In the Hint area, provide a helpful hint for users who get the problem incorrect, andclick the Save Changes button.
9. Make sure all the options you want to delete are not used for any of your foils. If adeleted option is used in a foil, it will appear in a text box in the Correct Option areafor that foil. To make the drop-down box reappear, type an option already defined inthe Select Options field, and hit Submit Changes. A drop-down box will reappear.To delete the irrelevant options from the Option Response question, select that optionfrom the Delete an Option drop down, and hit the Save Changes button. Do thisfor each option you wish to remove.

2 CREATING CONTENT USING LON-CAPA 18
2.14.5 Simple Option Response: No Concept Groups
If you select Simple Option Response from the drop-down box, you will get a templatethat will allow you to enter up to eight foils with no grouping. The system will randomlymix these foils when presenting them to the student. You can have more foils than the MaxNum of Shown Foils so that each student will not have the identical foils.
2.15 Custom Response Problems
Custom Response is a way to have a problem graded based on an algorithm. The use ofthis response type is generally discouraged, since the responses will not be analyzable by theLON-CAPA statistics tools.
The student answer is stored in the variable $submission, and needs to be evaluated byPerl code inside the ¡answer¿-tag. Custom Response needs to return a standard LON-CAPA.The most common response are:
• EXACT ANS: return if solved exactly correctly
• APPROX ANS: return if solved approximately
• INCORRECT: return if not correct, uses up a try
• SIG FAIL, NO UNIT, EXTRA ANSWER, MISSING ANSWER, BAD FORMULA,WANTED NUMERIC: return if not correct for different reasons, does not use up a try
The answer display is shown instead of the student response in ’show answer’ mode. Thefollowing example illustrates this:
<problem>
<startouttext />Accept an answer of around 90 or -90<endouttext />
<customresponse answerdisplay="something near 90 or -90">
<answer type="loncapa/perl">
# We do not want a vector
if ($submission=~/\,/) return ’EXTRA_ANSWER’;
# Need a numerical answer here
if ($submission!~/^[\d\.\-\e]+$/i) return ’WANTED_NUMERIC’;
$difference=abs(90-abs($submission));
if ($difference==0) return ’EXACT_ANS’;
if ($difference < 0.1) return ’APPROX_ANS’;
return ’INCORRECT’;</answer>
<textline readonly="no" />
</customresponse>
</problem>
Full list of possible return codes:
• EXACT ANS: student is exactly correct
• APPROX ANS: student is approximately correct
• NO RESPONSE: student submitted no response

2 CREATING CONTENT USING LON-CAPA 19
• MISSING ANSWER: student submitted some but not all parts of a response
• EXTRA ANSWER: student submitted a vector of values when a scalar was expected
• WANTED NUMERIC: expected a numeric answer and didn’t get one
• SIG FAIL: incorrect number of Significant Figures
• UNIT FAIL: incorrect unit
• UNIT NOTNEEDED: Submitted a unit when one shouldn’t
• UNIT INVALID INSTRUCTOR: the unit provided by the author of the problem isunparsable
• UNIT INVALID STUDENT: the unit provided by the student is unparasable
• UNIT IRRECONCIBLE: the unit from the student and the instructor are of differenttypes
• NO UNIT: needed a unit but none was submitted
• BAD FORMULA: syntax error in submitted formula
• INCORRECT: answer was wrong
• SUBMITTED: submission wasn’t graded
• DRAFT: submission only stored
• MISORDERED RANK: student submitted a poorly order rank response
• ERROR: unable to get a grade
• ASSIGNED SCORE: there is a resource.partid.responseid.awarded the real awardedshould be set to the average of the individual awards
• TOO LONG: answer submission to CAPA engine longer than 500 characters
• INVALID FILETYPE: student tried to upload a file that was of an extension that wasnot specifically allowed
• COMMA FAIL: answer requires the use of comma grouping and it wasn’t provided orwas incorrect
2.16 Creating a String Response Problem
To create a String Response problem, create a new resource (described in 2.2). This is a“problem” resource so the URL must end in “.problem”.
1. In the drop-down option box as seen in 5, select String Response Problem, andclick the New Problem button.

2 CREATING CONTENT USING LON-CAPA 20
Figure 10: String Response Editor

2 CREATING CONTENT USING LON-CAPA 21
2. Click the Edit button above the sample problem to enter edit mode. You should seethe String Response editor page open up, which should look something like what yousee in the “String Response Editor” figure.
3. Clear the text from the Text Block at the top of the problem, and type in yourproblem.
4. In the Answer Box, type the correct answer.
5. Select the answer condition from the drop-down. There are three cases to choose from:
(a) cs: This means “Case Sensitive”. For example, this is useful in chemistry, whereHO and Ho are completely different answers. The student must match the caseof the answer.
(b) ci: This means “Case Insensitive”. The system does not use the case of theletters to determine the correctness of the answer. If the correct answer is “car”,the system will accept “car”, “CAR”, “Car”, “caR”, etc.
(c) mc: This means “Multiple Choice”. The student’s answers must contain thesame letters as the question author’s, but order is unimportant. This is usuallyused to give a multiple choice question in the question’s Text Block, which mayhave several correct parts. If the author sets the correct answer as “bcg”, thesystem will accept “bcg”, “cbg”, “gcb”, etc., but not “bc” or “abcg”.
It is conventional to inform the students if the problem is case sensitive, or that theorder of the answers doesn’t matter.
6. Optionally, locate the Single Line Text Entry Area block and set a length in theSize box. This will only affect the size of the box on the screen; if you set the box sizeto 2, the student can still enter 3 or more letters in their answer.
7. Scroll down to the Hint element, and type some text that will help students whenthey answer incorrectly, or delete the hint by setting the Delete field to Yes.
8. Click the Submit Changes button.
2.17 Creating Numerical Response and Formula Response Prob-lems
Numerical Response problems are answered by entering a number and an optional unit. Forinstance, a numerical response problem might have an answer of 2m/s2. Formula Responseproblems are answered by entering a mathematical formula. For instance, a formula responseproblem might have an answer of x2 +11. The answer may be in any equivalent format. Forinstance, for x2 + 11, the system will also accept x ∗ x+ 11 or x2 + 21− 10.
Creating Numerical Response and Formula Response problems starts the same as theother problem types, but because of the power of Numerical Response and Formula Responseproblems, they are covered in their own section after the end of the tutorial. For moreinformation about these problem types, please see section 6 for Numerical Response problemsand section 2.11 for Formula Response problems.
2 CREATING CONTENT USING LON-CAPA 22
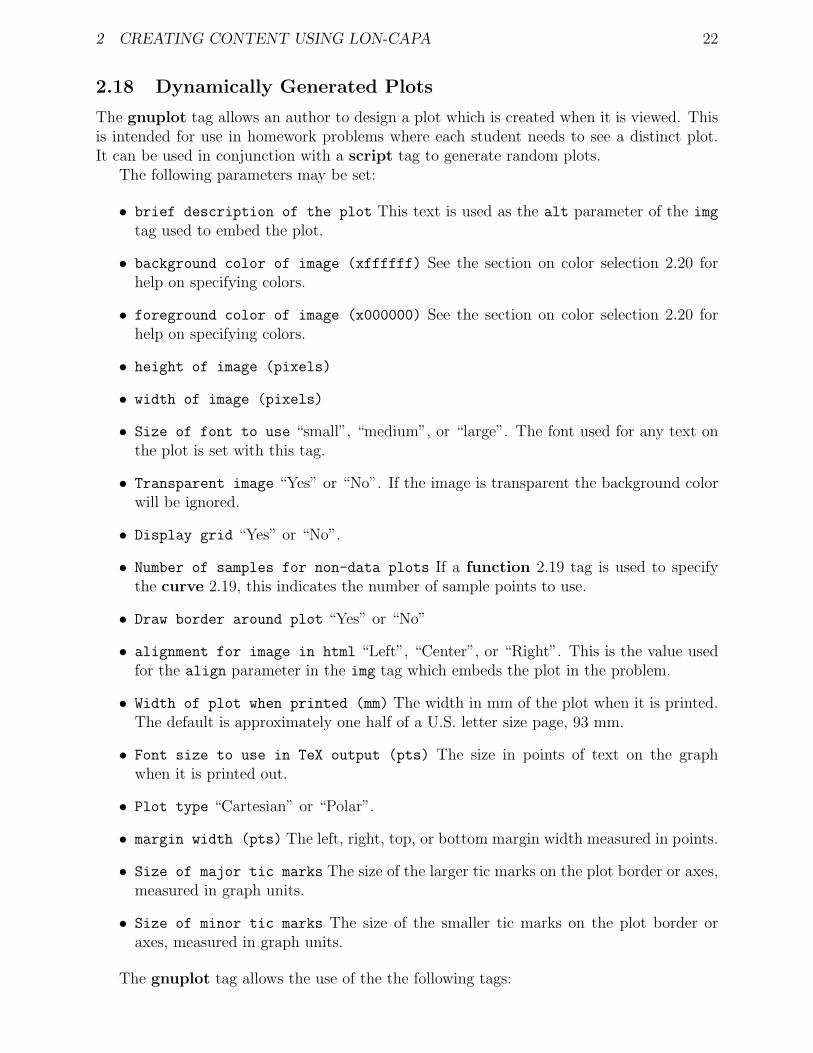
2.18 Dynamically Generated Plots
The gnuplot tag allows an author to design a plot which is created when it is viewed. Thisis intended for use in homework problems where each student needs to see a distinct plot.It can be used in conjunction with a script tag to generate random plots.
The following parameters may be set:
• brief description of the plot This text is used as the alt parameter of the img
tag used to embed the plot.
• background color of image (xffffff) See the section on color selection 2.20 forhelp on specifying colors.
• foreground color of image (x000000) See the section on color selection 2.20 forhelp on specifying colors.
• height of image (pixels)
• width of image (pixels)
• Size of font to use “small”, “medium”, or “large”. The font used for any text onthe plot is set with this tag.
• Transparent image “Yes” or “No”. If the image is transparent the background colorwill be ignored.
• Display grid “Yes” or “No”.
• Number of samples for non-data plots If a function 2.19 tag is used to specifythe curve 2.19, this indicates the number of sample points to use.
• Draw border around plot “Yes” or “No”
• alignment for image in html “Left”, “Center”, or “Right”. This is the value usedfor the align parameter in the img tag which embeds the plot in the problem.
• Width of plot when printed (mm) The width in mm of the plot when it is printed.The default is approximately one half of a U.S. letter size page, 93 mm.
• Font size to use in TeX output (pts) The size in points of text on the graphwhen it is printed out.
• Plot type “Cartesian” or “Polar”.
• margin width (pts) The left, right, top, or bottom margin width measured in points.
• Size of major tic marks The size of the larger tic marks on the plot border or axes,measured in graph units.
• Size of minor tic marks The size of the smaller tic marks on the plot border oraxes, measured in graph units.
The gnuplot tag allows the use of the the following tags:

2 CREATING CONTENT USING LON-CAPA 23
• curve 2.19
• key 2.18
• label 2.18
• axes 2.18
• tics 2.18
• title, xlabel, and ylabel 2.18
Three of the more basic tags are title, xlabel, and ylabel. Their size and color dependon the values chosen for the font size and graph foreground color specified in the gnuplot2.18 tag. The figure below shows the locations of the various labels.
The Plot Axes tag allows you to specify the domain and range of the data to display.It is closely tied with the Plot Ticks 2.18 tags, which specify where the gridlines are drawnon the plot. The Plot Axes tag sets the following parameters:
The color of grid linesIf the “Display Grid” parameter of the Gnuplot tag is set to yes, the grid will be displayed
in the specified color. Hexadecimal notation is used to specify the color 2.20.The view of the graph shownThe viewing rectangle of the graph is set with the following parameters:
• minimum x-value
• maximum x-value
• minimum y-value
• maximum y-value
See also Plot Ticks 2.18 and the general Gnuplot help 2.18.The xtics and ytics tags can be inserted by selecting the Plot tics item from the insert
selection list of the gnuplot tag.The xtics and ytics tags have identical structure and the description presented here
applies to both.The tics tags allow specification of the following parameters:

2 CREATING CONTENT USING LON-CAPA 24
• Location of major tic marks “Border” or “Axis”. Tic marks can be placed on theborder or on the axes. The images below illustrate the effects of each of these options.
• Mirror tics on opposite axis? “Yes” or “No”. If the location of tic marksis set to “border” this parameter determines if they are shown on both the top andbottom or right and left sides of the graph. The “mirror” tic marks are unlabelled.
• Start major tics at
The point in graph coordinates which to start making major tics. This may be lessthan or greater than the lower limit for the axis.
• Place a major tic every
The span, in graph coordinates, between each major tic mark.
• Stop major tics at
This may be less than or greater than the upper limit for the axis.
• Number of minor tics between major tic marks
The number of subdivisions to make of the span between major tic marks. Using avalue of “10” leads to 9 minor tic marks. The example below uses a value of “5” toproduce 4 tic marks.

2 CREATING CONTENT USING LON-CAPA 25
The key tag causes a key to be drawn on the plot when it is generated. The key willcontain an entry for each curve 2.19 which has a name.
The key is the color of the foreground of the plot, specified in the gnuplot 2.18 tag.The label tag allows the author to place text at any position on the plot. There may
be many label tags on one plot and all the labels which fall within the plot will show. Thecolor used will be to foreground color of the plot and the font will be the size specified forthe plot, both of which are set in the gnuplot 2.18 tag.
• justification of the label text on the plot “left”, “right”, or “center”.
• rotation of label (degrees)
• x position of label (graph coordinates)
• y position of label (graph coordinates)
The text to be placed on the plot must be entered as well.
2.19 Specifying Curves to Plot
The curve tag is where you set the data to be plotted by gnuplot.The following parameters may be set:
• color of curve
The color of the curve on the plot. See Selecting Colors 2.20.
• name of curve to appear in key
If a key is present, the name of the curve will appear with a sample of its line type.
• line style
See the section on line styles 2.19 for more information about the available line stylesand their data requirements.
• line type
The type of line. Current options include ’solid’ and ’dashed’. At this time, all dashedlines draw with line width of ’1’ in web output. This parameter may not apply to alllinestyles.
2 CREATING CONTENT USING LON-CAPA 26
• line width
The thickness of the line drawn by plotting engine. This parameter may not apply toall linestyles.
• point type
This parameter may not apply to all linestyles.
• point size
This parameter may not apply to all linestyles. The size of the points, in pixels, presenton the line. Some point types are not affected by this parameter.
There are two ways of entering the information to be plotted, which are accessed usingthe subtags of curve, data 2.19 and function 2.19.
The data tag is used to specify the values plotted in the gnuplot 2.18 tag. The datatag is only used in the Curve 2.19 tag.
The data must be either a perl array, @X, or a comma seperated list, such as “0.5,0.9,1.5,2.4” (without quotes). ’NaN’ is a valid value.
The function and number data tags required varies based on the line style 2.19 chosenfor the curve. In all cases the first data tag will hold the “X” values and the second willhold the “Y” values.
All of the data sets in the data tag must have the same number of elements.The function tag allows you to specify the curve to be plotted as a formula, instead of
numerical data.The function must be a mathematical expression. Use the independent variable “x” for
cartesian plots and “t” for polar plots. Implicit multiplication is not accepted by Gnuplot.The following are examples of valid functions and invalid functions:
• sin(x)
• sin(2*x)
• sin(x**2)
• exp(x)
• 3*x**x
• exp(sin(2*x))
• sinh(x)
• sin(t)*cos(t) (polar plot only)
Unless otherwise noted the linestyles require only 2 data sets, X and Y.
• lines Connect adjacent points with straight line segments.
• points Display a small marker at each point.

2 CREATING CONTENT USING LON-CAPA 27
• linespoints Draw both lines and points.
Draws a small symbol at each point and then connects adjacent points with straightline segments.
• dots Place a tiny dots on the given points.
• steps Connect points with horizontal lines.
This style connects consecutive points with two line segments: the first from (x1,y1)to (x2,y1) and the second from (x2,y1) to (x2,y2).
• fsteps Connect data with horizontal lines.
This style connects consecutive points with two line segments: the first from (x1,y1)to (x1,y2) and the second from (x1,y2) to (x2,y2).
• histeps Plot as histogram.
Y-values are assumed to be centered at the x-values; the point at x1 is represented as ahorizontal line from ((x0+x1)/2,y1) to ((x1+x2)/2,y1). The lines representing the endpoints are extended so that the step is centered on at x. Adjacent points are connectedby a vertical line at their average x, that is, from ((x1+x2)/2,y1) to ((x1+x2)/2,y2).
• errorbars Same as yerrorbars.
• xerrorbars Draw horizontal error bars around the points.
Requires 3 or 4 data sets. Either X, Y, Xdelta or X, Y, Xlower, Xupper. Xdelta is achange relative to the given X value. The Xlower and Xupper values are absolute gridcoordinates of the upper and lower values to indicated with error bars.
• yerrorbars Draw vertical error bars around the points.
Requires 3 or 4 data sets. Either X, Y, Ydelta or X, Y, Ylower, Yupper. Ydelta isa change relative to the given Y value. The Ylower and Yupper values are the gridcoordinates of the upper and lower values to indicate with error bars.
• xyerrorbars Draw both vertical and horizontal error bars around the points.
Requires 4 or 6 data sets. Either X, Y, Xdelta, Ydelta or X, Y, Xlower, Xupper,Ylower, Yupper. Xdelta and Ydelta are relative to the given coordinates. Xlower,Xupper, Ylower, and Yupper are the grid coordinates of the upper and lower values toindicate with the error bars.
• boxes Draw a box from the X-axis to the Y-value given.
Requires either 2 or 3 data sets. Either X, Y or X, Y, Xwidth. In the first casethe boxes will be drawn next to eachother. In the latter case Xwidth indicates thehorizontal width of the box for the given coordinate.
• vector Draws a vector field based on the given data.
Requires 4 data sets, X, Y, Xdelta, and Ydelta. The ‘vector‘ style draws a vector from(X,Y) to (X+Xdelta,Y+Ydelta). It also draws a small arrowhead at the end of thevector. May not be fully supported by gnuplot.

3 PRINTING YOUR RESOURCES 28
2.20 Color Selection
The default colors are a white background (xffffff) with black (x000000) forground, gridlines,and curve.
• Background color is an attribute of the gnuplot tag 2.18. This controls the color of theplot image. The default is white (xffffff).
• Forground color is an attribute of the gnuplot tag 2.18. This controls the color of theborder.
• Gridline color is an attribute of the axis tag 2.18.
• Curve color is an attribute of the curve tag 2.19. This is the color of the curve functionor data points. Different curves can be given different colors.
2.21 General Problem Editing
The following capabilities are available in all problem types:
2.21.1 Adding Picture
To add a picture to a problem, the picture must first be uploaded to your construction space,then published. Then, in the text area of your problem, add the following:
<img src="/res/DOMAIN/AUTHOR/directory-of-picture/picture.jpg" />
where DOMAIN is the domain the picture is in, AUTHOR is the person who publishedthe picture, and the rest is the standard path to the picture.
It is also possible for advanced users to use a script variable in the place of the pictureURL, like this:
<img src=’’$picture’’ />
and use the string variable $picture in the script of the problem to select from severalpossible pictures. If you do this, you will need to Edit XML for the problem and add thevarious graphics used in the problem to the ¡allow¿ tags on the bottom.
When print resources with pictures, LON-CAPA will automatically convert graphics inEPS files. (EPS is a graphics format designed for printing.)
The automatic conversion of a web graphic to an EPS file will sometimes look blocky,because paper has a much higher resolution then the web. If you would like to provide LON-CAPA with an EPS file to use while printing for a given graphic file, upload your EPS fileinto your authoring space with the same name as the .gif, .jpg, or other web graphic, exceptending with the extension “.eps”. When you publish the file, LON-CAPA will automaticallyuse it in place of the web image file when printing.
For instance, if you have a graphics file my.image.gif, you can upload an EPS file namedmy.image.eps.
3 Printing Your Resources
3.1 Printing from Construction Space
To print a resource, do the following:

3 PRINTING YOUR RESOURCES 29
1. The [PRT] button will only be accessible when you are looking at one of your resourcesfor your course.
2. Click PRT to access the Print Helper, which will help your create a PDF document.
The Print helper will guide you through the process of preparing a PDF document of theresource. If you see error message when trying to prepare a PDF file, then you will need tocontact the author of the problem which contains that printing error.
Printing involves a translation of your XML file into LaTeX and from there to PDF. Someof the XML tags have a set of special print options. 3.3 Sometimes translations require specialconsiderations. 3.4
3.2 Printing a Subdirectory of Problems
Many authors organize their construction space or a directory in their construction spaceas a problem library. To print out an entire directory of problems to a PDF file, follow thesteps below:
1. First, select to a PDF file, select one of the problems to view.
2. Click PRT on the Inline Menu or Remote Control.
3. Select the option to print all ’Problems from current subdirectory.’
4. Optionally, choose to print the library with Answers. You can choose to print witheither the default two column output or with one column.
5. Click the Next button.
6. On the next screen, select which problems you want to print by either clicking on oneof the Select buttons or individually checking which problems you want to select.
7. Click the Next button.
8. As long as there were no errors in any of the problems, you should now see a link to aPDF file that you can download and view.
If an error occurs with just one of the problems then entire directory will not be able toprint. LON-CAPA will make a guess at which problem(s) had errors. You will need totroubleshoot and fix those problems before the entire directory can be printed. Informationabout common print errors is available at 3.4.
3.3 Tips for Improving Print Output
Here you can find some useful tips how to make your printing output looking prettier.Print output oriented attributes of standard HTML/LON CAPA tags
• 3.3.1 <h1>-<hN> TeXsize attribute
• 3.3.1 <basefont> TeXsize attribute
3 PRINTING YOUR RESOURCES 30
• 3.3.1 <font> TeXsize attribute
• 3.3.2 <hr> TeXwidth attribute
• 3.3.2 <table> TeXwidth attribute
• 3.3.3 <table> TeXDropEmptyColumns attribute
• 3.3.2 <td> TeXwidth attribute
• 3.3.2 <th> TeXwidth attribute
• 3.3.4 <img> TeXwidth attribute
• 3.3.4 <img> TeXheight attribute
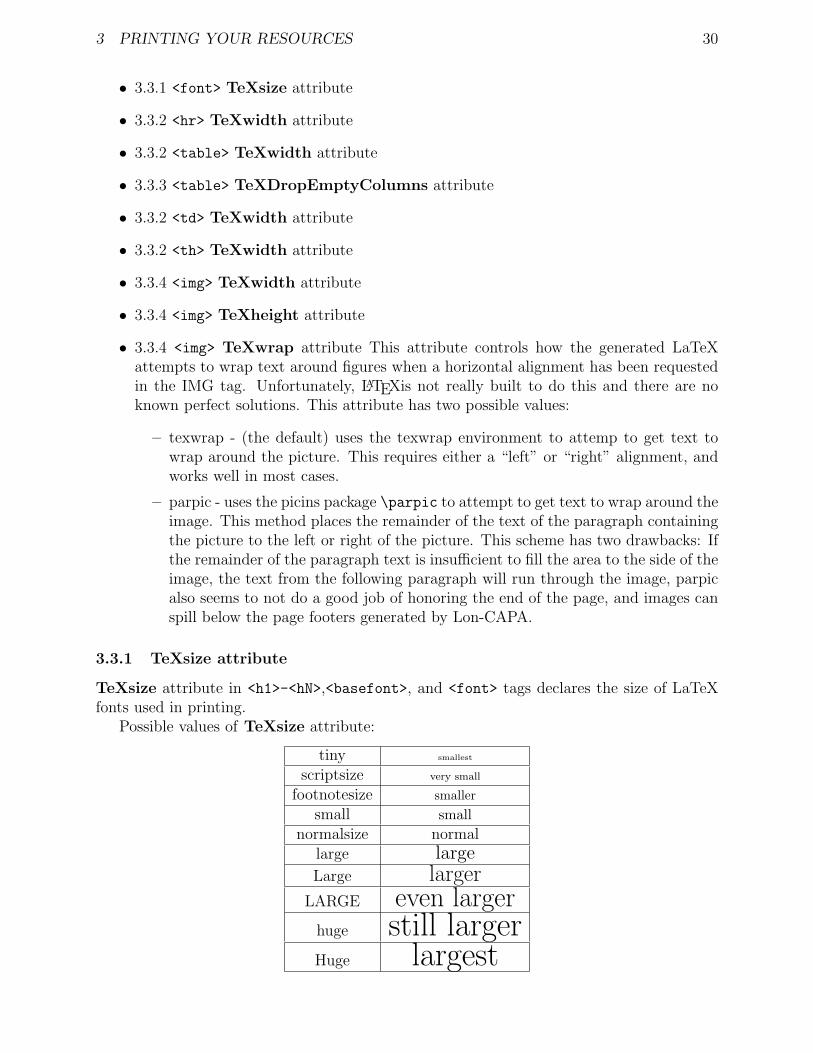
• 3.3.4 <img> TeXwrap attribute This attribute controls how the generated LaTeXattempts to wrap text around figures when a horizontal alignment has been requestedin the IMG tag. Unfortunately, LATEXis not really built to do this and there are noknown perfect solutions. This attribute has two possible values:
– texwrap - (the default) uses the texwrap environment to attemp to get text towrap around the picture. This requires either a “left” or “right” alignment, andworks well in most cases.
– parpic - uses the picins package \parpic to attempt to get text to wrap around theimage. This method places the remainder of the text of the paragraph containingthe picture to the left or right of the picture. This scheme has two drawbacks: Ifthe remainder of the paragraph text is insufficient to fill the area to the side of theimage, the text from the following paragraph will run through the image, parpicalso seems to not do a good job of honoring the end of the page, and images canspill below the page footers generated by Lon-CAPA.
3.3.1 TeXsize attribute
TeXsize attribute in <h1>-<hN>,<basefont>, and <font> tags declares the size of LaTeXfonts used in printing.
Possible values of TeXsize attribute:
tiny smallest
scriptsize very small
footnotesize smaller
small small
normalsize normallarge largeLarge larger
LARGE even largerhuge still largerHuge largest

3 PRINTING YOUR RESOURCES 31
Note, that all parameters coincide with standard LaTeX commands for changing fontsize though you do not escape them.
Examples:
<basefont size="4" TeXsize="Large" />
<font color="#FFFFFF" TeXsize="small">
<h1 align="center" TeXsize="Huge">
3.3.2 TeXwidth attribute
TeXwidth attribute allows you to specify the width of
• the table in <table> tag
• the table cell in <td> or <th> tags
• the length of the line in <hr> tag
You can use the following units:
mmcm =10 mmin =25.4 mmpt =0.35 mmpc =4.22 mm
Examples:
<hr TeXwidth="2 cm">
<td TeXwidth="1 in">
3.3.3 TeXDropEmptyColumns attribute
TeXDropEmptyColumns attribute allows you to supress printing of empty columns intable. This option is useful when you have deal with big tables (very often nested) with a lotof empty columns. Situation is typical in chemistry where tables are used for visualizationof chemical reactions.
Example:
<table TeXDropEmptyColumns="yes">
3.3.4 Image TeX attributes
• Image Url contains the URL of the image to be inserted in the problem. You mayenter a URL or click “Select” to choose an image that has already been uploaded toyour construction space, or click “Search”
• Description contains a textual description of the image. If the image cannot be renderedby the target browser, this description is displayed instead.
• width (pixel) allows you to set the width of the image, in pixels, as it will be displayedin a web browser.

3 PRINTING YOUR RESOURCES 32
• height (pixel) allows you to set the height of the image, in pixels, as it will be displayedin a web browser.
• TeXwidth (mm) Allows you to set the width of the image, in mm, as it will be renderedinto the LATEXdocument used to print the problem.
• TeXheight (mm) Allows you to set the height of the image, in mm, as it will be renderedintot he LATEXdocument used to print the problem.
• TeXwrap Allows you to select how the LATEXdocument will attempt to wrap textaround a horizontally aligned image (See Alignment below).
parbox \newline and \parbox will be used to place the image. This method ensuresthat text will not be wrapped on top of the image, however very little text willappear next to the image itself.
parpic The picins package \parpic command will be used to place the image. Thiswill wrap the remainder of the paragraph containing the picture around the image.If, however, there is insufficient text to fill the space to the left or right of theimage, the next paragraph may be wrapped on top of the image. In addition,\parpic does not always honor the end of the page, causing the image to extendbelow the page footer.
• Alignment Specifies the alignment of the image relative to the enclosing text paragraph:
bottom The image will be aligned so that its bottom will be at the baseline of thesurrounding text.
middle The image will be aligned so that its center-line will be at the baseline of thesurrounding text.
top The image will be aligned so that its top will be at the baseline of the surroundingtext.
left The image will be placed so that it is at the left of the surrounding text. Thesurrounding text will fill in the region to the right of the image.
right The image will be placed so that it is at the right of the surrounding text. Thesurrounding text will fill in the region to the left of the image.
3.3.5 TeX Type attribute
TeXtype attribute is responsible for the definition of the type of LaTeX list environmentused during printing of available options. Possible values of this attribute:
TeXtype attribute is responsible for the definition of the type of LaTeX list environmentused during printing of available options. Possible values of this attribute:

3 PRINTING YOUR RESOURCES 33
value example of list1 1. First Item
2. Second Item
3. Third ItemA A. First Item
B. Second Item
C. Third Itema a. First Item
b. Second Item
c. Third Itemi i. First Item
ii. Second Item
iii. Third Item
Examples:
<radiobuttonresponse TeXtype="1">
<radiobuttonresponse TeXtype="A">
3.3.6 TeX Itemgroup attribute
TeXitemgroupwidth attribute allows you to specify the width of table with items formatching. The value of this attribute defines the width in percents with respect to text linewidth.
<matchresponse TeXitemgroupwidth="40\%">
3.3.7 TeX Item Group Width attribute
TeXitemgroupwidth attribute allows you to specify the width of table with items formatching. The value of this attribute defines the width in percents with respect to text linewidth.
<matchresponse TeXitemgroupwidth="40%">
3.3.8 TeX Layout attribute
TeXlayout attribute governs the way how available options are displayed when printed -either vertically (attribute value - ”vertical”) or horizontally (attribute value - ”horizontal).
Examples:
<optionresponse TeXlayout="horizontal">
<optionresponse TeXlayout="vertical">

3 PRINTING YOUR RESOURCES 34
3.4 Troubleshooting PDF Errors
When you print a LON-CAPA resource, the XML of your resource is translated into LaTeX.The LaTeX is then processed and turned into a PDF document which can be displayed withyour browser’s Acrobat plugin and subsequently printed.
There are several problems that crop up both due to limitations in the XML to LaTeXtranslation and due to differences in the model used by web browsers to render HTML andLaTeX to compose print pages. This document provides information about some of theseproblems and, where possible, solutions, and tricks to work around them. If you have aprinting trick or a problem and would like to report it, please go to http://bugs.lon-capa.organd register a bug report.
General information about printing within LonCAPA is also available: 3.1The print rendition of some Perl functions looks uglyIn particular these functions are:
• &prettyprint
• &dollarformat
• &xmlparse
• &chemparse
To make these two functions work correctly within the print translator, it is necessary towrap them within a ¡display¿ tag. For example:
<p>
If I had <display>&prettyprint(100,’$2f’)</display>
</p>
Note that the <display> tags must be tightly wrapped around the function call or youwill get a syntax error in web presentation mode. For additional information about caseswhere you must use <display>, see “Variables with tags don’t print correctly” below.
Image placement and alignment and text wrapping is wrongUnfortunately this is due to a large difference between the LaTeX and HTML page layout
model. In HTML images are placed exactly where you ask them to be placed. In LaTeX,images are considered floats, which LaTeX will place for you. Some of the common htmltricks, using tables e.g. to control text wrapping around figures, will not always work inprint mode; especially if the text is to the right side of the figure in the table.
The alignment choice affects whether or not the print rendering engine attempts to gettext to wrap around the image. With align=‘‘right’’ or align=‘‘left’’, the printrendering engine attempts to use the wrapfigure environment to place text around the figureat the appropriate side. If a figure is in a table, then the print engine, by default, the printengine will use wrapfigure, set the alignment to “right” unless you override it. Otherwise,the default alignment is “bottom” as it is for html, and no wrapping will occur.
\parpic style wrapping is also available by specifying TeXwrap=‘‘parpic’’ in the ¡img¿tag. In some limited casese this gives a better result.
Other print specific ¡img¿ tag attributes are available. 3.3.Variables with tags don’t print correctly

4 PUBLISHING YOUR RESOURCES 35
If a variable contains XML, in general it is necessary to force the XML parser to makea pass over the contents of the contents of the variable prior to rendering the section of theresource that contains that substitution. When output, those variables must be bracketedinside of <display> </display> tags. For example:
<problem>
<script type="loncapa/perl">
$a = &xmlparse(’<br />’);
</script>
<startouttext />
<p>This is a break <display>$a</display> and then some more text</p>
<endouttext />
</problem>
Without the xmlparse call and the display tag bracketing the variable, this problem willdisplay on the web just fine, but print incorrectly.
4 Publishing Your Resources
In order to make the content you’ve created available for use in courses, you must publishyour content. LON-CAPA provides an easy interface for publishing your content pages,problem resources, and sequences. You can specify title, author information, keywords, andother metadata. LON-CAPA uses this metadata for many things, and it’s important to fillthe metadata out as accurately as possible.
4.1 What is Metadata?
Metadata is data about data. Metadata can often be thought of as a label on some bitof information that can be useful to people or computer programs trying to use the data.Without metadata, the person or computer trying to use the original information would haveto guess what the original data is about.
When resources are published at least title, subject and keywords should be provided sothat the resource could be found easily.
For example, if you create a problem and neglect to say in the title or subject of theproblem what it is about, then a human who wants to use that problem would have to readthe problem itself to see what it was about. This is much more difficult than just readinga title. A computer trying to do the same thing would be out of luck; it is too stupid tounderstand the problem statement at all.
Another example of metadata is the ¡title¿ tag of a web page, which usually shows upin the title bar of the browser. That is information about the web page itself and is notactually part of the web page. People use the title information when they bookmark a page.Search engines use it as a clue about the content of the web page.
4.2 Publishing A Resource
To publish a resource, log in and choose your Author role. Then click CSTR to go to yourconstruction space. You should see something like the “Construction Space for Publishing”.

4 PUBLISHING YOUR RESOURCES 36
Figure 11: Construction Space for Publishing
Figure 12: Publishing Metadata Screen

5 CREATING A COURSE: MAPS AND SEQUENCES 37
Click on the Publish button for the resource you wish to publish. You will get a metadatascreen that should look something like the “Publishing Metadata Screen” figure. Fill out theform. If you are creating resources that may be used in several courses, you should talk withthe other authors and establish some sort of standard title and subject scheme in advance.
Language is the language the problem is written in. Publisher/Owner is the LON-CAPA user who owns the problem.
Keywords and Abstract are more information about the problem.The Keywords are words that are strongly connected to your problem; for instance a
physics problem about a pulley might include “pulley” as a key word. LON-CAPA pullsout words used in the text of the resource for you so you can just click on their check boxesto make them keywords. Additional keywords allows you to add any keyword to yourproblem that are not actually in the problem. For instance, on that same problem a physicistmight add the keyword “statics”, even though it doesn’t appear in the original problem,because Physics uses that as a classification of problem type. Additional Keywords arealso useful when publishing graphics.
You need to set the copyright and distribution permissions in the COPYRIGHT/DISTRIBUTIONdrop-down. This setting controls who is allowed to use your resource as follows:
• System Wide - can be used for any courses system wide is the default. Thecontent can be used for any course within the network, regardless of the domain.Instructors all over the world can find your content and use it in their courses. Oncean instructor has selected a resource, the students in the course can have access to it.
• Domain - Limited to courses in the domain published means that only coursesrunning in the same domain as you can use your content.
• Private - visible to author only is not supported anymore. Use Customized rightof use instead.
• Public - no authentication required means anyone can find and use the resource- even without being logged in to the system.
• Customized right of use means that access to the resource is controlled by a separateCustom Rights file. This file needs to be specified during publication. You can edita Custom Rights file in your author space, and need to publish it like any other file.Any number of your resource can point at the same Custom Rights file - if you wantto change access rights for all of them, you just need to change and re-publish this onefile.
Not all of these choices may be visible, depending on the nature of the resource.Now when you click Finalize Publication, your resource will be published and usable
(unless you set the distribution to “private”).If you’re following this as a tutorial, publish your resources so we can use them in the
next section.
5 Creating A Course: Maps and Sequences
In order to create a useful course, we need to arrange our raw materials so that students canuse them.

5 CREATING A COURSE: MAPS AND SEQUENCES 38
Figure 13: Map Editor Selection
Figure 14: Simple Map Editor
5.1 Creating Sequences
A Sequence is a series of resources that can be navigated using the NAV remote controlbutton, or by using the arrow keys on the remote control.
To create a Sequence resource, create a new resource as described in section 2.2. This is a“sequence” resource so the URL must end in “.sequence”. After you enter in the URL endingin “.sequence”, you should see a screen as in figure 13. You can use either the advancededitor or the simplified editor.
5.2 Creating a Simple .sequence With The Simple Editor
After creating a new .sequence resource and getting the editor selection prompt (as in the“Simple Map Editor” figure), click the Simple Edit button to get to the simple map editor,which appears in the figure.
The Simple Editor can create .sequences and .pages which are linear, which means theyhave no branches or conditions.

5 CREATING A COURSE: MAPS AND SEQUENCES 39
Figure 15: Initial Map Editor
On the right side of the simple editor is the Target, which represents the map you arecurrently building. On the left side is the Import area, which represents a work area youcan use for your convenience to load and manipulate resources you may wish to include inyour map. Using the three buttons in the middle of the screen, you can cut things out of theTarget (top button), copy from the Target to the Import (middle button), and copy fromthe Import to the Target (bottom button).
You can do a Group Search and a Group Import on both sides of the screen. A GroupSearch allows you to run a search, then import selected results from that search either directlyinto your Map or into your Import space. Checkboxes will appear next to the results in theGroup Search, and you can click the resources you wish to add to your map in the order thatyou want them added. After you select the resources, you will be presented with a screenthat allows you to change their order. You will then be able to import the selected resourcesand work with them.
A Group Import works in a similar fashion, but allows you to use the LON-CAPA networkbrowser to select your resources.
On the Import side, you can also browse for another Map, and load the resources usedin that map into your Import workspace. You can also discard the selected resources, clearall the resources, and view the selected resources by using the buttons on the Import side ofthe screen.
Both list boxes support standard multi-select mechanisms as used in your OS.
5.3 Creating a Simple .sequence With The Advanced Editor
After creating a new .sequence resource and getting the editor selection prompt (13), clickthe Advanced Edit button to get to the advanced map editor. You should see the initialmap editor as shown in the “Initial Map Editor” figure. Note there are two windows: Oneis the workspace and one is a secondary window which will contain information as you addresources.

5 CREATING A COURSE: MAPS AND SEQUENCES 40
1.
Figure 16: After clicking Start in the Map Constructor
Figure 17: Straightened Map
Click the Start box. You’ll see what is shown in the “After clicking Start in the MapConstructor” figure. Click Link Resource in the secondary window then click on theFinish box. After that, click Straighten. You should see something looking like the“Straightened Map” figure. This creates a simple map that flows from beginning toend.
To insert a resource into the flow, click the black line with two arrows, seen between theStart and Finish boxes in the “Straightened Map” figure. In the secondary window,you will see something like the “Inserting a Resource” figure. Click Insert ResourceInto Link. A new resource box will appear in the link. Click the resource, which willhave the label Res.
3. Click Browse and the Network Directory Browser will appear, as shown in the“Network Directory Browser” figure. Press the SELECT button that is next to the

5 CREATING A COURSE: MAPS AND SEQUENCES 41
2.
Figure 18: Inserting a Resource
Figure 19: Network Directory Browser

5 CREATING A COURSE: MAPS AND SEQUENCES 42
Figure 20: Resource Chosen
resource you want to place in the chosen resource box. Once you’ve done that, if youlook back at the window that popped up when you clicked on New Resource, you’llsee something like the “Resource Chosen” figure. You can type the URL and Titleinto the secondary window if you prefer, following the format you see when you’vesuccessfully browsed to a resource. After you click Save Changes, your changes willbe set and the icons for the resource will appear in the Res box, as shown in figure20. Click Save Map in the bar above your map to save the map.
Clicking on the left icon for a resource will open a new browser window with aninformational page about that resource. Clicking on the right icon for a resource willopen a new browser window and take you to the rendering of that resource.
4. Repeat steps two and three for as many resources as you’d like to bind together intoone page. You can insert the new resources anywhere you’d like.
5. When you are done adding resources, click the Save Map link to save the map.
In addition to manually adding in resources, the Advanced Editor also has the ability toimport resources in the same way that the Simple Editor can: From a LON-CAPA networkbrowser window, from a Group Search, or from another Map.
The Advanced Editor has many more capabilities which you can explore.
5.4 Page Maps
Creating a Page map is the same as creating a Sequence map, except that when choosingthe name of the resource, the URL will end with “.page”. This way, all resources you add inthe map editor will appear on one page together. Pages are often used to connect problemsin a homework set.
5.5 Creating a Course: Top-level Sequence
In order to view sequences, they need to be part of a course.

6 NUMERICAL RESPONSE AND FORMULA RESPONSE QUESTIONS 43
Figure 21: Creating a New Course
Courses have a Top-level map which defines the whole course. This Top-Level map willoften contain maps corresponding to homework assignments, chapters, or units. To viewyour maps, you will need to make them part of a course. Only Domain Coordinators canmake courses and set their Top-level maps, so work with your Domain Coordinator if youneed to view your maps.
6 Numerical Response And Formula Response Ques-
tions
Numerical Response problems are very powerful. In fact, they are so powerful it wouldbe impossible to fully explain what is possible in a simple document. This chapter willfocus on getting you started with Numerical Response problems and show you some of thepossibilities, with no prerequisite knowledge necessary. The more you learn, the more youwill find you can do.
If you like, you can follow this chapter as its own tutorial. Create a Numerical Responseproblem using the instructions in section 2.2, ending your resource name with “.problem”,and create a new Simple Numerical Response problem.
6.1 The Parts of a Numerical Response Problem
A Numerical Response problem has seven major parts by default:
1. The Script is the heart of advanced Numerical Response problems. It can be used todecide some of the parameters of the problem, compute the answer to the problem,and do just about anything else you can imagine. The Script language is Perl. You

6 NUMERICAL RESPONSE AND FORMULA RESPONSE QUESTIONS 44
Figure 22: Numerical Response editor

6 NUMERICAL RESPONSE AND FORMULA RESPONSE QUESTIONS 45
do not need to know Perl to use the Script block because we will be stepping throughsome advanced examples in this chapter, but knowing Perl can help.
2. Like other problem types, the Text Block is used to display the problem the studentwill see. In addition, you can place variables in the Text Block based on computationsdone in the Script.
3. The Answer is the answer the system is looking for. This can also use parametersfrom the Script block, allowing the answer to be computed dynamically.
4. A tolerance parameter determines how closely the system will require the student’sanswer to be in order to count it correct.
For technical reasons, it is almost never a good idea to set this parameter to zero.Computers can only approximate computations involving real numbers. For instance,a computer’s [decimal] answer to the simple problem 1
3is “0.33333333333333331”. It
should be an infinite series of 3’s, and there certainly shouldn’t be a “1” in the an-swer, but no computer can represent an infinitely long, infinitely detailed real number.Therefore, for any problem where the answer is not a small integer, you need to allowa tolerance factor, or the students will find it nearly impossible to exactly match thecomputers idea of the answer. You may find the default too large for some problems.
There are three kinds of tolerance. For some answer A and a tolerance T ,
(a) an Absolute tolerance will take anything in the range A ± T . So if A = 10and T = 2, then anything between 8 and 12 is acceptable. Any number in thetolerance field without a % symbol is an absolute tolerance.
(b) a Relative tolerance will take anything in the rangeA±aT , where T is interpretedas a percentage/100. Any number in the tolerance field followed by a % symbolis a relative tolerance. For example, a = 10 and t = 10% will accept anythingbetween 9 and 11.
(c) a tolerance that is a calculated variable (identified by $ sign as the first character).For example, if an answer is $X,and for a student possible values range from−$X1to +$X1, you could choose T = $tolerance = $2X1/100; acceptable answerswould then be from $X − $tolerance to $X + $tolerance. (This is especiallyuseful when answers close to zero are possible for some students)
5. A significant figures specification tells the system how many significant figures thereare in the problem, as either a single number or a range of acceptable values, expressedas min,max. The system will check to make sure that the student’s answer containsthis many significant digits, useful in many scientific calculations. For example, ifthe problem has three significant digits, the significant digit specification is “3”, andthe answer is “1.3”, the system will require the students to type “1.30”, even thoughnumerically, “1.3” and “1.30” are the same. A significant figure specification of “3,4”means both “1.30” and “1.300” are acceptable.
6. The Single Line Text Entry area, as in other problem types, allowyou to manipulatethe text entry area the student will see.
7. Finally, the Hint should contain text which will help the students when they answerincorrectly.

6 NUMERICAL RESPONSE AND FORMULA RESPONSE QUESTIONS 46
6.2 Simple Numerical Response Answer
Along with showing the Numerical Response editor, figure 22 also shows the parameters forone of the simplest possible types of numerical response. The Text Block has the problem’squestion, which is the static text “What is 2 + 2?” The Answer is “4”. The Hint has beenset to something appropriate for this problem. Everything else has the default values fromwhen the problem was created.
If you create a problem like this, hit Submit Changes, then hit View after the changeshave been submitted, you can try the problem out for yourself. Note the last box in theHTML page has the answer LON-CAPA is looking for conveniently displayed for you, alongwith the range the computer will accept and the number of significant digits the computerrequires when viewed by an Author.
As you’re playing with the problem, if you use up all your tries or get the answer correctbut wish to continue playing with the problem, use the Reset Submissions button to clearyour answer attempts.
6.3 Simple Script Usage
Totally static problems only scratch the surface of the Numerical Response capabilities. Toreally explore the power of LON-CAPA, we need to start creating dynamic problems. Butbefore we can get to truly dynamic problems, we need to learn how to work with the Scriptwindow.
A script consists of several statements, separated by semi-colons. A statement isthe smallest kind of instruction to the computer. Most problems will be built from severalstatements.
A script can contain comments, which are not interpreted as statements by the com-puter. Comments start with # and go to the end of that line. Thus, if a line starts with #,the whole line is ignored. Comments can also begin in the middle of a line. It is a good ideato comment more complicated scripts, as it can be very difficult to read a large script andfigure out what it does. It is a very good idea to adopt some sort of commenting standard,especially if you are working in a group or you believe other people may use your problemsin the future.
• One of the simplest statements in LON-CAPA is a variable assignment. A variablecan hold any value in it. The variable name must start with a $. In the Script, youneed to assign to variables before you use them. Put this program into the Script fieldof the Numerical Response:
$variable = 3;
This creates a variable named variable and assigns it the value of “3”. That’s onestatement.
Variable names are case sensitive, must start with a letter, and can only consist of letters,numbers, and underscores. Variable names can be as long as you want.

6 NUMERICAL RESPONSE AND FORMULA RESPONSE QUESTIONS 47
There are many variable naming conventions, covering both how to name and how tocapitalize variables1. It is a good idea to adopt a standard. If you are working with a group,you may wish to discuss it in your group and agree on a convention.
If you Submit Changes and View the problem, you will see nothing has changed. Thisis because in order for a variable to be useful, it must be used. The variable can be used inseveral places.
6.3.1 Variables in Scripts
Variables can be used later in the same script. For instance, we can add another line belowthe $variable line as such:
$variable2 = $variable + 2;
Now there is a variable called $variable2 with the the number “5” as its value.Variables can also be used in strings , which are a sequence of letters. The underlying
language of the script, Perl, has a very large number of ways of using variables in strings,but the easiest and most common way is to use normal double-quotes and just spell out thename of the variable you want to use in the string, like this:
$stringVar = ‘‘I have a variable with the value $variable.’’;
This will put the string “I have a variable with the value 3.” into the variable named“stringVar”.
If you are following this chapter as a tutorial, add the previous two lines to your Scriptand submit the changes for the problem. There’s no need to view it; there’s still no visiblechange.
6.3.2 Variables in the Text Block
Once you’ve defined variables in the Script, you can use them in the Text Block. Forexample, using the previous three-line script we’ve created so far, you can place the followingin the Text Block:
See the 3: $variable<br />
See the string: <b>$stringVar</b><br />
If you save that and hit View, you should get what you see in figure 23. Note how the“$variable” was turned into a 3, and the “$stringVar” was turned into “I have a variablewith the value 3.”
6.3.3 Variables in the Answer Block
You can use variables in the Answer part of the question. This means you can compute ananswer to a question. If you set the answer of the question to be $variable, Save Changesand View it, you’ll see that LON-CAPA is now expecting “3.0” as the answer, plus or minus5%.
1The author favors capsOnNewWords. Some people use underscore to separate words. Many use up-
percase letters to specify constants like PI or GOLDEN MEAN. Some people always StartWithCapatalization.
What’s really important is to be consistent, so you don’t have to guess whether the variable you’re thinking
of is coefFriction, CoefFriction, COEF FRICTION, or something else.

6 NUMERICAL RESPONSE AND FORMULA RESPONSE QUESTIONS 48
Figure 23: Result of Variables in the Text Block
$a = -3.0;
$b = &sin($a);
$c = &pow(3.0, &abs($a));
Figure 24: Some Function Calls
6.4 Calling Functions
With variables, you can store strings or numbers. Functions allow you to manipulate thesestrings or numbers. Functions work like mathematical functions: They take some numberof arguments in, and return one argument, usually a number or a string for our purposes.There are a lot of functions available in LON-CAPA. You can see a complete list at ??.
For now, let’s just look at some simple examples.In the Script block, function names start with &. Some example function calls are
shown in figure 24. You can see that functions can take either variables, numbers, or theresults of other function calls as parameters. The &sin function returns the sine of an angleexpressed in radians. &pow raises the first parameter to the power of the second parameter.&abs returns the absolute value of the argument.
6.4.1 Numerical Response Randomization
If you’re doing this as a tutorial, try a few random seeds to see what happens.
6.5 Dynamic, Randomized Problems: Putting It All Together
Now you have all the tools to create those wonderful dynamic, randomized problems thatyou’ve seen in LON-CAPA.
Try filling out your problem with the parameters shown in the “Slope Problem Parame-ters” figure.
When creating randomized problems, you want to make sure that the problems alwayshave an answer. Consider what might happen if two slopes are chosen, both with the ex-pression &random(-1.0,1.0,.2). One out of ten students would get a problem where bothslopes were equal, which has either no solution (for unequal y-intercepts) or an infinite num-ber of solutions (for equal slopes and y-intercepts). Both of these cause a division-by-zeroerror on the division that computes the answer. There are many ways to avoid this, one ofthe easiest of which is picking one slope negative and one positive. This same problem canshow up in many other places as well, so be careful.

6 NUMERICAL RESPONSE AND FORMULA RESPONSE QUESTIONS 49
Figure 25: Slope Problem Parameters
6.6 Units, Format
Numerical Response problems can require units. In the problem editing form, place thedesired unit in the Unit field. For information about what units the system accepts, see ??.The computer will accept the answer in any of its accepted unit formats. For example, ifthe answer to a problem is “1ft”, the computer will accept “12in” as correct.
You can format the number displayed by the computer as the answer. For instance, ifthe answer is one-third, the computer will display that it computed “.333333333” as theanswer. If you’d like to shorten that, you can use the Format field. Format strings like“2E” (without the quotes) will display three significant digits in scientific notation. Formatstrings like “2f” will display two digits after the decimal point. Format strings like “2s” willround a number to 2 significant digits.
6.7 For More Information
The full power of Perl is well outside the scope of this document. Looking in the functionlist at 8.3 can give you some ideas. O’Reilly has some good Perl books. The Perl 5 PocketReference will contain more than what you need to know to use LON-CAPA, available athttp://www.oreilly.com/catalog/perlpr3/ .
If you have any problems, consult http://help.loncapa.org/fom/cache/5.html . If youdon’t find the answer to your problem, please help us expand the FAQ by submitting a newpending question.
Our advanced users often come to prefer the XML interface for the problems, availablethrough the EditXML buttons. Covering the XML format is beyond the scope of thismanual, but you can learn a lot by using the editor to make changes and seeing whathappens to the XML.
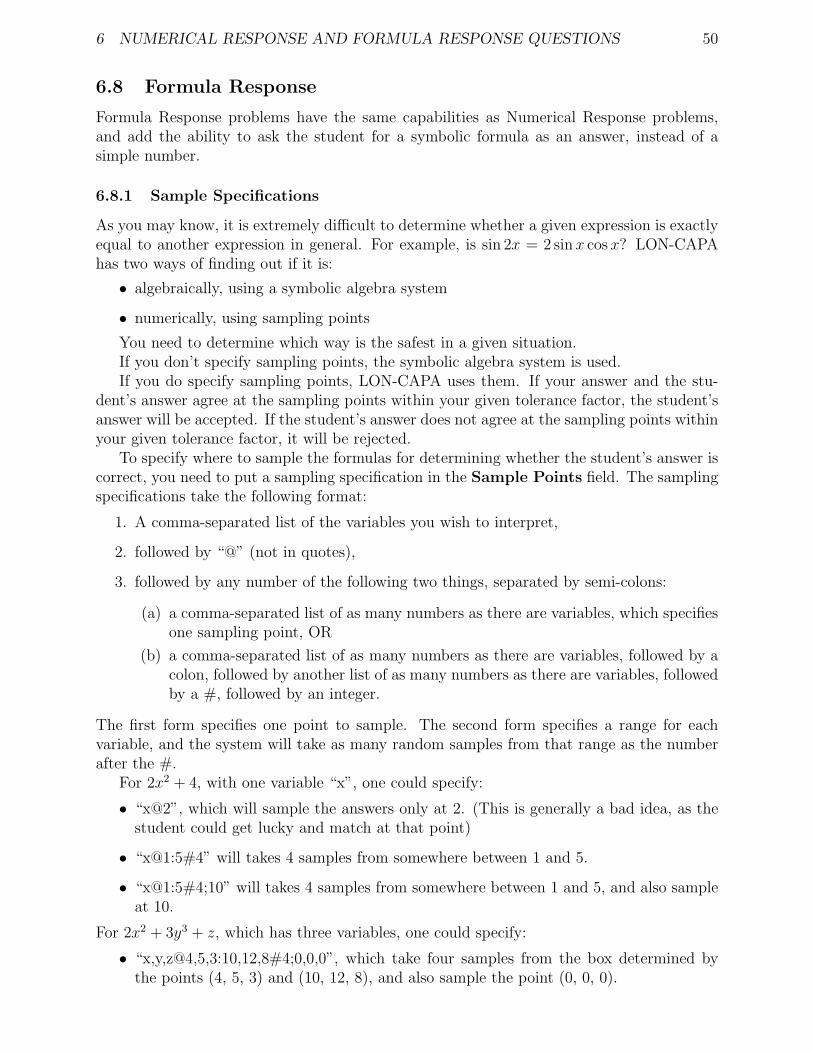
6 NUMERICAL RESPONSE AND FORMULA RESPONSE QUESTIONS 50
6.8 Formula Response
Formula Response problems have the same capabilities as Numerical Response problems,and add the ability to ask the student for a symbolic formula as an answer, instead of asimple number.
6.8.1 Sample Specifications
As you may know, it is extremely difficult to determine whether a given expression is exactlyequal to another expression in general. For example, is sin 2x = 2 sinx cos x? LON-CAPAhas two ways of finding out if it is:
• algebraically, using a symbolic algebra system
• numerically, using sampling points
You need to determine which way is the safest in a given situation.If you don’t specify sampling points, the symbolic algebra system is used.If you do specify sampling points, LON-CAPA uses them. If your answer and the stu-
dent’s answer agree at the sampling points within your given tolerance factor, the student’sanswer will be accepted. If the student’s answer does not agree at the sampling points withinyour given tolerance factor, it will be rejected.
To specify where to sample the formulas for determining whether the student’s answer iscorrect, you need to put a sampling specification in the Sample Points field. The samplingspecifications take the following format:
1. A comma-separated list of the variables you wish to interpret,
2. followed by “@” (not in quotes),
3. followed by any number of the following two things, separated by semi-colons:
(a) a comma-separated list of as many numbers as there are variables, which specifiesone sampling point, OR
(b) a comma-separated list of as many numbers as there are variables, followed by acolon, followed by another list of as many numbers as there are variables, followedby a #, followed by an integer.
The first form specifies one point to sample. The second form specifies a range for eachvariable, and the system will take as many random samples from that range as the numberafter the #.
For 2x2 + 4, with one variable “x”, one could specify:
• “x@2”, which will sample the answers only at 2. (This is generally a bad idea, as thestudent could get lucky and match at that point)
• “x@1:5#4” will takes 4 samples from somewhere between 1 and 5.
• “x@1:5#4;10” will takes 4 samples from somewhere between 1 and 5, and also sampleat 10.
For 2x2 + 3y3 + z, which has three variables, one could specify:
• “x,y,z@4,5,3:10,12,8#4;0,0,0”, which take four samples from the box determined bythe points (4, 5, 3) and (10, 12, 8), and also sample the point (0, 0, 0).
7 TAGS USED IN XML AUTHORING 51
6.8.2 Formula Notes
• The formula evaluator can not handle things of the form “x + - y”. If you have arandom variable that may be positive or negative (as in the example following thissection), you can try wrapping the references to that variable in parentheses. Asalways, it is a good idea to try out several randomized versions of your problems tomake sure everything works correctly.
• Never use relative tolerance in Formula Response problems. Relative toler-ance is poorly defined in Formula Response problems. Always use absolute tolerance.
6.8.3 Example Formula Response
A very simple formula response problem:
• In the Script, place the following:
$slope = &random(-5.0,5.0,.5);
$yint = &random(-5.0,5.0,.5);
$answer = ‘‘$slope*x + ($yint)’’;
• In the Text Block, place the following: “For a line with slope $slope and y-intercept$yint, what is y equal to?”
• In the Answer, place the following: $answer
• Set the Tolerance to .000001.
• Set the Sample Points to x@0;1;2;3 .
7 Tags Used in XML Authoring
It is assumed that the reader is already familiar with the basic terminology of XML. If not,it is recommended that you read http://www.w3schools.com/xml/xml syntax.asp to acquirea basic understanding of how to read and write XML.
LON-CAPA uses a very simple subset of XML and there is a lot you do not need to know,including but not limited to: CDATA, DTDs, namespaces, and stylesheets. If you search forXML resources on the Internet yourself, you do not need to read about those things to learnhow LON-CAPA uses XML for problems.
7.1 Response Tags
Response tags are the tags used by LON-CAPA to indicate what a student should enter intothe system, such as a string answer, clicking on a picture, typing in a formula, etc. They arethe core tags of homework problems; a homework problem without at least one response tagis not really a homework problem.
Simple examples of the more complicated tags are available as templates for you to choosefrom when creating a new problem in your Construction Space.

7 TAGS USED IN XML AUTHORING 52
7.1.1 numericalresponse
stringresponse implements a string answer. An internal textline tag (see 7.5) is necessaryfor the student’s response to go in. It can check the string for either case or order. Possibleattributes are:
• answer: required. Specifies the correct answer, either a perl list or scalar.
• type: optional. Specifies how the string is checked (like the CAPA styles). Possiblevalues are:
– cs: case sensitive, order important.
– ci: case insensitive, order important.
– mc: case insensitive, order unimportant. The mnemonic for this option is “multiplechoice”, which is how it was used in CAPA: To allow the user to specify choicesfrom a multiple choices problem, as in “adce”, meaning parts a, d, c, and e aretrue. Order didn’t matter in such a problem. In LON-CAPA, using option-response with True and False foils would be preferable, but this will remainsupported for easier CAPA to LON-CAPA conversion.
7.1.2 imageresponse
imageresponse implements a image-click answer. imageresponse tags should contain afoilgroup tag, which contain foil tags. Each foil tag can contain:
• image: required. The delimited text should correspond to a published image resource.Example: <image>/res/adm/includes/templates/man1.jpg</image>. The follow-ing image formats are recommended - gif, jpg or png. Other formats may work, butthere may be printing or display issues. The image should only appear once per foil.
• rectangle: required. The delimited text specifies a rectangular area that is correct,specified as (x1,y1)-(x2,y2), where x1, x2, y1, and y2 are number corresponding tothe x and y coordinates of two corners that define a rectangle which specifies wherethe right answer for this foil is located on the image. For example, (0,0)-(100,200)will specify that a rectangle 100 pixels wide and 200 pixels tall, situated in the upperleft of the image, is correct. At least one rectangle is required; multiple rectangles maybe specified.
• text: required. The delimited text is printed before the image is shown on the screen.This text is typically used to describe to the student what they are expected to clickon.
7.1.3 optionresponse
optionresponse implements a “select from these choices” style question. The choices arespecified by the instructor and use the foil structure tags as described in 7.3, with thisadditional addition:
• foilgroup: required to have an options attribute which should be a perl list of possibleoptions for the student.

7 TAGS USED IN XML AUTHORING 53
7.1.4 radiobuttonresponse
radiobuttonresponse implements a true/false question with one correct answer. It usesthe foil structure tags as described in 7.3, but the value of a foil can only be true, false, orunused.
7.1.5 dataresponse
dataresponse is an advanced type of response tag that implements a simple data storageand needs an input tag, such as textline, to work correctly. Possible attributes are:
• name: internal name for the value. It will have the part id and response id added toit.
• type: type of data stored in this response field. It should be one of the types supportedby parameter.html
• display: string that will be used to describe the field when interfacing with humans.
7.1.6 externalresponse
externalresponse is an advanced type of response tag that implements the ability to havean external program grade a response. It expects either a textline or textfield inside thetag. Possible attributes are:
• url: url to submit the answer form to. It does not need to be a LON-CAPA machine.
• answer: data to post in the form element LONCAPA correct answer to the remotesite.
• form: hash variable name that will be submitted to the remote site as a HTTP form.
The form sent will consist of
• LONCAPA student response full text of what the student entered in the entryfield
• LONCAPA correct answer contents of the answer attribute
• LONCAPA language specified language encoding of the requesting resource
• all items in the form attribute if any of these clash with the above, the abovevalues will overwite the value in the form attribute
The response of the remote server needs to be in XML as follows:
• loncapagrade: takes no attributes, but must surround the response.
• awarddetail: required. The delimited text inside must be one of the detailed resultsthat appears in the data storage documentation. CVS:loncapa/doc/homework/datastorage,look for resource.partid.responseid.awarddetail.
• message: optional message to have shown to the student.
7 TAGS USED IN XML AUTHORING 54
Example:
<loncapagrade>
<awarddetail>INCORRECT</awarddetail>
<message>
A message to be shown to the students
</message>
</loncapagrade>
7.1.7 Attributes For All Response Tags
These response tag attributes are used by all response tags:
• id: If this isn’t set, it will be set during the publication step. It is used to assignparameter names in a way that can be tracked if an instructor modifies by hand.
• name: optional. If set, it will be used by the resource assembly tool when one ismodifying parameters.
7.2 responseparam and parameter
If responseparam appears, it should be inside of a response tag. It defines an externallyadjustable parameter for the question, which the question can then use to allow other usersto customize the problem for their courses without changing the source code of the problem.Possible attributes are:
• default: required. Specifies a default value for the parameter.
• name: required. Specifies an internal name for the parameter.
• type: required. Specifies the type of parameter: tolerance, int, float, string, ordate.
• description: string describing the parameter. This is what is used to talk about aparameter outside of a problem.
parameter is exactly the same as responseparam, but should appear outside of a responsetag.
7.3 Foil Structure Tags
All tags that implement a foil structure have an optional arg of max that controls themaximum number of total foils to show.
• foilgroup: required. Must surround all foil definitions.
• foil: required. The foil is defined by what is delimited by the foil tag.
• conceptgroup: optional. Surrounds a collection of foil. When a problem is displayed,only one of the contained foil is selected for display. It has one required attributeconcept.

7 TAGS USED IN XML AUTHORING 55
7.4 Hint Tags
All of these tags must appear inside a response tag:
• hintgroup: tag that surrounds all of a hint.
• hintpart: required. Tag to implement conditional hints. It has a required argumenton. When a hint tag named the same as the on attribute evaluates to be correct, thehintpart will show. If no other hintpart is to show then all hintparts with an onvalue set to “default” will show.
• numericalhint: It has all the arguments that numericalresponse does, and therequired attribute name which should be set to the value of which hintpart will beshown.
• stringhint: It has all the arguments that stringresponse does, and the requiredattribute name which should be set to the value of which hintpart will be shown.
• formulahint: It has all the arguments that formularesponse does, and the requiredattribute name which should be set to the value of which hintpart will be shown.
• optionhint: The required attribute name should be set to the value of which hint-part will be shown.
• radiobuttonhint: The required attribute name should be set to the value of whichhintpart will be shown, and the attribute answer should be a two element list, firstthe type (foil or concept) and then either the foil’s name or the concept’s string.
7.5 Input Tags
This group of tags implements a mechanism for getting data for students. They will usuallybe used by a response tag.
• textfield: Creates a large text input box. If data appears between the start and endtags, the data will appear in the textfield if the student has not yet made a submission.Additionally, it takes two attributes: rows and cols, which control the height andwidth of the text area respectively. It defaults to 10 rows and 80 columns.
• textline: Creates a single line input element. It accepts one attribute size whichcontrols the width of the textline, defaulting to 20.
7.6 Output Tags
This group of tags generates useful output.
• algebra: Typesets algebraic expressions
<algebra>2x^y+sqrt(3/x^2)</algebra>
Expressions are displayed using the math expression display mechanism defined in theuser’s preferences. The default is tth. See the section below concerning the <m> tagfor more information on that as well as on the attribute display.

7 TAGS USED IN XML AUTHORING 56
• chem: Typesets chemical equation
<chem>02 + 2H2 -> 2H20</chem>
• num: Typesets a number formatted in scientific notation, fixed point, fixed point withcommas, fixed point with commas and dollar sign, or in significant digits.
<num format="2E">31454678</num>
<num format="2f">31454678</num>
<num format="2f">31454678</num>
<num format=",2f">31454678</num>
<num format="$2f">31454678</num>
<num format="2s">31454678</num>
• parse: to display the parsed view of a variable’s contents
<script type="loncapa/perl">
$table=‘<table>’;
for ($i=1;$i<=10;$i++)
$table.=‘<tr><td>’.$i.‘</td><td>’.&random(1,10,1).‘</td></tr>’;
$table.=‘</table>’;
</script>
<parse>$table</parse>
• standalone: Everything in between the start and end tag is shown only on the weband only if the resource is not part of a course.
• displayduedate: This will insert the current due date if one is set in the document.It is generated to be inside a table of 1x1 elements. The displayduedate tag acceptsThe following attributes:
style=“plain” Makes the due date appear without any boxing. If the parameter valueis other than “plain”, or if the style parameter is omitted, the due date will bedisplayed within a box.
format=“fmt string” Allows you to control the format of the due date. “fmt string”is an arbitrary string that can contain any of the following formatting items:
%a Replaced by the abbreviated weekday name according to the current locale.
%A Replaced by the full weekday name according to the current locale.
%b The abbreviated month name according to the current locale.
%B The full month name according to the current locale.
%c The preferred date and time representation for the current locale (the defaultformat string is just this).
%C The century number as a two digit integer
%d The day of the month as a decimal number. Leading zeroes are shown forsingle digit day numbers.

7 TAGS USED IN XML AUTHORING 57
%D Equivalent to %m/%d/%y
%e Like %d but a leadnig zero is replaced by a space.
%F Equivalent to %Y-%m-%d
%G The four digit year number.
%g The two digit year numbger.
%H The hour as a two digit number in the range 00 thorugh 23.
%I The hour as a two digit number in the range 00 through 12.
%j The day your the year in the range 001 through 366.
%k The hour (24 hour clock), single digits are preceded by a blank.
%l Like %k but using a 12 hour clock.
%m The month as a two digit decimal number in the range 01 through 12.
%M The minute as a two digit decimal number in the range 00 through 59.
%n A newline character.
%p AM or PM depending on the time value.
%P am or pm.
%r The time in am or pm notation.
%R Time in 24 hour notatinon (%H:%M). See also %T below.
%s Number of seconds since midnight of January 1, 1970.
%S The second as a decimal number int the range 00 through 59.
%t A horizontal tab character.
%T The time in 24 hour notation (%H:%M:%S).
%u Day of the week as a decimal number with Monday as 1.
%U The week number of the current year in the range 00 through 53. Week 1 isthe week containing the first Sunday of the year.
%V Same as %U but week 1 is the first week with at least 4 days, with Mondaybeing the first day of a week.
%w Day of the week as a decimal integer in the range 0 through 7, Sunday is 0.
%W Week number of the current year in the range 00 through 53, where thefirst Monday of the year is the first day of week 01.
%x The preferred date notation in the current locale without the time.
%X The preferred time notation in the current locale without the date.
%y The year as a decimal number without the century (range 00 through 99).
%Y The year as a decimal number including the century.
%% A % character.
%+ Date and time in the form returned by the Unix date command.
• displaytitle: This will insert the title of the problem from the metadata of the prob-lem. Only the first displaytitle in a problem will show the title; this allows cleanusage of displaytitle in LON-CAPA style files.
• window: This creates a link that when clicked shows the intervening information ina pop-up window. By default the window will be 500 pixels wide and 200 pixels tall,and the link text will be a superscript * (so as to look like a footnote). These can bechanged using the attributes
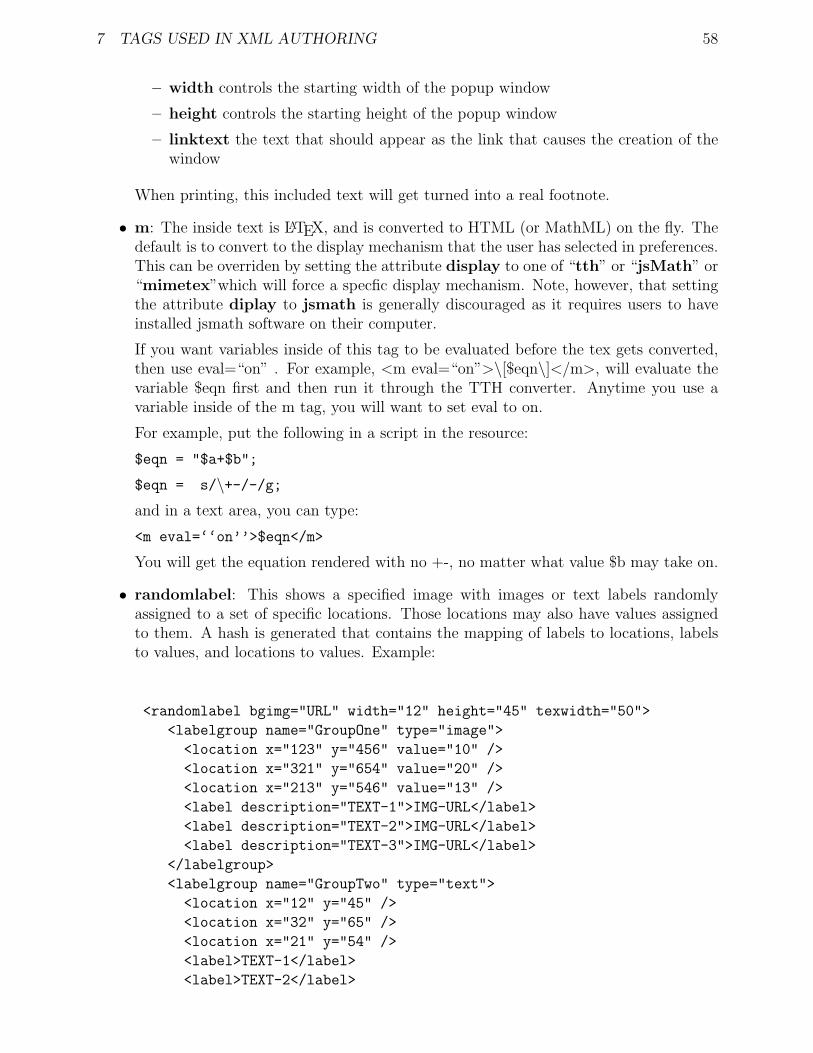
7 TAGS USED IN XML AUTHORING 58
– width controls the starting width of the popup window
– height controls the starting height of the popup window
– linktext the text that should appear as the link that causes the creation of thewindow
When printing, this included text will get turned into a real footnote.
• m: The inside text is LATEX, and is converted to HTML (or MathML) on the fly. Thedefault is to convert to the display mechanism that the user has selected in preferences.This can be overriden by setting the attribute display to one of “tth” or “jsMath” or“mimetex”which will force a specfic display mechanism. Note, however, that settingthe attribute diplay to jsmath is generally discouraged as it requires users to haveinstalled jsmath software on their computer.
If you want variables inside of this tag to be evaluated before the tex gets converted,then use eval=“on” . For example, <m eval=“on”>\[$eqn\]</m>, will evaluate thevariable $eqn first and then run it through the TTH converter. Anytime you use avariable inside of the m tag, you will want to set eval to on.
For example, put the following in a script in the resource:
$eqn = "$a+$b";
$eqn = s/\+-/-/g;and in a text area, you can type:
<m eval=‘‘on’’>$eqn</m>
You will get the equation rendered with no +-, no matter what value $b may take on.
• randomlabel: This shows a specified image with images or text labels randomlyassigned to a set of specific locations. Those locations may also have values assignedto them. A hash is generated that contains the mapping of labels to locations, labelsto values, and locations to values. Example:
<randomlabel bgimg="URL" width="12" height="45" texwidth="50">
<labelgroup name="GroupOne" type="image">
<location x="123" y="456" value="10" />
<location x="321" y="654" value="20" />
<location x="213" y="546" value="13" />
<label description="TEXT-1">IMG-URL</label>
<label description="TEXT-2">IMG-URL</label>
<label description="TEXT-3">IMG-URL</label>
</labelgroup>
<labelgroup name="GroupTwo" type="text">
<location x="12" y="45" />
<location x="32" y="65" />
<location x="21" y="54" />
<label>TEXT-1</label>
<label>TEXT-2</label>

7 TAGS USED IN XML AUTHORING 59
<label>TEXT-3</label>
</labelgroup>
</randomlabel>
Possible attributes are:
– bgimg: Either a fully qualified URL for an external image or a LON-CAPAresource. It supports relative references (../images/apicture.gif). The image musteither be a GIF or JPEG.
– width: The width of the image in pixels.
– height: The height of the image in pixels.
– texwidth: The width of the image in millimeters.
7.7 Internal Tags
• labelgroup: One is required, but multiple are allowed. This declares a group oflocations and labels associated with them. Possible attributes are:
– name: This is the name of the group. A hash with this name will be gener-ated holding the mappings for later use in the problem. For each location avalue will be set for which label is there (EX. $hash’1’=”TEXT-2”). For lo-cations with values, the hash will contain 2 items, a location to value mapping($hash’value 1’=10), and a label to value mapping ($hash’labelvalue 2’=10).For all image style of labels there will also be a label description to label URLmapping ($hash’image 2’=IMG-URL). The entry numlocations will also beset to the total number of locations that exist (Note: locations and labels startcounting from one.)
– type: the type of labels in this group, either ’image’ or ’text’
– location: declares a location on the image that a label should appear at. Possibleattributes are:
∗ x: The x value of the location in pixels.
∗ y: The y value of the location in pixels.
∗ value: An optional scalar value to associate at this location.
∗ label: Declaration of a label. If this is a text type label, the internal textshould be the text of the label (HTML is not currently supported); if thisis an image type of label, the internal text must be a LON-CAPA resourcespecification, and the description filed must be set. Possible attributes are:
· description: Required field for image labels. It will be used when settingvalues in the hash.
7.8 Scripting Tags
• display: The intervening Perl script is evaluated in the safe space and the return valueof the script replaces the entire tag.

7 TAGS USED IN XML AUTHORING 60
• import: This causes the parse to read in the file named in the body of the tag andparse it as if the entire text of the file had existed at the location of the tag.
• parserlib: The enclosed filename contains definitions for new tags.
• script: If the attribute type is set to “loncapa/perl” the enclosed data is a Perl scriptwhich is evaluated inside the Perl safe space. The return value of the script is ignored.
• scriptlib: The enclosed filename contains Perl code to run in the safe space.
• block: This has a required argument condition that is evaluated. If the condition istrue, everything inside the tag is evaluated; otherwise, everything inside the block tagis skipped.
• notsolved: Everything inside the tag is skipped if the problem is “solved”.
• postanswerdate: Everything inside the tag is skipped if the problem is before theanswer date.
• preduedate: Everything inside the tag is skipped if the problem is after the due date.
• randomlist: The enclosed tags are parsed in a stable random order. The optionalattribute show restricts the number of tags inside that are actually parsed to no morethan show.
• solved: Everything inside the tag is skipped if the problem is “not solved”.
• while: This implements a while loop. The required attribute condition is a Perlscriptlet that when evaluated results in a true or false value. If true, the entirety ofthe text between the whiles is parsed. The condition is tested again, etc. If false, itgoes to the next tag.
7.9 Structure Tags
These tags give the problem a structure and take care of the recording of data and givingthe student messages.
• problem: This must be the first tag in the file. This tag sets up the header of thewebpage and generates the submit buttons. It also handles due dates properly.
• part: This must be below problem if it is going to be used. It does many of the sametasks as problem, but allows multiple separate problems to exist in a single file.
• startouttext and endouttext: These tags are somewhat special. They must haveno internal text and occur in pairs. Their use is to mark up the problem so the webeditor knows what sections should be edited in a plain text block on the web.
• comment: This tag allows one to comment out sections of code in a balanced manner,or to provide a comment description of how a problem works. It only shows up for theedit target, stripped out for all other targets.

8 <SCRIPT> TAG 61
8 <script> Tag
8.1 Supported script functions
This is a list of functions that have been written that are available in the Safe space scriptingenvironment inside a problem:
• sin(x), cos(x), tan(x)
• asin(x), acos(x), atan(x), atan2(y,x)
• log(x), log10(x)
• exp(), pow(x,y), sqrt(x)
• abs(x), sgn(x)
• erf(x), erfc(x)
• ceil(x), floor(x)
• min(...), max(...)
• factorial(n)
• N%M (modulo function)
• sinh(x), cosh(x), tanh(x)
• asinh(x), acosh(x), atanh(x)
• roundto(x,n)
• cas(s,e,l)
• web(“a”,”b”,”c”) or web(a,b,c)
• html(“a”) or html(a)
• j0(x), j1(x), jn(n,x), jv(y,x)
• y0(x), y1(x), yn(n,x), yv(y,x)
• random
• choose
• tex(“a”,”b”) or tex(a,b)
• var in tex(a)
• to string(x), to string(x,y)
• class(), sec()
• name(), firstname(), lastname(), student number()

8 <SCRIPT> TAG 62
• check status(partid)
• open date(partid), due date(partid), answer date(partid)
• open date epoch(partid), due date epoch(partid), answer date epoch(partid)
• submission(partid,responseid,version)
• currentpart()
• sub string()
• array moments(array)
• format(x,y),prettyprint(x,y,target),dollarformat(x,target)
• languages
• map(...)
• caparesponse check
• caparesponse check list
We also support these functions from Math::Cephes
bdtr: Binomial distribution
bdtrc: Complemented binomial distribution
bdtri: Inverse binomial distribution
btdtr: Beta distribution
chdtr: Chi-square distribution
chdtrc: Complemented Chi-square distribution
chdtri: Inverse of complemented Chi-square distribution
fdtr: F distribution
fdtrc: Complemented F distribution
fdtri: Inverse of complemented F distribution
gdtr: Gamma distribution function
gdtrc: Complemented gamma distribution function
nbdtr: Negative binomial distribution
nbdtrc: Complemented negative binomial distribution
nbdtri: Functional inverse of negative binomial distribution
ndtr: Normal distribution function
ndtri: Inverse of Normal distribution function
pdtr: Poisson distribution
pdtrc: Complemented poisson distribution
pdtri: Inverse Poisson distribution
stdtr: Student’s t distribution
stdtri: Functional inverse of Student’s t distribution
Please see Math::Cephes for more information

8 <SCRIPT> TAG 63
8.2 Script Variables
• $external::target - set to the current target the xml parser is parsing for
• $external::part - set to the id of the current problem <part>; zero if there are no<part>
• $external::gradestatus - set to the value of the current resource.partid.solved value
• $external::datestatus - set to the current status of the clock either CLOSED, CAN ANSWER,CANNOT ANSWER, SHOW ANSWER, or UNCHECKEDOUT
• $external::randomseed - set to the number that was used to seed the random numbergenerator
• $pi - set to PI
• $rad2deg - converts radians to degrees
• $deg2rad - converts degrees to radians
8.3 Table: LON-CAPA functions
LON-CAPA Function Description&sin($x), &cos($x), &tan($x) Trigonometric functions where x is in radians.
$x can be a pure number, i.e., you can call&sin(3.1415)
&asin($x), &acos($x), &atan($x),&atan2($y,$x)
Inverse trigonometric functions. Return valueis in radians. For asin and acos the value of xmust be between -1 and 1. The atan2 returnsa value between -pi and pi the sign of which isdetermined by y. $x and $y can be pure num-bers
&log($x), &log10($x) Natural and base-10 logarithm. $x can be apure number
&exp($x), &pow($x,$y), &sqrt($x) Exponential, power and square root, i.e.,ex, xyand /x. $x and $y can be pure numbers
&abs($x), &sgn($x) Abs takes the absolute value of x while sgn(x)returns 1, 0 or -1 depending on the value of x.For x>0, sgn(x) = 1, for x=0, sgn(x) = 0 andfor x<0, sgn(x) = -1. $x can be a pure number
&erf($x), &erfc($x) Error function. erf = 2/sqrt(pi) integral (0,x)et-sq and erfx(x) = 1.0 - erf(x). $x can be apure number
&ceil($x), &floor($x) Ceil function returns an integer rounded upwhereas floor function returns and integerrounded down. If x is an integer than it re-turns the value of the integer. $x can be a purenumber

8 <SCRIPT> TAG 64
LON-CAPA Function Description&min(...), &max(...) Returns the minimum/ maximum value of a
list of arguments if the arguments are numbers.If the arguments are strings then it returns astring sorted according to the ASCII codes
&factorial($n) Argument (n) must be an integer else it willround down. The largest value for n is 170. $ncan be a pure number
$N%$M N and M are integers and returns the remainder(in integer) of N/M. $N and $M can be purenumbers
&sinh($x), &cosh($x), &tanh($x) Hyperbolic functions. $x can be a pure number&asinh($x), &acosh($x), &atanh($x) Inverse hyperbolic functions. $x can be a pure
number&format($x,’nn’) Display or format $x as nn where nn is nF or
nE or nS and n is an integer.&prettyprint($x,’nn’,’optional target’) Note that that tag <num> can be used to do
the same thing. Display or format $x as nnwhere nn is nF or nE or nS and n is an integer.Also supports the first character being a $, itthen will format the result with a a call to &dol-larformat() described below. If the first charac-ter is a , it will format it with commas groupingthe thousands. In S mode it will fromat thenumber to the specified number of significantfigures and display it in F mode. In E mode itwill attempt to generate a pretty x10ˆ3 ratherthan a E3 following the number, the ’optionaltarget’ argument is optional but can be used toforce &prettyprint to generate either ’tex’ out-put, or ’web’ output, most people do not needto specify this argument and can leave it blank.
&dollarformat($x,’optional target’) Reformats $x to have a $ (or \$ if in tex mode)and to have , grouping thousands. The ’optionaltarget’ argument is optional but can be used toforce &prettyprint to generate either ’tex’ out-put, or ’web’ output, most people do not needto specify this argument and can leave it blank.
Option 1 - $best = &languages()Option 2 - @all = &languages()Option 3 - $best =&languages(\@desired languages)Option 4 - @all =&languages(\@desired languages)
Returns the best language to use, in the firsttwo options returns the languages codes in thepreference order of the user. In the second twoexamples returns the best matches from a listof desired language possibilities.

8 <SCRIPT> TAG 65
LON-CAPA Function Description&roundto($x,$n) Rounds a real number to n decimal points. $x
and $n can be pure numbers&cas($s,$e,$l) Evaluates the expression $e inside the symbolic
algebra system $s. Currently, only the Maximasymbolic math system is implemented. $l is anoptional comma-separated list of libraries. Ex-ample: &cas(’maxima’,’6*7’)
&implicit multiplication($f) Adds mathematical multiplication operatorsto the formula expression $f where onlyimplicit multiplication is used. Exam-ple: &implicit multiplication(’2(b+3c)’) re-turns 2*(b+3*c)
&web(“a”,”b”,”c”) or &web($a,$b,$c) Returns either a, b or c depending on the outputmedium. a is for plain ASCII, b for tex outputand c for html output
&html(“a”) or &html($a) Output only if the output mode chosen is inhtml format
&j0($x), &j1($x), &jn($m,$x), &jv($y,$x) Bessel functions of the first kind with orders 0,1 and m respectively. For jn(m,x), m must bean integer whereas for jv(y,x), y is real. $x canbe a pure number. $m must be an integer andcan be a pure integer number. $y can be a purereal number
&y0($x), &y1($x), &yn($m,$x), &yv($y,$x) Bessel functions of the second kind with orders0, 1 and m respectively. For yn(m,x), m mustbe an integer whereas for yv(y,x), y is real. $xcan be a pure number. $m must be an integerand can be a pure integer number. $y can be apure real number
&random($l,$u,$d) Returns a uniformly distributed random num-ber between the lower bound, l and upperbound, u in steps of d. $l, $u and $d can bepure numbers
&choose($i,...) Choose the ith item from the argument list. imust be an integer greater than 0 and the valueof i should not exceed the number of items. $ican be a pure integer

8 <SCRIPT> TAG 66
LON-CAPA Function DescriptionOption 1 -&map($seed,[\$w,\$x,\$y,\$z],[$a,$b,$c,$d])orOption 2 -&map($seed,\@mappedArray,[$a,$b,$c,$d])Option 3 - @mappedArray =&map($seed,[$a,$b,$c,$d])Option 4 - ($w,$x,$y,$z) =&map($seed,\@a)Option 5 - @Z = &map($seed,\@a)where $a=’A’$b=’B’$c=’B’$d=’B’$w, $x, $y, and $z are variables
Assigns to the variables $w, $x, $y and $z thevalues of the $a, $b, $c and $c (A, B, C andD). The precise value for $w .. depends on theseed. (Option 1 of calling map). In option 2,the values of $a, $b .. are mapped into the ar-ray, @mappedArray. The two options illustratethe different grouping. Options 3 and 4 give aconsistent way (with other functions) of map-ping the items. For each option, the group canbe passed as an array, for example, [$a,$b,$c,$d]=> \@a. And Option 5 is the same as option 4,where the array of results is saved into a singlearray rather than an array of scalar variables.
Option 1 -&rmap($seed,[\$w,\$x,\$y,\$z],[$a,$b,$c,$d])orOption 2 -&rmap($seed,\@rmappedArray,[$a,$b,$c,$d])Option 3 - @rmapped array =&rmap($seed,[$a,$b,$c,$d])Option 4 - ($w,$x,$y,$z) =&rmap($seed,\@a)Option 5 - @Z = &map($seed,\@a)where $a=’A’$b=’B’$c=’B’$d=’B’$w, $x, $y, and $z are variables
The rmap functions does the reverse action ofmap if the same seed is used in calling map andrmap.
$a=&xmlparse($string) You probably should use the tag <parse> in-stead of this function. Runs the internal parserover the argument parsing for display. Warn-ing This will result in different strings in differ-ent targets. Don’t use the results of this func-tion as an answer.
&tex($a,$b), &tex(“a”,”b”) Returns a if the output mode is in tex otherwisereturns b
&var in tex($a) Equivalent to tex(“a”,”“)
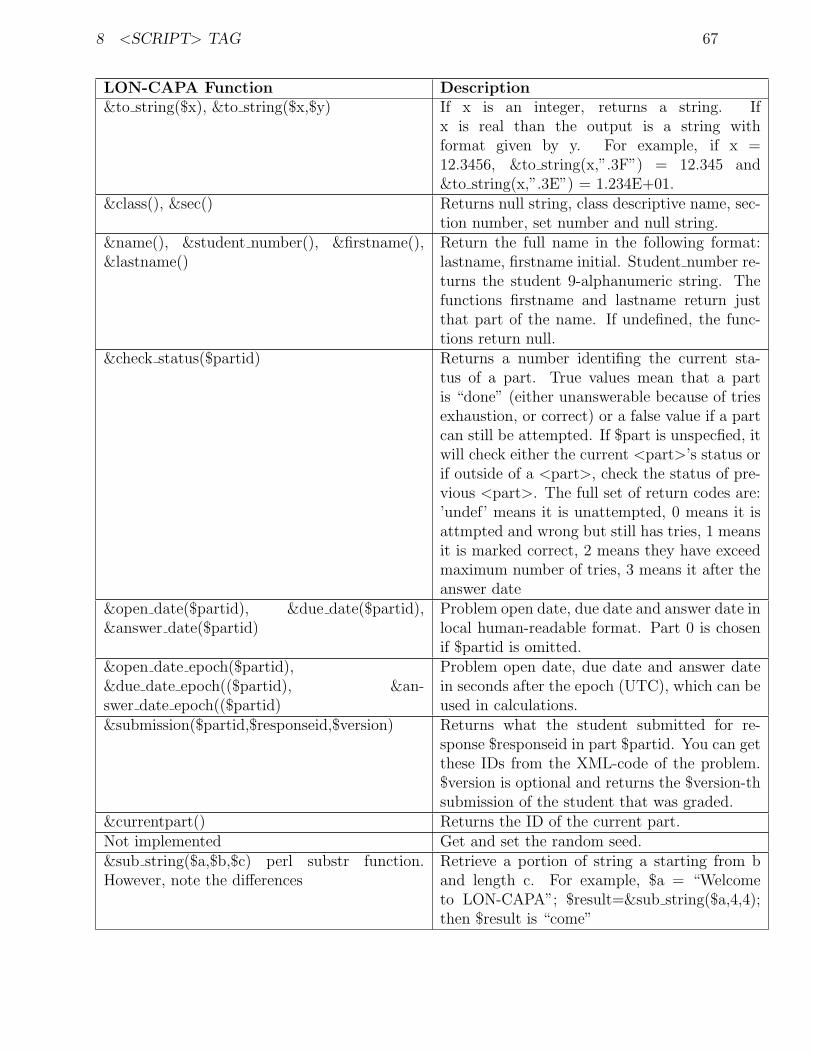
8 <SCRIPT> TAG 67
LON-CAPA Function Description&to string($x), &to string($x,$y) If x is an integer, returns a string. If
x is real than the output is a string withformat given by y. For example, if x =12.3456, &to string(x,”.3F”) = 12.345 and&to string(x,”.3E”) = 1.234E+01.
&class(), &sec() Returns null string, class descriptive name, sec-tion number, set number and null string.
&name(), &student number(), &firstname(),&lastname()
Return the full name in the following format:lastname, firstname initial. Student number re-turns the student 9-alphanumeric string. Thefunctions firstname and lastname return justthat part of the name. If undefined, the func-tions return null.
&check status($partid) Returns a number identifing the current sta-tus of a part. True values mean that a partis “done” (either unanswerable because of triesexhaustion, or correct) or a false value if a partcan still be attempted. If $part is unspecfied, itwill check either the current <part>’s status orif outside of a <part>, check the status of pre-vious <part>. The full set of return codes are:’undef’ means it is unattempted, 0 means it isattmpted and wrong but still has tries, 1 meansit is marked correct, 2 means they have exceedmaximum number of tries, 3 means it after theanswer date
&open date($partid), &due date($partid),&answer date($partid)
Problem open date, due date and answer date inlocal human-readable format. Part 0 is chosenif $partid is omitted.
&open date epoch($partid),&due date epoch(($partid), &an-swer date epoch(($partid)
Problem open date, due date and answer datein seconds after the epoch (UTC), which can beused in calculations.
&submission($partid,$responseid,$version) Returns what the student submitted for re-sponse $responseid in part $partid. You can getthese IDs from the XML-code of the problem.$version is optional and returns the $version-thsubmission of the student that was graded.
¤tpart() Returns the ID of the current part.Not implemented Get and set the random seed.&sub string($a,$b,$c) perl substr function.However, note the differences
Retrieve a portion of string a starting from band length c. For example, $a = “Welcometo LON-CAPA”; $result=&sub string($a,4,4);then $result is “come”
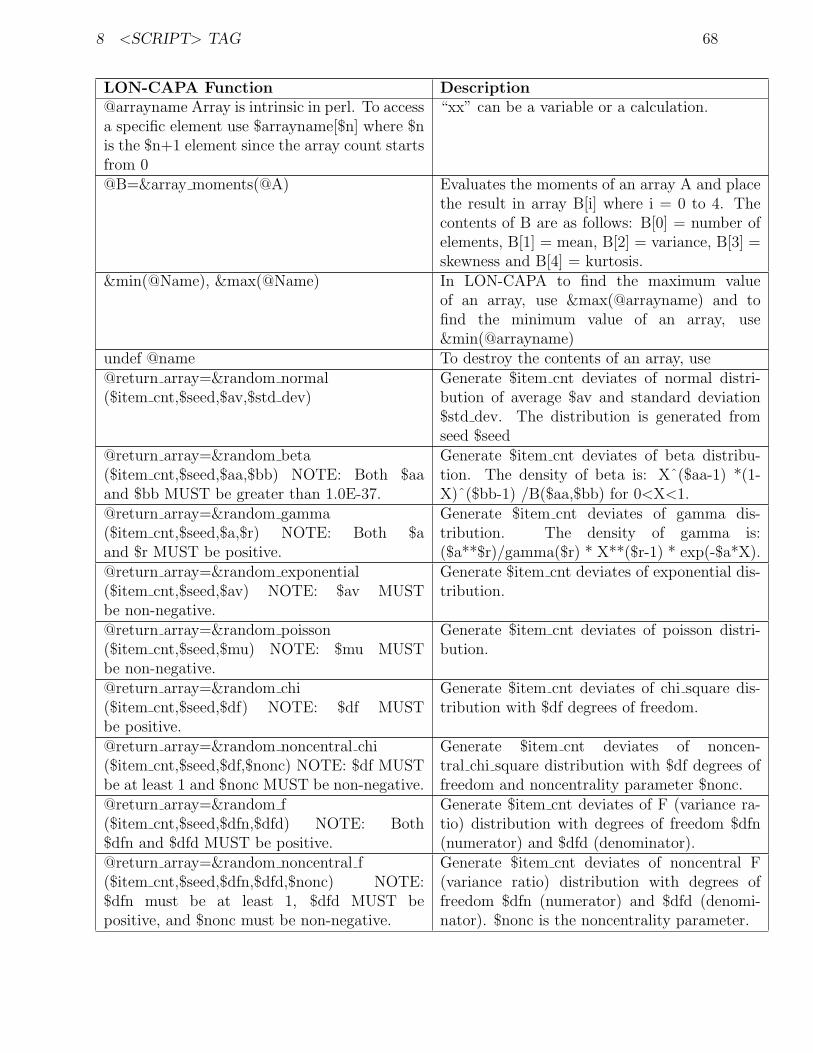
8 <SCRIPT> TAG 68
LON-CAPA Function Description@arrayname Array is intrinsic in perl. To accessa specific element use $arrayname[$n] where $nis the $n+1 element since the array count startsfrom 0
“xx” can be a variable or a calculation.
@B=&array moments(@A) Evaluates the moments of an array A and placethe result in array B[i] where i = 0 to 4. Thecontents of B are as follows: B[0] = number ofelements, B[1] = mean, B[2] = variance, B[3] =skewness and B[4] = kurtosis.
&min(@Name), &max(@Name) In LON-CAPA to find the maximum valueof an array, use &max(@arrayname) and tofind the minimum value of an array, use&min(@arrayname)
undef @name To destroy the contents of an array, use@return array=&random normal($item cnt,$seed,$av,$std dev)
Generate $item cnt deviates of normal distri-bution of average $av and standard deviation$std dev. The distribution is generated fromseed $seed
@return array=&random beta($item cnt,$seed,$aa,$bb) NOTE: Both $aaand $bb MUST be greater than 1.0E-37.
Generate $item cnt deviates of beta distribu-tion. The density of beta is: Xˆ($aa-1) *(1-X)ˆ($bb-1) /B($aa,$bb) for 0<X<1.
@return array=&random gamma($item cnt,$seed,$a,$r) NOTE: Both $aand $r MUST be positive.
Generate $item cnt deviates of gamma dis-tribution. The density of gamma is:($a**$r)/gamma($r) * X**($r-1) * exp(-$a*X).
@return array=&random exponential($item cnt,$seed,$av) NOTE: $av MUSTbe non-negative.
Generate $item cnt deviates of exponential dis-tribution.
@return array=&random poisson($item cnt,$seed,$mu) NOTE: $mu MUSTbe non-negative.
Generate $item cnt deviates of poisson distri-bution.
@return array=&random chi($item cnt,$seed,$df) NOTE: $df MUSTbe positive.
Generate $item cnt deviates of chi square dis-tribution with $df degrees of freedom.
@return array=&random noncentral chi($item cnt,$seed,$df,$nonc) NOTE: $df MUSTbe at least 1 and $nonc MUST be non-negative.
Generate $item cnt deviates of noncen-tral chi square distribution with $df degrees offreedom and noncentrality parameter $nonc.
@return array=&random f($item cnt,$seed,$dfn,$dfd) NOTE: Both$dfn and $dfd MUST be positive.
Generate $item cnt deviates of F (variance ra-tio) distribution with degrees of freedom $dfn(numerator) and $dfd (denominator).
@return array=&random noncentral f($item cnt,$seed,$dfn,$dfd,$nonc) NOTE:$dfn must be at least 1, $dfd MUST bepositive, and $nonc must be non-negative.
Generate $item cnt deviates of noncentral F(variance ratio) distribution with degrees offreedom $dfn (numerator) and $dfd (denomi-nator). $nonc is the noncentrality parameter.

8 <SCRIPT> TAG 69
LON-CAPA Function Description@return array=&random multivariate normal($item cnt,$seed,\@mean,\@covar) NOTE:@mean should be of length p array of realnumbers. @covar should be a length p array ofreferences to length p arrays of real numbers(i.e. a p by p matrix.
Generate $item cnt deviates of multivari-ate normal distribution with mean vector@mean and variance-covariance matrix.
@return array=&random multinomial($item cnt,$seed,@p) NOTE: $item cnt isrounded with int() and the result must benon-negative. The number of elements in @pmust be at least 2.
Returns single observation from multinomialdistribution with $item cnt events classified intoas many categories as the length of @p. Theprobability of an event being classified into cat-egory i is given by ith element of @p. The ob-servation is an array with length equal to @p,so when called in a scalar context it returns thelength of @p. The sum of the elements of theobervation is equal to $item cnt.
@return array=&random permutation($seed,@array)
Returns @array randomly permuted.
@return array=&random uniform($item cnt,$seed,$low,$high) NOTE: $lowmust be less than or equal to $high.
Generate $item cnt deviates from a uniform dis-tribution.
@return array=&random uniform integer($item cnt,$seed,$low,$high) NOTE: $low and$high are both passed through int(). $low mustbe less than or equal to $high.
Generate $item cnt deviates from a uniform dis-tribution in integers.
@return array=&random binomial($item cnt,$seed,$nt,$p) NOTE: $nt is roundedusing int() and the result must be non-negative.$p must be between 0 and 1 inclusive.
Generate $item cnt deviates from the binomialdistribution with $nt trials and the probabiltyof an event in each trial is $p.
@return array=&random negative binomial($item cnt,$seed,$ne,$p) NOTE: $ne is roundedusing int() and the result must be positive. $pmust be between 0 and 1 exclusive.
Generate an array of $item cnt outcomes gen-erated from negative binomial distribution with$ne events and the probabilty of an event ineach trial is $p.
8.4 Table: CAPA vs. LON-CAPA function differences
CAPA Functions LON-CAPA Differences (if any)sin(x), cos(x), tan(x) &sin($x), &cos($x), &tan($x)asin(x), acos(x), atan(x),atan2(y,x)
&asin($x), &acos($x), &atan($x),&atan2($y,$x)
log(x), log10(x) &log($x), &log10($x)exp(x), pow(x,y), sqrt(x) &exp($x), &pow($x,$y), &sqrt($x)abs(x), sgn(x) &abs($x), &sgn($x)erf(x), erfc(x) &erf($x), &erfc($x)ceil(x), floor(x) &ceil($x), &floor($x)min(...), max(...) &min(...), &max(...)factorial(n) &factorial($n)

8 <SCRIPT> TAG 70
CAPA Functions LON-CAPA Differences (if any)N%M $N%$Msinh(x), cosh(x), tanh(x) &sinh($x), &cosh($x), &tanh($x)asinh(x), acosh(x),atanh(x)
&asinh($x), &acosh($x),&atanh($x)
/DIS($x,”nn”) &format($x,’nn’) The difference is obvious.Not in CAPA &prettyprint($x,’nn’,’optional
target’)Not in CAPA &dollarformat($x,’optional target’)Not in CAPA &languages(@desired languages)roundto(x,n) &roundto($x,$n)Not in CAPA &cas($s,$e)Not in CAPA &implicit multiplication($f)web(“a”,”b”,”c”) orweb(a,b,c)
&web(“a”,”b”,”c”) or&web($a,$b,$c)
html(“a”) or html(a) &html(“a”) or &html($a)jn(m,x) &j0($x), &j1($x), &jn($m,$x),
&jv($y,$x)In CAPA, j0, j1 and jn are con-tained in one function, jn(m,x)where m takes the value of 0,1 or 2. jv(y,x) is new to LON-CAPA.
yn(m,x) &y0($x), &y1($x), &yn($m,$x),&yv($y,$x)
In CAPA, y0, y1 and ynare contained in one function,yn(m,x) where m takes thevalue of 0, 1 or 2. yv(y,x) isnew to LON-CAPA.
random(l,u,d) &random($l,$u,$d) In CAPA, all the 3 argumentsmust be of the same type.However, now you can mix thetype
choose(i,...) &choose($i,...)
/MAP(seed;w,x,y,z;a,b,c,d)
Option 1 -&map($seed,[\$w,\$x,\$y,\$z],[$a,$b,$c,$d])orOption 2 -&map($seed,\@mappedArray,[$a,$b,$c,$d])Option 3 - @mappedArray =&map($seed,[$a,$b,$c,$d])Option 4 - ($w,$x,$y,$z) =&map($seed,\@a)where $a=’A’$b=’B’$c=’B’$d=’B’$w, $x, $y, and $z are variables
In CAPA, the arguments aredivided into three groups sep-arated by a semicolon ;. InLON-CAPA, the separation isdone by using [] brackets orusing an array @a. Note thebackslash (\) before the argu-ments in the second and thirdgroups.

8 <SCRIPT> TAG 71
CAPA Functions LON-CAPA Differences (if any)
rmap(seed;a,b,c,d;w,x,y,z)
Option 1 -&rmap($seed,[\$w,\$x,\$y,\$z],[$a,$b,$c,$d])orOption 2 -&rmap($seed,\@rmappedArray,[$a,$b,$c,$d])Option 3 - @rmapped array =&rmap($seed,[$a,$b,$c,$d])Option 4 - ($w,$x,$y,$z) =&rmap($seed,\@a)where $a=’A’$b=’B’$c=’B’$d=’B’$w, $x, $y, and $z are variables
In CAPA, the arguments aredivided into three groups sep-arated by a semicolon ;. InLON-CAPA, the separation isdone by using [] brackets (withcreate an unamed vector ref-erence) or using an array @a.Note the backslash (\) beforethe arguments in the secondand third groups (Which causePerl to send to variable loca-tions rather than the variablevalues, similar to a C pointer).
NOT IMPLEMENTED INCAPA
$a=&xmlparse($string) New to LON-CAPA
tex(a,b), tex(“a”,”b”) &tex($a,$b), &tex(“a”,”b”)var in tex(a) &var in tex($a)to string(x), to string(x,y) &to string($x), &to string($x,$y)capa id(), class(), section(),set(), problem()
&class(), §ion() capa id(), set() and problem()are no longer used. Currently,they return a null value.
name(), student number() &name(), &student number()open date(), due date(),answer date()
&open date(), &due date(), &an-swer date()
Output format for time ischanged slightly. If pass noon,it displays ..pm else it displays..am. So 23:59 is displayed as11:59 pm.
get seed(), set seed() Not implementedsub string(a,b,c) &sub string($a,$b,$c) perl substr
function. However, note the differ-ences
Perl intrinsic function, sub-str(string,b,c) starts countingfrom 0 (as opposed to 1). Inthe example to the left, sub-str($a,4,4) returns “ome “.
array[xx] @arrayname Array is intrinsic inperl. To access a specific elementuse $arrayname[$n] where $n is the$n+1 element since the array countstarts from 0
In LON-CAPA, an array is de-fined by @arrayname. It is notnecessary to specify the dimen-sion of the array.
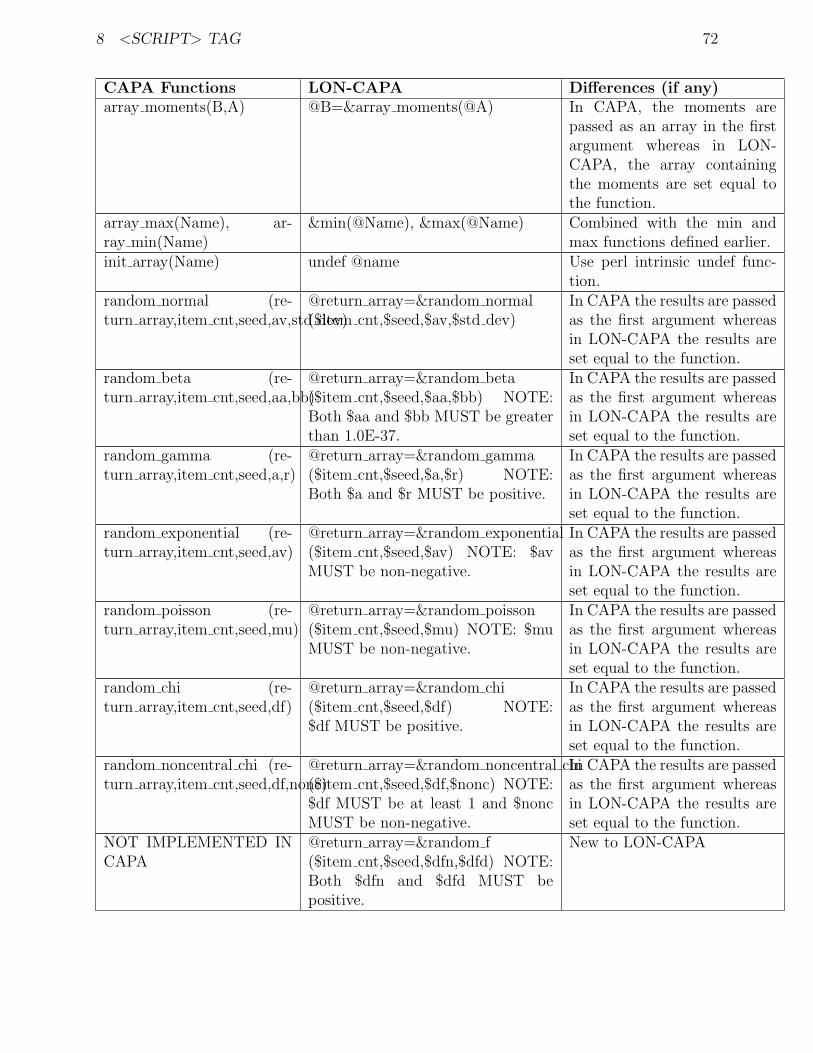
8 <SCRIPT> TAG 72
CAPA Functions LON-CAPA Differences (if any)array moments(B,A) @B=&array moments(@A) In CAPA, the moments are
passed as an array in the firstargument whereas in LON-CAPA, the array containingthe moments are set equal tothe function.
array max(Name), ar-ray min(Name)
&min(@Name), &max(@Name) Combined with the min andmax functions defined earlier.
init array(Name) undef @name Use perl intrinsic undef func-tion.
random normal (re-turn array,item cnt,seed,av,std dev)
@return array=&random normal($item cnt,$seed,$av,$std dev)
In CAPA the results are passedas the first argument whereasin LON-CAPA the results areset equal to the function.
random beta (re-turn array,item cnt,seed,aa,bb)
@return array=&random beta($item cnt,$seed,$aa,$bb) NOTE:Both $aa and $bb MUST be greaterthan 1.0E-37.
In CAPA the results are passedas the first argument whereasin LON-CAPA the results areset equal to the function.
random gamma (re-turn array,item cnt,seed,a,r)
@return array=&random gamma($item cnt,$seed,$a,$r) NOTE:Both $a and $r MUST be positive.
In CAPA the results are passedas the first argument whereasin LON-CAPA the results areset equal to the function.
random exponential (re-turn array,item cnt,seed,av)
@return array=&random exponential($item cnt,$seed,$av) NOTE: $avMUST be non-negative.
In CAPA the results are passedas the first argument whereasin LON-CAPA the results areset equal to the function.
random poisson (re-turn array,item cnt,seed,mu)
@return array=&random poisson($item cnt,$seed,$mu) NOTE: $muMUST be non-negative.
In CAPA the results are passedas the first argument whereasin LON-CAPA the results areset equal to the function.
random chi (re-turn array,item cnt,seed,df)
@return array=&random chi($item cnt,$seed,$df) NOTE:$df MUST be positive.
In CAPA the results are passedas the first argument whereasin LON-CAPA the results areset equal to the function.
random noncentral chi (re-turn array,item cnt,seed,df,nonc)
@return array=&random noncentral chi($item cnt,$seed,$df,$nonc) NOTE:$df MUST be at least 1 and $noncMUST be non-negative.
In CAPA the results are passedas the first argument whereasin LON-CAPA the results areset equal to the function.
NOT IMPLEMENTED INCAPA
@return array=&random f($item cnt,$seed,$dfn,$dfd) NOTE:Both $dfn and $dfd MUST bepositive.
New to LON-CAPA

9 BRIDGE TASK 73
CAPA Functions LON-CAPA Differences (if any)NOT IMPLEMENTED INCAPA
@return array=&random noncentral f($item cnt,$seed,$dfn,$dfd,$nonc)NOTE: $dfn must be at least 1,$dfd MUST be positive, and $noncmust be non-negative.
New to LON-CAPA
NOT DOCUMENTED INCAPA
@return array=&random multivariate normal($item cnt,$seed,\@mean,\@covar)NOTE: @mean should be of lengthp array of real numbers. @covarshould be a length p array ofreferences to length p arrays of realnumbers (i.e. a p by p matrix.
Note the backslash before the@mean and @covar arrays.
NOT IMPLEMENTED INCAPA
@return array=&random multinomial($item cnt,$seed,@p) NOTE:$item cnt is rounded with int() andthe result must be non-negative.The number of elements in @p mustbe at least 2.
New to LON-CAPA
NOT IMPLEMENTED INCAPA
@return array=&random permutation($seed,@array)
New to LON-CAPA
NOT IMPLEMENTED INCAPA
@return array=&random uniform($item cnt,$seed,$low,$high)NOTE: $low must be less thanor equal to $high.
New to LON-CAPA
NOT IMPLEMENTED INCAPA
@return array=&random uniform integer($item cnt,$seed,$low,$high)NOTE: $low and $high are bothpassed through int(). $low must beless than or equal to $high.
New to LON-CAPA
NOT IMPLEMENTED INCAPA
@return array=&random binomial($item cnt,$seed,$nt,$p) NOTE:$nt is rounded using int() and theresult must be non-negative. $pmust be between 0 and 1 inclusive.
New to LON-CAPA
NOT IMPLEMENTED INCAPA
@return array=&random negative binomial($item cnt,$seed,$ne,$p) NOTE:$ne is rounded using int() and theresult must be positive. $p must bebetween 0 and 1 exclusive.
New to LON-CAPA
9 Bridge Task
Bridge Tasks (BTs) are open-ended, performance-based assessments. BTs are based on amastery-model of assessment and evaluated on a pass-fail basis. You may use BTs in avariety of ways, from supporting the scoring of a final project, to individual lab assignments.See Introduction to Bridge Task 9.1) for a more in-depth explanation to Bridge Tasks. The

9 BRIDGE TASK 74
main features of a bridge task (9.2) section gives the differences between BTs and otherassessments.
An author creates a bridge task either by writing the XML code or by using the editmode and publishing it. A course coordinator must then place the Bridge Task resource inhis/her course’s document list. The section on Bridge Task Creation (9.3) describes how toauthor as well as set up these Bridge Tasks.
Once the bridge task is created and published, the course coordinator must insert theresource in the course’s document list (See Setting Up a Bridge Task 9.6). The coursecoordinator may also create slots to limit the place/time the bridge task may be opened(See Using Slots in Bridge Task 9.6.1). This resource may also be placed inside conditionalsresources so that it is accessible only after a particular condition has been met (see BridgeTask and Conditional Resources 9.6.2).
Once the course coordinator has set up the Bridge Task the student is able to open anduse the bridge task. A Bridge Task handin process using portfolio files may be used by theinstructors or students if they wish (See Handing In Bridge Task Files 9.7)..
9.1 Introduction to Bridge Task
Bridge tasks consist of one or more individual tasks that describe what the student is todo, usually in the form of a problem to solve. LON-CAPA supports the creation of multipleversions of each task, so that each student may receive a mix of randomly assigned tasksto perform. Students use LON-CAPA to view the bridge task. LON-CAPA supports thescheduling of BTs to restrict access by IP address range and to allow students to scheduleslots of time to take a BT.
When students complete a BT, they upload files they have created for grading. Files areuploaded using LON-CAPA’s portfolio system.
LON-CAPA supports the creation of scoring rubrics associated with each individualtask to guide graders and ensure inter-rater reliability among multiple graders in a course.Instructors specify criteria to assign an overall score to a BT based on the scores of theindividual rubrics.
BTs are used in Michigan State University’s CSE 101 course. The course is designed toteach computer competencies by having students solve problems using a variety of computersoftware (MS-Word, MS-Excel, World Wide Web, and MS Access). In CSE 101, BTs areused for summative assessment, the majority of students’ grades are based upon the BTs.Here, students must successfully pass a BT before attempting the next BT. A student’sfinal course grade is based on the highest level BT passed. The CSE 101 class is quitelarge, approximately 2000 students per semester. Students may take up to one BT per week;typically there are over 14,000 BTs administered per semester. Thus there is a need to quicklyand accurately access students. LON-CAPA successfully supports the load requirements.
9.2 Bridge Task Features
There are many ways in which BTs differ from other assessments.
1. Multiple Versions. There are multiple versions of a BT. A person taking a BT mayreceive a different version than the person taking the same BT sitting next to himor her. To create BTs that have different versions, the instructors who created the

9 BRIDGE TASK 75
BT will create multiple sub-questions. The BT engine then chooses one of the subquestions and gives that sub question to the student, thus creating multiple versions.
2. Essay/task based. Bridge task questions open-ended. Users create files which theyupload and submit to the system.
3. Rubric-Based Grading. Each question in a bridge task has scoring rubrics, criteria,associated with them. These criteria are used as the basis of grading. The gradingpage provides the criteria checklist on which the grader enters whether a student passesor fails each criterion. This ensures inter-rater reliability among multiple graders.
4. Mandatory and Optional Criteria. Some criteria can be made mandatory, that isa student will fail if the student does not pass that criteria. Some criteria are optionaland the student must pass a certain number of these optional criteria. Criteria areassociated with questions, which can also be made optional or mandatory. LON-CAPAcalculates whether a student has passed or fail based on the number of mandatory andoptional questions the student has passed.
5. Automatic Bookkeeping. The system calculates whether the student has passed aBT or not and records it into the database. The system stores
• a complete record of the BT each student received
• when each student’s BT was administered
• the BT instance
• the files the student turned in
• the associated grading criteria
• the grading results (and history of grading, including grader ID)
6. Sequential Bridge Tasks. The system can be set in such a way that a student canonly take a certain bridge task after passing the previous bridge task on the list. Thisis done using conditionals in LON-CAPA. There are other ways to use conditionalsand bridge tasks to customize the usage of bridge tasks in a course.
7. Slots. Slots can be created to relate students with time and location. This allowscontrol of where and when a student can take a bridge task.
8. Proctor Authentication. Slots also allow a particular proctor to be in a particularlocation for a bridge task. Each student who is scheduled to take the bridge task mustbe authenticated by the proctor.
9.3 Creating Bridge Task
There are multiple steps for creating a bridge task and setting the bridge task up so that thestudents is able to use it. The flow of the bridge task creation process is shown in figure 26.
There are two ways of creating the bridge task. The first method is to directly edit theXML file being used (See Bridge Task XML Editing 9.4). The second method is to use theLON-CAPA online edit mode (See Bridge Task Mode Editing 9.5).

9 BRIDGE TASK 76
Figure 26: Bridge Task creation flowchart
Once the bridge task is created and published, the course coordinator must insert theresource in the course’s document list (See Setting Up Bridge Task 9.6). The course coordi-nator may also create slots to allow for multiple place/time the bridge task may be openedor to allow for multiple separate attempts at the bridgetask (See Using Slots in Bridge Task9.6.1). As with any resource, the map it is in may use conditionals to control access to theresources based on other information in the course. (For example, the section of a user, thepassing of a prior bridgetask, etc.)
9.4 Bridge Task XML Editing
The LON CAPA .task format is an XML file used directly by LON CAPA. XML is a markuplanguage, much like HTML. A primer on XML is given in section 9. An XML file containselements in tags, and elements may contain attributes. The syntax, spelling (includingcapitalization) of the XML file must be exact, otherwise the XML file will generate errors.
The online editor for the .task format is discussed in the next section. This sectiondescribes creating the .task file by simply using a text editor such as Notepad.
The .task format consists of four parts:
• The header, which contains information about the file itself. The header can be copiedfrom this documentation as is (see .Task Headers 9.4.1)
• Parameter information. This part consists of the possible values for various parametersin the Bridge Task (see .Task Parameter and Variable 9.4.2)
• Questions section. This part consists of the actual text the user sees as well as allcriteria and questions (see .Task Question 9.4.3)

9 BRIDGE TASK 77
• Footer section. This part consists of the actual text the user sees as well as all criteriaand questions (see .Task Finishing Up 9.4.4)
Once all parts are created, the author must publish the file so that it is accessible bycourse coordinators (see .Task Finishing Up 9.4.4).
9.4.1 .Task Headers
The root node of the .task format is the task element, which is an XML element written asfollows:
<Task OptionalRequired=’0’>The Task element signifies that this is a bridge task. The OptionalRequired is a manda-
tory attribute, and the value (0 in this case) determines how many optional questions thestudent must pass.
9.4.2 .Task Parameter and Variable
To create difference versions of Bridge Tasks for each student, parts of the questions aredefined using variables. Each variable contains multiple instances of possible values andLON-CAPA randomly selects an instance to give to the student.
All variables are placed inside a Setup element. Each setup element has an id attributewhich contains the name of the variable. The possible instances or values of those variablesare placed inside the setup element inside an Instance tag. Each Instance element has twomandatory attributes, the OptionalRequired attribute which should be set to 0, and theunique id of that instance. The value of the id attribute can be any text as long as it isunique throughout the document.
The actual data of the instance is placed inside InstanceText tags. Currently the instancedata is created with a loncapa/perl script. In this script the parameters of the variable are set.The syntax to set the parameter of a variable is ’$variableName fieldname = ”fieldValues”’.The variable name is taken from the attribute id from the Setup element, the field name isthe name of the parameter the author sets, and the fieldValue is simply the value of the field.The first parameter that must be set is the instance field, with the value being an identifierof the instance.
The example below shows a portion of the bridge task XML file. This portion should beplaced inside the task element :Lines between <!−− and −− > or /∗ and ∗/ are commentsand should not be typed into the editor.
<!-- Create a variable named entity Subject -->
<Setup id="entitySubject">
<!-- The first instance. With id instanceHarry -->
<Instance OptionalRequired="0" id="instanceHarry">
<!-- The parameters for this instance -->
<InstanceText>
<script type=’loncapa/perl’>
/* The first line must be the instance id */
$entitySubjectinstance = "instanceHarry";

9 BRIDGE TASK 78
/* The two parameters. Personname = Harry and place=zoo */
$entitySubjectpersonname = "Harry";
$entitySubjectplace = "zoo";
</script>
</InstanceText>
</Instance>
<!--End of instanceHarry-->
<!-- The second instance. With id instanceBetty -->
<Instance OptionalRequired="0" id="instanceBetty">
<!-- The parameters for this instance -->
<InstanceText>
<script type=’loncapa/perl’>
/* The first line must be the instance id */
$entitySubjectinstance = "instanceBetty";
/* The two parameters. Personname = Betty and place=park */ $entitySubjectpersonname =
$entitySubjectplace = "park";
</script>
</InstanceText>
</Instance>
<!--End of instanceBetty-->
</Setup>
The example above describes a variable question. It has two different possible val-ues for the entity ”subject”, Harry and zoo or Betty and park. Variables can be placedinside the questions by using the variable name and field name. The first line <Setupid=”entitySubject”> creates a variable named entitySubject (based on the id attribute ofthis line).
The first instance of this variable is shown from lines 2 to 10. Line two <Instance Option-alRequired=”0” id=”instanceHarry”> marks the beginning of the instance element namedinstanceHarry (based on the id attribute). The OptionalRequired is given a value of 0.Lines 3-9 determine the actual value of this variable. Lines 3 and 4 must be typed as shown.Lines 5-7 define the instance properties, which must be of the form $ <variable name><property name> = <value>. The first line of the property must be the instance prop-erty (see line 5 of example), with the value being the id of the instance. Other lines (6-7)can be used for any attributes you wish to define. The closing </script>, </InstanceText>and </Instance> tags must be typed as shown.
Line 12-21 shows the second instance with the same rules as the first instance. Line 23</Setup> gives the closing Setup tag which must be as shown.. The example of the usageof this variable inside the question is this text:
This is a test question. $entitySubjectpersonname went to the $entitySubjectplace..
The LON-CAPA engine will replace any instance of $<variable name> (<property name>)with the correct value, depending on the randomly chosen instance.
Based on this code, two different questions are possible:

9 BRIDGE TASK 79
1. This is a test question. Harry went to the zoo
2. This is a test question. Betty went to the park
9.4.3 .Task Questions and Criteria
The task description should be divided into questions. Questions can also be divided intosub-questions. A question or sub-question must have one or more criteria that are the scoringrubrics used to evaluate that question. A task may also have a criteria. Graders use thesecriteria to evaluate student work Both questions and criteria are interspersed within the taskdescription, placed where students see them when reviewing their graded bridge task.
Questions are created by using the Question tag. Each question must have a unique idattribute which identifies the question, the value of the id attribute is any text that is uniquein the document. Each question must also have the Mandatory attribute which can be setto ”Y” if the question is mandatory or ”N” otherwise. Finally the question may also havea OptionalRequired attribute, which determines how many optional criteria students mustpass to pass the question.
The question element will have the actual text of the question. The questions are createdinside the QuestionText element. The question descriptions are placed inside the file bysimply typing the text. The text can be marked up to have various formatting. The markup language used is simple HTML.
Criteria are created using the Criteria tag. The attributes for the criteria tag are similarto the attributes for the questions tag. Criteria tags have id attributes as well as Mandatoryattributes. Like for the question tag, the value of the id attribute is any text that is uniquein the document, and the Mandatory attribute (values ”Y” or ”N”) determines whether thecriteria is mandatory or not. Criteria tags do not have OptionalRequired attributes. Thecriteria description is created inside the CriteriaText element and can be formatted the sameway as the formatting of the questions (using HTML).
The following is an example of a question and criteria element. Question elements areplaced inside the task element or inside other question elements. Text between <! − −and−− > are comments and should not be typed into the editor.
<!-- Beginning of question element with id q.testquestion. A mandatory question where the
<Question id=’q.testquestion’ Mandatory=’Y’ OptionalRequired=’1’>
<!--The text of the question -->
<QuestionText>
Some test explanation
<!--A mandatory criteria with the id of ’criteria.overall.handin’. This criteria will not
<Criteria id=’criteria.overall.handin’ Mandatory=’Y’>
<!--The text of the criteria-->
<CriteriaText>
Criteria text 1
<!--Grader Notes are not shown to the students at all -->
<GraderNote>
This part cannot be seen by students but is used to give additional info to the grader to
</GraderNote>
</CriteriaText>
</Criteria>

9 BRIDGE TASK 80
<!--End of the criteria -->
<!--An optional question named q.question1 -->
<Question Mandatory=’N’ id=’q.question1’ OptionalRequired=’0’>
<QuestionText>
The actual test question
<!--A mandatory criteria -->
<Criteria id=’criteria.question1’ Mandatory=’Y’>
<CriteriaText>
Criteria text 2
</CriteriaText>
</Criteria>
</QuestionText>
</Question>
<!--End of question q.question1-->
<!--Some more question text -->
Instructions to the student on submitting files
</QuestionText>
</Question>
<!--End of question q.testquestion-->
The question that the students will see is:”Some test explanation
The actual test questionInstructions to the student on submitting files”
Any text inside a QuestionText element (lines 2, 14) and not inside a criteria elementwill be shown to the users. This example has one question, and one optional sub-question.The question element is given in line 1, the id of the question being ’q.testquestion’, it is amandatory question (Mandatory=’Y’) and it requires that 1 optional question/criteria bepassed (OptionalRequired=’1’). The sub-question is given in line 13, named ’q.question1’,is not mandatory and has no optional questions or criteria that is required to be correctlyanswered.
The example above shows a code for the creation of criteria. There are 2 criteria inthe above question (line 4 and 16). Each criteria has a name (criteria.question1 and crite-ria.overall.handin) which are both mandatory (the attribute Mandatory is set to ’Y’). Thetext of the criteria is given inside the CriteriaText element inside each CriteriaElement. Thestudent will never see the criteria when the student is taking the test. The grader will seethis on his/her screen:
”Criteria text 1. Grader Note: This part cannot be seen by the students but is used togive additional info to the grader to help evaluating the criteria.Pass FailComment:

9 BRIDGE TASK 81
Criteria text 2.Pass FailComment:
”When the bridge task is graded the student will see both the questions and the criteria
in his space. Anything inside the GraderNote element (line 7) is not shown to the student.”Some test explanation
Criteria text 1PassThe actual test questionCriteria text 2.PassInstructions to the student on submitting files”
9.4.4 .Task Finishing Up
Once all questions are written, the file must be closed with the </Task> tag. The file mustbe saved with a .task extension then placed into a LON CAPA author’s folder. To uploadthe file simply go to the construction space and simply upload the new file using the uploadnew document button. Once the file is uploaded to LON CAPA, the author can publish thefile so that the domain coordinator will be able to use the file. To do this select publish (orre-publish) in the select action combo box next to the file name.
The LON CAPA interface allows you to view the bridge task from different point ofviews. You can see it from the student’s view, the grader view, or the student’s view afterfeedback:
1. From the list of files authored, click on the bridge task that has just been created/edited.A pull-down menu with the label ”Problem Status” is located just above the question
2. Select ”Answerable” to see the original view, ”Criteria Grading” to see a grader view,and ”Show Feedback” to see the feedback view .To see the feedback view properly, youmust have graded the student with the grader view. Once you have graded using thefeedback view however, the answerable view will be similar to the feedback view.
3. To reset the view a ”Reset Submissions” button is provided.
9.5 Bridge Task Edit Mode
Another way of creating Bridge Task is via the edit mode. The edit mode allows authorsto create resources (including Bridge Tasks) online. The basic idea of the this editor is theauthor inserts and deletes different section types into the file to build the bridge task.
If a task file has already been created, click on the file name followed by the ”Edit”button to open the file in the colorful editor.
If a task file needs to be created:
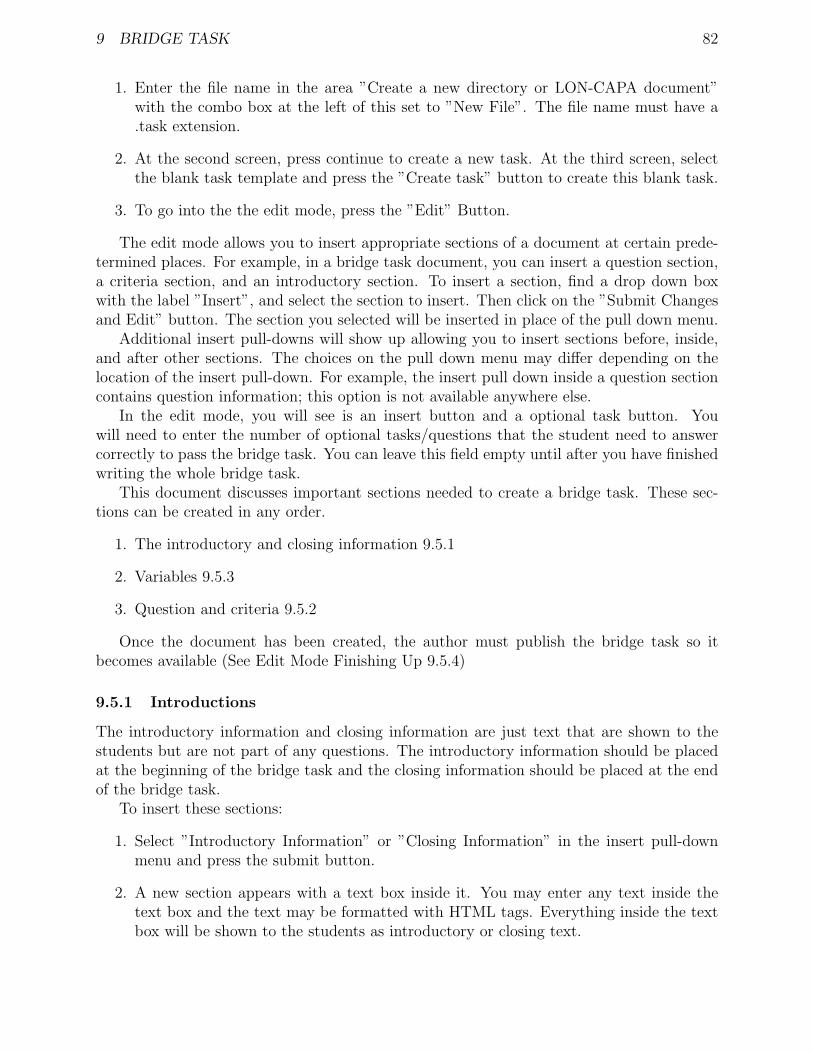
9 BRIDGE TASK 82
1. Enter the file name in the area ”Create a new directory or LON-CAPA document”with the combo box at the left of this set to ”New File”. The file name must have a.task extension.
2. At the second screen, press continue to create a new task. At the third screen, selectthe blank task template and press the ”Create task” button to create this blank task.
3. To go into the the edit mode, press the ”Edit” Button.
The edit mode allows you to insert appropriate sections of a document at certain prede-termined places. For example, in a bridge task document, you can insert a question section,a criteria section, and an introductory section. To insert a section, find a drop down boxwith the label ”Insert”, and select the section to insert. Then click on the ”Submit Changesand Edit” button. The section you selected will be inserted in place of the pull down menu.
Additional insert pull-downs will show up allowing you to insert sections before, inside,and after other sections. The choices on the pull down menu may differ depending on thelocation of the insert pull-down. For example, the insert pull down inside a question sectioncontains question information; this option is not available anywhere else.
In the edit mode, you will see is an insert button and a optional task button. Youwill need to enter the number of optional tasks/questions that the student need to answercorrectly to pass the bridge task. You can leave this field empty until after you have finishedwriting the whole bridge task.
This document discusses important sections needed to create a bridge task. These sec-tions can be created in any order.
1. The introductory and closing information 9.5.1
2. Variables 9.5.3
3. Question and criteria 9.5.2
Once the document has been created, the author must publish the bridge task so itbecomes available (See Edit Mode Finishing Up 9.5.4)
9.5.1 Introductions
The introductory information and closing information are just text that are shown to thestudents but are not part of any questions. The introductory information should be placedat the beginning of the bridge task and the closing information should be placed at the endof the bridge task.
To insert these sections:
1. Select ”Introductory Information” or ”Closing Information” in the insert pull-downmenu and press the submit button.
2. A new section appears with a text box inside it. You may enter any text inside thetext box and the text may be formatted with HTML tags. Everything inside the textbox will be shown to the students as introductory or closing text.

9 BRIDGE TASK 83
Figure 27: Bridge Task question creation screenshot
9.5.2 Questions and Criteria
The task description should be divided into questions. Questions can also be divided intosub-questions. A question or sub-question must have one or more criteria that are the scoringrubrics used to evaluate that question. A task may also have a criteria. Graders use thesecriteria to evaluate student work Both questions and criteria are interspersed within the taskdescription, placed where students see them when reviewing their graded bridge task.
Figure 27 shows a screenshot of the question creation page. To create a question:
1. Select ”Question” in the main insert pull-down (circled as 1).
2. Press the submit changes and edit button.
3. In this question create a unique id which can be any kind of text (in circle 3).
4. Set whether a student must pass this question by setting the value of ”Passing isMandatory” to ”yes” (circle 4) or whether this question is optional by setting thevalue to ”no”.
5. Set the number of optional subquestions/criteria that the students must get correct inorder to pass this question. You can also wait until later to fill this in.
6. Create the question information by choosing Question information in the insert pull-down (circled as 2) and pressing the submit button.

9 BRIDGE TASK 84
Figure 28: Bridge Task criteria creation screenshot
7. A text box should appear (circle 6) and you can insert any text in this text box.Anything that is typed in this text box will appear to the student as part of thequestion. HTML tags can also be used to format the text in the text box. Subquestionscan be added by inserting a new question (circle 2).
To add a criteria (see Figure 28):
1. Instead of choosing ”Question” in the insert pull down, select ”Question Criteria”(circled as 1). Pressing the submit button will bring up the Question criteria as wellas the criteria information where you can write the criteria (Circled 3). The criteria isshown to the student only when the student is reading his/her feedback. The criteriais also shown to the grader in order for the grader to be able to grade the studentsubmission.
2. In the criteria block, first create a unique id for this criteria (any text) (circle 1).
3. Specify whether a criteria is mandatory or not, this is set in the Passing is mandatorypull-down similar to that of the question (circle 2).
4. Text in the text block (circle 4) is shown as the criteria. The text can be formattedwith HTML.
5. You can also insert a grader note which will only be shown to the user. To do thisselect ”Text to display to grader” in the insert pull down menu of circle number 3.

9 BRIDGE TASK 85
Figure 29: Bridge Task variable creation screenshot
9.5.3 Parameter and Variable
To create difference versions of Bridge Tasks for each student, parts of the questions aredefined using variables. Each variable contains multiple instances of possible values andLON-CAPA randomly selects an instance to give to the student. Figure 29 shows a screenshotof this process.
To create a variable:
1. Choose ”Setup ...” in the insert pull-down menu (circled 1 in figure).
2. Press the Submit Changes and Edit just above the work space.
3. A new box should appear with the label ”Setup ...”. In this box, fill out the id box(circled 3) with any text that is unique to unique to the document. This id is the nameof the variable and will be used when creating the values for the variable.
4. The setup box has an insert pull-down menu next to the label (circled 2), select ”Spe-cific Question Instance” in this pull down menu, then again press the Submit Changesand Edit button.
5. This creates one single instance of a set of possible values. For each instance created,a new ”Specific Question Instance” must be created.
6. Right now a box should appear inside the ”Setup... ” box with the label ”SpecificQuestion Instance”. Insert a unique id for that instance which can be any unique text

9 BRIDGE TASK 86
(circled 4). This id is the instance name and is used as one of the property of thevariable.
7. In the question instance block, select ”Information for the Instance” in the insert pulldown (circled 5). Again press submit button.
8. Add a new script (circled 6) in the insert pull down. A new text block should appear.
9. In this text box, a perl script will be created (circled 7). A set of parameters for thisvariable is added. The syntax to set the parameter of a variable is ’$variableNamefieldname = ”fieldValue”’. The variable name is taken from the id field of the Setupblock, thefield name is the name of the parameter the author sets, and the fieldValueis simply the value of the field. The first parameter that must be set is the instancefield, with the value being an identifier of the instance (which is the id of the specificquestion instance block).
The example below shows two instances of this script for the variable entitySubject withtwo instances, ’instanceHarry’ and ’instanceBetty’.
The first instance (instanceHarry) is:
$entitySubjectinstance = "instanceHarry";
$entitySubjectpersonname = "Harry";
$entitySubjectplace = "zoo";
The second instance (instanceBetty) is:
$entitySubjectinstance = "instanceBetty";
$entitySubjectpersonname = "Betty";
$entitySubjectplace = "park";
The example above describes a variable question. It has two different possible valuesfor the entity ”subject”, Harry and zoo or Betty and park. Variables can be placed insidethe questions by using the variable name and field name. The example of the usage of thisvariable inside the question is this text:
This is a test question. $entitySubjectpersonname went to the $entitySubjectplace..
The LON-CAPA engine will replace any instance of $<variable name> (<property name>)with the correct value, depending on the randomly chosen instance.
Based on this code, two different questions are possible:
1. This is a test question. Harry went to the zoo
2. This is a test question. Betty went to the park
9.5.4 Edit Mode Finishing Up
Once the construction is complete, click on the ”Submit Changes and View” button. Clickon list to list the current author’s directory. The author should now publish the file so thatthe domain coordinator will be able to use the file. To do this select publish (or re-publish)in the select action combo box next to the file name.
The LON CAPA interface allows you to view the bridge task from different point ofviews. You can see it from the student’s view, the grader view, or the student’s view afterfeedback.

9 BRIDGE TASK 87
1. From the list of files authored, click on the bridge task that has just been created/edited.
2. A pull-down menu with the label ”Problem Status” is located just above the question.select ”Answerable” to see the original view, ”Criteria Grading” to see a grader view,and ”Show Feedback” to see the feedback view.
3. To see the feedback view properly, you must have graded the student with the graderview.
4. Once you have graded using the feedback view however, the answerable view willbe similar to the feedback view. To reset the view a ”Reset Submissions” button isprovided.
9.6 Setting Up a Bridge Task
The first step in making bridge tasks available to students is to include it in the documentspace. To do this:
1. Enter the course coordinator space for the course
2. Go to ”Course Documents” and click on import. This page gives the list of files thatyou have created.
3. Select the bridge task and press import to insert the file to the list of documents.
4. After importing the document, you must re-initialize the course.
Now the assignment is in the list of documents, but it is not available for students. Thereare two ways of making bridge tasks available to students. One method is by using slots (thedefault method), which restrict the bridge task document to open at certain time/place only.The other method allows students to take bridge task like any other Lon-CAPA assignments,that is at any time they want within opening and closing dates. This method does not restrictthe access to particular computers or rooms. Any student in the course may open the BT.
If you want to use slots, first create the slots (See Bridge Task and Slots 9.6.1). Oncethe BT is imported (and slots are created) go back to the document list and click on thebridge task resource, this should take you to a page that shows the resource content. If youare not using slots, click on the bridge task resource. Whether using or not using slots, clickon PPRM (a button on the top menu) to modify parameters for this resource.
Set the opening date and the due date (if any) in the for resource column. To do this,click on the * in the in course for resource column. A pop up should appear. Enter the dateyou want the resource to be available and click the store link.
If you are using slots:
1. Change the ”Use slot based access controls” parameter to ”Yes”.
2. Change the ”Slots of availability” parameter for the course in for resource column tothe name of the slot that you created. You may need to change the input type (thecombo box at the top of the popup) to ’String Value’ instead of ’default’.
If you are not using slots:

9 BRIDGE TASK 88
1. Change the ”Use slot based access controls” parameter to ”no” by clicking on the * inthe for resource column
The bridge task should now be available to students. To see the BT in the student view,switch to a student role in your course. Navigate contents and click on the resource.
9.6.1 Bridge Task and Slots
To restrict when and where BTs can be taken, the slots feature of Lon-Capa is used. Slotsallow the instructors to specify the room, the time, the students that can take the BridgeTasks, and finally any proctors that will authenticate the students.
For information about creating slots see the section on Slots (??).
9.6.2 Bridge Task and Conditional Resources
It is possible to configure bridge tasks such that only when a student passes a Bridge Taskdoes the next Bridge Task appear to the student. This feature is useful in such cases asBridge Tasks are related to one another, and the results of one Bridge Task is needed for thenext Bridge Task.
To create configure bridge tasks these way, a sequence page must be created. A resourceauthor starts at his/her construction space (Main menu: CSTR). Once in the constructionspace, the author create a new assembled sequence. See 5 for a more concise reference oncondition and sequences.
The author must create various conditionals to determine which resources to show. Theeasiest way to do this is by using advanced edit. The advanced edit visualizes the variousconditions and resources. This interface needs popups, so make sure popups are enabled inthe browser.
In the main starting view of the advanced edit, there are two squares, marked start andend respectively. Start by creating a link between the start square and the end square. Todo this click on the start square (on the row under the text start), select ”Link Resource”,then click on the end square. A link is now created between the start and the end boxes.
Once a link is created the author adds resources and conditions. Click on the link andthen choose insert resource into link. This allows the placement of a resource such as abridge task into the sequence. Once the resource is placed into the link, the author shouldcreate a mapalias. To do this, select the resource, then click on set parameters, and changethe value of Custom Parameter to an alias.
Under each square is an area of the same color as the square, these areas can be used tocreate conditionals to get to the next resource to the sequence. This document only discussesusing conditionals to block access to the next resource (including Bridge Tasks).
Add conditionals by clicking on the area just under the squares. A popup window willappear with a condition box and some options. The condition box allows the author toenter a variety of different conditions. To block access to the next resource, select the secondoption ”Blocking this link if false”.
The conditions used will be :
&EXT(’user.resource.resource.0.awarded’,’<alias of resource>’) eq ’1’
<alias of resource> should be changed to the alias set for the previous resource that thestudent needs to pass before the next resource is unblocked. If the student has not passed a

10 APPENDIX: SYMBOLS IN TEX 89
particular homework/problem/bridge task, the value of user.resource.resource.0.awarded is 0otherwise the value is 1. This line checks whether the value of user.resource.resource.0.awardedfor that resource is equals to 1, if not the link is blocked and the next resources are not shownto the user.
9.7 Handing In Bridge Task Files
After a student finishes creating the Bridge Task, the student must hand in the files. Thereare many ways to do this, students can email the files necessary, or students can email a linkto the instructor that shows where his files are. LON-CAPA provides a way to upload fileusing the portfolio. The portfolio is a space given to each student which can contain filesand is shareable.
The process of handing in files consists of:
1. Upload files into portfolio
2. Select the files to be submitted
3. Submit the files
At the end of every bridge task there will be a box to submit files in the portfolio forgrading. When the student click on the link ”select portfolio files”, a new window is openedshowing the content of the student’s portfolio. The student can create directories in theportfolio and upload files using the upload file buttons.
Once the files that are needed are uploaded, the student select (by checking the checkboxnext to the filenames) of all files that he needs to submit to the instructor. Once all filesneeded are checked off, the student needs to press the ”select checked files and close window”button.
By pressing the close window button, the student’s portfolio window should close, andthe student should see his or her Bridge Task Page. The text field in the upload files intoportfolio should contain the list of names. The student must then press ’submit answer’ tosubmit the answer to be graded.
If the student needs to resubmit the file, the student must repeat the process and checkoff all the files (not only new files) that needs to be submitted. Once a file is submitted, thestudent may not overwrite or delete the files.
10 Appendix: Symbols in Tex
10.1 Greek Symbols
If you are viewing this online, copy and paste the text from any of the right columns intoyour text area to get the symbol on the left.

10 APPENDIX: SYMBOLS IN TEX 90
Symbol HTML character entities Copy this columnα α or α <m>$\alpha$</m>
β β or β <m>$\beta$</m>
γ γ or γ <m>$\gamma$</m>
Γ Γ or Γ <m>$\Gamma$</m>
δ δ or δ <m>$\delta$</m>
∆ Δ or Δ <m>$\Delta$</m>
ǫ ε or ε <m>$\epsilon$</m>
ε <m>$\varepsilon$</m>
ζ ζ or ζ <m>$\zeta$</m>
η η or η <m>$\eta$</m>
θ θ or θ <m>$\theta$</m>
ϑ ϑ or ϑ <m>$\vartheta$</m>
Θ Θ or Θ <m>$\Theta$</m>
ι ι or ι <m>$\iota$</m>
κ κ or κ <m>$\kappa$</m>
λ λ or λ <m>$\lambda$</m>
Λ Λ or Λ <m>$\Lambda$</m>
µ μ or μ <m>$\mu$</m>
ν ν or ν <m>$\nu$</m>
ξ ξ or ξ <m>$\xi$</m>
Ξ Ξ or Ξ <m>$\Xi$</m>
π π or π <m>$\pi$</m>
ϖ or ϖ <m>$\varpi$</m>
Π Π or Π <m>$\Pi$</m>
σ σ or σ <m>$\sigma$</m>
ς <m>$\varsigma$</m>
Σ Σ or Σ <m>$\Sigma$</m>
τ τ or τ <m>$\tau$</m>
υ υ or υ <m>$\upsilon$</m>
Υ Υ or Υ <m>$\Upsilon$</m>
φ φ or φ <m>$\phi$</m>
ϕ <m>$\varphi$</m>
Φ Φ or Φ <m>$\Phi$</m>
χ χ or χ <m>$\chi$</m>
ψ Ψ or ψ <m>$\psi$</m>
Ψ Ψ or Ψ <m>$\Psi$</m>
ω ω or ω <m>$\omega$</m>
Ω Ω or Ω <m>$\Omega$</m>
ρ ρ or ρ <m>$\rho$</m>
<m>$\varrho$</m>
10.2 Other Symbols
If you are viewing this online, copy and paste the text on any of the right columns into yourtext area to get the symbol on the left.

10 APPENDIX: SYMBOLS IN TEX 91
Symbol HTML entity Copy this column± ± or ± <m>$\pm$</m>
× × or × <m>$\times$</m>
÷ ÷ or ÷ <m>$\div$</m>
· · or · <m>$\cdot$</m>
⋆ <m>$\star$</m>
° or °• • <m>$\bullet$</m>
† <m>$\dag$</m>
‡ <m>$\ddag$</m>
† † <m>$\dagger$</m>
‡ ‡ <m>$\ddagger$</m>
c© © or © <m>$\copyright$</m>
≤ ≤ or ≤ <m>$\leq$</m>
≥ ≥ or ≥ <m>$\geq$</m>
6= <m>$\neq$</m>
≪ <m>$\ll$</m>
≫ <m>$\gg$</m>
≃ <m>$\simeq$</m>
⊥ ⊥ or ⊥ <m>$\perp$</m>
‖ <m>$\parallel$</m>
← ← or ← <m>$\leftarrow$</m>
⇐ ⇐ or ⇐ <m>$\Leftarrow$</m>
→ → or → <m>$\rightarrow$</m>
⇒ ⇒ or ⇒ <m>$\Rightarrow$</m>
↑ ↑ or ↑ <m>$\uparrow$</m>
⇑ ⇑ or ⇑ <m>$\Uparrow$</m>
↔ ↔ or ↔ <m>$\leftrightarrow$</m>
⇔ ⇔ or ⇔ <m>$\Leftrightarrow$</m>√√ or √ <m>$\surd$</m>
∂ ∂ or ∂ <m>$\partial$</m>∑∑ or ∑ <m>$\sum$</m>∫∫ or ∫ <m>$\int$</m>
∞ ∞ or ∞ <m>$\infty$</m>