Learn To Bead and Make Jewelry - LearnToBead · Learn To Bead and Make Jewelry - LearnToBead.net...
29
Learn To Bead and Make Jewelry - LearnToBead.net file:///C|/MyWorkadayDocuments/learntobead/kits/beadweave/stitch/blazingbarnacles/bw2-RAW-01-BlazingBarnaclesNecklace-seablue.htm[11/9/2012 12:50:51 PM] Learn To Bead and Make Jewelry LEARN TO BEAD . NET The Design Approach To Learning BEAD WEAVING Blazing Barnacles Necklace Instructor: Kathleen Lynam No need to scrape off these barnacles! Construct your own colony of barnacles using right angle weave and peyote stitches. Palette 1: Sea Blue BEAD WEAVING BLAZING BARNACLES NECKLACE BW2-RAW-01-Right Angle Weave This set of instructions is organized as a series of Jewelry Design Choices: I. Planning Your Project IA. Conceptualizing Your Piece IB. Measurements IC. Selecting Materials ID. Sketching a Pattern or Graph IE. Identifying Potential Areas of Weakness within Your Piece
-
Upload
truongtuong -
Category
Documents
-
view
225 -
download
1
Transcript of Learn To Bead and Make Jewelry - LearnToBead · Learn To Bead and Make Jewelry - LearnToBead.net...
Learn To Bead and Make Jewelry - LearnToBead.net
file:///C|/MyWorkadayDocuments/learntobead/kits/beadweave/stitch/blazingbarnacles/bw2-RAW-01-BlazingBarnaclesNecklace-seablue.htm[11/9/2012 12:50:51 PM]
Learn To Bead and Make JewelryLEARN TO BEAD . NETThe Design Approach To Learning
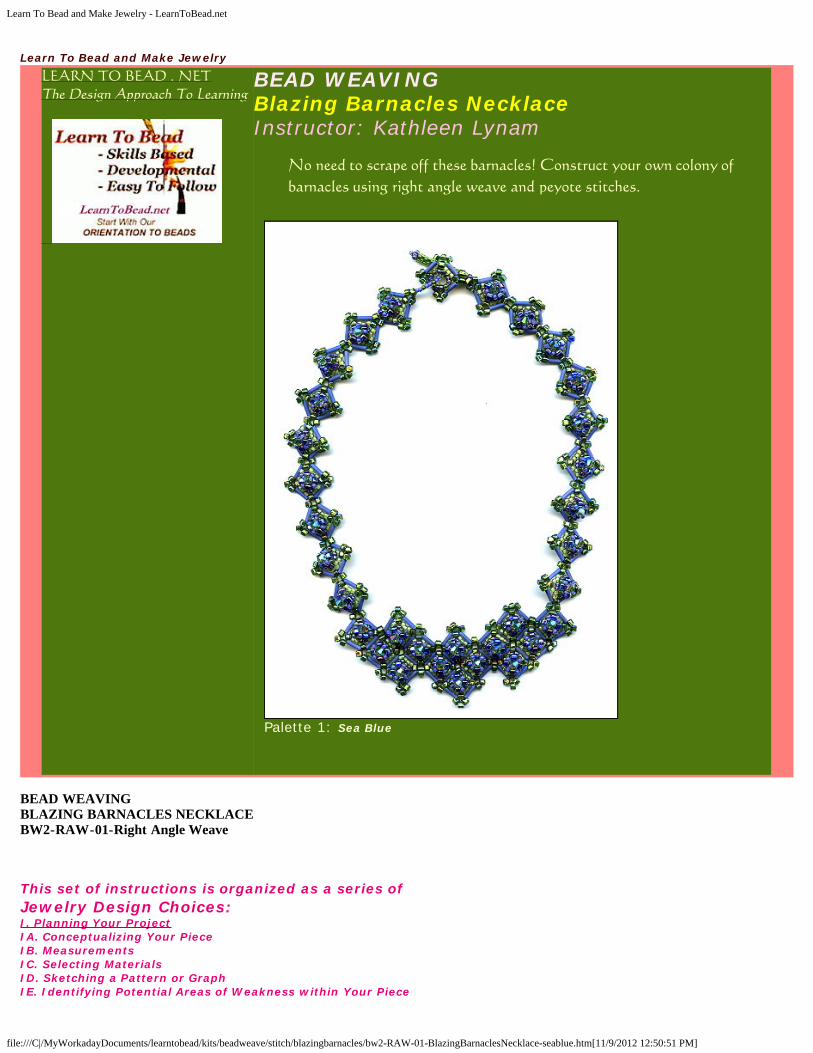
BEAD WEAVING Blazing Barnacles NecklaceInstructor: Kathleen Lynam
No need to scrape off these barnacles! Construct your own colony ofbarnacles using right angle weave and peyote stitches.
Palette 1: Sea Blue
BEAD WEAVINGBLAZING BARNACLES NECKLACEBW2-RAW-01-Right Angle Weave
This set of instructions is organized as a series ofJewelry Design Choices:I. Planning Your ProjectIA. Conceptualizing Your PieceIB. MeasurementsIC. Selecting MaterialsID. Sketching a Pattern or GraphIE. Identifying Potential Areas of Weakness within Your Piece

Learn To Bead and Make Jewelry - LearnToBead.net
file:///C|/MyWorkadayDocuments/learntobead/kits/beadweave/stitch/blazingbarnacles/bw2-RAW-01-BlazingBarnaclesNecklace-seablue.htm[11/9/2012 12:50:51 PM]
IF. Visualizing Your ProcessIG. Organizing Your Work Space
II. Begining Your ProjectIIA. Basic StepsIIB. Dealing with ContingenciesIIC. Finishing Touches
III. Summary of Learning Objectives You Have MetAfter Accomplishing This Project
IV. Next StepsIVA. Suggested Readings
What YouWill Learn:- Creating askeletal frameworkfor makinginterlinkedcomponents usingRight Angle Weave- Addingdimensionality tothis framework- Linkingcomponent pieceto componentpiece to make anecklace- Working tubularpeyote off of rightangle weave- Making your owntoggle clasp,designed to bevisually organicwith the piece.
Prerequisites:- Orientation ToBeads & JewelryFindings- BW1.09 RightAngle Weave:Bracelet - Beginnerknowledge of RightAngle Weave- BW2-PY-01TUBULAR PEYOTEBracelet --Knowledge of howto step-up whendoing tubularpeyote
TimeFrame:This bracelet takesabout 37 hours tocomplete
These Instructions are written from what is called The Design Perspective.
They first guide you through the kinds of choices to be made, whendesigning this particular piece. This gives you a sense of how the artistthought through the development of the project. This provides you with abetter understanding and some insights about what kinds of things youwould need to consider, when designing a similar piece, or adding personaltouches to this project.
Then step-by-step, easy-to-follow instructions for completing this project arepresented.
Finally, the skills learned by doing this project are summarized.
The Blazing Barnacles Necklace is a good example of a creative way toadapt the architectural features of Right Angle Weave for creatingcomponents and adding dimensionality to your piece. This project shows onepossibility of how to work one stitch technique -- tubular peyote -- offanother, in this case, right angle weave.
Learn To Bead and Make Jewelry - LearnToBead.net
file:///C|/MyWorkadayDocuments/learntobead/kits/beadweave/stitch/blazingbarnacles/bw2-RAW-01-BlazingBarnaclesNecklace-seablue.htm[11/9/2012 12:50:51 PM]
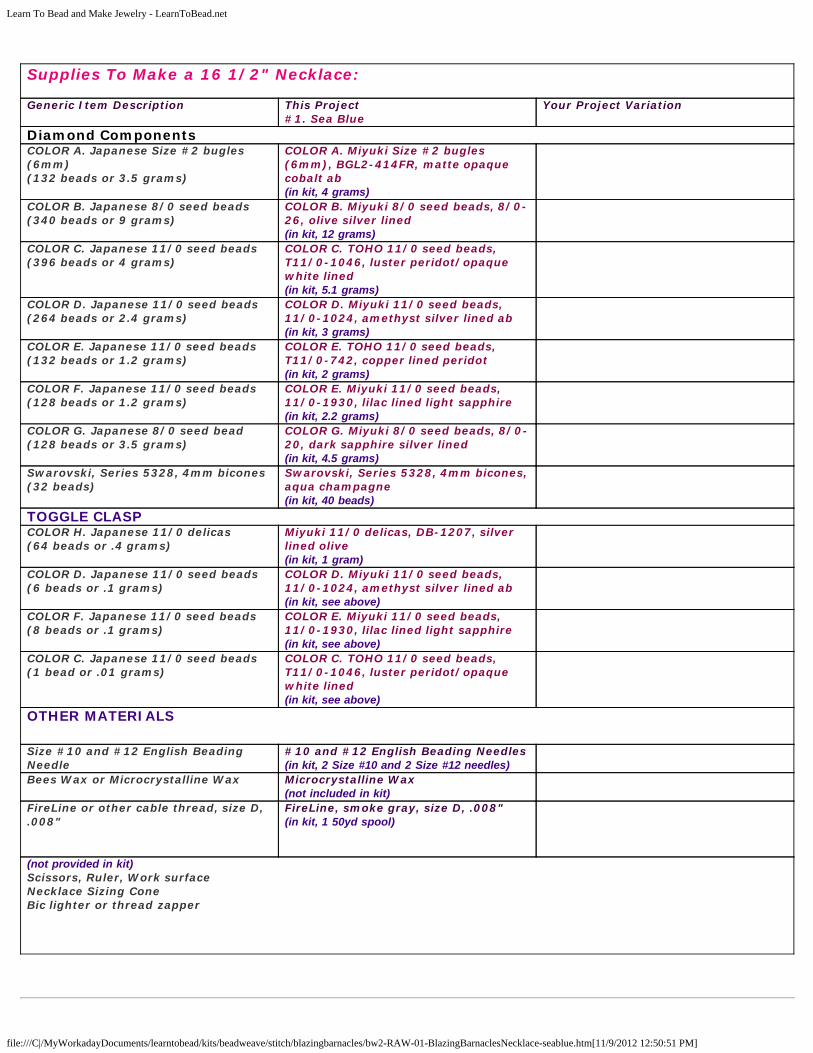
Supplies To Make a 16 1/2" Necklace:
Generic Item Description This Project#1. Sea Blue
Your Project Variation
Diamond ComponentsCOLOR A. Japanese Size #2 bugles(6mm)(132 beads or 3.5 grams)
COLOR A. Miyuki Size #2 bugles(6mm), BGL2-414FR, matte opaquecobalt ab (in kit, 4 grams)
COLOR B. Japanese 8/0 seed beads(340 beads or 9 grams)
COLOR B. Miyuki 8/0 seed beads, 8/0-26, olive silver lined(in kit, 12 grams)
COLOR C. Japanese 11/0 seed beads(396 beads or 4 grams)
COLOR C. TOHO 11/0 seed beads,T11/0-1046, luster peridot/opaquewhite lined(in kit, 5.1 grams)
COLOR D. Japanese 11/0 seed beads(264 beads or 2.4 grams)
COLOR D. Miyuki 11/0 seed beads,11/0-1024, amethyst silver lined ab(in kit, 3 grams)
COLOR E. Japanese 11/0 seed beads(132 beads or 1.2 grams)
COLOR E. TOHO 11/0 seed beads,T11/0-742, copper lined peridot(in kit, 2 grams)
COLOR F. Japanese 11/0 seed beads(128 beads or 1.2 grams)
COLOR E. Miyuki 11/0 seed beads,11/0-1930, lilac lined light sapphire (in kit, 2.2 grams)
COLOR G. Japanese 8/0 seed bead(128 beads or 3.5 grams)
COLOR G. Miyuki 8/0 seed beads, 8/0-20, dark sapphire silver lined(in kit, 4.5 grams)
Swarovski, Series 5328, 4mm bicones (32 beads)
Swarovski, Series 5328, 4mm bicones,aqua champagne(in kit, 40 beads)
TOGGLE CLASPCOLOR H. Japanese 11/0 delicas(64 beads or .4 grams)
Miyuki 11/0 delicas, DB-1207, silverlined olive(in kit, 1 gram)
COLOR D. Japanese 11/0 seed beads(6 beads or .1 grams)
COLOR D. Miyuki 11/0 seed beads,11/0-1024, amethyst silver lined ab(in kit, see above)
COLOR F. Japanese 11/0 seed beads(8 beads or .1 grams)
COLOR E. Miyuki 11/0 seed beads,11/0-1930, lilac lined light sapphire (in kit, see above)
COLOR C. Japanese 11/0 seed beads(1 bead or .01 grams)
COLOR C. TOHO 11/0 seed beads,T11/0-1046, luster peridot/opaquewhite lined(in kit, see above)
OTHER MATERIALS
Size #10 and #12 English BeadingNeedle
#10 and #12 English Beading Needles(in kit, 2 Size #10 and 2 Size #12 needles)
Bees Wax or Microcrystalline Wax Microcrystalline Wax(not included in kit)
FireLine or other cable thread, size D,.008"
FireLine, smoke gray, size D, .008"(in kit, 1 50yd spool)
(not provided in kit) Scissors, Ruler, Work surfaceNecklace Sizing ConeBic lighter or thread zapper

Learn To Bead and Make Jewelry - LearnToBead.net
file:///C|/MyWorkadayDocuments/learntobead/kits/beadweave/stitch/blazingbarnacles/bw2-RAW-01-BlazingBarnaclesNecklace-seablue.htm[11/9/2012 12:50:51 PM]
BLAZING BARNACLES NECKLACE
I. PLANNING YOUR PROJECTThinking about the types of choices made for this project
I was taking a workshop with Marcia DeCoster, and had been ooh'ing and ahh'ing over her pieces. She explained some of hercreative work process. She liked to play by making little components, and then playing with their arrangements. She inspiredme to play, as well.
Right Angle Weave seemed a natural starting point. It is very "architectural" and lends itself to an idea of creating buildingblocks. RAW gives you 4 points within the unit stitch to work off of -- and you can integrate almost any other stitch, almostseemlessly. So I played and played and played, first trying to create a very dimensional looking component. As my "form" --inthis case, a RAW diamond square -- began to materialize in a satisfying way. I found that I could force a peyote tube toemerge from the center of my diamond. I decreased each row, as I built my tube upwards. It did not take long for my tubularstructure to look like a natural setting for some kind of stone. An Austrian crystal bead was the perfect final touch.
I then turned to color issues. As I picked colors and stacked them within my RAW diamonds and upwards within my peyotetube, it felt as if they were growing and emerging with life and energy.
I gravitate to nature and natural images and colors within my pieces, as I did this time. I began to see my components as sea-like -- barnacles attaching to rocks and shells and boats.

Learn To Bead and Make Jewelry - LearnToBead.net
file:///C|/MyWorkadayDocuments/learntobead/kits/beadweave/stitch/blazingbarnacles/bw2-RAW-01-BlazingBarnaclesNecklace-seablue.htm[11/9/2012 12:50:51 PM]
Use of Components
Of particular importance is the idea of creating "components" and their utilization within a piece.
There are a few design challenges. Yes, assembling a series of components can make the design process a little easier, insome ways. Yet, it can also result in a piece that is boring and monotonous. So, somehow,you need to add some variation.This can mean playing with color. Playing with volume, space and proportions. Playing with placement and positioning. Plahingwith textures, patterns, and rhythms. In Blazing Barnacles, I play primarily with volume -- small diamonds and largerdiamonds. The larger diamonds themselves are made up of 4 smaller diamonds.
Another design challenge is how to manage the transition from one component to the next. In this piece, I do two things. I bringcolor from the previous component into the next. Also, any two components share beads at their connection -- thus, I slightlyblur the boundaries between any two components.
Working One Technique Off Another
When you can work one technique off another in the same piece, you end up with a more intriguing outcome. You have adifferent rhythm and texture, because of the different placement of beads. You have more visual appeal. You sense a moreadept application of the artist's hand in craft.

Learn To Bead and Make Jewelry - LearnToBead.net
file:///C|/MyWorkadayDocuments/learntobead/kits/beadweave/stitch/blazingbarnacles/bw2-RAW-01-BlazingBarnaclesNecklace-seablue.htm[11/9/2012 12:50:51 PM]
Right Angle Weave gives you four points to work off of. Peyote requires that you create a "zipper" arrangement of your beads.In my first inner row (first row inside my diamond), I force this zipper to emerge, partly using the four RAW corners, and partlyby forcing a seed bead in each of the 4 sides of this inner row to protrude.
IA. Conceptualizing Your Piece
Ask yourself these questions:Purpose? Is this to be for a Woman 15 1/2 - 18 1/2”) or man (17 1/2" - 19 1/2")?What is the Context/Setting the necklace might be worn in?
Sizing?Size of neck? How close to the neck should it fit -- tight choker, near, down how far on the chest?
Materials?What types and materials of beads do I want to use? glass, gemstone, metal, mix? What size(s) or shape(s) of beads do I want to use?What kinds of stringing materials do I want to use, and do I want to wax the cord?What will the clasp assembly look like, and where and how will I attach the clasp?
Design and Color Issues?What should my component look like? How will I attach one component to other?Will my necklace be a "line of components", or will I vary the volume or placement?Are there any odds and evens issues?Do I want to use the same bead throughout, or do I want to create a pattern? How much surface embellishment do I want to do? how elaborate do I want to get? What colors do I want to use? Metal colors? Glass bead colors?How can I use color and material to enhance a sense of dimenionality?Do I want to use a manufactured clasp, or make my own?
Wearability?How easily will the woven beads, once the project is finished, conform to and feel comfortable on the neck?How will the necklace wear and drape?
The Blazing Barnacles Necklace is a woman's necklace meant to be worn comfortably around the neck.
I decided to build the necklace from a diamond-shaped component, and to fashion a center focal section that hadmore volume and space, but that was still made up of these same diamond shaped components.
I mix bead sizes and shapes. I mix stitch techniques. I mix glass and crystal materials. One of the critical ties thatbinds all this mixing together is the choice of colors. Better choices result in a greater sense of unity, a more naturaltransition from one component to the next along the necklace length, and a more pleasing sense of dimensionality.
My center-focal section has 3 diamonds -- definitely a conscious choice to use an odd number. The number ofdiamond-shaped components used as the "strap" will depend on the length you want your piece, not on any evensand odds logic.
Bead sizes are critical. The diamond shape has to be a size that will coordinate with the peyote tube. The beadsused in each row of the peyote tube have to be a certain size, because we are decreasing the width of this tube --really more conical shaped -- as we add each subsequent row. The sizes of the beads in the next subsequent rowhow to fit with the spaces left for them in the previous rows.
The point at which the strap is attached to the center-focal section is critical. This enables the piece to drape andlay better across the chest.
I decided to make my own toggle clasp using seed beads and delicas. I felt this would give a more organic feel to

Learn To Bead and Make Jewelry - LearnToBead.net
file:///C|/MyWorkadayDocuments/learntobead/kits/beadweave/stitch/blazingbarnacles/bw2-RAW-01-BlazingBarnaclesNecklace-seablue.htm[11/9/2012 12:50:51 PM]
the piece.
IB. Measurements
Ask yourself these questions:What length and width necklace do I want to end up with?What are the widths and lengths of each of the beads I want to use?How many component shapes long?How many component shapes wide? Do I need any definable center points?How much more length will clasp attachment create?Will there be any variation in the actual sizes of the beads, from bead to bead?
For this project, I wanted to make a necklace approximately 16 1/2" long, which includes the clasp. In this case, theclasp adds about 1" to the piece.
I wanted a definable center point.
The size of my center-focus piece is fixed. For the necklace straps, one side (with the toggle bar) has 9 diamondshaped components. The other side (loop side) has 10 diamond shaped components, with the last componentserving as the "clasp-loop".
MEASUREMENTSCriteria This Project Your Project VariationNecklace lengthw/clasp
16 1/2 ”
Size of diamondcomponent, includingpicot embellishment ateach of four corners.
3/4" x 3/4"(19mm x 19mm)
Clasp adds this length 3/4" – 1” Each additional pair(thus, one on eachside) of diamondcomponents along thestrap adds this muchlength:
5/8" - 3/4"(16-19mm)
NOTE: There are 25mm in an inch. Rulers are marked in inches on one side and millimeters on the other.
IC. Selecting Materials
Ask yourself these questions:Types of beads? Glass, metal, other?Sizes of beads? Stringing material? beading thread, cable thread?Clasp? Make my own or use a manufactured clasp?
Blazing Barnacles needs to sparkle like encrusted jewels from the sea. I used beads with iris and ab finishes, some

Learn To Bead and Make Jewelry - LearnToBead.net
file:///C|/MyWorkadayDocuments/learntobead/kits/beadweave/stitch/blazingbarnacles/bw2-RAW-01-BlazingBarnaclesNecklace-seablue.htm[11/9/2012 12:50:51 PM]
luster, some fascinating color-lined effects. And, of course, within each diamond component is set a sparklyAustrian crystal bead.
Here I use FireLine cable thread. Right Angle Weave is a loose stitch, and I wanted to get more thread tension.FireLine allows for this better than beading threads like Nymo or C-Lon. Since I was using bugles and Austriancrystals, which are known for having sharper holes, the FireLine has more abrasion resistance.
A clasp that feels as a natural, organic part of your piece will always be more satisfying.
ID. Sketching a Pattern or Graph
We need to translate our piece into a series of diagrams or graphs to get a better handle on its construction.
First, we are adapting the Right Angle Weave stitch for making our Skeletal Structure. We are not executing it exactly in theclassical way. But we are adapting its mission to our purposes. From the start, it is important to be able to visualize what thatbasic Right Angle Weave Unit is. We actually have 2 types of units in this design.
THE DIAMOND SHAPE UNIT:Consists of stringing on 8 beads: Alternating Size #2 bugles with 8/0 Seed Beads.
NOTE: As we keep adding beads to our piece, and integrating more diamond shapes, it is easy to lose track of where yourthread needs to go next. Always come back to visualizing this basic RAW unit -- this circle of 8 beads -- and you won't get lost.
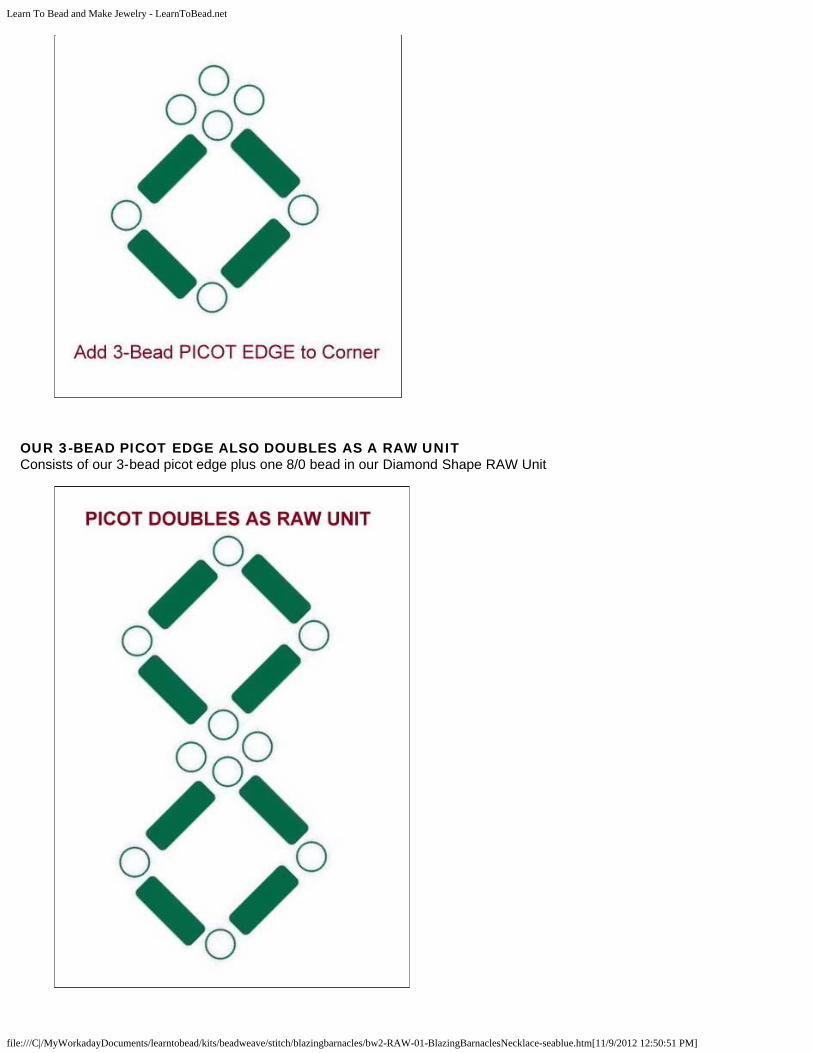
THE 3-BEAD PICOT EDGE ON EACH CORNERConsists of 3 8/0 seed beads.
Learn To Bead and Make Jewelry - LearnToBead.net
file:///C|/MyWorkadayDocuments/learntobead/kits/beadweave/stitch/blazingbarnacles/bw2-RAW-01-BlazingBarnaclesNecklace-seablue.htm[11/9/2012 12:50:51 PM]
OUR 3-BEAD PICOT EDGE ALSO DOUBLES AS A RAW UNITConsists of our 3-bead picot edge plus one 8/0 bead in our Diamond Shape RAW Unit
Learn To Bead and Make Jewelry - LearnToBead.net
file:///C|/MyWorkadayDocuments/learntobead/kits/beadweave/stitch/blazingbarnacles/bw2-RAW-01-BlazingBarnaclesNecklace-seablue.htm[11/9/2012 12:50:51 PM]
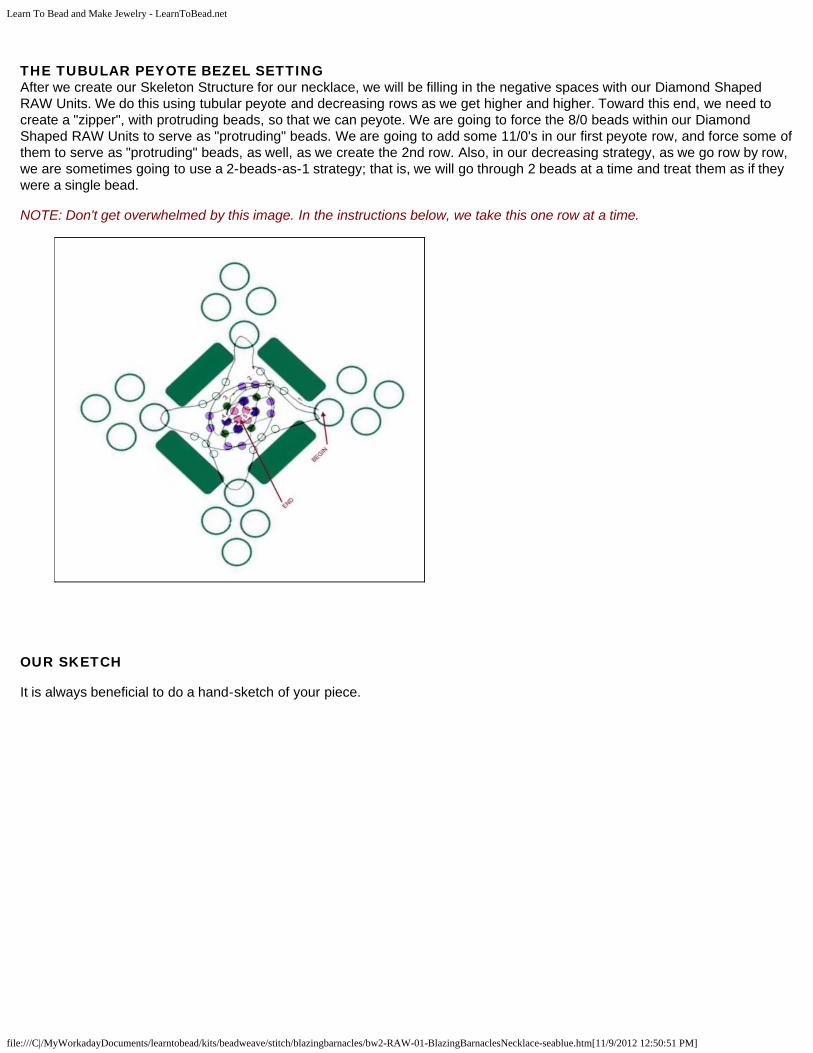
THE TUBULAR PEYOTE BEZEL SETTINGAfter we create our Skeleton Structure for our necklace, we will be filling in the negative spaces with our Diamond ShapedRAW Units. We do this using tubular peyote and decreasing rows as we get higher and higher. Toward this end, we need tocreate a "zipper", with protruding beads, so that we can peyote. We are going to force the 8/0 beads within our DiamondShaped RAW Units to serve as "protruding" beads. We are going to add some 11/0's in our first peyote row, and force some ofthem to serve as "protruding" beads, as well, as we create the 2nd row. Also, in our decreasing strategy, as we go row by row,we are sometimes going to use a 2-beads-as-1 strategy; that is, we will go through 2 beads at a time and treat them as if theywere a single bead.
NOTE: Don't get overwhelmed by this image. In the instructions below, we take this one row at a time.
OUR SKETCH
It is always beneficial to do a hand-sketch of your piece.
Learn To Bead and Make Jewelry - LearnToBead.net
file:///C|/MyWorkadayDocuments/learntobead/kits/beadweave/stitch/blazingbarnacles/bw2-RAW-01-BlazingBarnaclesNecklace-seablue.htm[11/9/2012 12:50:51 PM]
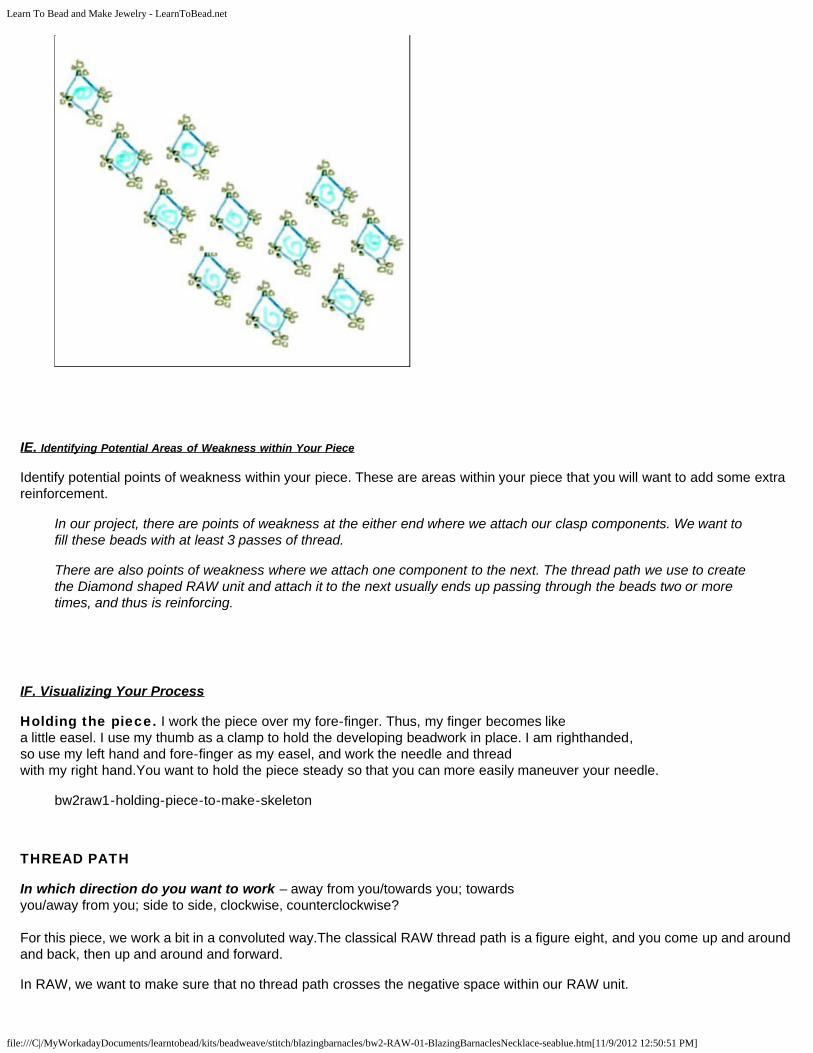
IE. Identifying Potential Areas of Weakness within Your Piece
Identify potential points of weakness within your piece. These are areas within your piece that you will want to add some extrareinforcement.
In our project, there are points of weakness at the either end where we attach our clasp components. We want tofill these beads with at least 3 passes of thread.
There are also points of weakness where we attach one component to the next. The thread path we use to createthe Diamond shaped RAW unit and attach it to the next usually ends up passing through the beads two or moretimes, and thus is reinforcing.
IF. Visualizing Your Process
Holding the piece. I work the piece over my fore-finger. Thus, my finger becomes likea little easel. I use my thumb as a clamp to hold the developing beadwork in place. I am righthanded,so use my left hand and fore-finger as my easel, and work the needle and threadwith my right hand.You want to hold the piece steady so that you can more easily maneuver your needle.
bw2raw1-holding-piece-to-make-skeleton
THREAD PATH
In which direction do you want to work – away from you/towards you; towardsyou/away from you; side to side, clockwise, counterclockwise?
For this piece, we work a bit in a convoluted way.The classical RAW thread path is a figure eight, and you come up and aroundand back, then up and around and forward.
In RAW, we want to make sure that no thread path crosses the negative space within our RAW unit.

Learn To Bead and Make Jewelry - LearnToBead.net
file:///C|/MyWorkadayDocuments/learntobead/kits/beadweave/stitch/blazingbarnacles/bw2-RAW-01-BlazingBarnaclesNecklace-seablue.htm[11/9/2012 12:50:51 PM]
We also want to maintain the integrity of our RAW unit.
This means, we always want to circle around our 8 beads in the primary RAW unit, or our 4 beads in our secondary RAW unit.We may want to make a right turn at one point, but if this violates the unit structure, we need to go all the way around the unituntil we are better positioned to make that turn.
Remember, our unit has either 8 beads or 4 beads, and we need to pass through ALL of them on our way to the next step.
In Tubular Peyote, our thread path is one directional. Our beads lay themselves out like a zipper, with one up bead, one downbead, one up bead, one down bead, and so forth. When we add a row, we add a bead between each up bead, going throughthe up bead, through the new bead, and through the next up bead, to lock things in place.
In Tubular Peyote, when your row is an even number of beads, we STEP-UP at the end of the row, to begin the next row.

Learn To Bead and Make Jewelry - LearnToBead.net
file:///C|/MyWorkadayDocuments/learntobead/kits/beadweave/stitch/blazingbarnacles/bw2-RAW-01-BlazingBarnaclesNecklace-seablue.htm[11/9/2012 12:50:51 PM]
Do you want to work from one end to the other, or complete the piece in stages, orcreate a series and components, and then attach them together?
In our instructions, we create the Skeletal Structure for our center-focal piece first. Then we add both sides of the strap.
We create our tubular peyote bezel cups within each Diamond Shaped RAW unit, one at a time.
Then we finish off by adding our Toggle Clasp.
Create a few sample components. This gives you a chance to pre-test your ideas and strategies,before barging in to the full task. This lets your body/mind feel/understand the control you need over the thread's tension.
Set your mantra going.Organize the “flow” of your work in your mind. Create a pattern and rhythm in yourhead, utilizing such things as shapes, sizes, and colors, and noting where thread goes inand where thread comes out, and whether you are working clock-wise, counter-clockwiseor in a figure 8 motion.
In this example, for the skeletal structure, my mantra was less a rhyme, than an admonition:
"Follow the 8 beads in the unit!"
For the peyote, my mantra mimicked the instructions:
"Exit inside corner 8.3C four times around the blockStep up.2D four times around the blockStep up.1E four times around the blockStep up.
Learn To Bead and Make Jewelry - LearnToBead.net
file:///C|/MyWorkadayDocuments/learntobead/kits/beadweave/stitch/blazingbarnacles/bw2-RAW-01-BlazingBarnaclesNecklace-seablue.htm[11/9/2012 12:50:51 PM]
1G four times around the blockStep up.1F four times around the blockStep up.Add that crystal and secure."
IG. Organizing Your Work Space
Get your beads, stringing materials, tools, ruler, wax, work surface, handy pen and paper, and thelike, altogether in one place.
II. BEGINNING YOUR PROJECT
IIA. Basic Steps
We are going to make our necklace in these basic steps:
1. Make the 3-Large Diamond Focal Center Skeletal Structure2. Create the Tubular Peyote Bezel Cups within each Diamond Unit and add Austrian Crystal in Centerof Unit3. Make the Small Diamond Units for the Strap and Toggle "Loop", and Add Our Tubular Peyote BezelCups within each Diamond Unit4. Make the Toggle Clasp
Cut an arm's to arm's length of thread (about 6'). Put your thread on the needle.
Wax the thread.
1. Let's Get Started With The 3-Large Diamond Focal Center Structure...

Learn To Bead and Make Jewelry - LearnToBead.net
file:///C|/MyWorkadayDocuments/learntobead/kits/beadweave/stitch/blazingbarnacles/bw2-RAW-01-BlazingBarnaclesNecklace-seablue.htm[11/9/2012 12:50:51 PM]
In our 3-Large Diamond Center, each Large Diamond is made up of 4 small diamonds.
The first and 3rd Large Diamonds our positioned at the same height, but the middle Large Diamond is one RAW unit lower.
The Steps:
You will need the Size #2 bugles (Color A) and the 8/0 seed beads (Color B).
1.1. MAKE FIRST SMALL DIAMOND UNIT: Pick up 1A, 1B, 1A, 1B, 1A, 1B, 1A, 1B. You should have 4 size 8/0 beads and 4 size #2 bugle beads on your thread.
1.2. Come back up with your thread through the next 1A and 1B.This brings your beads into a square-circle.Tie a knot.Bring your thread through the next 1A, positioning yourself to begin the next step.

Learn To Bead and Make Jewelry - LearnToBead.net
file:///C|/MyWorkadayDocuments/learntobead/kits/beadweave/stitch/blazingbarnacles/bw2-RAW-01-BlazingBarnaclesNecklace-seablue.htm[11/9/2012 12:50:51 PM]
1.3. ADD 3-PICOT CORNER EMBELLISHMENT: Add a 3-bead picot at each corner.Pick up 3B and pass over the corner B in your RAW unit, into the next A (bugle).Do this all the way around.You will have a 3-beade picot at each corner.
1.4. Picture your small diamond shaped unit as a compass -- with North, South, East and West directionality. Orient your work so that your needle and thread are coming out a bottom picot on the "EAST" bead.
1.5. MAKE YOUR SECOND SMALL DIAMOND UNIT and ADD 3-PICOT CORNER EMBELISHMENTS:Pick up 1A, 1B, 1A, 1B, 1A and go through South picot, and continue through the next 1A, 1B and 1A. See diagram below.

Learn To Bead and Make Jewelry - LearnToBead.net
file:///C|/MyWorkadayDocuments/learntobead/kits/beadweave/stitch/blazingbarnacles/bw2-RAW-01-BlazingBarnaclesNecklace-seablue.htm[11/9/2012 12:50:51 PM]
REMEMBER: This is Right Angle Weave, so there are sides that are shared.
1.6. You are now positioned to add 3 picot beads to this corner. Work your way to the next corner, and add 3 more picot beads>
You now how two connected small diamonds, each with 3-bead picot edges at each corner.
1.7. MAKE YOUR THIRD SMALL DIAMOND UNIT:Now we'll add a third small diamond.
Maneuver your needle and thread, so that you are in the correct position to add your bugle beads and size 8/0 beads, asbefore. Then add your picot beads at the corners, where needed.
1.8. MAKE THE REMAINING NINE SMALL DIAMOND UNITS (for total of 12):Continue adding small diamond units until you end up with the configuration below. Let the numbered diamonds be a guide towhich diamonds you should create next.
Learn To Bead and Make Jewelry - LearnToBead.net
file:///C|/MyWorkadayDocuments/learntobead/kits/beadweave/stitch/blazingbarnacles/bw2-RAW-01-BlazingBarnaclesNecklace-seablue.htm[11/9/2012 12:50:51 PM]
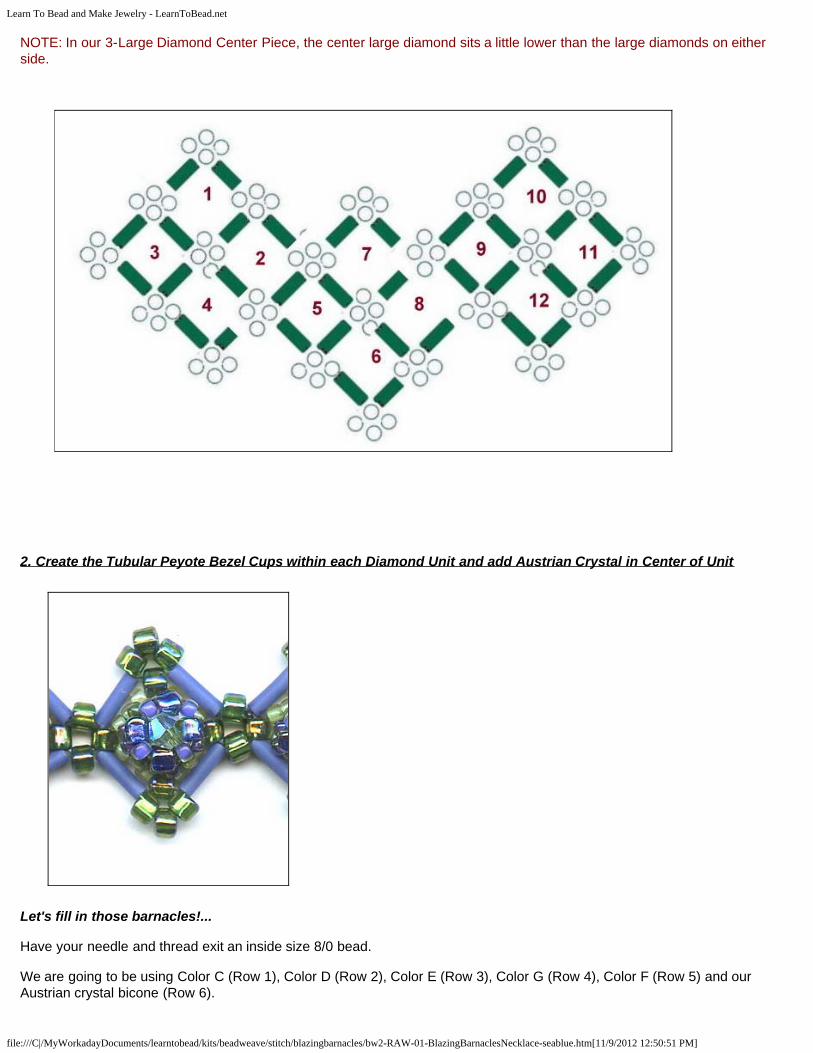
NOTE: In our 3-Large Diamond Center Piece, the center large diamond sits a little lower than the large diamonds on eitherside.
2. Create the Tubular Peyote Bezel Cups within each Diamond Unit and add Austrian Crystal in Center of Unit
Let's fill in those barnacles!...
Have your needle and thread exit an inside size 8/0 bead.
We are going to be using Color C (Row 1), Color D (Row 2), Color E (Row 3), Color G (Row 4), Color F (Row 5) and ourAustrian crystal bicone (Row 6).
Learn To Bead and Make Jewelry - LearnToBead.net
file:///C|/MyWorkadayDocuments/learntobead/kits/beadweave/stitch/blazingbarnacles/bw2-RAW-01-BlazingBarnaclesNecklace-seablue.htm[11/9/2012 12:50:51 PM]
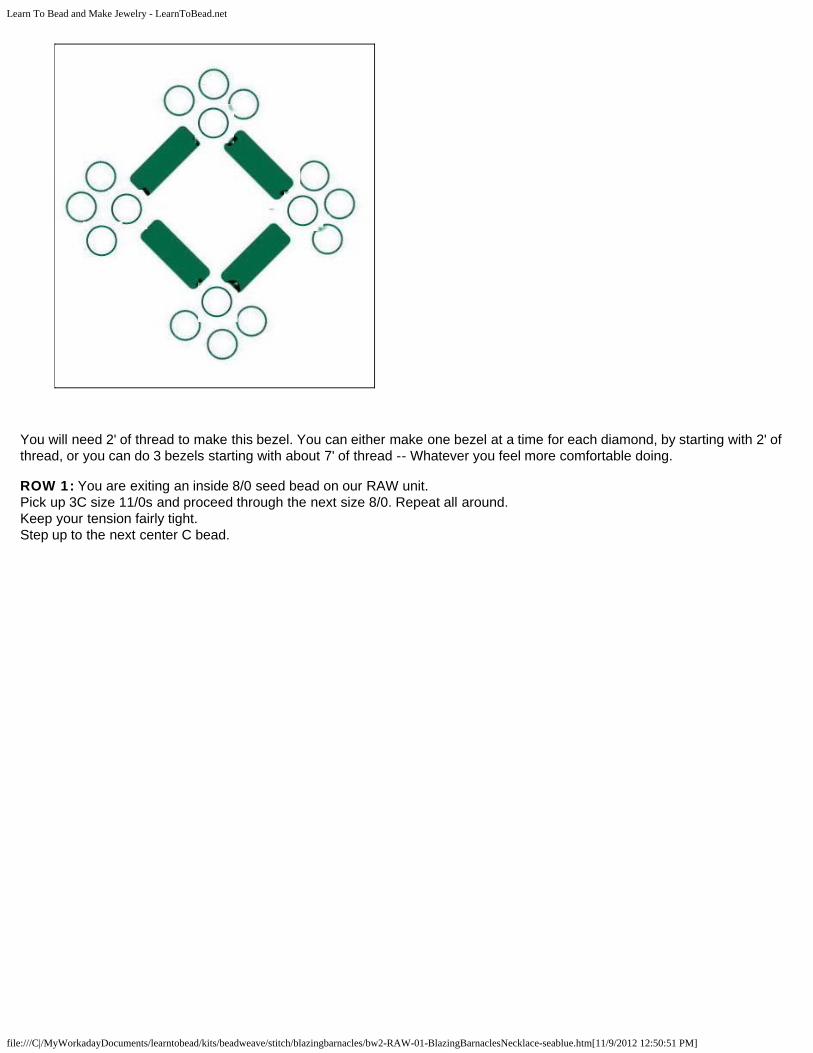
You will need 2' of thread to make this bezel. You can either make one bezel at a time for each diamond, by starting with 2' ofthread, or you can do 3 bezels starting with about 7' of thread -- Whatever you feel more comfortable doing.
ROW 1: You are exiting an inside 8/0 seed bead on our RAW unit. Pick up 3C size 11/0s and proceed through the next size 8/0. Repeat all around.Keep your tension fairly tight.Step up to the next center C bead.

Learn To Bead and Make Jewelry - LearnToBead.net
file:///C|/MyWorkadayDocuments/learntobead/kits/beadweave/stitch/blazingbarnacles/bw2-RAW-01-BlazingBarnaclesNecklace-seablue.htm[11/9/2012 12:50:51 PM]
ROW 2: Pick up 2D 11/0s and stitch to the next center 11/0. Repeat all around.NOTE: In effect, we are forcing this Row 1 C bead to serve as a protruding bead for Row 2.Step up through the 2D beads you first added in the 2nd Row.
Learn To Bead and Make Jewelry - LearnToBead.net
file:///C|/MyWorkadayDocuments/learntobead/kits/beadweave/stitch/blazingbarnacles/bw2-RAW-01-BlazingBarnaclesNecklace-seablue.htm[11/9/2012 12:50:51 PM]
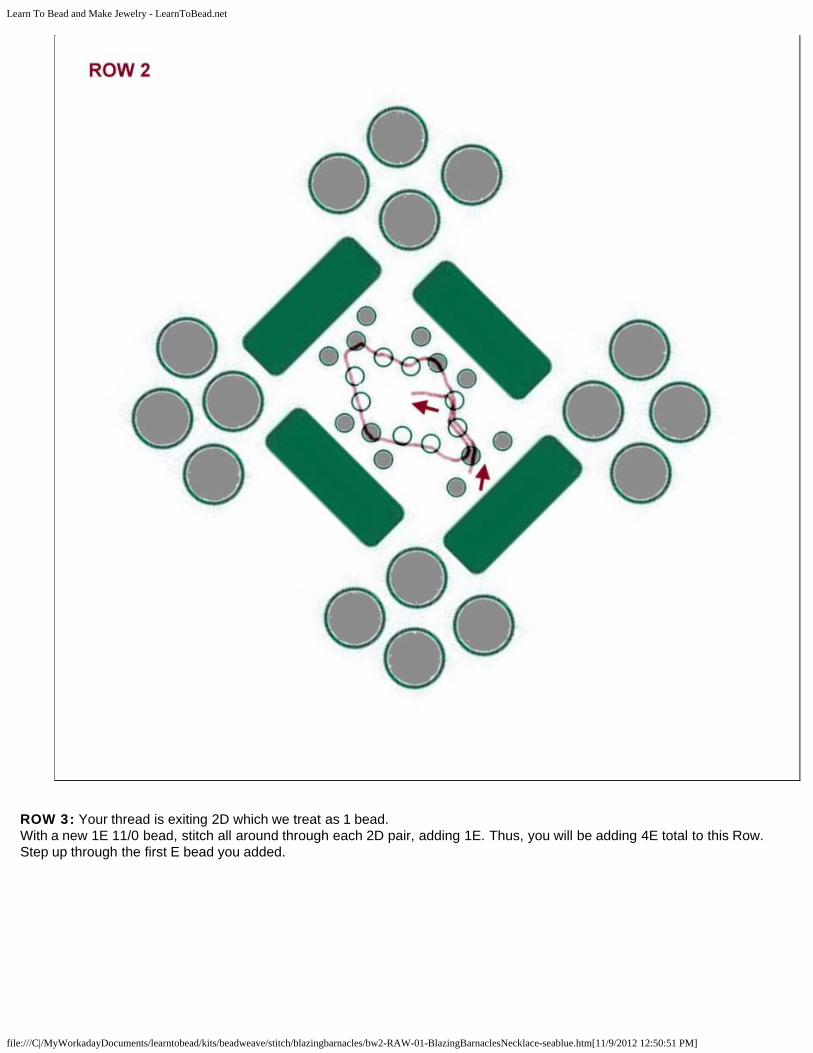
ROW 3: Your thread is exiting 2D which we treat as 1 bead. With a new 1E 11/0 bead, stitch all around through each 2D pair, adding 1E. Thus, you will be adding 4E total to this Row.Step up through the first E bead you added.

Learn To Bead and Make Jewelry - LearnToBead.net
file:///C|/MyWorkadayDocuments/learntobead/kits/beadweave/stitch/blazingbarnacles/bw2-RAW-01-BlazingBarnaclesNecklace-seablue.htm[11/9/2012 12:50:51 PM]
ROW 4: Now add 1G 8/0s between each E all the way around.Step up through the first G bead you just added.
ROW 5: Next, add 1F 11/0s through each G bead all the way around.
Learn To Bead and Make Jewelry - LearnToBead.net
file:///C|/MyWorkadayDocuments/learntobead/kits/beadweave/stitch/blazingbarnacles/bw2-RAW-01-BlazingBarnaclesNecklace-seablue.htm[11/9/2012 12:50:51 PM]
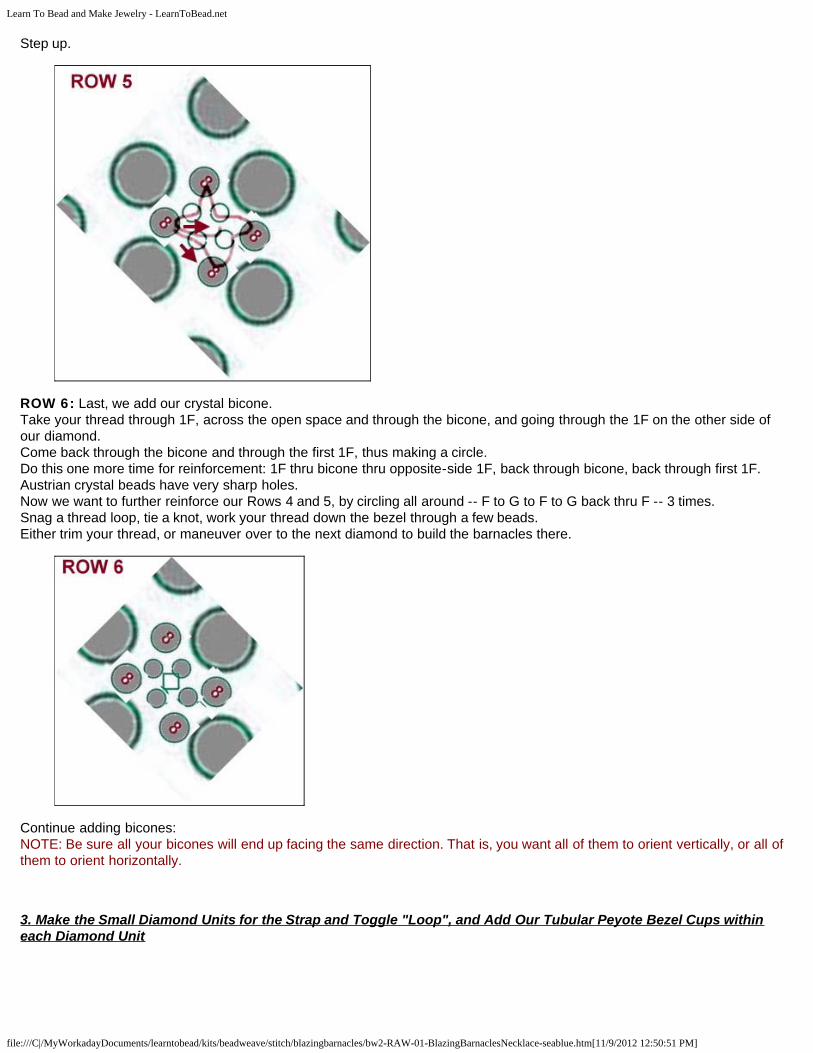
Step up.
ROW 6: Last, we add our crystal bicone.Take your thread through 1F, across the open space and through the bicone, and going through the 1F on the other side ofour diamond.Come back through the bicone and through the first 1F, thus making a circle.Do this one more time for reinforcement: 1F thru bicone thru opposite-side 1F, back through bicone, back through first 1F.Austrian crystal beads have very sharp holes.Now we want to further reinforce our Rows 4 and 5, by circling all around -- F to G to F to G back thru F -- 3 times.Snag a thread loop, tie a knot, work your thread down the bezel through a few beads.Either trim your thread, or maneuver over to the next diamond to build the barnacles there.
Continue adding bicones:NOTE: Be sure all your bicones will end up facing the same direction. That is, you want all of them to orient vertically, or all ofthem to orient horizontally.
3. Make the Small Diamond Units for the Strap and Toggle "Loop", and Add Our Tubular Peyote Bezel Cups withineach Diamond Unit

Learn To Bead and Make Jewelry - LearnToBead.net
file:///C|/MyWorkadayDocuments/learntobead/kits/beadweave/stitch/blazingbarnacles/bw2-RAW-01-BlazingBarnaclesNecklace-seablue.htm[11/9/2012 12:50:51 PM]
On either side of our 3-large diamond center piece, add single small diamond units, each connected by the side picot bead.
This necklace is for a 16 1/2" neck. I have 10 small diamond units plus a toggle bar connected from my left side. I have 11small diamond units connected from my right side. All these small diamond units are embellished with our tubular peyote bezelcup and Austrian crystal, except for the 11th on the right side. This 11th unit is only partially embellished, and it serves as the"loop" for our Toggle clasp.
We attach the left side to small diamond #3 in our 3-large diamond center piece.We attach the right side to small diamond #11.
4. Make the Toggle Clasp
Learn To Bead and Make Jewelry - LearnToBead.net
file:///C|/MyWorkadayDocuments/learntobead/kits/beadweave/stitch/blazingbarnacles/bw2-RAW-01-BlazingBarnaclesNecklace-seablue.htm[11/9/2012 12:50:51 PM]
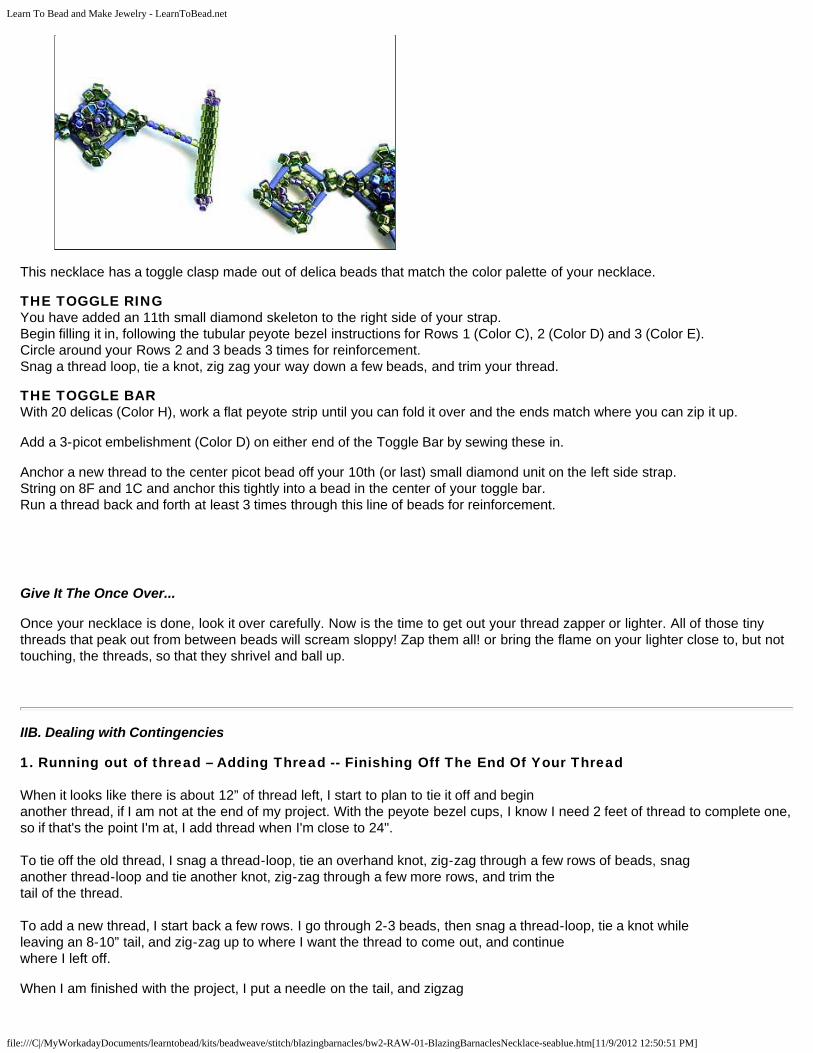
This necklace has a toggle clasp made out of delica beads that match the color palette of your necklace.
THE TOGGLE RINGYou have added an 11th small diamond skeleton to the right side of your strap. Begin filling it in, following the tubular peyote bezel instructions for Rows 1 (Color C), 2 (Color D) and 3 (Color E).Circle around your Rows 2 and 3 beads 3 times for reinforcement.Snag a thread loop, tie a knot, zig zag your way down a few beads, and trim your thread.
THE TOGGLE BARWith 20 delicas (Color H), work a flat peyote strip until you can fold it over and the ends match where you can zip it up.
Add a 3-picot embelishment (Color D) on either end of the Toggle Bar by sewing these in.
Anchor a new thread to the center picot bead off your 10th (or last) small diamond unit on the left side strap.String on 8F and 1C and anchor this tightly into a bead in the center of your toggle bar. Run a thread back and forth at least 3 times through this line of beads for reinforcement.
Give It The Once Over...
Once your necklace is done, look it over carefully. Now is the time to get out your thread zapper or lighter. All of those tinythreads that peak out from between beads will scream sloppy! Zap them all! or bring the flame on your lighter close to, but nottouching, the threads, so that they shrivel and ball up.
IIB. Dealing with Contingencies
1. Running out of thread – Adding Thread -- Finishing Off The End Of Your Thread
When it looks like there is about 12” of thread left, I start to plan to tie it off and beginanother thread, if I am not at the end of my project. With the peyote bezel cups, I know I need 2 feet of thread to complete one,so if that's the point I'm at, I add thread when I'm close to 24".
To tie off the old thread, I snag a thread-loop, tie an overhand knot, zig-zag through a few rows of beads, snaganother thread-loop and tie another knot, zig-zag through a few more rows, and trim thetail of the thread.
To add a new thread, I start back a few rows. I go through 2-3 beads, then snag a thread-loop, tie a knot whileleaving an 8-10” tail, and zig-zag up to where I want the thread to come out, and continuewhere I left off.
When I am finished with the project, I put a needle on the tail, and zigzag

Learn To Bead and Make Jewelry - LearnToBead.net
file:///C|/MyWorkadayDocuments/learntobead/kits/beadweave/stitch/blazingbarnacles/bw2-RAW-01-BlazingBarnaclesNecklace-seablue.htm[11/9/2012 12:50:51 PM]
it through some rows of beads, before cutting off the tail.
NEVER cut the thread at the point you have tied a knot.
2. Some areas of your piece feel too loose, or are pulling apart
I snag a thread-loop and tie off a new thread a few rows below where the problem is. Izig-zag my way up to the problem area, and reinforce it, by weaving around and aroundand in and out, and across and back. The more you fill the hole with thread, the tighterthe piece will feel.
3. Your piece is too short or too long
Here you would either create or remove additional small diamond units to the strap. Each added pair (Left and Right) will add(or subtract) another 5/8-3/4" to your piece.
If you have already attached your clasp, you will have to cut it off.
IIC. Finishing Touches
IIC1. Signature bead or embellishment
I think it is always a good idea to use a signature bead in your projects. This might be a uniquebead added near the beginning or end of the piece, or incorporated within each link, or anengraved tag added as part of the clasp assembly. You want your signature bead to identify thepiece as your own, but you don’t want your signature bead to compete with or detract from yourpiece.
The general structure of this Blazing Barnacles Necklace was created by Kathleen Lynam.Any personalization you might do – choice of beads, choice of patterns, choice of stringingmaterial, choice of clasp, choice of color scheme, choice of embellishments – are your owntouches, and deserve your signature.
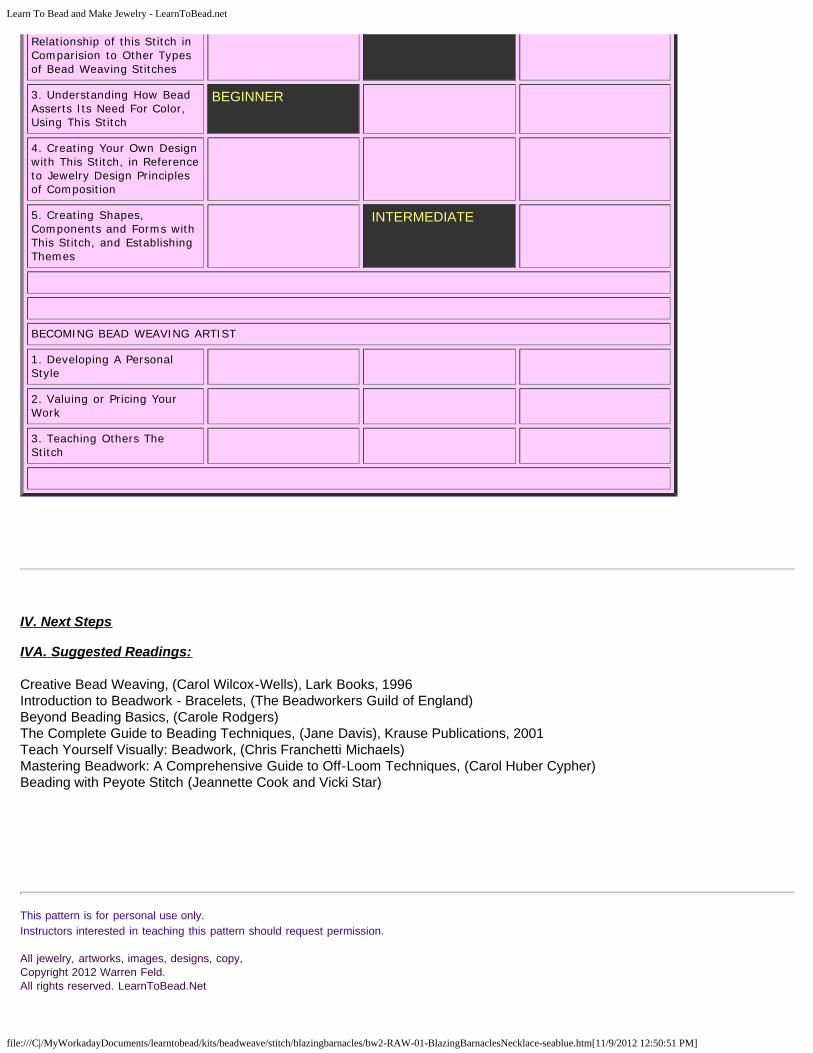
III. Learning Objectives MetAfter Accomplishing This Project
LEARNINGOBJECTIVES
BLAZING BARNACLES NECKLACE
BEGINNER INTERMEDIATE ADVANCED
TECHNICAL MECHANICS
1. Managing Thread Tension BEGINNER
Learn To Bead and Make Jewelry - LearnToBead.net
file:///C|/MyWorkadayDocuments/learntobead/kits/beadweave/stitch/blazingbarnacles/bw2-RAW-01-BlazingBarnaclesNecklace-seablue.htm[11/9/2012 12:50:51 PM]
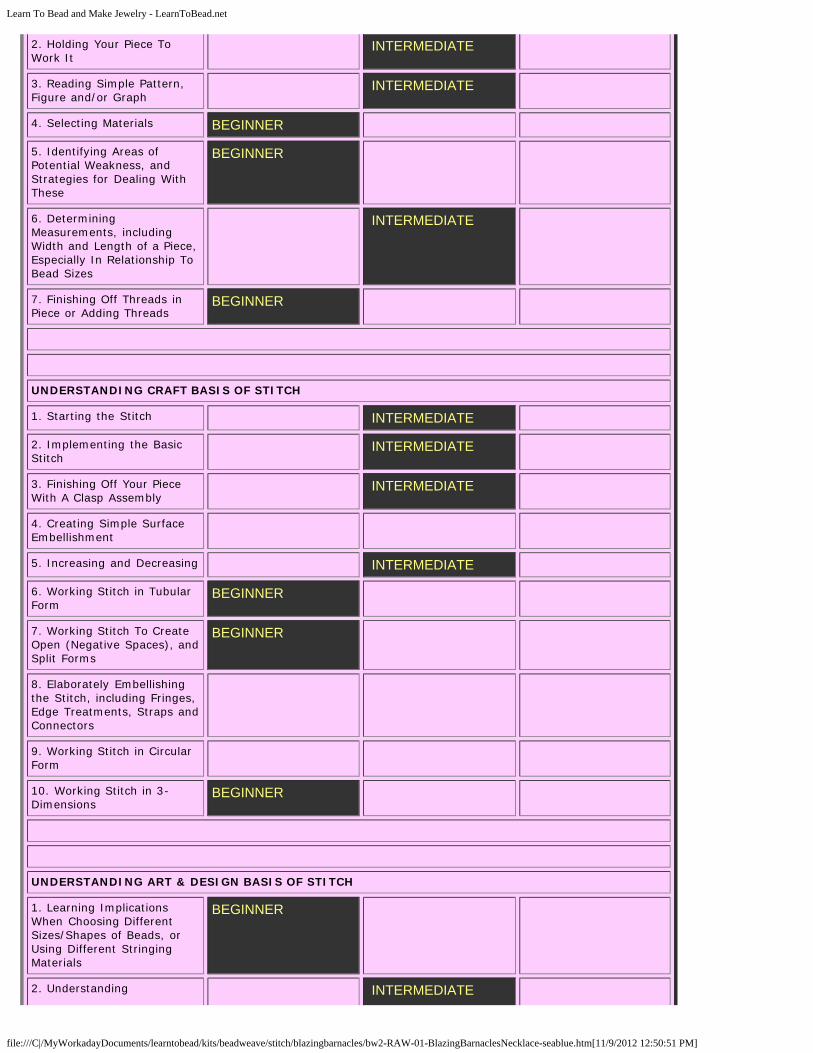
2. Holding Your Piece ToWork It
INTERMEDIATE
3. Reading Simple Pattern,Figure and/or Graph
INTERMEDIATE
4. Selecting Materials BEGINNER
5. Identifying Areas ofPotential Weakness, and Strategies for Dealing WithThese
BEGINNER
6. DeterminingMeasurements, includingWidth and Length of a Piece,Especially In Relationship ToBead Sizes
INTERMEDIATE
7. Finishing Off Threads inPiece or Adding Threads
BEGINNER
UNDERSTANDING CRAFT BASIS OF STITCH
1. Starting the Stitch INTERMEDIATE
2. Implementing the BasicStitch
INTERMEDIATE
3. Finishing Off Your PieceWith A Clasp Assembly
INTERMEDIATE
4. Creating Simple SurfaceEmbellishment
5. Increasing and Decreasing INTERMEDIATE
6. Working Stitch in TubularForm
BEGINNER
7. Working Stitch To CreateOpen (Negative Spaces), andSplit Forms
BEGINNER
8. Elaborately Embellishingthe Stitch, including Fringes,Edge Treatments, Straps andConnectors
9. Working Stitch in CircularForm
10. Working Stitch in 3-Dimensions
BEGINNER
UNDERSTANDING ART & DESIGN BASIS OF STITCH
1. Learning ImplicationsWhen Choosing DifferentSizes/Shapes of Beads, orUsing Different StringingMaterials
BEGINNER
2. Understanding INTERMEDIATE
Learn To Bead and Make Jewelry - LearnToBead.net
file:///C|/MyWorkadayDocuments/learntobead/kits/beadweave/stitch/blazingbarnacles/bw2-RAW-01-BlazingBarnaclesNecklace-seablue.htm[11/9/2012 12:50:51 PM]
Relationship of this Stitch inComparision to Other Typesof Bead Weaving Stitches
3. Understanding How BeadAsserts Its Need For Color,Using This Stitch
BEGINNER
4. Creating Your Own Designwith This Stitch, in Referenceto Jewelry Design Principlesof Composition
5. Creating Shapes,Components and Forms withThis Stitch, and EstablishingThemes
INTERMEDIATE
BECOMING BEAD WEAVING ARTIST
1. Developing A PersonalStyle
2. Valuing or Pricing YourWork
3. Teaching Others TheStitch
IV. Next Steps
IVA. Suggested Readings:
Creative Bead Weaving, (Carol Wilcox-Wells), Lark Books, 1996Introduction to Beadwork - Bracelets, (The Beadworkers Guild of England)Beyond Beading Basics, (Carole Rodgers)The Complete Guide to Beading Techniques, (Jane Davis), Krause Publications, 2001 Teach Yourself Visually: Beadwork, (Chris Franchetti Michaels) Mastering Beadwork: A Comprehensive Guide to Off-Loom Techniques, (Carol Huber Cypher)Beading with Peyote Stitch (Jeannette Cook and Vicki Star)
This pattern is for personal use only. Instructors interested in teaching this pattern should request permission.
All jewelry, artworks, images, designs, copy, Copyright 2012 Warren Feld. All rights reserved. LearnToBead.Net

Learn To Bead and Make Jewelry - LearnToBead.net
file:///C|/MyWorkadayDocuments/learntobead/kits/beadweave/stitch/blazingbarnacles/bw2-RAW-01-BlazingBarnaclesNecklace-seablue.htm[11/9/2012 12:50:51 PM]
Phone: 615/292-0610Website: www.learntobead.net Email: [email protected]