Learn SQL Server Administration in a Month of Lunches
258
-
Upload
pdfupload4rst -
Category
Documents
-
view
527 -
download
33
description
Learn SQL Server Administration in a Month of Lunches
Transcript of Learn SQL Server Administration in a Month of Lunches


Learn SQL Server Administration in a Month of Lunches


Learn SQL ServerAdministration
in a Month of Lunches
DON JONES
M A N N I N G
SHELTER ISLAND
For online information and ordering of this and other Manning books, please visitwww.manning.com. The publisher offers discounts on this book when ordered in quantity. For more information, please contact
Special Sales DepartmentManning Publications Co.20 Baldwin RoadPO Box 261Shelter Island, NY 11964Email: [email protected]
©2014 by Manning Publications Co. All rights reserved.
No part of this publication may be reproduced, stored in a retrieval system, or transmitted, in any form or by means electronic, mechanical, photocopying, or otherwise, without prior written permission of the publisher.
Many of the designations used by manufacturers and sellers to distinguish their products are claimed as trademarks. Where those designations appear in the book, and Manning Publications was aware of a trademark claim, the designations have been printed in initial caps or all caps.
Recognizing the importance of preserving what has been written, it is Manning’s policy to have the books we publish printed on acid-free paper, and we exert our best efforts to that end. Recognizing also our responsibility to conserve the resources of our planet, Manning booksare printed on paper that is at least 15 percent recycled and processed without the use of elemental chlorine.
Manning Publications Co. Development editor: Suzie Pitzen20 Baldwin Road Copyeditor: Elizabeth MartinPO Box 261 Proofreader: Barbara MireckiShelter Island, NY 11964 Typesetter: Dennis Dalinnik
Cover designer: Leslie Haimes
ISBN: 9781617292132Printed in the United States of America
1 2 3 4 5 6 7 8 9 10 – MAL – 19 18 17 16 15 14
To the Atlantis Team, who helped mestay on track with my writing schedule:
Malcolm, Ellen, Michael, Gregory, Randy,Adam, and Momma, along with Brit Lee.
And to Christopher, for helping mestay on track every day.


brief contents1 ■ Before you begin 1
2 ■ Server assessment and configuration 8
3 ■ T-SQL crash course 16
4 ■ Managing databases 34
5 ■ Backup and recovery 44
6 ■ Authentication: who are you? 56
7 ■ Authorization: what are you allowed to do? 65
8 ■ Accounting: what did you do? 75
9 ■ Analyzing indexes 82
10 ■ Maintaining indexes 92
11 ■ Tuning index designs 101
12 ■ Reading query execution plans 110
13 ■ Block and deadlock analysis 119
14 ■ Automating management with SQL Server Agent 128
15 ■ Multiserver management 137
16 ■ Windows PowerShell and SQL Server 143
17 ■ Using Extended Events 153
vii

BRIEF CONTENTSviii
18 ■ Monitoring and analyzing performance 166
19 ■ Options for high availability 178
20 ■ Virtualizing SQL Server 189
21 ■ Moving, migrating, and upgrading databases 197
22 ■ SQL Server performance checklist 205
23 ■ Never the end 207

contentspreface xviiacknowledgments xviiiabout this book xix
1 Before you begin 11.1 Is this book for you? 11.2 How to use this book 21.3 Setting up your lab environment 3
Choosing a SQL Server edition for your lab 3 ■ Selecting a version of Windows for your lab 4 ■ My recommendation for your lab environment 5 ■ A word about SQL Server versions 5
1.4 SQL Server documentation 51.5 Online resources 61.6 A word on my recommendations 61.7 Being immediately effective with SQL Server 7
2 Server assessment and configuration 82.1 Identifying instances and versions 82.2 Identifying databases 11
ix
2.3 Identifying other server objects 13

CONTENTSx
2.4 Inventorying the server configuration 142.5 Hands-on lab 15
3 T-SQL crash course 163.1 SELECT queries 16
A basic SELECT query 17 ■ Returning specific rows from the table 19 ■ Delimiting string and date values 20Sorting results 20 ■ Finding T-SQL documentation 21
3.2 DELETE, UPDATE, and INSERT queries 23DELETE queries 23 ■ UPDATE queries 24INSERT queries 24
3.3 Assessing a database’s structure 253.4 Multitable SELECT queries 313.5 Hands-on lab 33
4 Managing databases 344.1 Configuring database options 344.2 Detaching and attaching databases 364.3 Assessing database storage 384.4 Identifying potential performance concerns
in storage 38Problems with file layout 38 ■ Problems with file size 40Filegroups 41
4.5 System databases 414.6 An overview of storage hardware 424.7 Hands-on lab 43
5 Backup and recovery 445.1 The transaction log 445.2 How backups work 47
Making a full database backup 48 ■ Making a differential database backup 48 ■ Making a transaction log backup 48
5.3 How restoration works 49Preparing for recovery 50 ■ Starting the recovery 50
5.4 Model backup and recovery scenarios 52
5.5 Special procedures for system databases 54
CONTENTS xi
5.6 Backup and recovery using T-SQL or PowerShell 545.7 Hands-on lab 55
6 Authentication: who are you? 566.1 Understanding logins 56
Windows Authentication 57 ■ Mixed Mode Authentication 58
6.2 Understanding database users 596.3 How the real world often does authentication 626.4 Understanding application roles 636.5 Hands-on lab 64
7 Authorization: what are you allowed to do? 657.1 Understanding SQL Server permissions 65
Securing database objects 66 ■ Revoking permissions 67Column-level permissions 68 ■ The many sources of permissions 68
7.2 Using server roles 687.3 Using database roles 697.4 Schemas and owners 70
Owners 70 ■ Schemas 70
7.5 Permission chains 717.6 How the real world often does authorization 737.7 Hands-on lab 74
8 Accounting: what did you do? 758.1 Triggers 758.2 SQL Server Profiler 768.3 Event logs and C2 auditing 768.4 SQL Audit 76
SQL Audit architecture 76 ■ Creating an audit 77Using SQL Audit for security auditing 79Using SQL Audit for troubleshooting 80
8.5 Hands-on lab 81
9 Analyzing indexes 829.1 Index basics 82
9.2 Heaps 83
CONTENTSxii
9.3 Clustered indexes 849.4 Nonclustered indexes 869.5 Index inventory 889.6 Constraints and indexes 909.7 More about indexes 909.8 Hands-on lab 91
10 Maintaining indexes 9210.1 Understanding index fragmentation 9210.2 Analyzing index fragmentation 9410.3 Indexes maintenance strategies 95
Fill factor 96 ■ Databases that aren’t yours 96
10.4 Performing the maintenance 97Recreating an index with DROP_EXISTING 97Rebuilding an index by using ALTER INDEX 98Rebuild the index online 98 ■ Reorganizing an index 98
10.5 Suggestions for index maintenance 9910.6 Hands-on lab 100
11 Tuning index designs 10111.1 How indexes can become less useful 10111.2 Using Profiler to capture usage patterns 102
Creating a trace template 102 ■ Capturing the traffic 103
11.3 Using the Database Engine Tuning Advisor 103Backing up an index 103 ■ Running the Advisor 104
11.4 What you can and can’t do with indexes on someone else’s database 105
11.5 Hands-on lab 10711.6 Way above and way beyond 107
Index key size 107 ■ Index selectivity 108Compound indexes 108 ■ Covering indexes 109
12 Reading query execution plans 11012.1 What’s an execution plan? 11012.2 Common plan symbols and what they mean 113
12.3 How to read an execution plan 115
CONTENTS xiii
12.4 What to look for in an execution plan 11712.5 Hands-on lab 118
13 Block and deadlock analysis 11913.1 What’s locking and blocking? 11913.2 Understanding transactions 12013.3 Types of locks 12013.4 Lock and block analysis 12213.5 Deadlocks 12513.6 Mitigating blocks and deadlocks 12613.7 Hands-on lab 127
14 Automating management with SQL Server Agent 12814.1 What is SQL Server Agent? 12814.2 Jobs 12914.3 Operators 13014.4 Alerts 13214.5 Database Mail 13214.6 SQL Server Agent security 13414.7 A quick cheat: Database Maintenance Plans 13414.8 Ideas for using SQL Server Agent 13514.9 Hands-on lab 136
15 Multiserver management 13715.1 What is multiserver management? 13715.2 Creating a multiserver management hierarchy 13715.3 Creating and using multiserver management jobs 14015.4 Ideas for multiserver jobs 14115.5 Hands-on lab 142
16 Windows PowerShell and SQL Server 14316.1 Windows PowerShell overview 14316.2 SQL Server and PowerShell 145
Meet the SQLSERVER provider 146
Doing something useful 148
CONTENTSxiv
16.3 SQL Server Agent and PowerShell 14916.4 Hands-on lab 152
17 Using Extended Events 15317.1 What are Extended Events? 15317.2 Creating and using a session 154
Using the New Session Wizard 154 ■ Viewing live session data 157 ■ Working with session logs 159
17.3 Creating a custom session 16117.4 Tips for Extended Events 16517.5 Hands-on lab 165
18 Monitoring and analyzing performance 16618.1 Key Performance Monitor counters 166
Setting up Performance Monitor 167 ■ Memory 169SQLServer:Buffer Manager 169 ■ SQLServer:Memory Manager 170 ■ PhysicalDisk 170Processor (_Total) % 170 ■ System 171SQL Server:SQL Statistics 171 ■ Network interface and network segment 171
18.2 Using Data Collectors and reports 171Setting up the data warehouse 172 ■ Configuring data collection 172 ■ Configuring a data collection set 173Working with data collection reports 174
18.3 Watching for performance trends 17518.4 The big performance killers 175
Memory 175 ■ Disk 176 ■ Processor 176
18.5 Hands-on lab 177
19 Options for high availability 17819.1 What is high availability? 17819.2 Log shipping 17919.3 Database mirroring 179
Mirroring modes 180 ■ Mirroring failover 181Connecting clients to a mirror set 181
19.4 AlwaysOn Clustering 182Cluster architecture 182 ■ Data file redundancy in clusters 183
Cluster failover scenario 184 ■ Clustering pros and cons 184
CONTENTS xv
19.5 AlwaysOn Availability Groups 184Availability group replication 186 ■ Availability group failover 186 ■ Availability group bonuses 186
19.6 HA beyond SQL 18719.7 HA comparison 187
20 Virtualizing SQL Server 18920.1 Why virtualize? 18920.2 Understanding virtual and physical hardware 19120.3 CPU and memory in a virtual environment 192
Sizing CPUs 192 ■ Sizing memory 192
20.4 Disk I/O in a virtual environment 19320.5 Tricks with performance monitoring
in a virtual environment 19520.6 Hands-on lab 196
21 Moving, migrating, and upgrading databases 19721.1 Refresh: detaching and attaching databases 19721.2 The Copy Database Wizard 20021.3 Overview: SQL Server Integration Services 20021.4 Database upgrades 20121.5 Compatibility levels 20221.6 Hands-on lab 204
22 SQL Server performance checklist 205
23 Never the end 207
appendix Installing SQL Server 209
index 225


prefaceI’ve been working with Microsoft SQL Server for a very long time—it was, in fact, oneof the first Microsoft server products I was responsible for in a production environ-ment. I do so much with Windows PowerShell these days that not many folks know Ihave a strong fondness for good ol’ SQL Server.
Learn SQL Server Administration in a Month of Lunches exists in large part because I’vemet so many administrators who came to SQL Server the same way I did: “Hey, youknow Microsoft stuff, why don’t you have a look at our database server and see why it’srunning so slowly?” The “Reluctant DBAs,” as I call us, aren’t typically involved in data-base development. We might not have access to the code that’s connecting to SQLServer; in many cases we simply need to know how to run a reliable backup, keepindexes maintained, and keep the server running as smoothly as possible. That’s whatthis book will try to teach you.
This book won’t try to make you an expert DBA, and I doubt this book will be the lastone you read on SQL Server. But this book is a good first book to read on SQL Server:it’ll help you understand the less-than-obvious things going on under the hood, andhopefully give you a solid foundation for working more effectively with SQL Server.
Good luck!
xvii

acknowledgmentsBooks don’t write, edit, and publish themselves, although I keep looking for bookelves who’ll do just that! Until I find them, I’m always grateful to everyone at ManningPublications who worked so hard to make this book happen, given our rapid sched-ule. Thanks to Michael Stephens, development editor Suzie Pitzen, the productionteam of Elizabeth Martin, Barbara Mirecki, Mary Piergies, Janet Vail, and DennisDalinnik, and the many others who worked behind the scenes.
I’d also like to acknowledge everyone who provided feedback for this book, partic-ularly all of the MEAP (Manning Early Access Program) readers, and the followingpeer reviewers who read the manuscript during its development: Adam Dutko, CarmVecchio, Christopher Morgan, Chuck Henderson, Daniel Kreeger, George Laframboise,Ian Stirk, Maqbool Patel, Nick Selpa, Spike Xavier, and Stan Bice. Their input andinsights have made this a better book.
Finally, special thanks to Richard Siddaway for his careful technical proofread ofthe final manuscript shortly before it went into production.
xviii

about this bookMost of what you’ll need to know about this book is covered in chapter 1, but thereare a few things that we should mention up front.
First, if you plan to follow along with our examples, and complete the hands-on exer-cises, you’ll need a virtual machine or computer running Windows 7 or later. You’llneed at least 2 GB of RAM, and 10 GB of free disk space. You could also use Windows 8,or Windows 8.1. Whichever you use, you’ll need to be able to log on as the computer’sAdministrator. One more decision: do you want to go with the free SQL Server ExpressEdition or another edition of SQL Server. We cover that in more detail in chapter 1, andit’s an important decision that will impact how you move through this book.
Second, be prepared to read this book from start to finish, covering each chapterin order. Chapters are short, meaning, as the title says, you can read a chapter on yourhour lunch break. (You don’t have to, but each chapter takes about 40 minutes toread and digest, giving you time to enjoy your sandwich.) The human brain canabsorb only so much information at once, and by taking on SQL Server in smallchunks, you’ll learn faster and more thoroughly.
Don’t feel the need to read ahead. A chapter a day will give you time to read andpractice what each chapter shows you.
Third, this book contains short code snippets so you should be able to type themin quite easily. In fact, I recommend that you do type them, since doing so will helpreinforce an essential skill: accurate typing!
That said, there are a few conventions that you should be aware of. Code will alwaysappear in a fixed-width font. In a few examples, bold fixed-width font will be used
xix

ABOUT THIS BOOKxx
to highlight the information you’ll need to insert in the code. I have tried to formatthe code so it fits within the available page space in the book by adding line breaks.But the neat thing about SQL Server is that it isn’t terribly sensitive about line breaksin code. For the most part, you can type everything exactly as shown here in the bookand it’ll work, or you can type it out as one long line and it’ll still work. The format-ting shown here in the book is mainly to keep everything fit to the page size, and toenhance readability.
Author OnlineThe purchase of Learn SQL Server Administration in a Month of Lunches includes accessto a private forum run by Manning Publications where you can make comments aboutthe book, ask technical questions, and receive help from the authors and other users.To access and subscribe to the forum, point your browser to www.manning.com/LearnSQLServerAdministrationinaMonthofLunches or www.manning.com/jones5 andclick the Author Online link. This page provides information on how to get on theforum once you are registered, what kind of help is available, and the rules of conductin the forum.
Manning’s commitment to our readers is to provide a venue where a meaningfuldialogue between individual readers and between readers and the author can takeplace. It’s not a commitment to any specific amount of participation on the part of theauthor, whose contribution to the book’s forum remains voluntary (and unpaid). Wesuggest you try asking the authors challenging question, lest their interest stray!
The Author Online forum and the archives of previous discussions will be accessi-ble from the publisher’s website as long as the book is in print.
About the authorDon Jones is a multiple-year recipient of Microsoft’s prestigious Most Valuable Profes-sional (MVP) Award for his work with Windows PowerShell, but one of the first Microsoftproducts he ever worked with in production was SQL Server—way back in version 6.5.He’s since found a sideline teaching “reluctant DBAs” how to be effective with SQLServer maintenance and administration. Visit MoreLunches.com and click this book’scover image to learn more about Don, and to find out how to contact him online.
Don is the author of a number of books published by Manning, including Power-Shell in Depth (a second edition is in the works); Learn Windows PowerShell in a Month ofLunches, Second Edition; and Learn PowerShell Toolmaking in a Month of Lunches.

Before you begin
SQL Server is Microsoft’s relational database management system (RDBMS), and it’sat the heart of many corporate applications. Its job is, quite simply, to store data.Application developers write applications that add, remove, and change data con-stantly. As a major platform component, SQL Server requires a bit of ongoing main-tenance—and that’s what this book is designed to teach.
1.1 Is this book for you?Let’s start by making sure this is the SQL Server book for you. This book doesn’t set outto make you a Database Administrator (DBA), nor does it cover anything in the way ofSQL Server development or programming. Instead, this book is meant as a startingpoint, and from here you could go on to being a DBA or developer. This book is aboutmaintaining SQL Server, monitoring it, and doing a bit in the way of performance tun-ing. Mostly, this book focuses on how to spot problem situations that you might noteven have permission to fix, and that you’ll have to report to someone else, such as anapplication developer. I’ll help you understand where to look, and what data to col-lect, so that your report can be as useful as possible to whomever you send it.
In a traditional organization, DBAs are something of a hybrid. They’re familiarwith the server itself, meaning they often deal with its security, backups, availability,and performance. They’re also into the code, meaning they can troubleshoot SQLqueries, write stored procedures, and perhaps even code a bit in C# or Visual Basic.They tend to work primarily with in-house applications, meaning they either haveaccess to application code or work directly with someone who does.
But more and more organizations are finding themselves supporting numerous
1
SQL Server installations for slightly different reasons. Increasingly, SQL Server is

2 CHAPTER 1 Before you begin
used as the back end to commercial software applications, meaning you do not haveaccess to the application code—it’s owned by a vendor. In those cases, you’re a bitmore limited in what you can do, since you can’t actually change the code. But youstill have to maintain SQL Server and keep it running. If performance does falter,you’ll need to figure out why, and be able to send an intelligent, actionable report tothe vendor. This book is meant for folks working in those organizations, to helpthem accomplish those exact tasks. I’ll show you how to perform backups andrestores, how to look for major performance problems, and in many cases how tocollect “evidence” that you can provide to a vendor or developer to help correctproblem situations. I’ll share a bit about underlying design concepts, but mainly as away of helping you understand why SQL Server works the way it does. For this book,I’m assuming you can’t change database or software designs, and that you have towork with what you’ve been given.
I find a lot of “reluctant DBAs” out there, folks who work with Microsoft servertechnologies in their organization, perhaps administering Active Directory or workingwith file servers. The organization implements SQL Server to act as the back end forsome application they’ve bought, and belatedly realizes that someone actually has tomaintain that SQL Server installation. So one of the “Microsoft people” in the organi-zation gets SQL Server “dumped” on them, making them a reluctant DBA. This book isreally written for them.
1.2 How to use this bookThe idea here is that you’ll read one chapter each day. You don’t have to read it dur-ing lunch, but each chapter should take you only about 40 minutes to read, giving youan extra 20 minutes to gobble down your sandwich and practice what the chaptershowed you. You really should focus on just one chapter a day, then let your brain pro-cess that information overnight. Blasting through a third of the book in a single daywon’t actually let the information digest and stick the way it needs to.
THE MAIN CHAPTERS
Of the chapters in this book, chapters 2 through 23 contain the main content, givingyou 22 days’ worth of lunches to look forward to. This means you can expect to com-plete the main content of the book in about a month. Try to stick with that schedule asmuch as possible, and don’t feel the need to read extra chapters in a given day. It’smore important that you spend some time practicing what each chapter shows you,because using the product will help cement what you’ve learned. Not every chapterwill require a full hour, so sometimes you’ll be able to spend the additional time prac-ticing (and eating lunch) before you have to get back to work.
HANDS-ON LABS
Most of the main content chapters include a short lab for you to complete. You’ll begiven instructions, and perhaps a hint or two, but you won’t find any answers in thebook. The answers are online, at MoreLunches.com, but try your best to complete
each lab without looking at the online answers.
3Setting up your lab environment
SUPPLEMENTARY MATERIALS
The MoreLunches.com website contains additional supplementary content, includingextra chapters and companion videos.
FURTHER EXPLORATION
A few chapters only skim the surface of some cool technologies, and I’ll end thosechapters with suggestions for how you might explore those technologies on your own.I’ll point out additional resources, including free stuff that you can use to expandyour skill set as the need arises.
ABOVE AND BEYOND
You’ll notice a few ABOVE AND BEYOND sidebars in the book. They’re designed toprovide additional information or insight that you don’t really need, but that youmight find interesting. If you’re pressed for time, or just feeling “full,” feel free to skipthem, or to come back and read them later.
1.3 Setting up your lab environmentThe best way to learn SQL Server is to use it, and that’s one reason this book comesequipped with hands-on labs, as I described previously. To perform those labs, you’llneed a lab to work on. The best and easiest way to set this up is to turn to the appendixof this book. More on that at the end of this section; for now, let’s start with a quickoverview of what you’ll need.
To begin, you’ll need a computer running Windows 7 or later. You’ll probablyneed at least 2 GB of RAM, and 10 GB of free disk space. You could also choose to useWindows 8 or later, but no matter what, you’ll need to be able to log on as the com-puter’s Administrator. You’ll need to decide if you want to go with the free SQL ServerExpress Edition, or another edition of SQL Server. The next few sections offer guid-ance on choosing an edition.
You’ll also want a sample database to play with, so head over to http://msftdbprod-samples.codeplex.com/downloads/get/478214, where you can download the “Adven-ture Works for SQL Server 2012” sample database.
TIP If you’d like help setting up SQL Server, including getting that sampledatabase installed, turn to the appendix, a screen-by-screen walkthrough of theinstallation process. The screen shots make it a pretty long document, whichis why the publisher and I decided to make it an appendix, rather than add-ing the material to this chapter. For more supplementary materials, log on toMoreLunches.com. Click on this book’s cover image, and you’ll have access tohands-on lab answers as well as database, SQL Server, and index inventory sheets.
1.3.1 Choosing a SQL Server edition for your lab
SQL Server’s Express Edition is great for practicing, primarily because it’s free. Forthat reason, this book’s appendix will direct you to download it, and walk you throughinstalling it. However, it isn’t 100% identical to what I call the “big boy” versions of the
product (Standard, Enterprise, and even Developer). Express behaves differently if
4 CHAPTER 1 Before you begin
you’re not logged on as Administrator, or if your computer has User Account Control(UAC) enabled. Express doesn’t include some of the auditing and performance tun-ing features that I’ll cover in this book. It also lacks a few of the management tools andoptions I’ll show you.
My goal with this book isn’t to teach you how to use the Express Edition; it’s toteach you how to maintain the real, production-quality editions of SQL Server thatyou would find in a business environment. If you decide to use Express as your “let’splay with this product” software, understand that there will be differences, and thatI’m not going to call attention to all of them, because you won’t encounter those dif-ferences if you’re maintaining a production SQL Server installation that’s part of abusiness application.
If you’d prefer to work through this book’s labs using a “real” edition of SQLServer, you can download and install a free 180-day trial from Microsoft. Visitwww.microsoft.com/en-us/sqlserver/get-sql-server/try-it.aspx (or, if Microsoft changesthe URL, go to http://microsoft.com/sqlserver and look for trial downloads). If youchoose to go with the trial edition, then the setup instructions in this book’s appendixshould still be completely valid. That 180-day trial can either be Developer or Enter-prise, depending on the version of Windows you install it on.
1.3.2 Selecting a version of Windows for your lab
Windows comes in two broad flavors: client and server. The client OSes are Windows 7,Windows 8, and later; the server OSes are Windows Server 2012, Windows Server 2012R2, and so on.
SQL Server has two editions that will run on a client OS: Express and Developer.Express is the free one I mentioned earlier. Developer is a paid edition of SQL Serverthat’s intended for software developers. Developer is a lot closer to the real, business-level editions of SQL Server than Express. If you use Developer, you’ll get a muchcloser taste of what the real SQL Server is like than if you use Express, because Devel-oper offers basically the same feature set as the Enterprise edition of SQL Server.Developer isn’t free. But, if you download the 180-day trial of SQL Server, you shouldbe able to install it on a client version of Windows and you’ll end up with Developer.
TIP To see the differences between editions of SQL Server 2012, visit http://msdn.microsoft.com/en-us/library/cc645993(v=SQL.110).aspx.
Here’s the thing: I’m assuming that you want to learn SQL Server maintenancebecause you want to maintain SQL Server in a business environment. Well, businessenvironments don’t use Developer or Express as the back end to production applica-tions! So if you want to really practice what you’ll do in the real world, you need a serverversion of Windows running the Standard or Enterprise editions of SQL Server. Youcan certainly get a trial of Windows Server 2012 or later, and you can get a trial of SQLServer Enterprise Edition. Those trials are good for only about 6 months, but that
should be long enough for you to get through this book.
5SQL Server documentation
1.3.3 My recommendation for your lab environment
So while you can practice on a client OS using Express, I recommend you at least workon a client OS using the 180-day Developer trial, and I prefer that you work on a serverOS using the 180-day Enterprise trial. I know that’s a lot to set up. You may need Win-dows 8 or later on a computer that supports Hyper-V, so that you can install Windowsserver into a virtual machine (that’ll require your computer to have at least 4 GB ofmemory, too). SQL Server isn’t something you can easily “play with” cheaply or withlow-end hardware, unless you’re willing to go with Express and deal with its differ-ences. Let’s summarize:
■ Good: Windows 7 or later, 2 GB of RAM or more, 10 GB of free disk, and SQLServer Express (with Advanced Services). There will be some differences infunctionality, and you won’t be able to practice everything in this book. Theappendix will get you through setting up SQL Server.
■ Better: Windows 7 or later, 2 GB of RAM or more, 10 GB of free disk, and the 180-day trial of SQL Server (which will install as Developer Edition, functionallyequivalent to Enterprise Edition). The appendix should still work for gettingSQL Server installed.
■ Best: Windows Server 2012 or later (180-day trial is okay), 2 GB of RAM or more,10 GB of free disk, and the 180-day trial of SQL Server (which will install asEnterprise Edition). The appendix will get you through installing SQL Server,but you’re on your own for installing the Windows Server OS.
1.3.4 A word about SQL Server versions
I wrote this book for SQL Server 2012, and everything in it should be accurate for thatversion. Because this book focuses on foundation-level maintenance tasks, everythinghere should be valid for SQL Server 2014 also.
Many organizations run multiple versions of SQL Server, usually because each ver-sion is supporting some application that’s certified (by its vendor) to work with onlythat version. Again, because this book’s tasks are foundation-level, they haven’tchanged much over the years. You should find that most of what I share here workswith SQL Server 2005, SQL Server 2008, and SQL Server 2008R2. However, my focus ison SQL Server 2012. I won’t be exhaustively pointing out version differences, becausedoing so becomes really complex to test and verify. Just understand that, with someolder versions, things may be in different places in the tools, or certain features Idiscuss might not exist. That’s one of the joys of working with SQL Server in a produc-tion environment!
1.4 SQL Server documentationThroughout this book, I’ll refer to SQL Server Books Online (often calling it BooksOnline), which is SQL Server’s official documentation. I don’t tend to send you directlyto a web page for Books Online, because Microsoft periodically reorganizes its web-
site, and my links end up being useless. Instead, I’ll direct you to search terms, which
6 CHAPTER 1 Before you begin
you can then use to find the intended material no matter what Microsoft does to thewebsite. Search terms are also better if you need to look up something for a previousversion of SQL Server.
Books Online is capable of installing locally on your computer, meaning it copiescontent from the internet for offline use. That can take up a lot of space, and it’s obvi-ously possible for the download to get out of date, so many administrators rely on theweb-based Books Online. That starts at http://technet.microsoft.com/en-us/library/ms130214.aspx, and you’ll find an Other Versions link at the top of most pages that letyou switch between the documentation for different versions. Just make sure you’rereading the documentation that matches whatever version of SQL Server you’re tryingto use!
1.5 Online resourcesI’ve mentioned the MoreLunches.com website a couple of times, and I hope you’ll findtime to visit. A number of supplementary resources for this book are available there:
■ Example answers for each end-of-chapter lab■ Downloadable code listings (so you don’t have to type them in from the book)■ Additional articles and bonus chapters■ Links to Q&A discussion forums related to SQL Server
I’m pretty passionate about helping folks understand SQL Server maintenance,although my travel schedule doesn’t give me a lot of time to get online and answerquestions. But you’re always welcome to contact me through Twitter (@concentrated-don), and I’ll do my best to either help, or get you to a forum where someone elsecan. I can’t answer technical questions via email.
1.6 A word on my recommendationsNearly every organization I work with has multiple versions of SQL Server: 2005, 2008,2008R2, 2012, and so on. For that reason, I’ve tried to keep this book as version-neutralas possible. The vast majority of what you’ll learn is applicable to every version, as I’vealready mentioned.
I also try to avoid giving too much version-specific advice. For example, Microsoftmay have offered guidance for SQL Server 2005 in terms of how to configure such-and-such a setting, but it may have negated that guidance for a subsequent version. Inthose version-specific instances, unless there’s a really strong, impactful reason tomention something, I’m going to steer clear.
Be on your guard when you start doing your own research on things like perfor-mance, and when you read someone else’s advice—even mine—validate it for the spe-cific version of SQL Server you’re using, down to the edition (Enterprise, Standard,etc.). What someone wrote in his or her blog about SQL Server 2008 might not be appli-cable to SQL Server 2012. Sometimes, advice gets out there in the world, doesn’t get
attached to a specific version in people’s minds, and becomes some kind of legendary
7Being immediately effective with SQL Server
cure-all for a specific problem. The problem with that is Microsoft: it’s always med-dling around and improving the product, which often makes older advice eitherunnecessary or downright wrong! Be really cautious of following advice unless youknow what version it’s applicable to.
1.7 Being immediately effective with SQL ServerImmediately effective is a phrase I’ve made into my primary goal for this entire book (infact, I authored a book on how to write immediately effective books). As much as pos-sible, I’ll try to have each chapter focus on something that you could use in a real pro-duction environment, right away. Immediately. That means I’ll sometimes gloss oversome details in the beginning, but when necessary I’ll circle back and cover them atthe right time. In many cases, I had to choose between first hitting you with 20 pagesof theory, or diving right in and accomplishing something without explaining all thenuances, caveats, and details. When those choices came along, I almost always choseto dive right in, with the goal of making you immediately effective. But all of thoseimportant details and nuances will still be explained at a different time in the book.And of course, I want to emphasize that this book should only be your starting pointfor SQL Server—there’s a lot more to explore, and I’ll post recommended resourceson MoreLunches.com so you have some next steps available.
OK, that’s enough background. It’s time to start being immediately effective. Yourfirst lunch lesson awaits.

Server assessment andconfiguration
It’s important to start off on the right foot, and that includes figuring out whatyou’re dealing with. In this chapter, I’ll cover some of the basics of SQL Serverarchitecture, and look at your existing server (or servers) to see what you’ve got.We’ll also dive into the server-level configuration settings, and I’ll explain what themost important ones mean to you.
2.1 Identifying instances and versionsSQL Server was one of the first products to support what we’d now probably call virtu-alization. In SQL Server 2000, Microsoft designed the product to support multipleinstances. In other words, you can install multiple copies of SQL Server on a singlecomputer, and run them at the same time. Each copy, or instance, is separated fromthe others. You can even run multiple versions side-by-side on the same computer!
NOTE When you install SQL Server, it includes several common compo-nents, network access libraries being one of them. If you install multipleversions, these common components will always be the latest version of theproduct. Normally, that doesn’t cause any problems, but be aware that it’shappening in case something crops up.
The idea between multiple instances is similar to the idea of running multiple virtualmachines on a single host. Each instance can have its own configuration, its own ver-sion, and its own security settings. Rather than having a dedicated physical computerfor each installation of SQL Server, you can combine them on a single computer, sav-ing resources. If each instance’s workload is less than the total capability of the com-
8
puter, then it might make sense to consolidate at least some instances. Instances also

9Identifying instances and versions
play a role in SQL Server clustering, since instances can be logically moved from com-puter to computer in the event of a failure or of a maintenance need.
When a client computer connects to a computer running SQL Server, it needs toindicate which copy of SQL Server it wants to talk to. Each computer can have onedefault instance, which is the instance you connect to if you connect to just the com-puter itself. Any other installed copies of SQL Server need to be named instances, mean-ing that in addition to the computer name, you also have to know the name of theSQL Server instance you want. If you have a computer named SQL01, then connectingto just SQL01 will get you the default instance, if one is installed. (It’s possible to haveonly named instances installed.) If you connect to SQL01\SQLEXPRESS, you’ll connectto the named instance called SQLEXPRESS running on the computer SQL01.
NOTE SQL Server Express installs, by default, to a named instance calledSQLEXPRESS. If you modified that during the installation, you’ll need to knowthe new instance name.
There are a few ways to figure out what instances are running on a given computer.Some of them require that SQL Server’s graphical management tools be installed,which might not always be the case, especially on a server computer. The easy way tocheck is simply looking and seeing what’s running on the computer. SQL Server runsas a Windows service, so checking out the list of installed services will quickly revealSQL Server instances and their names. I like to use Windows PowerShell for this: opena PowerShell window, as shown in figure 2.1, and run Get-Service. As you can see, I
Figure 2.1Two instances of SQL Server are
installed.
10 CHAPTER 2 Server assessment and configuration
have two instances installed. By the way, PowerShell is preinstalled on Windows Server2008 and later; you can get the latest version from http://download.microsoft.com.Search for “Windows management Framework,” and read the prerequisites closely tomake sure the version you’re grabbing can run on your server.
■ The MSSQLSERVER instance is the default instance, meaning you don’t specifyan instance name when connecting to it.
■ The MSSQL$SQL2 service is the SQL2 named instance. Every instance but thedefault will run under a service named MSSQL$, followed by the instance name.
This is an excellent way to quickly figure out what instances are included on the com-puter, so that you know what to try and connect to. Now we need to connect to those,and figure out what version they’re each running.
Open SQL Server Management Studio. Prior to Windows 8, this is easy to find inthe SQL Server 2012 folder on the Start menu; in Windows 8 and later, go to the Startscreen and type SQL to find SQL Server Management Studio.
TIP Once I find the SQL Server 2012 folder on a computer, I tend to pin theicon to the Task bar, so that I can get to it faster in the future.
As shown in figure 2.2, you’ll be greeted by the Connect to Server window. I’ll start byconnecting to the local SQL2 instance, by providing the server name localhost\SQL2and using my Windows logon for authentication. Since I’m logged on as Administra-tor, this should usually work. Keep in mind that if you didn’t install an instance namedSQL2, you shouldn’t expect this to work.
The management console can connect to multiple instances at once, so I’ll clickConnect on the Object Explorer, and select Database Engine to connect to the defaultinstance. This time, I’ll provide localhost as the server name. As shown in the figure 2.3,I now have two instances in Object Explorer, and I can see their version numbers.
Figure 2.2 Connecting
to SQL Server
11Identifying databases
Here’s a rundown of the common major ver-sion numbers:
■ 11: SQL Server 2012■ 10.5: SQL Server 2008R2■ 10: SQL Server 2008■ 9: SQL Server 2005■ 8: SQL Server 2000■ 7: SQL Server 7.0
You shouldn’t run across anything older,although it’s possible. SQL Server 6.5 and priorusually ran on Windows NT 3.51—that’s goingback quite a ways.
TRY IT NOW Connect to the SQL Serverinstance on your lab computer, and makesure you can identify the version number.If you have access to other SQL Server com-puters (and permission to connect to them),see if you can figure out what versionthey’re running.
2.2 Identifying databasesThe basic unit of management in SQL Server isa database. If you’ve set up your lab computer,then you’ve already seen how a database (suchas the AdventureWorks sample database) canbe easily moved between computers. Databasesare more or less all-inclusive, meaning theycontain almost everything they need to func-tion. It’s always a good idea to know what data-bases are connected, or attached, to a SQLServer instance, and what each one is used for.It’s also a good idea to know where the data-base’s files physically live.
In Object Explorer, expand the Databasesnode to find installed databases. For now, youdon’t need to worry about the System databasesor the database snapshots; you’re just lookingfor any actual databases, such as Adventure-Works2012, shown in figure 2.4. If you’ve justinstalled SQL Server, you won’t find any
Figure 2.3 Observing SQL Server version numbers
Figure 2.4 Inventorying the databases in
databases—but you can (and should) install localhost\SQL2
12 CHAPTER 2 Server assessment and configuration
Microsoft’s AdventureWorks database so that you’ll have something to play with.Remember that this book’s appendix discusses installing that database. That said,please don’t install AdventureWorks on one of your company’s production servers—keep it in your lab environment.
NOTE If you accidentally close Object Explorer, you can get it back by select-ing it from the View menu in SQL Server Management Studio. Or, press F8.
Right-click a database, select Properties, then select the Files page, as shown in fig-ure 2.5.
Most of the settings in this Properties dialog will be covered in upcoming chapters,but for now it’s useful to know the physical path of each database file, as well as theirsizes. My AdventureWorks database is set to grow in 16 MB increments, with no maxi-mum size, whenever the database gets full. Scrolling left and right in the Database files
Figure 2.5 Inventorying a database’s files

13Identifying other server objects
table lets you see additional information, such as the fact that my database is currently189 MB in size, and its log file is just 1 MB in size.
The last piece of information you’ll want to know is what each database is used for.SQL Server doesn’t have that information; you’ll need to ask around in your organiza-tion if you’re not sure.
2.3 Identifying other server objectsThere are a few things apart from databases that you’ll want to know about. In ObjectExplorer, expand your instance’s Security folder, then expand the Server Roles folder.Right-click sysadmin and select Properties. As shown in figure 2.6, you can now see
Figure 2.6 Members of the sysadmin fixed server role

14 CHAPTER 2 Server assessment and configuration
who belongs to the sysadmin fixed server role. The members of this role have totalcontrol over SQL Server, so it’s good to know who they are.
NOTE On client OSes like Windows 7, you may need to double-click insteadof right-click. Because absolutely no business runs SQL Server on a client OSfor production purposes, I’m going to proceed with server-oriented direc-tions. If you’re using a client OS for practice, remember that you’re not gettingthe “real” experience, and there may be operational and feature differencesthat I won’t discuss.
Here, you can see that I have four members that are service accounts, one memberthat’s a Windows logon (Administrator), and one member that’s a SQL Server login(sa). This is a common configuration for a newly installed SQL Server instance; the saaccount will be present only if the server is configured for Mixed Mode Authentica-tion, instead of using Windows Authentication only. In a domain environment, it’salso common to see the domain’s Domain Admins group here.
TRY IT NOW Take a moment to inventory the other fixed server roles. We’llcover the permissions assigned to these roles later; for now, it’s enough to seewho belongs to each one, so that you have an idea of who is accessing the server.
2.4 Inventorying the server configurationThe last thing I like to do with an unfamiliar server is inventory its configuration. Theinformation I’m after now isn’t easily accessible from within SQL Server ManagementStudio; instead, I’ll launch SQL Server Configuration Manager. Mine is shown in fig-ure 2.7, where I’ve selected the SQL Server Services node to see the services installedon my computer.
NOTE This is another good way to see what instances are installed on thecomputer.
Figure 2.7 Viewing installed SQL Server services

15Hands-on lab
The information I’m after here is the user accounts being used to run each service, aswell as the start mode of each service. I notice that the SQL Server Agent serviceassigned to the default instance is set to start manually, and isn’t currently running.That suggests the default instance isn’t using any of the Agent features. That’s good toknow: if I’m working with that instance, I know that I can’t rely on any of those fea-tures unless I set Agent to start automatically, and get the service running. You’ll learnmore about Agent in an upcoming chapter.
NOTE If you’re using SQL Server Express to follow along, you may find that itlacks SQL Server Agent, or that Agent can’t be started. As I’ve mentioned,Express isn’t really the focus of this book, because in a business environmentyou won’t find yourself maintaining Express instances.
2.5 Hands-on labFor your first hands-on lab, go ahead and practice what you’ve learned in this chapter.Start by going to MoreLunches.com. Select this book’s cover image, and look for theInventory Worksheet download. That’s a Microsoft Office Word document, and you’lluse it in this lab.
If you have access to only your lab computer, complete the following inventoryinformation for it. If you have access to (and permission to use) another SQL Server,complete an inventory sheet for it as well.

T-SQL crash course
SQL Server operates using a language called Transact-SQL (T-SQL). It’s a Microsoft-specific variation of the industry-standard Structured Query Language, or SQL.T-SQL is compliant with the industry-standard SQL elements, and adds its own fea-tures for things like server management and schema definition. While much of SQLServer can be operated using the GUI, SQL Server’s real power lies in T-SQL (someof the GUI runs T-SQL under the hood). In this chapter, we’ll explore some of thebasic data manipulation language (DML) queries in T-SQL.
It’s difficult to understand a lot of how SQL Server works, and even difficult toreally work with SQL Server, without knowing a little bit about T-SQL. However, Idon’t have a goal in this book of trying to make you a T-SQL programmer. So I’mgoing to go through some of the major T-SQL queries in this compact chapter. Thatway, you’ll get the context you need for much of the rest of the book to make sense,but I won’t bog you down with stuff that isn’t directly related to the goal of effec-tively maintaining SQL Server.
3.1 SELECT queriesA SELECT query is designed to retrieve data from a database. It’s the most commonof the four basic DML queries (the others being DELETE, UPDATE, and INSERT),and it’s one you’ll use a lot as you work with SQL Server.
Start by getting SQL Server Management Studio up and running. Connect toyour instance, then click the New Query button in the toolbar. A second toolbarwill also open underneath the main one, and you’ll need to use the drop-down boxthere to select your database. It will probably default to master, which is where SQL
16

17SELECT queries
Server keeps its configuration settings—we don’t want to mess with that! Instead, selectAdventureWorks2012, as shown in figure 3.1.
That selection tells the console that our queries will be run in that database.
3.1.1 A basic SELECT query
Let’s start with a simple query. Type the following in the query window, then pressAlt+X to run the query.
SELECT * FROM Person.Person
The results are shown in figure 3.2. You can also see that I’ve expanded the database’sstructure, showing a list of its tables, and near the bottom of that list is the Person.Persontable. Within a database, data is actually stored in tables, which are a lot like a spread-sheet in Microsoft Office Excel. Each table consists of a predefined set of columns,and each entry in the table consists of a single row. In the query results, you’ll noticethat some rows contain NULL for some columns, meaning they don’t define a valuefor that column.
NOTE In most cases, SQL Server is not case-sensitive. Query keywords likeSELECT and FROM can be typed in lowercase, but the common convention isto show them in uppercase. Object names like Person.Person are normallynot case-sensitive, but it’s common practice to type them as they’re defined in
Figure 3.1 Selecting a database for the query window
the database itself.

18 CHAPTER 3 T-SQL crash course
Let’s talk a bit more about what the SELECT query can do.
■ The query starts with the keyword SELECT. That tells SQL Server we want toretrieve data.
■ The * tells SQL Server to retrieve all of the columns from the table. It’s a poorpractice to use * in production queries, because it forces SQL Server to take theextra step of going and figuring out what all the columns are. Instead, you’d usea comma-separated list of column names, such as:
SELECT BusinessEntityID,PersonType,NameStyle FROM Person.Person
■ The FROM keyword, followed by a table name, tells SQL Server which table wewant to retrieve the data from.
NOTE Throughout this chapter, I’m expecting that you will follow along,and run each of the queries I give you. If you are going to follow along,you’ll need the AdventureWorks database installed. I’m assuming thatyou’ve at least read this book’s appendix and installed AdventureWorksas directed.
This query retrieves all rows from the table.
Figure 3.2 Running a sample query

19SELECT queries
3.1.2 Returning specific rows from the table
In production, it’s more common to retrieve just a subset of the rows that meet what-ever need you’re trying to fulfill. To do so, you add a WHERE clause to your query. Trythis query:
SELECT FirstName,MiddleName,LastName,Title FROM Person.PersonWHERE Title IS NOT NULL AND FirstName LIKE 'D%'
There are a few things to note about this query:
■ The query still starts with the SELECT keyword.■ I used a comma-separated list of column names instead of *, but I listed the col-
umns in a different order than they occur in the database. My results willappear in the order I listed them.
■ I still used FROM to specify the table name.■ I added a WHERE clause, which in this example has two criteria. These are con-
nected by the AND Boolean operator, meaning only those rows where both ofmy criteria are true will be included. The first criteria specifies that the Title col-umn not be null, and the second specifies that the FirstName column start withthe letter D.
TRY IT NOW You should definitely run this query. Much of the SELECT state-ment’s complexity comes from the WHERE clause, so we’re going to spendmore time working with it.
SQL Server provides a number of operators for the WHERE clause to use. Some of themajor ones are:
■ = (the equal sign), which specifies that a value must be exactly the same as theone given. For example, WHERE FirstName = 'Daniel' will return only rowswhere the FirstName column contains “Daniel.” Notice that, in T-SQL, stringslike “Daniel” are delimited with single quotation marks.
■ < (less than) and > (greater than), along with variations like <= (less than orequal to) and >= (greater than or equal to), which usually work with numericand date values. For example, WHERE TotalSpent > 100.
■ LIKE, which can use the wildcard % (percent sign) to perform simple patternmatches in strings. For example, WHERE LastName LIKE '%s%' will return allrows where the LastName column contains the letter “s” anywhere in the value.
■ NOT, which is a Boolean operator that reverses true and false. For example,WHERE FirstName NOT LIKE 'D%', which will return all rows where the First-Name column does not start with “D.” You can also use <> (not equal to), suchas in WHERE FirstName <> 'Daniel'.

20 CHAPTER 3 T-SQL crash course
■ IN, which specifies a set of values to match against. For example, WHERE Last-Name IN ('Banks','Bruno','Lee') will return all rows having one of those valuesin the LastName column.
■ AND and OR, which are Boolean operators that each connect two criteria.You’ve seen AND at work already; using OR might look something like WHEREFirstName LIKE 'D%' OR LastName LIKE 'D%'. Notice that each side of the ORoperator contains a complete criteria, in the form column <operator> value.
3.1.3 Delimiting string and date values
As already described, SQL Server expects strings to be contained within single quota-tion marks. But what if you have a string value that includes a single quote, such as thelast name “O’Malley?” Consider this query (you don’t need to run this, because itwon’t work):
SELECT * FROM Person.Person WHERE LastName = 'O'Malley'
SQL Server will read this as an instruction to select all rows where the LastName col-umn contains “O,” and will get upset about the “Malley’” part. One way to solve this isto double the single quotes that are a part of the string:
SELECT * FROM Person.Person WHERE LastName = 'O''Malley'
SQL Server will now properly read this as “O’Malley.” Two single quotes in a row areread as a literal single quote, rather than as a string delimiter.
Date values also go in single quotes:
WHERE EnrollmentDate > '01-01-2013'
With date criteria, > (greater than) means “later in time,” while < (less than) means“earlier in time.” SQL Server treats dates and times a bit like numbers, so you can’t usestring-specific operators such as LIKE.
3.1.4 Sorting results
SQL Server normally returns data in whatever order it’s stored in the database, whichis often the most recently added data will be last on the list. You can use the ORDER BYclause to change the sort order:
SELECT FirstName,MiddleName,LastName,Title FROM Person.PersonWHERE Title IS NOT NULL AND FirstName LIKE 'D%'ORDER BY FirstName ASC, LastName DESC
TRY IT NOW Please run this query so that you can see it change the order ofthe results.
Notice that SQL Server isn’t terribly picky about formatting. I was able to
break this query onto multiple lines, or you could have typed it all on one,
21SELECT queries
long line. I tend to start each major clause at the beginning of its line, and ona new line; additions like the logical AND I’ll often put on a new line andindent a space or two. SQL Server doesn’t care, but it makes it easier for me toread the query.
Here, I’ve asked SQL Server to sort on two columns. It will first sort the entries alpha-betically by FirstName in ascending (A to Z) order. Ascending is the default; I couldhave left out the ASC keyword. For people with the same first name, they’ll be sortednext in reverse alphabetic order (descending, or Z to A) by last name. You must spec-ify DESC to reverse the sort order, since ascending is the default.
NOTE The WHERE and ORDER BY clauses are not connected to each other.You can use them together in the same query, or you can use just one or theother. However, when you use both of them, WHERE comes first.
Notice something interesting about the WHERE clause in that query: when you want tograb rows that have a column which is NULL or which isn’t NULL, you can’t use thenormal comparison operators, such as the equal sign (=). In other words, youwouldn’t write WHERE column = NULL or WHERE column <> NULL; you have to use IS andNOT: WHERE column IS NULL or WHERE column IS NOT NULL.
3.1.5 Finding T-SQL documentation
This is probably a good time to point out the SQL Server Books Online application,which contains SQL Server’s documentation—including documentation on the T-SQLlanguage. On Windows 7 and earlier, Books Online can be found (if you installed thefeature) on the Start menu. On Windows 8, search the Start screen. You can also justchoose View Help from the Help menu in SQL Server Management Studio, whereyou’ll be given the option to use a locally installed Books Online, or view the help onMicrosoft’s website.
NOTE While local, offline help is convenient, I prefer the online, web-basedhelp, because it gives me easier access to multiple versions of the help. BecauseI work with multiple versions of SQL Server, that access is pretty handy.
Figure 3.3 shows the online help. I’ve navigated to Database Engine, Transact-SQLReference, Data Manipulation Language (DML), and SELECT to find the documenta-tion for the SELECT query. Notice the Other Versions drop-down, where I can switchto the documentation for a different version of SQL Server.
You’ll find all of the basic queries, and their clauses, under this DML section ofthe help.

22 CHAPTER 3 T-SQL crash course
ABOVE AND BEYONDYou don’t need to remember all of the three-letter acronyms (TLAs) associated withSQL Server, but it sure helps navigate help and online examples. Some of themajor ones:
■ SQL—Structured Query Language■ DML—Data Manipulation Language■ DDL—Data Definition Language■ SSRS—SQL Server Reporting Services■ SSIS—SQL Server Integration Services■ SSAS—SQL Server Analysis Services■ DMO—Database Management Objects■ SMO—SQL Management Objects (superseded DMO in SQL Server 2005 and later)
You’ll encounter some of these throughout this book, and I’ll explain what they meanwhen we cover them. Expect to see coverage on SQL, DML, and DDL, in particular.
Figure 3.3 The online documentation is easy to access from anywhere.

23DELETE, UPDATE, and INSERT queries
3.2 DELETE, UPDATE, and INSERT queriesOf the four common DML queries, only SELECT is pretty harmless, because it simplyretrieves data without affecting any of it. DELETE, UPDATE, and INSERT are potentiallydangerous because they change, or manipulate, data (which is where the DML acro-nym comes from). Fortunately, we’re working on our AdventureWorks database: if youmess it up, you can always delete it (right-click it in Management Studio to find theDelete option, making sure you close any open query windows first), redownload it,and attach the downloaded files. You’ll lose any work you’ve done, but that should befine for your lab environment.
NOTE I want to point out that, as an administrator—especially as a beginningSQL Server admin—you might not have much opportunity to run these que-ries in production databases. But you’ll see these queries, and I want you torecognize what they are. We’ll use some of these in upcoming chapters’ labs,so I can have you set up particular situations, which is why we’re covering T-SQLso early in the book. But if you’re thinking, “Wow, I didn’t expect to get intoprogramming by now,” don’t worry. This stuff isn’t super-important at thisstage in your SQL Server administration career.
3.2.1 DELETE queries
DELETE queries, as the keyword implies, remove data from a table. You’ll almostalways add a WHERE clause to these queries, since otherwise you’ll delete everythingin the specified table. Because you can’t delete single columns (you have to deleteentire rows), you don’t specify a column list.
CAUTION There’s no need to try the following query—it’ll delete a numberof rows from your database. Also note that, because of the way the database isconstructed, this query may not complete without error. That’s okay. We’renot interested in its results, we’re interested in the query itself.
For example:
DELETE FROM Person.PersonWHERE BusinessEntityID IN ( SELECT BusinessEntityID FROM Person.BusinessEntity WHERE rowguid LIKE 'A%')
This query makes use of a subquery. In other words, the query inside the parentheseswill execute first, just as in a mathematical expression. The result of this subquery is alist of BusinessEntityID values, because that’s the column that the subquery selects.Those in turn correspond to the BusinessEntityID column in the Person.Person table,so whatever is selected by the subquery will be deleted in the Person.Person table.Subqueries like this are expensive for SQL Server to execute, especially for large

24 CHAPTER 3 T-SQL crash course
tables, so they’re often considered a poor practice. In this case, I wanted to make sureyou knew what they looked like. A simpler DELETE query might look like this:
DELETE FROM Person.PersonWHERE FirstName LIKE 'D%'
3.2.2 UPDATE queries
UPDATE queries change existing information in the table. You’ll specify the table tomodify, and if you don’t want to change every row you can specify a WHERE clause.Your actual changes are specified by a SET clause, which includes a comma-separatedlist of things to change.
For example, imagine that we had people entering both “Sr” and “Sr.” for namesuffixes in the Person.Person table. We could standardize those by changing thewrong ones:
UPDATE Person.PersonSET Suffix = 'Sr'WHERE Suffix = 'Sr.'
An example of changing multiple columns at once might look like this:
UPDATE MyTableSET Column = 'Value', OtherColumn = 'OtherValue'WHERE This = 'That'
Obviously, that’s just a simple example.
3.2.3 INSERT queries
An INSERT query adds new rows to the database. There’s no need for a WHERE clausehere, since you’re not working with existing data. You usually specify a list of the col-umns for which you’re providing values, and then a list of those values. The columnand value lists must come in the same order, and must have the same number ofitems. You’re required to include any columns for which SQL Server has not defined adefault value, and where a NULL value isn’t allowed. For example:
INSERT INTO Person.Person (BusinessEntityID,PersonType,NameStyle,FirstName,LastName, EmailPromotion)VALUES (1861,'SC',0,'Danica','Roberts',0)
Some notes about that query:
■ Numeric column values aren’t delimited.■ Strings are delimited, as always, in single quotes.■ I omitted some columns that allow null values or that provide a default value of
some kind; you’ll learn how I knew that in the next section.
An INSERT query is one of the few SQL queries that affects only a single row—the oneit is adding. There are other variations of INSERT, such as INSERT INTO, which can
insert multiple rows. We won’t cover those in this crash course chapter.
25Assessing a database’s structure
3.3 Assessing a database’s structureAs shown in figure 3.4, Management Studio provides plenty of information about thestructure of the database. I’ve used Object Explorer to drill down into the columns ofthe Person.Person table.
You can see all of the columns in the table listed, including BusinessEntityID,Person-Type,FirstName. I’ve marked two spots where you can see how Management Studionotes columns that may be null, and those which are not null, meaning they must con-tain a value. You can also see the type of data required for each column. For example,FirstName requires data of the type nvarchar(50), meaning it is a 50-character stringthat supports double-byte character sets (DBCS). A DBCS is used to support languagesthat have a large number of characters, such as most Asian languages. Some of themain data types are:
■ Bigint, Int, Smallint, and Tinyint—Represent whole numbers of varying lengths.■ Varchar and Nvarchar—String fields that can hold values of varying lengths up to
Figure 3.4 Viewing the columns in Person.Person
the maximum size specified. The “N” denotes a DBCS-compatible column.

26 CHAPTER 3 T-SQL crash course
■ Char and Nchar—String fields that hold values of a fixed length, up to the maxi-mum size specified. In other words, a char(10) will always contain 10 characters.If you provide a smaller value, it’ll be padded with blanks to create the desiredsize (which wastes space). Again, “N” denotes a DBCS-compatible column.
■ Datetime, along with variations such as Datetime2, Date, and Time—Hold date andtime values.
■ Uniqueidentifier—A globally unique identifier (GUID) that SQL Server createsfor you. These are guaranteed to be unique within the table.
Some columns here are set to be not null, but I didn’t provide a value for them in myINSERT query. I got away with it because the table structure defines a default value forthem, which is used when I don’t provide a value of my own. You can see these inObject Explorer under the Constraints column, but it won’t tell you what the defaultsare. Instead, right-click the table and select Design. You’ll see a screen like the one inthe next figure.
Figure 3.5 The table design reveals details about its structure.

27Assessing a database’s structure
Clicking the rowguid column in the upper pane reveals that it provides a defaultvalue, which is the output of SQL Server’s built-in newid() function. That’s whatinserts a new unique ID into the column, so I get a new, unique ID each time I make anew row. That happens automatically thanks to the default. The ModifiedDate col-umn uses the built-in getdate() function for its default, which returns the currentdate and time. The NameStyle column provides a static default value of 0, as does theEmailPromotion column.
TRY IT NOW Make sure you can spot these details in Management Studio. It’simportant that you know how to look up these pieces of information yourself,because it’s the only place they’re formally documented.
There’s another important piece of structure, which I relied upon (but didn’texplain) when I showed you the INSERT query. Where, exactly, did I come up with thatvalue for BusinessEntityID? I did the same thing in the DELETE example, where I que-ried BusinessEntityID values. How did I know which table those came from?
Figure 3.6 Database Diagrams folders are located in each database.

28 CHAPTER 3 T-SQL crash course
There are a few ways I could have found that out, but the easiest way—and the waythat will provide the maximum number of other benefits—is to create a database dia-gram. SQL Server can generate the diagram automatically for you, and they’re a visualrepresentation of how various tables relate to one another. To create one, look for theDatabase Diagrams folder on Object Explorer. It’ll usually be the first thing underthe database itself, as shown in figure 3.6.
The first time you click this folder in a new database, you may see the warning mes-sage that I got in the previous figure. This is just telling you that SQL Server can’t createdatabase diagrams in this database until the database has a valid owner. Let’s take care ofthat. I’ll click OK on that message, right-click the database, and select Properties. On theFiles page, in the Owner text box, I’ll use the … browse button to select my Administra-tor account. The result is shown in figure 3.7; I’ll click OK to save that information.
Now, when I click Database Diagrams, I get a different message, telling me that thedatabase needs some support objects to make diagramming possible. Just answer Yes.Then, right-click Database Diagrams and select New Database Diagram.
Figure 3.7 Adding an owner to the database

29Assessing a database’s structure
As shown in figure 3.8, you’ll get a list of tables in the database. Since I want all ofthem in the diagram, I’ll click the first table (Address), scroll to the bottom of the list,and hold the Shift key while clicking the last table (WorkOrderRouting). All of thetables should be highlighted now, so I’ll click Add.
The result, figure 3.9, is an impressive, visual layout of the tables and how theyrelate to one another—and since this database has a lot of tables, it may take sometime for your computer to complete the drawing.
TRY IT NOW If you haven’t done so already, start following along and get yourbasic diagram started. Be sure to include all of the tables from the Adventure-Works database.
Figure 3.8 Database Diagrams start with a list of tables.
Figure 3.9 Arranging the tables creates a better layout.

30 CHAPTER 3 T-SQL crash course
When the diagram is ready, the table list will be empty (since there are no more tablesto add), and you can click Close. The default layout isn’t all that useful, so I’ll right-click in a blank area of the diagram, as shown in the next figure, and select ArrangeTables. I’ll then right-click again, in a blank area, and select Zoom, and then select ToFit. The result is a huge diagram.
You’ll notice a zoom factor drop-down list in the toolbar—mine went to 10%,although yours may be different depending on your screen size. I’m going to changethat to 100%, which zooms in a bit. I’ll then scroll up and down, left and right until Ifind the Person (Person) table. For me, it’s on the far left.
As shown in figure 3.10, the table has a bunch of key icons on the side, which con-nect to other tables. Those are the tables that have a relationship with Person.Person,meaning they share some kind of data with it. Hovering your mouse over the keys dis-plays details about each relationship. You can click the attached line to highlight it,and then trace that to the other end.
Figure 3.10 Locate the BusinessEntityID relationship and click it.

31Multitable SELECT queries
The other end of this relationship is the Person.BusinessEntity table. This is how Iknew that the BusinessEntityID column in Person.Person contained values from thePerson.BusinessEntity table—the two tables are connected, or related. Now, right-clickthat relationship line and select Properties. A Properties pane pops up, and the Descrip-tion field says, “Foreign key constraint referencing BusinessEntity.BusinessEntityID.”Here’s what that means:
■ The Person.Person table’s BusinessEntityID column has a foreign key constraint appliedto it. That means the field can only hold values that come from a correspondingfield in another table.
■ The other table is Person.BusinessEntity, and the field is BusinessEntityID. Person.Per-son’s BusinessEntityID column must draw its values from Person.BusinessEntity’sBusinessEntityID column.
Read that a few times, and study your diagram, until it makes sense! Then, let’s putyour new diagram-reading skill to use.
TRY IT NOW Take a look at the Sales.SalesOrderDetail table, and its columns.One column is named SalesOrderID, and in Management Studio you can tellthat it has a foreign key constraint (in the column list, FK means foreign key).
From what other table, and what column in that table, must the SalesOrderIDcolumn of Sales.SalesOrderDetail draw its values?
Here’s your answer: the SalesOrderID column of Sales.SalesOrderDetail islinked to the Sales.SalesOrderHeader table, and specifically to the SalesOrderIDcolumn of that table.
Now, why do you care?
3.4 Multitable SELECT queriesOnce you know what columns link to tables, you can create multitable queries thatcombine, or join, those tables. For example, try running the following query in fig-ure 3.11, which combines information from a sales order “header” table with a salesorder “detail” table to construct a complete order:
SELECT sod.ProductID,sod.OrderQty, soh.OrderDate,soh.[Status]FROM Sales.SalesOrderHeader AS sohINNER JOIN Sales.SalesOrderDetail sod ON sod.SalesOrderID = soh.SalesOrderID
Let’s break down that query:
■ I start with the SELECT keyword.■ I’ve referred to four columns. Note that I’ve put the prefixes “soh” and “sod” in
front of them. Those are called aliases, and they represent the SalesOrderHeader
(soh) and SalesOrderDetail (sod) columns. I used those aliases because they
32 CHAPTER 3 T-SQL crash course
remind me of the full table names, but are easier to type. I could have just used“fred” and “Wilma,” but those wouldn’t make as much sense to me.
■ Notice that the [Status] column is contained in square brackets. That’s because“status” is a special keyword in SQL Server; the square brackets tell SQL Server
Figure 3.11 A multitable query
that I’m referring to a column name, not the keyword.

33Hands-on lab
■ Next I specify my first table, in the FROM clause. I used the AS keyword to assignthat “soh” alias. It’s a bit weird to see the alias used first, in the column list, andthen actually defined later in the query, but that’s how SQL works.
■ The INNER JOIN keyword tells SQL Server that I’m connecting two tables, and Igive it the second table name. I also define an alias, although this time I skippedthe AS keyword and just gave it the alias name—that’s legal.
■ The ON keyword tells SQL Server how the two tables are joined. I specified thetwo columns that match them up: the SalesOrderID column from each table.
OK, I’ll be honest—this is pretty advanced stuff, and if it doesn’t make sense right now,that’s fine. You’ll see this a lot more later, and I’m quite frankly not concerned aboutyour ability to write join queries. What’s important is that you be able to recognize onewhen you see one, because they play a big role in performance in SQL Server.
3.5 Hands-on labLet’s practice what you’ve just read about in this chapter. See if you can complete thefollowing tasks:
■ Write a SELECT query that will retrieve the Title, FirstName, LastName, and Suf-fix columns from the Person.Person table.
■ Write a SELECT query that will list the FirstName and LastName from Per-son.Person, as well as the CustomerID from Sales.Customer, all in a single resulttable. Include only those customers who have a PersonID that is not null.
Remember, you can find answers at MoreLunches.com. Click this book’s cover image,and look under the Downloads section for the Lab Answers.

Managing databases
Databases are the basic unit of management and work within SQL Server. A data-base is an almost entirely self-contained package that bundles security settings, con-figuration settings, your actual data, and much more. That makes databases a goodplace to start your education in SQL Server maintenance. Some of the things you’lllook at in this chapter will need a much more complete explanation, which willcome in later chapters; the goal right now is to focus on the database containeritself. We’ll be covering database configuration options and some basics of how tomanage databases.
4.1 Configuring database optionsIf you don’t have it open, get SQL Server Management Studio on your screen.Right-click a database, such as AdventureWorks2012, and select Properties. Youshould be looking at the General page of the Database Properties dialog, as shownin figure 4.1.
There’s not really anything to change on this tab, but it does give you aquick glance at who owns it, when it was last backed up, and how big it is—alluseful information. The next page is Files, and this is where we can start assess-ing database storage. You’ll do that in an upcoming section of this chapter, sojust remember where you saw the information. That goes for the Filegroupspage as well.
The other main page we need to look at right now is the Options page. Here’swhat you should see:
34

35Configuring database options
■ Collation defaults to the collation setting of the SQL Server instance (and youincur a performance hit if you select a collation other than that). It refers to theway SQL Server treats data for sorting and comparing purposes. For example, inLithuania the letter “Y” comes between “I” and “J,” so SQL Server would need toknow if you wanted to use those rules. The “Latin” collations work well for Eng-lish and most Romance languages.
■ Recovery model determines how the database can be recovered. Production data-bases should use the Full model; nonproduction databases, or databases thatare primarily read-only, may use Simple. You’ll learn more about these in thenext chapter.
■ Compatibility level can be used to change the behavior of the database to corre-spond with a previous version of SQL Server. This is mainly used when you
Figure 4.1 The General tab includes basic information about the database.
migrate a database from an older version to a newer version.

36 CHAPTER 4 Managing databases
■ Containment type specifies exactly how standalone the database is. Normally,databases have a few dependencies on certain instance-wide objects, meaningyou can’t easily move only the database to a different instance. A contained data-base has fewer, or zero, dependencies, making it more standalone—but lesscentrally managed. Chapter 6 will go into some of these details.
■ Auto Close should, in general, be False. This specifies that SQL Server shouldclose the physical database files when the database isn’t being used. Whensomeone does try to use it, there will be a delay as SQL Server opens the file. Fora large database, or on a busy server, that delay can be significant.
■ Auto Create Statistics should usually be True. This tells SQL Server to automati-cally create certain statistical information used to optimize query performance.You’ll learn a lot more about statistics in several upcoming chapters, and you’llalso learn about the Auto Update Statistics and Auto Update Statistics Asyn-chronously options.
■ Auto Shrink is typically set to False. Setting it to True causes SQL Server to peri-odically try to make the database files smaller by returning unused space to theOS. Later in this chapter, you’ll learn why that’s often a bad idea.
Those are the main settings that you need to focus on for now. There are some othersthat will come up in discussion in upcoming chapters, so just remember where youfound the database properties, and how to get back to that dialog.
4.2 Detaching and attaching databasesWhen you need to move a database between instances, or even copy a database—per-haps to a test environment—detaching and attaching can be an easy way to do it.Detaching tells SQL Server to close the database and forget that it exists. At that point,the database is just some files on disk. You can copy them, move them, or do whateverelse you want.
Attaching is the opposite—and you’ve already done it if you set up your lab envi-ronment, since you attached the AdventureWorks database. Attaching “connects”the database to a SQL Server instance, so that administrators and users can workwith the database.
To detach a database, right-click it, select Tasks, then select Detach…. As shown infigure 4.2, you have two options.
Drop Connections, the first option, will forcibly disconnect anyone using the data-base. That could result in a user being upset, so you don’t want to do that on a produc-tion database in the middle of the workday. Update Statistics, the second option, tellsSQL Server to make one last update of the database’s performance statistics beforedetaching. That way, when the database is attached to a new instance, it’s ready to goright away—provided the new instance is the same version of SQL Server; statisticsaren’t compatible across versions.

37Detaching and attaching databases
You should already have seen how to perform an attach operation; if not, turn to theappendix and follow the lab setup procedure.
ABOVE AND BEYONDThere’s another way to copy a database that you should be aware of, although we’renot going to use this technique in this book. It’s called the Copy Database Wizard,and you start it by right-clicking the database, choosing Tasks, then selecting CopyDatabase….
This Wizard is capable of copying a database to a different instance, with the advan-tage of not taking the database offline as a Detach would do. The Wizard is alsocapable of copying the instance-level dependencies that a database may need tofunction properly.
Figure 4.2 You have two options when detaching a database.

38 CHAPTER 4 Managing databases
4.3 Assessing database storageGo back to the Files page in the database properties. Every SQL Server database has atleast two, and possibly many more, files:
■ Files with a .MDF filename extension are a database’s primary files. This is whereeverything in the database is normally stored. Every database has a .MDF file. Incases where you have multiple database files (see .NDF files in the third item ofthis list), the .MDF file will always store the database’s internal configurationinformation and other internal system data.
■ A .LDF filename extension indicates the database’s transaction log file. This fileserves several important operational and recovery purposes, and you’ll learnabout it in the next chapter. Every database has one of these, and only one,although databases in the Simple recovery model automatically empty the logso it’ll usually never be very large. We’re going to discuss the Simple model inthe next chapter, and I’ll share more details about it then.
■ Databases can also have zero or more .NDF, or secondary data, files. These areusually created as a tactic to improve performance or to make backing up alarge database more manageable.
Start your assessment by figuring out what files you have, and where they are physicallystored. If possible, work with a server administrator to understand how the server isaccessing the files. For example, if .LDF files are stored on one Storage Area Network(SAN), and .MDF files are on another, try to discover if the server is accessing bothSANs by means of a single network adapter, or if it’s using different adapters for each.Those answers will become important in the next section.
Also try to learn more about what type of storage is being used. Are files beingwritten to a single local disk? A local array, or mirror? If they’re being written to aSAN, how is the SAN configured? Are there any solid-state drives (SSDs) in use? Again,these are all important answers as you try to identify any potential concerns with thestorage subsystem.
4.4 Identifying potential performance concerns in storageStorage is the absolute single biggest bottleneck for SQL Server performance. As such,one of your biggest concerns should be whether or not the storage layout is optimizedfor performance. Storage is also one of the biggest potential failure points, since diskdrives do indeed fail every now and then. That means reliability and recoverability willbe another concern. Your final concern relates to whether or not you’re able to effi-ciently back up and restore the database, should the need for restoration arise. Howyour database storage is laid out can affect that significantly.
4.4.1 Problems with file layout
Let’s start with a few major problem areas. You should make sure that, unless there’s a
good reason, none of your databases have any of the following situations:
39Identifying potential performance concerns in storage
■ Colocated log and data files. For both performance and reliability reasons, youwant your data (.MDF and .NDF) files separated from your log (.LDF) files. Sepa-rated ideally means on different physical disks.
■ Unnecessary secondary files. If your database is split into one .MDF and one ormore .NDF files, and they’re all located on the same storage volume, then thosesecondary files may be unnecessary. On a huge database, the .NDF files mayserve to break up the backup tasks into more manageable chunks; on smallerdatabases, there’s no reason to have .NDF files if they’re going to live on thesame disk volume as the .MDF file.
■ Heavy disk fragmentation. Use Windows’ disk defragmentation tools to look at thelevel of physical disk fragmentation. Ideally, you want SQL Server’s database filesto come from a single contiguous block of space on whatever disk volumes theylive on. Anything else slows down SQL Server. Note that you can’t defragmentthese files without either detaching the database or shutting down the SQLServer instance.
The last thing to look at is a bit more of a judgment call, and that’s how your databaseuses any .NDF files it may have. When you create a .NDF file, you choose which data-base objects are moved to that file. Similarly, when a developer creates a databaseobject, they pick which file it lives in. Those objects can include tables, which house allof your actual data, and programming objects like views, stored procedures, and thelike. If your goal is to improve performance, or to split up a large database to makebackups more manageable, then you can’t just move any old files into a .NDF: youhave to be strategic.
Let’s say your database includes two heavily used tables, A and B. There are abunch of other tables, but those two get the majority of the traffic. Moving A and B toseparate .NDFs, while leaving everything else in the main .MDF, can be a good way toimprove performance if—and only if—the three files live on separate disk volumes,and ideally if those disk volumes are accessed by different controllers (either actualdisk controller cards for local storage, or SAN adapters for SAN storage). That way, SQLServer can access each of the three without the other two getting in the way.
Imagine that you run a freight train. You have three boxcars full of merchandisethat you need to get to three different destinations. One way to do so would be to tackall three boxcars behind a single engine, and run it to each of the three destinations.That’d be pretty slow, and it’s what SQL Server does when all of your data is in a single.MDF file.
Another approach would be to attach each boxcar to a different engine. If they’reall sharing track for a portion of the journey, you’re really not getting much benefit.This is like having multiple .NDF files, but only one controller channel to the storage.
The best approach would be to have three boxcars, three engines, and three sepa-rate tracks. Everyone can go their own way, without worrying about what the othersare doing. This is the same as having multiple .NDFs, with different controller chan-
nels to each storage volume.
40 CHAPTER 4 Managing databases
Modern SANs can help alleviate the need to have multiple .NDFs. SANs are fast, socontroller channel contention may not be a problem. SANs inherently spread yourdata across many different physical disks, further reducing contention and improv-ing performance. With a fast, well-built SAN, you may not need .NDFs for perfor-mance purposes.
4.4.2 Problems with file size
Sizing is also something to look at. Go back to the database properties dialog’s Filestab and look at the properties for each file. You’ll notice that each has a current size,as well as a growth option. Most folks leave their files set to autogrow by some size orpercentage. Autogrowth is a bad thing, although you may want to leave it on for spe-cific reasons. Here’s why it’s bad:
■ Autogrowth puts a significant burden on a server, and when it happens duringproduction hours your users will be impacted.
■ Autogrowth results in the physical fragmentation of the database files, whichslows down database access. This is because disk space is requested from the OSin chunks (set by the autogrowth size you’ve configured), and those chunkswon’t be all lined up in a contiguous space.
■ Autogrowth isn’t managed. Either you’ll allow unlimited growth, which willeventually consume available disk space, or you’ll cap the growth, forcing you todeal with the capacity problem anyway.
Without autogrowth won’t your database eventually fill up and stop working? No—notif you’re monitoring it. Growth is fine. Databases grow. When a database starts to needmore room, you should plan to manually increase its size during a scheduled mainte-nance window, to avoid the downsides of autogrowth. That maintenance window caninvolve taking the database (or the entire SQL Server instance) offline, so that Win-dows can defragment the physical layout of the database file. In other words, manageyour database sizes. You can do that right from the properties dialog box. Someadministrators prefer to leave autogrowth turned on as a kind of last-ditch safety net—it’s a way to ensure the application doesn’t stop working unexpectedly. I personallydon’t like to rely on that safety net, because, in my experience, autogrowth has causedme a lot of grief over the years.
Autogrowth on a log file is also bad. Typically, your log files should remain at amore or less constant size. The backup process should empty out the log, leaving itready for new entries. Your log may need to grow if there’s an increase in overall work-load, meaning the log has more to keep track of between backup operations, but onceit hits its new “comfort zone” size, the growth should stop. Again, that growth should,as much as possible, be managed manually.
Autogrowth is a good last-ditch emergency measure (which is why some folks leaveit on), but your goal should be for it to never happen. So how can you properly size
your database? You do so through monitoring. Pay attention to how much of the
41System databases
database file is being used, and monitor that figure. Get a feel for how much larger adatabase grows every day, for example, and you’ll be able to predict when it will needmore room. You’ll also know about how much room to give it to have it last for a speci-fied number of additional days. To perform that monitoring, you can pop into SQLServer Management Studio every few days and look at the databases’ properties. You’llsee the file sizes, and, if you like, you can record them in an application such as Micro-soft Office Excel. That way, you can have the spreadsheet generate charts that showyou database growth over time. Charts help me visualize when the database size isgoing to become too large for the disk it’s on, for example.
4.4.3 Filegroups
We haven’t yet discussed filegroups. If your database consists of a single .MDF file (and a.LDF file), you won’t use filegroups. Filegroups come into play when you have one ormore .NDF files. In that scenario, filegroups act purely as a convenience. They let youtarget specific operations—primarily backups and restores—to a single filegroup,thereby affecting a bunch of files.
Let’s say that, for performance reasons, you’ve split your database across three.NDF files in addition to the main .MDF file. Each of those four files is located on aseparate disk volume, and each volume is accessed by a different disk controller.That’s great for parallel operations, and it should help performance in the system. Butnow you have to back up and recover four files, making a lot more work for yourself.Instead, you can group those into a single filegroup, and then run backups againstthat filegroup, grabbing all four files at once.
On a huge database, you might have many different .NDF files to spread out thedata. If, taken altogether, they’re too large to back up in a single maintenance window,you might group them into different filegroups. That way, you can back them up sepa-rately. Of course, recovering becomes a lot more complicated, since you won’t have asingle point-in-time backup that includes everything. You’ll dive more into this topicin the next chapter.
4.5 System databases We should spend a few minutes discussing the four system databases in SQL Server.
■ Master is where SQL Server stores its own configuration information. This data-base doesn’t change often—mainly when you add or remove a database, ormake a server-wide configuration change—but you should back it up regularly.There are special procedures for restoring this database, and for moving it to adifferent location. Consult SQL Server’s documentation for instructions.
■ Model is a template from which all new databases are created. Unless you’vemade changes to it (which is rare), there’s no real need to back it up or move it.
■ TempDb is a temporary database. This should be located on a fast storage vol-ume, ideally separate from the volumes used by your databases. It doesn’t need
to be backed up (SQL Server makes a new one each time it starts, anyway), and
42 CHAPTER 4 Managing databases
its disk volume doesn’t need to be redundant (meaning it doesn’t necessarilyneed to be on a disk array). Many organizations install a local SSD (often chosenbecause they’re fast) and put TempDB on it.
■ MSDB is technically a system database, but it’s really used just like any of yourdatabases. SQL Server Agent uses it for all of its tasks, which you’ll learn aboutin several upcoming chapters. MSDB should be backed up, and treated more orless like any of your own databases.
TempDB is worth discussing a bit more. There are a number of different query opera-tions that might need to use some space in TempDB, and there are certain administra-tive options that use it as well. Developers can explicitly put things into TempDB aspart of their code. It’s used for lots of things. In terms of properly maintaining SQLServer, you don’t need to worry so much about what it’s used for as you do about howto position it properly for maximum performance. That’s something we’ll touch on inseveral upcoming chapters.
4.6 An overview of storage hardwareIt’s almost impossible to talk about SQL Server performance without talking aboutdisk storage, because the disk system contributes most of SQL Server’s performanceoverhead. Since I brought up the topic of arrays and SSDs, I will quickly review some ofthose options for folks that might not be familiar with them.
A disk is a basic unit of storage hardware. SQL Server is completely capable of run-ning itself from a single disk, provided it’s big enough to store the data you’ll be keep-ing. But a single disk can only do so much in a given period of time, and it can quicklybecome a performance bottleneck. Imagine asking someone to read the contents ofthis book aloud: their mouth is a single output channel, and it’s going to take sometime for them to stream all of those words out into the air.
An array is a group of disks that work together. There are many different types ofarrays. A mirror, for example, is one or more disks that retain an exact copy of anotherset of disks. Mirrors provide redundancy, meaning if the first group of disks dies, you’vegot a live backup ready to go. Stripe arrays take data and spread it across multiple disks,reducing the bottleneck that a single disk would create. So instead of having one diskreading and writing your data, you’ve got several disks working together to do so.Some of those arrays can include parity information, which helps provide redundancyfor the data on the array. With parity, you could have one or more disks (dependingon how the array is set up) fail, and not lose any data.
An SSD is a solid-state disk, which stores data in microchips rather than on mag-netic platters. They’re generally much faster than disks, because they don’t havemechanical bits that have to spin and move.
A SAN is a big box full of disk arrays that sits on the network. Servers are assignedpieces of the SAN’s total storage, and they use their pieces just like they’d use a locallyattached set of disks. SANs are a way of centralizing disks for management purposes.
SANs are nearly always configured as large arrays, providing resilience against the failure
43Hands-on lab
of individual disks inside the SAN. Rather than plugging in disks using a copper cable,you connect a server to the SAN over a network of some kind. Most SQL Serverinstances keep their data on a SAN, because the SAN itself can provide a high level ofboth performance and reliability. SANs are commonly managed by specialized admin-istrators, so as a SQL Server administrator you might have to work with them to under-stand how your servers’ data is being physically stored.
4.7 Hands-on labLet’s practice what you’ve just read about in this chapter. Go to MoreLunches.com,click this book’s cover image, and find the Database Inventory Sheet download. Com-plete one sheet for each database on one of your SQL Server instances. If you don’thave a production environment to inventory, complete the worksheet for your Adven-tureWorks database instead.

Backup and recovery
Backups are perhaps the most common task people think of when you say “servermaintenance.” Without a doubt, they’re important. I have to be honest: many orga-nizations don’t use SQL Server’s native backup facilities. Instead, they rely on otherbackup software, like Backup Exec, BrightStor, or even Microsoft System CenterData Protection Manager. Those solutions let a company manage all of its back-ups—including SQL Server—in a single place, whereas SQL Server’s native backupabilities only apply to SQL Server. This chapter won’t cover those other solutions.What it will cover is what’s built into SQL Server—and plenty of organizations douse that, even if they only use SQL Server to create a backup file that is subsequentlypicked up by another backup solution.
5.1 The transaction logBefore we can talk about backups, we have to talk about how SQL Server works,internally, and about its transaction log. This process is crucial to how backupswork, along with a dozen other maintenance and performance-related tasks.
SQL Server stores all data in 8 KB chunks called pages. A page typically containsall of the data for a single row in a single table, and it can contain multiple rows, ifthey’re small. There are some exceptions: SQL Server supports certain data typesthat can span several pages, but for right now think of each 8 KB page as being thebasic unit of management.
When you issue a query that makes a change—that is, an UPDATE, INSERT, orDELETE query—SQL Server starts by finding the page that contains the affected data(or in the case of an INSERT, the page that will contain the new data), and loading it
44
into an area of memory called the buffer pool. Figure 5.1 illustrates that action.

45The transaction log
At almost the same time, SQL Server makes a copy of the actual query in its transac-tion log, as shown in figure 5.2. The log isn’t a database file. Think of it as a big list ofall the queries that SQL Server has been asked to run.
Buffer pool
Disk
.MDF .LDF
INSERT INTO Table (ColA,ColB) VALUES('ValA','ValB')
ValAValB
1
Figure 5.1 Loading a page into the buffer pool
Buffer pool
Disk
.MDF .LDF
INSERT INTO Table (ColA,ColB) VALUES('ValA','ValB')
ValAValB 2
INSERT INTO Table(ColA,ColB)
VALUES('ValA','ValB')
Figure 5.2 SQL Server copies all queries into the transaction log.

46 CHAPTER 5 Backup and recovery
At this point, the changes SQL Server has made only exist in memory, although thequery itself is on disk. If SQL Server were to crash, when you restarted it the serverwould go into recovery mode. It would read all of the queries sitting in that log, andreexecute them to reproduce those same changes. This is how SQL Server protectsagainst data loss. You can see why it’s important that the log file be on a different diskthan the database file! If you lose one, you’ve still got the other as a backup.
Eventually (usually just milliseconds, but that’s forever to a computer) SQL Serverwill save the changed, or dirty, page back to disk, as shown in figure 5.3. At the sametime, it marks, or checkpoints, the log file to show that the query was successfully com-mitted to disk. Now, if the server goes into recovery mode, it knows not to worry aboutthis query, because it’s already been made and saved.
Every query executes like this when a database is in the Full recovery model. Thecommitted query is still in the log, but it’s specifically marked as having been commit-ted. It’s also timestamped, so that SQL Server knows when the query took place. If SQLServer ever ends up in recovery mode, it replays queries in the same order they origi-nally took place, and the timestamp helps ensure that.
In the Simple recovery model, checkpointed log entries are deleted. That meansyou can never again reexecute them, but it means you never have to worry about thelog file getting full. Well, mostly not worry. A very large transaction can certainly fill thelog, since the entire transaction has to fit in the log until the transaction completes.Certain maintenance tasks like rebuilding indexes are very large transactions, so insome cases you may need to worry about the log size. But the idea behind the Simplemodel is that completed transactions are removed automatically from the log.
Buffer pool
Disk
.MDF .LDF
INSERT INTO Table (ColA,ColB) VALUES('ValA','ValB')
ValAValB
ValAValB
3
INSERT INTO Table(ColA,ColB)
VALUES('ValA','ValB')
Figure 5.3 SQL Server commits the page and checkpoints
the log.
47How backups work
When a database uses the Bulk-Logged recovery model, most regular queries arelogged just as they are in the Full model. However, certain bulk operations are loggedas a single entry, which means SQL Server can’t reexecute them. Typically, if you needto bulk-load or bulk-change data, you switch to the Bulk-Logged recovery model, doyour work, switch back to Full, then immediately back up the database to capturethose bulk changes.
5.2 How backups workSQL Server supports four kinds of backup:
■ Full—Backs up the entire database either to a locally attached tape drive, or to afile on disk.
■ Differential—Grabs all of the data that has changed since the last full backup.You run these when your database is too big to do a regular full backup. Eachdifferential you do will be larger than the last, since it contains the changessince the last full backup.
■ Copy—Grabs all of the data, the same as a full backup, but doesn’t reset the dif-ferential marker. Any differentials taken after a copy will still refer back to themost recent full backup, not to the copy.
■ Transaction log—Works only on the database’s transaction log. By making thiskind of backup, you also gain the ability to clear the log, making room for moretransactions. I’ll discuss this in just a bit.
Backups are physically saved to a media set, which can contain multiple backups. Back-ups can be given an expiration date, too, to help ensure that nobody accidentally usesthem when they’re too old to be accurate.
None of these backups automatically empties, or truncates the log. That’s a separateand important step. Truncating means you permanently delete all of the checkpointedqueries from the log, freeing space in the log for new queries. This is how you keep thelog from eventually filling the entire disk. But you can’t truncate the log without backingit up (at least, not in newer versions of SQL Server; it used to be possible).
The transaction log backup, as the name implies, backs up only the transaction log,doing nothing else to it. As part of backing up the log, you can also opt to truncate it,which empties out all the checkpointed transactions and frees space in the log file.Transaction log backups can be very quick, since most transaction logs aren’t that big.You’ll want to be sure to back up to a different disk than either the database or the logfile is on, so that if you lose a disk you don’t lose your data and your backups!
We’ll discuss how you decide how often you’ll do each of these kinds of backuplater in the chapter. But for now, let’s walk through how to do each one first.
TRY IT NOW In the next three sections I’m going to walk you through a com-plete backup process. Then, I’ll explain how to restore data and walk youthrough that process. I suggest you follow along with the steps I’m taking,
since they’re your hands-on lab for this chapter.
48 CHAPTER 5 Backup and recovery
5.2.1 Making a full database backup
Start by right-clicking the AdventureWorks2012 database and choosing Properties. Onthe Options tab, change the Recovery model to Full, then click OK. SQL Server willneed a few seconds to complete that change.
Now make the backup.
1 Right-click the AdventureWorks2012 database, choosing Tasks, then Back Up….By default, you’ll be set to make a full backup of the database, which will notexpire. SQL Server will make a new backup set, which is designed to containone or more backups. It will also default to creating a new media set on disk.
2 On the Options page, we’ll back up to the existing media set, but since this is anew full backup, select the option to Overwrite all existing backup sets.
3 Click OK to start the backup.4 Click OK on the success dialog.
That’s it! AdventureWorks is a small database, so this should only take a few secondsto complete.
5.2.2 Making a differential database backup
With AdventureWorks2012 selected in the Object Explorer of SQL Server Manage-ment Studio, click New Query. In the query window, type the following, and pressAlt+X to run it:
UPDATE Person.PersonSET MiddleName = 'G' WHERE BusinessEntityID = 3GO
SELECT * FROM Person.Person
This will give us a change in the database, so that there will be something for thebackup to capture. Now let’s make a differential backup:
1 Right-click the AdventureWorks2012 database, choosing Tasks, then Back Up….2 For Backup type, select Differential. Notice that SQL Server creates a new default
backup set name, but we’re still saving the backup to the same media set.3 On the Options page, verify that we’re set to Append to the existing backup set. 4 Click OK to run the backup.5 Click OK on the success dialog.
You’re done!
5.2.3 Making a transaction log backup
For this last step, you’re going to run the following query. It should already be in yourquery window; change the “G” to an “X”. Just before you press Alt+X to run the query,
make a note of the exact time on your computer, in seconds. Here’s the query:
49How restoration works
UPDATE Person.PersonSET MiddleName = 'X' WHERE BusinessEntityID = 3GO
SELECT * FROM Person.Person
You’re going to change the “X” to a “B” now, and run the query again. Make a note ofthe exact time, in seconds, just before you press Alt+X to run this:
UPDATE Person.PersonSET MiddleName = 'B' WHERE BusinessEntityID = 3GO
SELECT * FROM Person.Person
Now let’s make a t-log backup:
1 Right-click the AdventureWorks2012 database, choosing Tasks, then Back Up….2 Change the Backup type to Transaction Log. Again, you’ll get a new backup set,
but the same disk media set.3 On the Options page, select the option to Truncate the transaction log. It should
be selected by default, just as it was in the previous two backup operations.4 Click OK to run the backup.5 Click OK on the success dialog.
At this point you should have three backups: full, differential, and t-log. Your databasehas gone from its original value for that guy’s middle initial, through three differentvariations. This will give us something fun to work with in the next section.
You’ll notice that we didn’t take the database offline to perform these tasks. That’sright, backups can happen while the database is online and in use! Transaction logbackups don’t present a problem when you do that, but full and differential databasesmight. SQL Server takes a pretty big performance hit when you run a backup while thedatabase is under heavy use, which is why most organizations schedule it for a mainte-nance window during off-hours.
5.3 How restoration worksWhen you restore, you typically start by making a tail-end t-log backup. You shouldhave seen that option when you made the t-log backup in the previous section. Thatgrabs the active, or uncheckpointed, queries in the transaction log. That’s differentthan a normal t-log backup, which grabs the checkpointed transactions. When youmake that tail-end backup, the database will go into a restoring state, which allows you torestore backups, but prevents normal use of the database.
You then restore your full backup, and tell SQL Server that you’re not done.Then you restore your differential, and again tell the server there’s more coming.You then restore all of your transaction log backups, including the tail-end backup,
which goes last. All the while, you keep telling SQL Server, “Wait! There’s more!”
50 CHAPTER 5 Backup and recovery
When you restore your last backup file, you tell SQL Server that you’re done, and it’llgo into recovery mode.
Recovery mode reexecutes all of the queries in your restored t-logs, bringing thedatabase up-to-date. The database goes online after the recovery mode is complete,and should be ready to use.
One neat variation on this is to do a point-in-time recovery, which lets you restoreall of your transaction logs, but tell recovery mode to stop reexecuting queries once itreaches a certain point. Remember how I had you make a note of the exact time whenyou ran those queries in the previous section?
5.3.1 Preparing for recovery
Let’s run through a recovery. I’ll start by making a tail-end backup:
1 Close all open windows within SQL Server Management Studio, leaving only theObject Explorer open.
2 Right-click the AdventureWorks2012 database, choosing Tasks, then Back Up….3 For the Backup type, select Transaction Log.4 On the Options page, select Back up the tail of the log, and leave the database
in the restoring state. 5 Click OK to start. 6 Click OK on the success dialog. Notice that the icon on the database now indi-
cates it’s in restore mode.
NOTE If you get an error that the backup couldn’t complete because thedatabase is in use, make sure you’ve closed any other windows. Wait a fewminutes, and try again.
5.3.2 Starting the recovery
Let’s get the recovery under way.
1 Right-click the AdventureWorks2012 database, choose Tasks, then Restore, thenDatabase….
2 You should see a dialog something like the one in figure 5.4. Your full backup,differential backup, and t-log backups should all be present. Remember thosetwo times you noted when making the transaction log backups in the previoussection? Change the Restore to time to be somewhere in between the two timesyou noted.
3 Click OK to start. We’ll review the other pages and options in this dialog ina moment.
4 You should get a success dialog; click OK.5 With AdventureWorks2012 selected in the Object Explorer, click New Query in
the toolbar.6 Run the following query:
SELECT * FROM Person.Person

51How restoration works
If you were careful with your time notations, the middle initial will be “X”. That meansyou restored one of the three queries you ran, but not the last one, which should havehappened after the time you specified in the restore dialog. Neat, right?
Now, back to the Restore dialog and its Files page, shown in figure 5.5. This letsyou decide where the database’s physical files will be restored. The default is to restorethem to their original location, but if you’re trying to restore the database to a lab, orto keep the current database available, you can choose a different location.
The Options page, in figure 5.6, provides a built-in option to take a tail-end t-logbackup (which the UI calls a tail-log backup). This is selected by default if you try to per-form a restore and haven’t already done a t-log backup (the UI is trying to watch outfor you and make sure you don’t lose any data). There’s also an option to close exist-ing connections, if the database isn’t already in the restoring state. Another option isto overwrite the existing database that you’re restoring to.
Figure 5.4 Start the recovery process in this dialog.

52 CHAPTER 5 Backup and recovery
5.4 Model backup and recovery scenariosSo now that you know which buttons to push, when do you push them?
As you’ll find with many things in SQL Server, the answer is, it depends. However,there are certainly some guidelines. Start by taking a full backup as often as you can. Ifthat can be once a day—perfect! You won’t need to deal with differentials. If not, thentry to grab a full backup weekly, and a differential nightly. Then, throughout the day,grab a t-log backup, making sure you get that backup onto separate storage from theactual t-log file.
How often do you run a t-log backup? Every 15 minutes, if you can. Every 10. Every 5.It depends on your recovery point objective, or RPO, which is the amount of data you canstand to lose. Although a t-log backup every 5 minutes might be a bit much, I knowfolks who do that. They have a super busy database, so it’s a convenient way to get abackup and to clear out the log for further use. When the time comes to recovery,
Figure 5.5 Choose alternate file restore locations.
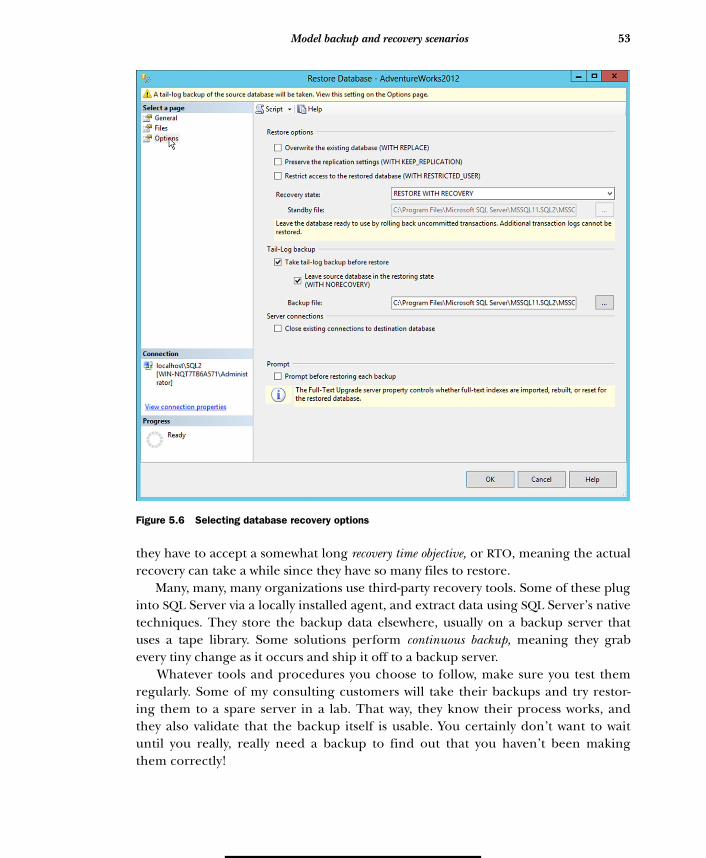
53Model backup and recovery scenarios
they have to accept a somewhat long recovery time objective, or RTO, meaning the actualrecovery can take a while since they have so many files to restore.
Many, many, many organizations use third-party recovery tools. Some of these pluginto SQL Server via a locally installed agent, and extract data using SQL Server’s nativetechniques. They store the backup data elsewhere, usually on a backup server thatuses a tape library. Some solutions perform continuous backup, meaning they grabevery tiny change as it occurs and ship it off to a backup server.
Whatever tools and procedures you choose to follow, make sure you test themregularly. Some of my consulting customers will take their backups and try restor-ing them to a spare server in a lab. That way, they know their process works, andthey also validate that the backup itself is usable. You certainly don’t want to waituntil you really, really need a backup to find out that you haven’t been makingthem correctly!
Figure 5.6 Selecting database recovery options

54 CHAPTER 5 Backup and recovery
5.5 Special procedures for system databasesI mentioned that the system databases require somewhat special treatment.
■ TempDB doesn’t require backing up, since it’s never supposed to contain per-manent data. If you delete TempDB, SQL Server will make a new one.
■ Model doesn’t require backing up unless you’ve made changes to it, which isunusual; if you have, grab a backup after making those changes and keep thebackup handy in case you need it.
■ MSDB can be treated the same as an ordinary database. If you need to recover it,you would temporarily stop the SQL Server Agent service during the recovery,and restart it when you’re done.
■ Master is the tricky one. As I wrote earlier, this database keeps track of SQL Server’sconfiguration, meaning SQL Server can’t start or run without it. To restore it,follow the steps at http://technet.microsoft.com/en-us/library/ms190190.aspx.
5.6 Backup and recovery using T-SQL or PowerShellThus far, I’ve shown you how to perform backups and restores using SQL Server Man-agement Studio’s GUI, but you can also use T-SQL commands. To create a full backup:
BACKUP DATABASE <database_name>TO <backup_device>WITH FORMAT, MEDIANAME = 'E:\Backups\Backup.bak' NAME = 'My backup name'
This command creates a new media set on the E: drive. If you’re using SQL Server2012 or later, you can also execute a Windows PowerShell Command:
Backup-SqlDatabase -ServerInstance SERVERA\SQLEXPRESS -Database MyDatabase -BackupAction Database
Expert adviceWhatever backup and Recovery model you go with, I recommend you create a literalpicture book of your restore procedures. Walk through the process and take screenshots each step of the way, showing and documenting whatever settings you’d selectin your environment.
You will certainly appreciate having that picture book when the need to perform areal recovery, in production, finally arises. You’ll be in a stressful situation, and youdon’t want to have to think about what you’re doing. The picture book will helpensure you pick the right options and get your server back online as fast as possi-ble, without errors.

55Hands-on lab
You’d substitute the correct server\instance name and the correct database name. Youcan use similar commands for differential and log backups; see http://technet.micro-soft.com/en-us/library/ms187510.aspx#TsqlProcedure for syntax and a list of thoserelated procedures.
Transaction logs can also be backed up this way:
BACKUP LOG <database_name> TO <backup_device_name>
Or, using PowerShell:
Backup-SqlDatabase -ServerInstance SERVERA\SQLEXPRESS -Database MyDatabase -BackupAction Log
Again, provide the correct server\instance name and database name. Backing up thetransaction log will truncate it; note that older versions of SQL Server offered a WITHTRUNCATE ONLY option that would truncate the log but not back it up. SQL Server 2012discontinued that option.
5.7 Hands-on labYour lab for this chapter is to follow along with the backup and restore procedures Idescribed in the chapter. If you’ve already done so, then you’re done with today’s lunch!

Authentication:who are you?
Security experts often refer to the “three As” of security: authentication, or who youare; authorization, or what you can do; and accounting, or auditing, which is whatyou’ve done. In this and the next two chapters we’ll explore those concepts as theyapply to SQL Server. We’ll begin with authentication. Are you who you say you are?SQL Server uses a two-layer system of authentication—logins and database users—with lots of variations and options. Some of these options are in the product becausethey’ve always been there; some of them are new concepts for SQL Server that aredesigned to meet changing business and operational requirements.
6.1 Understanding loginsThe first layer in traditional SQL Server Authentication is the login. A login lets youconnect to the server itself, and can be used to assign certain server-wide permis-sions. A login doesn’t have anything to do with a specific database.
Remember that SQL Server has two authentication modes. In Windows Authen-tication mode, all SQL Server logins are either local user or group accounts, ordomain user or group accounts. In other words, SQL Server doesn’t authenticateyou. Instead, you’re authenticated by Active Directory, or by the local computer’sSecurity Accounts Manager (SAM). SQL Server merely believes whatever they say.
Let’s say your Active Directory domain account belongs to the Domain Usersdomain user group. (By default, all users belong to that group, so this is a prettycommon example.) Let’s also say that you’ve added the Domain Users domain usergroup to SQL Server as a login. That means you—and every other member of thegroup—are now allowed to connect to the server. SQL Server knows who you are.
56

57Understanding logins
In fact, when you do connect, SQL Server will “see” your actual user account, so it willknow very specifically who you are. Anything you do could potentially be audited, orlogged, and your user account name will show up right next to that activity.
When it comes time to assign permissions, SQL Server can only assign permissionsto every user in the Domain Users group, because it’s the Domain Users group that’sbeen created as a login. Logins are listed under the Security tab of the ObjectExplorer, as shown in figure 6.1. The icons don’t differentiate Windows logins, but thelogin names make it pretty clear which ones come from Windows: they’re precededeither by the domain name, the computer name, or something like “NT Service.”
You can right-click the Logins folder to create a login. Notice that you have twooptions: Windows Authentication or SQL Server Authentication. Let’s discuss each option.
6.1.1 Windows Authentication
As shown in figure 6.2, when you choose Windows Authentication you’re only expectedto provide a name. That would be the local computer or domain user or user groupname. You don’t provide a password; that’s handled by Active Directory or by thelocal SAM.
The upside of Windows Authentication is that, once you’ve added the login, youdon’t have to worry about it. SQL Server doesn’t have to worry about passwords being
Figure 6.1 Logins are listed in the Object Explorer.
changed or anything else. If you add a group, then the folks who control that group in

58 CHAPTER 6 Authentication: who are you?
Active Directory will decide who needs to be in it—not you. Windows logins are gener-ally lower overhead for whoever is managing SQL Server. However, applications have tobe configured to use this kind of login. When an application connects to SQL Server, itmust specify a connection string that specifies a trusted connection. That tells SQL Server touse the user’s Windows logon credential, and to pass that through to SQL Server. If theapplication can’t be configured to do that (and many can’t), then Windows Authentica-tion isn’t an option.
6.1.2 Mixed Mode Authentication
The entire SQL Server instance must be configured to support the alternative, whichis Mixed Mode Authentication. Mixed Mode is what makes SQL Server Authenticationavailable (shown in figure 6.2). When you select that option, you then have to providea password for the user, and decide if you’ll enforce the SQL Server password policy
Figure 6.2 Specify a name to create a Windows login.
(how complex the password must be), password expiration, and other options. With

59Understanding database users
SQL Authentication, SQL Server is entirely in charge of the authentication process. Itprompts for the password when the user connects, and it checks to see if the passwordis correct. In an application, the user name and password are usually provided in theconnection string, which means—and this is a security concern—the user name andpassword are built right into the application’s source code, or stored elsewhere inclear text. Yes, clear text. No, it isn’t a great idea, but that’s what a lot of applicationdevelopers do. More on that later in this chapter.
TRY IT NOW What logins are present in your SQL Server computer (or com-puters)? What Authentication mode—Windows only, or Mixed Mode—doyour servers use?
When in Mixed Mode, SQL Server provides a default SQL Server login named sa, whichstands for system administrator. By default, this login is given all-powerful server-widepermissions. Earlier versions of SQL Server allowed this login to exist without having apassword (you can imagine what a horrible security idea that was) but newer versionsrequire a complex password for this login. Because sa exists by default on nearly everySQL Server, it’s often the most common target for attackers. One best practice is to dis-able the login entirely, and to manually create a new login to use in its place.
6.2 Understanding database usersA login only grants you some kind of access to the entire SQL Server instance. Fromthere, you’ll want to get into one or more databases. That happens by mapping a loginto a database user inside each database that you’ll be using. Figure 6.3 shows the rela-tionship between logins and database users.
The idea here is that one person (or group) will manage the server itself, and so theyget to control who will connect to it. They do that by managing logins. But SQL Server
Login
Databaseuser
Mapping
Server
Figure 6.3 Mapping database
Database users to logins
60 CHAPTER 6 Authentication: who are you?
realizes that the people who own the actual databases might be different, such as when adepartmental application database needs a SQL Server to live on. The SQL Serveradministrator wants to control access to the server, but the department manager wantsto control who gets to his or her data. So logins don’t grant any explicit access to data-bases. Instead, someone inside the database creates database users. Those don’t comewith their own password or anything (well, usually they don’t). Instead, they referencean existing server-wide login. Permissions within the database can then be assigned tothe database user, controlling what that login can do inside the database.
A single login might well be mapped to database users inside many different databases,and might well have different permissions assigned within each. This whole two-layer secu-rity design is designed to separate control. Unfortunately, the two-layer design is oftenredundant, because often as not the people controlling server access are also controllingdatabase access, and so the login+user model can seem like unneeded complexity.
Database users are shown under the Security folder of an actual database, as shownin figure 6.4. You’ll notice a couple of special database users in the list:
■ dbo—A default database user, meaning it exists in every new database. It’smapped to the sysadmin fixed server role (which we’ll discuss in the next chap-ter). That effectively gives all server administrators access to every database.
■ guest—Another default database user. It’s disabled by default, meaning it can’t
Figure 6.4 Use Object Explorer to view database users.
be used. If enabled, any login trying to use the database, but that hasn’t been

61Understanding database users
mapped to a database user, will be dynamically mapped to guest. The login willthen receive whatever permissions have been assigned to guest. You shouldn’tenable the guest user unless your application specifically requires it.
As shown in figure 6.5, when you create a database user you get to pick the login thatthe user maps to. Anyone who uses that login to connect to SQL Server will be repre-sented by that database user when they use your database.
The login+user model can also make it more difficult to move databases around.Let’s say you have a database that contains five database users. Each maps to a specificlogin on the server. You find, over time, that your database isn’t performing well,and so you decide to move it to a different server in your organization. You detachthe database, copy its files, and attach it to the new SQL Server instance. Right away,your database might not work, because the new instance might not have the same loginsas the old instance. So you think, “No problem, I’ll just create the logins I need. Thereare only five of them, so it’s no big deal.” Wrong. Internally, SQL Server keeps track of
Figure 6.5 Creating a database user requires you to specify a login.

62 CHAPTER 6 Authentication: who are you?
logins by a GUID, which is a long string of hexadecimal values. You can recreate log-ins with the same names as on the old server, but their GUIDs will be different, sothey still won’t match up to the logins your database users are mapped to. Nowyou’ve got even more work to do to fix the GUIDs! By the way, the problem and solu-tion for these so-called orphaned logins are well-described at www.codeproject.com/Articles/594134/How-to-Fix-Orphaned-SQL-Users, should you ever need to performthat task yourself.
Anyway, Microsoft has started rethinking the whole authentication layer with thegoal of making databases more self-contained. In fact, that’s the word they’re using:contained. The idea is to make a database user that has its own password, and that isn’tmapped to a login at all. Essentially, you’re bypassing the entire login layer, and lettingusers authenticate directly to the database. If all of your database users are created inthat fashion, then you’ve created a contained database, which can be easily moved fromserver to server with no server-level dependencies to worry about. As Microsoft andprivate data centers start to think more about cloud-like management processes, thisability to quickly relocate a database becomes very valuable. Databases must be config-ured so that their Containment Type option is Partial, and they must be hosted in aSQL Server instance that has been configured to permit contained databases.
TRY IT NOW Take a moment to inventory the users in your database. Whichones map to logins? Do you have any that are contained within the database?
6.3 How the real world often does authenticationHere’s how Microsoft thinks you should approach SQL Server security:
■ Use only Windows Authentication mode.■ Create logins that represent domain user groups from Active Directory.■ Configure all applications to use a trusted connection when connecting to SQL
Server, meaning they pass along the user’s Windows logon identity.■ Map Windows logins in SQL Server to database users.
In most cases, this gives you the maximum amount of flexibility, the lowest operationaloverhead, and the best information about your server. You can easily see each user’sidentity, meaning monitoring, many performance-tuning tasks, and auditing all becomeeasier. This model can work well for internal applications. Of course, when you’re run-ning a public application like a website, where your users aren’t logging on to adomain, this model doesn’t apply. Instead, you’ll usually create an Active Directoryuser to represent your anonymous users (customers, partners, or whatever they are).You create a SQL Server login for that user account, and map it to a database user. Anyinternal users who connect to the database would still be uniquely identifiable, becauseyou’d create a separate login and database user for them.
The problem is, many application developers don’t like using this model. They geta little lazy. They don’t want to have to troubleshoot all of those layers. Instead, they
tend to adopt a different model:
63Understanding application roles
■ They create a single, non-Windows login for their application. Or, they use thebuilt-in sa account, which is a horrible practice.
■ They hardcode the login name and password into their application’s connec-tion string.
■ They map the login to a single database user.
The downside here is that every user connected to the server is indistinguishable fromthe rest. They’re all sharing the same credential, so you can’t tell them apart. That sin-gle database user is given all-powerful permissions in the database, and the applica-tion implements its own security layer. A problem is that the login name and passwordisn’t all that hard to retrieve—.NET Framework applications, for example, can bereadily decompiled to reveal the login information. That would allow someone to con-nect directly to SQL Server, bypassing the application and its security, and enablingthem to do whatever they wanted to your data. I’ve seen it happen.
So what can you do? It depends a bit on the application. If you can access theapplication’s connection string (it may be stored in a configuration file, in the Win-dows registry, or somewhere else you can get to), you can potentially change it touse Windows Authentication instead. You’ll have to work with the applicationdeveloper or a knowledgeable consultant to set up the permissions that the applica-tion is expecting in SQL Server, but it’s possible. For some applications, however,you won’t be able to make that change, and you’ll simply be stuck with whatever thedeveloper did.
6.4 Understanding application rolesSQL Server offers a third authentication option that’s designed to accommodatedevelopers’ laziness (or lack of understanding, or whatever it is that makes them dowhat they do in their applications) while preserving a higher level of security than the“let’s just use a single login for everyone” approach. This third option is an applicationrole. These are listed in Object Explorer, under the database’s Security folder, withinthe Roles subfolder.
An application role isn’t mapped to a login, nor does it require a database user.You assign permissions directly to it. The application itself either connects using Win-dows Authentication (meaning it uses the user’s logon credentials), or by using a typi-cal connection string. But then the application executes a couple of lines of code toactivate the application role. Immediately, all permissions assigned to the login and/ordatabase user are gone for that connection, and the permissions assigned to the appli-cation role take over for the duration of the connection. This lets someone connect toSQL Server with a relatively low-permission credential, and then have elevated permis-sions activated for use by the application. Application roles are much more difficultfor a user to activate on their own, meaning the role can’t be used as easily to bypassany in-application security by connecting directly to SQL Server. SQL Server’s BooksOnline contains more information about using application roles, including code sam-
ples. Application roles are great, but as an administrator, you don’t really get to decide
64 CHAPTER 6 Authentication: who are you?
whether or not to use them. You can recommend them to developers, but ultimatelyit’s the application developer who has to implement them.
6.5 Hands-on labYour lab for this chapter is a bit complex.
First, I’d like you to change your lab SQL Server to Mixed Mode Authentication, ifyou haven’t done so already. Ensure that the default sa account is given a passwordsuch as “P@ssw0rd.” Do these tasks by using SQL Server Management Studio.
Then, create a new SQL Server login named testuser. Also assign it the password“P@ssw0rd”. In the AdventureWorks database, create a new database user named tes-tuser, and map it to the testuser login. The trick? Create the login and user by runningT-SQL commands in a query window, not by using the GUI. That means you may haveto look up the correct syntax in SQL Server’s Books Online. I’ll give you a hint: thecommands you’re looking for are CREATE LOGIN and CREATE USER, respectively.

Authorization: what areyou allowed to do?
We’re on the second “A” of security: after authenticating you so that it knows who youare, SQL Server needs to decide what you’re allowed to do. By default, the answer is“Nothing.” You have to be granted permission to do things, both at the server leveland within individual databases, and that’s what this chapter is all about.
7.1 Understanding SQL Server permissionsSQL Server has an extremely granular system of permissions that determines who isallowed to do what. Remember, the authentication process tells SQL Server whoyou are; these permissions then determine what you can do.
There are server-wide permissions that govern your ability to do things such ascreate new databases and logins, but most of the time you’ll be more concernedwith database-level permissions. These determine what a user can do from within aspecific database, and there are a lot of options.
REMEMBER Server-level permissions are assigned to logins, and database-level permissions are assigned to database users.
To discuss permissions, it’s often useful to use views as an example. A view is a type ofvirtual table. Views are a real database object that basically contains a SQL Serverquery, rather than containing data. When you access the new view, SQL Server runsthe query and presents the results. You can use views to provide a convenient way ofviewing data from multiple related tables at once, or use views to provide certainusers with a subset of a table’s data. SQL Server has some performance optimizationsthat can make a view faster to execute than simply running its query on demand.
65

66 CHAPTER 7 Authorization: what are you allowed to do?
7.1.1 Securing database objects
Inside a database you have a number of types of objects, including tables, stored pro-cedures, views, and user-defined functions. These objects are called securables, mean-ing they are something that can have permissions assigned to them. Each kind ofsecurable has different types of permissions. On a table you can give permission toalter the table, execute INSERT, DELETE, UPDATE, or SELECT queries, view the table’sdefinition, and so on. Views have similar permission types, while stored proceduresonly have permissions for altering the procedure, executing it, and so on. Differentobject types = different permission types.
For each permission type, you can assign a GRANT or DENY permission. When yougrant a permission, you also have the option to do a WITH GRANT. Here’s how it all works:
■ Assigning a GRANT permission gives the user the ability to perform that task. AssigningGRANT for the SELECT statement lets a user perform SELECT queries on the table.
■ WITH GRANT gives a user the ability to pass their permission on to other users. Youmight do this with a manager who’s allowed to read a table, and allowed toassign others the ability to read a table.
■ A DENY permission prevents a user from performing the given task. A user could begranted permission to run UPDATE queries, but denied the ability to runDELETE queries. Would that make sense to do? Maybe not, but you can do it.
You can manage permissions in the SQL Server Management Studio GUI, or you canrun T-SQL commands. This command gives a user the ability to insert data into a table,and gives them the option to pass that permission on to other users:
GRANT INSERT ON [HumanResources].[Department] TO [testuser] WITH GRANT OPTION
This example gives them permission to delete data, but not to pass that permission onto others:
GRANT DELETE ON [HumanResources].[Department] TO [testuser]
This example shows how to deny someone the ability to select data from a table:
DENY SELECT ON [HumanResources].[Department] TO [testuser]
Each of these commands creates an entry in an internal SQL Server table, which ishow SQL Server keeps track of the permissions. That’s easier to imagine in the GUI,where, as shown in figure 7.1, you can also check boxes to assign these permissions.Note that the Permissions page shown in the figure will always be blank when you firstopen the dialog box; you have to use the Search button to find a specific user, thenwork with their permissions.
TRY IT NOW In SQL Server Management Studio, expand the AdventureWorks-2012 database. Under the Tables folder, right-click a table and choose Proper-ties. On the Permissions page, click Search and enter the name of a user (usetestuser if you completed the lab in the previous chapter, or dbo if you didn’t).
Notice the permissions on the Explicit tab.

67Understanding SQL Server permissions
7.1.2 Revoking permissions
REVOKE is used to remove a permissions entry from the table (in the GUI, youuncheck a checkbox to remove permissions). That can be a bit confusing, because“revoke” doesn’t always mean “stop them from using this!”
If you revoke a DENY permission, then you may be granting someone access! Howcould that happen? Normally, a DENY permission means you can’t do something, evenif you have permission to do that task from somewhere else. Let’s say you are givenselect permissions to your database user account, but that you’re also in a groupwhere select permission was denied. Normally, the DENY overrides everything, andyou wouldn’t be able to run SELECT queries. But if that DENY is revoked, your otherGRANT permission would suddenly kick in, giving you the ability to run SELECT que-ries. Most DBAs try to avoid using DENY permissions, because it can get a bit tough to
Figure 7.1 Assigning permissions is as easy as checking boxes.
keep track of and troubleshoot.

68 CHAPTER 7 Authorization: what are you allowed to do?
7.1.3 Column-level permissions
Here’s another wrinkle: while you can apply permissions to an entire table, you canalso apply them to individual columns. That’s right. You can give someone the abilityto only select data from only a single column within a table!
In a default SQL Server configuration, a table-level DENY will not override a column-level GRANT. That is, the column-level permissions are seen as more specific, so eventhough there’s a DENY in there, the person would have the specified permission onthe column. That’s for a default SQL Server configuration.
If SQL Server is configured to use the Common Criteria audit specification (avail-able in Enterprise Edition only), then a column-level GRANT will be overridden by atable-level DENY. Confusing, right? The default behavior (where the table-level DENYdoesn’t override) is an inconsistency in the product. Microsoft’s official statement isthat the behavior has been left in for backward-compatibility, but that a future versionof SQL Server will change the behavior.
NOTE For more information on Common Criteria in SQL Server, visit http://technet.microsoft.com/en-us/library/bb326650.aspx.
7.1.4 The many sources of permissions
Figure 7.1 also shows the existence of an Effective tab for permissions management.While the Explicit tab shows the permissions assigned to a given user right on thatobject, the Effective tab shows all of their permissions on that object, even permis-sions that come from their membership in a group or role. In other words, theEffective tab shows the permissions they’re operating with, down to the individualcolumn level. The tab is useful for troubleshooting: if someone thinks they shouldhave permission to do something, but they’re running into “access denied” errors,the Effective tab lets you check their actual permissions, and where those permis-sions came from.
7.2 Using server rolesBefore we get further down the rabbit hole of permissions, let’s look at the concept ofroles. A role is a SQL Server object that bundles a set of permissions, so you can conve-niently assign those permissions to one or more users by placing the user (or users)into that role.
Server roles, as the name implies, focus on server-level permissions. Prior to SQLServer 2012, these were officially called fixed server roles, because they came with SQL Serverand couldn’t be changed. You could put logins into the roles, but you couldn’t changethe roles’ permissions. The dbcreator server role grants the ability to create new data-bases; the sysadmin role grants all server-wide privileges. As of SQL Server 2012, you canalso create your own server roles, and assign them custom permissions. You still can’tmodify the permissions assigned to the built-in roles, but you can at least make up new
roles as needed.
69Using database roles
There’s also a special server role called public. All users belong to this role, andyou can modify its permissions. So this is basically the common set of permissionsshared by all users of the server. By default, it grants the permission to connect to theserver, meaning any user can connect to the server. That permission is granted to allof SQL Server’s default connection mechanisms, include TCP, VIA, and named pipes.The public role is also given permission to see that all databases exist, meaning any-one can list all of the databases on the server. They can’t necessarily do anythinginside those databases, but they can see them.
Apart from the public role, most SQL Server users won’t be in a server role. In atypical environment, only administrators, and perhaps developers, will have a place ina server role. To manage role memberships:
1 In SQL Server Management Studio, expand the Security folder in Object Explorer.2 Expand the Roles folder.3 Right-click a role and select Properties. 4 Add or remove role members as needed.
TRY IT NOW How many server roles are in your default configuration ofSQL Server?
7.3 Using database rolesDatabase roles serve the same basic purpose as server roles: to bundle a set of permis-sions, making it easy to assign that set to one or more users. There are fixed databaseroles, whose permissions you can’t change, and custom database roles, whose permis-sions you control. (Custom database roles have been in SQL Server since the conceptof roles was introduced.) You’ll find databases roles in SQL Server Management Stu-dio by expanding the database, expanding Security, then expanding Roles.
The fixed database roles provide common permission sets:
■ db_accessadmin—Provides the ability to control database permissions.■ db_backupoperator—Gives permission to run backup operations (although not to
restore backed-up data).■ db_datareader and db_datawriter—Grant permission to select data, and to update,
insert, or delete data.■ db_denydatawriter and db_denydatareader—Explicitly deny write and read permission.■ db_ddladmin—Grants permission to run DDL commands, which control the data-
base design and schema.■ db_owner—Typically all-powerful within the database.
Again, there’s a special public role, which controls the common permissions grantedto anyone in the database. Its permissions can be modified, and by default onlyinclude the ability to access certain built-in common functions, stored procedures,
and system views.
70 CHAPTER 7 Authorization: what are you allowed to do?
TRY IT NOW What objects are included in the permissions for the public rolein the AdventureWorks2012 database?
7.4 Schemas and ownersAs you mess around with permissions in SQL Server Management Studio, you’ll comeacross two important terms: owner and schema.
7.4.1 Owners
Every object in a SQL Server database has an owner. By default, that’s usually the built-in dbo database user (dbo stands for database owner). Any object can, technically, beowned by any user. When an object is created, if the creating user is a member of thedb_owner role, the owner is assigned as dbo rather than as the creating user. But if auser who isn’t a member of db_owner creates an object, the object is owned by thatuser until someone changes the ownership. There are also situations where someonewho belongs to db_owner can create an object and end up having it owned by them-selves, rather than by dbo, but it’s a bit unusual.
Owners have full control over their objects, and can modify them, assign permis-sions to them, and so on. Owners also play an important role in permission chains,which we’ll discuss in a bit.
In older versions of SQL Server, you could refer to an object by a fully qualified name,which took the form server.database.owner.object. So a table named MyTable, owned bydbo, in the Corp database, on a server named SQL1, would be sql1.corp.dbo.mytable.You rarely need to use all of those naming components; SQL Server defaults to thecurrent server, to the current database, and to dbo. Assuming we wanted to accessMyTable on the current server and in the current database, you’d refer to it simply asmytable. But the fully qualified name lets you refer to objects in other databases, onother servers, or owned by users other than dbo.
Older versions of SQL Server wouldn’t let you delete a user if they owned anything.So if you had created john.mytable, the user John couldn’t be deleted until ownershipof MyTable had been transferred to another user.
7.4.2 Schemas
Newer versions of SQL Server (2005 and later) introduced schemas. These broke theconnection between naming and ownership, and they can be a bit tricky to under-stand. One reason they’re confusing is that, for backward-compatibility, SQL Serverhas built-in schemas named after the most common owner user names of the past.That means a database will have, by default, both a user and a schema named dbo,guest, and so on. Confusing!
So what’s a schema? Basically it’s a container, like a box. The dbo schema is the defaultone, and all objects are placed into that schema unless you specify otherwise. The dboschema itself is owned by the dbo database user. When you create new database users,
they’re given a default schema, which will also be dbo if you don’t specify differently. So
71Permission chains
now, the fully qualified naming convention is server.database.schema.object, taking theowner out of the equation.
It’s possible to have multiple objects with the same name, provided they’re in dif-ferent schemas. You could, for example, have a view named dbo.myview and onenamed barney.myview if you wanted to. When a user executes a query that refers toMyView, and doesn’t use a fully qualified name, SQL Server will start by looking for theobject in the user’s default schema. If the object doesn’t exist, SQL Server will look for itin the dbo schema. Let’s say you create a database user named Fred, and set his defaultschema to be Barney. Fred then runs SELECT * FROM MyView. Fred will be queryingfrom barney.myview. That means the same query could potentially work differently fordifferent users, based on their schema. This can get mega-confusing, so it’s somethingmost developers try to avoid. Instead, they’ll tend to use schemas strictly as a way of orga-nizing tables and other objects. In the AdventureWorks2012 database, for example,you’ll see schemas for HumanResources, Production, Sales, and so on, showing howthe developer organized the database objects based on their role in the application.
It’s possible to assign permissions to an entire schema, which can save a lot of timein permissions management. For example, if your Sales department needs uniformaccess to a set of objects, placing those objects in a Sales schema makes it easy to assignall of the needed permissions in one simple step. In SQL Server Management Studio,under the databases’s Security folder, you’ll see a Schemas folder that contains all ofthe database’s schemas. You can assign permissions right there.
TRY IT NOW Locate the Schemas folder in the AdventureWorks2012 database.Does anyone have special permissions in the HumanResources schema?
7.5 Permission chainsPermission chains are an important part of how SQL Server works, and they’re con-nected to object ownership. The concept is pretty basic: when you access an object,SQL Server checks to see if you have permission to do whatever you’re doing. If youdo, SQL Server proceeds.
If the object you accessed has to access other objects behind the scenes, SQL Serverdoes not recheck your permissions so long as the objects are all owned by the same user,including the object you initially accessed.
Let’s say you try to query a view named MyView, which is built on a table namedMyTable. Both are owned by dbo, and you have permission to query MyView, but youdon’t have any permissions on MyTable. The query will succeed: SQL Server will checkyour permissions on MyView, and because the underlying MyTable has the sameowner, it won’t recheck your permissions when the view accesses the table.
This behavior means you can grant people access to UI objects, but you don’t haveto grant them access to the underlying data. You can force users to access data onlythrough views, functions, stored procedures, and other objects that may limit theusers’ functional capabilities. The users won’t be able to bypass those objects, because
the users won’t have any permissions on the actual tables.
72 CHAPTER 7 Authorization: what are you allowed to do?
Permission chains are a big reason why most database developers leave all objectownership with the built-in dbo user. When ownership changes in an object accesschain, SQL Server rechecks permissions. Let’s say MyView is owned by dbo, but MyTableis owned by a user named Diane. You have permission on MyView, but not on MyTable.So you query MyView, and SQL Server is okay with that. But when the view tries toaccess the underlying table, SQL Server has to recheck permissions because the owneris different. SQL Server would realize that you don’t have permission to the table, andthe query would fail.
Why would you ever want to set up that kind of situation? Suppose you had a tablethat contained sensitive information such as employee salaries. Making that tableowned by a separate user would ensure nobody would be able to query that data with-out having explicit permissions right on the table itself. Developers couldn’t buildviews or stored procedures that bypassed that security requirement, unless those viewsor stored procedures were owned by that same, separate user.
TRY IT NOW Let’s run through a permission chain example in the Adventure-Works2012 database. I’ll assume you completed the hands-on lab in the previ-ous chapter, so you have a testuser login, and a testuser database user in thedatabase. If you don’t, go back to the previous chapter and complete the “Tryit Now” and hands-on lab sections.
Start by opening a new query window and making sure the AdventureWorks2012database is selected: Click New Query in the toolbar, then press Ctrl+U, andselect AdventureWorks2012. In the query window, type and execute this query:
EXECUTE AS USER = 'testuser'SELECT * FROM HumanResources.Department
You should get an access denied error, because testuser hasn’t been given per-mission on that table. Open a new query—this will reset your permissions backto whomever you’re logged on as. In the new query window, run the following:
CREATE VIEW HumanResources.DeptTestASSELECT * FROM HumanResources.Department;GO
GRANT SELECT ON HumanResources.DeptTestTO testuser;GO
This creates a new view named DeptTest, and gives testuser permission on it.Because we didn’t specify an owner, it should have the default owner. Back inyour original query window, run this query:
SELECT * FROM HumanResources.DeptTest
That should work. Testuser doesn’t have permission to the table, but that wasn’tchecked. Testuser has permission to DeptTest, and because it’s owned by the
same user as the underlying table, the permission was only checked on DeptTest.
73How the real world often does authorization
7.6 How the real world often does authorizationIn the real world, you won’t always see the approaches outlined in this chapter used. It’sunfortunate, but many software developers don’t know much about SQL Server Authori-zation, and they don’t take the time to learn. Instead, they program their applications toconnect to SQL Server by means of a single SQL Server login, and they give that loginfull permissions within their application’s database. Their application then decides whatindividual users are allowed to do. This approach has a number of downsides:
■ SQL Server “sees” all users connecting as a single user. That means SQL Servercan’t tell them apart, which makes for difficult management and troubleshoot-ing. If you need to disconnect a particular user, you can’t, because you can’t eas-ily determine who is using what connection. Finding a user that’s running aslow-running query is not easy.
■ If someone discovers the login name and password that the application is using(something that’s remarkably easy to do, even by a minimally experienced user)then they can bypass the application, connect directly to SQL Server, and dowhatever they want. You’ll have difficulty identifying those users, becausethey’re logging in using the same credentials as legitimate users.
■ Too often, the single user account selected by developers is the all-powerful saaccount, giving applications and malicious users full access to the entire server.
■ Changes to “who is allowed to do what” often mandate an update to the applica-tion, which may even mean deploying that update. That’s significantly harder todo than if permissions were centrally managed at SQL Server.
So what can you do about these applications? Unfortunately, not always very much. Ifthe application’s connection string is available—if it’s in a configuration file that youcan change or in the Windows registry—you may be able to modify it to use Windowslogins instead of hardcoded credentials. For example, if you see this connection string:
Server=myServerAddress;Database=myDataBase;User Id=myUsername;Password=myPassword;
Changing it to this would probably work:
Server=myServerAddress;Database=myDataBase;Trusted_Connection=True;
The application won’t necessarily know that you’ve made a change. Having done that,you do need to make sure your users’ Windows logon credentials are passed throughto SQL Server. That will be automatic if their client application is connecting directly toSQL Server, and if they’re running the application on a Windows OS. It isn’t automaticif they’re connecting to some middle-tier application or running a non-Windowsapplication. You’ll also have to make sure that each user (or, more likely, a user groupthat they belong to) is assigned the needed permissions in SQL Server. If a user (or theapplication) attempts to do something that isn’t authorized for the current logon, theapplication will receive an error from SQL Server. Given that the application probably
expected to have full access, that error may crash the application, forcing the user to
74 CHAPTER 7 Authorization: what are you allowed to do?
start over. It’s pretty rare that you can switch an application over to another permis-sions model, but you can definitely communicate with vendors and developers andask them to consider a switch in an upcoming release of the software.
7.7 Hands-on labThis lab assumes that you completed the previous chapter’s lab; if you haven’t, goback and do that first.
For this lab, feel free to use the SQL Server Management Studio GUI. That said, tochallenge yourself, see if you can identify the commands that will accomplish eachtask in this lab. I’ll provide answers in the downloadable lab answer guide available atMoreLunches.com.
1 Create a database role in AdventureWorks2012. Name the role SalesReader.2 Grant the Sales role SELECT permission over all tables in the Sales schema.3 Add the testuser database user to the Sales role.4 Confirm that testuser can query information from the Sales.Customer table.
HINT In a query window, run EXECUTE AS USER = 'testuser' to have thatquery window run subsequent queries using the testuser database user.

Accounting:what did you do?
After authentication and authorization, many organizations have a need for thethird “A” of security: accounting. Typically, the IT world refers to that as auditing,and there are a number of ways that SQL Server can help you keep track of who’sdoing what. I’ll start by introducing you to three auditing mechanisms that youprobably won’t use, mainly so I can explain why you won’t use them; I’ll then intro-duce SQL Audit, which is the auditing technology you’ll probably rely on the most.
8.1 TriggersTriggers are one way that SQL Server can help log actions made in a database. Ineed to start by pointing out that these absolutely require custom programming,and they’re far from foolproof: an administrator can easily disable triggers, bypass-ing them completely. They also come with a lot of design considerations and a fewcaveats. Because they’re a programming element, I’m not going to cover them indepth, since this isn’t a book about SQL Server programming, but I do want you toknow what they are. If you want to learn a lot more about them, dive into the offi-cial documentation at http://msdn.microsoft.com/en-us/library/ms189799.aspx.
A trigger is a special kind of stored procedure, which is a script that lives inside aSQL Server database. Triggers can contain one or more T-SQL statements, and canin fact be quite complex (it’s also possible to create them in a .NET Framework lan-guage like C# or Visual Basic). Triggers run automatically in response to specificthings happening inside the database.
DML triggers run in response to UPDATE, DELETE, or INSERT statements beingrun. They can either run in lieu of whatever change a query was trying to make, or
75
they can run after the change is made. In theory, you could program a trigger to

76 CHAPTER 8 Accounting: what did you do?
log the change to a separate table, creating your own auditing system. Triggers don’trun in response to SELECT statements, so there’s no way to use a DML trigger to keeptrack of all access to data.
DDL triggers run in response to database schema modifications, such as removingcolumns from a table or creating a new table. Again, you could use these to log schemachanges to another table to create a sort of audit log. DDL triggers don’t run in responseto every possible configuration change in a database, so they’re not a catchall way ofauditing all administrative activity.
8.2 SQL Server ProfilerIn theory, SQL Server Profiler offers a way to track system activity, down to the querylevel. Profiler is a pretty heavy monitoring solution, meaning it creates its own perfor-mance impact and isn’t designed for continual use. It also doesn’t log its data in a waythat facilitates using it as an audit log.
8.3 Event logs and C2 auditingSQL Server has supported C2 auditing almost forever. C2 refers to a government stan-dard for auditing, requiring the server to log every possible access attempt, whetherfailed or successful. SQL Server logs that information to the Windows event logs.Unfortunately, pretty much nobody uses C2 auditing, and I don’t recommend youeven try it out, because it can generate an enormous level of log traffic—more thanthe Windows event log architecture was designed to handle. Turning on C2 auditingrequires that you include logging overhead in your server capacity design. It’s thatintensive. And the results are barely usable: the native event logs aren’t designed to beeasily queried or used to generate auditing reports.
8.4 SQL AuditSQL Audit, a built-in feature of newer versions of SQL Server (2008 and later), isspecifically designed to provide a granular level of audit log-quality accounting.Enterprise editions of SQL Server provide a full range of audit capabilities; Standardeditions provide only a basic subset.
8.4.1 SQL Audit architecture
SQL Audit uses SQL Server’s native Extended Events engine (which you’ll learn aboutin chapter 17). Extended Events, unlike SQL Server Profiler, is a lightweight monitoringengine, meaning it’s designed to run continuously, in the background, without severelyimpacting SQL Server’s performance. SQL Audit receives events from the engine anduses them to create an audit trail of only the activity you specify, meaning you can decidehow much detail you need to capture.
A server audit is defined at the SQL Server instance level, meaning they’re active forall databases, not just a single database. You start by creating an audit object, which
contains the complete definition for what you’ll be auditing, where the audit log will
77SQL Audit
go, and so on. You can have multiple active audits simultaneously, although I tend totry to keep everything consolidated into a single audit, or at least as few as possible,just to keep them easier to manage. You can also define database audits, which as thename implies are active only for a specific database.
Within an audit, you create an audit specification. That defines what will be audited.Each audit object can contain one, and only one, audit specification. Specifications letyou indicate what actions, or events, you want audited, such as failed logins, server rolemembership changes, and so on. Actions are organized into action groups, making it abit easier to select an entire related set of actions. The actions available to a serveraudit are different than those in a database audit, because you can do different thingsat the server level (such as log in) and the database level (such as dropping a table).
Audits also include a target, which details where the audit log will go. These can bethe Windows Security event log, the Application event log (which can be viewed byany authenticated user), or to a file. I generally use a file, since they’re easier to col-lect, consolidate, and manage than the event logs.
Note that the SQL Server service account must have permission to write to the tar-get; if it can’t, then the SQL Server instance may not start. You can modify the servicestartup properties to include the –f command-line parameter to start the instance andbypass auditing. That lets you get in and modify the target, disable the audit, or fur-ther troubleshoot the access problem. Additionally, if SQL Server tries to write anevent to the audit target and fails to do so, you can configure the audit so that theinstance will shut down immediately. The idea is to ensure all specified activity isaudited; if it can’t be, then the instance isn’t allowed to run.
Database audits are referred to by an internal GUID. The audit doesn’t live in thedatabase itself, but the database refers to the audit by that GUID. When you detach adatabase and move it to another instance, the audit doesn’t go with it, but the data-base will still be trying to refer to it by that GUID. That’s called an orphaned audit, andit’s similar to orphaned logins, which we discussed in chapter 6. You have to fix this byrunning the T-SQL ALTER DATABASE AUDIT SPECIFICATION command; look up thecommand for more details on correcting the problem.
NOTE Technically, an audit is an audit is an audit; it’s the audit specificationthat is either server- or database-specific. Specifications become detached fromtheir audits when you move a database to another instance, and it’s that rela-tionship you’ll have to fix, reconnecting the database audit specification to theinstance-level audit object it goes with (or creating a new one for it to refer to).
8.4.2 Creating an audit
I’m going to walk you through the process of creating an audit object, a server auditspecification, and selecting an audit target.
TRY IT NOW Please follow along! I’ll be using an example that includes someof the more common server-level audit actions, so this is good practice for a
production server.
78 CHAPTER 8 Accounting: what did you do?
Start in SQL Server Management Studio.
1 In Object Explorer, expand the Security folder. 2 Right-click Audits, and select New Audit…. 3 Configure the General page as shown in figure 8.1. I’ve provided a name for the
audit, as well as a file path. You don’t provide a file name; that’ll be generatedautomatically in the specified path. Notice that I haven’t configured this to shutdown the instance if an audit fails. Also notice how I’ve configured the file han-dling: there will be no more than two files, of no more than 20 MB apiece. Theaudit will reserve that space immediately, ensuring it will have space to write tothose files. Once the second file fills up, the first will be deleted and a new onecreated. So I’ll always have 40 MB in audit files.
4 The audit is disabled by default; you’ll see that in its icon once you click OK.We’ll enable it in a bit.
5 Right-click Server Audit Specifications and select New Server Audit Specifica-tion….
6 Configure the General page as shown in figure 8.2. I’ve attached this specificationto the audit object I just created, and I’ve selected three login- and password-related action groups to include in the specification. Click OK. Notice that thespecification is also disabled by default.
7 Enable both the specification and the audit by right-clicking them and selectingthe Enable option; click Close on the status dialog box displayed by each.
Figure 8.1 Configure the General page for audit as shown.

79SQL Audit
TIP If the audit fails to enable, then it’s likely the SQL Server instance’s ser-vice account doesn’t have read and write permissions to the file path youspecified. I used C:\ in my example, and that is restricted on most server com-puters. You can fix the problem by creating a new path (such as C:\Audit) inWindows Explorer, and modifying its permissions to include SQL Server’s ser-vice account (or something like Everyone:Full Control, which isn’t awful for alab environment). Then modify the audit to use that path instead.
Now let’s test the audit. I’ll launch a new copy of SQL Server Management Studio andconnect to my instance. That should generate a login success audit, and your auditpath should now contain a file with a .sqlaudit filename extension. The filename willinclude your audit’s name (Global%5Audit, in my example, with the “%5” being anencoded representation of a space) followed by a long unique identifier.
Audit files are in a binary format; you can’t simply open them in Notepad. Instead,in SQL Server Management Studio, right-click the audit and select View Audit Logs….You’ll see something like figure 8.3, which shows all of the audited events. Notice thatthe bottom pane shows details about the selected event, and that you can filter, search,and export the log using toolbar buttons at the top. Exporting provides the ability towrite to a text-based log format, or to a comma-separated values (CSV) file, which canbe opened in Excel or imported into a database.
NOTE Once you’re done playing with auditing, you can disable the auditobject by right-clicking it and choosing the Disable option.
8.4.3 Using SQL Audit for security auditing
Say “audit” and most folks’ minds justifiably jump to “security.” SQL Audit—particu-larly on Enterprise editions of SQL Server, where more granular auditing is available—is well suited to maintaining security in the organization. Heck, I have customerswhose legal and industry requirements demand that they audit all read access to cer-tain database tables (like those containing confidential customer information). SQLAudit can do it.
That said, you don’t start auditing massive amounts of activity without first spend-
Figure 8.2 Configure the specification as shown.
ing serious time thinking about it. Auditing all SELECT access to a busy database, for

80 CHAPTER 8 Accounting: what did you do?
example, generates a lot of audit traffic. A lot, lot, lot. You’re going to have to set asideserious disk space to capture that information, and you’re going to have to have a planto maintain those logs, archiving them for however long you’re required to do so.That level of auditing is going to impact SQL Server performance to some degree(although you’d have to run tests in a lab environment to determine exactly howmuch), so you might well have to upsize your SQL Server computer to handle it: moreprocessor, more RAM, and certainly more disk controllers and faster disks. Pointbeing, SQL Audit can do it, but you’re not just going to flip the switch and be happy.It’s going to require serious conversation and planning within your organization.
8.4.4 Using SQL Audit for troubleshooting
Folks tend to think of auditing as a security thing (“Make sure we know who accessedwhat, at all times!!!!”) but it’s equally useful as a troubleshooting tool. I’ll often createan audit and a server audit specification that audits failed login attempts. I’ll leave the
Figure 8.3 Use Management Studio to view the audit log.
audit disabled until a user calls in and says they’re having trouble logging in. I can

81Hands-on lab
quickly enable the audit, ask the user to try again, and then examine the audit log tosee what’s going on. I can then disable the audit until I need it again.
Honestly, I find myself using SQL Audit a lot more for troubleshooting than foranything else. Yes, I have customers who need auditing for security purposes, but withsuch a wealth of information available, it’s a powerful troubleshooting tool. I can evenuse it to capture specific queries for tuning, if needed, and it’s a bit easier to turn onand off than it is to fire up SQL Server Profiler.
NOTE As you get started with SQL Server administration and maintenance,you probably won’t use SQL Server Profiler much. It’s a fairly advanced tool.However, we’ll be using it to accomplish a few specific tasks, starting in chap-ter 11.
8.5 Hands-on labYou don’t have a mandatory hands-on lab in this chapter, but I do want to offer anoptional one. This requires that you have an Enterprise edition of SQL Server, though;Standard and Express don’t permit granular database audit specifications.
See if you can set up an audit specification in a database, to audit use of theSELECT statement by members of the db_owner database role on that database. Don’tdo this on a production server; perhaps download and install a trial of SQL ServerEnterprise Edition to try this. In a production database this will likely create an enor-mous log very quickly. In fact, if you’re able to set this up, try running a few SELECTstatements to see just how fast a large number of events is created.

Analyzing indexes
Indexes, as I’ve mentioned in previous chapters, are hugely important to SQLServer. They also represent a complete compromise: every index has the potentialto help certain types of query run faster, while slowing other types. It’s extremely,extremely, extremely important that you understand what indexes are, how theywork, and what you can do with them. This is also a good time to analyze an exist-ing database to see what indexes it has. Becoming familiar with a database’sindexing strategy is a real key to helping understand any performance issues thatmay crop up.
9.1 Index basicsIndexes in SQL Server apply to tables, not to entire databases, but when we talkabout indexes we tend to think about their impact on overall database applicationperformance. An index is, in a very real sense, a lot like an old-fashioned papertelephone book. Like a phone book, an index is designed to speed up queries, inthis case, queries that need to find particular pieces of information, or put thosepieces of information into a particular order.
Just like the data in a table, indexes are stored in 8 KB chunks called pages. Thesepages are stored in the database’s files on disk, and they’re moved into and out of thebuffer cache in SQL Server’s memory. SQL Server always reads and writes index pagesin 8 KB increments, which becomes a key to understanding index performance.
In most real-world databases, you will find that every table has at least oneindex, although SQL Server doesn’t require tables to have any indexes. Most tableswill have multiple indexes, which are designed to help speed up specific different
82
types of queries and cross-references.

83Heaps
9.2 HeapsWhen a table lacks a clustered index, something I’ll explain in the next section, it isreferred to as a heap. Think of that as meaning something like, “a big old heap ofdata,” because that phrase does a good job of conveying what you’re dealing with: anunsorted, unordered, chaotic mess.
To understand what a heap does, let’s start with a basic example of a few data pagesin SQL Server. Remember, these data pages contain the data from the table. In thiscase, let’s say that they’re customer names. Each page can hold about 8 KB of data.Suppose, when we first create the table, we’re loading customer names from a sourcethat already has the names in alphabetical order. That means we’ll be inserting the“A” customers first, then “B,” and so on. So our initial data pages will be nicely inorder, as shown in figure 9.1.
Because there’s no index on this table, the data pages are not linked. That is, whenSQL Server reads in the first page, it has no immediate idea which data page comesnext. Even though they appear to be in order to our human eyes, SQL Server has noclue. So each time it needs another data page, SQL Server has to refer to the Index Allo-cation Map, or IAM. That’s a special structure included with the table, also kept on 8 KBpages. Right there, we’ve halved our table’s performance, because almost every timeSQL Server needs to read an 8 KB data page, it must first backtrack and read throughthe IAM.
The problems begin to arise when you add data to the table. Suppose you add“Bentley” to our example table of customer names. Logically, the name goes after the“A” customers, but those data pages are already full. So SQL Server drops “Bentley” onthe next available 8 KB chunk of disk space. The pages are now logically out of order,meaning SQL Server has to jump around the disk a lot in order to read the data. Fig-ure 9.2 shows where we are now.
Even worse is when you change some data, and the changes no longer fit on theoriginal page. For example, suppose we need to change “Charles” to “Charleston.”
ABOVE AND BEYONDTechnically, SQL Server prefers to read things in chunks of 8 pages called an extent.With indexes, it can only do so if the index is in good condition—which is what you’llbe learning about in this chapter. For indexes in poor conditions, SQL Server dropsto a less-efficient method of reading one page at a time. Read on for the gory details.
Able, DanAbrams, AnnAdams, KeithBarstow, KenBaden, Joe
Bundt, Cathy
1
Carlton, DanaDavid, Dee
Delgado, DonEarnhardt, EricFrancos, BarbGooding, Ann
2
Hargrove, ChrisHart, Erin
Jones, DonKyling, Jeff
Larson, GraceLindly, John
3Figure 9.1 The initial data pages
in a table of customer names
84 CHAPTER 9 Analyzing indexes
The 8 KB page where “Charles” existed is full; there’s no room for the additional threecharacters. So the entire data row gets moved to a new page, making the heap evenmore chaotic. Worse, the original page now has 7 empty bytes that won’t get quicklyreused. The result is a lot of wasted space as the table grows. Wasted space also meansworse performance, because now a single 8 KB disk read operation won’t be reading afull 8 KB of data—some of the read operation is wasted. As this fragmentation continuesto occur, more space will be wasted, and performance will continue to slowly decline.There’s no easy fix, either—except to index the table.
9.3 Clustered indexesSQL Server builds indexes in a structure called a B-Tree (there’s some debate aboutwhat the “B” stands for; it isn’t “binary,” but its origin seems to be lost in time). Fig-ure 9.3 shows a simplified example. In order to locate a particular record, SQL Serverstarts at the top of the tree and works its way down, choosing between a small numberof potential paths each time. Even with a large body of data, this structure makes itpossible to locate a particular piece of data with relatively few read operations.
To find “Adams,” SQL Server would start at the top. It knows the name it wantsbegins with “A,” so it follows that path. It knows the name begins with “Ad,” so it fol-
Able, DanAbrams, AnnAdams, KeithBarstow, KenBaden, Joe
Bundt, Cathy
1
Carlton, DanaDavid, Dee
Delgado, DonEarnhardt, EricFrancos, BarbGooding, Ann
2
Hargrove, ChrisHart, Erin
Jones, DonKyling, Jeff
Larson, GraceLindly, John
3
Bentley, Bob
4
Figure 9.2 Adding rows quickly causes the pages to become out of order.
A-Z
F-RA-E S-Z
Aa-Ag Ah-As
AardvarkAdamsAnck Figure 9.3 Indexes are built
as B-tree structures.

85Clustered indexes
lows that path next. Each of these intermediate steps is referred to as a node withinthe index, and each is stored on the standard 8 KB page of disk space. The choiceson each node point, or link, to a subsequent page, allowing SQL Server to scan thetree without having to refer back to an IAM. In a clustered index, the last nodes link tothe data page containing the complete row of data that SQL Server was looking for.For that reason, clustered indexes are said to control the logical ordering of thedata pages. Figure 9.4 illustrates the structure. Notice that the data pages, num-bered 1 through 3, are not physically in order. But the index treats them as if theywere logically in order, because the index has the data in order, and it points to theappropriate data pages.
Something to keep in mind: when you are putting the data pages in order, you canobviously only put them into one kind of order. In other words, suppose you took all thepeople in your office building and asked them to line up by last name. You probablycouldn’t also ask them to line up in order of height—they can only order themselveson one piece of data, or key, at a time. Therefore, SQL Server tables can have one, andonly one, clustered index.
Clustered indexes are the fastest kind of index, so they’re usually built on the keythat is queried most frequently. They’re fast because once SQL Server reaches the endof the index structure, it is at the actual data page. It doesn’t have to go anywhere elseto find the rest of the data it was looking for. It’s as if you had a traditional paperphone book, which lists your city’s residents in alphabetical order by last name, and asif you managed to get everyone to buy houses in exactly that same order—so that
A-Z
F-RA-E S-Z
Aa-Ag Ah-As
AardvarkAdamsAnck
AthertonAziz
AhkashaAjuktAscot
1 2 3
Figure 9.4 Clustered indexes control the logical order of data pages.
every person physically lived in alphabetical order. Once you found the person you

86 CHAPTER 9 Analyzing indexes
were looking for, you’d have access to all of their information because you’d be stand-ing right in front of the actual person.
9.4 Nonclustered indexesIf a table can have only one clustered index, what happens if you need to sort the data,or search through it, using other criteria? That is, if we’ve built an index on a cus-tomer’s last name, what if we need to search for customers in a particular city? This iswhere nonclustered indexes come in. You can have as many of these as you want on agiven table, and they work exactly like a traditional paper phone book.
Using the phone book, you look up a resident by last name. Once you have theirrow in the index, you’re given the person’s physical address. If you need to know moreabout them, their age, their height, or something else, you have to make the “jump”to their house in order to obtain that information. As shown in figure 9.5, that’s hownonclustered indexes work. When you reach the end of the index, the leaf page, youaren’t looking at the complete row for the record you’re after. Instead, you’re given areference to the data page. SQL Server then has to jump to that data page to read theinformation. Nonclustered indexes are therefore slightly slower than a clustered index,since a nonclustered index involves that extra jump.
The reference contained in a nonclustered index’s leaf nodes depends onwhether or not the table is a heap. When a table contains a clustered index, the non-clustered indexes all point to the clustered index key. Let’s say you were searchingfor “Derby” in a customer list. You’ve built a clustered index on that table, using an
ABOVE AND BEYONDSome folks misunderstand clustered indexes, and mistakenly believe that they con-trol the physical order of the pages on disk. That isn’t true, but there’s a grain of pos-sible truth there.
In most table designs, a sequential number uniquely identifies each row. That is,rather than identifying a customer record by the customer’s last name, since custom-ers’ names are hardly unique, there’s an internal ID number of sorts that can be usedinstead. Database designers do this to ensure they have an absolutely unique valueby which they can refer to any given row. Using an arbitrary, sequential number, some-thing SQL Server calls an identity column and can create automatically for you, isextremely common.
Because each new identity value is larger than the one before it, the clustered indextends to keep the pages in the correct physical order as well as the correct logicalorder. That isn’t the index’s job, it’s simply a byproduct of the fact that the index keyis an arbitrary, sequential number. When you add a new row, it will always contain thelargest key value in the table at that point in time, so when SQL Server writes thepage to the end of the database file, it just happens to be in numeric order.
arbitrary, sequential identity column as the clustered index key. A nonclustered index

87Nonclustered indexes
on customers’ names would end in a reference to that identity column, let’s say “Derby”resolved to identity number 34726. SQL Server would then quickly seek through theclustered index to find key 34726, which would lead the server to the data row forthat customer.
NOTE You read that right: using a nonclustered index necessarily involvestwo index operations. The first operation is the nonclustered index, and thesecond operation is the clustered index. That’s why nonclustered indexes area bit slower. They always involve that second operation.
You may be thinking, “Wow, that sounds like horrible performance,” but it isn’t thatbad. Clustered index seeking is a super-quick operation in most cases, so it adds only atiny bit of overhead. What’s really awful is if the table doesn’t have a clustered index,meaning the table is a heap.
In that case, the nonclustered index leaf nodes contain a reference to the internal
1-300
1-100
CLUSTERED INDEX
A-Z
NONCLUSTERED INDEX
A-M N-Z
A-C
Adams isrow #212
101-200 201-300
51-1001-50
ID=1Name=Adams
ID=2Name=Bentley
1 2
Figure 9.5 Nonclustered indexes require a jump to the actual data page.
SQL Server row ID number for the desired data page. You might think, “Wow, that’s a

88 CHAPTER 9 Analyzing indexes
lot faster than doing a clustered index seek,” right? After all, you go straight from thenonclustered index to the data page, as shown in figure 9.6.
Unfortunately, that great situation doesn’t tend to exist in a heap for very long.Recall from the earlier explanation on heaps that changes to data rows tend toresult in the row being moved to a new page, fragmenting the table’s data pages.When that happens, nonclustered indexes aren’t updated with the new location!Instead, a little pointer is left behind. So now, as shown in figure 9.7, SQL Serverseeks through the nonclustered index, jumps to the data page, and finds a forward-ing number. It has to jump to the new page, where there might be yet another for-warding number. Over time, this will massively reduce overall performance. Heapsare terrible (except for tiny tables that don’t ever change). Had the table beengiven a clustered index, the clustered index would be continually tracking wherethe data page was, meaning you would always have that one extra clustered indexlookup. With a heap, you might have zero to a bazillion additional operations,with no way to predict what it would be, and no real way to clean up and improveperformance.
9.5 Index inventoryYou can review the indexes on a table right within SQL Server Management Studio. Asshown in figure 9.8, expanding a table reveals an Indexes folder, where all of thetable’s indexes are listed.
212:Adams
216:Denby
215:Jones
217:Bentley
HEAP
A-Z
NONCLUSTERED INDEX
A-M N-Z
A-C
Adams isrow #212
213:Charles
214:Aardvark
Figure 9.6 From nonclustered index to data page in a heap

89Index inventory
You can double-click any index to see the column or columns used to build the index,and obviously you can see right in the list which index is clustered, and which ones arenonclustered. Be skeptical of any table that shows nonclustered indexes, but no clus-tered indexes; those nonclustered indexes will be built on a heap, which as you’velearned in this chapter can present serious performance problems over time.
212:fwd to218
216:Denby
215:Jones
217:Bentley
HEAP
A-Z
NONCLUSTERED INDEX
A-M N-Z
A-C
Adams isrow #212
213:Charles
214:Aardvark
218:fwd to220
219:Cherry
220:Adams
Figure 9.7 Nonclustered indexes on a heap perform more poorly over time.
Figure 9.8 Indexes are listed in SQL Server Management Studio

90 CHAPTER 9 Analyzing indexes
9.6 Constraints and indexesMost database tables have relationships with one another. In figure 9.9, you can see atable that contains customer information, and a second table that contains orders.Obviously, customers place orders, and so these two tables are related to one another.
SQL Server provides mechanisms, called constraints, that can help enforce theserelationships. Specifically, a foreign key constraint (commonly called an FK) tells SQLServer that a particular table column can only contain values pulled from a specifiedcolumn in the related table. In our example, the CustomerID column in the Orderstable includes an FK to the ID column of the Customers table. Using this constraint,we’re assured that orders can only relate to actual customers.
FKs typically point to a related table’s primary key, or PK. When the database applica-tion needs to pull information from the related tables, perhaps displaying an order,which would also involve looking up the customer information, the application exe-cutes a special kind of query called a join. Joins can perform poorly if a good indexingstrategy isn’t employed. Usually, the join will execute well if the PK is also the key forthe related table’s clustered index. In our example from figure 9.8, the ID column ofthe Customers table would be the key column for that table’s clustered index; anyother indexes on the Customers table would be nonclustered indexes.
This relationship is another reason why:
■ Database designers tend to add a table column that is an identity column,meaning an arbitrary, sequential number. This column gives them an easy valueto make into the PK, which is what other tables’ FK-constrained columns willpoint to.
■ Designers tend to build tables’ clustered indexes on that PK column, to helpspeed up the join queries that will draw information from related tables.
While there are no specific technical rules that drive these decisions, the performanceimplications tend to make these rules almost universal in database design.
9.7 More about indexesThere are other tactics related to indexes that we’ll cover in several upcoming chap-ters, including things like covering indexes, composite indexes, and more. Thosekinds of indexes are still either clustered or nonclustered, but are designed to meet
IDLast nameFirst name
Street addressCity
StatePostal code
IDCustomerIDOrderDateOrderTotal
Customers Orders
Figure 9.9 Tables often relate to one another within a database.
specific query performance needs.

91Hands-on lab
We’ll also, in several upcoming chapters, discuss the pros and cons of havingindexes. Remember that while an index can speed up queries that need to find spe-cific data or need to get the data into a specific order, indexes will slow down queriesthat add data, delete data, or make changes to data. That’s because each modificationto the table’s data requires that one or more indexes also be updated, increasing thetime it takes to execute those changes. The entire act of balancing those pros andcons is called index tuning, and chapter 11 covers that topic.
9.8 Hands-on labLet’s practice what you’ve just read about in this chapter. Go to MoreLunches.com,click this book’s cover image, and find the Index Inventory Sheet download. Com-plete one sheet for each of several tables on one of your SQL Server instances. You canpick which tables to inventory; if your database doesn’t have a huge number, inventorythem all. If you don’t have a production environment to inventory, complete theworksheet for your AdventureWorks database instead.

Maintaining indexes
In the previous chapter, I explained how SQL Server indexes are built, and broadlyhinted at how SQL Server uses them. Indexes will play a big part in many upcomingchapters, as they’re one of the biggest performance-related items that an adminis-trator can potentially play with. In keeping with this book’s overall theme, though,I’m assuming that your databases are already indexed using whatever indexes thedatabase application developer figured would work well.
But indexes, like cars, don’t work very well, for very long, unless they’re prop-erly maintained.
10.1 Understanding index fragmentationThe biggest problem—the only operational problem—that indexes run into is frag-mentation. Remember that an index is an ordered reference to a particular table’sdata. The index takes all the values from a designated key column, like customername or product stock number, and lists those values in a specific order. The idea isthat it’s much easier to find a piece of data when it’s already sorted: you can seek tothe section of the index you need, and find the item you want. That’s what anindex’s B-tree structure helps to facilitate.
NOTE I use the word seek specifically because it’s the term SQL Server usesto describe a quick lookup in a B-tree. Another term is scan, wherein SQLServer literally starts at the top of the list and reads its way through, oneitem at a time. Seeks are almost always faster than a scan, except on a verysmall table.
92

93Understanding index fragmentation
Indexes really only work well when they are in order. An index works best when thevalues in it are listed in perfect sequence, on sequential data pages, as shown in fig-ure 10.1.
The problem with keeping an index in that perfect condition is that indexes, likethe data they point to, change. Let’s go back to the traditional paper phone book. Whathappens when someone new moves into town? Most phone book pages are completelyfull, so there’s no room to write in a new arrival. In some cities, the phone companyperiodically issues a supplement, which contains new information: if the originaldirectory doesn’t have the person you’re after, then you flip through the latest supple-ment to see if they’re listed there instead. As you can imagine, this slows things down,and it’s pretty much what happens when a SQL Server index becomes fragmented.
Imagine that we need to insert the name “Colby” into the index shown in figure 10.1.The value belongs on page 1 of the index, but page 1 is full. So SQL Server splits page 1,creating a new page 4. Half the information from page 1 is copied to page 4, and thenew value is inserted. The result is a half-empty page 1, and a half-empty page 4. Also,the pages are no longer in physical sequence. If SQL Server needs to read the data inlogical order, as shown in figure 10.2, it has to read page 1, then page 4, and then skipback to read pages 2 and 3. Over time, this back-and-forth skipping caused by the frag-mented index can slow SQL Server down considerably.
In fact, SQL Server internally keeps track of how fragmented an index is, and ata certain point—which depends on a fairly large number of factors—SQL Serverwill figure out that it’s faster to scan the table for desired values than to use theindex. At that point, performance is totally trashed. You’re still wasting time updat-ing the index, meaning you get all the downsides of having the index in place, but
AndrewsBaileyColby
Delgado
HuntingtonIstan
JacksonKilarney
LoosMounteblat
NivenOppenheimer
ProstQuincey
RushSoloman
Figure 10.1 Indexes that remain in proper physical sequence perform the best.
AndrewsBaileyColby
Delgado
Page 1
HuntingtonIstan
JacksonKilarney
LoosMounteblat
Page 2
NivenOppenheimer
ProstQuincey
RushSoloman
Page 3
EdwardsFritchey
Goodman
Page 4
New!
Pageread
Figure 10.2 Index fragmentation comes
sequence from page splits.

94 CHAPTER 10 Maintaining indexes
you’re not using the index to speed up anything, so you get none of the index’sintended benefits!
NOTE If you have a specific query, and want to see if SQL Server is usingindexes to execute that query, you can manually run the query in SQL ServerManagement Studio and look at the execution plan SQL Server came up with.I’ll show you how to do that in chapter 12.
Fragmentation occurs to all indexes on tables where data is being added, deleted, orchanged; the only time fragmentation isn’t an issue is for a table that is entirelyread-only. Not many databases have purely read-only tables, so index fragmentationis one of the biggest things that you, as a database maintenance person, need toworry about.
10.2 Analyzing index fragmentationYou can quickly check the fragmentation level of an index by opening the index’sproperties dialog. However, don’t do it that way.
Checking fragmentation levels in the GUI is slow, and you’re likely going to haveto check dozens, if not hundreds, of indexes. This is where you definitely want toshift from the GUI to a query window, because SQL Server can deliver fragmenta-tion information on multiple indexes all at once. Open the query window, and runthe following:
SELECT *FROM sys.dm_db_index_physical_stats(DB_ID('database_name'), OBJECT_ID(N'schema.table_name'), NULL,NULL,'Sampled')
You’ll need to fill in the appropriate database_name, such as AdventureWorks2012. Byspecifying Sampled, you’ll get a good tradeoff between speed of execution and accu-racy; specify Limited for a faster but possibly less accurate scan; or specify Detailed fora slower, more accurate look at fragmentation.
You also need to replace schema.table_name with the appropriate table name,such as Person.Address (from the AdventureWorks2012 database). For example:
SELECT *FROM sys.dm_db_index_physical_stats(DB_ID('AdventureWorks2012'), OBJECT_ID(N'Person.Address'), NULL,NULL,'Sampled')
You’ll find a column named avg_fragmentation_in_percent that shows fragmenta-tion percentage. Note that index names aren’t shown in this output; instead, you geteach index’s unique numeric index ID. You’ll also want to look at the page_countcolumn, which shows how many pages the index occupies. For extremely smallindexes (under a dozen pages or so), fragmentation percentage will never be zero,and will not be entirely accurate. For indexes that small, frankly, fragmentation isn’t
much of a concern.
95Indexes maintenance strategies
TRY IT NOW Try analyzing the fragmentation in several tables in one of yourdatabases. Keep in mind that, for especially small tables (which is almost all ofthem in the sample AdventureWorks database), the fragmentation percent-age won’t be accurate, and achieving 0% fragmentation may not be possible.
There are two kinds of fragmentation to worry about:
■ Internal fragmentation—What I’ve described in this section. It’s when the index’srows of information are out of order within the database.
■ External fragmentation—A bit more complex. SQL Server groups 8 KB pagesinto sets of 8, called extents. When SQL Server needs to read a number ofsequential pages, it’s easier (and faster) to do so if they’re all grouped intosequential extents. External fragmentation is when the pages of an index arespread across extents that are separated from each other by extents contain-ing unrelated pages.
10.3 Indexes maintenance strategiesOnce you’ve determined that an index is overly fragmented (as a rule, anything morethan 30% is cause for concern) you need to defragment the index. You have severaloptions, which become more and more flexible with newer versions of SQL Server.
■ Drop and rebuild the index. This solves the problem, but introduces several of itsown. For one, queries that depended upon the index will have poor perfor-mance until the index is online. In addition, building an index on a large tablemay lock the table, preventing changes from users. Here’s the biggest downsideif you do this with a clustered index: any nonclustered indexes will be automati-cally rebuilt on the resulting heap, and when you build the new index all thenonclustered indexes will be rebuilt again. Definitely don’t do this during pro-duction hours!
■ Rebuild the index. This is spiritually the same as dropping and recreating theindex, but is done as a single operation in SQL Server. With a clustered index,you won’t cause your nonclustered indexes to be rebuilt on a heap, and then re-rebuilt on the new clustered index. This can still be impactful in production:the index won’t be available for use while it’s being rebuilt, and queries may faildue to locking. There are two ways to perform this kind of rebuild:– CREATE INDEX with DROP_EXISTING uses the CREATE INDEX statement and
its DROP_EXISTING option. Indexes that contain constraints (such as aUNIQUE constraint) can be rebuilt using this technique, although under thehood SQL Server has to drop and recreate the constraints, which can betime-consuming. A downside is that indexes have to be rebuilt one at a time,although as you’ll see later in this chapter that isn’t always a bad thing.
– ALTER INDEX REBUILD uses the ALTER INDEX statement. Unlike the aboveoption, this doesn’t have to drop and re-create constraints in the index, so it
can be faster to run. This is how I usually rebuild indexes.
96 CHAPTER 10 Maintaining indexes
■ Rebuild the index online. An option in newer versions of SQL Server (2012 andlater), this builds a new index behind the scenes, then uses some sleight-of-hand to swap in the new index and delete the old one. This has a performanceimpact, but it keeps everything functional and accessible. The big price is indisk space: you’ll need enough to store that second copy of the index while it’sbeing built.
■ Reorganize the index. This can be accomplished while the index is still online andbeing used, because all it really does is rearrange the pages into the correctphysical sequence. This process can be paused and restarted, although it maynot always help you achieve 0% fragmentation. There’s no impact on nonclus-tered indexes.
We’ll cover how to rebuild and reorganize an index in a minute. But first, a couple offinal notes before moving on.
10.3.1 Fill factor
There’s an important concept called fill factor that comes into play when you rebuild(but not reorganize) a nonclustered index. The fill factor determines how full (or, ifyou’re a pessimist, how empty) index leaf pages are in the rebuilt index. A fill factor of50 means the page is half full (or half empty); a fill factor of 70 means the page is 70%full (30% empty).
Why leave empty space? Empty space allows for the addition of new rows to theindex leaf pages without splitting pages, meaning the index lasts longer before itbecomes too fragmented to be useful and needs to be rebuilt. But there’s a downsideto a low fill factor: while it helps avoid page splits for a period of time, it also slowsdown SQL Server. Keep in mind that SQL Server reads the entire index page fromdisk; if the page is half empty, then SQL Server just wasted time reading nothing! Forbest disk performance, always SQL Server’s weakest spot, you want your index pages100% full, so that each disk operation is completely useful. Full pages will result inpage splits and fragmentation almost immediately, so coming up with the right fill fac-tor is a balancing act. More on that in a moment.
10.3.2 Databases that aren’t yours
How much of this maintenance stuff can you do for databases you don’t “own,” suchas a database being used to support some line-of-business application?
It depends. You can definitely monitor fragmentation (keeping an eye on thingsnever hurts). Some vendors build index maintenance routines into the application,and so you should see fragmentation go up and down as those routines run. On theother hand, many vendors don’t do anything to maintain their database’s indexes, soyou’ll see fragmentation go up. . . and up. . . and up. . . For those, you’ll need to runindex rebuilds and reorganizations on your own, probably on a regular basis. Doing
so won’t “hurt” the application. In fact, it’ll help it perform much better.
97Performing the maintenance
10.4 Performing the maintenanceAlthough you can accomplish these maintenance tasks using the SQL Server Manage-ment Studio GUI, I much prefer to use T-SQL statements, since I can pop them into aSQL Server Agent job and have them run automatically. (You’ll learn more aboutAgent in an upcoming chapter. Agent is somewhat like Windows Task Scheduler, onlyfor SQL Server).
NOTE Because this maintenance is something you should perform regularly,try to get into the habit of using T-SQL to do it. Doing this in the GUI is goingto be a bit tedious, and it’s going to discourage you from doing this as often,and as well, as you should.
Note that I’m not offering command examples to drop and recreate an index. I don’tever recommend doing that as part of routine maintenance.
10.4.1 Recreating an index with DROP_EXISTING
As a quick reminder of what this will do:
■ The index will be rebuilt.■ If it’s a clustered index, there will be no impact on nonclustered indexes.■ Index constraints may be dropped and recreated automatically.■ You have to do one index at a time.■ For nonclustered indexes, you can specify a fill factor.■ SQL Server statistics on the index will be updated, so that SQL Server knows the
index’s new condition.
With that in mind, here’s the command:
CREATE [UNIQUE] [CLUSTERED] INDEX index_nameON schema.table_name(column_name)WITH (DROP_EXISTING = ON);
There’s a lot of information to fill in, so let me offer a concrete example. Suppose youwant to rebuild an index named IDX1, on the Person.Address table, and it indexes onthe table’s AddrID column. It’s a nonclustered index, but has a UNIQUE constraint,meaning every value in the column must be unique. Here’s what you’d run:
CREATE UNIQUE INDEX IDX1ON Person.Address(AddrID)WITH (DROP_EXISTING = ON);
I never use this syntax. I always use ALTER INDEX instead, as it’s easier and can do mul-tiple indexes at once. It also offers the online-rebuild option, if I need it. But you mayrun into existing maintenance scripts that use this syntax, so you should be able to rec-ognize it when you see it.

98 CHAPTER 10 Maintaining indexes
10.4.2 Rebuilding an index by using ALTER INDEX
As a reminder:
■ The index will be rebuilt.■ If it’s a clustered index, there will be no impact on nonclustered indexes.■ There will be no effect on index constraints.■ You can do multiple indexes with one command.■ You can specify a fill factor for nonclustered indexes.■ SQL Server statistics on the index will be updated, so that SQL Server knows the
index’s new condition.
Here’s how to do it:
ALTER INDEX index_name ON schema.table_name REBUILD;
Provide the correct index name and schema.table name (for example, Person.Address)in the appropriate places. Or, to do all indexes on a table:
ALTER INDEX ALL ON schema.table_name REBUILD;
10.4.3 Rebuild the index online
In SQL Server 2012 Enterprise Edition (and later versions), you can also execute thisas an online operation, which I described previously. Here’s how:
ALTER INDEX index_name ON schema.table_name REBUILDWITH (ONLINE = ON);
And, you can specify a new fill factor. If you don’t, the last-used fill factor will be usedfor the rebuild. Here’s how to specify a new one:
ALTER INDEX index_name ON schema.table_name REBUILDWITH (FILLFACTOR = number);
Provide a number such as 70 for 70% and you’re good to go. This can be used in com-bination with an online rebuild:
WITH (ONLINE = ON, FILLFACTOR = number
10.4.4 Reorganizing an index
As a reminder of what this will do:
■ The index will be reorganized, but not completely defragmented.■ If it’s a clustered index, there will be no impact on nonclustered indexes.■ Index constraints are not affected.■ You can do multiple indexes in one command.■ You cannot modify the fill factor.■ SQL Server statistics on the index will not be updated, so you typically want to
run an UPDATE STATISTICS command after reorganizing.

99Suggestions for index maintenance
Here’s the command:
ALTER INDEX index_name ON schema.table_name REORGANIZE;
Provide the correct index name and schema.table name (e.g., Person.Address) in theappropriate places. Or, to do all indexes on a table:
ALTER INDEX ALL ON schema.table_name REORGANIZE;
10.5 Suggestions for index maintenanceI’m going to offer suggestions for coming up with the right index maintenance strategy,including the right fill factor for your nonclustered indexes. I have a few assumptionsI make going into this, which are based entirely on my own experience with custom-ers. These aren’t hard-and-fast rules, but they’re the guidelines I tend to follow:
■ I don’t like to rebuild indexes during production hours, so I try to identify amaintenance window where a rebuild can be conducted.
■ When I’m on a version of SQL Server that supports it, I prefer to use onlineindex rebuilds, even though that requires more disk space. Disk space is cheapthese days, and online rebuilds avoid the chance that I’ll disrupt some otheruser or process that’s accessing the database, even during a declared mainte-nance window.
■ I try to minimize rebuilds, just because they do create impact in the database.■ I come up with a maintenance strategy on a per-index basis. That’s because each
index on each table tends, in my experience, to be used somewhat differently. IfI’m being a bit lazy, I’ll use a one-size-fits-all strategy and choose a strategy that’sgood (if not great) for all the indexes, but I try not to be lazy.
■ I try to find a good balance between index performance and disk performance.
With that in mind, here’s what I do:
1 I start by rebuilding all of my indexes. For my nonclustered indexes, I choose asomewhat arbitrary fill factor. I grab a number out of the air, usually 70.
2 I monitor fragmentation daily. When I start approaching 30%, I execute a reor-ganization on the index. If I get to that point quickly— say, in the middle of theworkday—I lower my target fill factor.
3 By the time I hit my next maintenance period for an index rebuild, I want tohave fragmentation at about 20-30%. If I get to that period and fragmentationis higher than that, I lower my target fill factor; if fragmentation is lower, then Iraise my target fill factor.
This often goes on for a few weeks, since in many cases I can only do rebuilds on theweekends. In other words, I want to hit Friday afternoon with 20-30% fragmenta-tion, which means I’m filling up my index pages as much as possible without over-fragmenting. If I hit that 30% threshold midweek, I’ll use a reorganization to buy
some time. In scenarios where I have a short nightly maintenance window, I can often
100 CHAPTER 10 Maintaining indexes
use a nightly index reorganization to keep fragmentation fairly low, but I always try toget that weekly rebuild (at least for busy indexes) to rebalance the fill factor for theupcoming week.
Again, not every index is the same because not every table gets used the same. Forexample, some databases have lookup tables that contain fairly static data. Becausethe tables don’t change much, their indexes don’t change much, and I might onlyrun an index rebuild once a month, once a quarter, or something like that. Some-times I just monitor the indexes and manually run a rebuild when it’s needed, for thatkind of table.
The point is to watch what’s happening with fragmentation, and to keep in mind thebalancing act between index fragmentation and disk performance.
I want to call special attention to the 30% number that I’ve used a couple of times.That’s just a kind of general rule that the SQL Server community uses; it does not meanthat an index with less than 30% fragmentation is just fine. Any fragmentation slowsthings down; with an especially large index, 30% fragmentation may well be too high forthe index to be useful. We ideally want 0% fragmentation, but we can’t practicallyachieve that, so we learn to live with a little fragmentation, and we actively maintain theindexes to minimize how much fragmentation we have to live with. Nothing but experi-ence will tell you what’s acceptable for a given application in a given environment.
10.6 Hands-on labFor this chapter’s hands-on lab, try to perform an index reorganization and an indexrebuild. The commands were provided in this chapter; if you’re using the Adventure-Works sample database, then odds are you won’t find much fragmentation or see yourrebuild or reorganization have much effect. That’s because AdventureWorks doesn’tcontain much data. But becoming comfortable with the maintenance commands is agood reason to try ’em out, anyway.
Because the command syntax is provided in this chapter, you won’t find sampleanswers for this lab on MoreLunches.com.
Go automaticSQL Server fan Michelle Ufford wrote a complete stored procedure that helps automatesome of the index maintenance balancing act. You can find it at http://sqlfool.com/wp-content/uploads/2011/06/dba_indexDefrag_sp_v41.txt.

Tuning index designs
By now, you should understand how indexes work, and how to maintain them. Butwhat do you do if some of your indexes are no longer hitting the perfect balance ofpositive and negative performance impact? It may be time to tune those things!
We’re about to embark on something that is traditionally collaboration betweendevelopers and DBAs, and we’ll potentially be modifying portions of the overalldatabase design (specifically, the index structure). Please follow along carefully,and be sure to follow the cautions and tips that I’ll offer.
11.1 How indexes can become less usefulThe indexes that a developer or DBA creates on a database are often put there as abest guess about what will provide the most balanced performance for the applica-tion. Keep in mind that indexes can both speed up and slow down queries, andfinding the perfect balance requires a deep understanding of how the database isbeing used by real-world users in real-world conditions. Sometimes that “best guess”isn’t 100% on the money.
Perhaps the database contains a lot more data than anticipated, and the natureof the data means that indexes aren’t providing much of a performance boost, butthey’re still slowing down data inserts and updates. Or perhaps a database hasbecome more read-only over time, and could benefit from having more indexes.Maybe users aren’t searching for records the way someone had anticipated, andentirely different indexes would be useful.
Whatever the case, sometimes the initial index structure in a database isn’t theperfect one anymore. Tuning is the process of figuring out where the best balance
101
lies for current usage patterns.

102 CHAPTER 11 Tuning index designs
Index tuning is as much art as science, and this book isn’t going to go into every pos-sible gory detail. Instead, I’m going to provide the best starting point I can, and help youunderstand the process. In most cases, what I’m giving you will help you validate thatthe current indexes are providing a good, balanced performance. In some cases, you’llget suggestions for index changes that can create a positive overall impact.
11.2 Using Profiler to capture usage patternsThe important thing here is to make sure we’re not guessing at how the database isbeing used. Instead, we need to observe how the database is being used, right in theproduction environment, and use that data to see what indexes are offering the bestbalance of performance. We’ll start by using SQL Server Profiler to capture represen-tative, real-world traffic that shows us how the database is being used.
NOTE Although it’s fine in a lab environment, in production you shouldavoid running Profiler on the server from which you’re planning to capturetraffic. Profiler imposes a lot of overhead, and that can affect your results.Instead, install SQL Server’s management tools on a client computer, and runProfiler there.
I’m going to assume you don’t have the management tools from SQL Server 2012 orlater, which means you’ll need to build a trace template. If you do have SQL Server2012 (or later) management tools, there’s a built-in trace template already, so you canskip down to “11.2.2: Capturing the traffic.” As a suggestion, try to get a copy of theSQL Server 2012 management tools. If you have any installations of SQL Server 2012,then you’re licensed to use its tools, and they can be used with older versions of SQLServer, too.
TRY IT NOW I suggest that you follow along with the next two sections. Thetrace template, in particular, is something you can easily reuse in your produc-tion environment. You might install SQL Server’s management tools on yourproduction client computer, so you can create the trace template right now.
11.2.1 Creating a trace template
You’ll need to start by launching SQL Server Profiler. It’ll ask you to connect to aserver, but for now hit Cancel on that dialog.
Find and click a New Template button on the toolbar. Choose the appropriateserver type, such as Microsoft SQL Server 2008, and name the template something like2008 Tuning. I advise using “Tuning” somewhere in the name, to help clearly identifythe template as being for tuning.
The Event Selection tab is where you’ll need to carefully select the following(check all checkboxes that aren’t grayed out in the UI):
■ Under Stored Procedures, choose RPC:Completed and SP:StmtCompleted.■ Under TSQL, choose SQL:BatchCompleted.
Hit Save to save the template.

103Using the Database Engine Tuning Advisor
11.2.2 Capturing the traffic
Open SQL Server Profiler, and if you aren’t prompted to connect to a server then hitthe New Trace button in the toolbar. You’ll connect to the SQL Server instance thatcontains the database you want to tune; again, do not run Profiler on that same server.Run it from your client computer, if possible.
Name your trace whatever you like—“AdventureWorks2012 trace 1” or something.Select the Tuning template (if you created a tuning template, select that). You alsoneed to decide where you’re going to save the trace data: I prefer using a file on mylocal computer. You can also save the information to a SQL Server database, but itneeds to be a different server than the one you’re profiling, so you don’t overly impactperformance. I’ll often install SQL Server Express on my local computer, so I can savethe trace data there.
Before you hit Run to start the trace, make sure that you’re about to capture repre-sentative traffic. In other words, you need to run this trace during a period when usersare using the database in a typical fashion. I like to try to capture traffic for an hour orso, provided I’m sure that’s representative in terms of the activity users will be conduct-ing. You can optionally enable an automatic stop time for the trace (useful when youneed to run one overnight in order to catch that representative traffic). SQL Servernot only needs to see the queries users are running, it also needs an idea of how ofteneach query is run, so that it can help create balanced recommendations.
If you didn’t configure an automatic trace stop time, click the Stop button in thetoolbar of SQL Server Profiler when you’ve captured enough traffic. You can nowclose Profiler.
TRY IT NOW Go ahead and try running a capture. You’ll notice that, until yourun some queries, there won’t be anything to capture. That’s okay. In yourhands-on lab for this chapter I’ll help you capture some actual traffic.
11.3 Using the Database Engine Tuning AdvisorWe’re about to jump into a process that alters your database’s index structure, so awarning is in order:
WARNING Don’t make any changes to your indexes until you’ve backed upthe existing index structure.
11.3.1 Backing up an index
To back up an existing index, and make it easy to recreate the index if needed, youcan use SQL Server Management Studio:
1 Locate the index in the Object Explorer.2 Right-click the index and select Script Index as, then choose CREATE To, then
choose File…. 3 Provide a filename (usually with a .sql filename extension), saving the file some-
place safe.

104 CHAPTER 11 Tuning index designs
The result will be a text file containing a CREATE INDEX statement that will com-pletely recreate the index at need. If you have a lot of indexes, that’s going to be atime-consuming process. Instead, consider grabbing the SQL script from http://sqlship.wordpress.com/2009/12/15/script-indexes-sql-server-2005-sql-server-2008/, which willscript out all of your database’s indexes as CREATE INDEX commands.
11.3.2 Running the Advisor
The Database Engine Tuning Advisor is a separate utility installed along with SQLServer’s administrative tools; it isn’t part of SQL Server Management Studio. That said,you can easily launch it from the Tools menu in SQL Server Management Studio. TheAdvisor is designed to analyze query traffic and help decide if you’ve got the rightindexes in place to maximize performance for those queries.
NOTE Older versions of SQL Server (SQL Server 2005 and earlier) called thistool the Index Tuning Wizard, and it might not be accessible directly fromolder versions of SQL Server’s management console. I always suggest usingthe latest management tools whenever you can practically (and legally) do so.
Start by connecting the Advisor to the SQL Server instance that contains the databaseyou’re trying to tune. Note that what you’re about to do will create a performanceimpact on SQL Server; the Advisor is going to ask it to optimize all the queries you cap-tured using Profiler, but to not actually run the queries. This is a process you shouldideally do during a slow period in user activity, or during a maintenance window.Because some of SQL Server’s query optimization decisions are based on currentworkload, the Advisor won’t get 100% accurate optimizer results, but it’s designed towork with “close enough.”
As shown in figure 11.1, you’ll come up with a name for this tuning session, pointthe Advisor to the trace file (or database) that you captured earlier, and give it a data-base in which to store its temporary work data. You’ll also specify the database beingtuned, which in the figure is AdventureWorks2012.
The Tuning Options tab is where all the fun happens:
■ You can choose to limit how long the Advisor tries to optimize the workload. A large tracecapture can take hours to process, so if you’re running the Advisor during a main-tenance window, the Limit tuning time option lets you ensure it’ll quit workingbefore the maintenance window ends and your users come back to work.
■ You can have the Advisor evaluate several different aspects of your Physical Design Struc-tures, such as all indexes, nonclustered indexes only, and so on. You can also have itevaluate the effectiveness of what’s already in place, meaning it won’t make sug-gestions about things you could potentially add.
■ You can specify existing items to keep. This includes the option to consider discard-ing everything and starting from scratch.
Once you’ve dialed in the options you want, click Start Analysis in the toolbar, and
go get a cup of coffee. No changes will be made at this time; you’re only asking for
105What you can and can’t do with indexes on someone else’s database
recommendations. The final report will show an estimated improvement percent-age, along with recommendations, if any were generated. You can then choose toimplement the suggestions, if desired. Figure 11.2 shows a portion of the completedreport, and you’ll notice in this case there were no suggestions for improvement.That’s good! It means everything’s already pretty well optimized for the workloadyou provided.
11.4 What you can and can’t do with indexes on someone else’s databaseThis is a tricky bit. Performing index tuning is pretty straightforward for databaseswhere you own, or have access to, the application’s code. You, or a developer whoworks with you, can easily verify that the application doesn’t have any hard-codedinternal dependencies on a specific index.
When you’re working with a database that supports a third-party application (anapplication you don’t have the source code for) things aren’t so straightforward. Mostapplications don’t know, or care, what indexes exist or don’t exist. For the mostpart, indexes are entirely a SQL Server-side thing, and are invisible to the applica-tions that connect to SQL Server. There are exceptions. You can potentially break
Figure 11.1 Set up the Advisor to tune your database.
applications that:

106 CHAPTER 11 Tuning index designs
■ Have internal maintenance routines that explicitly rebuild, reorganize, or otherwise refer-ence specific indexes. This doesn’t apply to all applications that run their own indexmaintenance routines; for example, an application that runs ALTER INDEX ALLdoesn’t refer to specific indexes.
■ Have queries that use index hints. These are generally regarded as a poor practice,because they override SQL Server’s built-in query optimization intelligence, butthey exist.
How can you tell if an application falls into one (or both) of these scenarios? Well,without access to the source code, it’s a bit difficult. I’ll typically spin up a virtualmachine that has a copy of the application’s database, then run a copy of the applica-tion against that copy of the database. That way, I can remove or modify indexes andsee if anything breaks. There are certainly more formal ways of getting SQL Server totell you what indexes are being used, also, but I’ve tended to find the “try-it-to-see-if-anything-breaks” approach will keep me from potentially overlooking something.
If you’re able to determine that an application does not explicitly refer to any spe-cific indexes by name, you’re pretty much free to modify the indexes in the databasehowever you like. That’s just the technical aspect of modifying the indexes. It’s entirelypossible that the application’s vendor, if they discover you’ve been tampering withtheir indexing strategy, might not want to offer you technical support on the applica-
Figure 11.2 Review the Advisor’s report to see improvement recommendations.
tion. That’s something you can discuss with them in advance.

107Way above and way beyond
You can—and absolutely should—also back up the original indexes, making it easyto put them back in place if needed.
11.5 Hands-on labI’d definitely like you to play with profiler and the Advisor a bit, with the understand-ing that the AdventureWorks database doesn’t have a lot of data, and we don’t have away of generating a lot of traffic for you to capture. That said, it’s still worth goingthrough the process, so that you’re familiar with it.
Start a tuning trace against your AdventureWorks2012 database. While the trace isrunning, go into SQL Server Management Studio, open a new query window, and runthe following:
USE AdventureWorks2012;GO
SELECT Name,StartTime FROM HumanResources.ShiftORDER BY Name,StartTime
SELECT * FROM Person.Address
SELECT * FROM Person.Person
That will generate a bit of traffic for Profiler to capture. Stop the trace capture, anduse the resulting trace data to run through the Database Engine Tuning Advisor. Seewhat suggestions (if any) it offers. There’s no right answer for this lab, so you won’tfind a solution on MoreLunches.com.
NOTE As I mentioned earlier, it’s likely you won’t generate any Advisorresults, because it won’t have much to work with. It’s important to see how touse this tool, though, because in order to see it in action you’ll need to run iton a production network, and you certainly want to know what you’re doingwhen that time comes!
11.6 Way above and way beyondAs an administrator, you don’t necessarily need to know much more about indexdesign tuning than I’ve presented in this chapter. But it’s useful to know more, so ifyou’d like to get some deeper background on index design, keep reading the extremelyoptional remainder of this chapter.
I’m going to try to explain some of the more advanced index design choices thatyou might consider, that the Advisor might recommend, or that you just might want tobe on the lookout for in your own databases.
11.6.1 Index key size
SQL Server works best with keys that are of a fairly limited size. There’s no real hard-and-fast rule here, but in general you want to try to keep key sizes small. Indexing on a20-character text field (like a name) tends to perform better than an index built on
a 200-character field. Why? Mainly because when you have a smaller key, more values
108 CHAPTER 11 Tuning index designs
can fit on a single 8 KB index page. That means SQL Server needs fewer disk opera-tions to read through the index, and fewer disk operations always helps performance.It also means SQL Server can cache more pages in memory, avoiding disk operationsaltogether for cached pages.
Obviously, you put your indexes where they need to be; you don’t necessarily forgoindexing a column just because it’s a big column. But some common-sense tabledesign decisions can help decrease key size. Let’s say you have a table that uses a SQLServer IDENTITY specification to create unique, numeric values for each row in thetable. Most tables have a column like that, but what data type do you choose for it? SQLServer has numerous integer data types, all of which are usable, but all of which offerdifferent key sizes. A TINYINT, for example, is just 1 byte long, making for a very smallkey size but it only offers 255 possible key values, so unless you know you’ll never havemore than 255 rows of data, TINYINT isn’t a very good choice for a unique identifier.BIGINT can hold an enormous number of values (more than 9 quintillion), but eachvalue takes 8 bytes. That’s twice the storage needed than for a regular INT, which stilloffers more than 2 billion possible identifier values. So selecting an appropriate datatype can help provide a good balance for index performance.
11.6.2 Index selectivity
Selectivity is a measurement of how unique the various values in an index are. Let’s sayyou built an index on a column that holds U.S. state names: you’d have a bit morethan 50 possible values (including places like Washington, D.C.). Now let’s say that thetable held a million data rows. Fifty or so values out of a million rows isn’t very selective.In other words, the index doesn’t let you narrow down the rows very much, sincethere are so few index values compared to the number of data rows.
SQL Server tracks, as part of its statistics, how selective an index is. Indexes withlow selectivity may not wind up being used often, which means you’ll be incurringoverhead in keeping the indexes up-to-date, but not getting much actual benefit fromthe indexes.
11.6.3 Compound indexes
Although many indexes are built on a single column, SQL Server supports compoundindexes, which are built on multiple columns. There’s a trick to making these as effec-tive as possible in terms of improving query performance, and it’s to keep the leadingedge of the index as selective as possible.
Let’s say you have a table with a column for a customer’s first name, and a secondcolumn for the customer’s last name. You might well build a compound index thatincludes both columns. The leading edge of the index is the first column: would youput first name first, or last name first?
In most English-speaking cultures, there’s a tendency to want to make the com-pound index “last name, first name,” because when we think of looking up someone
by name, we tend to start with the last (or family) name. But that won’t necessarily make
109Way above and way beyond
the performance of the index better. You need to know a bit more about how the datawill be queried by users.
If users will primarily be looking up users by last name, then making the last namethe leading edge of the index might make sense. You have to ask yourself why you’remaking a compound index that includes the first name, if the last name is what mostqueries will be focused on!
But if users will primarily be looking for both first name and last name, then puttingthe first name as the compound index’s leading edge might make more sense. A lot ofpeople share the same last name, which might make it less selective. Let’s say you havea hundred customers with the last name Jones, but only two customers with the firstname Don. Putting the first name as the leading edge of the index means SQL Servercan immediately narrow down the results to those two rows containing Don, and thenscan those two rows to match the requested last name. If you’d put the last name first,SQL Server would only be able to initially narrow down to 100 rows, which it wouldthen have to scan in order to match the desired first name.
11.6.4 Covering indexes
The last index trick you should know about is a covering index. This isn’t a specialtype of index that you explicitly create, but is rather any regular index—single-columnor compound—that contains all of the data needed to satisfy a query.
You know from previous chapters that a nonclustered index provides a pointer tothe actual data row you’re after, which incurs a bit of a performance hit when SQLServer has to jump to the data row. Suppose you have a customer table that containscolumns for first name, last name, and mailing address. Say that you built a com-pound index on the first name and last name columns. Now imagine that you executea query like SELECT FirstName,LastName FROM Customers WHERE LastName ='Jones'. You can expect SQL Server to use your compound index to help speed up thatquery, but because in this case the index itself contains the two values you asked for,SQL Server won’t ever make the jump to the data row. Because you asked only forvalues that were already in the index, the index covered the query’s data, so there wasno need to jump to the data row to look up more information.
It can be tempting to try to build all kinds of covering indexes to help speed up que-ries, but you have to exercise restraint. Keeping those indexes maintained can cause anenormous negative performance impact in a database that has a lot of updates happen-ing, and the performance bonus of a covering index won’t offset that cost.

Reading queryexecution plans
When SQL Server is given a query to execute, it runs the query through an internalquery optimizer. The optimizer looks at what the query is trying to do, what indexesare available to help, what condition those indexes are in, what load the server iscurrently handling, literally dozens of different factors. It considers all the ways itmight execute the query—scanning a table, seeking in an index, and so on. There’sa limit on how long it’ll run through the permutations, because eventually it’ll bewasting time instead of running the query! At some point it’ll pick the best choicefound by then, and that becomes the execution plan for that query. SQL Server thenruns the plan, executing the query.
12.1 What’s an execution plan?Imagine that you need to drive to work. You probably have several different routesthat you can use, and you might take into account several factors:
■ How much fuel do you have in the car? If you’re getting low, you might discard alonger or a more stop-and-start routing.
■ What condition are the roads in? Watching the morning news or checking anonline traffic report might make one route more attractive than another.
■ Do you have any additional stops along the way? Those errands might dictate spe-cific routes.
SQL Server goes through that process each time it needs to run a query. It won’tspend forever contemplating every available option, any more than you’ll spend anhour researching traffic reports before you jump into your car for a half-hour drive!
110

111What’s an execution plan?
Just as you probably do, SQL Server can also cache, or save, execution plans forfuture reuse. That saves time when executing the same query over and over, since SQLServer won’t have to go through the optimization process every time. Plans tend to bemost easily cached for stored procedures and views, because those are persistent objectsthat SQL Server expects to see run again and again. An ad-hoc query, or a query that ishanded to SQL Server instead of being placed into a stored procedure, won’t benefitas much from cached execution plans. It isn’t that ad-hoc queries’ plans aren’tcached; it’s just that SQL Server’s likelihood of reusing them before they’re removedfrom the cache isn’t as high.
NOTE Although administrators can’t do anything about it, developers can con-tribute to application performance by having their applications run storedprocedures, rather than by sending ad-hoc queries to SQL Server.
You can use SQL Server Management Studio to see the execution plans that SQL Servercomes up with. These are stored internally (and can be saved to disk) as XML-baseddata, but SQL Server also provides a graphical visualization of the execution plan.
TRY IT NOW I’m going to walk you through executing an ad-hoc query inAdventureWorks2012; please follow along and make sure you’re getting simi-lar results.
Start by opening SQL Server Management Studio and connecting to your SQL Serverinstance. Open a new query window, and make sure it’s focused on the Adventure-Works2012 database. In the query window, enter the following query:
SELECT p.Title,p.FirstName,p.LastName, ea.EmailAddressFROM Person.Person AS pINNER JOIN Person.EmailAddress AS eaON p.BusinessEntityID = ea.BusinessEntityIDWHERE Title IS NOT NULLORDER BY LastName ASC, FirstName DESC
Execute the query to make sure you don’t have any typos; as you can see in figure 12.1,I got about 1,000 rows of data from the query.
Now let’s see the execution plan SQL Server came up with. We’ll start by askingSQL Server to display the estimated plan; this submits our query to the optimizer, butdoesn’t run the query. The estimated plan is usually close to the final plan, but thereare a few things SQL Server doesn’t take into account. We’ll compare the actual planin a bit. For now, in SQL Server Management Studio, click the Query menu and selectDisplay Estimated Execution Plan (or press Ctrl+L). Figure 12.2 shows what youshould see.
We’ll spend some time interpreting this output in the next section; for now, let’ssee the actual execution plan, too. From the Query menu again, select Include Actual
Execution Plan (or press Ctrl+M). This time, you’ll also have to run the query to get
112 CHAPTER 12 Reading query execution plans
Figure 12.1 Run this query to make sure you’re getting results.
Figure 12.2 The estimated execution plan is in the bottom pane.

113Common plan symbols and what they mean
the execution plan. Figure 12.3 shows what I got; your results should be similar ifnot identical.
You’ll notice that the query results show up in their own tab, separate from the exe-cution plan. This actual plan looks a lot like the estimated one, which is common,especially for simple queries running against a small set of tables. You’ll also notice atextual hint above the graphical plan: Missing Index (Impact 87.844). That’s SQLServer’s way of saying, “Hey, I could have run this a lot faster—maybe 87% faster—ifthis other index had existed.” Take those tips into consideration, but don’t let themfreak you out. An index that would speed up this particular query might slow downmany, many others, so you have to put things into context. For example, this plan tooka couple of milliseconds to run. A savings of 87% would still be a couple of millisec-onds—87% seems like a big potential savings, but it’s 87% of a tiny number, so anyimprovement will be pretty tiny, too.
12.2 Common plan symbols and what they meanLet’s run through some of the major symbols you’ll see (refer to figures 12.2 and 12.3as you’re running through this list). I’m going to provide the icons used by SQL Server2012; older versions have slightly different icons, and in some cases the operation
Figure 12.3 You have to run the query to get the actual execution plan.
names may even be slightly different.

114 CHAPTER 12 Reading query execution plans
Scan is usually a bad thing. This is like me giving you a huge list ofnames, which might not be in any particular order, and asking you to
find one specific name. In anything but a very small table (maybe a dozen rows), this isan inefficient operation. You’ll see this as table scan, clustered index scan, and non-clustered index scan.
NOTE In the icons, the little brackets are added to the clustered index opera-tion; the nonclustered index operation doesn’t have the little brackets.
A seek is a good thing. This is when SQL Server uses a B-tree index, eitherin a clustered index seek or a nonclustered index seek.
In conjunction with a seek, you’ll often see a Bookmark Lookup. After seekingor scanning in a nonclustered index, SQL Server uses the Bookmark Lookup to
jump to the actual data row. For a table that has a clustered index, it’ll be a fast scan ofthat index; for a table that’s only a heap, it’ll be a jump to the row ID (RID) for thedesired row (which may involve one or more forwarding hops, because it’s a heap).Older versions of SQL Server call this a clustered index seek or RID Lookup, for clus-tered indexes and heaps, respectively.
Next up is a Filter operation, which goes through the current result set one rowat a time and removes rows that don’t meet whatever criteria you’ve specified.
This is less efficient than querying only the data you wanted in the first place, andoften indicates that a suitable index wasn’t available.
SQL Server has several ways of connecting two tables. The most common one,the Nested Loops operation, takes each row in the first table, and searches the
second table for matches. The first, or outer table, may be internally sorted first toimprove search speed. Let’s say I ran the following:
SELECT One,Two FROM TableA INNER JOIN TableB ON Three = Four
TableA is the outer table, and I’m going to look at all the values in its Three column.For each value, I’ll look in TableB’s Four column to try to find matching values. Rowswhere I find a match are passed on to the next operation as my result.
A Hash Match is another way to join two tables. SQL Server will use this whenkeys are large, and for certain operations such as DISTINCT and UNION. SQL
Server executes a quick cryptographic hash on each row in the first table, then looksfor matching hashes in the second table.
A Merge Join is what you saw in the example execution plan that I ran earlier.This is an efficient way of matching two tables to each other. In my example, I
matched the tables on their BusinessEntityID columns, both of which are the keys forthe tables’ respective clustered indexes. Imagine taking two stacks of papers, each of
which has a person’s name written on it. The stacks have been sorted into alphabetical
115How to read an execution plan
order, so all you have to do is quickly merge them. This technique requires thosestacks to be sorted first and in my earlier example the fact that I was doing this on anexisting index made that possible.
You’ll see a Compute Scalar operation when SQL Server has been asked to domath (adding the value of two columns, for example).
The Stream Aggregate operation comes up when you’re grouping rows, per-haps grouping all of the sales orders for a particular region so that you cancompute a regional total value. This operation will often sort the data if it
hasn’t already been sorted.
The Sort operation does exactly what the name implies: sorts the data. This canbe a bit slow for large data sets, and works better if the data is presorted, as
would be the case if there were an index on the data being sorted.
There are a couple of other operations you can often expect to see. These have moreto do with some fun bits of SQL Server internals, but it can be interesting to under-stand what they’re doing:
■ The Parallelism operator means that SQL Server is splitting some of the queryoperation across multiple threads of execution. These usually come in sets:Repartition Streams indicates that SQL Server is taking multiple streams of dataand rearranging them into other multiple streams to facilitate parallel process-ing; Gather Streams is where SQL Server brings everything back together into asingle output stream. The opposite of that is Distribute Streams, which engagesparallelism by splitting a bunch of records into multiple streams for simultane-ous processing.
■ Index and Clustered Index modifications, including Update, Insert, and Delete,only occur in UPDATE, INSERT, and DELETE queries, and they can visually showyou how much work SQL Server is doing to keep indexes updated when per-forming those queries.
With some of those in mind, let’s look at how to interpret them in the context of a realexecution plan.
12.3 How to read an execution planFirst, remember your goal when reading an execution plan: you might not be able to fixanything! You’re trying to spot bad queries or operations that indicate there’s an oper-ational or design problem. You’ll typically need to report these to a vendor or a devel-oper. You’re diagnosing the problem, even though you may not be able to fix theproblem all by yourself.
Let’s check out that execution plan again (figure 12.4). These are read from right to left, so we start with two Clustered Index Scan opera-
tions. Wait, did I say a scan? Aren’t those slow? Well, yes, but in this case it’s because

116 CHAPTER 12 Reading query execution plans
I’m asking for all rows in the table, rather than scanning for a specific value. But you’llnotice that 91% of the query’s execution time came from that scan. Retrieving datafrom disk is expensive.
Next, the two stacks of sorted rows are run through a Merge Join, giving a singleresult set. That’s passed to a Sort, although I’m betting the data was at least partially inthe right order already, because the Sort didn’t take long. The last operation, SELECT,indicates that the query is over and the results are ready.
TIP Hovering your cursor over any operation reveals additional details.
TRY IT NOW I’d like you to look at the little hover-over details box on yourown computer; I’ll describe what you’re seeing.
My “big three” pieces of additional information are:
■ Actual Number of Rows—How many rows the operation returned.■ Estimated I/O Cost—The amount of disk time spent executing the operation.
Reducing this number is usually the best way to improve performance.■ Estimated CPU Cost—Tells you how much processor time the operation took
to complete.
Consider reading the fantastic article at www.simple-talk.com/sql/performance/
Figure 12.4 The estimated execution plan is in the bottom pane.
execution-plan-basics/ for more details on how plans are cached, and how to interpret

117What to look for in an execution plan
various kinds of plans. I’m focusing on graphical plans because they’re the easiest tostart with; that article also covers text-based plans and XML-based plans, which canmake it easier to work through extremely complex queries.
12.4 What to look for in an execution planYou’re staring at a plan. Now what? Start by looking for low-hanging fruit, meaningthe highest-cost operations in a query. If an operation contributed 80% to the overallquery, then reducing the execution time of that operation can help the most inimproving the overall query performance. The biggest single “win” can often be hadby adding an index, but be very careful about over-improving one query at a cost to allthe others. You can rarely look at just one query; you need to consider the entire sys-tem. That’s where the Database Engine Tuning Advisor can help.
Some other major considerations—things I generally try to keep an eye out for—include:
■ Major differences between estimated and actual plans are often caused by stale statistics.That’s much like watching a traffic report in the morning and heading off towork hours later. Your actual commute will be different than what you’d esti-mated, because your statistics are old. To fix this in SQL Server, manually updatestatistics or allow automatic statistics updates to correct this problem. Note thatyou won’t spot this unless you’re checking queries for both their estimated andactual plans, which SQL Server Management Studio won’t do by default.
■ Those “Missing Index” messages when displaying execution plans. As I noted earlier,those aren’t always a mandate to create the missing index, but they’re definitelysomething that needs to be considered.
■ Table scans on anything other than very tiny tables. That always indicates that a suit-able index wasn’t available. Adding the index isn’t necessarily a foregone con-clusion, because, as you know by now, indexes are all about compromise.Frequent table scans across a large table may also indicate that an index is miss-ing (perhaps accidentally dropped) or other problem.
■ Bookmark lookups to a RID. Because newer versions of SQL Server use the sameicon for that as well as a clustered index seek, you’ll need to dig into that detailspop-up every time you see a bookmark lookup, especially one that has a highpercentage of execution time. RID lookups indicate a hop from a nonclusteredindex to a heap, and heaps are almost always bad.
■ Hash joins aren’t inherently bad, but they’re not very efficient. If you’re seeing a lot ofthem across a large number of queries, there might be indexes that could beadded to help drive a nested loop or, even better, a merge join.
■ Massive numbers of joins in a single query can be tough for SQL Server to execute effi-ciently. I start paying close attention to queries with five or more tables beingjoined, although five tables isn’t a danger zone for SQL Server. It’s where I startchecking to make sure the right indexes are in place to facilitate those joins.
Start showing me queries with seven, nine, eleven, or more tables being joined,
118 CHAPTER 12 Reading query execution plans
and I start wondering if maybe the database design hasn’t been overnormal-ized. It’s far from trivial to fix that, but it’s worth a discussion with the developeror vendor.
At the end of the day, you’re looking for long-running, high-percentage operations soyou can report them to a vendor or developer. They might not be seeing the same exe-cution plans in their development environments, and sharing your plans with themcan help them improve their code, or make suggestions for tuning your particular sys-tem. Saving plans as XML (easily done from the File menu in SQL Server ManagementStudio when you’re viewing a plan) is a great way to share plans, because the XML canbe easily attached to an email.
12.5 Hands-on labAnalyze the execution plan on the following query (which uses the AdventureWorks-2012 database):
SELECT Sales.SalesOrderDetail.OrderQty ,Sales.SalesOrderDetail.SpecialOfferID ,Sales.SalesOrderDetail.UnitPrice ,Sales.SalesOrderDetail.UnitPriceDiscount ,Sales.SalesOrderHeader.Status ,Sales.SalesOrderHeader.AccountNumberFROM Sales.SalesOrderDetailINNER JOIN Sales.SalesOrderHeader ON Sales.SalesOrderDetail.SalesOrderID =
Sales.SalesOrderHeader.SalesOrderIDORDER BY Sales.SalesOrderDetail.UnitPrice DESC
See if you can now answer a few questions about the execution plan:
1 There are two tables being joined, so you should expect to see at least two oper-ations running on the right-hand side of the plan. What are the first twooperations? Note that you may only get one operation if your SQL Server com-puter only has a single processor. In a virtual machine, you can try adding a sec-ond virtual CPU so that SQL Server can use parallelization.
2 What kind of partitioning type do the parallelism operators use? You’ll need tolook in the pop-up details box for this answer.
3 Given the type of partitioning, what kind of join operator might you expect tosee next?
4 Do you notice anything unusual about the icons in this execution plan, com-pared to the icons you saw in previous examples in this chapter?
5 What’s the most expensive operation in this execution plan?
You’ll find answers at MoreLunches.com. Find this book’s cover image, click it, andlook for the file downloads section.

Block anddeadlock analysis
If only one or two users needed to get to your data, then locking and blockingwouldn’t be necessary, but there wouldn’t be very much point to having SQL Server,either! As it is, concurrent-access database systems like SQL Server implement lock-ing to help ensure individual users don’t overly impact one another when they’reall accessing the same data. In this chapter, we’ll look at what locks do, how theywork, and how they can negatively impact system performance. I’ll be focusing onhelping you gather evidence of poorly written or slow-running queries, so that youcan work with a developer or vendor to help improve performance.
13.1 What’s locking and blocking?Imagine a bunch of people gathered around a bulletin board, all trying to read theposted information. As some are trying to read the list, others are erasing items andscribbling in new ones. Sometimes, people don’t get to read an entire item beforesomeone else is erasing it. Sometimes, two people are trying to rewrite the sameitem at the same time, getting into arguments, writing over each other’s post, andgenerally creating chaos.
Locking is a SQL Server feature that helps manage that process. Whenever youaccess data in any way, SQL Server locks it. If you’re trying to read data, for exam-ple, SQL Server quickly places a shared lock on the data, allowing others to read it(peering over your shoulder at the same list, as it were), but preventing anyone elsefrom changing the data until you’re done reading it. If you need to change data,SQL Server puts a stronger lock on the data, preventing anyone else from peekingat it until your change is complete.
119

120 CHAPTER 13 Block and deadlock analysis
Blocking is a natural outcome of locking. If you’re changing something, and I’mtrying to read it, my process gets blocked until you’re done changing it, your lock isreleased, and I’m allowed to take my own lock. Because most queries execute soquickly, locks don’t last for long (we’re talking milliseconds, here), so nobody getsblocked for long. But in an extremely busy database application, particularly one withpoorly designed or long-running queries, block times can start to add up. Users findthemselves waiting for perceptible lengths of time, and although SQL Server isn’t nec-essarily working all that hard, the overall application starts to feel sluggish.
Being able to monitor locking and blocking, and to spot problem areas, is a key tohelping maintain SQL Server performance. Sometimes, performance doesn’t alwaysdrag because SQL Server is out of memory or because the processor utilization ispegged; sometimes, blocking makes the application feel slow.
13.2 Understanding transactionsTransactions play a key role in the lifetime of a lock. A typical SQL query, like a SELECTquery, is an implicit transaction. That is, any locks needed to execute the query willonly last until the query is complete. That’s pretty easy to understand, and in mostapplications you’ll rarely run into blocking issues with those simple queries.
Sometimes, a developer needs several queries to execute together in a batch. Per-haps you need to create a customer order, and attach several items to it. You don’twant to insert the rows representing just some order items, because then the orderwould be incomplete. A developer might take those several simple queries and attachthem to each other in an explicit transaction.
With an explicit transaction, all of the statements in the transaction will either failtogether, or succeed together. In their code, the developer can even abort the transac-tion, and SQL Server will magically undo everything that the transaction had done upto that point.
Unfortunately, that magic involves locking. The queries inside the transaction stillneed to lock data in the same way that they would if they were running individually,outside a transaction. But because SQL Server needs the ability to undo everythingthat happened in the transaction, each query’s locks don’t go away when that onequery completes. Instead, the locks stay in place until the entire transaction is com-pleted. The more queries that get jammed into the transaction, the longer thoselocks will live, and the longer they’ll block others from accessing the same data. If thetransaction happens to be accessing a lot of data—and therefore locking it—there’s agood chance more people will be blocked, increasing the perception of poor applica-tion performance.
13.3 Types of locksSQL Server thinks about locks in two ways: what is being locked, and how it is beinglocked. When choosing what to lock, SQL Server tries to lock the smallest bit of data
possible, so that it can minimize the blocking impact on other users. Keeping track of
121Types of locks
a bunch of tiny locks can be memory- and processor-intensive, so sometimes SQLServer will escalate the lock, and lock a larger chunk of data.
Let’s say you have a database table with 100 rows of data. You start a transactionthat modifies a single row, so SQL Server locks that row. Your next query locks anotherrow, and so on. At some point, say, 30 rows in, SQL Server decides it’s tired of keepingtrack of all those single-row locks. It releases them, and instead acquires a lock on theentire table. Even though you’re not technically modifying the entire table, you’venow prevented anyone else from working with it. For this reason, lock escalation issomething administrators have to keep a close eye on. That kind of “overlocking,” as Icall it, is almost always the result of poorly designed queries and transactions, whichyou’ll have to report to a developer or vendor for analysis and correction.
What does SQL Server lock? Here’s the list, more or less in order of increasing size:
■ Single row of data■ A key (a row of data within an index)■ An entire 8 KB page of data■ An entire extent of 8 pages■ An entire heap or index■ An entire table■ An entire database file on disk■ An entire database
I’ve omitted a couple of the more rare lock types, because we’re going to focus onlocks that deal with user data. SQL Server more or less follows this list for escalations: itmight start by locking a row, but might escalate to all of the rows on a page, and thento an entire table.
You’ll notice that some of those lock types relate to tables, while others (such as akey lock) relate to indexes. That’s because indexes change, and when updating themSQL Server has to get a lock on the data before the change can be made. You can startto imagine how many locks a single change might involve: if you modify a row in atable, and that table has 12 indexes, then you might have to have 13 locks! One lockwill hold the row you’re changing, while the other 12 will let the indexes be updated.That’s how block times can start to add up, because now all 13 locks have to be helduntil both the table row and all 12 indexes are updated, something that might take aperceptible period of time.
The main types of locks SQL Server can hold are:
■ Shared—Allows someone else to read, but not change, the data. SQL Serverallows multiple Shared locks on the same data.
■ Update—Allows someone else to read the data but tells SQL Server that the datais being read with the intent of updating it. SQL Server only allows one Updatelock on a given piece of data, but it will allow multiple Shared locks at the same
time. Update locks are eventually converted to an Exclusive lock when the
122 CHAPTER 13 Block and deadlock analysis
query makes the update. The idea here is that UPDATE queries are technically atwo-step process, with the first step reading the existing data and the secondstep modifying it. An Update lock helps keep the data available for others toread for as long as possible.
■ Exclusive—Used to change data. SQL Server will allow one and only one Exclu-sive lock on a given piece of data, and it won’t allow any other locks on thatsame data. If you’re trying to change data, and therefore trying to acquire anExclusive lock on it, you’ll be blocked until all other existing locks go away.
Thanks to escalation, SQL Server has to take a lot more locks than you might think.Let’s say you get an Exclusive lock on a row. SQL Server doesn’t know what your plansare for the entire transaction, so it has to reserve the right to escalate that lock to apage, extent, table, and so on. At the same time it gets your Exclusive lock on therow, it also gets an Intent Exclusive lock on the page, extent, table, and so on. Thoseintent locks are how the server enables itself to escalate your lock, if needed. SQLServer has to acquire the Intent locks first, meaning it starts from the largest object(say, the entire database) and works its way down until it reaches the data it wants thereal lock on.
SQL Server also keeps track of a lock’s isolation level. Isolation describes how well atransaction is protected from others. In a Read Uncommitted query, a SELECT statementis allowed to read data without first obtaining a Shared lock. That means other trans-actions might come along and obtain an Exclusive lock on the data, and that SELECTstatement might be reading data that is actively being changed. That’s called a dirtyread, because the data being read might be dirty, or not fully committed. That level ofisolation (technically I suppose it’s nonisolation) helps improve concurrency, but theapplication has to be written to deal with potential data integrity problems. There arelevels of isolation, but I’m not going to focus much on them because at a low level ofadministration you can’t work with them. I’ll mention them as appropriate in theupcoming discussion.
13.4 Lock and block analysisHow can you get your eyeballs on locks and blocks? One way to get an overall look atserver-level locking is to use Performance Monitor. The SQLServer Locks object letsyou look at granular lock activity, as shown in figure 13.1. You can see row-level locks,page-level locks, and so on, all in their own graph.
As you can see, you can get a pretty good overview of some key items:
■ How many locks are being requested each second.■ How long, on average, queries are waiting before they get their locks. This isn’t
exactly the same as how long processes are being blocked, but this numbertracks block time pretty closely.
■ How many locks are timing out. You never want this to be a high number, as it
indicates queries that weren’t able to get their locks.
123Lock and block analysis
Each of these is available for specific data types, meaning you can see lock requestsper second for rows, pages, extents, tables, and so on; there are _TOTAL instances thatlet you see aggregate values for the entire server instance.
Keep in mind that, using SQL Server Agent, you can configure alerts on theseperformance counters. That way, you can be notified when lock wait times exceedsome threshold you’ve determined. I’ll often do that when I’m troubleshootingan application that I know is having troubles; by receiving an alert when lock waittimes start to go up, I can immediately start deeper level troubleshooting, know-ing that the application is in fact having problems right then. I’ll use a perfor-mance baseline from when the system is working well to determine a good lockwait time threshold.
TRY IT NOW You won’t have a hands-on lab at the end of this chapter, but Iurge you to follow along with the procedure I’ll cover now.
One of those deeper troubleshooting steps is to configure a blocked process report,which runs from SQL Server’s Extended Events system (introduced in SQL Server2008, and expanded in subsequent versions). This will show you a list of processes thathave been blocked for longer than the threshold you specify, so you need to decide onan acceptable length of time, in seconds, for a process to be blocked. Say you choose 5
Figure 13.1 Use Performance Monitor to view system-level lock activity.
seconds; you’d run the following command in SQL Server:

124 CHAPTER 13 Block and deadlock analysis
sp_configure 'show advanced options', 1 ;GORECONFIGURE ;GOEXEC sp_configure 'blocked process threshold', 5;RECONFIGURE;
NOTE This is a “sticky” configuration setting, which means it will stay in effectafter a server restart. All you’re doing with this setting is generating an event,which doesn’t impact server performance.
Now, when a process is blocked for more than 5 seconds, SQL Server can capture theevent and generate a report for you. As I mentioned, that report is captured and viewedthrough SQL Server’s Extended Events functionality, so we’ll need to set that up:
1 In SQL Server Management Studio’s Object Explorer, expand Management,then expand Extended Events. You should see a Sessions folder; right-click itand choose New Session….
2 Provide a Session name, such as My block report.3 On the Events page, type block into the Event library: field, as I’ve done in fig-
ure 13.2. That should get you to the blocked_process_report; click that andthen click the > (right-arrow) button to add it to the Selected events list.
Once you’re done, click OK to close the window. You’ll need to right-click the newsession in SQL Server Management Studio, and select Start to start the session. When
Figure 13.2 Add blocked_process_report to Selected events.

125Deadlocks
any new blocked process reports are generated, they’ll be listed underneath that ses-sion. These reports show what processes are being blocked, what database they weretrying to access, what kind of lock they were trying to obtain, and so on. This helpsme figure out what exactly is happening, and to provide useful information to adeveloper or vendor.
How do I use this blocked process report? For one, the actual report includes a bigchunk of XML data that I can provide to a developer or vendor, telling them what wasblocked, how long it was blocked, what query it was waiting on, and so forth. It evenshows me what caused the block, so it’s the first step in finding that information. We’lllook more at that in chapter 17, when we dig deeper into Extended Events.
Your application users’ experience will correlate with the blocked process report.That is, a user who is being blocked would show up, letting you match technical data(the report) to user complaints. From there, I’ll typically rely on the developer or ven-dor to tell me what they need next in terms of diagnostic information.
13.5 DeadlocksDeadlocks are an especially vicious kind of lock. They occur when two separate pro-cesses are each trying to obtain locks on two different resources. Let’s say that Process Ahas obtained a lock on Resource 1, but it is waiting on a lock for Resource 2. Process Bhas a lock on Resource 2, and is waiting for a lock on Resource 1. The processes aresaid to be deadlocked, because unless one of them gives up pretty quickly, neither can“let go” of the locks they have, and they can’t get the locks they want. SQL Serverdetects these situations automatically and selects one of the processes, at random, tobe the victim. The victim process is then given an error, and all of its locks are released,
ABOVE AND BEYONDI won’t get into Extended Events much in this chapter. I’ll go into much more depth,and even repeat this example with a more detailed explanation, in chapter 17.
Extended Events is a lightweight way of monitoring key performance factors. Bylightweight, I mean the system is designed to run continuously without impactingperformance itself; that’s different from, say, SQL Server Profiler, which can cap-ture some of the same information but which imposes its own not-inconsiderableoverhead.
Extended Events sessions are a persistent monitor for specific events. You set up asession to look for certain events, and run that session to begin capturing informa-tion about those events.
You can read more about Extended Events at http://technet.microsoft.com/en-us/library/bb630282(v=sql.110).aspx.
allowing the nonvictim process to proceed.

126 CHAPTER 13 Block and deadlock analysis
NOTE Technically, the victim isn’t chosen randomly. SQL Server tries to fig-ure out which deadlocked process will be the least expensive, meaningwhich one will involve the least rollback effort. The end result, though, usu-ally appears to be pretty random. You can’t control SQL Server’s choice,although developers can (in their code) tag sessions as low- or high-priorityto help steer SQL Server’s decision. I don’t run into many developers whodo so.
You can’t fix deadlocks, and they’re not a massive problem if they don’t happen toooften. But poorly designed transactions, especially in a busy system, can start toincrease the number of deadlocks you see. Because deadlocks result in a terminatedprocess, they tend to crash applications and raise errors to users, making them visibleand extremely annoying. The only resolution is to redesign the conflicting queries ortransactions so that they don’t deadlock anymore.
Another problem with deadlocks is that application developers don’t always codetheir applications to deal well with being a deadlock victim. SQL Server returns a trap-pable error to the application, but it’s up to the application to do something sensiblewith that error, like informing the user of the problem and asking them if they want totry their operation again. When not properly handled, the user may receive a genericerror message, or the application may crash, or the application may not give any visi-ble indication that anything went wrong—which means the user may think their oper-ation succeeded. Again, you can’t fix that as a SQL Server administrator. It’s up to thedeveloper or vendor to modify their code.
Performance Monitor is a good way to watch for deadlocks, as there’s a specificcounter that tracks terminated processes and deadlocks. You can also use anotherExtended Events session to watch for deadlock activity. SQL Server Profiler can also beused to view extended information about deadlocks, although it isn’t a good idea toleave Profiler running all the time. I’ll usually only use that tool once I know dead-locks are a problem, and I need to capture information for a developer or vendor toanalyze. In those cases, they’ll often tell me exactly what they need to see, so that I canset up the appropriate trace in Profiler.
On a routine basis, I’ll monitor deadlock activity using Performance Monitor. I’llestablish a baseline of acceptable deadlock level (it’s often very low, or even “no dead-locks are acceptable”), then dig deeper if the system starts to exceed that thresholdfor any extended period of time. SQL Server Agent alerts on that performance coun-ter, in fact, are a great idea, because you can get an immediate notification right whenthe problem is happening.
13.6 Mitigating blocks and deadlocksWhile you, as an administrator, can’t necessarily fix deadlocks or prevent long blocktimes, you can certainly help reduce their frequency or impact. Keep in mind thatblocks and deadlocks are, more or less, all about timing. If transactions can run
quickly enough, it’s much less likely that you’ll get into a deadlock, and fast-running
127Hands-on lab
transactions won’t hold locks for as long, which means they won’t block other pro-cesses as long.
Improving disk performance is one of the best things you can do to speed up over-all transaction throughput and reducing the likelihood of long block times or of dead-locks. Bear in mind that any given UPDATE, INSERT, or DELETE query is probablygoing to be updating not only table data, but also one or more indexes, all of whichinvolves a lot of disk activity. The faster the disk throughput, the faster the query. Wehave a chapter coming up on performance, and I’ll provide tips specific to the disksubsystem that should help a bit.
13.7 Hands-on labBecause it can be so difficult to artificially create and observe locks and blocks, for thischapter I’d like you to become more familiar with the queries you’d run to do so. Goback through the chapter and make sure you’re comfortable running the various que-ries. If you have a production SQL Server instance that you can monitor, use Perfor-mance Monitor to review some of the counters I pointed out in this chapter.

Automating managementwith SQL Server Agent
We’ve covered backups, index maintenance, and a number of other importantmaintenance tasks so far. You can perform all of those tasks manually, but wouldn’tit be nicer if you could set them up once, and have them run on a regular basis? Ofcourse! That’s where SQL Server Agent becomes your very best friend.
14.1 What is SQL Server Agent?SQL Server Agent, Agent for short, is a separate service that installs along with SQLServer. It runs under its own service account, and it stores its configuration infor-mation in the built-in MSDB database. You can think of Agent as a kind of super-duper task scheduler: it runs tasks on whatever schedule you set. It can also do a lotto help automate certain aspects of SQL Server monitoring, and it can even providea basic framework for automating certain kinds of reports.
Agent consists of three main elements: jobs, operators, and alerts. We’ll covereach of those in this chapter, along with supporting mechanisms like DatabaseMail, Agent security, and Database Maintenance Plans. I’ll even give you some ideasfor putting Agent straight to use in your environment.
NOTE I won’t be covering 100% of what Agent can do, but I’ll try to touchon the stuff that’s most immediately usable in most environments. Still, it’sworth spending some time later reading up on what else Agent can do foryou. SQL Server Books Online is the place to start.
Start by finding Agent in SQL Server Management Studio. It has its own folder inthe Object Explorer, as shown in figure 14.1. You’ll need to make sure it’s actually
128
started, because some installations of SQL Server will install Agent, but not configure

129Jobs
it to start automatically. You can use theseparate SQL Server Configuration Man-ager console to modify the properties ofthe Agent service so that it starts automat-ically. Remember that if Agent is not run-ning, nothing you set up will work!
On a server that has multiple instancesof SQL Server, you’ll also have multipleinstances of Agent. Each SQL Serverinstance has its own Agent service; infigure 14.2, you can see that my SQLServer Configuration Manager shows twoinstances. The default is MSSQLSERVER,and my second instance is SQL2. Eachinstance has a SQL Server service and aSQL Server Agent service. At the edge ofmy Configuration Manager display, youcan see that only one Agent instance(the one belonging to SQL2) is running.It’s also the only instance set to startautomatically.
14.2 JobsThe real heart of Agent is its job system. A job is a unit of automation that you caneither kick off manually, or schedule to run automatically. A job consists of one ormore job steps, which can run SQL queries, run external commands, or perform any ofa number of other tasks. Jobs can incorporate some very simple execution logic: aftercompleting a job step, for example, you can have Agent quit the job (reporting thejob as successful or failed, whichever makes sense), or proceed to the next step. Jobsteps can write their output to a file (useful if you’re running a query that returns rows
Figure 14.1 Agent can be found in Object Explorer.
Figure 14.2 Each SQL Server instance also comes with an instance of Agent.

130 CHAPTER 14 Automating management with SQL Server Agent
of data), and they can be configured to run as a specific user account, if needed (moreon that later in this chapter).
TRY IT NOW In the following list, I’m going to walk you through the processof setting up a basic job. Follow along in your own SQL Server instance; thiswill constitute the hands-on portion of this chapter.
Let’s create a basic job that kicks off a reorganization of every index in one of theAdventureWorks2012 database tables:
1 In SQL Server Management Studio, expand SQL Server Agent.2 Right-click the Jobs folder and select New Job….3 On the General page, name the job Reorg AW2012.4 Notice that the job’s Enabled checkbox is checked by default; you can uncheck
this to disable a job. Doing so prevents the job from running, but leaves it con-figured for later enablement.
5 On the Steps page, click New…. 6 Name the step Run reorg. Leave the Type set to T-SQL.7 For Database, choose AdventureWorks2012 from the drop-down list (this assumes
you installed the AdventureWorks2012 database when you set up your SQL Serverlab instance).
8 In the Command text box, type:
ALTER INDEX ALL ON Person.Address REORGANIZE;
9 Review the options on the Advanced tab, but don’t make any changes at this time. 10 Click OK.11 Notice that the Schedules page allows you to define one or more schedules,
which would run the job automatically. We won’t be setting one up right now.12 Click OK.13 Notice that your job now appears under Agent’s Jobs folder in SQL Server Man-
agement Studio. (If it doesn’t, press F5 to refresh the display.)14 Right-click the new job and choose Start job at step….15 The job should run successfully, as shown in figure 14.3.
Congratulations! You just made your first SQL Server Agent job.
14.3 OperatorsAgent allows you to define operators, which represent an email address that SQL Servercan use to send notifications. You might set up operators for actual people (like you)in your organization, or you might set up an operator that represents some kind ofshared mailbox, like a help desk inbox.
Operators are targets for outgoing notifications, and SQL Server offers two, well,
technically three, ways of sending those notifications:
131Operators
■ Email■ Pager email■ NET SEND, which is a deprecated feature, unused by pretty much everybody,
and won’t work with any version of Windows you probably have in use today.
The difference between email and pager email is actually kind of cool. The intentis that a regular email is going to someone’s inbox, which they probably aren’tlooking at 24 hours a day. A pager is intended to be an email address that perhapsgoes to a cell phone as a text message (since pretty much nobody uses pagers any-more). SQL Server will send notifications to an email at any time, because it’sassumed it won’t be interrupting anyone’s sleep, dinner, vacation, and so on. Apager email is assumed to be interruptive. Perhaps the recipient’s cell phone willchime, for example, waking them up. Therefore, SQL Server lets you configure anon-duty schedule for the pager email, and notifications will be sent only during thatschedule. You can define one schedule for weekdays, and separate schedules forSaturdays and Sundays.
TRY IT NOW Go ahead and set up an operator using the steps that follow. Usea bogus email address, if you like. We’ll need to set this up in order to dosome other stuff later in the chapter.
Let’s set up an operator:
1 Under SQL Server Agent, right-click Operators and select New Operator….2 Name the new operator Help Desk.3 For both Email name and Pager email name, enter an email address. 4 Click OK.
That’s it! Because we didn’t enable a pager schedule, only the Email name will beused, and any notifications sent to this operator will be allowed on any day, at anyhour. We haven’t actually configured SQL Server to be able to send email. That will
Figure 14.3 A status dialog shows the job’s success or failure.
happen in an upcoming section of this chapter.

132 CHAPTER 14 Automating management with SQL Server Agent
14.4 AlertsAn alert is a configuration setting in Agent that tells it to notify an operator when aparticular condition, usually an error, occurs. It’s easiest to set one up to see what theoptions are, and to see how they work.
TRY IT NOW Follow along to set up a sample alert; you’ll need to have config-ured an operator in the previous section. We won’t test the alert, but this is agood way to see what options are available.
1 In the Object Explorer of SQL Server Management Studio, expand SQL ServerAgent and right-click Alerts. Choose New Alert….
2 Name the alert. I’ll use AW2012 Problems as the name.3 Leave the Type set to SQL Server event alert, but notice that you can also have
alerts triggered by SQL Server performance conditions or WMI events (whichwe won’t be covering here).
4 Select AdventureWorks2012 for Database name.5 For alert severity, choose 019—Fatal Error in Resource. This will cause alerts to
be sent for any errors that have this severity or higher. You do not want to set thealert severity too low, or SQL Server will start spewing notifications like youwouldn’t believe. Typically, severity level 11 and higher is considered a problemcondition, and severity levels 11 through 16 are usually developer- or query-related errors.
6 On the Response page, notice that you can have a job run in response to the alert.We won’t do that, but go ahead and enable Notify operators. Select the operatoryou created earlier, and select E-mail.
7 On the Options page, notice the options you can choose. A nice one is the Delaybetween responses. For alerts that happen a lot, this can throttle the response fre-quency by making Agent wait for several minutes before re-responding to a recur-rence of the same problem. This helps your inbox from getting flooded bysomething that happens a lot in a short period of time!
8 Click OK to save the alert.
Done! I suggest giving alerts descriptive names, so that you can easily figure out fromObject Explorer what an alert is doing.
14.5 Database Mail
Before SQL Server can send email, it has to know how to send it. In older versions ofSQL Server (think pre-2005), setting up outgoing email capability was a massive painin the neck. You had to install an email client like Microsoft Outlook, log in as what-ever user account ran SQL Server Agent . . . it was tragic. I mention this in case youhave an old version of SQL Server still running; if it hasn’t already been set up for

133Database Mail
email, it’s almost not worth the bother toset it up. In fact, modern versions ofOutlook might not even work to get thefeature configured.
Newer versions of SQL Server (2005and later) have a feature called DatabaseMail that’s much easier to set up. You’llfind this in SQL Server Management Stu-dio’s Object Explorer, under the Man-agement folder. Right-click Database Mailand select Configure Database Mail… toset it up; the option won’t be availableif Database Mail is already configured.Figure 14.4 shows where it’s located inObject Explorer.
DO NOT TRY IT NOW I’m not going to ask you to configure Database Mail,although you’re welcome to do so if you like. You’ll probably need someassistance and information from whoever runs your organization’s mail serveror services.
Database Mail is built around one or more profiles; you need at least one in order tohave SQL Server send email. Each profile can have one or more Simple Mail Trans-port Protocol (SMTP) accounts associated with it, and Database Mail will try them inwhatever order you list them. Each account specifies an email address, user name,password, SMTP server address, and other details—information you’ll need to getfrom whoever runs email in your organization. Most of the time, you’ll just have oneprofile, and it’ll have just one SMTP account.
One reason you’ll need help from your email administrator is most mail serversare pretty locked-down these days, meaning they’ll only accept email from authenti-cated users. Most organizations I work with take one of two approaches:
■ They’ll set up an actual email user account so that SQL Server can authenticate. Thiscan happen using Windows Authentication (which is safest), or using BasicAuthentication. The latter transmits a username and password in clear text, soif you use that it’s typically coupled with Secure Socket Layer (SSL) encryptionto protect the credential. The mail server has to be set up to support all that.
■ They’ll configure the mail server to allow anonymous relaying from the IP address used bythe SQL Server computer. This is the easiest to set up from the SQL Server side ofthings, because technically SQL Server isn’t authenticating. Some organiza-tions’ security policies don’t permit this kind of email setup, though.
Database Mail is pretty much set-it-and-forget-it; once it’s configured, you won’t mess
Figure 14.4 Database Mail is set up in SQL Server Management Studio.
with it much. However, be sure it’s working! You can right-click Database Mail in SQL

134 CHAPTER 14 Automating management with SQL Server Agent
Server Management Studio to send a test message, which helps verify that your config-uration is working properly.
14.6 SQL Server Agent securityI’m going to be honest with you: Agent security can be a total pain in the neck. Secu-rity comes into play whenever a job runs, because obviously the job needs to accessresources. The simple approach to security is to have jobs owned by a member of thesysadmin fixed server role; those jobs automatically execute under full administrativeprivileges. If that’s not what you want, or if the job needs to be owned by someoneelse, things will get a little more complicated.
NOTE This is an area of SQL Server that has evolved considerably through itsvarious versions. I’m describing how SQL Server 2012 operates; newer ver-sions may be a tiny bit different, and older versions will differ increasingly asyou go back in time.
We’ll begin with credentials, which you’ll find in SQL Server Management Studio underthe Security folder. A credential has a name so that you can identify it, and it includesan identity (a user name) and a password. Credentials can be encrypted to help pro-tect the password from being discovered.
Let’s move on to proxies, something you’ll find under SQL Server Agent’s section ofSQL Server Management Studio. A proxy is because a user account that can be used toperform specific tasks, and you’ll notice folders for several different kinds of tasks.
A proxy uses one of the credentials that you set up at the server level. You definethe principals (users, user groups, server roles, and so on) that are allowed to use theproxy, and you define which Agent task types the proxy can be used for.
When you create a job step, you can use the Run as drop-down to choose a proxy.You’ll only be able to choose proxies that are enabled for the type of job step you’recreating, and that you have permission to use.
The purpose of this multipart security system is to allow top-level administrators tocontrol the actual credentials, and to then make those available to other administra-tors or users for use in job steps. The person creating the job step doesn’t need toknow the credential password, because it’s known to SQL Server. If you happen to bethe only administrator of SQL Server, then this can all seem needlessly complex, butit’s useful in larger environments that involve many different layers of administration.
Credentials and proxies are useful when you need to create a job step that runs anexternal command, like a command-line utility or Windows PowerShell command.Because those execute outside SQL Server, they can’t make use of your SQL Serverlogin. Credentials and proxies let you give those job steps the authority they need torun properly.
14.7 A quick cheat: Database Maintenance PlansDatabase Maintenance Plans, or just Maintenance Plans, are an all-in-one way of automat-
ing the most common maintenance tasks, including backups and index maintenance.
135Ideas for using SQL Server Agent
These are configured under the Management folder in SQL Server Management Stu-dio, although they use some Agent functionality to actually execute. I’m mentioningMaintenance Plans in this chapter because they automate many of the common tasksthat you might otherwise have to set up manually in Agent.
Maintenance Plans can be managed manually, although when I set them up I pre-fer to do so using the convenient built-in wizard. The wizard lets you select the data-bases that will be included in the Maintenance Plan, as well as the actual maintenancetasks that’ll be run. Figure 14.5 shows how you can start the wizard by right-clickingMaintenance Plans in SQL Server Management Studio.
TRY IT NOW Go ahead and run through the Maintenance Plan Wizard. Iwon’t walk you through the steps, because that’s what the wizard does, but Iwant you to see what a Maintenance Plan can include. Target the Mainte-nance Plan to your AdventureWorks database.
14.8 Ideas for using SQL Server AgentWhat do I see people using SQL Server Agent to automate? Lots. Here are a few ideas:
■ Running queries that return results, writing those results to a file, and attachingthat file to an email. It’s a simple way of automating basic reports. The outputisn’t fancy, but in some cases it gets the job done regardless.
■ Obviously, running maintenance tasks like database maintenance plans, back-ups, and so on. This is what Agent was made for!
■ Sending alerts when critical performance measurements, such as free diskspace, pass some specified threshold.
■ Automatically running data-loading or importing tasks, such as SSIS packages.
Another thing to keep in mind is Agent’s support for centralized multiserver manage-ment. Agent lets you create a job that is sent to, and run on, multiple other servers all
Figure 14.5 Use the wizard to create a new Maintenance Plan.
in parallel. We’ll cover that in the next chapter.

136 CHAPTER 14 Automating management with SQL Server Agent
14.9 Hands-on labAs I mentioned earlier, your lab in this chapter was to follow along with the Try it Nowsections, so you should have a Job, an Operator, and an Alert already configured. Ifyou haven’t done so, go back and do those steps now. And, now that you’re usingAgent, be sure you’re backing up its database (MSDB) so that your Agent configura-tion is safe!

Multiserver management
Multiserver management is one of the cooler things you can do with SQL Server.The idea is to use SQL Server Agent to “push” a given job to one or more other SQLServer instances, running that job in parallel on all of them. It’s a great way to auto-mate the administration of multiple servers, helping to improve consistency andhelping to save you time.
15.1 What is multiserver management?Multiserver management is a feature of SQL Server Agent, which means every SQLServer instance that you want to participate needs to have its SQL Server Agent ser-vice running. You’ll designate one SQL Server instance as your master server, andenroll one or more other instances as targets. When you run multiserver jobs,Agent will coordinate their execution on each target, and even track job progressfor you, all in one central location.
15.2 Creating a multiserver management hierarchyYou have to have a master instance in order to use multiserver management, so let’sstart by creating one. Right-click SQL Server Agent in Object Explorer, select MultiServer Administration, and select Make this a Master…. Figure 15.1 shows where tofind those options.
TRY IT NOW Follow along if you have two instances of SQL Server installedon your lab computer. If you don’t, consider installing a second instancenow, then proceeding with the rest of this chapter.
137

138 CHAPTER 15 Multiserver management
You’ll run through a little wizard, which will start by prompting you for the emailaddress of a “multiserver operator.” As you learned in the previous chapter, SQL ServerAgent jobs can send notifications to operators; with multiserver jobs, only the operatoryou designate here can receive notifications. Whatever contact information you providewill be used to create an operator on the master and on any target instances that youlater enroll. That way, they all have the same operator to send notifications to.
Figure 15.2 shows the next screen, where you can start enrolling targets. I’m set-ting up my SQL2 instance as the master instance, but my lab computer also has adefault instance installed, and you can see that I’ve decided to enroll it as a target.
The next screen, shown in figure 15.3, may differ a bit depending on your serverconfiguration. It’s asking you what authentication the target servers should use;technically, targets pull (or download) jobs from the master, so the targets need away to authenticate.
Figure 15.1 Make the instance a Master to get started.
Figure 15.2 Specify target instances for this master.

139Creating a multiserver management hierarchy
You might run into an error, like the one shown in figure 15.4, which indicates thatSQL Server’s default security configuration doesn’t allow the extended stored proce-dures needed to enable multiserver administration.
This is a common error, and usually indicates that SQL Server Agent has neverbeen started on the target instance by using SQL Server Management Studio.
Figure 15.3 Tell the targets how to authenticate to the master.
Figure 15.4 This is a common error when enrolling a target.

140 CHAPTER 15 Multiserver management
NOTE You can read more about the Agent XPs, and the security implications ofXPs in general, at http://technet.microsoft.com/en-us/library/ms178127.aspx.
You can fix the problem by using SQL Server Management Studio to connect to theinstance in question, right-clicking SQL Server Agent in Object Explorer, and choos-ing Start. If the service is already started, stop and restart it by using SQL ServerManagement Studio. That’ll both start the SQL Server Agent service and enable theAgent XPs.
Another common error is shown in figure 15.5, and indicates that the multiserveradministration components on the target weren’t able to establish a secure connec-tion to the master.
This is documented at http://technet.microsoft.com/en-us/library/ms365379.aspx,where you’re directed to edit a specific registry key. This has some security implica-tions, so I’d prefer you to read through that article and understand the ups anddowns, rather than me telling you to make a change. You have the option to have SQLServer Agent not use encrypted communications between the target and master, whichshould only be done when you’re certain that the network connection between themcan’t be compromised by an attacker.
Once you’ve done all that, you’ll need to rerun the wizard to make your instance amaster. This time, it should succeed. You’ll have a master, and you’ll have enrolledwhatever targets you specified. It’s entirely possible to enroll additional targets in thefuture. I usually do so by connecting to the target, right-clicking SQL Server Agent,choosing Multi Server Administration, and then selecting Make Target…. All you haveto do then is specify the name of the master instance. Always make sure those AgentXPs are enabled on the target before you try doing that.
15.3 Creating and using multiserver management jobsLet’s set up a multiserver job that runs a simple T-SQL command. Start in SQL Server
Figure 15.5 This error indicates an encryption problem.
Management Studio on your master instance:

141Ideas for multiserver jobs
1 Expand SQL Server Agent.2 Right-click Jobs and choose New Job…. 3 On the General page, give the job a name. I used Multi Test.4 On the Steps page, add a new job step. Configure the step as shown in figure 15.6.
I’m having it run the DBCC CHECKDB command on the master database (becausemy second instance doesn’t have any other database for me to play with). ClickOK on the job step.
5 On the Targets page, select Target multiple servers and check the available tar-get, as shown in figure 15.7.
6 Click OK to create the job.7 To test the job, expand Jobs so that you can see the new job. Right-click the job
and select Start job at step….
This posts a request to the targets, asking them to connect to the master, download thejob definition, and execute the job. It doesn’t happen instantly, though, so you can usethe Job Activity Monitor to keep an eye on it, and the job’s history will show you when itwas last run (along with its results). Jobs that are given a schedule will run more reli-ably, because the targets can check in, get the job, and run it on that schedule.
15.4 Ideas for multiserver jobsI use multiserver jobs in a couple of different ways. One way is when I need to make aone-time configuration change across a large number of SQL Server instances. For
Figure 15.6Configure the job step as shown.
Figure 15.7 Target multiple instances with a single job.
that reason, I tend to have one instance of SQL Server that’s my “personal” instance;

142 CHAPTER 15 Multiserver management
I’ll use it to host small databases that I use to track computer inventory informationand other operational tasks. That instance becomes my master for multiserver jobs,and I enroll all of my “real” SQL Server instances as targets. That way, when I need tomake some configuration change, I can write the necessary T-SQL statements into ajob and then assign that job to all of the targets. Bam! Mission accomplished.
Another way to use multiserver jobs is for routine maintenance, such as updatingindex statistics, reorganizing indexes, and so on. I’ll admit that, although I’ve seensome administrators use a centralized multiserver job for those tasks, I don’t do itmuch myself. I tend to want those kinds of things customized on a per-instance orper-database basis, which eliminates multiserver jobs as a good option. But, they’recertainly an option for some kinds of routine maintenance, and you should keepthem in mind as a possibility.
15.5 Hands-on labBecause multiserver management necessarily requires multiple servers, I’m not goingto ask you to do a hands-on lab for this chapter. However, if you have the ability toinstall multiple SQL Server instances on your lab computer, do so, and walk throughthe examples in this chapter as your hands-on experience.

Windows PowerShelland SQL Server
Windows PowerShell was introduced in 2007, and it has since become a standardplatform for administrative automation across Microsoft business and server prod-ucts. It’s a command-line shell, and product teams (like SQL Server’s team) extendthe shell so it can help manage their products. In this chapter, we’ll look at how touse PowerShell with SQL Server.
16.1 Windows PowerShell overviewWindows PowerShell is a command-line shell, not unlike Unix-style shells like Bashor the old Windows Command Prompt (Cmd.exe). What’s different about Power-Shell is that it’s a modern shell, designed around modern needs and with the Win-dows OS in mind. The shell itself contains minimal functionality; feature andproduct teams write modules (or snap-ins) that give the shell additional capabilities.For example, the SQL Server team created a module that lets the shell connect to,and manage, SQL Server. It’s important to keep in mind that the ability to manage aproduct by using PowerShell is dependent upon the specific product version pro-viding that module. SQL Server 2012 provided SQL Server’s first fully functionalmodule, making it the oldest version of SQL Server that can be extensively man-aged by using PowerShell. SQL Server 2008 R2 shipped with a less-complete snap-infor PowerShell.
NOTE This chapter assumes that you have a basic familiarity with WindowsPowerShell; if you don’t, consider reading Learn Windows PowerShell 3 in aMonth of Lunches, Second Edition (Manning, 2012), which provides a begin-ner-level introduction, or Learn PowerShell Toolmaking in a Month of Lunches
143
(Manning 2012), which gets into the scripting and toolmaking aspects of

144 CHAPTER 16 Windows PowerShell and SQL Server
the shell. Jeffrey Hicks and I are the authors of both. PowerShell In Depth byJeffrey Hicks, Richard Siddaway and me (Manning 2013) provides a compre-hensive administrator’s reference to shell functionality.
To get PowerShell running on any version of Windows where it’s installed, hold the Win-dows key on your keyboard and press R. That brings up a Run dialog; type powershelland hit Enter (or click OK). If you’re doing this for the first time on a computer, I sug-gest immediately typing $PSVersionTable into the shell and then pressing Enter.Doing so will reveal the shell’s version information. (If nothing shows up, you’re onv1.0.) Table 16.1 details the versions of PowerShell that ship with various versions ofWindows, and the versions that can be installed.
SQL Server 2012’s PowerShell module requires at least PowerShell 2.0, and also workson PowerShell 3.0 (and later). If you want a later version of PowerShell than whatcomes with your version of Windows, you can download the Windows ManagementFramework (WMF) from http://download.microsoft.com. The WMF version corre-sponds to the PowerShell version (WMF 2.0 contains PowerShell 2.0), and the WMFincludes supporting technologies, including Windows Remote Management and Back-ground Intelligent Transfer Service.
NOTE When Microsoft releases a new version of PowerShell, it typically isreleased as part of the latest version of Windows. A short time after thatrelease, Microsoft typically makes the corresponding WMF download availablefor the two most recent versions of Windows. Avoid installing the latest WMFon servers until you’ve verified that the products running on that server arecompatible with that version of the WMF and PowerShell.
One reason PowerShell has been well accepted by administrators is that, with a littlebit of jump-start instruction, the shell is pretty easy to learn. It offers a number of dis-
Table 16.1 PowerShell and Windows versions
Windows version Comes with PowerShell version Supports PowerShell version
Windows XP/ Windows Server 2003
None 1.0, 2.0
Windows Vista, Windows Server 2008
1.0 2.0, 3.0 (Windows Vista sup-ports only 2.0)
Windows 7, Windows Server 2008 R2
2.0 3.0, 4.0
Windows 8, Windows Server 2012
3.0 3.0, 4.0
Windows 8.1, Windows Server 2012 R2
4.0 4.0
coverability features that help you find the commands you need to accomplish given

145SQL Server and PowerShell
tasks, and the command syntax is very straightforward and noncryptic. Commandstypically come with extensive built-in help, including usage examples and explana-tions. Unfortunately, most of those features only apply to one of two ways that a prod-uct team can choose to implement PowerShell support—and unfortunately, the SQLServer team chose the other way.
16.2 SQL Server and PowerShellThere are a couple of ways to launch PowerShell and have SQL Server support preloadedfor you. Note that launching PowerShell as I described earlier in this chapter will notautomatically preload SQL Server’s module; you’d have to do so manually.
In SQL Server Management Studio, you can right-click nearly anywhere and find aStart PowerShell menu option. That will open a shell with several SQL Server modulespreloaded. If you only launch a plain copy of the shell, run Import-Module SQLPS toload up the main SQL Server module.
NOTE Additional modules provide functionality for other SQL Server compo-nents, such as SQLASCMDLETS and Microsoft.AnalysisServices.PowerShell.Cmdlets. You can import those if needed. If you’ve installed SQL ServerManagement Studio on your client computer, then the PowerShell modulesshould also be installed and available.
If you get a list of commands implemented by the core SQL Server module, you won’tbe impressed:
PS SQLSERVER:\> get-command -module sqlps | select name
Name----Add-SqlAvailabilityDatabaseAdd-SqlAvailabilityGroupListenerStaticIpBackup-SqlDatabaseConvert-UrnToPathDecode-SqlNameDisable-SqlAlwaysOnEnable-SqlAlwaysOnEncode-SqlNameInvoke-PolicyEvaluationInvoke-SqlcmdJoin-SqlAvailabilityGroupNew-SqlAvailabilityGroupNew-SqlAvailabilityGroupListenerNew-SqlAvailabilityReplicaNew-SqlHADREndpointRemove-SqlAvailabilityDatabaseRemove-SqlAvailabilityGroupRemove-SqlAvailabilityReplicaRestore-SqlDatabaseResume-SqlAvailabilityDatabaseSet-SqlAvailabilityGroup
Set-SqlAvailabilityGroupListener
146 CHAPTER 16 Windows PowerShell and SQL Server
Set-SqlAvailabilityReplicaSet-SqlHADREndpointSQLSERVER:Suspend-SqlAvailabilityDatabaseSwitch-SqlAvailabilityGroupTest-SqlAvailabilityGroupTest-SqlAvailabilityReplicaTest-SqlDatabaseReplicaState
Looking at the list, it doesn’t seem like SQL Server’s module can do much, does it?The awesome Invoke-SqlCmd command can do a lot, because it lets you executeany T-SQL command you like, and since most of SQL Server can be managed by run-ning T-SQL commands. But that seems like cheating, right? Using PowerShell justto run T-SQL?
16.2.1 Meet the SQLSERVER provider
The trick is that much of SQL Server’s PowerShell support is implemented by some-thing called a PowerShell Provider, or PSProvider. These work a bit like a disk drive,with the root of the drive providing core functionality, and the folders beneath thatroot pointing to different SQL Server components. When the SQLPS module isloaded, it automatically maps to the local instance, if one exists; you can then addmore connections to other instances that you want to manage.
For example, in the default SQLSERVER: drive, I can get a directory listing by run-ning Dir or Ls, and see the following:
Name Root Description---- ---- -----------SQL SQLSERVER:\SQL SQL Server Database E...SQLPolicy SQLSERVER:\SQLPolicy SQL Server Policy Man...SQLRegistration SQLSERVER:\SQLRegistr... SQL Server RegistrationsDataCollection SQLSERVER:\DataCollec... SQL Server Data Colle...XEvent SQLSERVER:\XEvent SQL Server Extended E...Utility SQLSERVER:\Utility SQL Server UtilityDAC SQLSERVER:\DAC SQL Server Data-Tier ...SSIS SQLSERVER:\SSIS SQL Server Integratio...SQLAS SQLSERVER:\SQLAS SQL Server Analysis S...
As you can see, the subfolders of the drive each represent a major SQL Server compo-nent: SQL is the main database engine, SSIS is SQL Server Integration Services (SSIS),and so on. Underneath each component is a connection to a specific computer, andunder those are folders for connections to instances on those computers. For example:
PS SQLSERVER:\> cd sqlPS SQLSERVER:\sql> ls
MachineName-----------WIN-NQT7TB6A571
PS SQLSERVER:\sql> cd .\WIN-NQT7TB6A571
PS SQLSERVER:\sql\WIN-NQT7TB6A571> ls
147SQL Server and PowerShell
Instance Name-------------DEFAULTSQL2
Figure 16.1 illustrates the basic hierarchy to that point. This hierarchy can get a bit cumbersome, because to do anything you’ve got a long
path just to get started. If I want to manage something in the Database Engine on mycomputer, which is named WIN-NQT7TB6A571, and in my instance named SQL2, mycommand-line path starts with SQLSERVER:\SQL\WIN-NQT7TB6A571\SQL2.
A problem with this provider-based approach is that PowerShell doesn’t have away to provide help files, or to help you discover what you can do or how to do it. Youjust kinda have to know. That’s good for book authors like me, but it makes it hard toget started.
NOTE By the way, in support of my fellow book authors, I’ll recommend SQLServer 2012 with PowerShell V3 Cookbook (Pact Publishing, 2012) by Donabel San-tos. It’s one I keep handy when I’m working with PowerShell and SQL Server.
Why did the SQL Server team elect to go down the provider path, rather than pro-viding a set of more traditional commands? Possibly because the provider modelmade it easier for them to delegate their programming work across the many sub-teams that comprise the overall group. By having each major component (such asSSIS) plug in to a top-level SQL Server provider, they created something that probablylooked elegant in the planning stages. Providers also have the benefit of being more
SQLSERVER:drive
SQLDatabase Engine
COMPUTERNAME Instance 1
Instance 2
SSISIntegration Services
COMPUTERNAME Instance 1
Instance 2
SSASAnalysis Services
COMPUTERNAME Instance 1
Instance 2
COMPUTERNAME Instance 1
Instance 2
Figure 16.1 Exploring the SQLSERVER provider hierarchy

148 CHAPTER 16 Windows PowerShell and SQL Server
dynamic. You can add something to the hierarchy without necessarily having to pro-gram a whole new set of commands; the built-in PowerShell commands used to workwithin a provider will work. That said, the provider model has been criticized by someas being difficult to learn. Regardless, it’s what we have to work with, so let’s see what itcan do.
16.2.2 Doing something useful
One common thing that administrators are asked for in SQL Server is a list of loginsthat, perhaps, have nonexpiring passwords. That’s certainly a security concern formany organizations, but clicking through SQL Server Management Studio to find allof those accounts can be time-consuming. It’s pretty easy information to get with a T-SQLquery, but you can also do it with PowerShell:
TRY IT NOW By all means, follow along with these examples. I’ll provide thecommands I type in boldface, so that you can pick them out of the examplemore easily.
PS SQLSERVER:\sql\WIN-NQT7TB6A571\sql2\logins> Get-ChildItem | Where { -not $_.PasswordExpirationEnabled } | Select Name,LoginType
Name LoginType---- ---------##MS_PolicyEventProcessingLogin## SqlLogin##MS_PolicyTsqlExecutionLogin## SqlLoginNT AUTHORITY\SYSTEM WindowsUserNT Service\MSSQL$SQL2 WindowsUserNT SERVICE\SQLAgent$SQL2 WindowsUserNT SERVICE\SQLWriter WindowsUserNT SERVICE\Winmgmt WindowsUsertestuser SqlLoginWIN-NQT7TB6A571\Administrator WindowsUser
I boldfaced the command to make it easier to read. You can see that I changed tothe Logins folder of my SQL2 instance, running on the computer named WIN-NQT7TB6A571, under the SQL (Database Engine) component of the SQLSERVER:drive. I asked for a list of all items within that Logins folder, keeping only those whosePasswordExpirationEnabled property was False, and selecting just the Name andLoginType properties of those logins.
NOTE If all that seems clear as mud, keep in mind that most of the syntax isbasic PowerShell stuff that I haven’t covered. Again, a good beginner-levelbook in PowerShell will teach you those things pretty quickly.
Let’s do another example. This one’s useful: generating a list of blocking processes,meaning processes that are currently blocking other processes. This example showsthat the provider model—and even the handful of commands provided in the SQLPSmodule—often aren’t enough to do what you want. (This time, I’m using boldface to
highlight the information you’ll need to insert.)
149SQL Server Agent and PowerShell
$server = New-Object –TypeName Microsoft.SqlServer.Management.Smo.Server
➥ -ArgumentList "INSTANCE_NAME"$server.EnumProcesses() |Select Name,Spid,Command,Status,Login,Database,BlockingSpid |Format-Table –Auto
That should be a list of all processes running on the given instance; to see blockingprocesses:
$server.EnumProcesses() |Where { $_.BlockingSpid –ne 0 } |Select Name,Spid,Command,Status,Login,Database,BlockingSpid |Format-Table –Auto
This example used SQL Management Objects, or SMO (pronounced, “smoe”). That’s a.NET Framework API provided by SQL Server for management purposes. If it looks a bitlike programming. . .it is. It was originally designed as a Visual Basic or C# API, but it’saccessible from within PowerShell. There’s a lot to it, far more than I can cover in this onechapter, although the cookbook I referenced earlier provides a lot of SMO examples.
I wanted to show you these two examples as a way of helping you understand howPowerShell works with SQL Server. Yes, it’s possibly more complex than it needs to be,given how other products (like Exchange Server) have managed to simplify theirinterfaces into sets of more easily discoverable and well-documented commands. Butit’s what we have to work with. So what can it help you automate?
■ Inventory SQL Server configuration settings■ Alter database properties■ Change object ownership■ Maintain indexes■ Bulk-load data■ Kill blocking processes■ Check disk space usage■ Set up Database Mail■ List failed login attempts
The list is huge. Anything you have to do more than once is going to become cumber-some in the graphical SQL Server Management Studio, and although some things canbe automated by using T-SQL, other tasks will require you to use SMO, and PowerShellis perhaps the easiest way to do that.
16.3 SQL Server Agent and PowerShellSQL Server Agent, being an automation tool itself, works fine with Windows Power-Shell. In fact, one of the cooler things you can do with it is running PowerShell scripts.This is useful for tasks that can’t be handled by the Database Maintenance Plan func-tionality, or that can’t easily be accomplished by using T-SQL. Agent pops open a back-ground PowerShell process that has all the SQL Server modules preloaded, and then
runs whatever commands you give it.
150 CHAPTER 16 Windows PowerShell and SQL Server
TRY IT NOW This is another good example to follow along on, as there are acouple of easy-to-miss details that I’ll point out.
To begin, I’m going to create a job that lists blocked processes, using the examplecode from the previous section of this chapter. Beginning in SQL Server ManagementStudio, with Management and SQL Server Agent expanded:
1 Right-click Jobs and select New Job….2 Configure the General page as shown in figure 16.2.3 On the Steps page, click New….4 Configure the page as shown in figure 16.3. The command code I used is below;
notice that I used boldface for items that you must change:
$server = New-Object –TypeName Microsoft.SqlServer.Management.Smo.Server
➥ -ArgumentList "INSTANCE_NAME"$procs = $server.EnumProcesses() |Where { $_.BlockingSpid –ne 0 } |Select Name,Spid,Command,Status,Login,Database,BlockingSpid |Format-Table –Auto
Send-MailMessage -To "[email protected]" -From "[email protected]"
➥ -Body $procs -Subject "SQL blocked processes"
➥ -SmtpServer mail.company.com
5 Click OK twice.
Figure 16.2 Configure the job’s General page.

151SQL Server Agent and PowerShell
This creates a job, but doesn’t have it run on a schedule. Instead, we’re going to runthis as the result of an alert. Staying in SQL Server Management Studio:
1 Right-click Alerts and select New Alert….2 Configure the General page as shown in figure 16.4. Note that I set the
blocked process threshold to 5; you can adjust that how ever you like. Yourreport will be sent whenever the number of blocked processes rises above thespecified number.
Figure 16.3 Configure the Steps page.
Figure 16.4 Configure the alert’s General page.

152 CHAPTER 16 Windows PowerShell and SQL Server
3 Configure the Response page as shown in figure 16.5.4 Click OK.
You’re done! Go back to chapter 13 for an example of how I created a process thatcan block others; repeat that experiment if you’d like to test that your blocked processreport. Note that the job I created depends upon the SQL Server Agent account beingable to send email anonymously through the specified email server; that depends onthe mail server being willing to do so. In your lab environment, without an SMTP mailserver, the message won’t be sent.
16.4 Hands-on labThis lab may seem a little unfair, because I’m going to ask you to do something Ihaven’t shown you how to do. But that’s very real-world! You’ll probably need to startusing a search engine, including keywords like PowerShell, “SQL Server” (in quotes),and SMO to help limit the results to the most useful ones. I’ll provide an answer onMoreLunches.com: find this book’s cover image, click it, and find the Downloads sec-tion to get the sample solutions ZIP file.
Write a PowerShell command that will list all indexes with fragmentation of morethan 10% (on your sample AdventureWorks2012 database, this may produce no out-put, because it’s unlikely those indexes are that fragmented). Then, write a secondcommand that will reorganize all indexes with more than 10% fragmentation.
Figure 16.5 Configure the alert’s Response page.

Using Extended Events
I introduced you to Extended Events in chapter 13, where we used them to captureinformation on blocked processes. Now, I’d like to dig deeper into ExtendedEvents with some very specific (and super-useful) scenarios. We’ll walk throughhow the technology works, get it set up for various purposes, and look at what it canprovide you.
17.1 What are Extended Events?As I described earlier, Extended Events is a native SQL Server technology thatallows for continuous monitoring and capturing of specific things happening onthe server. You create a session that monitors for whatever events you’re interestedin, and it logs information from those events when they occur. You can then reviewthose logs at your leisure.
In Windows (and SQL Server) terminology, an event is something like a log mes-sage sent from one piece of software to another. A piece of software has to be pro-grammed to produce the event, and another piece of software registers to benotified when the event happens. With Extended Events, different pieces of SQLServer produce events, while the actual Extended Events system registers to receivethose events.
There are a number of ways to work with Extended Events, but we’ll use the GUI.Start in SQL Server Management Studio, in the Management folder of the ObjectExplorer. You should see an Extended Events item, which you can expand to reveal aSessions folder. Each session can be stopped or started (you’ll notice the icon changefor each state), and each session is set up to capture specific information.
153

154 CHAPTER 17 Using Extended Events
Sometimes, you’ll set up sessions that you want running all of the time, and I’llshow you how to do that. You’ll often configure those to rotate data automatically, sothat you always have a certain amount of running data available, but so that the datadoesn’t fill up local storage and explode or something. Other times, you’ll set up ses-sions meant to help you troubleshoot specific problems; those may not rotate thedata, and you’ll typically start them on-demand when you’re ready to use them. I’llwalk you through examples of both kinds of session.
TRY IT NOW Setting up and using sessions can be a bit complex, so I recom-mend that you follow along with all of the examples in this chapter. Theseexamples also serve as your hands-on lab for this chapter.
17.2 Creating and using a sessionBecause sessions can be a little hard to set up, SQL Server includes the New SessionWizard, which helps create a new session based on predefined templates provided byMicrosoft. I’ll walk you through an example that tracks query batch information, andthen discuss some of the permutations offered by the Wizard.
17.2.1 Using the New Session Wizard
Make sure you’re in SQL Server Management Studio, looking at the Sessions folderunder Extended Events, and then follow these steps:
1 Right-click Sessions and select New Session Wizard. 2 As shown in figure 17.1, provide a unique, descriptive name for your session,
ideally describing what it will capture. You can check the Schedule checkbox tohave this session begin capturing events each time the SQL Server instancestarts. For this example, I’ll leave that checkbox cleared.
Figure 17.1 Provide a unique name for each session.

155Creating and using a session
3 As shown in figure 17.2, you can choose one of the existing session templates asa starting point, including connection tracking, activity tracking, countingquery locks, and several templates related to query execution. These are all use-ful for performance monitoring, but for this example I’ll start with the QueryBatch Tracking template. You may notice that a lot of what Extended Eventscaptures overlaps with what SQL Server Profiler can capture. We’ll discuss thatmore in a bit.
4 If you start with a template, the next screen will show all of the preselectedevents. If you start without a template, you choose your own events. Each eventcaptures specific data, which you can analyze later. For this example, I’m notgoing to specify any events beyond what the template preselected for me. Fig-ure 17.3 shows how complex this screen is. You can type text into the Eventlibrary field, and the list of events will filter to only include those whose names (bydefault) match what you’ve typed (a quick way to search for events). The left andright arrow buttons move events from the library side to the Selected events side,meaning those events will be captured in the final session.
5 The next screen, a portion of which I show in figure 17.4, lets you specify theinformation you want to capture about each event. I’ll often add database_name,which isn’t usually selected by default but which I find easier to use than thenumeric database ID. Note that not every event produces all of the same infor-mation; if you select a field that isn’t included in whatever events you’re captur-ing, then that data will be blank when you go to look at it.
6 On the next screen you can set filters, and only events that meet your filter cri-teria will be captured. This lets you eliminate noise from the captured logs,such as filtering so that only events for a specific database are captured. You cansee in figure 17.5 that I’ve added a filter to capture only events relating to theAdventureWorks2012 database. You have to be careful when doing this: if I’mlooking for events that don’t populate the database_name field, then I might
Figure 17.2 Start with a Microsoft-provided template.
not capture anything because none of those will meet my filter criteria.

156 CHAPTER 17 Using Extended Events
7 The last screen asks where you want to store the data. As shown in figure 17.6,I’ve decided to store the events in memory, keeping only the 1,000 most recentevents. You can also choose to save them to a local file, which is more appropri-ate if you plan to capture a large amount of information.
8 Finish the Wizard. I’m going to choose the option to start the session automati-cally, although you can also right-click any session to start or stop it. You can alsochoose to have the Wizard open a new results pane in SQL Server ManagementStudio, and to start displaying live information as it’s captured. Figure 17.7shows what that looks like.
Figure 17.3 You can select as many events as you like.
Figure 17.4 Add additional information to capture from
each event.
157Creating and using a session
NOTE I executed a query, SELECT * FROM Person.Person, in a separate querywindow so that Extended Events would have a SQL batch to capture and dis-play. That’s what you’re seeing in figure 17.7: the event data produced by thatSQL query.
17.2.2 Viewing live session data
Obviously, the data you get from an event depends on the event itself. In my runningexample, I’m capturing basic information about executing queries. I could capture
Figure 17.5 Add filters to help reduce the data captured.
Figure 17.6 Decide where event data will be stored.
the same information by using SQL Server Profiler, but here’s the difference: Extended

158 CHAPTER 17 Using Extended Events
Events are designed to run continuously. They’re lightweight, meaning they don’t imposetheir own massive overhead on the system. SQL Server Profiler. . .not so much. It’s apretty heavy monitoring tool that isn’t designed to run continuously during produc-tion hours.
What information did I get? Here’s some of what that particular Extended Eventstemplate captures (keeping in mind that I added database_name myself):
■ Batch_text includes the raw query. If you’re looking for long-running queries,this will show you the actual query that was executed, so you can then take itoffline and test or tweak it.
■ Client_app_name is the name of the application that executed the query batch.■ Cpu_time shows you how much processor effort was used to execute the query.■ Duration is the total time the query took to execute.■ Logical_reads is the number of reads SQL Server executed; some of these may
have been served from buffer cache, so physical_reads shows you how manyread operations went to physical storage. Writes shows the number of logicalwrite operations, which will always, eventually, become a physical write.
■ Row_count shows the number of rows returned by the query.
Figure 17.7 You can opt to view live session data.

159Creating and using a session
Keep in mind that you can always right-click a started session and select Watch LiveData to return to that live data screen.
17.2.3 Working with session logs
Live data isn’t always what you want; sometimes youwant to run a session all day, or overnight, and ana-lyze what was captured at some later time. No prob-lem. Take a look at figure 17.8.
You can see that my session expands to show thering buffer being used to store event information.That’s because, when I created the session, I electedto keep the most recent 1,000 events in memory,remember? The ring buffer is where those live. Thebuffer stores captured information in XML, andyou can click the buffer data to display the XML, asshown in figure 17.9.
You can easily share this XML file with someoneelse via email or whatever, and as you can see it includes the same query batch infor-mation that I listed earlier. The problem with XML is that, although it’s portable andkind of human-readable, you can’t query it easily using SQL Server’s native tools. If we
Figure 17.8 Expand the session to access its logs or buffer.
Figure 17.9 Viewing event data as XML

160 CHAPTER 17 Using Extended Events
wanted to extract the longest-running queries from that XML log, it’d be a pain in theneck to do manually. Fortunately, we don’t have to!
TRY IT NOW The trick I’m going to show you next assumes that you’ve beenlogging event information to a file, rather than (or in addition to) a memorybuffer. If you’d like to keep following along, you’ll need to modify your ses-sion configuration, and remember the filename it logs to.
Start by extracting the event data into a temporary table, keeping it as XML forthe moment:
SELECT CAST(event_data AS XML) AS event_data_XMLINTO #EventsFROM sys.fn_xe_file_target_read_file(filename*.xel', null, null, null) AS F;
Notice where the filename goes in that command. This created a temporary tablenamed #Events (all temporary table names are prefixed by a #; that’s how SQL Serverknows they’re meant to be temporary). Next, you’ll need to turn that XML into rela-tional data that SQL Server can query easily:
SELECTevent_data_XML.value ('(/event/action[@name=''query_hash'']/value)[1]', 'BINARY(8)' ) AS query_hash,event_data_XML.value ('(/event/data [@name=''duration'' ]/value)[1]', 'BIGINT' ) AS duration,event_data_XML.value ('(/event/data [@name=''cpu_time'' ]/value)[1]', 'BIGINT' ) AS cpu_time,event_data_XML.value ('(/event/data [@name=''physical_reads'']/value)[1]', 'BIGINT' ) AS physical_reads,event_data_XML.value ('(/event/data [@name=''logical_reads'' ]/value)[1]', 'BIGINT' ) AS logical_reads,event_data_XML.value ('(/event/data [@name=''writes'' ]/value)[1]', 'BIGINT' ) AS writes,event_data_XML.value ('(/event/data [@name=''row_count'' ]/value)[1]', 'BIGINT' ) AS row_count,event_data_XML.value ('(/event/data [@name=''statement'' ]/value)[1]', 'NVARCHAR(4000)') AS statementINTO #QueriesFROM #Events;
CREATE CLUSTERED INDEX idx_cl_query_hash ON #Queries(query_hash);
SELECT * FROM #Queries ORDER BY duration DESC;
This creates a temp table named #Queries, translating the XML into a normal SQLServer table. You can see at the end that I queried them all in descending order ofduration, meaning my most expensive queries will be at the top of the list.
NOTE There’s a great tutorial at www.solidq.com/sqj/Pages/Relational/Tracing-Query-Performance-with-Extended-Events.aspx that not only walksthrough this entire process, but gives you example queries to play with as well.
I highly recommend you take the time to go through it.
161Creating a custom session
17.3 Creating a custom sessionBack in our discussion on lock and block analysis, I walked you through setting up anExtended Events report to capture blocked process information. I’d like to repeat thatexample, expanding on some of the explanations to help you better understandExtended Events.
As you recall, this report will show you a list of processes that have been blockedfor longer than the threshold you specify, so you need to decide on an acceptablelength of time, in seconds, for a process to be blocked. Say you choose 1 second; you’drun the following command in SQL Server:
sp_configure 'show advanced options', 1 ;GORECONFIGURE ;GOEXEC sp_configure 'blocked process threshold', 1;RECONFIGURE;
CAUTION I’d never actually configure 1 second. When we did this exampleearlier, I suggested 5 seconds. A 1-second threshold is going to generate a lotmore data, which for this example is what I want. A short threshold will makeit easier to generate something for us to look at in the lab environment.
Now SQL Server can produce the event, which can be captured by Extended Events,and used to generate a report for you. We need to set up a session to capture theevent data:
1 In SQL Server Management Studio’s Object Explorer, expand Management,and then expand Extended Events. You should see a Sessions folder; right-clickit and choose New Session…. Notice that we’re not using the Wizard this time.
2 Provide a Session name, such as My block report.3 On the Events page, type block into the Event library: field. That should get
you to the blocked_process_report; click that and then click the > (right-arrow)button to add it to the Selected events list. The only big difference between thisexample and the previous one, where we used the Wizard, is that we didn’t get apreselected list of events by using a template. Figure 17.10 shows what yourevent should look like at this point.
4 Add database_name to the list of captured fields.5 Don’t include any filters.6 Save the data to a file, as shown in figure 17.11, and make a note of the filename
for later reference. I’m configuring the file to have a max size of 1 GB, and con-figuring SQL Server to automatically create up to 5 new files. At that point, theoldest file will be deleted automatically to make room for a new one, so I’ll needto ensure I can spare 5 GB of local disk space.
Once you’re done, ensure that the session is started. (If you still have a blocked process
report session from chapter 13, stop that session. You can even delete it if you like.)
162 CHAPTER 17 Using Extended Events
To try to create a blocked process, I’m going to open a new query window and run thefollowing:
DECLARE @x INT = 0;
WHILE @x < 200BEGIN
UPDATE Person.Person SET Title = NULL WHERE Title IS NULL;SELECT @x = @x + 1;
END
This is making a meaningless set of changes to a table, but it’s doing it 200 times. Theidea is to put some locks in place that will exist for a long time. I then open a new SQLServer Management Studio window (I did this on a separate computer; you could alsocreate a new connection to the same SQL Server instance right in the same Studio win-dow) so that I’d have a separate process to work from. In that window, I ran the same
Figure 17.10 Capture the blocked_process_report event.
Figure 17.11 Capture the events to a file on disk.

163Creating a custom session
query. Again, the idea is to get it waiting for long enough to trigger my blocked pro-cess threshold.
TRY IT NOW If you’re playing along, it’s important to get both of these que-ries started at more or less the same time. I used a second computer becauseit was easier for me to run the first query, then immediately switch keyboardsand get the second one running.
I’ve run one query that’s going to put Exclusive locks on a bunch of database rows—possibly escalating to block entire pages or even the entire table—for several seconds.I then ran a second query that wanted to do exactly the same thing; it would remainblocked and hopefully generated a blocked process report.
After ensuring that the queries ran long enough to pass my blocked processthreshold, I expanded the blocked process Extended Events session and double-clicked its target (which in my example, remember, is coming from a file on disk, notfrom a memory buffer). As shown in figure 17.12, I can see that a process was indeedblocked attempting to gain an Update lock (remember, UPDATE queries first grab anUpdate lock, which later becomes Exclusive). That means the second process I wasrunning couldn’t get a lock to read the data, because the first process already had anExclusive lock.
The event data also includes a field named blocked_process, which contains a lotmore data in XML format. Here’s what I saw:
<blocked-process-report> <blocked-process> <process id="processc937b498" taskpriority="0" logused="0"
waitresource="KEY: 5:72057594045595648 (8194443284a0)" waittime="2879" ownerId="6695214" transactionname="UPDATE" lasttranstarted="2013-11-06T08:41:33.210" XDES="0xff04f208" lockMode="U" schedulerid="2" kpid="3312" status="suspended" spid="71" sbid="0" ecid="0" priority="0"
Figure 17.12 You can see the blocked process!
trancount="2" lastbatchstarted="2013-11-06T08:40:04.453"

164 CHAPTER 17 Using Extended Events
lastbatchcompleted="2013-11-06T08:39:43.430" lastattention="1900-01-01T00:00:00.430" clientapp="Microsoft SQL Server Management Studio - Query" hostname="WIN-NQT7TB6A571" hostpid="1736" loginname="WIN-NQT7TB6A571\Administrator" isolationlevel="read committed (2)" xactid="6695214" currentdb="5" lockTimeout="4294967295" clientoption1="671090784" clientoption2="390200">
This information is a treasure chest! It tells me what computer (hostname) wasblocked, when this happened, how long the process waited for a lock before timingout, pretty much everything. What follows next is the query it was trying to run:
<executionStack> <frame line="6" stmtstart="96" stmtend="222"
sqlhandle="0x0200000051b03e00e63acce39eea915534a9dfe8852f56530000000000000000000000000000000000000000" />
</executionStack> <inputbuf>DECLARE @x INT = 0;
WHILE @x < 200BEGIN
UPDATE Person.Person SET Title = NULL WHERE Title IS NULL;SELECT @x = @x + 1;
END </inputbuf> </process> </blocked-process>
That’s the blocked process; I also get a whole section on the blocking process, so I cansee who and what was causing the problem:
<blocking-process> <process status="suspended" spid="69" sbid="0" ecid="0" priority="0"
trancount="2" lastbatchstarted="2013-11-06T08:40:05.580" lastbatchcompleted="2013-11-06T08:39:47.360" lastattention="1900-01-01T00:00:00.360" clientapp="Microsoft SQL Server Management Studio - Query" hostname="WIN-NQT7TB6A571" hostpid="704" loginname="WIN-NQT7TB6A571\Administrator" isolationlevel="read committed (2)" xactid="6694253" currentdb="5" lockTimeout="4294967295" clientoption1="671090784" clientoption2="390200">
<executionStack> <frame line="6" stmtstart="96" stmtend="222"
sqlhandle="0x0200000051b03e00e63acce39eea915534a9dfe8852f56530000000000000000000000000000000000000000" />
</executionStack> <inputbuf>DECLARE @x INT = 0;
WHILE @x < 200BEGIN
UPDATE Person.Person SET Title = NULL WHERE Title IS NULL;
SELECT @x = @x + 1;
165Hands-on lab
END </inputbuf> </process> </blocking-process></blocked-process-report>
That’s a real wealth of information.
17.4 Tips for Extended EventsExtended Events provide a great deal of really useful information. It’s worth exploringthe templates in the New Session Wizard, because those represent predefined sets ofevents that most administrators will find useful at some point.
Additional tips:
■ Avoid running sessions unnecessarily, to cut down on the amount of data youhave to pore through. I tend to run sessions when I’m actively troubleshootinga problem.
■ Document what you have each session capturing, ideally in some shared docu-ment that other administrators can get to as well.
■ Be aware that Extended Events is actively under development by Microsoft, soolder versions of SQL Server might not support as much variety, whereas newerversions will be able to capture much more.
17.5 Hands-on labI’m hoping you took the time to follow along with the examples in this chapter; if youdidn’t, at least run through that blocked process report, as it’s a crazy-useful tech-nique. That’ll be your hands-on lab for this chapter.

Monitoring andanalyzing performance
This is one of the most important chapters in this book. Aside from index mainte-nance and monitoring, performance monitoring is one of the most impactfulthings you can do as a SQL Server administrator. In this chapter, I’ll focus on someof the easiest ways to monitor SQL Server performance, particularly from the per-spective of SQL Server 2012 and later.
This chapter is, I’ll admit, a wee bit on the long side. You may need a couple ofdays’ lunches to go through everything.
18.1 Key Performance Monitor countersWindows’ built-in Performance Monitor tool remains one of the best ways to get aquick look at performance, and for compiling long-term performance informa-tion. It isn’t an enterprise monitoring system as System Center Operations Man-ager, but it does let you dig in to see a snapshot at what’s happening.
When using Performance Monitor, always run it on a machine other than theone you’re analyzing. The tool works fine remotely and runs on all Windows com-puters. It can display information in a real-time chart, or save performance infor-mation to a log, called a data collector set. Those logs can be opened later and viewedin a non-real-time graph.
TIP To run Performance Monitor on nearly any Windows computer, holdthe Windows key and press R. Then, type Perfmon and hit Enter.
166

167Key Performance Monitor counters
Performance Monitor breaks things down into objects, which are broad categories ofperformance items, and counters, which measure a specific performance metric. Inmany cases, counters are available in multiple instances. On a multiprocessor com-puter there will be an instance of the processor counters for each logical processor. Inthose cases, you’ll also often find a _TOTAL instance that aggregates all of the individ-ual instances.
Each of the next sections will focus on a particular performance object. I’ll try toprovide recommendations about what represents good and bad values, but in manycases I’ll suggest you refer to a baseline value. That’s an observed value on a system thatyou feel is working well, meaning it’s handling its workload acceptably. In other words,you need to start analyzing performance when a system is working well, so that youknow what “good” looks like. You then recapture and reanalyze periodically as yourworkload changes and evolves.
18.1.1 Setting up Performance Monitor
Once you have Performance Monitor (or PerfMon, to its friends), adding objects andcounters is easy. Click the big + icon in the toolbar, or press Ctrl+N. Select your object,then the counters, and click OK. Note in figure 18.1 that you can pull objects fromremote computers or the local machine.
Once you have all your counters, they’ll display in a real-time graph, shown in fig-ure 18.2.
You may need to adjust the line style, color, and weight to make it easier to differ-entiate each counter. You’ll notice that clicking a counter in the list near the bottomof the graph will highlight that counter in the graph itself; double-clicking lets youconfigure the graph line appearance, as shown in figure 18.3.
TIP If you aren’t getting the highlight effect when selecting a counter inthe list, press Ctrl+H. That toggles the highlighting behavior. You can thenuse the arrow keys on your keyboard to move between counters, and eachwill be highlighted with a bolder, darker line to make it easier to pick out of
ABOVE AND BEYONDNewer versions of SQL Server, including SQL Server 2012, provide a new, native wayof viewing bulk performance information. Called Dynamic Management Objects, orDMOs, they consist of two distinct elements: Dynamic Management Views, or DMVs,and Dynamic Management Functions, or DMFs.
To keep this book as version-neutral as possible, I’m going to focus primarily on Per-formance Monitor rather than on the DMOs. If you’re using versions of SQL Serverthat support DMOs, it’s worth your time to read up on them for they can make it eas-ier, for example, to collect information into a spreadsheet or database for long-termtrend analysis.
the bunch.

168 CHAPTER 18 Monitoring and analyzing performance
Figure 18.1 I prefer to set up one computer’s counters in a single graph.
Figure 18.2Adding too many lines can make the graph hard
to read.
169Key Performance Monitor counters
18.1.2 Memory Within this object, consider the following counters:
■ Pages/sec tracks how many pages of memory (not quite the same as SQL Server’s8 KB data pages) are being swapped between active RAM and the system page file.Lower numbers are better, but look for something under 50 on most systems.
■ Page faults/sec measures how many times the OS looked for a page in memory,but had to go to the disk-based swap file for it instead. Lower numbers are bet-ter, but match this against your baseline.
TIP Keep in mind that SQL Server can be configured, on a per-instance basis,with minimum and maximum memory values. If you’re experiencing mem-ory-related problems, don’t forget to check the instance configuration.
18.1.3 SQLServer:Buffer ManagerThis object lets you see how well SQL Server’s in-memory caches are working. Sincethese are a key to reducing disk I/O, it’s important to keep track of these counters:
■ Buffer cache hit ratio—Measures the percentage of data requests being servedfrom SQL Server’s cache, rather than from disk. Higher is better, and you ide-ally want around 90% or better in most transaction-based systems.
■ Page life expectancy—Tells you how long a page of data can be expected to live inthe cache before being flushed. Higher is better, but compare to your baseline
Figure 18.3 Customizing line appearance can restore sanity to the graph.
for analysis.

170 CHAPTER 18 Monitoring and analyzing performance
■ Checkpoint pages/sec—Tracks how many pages are being written to disk per secondby the checkpoint process. You should see this stay under 30 on most systems.
■ Lazy writes/sec—Tells you how many pages are being flushed from the cache. Thisshould be under 20.
18.1.4 SQLServer:Memory Manager
There are three things to look at on this object:
■ Memory grants pending—Tells you how many processes are waiting to be assignedmemory. You want this at zero.
■ Target server memory and total server memory—These go together. The first shouldbe close to the amount of RAM available in the computer, and the secondshould be close to the first.
18.1.5 PhysicalDisk
You’ll want to watch instances of this object for any disks storing SQL Server data orlog files. Focus on the following counters:
■ % disk time—The amount of time the disk was busy; continuous readings over85% indicate a system that has poor disk throughput. This is an urgent andimmediate problem that will create significant impact on SQL Server.
■ Current disk queue length—The number of disk requests waiting for the disk sys-tem to catch up. You want this under two per disk.
■ Avg. disk queue length—The average number of items waiting for the disk systemto catch up. It should also be under two per disk.
■ Disk transfers/sec—Measures overall read/write operations on disk, and shouldbe under 400 per disk.
■ Disk Bytes/sec—Measures the amount of data moving back and forth to disk. Youtypically want this under 800 MB per second.
■ Avg. disk sec/read and avg. disk sec/write—Measure the length of time read andwrite operations are taking. Each should be under 10 ms on average.
Note that this is one of the few objects that is absolutely reliable even inside a VM; we’lltalk about the caveats of VM performance in chapter 20.
18.1.6 Processor (_Total) %
It’s important to focus on all processors, hence the use of the special _Total aggregateinstance, unless you’ve configured SQL Server to use something other than all avail-able processors. Counters to watch:
■ Processor time—Measures the amount of time the processor was busy. This shouldhave an average value under 80%. I start to get worried when this averagesabove 50% under normal workloads, and that’s my signal to start looking for
other performance issues that might be contributing to the problem.
171Using Data Collectors and reports
■ % privileged—Measures the amount of time the processor spent in privilegedmode, typically servicing device drivers and kernel-level requests. You want thisunder 10% on average.
Keep in mind that overloaded processors can often be the result of the processor mak-ing up for some other bottleneck. Slow disk systems will require more disk queue andbuffer management, which will eat up processor cycles.
18.1.7 SystemThis object measures a couple of important core counters:
■ Processor queue length—Measures the number of instructions waiting on the pro-cessor to get to them. This should be under 2.
■ Context switches/sec—Measures the number of times per second that the proces-sor switches from one thread of execution to another. An average value under2,000 is typically acceptable.
18.1.8 SQL Server:SQL StatisticsThis object measures additional SQL Server-specific statistics. There are no firm rec-ommendations for these, but you want to know what they look like on a system that’sfunctioning well. Continue to monitor them for significant changes, as those will indi-cate increasing workload and potentially declining performance.
■ Batch requests/sec—The number of SQL command batches being handled eachsecond.
■ SQL compilations/sec and SQL recompilations/sec—Measure the number of SQL state-ments being compiled for execution.
18.1.9 Network interface and network segmentPeople often forget that the network is a big part of how SQL Server works. These twoobjects (both of which tend to be reliable inside of a VM, by the way) help you under-stand how SQL Server is utilizing the network.
■ Network Interface: Bytes total/sec—Should be under 50% of the network card’scapacity. Yes, 50%. Ethernet network performance degrades sharply after 50%saturation.
■ Network segment: % net utilization—Should stay under 80% of the network’s band-width, the point at which Ethernet performance falls off most drastically.
Keep in mind that the network segment is being used by every computer connected toit; it can be saturated even before SQL Server starts using it! The network interface isspecific to the computer.
18.2 Using Data Collectors and reportsA cool feature of newer versions (since 2008) of SQL Server is Data Collectors. These
are designed to run continuously in the background, logging performance data to a
172 CHAPTER 18 Monitoring and analyzing performance
centralized data warehouse (which is a specialized SQL Server database). You cantherefore have several SQL Server instances reporting data to a single spot, and thereare a ton of built-in, interactive reports you can use to summarize and monitor keyperformance metrics.
18.2.1 Setting up the data warehouse
Before you start collecting all that performance data, you need someplace to put it, sowe’ll start by creating a data warehouse. This can go on any SQL Server you like (thathas some free capacity—obviously don’t load up an already-busy server with this), anda single data warehouse can handle data from multiple SQL Server instances. A lot ofmy customers tend to set up a SQL Server instance for internal administrative stuff, lit-tle applications they create internally, or databases they create to store informationcollected by their administrative scripts. That’s a perfect place to put the data ware-house. You probably do need to put it on a regular edition of SQL Server, as opposedto the free Express editions, because the Express edition isn’t designed to acceptnumerous incoming connections all the time.
To get started, go to SQL Server Management Studio, expand the Managementfolder, and right-click Data Collection. You’ll see an option to configure the data ware-house, as shown in figure 18.4.
The wizard will walk you through the process. You’ll be setting up a new database,so you’ll have to think about where it’s going: you’ll need to have adequate disk space,consider how you’ll back up and maintain the database, and so on. This obviously isn’tsomething you should drop onto any old SQL Server instance without forethoughtand planning. Part of the setup process also creates three database roles inside thenew database, and lets you map specific logins into those, giving people permissionwithin the database.
18.2.2 Configuring data collection
After the management data warehouse is set up, you’ll need to run the wizard a secondtime, this time selecting the option to set up data collection. I’ve done that in figure 18.5.
Now that your data warehouse is set up, you’ll only need to run the wizard onceper SQL Server instance, selecting the Set up data collection option and pointing eachinstance to that data warehouse.
Figure 18.4 You must configure a data warehouse
to use data collection.
173Using Data Collectors and reports
One setup consideration is where the local data collec-tor will cache its data before uploading it to the datawarehouse. Typically, you can use the system TEMP direc-tory, but if you need a specific SQL Server instance touse a different disk path, you specify that during datacollection setup.
You’ll know that data collection is set up by lookingin Object Explorer in SQL Server Management Studio.As shown in figure 18.6, the default System Data Collec-tion Sets folder will exist, with the default collectorsunderneath.
18.2.3 Configuring a data collection set
Data collection sets have a pretty reasonable default configuration, but you can double-click one to modify its settings if needed. Figure 18.7 shows what you’ll see.
You can change the collection interval, modify the data warehouse location, and soon. You can even have data collected on one schedule and cached locally, with a less-frequent upload to the data warehouse. I have customers who’ll use fairly regular col-lection, but only upload to the data warehouse in the evenings, so that the next day’sreports are ready to go. You can also configure the data retention period (the defaultis 730 days).
NOTE Data collection and upload is handled by a set of SQL Server Agentjobs, which you can see in Object Explorer after setting up data collection.Ensure that SQL Server Agent is running on the instance, or data collectionwon’t happen.
Figure 18.5 Run the wizard a second time to set up data collection.
Figure 18.6 Use Object Explorer to verify data collection setup.

174 CHAPTER 18 Monitoring and analyzing performance
18.2.4 Working with data collection reportsRight-clicking Data Collection again will provide access to the available reports, as shownin figure 18.8. You can access built-in reports, or create your own custom reports.
The reports are somewhat interactive, offering the ability to drill down usinghyperlinks. I find the query statistics history to be useful, since it highlights the mostfrequently run and most long-running queries on the system, giving me a place tostart looking for potential query problems.
Figure 18.7 You can modify data collection set properties.
Figure 18.8 Choose from custom or built-in reports.

175The big performance killers
NOTE There’s a great article on Microsoft’s MSDN website that discusses thedata collector architecture, going into more detail on the available reportsand so forth. I heartily recommend that you read it. It’s at http://msdn.microsoft.com/en-us/library/dd939169(v=sql.100).aspx. The articlewas written for SQL Server 2008, but it’s applicable to later versions as well.
18.3 Watching for performance trendsMake no mistake: managing SQL Server performance is all about knowing what’snormal on a given instance, and watching for deviations from normal. That’s onereason the data collectors are so cool—they give you a built-in 2-year trend line tostart with. But you should make sure that your regular performance monitoring ofSQL Server includes building a trend line, and regularly comparing current perfor-mance to the trend.
Sadly, none of the native tools (aside from data collection) are designed for trendcollection; you have to get into additional tools, such as System Center OperationsManager, to gain that capability. And you do need that capability.
I have a few specific kinds of trends that I like to watch for:
■ Increasing memory churn. I like to see if SQL Server is generating a decreasing cachehit ratio in the OS, a sign that SQL Server isn’t getting the memory it needs fromphysical RAM, and is instead swapping to the OS page file—a slower operation.
■ Increasing lock wait times in SQL Server. This suggests that queries are taking lon-ger to run, and more queries are waiting longer to access the data they need.This is generally traceable to a disk bottleneck, although memory or CPU starva-tion can contribute. Chapter 13 went into more detail on this problem.
■ Increasing network bandwidth utilization. This is a good measure of steadilyincreasing workload, and although not alarming in and of itself, it does put meon the lookout for bottlenecks as the workload goes up.
■ Steadily increasing CPU utilization. I look at long-term averages over an hour or so,because CPU activity naturally spikes a lot in the short term. Steadily increasingCPU utilization is another sign of increasing workload, and it means I have to bevery careful to look for memory and disk bottlenecks.
18.4 The big performance killersLet’s look at some of the bigger performance-killers that you, as an administrator, canhelp mitigate.
18.4.1 MemoryGiving SQL Server as much memory as possible is almost never the wrong answer,although, depending on the way SQL Server is being used, a lot of memory won’t nec-essarily help in every situation.
Try to run SQL Server on a 64-bit machine, using a 64-bit OS, and of course use a64-bit edition of SQL Server. 64-bit doesn’t inherently speed up anything, but 64-bit
processors are more modern and do run faster than older processors. More importantly,
176 CHAPTER 18 Monitoring and analyzing performance
64-bit processors don’t have a 4 GB limit on memory. Look carefully at the hard pagefaults performance monitor counters, and if they’re getting high, SQL Server is likelystarved for memory.
NOTE It’s obviously easy to allocate more memory to a VM, but be carefulthat you’re not overcommitting memory beyond what the physical host hard-ware can handle. You’ll learn more about this in chapter 20 on virtualizingSQL Server.
Also consider enabling data compression in SQL Server (not provided in every edi-tion; generally, Enterprise Edition will have it). This helps increase both disk I/O andmemory utilization, because data pages are stored on disk and in memory as com-pressed objects. There’s a bit of extra CPU load in handling the compression, but thepayoff is usually worth it.
18.4.2 Disk
Disk is the ultimate bottleneck for SQL Server. There’s a lot you can do to speed thingsup, all of which primarily revolve around the theme of get more spindles on the job.That is, the more physical disks involved in SQL Server’s disk I/O, the less likely youare to run into hard bottlenecks. Some suggestions:
■ SSD can have a tremendous impact. FlashSoft (www.sandisk.com/products/flash-soft/), for example, relies on a local SSD for caching SQL Server data, and it candouble or even triple performance.
■ Use large disk arrays comprised of many, many physical disks. Most SANs are built thisway, making them ideal for storing SQL Server databases.
■ Try to eliminate contention as much as possible. Putting log files and data files on sepa-rate disks or arrays, for example, helps parallelize activity and reduce wait times.Parallelization is key: even having multiple disk controllers helps SQL Server domore things simultaneously, with each controller handling a separate array.
■ Go faster. While Fibre Channel was once the platinum standard for SANs, iSCSIand other technologies have caught up and are, in some measures, pullingahead. Faster is better.
■ Add RAM. To a degree, more memory, meaning larger page cache buffers, canhelp mitigate slow disk I/O.
■ Spread out. If you can spread database objects across multiple files, and movethose files to separate storage, you’ll help reduce contention and speed thingsup. Separate intelligently, moving your most active tables and objects to differ-ent files so that they can be accessed more simultaneously.
18.4.3 Processor
Add more processors. Use faster processors. Both are difficult resolutions in a physicalmachine, but they become easier in a VM. Processors having larger L2/L3 caches tend
to work better with SQL Server, too.
177Hands-on lab
One overlooked thing I try to focus on is whether or not my system’s processors arebeing used efficiently. After all, if you can’t add more or use faster CPUs, getting themost from what you have is key, right? Look at how much time the processor is spentin privileged mode, a counter I mentioned earlier in this chapter. Most privilegedmode time comes from device drivers, so more efficient device drivers can help a lot.Also consider running SQL Server on Windows Server Core (in Windows Server 2012and later, with SQL Server 2012 and later), since Server Core doesn’t need fancy videodrivers. Video is where a lot of privileged time gets eaten up. Manage your serversremotely, rather than by running management tools right on the server, because remotemanagement helps reduce privileged time, too.
18.5 Hands-on labThere’s no specific hands-on lab for this chapter, but if you have access to a produc-tion SQL Server instance, fire up Performance Monitor and check out some of thekey counters I listed in this chapter. Start getting a feel for what your productionservers look like. You can also set up Data Collectors on your lab instance of SQLServer, if you like, and get a feel for what that process looks like. Be aware, of course,that because your lab instance isn’t doing much of anything, the performance reportswon’t be very interesting.

Options forhigh availability
Most organizations using SQL Server depend on it pretty heavily. It’s mission critical,as they say. The problem with mission critical is that computers and software breakdown from time to time. Hardware fails. A data file gets corrupted on disk. Ormaybe you just need to maintain the server, applying a patch or two. What’s that?Mission critical means it has to be running 24/7, with no downtime for mainte-nance? That’s where high availability comes in.
This chapter is going to be mainly descriptive, meaning I’m going to explainhow these technologies work and what they can do for you. We won’t be gettinginto their setup, because in some cases that can require a significant amount ofserver hardware. SQL Server Books Online provides step-by-step details for settingthese up, if you need instructions.
19.1 What is high availability?High availability, or HA, involves building redundancy into your SQL Server plat-form. The idea is to have at least two of everything, so that if one fails, you’ve got abackup in place. SQL Server offers a number of different HA options, and you canimplement HA practices that sit outside of SQL Server, too.
Make no mistake: HA costs. Take an extreme example, where you want to makesure SQL Server can keep running absolutely, no matter what. Even if a meteor hitsyour datacenter. The entire building needs to be redundant! You’re going to haveto build a new datacenter, either across town or across the country—you can seewhere this HA thing can get expensive really quickly.
That’s why you have to start by setting goals for HA. What, exactly, do you need
178
to be able to survive? You’re going to need to have a budget, too, and the business

179Database mirroring
is going to have to come up with that number. It should be based on what downtimecosts, not on some random figure pulled out of the air. If you know the companywill lose a million dollars a day when SQL Server is offline, it’s reasonable to have abudget based on that number. A million bucks could build a datacenter across town.Just saying.
19.2 Log shippingSQL Server’s easiest HA technique is called log shipping. This involves two servers: yourmain production server, and a hot spare. Normally, the hot spare does nothing but actas a redundant server, either a physical or a virtual machine. If it’s doing no otherwork, Microsoft doesn’t make you pay for the SQL Server license. It doesn’t need to bethe same kind of computer as your production server, meaning it could be a smaller,less expensive rig. (Of course, if you need to actually use it, performance may suffer ifit’s not up to snuff.)
Log shipping starts with a snapshot of your database, which is a complete backup ofthe entire database from that moment. From then on, the production server’s transac-tion log is periodically bundled up and sent, or shipped, to the hot spare. The hot sparereplays the transactions in the log against its copy of the database, bringing that copyup to current. This technique always involves a certain amount of data being at-risk,meaning the hot spare isn’t being updated in real-time; if the production server failsyou’ll lose some data.
In the event of a production server failure, nothing happens automatically. Youhave to manually bring the hot spare online, and figure out a way to have clients talkto it instead of to the production server. Most folks do that with some DNS trickery:you have your clients all talking to a DNS CNAME alias, which normally points to theproduction server. In a failure, you modify DNS so that the CNAME points to the hotspare. Client computers may take as long as 10 minutes to adapt to that change,since they tend to cache DNS records locally for about that long. Some organizationswill lower the time-to-live, or TTL, of the CNAME record so that clients cache it forshorter periods. A lower TTL does mean more DNS traffic, so you have to architectfor that.
NOTE As of SQL Server 2012, log shipping is deprecated. That means Microsoftplans to get rid of the feature in the future, and is only including it for back-ward compatibility. It’s good to know what log shipping is and how it works,because it serves as a kind of functional baseline, but you shouldn’t start usingit in new projects.
19.3 Database mirroringDatabase mirroring is similar to log shipping, in that you have a production server and ahot spare. The hot spare can absolutely be doing production work for another data-base, meaning you can pair mirror servers to split workload. For example, Server A
can be the main server for Database 1, while Server B is the main server for Database 2.
180 CHAPTER 19 Options for high availability
Each mirrors the other’s databases, so Server A has a mirror of Database 2, and Server Bhas a mirror of Database 1. That way, both servers are being useful, meaning you’rewasting less money on standby resources. In a failure, one server would be doing allthe work, so you might have to accept a lower-than-normal level of performance fromit during the failure period.
The big difference between log shipping and database mirroring is that mirroringhappens more often, sending small groups of transactions rather than entire log files.That means your backup server is always a bit more up-to-date. That’s the up side; thedown side is that mirroring requires more processing power. Standard editions of SQLServer run mirroring in a single-threaded process, which means it’s only effective formirroring a single database. Enterprise Edition uses a multithreaded process that can,when backed by sufficient computing power, mirror multiple databases for you. Aswith log shipping, mirroring involves two—and only two—servers.
NOTE You have to mirror between the same editions: Enterprise to Enterprise,or Standard to Standard. You can read more about this and other requirementsat http://technet.microsoft.com/en-us/library/bb934127(v=SQL.105).aspx.
As of SQL Server 2008, Enterprise Edition, the principal copy of the database—theproduction server—can use the mirror as a form of backup. In the event that a single8 KB page of data gets corrupted on the principal, and the server is unable to readit, it will automatically request a fresh copy from the mirror server, which usuallyresolves the problem. It’s a kind of invisible, low-level repair operation made possibleby mirroring.
19.3.1 Mirroring modes
Mirroring can operate in one of two main modes, synchronous and asynchronous. Syn-chronous mode is also called the high-safety mode, because it tries harder to makesure the mirror copy is always up-to-date, meaning less of your data is at-risk at anygiven time. In this mode, when a client runs a query on the production server, the pro-duction server immediately sends the transaction to its mirror partner. The produc-tion server waits for confirmation from its partner, meaning it waits until thetransaction is replayed on the mirror copy, before telling the client that the transac-tion completed successfully. This places a significant burden on the overall application,because clients now have to wait for two SQL Server computers to run every transac-tion. This mode is available only in Enterprise Edition.
Asynchronous mode is also referred to as high-performance mode, because itdoesn’t wait for the dual confirmation. The production server processes client queriesimmediately, and confirms to the client as soon as it’s done so. The transactions aresent to the mirror as fast as possible, but it will typically lag a bit behind the primarycopy, so you may have some data at-risk if a failure occurs. The lag can become sub-stantial if the production server is under heavy workload, or if the mirror server’s
hardware isn’t able to keep up.
181Database mirroring
19.3.2 Mirroring failover
If you’re using asynchronous mode, then SQL Server doesn’t support any kind of auto-matic failover. You have to manually tell the system to use the mirror copy instead ofthe production copy. That’s a big downside of mirroring and high-performance mode,because your application may stay offline until someone manually “flips the switch” touse the mirror copy.
High-safety synchronous mode, conversely, requires a third server called a witness.This doesn’t contain a copy of the database, but instead sits around and watches thetwo mirror partners (the witness can also be serving up its own, unrelated databases toclients, so it’s not completely useless). The witness enables automatic failover, mean-ing it will “see” the production server fail, and make sure traffic starts going to the mir-ror copy instead. At that point, the mirror copy becomes the principal copy of thedatabase, and what used to be the production server is now considered the spare.
NOTE The witness can be running any edition of SQL Server, even Work-group or Express, which means you don’t have to pay for a SQL Server licenseif all the thing will do is sit there and stare at your mirror partners.
19.3.3 Connecting clients to a mirror set
Obviously, for things like automatic failover to work, your clients have to know whento switch servers. Normally, clients connect by using a connection string, which is a set ofinstructions that includes the server name. For a mirror set, that server name wouldbe the principal copy, or what I’ve been calling the production server. The connectionstring can also provide the name of the other server, the backup copy where the mir-ror exists. The OS’s data access layer stores this information in memory. Upon makingthe initial connection to the current principal server, the OS-level data access layerretrieves the mirror partner server’s name, caching it in memory. As you might imag-ine, all of this magic requires a Windows client OS. It won’t work with non-Windowssystems unless they’ve been specifically written to duplicate this behavior.
NOTE In a web application, the end-user’s web browser doesn’t talk directlyto SQL Server. Instead, it talks to a web server, which talks to the SQL Server,which means the web server is the “client” in that scenario, because it’s themachine connecting to SQL Server.
Here’s what a connection string might look like when you specify both mirror partners:
"Server=Partner_A; Failover_Partner=Partner_B; Database=AdventureWorks2012; Network=dbmssocn"
Reconnecting in the event of a failure is not necessarily automatic; applications mustbe aware of the failed connection, and must initiate a reconnect. This forces the clientto start all over, and presumably the connection to the old principal server will fail,forcing the client to try the failover partner. The witness, if you’re using one, helps the
two mirror partners understand who’s in charge, but it doesn’t necessarily help clients
182 CHAPTER 19 Options for high availability
reconnect. This is the biggest downside of mirroring, because you can’t guaranteethat clients will quickly and transparently start using the mirror. Read more about thisat http://technet.microsoft.com/en-us/library/ms175484(v=sql.105).aspx.
NOTE This is a major point of misunderstanding for mirroring. The witnessdetermines which of your two mirror partners believes it is in charge; this hasno impact on which one your clients connect to. In order for mirroring tohave truly automatic failover from a client perspective, you may have to makeat least small application-level changes to the client application code.
19.4 AlwaysOn ClusteringAlwaysOn is a brand name that was introduced with SQL Server 2012 to describe theproduct’s high-end HA options. AlwaysOn Clustering (also called AlwaysOn Availabil-ity Clusters) is one of two HA technologies included under the AlwaysOn brand.AlwaysOn Clustering is a new name for SQL Server clusters built atop the WindowsCluster Service, something that we’ve had for over a decade. But look: a shiny newbrand name!!
19.4.1 Cluster architecture
With clustering, you start with two or more servers, which we’ll call nodes. It’s possiblefor a node to be active, meaning it will be running a SQL Server instance that is beingused by client computers, or to be passive, meaning the node sits and waits for anothernode to experience a failure. Within the cluster, you can run multiple instances ofSQL Server, and you can designate which nodes are capable of running each instance.For every instance, you need to have a chunk of disk space where the instance cankeep its database files. That disk space is usually provided on a SAN, because the diskspace must be “visible” to every node that might run an instance. That way, whatevernode is running an instance will have access to the instance’s files on disk. Figure 19.1shows what this might look like in a complex setup.
Let’s look at what figure 19.1 is showing. We’ll start at the top of the diagram,where you can see four virtual server names and IP addresses. These are defined in theorganization’s DNS server, so that client computers can resolve the names (Instance1,Instance2, and so on) to the associated IP addresses. The clustering software on eachof the four server nodes, shown in the middle part of the figure, can potentially “lis-ten” to any incoming traffic for these IP addresses. NodeA, for example, “listens” toincoming traffic for Instance1, Instance2, and Instance3.
Each node has three instances of SQL Server installed, but in our example eachnode only has one instance started. In figure 19.1, I’ve shown the started instances in awhite box, and the stopped instances in a grey box. So on NodeB, the SQL Server ser-vices related to Instance 2 are started and running; the services for Instance 1 andInstance 3 are installed but stopped. In clustering terminology, we’d say that NodeBwas active for Instance 2, and passive for Instance 1 and Instance 3. NodeB can never
become active for Instance 4, because that node isn’t physically installed on NodeB.
183AlwaysOn Clustering
At the bottom of the diagram is the SAN, which has chunks set aside for each instance.As we start the explanation, NodeA “owns” the chunk of SAN space reserved forInstance 1’s files. NodeB owns the SAN space set aside for Instance 2’s files, and so on.Any of the nodes can potentially touch the files for any instance, but by mutual agree-ment they agree to stay hands off everything except what they’re currently using.
19.4.2 Data file redundancy in clustersPay special attention to the fact that this HA technology does not provide redundancy forthe database files. They’re all located on the SAN, which becomes a single point of fail-ure. In reality, most SANs are built with their own redundancies, the same as sparepower supplies, disk arrays, and so on, so SANs are generally thought of as a safe placeto keep your data. But there’s only one copy of data for each instance, and that’s apotential point of failure. What if the database becomes corrupted? The SAN is stillrunning, so it can’t necessarily help with that, but you’ll lose the entire database until
Storage Area Network (SAN)
Instance 1files
Instance 2files
Instance 3files
Instance 4files
Instance110.0.1.23
Instance210.0.1.27
Instance310.0.1.28
Instance410.0.1.31
NodeA
Instance 1
Instance 2
Instance 3
NodeB
Instance 1
Instance 2
Instance 3
NodeC
Instance 1
Instance 3
Instance 4
NodeD
Instance 1
Instance 2
Instance 4
Figure 19.1 AlwaysOn Clustering example. Notice that in each node there are three instances installed, but only one is active (highlighted in white). If one node fails temporarily, the others can step in to cover while it recovers.
you can restore from a backup.

184 CHAPTER 19 Options for high availability
19.4.3 Cluster failover scenario
Now consider a failover situation. Let’s say NodeB dies for whatever reason. A heartbeatsignal runs continuously between the cluster nodes, so its buddies will realize whenNodeB flatlines. Depending on how you’ve configured the cluster, either NodeA orNodeD could take over for NodeB, since NodeB was running Instance 2 and bothNodeA and NodeD have copies of that instance. Suppose NodeA takes over. All of asudden, NodeA starts its copy of Instance 2’s services. NodeA takes over the SANchunk reserved for Instance 2, and NodeA begins responding to incoming traffic onIP address 10.0.1.27, which is assigned to Instance2. In about a minute or so, Instance2will be back online, running on NodeA instead of NodeB. NodeA might have somerecovery to do, in terms of playing back transactions that NodeB hadn’t yet committedto disk, so that might take a few more seconds.
You can also manually initiate a kind of failover, which you might want to do formaintenance purposes. Suppose you’re ready to install a service pack on NodeD. Youmanually command the failover, which gives NodeD time to write pending changes todisk and cleanly hand off control of Instance 4 to, say, NodeC, the only other nodecapable of running Instance 4. This kind of failover takes longer, but it is cleaner, withless data at-risk, because the nodes can cooperate in the handoff.
19.4.4 Clustering pros and cons
These kinds of clusters are, sadly, expensive. They require a lot of hardware (SANs,networking equipment, and so on) in addition to the servers themselves. They’recomplex to set up and maintain, and there are a lot of moving pieces in the clusteringsoftware. They don’t provide data file redundancy, either. On the upside, they providegood HA for hardware failures, and they give you the flexibility of having each node toactive work while serving as a backup for its neighbors.
You have to size each node for the amount of work you expect it to do. For exam-ple, if you want NodeA to provide decent performance when running Instance 1, 2,and 3, then it has to have sufficient processing power. When it isn’t serving all threeinstances, that extra power is wasted.
These days, I tend to steer customers away from these clusters, mainly because SQLServer 2012 introduced something better: Availability Groups.
19.5 AlwaysOn Availability GroupsAlwaysOn Availability Groups were introduced in SQL Server 2012, and they closelyresemble the HA technology in Microsoft Exchange Server. You start with a bunch ofservers, which we’ll continue to call nodes. Unlike clustering, these nodes don’t needany shareable disk space, although you might still elect to connect them to a SAN fortheir database files. The point is that each node needs its own private, personal stor-age space. They’ll never take control of each others’ disk space.
You define an availability group that spans the nodes, and then assign one or more
databases to the group. Each node is said to host an availability replica, either the
185AlwaysOn Availability Groups
primary replica or a secondary replica. SQL Server 2012 supports up to four secondaryreplicas per availability group. Every database you add to the availability group iscalled an availability database, and they all live together. Only one node hosts the pri-mary replica at any given point, and it is the primary server for all databases in thegroup. The databases fail over as a unit. It’s possible for a single server to host multipleavailability groups, meaning things can get quite complex. Figure 19.2 shows what itmight look like.
Here, NodeA, NodeB, NodeC, and NodeD all participate in two availability groups,which I’ve named Group 1 and Group 2. Notice that there are virtual server names,DB1 and DB2, and corresponding IP addresses. Any of the nodes can respond to theseIP addresses, but right now NodeA is responding to 10.0.1.23 and NodeD is handling
Storage Area Network (SAN)
NodeAfiles
NodeBfiles
NodeCfiles
NodeDfiles
DB110.0.1.23
DB210.0.1.27
NodeA NodeB NodeC NodeD
Group 1
Group 2
Figure 19.2 AlwaysOn Availability Group architecture, showing two availability groups running on four nodes. Each group is accessible through a separate virtual IP address.
10.0.1.27; those IP addresses are virtually connected to the availability groups. As you

186 CHAPTER 19 Options for high availability
can see, NodeA hosts the primary replica for Group 1, while NodeD hosts the primaryreplica for Group 2. Group 1 contains two databases, while Group 2 contains onlyone. All four servers have their own storage areas on the SAN.
NOTE SQL Server 2014 introduces the ability to keep an AlwaysOn replica inMicrosoft’s Windows Azure cloud service. That means you have a cloud-basedbackup of your data running in Microsoft’s data centers. You’d pay for stor-age and compute time in that replica, but you wouldn’t pay for the data beingcopied in (you don’t pay for inbound data in Azure). You’d only start payingfor bandwidth if you needed to fail over to that replica.
19.5.1 Availability group replication
As changes are made to the databases by NodeA and NodeD, those changes are repli-cated to the other nodes in the availability groups, using a process similar to databasemirroring. The process can work in synchronous or asynchronous modes, the same asmirroring. This gives each node an up-to-date copy of all three databases. They usetheir own private SAN storage to keep those files. You can see how this offers betterdata file redundancy than clustering, because each database physically exists in fourdifferent places (you could even put some of them on a different SAN for even betterredundancy, and that’s what I usually recommend).
This replication can even happen over long distances if you have sufficient WANbandwidth, meaning you can easily keep a copy of your data across town. The nodes inan availability group share nothing other than a common network connection, mak-ing it easier to separate them.
19.5.2 Availability group failover
The nodes in an availability group are always in touch with one another through aheartbeat signal, much like the heartbeat used by clustering. (Availability Groups arebuilt on top of a portion of the Windows Cluster Service, so they share some capabili-ties with clustering.) When the node hosting the active replica flatlines, another nodepromotes itself to active and takes over. It starts responding to traffic on the virtual IPaddress, and within seconds, you’ve failed over. It’s much faster failover than with clus-tering, because every node is already running SQL Server. They don’t have to wait forservices to start up.
19.5.3 Availability group bonuses
Because the secondary replicas are all up-to-date copies of the database, running on aseparate SQL Server, you can put them to use. Remember, in clustering, the backupnodes don’t keep SQL Server running, because only one node at a time can “see” thedatabase files on the SAN. With availability groups, every node has its own private,up-to-date copy of the database.
You can configure backup operations to always back up from a secondary replica,
freeing resources on the primary. That effectively means you can run backups during
187HA comparison
production hours (!!!) without impacting production (!!!). That means you can runbackups all day long, protecting your data even more. You might also configurereporting functions, which only need a read-only copy of the database, after all, toconnect to a secondary replica, offloading further work from the primary.
When applications connect to SQL Server, they can include an intent statement inthe connection data. That intent states what the application intends to do: read data,or change data. You can configure the availability group so that incoming read-intentconnections are automatically routed to a secondary replica, saving the primary forwrite-intent connections. That’s an amazing way to increase the capacity of SQL Server,by moving traffic to another whole server.
19.6 HA beyond SQLThere are many approaches to HA aside from those contained in SQL Server itself.Technologies like VMware vSphere FT and Marathon Technologies’ everRun MX aredesigned to take a SQL Server instance running in a VM, and replicate its disk, mem-ory, and CPU state to an identical VM running on another host. If the main VM (or itshost) fails, execution transfers to the other VM, with little or no lag time.
Both Microsoft Hyper-V and VMware vSphere support live migrations of VMs, too. Soif you have SQL Server running in a VM, you can move that VM to another host, if desired.
These HA techniques present different levels of redundancy to protect against dif-ferent kinds of failures, and they all have their associated pros, cons, and costs. They’reworth looking at, just so you know what options you have for meeting various businessneeds that might come your way.
19.7 HA comparisonBy way of summary, I thought it would be useful to sum up how the different SQLServer-based HA options stack up against each other. This is a simple comparison, butit’ll help highlight the main business-level differences. Table 19.1 lays it out for you.
Table 19.1 Comparing HA techniques in SQL Server
TechniqueEase of setup
Relative costHardware
redundancyDatabase
redundancyRecommendation
Log shipping Easy Low Yes Yes Deprecated; do not use for new projects
Database mirroring
Easy Low to moderate
Yes Yes Single-threaded in stan-dard version; not real-time
Clustering Complex Expensive Yes No Traditional approach; doesn’t harden data; can get expensive
Availability Groups
Moderate Moderate to Expensive
Yes Yes Recommended: provides most options and best
redundancy
188 CHAPTER 19 Options for high availability
As I mentioned earlier, I’ve been pushing my clients toward AlwaysOn AvailabilityGroups. They’re far easier to set up than AlwaysOn Clusters, and they provide themaximum amount of redundancy, including the data itself. They’re more geoflexiblethan clustering, giving you the option of splitting across datacenters (provided youhave solid infrastructure in place to support it). They also give you the most optionsto have standby resources performing production work, meaning you’re wasting lessmoney on hardware, VMs, and SQL Server licenses.
Good alternatives exist outside SQL Server itself. Providing redundancy at the VMlevel gives you a ton of flexibility; I’ve lightly touched on those topics here, but youroptions vary a lot depending on the products you have in your environment.

Virtualizing SQL Server
Organizations, for the past several years, have been on a mission to virtualize every-thing, it seems, especially servers. It isn’t hard to understand why: virtualizationoffers a lot of flexibility, more compact data centers, interesting options for HA, andmore. Over those last few years, myths and inaccurate information have been per-petuated about virtualizing SQL Server. Let’s clear it up and see how well SQLServer responds to being virtualized!
20.1 Why virtualize?There are dozens of reasons to virtualize a server. VMs can be easily moved fromhost machine to host machine, helping to rebalance workloads, make maintenanceeasier, and even provide for fault tolerance. Once a server is running on a VMinstead of on a physical machine, you might not even care where its physical host islocated. Microsoft, for example, makes it possible to migrate VMs from your owndatacenter into their Azure cloud-based datacenter, giving you interesting optionsfor accessibility and high availability.
Virtualization can also help meet organizations’ political or business needs. Sup-pose you have a database that stores customer credit card information. You’dprobably be subject to the Payment Card Industry’s Data Security Standard (PCIDSS), which might entail specific server- and database-level configurations. Youmight not want those configurations to be shared by other databases that your orga-nization uses. In fact that PCI DSS-compliant server might need to be managed byentirely different administrators and auditors. Virtualizing lets you split that sensi-tive database off onto its own server, without requiring you to go out and buy,
189
install, and maintain a physical box.

190 CHAPTER 20 Virtualizing SQL Server
Understand that SQL Server has supported a kind of virtualization for a very,very long time. As shown in figure 20.1, SQL Server’s ability to run multiple instancesof itself on a single server OS means that you can effectively have multiple copies ofSQL Server running on one machine (physical or virtual), and those instances canbe completely separated from each other. My PCI DSS example requirement couldlikely be met by running a separate instance, rather than running an entirely sepa-rate server.
This virtualization model still has some weaknesses. Without special clustering con-figurations, for example, you can’t quickly move a SQL Server instance from one hostto another (although with Windows Cluster Service, you sort of can). There’s also asingle point of administration for the Windows OS itself, and Windows administratorshave a certain amount of all-powerful control over SQL Server, since SQL Server isobviously running on Windows. In instances where you need to separate that adminis-trative capability a bit, hypervisor-virtualization lets you do so.
Physical machine
Host OS
Physical storage
SQL Serverinstance
SQL Serverinstance
SQL Serverinstance
Figure 20.1 SQL Server virtualizes by running multiple side-by-side instances.

191Understanding virtual and physical hardware
20.2 Understanding virtual and physical hardwareAs shown in figure 20.2, hypervisor-based virtualization (“real” virtualization, as opposedto running side-by-side SQL Server instances) uses the hypervisor to emulate physi-cal resources like memory and a processor. Each VM believes it’s running on itsown physical computer, and the hypervisor manages access to the underlying physi-cal hardware.
As you can see, virtualization has a lot more layers. There are more OSes running,plus the overhead of emulating hardware. Virtualization is always less efficient thanusing physical machines, but because server computer hardware has become so pow-erful, we can afford to be a bit less efficient in exchange for having more flexibility.The trick in virtualizing SQL Server is to understand where those lowered efficienciescome into play, and understanding what you can and can’t do in various scenarios.
CAUTION The advice I’m going to offer in the remainder of this chapter is,obviously, generic. It doesn’t apply universally to all situations, and you should,
Physical machine
Host OS or hypervisor
Physical storage
Virtual machine
Guest OS
SQL Serverinstance
Virtual storageVirtual storage
SQL Serverinstance
Virtual machine
Guest OS
SQL Serverinstance
Figure 20.2 Hypervisors emulate physical hardware.
above all else, follow the SQL Server-specific guidance from your hypervisor

192 CHAPTER 20 Virtualizing SQL Server
vendor. Virtualizing is complex, and becoming increasingly complex, and isincreasingly being designed to allow workload-specific tuning and tweaking.
20.3 CPU and memory in a virtual environmentWhen I started building SQL Server machines, physical machines, mind you, wetended to overbuild them. Because it’s fairly difficult to upgrade a server’s physicalhardware, we’d stock machines full of CPUs, full of memory (RAM), and everythingelse. That way the machine could scale up as much as we’d ever (hopefully) need. Butit meant we were deploying a ton of wasted computing resources, and that is a key factto keep in mind when you virtualize SQL Server. You probably do not need as muchserver oomph as you might provision for a physical server.
20.3.1 Sizing CPUs
SQL Server, for example, can run smaller and even medium-sized workloads just finewith a single processor core. With physical servers, I almost always had more coresthan that, because it’s tough to add processors after the server is deployed. With virtu-alization, it’s pretty easy to roll out new cores to an existing VM: it’s literally just a con-figuration setting and a VM restart. So when it comes to CPU, start small. Give your SQLServer VMs as little CPU as possible, then ramp up until you’re covering your workload.Keep in mind that the jump from one core to two cores can be a big one, as two coresopens up the possibility for SQL Server to start parallelizing queries. It’s often worthexperimenting to see if your workload benefits from that.
You do need to pay a bit of attention to what other workloads the host computer ishandling other than SQL Server. If I’ve figured out that a given SQL Server VM needstwo processor cores, then I want the host machine to have two cores that can be moreor less dedicated to SQL Server, unless I know my SQL Server workload isn’t continu-ous and that it won’t always need continual use of those cores. That’s all part of theperformance management of a virtualized environment, though. It’s true of any work-load, not just SQL Server.
CAUTION Newer versions of SQL Server are licensed by the processor core,which means reconfiguring a VM to add a core also means you’ll be responsi-ble for paying additional SQL Server licensing fees. Be sure you understandthe licensing implications in your environment.
20.3.2 Sizing memory
Modern hypervisors support something called memory overcommit, although differ-ent vendors refer to it using differing terminology. The idea is that you can assignmore virtual RAM to a host’s VMs than the host has physical RAM. A host might have10 GB of RAM installed, and assign 2 GB each to 10 VMs. In that example, you’veovercommitted memory by a factor of 50%, which falls within common real-worldpractices. The idea is that the hypervisor shifts memory around to give it to whatever

193Disk I/O in a virtual environment
VMs need it, with the understanding that VMs rarely use all of the memory they’reassigned.
I dislike memory overcommit for SQL Server. That’s due in part to the fact thatSQL Server tends to try to use all the memory you let it, which by default means all thememory available in the computer (virtual or physical). If you’re only pretending togive SQL Server that actual memory, you’ll incur overhead as the hypervisor has toshift things around to meet SQL Server’s needs. Rather than dumping a bunch of RAMon SQL Server and hoping for the best, I try to figure out how much RAM it needs formy workload, give it that much, and make sure the same amount of physical RAM isavailable to back it up.
Some of the tricks hypervisors use to share memory between VMs don’t work wellwith certain SQL Server configurations, which further drives me to not overcommitRAM to my SQL Server VMs.
That said, I have numerous customers who do use memory overcommit with theirSQL Server VMs, and they’re very happy with the configuration. In most cases, they’vespecified a minimum memory level that they know meets their average continualworkload, allowing the hypervisor to provide more RAM when workloads spike.
A lot of what you do with memory, in this regard, depends on your hypervisor’scapabilities, your own virtualization management skills, and your exact workloads.Experiment, remembering that one of the cool parts about virtualization is that youcan change VM configurations more or less on-demand, so you’re not stuck with aconfiguration that isn’t working well.
20.4 Disk I/O in a virtual environmentThis is one of the trickiest areas for virtualizing SQL Server, and it’s one of the mostdifficult for me to write about without getting really specific about particular hypervi-sors. Let me start by trying to explain what can go wrong with disk I/O in a virtual envi-ronment. I’ll be relying on an example that’s pretty simplistic, just to lay out theframework for the discussion.
Let’s explore some of the layers shown in figure 20.3:
■ The physical machine, or host, is the physical computer. It runs a host OS, which con-tains the hypervisor that makes all the virtualization magic happen.
■ The host has its own physical storage. These days, that’s usually a remote SANaccessed by means of a specialized network, like iSCSI or Fibre Channel (FC).
■ The host runs one or more VMs. The configuration for these is usually defined insome kind of configuration file, which is stored on the host’s physical storage.
■ The VMs run guest OSes, like Windows Server, and typically run applications like SQLServer. That guest OS, any applications, and any application data are stored onvirtual storage. Typically, a virtual disk is a special file stored on the host’s physi-cal storage. The hypervisor manages the file, and the VM “sees” the file as if itwere a physical hard disk.

194 CHAPTER 20 Virtualizing SQL Server
When SQL Server writes an 8 KB page of data to disk, it goes through these layers:
1 SQL Server asks the Windows OS to write the data to disk.2 Windows passes the data to its disk controller, a piece of virtual hardware pro-
vided by the hypervisor.3 The hypervisor interprets the write activity, and makes the appropriate updates
to the virtual disk file.
You’ve got three entities involved in every read or write operation: SQL Server is manag-ing its data file, Windows is managing what it thinks are physical disk I/O operations, andthe hypervisor is taking that activity and managing a faked-out disk structure.
With some workloads, this is no problem. With other workloads, the extra layer ofthe hypervisor puts a noticeable performance kink in the system. An alternateapproach is shown in figure 20.4.
In this design, I’ve installed a virtual Host Bus Adapter, or HBA, inside the SQL ServerVM. (HBAs are used for FC SANs; if you use an iSCSI SAN, you’d just have another vir-tual Ethernet adapter in the SQL Server VM.) Now, SQL Server can see the organiza-tion’s SAN directly. SQL Server asks the virtualized Windows OS to write directly to theSAN. The hypervisor, here, isn’t involved in managing SQL Server’s data files. Thisremoves a middleman from the disk I/O, and can improve disk throughput consider-ably from SQL Server’s perspective. This is a fairly common approach in the organi-zations I work with. Many of them have seen significant disk I/O improvement by
Physical machine
Host OS or hypervisor
Physical storage
Virtual machine
Guest OS
SQL Server instance
Virtual storage
SQL Serverdata file
Figure 20.3 Typical virtualized SQL Server
switching to this model instead of the more traditional virtual storage model.

195Tricks with performance monitoring in a virtual environment
All that said, things have become a lot more complex. Virtualization vendors are con-stantly pushing ahead and improving performance of virtual storage, all while addingflexibility that doesn’t exist in physical storage models. So you should take my exam-ple as a general description of potential bottlenecks, and take the time to understandexactly how your virtualization model deals with storage.
20.5 Tricks with performance monitoring in a virtual environmentOne of the most frustrating parts about virtualizing SQL Server is that it breaks almosteverything you know about SQL Server performance monitoring. In general, you haveto be leery of monitoring performance inside a VM. Just because the virtualized OSsees the CPU as being at 80%, for example, doesn’t tell you much about CPU utiliza-tion. It could be that the hypervisor is only providing what it’s been asked for, and so whilethe VM sees the CPU as being at near-max, it doesn’t mean there isn’t more CPU lying inreserve. The same applies to memory, and to a large degree disk I/O, unless you’reusing a storage model where SQL Server is attaching directly to physical storage (like aSAN), in which case the VM’s disk I/O figures should be fairly accurate.
In fact, that’s a good rule: don’t trust a VM to tell you anything accurate about vir-tualized resources, but trust it to know what’s going on with real, physical resources.So how do you manage SQL Server performance? Yeah. Er. Um. It’s complicated.
You’ll probably need to find some commercial tools that know how. Seriously.
Physical machine
Host OS or hypervisor
Physical storage
Virtual machine
Guest OS
SQL Server instance
SQL Serverdata file
HBA
Figure 20.4 Giving SQL Server direct access to physical storage
Microsoft doesn’t ship anything natively with SQL Server, although Microsoft’s System

196 CHAPTER 20 Virtualizing SQL Server
Center Operations Manager product is coming along nicely in terms of monitoringvirtualized workloads; other vendors offer somewhat more mature solutions. The trickseems to be monitoring both the physical host and the VMs, so that you can correlateinside-the-VM performance to what-the-host-is-dealing-with performance. You’ll knowif the VM is maxed out because the host is maxed out, if the VM merely hasn’t beengiven any of the available resources, or if the VM hasn’t been allocated enoughresources. Performance monitoring at this level is, frankly, incredibly complicatedand it’s beyond the scope of this book. If you’re dealing with a virtualized SQL Server,my suggestion is to find vendors who can help you deal with performance and acceptthe cost of their tools as part of the cost of doing business. Remember, virtualizationbrings many benefits, but at least some of those will be partially offset by increasedmanagement costs.
20.6 Hands-on labYou won’t have a hands-on lab for this chapter, but take a moment to find and readthe SQL Server-related virtualization guidance from your organization’s hypervisorvendor. VMware’s guidance document is at www.vmware.com/files/pdf/sql_server_best_practices_guide.pdf.

Moving, migrating,and upgrading databases
The more you work with SQL Server, the more likely you are to need to move,migrate, or upgrade a database from time to time, and in this chapter I’ll show yousome of the main techniques for doing so. I’ll be focusing strictly on moving (orupgrading, or whatever) an entire database, completely intact, without makingchanges. You might need to do that if you’re relocating a database to a new SQLServer instance, for example, or if you’re upgrading versions of SQL Server.
I won’t be covering situations where you need to modify the database in somefashion, such as when you’re upgrading the version of the application that uses thedatabase. That’s beyond SQL Server itself.
21.1 Refresh: detaching and attaching databasesIf you set up a VM-based lab when you started this book, then you should rememberall about attaching databases, but here’s a quick review.
SQL Server keeps your data in a file, on disk, that has a .MDF filename exten-sion. Optionally, some databases may have data in one or more secondary .NDF filesas well. Also, each database will have a transaction log file in a .LDF file. By default,SQL Server has these files open for its own exclusive use at all times (well, so longas SQL Server is running, at least), making it impossible to copy these files. To getSQL Server to let go of a database’s files, closing them and making them availablefor filesystem operations, you detach the database.
In SQL Server Management Studio, right-click a database, select Tasks, thenselect Detach…. SQL Server will ask you to confirm the operation, which mightfail if there are users actively connected to the database. In fact, as shown in
197

198 CHAPTER 21 Moving, migrating, and upgrading databases
figure 21.1, you can see if there are any active connections, and if you select the DropConnections checkbox, SQL Server can terminate those connections for you, all inone step.
You also have the option to Update Statistics before closing the database files,which will leave the database updated and ready to go when you reattach it. If youplan to move the database to a different version of SQL Server, don’t bother updatingstatistics, because different versions of SQL Server can’t typically use stats generated byother versions. The new version will delete and recreate the statistics automatically.
Once detached, the database files—make sure you grab all of them, not just the.MDF file—can be moved to their new location. You can use whatever file-copy mecha-nisms you want, including Windows PowerShell, the Command Prompt window, andWindows Explorer. There’s nothing special about the database files at this point. Theyare just files.
Once they’re in their new location, you can attach them to an instance of SQLServer. Connect to that instance in SQL Server Management Studio, right-click theDatabases folder, and choose Attach…. You’ll be prompted for the file location (orlocations), and the database should attach and become available for use.
Now for the caveats! Keep in mind that databases aren’t fully self-contained: typi-cally, they rely on one or more logins, which are mapped into the database’s internaldatabase users. Logins exist at the server level, and if the new SQL Server instancedoesn’t have the correct logins, then users won’t be able to access the database.
You can’t recreate the logins and hope for the best. SQL Server maps logins to data-base users by using an internal security identifier, or SID, the login’s name. Figure 21.2illustrates how logins are mapped to database users.
In this example, two of the server logins, CONTOSO\DonJ (which, based on thename, is a Windows login) and johnd (probably a SQL Server login) are mapped todatabase users in the MyApp database. The mapping is made by the logins’ SIDs,which aren’t normally visible in the SQL Server Management Studio console.
Let’s say we detach the MyApp database and move it to a new SQL Serverinstance. Those same logins (based on SID, not on name) need to exist on theserver. You can’t simply create a new login named johnd, because when you do, SQLServer will assign a new SID, which won’t match the one that the database is looking
Figure 21.1 Check for active connections before detaching a database.
for. So what can you do?

199Refresh: detaching and attaching databases
You have two options.
■ If you’ve created johnd but it isn’t being used by a database on the newinstance, you can change the SID of the login to match what the database islooking for.
■ If johnd doesn’t exist on the new instance, you can create it and assign the SIDthat the database is looking for.
We’ll begin with the second option: start by finding out the SID for the logins used bythe database. On the original SQL Server instance, run the following query in theserver’s Master database:
SELECT name, [sid] FROM sys.server_principalsWHERE [type] = 's';
This will list logins by name, and include their SID. Write down the SIDs, copy them toa Notepad file, or whatever you like. Then, create the login on the new SQL Serverinstance, assigning the SID you copied:
CREATE LOGIN login_name WITH PASSWORD = N'Login_Password#', sid = 0x2F5B769F543973419BCEF78DE9FC1A64,DEFAULT_DATABASE=[master], DEFAULT_LANGUAGE=[us_english],
CHECK_EXPIRATION=OFF, CHECK_POLICY=OFF;GO
You’ll see where the login’s name, password, SID, and default database are assigned.This creates a SQL Server-type login; the process is similar for a Windows Authentica-tion login (look up the CREATE LOGIN command in SQL Server Books Online).
To fix existing mislinked database users, you’ll use a stored procedure. Make sureyour query window is focused on the database in question, and run this within thedatabase you’ve moved:
sp_change_users_login @Action='update_one', @UserNamePattern='<database_user>',@LoginName='<login_name>';
Logins (server)
CONTOSO\DonJ1234-abcd-5678-ef01
sa0987-fdec-4321-abcd
johnd8564-abee-7564-efee
MyAppdatabase
Database users
donj(login 1234-abcd-5678-ef01)
jdoe(login 8456-abee-7564-efee)
Figure 21.2 Logins map to database users by SID.
GO;

200 CHAPTER 21 Moving, migrating, and upgrading databases
You specify the database user name you’re trying to fix, and the login name it’s meantto map to. SQL Server will find everything and change the SID in the database tomatch the one on the existing login. It’s also possible to get a list of database users thataren’t properly linked to a login. Again, with a query window focused on the databasein question, run:
sp_change_users_login @Action='Report';GO;
You can read more about this orphaned database user situation, and how to prevent andfix it, at http://technet.microsoft.com/en-us/library/ms175475.aspx.
21.2 The Copy Database WizardSQL Server’s Copy Database Wizard can be a lot easier than detaching and attachinga database, in part because it’s capable of handling the whole login-user mappingstuff for you. Both the original instance and new instance of SQL Server must be run-ning and accessible to your computer. The Wizard does run from within SQL ServerManagement Studio, so for a large database, I’ll often run this right on the server.That way, I’m not copying data from the source to my computer, and then from mycomputer to the target. Instead, I’m copying right from the source to the target,which is usually quicker.
Start by right-clicking the database, choosing Tasks, and then selecting Copy Data-base…. The Wizard will prompt you for authentication information for both thesource (origin) and target (destination) instances. As shown in figure 21.3, the Wizardcan automate the detach/attach process for you, or perform the copy by using SMO.The latter allows the source database to remain online.
You’ll run through the remainder of the wizard’s screens to specify the source data-base, the destination database name, and other options. http://msdn.microsoft.com/query/dev10.query?appId=Dev10IDEF1&l=EN-US&k=k(SQL11.SWB.CDW.COMPLETE.F1)&rd=true has full details about how the Wizard works, including information on secu-rity requirements if you’re copying between servers.
21.3 Overview: SQL Server Integration ServicesThe Copy Database Wizard actually creates and runs an SSIS package. Older versionsof SQL Server called this Data Transformation Services (DTS), but the basic idea is thesame: it’s a kind of script that tells SQL Server how to move or copy data from oneplace to another, with fairly advanced abilities to modify or transform that data onthe way.
A discussion of SSIS is beyond the scope of this book, but I want you to know thatit exists. The technology is useful when you need to do anything more complex thana straight instance-to-instance copy (which the Copy Database Wizard does), butSSIS is a complex technology in its own right, with more than a few books written
about it.
201Database upgrades
21.4 Database upgradesMost organizations I work with tend to leave their databases on whatever version of SQLServer the database is already on. They try not to upgrade, often because the applicationvendor specifies a certain version of SQL Server for a certain version of their application,and they won’t necessarily support the customer if they use a different version of SQLServer. It’s common for me to see environments running SQL Server 2000, SQL Server2008, SQL Server 2008R2, and so on. Yeah, it’s a mess.
When organizations I work with do upgrade SQL Server, they typically do a migra-tion. That means they set up the new instance and copy the database from the oldinstance, often using one of the two main techniques I covered in this chapter, such asthe Copy Database Wizard. These side-by-side migrations, as they’re often called,come with numerous advantages. For one, you can migrate over and over and overwithout affecting the source database, which can remain in use. That lets you test theprocess as often as you want with little or no production impact. When you’re satisfiedthat everything’s working, you can “cut over” to the new instance and retire the oldone. Another advantage is that the two instances can be running on entirely different
Figure 21.3 The SMO method allows the database to remain online.
versions of Windows, making this an opportunity to upgrade the server’s OS as well as

202 CHAPTER 21 Moving, migrating, and upgrading databases
SQL Server. You can even migrate across SQL Server editions. You get a ton of flexibil-ity, which is why folks like migrations so much.
NOTE It’s possible to do a migration on the same server, by installing a newinstance of SQL Server on the same physical or virtual machine as an exist-ing instance. But be aware that certain shared components (for example,client connectivity components) will always be updated to that new version,which could potentially cause problems for any older instances running onthe same machine.
The term upgrade generally refers to an in-place upgrade, meaning you install a new ver-sion of SQL Server on top of the old one, with the new instance inheriting the settings,databases, and so on of the old version. It’s harder to roll back with this method: shortof backing up and restoring the entire server, you’re pretty much stuck if it doesn’twork. Microsoft also has rules for what it supports for in-place upgrades. It even offers aSQL Server Upgrade Advisor (search http://downloads.microsoft.com for the appro-priate version) that can scan an existing instance and advise of potential in-placeupgrade problems.
SUGGESTION Nearly everyone in the universe vastly prefers migrations overupgrades. Try to do migrations. It’s safer, more flexible, easier. Better inevery way.
If you must do an in-place upgrade, use the Advisor. Figure 21.4 shows an example ofthe reports it produces, which includes advice on things that must be done before theupgrade, after the upgrade, or at any time. You’ll even be warned about features sup-ported by the old version, which aren’t supported by the new version, so that you canevaluate your options if you’re using those features.
While the Upgrade Advisor is good, I wouldn’t regard it as 100% comprehensive,100% infallible, or 100% guaranteed. It’s an advisor, not a consultant. Before upgrad-ing, back up everything. Back it up twice. Make sure the backups work by restoring themto a lab computer, and performing your upgrade on that lab computer first. Test theupgraded instance to make sure your applications continue to work. Then, and onlythen, consider upgrading your production instance—after asking yourself again whyyou’re not doing a side-by-side migration instead!
21.5 Compatibility levelsCompatibility level is an option within each database in SQL Server: in SQL Server Man-agement Studio, right-click the database, select Properties, then look on the Optionspage to see the Compatibility Level. This setting tells SQL Server to treat that databaseas if it were running on an older version of SQL Server. The setting doesn’t guaranteecompatibility with an older version, but it does cause SQL Server to revert certain behav-iors to match how an older version would have behaved. You can read more about this

203Compatibility levels
feature, and see a list of changed behaviors, at http://technet.microsoft.com/en-us/library/bb510680.aspx. In SQL Server 2008R2 (SQL Server version 9.0, or compatibilitylevel 90), datetime and smalldatetime values are evaluated according to U.S. Englishrules when creating or altering partition functions. That’s sorta-kinda a bug, and inSQL Server 2012 (version 10.0, compatibility level 100), the behavior was updated touse the current language setting instead of U.S. English. If your application code isexpecting U.S. English to be used, then the new behavior could potentially causeproblems, so you might use the compatibility level setting to have SQL Server 2012behave as if it were SQL Server 2008R2.
Compatibility level is all-or-nothing: you get all of the behaviors associated with theversion you select. You can’t pick and choose.
Figure 21.4 Upgrade Advisor report from SQL Server 2005 to SQL Server 2008.

204 CHAPTER 21 Moving, migrating, and upgrading databases
21.6 Hands-on labThis lab is a bit more complex (and will take longer) than the ones I’ve given you tothis point, so you can regard it as optional. But it’s good practice for many of thethings you’ve done up until this point, so if you can find the time, it’s worth it.
Install a new instance of SQL Server (Express is fine) named MYSQL2. Then, moveor copy your AdventureWorks database from your original instance to the new one.Use whatever method you like. In fact, try them all!
SQL Serverperformance checklist
I want to wrap up with a checklist of performance items. This is a list I tend to followwhenever someone calls me and begins with a vague statement such as, “the SQLServer computer is running slowly.” That doesn’t give you much to go on, does it? Achecklist helps me stay consistent, and to not overlook simple stuff. Keep in mind,too, that SQL Server isn’t always at fault—many complex applications include otherservers that may contribute to performance problems. But, if you can narrow theproblem down to SQL Server, then this checklist will help you solve the problem.
I should emphasize that this list focuses mostly on things that I, as an adminis-trator, can do something about, especially when the database or server in questionis supporting an application for which I don’t “own” the code. I’m focusing on thethings I can do strictly on the server, without touching any programming. If you dohave access to the code, or have a coworker who does, there’s obviously a lot morethat you can dive into.
■ Is the server in basically good health? Sometimes a failed disk, bad network card, orother hardware problem can impact performance more than you might realize.
■ How are the server’s basic CPU, network, memory, and disk performance counters? Ifthey’re maxed out, or even running unusually high, you need to find outwhy. Is there an unusually high workload for some reason, or has the every-day workload outgrown what the server can deliver?
■ Are the database’s file sizes adequate? Autogrowth on a file that’s run out of roomis a massive performance killer. Take the time to manage file size manually toavoid autogrowth.
■ Are the database files on a contiguous area of disk space? If possible, take SQL
205
Server offline and defragment the disk to make sure.

206 CHAPTER 22 SQL Server performance checklist
■ Are the indexes in good health? Check their fragmentation levels and reorganize orrebuild if necessary. Remember that rebuilding takes longer and consumesmore resources, but delivers a healthier index.
■ Is the transaction log being maintained? I’ll sometimes come across massive transac-tion log files that are constantly autogrowing, because nobody is taking the timeto truncate the log after database backups are made.
■ Are a lot of blocks or deadlocks happening? You can check in Performance Monitor;if there are, then the application code might not be well optimized for the levelof concurrent workload.
■ Is the tempdb on a fast disk system? It should be and ideally on one that isn’t sharedwith anything else.
Because indexes are one area that you’re usually okay to mess with, even if you don’town the application code, I’ll also spend some time investigating indexes.
■ Capture some traffic and use the Database Engine Tuning Advisor to ensure allindexes are being used. Remember, indexes that aren’t speeding up SELECTqueries (or WHERE clauses) may be slowing down everything else.
■ Clustered indexes should be built on small keys, and you’ll usually find that tobe an automatically incremented integer.
■ Any column referred to by a foreign key constraint should be indexed.■ Are there any small, super-common queries that might benefit from a covering
index?■ More indexes with fewer columns are usually better than fewer indexes having
more columns each. When creating an index having multiple columns, themost restrictive column should be included first.
■ Indexes primarily help with WHERE, ORDER BY, DISTINCT, and GROUP BY queryclauses, so look at queries using those clauses to see where more or differentindexes might be beneficial.
■ Look for a high number of large table scans. These often indicate missingindexes or badly maintained indexes.
■ Almost every table should have a clustered index, so check to make sure they alldo. If one doesn’t, it should be an extremely small table that is ideally notreferred to by any other tables. That’s a rare situation.
■ Do all indexes have an appropriate fill factor setting? Remember, a smaller fillfactor helps indexes from becoming fragmented too quickly, but reduces indexperformance by increasing disk I/O.
This checklist should get you started on identifying major performance problems andarriving at a solution.

Never the end
You’re at the end of your month of lunches for SQL Server administration, butyou’re really at the very beginning of your SQL Server journey. There’s a lot moreto learn, especially if your goal is to become a real DBA. I’d like to use this last, shortchapter as a way to point you in the right direction for your next steps.
■ Start at http://SQLPASS.org, the Professional Association for SQL Server.Cofounded by Microsoft, this community organization is probably the largestand most active in the world. It holds free or low-cost SQL Saturday eventsworldwide, a global PASS Summit every year, and numerous other in-personevents to help you learn and grow. It provides access to great blogs about SQLServer, help you find Microsoft Most Valuable Professional (MVP) Award win-ners in SQL Server, and a lot more. There are local and virtual chapterswhere you can network and connect, giving you a personal community thatcan help you solve problems.
■ For online questions and answers, start with ServerFault.com (more admin-focused) or StackOverflow.com (good for T-SQL or programming questions).You’ll also find a good set of forums at SQLTeam.com. Microsoft’s officialforums are at http://social.msdn.microsoft.com/Forums/sqlserver/en-US/home. (Don’t expect to see Microsoft employees answering questions; theseare community forums.) I also sometimes use the forums at SQLServer-Central.com.
■ Head to www.microsoft.com/en-us/sqlserver/community/forums-and-blogs.aspx for the official word on all things SQL Server, including access totechnology-specific forums (like Integration Services) and product team
207

208 CHAPTER 23 Never the end
blogs. SQL Server is a huge product with numerous subteams, and it’s good tokeep up with what everyone is saying.
I’m not a big SQL Server expert myself, and I fully expect that you’ll quickly outgrowmy knowledge and move on to the real giants in the field. While I’ve found a littleniche in helping folks get started with SQL Server administration, authors such asItzik Ben-Gan, Grant Fritchey, Kalen Delaney, Orin Thomas, Mike Hotek, and oth-ers will take you from there. I’m especially fond of Grant Fritchey’s work on SQLServer performance tuning, as he uses a straightforward approach and has a veryclean writing style.
If you’re worried about becoming some kind of programmer when it comes to SQLServer, you can stop worrying. You definitely will be doing programming as a DBA! Infact, DBAs have been doing something for a long time that Microsoft is now calling“DevOps.” It involves stepping back and forth over the invisible line between adminis-tration/operations and software development, and SQL Server has pretty much alwaysrequired that broad, flexible set of skills. So pick up a book on T-SQL programmingand start reading, because it’s a skill you’ll use every day.
But for now, I think you’ve probably got a good starter set of skills. You can defi-nitely maintain a SQL Server instance, and you can take a good shot at collectinginformation to help a developer correct performance problems. You can do perfor-mance fine-tuning of your own, and you know a lot about what’s going on under thehood as SQL Server processes queries. Good luck with wherever SQL Server takesyou next!

Installing SQL Server
In this appendix, I’ll walk you through the process of installing SQL Server andthe AdventureWorks 2012 sample database. Note that I will be using SQL Server2012 Standard Edition, which is commonly used in production environments.Installing other production editions looks almost exactly the same, but installingthe Express edition has a few minor differences. If you’re installing Express, youshould still be able to use this walkthrough to get started. As a reminder, you candownload SQL Server Express 2012 from www.microsoft.com/en-us/download/details.aspx?id=29062; I suggest the SQLEXPRADV download for either 64-bit (x64)or 32-bit (x86), depending on the OS your computer runs.
A.1 Setting up your computerFor my lab environment, I prefer to use a VM. Note that if you want paralleliza-tion to work, your VM will need to be assigned at least two virtual processors. Thatonly impacts one lab in this book, so it’s not a big deal if you can only give it onevirtual processor. You can use Hyper-V if your computer supports it, or a productlike VMware Workstation. On a Mac, you can use something like Parallels orVMware Fusion.
I recommend using a newer OS, like Windows 7 or Windows 8. You can also use aserver OS, such as Windows Server 2012. If you don’t own a copy of one of these, youcan get a free trial from Microsoft’s website. You can, of course, install SQL Serverdirectly on a Windows 7 or Windows 8 (or later) computer that you already own.
I do suggest a 64-bit (x64) OS, although if you only have access to a 32-bit OS,SQL Server will still work just fine.
A.2 Installing SQL ServerStart by double-clicking the Setup executable, whether that’s one you downloaded(if you’re installing Express) or that you found on the SQL Server installation DVD.You’ll begin at a kind of “task list” screen for production editions; click the Installa-
209
tion task to find Setup and get things running.

210 APPENDIX Installing SQL Server
Figure A.1 shows what you should see first: the SQL Server presetup prerequisitecheck. Hopefully, you’ll have everything installed that you need; if you’re missing some-thing, follow the instructions and install whatever you’re asked to. Usually, that willinclude a version of the .NET Framework and other basic Microsoft software. Note thatSQL Server 2012 requires .NET Framework 3.5; on Windows Server 2012 R2 and Win-dows 8.1, that isn’t installed by default. It should be present, however, and ready forinstallation as an optional feature. You can read http://blogs.msdn.com/b/sql_shep/archive/2012/08/01/windows-2012-and-net-3-5-feature-install.aspx for instructions.
After you click OK, SQL Server will check the online Microsoft Update website forupdates to the setup routines. You’ll usually want to let it do this, so that you can havethe latest software. As shown in figure A.2, SQL Server may find an update or two foryou to install.
Once that’s done, as shown in figure A.3, SQL Server will install SQL Server Setup.Yeah, that seems strange, but it’s what has to be done: Setup has to install the realSetup, so that it can set up SQL Server. How many setups would Setup set up if it couldonly set up setups?
Once Setup is installed, it will launch automatically and start by checking severalpreinstallation rules. You’ll notice in figure A.4 that I got a warning, probably becausethe Windows Firewall is installed on my computer. The warning in this case is remind-ing me that Setup won’t add any exceptions to the firewall, so unless I do so manually,
Figure A.1 SQL Server starts by checking prerequisites.

211Installing SQL Server
Figure A.2 SQL Server will download setup updates for you.
Figure A.3 Setup will install the Setup files.

212 APPENDIX Installing SQL Server
nobody will be able to connect to my server. That’s a detail my server administratorhandles, so I’ll pass on the reminder to her.
Next, Setup will ask what you’d like to do. As shown in figure A.5, you can install adefault instance of SQL Server, or a named instance. I’ve chosen to install a namedinstance called SQL2. You can see in the table at the bottom of the screen that an exist-ing instance, MSSQLSERVER, is already installed. If you’re installing SQL ServerExpress, it should default to installing a named instance called SQLEXPRESS. I recom-mend letting it do that.
My next prompt is for a license key. As shown in figure A.6, you also have theoption of installing a free edition, such as an evaluation, which might expire. SQLServer Express might not show you this screen. I’ll enter my product key and clickNext to proceed. If you enter a product key, it will usually determine what edition ofSQL Server is installed, so make sure you double-check the key before using it.
Figure A.7 shows the next step, which is the inevitable license agreement. Makesure you read it and understand it (or get a lawyer to help) before proceeding.
The next screen, shown in figure A.8, is a shortcut offering of sorts. You can electto do a feature install, where you pick the bits of SQL Server you want, or you caninstall everything. The full install is pretty large, and it’s rare in a production environ-
Figure A.4 Setup will check several installation rules before proceeding.
ment that you’ll need everything, so I usually do a feature install.

213Installing SQL Server
Figure A.5 Decide if you want to install a named instance, or the default.
Figure A.6 Enter your product key to proceed.

214 APPENDIX Installing SQL Server
Figure A.7 Accept the license terms to proceed.
Figure A.8 I usually select the Feature Installation option.

215Installing SQL Server
Figure A.9 shows where I get to select the features I want. I’m going to install only thecore database engine, which is pretty common on a production server. I already havethe management tools from a previous installation (the existing instance on this com-puter), and if you scrolled down the feature list you’d see those tools with a gray checkmark, indicating they were already installed. Note that SQL Server Express has asmaller feature list.
Step 10, shown in figure A.10, is where Setup checks to see if any of the files itneeds to play with are in use. If they are, you’ll be required to restart your computer atthe end of the installation, and this is where you’ll receive that warning.
The next step, shown in figure A.11, is very important. This is where you give yournamed instance a name, and where you choose the root installation folder. Setup willcreate a folder hierarchy for your instance in this location, so it’s okay to install multi-ple instances to this same root folder.
Setup will then show you how much disk space this will all take, as shown in fig-ure A.12. Make sure you’re comfortable with the amount of free space you’ll have left.
The next screen, shown in figure A.13, is also important. Here, you’ll specify the useraccounts and startup types for the SQL Server services that are required by the fea-tures you chose. If you’re setting up a lab environment, it’s pretty safe to leave these at
Figure A.9 Select the features you want to install.
the default, although I do like to change SQL Server Agent to start automatically, and

216 APPENDIX Installing SQL Server
Figure A.10 Setup checks to see if any files are in use.
Figure A.11 Don’t forget the instance name that you provide here!

217Installing SQL Server
Figure A.12 Setup provides you with a disk space requirement.
Figure A.13 Choose the service parameters for SQL Server’s services.

218 APPENDIX Installing SQL Server
I often set the Browser to Manual since I don’t use it. In a production environment,it’s becoming more common to configure a user account or a Managed ServiceAccount to run the services under; you’ll need to consult with your directory servicesfolks to see which they prefer to use. You’ll learn more about how these user accountsare used in chapter 2.
We’re almost done, and figure A.14 has the last main configuration screen. Here,you’ll select the authentication mode SQL Server will use. In production, you’ll needto know what the applications using SQL Server expect, and many will require MixedMode, which is what I’ve selected. If you choose that, you must provide a password forthe built-in, all-powerful sa account.
In a lab environment, you can leave it at Windows Authentication. Either way,you’ll need to add a Windows user or group as an administrator of SQL Server. TheAdd current user button will add whomever you’re currently logged on as.
The next screen, shown in figure A.15, asks if you want error reports to be sent toMicrosoft. Your organization should have a policy about that, because many Microsoftproducts offer the option.
As shown in figure A.16, SQL Server will perform one last round of checks to makesure everything looks okay to install based on the information you’ve provided. Besure to deal with any errors, as you can’t safely proceed without resolving them.
Figure A.17 shows your final screen, where you’ll confirm what Setup is about to do.
Figure A.14 Choose your authentication mode.

219Installing SQL Server
Figure A.15 Choose an error reporting option.
Figure A.16 The final installation check.

220 APPENDIX Installing SQL Server
You’re off and running! Figure A.18 shows the progress bar you’ll be watching for any-thing from a few minutes to what seems like an eternity, depending on what you’veasked to be installed.
With any luck, you’ll complete without error. Figure A.19 shows that I’ll need torestart, something that happens a lot to me when I install another instance on a com-puter that already has one instance running on it. Take care of that restart, and SQLServer is up and running.
Once you restart (if necessary), SQL Server should be ready to use.
A.3 Installing the AdventureWorks 2012 databaseThis isn’t a necessary step in a production environment, but in a lab environment theAdventureWorks 2012 database gives you a fully populated database to play with, mak-ing labs more interesting.
NOTE If didn’t install SQL Server 2012, make sure you try to get a matchingversion of AdventureWorks. (There’s an AdventureWorks 2008 sample data-base also.) Most should be available from the same CodePlex.com websitewhere AdventureWorks 2012 is located. It’s usually safe to use an older data-base on a newer version of SQL Server. The worst that can happen is that it
Figure A.17 Check everything carefully before clicking Install.
simply won’t work—you shouldn’t damage anything by trying.

221Installing the AdventureWorks 2012 database
Figure A.18 Watching Setup install SQL Server.
Figure A.19 Setup complete, and time to restart.

222 APPENDIX Installing SQL Server
The trick is in getting the right download. AdventureWorks is Microsoft’s all-in-onesample, so it offers a lot of variations, such as one for data warehousing (the DW vari-ant). I went to http://msftdbprodsamples.codeplex.com/releases/ and found a linkfor all of the AdventureWorks releases, including 2008, 2008R2, and 2012. Note that theDW variant isn’t what you want. I went to http://msftdbprodsamples.codeplex.com/releases/view/93587 to get the right download. The Recommended Download onthat page was AdventureWorks2012_Database.zip, which is what I wanted. Pay closeattention to filenames; you don’t want the LT (light-weight) version, and you don’twant the DW (data warehousing) version.
There are brief instructions on the page for attaching the downloaded database toSQL Server, but I’ll walk you through it. Obviously, start by downloading it. What you’llend up with is a ZIP file; right-click that to extract all the files. I suggest extractingthem to a permanent location, such as C:\Data.
Then open SQL Server Management Studio. In newer versions of Windows, I liketo pin this to the Task bar so I can find it easily. It should be located in SQL Server’sinstallation folder if you can’t find it; in Windows 8, go to the Start screen and typeSQL to try and find it. The first thing you’ll see when you run it is the connectionscreen. As you can see in figure A.20, I’m connecting to my local computer (localhost)and the SQL2 instance I just installed (localhost\SQL2). I have it using WindowsAuthentication, meaning it’s connecting using my logon credentials.
In the Object Explorer, which is usually on the left, right-click Databases and selectAttach…, as shown in figure A.21.
Click the Add button to add the AdventureWorks 2012 data file, which has a .MDFfilename extension. If you’ve placed that file somewhere under your profile folder,such as in your Documents or Desktop folder, the folder picker may have trouble find-ing it. That’s why I tend to create a folder specifically for the database, under the C:\drive, just so it’s easy to find. Figure A.22 shows what you should see after choosing the
Figure A.20 Connect to
your SQL Server instance.
223Installing the AdventureWorks 2012 database
Figure A.21 Select the option to attach a database.
Figure A.22 Select the AdventureWorks 2012 database files.

224 APPENDIX Installing SQL Server
file. Notice that the corresponding log file, with a .LDF filename extension, has beenselected automatically.
Now click OK. As shown in figure A.23, youshould be able to expand the Databases node inObject Explorer and see AdventureWorks2012 con-nected and ready to go. You only have to do thisonce; it’ll be there from now on when you openSQL Server Management Studio.
I should point out that everything I’ve shownyou about attaching this database is suitable onlyin a lab environment. In a production environ-ment, you wouldn’t store your database on the C:\drive—and you probably wouldn’t be attaching asample database in production, either! Chapter 4discusses appropriate locations for database files,along with other concerns.
At this point, your lab should be set up andready to go.
Figure A.23 The database is attached and ready to go.

index
Symbols
*, asterisk 18% disk time counter 170% privileged counter 171
A
access denied error 72accounting 75–81action, audit and 77ad-hoc query 111administrator
credential control 134performance checklist 205
Advanced tab, job and 130AdventureWorks 2012 17
database 130, 220pay attention to filename 222
AdventureWorks sample database 11Advisor. See Database Engine Tuning AdvisorAgent. See SQL Server Agentalert, application troubleshooting 123alert, SQL Server Agent element 132alias 31ALTER INDEX, index rebuilding
impact 98AlwaysOn Availability Groups 184–187
architecture, example of 185maximum amount of redundancy 188
AlwaysOn Clustering 182–184AlwaysOn replica. See availability replicaanalysis, lock and block 122–125
blocked process report configuring. See blocked process report
system-level lock activity review 123watching for deadlocks 126
AND Boolean operator 19answers, lab 6application
index and internal maintenance routine of 106
application developers 1application role 63application vendor
index strategy tempering and 106array, disk and 42articles, additional 6AS keyword 33asynchronous mode 186
database mirroring and 180Attach option
Database folder and file atachment 198attaching database 36audit
creating 77–79troubleshooting 80See also security, accounting; SQL audit
authentication 56–64and flexibility 62login 56mapping Windows logins 62Windows Authentication mode 56
Auto Close setting 36Auto Create Statistics setting 36Auto Shrink setting 36autogrowth, file size problem 40–41availability group
and database 185defining 184
225
Lock object 122 availability replica, node as the host of 184

INDEX226
avg. disc sec/read and avg. disk sec/write counters 170
avg. disk queue length counter 170
B
B Tree, index structure 84Background Intelligent Transfer Service 144backup 44–49
continuous 53copy 47differential 47differential database 48full 47full database 48log file 46media set 47software 44tail-end 49tail-log 51transaction log 44–45, 47–49T-SQL commands 54
Backup Exec 44batch request/sec counter 171Bigint data type 25binary format, audit files and 79block, reducing frequency and impact of 126blocked process report
lock and block analysis 123use of 125
blocked process threshold, setting 151blocked_process, a field 163blocking processes, generating a list of 148blocking, SQL Server feature 119–127
as a natural outcome of locking 120Bookmark Lookup, symbol 114Books Online. See SQL Server Books OnlineBrightStor 44B-tree index 114buffer cache hit ratio counter 169buffer pool 44Bulk-Logged recovery model 47business environment, SQL Server and 4BusinessEntityID value 23
C
Char data type 26chart, database and 41checkpoint pages/sec counter 170checkpoints 46client application, direct connection to SQL
Server 73
client, connection to a mirror set 181–182cluster
clustering pros and cons 184data file redundancy in a 183failover scenario 184
cluster architecture 182–183active and passive nodes 182
clustered index scan 114operations 115
clustered index seek 114See also row ID (RID) lookup
code, downloadable 6Collation setting 35collection interval changing
data collection set and 173Command text box, job and 130command-line shell, PowerShell as 143commands
implemented by core SQL Server module 145comma-separated values (CSV) file 79common major version numbers 11compatibility level 202
setting 35Computer Scalar operation 115Configure Management Data Warehouse
Wizard 172Connect to Server window 10connection string 58
non-Windows systems 181connection, trusted 58consistency, troubleshooting performance
and 205Containment type setting 36context switches/sec counter 171continuous backup 53Copy Database Wizard 37, 200
authentication information prompt 200counters
disks storing data 170displayed in a real-time graph 167memory 169processors 170See also specific counters
CPUcost, estimated 116memory in a virtual environment 192–193sizing 192
CREATE INDEX commands, and index backup 104
credentials, benefits for SQL Server Agent security 134
CSV. See comma-separated values (CSV)current disk queue length counter 170custom session, creation of 161–165

INDEX 227
D
data collection 171–175and data warehouse 172configuration of 172–173
data collection reports, interactivity and 174data collection set, configuration 173data collector architecture, article on 175data collector set, performance information saved
into 166data retention period, configuration 173data storage, local file, saving to 156Data Transformation Services (DTS), older version
of SQL Server and 200data types 25–26database
adding all tables to a diagram 29AdventureWorks sample database 11all-inclusive nature of 11and Full recovery model 46and Simple recovery model 46as a basic unit of management 34autogrowth and physical fragmentation 40autogrowth vs. growth 40colocated log and data files 39columns that may be null 25configuring options 34–36database’s files, inventorying 12defined 11detach/attach process automated by Copy Data-
base Wizard 200detaching and attaching 36–37finding installed 11finding perfect performance balance 101heavy disk fragmentation 39importance of size management 40making backup online 49managing 34–43master 16moving to a different server 61object. See database objectpermissions within 60primary file 38purpose of each 13reason for different filegroups 41recovery. See database recoveryrestoration 49–53snapshot of 179storage, assessment 38structure, assessment of 25–31system 41table structure 17techniques for moving and migrating 197–200transaction log file 38
upgrading entire 197warning message 28
database administrator (DBA)reluctant 2role in a traditional organization 1
Database Automation Plans, built-in wizard and 135
database diagram, generated automatically by SQL Server 28
Database Engine 10Database Engine Tuning Advisor 117, 206
final report 105query traffic analysis 104setting up for database tuning 104
Database Mail 132–134newer version of SQL Server 133SQL Server Agent 128
Database Mail, setting upPowerShell and 149
Database Maintenance Plans 134–135manual management 135
database mirroringbiggest downside of 182failover 181high availability and 179–182modes 180similarity with log shipping 179
database objectfully qualified name 70permissions 66
Database Properties dialog 34database properties, altering, PowerShell
and 149database recovery 50–53
scenarios for 52–54database systems, multiple users and the purpose
of locking 119database upgrade 201–202
backing up before upgrading 203database user 59–62
activation of an application role 63connection with a relatively low-permission
credential 63contained database 62dbo, default user 60guest, default user 60internal 62login name and password retrieve 63mapping a login to 59orphaned login 62sharing the same credential 63specifying a login 61
database_name, filling in appropriate 94Datetime data type 26
unnecessary secondary files 39 DBA. See database administrator (DBA)

INDEX228
deadlocks 125–127reducing frequency and impact 126victim process 125
default instance 9default layout, database and 30detaching database 36developers
contribution to application performance 111DBAs, collaboration on indexes 101
DevOps, administration and software development 208
dirty read, Read Uncommitted query and 122disk
array 42byte/sec counter 170defined 42mirror 42performance killer 176performance, improving 127redundancy and 42storage, overview 42–43transfers/sec counter 170
Display Estimated Execution Plan option 111Distribute Streams 115DML queries, basic 16DMOs. See Dynamic Management Objects (DMOs)Domain Admins group 14Domain Users group, permission assignment and 57double-click vs. right-click 14Drop Connections checkbox, database detach-
ment and active connection check 198Drop Connections option 36DROP_EXISTING, index recreation 97
See also index maintenance, strategies of; rebuilding index online
DTS. See Data Transformation Services (DTS)Dynamic Management Objects (DMOs)
performance information analysis 167
E
email administratorDatabase Mails and help from 133
email, operator and outgoing notifications 131Enabled checkbox, job 130encryption, and communication between the tar-
get and master 140Enterprise Edition, multiple database
mirroring 180error message, generic, and deadlock 126event
additional information to capture, adding 155captured by Extended Events, example of 161defined 153
Event Selection tab, and trace template 102Exclusive lock 122, 163explicit transaction 120Express vs. Developer edition, SQL Server 4Extended Events 153–165
blocked process report 124, 161–164event. See eventexample of data captured 158New Session Wizard 154session. See sessionSQL Server Profiler, difference between 157tips for 165use 125
F
feature install vs. full install 212fields, captured, and adding database_name to
the list 161file
layout, problems with 38–40primary 38size, problems with 40–41
file-copy mechanisms, database files and 198filegroups 41Filegroups page 34Files page 34fill factor 99
features of 96index performance and 206
Filter operation 114filter, New Session Wizard and event capture 155forums, technology specific 207fragmentation
ideal 100levels check, execution speed vs. accuracy 94monitoring 99operational problem for indexes 92See also index fragmentation
FROM clause 33FROM keyword 18full install vs. feature install 212Full recovery model 46
G
Gather Streams 115General tab 35globally unique identifier (GUID) 26
internal 77goals, setting, and high availability 178graph
highlight effect 167line adjustment 167
Event library field 155 Performance Monitor and 167

INDEX 229
GUI, and work with Extended Events 153GUID. See globally unique identifier (GUID)
H
HA. See high availability (HA)hands-on-labs, learning with 2hardware problem
impact on performance 205Hash Match symbol 114HBA. See Host Bus Adapter (HBA)heap, defined. See index, heapsheartbeat signal 186
cluster nodes and 184heavy disk fragmentation 39help, offline vs. online 21high availability (HA) 178–188
availability group bonuses 186availability group failover 186availability group replication 186different options 187–188log shipping technique. See log shippingno redundancy for database files 183primary and secondary replicas 185
Host Bus Adapter (HBA) 194hot spare
database mirroring 179log shipping and 179
Hyper 209Hyper-V 209hypervisor. See virtualization, hypervisor-based
I
I/O Cost, estimated 116IAM. See Index Allocation MapID, unique 27identity column, database designers and 90immediately effective, author’s phrase 7implicit transaction 120Include Actual Execution Plan option 111increasing lock wait times in SQL Server, perfor-
mance trend 175increasing memory churn, performance
trend 175increasing network bandwith utilization, perfor-
mance trend 175index 82–91
backing up 103changes to data rows and data pages
fragmentation 88clustered 85
advice on building 206only one in SQL Server tables 85
compound 108–109first column as the leading edge of 108first name as the leading edge of 109
constraints 90automatically dropped and recreated 97features 90foreign key constraint (FK) 90primary key 90
empty space 96heaps 83–84
vs. clustered indexes 88identity column 86impact on performance 206inventory 88–89leaf page 86less useful 101most balanced performace for the
application 101multiple columns in 108multiple indexes 82node 85nonclustered 86–89
example of 87fill factor and index rebuilding 96
putting data pages in order 85suggestions for maintaining 99third-party application 105tuning. See index tuningwith multiple columns, advice on
creating 206Index Allocation Map (IAM) 83index fragmentation 92–95
analyzing 94cause of SQL Server slowing down 93external 95fragmentation levels check 94inaccurate percentage of 95internal 95problem with keeping in perfect condition 93unique numeric index ID in place of index
names 94index key size 107–108
fewer disk operations with smaller keys 108index maintenance 92, 99–100
benefits from online index rebuilds 99best performance when in order 93fragmentation. See index fragmentationkey column 92performing 97–99PowerShell and 149problem with keeping in perfect condition 93rebuilding index online 98reorganization 98routines built into applications by vendors 96
compared to phone book 82 strategies of 95–96

INDEX230
index tuning 91, 101–109advanced index design 107–109defined 101performing on someone else’s databases 105–
107Index Tuning Wizard. See Database Engine Tuning
Advisorindex, covering
defined 109negative performance impact 109
Index/Clustered Index modification 115Indexes folder, table’s indexes list in 88INNER JOIN keyword 33INSERT query 24instance 9Int data type 25Intent Exclusive lock 122intent statement, application and connection to
SQL Server 187Inventory Worksheet 15iSCSI technology 176isolation level
concurrency improvement and 122lock and 122
isolation, transaction description and 122
J
jobmultiserver 138SQL Server Agent element 129–130
K
key column 92key icon 30
L
lab answers 6lab environment
author’s recommendation 5setting up 3
lazy writes/sec counter 170.LDF filename extension, for database’s transac-
tion log file 197license key 212links, useful for online questions and answers 207live session data, viewing 157local SQL2 instance, connection to 10lock
deadlock and two separate processes 125escalated by SQL Server 121focus on user data 121
shared, on data 119short-lasting 120types of 120–122
locking, SQL Server feature 119–127log and data files, colocated 39log file, and backup 46log format, text-based 79log shipping 179log trancation, backup and 47logins 56–59
folder and SQL Server 148list of 148orphaned 62
M
maintaining SQL Server 2Maintenance Plans. See Database Maintenance
Plansmaintenance tasks, Database Maintenance Plans
and automatization of 134Managed Service Account 218management console, connection to multiple
instances 10Management folder, and data warehouse
configuration 172Management Studio 27Marathon Technologies’ everRun MX 187Master Server Wizard 138master, system database 41.MDF file 38–39.MDF filename extension, for database’s primary
files 197media set, backup saving and 47memory
as a performance killer 175–176sizing 192virtualization management skills 193
memory grants pending counter 170memory object, Performance Monitor
and 169memory overcommit, and modern
hypervisors 192Merge Join symbol 114message URL MoreLunches.com 43, 74Microsoft Hyper-V 187Microsoft System Center Data Protection
Manager 44Microsoft, support for multiple instances
of SQL Server 8migration
database upgrade 201on the same server 202side-by-side 201
on entire database table 121 vs. upgrade 202

INDEX 231
mirror, disk and 42Missing Index message 113, 117Mixed Mode Authentication 14, 58model, system database 41module (snap-in), PowerShell and 143MoreLunches.com 6
recommended resources 7supplementary content 3
MSDB, system database 42MSSQL$SQL2, named instance 10MSSQLSERVER, default instance 10Multi Server Administration option, and SQL
Server Agent 137, 140multiple instances
common components of SQL Server and 8compared to multiple virtual machines 8See also SQL Server
multiserver administration components, encryp-tion problem 140
multiserver job 140–142multiserver management 137–142
hierarchy in 137–140multiserver operator 138
multitable queries 31
N
named instance 9Nchar data type 26.NDF file 38–39.NDF filename extension, for database’s secondary
files 197Nested Loops operation 114.NET Framework API, and SQL Management
Objects (SMO) 149NET SEND, operator and outgoing
notifications 131network interface object
bytes total/sec counter 171Performance Monitor and 171
new database, setting up 172setup considerations 173
New Session Wizard 154–157data storage 156existing templates as a starting point 155preselected events list 155session creation and 154
New Template button, and trace template 102node
backup 186cluster architecture 182
nonclustered index scan 114nonclustered index seek 114Nvarchar data type 25
O
objectadding 167Performance Monitor 167
Object Explorer 11object ownership, changing
PowerShell and 149ON keyword 33online resources 6operator, SQL Server Agent element 130–131
difference between email and pager email 131
setting up 131Options page 34, 51orphaned audit 77Other Versions drop-down 21owner, database object and 70
P
page faults/sec 169page life expectancy counter 169page, data storage and 44page/sec counter 169pager mail, operator and outgoing
notifications 131Parallelism operator 115parallelization, assigning virtual machine 209Parallels 209parity information, disk and 42PerfMon. See Performance Monitorperformance killer 175–177
and autgrowth on a file 205Performance Monitor
graph 167network interface 171newer versions of SQL Server 167PhysicalDisk 170Processor (_Total) % 170remote performance monitoring 166SQLServer:Buffer Manager 169system object 171Windows’ built-in tool 166–167
Performance Monitor, setting up 167performance monitoring 166–177
virtual environment 195performance trends 175performance, checklist 205–206permissions
assigning 66–67assigning to entire schema 71centrally managed and application update 73column-level 68
database-level 65
INDEX232
permissions (continued)default SQL Server configuration 68DENY 66–67GRANT 66permission chain 71–72REVOKE 67servel-level 65server role use 68sources of 68table-level 68See also SQL Server permission assignment
Permissions page 66physical machine, description of 193physical storage
description of 193direct access to 195
PhysicalDiskPerformance Monitor and 170poor disk throughput 170
plans, estimated and actual 111consequence of old statistics 117
PowerShell 143–152compared to Exchange Server 149description 143discoverability features offered by 144downloading later version 144launch and preloaded support 145provider-based approach 147SQL Server Agent and 149–152tasks automated with 149Windows versions 144
PowerShell Provider 146primary key column, database designers
and 90procedure, stored, and application
performance 111process, blocked
creation, example of 162Extended Events and 164
processorbetter performance with 176question about efficient use of 177queue length counter 171time counter 170
Processor (_Total) % objectPerformance Monitor and 170–171
production server 179–180Professional Association for SQL Server 207Profiler. See SQL Server ProfilerProperties dialog 12proxies, benefits for SQL Server Agent
security 134PSProvider. See PowerShell Provider
Q
Q&A discussion forums, links to 6queries
ad-hoc 111Bulk-Logged recovery model 47consider the entire system 117DELETE 23executing, basic information captured 157Full recovery model 46index hints 106INSERT 23–24multitable 31overlocking as a result of poor design 121results and actual execution plan 113sample 18SELECT 23too many joins in a single 117transaction and 120typos in 111UPDATE 23–24useful statistics history 174
Query Batch Tracking template 155query execution plan 110–118
actual 111similar to estimated 113
additional information in 116ad-hoc query 111cached 111common plan symbols 113–115estimated plan displayed 111example for further analysis 118major considerations in 117–118multiple threads of execution 115reading 115–117saving as XML 118
query optimizer 110
R
RDBMS. See relational database management sys-tem (RDBMS)
Read Uncommitted query, and SELECT statement 122
recovery mode 50restarting SQL Server upon crash 46
recovery modelBulk-Logged 47Full 46Simple 46
Recovery model setting 35recovery point objective (RPO) 52recovery time objective (RTO) 53

INDEX 233
redundancybuilding and high availability 178disk and 42
relational database management system (RDBMS) 1Repartition Streams 115representative traffic, capturing 103resources, virtualized, and virtual machine 195Restore dialog 51restoring state, database and 49RID. See row ID (RID)right-click vs. double-click 14ring buffer 159Roles subfolder 63root installation folder, choosing 215routine maintenance, and multiserver job 142row ID (RID) 114
lookup 117RPO. See recovery point objectiveRTO. See recovery time objectiveRun dialog, and PowerShell 144
S
saaccount 73default SQL Server login 59
sample database, SQL Server and 3SAN. See Storage Area Networkscan symbol 114scan, in B-tree structure 92schema, database object and 70–71secondary files, unnesessary 39security
accounting 56, 75–81application role and high level of 63authentication 56–64authorization 56
changes and application update 73in the real world 73See also permissions, SQL Server permissions
two layer security design 60Windows Authentication. See Windows
AuthenticationSecurity folder 13, 60security identifier (SID), mapping logins to data-
base users 199Security tab 57seek. See scanseek symbol 114SELECT keyword 19SELECT query 16–18, 31–33
features of 18selectivity, index and 108server configuration, inventorying 14–15
server maintenance. See backupserver objects, identifying 13–14server role, permissions and 68Server Roles folder 13service account 14session
creation and use of 154, 160descriptive name for 154event data capture, example of 161Extended Events 153starting automatically 156
session log 159–160Sessions folder
blocked process report 124Extended Events 153–154
Shared lock 121SID. See security identifier (SID)Simple Mail Transport Protocol (SMTP) 133Simple recovery model 46Smallint data type 25SMO. See SQL Management Objects (SMO)SMTP. See Simple Mail Transport Protocol (SMTP)solid-state disk 42Sort operation 115SQL Audit 76–81
architecture. See SQL Audit architecturecreating an audit 77–79security auditing 79–80security maintenance 79See also audit
SQL Audit architecture 76–77database audit 77server audit 76
SQL compilations/sec and SQL recompilation/sec counters 171
SQL Management Objects (SMO) 149SQL Server
back end to commercial software applications 1backups and restores 2best way to learn 3blocked process report creation 124Books Online 128business environment 4careful research 6case sensitivity 17choice in approaches 147cluster architecture and multiple instances of 8,
182connecting two tables 114dangers of single login 73Data Collectors 171data compression, enabling 176database, defined 11documentation 5
unfamiliar server 14 enhancing knowledge on 207–208

INDEX234
SQL Server (continued)example of typical virtualized 194experts on advanced use of 208Express vs. Developer edition 4Express vs. trial edition 4extent 83formatting 20further exploration 3graphical visualization of execution plans 111HA techniques compared 187index maintenance. See index maintenanceindex. See indexindex selectivity tracking 108installing 209–220integer data types and different key sizes 108limited key size and better performance 107Lock object. See analysis, lock and blocklogical_reads 158main types of locks 121maintaining 1memory overcommit 193multiple copies on one machine 190multiple instances 129on-duty schedule and pager email 131organizations running multiple versions 5performance checklist. See performance,
checklistperformance monitoring 166permission assignment 57permissions. See SQL Server permissionsphysical_reads 158plan for query execution 94PowerShell. See PowerShellprovider-based approach 147results sorting 20security identifier for mapping logins to data-
base users 198SQL Statistics 171system requirements 3, 5two instances on a lab computer 137victim process randomly chosen 126virtual machine 192writing index pages 82
SQL Server 2000, multiple instances support, Microsoft and 8
SQL Server 2008R2, and compatibility level 203SQL Server 2010
and first fully functional module 143with PowerShell V3 Cookbook 147
SQL Server 2012, and compatibility level 203SQL Server Agent 15, 128–135
as a task scheduler 128compatibility with PowerShell 149Database Mail. See Database Mail
multiple instance 129multiserver management. See multiserver man-
agementperformance counters and alert
configuration 123PowerShell script 149security 134some ideas for using 135SQL Server Configuration Manager 129support for centralized multiserver
management 135XPs 140
SQL Server Agent securitycredentials 134proxies 134
SQL Server Books Online 5–6, 21SQL Server Cofiguration Manager console, and
SQL Server Agent properties modification 129
SQL Server database, trigger 75SQL Server editions, differences between 4SQL Server Enterprise Edition 176SQL Server installations, multiple on a single
computer 8SQL Server instances
and on-time configuration change across 141common configuration for a newly installed 14installed on the computer, identifying 9–10
SQL Server Integration Services (SSIS) 146package created and run by Copy Database
Wizard 200SQL Server login 14SQL Server Management Studio 10, 111, 117, 140
compatibility level 202index backup 103index review and 88Jobs folder 130
SQL Server Management Studio window, blocked process and 162
SQL Server Management Studio, pin to Task bar 222
SQL Server performance, and commercial tools for managing 195
SQL Server permissions 65–68default SQL Server configuration 68revoking. See permissions, REVOKEview, defined 65
SQL Server Profiler 125advantage of running from a client
computer 102example of traffic capturing 107representative traffic 103trace data saving 103watching for deadlocks 126
job steps 129 SQL Server profiler, system activity tracking 76

INDEX 235
SQL Server Upgrade Advisordatabase upgrade and 202report 203
SQL Server virtualization 189–196layers of 194reasons for 189–190weaknesses of 190
SQL Server, recommended options for 5SQL Server:SQL Statistics object
Performance Monitor and 171SQL Service account, permission to write to
target 77SQLEXPRESS, named instance 9SQLSERVER provider 146–148
hierarchy 147SQLServer:Buffer Manager object
Performance Monitor and 169SQLServer:Memory Manager object
Performance Monitor and 170square brackets 32SSD. See solid-state diskSSIS. See SQL Server Integration Services (SSIS)steadily increasing CPU utilization, performance
trend 175Steps page, job and 130Storage Area Network (SAN) 183
adapter 39stored procedure and fixing existing mislinked
database users 199Stream Aggregate operation 115stripe arrays 42synchronous mode 186
database mirroring and 180System Center Operations Manager, and virtual-
ized workloads monitoring 195system databases 41–42
backup and special procedures for 54master 41model 41MSDB 42temporary (TempDb) 41
system object, Performance Monitor and 171system requirements for SQL Server 5
T
tableclustered index. See index, clusteredconstraints enforce table relationships 90database structure 17example of a possible problem 83fragmenting data pages 88identity column 86index applying to 82
nonclustered index. See index, nonclusteredrelated to another in a database 90sorting data by more than one criteria 86wasted space in 84
table scans 114frequent 117
tail-log backup 51target 138–140
audit and 77encryption problem 140enrollment and multiserver management 138error while enrolling 139
Target multiple servers option, and multiserver job 141
target serverauthentication for 138memory and total server memory
counters 170TempDb, system database 41template, trace, creating 102temporary table 160third-party application, index and 105three letter acronyms (TLAs) 22threshold, and Extended Events 161Tinyint data type 25TLAs. See three letter acronyms (TLAs)t-log. See transaction logtraffic, capturing, SQL Server Profiler and 103trancation 47transaction
lifetime of a lock 120overlocking as a result of poor design 121
transaction log 44–47transaction log file 38
outgrown, performance and 206Transact-SQL (T-SQL) 16–22
compliance with industry standard SQL elements 16
finding documentation for 21statements, and index maintenance 97
trigger 75–76DDL 76defined 75DML 75–76
T-SQL. See Transact-SQL (T-SQL)Tuning Options tab, database tuning 104
U
UAC. See User Account Controlunique ID 27Update lock 121, 163UPDATE query 24Update Statistics option 36
index inventory. See index, inventory database update and reattachment 198

INDEX236
upgradedefinition of 202
user account 15User Account Control (UAC) 4
V
Varchar data type 25version numbers, common major 11versions, SQL Server 5view, and permissions 65virtual environment
and performance monitoring 195CPU and memory in. See CPUdisk I/O 193–195
virtual machine, server virtualization 189, 191–193
virtualization 8benefits of
See also SQL Server virtualizationefficiency as compared to using physical
machines 191hypervisor based 191–192support by SQL Server 190
VM. See virtual machine, server virtualizationVMware Fusion 209VMware vSphere 187
VMware vSphere FT 187VMware Workstation 209
W
WAN bandwidth, and availability group replication 186
warning message, database 28WHERE clause, operators 19Windows Authentication 57–58
logon credential 58Windows Firewall, causes warning 210Windows logon 14
credentials 73Windows Management Framework (WMF) 10, 144Windows PowerShell. See PowerShellWindows Remote Management 144Windows Server Core, and SQL Server 177Windows, client and server 4witness server 181WMF. See Windows Management Framework
(WMF)workload, impact on performance 205
X
XML, and long-running query extraction 159