Learn How To Increase Your Site's Optin Rate By 469% Overnight
17
matthewwoodward.co.uk http://www.matthewwoodward.co.uk/tutorials/increase-email-subscribers/ How To Increase Your Sites Email Optin Rate By 469% In Less Than 24 Hours No matter what type of site you run, your main goal should be to build your email list by converting one time visitors into long term subscribers. We have all heard the saying that the money is in the list and that is 110% true. Once you have someone’s email address – they are yours for life. If you have a solid email marketing strategy in place you can automate relationship building & profits. Every email subscriber I collect is worth $17.81 to me over 3 months. The more email subscribers I get – the more money I make, it’s just a numbers game. In June 2014 only 1.07% of new visitors subscribed to my list – that works out at 436 new subscribers x $17.81 = $7,765.16 profit. If in the same month just 2.5% of new visitors subscribed to my list I would have had 1,067 new subscribers or $19,003.27. That is an extra $11,238. So today I’m going to show you how I increased my blogs optin rate from 1.07% to 5.81%. That is the difference between $7,765.16 and $44,168.80 – with the same amount of traffic. What You Will Learn How I increased optin conversion from 1.07% to 5.81% How I increase profits from $7,765 to $47,748 How that affected user engagement How I did all of that in less than 24 hours How you can do exactly the same Stuart Walker – You Are My Hero I have to give credit where credit is due. Stuart Walker sent me this absolute gem of an email on the 23rd September 2014. A very strong contender for the best email I have ever received in my life. In case you don’t know Stuart Walker is the guy behind NicheHacks . If I was wearing socks, Stuart would have knocked them off. I went back to him and invited him to turn it into a full blown post for the blog. He did exactly that with this post – Stuart Walker Makes Matthew Woodward Look Stupid On His Own Blog . In this tutorial you are going to get a behind the scenes look of exactly how I implemented that advice from planning to execution and split testing. Creating A Plan Of Attack I’ve been an internet marketer for over a decade. Even with that level of knowledge I have to admit Stuarts advice was overwhelming when I first read it.
-
Upload
matthew-woodward -
Category
Marketing
-
view
106 -
download
0
Transcript of Learn How To Increase Your Site's Optin Rate By 469% Overnight

matthewwoodward.co.uk http://www.matthewwoodward.co.uk/tutorials/increase-email-subscribers/
How To Increase Your Sites Email Optin Rate By 469% In LessThan 24 Hours
No matter what type of site you run, your main goal should be to build your email list by converting one time visitorsinto long term subscribers.
We have all heard the saying that the money is in the list and that is 110% true. Once you have someone’s emailaddress – they are yours for life.
If you have a solid email marketing strategy in place you can automate relationship building & profits.
Every email subscriber I collect is worth $17.81 to me over 3 months. The more email subscribers I get – the moremoney I make, it’s just a numbers game.
In June 2014 only 1.07% of new visitors subscribed to my list – that works out at 436 new subscribers x $17.81 =$7,765.16 profit.
If in the same month just 2.5% of new visitors subscribed to my list I would have had 1,067 new subscribers or$19,003.27. That is an extra $11,238.
So today I’m going to show you how I increased my blogs optin rate from 1.07% to 5.81%.
That is the difference between $7,765.16 and $44,168.80 – with the same amount of traffic.
What You Will Learn
How I increased optin conversion from 1.07% to 5.81%
How I increase profits from $7,765 to $47,748
How that affected user engagement
How I did all of that in less than 24 hours
How you can do exactly the same
Stuart Walker – You Are My Hero
I have to give credit where credit is due. Stuart Walker sent me this absolute gem of an email on the 23rdSeptember 2014. A very strong contender for the best email I have ever received in my life.
In case you don’t know Stuart Walker is the guy behind NicheHacks.
If I was wearing socks, Stuart would have knocked them off. I went back to him and invited him to turn it into a fullblown post for the blog.
He did exactly that with this post – Stuart Walker Makes Matthew Woodward Look Stupid On His Own Blog .
In this tutorial you are going to get a behind the scenes look of exactly how I implemented that advice fromplanning to execution and split testing.
Creating A Plan Of Attack
I’ve been an internet marketer for over a decade. Even with that level of knowledge I have to admit Stuarts advicewas overwhelming when I first read it.

Although I understood the concepts perfectly, working out how to take that advice and implement it across the blogin the most efficient way was challenging.
So I made a quick list of the things I needed to consider-
Lead Magnets – Ideas & creation
Content Upgrades – Ideas & creation
Deployment – Optin boxes, exit popups, inline optins, popup optins
Delivery – How will the lead magnets/content upgrades be delivered?
I also wanted to take care of everything in one clean sweep which means getting everything done in just one day.
Lead Magnets Planning
If you don’t know a lead magnet is just a PDF, video, presentation or something similar you give away in exchangefor someones email address.
Stuart recommended to create a lead magnet that solves a problem or is an instant solution like a report, check listor cheat sheet.
I wanted to take this a step further and create a unique lead magnet for the various topics of posts this blogcovers. For example someone reading about SEO will be more enticed by a link building lead magnet than oneabout conversion rates.
So I pulled a full list of posts from my sitemap and categorised them all as follows-
SEO
Blogging
Income Reports / Roundups
Tools
Link Roundups
Social Media
Conversion
That means because of my stupid brain instead of only needing to create 1 lead magnet like Stuart suggested, Ihad to make 7.
Now that sounds like an awful lot of work right? That is where you are wrong! It took less than an hour to plan &create all 7 lead magnets.
Creating Lead Magnets In Minutes
So how did I plan & create 7 lead magnets in less than an hour?
The answer is simple – I just repurposed content I already have on the blog. One of the main drawbacks (orbenefits) of blogs is often your best content gets buried away.
So I decided to capitalise on that much like I do with my email marketing strategy & decided to transform my bestposts into lead magnets.
This is what my plan looked like-
SEO

How to steal competitor rankings – PDF of this post
Blogging
Blogging Resources – PDF’s of this post, this post & copy of this video.
Income Reports / Roundups
Full Collection – PDFs of every single income report
Tools
My tools of the trade – PDF of this post
Link Roundups
PDF’s of my top 5 posts of all time
Social Media
PDF’s of all my social media case studies
Conversion
PDF’s of all my conversion rate case studies
As you can see that is a very quick process especially with a free tool like this to create the PDF’s in 1 click.
Then I just packaged them up in zip files and uploaded them to my host ready for deployment.
Content Upgrades Planning & Creation
While creating the lead magnets was easy, the content upgrades were a bit trickier!
I’m lying – they were just as easy to plan and create as the lead magnets although there was less to create it didtake around the same time.
Stuarts advice here was simple. Find your top 10 most trafficked posts/pages and then create a very specificcontent upgrade for that post in exchange for an email address.
To give you an example anyone reading my email marketing strategy would be interested in a copy of myautoresponder sequence. They get the ‘content upgrade’ when they subscribe.
Again this can be anything like a printable checklist, cheat sheet, extra resources, videos or whatever you choose– as long as it is a specific upgrade to the content.
So I looked at my top 10 posts of the past 6 months and picked out the ones I could easily create a contentupgrade for-
How I Built A Top 100 Blog In 12 Months & How You Can Do It Too!
Tools Of The Trade
How To Double Your Twitter Traffic & Engagement In 30 Minutes
The Best Free SEO Tools & Internet Marketing Software
The Ultimate Guide To Tiered Link Building
How To Steal Your Competitors Rankings
That left me with 6 content upgrades to brain storm that not only had to be very specific upgrades but also neededto be quick to create by repurposing content I already have.

So with that in mind this is what I came up with-
How I Built A Top 100 Blog In 12 Months & How You Can Do It Too!
Live blogging presentation – copy of this video
Tools Of The Trade
PDF of this post
How To Double Your Twitter Traffic & Engagement In 30 Minutes
I wanted to try something different here so negotiated an exclusive discount code
The Best Free SEO Tools & Internet Marketing Software
PDF of this post
The Ultimate Guide To Tiered Link Building
PDF Planner – I had to create this from a personal template
How To Steal Your Competitors Rankings
How to steal series – PDFs of this post, this post & this post
As you can see they were all just as quick & easy to create as the lead magnets.
The sharp eyed among you will have noticed that the Tools Of The Trade upgrade is a PDF of the Free SEO Toolspost. While the Free SEO tools post upgrade is a PDF of the Tools Of The Trade post.
Sure the reader can click between them freely using the sites navigation – but why not try to capture an emailalong the way?
So now I had the lead magnets & content upgrades ready – it was time to put them into action.
Delivering Lead Magnets & Content Upgrades
The hardest thing to work out here was how to deliver the lead magnets & content upgrades.
I didn’t want to have to create lots of separate lists that send out each one individually – that would take a long timeto setup and leaves huge room for error.
Creating A Subscribers Resources Page
I decided to keep things simple and created a ‘subscriber resources’ page which lists all of the content upgradesand lead magnets in one place.
You can see what it looks like below but if you want to see a live version you need to optin.
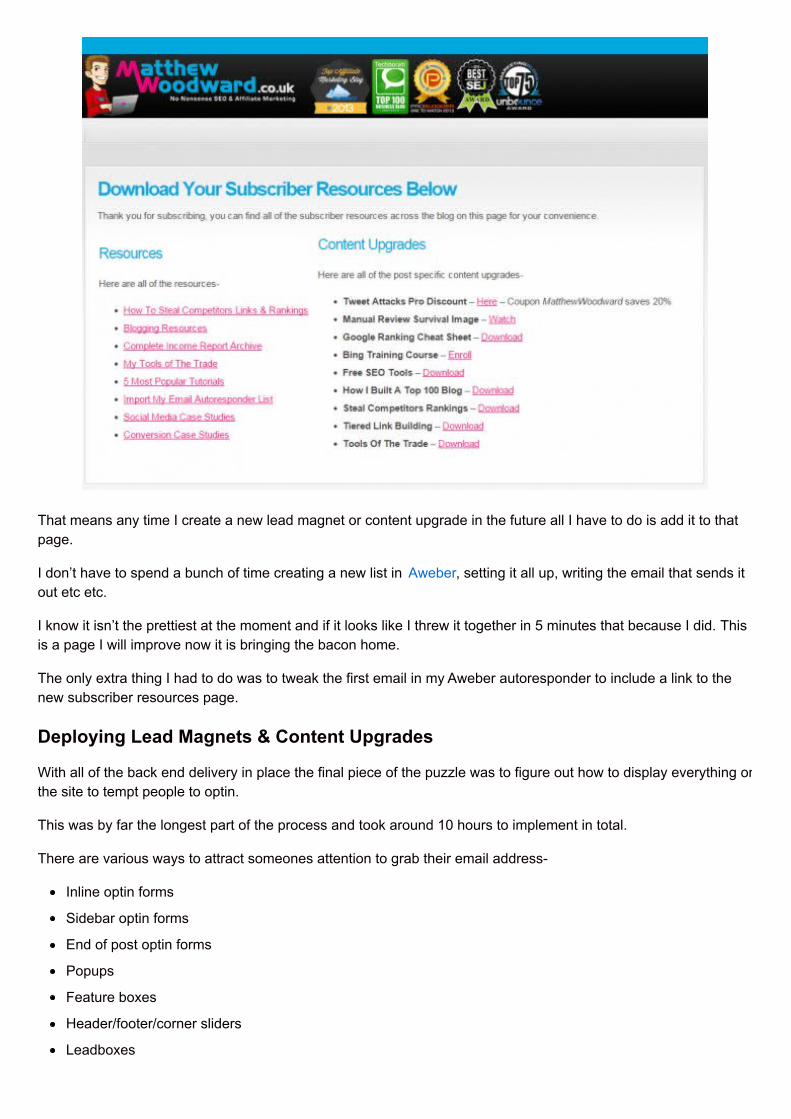
That means any time I create a new lead magnet or content upgrade in the future all I have to do is add it to thatpage.
I don’t have to spend a bunch of time creating a new list in Aweber, setting it all up, writing the email that sends itout etc etc.
I know it isn’t the prettiest at the moment and if it looks like I threw it together in 5 minutes that because I did. Thisis a page I will improve now it is bringing the bacon home.
The only extra thing I had to do was to tweak the first email in my Aweber autoresponder to include a link to thenew subscriber resources page.
Deploying Lead Magnets & Content Upgrades
With all of the back end delivery in place the final piece of the puzzle was to figure out how to display everything onthe site to tempt people to optin.
This was by far the longest part of the process and took around 10 hours to implement in total.
There are various ways to attract someones attention to grab their email address-
Inline optin forms
Sidebar optin forms
End of post optin forms
Popups
Feature boxes
Header/footer/corner sliders
Leadboxes

The problem is if you go on an all out frenzy it can be very spammy and damage your engagement rates likebounce rate and pages per visit.
So I decided to use the following deployment setup-
End Post & Feature Boxes
I chose to use the SEO lead magnet as a site wide lead magnet.
This is the ‘default’ lead magnet as is used at the end of posts & in features boxes.
Inline, Exit Popups & LeadBoxes
These optin types are easy to customise on a post by post basis so it made sense to use these 3 to deploy thelead magnets & content upgrades.
Each method is unobtrusive & is designed to have no effect on user engagement.
The inline ones are buried in the content, LeadBoxes only show after a user clicks a link and exit popups onlyshow when a user is leaving anyway.
Creating End Post Forms
I used to have a hard coded optin form in my theme that displayed alongside social links. The problem with that isusers had a number of choices – visit one of my social profiles or optin.
Now they only have 1 choice – optin. Having it hard coded also meant I couldn’t run split tests to measure &improve.
So I decided to take advantage of the end post optin templates provided by OptinMonster which makes them veryquick to setup, customise and most importantly – split test.
I’m split testing a couple of different versions of that currently.
Creating Feature Boxes
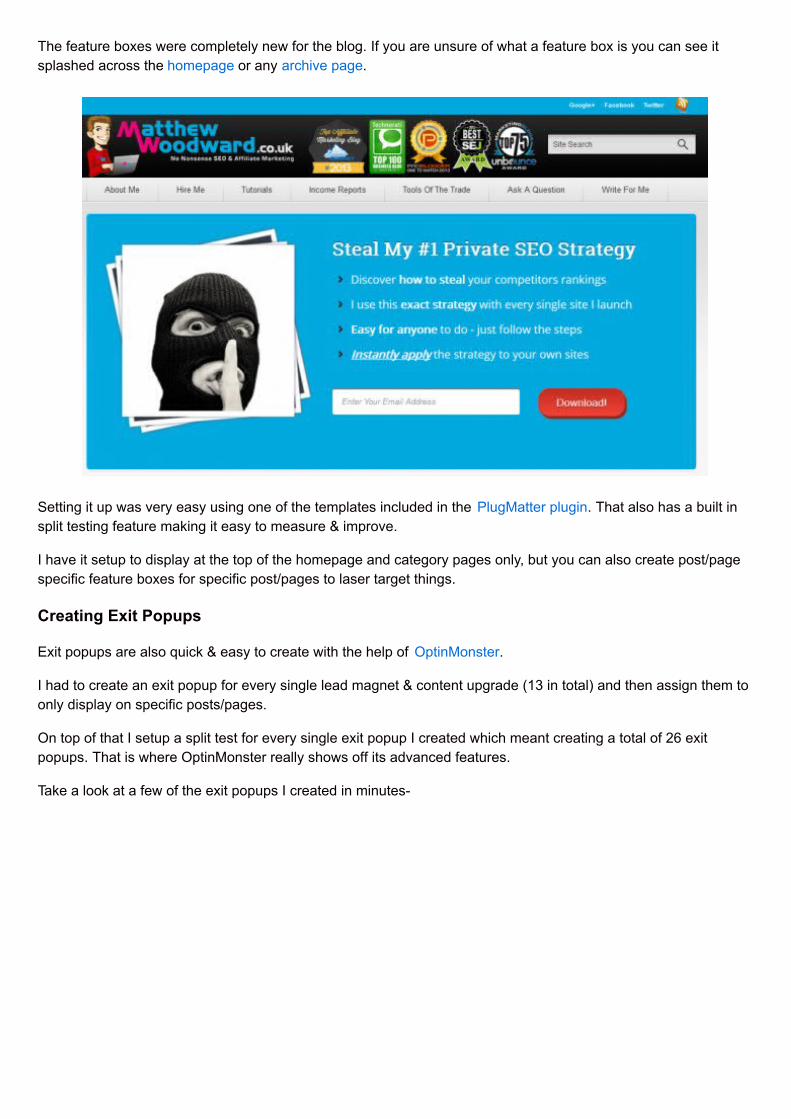
The feature boxes were completely new for the blog. If you are unsure of what a feature box is you can see itsplashed across the homepage or any archive page.
Setting it up was very easy using one of the templates included in the PlugMatter plugin. That also has a built insplit testing feature making it easy to measure & improve.
I have it setup to display at the top of the homepage and category pages only, but you can also create post/pagespecific feature boxes for specific post/pages to laser target things.
Creating Exit Popups
Exit popups are also quick & easy to create with the help of OptinMonster.
I had to create an exit popup for every single lead magnet & content upgrade (13 in total) and then assign them toonly display on specific posts/pages.
On top of that I setup a split test for every single exit popup I created which meant creating a total of 26 exitpopups. That is where OptinMonster really shows off its advanced features.
Take a look at a few of the exit popups I created in minutes-

As you can see the designs are all wildy different and with good reason. As people navigate around the blog I don’twant them to become ‘popup blind’ – a variety of designs stops that from happening.

Plus it’s just a case of clicking a couple of buttons to select & customise your template so it takes no time at all tocreation lots of variations.
Below you can see the results of just 3 of the 13 split tests I’m running to quantify just how critical it is to split test.
Blogging Lead Magnet Exit Popup Split Test
The blogging lead magnet exit popup split test was very interesting. It increased the conversion rate from 1.25% to2.74%.
In money terms a total of 4,864 people have seen it. At 1.25% that is worth $1,082 to me. At 2.74% it is worth$2,368.
Backlink Competitor Analysis Content Upgrade Exit Popup Split Test
This was a split test for a specific content upgrade which saw an increase in conversion from 2.31% to 4.44%!
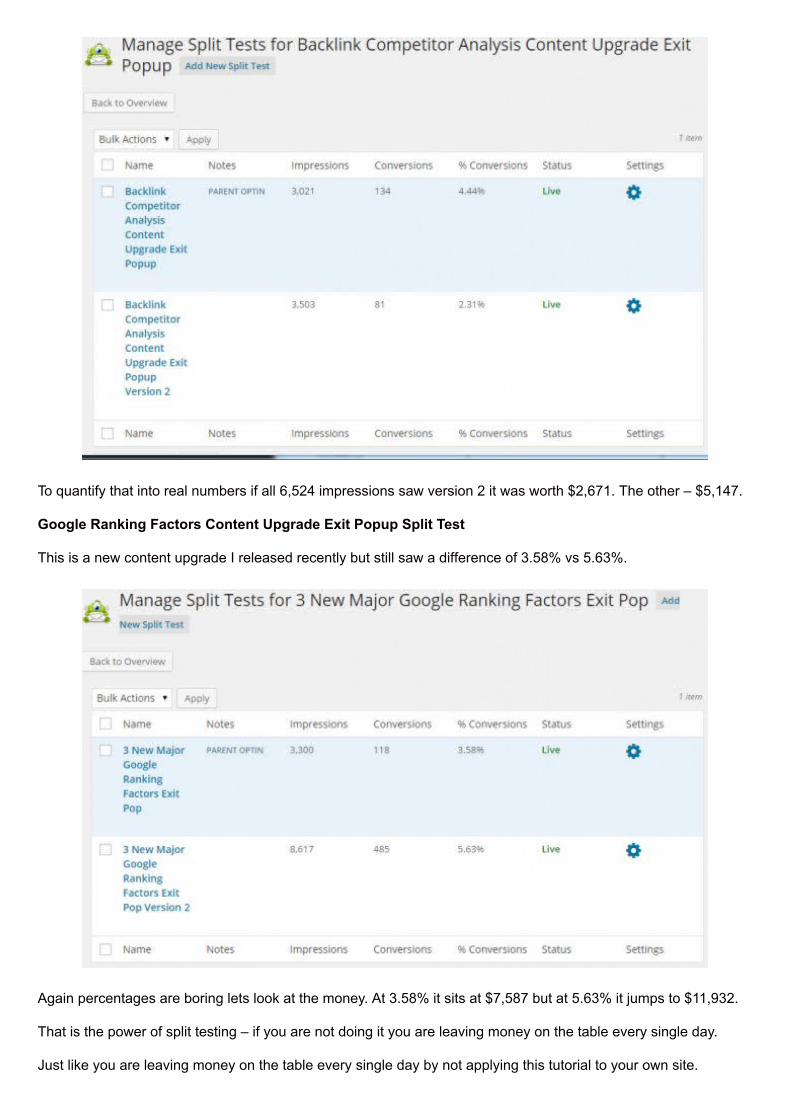
To quantify that into real numbers if all 6,524 impressions saw version 2 it was worth $2,671. The other – $5,147.
Google Ranking Factors Content Upgrade Exit Popup Split Test
This is a new content upgrade I released recently but still saw a difference of 3.58% vs 5.63%.
Again percentages are boring lets look at the money. At 3.58% it sits at $7,587 but at 5.63% it jumps to $11,932.
That is the power of split testing – if you are not doing it you are leaving money on the table every single day.
Just like you are leaving money on the table every single day by not applying this tutorial to your own site.
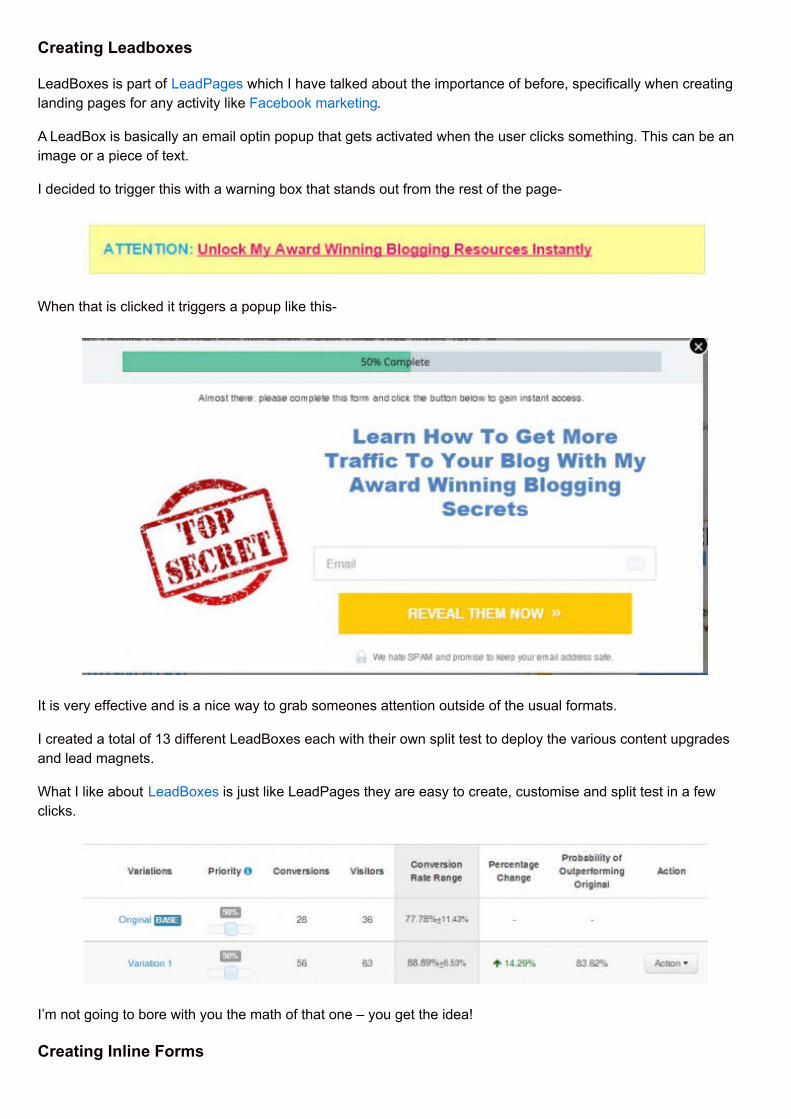
Creating Leadboxes
LeadBoxes is part of LeadPages which I have talked about the importance of before, specifically when creatinglanding pages for any activity like Facebook marketing.
A LeadBox is basically an email optin popup that gets activated when the user clicks something. This can be animage or a piece of text.
I decided to trigger this with a warning box that stands out from the rest of the page-
When that is clicked it triggers a popup like this-
It is very effective and is a nice way to grab someones attention outside of the usual formats.
I created a total of 13 different LeadBoxes each with their own split test to deploy the various content upgradesand lead magnets.
What I like about LeadBoxes is just like LeadPages they are easy to create, customise and split test in a fewclicks.
I’m not going to bore with you the math of that one – you get the idea!
Creating Inline Forms

One of the pieces of advice Stuart gave me was to make big ugly optin forms to display in the middle of postsrandomly.
Like super ugly ones that jump out at you – so I did exactly that using Awebers built in templates.
Luckily they have some of the ugliest email optin templates I have ever seen – perfect!
Don’t believe me, check out my handy work below-
Believe it or not they convert at 7.5% & 4.3% respectively!
Just like with the exit popups & leadboxes I created a totalof 13 ugly optin forms with Aweber each with their own splittest.

Those are the results for my stunning design examples above.
Sorry for the low impressions I recently disabled the loser of a previous split test and introduced a new designwhich reset the stats.
Going Live
Getting everything deployed and in sync was the hardest part of the entire process.
I decided to split the go live plan into 3 sections-
Stage 1 – Content Upgrades
The first set of things I deployed was the content upgrades. There were only 6 of these to do in total and werequick wins due to them being the most trafficked posts on the blog.
The content upgrades were deployed via an exit popup, ugly inline optin and the LeadBox triggered by the text ina yellow box.

Getting the right exit popup to display on the right page/post was easy – it was just a case of selecting whichpage/post to display it on with Optinmonster.
The same was true with the ugly inline optin which was a piece of code provided by Aweber to paste anywhereyou want the form to display.
Deploying the LeadBox was as easy as copying/pasting the alert box template I created and updating the text andLeadBox URL.
Stage 2 – Lead Magnets
Remember Stuarts advice was to create 1 lead magnet. I ended up creating 7 for each category of post I have.
This means I had to add the 7 lead magnets across a total of 201 posts via exit popups, inline optins andleadboxes.
Doing this for just 6 content upgrades previously was light work – now I needed to manually add 1 of 7 to everysingle post. This took around 4 hours to complete & was very tedious.
I batched the work up and deployed all the SEO ones across the SEO posts, then all the blogging ones across theblog posts and so on.
Adding the exit popups was the easiest part with Optinmonster as I could just edit the popup and select whichpages for it to display on in one swoop.
Adding the ugly inline optin forms & LeadBoxes was another story though and took the bulk of the time as it was allmanual editing.
Stage 3 – Site Wide Lead Magnet
The very last thing I deployed was the easiest thing to deploy – the site wide lead magnet.
This is displayed at the end of posts and in the feature box on the homepage & archive pages.
All I had to do was tick a box to enable the end of posts form in OptinMonster and do exactly the same for thefeature box with PlugMatter.
The Final Results
So when it is all said and done you might be wondering what the final results of all this hard work was.
Well here is an overview of the blogs email conversion rates over the past 9 months.
The visitors figure is taken from Google Analytics using asegment to only look at new visitors. The majority of returningvisitors are subscribers and were filtered out of the data.
If you want to really drill down into detail click on the imagebelow for a full break down of where the optins are comingfrom-

As you can see OptinMonster & LeadBoxes are driving most of the subscribers.
The feature box was only activated for the full month of November. You can see a drop off in numbers as Idisabled/enabled it to test how it performed on different pages & affected engagement rates.
As of yesterday I have re-enabled the feature box to it’s original setup in November on the homepage and archivepages.
Looking At The Numbers
If we compare the blog at it’s poorest conversion rate in June at 1.02% of 436 new subscribers vs it’s best month ofDecember at 5.81% with 2,681 new subscribers.
That is the difference between $7,765 and $47,748 – that is a 515% increase in profits across 3 months.
Granted it may be the case that these subscribers are of lower quality when incentivised but a 469% increase inoptin’s is going to have a huge impact on anyones bottom line.
Especially if you have that backed up with a powerful email marketing strategy.
But does all of this come at the cost of the user? Let’s find out.
Monitoring User Engagement Impact
One of the biggest things I was worried about was how would all of these changes affect you guys – the readers.
Without the readers the blog is worthless and you should never bite the hand that feeds you.
So I kept a close eye on 3 key user engagement signals.
Bounce Rate
The first signal I looked at was bounce rate. You can see where I deployed the changes with the big red arrow andyou can also see the reaction was a bad one.
The bounce rate nearly doubled – instantly. That was a huge problem but you do not find success without hitting afew failures along the way.
With continued split testing of designs and also placements of things I have managed to reduce the bounce rate tolower than it was before I deployed the changes.
Two of the things I tested were simply where I placed the LeadBox & ugly optin form in the content. Browse aroundthe blog and you can see it for yourself.
Average Visit Duration
I also wanted to know if the changes would mean you guys spent less time on the site-
As you can see it is fairly consistent floating between the 02:50 and 03:20 mark throughout.
Pages Per Visit
Last but not last was pages per visit, with all the new calls to action it could be that people are visiting less pageson a whole-
Again this is fairly consistent floating between 3.4 and 3.6 pages respectively.
Wrapping It Up
So there you have it – with the help of Stuart Walkers advice (you should visit his blog) I was able to increase theoptin conversion rate of the blog by 469% in less than 24 hours.
In monetary terms that is an increase from $7,765 to $47,748 all by repurposing content I already had anddeploying OptinMonster, PlugMatter & LeadBoxes.
Remember that only works because I have a solid email marketing strategy in place – you must always have thefoundations right before doing anything.
I’m going to keep improving things over the coming weeks.

For example I’m going to make it so existing subscribers don’t see a single optin form anywhere with the help ofOptinMonster.
Always Be Split Testing
And whatever you do – split test everything!
The proof is in the pudding with this tutorial as I continue to optimize the blogs optin conversion rate.
I’m consistently setting up split tests and choosing new winners as soon as there is enough data to make adecision.


![MARKETING AUTOMATION - Tech Guys Who Get Marketing€¦ · [ MARKETING AUTOMATION ] WHITEPAPER: Optin Page Optin Thanks Video 1 Info Graphic Main retargeting cookie dropped (30day)](https://static.fdocuments.us/doc/165x107/5f04109c7e708231d40c2501/marketing-automation-tech-guys-who-get-marketing-marketing-automation-whitepaper.jpg)