LBP7010C/LBP7018C - gdlp01.c-wss.comgdlp01.c-wss.com/gds/3/0300018353/01/LBP7010C...EN.pdf ·...
343
Transcript of LBP7010C/LBP7018C - gdlp01.c-wss.comgdlp01.c-wss.com/gds/3/0300018353/01/LBP7010C...EN.pdf ·...

Before You Start 6Legal Notices 7Legal Limitations on the Usage of Your Product and the Use of Images 9Using the e-Manual 10How to Use the e-Manual 11Operating Environment 12Installing the e-Manual 13Uninstalling the e-Manual 17Screen Layout of the e-Manual 20Top Page 21Topic Page 22Contents Page 23Search Method 24Viewing the e-Manual 25Disclaimer 27Copyright 28Trademarks 29Third Party Software 30Important Safety Instructions 31Installation 32Power Supply 33Handling 34Maintenance and Inspections 36Consumables 38About This Printer 39Printer Specifications 40System Requirements for Printing 42Names and Dimensions of Each Part 43Control Panel 45Printer Status Window 47Energy-saving Mode 49Sleep Mode 50Auto Shutdown 51Cautions for Handling the Printer 53Consumables 54Checking the Consumables Status 56Maintenance 58Toner Cartridge Replacement 59Attention (Toner Cartridge) 61Replacing the Toner Cartridge 63Moving Toner Cartridges to Replacement Position Manually 67Moving Toner Cartridges by Using Paper Key on the Printer 69Storing Toner Cartridges 71Drum Cartridge Replacement 72Attention (Drum Cartridge) 73Replacing the Drum Cartridge 75Storing the Drum Cartridge 79Moving the Printer 80Cleaning and Maintaining the Printer 82

Adjusting Color (Calibration) 84Auto Calibration Settings 86Cleaning the Fixing Roller of the Printer 88Performing [Fixing Unit Cleaning 2] 90Cleaning the Photosensitive Drum of the Printer 93Cleaning the Outside of the Printer 95Attention (Cleaning) 97Location of the Serial Number 98Printer Installation 99Attention (Printer Installation) 100Confirming the Supplied Accessories and Checking the Installation Site 102Removing the Packing Materials 104Installing the Printer 107Printing Configuration Page Print 109Driver Installation 111Installing the Printer Driver 112Easy Installation 114Connecting the Printer and Computer 117Easy Installation (USB Connection) 118Easy Installation (via the Print Server) 121After Installation 125Installing with Plug and Play 127Uninstalling the Printer Driver 130Starting the Uninstaller from [Control Panel] 136Basic Printer Operations 138Usable Paper 139Precautions for Paper 142Printable Area 144Paper Loading and Output 145Loading Paper 146Attention (Paper Loading) 149Basic Printing Procedure 150Attention (Basic Printing) 154How to Use Help 155Canceling a Job 157Selecting and Canceling a Print Job 158Canceling a Job Being Printed with One Click 160Checking the Printer Status 161Printing on Various Types of Paper 162Printing on Plain Paper, Heavy Paper, or Index Card 163Printing on Transparencies (Black and White Printing Only) 164Printing on Labels 165Printing on Envelopes 166Printing on Coated Paper 168Printing on Custom Size Paper 169Registering a Custom Paper Size 170Paper Loading Orientation 172Useful Printing Functions 173Displaying the Setting Screen 174

Scaling Print Output 176Layout Printing (N-page Print) 178Printing an Image Larger than A4 (Poster Printing) 180Adding a Watermark to a Document to Be Printed (Watermark Printing) 182Adding, Editing, or Deleting a Watermark 184Printing Borders, the Printing Date, and so on 187Printing a Color Document in Black and White 189Combining Data before Printing 191Changing the Output Method According to the Print Data or Number of Copies 195Printing Data with Different Orientations in the Same Data 196Printing with a Gutter 198Selecting the Paper Output Method 200Printing with the Page 180 Degrees Rotated 202Adjusting the Image Quality or Colors 204Performing Printing Appropriate for Particular Print Data 205Correcting Rough-Textured Images 206Adjusting the Toner Density 208Adjusting the Toner Density of Each Color for Each Density Range 210Printing with Brightness and Contrast Adjusted 212Adjusting the Color 214Matching the Color with the Screen 216Registering the Printing Preferences 219Changing the Default Values for Printing Preferences 220Saving Frequently Used Printing Preferences (Adding/Editing/Deleting a "Profile") 222Selecting a "Profile" 226Using the Printer in the Print Server Environment 227Print Server Environment 228Configuring the Print Server 230Checking the Settings of Your Network 235Installation on Clients 237Installing from the Printer Folder 238Installing from [Windows Explorer] 247Troubleshooting 248Printing Cannot Be Performed 249Printing Cannot Be Performed (USB Connection) 250Printing Cannot Be Performed (via the Print Server) 253The Print Server for Connection Cannot Be Found 256The Shared Printer Cannot Be Accessed 257The Printer Takes a Long Time to Start the Print Job 258The Printer Pauses during Printing, and then Printing Repeatedly Starts and Stops 259You Cannot Turn the Printer ON 260Steam Is Emitted from the Printer Output Area 261The Adobe Type Manager (ATM) Font Cannot Be Used 262You Cannot Install the Printer Driver 263The Printer Is Not Recognized Automatically (Easy Installation) 264You Cannot Uninstall the Printer Driver 265Starting the Uninstaller from the CD-ROM 266Uninstalling the USB Class Driver 269The Printer Driver Settings Cannot Be Changed 272

"Profiles" Cannot Be Selected or Edited 274Paper Jams 276Attention (Paper Jams) 277Clearing Paper Jams (Multi-purpose Tray) 278Clearing Paper Jams (Output Area) 279Clearing Paper Jams (Inside the Rear Cover) 280Indicators on the Printer Are On/Blinking 281A Message Appears in the Printer Status Window 283When <Service Error> Is Displayed 290Poor Printout Results 292Paper Curls 294Paper Creases 296White Streaks (Lines) Appear 298Black Streaks (Lines), Smudge Marks, or White Points Appear 299Printing Is Uneven 300Printed Pages Have White Specks 302The Toner Does Not Fix onto the Paper Well 303The Printed Paper Has Smudge Marks 304Smudge Marks of Spattering Toner Appear around the Text or Patterns 305The Back of the Printed Paper Has Smudge Marks 306The Overall Print Result Is Dark 307Residual Images Appear on Non-printed Areas 308White Dust Is Attached to the Printed Transparencies 310The Overall Print Result Is Faint 311Printing Is Faded 312Colored Text Appears Blurred 314Data Is Not Printed in the Correct Color (Specified Color) Due to "Out-of-Register Colors" 315Thin Lines or Fill Patterns Are Not Printed with the Specified Colors or Do Not Appear At All 317Shaded Patterns Are Not Printed in the Correct Color (Specified Color) 318Photographs and so on Are Printed in Different Colors from Those Displayed on the Monitor 319Fill Patterns and Borders Are Not Printed in the Correct Color (Specified Color) Even When theSame Color Is Specified for Them 320
Adjusting the Color and so on for Printing 321The Printing Position Is Skewed 322A Portion of the Page Is Not Printed 323Data Is Reduced and Printed 324The Next Page Is Printed from Halfway across the Previous Page 325Blank Paper Is Output (Nothing Is Printed on the Paper) 326The Overall Surface of the Paper Is Printed in a Particular Color 327The Printout Is Different from What Is Displayed on Screen 328The Flap of the Printed Envelope Sticks 329Multiple Sheets of Paper Are Fed at a Time 330Printed Transparencies or Coated Paper Are Stuck Each Other or Printed Images Are Peeled Off 331Poor Print Quality Is Always Occurs at a Particular Position (the Same Position) on Paper 332Appendix 333Points to Make Full Use of the Printer 334Basic Operations/Various Information for Windows 335Office Locations 342For Windows 8 Users 343

019A-000
Legal Notices
Legal Limitations on the Usage of Your Product and the Use of Images
Using the e-Manual
Before You Start

019A-001
Product Name
Safety regulations require the product's name to be registered.In some regions where this product is sold, the following name(s) in parentheses ( ) may be registered instead.
LBP7010C/LBP7018C (F159700)
EMC requirements of EC Directive
This equipment conforms with the essential EMC requirements of EC Directive. We declare that this product conforms withthe EMC requirements of EC Directive at nominal mains input 230 V, 50 Hz although the rated input of the product is 220to 240 V, 50/60 Hz. Use of shielded cable is necessary to comply with the technical EMC requirements of EC Directive.
Laser Safety
This product is certified as a Class 1 laser product under IEC60825-1:2007 and EN60825-1:2007. This means that theproduct does not produce hazardous laser radiation.
Since radiation emitted inside the product is completely confined within protective housings and external covers, the laserbeam cannot escape from the machine during any phase of user operation. Do not remove protective housings or externalcovers, except as directed by the equipment's manuals.
The label shown below is attached to the laser scanner unit inside the machine.
CLASS 1 LASER PRODUCTLASER KLASSE 1APPAREIL À LASER DE CLASSE 1APPARECCHIO LASER DI CLASSE 1PRODUCTO LÁSER DE CLASE 1APARELHO A LASER DE CLASSE 1LUOKAN 1 LASER-TUOTELASERPRODUKT KLASS 1
CAUTIONUse of controls, adjustments, or performance of procedures other than those specified in this manual may result inhazardous radiation exposure.
Legal Notices

International ENERGY STAR Program
As an ENERGY STAR® Partner, Canon Inc. has determined that this product meets the ENERGY STARProgram for energy efficiency.
The International ENERGY STAR Office Equipment Program is an international program that promotesenergy saving through the use of computers and other office equipment.
The program backs the development and dissemination of products with functions that effectively reduceenergy consumption. It is an open system in which business proprietors can participate voluntarily.
The targeted products are office equipment, such as computers, displays, printers, facsimiles, andcopiers. The standards and logos are uniform among participating nations.
WEEE Directive
European Union (and EEA) only.
This symbol indicates that this product is not to be disposed of with your household waste, accordingto the WEEE Directive (2002/96/EC) and your national law. This product should be handed over to adesignated collection point, e.g., on an authorized one-for-one basis when you buy a new similarproduct or to an authorized collection site for recycling waste electrical and electronic equipment (EEE).Improper handling of this type of waste could have a possible negative impact on the environment andhuman health due to potentially hazardous substances that are generally associated with EEE. At thesame time, your cooperation in the correct disposal of this product will contribute to the effective usageof natural resources. For more information about where you can drop off your waste equipment forrecycling, please contact your local city office, waste authority, approved WEEE scheme or yourhousehold waste disposal service. For more information regarding return and recycling of WEEEproducts, please visit www.canon-europe.com/environment.
(EEA: Norway, Iceland and Liechtenstein)

019A-002
Using your product to scan, print or otherwise reproduce certain documents, and the use of such images as scanned,printed or otherwise reproduced by your product, may be prohibited by law and may result in criminal and/or civil liability. Anon-exhaustive list of these documents is set forth below. This list is intended to be a guide only. If you are uncertain aboutthe legality of using your product to scan, print or otherwise reproduce any particular document, and/or of the use of theimages scanned, printed or otherwise reproduced, you should consult in advance with your legal advisor for guidance.
Paper MoneyTravelers ChecksMoney OrdersFood StampsCertificates of DepositPassportsPostage Stamps (canceled or uncanceled)Immigration PapersIdentifying Badges or InsigniasInternal Revenue Stamps (canceled or uncanceled)Selective Service or Draft PapersBonds or Other Certificates of IndebtednessChecks or Drafts Issued by Governmental AgenciesStock CertificatesMotor Vehicle Licenses and Certificates of TitleCopyrighted Works/Works of Art without Permission of Copyright Owner
Legal Limitations on the Usage of Your Product and the Use of Images

019A-003
Even if you do not have the supplied CD-ROM at hand, you can view the e-Manual any time if you install it on yourcomputer beforehand.For the efficient use of the e-Manual, you can use several search tools to find the desired content.
How to Use the e-Manual
Operating Environment
Installing the e-Manual
Uninstalling the e-Manual
Screen Layout of the e-Manual
Top Page
Topic Page
Contents Page
Search Method
Viewing the e-Manual
<To find the desired content>Selecting between the category iconsFrom the top page, select a category icon you want. "Top Page"
Searching from the list of contentsOn the list of contents, you can view the list of whole sections of the e-Manual sorted by category. You can directlydisplay sections in a category. "Contents Page"
Whole text search functionYou can search by keyword in the e-Manual. You can display the desired description from the search results byentering a keyword you want to search. This function supports AND search. "Search Method"
Using the e-Manual

019A-004
Click the following links to see the system requirements to use the e-Manual and how to install/uninstall the e-Manual.
Operating Environment
Installing the e-Manual
Uninstalling the e-Manual
How to Use the e-Manual

019A-005
You need a Web browser to use the e-Manual. Operation of the following Web browsers is guaranteed.Internet Explorer 6.0/7.0/8.0Firefox 2.x/3.x
NOTE
Enabling the script functionEnable the script function for a Web browser before using the e-Manual.
Operating Environment

019A-006
Install the e-Manual included in the supplied CD-ROM on your computer using the following procedure.
1Insert the supplied CD-ROM "User Software" into the CD-ROM drive of your computer.
2Click [Custom Installation].
If the above screen does not appear "Basic Operations/Various Information for Windows"
If the [AutoPlay] dialog box appearsClick [Run AUTORUN.EXE].
If the [User Account Control] dialog box appearsClick [Yes] or [Continue].
3Perform the following procedure.
(1) Clear the [Printer Driver] check box.(2) Click [Install].
Installing the e-Manual
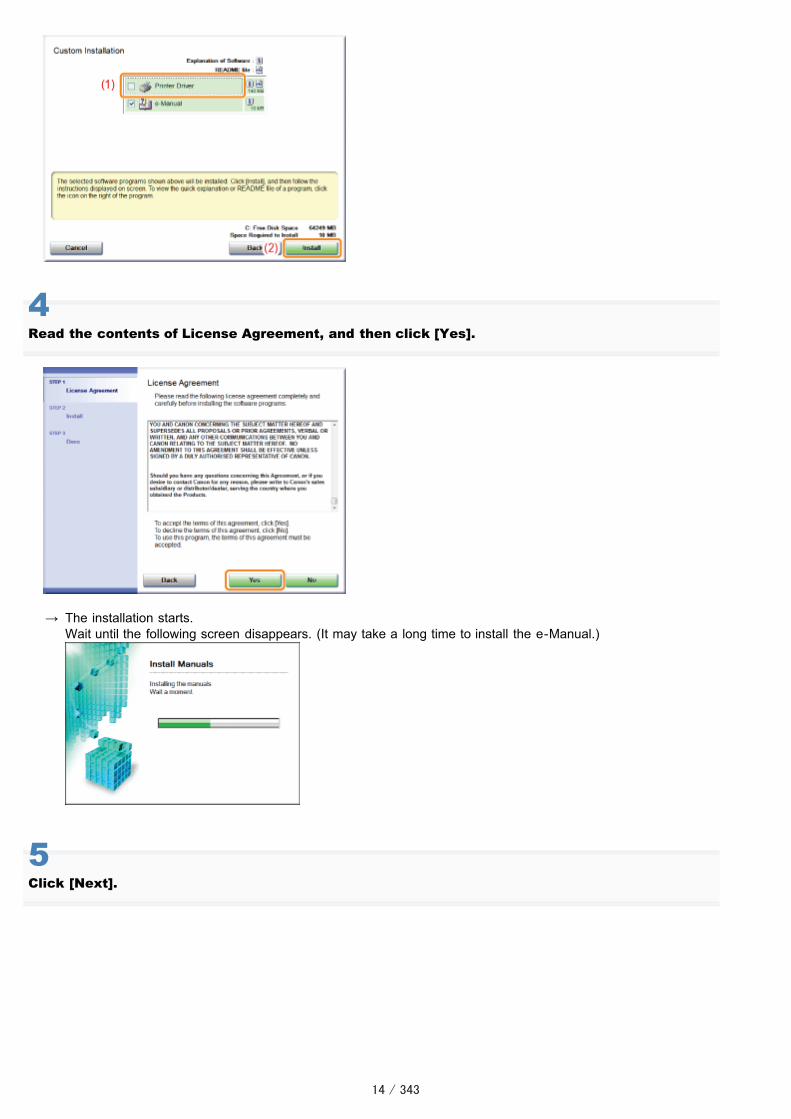
4Read the contents of License Agreement, and then click [Yes].
� The installation starts.Wait until the following screen disappears. (It may take a long time to install the e-Manual.)
5Click [Next].

6Click [Exit].
When the following screen appears, you can remove the CD-ROM.
Displaying the e-Manual
Double-click [LBP7010C 7018C e-Manual] created on the desktop.
When a security protection message appears
Perform the following procedure.
1. Click the information bar, and then select [Allow Blocked Content] from the pop-up menu.
2. Click [Yes].

NOTE
Displaying the e-Manual directly from the CD-ROMYou can also display the e-Manual directly from the CD-ROM without installing it in the computer you are using.
1. Insert the supplied CD-ROM "User Software" into the CD-ROM drive of your computer.2. Click [Display Manuals].3. Click [ ] button next to [e-Manual].
Depending on the operating system you are using, a security protection message is displayed.Allow the contents to be displayed.

019A-007
The process of removing the e-Manual to restore the computer to the same state as before the e-Manual was installed isreferred to as uninstallation. To uninstall the e-Manual, perform the following procedure.
1Insert the supplied CD-ROM "User Software" into the CD-ROM drive of your computer.
2Click [Additional Software Programs].
If the above screen does not appear "Basic Operations/Various Information for Windows"
If the [AutoPlay] dialog box appearsClick [Run AUTORUN.EXE].
If the [User Account Control] dialog box appearsClick [Yes] or [Continue].
3Click [Start] in [Manual Uninstaller].
Uninstalling the e-Manual

4Click [Uninstall] to start the uninstallation.
Please wait a moment until the uninstallation is complete. (It may take a long time to uninstall the printer driver.)
5Click [Exit].
6Click [Back].

7Click [Exit].
When the following screen appears, you can remove the CD-ROM.

019A-008
This section describes the screen layout of the e-Manual.The page displayed right after the e-Manual starts is called "Top Page" and the manual description is called "Topic Page"in this section.The "Contents Page" is displayed from [Contents] which is located on the upper right of the e-Manual and the searchdialog box is displayed from each page in another window.The screen layout is different for each page, so click the following links to see the instruction.
Top Page
Topic Page
Contents Page
Search Method
Screen Layout of the e-Manual

019A-009
(1) Handling the PrinterThis section describes the precautions and maintenance methods for handling the printer, and so on.
(2) PrintingThis section describes a variety of printing methods, such as basic printing and advanced one that uses the variousprinting functions.How to load paper is also described here.
(3) Frequently Asked QuestionsFrequently asked questions are featured.For details on the solutions for the other problems, see [Troubleshooting].
(4) InstallationThis section described how to install this printer, how to install the printer driver, and so on.
(5) [Top]The top page of the e-Manual is displayed.
(6) [Contents]The entire contents of the e-Manual are displayed.
(7) [Help]How to use the e-Manual is displayed.
(8) [Enter keyword(s) here]The search dialog box is displayed by entering a keyword and clicking [ ].For details, see "Search Method."
(9) [Points to Make Full Use of the Printer]This section describes software tasks and functions supplied with the printer to maximize the use of the printer.
(10) [Disclaimer]The disclaimers are displayed.
(11) [Copyright]The information of copyrights is displayed.
(12) [Trademarks]The trademarks are displayed.
(13) [Third Party Software]The information about the third party software is displayed.
(14) [Office Locations]Inquiries for this printer are displayed.
Top Page

019A-00A
(1) Category contentsThis is the list of the contents in the category. Clicking each item displays the description in the topic page.Clicking [ ] opens the menu and clicking [ ] closes the menu.
(2) Topic pageThe descriptions of each item are displayed.
(3) [Category] menuYou can select a different category from the pull-down menu.
(4) [ ]Click to move to the previous or next category.
(5) [Print]Prints the e-Manual.Select either of the following when printing.
[This category] Prints all the contents in a category.
[This topic] Prints only the topic page currently displayed.
Topic Page

019A-00C
(1) CategoriesShows the categories of the e-Manual. Click a category to view the detailed list of the category.
(2) Whole contentsShows the all categories and sections of the e-Manual. Click an item to view the contents.
Contents Page
019A-00E
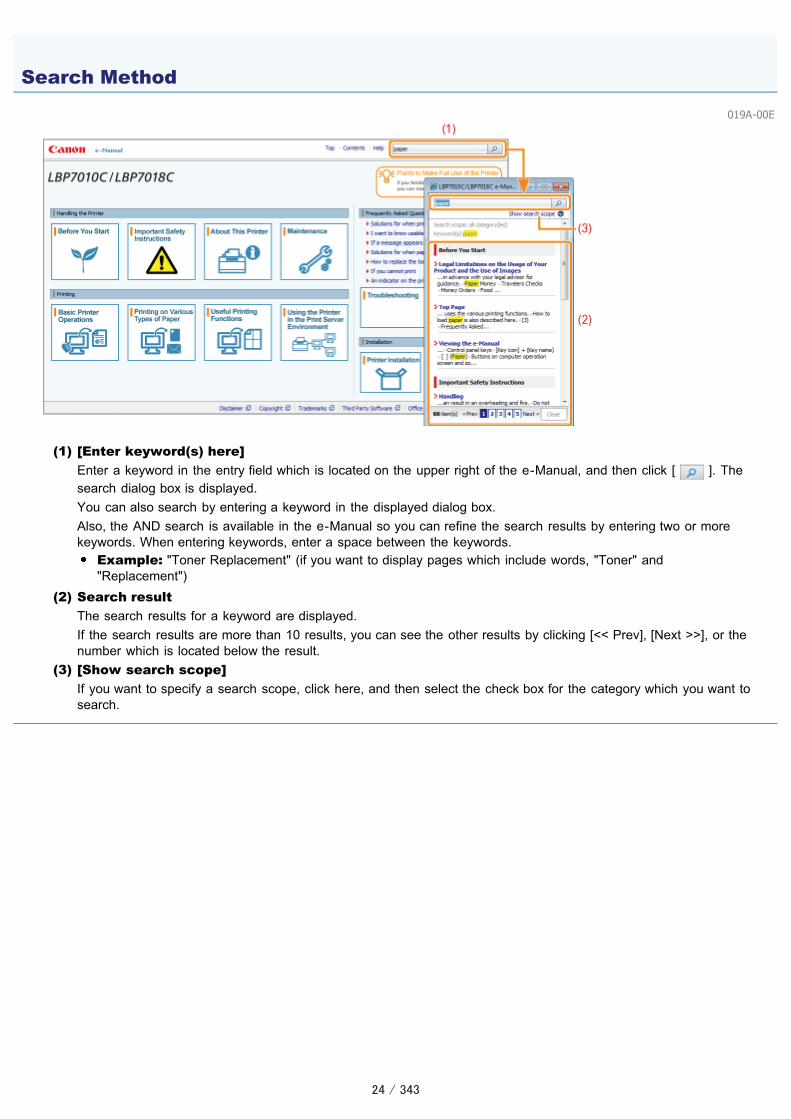
(1) [Enter keyword(s) here]Enter a keyword in the entry field which is located on the upper right of the e-Manual, and then click [ ]. Thesearch dialog box is displayed.You can also search by entering a keyword in the displayed dialog box.Also, the AND search is available in the e-Manual so you can refine the search results by entering two or morekeywords. When entering keywords, enter a space between the keywords.
Example: "Toner Replacement" (if you want to display pages which include words, "Toner" and"Replacement")
(2) Search resultThe search results for a keyword are displayed.If the search results are more than 10 results, you can see the other results by clicking [<< Prev], [Next >>], or thenumber which is located below the result.
(3) [Show search scope]If you want to specify a search scope, click here, and then select the check box for the category which you want tosearch.
Search Method

019A-00F
Symbols Used in the e-Manual
The following are descriptions of warnings and cautions used in the e-Manual to explain handling restrictions, precautions,and instructions that should be observed for your safety.
WARNINGIndicates a warning concerning operations that may lead to death or injury to persons if not performed correctly. To usethe machine safely, always pay attention to these warnings.
CAUTIONIndicates a caution concerning operations that may lead to injury to persons if not performed correctly. To use themachine safely, always pay attention to these cautions.
IMPORTANT
Indicates operational requirements and restrictions. Be sure to read these items carefully to operate the machinecorrectly, and avoid damage to the machine or property.
NOTE
Indicates a clarification of an operation, or contains additional explanations for a procedure. Reading these notes is highlyrecommended.
Indicates an operation that must not be performed. Read these items carefully, and make sure not to perform thedescribed operations.
Keys and Buttons Used in This Manual
The following are examples of how control panel keys and on-screen buttons are depicted in the e-Manual.
Type Depiction in the e-Manual Example
Control panel keys [Key icon] + (Key name) [ ] (Paper)
Buttons oncomputer operationscreen and so on
[Button name and so on] [OK]
Screenshots Used in the e-Manual
The contents of the screenshots used in the e-Manual are the default settings.Depending on the system configuration, the contents of the screenshots may partly differ.
The functions of the printer driver may be changed due to upgrade.
Illustrations Used in the e-Manual
Although the power cord used in this manual is as the one in the following illustration, the form of the power cord maydiffer depending on the country or region.
Viewing the e-Manual

Abbreviations Used in the e-Manual
Abbreviations of Operating SystemsIn the e-Manual, operating systems are abbreviated as follows.
Microsoft Windows 2000 operating system Windows 2000
Microsoft Windows XP operating system Windows XP
Microsoft Windows Vista operating system Windows Vista
Microsoft Windows 7 operating system Windows 7
Microsoft Windows Server 2003 operating system Windows Server 2003
Microsoft Windows Server 2008 operating system Windows Server 2008
Microsoft Windows operating system Windows

019A-00HThe information in this manual is subject to change without notice.CANON INC. MAKES NO WARRANTY OF ANY KIND WITH REGARD TO THIS MATERIAL, EITHER EXPRESS ORIMPLIED, EXCEPT AS PROVIDED HEREIN, INCLUDING WITHOUT LIMITATION, THEREOF, WARRANTIES AS TOMARKETABILITY, MERCHANTABILITY, FITNESS FOR A PARTICULAR PURPOSE OF USE OR AGAINSTINFRINGEMENT OF ANY PATENT. CANON INC. SHALL NOT BE LIABLE FOR ANY DIRECT, INCIDENTAL, ORCONSEQUENTIAL DAMAGES OF ANY NATURE, OR LOSSES OR EXPENSES RESULTING FROM THE USE OFTHIS MATERIAL.
Disclaimer

019A-00JCopyright 2012 by Canon Inc. All rights reserved.No part of this publication may be reproduced or transmitted in any form or by any means, electronic or mechanical,including photocopying and recording, or by any information storage or retrieval system without the prior writtenpermission of Canon Inc.
Copyright

019A-00KCanon, the Canon logo, LBP, and PageComposer are trademarks of Canon Inc.Adobe, Adobe Acrobat, and Adobe Reader are trademarks of Adobe Systems Incorporated.Microsoft, Windows, Windows Vista, Windows Server and Internet Explorer are either registered trademarks ortrademarks of Microsoft Corporation in the United States and/or other countries.Other product and company names herein may be the trademarks of their respective owners.
Trademarks

019A-00L
This product includes third-party software modules. Use and distribution of this software modules, including any updates ofsuch software modules (collectively, the "SOFTWARE") are subject to conditions (1) through (9) below.
(1) You agree that you will comply with any applicable export control laws, restrictions or regulations of the countriesinvolved in the event that this product including the SOFTWARE is shipped, transferred or exported into any country.
(2) Rights holders of the SOFTWARE retain in all respects the title, ownership and intellectual property rights in and tothe SOFTWARE. Except as expressly provided herein, no license or right, expressed or implied, is hereby conveyedor granted by rights holders of the SOFTWARE to you for any intellectual property of rights holders of theSOFTWARE.
(3) You may use the SOFTWARE solely for use with the Canon product you purchased (the "PRODUCT").(4) You may not assign, sublicense, market, distribute, or transfer the SOFTWARE to any third party without prior
written consent of rights holders of the SOFTWARE.(5) Notwithstanding the foregoing, you may transfer the SOFTWARE only when (a) you assign all of your rights to the
PRODUCT and all rights and obligations under the conditions to transferee and (b) such transferee agrees to bebound by all these conditions.
(6) You may not decompile, reverse engineer, disassemble or otherwise reduce the code of the SOFTWARE to humanreadable form.
(7) You may not modify, adapt, translate, rent, lease or loan the SOFTWARE or create derivative works based on theSOFTWARE.
(8) You are not entitled to remove or make separate copies of the SOFTWARE from the PRODUCT.(9) The human-readable portion (the source code) of the SOFTWARE is not licensed to you.
Third Party Software
019A-00R
Read these "Important Safety Instructions" thoroughly before operating the printer.As these instructions are intended to prevent injury to the user and other persons or destruction of property, always payattention to these instructions.Also, as it may result in unexpected accidents or injuries, do not perform any operation unless otherwise specified in themanual. Improper operation or use of this machine could result in personal injury and/or damage requiring extensive repairthat may not be covered under your Limited Warranty.
Installation
Power Supply
Handling
Maintenance and Inspections
Consumables
Important Safety Instructions
019A-00S
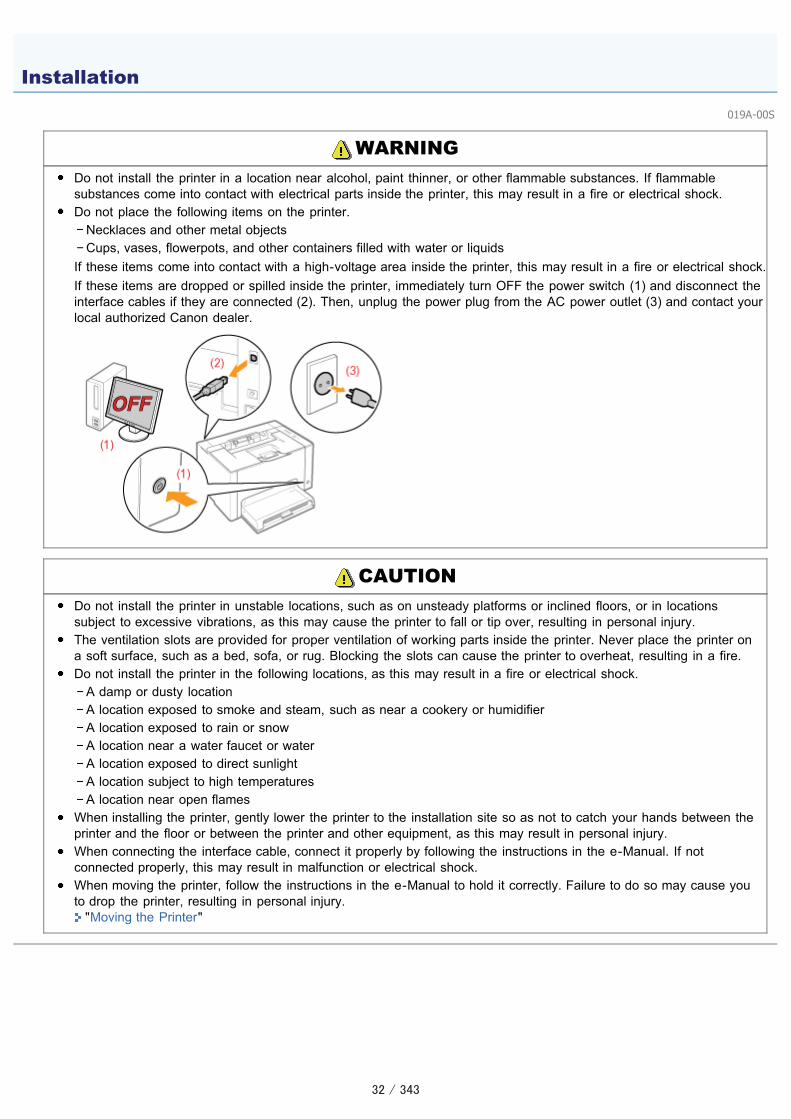
WARNINGDo not install the printer in a location near alcohol, paint thinner, or other flammable substances. If flammablesubstances come into contact with electrical parts inside the printer, this may result in a fire or electrical shock.Do not place the following items on the printer.
Necklaces and other metal objectsCups, vases, flowerpots, and other containers filled with water or liquids
If these items come into contact with a high-voltage area inside the printer, this may result in a fire or electrical shock.If these items are dropped or spilled inside the printer, immediately turn OFF the power switch (1) and disconnect theinterface cables if they are connected (2). Then, unplug the power plug from the AC power outlet (3) and contact yourlocal authorized Canon dealer.
CAUTIONDo not install the printer in unstable locations, such as on unsteady platforms or inclined floors, or in locationssubject to excessive vibrations, as this may cause the printer to fall or tip over, resulting in personal injury.The ventilation slots are provided for proper ventilation of working parts inside the printer. Never place the printer ona soft surface, such as a bed, sofa, or rug. Blocking the slots can cause the printer to overheat, resulting in a fire.Do not install the printer in the following locations, as this may result in a fire or electrical shock.
A damp or dusty locationA location exposed to smoke and steam, such as near a cookery or humidifierA location exposed to rain or snowA location near a water faucet or waterA location exposed to direct sunlightA location subject to high temperaturesA location near open flames
When installing the printer, gently lower the printer to the installation site so as not to catch your hands between theprinter and the floor or between the printer and other equipment, as this may result in personal injury.When connecting the interface cable, connect it properly by following the instructions in the e-Manual. If notconnected properly, this may result in malfunction or electrical shock.When moving the printer, follow the instructions in the e-Manual to hold it correctly. Failure to do so may cause youto drop the printer, resulting in personal injury. "Moving the Printer"
Installation

019A-00U
WARNINGDo not damage or modify the power cord. Also, do not place heavy objects on the power cord or pull on orexcessively bend it, as this can cause electrical damage, resulting in fire or electrical shock.Keep the power cord away from all heat sources. Failure to do so can cause the power cord insulation to melt,resulting in a fire or electrical shock.The power cord should not be taut, as this may lead to a loose connection and cause overheating, which couldresult in a fire.The power cord may become damaged if it is stepped on, fixed with staples, or if heavy objects are placed on it.Continued use of a damaged power cord can lead to an accident, such as a fire or electrical shock.Do not plug or unplug the power plug with wet hands, as this can result in electrical shock.Do not plug the power cord into a multi-plug power strip, as this can result in a fire or electrical shock.Do not bundle up or tie up the power cord in a knot, as this can result in a fire or electrical shock.Insert the power plug completely into the AC power outlet. Failure to do so can result in a fire or electrical shock.If excessive stress is applied to the connection part of the power cord, it may damage the power cord or the wiresinside the machine may disconnect. This could result in a fire. Avoid the following situations:
Connecting and disconnecting the power cord frequently.Tripping over the power cord.The power cord is bent near the connection part, and continuous stress is being applied to the power outlet or theconnection part.Applying a shock to the power connector.
Do not use power cords other than the one provided, as this can result in a fire or electrical shock.As a general rule, do not use extension cords. Using an extension cord may result in a fire or electrical shock.
CAUTIONDo not use a power supply voltage other than that listed herein, as this may result in a fire or electrical shock.Always grasp the power plug when unplugging the power plug. Do not pull on the power cord, as this may exposethe core wire of the power cord or damage the cord insulation, causing electricity to leak, resulting in a fire orelectrical shock.Leave sufficient space around the power plug so that it can be unplugged easily. If objects are placed around thepower plug, you may be unable to unplug it in an emergency.
Power Supply

019A-00W
WARNINGDo not disassemble or modify the printer. There are high-temperature and high-voltage components inside theprinter which may result in a fire or electrical shock.Electrical equipment can be hazardous if not used properly. Do not allow children to touch the power cord, cables,internal gears, or electrical parts.If the printer makes an unusual noise or emits smoke, heat, or an unusual smell, immediately turn OFF the powerswitch and disconnect the interface cables if they are connected. Then, unplug the power plug from the AC poweroutlet and contact your local authorized Canon dealer. Continued use can result in a fire or electrical shock.Do not use flammable sprays near the printer. If flammable substances come into contact with electrical parts insidethe printer, this may result in a fire or electrical shock.Always turn OFF the power switch and unplug the power plug and interface cables before moving the printer.Failure to do so can damage the cables or cords, resulting in a fire or electrical shock.Confirm that the power plug or power connecter is inserted completely after moving the printer. Failure to do so canresult in an overheating and fire.Do not drop paper clips, staples, or other metal objects inside the printer. Also, do not spill water, liquids, or otherflammable substances (alcohol, benzene, paint thinner, and so on) inside the printer. If these items come intocontact with a high-voltage area inside the printer, this may result in a fire or electrical shock. If these items aredropped or spilled inside the printer, immediately turn OFF the power switch and disconnect the interface cables ifthey are connected. Then, unplug the power plug from the AC power outlet and contact your local authorized Canondealer.When plugging or unplugging a USB cable when the power plug is plugged into an AC power outlet, do not touchthe metal part of the connector, as this can result in electrical shock.
CAUTIONDo not place heavy objects on the printer. The object or the printer may fall, resulting in personal injury.Turn OFF the power switch when the printer will not be used for a long period of time, such as overnight. Turn OFFthe printer and unplug the power plug if the printer will not be used for an extended period of time, such as forseveral days.Open or close covers gently and carefully. Be careful not to hurt your fingers.Keep your hands and clothing away from the roller in the output area. Even if the printer is not printing, the rollermay suddenly rotate and catch your hands or clothing, resulting in personal injury.The output slot is hot during and immediately after printing. Do not touch the area surrounding the output slot, asthis may result in burns.
Printed paper may be hot immediately after being output. Be careful when removing the paper and aligning theremoved paper, especially after continuous printing. Failure to do so may result in burns.The laser beam used in the printer can be harmful to human bodies. The laser beam is confined in the laserscanner unit by a cover, so there is no danger of the laser beam escaping during normal printer operation. Read thefollowing remarks and instructions for safety.
Never open covers other than those indicated in this manual.Do not remove the caution label attached to the cover of the laser scanner unit.
Handling

If the laser beam should escape and enter your eyes, exposure may cause damage to your eyes.

019A-00X
WARNINGWhen cleaning the printer, turn OFF the printer and computer, remove the interface cables, and then unplug thepower plug. Failure to do so can result in a fire or electrical shock.Unplug the power plug from the AC power outlet periodically and clean the area around the base of the powerplug's metal pins and the AC power outlet with a dry cloth to remove all dust and grime. In damp, dusty, or smokylocations, dust can build up around the power plug and become damp, which can cause a short circuit, resulting ina fire.Clean the printer with a well wrung out cloth dampened with water or mild detergent diluted with water. Do not usealcohol, benzene, paint thinner, or other flammable substances. If flammable substances come into contact withelectrical parts inside the printer, this may result in a fire or electrical shock.Some areas inside the printer are subject to high voltage. When removing jammed paper or when inspecting theinside of the printer, be careful not to allow necklaces, bracelets, or other metal objects to touch the inside of theprinter, as this can result in burns or electrical shock.Do not dispose of used toner cartridges or a drum cartridge in open flames. This may cause the toner remaininginside the cartridges or the drum cartridge to ignite, resulting in burns or fire.If you accidentally spill or scatter toner, carefully gather the toner particles together or wipe them up with a soft,damp cloth in a way that prevents inhalation.Never use a vacuum cleaner that does not have safeguards against dust explosions to clean up spilled toner. Doingso may cause a malfunction in the vacuum cleaner, or result in a dust explosion due to static discharge.Confirm that the power plug or power connecter is inserted completely after cleaning the printer. Failure to do socan result in an overheating and fire.Check the power cord and plug regularly. The following conditions may result in fire, so contact your local authorizedCanon dealer or the Canon help line.
There are burn marks on the power plug.The blade on the power plug is deformed or broken.The power is turned OFF or ON when bending the power cord.The coating of the power cord is damaged, cracked, or dented.A part of the power cord becomes hot.
Check regularly that the power cord and plug are not handled in the following manner. Failure to do so can result ina fire or electrical shock.
The power connector is loosened.Stress is being applied to the power cord by a heavy object or by fixing it with staples.The power plug is loosened.The power cord is tied in a bundle.A part of the power cord is put in an aisle.The power cord is put in front of the heating appliance.
CAUTIONNever attempt to service this printer yourself, except as explained in this manual. There are no user serviceableparts inside the printer. Adjust only those controls that are covered in the operating instructions. Improperadjustment could result in personal injury and/or damage requiring extensive repair that may not be covered underyour Limited Warranty.
Maintenance and Inspections

The fixing unit and its surroundings inside the printer become hot during use. When removing jammed paper orwhen inspecting the inside of the printer, do not touch the fixing unit and its surroundings, as this may result inburns.When removing jammed paper or when inspecting the inside of the machine, do not expose yourself to the heatemitted from the fixing unit and its surroundings for a prolonged period of time. Doing so may result in lowtemperature burns, even though you did not touch the fixing unit and its surroundings directly, as this may result inburns.If paper is jammed, remove the jammed paper so that any pieces of paper do not remain inside the printeraccording to the displayed message. Also, do not put your hands forcibly into the parts other than those directed onthe screen. Failure to do so may result in burns or injuries.When removing jammed paper, replacing the toner cartridges or drum cartridge, be careful not to get any toner onyour hands or clothing, as this will dirty your hands or clothing. If toner gets on your hands or clothing, wash themimmediately with cold water. Washing with warm water sets the toner, making it impossible to remove the tonerstains.When removing jammed paper, be careful not to allow the toner on the paper to scatter. The toner may get intoyour eyes or mouth. If toner gets into your eyes or mouth, wash them immediately with cold water and consult aphysician.When loading paper or removing jammed paper, be careful not to cut your hands with the edges of the paper.When removing the toner cartridges or drum cartridge, remove the toner cartridges or drum cartridge carefully so asto prevent the toner from scattering and getting into your eyes or mouth. If toner gets into your eyes or mouth, washthem immediately with cold water and consult a physician.Do not attempt to disassemble the toner cartridges or drum cartridge. The toner may scatter and get into your eyesor mouth. If toner gets into your eyes or mouth, wash them immediately with cold water and consult a physician.If toner leaks from the toner cartridges or drum cartridge, be careful not to inhale the toner or allow it to come intodirect contact with your skin. If the toner comes into contact with your skin, wash with soap. If the skin becomesirritated or you inhale the toner, consult a physician immediately.

019A-00Y
WARNINGDo not dispose of used toner cartridges in open flames. This may cause the toner to ignite, resulting in burns or fire.Do not store toner cartridges or paper in a location exposed to open flames. This may cause the toner or paper toignite, resulting in burns or fire.When disposing of the toner cartridges or drum cartridge, place the toner cartridges or drum cartridge into a bag toprevent the toner from scattering, and then dispose of the toner cartridges or drum cartridge according to localregulations.If you accidentally spill or scatter toner, carefully gather the toner particles together or wipe them up with a soft,damp cloth in a way that prevents inhalation.Never use a vacuum cleaner that does not have safeguards against dust explosions to clean up spilled toner. Doingso may cause a malfunction in the vacuum cleaner, or result in a dust explosion due to static discharge.
CAUTIONKeep the toner cartridges and other consumables out of the reach of small children. If the toner or other parts areingested, consult a physician immediately.Do not attempt to disassemble the toner cartridges or drum cartridge. The toner may scatter and get into your eyesor mouth. If toner gets into your eyes or mouth, wash them immediately with cold water and consult a physician.If toner leaks from the toner cartridges or drum cartridge, be careful not to inhale the toner or allow it to come intodirect contact with your skin. If the toner comes into contact with your skin, wash with soap. If the skin becomesirritated or you inhale the toner, consult a physician immediately.If the sealing tape is pulled out forcefully or stopped at midpoint, toner may spill out. If the toner gets into your eyesor mouth, wash them immediately with cold water and immediately consult a physician.
Consumables

019A-011
Printer Specifications
System Requirements for Printing
Names and Dimensions of Each Part
Control Panel
Printer Status Window
Energy-saving Mode
Cautions for Handling the Printer
Consumables
About This Printer

019A-012
Hardware Specifications
Type Desktop Page Printer
Printing method Electrophoto method (On-demand fixing)
Printing speed(Plain paper (60 to100 g/m²), whenprinting A4 papercontinuously)
Black and white printing: 16 pages/min.Color printing: 4 pages/min.
The print speed may drop depending on the paper settings for the size, type,orientation, and number of copies.
Warm up time(Time from poweron to printer ready)
66 seconds or less
May vary depending on the usage conditions, such as the installation environment.
Recovery time(Time from sleepmode to printerready)
Approx. 10 seconds
First print time(When printing A4paper)
Black and white printing: 13.6 secondsColor printing: 24.7 seconds
May vary depending on the output environment.
Paper size
Standard sizes:A4, B5, A5, Legal, Letter, Executive, Statement, Envelope Monarch, Envelope No. 10(COM10), Envelope DL, Envelope C5, Envelope B5, Foolscap, Index Card, and 16KCustom paper sizes:Width 76.2 to 215.9 mm, Length 127.0 to 355.6 mm
Paper capacity(Multi-purpose tray)
Approx. 150 sheets
Paper output Face-down
Output capacity(Output tray)
Approx. 50 sheets
Noise(Declared noiseemission inaccordance withISO 9296)
LwAd (declared A-weighted sound power level (1 B = 10 dB))During standby: InaudibleDuring operation (Black and white): 6.4 B or lessDuring operation (Color): 6.2 B or less
LpAm (declared A-weighted sound pressure level (bystander position))During standby: InaudibleDuring operation (Black and white): 50 dBDuring operation (Color): 48 dB
Operatingenvironment(Printer unit only)
Operating environmentTemperature range: 10 to 30°C (50 to 86°F)Humidity range: 20 to 80% RH (no condensation)
Host interfaceUSB interface
Hi-Speed USB/USB
Printer Specifications

User interfaceSix LED indicatorsOne operation key
Power supply 220 to 240 V (±10%), 50/60 Hz (±2 Hz)
Power consumption(at 20°C (68°F))
Maximum: 868 W or lessDuring operation (Black and white): Approx. 230 WDuring operation (Color): Approx. 145 WDuring standby: Approx. 7 WDuring the sleep mode: Approx. 1.1 W
Even if the power of the printer is turned OFF, power is consumed only slightly while thepower plug is inserted into the AC power outlet.To cut the power consumption completely, unplug the power plug from the AC poweroutlet.
Consumables
Toner cartridgesCanon Toner Cartridge 729 BlackCanon Toner Cartridge 729 YellowCanon Toner Cartridge 729 MagentaCanon Toner Cartridge 729 Cyan
Drum cartridgeCanon Drum Cartridge 029
For details on the yield, see "Replacement Timing" in "Consumables."
Weight
Printer unit and included partsPrinter unit (excluding the toner cartridges and drum cartridge): Approx. 10.7 kgToner cartridge (each): Approx. 0.3 kgDrum cartridge: Approx. 0.4 kg
ConsumablesToner cartridge (each) (Canon Genuine Cartridge): Approx. 0.3 kgDrum cartridge (Canon Genuine Cartridge): Approx. 0.4 kg
Software Specifications
Printing software Canon Advanced Printing Technology (CAPT) software
Printable area
Data can be printed with a margin of 5.0 mm.(10 mm for envelopes)
For details, see "Printable Area."

019A-013
The printer driver is software required for printing with this printer.The following system environment is required to use the printer driver.
Operating SystemWindows 2000 Server or ProfessionalWindows XP Professional or Home EditionWindows XP Professional x64 EditionWindows Vista (32-bit or 64-bit version)Windows 7 (32-bit or 64-bit version)Windows Server 2003Windows Server 2003 x64 EditionsWindows Server 2008 (32-bit or 64-bit version)
Depending on your language, the printer driver for a 64-bit operating system is not included in the supplied CD-ROM.Download the printer driver from the Canon Web site (http://www.canon.com/) as needed.
For details on the latest status of the supported operating systems and Service Pack, see the Canon Web site(http://www.canon.com/).
System Requirements (minimum required)
Windows 2000, XP, and Server 2003 Windows Vista, 7, and Server 2008
CPU 300 MHz or more CPU and RAM conforming to recommendedsystem requirements for Windows Vista, 7,or Server 2008Available memory (RAM) 128 MB or more
Available hard disk space Free hard disk space displayed on the installation screen of the printer driver
Recommended System Requirements
Windows 2000, XP, and Server 2003 Windows Vista, 7, and Server 2008
CPU 1.2 GHz or more CPU and RAM conforming to recommendedsystem requirements for Windows Vista, 7, orServer 2008
Available memory(RAM) 256 MB or more
InterfaceHi-Speed USB/USB
NOTE
About available memoryThe actual amount of available memory varies depending on the system configuration of your computer and theapplication software currently in use.In any of the above system environments, print quality is not guaranteed.
About unidirectional communication equipmentThe printer performs bi-directional communication. Operation of the printer when connected via unidirectionalcommunication equipment is not tested, and as a result, Canon cannot guarantee printer operation if the printer isconnected using unidirectional print servers, USB hubs or switching devices.
System Requirements for Printing

019A-014
Part Name
Front View
(1) Output Tray (5) Multi-purpose Tray (9) Front Cover
(2) Ventilation Slot (6) Control Panel (10) Power Switch
(3) Lift Handle (7) Top Cover (11) Paper Guides
(4) Tray Cover (8) Auxiliary Tray
Rear View
(1) Ventilation Slots (4) USB Connector (6) Ventilation Slot
(2) Rear Cover (5) Power Socket (7) Lift Handle
Names and Dimensions of Each Part

(3) Rating Label
Interior View
(1) Lock Release Levers (2) Drum Cartridge Guide (3) Toner Cartridge Guide
Dimensions of Each Part
019A-015
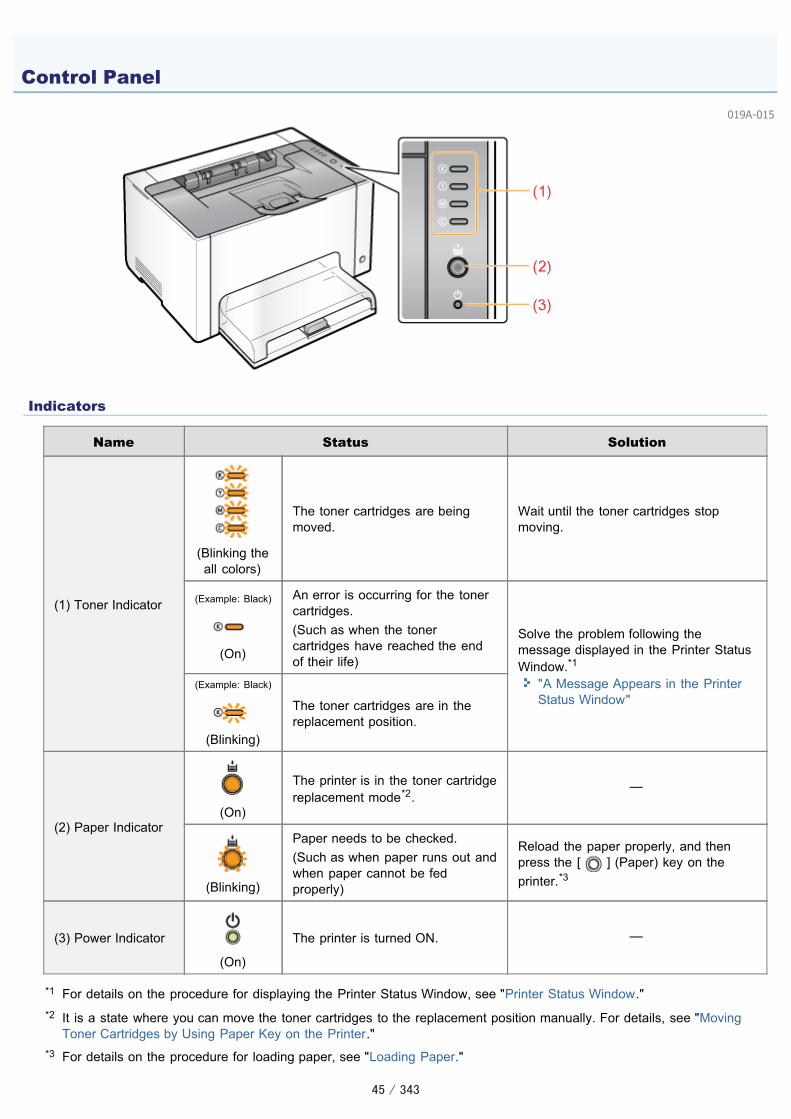
Indicators
Name Status Solution
(1) Toner Indicator
(Blinking theall colors)
The toner cartridges are beingmoved.
Wait until the toner cartridges stopmoving.
(Example: Black)
(On)
An error is occurring for the tonercartridges.(Such as when the tonercartridges have reached the endof their life)
Solve the problem following themessage displayed in the Printer StatusWindow.*1
"A Message Appears in the PrinterStatus Window"
(Example: Black)
(Blinking)
The toner cartridges are in thereplacement position.
(2) Paper Indicator(On)
The printer is in the toner cartridgereplacement mode*2.
(Blinking)
Paper needs to be checked.(Such as when paper runs out andwhen paper cannot be fedproperly)
Reload the paper properly, and thenpress the [ ] (Paper) key on theprinter.*3
(3) Power Indicator
(On)
The printer is turned ON.
*1 For details on the procedure for displaying the Printer Status Window, see "Printer Status Window."*2 It is a state where you can move the toner cartridges to the replacement position manually. For details, see "Moving
Toner Cartridges by Using Paper Key on the Printer."*3 For details on the procedure for loading paper, see "Loading Paper."
Control Panel
Key
Name Function
(2) Paper Key
When the Paper indicator is blinking:Printing resumes by pressing this key after reloading paper properly.*1
When the Paper indicator is on:The toner cartridges which are in the replacement position are moved by pressing thiskey.The toner cartridge replacement mode*2 is released by pressing and holding this key (for 2seconds).When the Paper indicator is off:The printer enters to the toner cartridge replacement mode*2 by pressing and holding thiskey (for 2 seconds).
*1 For details on the procedure for loading paper, see "Loading Paper."*2 It is a state where you can move the toner cartridges to the replacement position manually. For details, see "Moving
Toner Cartridges by Using Paper Key on the Printer."

019A-016
The Printer Status Window allows you to check the printer status (such as the operation status and job information),perform utility functions, specify the settings for the printer unit, and so on.
(1) Menu bar
[Job] menu You can cancel a job, resume a job which is paused during printing for somereason, or display the print queue.[Options] menu You can perform utility functions, specify the settings for the printer unit, and soon.[Help] menu Use this menu to display Help and the version information.
(2) Tool bar
[ ] (Print queue)Displays the print queue, a function of Windows. For details on the print queue, see Windows Help.[ ] (Refresh) Obtains the printer status and refreshes the Printer Status Window display.[ ] (Consumables Information)Displays the [Consumables Information] dialog box.You can check the statuses of the toner cartridges and drum cartridge. "Checking the Consumables Status"
(3) [Icon]
Displays the printer status.
The printer is ready to print or in the sleep mode.
The printer pauses.
The printer problems need to be corrected.
Communication cannot be performed with the printer.
A service call is occurring.
(4) [Animation Area] Displays the printer status using an animated graphic. This area displays the printingprogress or error conditions depending on the printer status.
(5) [Message Area] Displays messages about the printer status.
(6) [Message Area] (Auxiliary) Displays additional information (such as situation explanation and solutions) if an erroror other such event occurs.
(7) [Job Information Area] Displays information about the job.
Printer Status Window

(8) [Progress Bar] Displays the printing progress of the current job. The bar gradually grows indicatingthe printing progress.
(9) [Status Bar] Displays the device to which the printer is connected.
(10) [ ] (Resolve Error) You can resume a job when it is paused during printing for some reason.
(11) [ ] (Cancel Job) Cancels the current job. While another user's job is being printed, the [Cancel Job]button is displayed in gray.
NOTE
For details on each option in the Printer Status WindowSee Help.
"How to Use Help"
Displaying the Printer Status Window
Click [ ] in the Windows task tray, and then select the printer name.
NOTE
When displaying the Printer Status Window from the printer driverClick [ ] (Display Printer Status Window) in locations such as in the [Page Setup] sheet.
Displaying the Printer Status Window automaticallyWhen an error or consumables warnings occurred, the Printer Status Window will be displayed automatically if the printerreceives a printing job.
You can change the display settings in the [Preferences (Users)] or [Preferences (Administrators)] dialog box inthe Printer Status Window. For more details, see Help.
"How to Use Help"

019A-08H
You can reduce power consumption of the printer efficiently by using a sleep mode or by shutting down the printer when itis not used for a certain time.
Sleep ModeYou can configure the printer to enter the sleep mode when data is not sent from the computer or when the printerstatus remains as it is longer than the specified time.
Auto ShutdownYou can configure the printer to shut down when the specified time is elapsed after entering the sleep mode.
Energy-saving Mode

019A-08J
You can specify the settings for sleep mode using the following procedure.
1Click [ ] in the Windows task tray, and then select the printer name.
2����������� ����������������� ����� �������������� �����
3Specify the settings for the sleep mode.
(1) Select the [Enter Sleep Mode after Fixed Period] check box.(2) Specify the time until the printer enters the sleep mode in [Time to Enter Sleep Mode].(3) Click [OK].
NOTE
About the setting for the time to enter the sleep modeYou can select [1], [5], [10], [15], [30], [60], [90], [120], [150], or [180] minutes for [Time to Enter Sleep Mode]. Thedefault value is [1] minutes.
We recommend that you use this option in the default setting.
Sleep Mode

019A-08K
You can specify the settings for auto shutdown using the following procedure.
NOTE
Precautions when sharing the printerYou cannot change the settings with the shared printer.Change the settings from the environment in which a local printer is installed.
1Insert the supplied CD-ROM "User Software" into the CD-ROM drive of your computer.
2Click [Additional Software Programs].
If the above screen does not appear "Basic Operations/Various Information for Windows"
If the [AutoPlay] dialog box appearsClick [Run AUTORUN.EXE].
If the [User Account Control] dialog box appearsClick [Yes] or [Continue].
3Click [Start] in [Auto Shutdown Tool].
Auto Shutdown
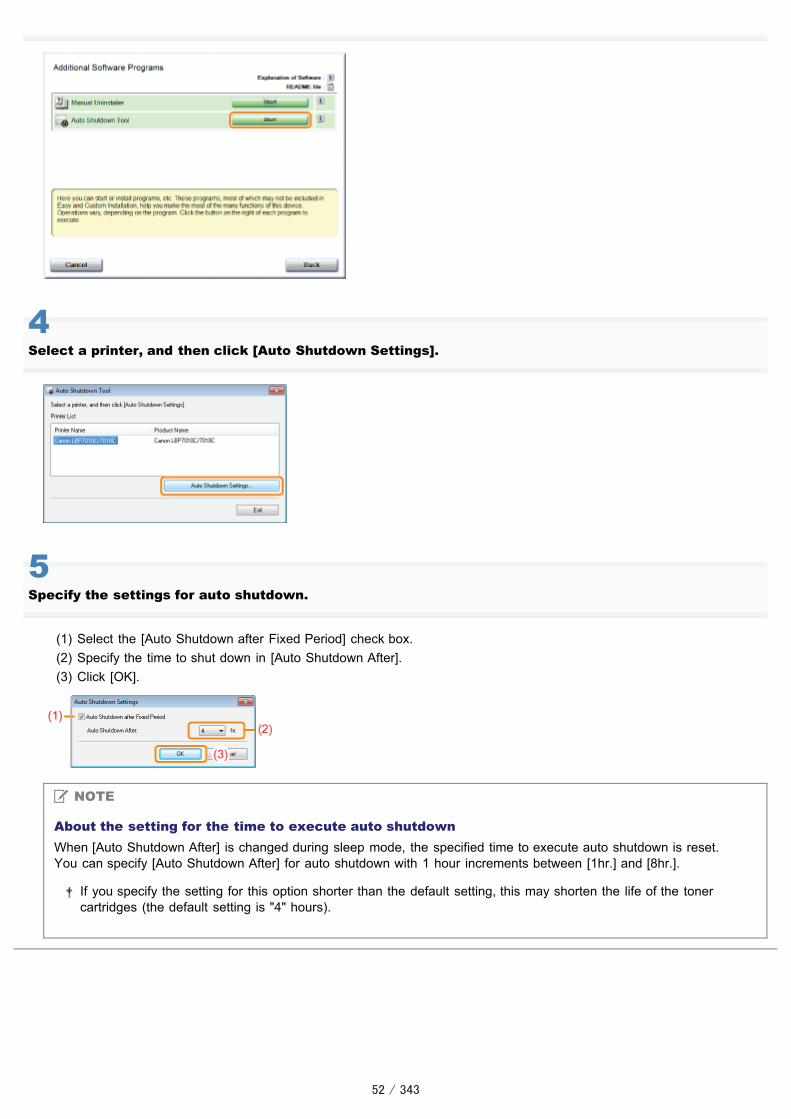
4Select a printer, and then click [Auto Shutdown Settings].
5Specify the settings for auto shutdown.
(1) Select the [Auto Shutdown after Fixed Period] check box.(2) Specify the time to shut down in [Auto Shutdown After].(3) Click [OK].
NOTE
About the setting for the time to execute auto shutdownWhen [Auto Shutdown After] is changed during sleep mode, the specified time to execute auto shutdown is reset.You can specify [Auto Shutdown After] for auto shutdown with 1 hour increments between [1hr.] and [8hr.].
If you specify the setting for this option shorter than the default setting, this may shorten the life of the tonercartridges (the default setting is "4" hours).
019A-01C
This printer consists of various electronic and precision optical parts. Read the following section so that you can handle theprinter properly.
See "Important Safety Instructions" also.
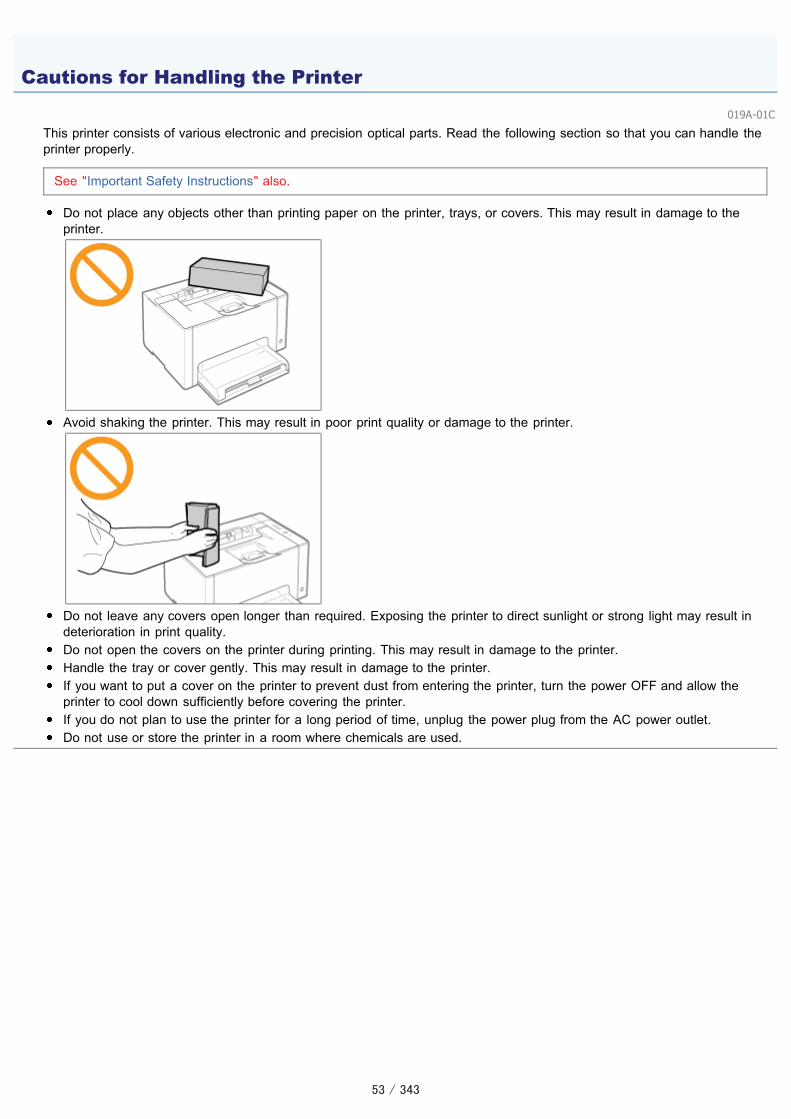
Do not place any objects other than printing paper on the printer, trays, or covers. This may result in damage to theprinter.
Avoid shaking the printer. This may result in poor print quality or damage to the printer.
Do not leave any covers open longer than required. Exposing the printer to direct sunlight or strong light may result indeterioration in print quality.Do not open the covers on the printer during printing. This may result in damage to the printer.Handle the tray or cover gently. This may result in damage to the printer.If you want to put a cover on the printer to prevent dust from entering the printer, turn the power OFF and allow theprinter to cool down sufficiently before covering the printer.If you do not plan to use the printer for a long period of time, unplug the power plug from the AC power outlet.Do not use or store the printer in a room where chemicals are used.
Cautions for Handling the Printer
019A-01E
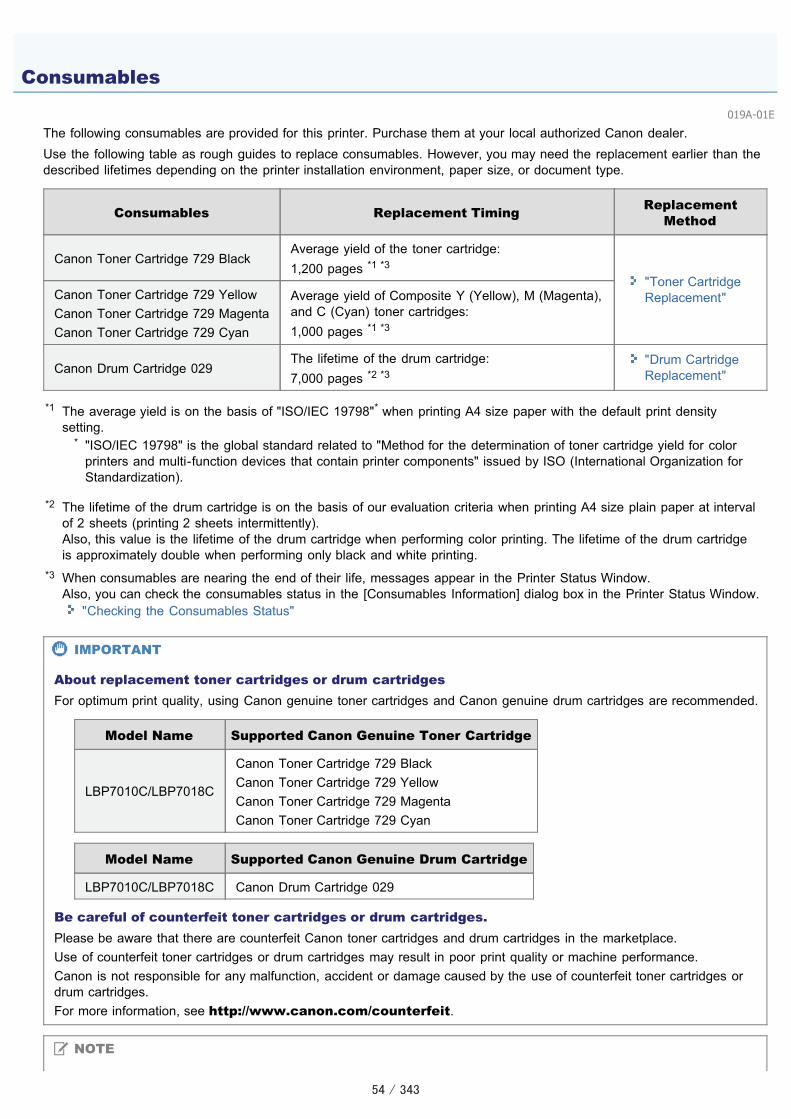
The following consumables are provided for this printer. Purchase them at your local authorized Canon dealer.Use the following table as rough guides to replace consumables. However, you may need the replacement earlier than thedescribed lifetimes depending on the printer installation environment, paper size, or document type.
Consumables Replacement Timing ReplacementMethod
Canon Toner Cartridge 729 BlackAverage yield of the toner cartridge:1,200 pages *1 *3
"Toner CartridgeReplacement"Canon Toner Cartridge 729 Yellow
Canon Toner Cartridge 729 MagentaCanon Toner Cartridge 729 Cyan
Average yield of Composite Y (Yellow), M (Magenta),and C (Cyan) toner cartridges:1,000 pages *1 *3
Canon Drum Cartridge 029The lifetime of the drum cartridge:7,000 pages *2 *3
"Drum CartridgeReplacement"
*1 The average yield is on the basis of "ISO/IEC 19798"* when printing A4 size paper with the default print densitysetting.
* "ISO/IEC 19798" is the global standard related to "Method for the determination of toner cartridge yield for colorprinters and multi-function devices that contain printer components" issued by ISO (International Organization forStandardization).
*2 The lifetime of the drum cartridge is on the basis of our evaluation criteria when printing A4 size plain paper at intervalof 2 sheets (printing 2 sheets intermittently).Also, this value is the lifetime of the drum cartridge when performing color printing. The lifetime of the drum cartridgeis approximately double when performing only black and white printing.
*3 When consumables are nearing the end of their life, messages appear in the Printer Status Window.Also, you can check the consumables status in the [Consumables Information] dialog box in the Printer Status Window.
"Checking the Consumables Status"
IMPORTANT
About replacement toner cartridges or drum cartridgesFor optimum print quality, using Canon genuine toner cartridges and Canon genuine drum cartridges are recommended.
Model Name Supported Canon Genuine Toner Cartridge
LBP7010C/LBP7018C
Canon Toner Cartridge 729 BlackCanon Toner Cartridge 729 YellowCanon Toner Cartridge 729 MagentaCanon Toner Cartridge 729 Cyan
Model Name Supported Canon Genuine Drum Cartridge
LBP7010C/LBP7018C Canon Drum Cartridge 029
Be careful of counterfeit toner cartridges or drum cartridges.Please be aware that there are counterfeit Canon toner cartridges and drum cartridges in the marketplace.Use of counterfeit toner cartridges or drum cartridges may result in poor print quality or machine performance.Canon is not responsible for any malfunction, accident or damage caused by the use of counterfeit toner cartridges ordrum cartridges.For more information, see http://www.canon.com/counterfeit.
NOTE
Consumables

Toner, Toner Cartridge, and Drum Cartridge AvailabilityToner cartridge and drum cartridge for this machine will be available for at least seven (7) years (or any such longerperiod as required by applicable laws) after production of this machine model has been discontinued.

019A-074
You can check the current consumables status in the [Consumables Information] dialog box in the Printer Status Window.
For details on the Printer Status Window, see "Printer Status Window."
(1) [Toner Cartridge Information]You can check the status of the toner cartridges of each color.
Status Bar(Example: Black)
Message Status Solution
Available Continue using as normal.
ReplacementNeededSoon
The toner cartridge is nearingthe end of its life.
Have ready a replacementtoner cartridge.We recommend that youreplace the toner cartridgebefore printing a large amountof data.
ReplaceCartridge
The toner cartridge has reachedthe end of its life.
Replace the toner cartridge.Print quality cannot beguaranteed due to the tonercartridge reaching the end of itslife and so on.
InsertCartridge
The toner cartridge is notinstalled.Wrong color toner cartridge isinstalled.
Install the toner cartridgeproperly.
(2) [Drum Cartridge Information]You can check the status of the drum cartridge.
Message Status Solution
Available Continue using as normal.
ReplacementNeeded Soon
The drum cartridge is nearing the endof its life.
Have ready a replacement drumcartridge.We recommend that you replace thedrum cartridge before printing a largeamount of data.
Replace CartridgePrint quality cannot be guaranteed dueto a drum cartridge reaching the endof its life.
Replace the drum cartridge.
Insert Cartridge The drum cartridge is not installed. Install the drum cartridge properly.
Checking the Consumables Status

NOTE
Replacement procedures for the toner cartridges or drum cartridge"Toner Cartridge Replacement""Drum Cartridge Replacement"

019A-01F
Toner Cartridge Replacement
Replacing the Toner Cartridge
Storing Toner Cartridges
Drum Cartridge Replacement
Replacing the Drum Cartridge
Storing the Drum Cartridge
Moving the Printer
Cleaning and Maintaining the Printer
Adjusting Color (Calibration)
Cleaning the Fixing Roller of the Printer
Cleaning the Photosensitive Drum of the Printer
Cleaning the Outside of the Printer
Location of the Serial Number
Maintenance

019A-01H
Toner cartridges are consumable products. When the toner cartridges are nearing the end of their life, a message willappear in the Printer Status Window. Follow the directions in the message.
For details on the yield of the toner cartridges or replacement toner cartridges, see "Consumables."
Message Solution Replacement Method
Have ready the replacement tonercartridges of the displayed colors.We recommend that you replace thetoner cartridge before printing a largeamount of data.
Move the toner cartridges of thedisplayed color to thereplacement position, and thenreplace them.
"Moving Toner Cartridgesto Replacement PositionManually""Replacing the TonerCartridge"
Replace the toner cartridges of thedisplayed colors.
You can continue printing as is,however, as this may result indamage to the printer.
Replace the toner cartridges of thedisplayed colors.
You can continue printing as is,however, print quality maydeteriorate.
Replace the toner cartridges of thedisplayed colors.
You can continue printing as is by
Toner Cartridge Replacement

clicking [ ] (Resolve Error),however, as this may result indamage to the printer.
"Replacing the TonerCartridge"*3
Replace the toner cartridges of thedisplayed colors.
You can continue printing as is byclicking [ ] (Resolve Error),however, print quality maydeteriorate.
*1 <Toner Colors> displays the colors of the toner cartridges targeted for messages. (Multiple colors of the tonercartridges may be displayed.)
*2 <Operable Toner Slot Color> displays the color of the toner cartridge at the replacement position.*3 The toner cartridges of the displayed colors move to the replacement position automatically.
(If the multiple colors of the toner cartridges are displayed, replace the toner cartridge moved to the replacementposition first, and close the top cover, the next color of the toner cartridge moves to the replacement positionautomatically.)
<In cases such as where you do not immediately replace the toner cartridge with a replacementtoner cartridge after purchasing it>Pay attention to the points described in the following section to store it.
"Storing Toner Cartridges"

019A-01J
See "Important Safety Instructions" and "Storing Toner Cartridges" also.
IMPORTANT
About replacement toner cartridgesFor optimum print quality, using Canon genuine toner cartridges is recommended.
Model Name Supported Canon Genuine Toner Cartridge
LBP7010C/LBP7018C
Canon Toner Cartridge 729 BlackCanon Toner Cartridge 729 YellowCanon Toner Cartridge 729 MagentaCanon Toner Cartridge 729 Cyan
Be careful of counterfeit toner cartridges.Please be aware that there are counterfeit Canon toner cartridges in the marketplace.Use of counterfeit toner cartridge may result in poor print quality or machine performance.Canon is not responsible for any malfunction, accident or damage caused by the use of counterfeit toner cartridge.For more information, see http://www.canon.com/counterfeit.
Hold the toner cartridge properly.When handling the toner cartridge, hold it properly as shown in the figure. Do not place it vertically or upside-down.
Do not touch the electrical contacts (A), the toner cartridge memory (B), or the development roller(C).If you touch the electrical contacts (A) or the toner cartridge memory (B), this may result in damage to the cartridge.Also, print quality may deteriorate if you touch the development roller (C).
Do not touch the high-voltage contacts (D) or the photosensitive drum (E).If you touch the high-voltage contacts (D), this may result in damage to the printer.Also, print quality may deteriorate if you touch or damage the photosensitive drum (E). Do not touch with your hands.
Attention (Toner Cartridge)

Other precautionsDo not expose the toner cartridges to direct sunlight or strong light.Do not attempt to disassemble or modify the toner cartridges.Condensation (water droplets on the inside or outside) may form on the toner cartridges when they are brought intoan environment with a sudden change in temperature or humidity.When moving a new toner cartridge to a location with change in temperature, leave the cartridge in the protectivebag at the new location for two or more hours to allow it to adjust to the new temperature.Do not leave the top cover open for a long time.Keep the toner cartridges away from products that generate magnetic waves, such as a computer or computerdisplay.
NOTE
About the packing materialsThe packing materials may be changed in form or placement, or may be added or removed without notice.

019A-01L
You can check the current toner cartridges status of each color in the [Consumables Information] dialog box in thePrinter Status Window.
"Checking the Consumables Status"
When the toner cartridges have reached the end of their life (when an error message is displayed in the Printer StatusWindow), the toner cartridges of the colors have reached end of their life are automatically moved to the replacementposition.If you want to replace the toner cartridges such as before the toner cartridges have reached the end of their life, youneed to manually move the toner cartridges of the colors you want to replace to the replacement position.
"Moving Toner Cartridges to Replacement Position Manually"
Before replacing the toner cartridges, see "Attention (Toner Cartridge)."
1Close the auxiliary tray.
2Open the top cover.
3Remove the toner cartridge.
Replacing the Toner Cartridge

4Check the color at the replacement position.
If the color at the replacement position is not the one you want to replaceInstall the removed toner cartridge, close the top cover, and then manually move the toner cartridge of the color youwant to replace to the replacement position. "Moving Toner Cartridges to Replacement Position Manually"
5Take out the new toner cartridge from the protective bag.
You can open the protective bag with your hands from the notch.
Keep the protective bag. Do not discard it. You will need it when you remove the toner cartridge for printermaintenance or other purposes.
6Shake the toner cartridge five or six times as shown in the figure to evenly distribute the toner insidethe cartridge.

7Place the toner cartridge on a flat surface.
8Lift the tab, and then pull out the sealing tape (approx. 50 cm).
IMPORTANT
Precautions when pulling out the sealing tapeDo not pull the sealing tape diagonally, upward, or downward. If the tape is severed, this may become difficult topull out completely.
If the sealing tape stops at midpoint, pull it out of the toner cartridge completely. If any tape remains in the tonercartridge, this may result in poor print quality.Dispose of the removed sealing tape according to local regulations.
9Remove the protective cover.
Keep the protective cover. Do not discard it. You will need it when you remove the toner cartridge for printermaintenance or other purposes.

10Install the toner cartridge.
Install the toner cartridges while aligning (A) on both sides of the toner cartridges with the toner cartridge guides inside theprinter.
11Close the top cover.

019A-075
This section describes the procedure for moving the toner cartridges to the replacement position by using the Printer StatusWindow.
You cannot move the toner cartridges to the replacement position such as when the printer is busy printing, preparingto print, or operating.Move the toner cartridges to the replacement position when the printer stops operating.
NOTE
When moving the toner cartridges to the replacement position by using the [ ] (Paper) key onthe printerYou can also move the toner cartridges by using the [ ] (Paper) key on the printer.
"Moving Toner Cartridges by Using Paper Key on the Printer"
1Click [ ] displayed in the task tray, and then select a printer name.
2����������� ����������������� � ���������������� !��#���������
3Click the button for the colors you want to move to the replacement position.
� The toner cartridge of the color you clicked moves to the replacement position.
Do not open the top cover while the toner cartridges are moving.
Moving Toner Cartridges to Replacement Position Manually

Replace the toner cartridges after moving is complete. "Replacing the Toner Cartridge"
4Click [Finish Replacing] after the toner cartridge replacement is complete.

019A-076
You can move the toner cartridges to the replacement position by entering the printer to the toner cartridge replacementmode * using the [ ] (Paper) key on the printer.
* It is a state where you can move the toner cartridges to the replacement position manually.
You cannot move the toner cartridges to the replacement position such as when the printer is busy printing, preparingto print, or operating.Move the toner cartridges to the replacement position when the printer stops operating.
1Make sure that the (Paper) indicator is off.
When the (Paper) indicator is onProceed to Step 3 because the printer is already in the toner cartridge replacement mode.
When the (Paper) indicator is blinking "Indicators on the Printer Are On/Blinking"
2Press and hold the [ ] (Paper) key (for 2 seconds).
� The printer enters to the toner cartridge replacement mode and the Toner indicator of the color at the replacementposition is blinking.
Moving Toner Cartridges by Using Paper Key on the Printer
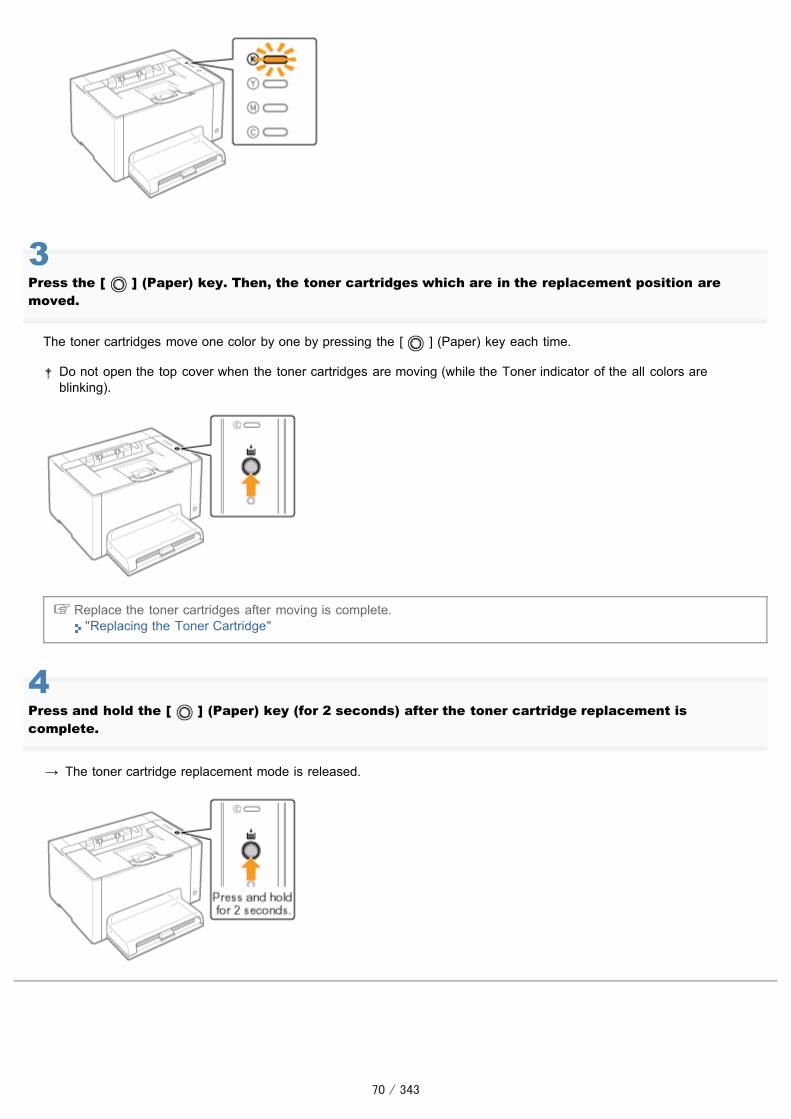
3Press the [ ] (Paper) key. Then, the toner cartridges which are in the replacement position aremoved.
The toner cartridges move one color by one by pressing the [ ] (Paper) key each time.
Do not open the top cover when the toner cartridges are moving (while the Toner indicator of the all colors areblinking).
Replace the toner cartridges after moving is complete. "Replacing the Toner Cartridge"
4Press and hold the [ ] (Paper) key (for 2 seconds) after the toner cartridge replacement iscomplete.
� The toner cartridge replacement mode is released.

019A-01R
Be careful of the following points when storing a new toner cartridge or handling a toner cartridge that was taken out of theprinter for maintenance or moving the printer.
IMPORTANT
Precautions when storing toner cartridgesTo use toner cartridges in a safe and trouble-free manner, store them in a place that fulfills the following conditions.
Do not store toner cartridges in a location exposed to direct sunlight.Do not store toner cartridges in a location subject to high temperature or humidity or in a location with dramaticchanges in temperature or humidity.
Storage temperature range: 0 to 35 °CStorage humidity range: 35 to 85% RH (no condensation)
Do not store toner cartridges in a place where corrosive gases, such as ammonia, are generated, or where aconsiderable amount of salt is contained in the air, or where there is a lot of dust.Keep toner cartridges out of the reach of small children.
Store toner cartridges in the same orientation as when they are installed in the printer.Do not store toner cartridges vertically or upside-down.
When removing the toner cartridges which are being used from the printerImmediately attach the protective cover (A) to the toner cartridges and place them into the original protective bag, orwrap them with thick cloth.
About a new toner cartridgeDo not take a new toner cartridge out of the protective bag until it is ready to be used.
NOTE
About condensationEven within the storable humidity range, water droplets may develop both inside and outside toner cartridges due to thedifference in temperature. The formation of water droplets is called condensation.Condensation will adversely affect the quality of toner cartridges.
Storing Toner Cartridges

019A-077
Drum cartridges are consumable products. When a drum cartridge is nearing the end of its life, a message will appear inthe Printer Status Window. Follow the directions in the message.
For details on the lifetime of the drum cartridge or a replacement drum cartridge, see "Consumables."
Message Solution Replacement Method
Have ready a replacement drum cartridge.We recommend that you replace the drumcartridge before printing a large amount of data.
"Replacing theDrum Cartridge"
Replace the drum cartridge.
You can continue printing as is, however,print quality may deteriorate.
Replace the drum cartridge.
You can continue printing as is by clicking[ ] (Resolve Error), however, printquality may deteriorate.
<Such as when you do not immediately replace the drum cartridge with a replacement drumcartridge after purchasing it>Pay attention to the points described in the following section to store it.
"Storing the Drum Cartridge"
Drum Cartridge Replacement
019A-078
See "Important Safety Instructions" or "Storing the Drum Cartridge" also.
IMPORTANT
About replacement drum cartridgesFor optimum print quality, using Canon genuine drum cartridges is recommended.
Model Name Supported Canon Genuine Drum Cartridge
LBP7010C/LBP7018C Canon Drum Cartridge 029
Be careful of counterfeit drum cartridges.Please be aware that there are counterfeit Canon drum cartridges in the marketplace.Use of counterfeit drum cartridges may result in poor print quality or machine performance.Canon is not responsible for any malfunction, accident or damage caused by the use of counterfeit drum cartridges.For more information, see http://www.canon.com/counterfeit.
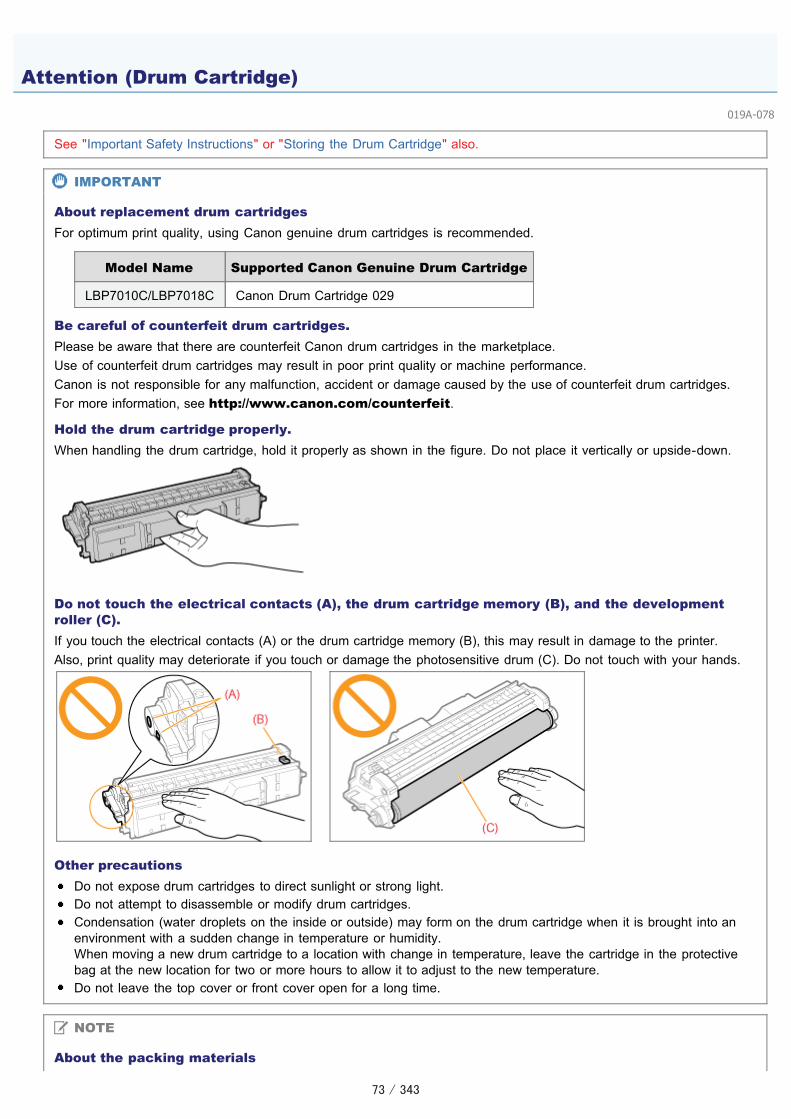
Hold the drum cartridge properly.When handling the drum cartridge, hold it properly as shown in the figure. Do not place it vertically or upside-down.
Do not touch the electrical contacts (A), the drum cartridge memory (B), and the developmentroller (C).If you touch the electrical contacts (A) or the drum cartridge memory (B), this may result in damage to the printer.Also, print quality may deteriorate if you touch or damage the photosensitive drum (C). Do not touch with your hands.
Other precautionsDo not expose drum cartridges to direct sunlight or strong light.Do not attempt to disassemble or modify drum cartridges.Condensation (water droplets on the inside or outside) may form on the drum cartridge when it is brought into anenvironment with a sudden change in temperature or humidity.When moving a new drum cartridge to a location with change in temperature, leave the cartridge in the protectivebag at the new location for two or more hours to allow it to adjust to the new temperature.Do not leave the top cover or front cover open for a long time.
NOTE
About the packing materials
Attention (Drum Cartridge)

The packing materials may be changed in form or placement, or may be added or removed without notice.

019A-079
You can check the current drum cartridge status in the [Consumables Information] dialog box in the Printer StatusWindow.
"Checking the Consumables Status"
Before replacing the drum cartridge, see "Attention (Drum Cartridge)."
1Remove the tray cover.
2Remove the paper loaded in the multi-purpose tray.
3Close the auxiliary tray.
Replacing the Drum Cartridge

4Open the top cover.
5Hold the tab (A), and then open the front cover.
6Lift the lock release lever on both sides.
7Remove the drum cartridge.

8Take out the new drum cartridge from the protective bag.
You can open the protective bag with your hands from the notch.
Keep the protective bag. Do not discard it. You will need it when you remove the drum cartridge for printermaintenance or other purposes.
9Remove the protective cover.
Keep the protective cover. Do not discard it. You will need it when you remove the drum cartridge for printermaintenance or other purposes.
10Install the drum cartridge.
Push the drum cartridge into the printer firmly until it touches the back of the printer while aligning (A) on both sides of thedrum cartridge with the drum cartridge guides inside the printer.

11Press down the lock release lever on both sides.
12Close the front cover.
13Close the top cover.

019A-07A
Be careful of the following points when storing a new drum cartridge or handling a drum cartridge that was taken out of theprinter for maintenance or moving the printer.
IMPORTANT
Precautions when storing drum cartridgeTo use drum cartridges in a safe and trouble-free manner, store it in a place that fulfils the following conditions.
Do not store drum cartridges in a location exposed to direct sunlight.Do not store drum cartridges in a location subject to high temperature or humidity or in a location with dramaticchanges in temperature or humidity.
Storage temperature range: 0 to 35 °CStorage humidity range: 35 to 85% RH (no condensation)
Do not store drum cartridges in a place where corrosive gases, such as ammonia, are generated, or where aconsiderable amount of salt is contained in the air, or where there is a lot of dust.Keep drum cartridges out of the reach of small children.
Store drum cartridges in the same orientation as when they are installed in the printer.Do not store drum cartridges vertically or upside-down.
When removing the drum cartridge which is being used from the printerImmediately attach the protective cover (A) to the drum cartridge and place it into the original protective bag, or wrap itwith thick cloth.
About a new drum cartridgeDo not take a new drum cartridge out of the protective bag until it is ready to be used.
NOTE
About condensationEven within the storable humidity range, water droplets may develop both inside and outside drum cartridges due to thedifference in temperature. The formation of water droplets is called condensation.Condensation will adversely affect the quality of drum cartridges.
Storing the Drum Cartridge

019A-01S
When changing the location of the printer or moving the printer for maintenance, be sure to perform the followingprocedure.
For details on the installation site, see "Printer Installation."
See "Important Safety Instructions" also.
1Turn the printer OFF, then disconnect the cables or cords from the printer.
<How to disconnect the cable or cord>
USB cable(2) Turn the computer off.(3) Disconnect the cable from the printer.
Power cord(4) Disconnect the power plug from the AC power outlet.(5) Disconnect the cord from the printer.
2Close the auxiliary tray, and then remove the tray cover and multi-purpose tray.
3Carry the printer unit to the installation site.
Moving the Printer

Carry the printer by holding it by the lift handles from the front side.
4Install the multi-purpose tray and tray cover.
5Connect the removed cable or cord.
<How to connect the cable or cord>
USB cable Connect to the USB connector on the printer.
Power cord(1) Plug the power cord to the power socket on the printer.(2) Plug the power plug into the AC power outlet.
When transporting the printer unit
To prevent damage to the printer during transport, perform the following.Remove the toner cartridges.
See "Storing Toner Cartridges" also.
Securely pack the printer in the original box with packing materials in the box.
If the original box and packing materials in the box are not available, find an appropriate box along with packingmaterials and pack the printer and the parts appropriately.

019A-01U
Adjusting Color (Calibration)Perform calibration when the colors have changed and the data is not printed in the correct colors (specified colors).
Cleaning the Fixing Roller of the PrinterClean the fixing roller of the printer when you notice the following symptoms.
The front or back of the printed paper has smudge marks.
The message <Cleaning Required> is displayed in the Printer Status Window.
Cleaning the Photosensitive Drum of the PrinterClean the photosensitive drum of the printer when you notice the following symptoms.
Short white streaks (lines) appear at equal distance on the images (especially in a high-humidity environment).Long black streaks (lines) appear on the images (especially in a low temperature environment).Short black streaks (lines), smudge marks, or white points appear at equal distance on the images (especially ina high temperature environment).
Cleaning and Maintaining the Printer

Cleaning the Outside of the PrinterPeriodically clean the outer surfaces and ventilation slots of the printer to maintain the optimal print quality.

019A-07C
This section describes the procedure for performing calibration manually.
IMPORTANT
Precautions when performing calibrationIf you perform calibration frequently, this may affect the life of the toner cartridges or drum cartridge.Perform calibration after making sure that the toner remains in the toner cartridges.
You can check the current toner cartridges status of each color in the [Consumables Information] dialog box inthe Printer Status Window.
"Checking the Consumables Status"
If you perform calibration in the state where the toner cartridges have reached the end of their life, calibrationmay not finish properly. In this case, replace the toner cartridges, and then perform calibration again.
"Toner Cartridge Replacement"
NOTE
Perform calibration at the designated time or immediately after the printer is turned ON.You can set the printer to automatically perform calibration at the designated time everyday or to perform calibrationimmediately after the printer is turned ON.
"Auto Calibration Settings"
1Click [ ] displayed in the task tray, and then select a printer name.
2����������� ����������������� � ��������� $��� ����
3Click [OK].
Adjusting Color (Calibration)

NOTE
Calibration timeIt takes approximately 57 seconds.

019A-07E
This section describes the procedure for performing calibration automatically.
NOTE
If calibration is not automatically performedWhen the time between turning the printer OFF once and ON again is less than 8 hours, calibration is not performed.However, calibration may be performed even if the time is less than 8 hours depending on your environment.
1Click [ ] displayed in the task tray, and then select a printer name.
2����������� ����������������� ����� ���������� $��� ������ �����
3Specify the auto calibration settings.
When performing calibration automatically at the designated time everyday
(1) Select the [Use Periodical Calibration Timer] check box.(2) Specify the time to perform calibration in [Time].
If calibration is not automatically performedWhen the printer is under the following circumstances, calibration is not performed even if [Use Periodical CalibrationTimer] is specified.
When the printer is printing, or an error has occurred (Calibration is performed after the job is completed or theerror is resolved.)When the time specified in [Time] has come within 30 minutes after performing calibration last time
Auto Calibration Settings
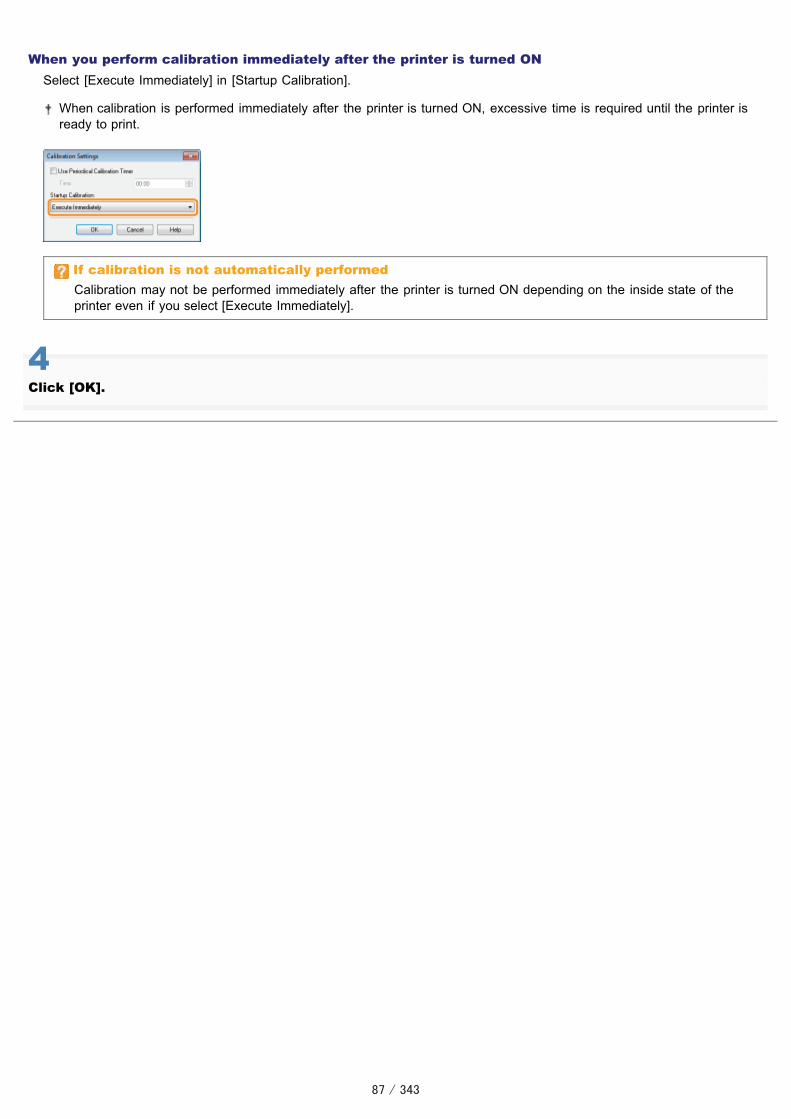
When you perform calibration immediately after the printer is turned ONSelect [Execute Immediately] in [Startup Calibration].
When calibration is performed immediately after the printer is turned ON, excessive time is required until the printer isready to print.
If calibration is not automatically performedCalibration may not be performed immediately after the printer is turned ON depending on the inside state of theprinter even if you select [Execute Immediately].
4Click [OK].

019A-01W
A4 plain paper is required to clean the fixing roller. Have A4 plain paper ready.
1Load A4 plain paper in the multi-purpose tray.
"Loading Paper"
NOTE
Open the auxiliary tray before cleaning.
2Click [ ] in the Windows task tray, and then select the printer name.
3����������� ����������������� � ���������� ����
4Select [Cleaning Type].
(1) Select [Fixing Unit Cleaning 1].
Cleaning the Fixing Roller of the Printer

(2) Click [OK].
� The paper is fed, and the printer starts cleaning the fixing roller.
When the printed paper has smudge marks even if [Fixing Unit Cleaning 1] is performedPerform [Fixing Unit Cleaning 2]. "Performing [Fixing Unit Cleaning 2]"
NOTE
Cleaning timeIt takes approximately 130 seconds.
Cleaning the fixing roller cannot be canceled. Please wait until it is completed.(The cleaning is finished when the paper is output completely.)

019A-07F
A4 plain paper is required to perform [Fixing Unit Cleaning 2]. Have A4 plain paper ready.
1Load A4 plain paper in the multi-purpose tray.
"Loading Paper"
NOTE
Open the auxiliary tray before cleaning.
2Click [ ] displayed in the task tray, and then select a printer name.
3����������� ����������������� � ���������� ����
4Select [Cleaning Type].
(1) Select [Fixing Unit Cleaning 2].
Performing [Fixing Unit Cleaning 2]

(2) Click [OK]. Then, the cleaning page is printed.
Next, clean the fixing roller using the printed cleaning page.
5If any paper is loaded in the multi-purpose tray, remove it.
6Load the cleaning page in the multi-purpose tray with the printed side facing down.
7Press the [ ] (Paper) key.
� The cleaning page is fed into the printer, and the printer starts cleaning the fixing roller.
NOTE
Cleaning timeIt takes approximately 90 seconds.
Cleaning the fixing roller cannot be canceled. Please wait until it is completed.(The cleaning is finished when the paper is output completely.)


019A-07H
1Click [ ] displayed in the task tray, and then select a printer name.
2����������� ����������������� � ���������� ����
3Select [Cleaning Type].
(1) Select [Drum Cleaning 1] or [Drum Cleaning 2] depending on the symptoms.(2) Click [OK].
� The message <Cleaning> appears in the Printer Status Window, and the printer starts cleaning thephotosensitive drum.
[Drum Cleaning 1] Select when short white streaks (lines) appear at equal distance on the images (especially in ahigh-humidity environment).
[Drum Cleaning 2]
Select when the following circumstances occur.Long black streaks (lines) appear on the images (especially in a low temperatureenvironment).Short black streaks (lines), smudge marks, or white points appear at equal distance on theimages (especially in a high temperature environment).
Cleaning the Photosensitive Drum of the Printer

NOTE
Cleaning time[Drum Cleaning 1]: It takes approximately 93 seconds.[Drum Cleaning 2]: It takes approximately 125 seconds.
Cleaning the photosensitive drum cannot be canceled. Please wait until it is completed.

019A-01X
Before cleaning the outside of the printer, see "Attention (Cleaning)."
1Turn the printer OFF, then disconnect the cables or cords from the printer.
<How to disconnect the cable or cord>
USB cable(2) Turn the computer off.(3) Disconnect the cable from the printer.
Power cord(4) Disconnect the power plug from the AC power outlet.(5) Disconnect the cord from the printer.
2Firmly wring a soft cloth dampened with water or a mild detergent diluted with water, and wipe offthe dirt.
3After wiping off the dirt, wipe the printer with a dry cloth.
4When the printer is completely dry, connect the removed cable or cord.
Cleaning the Outside of the Printer

<How to connect the cable or cord>
USB cable Connect to the USB connector on the printer.
Power cord(1) Plug the power cord to the power socket on the printer.(2) Plug the power plug into the AC power outlet.

019A-01Y
See "Important Safety Instructions" also.
IMPORTANT
Precautions when cleaning the outside of the printerDo not use a cleaning agent other than water or a mild detergent diluted with water, as this may deform or crackthe plastic materials in the printer.When using a mild detergent, be sure to dilute it with water.Also, if you use a mild detergent for cleaning, be sure to wipe away the detergent with a soft cloth dampened withwater.Grease or oil does not have to be applied to this printer. Do not apply grease or oil.
Attention (Cleaning)

019A-020
The serial number is required for receiving maintenance service.You can find the serial number at the location shown in the following figure.
Do not remove the labels on which the serial number is indicated.
Rear of the printer
Outside view of the packaging box
Location of the Serial Number

019A-021
When installing the printer, perform the following procedures.
Before installing the printer, see "Attention (Printer Installation)."
1
Checking beforeInstalling the Printer
Confirming theSuppliedAccessoriesChecking theInstallation Site
"Confirming the Supplied Accessories and Checking the Installation Site"
2 Removing thePacking Materials "Removing the Packing Materials"
3
Installing the PrinterCarrying the Printerto the InstallationSiteConnecting thePower Cord
"Installing the Printer"
4 Loading Paper "Loading Paper"
5 Installing the PrinterDriver "Installing the Printer Driver"
6 Checking thePrinting Operation
Check the operations by Configuration Page Print."Printing Configuration Page Print"
Printer Installation

019A-022
See "Important Safety Instructions" also.
IMPORTANT
Protecting the printer from condensationTo prevent condensation from forming inside the printer in the following cases, adjust the printer to the ambienttemperature and humidity for at least two hours before use.
When the room where the printer is installed is heated rapidlyWhen the printer is moved from a cool or dry location to a hot or humid location
If water droplets (condensation) form inside the printer, this can result in paper jams or poor print quality.
When using an ultrasonic humidifierWhen you are using an ultrasonic humidifier, we therefore recommend that you use purified water or other water that isfree of impurities.If you use tap water or well water, impurities in the water will be dispersed through the air. This can be trapped insidethe printer, causing degradation in print quality.
Precautions for the power supplyUse an AC power outlet exclusively for the printer. Do not use the other sockets of the AC power outlet.Do not plug the power plug into the auxiliary outlet on a computer.Do not use the same AC power outlet for both the printer and any of the following equipment.
Copy machineAir conditionerShredderEquipment that consumes a large amount of electricityEquipment that generates electrical noise
The maximum power consumption of the printer is 868 W or less.Electrical noise or a dramatic drop in mains voltage may cause the printer or computer to operate incorrectly or losedata.
Do not install the printer in the following locations, as this may result in damage to the printer.A location subject to dramatic changes in temperature or humidityA location subject to condensationA poorly ventilated location (If you use the printer for a long time or to perform a large amount of printing in a poorly ventilated room, the ozoneor other odors generated by the printer may create an uncomfortable working environment. In addition, chemicalparticles are dispersed during printing. Therefore, it is important to provide adequate ventilation.)A location near equipment that generates magnetic or electromagnetic wavesA laboratory or location where chemical reactions occurA location exposed to salt air, corrosive gases, or toxic gasesA location, such as on a carpet or mat, that may warp from the weight of the printer or where the printer is liable tosink
Precautions when connecting the power cordDo not plug the power plug of the printer into an auxiliary outlet on a computer.One AC power outlet should be used exclusively for the printer.Do not connect this printer to an uninterruptible power source. This may cause printer malfunction or breakdown in the event of a power failure.
When turning ON the printer for the first time after the printer installationAlthough a sheet of blank paper may be output, this is not an error.
NOTE
About the consumables included with this printer
Attention (Printer Installation)

The replacement timing of the included consumables is as follows.
K (Black) Toner CartridgeAverage yield of the toner cartridge:550 pages *1
Y (Yellow) Toner CartridgeM (Magenta) Toner CartridgeC (Cyan) Toner Cartridge
Average yield of Composite Y (Yellow), M (Magenta), and C (Cyan) tonercartridges:500 pages *1
Drum CartridgeThe lifetime of the drum cartridge:7,000 pages *2
*1 The average yield is on the basis of "ISO/IEC 19798"* when printing A4 size paper with the default printdensity setting.* "ISO/IEC 19798" is the global standard related to "Method for the determination of toner cartridge yield for
color printers and multi-function devices that contain printer components" issued by ISO (InternationalOrganization for Standardization).
*2 The lifetime of the drum cartridge is on the basis of our evaluation criteria when printing A4 size plain paperat interval of 2 sheets (printing 2 sheets intermittently).Also, this value is the lifetime of the drum cartridge when performing color printing. The lifetime of the drumcartridge is approximately double when performing only black and white printing.
For purchasing consumables, see "Consumables."

019A-023
Confirming the Supplied Accessories
Make sure that all the supplied accessories are contained in the box before installing the printer.If an item is missing or damaged, please contact your local authorized Canon dealer.
NOTE
This printer includes two "User Software" CD-ROMs.You can use either CD-ROM.
About the USB cableThis printer does not come with a USB cable. Have an appropriate one available for the computer you are using.Use a USB cable with the following symbol.
About the Supplied ManualsThe manuals supplied with this printer consist of the following. Read these manuals according to your purpose and makefull use of this printer.
Manual Name Contents
Quick Setup Guide Explains the procedure for installing the printer.
e-ManualExplains all the operations of this printer, such as how to use the printer andtroubleshooting.(The contents of "Quick Setup Guide" are also included.)
Getting Started Guide
This is the simple manual (PDF format) written in the following languages.Arabic, Bulgarian, Croatian, Czech, Estonian, Greek, Hungarian, Latvian,Lithuanian, Persian, Portuguese, Romanian, Slovakian, Slovenian, Turkish,Ukrainian
To view the manual in PDF format, Adobe Reader/Adobe Acrobat Reader is required.If Adobe Reader/Adobe Acrobat Reader is not installed on your system, download it from the Adobe Systems
Confirming the Supplied Accessories and Checking the Installation Site

Incorporated Web site.
Checking the Installation Site
In order to use this printer in a safe and trouble-free manner, install the printer in a place that fulfills the followingconditions.
Temperature and Humidity Conditions
Temperature range 10 to 30°C (50 to 86°F)
Humidity range 20 to 80% RH (no condensation)
Power Supply Requirements220 to 240 V (±10%), 50/60 Hz (±2 Hz)
Installation RequirementsA location with sufficient space
Refer to the following dimensions of each part and ensure the installation space.
A location with good ventilationA location with a flat, even surfaceA location able to fully support the weight of the printer

019A-024
NOTE
Store the packing materials come up during unpacking.The box comes with when you purchased the printer and the packing materials in the box are required when transportingthe printer for relocation or maintenance.
About the packing materialsThe packing materials may be changed in form or placement, or may be added or removed without notice.
Remove all the orange tape if it is attached to the printer when performing the followingprocedure.
1Remove the protective sheet.
2Open the top cover.
3Remove the two plastic packing materials (orange) with tape inside the printer.
Removing the Packing Materials

4Remove the paper inside the printer.
5Close the top cover.
Check !
Checking if the packing materials are removedCheck that the following packing materials are completely removed.
Dispose of the left packing materials according to localregulations.
* Make sure that all the orange tape is completely removed.

Close the covers after you finish checking.
Next, install the printer. "Installing the Printer"

019A-025
Carrying the Printer to the Installation Site
1Carry the printer unit to the installation site.
Carry the printer by holding it by the lift handles from the front side.
2Install the multi-purpose tray.
3Install the tray cover.
Installing the Printer

Connecting the Power Cord
1Connect the power cord.
NOTE
The form of the supplied power cordThe form of the supplied power cord may differ from the one in the above illustration.
Next, perform the following procedures.
1 Load paper. "Loading Paper"
2 Install the printerdriver. "Installing the Printer Driver"
3 Check the printingoperation.
Check the operations by Configuration Page Print."Printing Configuration Page Print"

019A-026
Configuration Page Print shows the settings of the printer unit and other current printer information.
Configuration Page Print is designed to be printed on A4 paper. Be sure to use A4 paper.
1Load A4 paper in the multi-purpose tray.
"Loading Paper"
NOTE
Open the auxiliary tray before printing.
2Click [ ] in the Windows task tray, and then select the printer name.
3����������� ����������������� � ���������& ����� ���'���'� ����
4Click [OK] to print Configuration Page Print.
Printing Configuration Page Print

If Configuration Page Print is not printed "Printing Cannot Be Performed (USB Connection)" "Printing Cannot Be Performed (via the Print Server)"

019A-027
Installing the Printer Driver
Uninstalling the Printer Driver
Driver Installation
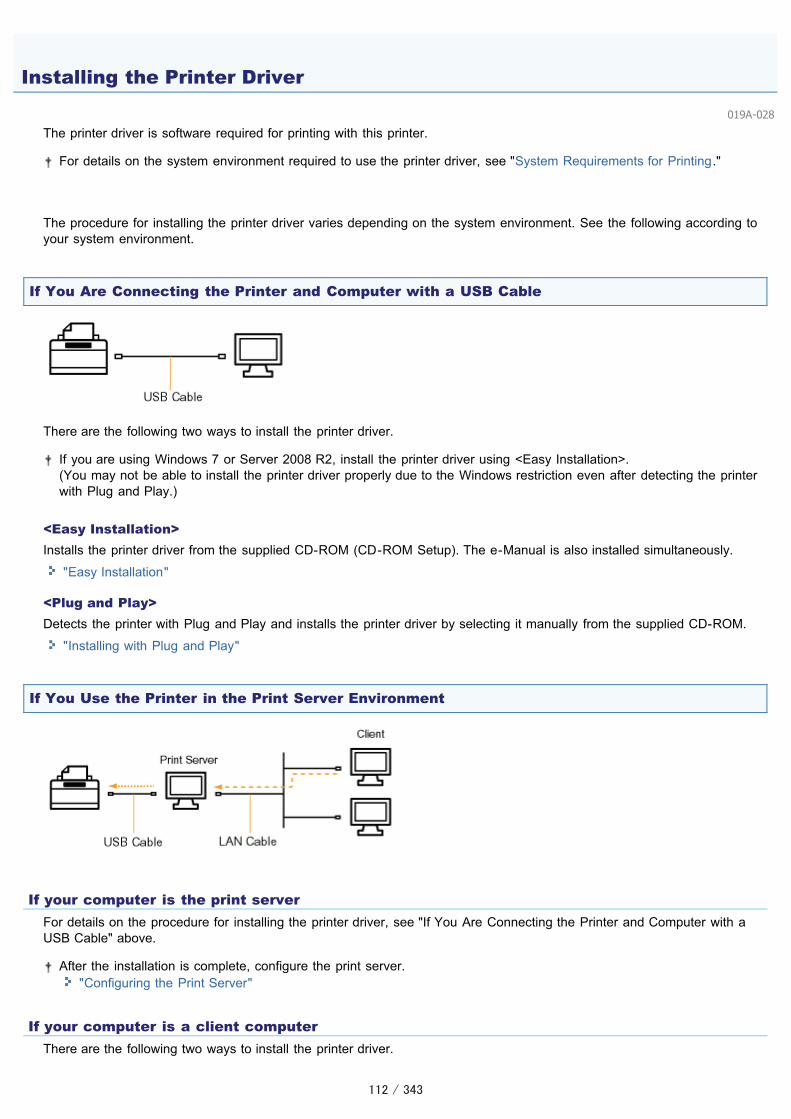
019A-028
The printer driver is software required for printing with this printer.
For details on the system environment required to use the printer driver, see "System Requirements for Printing."
The procedure for installing the printer driver varies depending on the system environment. See the following according toyour system environment.
If You Are Connecting the Printer and Computer with a USB Cable
There are the following two ways to install the printer driver.
If you are using Windows 7 or Server 2008 R2, install the printer driver using <Easy Installation>.(You may not be able to install the printer driver properly due to the Windows restriction even after detecting the printerwith Plug and Play.)
<Easy Installation>Installs the printer driver from the supplied CD-ROM (CD-ROM Setup). The e-Manual is also installed simultaneously.
"Easy Installation"
<Plug and Play>Detects the printer with Plug and Play and installs the printer driver by selecting it manually from the supplied CD-ROM.
"Installing with Plug and Play"
If You Use the Printer in the Print Server Environment
If your computer is the print serverFor details on the procedure for installing the printer driver, see "If You Are Connecting the Printer and Computer with aUSB Cable" above.
After the installation is complete, configure the print server."Configuring the Print Server"
If your computer is a client computerThere are the following two ways to install the printer driver.
Installing the Printer Driver

<Local Installation>You can install the printer driver using the supplied CD-ROM.
"Easy Installation"
<Download Installation>You can install the printer driver without using the supplied CD-ROM, but by downloading the printer driver from the printserver. There are the following two ways to download and install the printer driver.
"Installing from the Printer Folder""Installing from [Windows Explorer]"

019A-029
1Connect the USB cable.
"Connecting the Printer and Computer"
If the printer is connected to a client computer via the print server, the USB cable is not required.
2Turn the computer on, and then log on to Windows as a user with administrative rights.
If the automatic setup screen of Plug and Play appears (USB connection)Click [Cancel], turn OFF the printer, and then use this procedure to install the printer driver.
3Insert the supplied CD-ROM "User Software" into the CD-ROM drive of your computer.
4Click [Easy Installation].
Easy Installation

If the above screen does not appear "Basic Operations/Various Information for Windows"
If the [AutoPlay] dialog box appearsClick [Run AUTORUN.EXE].
If the [User Account Control] dialog box appearsClick [Yes] or [Continue].
5Click [Install].
6Read the contents of License Agreement, and then click [Yes].

7Click [Next].
The subsequent procedure varies depending on your environment. See the appropriate procedure according toyour environment. "Easy Installation (USB Connection)" "Easy Installation (via the Print Server)"

019A-02A
See "Important Safety Instructions" also.
IMPORTANT
Do not plug or unplug the USB cable while the printer or computer is ON.This may cause the printer to malfunction.
About unidirectional communication equipmentThe printer performs bi-directional communication. Operation of the printer when connected via unidirectionalcommunication equipment is not tested, and as a result, Canon cannot guarantee printer operation if the printer isconnected using unidirectional print servers, USB hubs or switching devices.
NOTE
About the USB cableThis printer does not come with a USB cable. Have an appropriate one available for the computer you are using.Use a USB cable with the following symbol.
1Make sure that the printer and computer are OFF.
2Connect the USB cable.
Flat end (A): Connects to a USB port on your computer.
Square end (B): Connects to the USB connector on this printer.
Do not turn the printer ON at this stage even if you want to install the printer driver.
Connecting the Printer and Computer

019A-02C
For details on the procedure before selecting an installation method (the procedure before Step 1), see "EasyInstallation."
1Select the method of installation.
(1) Select [Install with USB Connection].(2) Click [Next].
If a message that prompts you to restart the computer appearsRestart the computer and install the printer driver again.
2Click [Yes].
3When the following screen appears, turn the printer ON.
� The installation starts.
Easy Installation (USB Connection)
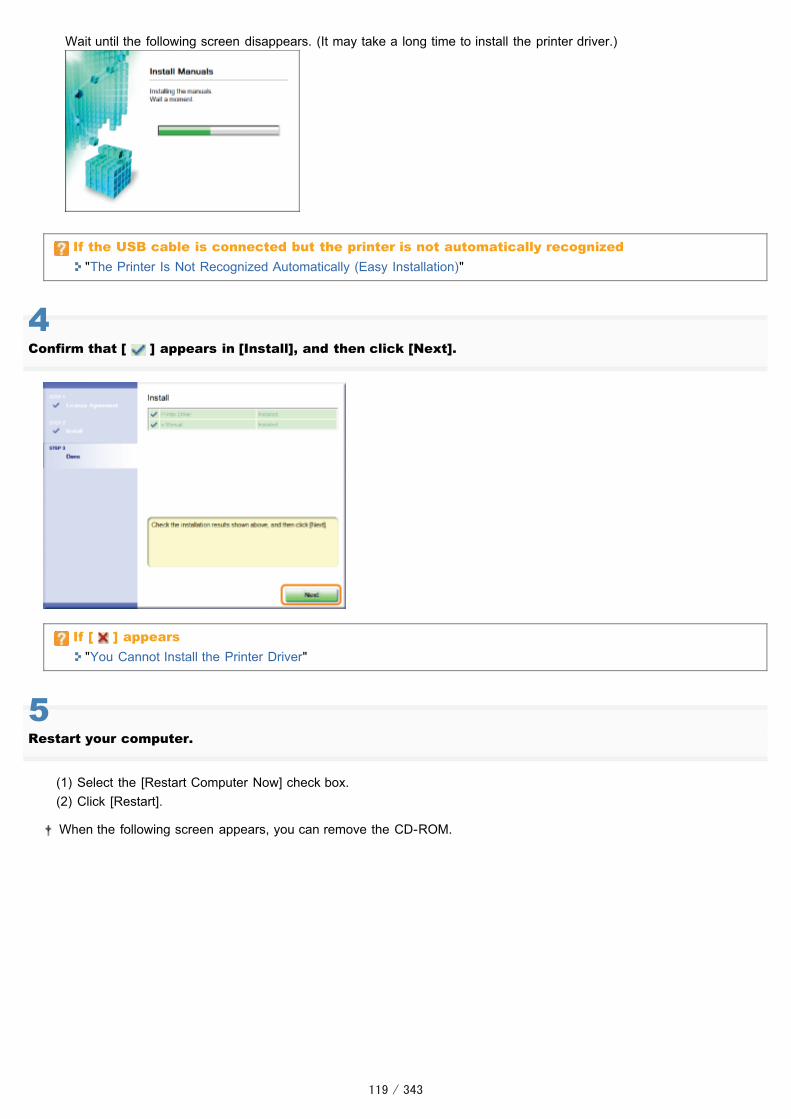
Wait until the following screen disappears. (It may take a long time to install the printer driver.)
If the USB cable is connected but the printer is not automatically recognized "The Printer Is Not Recognized Automatically (Easy Installation)"
4Confirm that [ ] appears in [Install], and then click [Next].
If [ ] appears "You Cannot Install the Printer Driver"
5Restart your computer.
(1) Select the [Restart Computer Now] check box.(2) Click [Restart].
When the following screen appears, you can remove the CD-ROM.
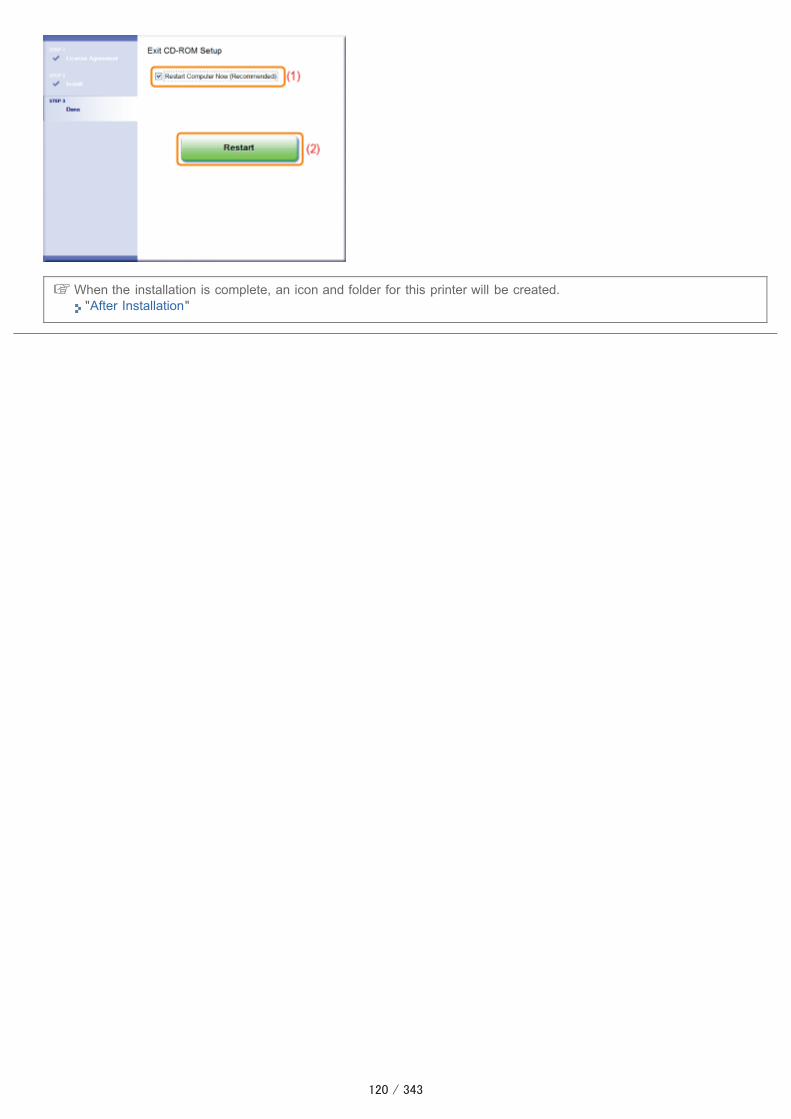
When the installation is complete, an icon and folder for this printer will be created. "After Installation"

019A-02E
For details on the procedure before selecting an installation method (the procedure before Step 1), see "EasyInstallation."
1Select the method of installation.
(1) Select [Manually Set Port to Install].(2) Click [Next].
2Click [Add Port].
3Select a port to be added.
(1) Select [Network].(2) Click [OK].
Easy Installation (via the Print Server)

4Select a shared printer.
(1) Select a shared printer on the print server.(2) Click [OK].
5Select whether or not to use the printer as the default printer.
(1) If you want to use the printer as the default printer, select the [Set as Default] check box.(2) Click [Next].
6Click [Start].

7Click [Yes].
� The installation starts.Wait until the following screen disappears. (It may take a long time to install the printer driver.)
If the [Printers] dialog box appearsClick [Install driver].
8Confirm that [ ] appears in [Install], and then click [Next].
If [ ] appears

"You Cannot Install the Printer Driver"
9Restart your computer.
(1) Select the [Restart Computer Now] check box.(2) Click [Restart].
When the following screen appears, you can remove the CD-ROM.
When the installation is complete, an icon and folder for this printer will be created. "After Installation"

019A-02F
If the printer driver is installed properly, the following icons, folders, and so on are added to the following locations.
Printer folder ( "Basic Operations/Various Information for Windows")Printer icon for this printer
Task trayPrinter Status Window icon
The icon does not appear if you did not restart your computer after the printer driver installation.
[All Programs] or [Programs] under the [Start] menu[Canon Printer Uninstaller] - [Canon LBP7010C 7018C Uninstaller]
Use this option when uninstalling the printer driver.
Desktop[LBP7010C 7018C e-Manual]
This icon does not appear if you install the printer driver using a method other than Easy Installation.
[All Programs] or [Programs] under the [Start] menu[Canon LBP7010C 7018C] - [LBP7010C 7018C e-Manual]
After Installation

This icon does not appear if you install the printer driver using a method other than Easy Installation.
If the icons and folders are not addedThe installation is not completed properly.See "You Cannot Install the Printer Driver" and install the printer driver again.

019A-02H
If you are using Windows 7 or Server 2008 R2, install the printer driver in "Easy Installation."(You may not be able to install the printer driver properly due to the Windows restriction even after detecting the printerwith Plug and Play.)
1Connect the USB cable.
"Connecting the Printer and Computer"
2Turn the printer ON.
3Turn the computer on, and then log on to Windows as a user with administrative rights.
� The automatic setup screen of Plug and Play appears.
If the printer driver is installed automaticallyIf you installed the printer driver for this printer previously, the driver is installed automatically.If you want to update the printer driver (or want to install it manually), install the printer driver after uninstalling it once. "Uninstalling the Printer Driver"
If the following screen appears
Installing with Plug and Play
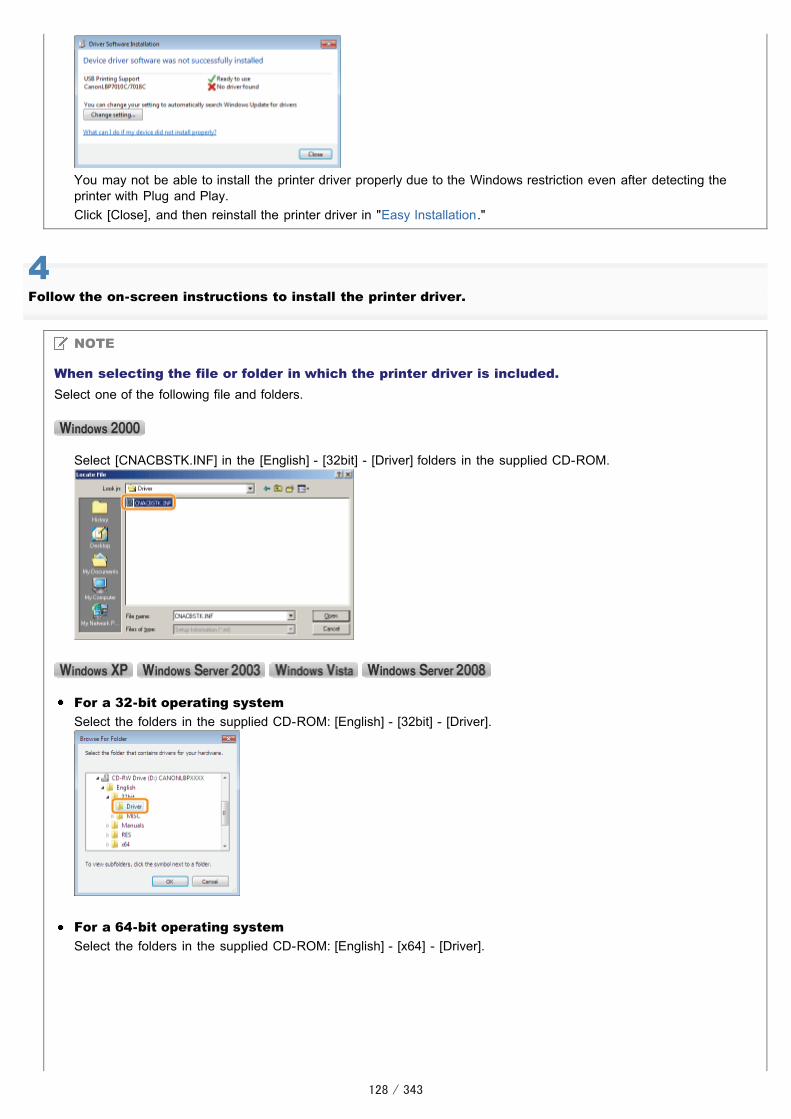
You may not be able to install the printer driver properly due to the Windows restriction even after detecting theprinter with Plug and Play.Click [Close], and then reinstall the printer driver in "Easy Installation."
4Follow the on-screen instructions to install the printer driver.
NOTE
When selecting the file or folder in which the printer driver is included.Select one of the following file and folders.
Select [CNACBSTK.INF] in the [English] - [32bit] - [Driver] folders in the supplied CD-ROM.
For a 32-bit operating systemSelect the folders in the supplied CD-ROM: [English] - [32bit] - [Driver].
For a 64-bit operating systemSelect the folders in the supplied CD-ROM: [English] - [x64] - [Driver].

If you are not sure whether you are using 32-bit Windows Vista/Server 2008 or 64-bit Windows Vista/Server 2008,see "Basic Operations/Various Information for Windows."
If the screen for selecting the printer driver appearsEven if which printer driver is selected, there is no problem with the installation because the same printer driver isinstalled.
When the installation is complete, an icon and folder for this printer will be created. "After Installation"

019A-02J
The process of removing the printer driver to restore the computer to the same state as before the printer driver wasinstalled is referred to as uninstallation. To uninstall the printer driver, perform the following procedure.
1If a USB cable is connected, turn OFF the printer and computer, and then remove the USB cable.
2Turn the computer on, and then log on to Windows as a user with administrative rights.
3Close the following files and programs if open.
Help filesPrinter Status WindowControl PanelOther applications
4Start the uninstaller.
���������� ������������������������ ������������� �������� ����������������� ��������� ���������������� �Uninstaller].
If the uninstaller is not found in the [Start] menu "Starting the Uninstaller from [Control Panel]"
If the [User Account Control] dialog box appearsClick [Yes] or [Continue].
5Perform the following procedure.
If this printer is displayed
(1) Select this printer.(2) Click [Delete].
Uninstalling the Printer Driver

If this printer is not displayedClick [Delete].
6Click [Yes].
� The uninstallation starts.Wait until the following screen disappears. (It may take a long time to uninstall the printer driver.)
When the following screen appears, click [Yes] or [Yes To All].
7Click [Exit].

8Open the printer folder.
"Basic Operations/Various Information for Windows"
9Confirm that the icon for this printer is not found.
IMPORTANT
If the icon for this printer is displayed
1. Right-click the icon, and then select [Remove device] or [Delete] from the pop-up menu.2. Click [Yes].
If the [User Account Control] dialog box appears, click [Yes].
10Restart Windows.
Next, uninstall the e-Manual using the following procedure. (If you did not install the e-Manual, you do not need to perform the following procedure.)

11Insert the supplied CD-ROM "User Software" into the CD-ROM drive of your computer.
12Click [Additional Software Programs].
If the above screen does not appear "Basic Operations/Various Information for Windows"
If the [AutoPlay] dialog box appearsClick [Run AUTORUN.EXE].
If the [User Account Control] dialog box appearsClick [Yes] or [Continue].
13Click [Start] in [Manual Uninstaller].

14Click [Uninstall] to start the uninstallation.
Please wait a moment until the uninstallation is complete. (It may take a long time to uninstall the printer driver.)
15Click [Exit].
16Click [Back].

17Click [Exit].
When the following screen appears, you can remove the CD-ROM.

019A-02K
1Perform the following procedure.
���������� ������������������������������������ ����� �!����!��"�#����$���!!%&��'������ ���(
From the [Start] menu, select [Control Panel], and then click [Add or Remove Programs].
From the [Start] menu, select [Control Panel], and then click [Uninstall a program].
���������� ������������������������ ��������!!����&��'������ ���(
From the [Start] menu, select [Control Panel], and then double-click [Programs and Features].
2Perform the following procedure.
(1) Select [Canon LBP7010C/7018C].(2) Click [Change/Remove].
(1) Select [Canon LBP7010C/7018C].(2) Click [Uninstall/Change].
If [Canon LBP7010C/7018C] is not listed "Starting the Uninstaller from the CD-ROM"
Starting the Uninstaller from [Control Panel]

If the [User Account Control] dialog box appearsClick [Yes] or [Continue].

019A-02L
Usable Paper
Precautions for Paper
Printable Area
Paper Loading and Output
Loading Paper
Basic Printing Procedure
How to Use Help
Canceling a Job
Checking the Printer Status
Basic Printer Operations
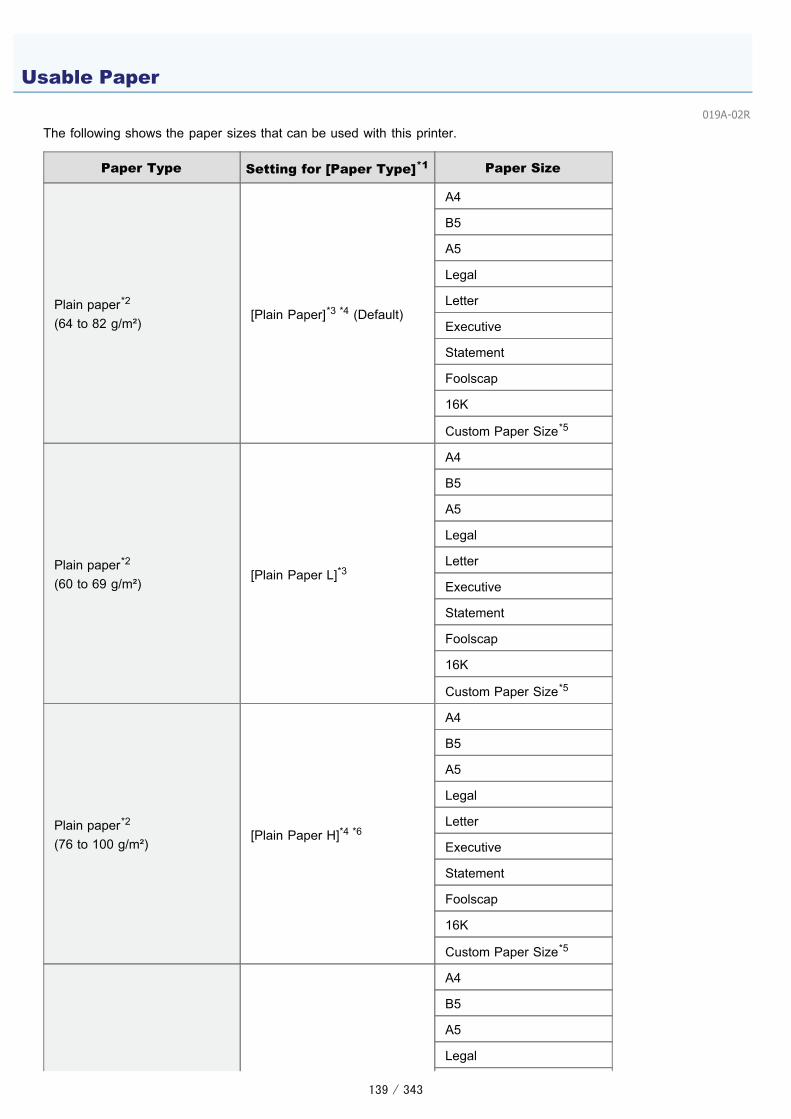
019A-02R
The following shows the paper sizes that can be used with this printer.
Paper Type Setting for [Paper Type]*1 Paper Size
Plain paper*2
(64 to 82 g/m²)[Plain Paper]*3 *4 (Default)
A4
B5
A5
Legal
Letter
Executive
Statement
Foolscap
16K
Custom Paper Size*5
Plain paper*2
(60 to 69 g/m²)[Plain Paper L]*3
A4
B5
A5
Legal
Letter
Executive
Statement
Foolscap
16K
Custom Paper Size*5
Plain paper*2
(76 to 100 g/m²)[Plain Paper H]*4 *6
A4
B5
A5
Legal
Letter
Executive
Statement
Foolscap
16K
Custom Paper Size*5
A4
B5
A5
Legal
Usable Paper

Heavy paper(92 to 130 g/m²)
[Heavy Paper 1]*6Letter
Executive
Statement
Foolscap
16K
Custom Paper Size*5
Heavy paper(131 to 163 g/m²)
[Heavy Paper 2]
A4
B5
A5
Legal
Letter
Executive
Statement
Foolscap
16K
Custom Paper Size*5
Transparency(black and white printing only)
[Transparency]A4
Letter
Label [Labels]
A4
Letter
16K
Custom Paper Size*5
Index Card [Heavy Paper 2] Index Card
Envelope[Envelope][Envelope H]*7
Envelope Monarch
Envelope No. 10 (COM10)
Envelope DL
Envelope C5
Envelope B5
Coated paper(100 to 130 g/m²)
[Coated Paper 1]
A4
Letter
16K
Custom Paper Size*5
Coated paper(155 to 165 g/m²)
[Coated Paper 2]
A4
Letter
16K
Custom Paper Size*5
Coated paper(210 to 220 g/m²)
[Coated Paper 3]
A4
Letter
16K
Custom Paper Size*5

*1 The setting is located in the [Paper Source] sheet in the printer driver.*2 Recycled paper can be also used.*3 If you want to print paper of 64 to 69 g/m², you can specify either of [Plain Paper] or [Plain Paper L].*8*4 If you want to print paper of 76 to 82 g/m², you can specify either of [Plain Paper] or [Plain Paper H].*8*5 You can load custom size paper that is 76.2 to 215.9 mm wide and 127.0 to 355.6 mm long.*6 If you want to print paper of 92 to 100 g/m², you can specify either of [Plain Paper H] or [Heavy Paper 1].*8*7 If you want to improve the toner fixation when printed with [Envelope] selected, select [Envelope H].*8 If either setting causes the following problems and so on, specify the other setting to print.
Output paper curls.Residual images appear on non-printed areas.The toner does not fix onto paper well, and the printing comes out faint.
IMPORTANT
About print speedThe print speed may drop depending on the paper settings for the size, type, orientation, and number of copies.When printing paper whose width is less than 192 mm, the print speed drops.
Precautions for paper"Precautions for Paper"
NOTE
Printable area"Printable Area"
Envelope sizesThe envelope sizes are as follows.
Envelope Monarch 98.4 mm x 190.5 mm
Envelope No. 10 (COM10) 104.7 mm x 241.3 mm
Envelope DL 110.0 mm x 220.0 mm
Envelope C5 162.0 mm x 229.0 mm
Envelope B5 176.0 mm x 250.0 mm

019A-02S
Paper Which Requires Attention Before Use
When using the following types of paper, this may cause influence to the printout results or printer in some cases.
Paper that was stored poorlyCreased or folded paperTorn or damaged paperWrinkled paperCurled paperWet or moist paperPaper with rough edgesIrregularly-shaped paper
Paper with holes or perforationsPaper with binding holesPaper with perforations
Paper with adhesive or a special coatingHeat-sensitive paperPaper with adhesiveCarbon paperTreated color paperSpecially coated paper (coated paper for ink jet printers and so on)
Paper that was printed by another printerPaper that was printed by a copy machine or another printer (The reverse side of the paper is also not usable.)
Paper that is difficult for the toner to fix ontoPaper with rough surfacesPaper containing thick fibersPaper with an extremely rough or smooth surfacePaper that is thicker or thinner than the specified usable paper "Usable Paper"
IMPORTANT
About paper with staples, clips, ribbons or tapeThis kind of paper may result in the printer malfunction or damage to the printer.
About paper that contains ink that melts, burns, evaporates or emits harmful gases at or lowerthan the heating temperature of the fixing unitThis kind of paper may result in the printer malfunction or damage to the printer.
Printing on the reverse side of paper that was previously printed (Performing 2-sided printingmanually)This printer enables you to perform 2-sided printing manually by inserting the reverse side of the paper* that waspreviously printed.When printing on the reverse side of paper that was previously printed, flatten the curl and load one sheet of paper at atime in the multi-purpose tray, and perform the following procedure in the printer driver.
1. Display the [Paper Source] sheet.2. Select the [Print on the Other Side] check box.
* You can use only paper printed by this printer. Also, you cannot print on the printed side again.
Precautions for Paper

Storing Paper
The quality of paper may deteriorate if stored improperly even when the paper meets the normal specifications.Inferior paper may cause misfeeds, paper jams, or deterioration in print quality.
How to store paperObserve the following guidelines when storing and handling paper.
Store paper on a flat surface.To help paper avoid moisture or dryness, keep paper in its wrapper until it is ready to be used.Do not place paper in the condition where it may curl or become creased.Do not store paper vertically or store too many stacks of paper in one pile.
Do not store paper in the following locations.A location exposed to direct sunlightA location subject to high humidityA dry locationA location with a temperature or humidity that differs significantly from the location where it will be used
If you print on damp paperIf you print on damp paper, steam may be emitted from the printer output area.Because moisture in the paper is evaporating due to the heat generated when toner fixes, this is not a malfunction. (This islikely to occur when the room temperature is low.)
Storing Printouts
When handling or storing paper printed by this printer, be careful of the following points.
How to store printoutsStore paper on a flat surface.Avoid storing printouts in folders made of PVC material, as this may cause the toner to melt and stick to the PVCmaterial. Toner may peel when printouts are folded or creased.Store printouts in the condition where they are not folded or creased as toner may peel.Put printouts in a binder when storing for a long period of time (two years or longer).Printouts may discolor when stored for a long period of time.Avoid storing printouts in a location subject to high temperatures.
Precautions when sticking printouts with adhesiveBe sure to use insoluble adhesive.Test the adhesive on an unneeded printout before using.Before stacking printouts that stuck with adhesive, check that the adhesive completely dried.

019A-02U
NOTE
If you want to extend the printable areaSpecify the following settings in the printer driver.
1. Click [Advanced Settings] in the [Finishing] sheet.2. Set [Expand Print Region and Print] to [On].
Depending on the print data to be printed, the edge of paper may be missing partly during printing or may blotduring color printing.
Plain Paper/Heavy Paper/Transparency/Label/Index Card/Coated Paper
You cannot print on any area within 5 mm of the edges of paper.
Envelope
This printer can print on the following area.You may have to change the printable area before printing, depending on the application you use.
Printable Area

019A-02W
This printer has the following paper source and output destination.
Paper Source (A): Multi-purpose Tray "Loading Paper"
OutputDestination (B): Output Tray
Outputs paper with the printed side facing down.
Open the auxiliary tray before printing.
Paper Capacity of the Paper Source and Output Destination
Paper TypePaper Source Output Destination
Multi-purpose Tray Output Tray*
Plain paper (Ex. 75 g/m²) Approx. 150 sheets Approx. 50 sheets
Heavy paper (Ex. 105 g/m²) Approx. 100 sheets Approx. 15 sheets
Heavy paper (Ex. 163 g/m²) Approx. 60 sheets Approx. 15 sheets
Transparency Approx. 100 sheets 1 sheet
Label Approx. 50 sheets Approx. 5 sheets
Index Card Approx. 50 sheets Approx. 5 sheets
Envelope Approx. 10 sheets Approx. 5 sheets
Coated paper Approx. 50 sheets Approx. 15 sheets
* Actual paper capacity varies depending on the installation environment and paper type to be used.
Paper Loading and Output

019A-02Y
For details on the paper that you can load, "Usable Paper."
Before loading paper, see "Attention (Paper Loading)."
1Remove the tray cover.
2Slide the paper guides a little wider and longer than the actual paper size.
You can slide both sides of the paper guides by holding the lock release lever (A).
3Gently load paper with the printing side facing up until it touches the back of the tray.
For paper size other than A5 paper sizeBe sure to load paper in portrait orientation.
For A5 paper sizeLoad paper in landscape orientation (when printing preferences are thedefault values).
You can also load paper in portrait orientation by activating [Feed A5
Loading Paper

from Short Edge] in the [Paper Source] sheet in the printer driverwhen printing.(Printing speed drops by loading paper in portrait orientation whenprinting on plain paper.)
IMPORTANT
When loading envelopesSee "Printing on Envelopes" and load the paper in the correct orientation.
NOTE
When loading paper with a letterhead or logoSee "Paper Loading Orientation" and load the paper in the correct orientation.
4Align the paper guides with the loaded paper.
You can slide both sides of the paper guides by holding the lock release lever (A).
IMPORTANT
Be sure to align the paper guides with the paper.If the paper guides are too loose or too tight, this may result in misfeeds or paper jams.
5Make sure that the paper stack is loaded under the load limit guides (A) and the hooks (B) on the

paper guides.
6Install the tray cover.
For details on the basic printing procedure, see "Basic Printing Procedure."
If printing custom size paper, you need to register the custom paper size in the printer driver previously."Registering a Custom Paper Size"
In cases such as where paper runs out during printing, the (Paper) indicator (orange) blinks. Printingresumes by pressing the [ ] (Paper) key.

019A-07J
See "Important Safety Instructions" also.
IMPORTANT
Precautions when loading paperLoad the paper so that it is straight.If the rear edge of the paper stack is not properly aligned, this may result in misfeeds or paper jams.If the paper is curled or folded at corners, flatten it before loading it in the printer.
Do not touch the loaded paper or pull it out during printing.This may result in paper jams or damage to the printer.
When using paper that is poorly cutMultiple sheets of paper may be fed at a time. In this case, fan the paper thoroughly, and then align the edges of thestack properly on a hard, flat surface.
Attention (Paper Loading)
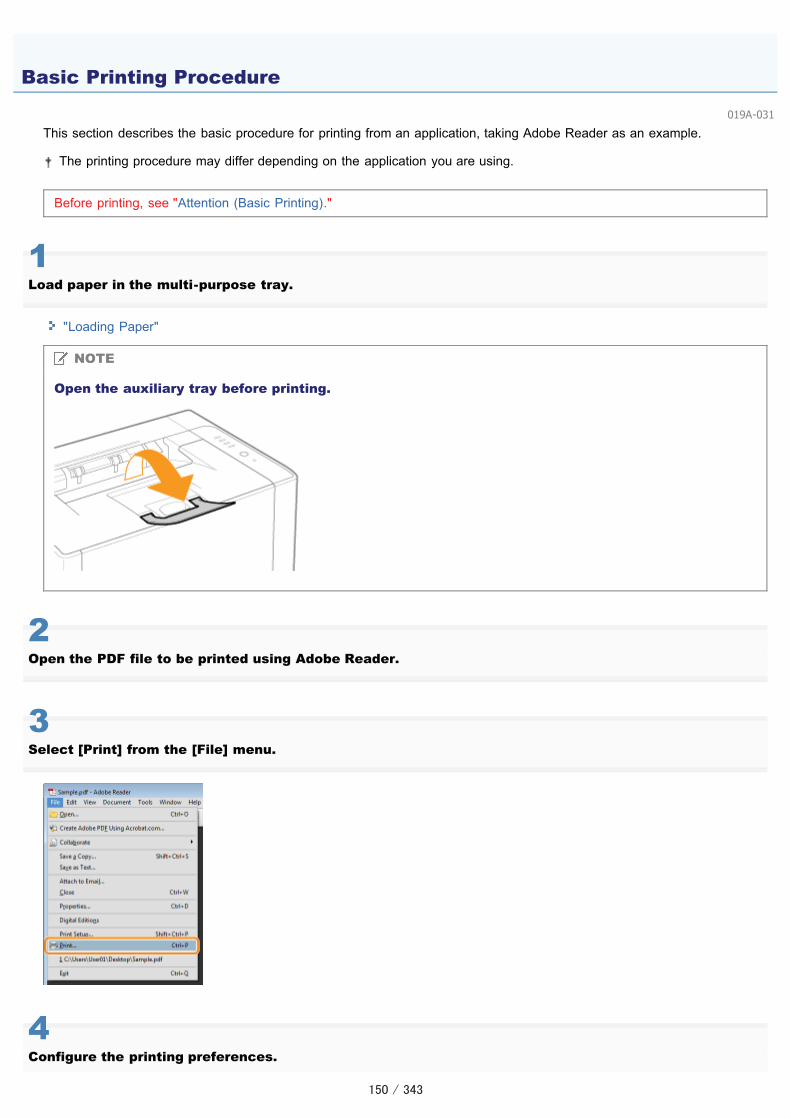
019A-031
This section describes the basic procedure for printing from an application, taking Adobe Reader as an example.
The printing procedure may differ depending on the application you are using.
Before printing, see "Attention (Basic Printing)."
1Load paper in the multi-purpose tray.
"Loading Paper"
NOTE
Open the auxiliary tray before printing.
2Open the PDF file to be printed using Adobe Reader.
3Select [Print] from the [File] menu.
4Configure the printing preferences.
Basic Printing Procedure

(1) Select this printer.
You can change the printer name in the printer folder ( "Basic Operations/Various Information forWindows").
(2) Configure the printing preferences.
5Click [Properties].
6Specify the settings for [Page Size] and [Output Size].
(1) Display the [Page Setup] sheet.(2) Select the page size of the document created by an application.(3) Select if the size of the paper to be printed is different from that of the data.

IMPORTANT
If the [Page Size] setting and [Output Size] setting are differentThe print is automatically reduced or enlarged to fit on the page.
7Specify the setting for [Paper Type].
(1) Display the [Paper Source] sheet.(2) Select the type of the paper loaded in the paper source.*
* Specify the setting according to the paper type as follows.
Paper Type Setting for [Paper Type]
Plain paper (64 to 82 g/m²) [Plain Paper]*1 *2 (Default)
Plain paper (60 to 69 g/m²) [Plain Paper L]*1
Plain paper (76 to 100 g/m²) [Plain Paper H]*2 *3
Heavy paper (92 to 130 g/m²) [Heavy Paper 1]*3
Heavy paper (131 to 163 g/m²) [Heavy Paper 2]
Transparency(black and white printing only)
[Transparency]
Label [Labels]
Index Card [Heavy Paper 2]
Envelope[Envelope][Envelope H]*4
Coated paper (100 to 130 g/m²) [Coated Paper 1]
Coated paper (155 to 165 g/m²) [Coated Paper 2]

Coated paper (210 to 220 g/m²) [Coated Paper 3]
*1 If you want to print paper of 64 to 69 g/m², you can specify either of [Plain Paper] or [Plain Paper L].*5
*2 If you want to print paper of 76 to 82 g/m², you can specify either of [Plain Paper] or [Plain Paper H].*5
*3 If you want to print paper of 92 to 100 g/m², you can specify either of [Plain Paper H] or [Heavy Paper1].*5
*4 If you want to improve the toner fixation when printed with [Envelope] selected, select [Envelope H].
*5 If either setting causes the following problems and so on, specify the other setting to print.Output paper curls.Residual images appear on non-printed areas.The toner does not fix onto paper well, and the printing comes out faint.
8Specify the other printing preferences as needed.
"Useful Printing Functions" describes the printing procedures that use the various printing functions. Make full use ofthe functions of this printer.
NOTE
For details on the settingsSee Help.
"How to Use Help"
9Confirm the settings, then click [OK].
� The [Print] dialog box reappears.
10Click [OK].
� The printer starts printing.
If the printer cannot print properly "Printing Cannot Be Performed (USB Connection)" "Printing Cannot Be Performed (via the Print Server)"

019A-032
NOTE
Install the printer driver.The printer driver is software required for printing with this printer. Before printing, install the printer driver.
"Installing the Printer Driver"
When printing on custom size paperYou need to register the custom paper size in the printer driver previously.
"Registering a Custom Paper Size"
About the contents specified in "Basic Printing Procedure"The specified settings apply only to data to be printed from the same application. Exiting the application resets thechanged settings to the default settings.For details on the procedure for changing the default values for printing preferences, see "Changing the Default Valuesfor Printing Preferences."
Attention (Basic Printing)

019A-033
For details on each setting in the printer driver or the Printer Status Window, see the instructions in Help.
(1) Navigation paneSelect a topic for your desired option.
[Contents] sheetThe titles of the sheets, dialog boxes, and so on are listed. Select a sheet, dialog box, and others for your desired option.[Index] sheetDisplays the [Index] list. Enter a keyword in [Type in the keyword to find] or scroll down the keyword list, and then double-click theoption you would like information on.[Search] sheetEnter an arbitrary word or phrase to search the topic. Enter the word or phrase in [Type in the word(s) to search for] and click [List Topics]. Double-click a sheet,dialog box, and others for your desired option in the listed topics.
(2) Topic paneThe setting list are displayed for each sheet or dialog box.Click the desired option to display its description.
How to Display Help
When displaying Help from the printer driverClick [Help].
When displaying Help from the Printer Status WindowFrom the [Help] menu, select [Help Topics].
How to Use Help


019A-034
You can cancel a print job using either of the following methods.
You cannot cancel another user's job. (For the print server environment, you can cancel print jobs on the print server.)
Selecting and Canceling a Print JobWhen printing multiple jobs, you can select a job and cancel it using the print queue (a function of Windows).
Canceling a Job Being Printed with One ClickYou can cancel a job currently being printed with one click from the Printer Status Window.
Canceling a Job

019A-035
1Display the print queue.
When displaying Help from the Printer Status Window
1. Click [ ] in the Windows task tray, and then select the printer name.
2. Click [ ] (Print Queue).
When displaying from the printer folder
1. Open the printer folder."Basic Operations/Various Information for Windows"
2. Double-click the icon for this printer.
2Right-click the job that you want to cancel, then select [Cancel] from the pop-up menu.
Selecting and Canceling a Print Job

If a print job does not appearAnother user's job is not displayed. (For the print server environment, all print jobs are displayed on the print server.)
NOTE
For details on the print queueSee Windows Help.
3Clicking [Yes] cancels the print job.
If you cannot cancel a jobYou cannot cancel the job whose pages are in the process of printing.

019A-036
1Click [ ] in the Windows task tray, and then select the printer name.
2Clicking [ ] (Cancel Job) cancels the print job.
If you cannot cancel a job
You cannot cancel the job whose pages are in the process of printing.You cannot cancel another user's job. (For the print server environment, you can cancel print jobs on theprint server.)
Canceling a Job Being Printed with One Click

019A-037
You can check the current printer status using the Printer Status Window.
"Printer Status Window"
The Printer Status Window shows the current printer status with messages, animations, and icons.If you find any problems with the printer, check the Printer Status Window.
Checking the Printer Status

019A-038
Printing on Plain Paper, Heavy Paper, or Index Card
Printing on Transparencies (Black and White Printing Only)
Printing on Labels
Printing on Envelopes
Printing on Coated Paper
Printing on Custom Size Paper
Paper Loading Orientation
Printing on Various Types of Paper
019A-039
Confirming usable paperThis printer can print plain paper (60 to 100 g/m²) and heavy paper (92 to 163 g/m²) of the following sizes or Index Card.
Standard sizes A4, B5, A5, Legal, Letter, Executive, Statement, Foolscap, and 16K
Custom paper sizes Width 76.2 to 215.9 mm, Length 127.0 to 355.6 mm
Recycled paper can be also used.
NOTE
When using custom paper sizesYou need to register the custom paper sizes in the printer driver previously.
"Registering a Custom Paper Size"
Loading paperLoad paper in the multi-purpose tray.
"Loading Paper"
Printing from an applicationAfter loading paper, perform printing.
"Basic Printing Procedure"
The print speed drops when printing on heavy paper (92 to 163 g/m²) or Index Card.(The print speed drops when printing on 92 to 100 g/m2 paper if [Paper Type] is set to [Heavy Paper 1].)
Printing on Plain Paper, Heavy Paper, or Index Card

019A-03A
Confirming usable transparenciesThis printer can use the following sizes of transparencies.
Standard sizes A4, Letter
Transparencies can only be printed in black and white.
Loading transparenciesLoad transparencies in the multi-purpose tray.
"Loading Paper"
<Precautions when loading transparencies>Thoroughly fan the transparencies, and then align the edges before loading them as they may stick to each other. Ifthey are not fanned enough, multiple sheets of paper may be fed at once, causing paper jams.
When fanning or aligning the transparencies, try to hold the edges to avoid touching the printing surface.Take care not to mark or stain the printing surface of the transparencies with fingerprints, dust, or oil. This may result inpoor print quality.
Printing from an applicationAfter loading transparencies, perform printing.
"Basic Printing Procedure"
The print speed drops when printing on transparencies.
Take out one sheet at a time each time a transparency is output.
Printing on Transparencies (Black and White Printing Only)

019A-03C
Confirming usable labelsThis printer can use the following sizes of labels.
Standard sizes A4, Letter, and 16K
Custom paper sizes Width 76.2 to 215.9 mm, Length 127.0 to 355.6 mm
Using the following types of labels may result in paper jams that are difficult to clear or may result in damage to theprinter.
Peeled labels or partly used labelsCoated labels that are easily peeled off from the backing sheetLabels with uneven adhesive
NOTE
When using custom paper sizesYou need to register the custom paper sizes in the printer driver previously.
"Registering a Custom Paper Size"
Loading labelsLoad labels in the multi-purpose tray.
"Loading Paper"
<Precautions when loading labels>Fan the labels thoroughly, and then align the edges before loading them. If they are not fanned enough, multiple sheetsof paper may be fed at once, causing paper jams.
Take care not to mark or stain the printing surface of the labels with fingerprints, dust, or oil. This may result in poorprint quality.
Printing from an applicationAfter loading labels, perform printing.
"Basic Printing Procedure"
The print speed drops when printing labels.
Printing on Labels

019A-03E
Confirming usable envelopesThis printer can use the following envelopes.
Using the following types of envelopes may result in paper jams that are difficult to clear or may result in damage tothe printer.
Envelopes with fasteners or snapsEnvelopes with address windowsEnvelopes with adhesive on the surfaceWrinkled or creased envelopesPoorly manufactured envelopes in which the glued parts are unevenIrregularly-shaped envelopes
Loading envelopesLoad envelopes in the multi-purpose tray.
"Loading Paper"
<Precautions when loading envelopes>Load envelopes in the correct orientation as follows.
( : Feeding direction)
Before loading envelopes, align them as follows.
1. Place the stack of envelopes on a flat 2. Loosen any stiff corners of the 3. Align the edges of the
Printing on Envelopes

surface, and then flatten them to releaseany remaining air.Then, press the edges tightly.
envelopes and flatten curls asshown in the figure.
envelopes on a flatsurface.
Printing from an applicationAfter loading envelopes, perform printing.
"Basic Printing Procedure"
Do not print on the reverse side (glued side) of envelopes.
The print speed drops when printing on envelopes.
When envelopes are printed, they may be creased.

019A-07K
Confirming usable coated paperThis printer can use the following sizes of coated paper (100 to 130 g/m², 155 to 165 g/m², 210 to 220 g/m²).
Standard sizes A4, Letter, and 16K
Custom paper sizes Width 76.2 to 215.9 mm, Length 127.0 to 355.6 mm
NOTE
When using custom paper sizesYou need to register the custom paper sizes in the printer driver previously.
"Registering a Custom Paper Size"
Loading coated paperLoad coated paper in the multi-purpose tray.
"Loading Paper"
<Precautions when loading coated paper>Fan the paper stack thoroughly, and then align the edges before loading them. If they are not fanned enough, multiplesheets of paper may be fed at once, causing paper jams.
When fanning or aligning coated paper, try to hold the edges to avoid touching the printing surface.Take care not to mark or stain the printing surface of coated paper with fingerprints, dust, or oil. This may result in poorprint quality.
Printing from an applicationAfter loading coated paper, perform printing.
"Basic Printing Procedure"
The print speed drops when printing on coated paper.
Printing on Coated Paper

019A-03F
Confirming usable custom size paperYou can use custom size paper that is 76.2 to 215.9 mm wide and 127.0 to 355.6 mm long with this printer.
Loading custom size paperLoad paper in the multi-purpose tray.
"Loading Paper"
Registering a custom paper sizeIf printing custom size paper, you need to register the custom paper size in the printer driver previously.
"Registering a Custom Paper Size"
Printing from an applicationAfter loading custom size paper, perform printing.
"Basic Printing Procedure"
The print speed drops when printing on heavy paper (92 to 163 g/m²).(The print speed drops when printing on 92 to 100 g/m2 paper if [Paper Type] is set to [Heavy Paper 1].)
Printing on Custom Size Paper

019A-03H
1Open the printer folder.
"Basic Operations/Various Information for Windows"
2Right-click the icon for this printer, then select [Printing Preferences] from the pop-up menu.
3Display the [Custom Paper Size Settings] dialog box.
(1) Display the [Page Setup] sheet.(2) Click [Custom Paper Size].
Registering a Custom Paper Size

4Specify the custom paper size.
[Name of Custom Paper Size] Enter the name of the custom paper size to be added. You can enter up to 31characters.
[Unit] Select the unit to be used when setting the custom paper size.
[Paper Size]Specify the height and width of the custom paper size ([Height] [Width]). Specify the custom paper size in portrait orientation ([Height] [Width]) within user-definable sizes.
5Register the custom paper size.
(1) Click [Register].
The number of custom paper sizes that you can add depends on the system environment.
(2) Confirm that the registered custom paper size is added to [Paper List].(3) Click [OK].
For details on the basic printing procedure, see "Basic Printing Procedure."
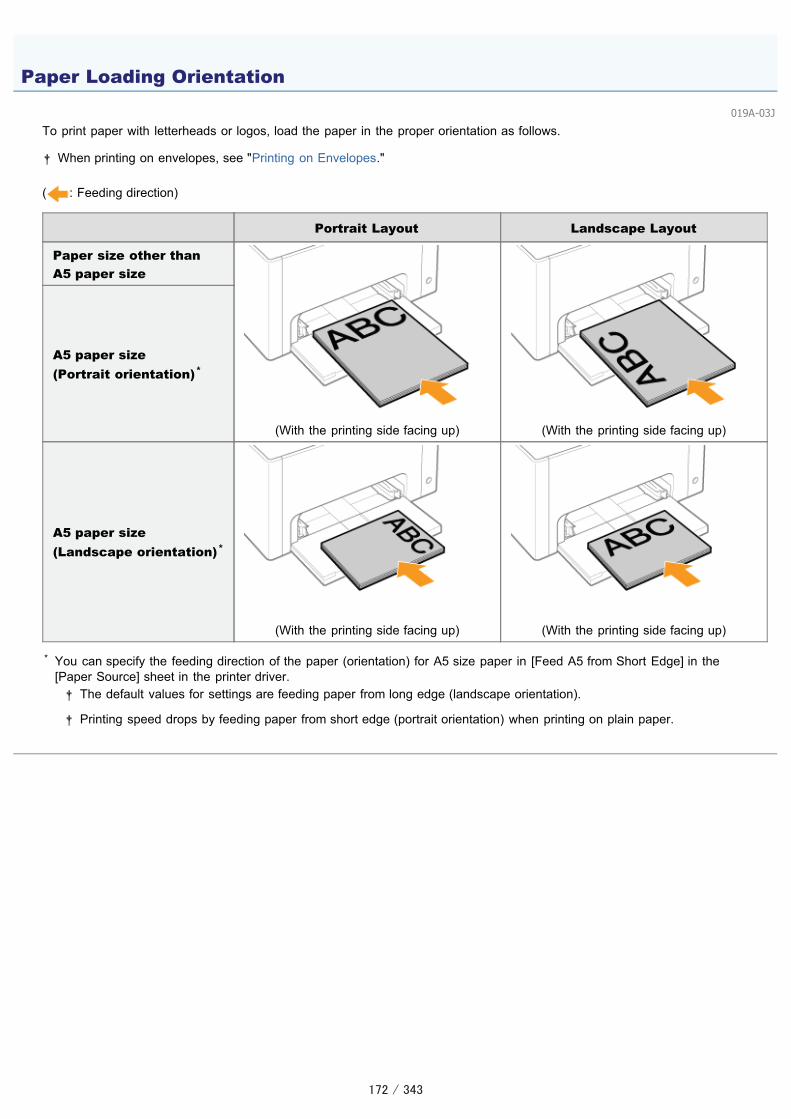
019A-03J
To print paper with letterheads or logos, load the paper in the proper orientation as follows.
When printing on envelopes, see "Printing on Envelopes."
( : Feeding direction)
Portrait Layout Landscape Layout
Paper size other thanA5 paper size
(With the printing side facing up) (With the printing side facing up)
A5 paper size(Portrait orientation)*
A5 paper size(Landscape orientation)*
(With the printing side facing up) (With the printing side facing up)
* You can specify the feeding direction of the paper (orientation) for A5 size paper in [Feed A5 from Short Edge] in the[Paper Source] sheet in the printer driver.
The default values for settings are feeding paper from long edge (landscape orientation).
Printing speed drops by feeding paper from short edge (portrait orientation) when printing on plain paper.
Paper Loading Orientation

019A-03K
Displaying the Setting Screen
Scaling Print Output
Layout Printing (N-page Print)
Printing an Image Larger than A4 (Poster Printing)
Adding a Watermark to a Document to Be Printed (Watermark Printing)
Printing Borders, the Printing Date, and so on
Printing a Color Document in Black and White
Combining Data before Printing
Changing the Output Method According to the Print Data or Number of Copies
Adjusting the Image Quality or Colors
Registering the Printing Preferences
Changing the Default Values for Printing Preferences
Saving Frequently Used Printing Preferences (Adding/Editing/Deleting a "Profile")
Useful Printing Functions

019A-03L
You can specify the various printing preferences in the setting screen of the printer driver.There are the following methods to display the setting screen.
Displaying from an applicationThe specified settings apply only to data to be printed from the same application. Exiting the application resets the changedsettings to the default settings.
How to display(The procedure may differ depending on the application you are using.)
1. Select [Print] from the [File] menu in the application.2. Select this printer, and then click [Properties] or [Preferences].
Displaying from the printer folder ( "Basic Operations/Various Information for Windows")
<Printing preferences screen>You can change the default values for printing preferences which apply to all data.
How to displayRight-click the icon for this printer, then select [Printing Preferences] from the pop-up menu.
<Printer properties screen>You can specify the settings for "Profiles" to be added to the server and so on.
How to display
Displaying the Setting Screen

Right-click the icon for this printer, and then select [Printer properties] or [Properties] from the pop-up menu.
NOTE
For details on the settingsSee Help.
"How to Use Help"
About the sheets displayed by WindowsThe following sheets are displayed by Windows. For more details, see Windows Help.
[General] sheet[Sharing] sheet[Ports] sheet[Advanced] sheet[Color Management] sheet[Security] sheet
About the printer driverThe functions of the printer driver may be changed due to upgrade.

019A-03U
You can print with automatic scaling according to the paper size or arbitrary scaling.
1Display the setting screen of the printer driver.
"Displaying the Setting Screen"
2Specify the settings for scaling.
When printing with automatic scaling according to the paper size
(1) Display the [Page Setup] sheet.(2) Select the page size of the document created by an application.(3) Select the size of the paper loaded in the paper source.
If you select a different paper size from [Page Size], the print data will be automatically enlarged or reduced.
When printing with arbitrary scaling
(1) Display the [Page Setup] sheet.(2) Select the [Manual Scaling] check box.(3) Specify the desired scaling factor.
Scaling Print Output
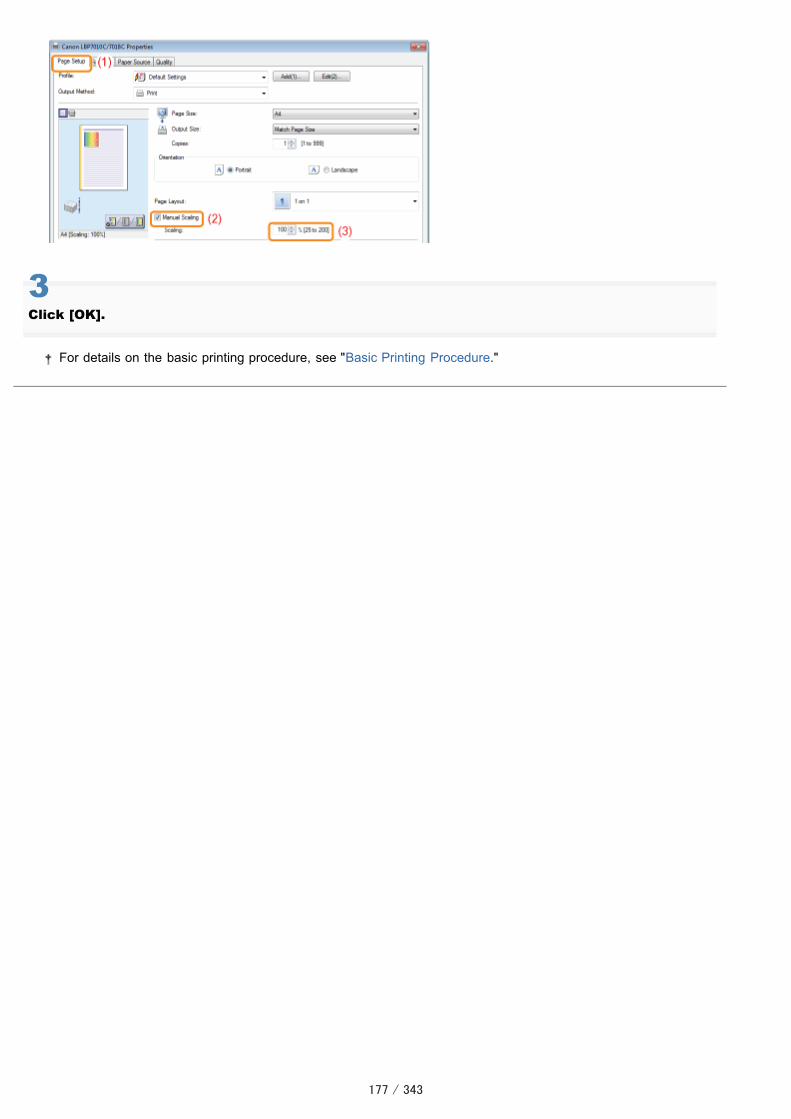
3Click [OK].
For details on the basic printing procedure, see "Basic Printing Procedure."

019A-03W
You can print multiple pages on one sheet.This is a printing method which is referred to as intensive printing or N-page Print.
IMPORTANT
About the application function to print a document as a collated set of copiesSome applications provide a function to print a document as a collated set of copies. Do not use this function whenprinting multiple pages on one sheet. The document may not be printed properly.
1Display the setting screen of the printer driver.
"Displaying the Setting Screen"
2Specify the setting for [Page Layout].
(1) Display the [Page Setup] sheet.(2) Select the number of pages to be printed on one sheet.
If you cannot specify the setting
Layout Printing (N-page Print)

"The Printer Driver Settings Cannot Be Changed"
NOTE
Using Preview to specify the settingYou can also specify a page layout by clicking within the document image on Preview when [ ] is selected.(Using Preview to be able to specify is [2 on 1] and [4 on 1] only.)
3Specify the page order layout on paper.
4Click [OK].
For details on the basic printing procedure, see "Basic Printing Procedure."

019A-03X
You can enlarge and divide a single page image to print it out on multiple sheets of paper. You can make one large posterby joining these printouts together.
1Display the setting screen of the printer driver.
"Displaying the Setting Screen"
2Specify the setting for poster printing.
(1) Display the [Page Setup] sheet.(2) Select [Poster [N x N]] (N = 2, 3, 4) from [Page Layout].
If you cannot specify the setting "The Printer Driver Settings Cannot Be Changed"
3Click [OK].
Printing an Image Larger than A4 (Poster Printing)

For details on the basic printing procedure, see "Basic Printing Procedure."

019A-040
You can superimpose watermarks (such as [COPY] and [DRAFT]) over the documents created by an application.Additionally, you can add new watermarks and edit or delete the added watermarks.
1Display the setting screen of the printer driver.
"Displaying the Setting Screen"
2Select a watermark.
(1) Display the [Page Setup] sheet.(2) Select the [Watermark] check box.(3) Select the character string to be printed as a watermark.
When adding, editing, or deleting a watermark, see "Adding, Editing, or Deleting a Watermark."
If you cannot select the [Watermark] check box "The Printer Driver Settings Cannot Be Changed"
Adding a Watermark to a Document to Be Printed (Watermark Printing)

3Click [OK].
For details on the basic printing procedure, see "Basic Printing Procedure."

019A-041
1Display the [Edit Watermark] dialog box.
(1) Display the [Page Setup] sheet.(2) Select the [Watermark] check box.(3) Click [Edit Watermark].
If you cannot select the [Watermark] check box "The Printer Driver Settings Cannot Be Changed"
2Add, edit, or delete a watermark.
When adding a watermark
(1) Click [Add].(2) Specify each setting.
For more details on each setting, see Help."How to Use Help"
Adding, Editing, or Deleting a Watermark

When editing a watermark
(1) Select a watermark you want to edit from [Watermark List].(2) Edit the watermark.
You cannot edit the default watermarks.
For more details on each setting, see Help."How to Use Help"
When deleting a watermark
(1) Select a watermark you want to delete from [Watermark List].(2) Click [Delete].
You cannot delete the default watermarks or a watermark which is being selected in the setting screen of theprinter driver.
(3) Click [Yes].

3Click [OK]. Then, the [Page Setup] sheet reappears.

019A-042
You can print a border, the date, and page numbers on the document to be printed.
1Display the setting screen of the printer driver.
"Displaying the Setting Screen"
2Display the [Page Options] dialog box.
(1) Display the [Page Setup] sheet.(2) Click [Page Options].
If you cannot click [Page Options] "The Printer Driver Settings Cannot Be Changed"
3Specify the settings for borders, the printing date, and so on.
(1) Specify each setting.
Printing Borders, the Printing Date, and so on

For more details on each setting, see Help."How to Use Help"
(2) Click [OK]. Then, the [Page Setup] sheet reappears.
4Click [OK].
For details on the basic printing procedure, see "Basic Printing Procedure."

019A-07L
Color documents can be printed in black and white using only black toner.It is convenient if you use this option when printing a test page of color documents.
1Display the setting screen of the printer driver.
"Displaying the Setting Screen"
2Specify the setting for [Color Mode].
(1) Display the [Quality] sheet.(2) Select [Black and White].
NOTE
Using Preview to specify the settingYou can also specify the setting by clicking the button on Preview in the [Page Setup] sheet, the [Finishing] sheet, andthe [Paper Source] sheet.
: [Auto [Color/B&W]]
Printing a Color Document in Black and White

: [Black and White]
: [Color]
3Click [OK].
For details on the basic printing procedure, see "Basic Printing Procedure."

019A-043
You can combine two or more data into one.You can also change the settings for the combined print data and edit print data of different applications.You can also preview the print data.
1Display the setting screen of the printer driver from an application.
"Displaying the Setting Screen"
2Select [Edit and Preview] from [Output Method].
If you cannot select [Edit and Preview] "The Printer Driver Settings Cannot Be Changed"
3Click [OK].
4
Combining Data before Printing

Configure the printing preferences.
(1) Specify the printing preferences in each sheet as needed.(2) Click [OK].
5Perform printing from an application.
� The list of print data is displayed in the [Canon PageComposer] dialog box.
NOTE
To specify the setting to always display the [Canon PageComposer] dialog box when performingprintingSet [Output Method] to [Edit and Preview] as a default value for printing preferences, and then select the [Lock] checkbox.
For details on the procedure for changing the default values for printing preferences, see "Changing the DefaultValues for Printing Preferences."
6Repeat Step 1 to 5 to combine the desired data.
7Combine the print data.
(1) Select the print data that you want to combine.(2) Select [Combine] from the [Edit] menu.

When the following screen appears, read the contents, and then click [OK].
8Perform the following procedure.
(1) Enter the name of the combined print data.(2) Click [Combine].
9Print the combined print data.
(1) Select the combined print data.(2) Select [Print] from the [File] menu. Then the printer starts printing.

NOTE
Combined print data are not saved.After the combined print data is printed, the print data is deleted from Canon PageComposer.The print data is also deleted if Canon PageComposer is closed without printing the print data.
For more details on Canon PageComposerSee Help for Canon PageComposer.
Help is displayed by clicking [Help] in the [Help] menu.

019A-044
Printing Data with Different Orientations in the Same Data
Printing with a Gutter
Selecting the Paper Output Method
Printing with the Page 180 Degrees Rotated
Changing the Output Method According to the Print Data or Number ofCopies

019A-045
When printing a document with pages in different orientations in the same data, you can specify the paper alignment andgutter settings for output.
1Display the setting screen of the printer driver.
"Displaying the Setting Screen"
2Perform the following procedure.
(1) Display the [Finishing] sheet.(2) Select the [Print in Different Orientations] check box.
3Specify the paper alignment and gutter settings for output.
(1) Click [Details].(2) Specify each setting.
For more details on each setting, see Help."How to Use Help"
(3) Click [OK]. Then, the [Finishing] sheet reappears.
Printing Data with Different Orientations in the Same Data
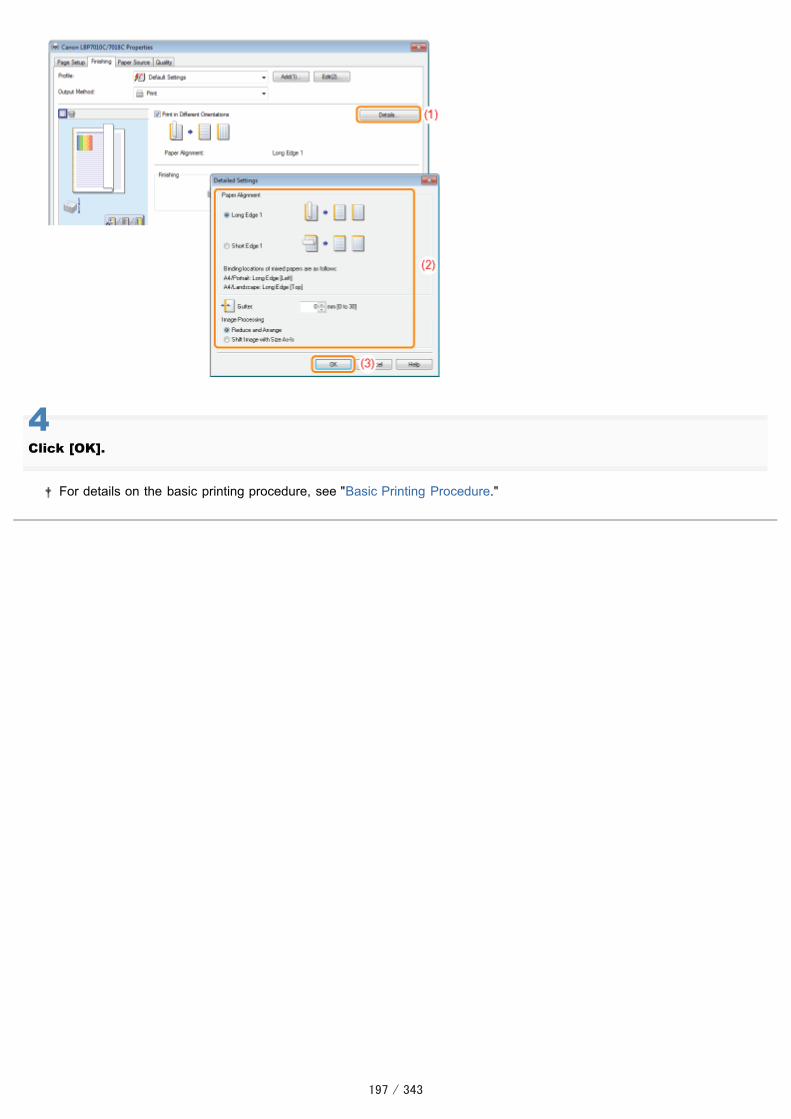
4Click [OK].
For details on the basic printing procedure, see "Basic Printing Procedure."

019A-046
You can specify a gutter of 0 to 30 mm for the paper to be printed.When a gutter is specified, the position of the page image is adjusted to make room for the gutter. At this point, you canselect whether to reduce the image size to fit the remaining space.
1Display the setting screen of the printer driver.
"Displaying the Setting Screen"
2Perform the following procedure.
(1) Display the [Finishing] sheet.(2) Select an edge on which the gutter is to be located.
NOTE
Using Preview to specify the settingYou can also specify the gutter by clicking an edge of the document image on Preview when [ ] is selected.
Printing with a Gutter

3Set the gutter.
(1) Click [Gutter].(2) Specify each setting.
For more details on each setting, see Help."How to Use Help"
(3) Click [OK]. Then, the [Finishing] sheet reappears.
4Click [OK].
For details on the basic printing procedure, see "Basic Printing Procedure."

019A-047
You can select the paper output method before printing.
<If you do not specify the paper output method>Printouts of a complete job are grouped.
<If you collate the printouts>Printouts of a complete job are collated.
1Display the setting screen of the printer driver.
"Displaying the Setting Screen"
2Specify the setting for [Finishing].
(1) Display the [Finishing] sheet.(2) Select a paper output method.
NOTE
Using Preview to specify the settingYou can also specify a paper output method by right-clicking on Preview when [ ] is selected.
Selecting the Paper Output Method

3Click [OK].
For details on the basic printing procedure, see "Basic Printing Procedure."

019A-048
You can print with the print data rotated 180 degrees when the orientation of the paper loaded in a paper source differsfrom the orientation of the document.This option is useful for printing envelopes and index dividers that can be fed only in specific orientations.
1Display the setting screen of the printer driver.
"Displaying the Setting Screen"
2Display the [Advanced Settings] dialog box.
(1) Display the [Finishing] sheet.(2) Click [Advanced Settings].
3Specify the setting for [Rotate Print Data 180 Degrees].
(1) Select [Rotate Print Data 180 Degrees].(2) Select [On].(3) Click [OK]. Then, the [Finishing] sheet reappears.
Printing with the Page 180 Degrees Rotated

4Click [OK].
For details on the basic printing procedure, see "Basic Printing Procedure."

019A-049
Performing Printing Appropriate for Particular Print Data
Correcting Rough-Textured Images
Adjusting the Toner Density
Printing with Brightness and Contrast Adjusted
Adjusting the Color
Matching the Color with the Screen
Adjusting the Image Quality or Colors

019A-04A
Selecting the appropriate mode for the contents of the document allows you to perform printing with appropriate setting.For example, if selecting [Photos] when printing a photo, the setting for printing preferences are changed to the optimumsettings for printing photos.
1Display the setting screen of the printer driver.
"Displaying the Setting Screen"
2Specify the setting for [Objective].
(1) Display the [Quality] sheet.(2) Select the appropriate mode for the contents of the document.
Selecting each mode displays a comment on the mode under the list.
If you want to change the printing preferences for the selected mode to meet your needs, click [AdvancedSettings].
3Click [OK].
For details on the basic printing procedure, see "Basic Printing Procedure."
Performing Printing Appropriate for Particular Print Data

019A-04C
If image data such as photographic images are enlarged in size in an application and printed, the printed images may lookrough or jagged.You can correct and smooth out this kind of low-resolution image data.
1Display the setting screen of the printer driver.
"Displaying the Setting Screen"
2Display the [Advanced Settings] dialog box.
(1) Display the [Quality] sheet.(2) Click [Advanced Settings].
3Specify the setting for image correction.
(1) Select [Enable Image Correction].(2) Select [On].(3) Click [OK]. Then, the [Quality] sheet reappears.
Correcting Rough-Textured Images
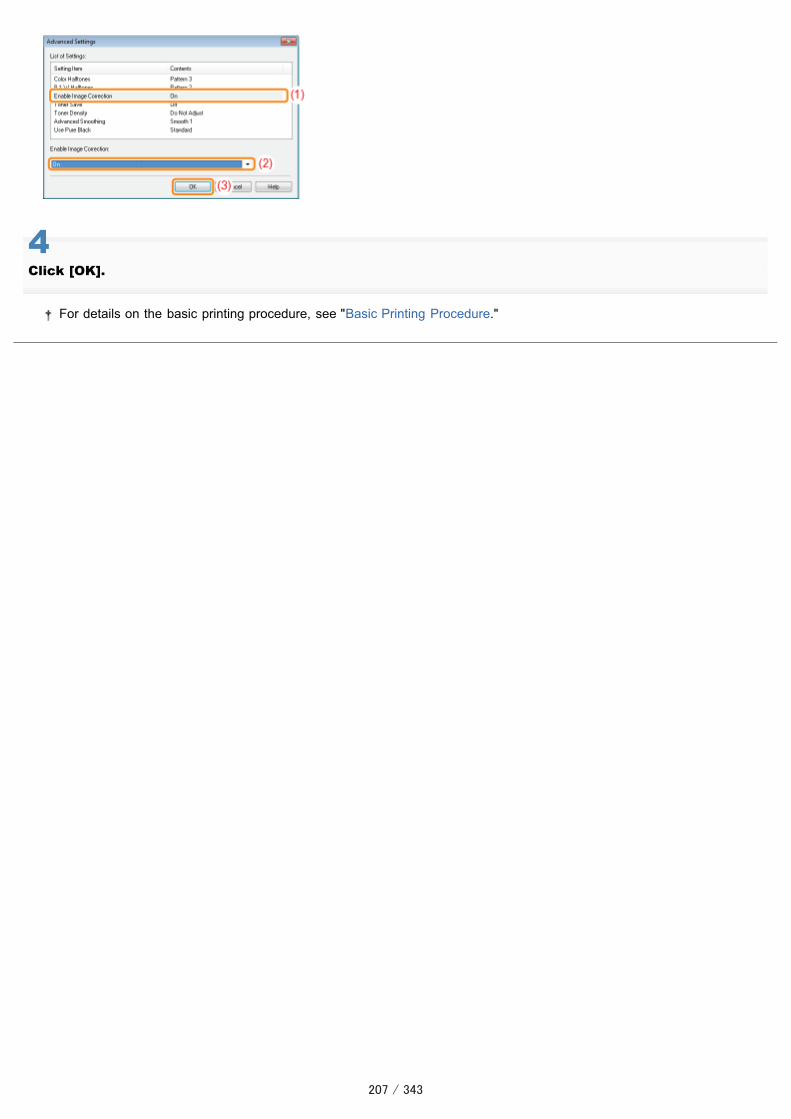
4Click [OK].
For details on the basic printing procedure, see "Basic Printing Procedure."

019A-04E
You can print with toner density adjusted.
1Display the setting screen of the printer driver.
"Displaying the Setting Screen"
2Display the [Advanced Settings] dialog box.
(1) Display the [Quality] sheet.(2) Click [Advanced Settings].
3Display the [Toner Density Details] dialog box.
(1) Select [Toner Density].(2) Select [Adjust].(3) Click [Details].
Adjusting the Toner Density

4Adjust the toner density.
(1) Adjust the density by dragging the slider of each color horizontally.
You can also adjust the toner density of each color for each density range."Adjusting the Toner Density of Each Color for Each Density Range"
(2) Click [OK]. Then, the [Advanced Settings] dialog box reappears.
5Click [OK]. Then, the [Quality] sheet reappears.
6Click [OK].
For details on the basic printing procedure, see "Basic Printing Procedure."

019A-07R
1Click [Fine Adjust Density].
2Adjust the toner density of each color for each density range.
(1) Display the sheet of the colors that you want to adjust.(2) Adjust the density by dragging the slider of each density range horizontally.(3) Click [OK]. Then, the [Toner Density Details] dialog box reappears.
<Adjusting example of each density range> (Example: Cyan)
[High]
[Medium]
Adjusting the Toner Density of Each Color for Each Density Range
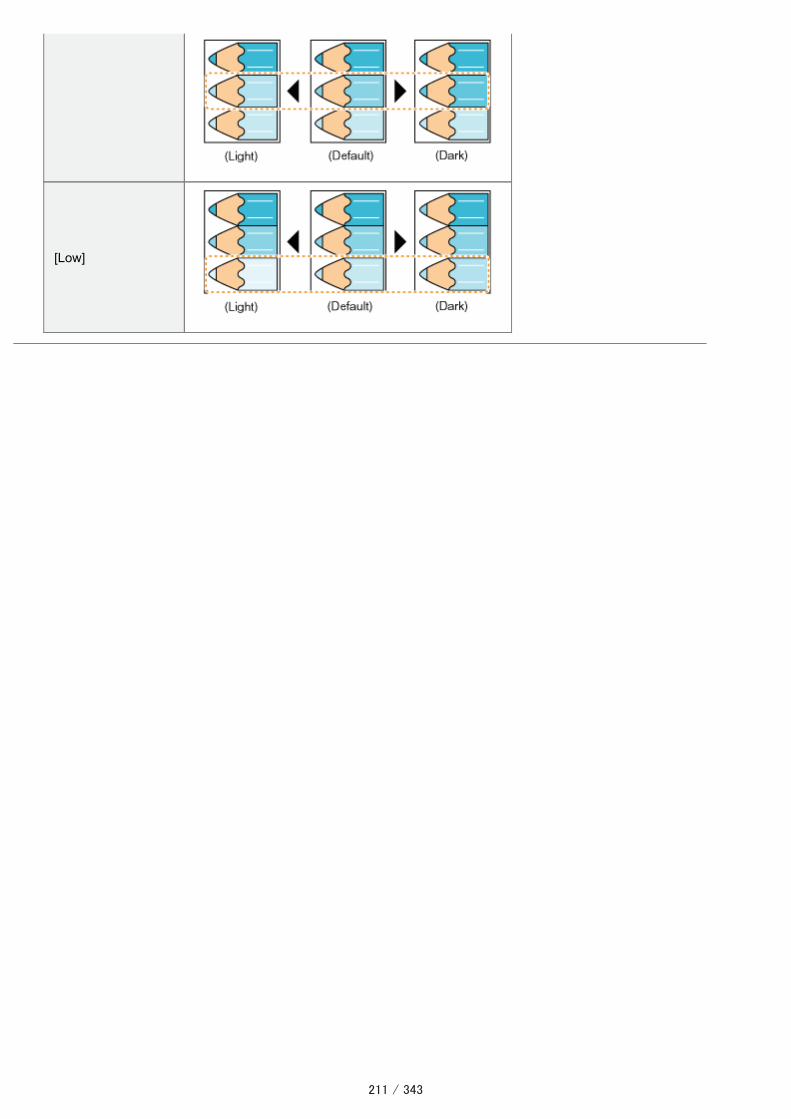
[Low]

019A-04F
You can print with the brightness and contrast adjusted.
1Display the setting screen of the printer driver.
"Displaying the Setting Screen"
2Display the [Color Settings] dialog box.
(1) Display the [Quality] sheet.(2) Select the [Manual Color Settings] check box.(3) Click [Color Settings].
3Adjust the brightness and contrast.
(1) Display the [Color Adjustment] sheet.(2) Adjust the brightness and contrast by dragging the [Brightness] and [Contrast] sliders.
Printing with Brightness and Contrast Adjusted

4Click [OK]. Then, the [Quality] sheet reappears.
5Click [OK].
For details on the basic printing procedure, see "Basic Printing Procedure."

019A-07S
You can perform color printing with the color adjusted.
This section describes the procedure for adjusting the color when printing in the printer driver.Perform calibration when the colors have changed and the data is not printed in the correct colors (specified colors).
"Adjusting Color (Calibration)"
1Display the setting screen of the printer driver.
"Displaying the Setting Screen"
2Display the [Color Settings] dialog box.
(1) Display the [Quality] sheet.(2) Select the [Manual Color Settings] check box.(3) Click [Color Settings].
3Adjust the color.
Adjusting the Color

(1) Display the [Color Adjustment] sheet.(2) Adjust the colors by moving [Preview Image] at the center of the Adjustment Grid horizontally and vertically.*
When [Preview Image] is in the center, the image has not been adjusted.
A sample image after adjustment is displayed in [Preview].
* Move [Preview Image] by either of the following procedures.
Click the buttons of each color around the Adjustment Grid (the color is deepened by one increment).
Click any desired color on the Adjustment Grid ([Preview Image] is moved to the position you clicked).
Drag [Preview Image] onto the desired color.
NOTE
Confirm [Preview Image] position by values.You can confirm the position of [Preview Image] by the X (horizontal) and Y (vertical) values for [Adjusted Position].(The central position is X: 0, Y: 0.)
4Click [OK]. Then, the [Quality] sheet reappears.
5Click [OK].
For details on the basic printing procedure, see "Basic Printing Procedure."
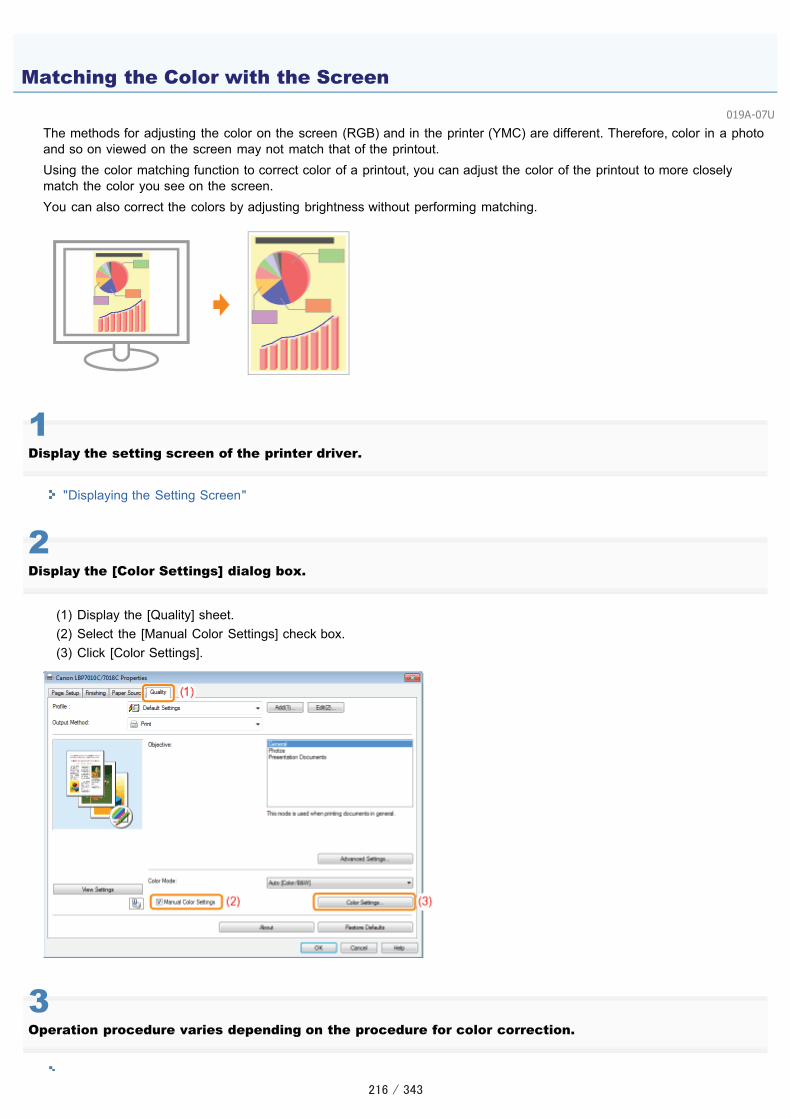
019A-07U
The methods for adjusting the color on the screen (RGB) and in the printer (YMC) are different. Therefore, color in a photoand so on viewed on the screen may not match that of the printout.Using the color matching function to correct color of a printout, you can adjust the color of the printout to more closelymatch the color you see on the screen.You can also correct the colors by adjusting brightness without performing matching.
1Display the setting screen of the printer driver.
"Displaying the Setting Screen"
2Display the [Color Settings] dialog box.
(1) Display the [Quality] sheet.(2) Select the [Manual Color Settings] check box.(3) Click [Color Settings].
3Operation procedure varies depending on the procedure for color correction.
Matching the Color with the Screen

Using the Matching Function to Correct ColorUsing the color matching function, you can adjust the color of the printout to more closely match the color you see onthe screen.
Correcting Color by Adjusting Brightness (Gamma Adjustment)You can adjust the brightness of the printout results without spoiling the lightest parts and darkest parts of the imagedata.Use this option when the printout result is brighter than the original image or when you want to change the brightnessof the image.
Using the Matching Function to Correct Color
1. Specify the setting for [Matching Mode].
(1) Display the [Matching] sheet.(2) Select [Driver Matching Mode].
2. Specify the setting for [Matching Method].
(1) Set [Matching Method] to [Perceptual [Monitor Color Matched]].(2) Select a profile you want to use.(3) Click [OK]. Then, the [Quality] sheet reappears.
NOTE
About the options for [Monitor Profile]

The profiles registered in your computer are displayed.
About [Application Color Matching Priority]If the check box is cleared, you can prioritize the color matching process specified in the printer driver.If you want to prioritize the color matching in the application, select the check box.
3. Click [OK].
For details on the basic printing procedure, see "Basic Printing Procedure."
Correcting Color by Adjusting Brightness (Gamma Adjustment)
1. Specify the setting for [Matching Mode].
(1) Display the [Matching] sheet.(2) Select [Gamma Adjustment].
2. Specify the setting for [Gamma Adjustment].
(1) Select a value for gamma.
The larger the number is, the darker in color the data is printed.
(2) Click [OK]. Then, the [Quality] sheet reappears.
3. Click [OK].
For details on the basic printing procedure, see "Basic Printing Procedure."

019A-04H
Changing the Default Values for Printing PreferencesChange the default values for printing preferences which apply to all data.For example, if you perform layout printing frequently, you do not need to change the settings each time you print bychanging the default values for [Page Layout].
Saving Frequently Used Printing Preferences (Adding/Editing/Deleting a "Profile")You can save frequently used multiple printing preferences as "Profiles." You can perform printing with the registeredsettings by only selecting the desired "Profile."Also, some settings that support various jobs are registered as the default "Profiles."
Registering the Printing Preferences

019A-04J
1Open the printer folder.
"Basic Operations/Various Information for Windows"
2Right-click the icon for this printer, then select [Printing Preferences] from the pop-up menu.
3Change the printing preferences in the [Page Setup], [Finishing], [Paper Source], and [Quality] sheets.
The settings changed here become the default values.For more details on the settings, see Help.
"How to Use Help"
IMPORTANT
The setting options that are not being changed the default valuesThe default values in the settings for [Sample Type] in the [Quality] - [Color Settings] - [Color Adjustment] sheet are notchanged.
Changing the Default Values for Printing Preferences

4Confirm the settings, then click [OK].
� The printer folder reappears.

019A-04K
Adding a "Profile"
1Display the setting screen of the printer driver.
"Displaying the Setting Screen"
2Specify the printing preferences in the [Page Setup], [Finishing], [Paper Source], and [Quality] sheets.
The contents specified here is registered in "Profiles."For more details on the settings, see Help.
"How to Use Help"
IMPORTANT
The setting options that are not adding to a "Profile"The settings for the following options are not added to a "Profile."
Sheet/Dialog Box Option
[Quality] sheet - [Advanced Settings] dialog box
[Color Halftones]
[B & W Halftones]
[Use Pure Black]
[Quality] - [Color Settings] - [Color Adjustment] sheet [Sample Type]
3Click [Add].
If you cannot click [Add] ""Profiles" Cannot Be Selected or Edited"
Saving Frequently Used Printing Preferences (Adding/Editing/Deleting a"Profile")

4Specify information about a "Profile."
[Name] Enter the name for "Profiles." Up to 31 characters can be entered.
[Icon] You can select the icon for the "Profile."
[Comment] Enter the comment for the "Profile." Up to 255 characters can be entered.
[View Settings] Display the [View Settings] dialog box. You can check the current printer driver settings.
5Click [OK] to register the "Profile."
� The setting screen of the printer driver reappears.Make sure that the name of the added "Profile" is in [Profile].
For details on the procedure for using a "Profile", see "Selecting a "Profile"."
Editing an Added "Profile"
You can change information about an added "Profile" or export a "Profile" as a file.
1Display the setting screen of the printer driver.
"Displaying the Setting Screen"
2Click [Edit].

If you cannot click [Edit] ""Profiles" Cannot Be Selected or Edited"
3Edit information about a "Profile."
For more details on the settings, see Help.
"How to Use Help"
4Click [OK].
� The setting screen of the printer driver reappears.
Deleting an Added "Profile"
1Display the setting screen of the printer driver.
"Displaying the Setting Screen"
2Click [Edit].

If you cannot click [Edit] ""Profiles" Cannot Be Selected or Edited"
3Delete a "Profile."
(1) Select a "Profile" you want to delete.(2) Click [Delete].
You cannot delete the default "Profiles" or a "Profile" which is being selected in the setting screen of theprinter driver.
(3) Click [Yes].
4Click [OK].
� The setting screen of the printer driver reappears.

019A-04L
1Display the setting screen of the printer driver.
"Displaying the Setting Screen"
2Select a "Profile."
If the printer name is changed, any added "Profiles" cannot be used. To use the added "Profile", change the printername to its previous one.
If you cannot select a "Profile" ""Profiles" Cannot Be Selected or Edited"
NOTE
When selecting [Default Settings]Reset all the settings to the default values other than the following options.
Sheet/Dialog Box Option
[Quality] sheet - [Advanced Settings] dialog box
[Color Halftones]
[B & W Halftones]
[Use Pure Black]
[Quality] - [Color Settings] - [Color Adjustment] sheet [Sample Type]
3Click [OK].
For details on the basic printing procedure, see "Basic Printing Procedure."
Selecting a "Profile"

019A-04R
Print Server Environment
Configuring the Print Server
Checking the Settings of Your Network
Installation on Clients
Installing from the Printer Folder
Installing from [Windows Explorer]
Using the Printer in the Print Server Environment
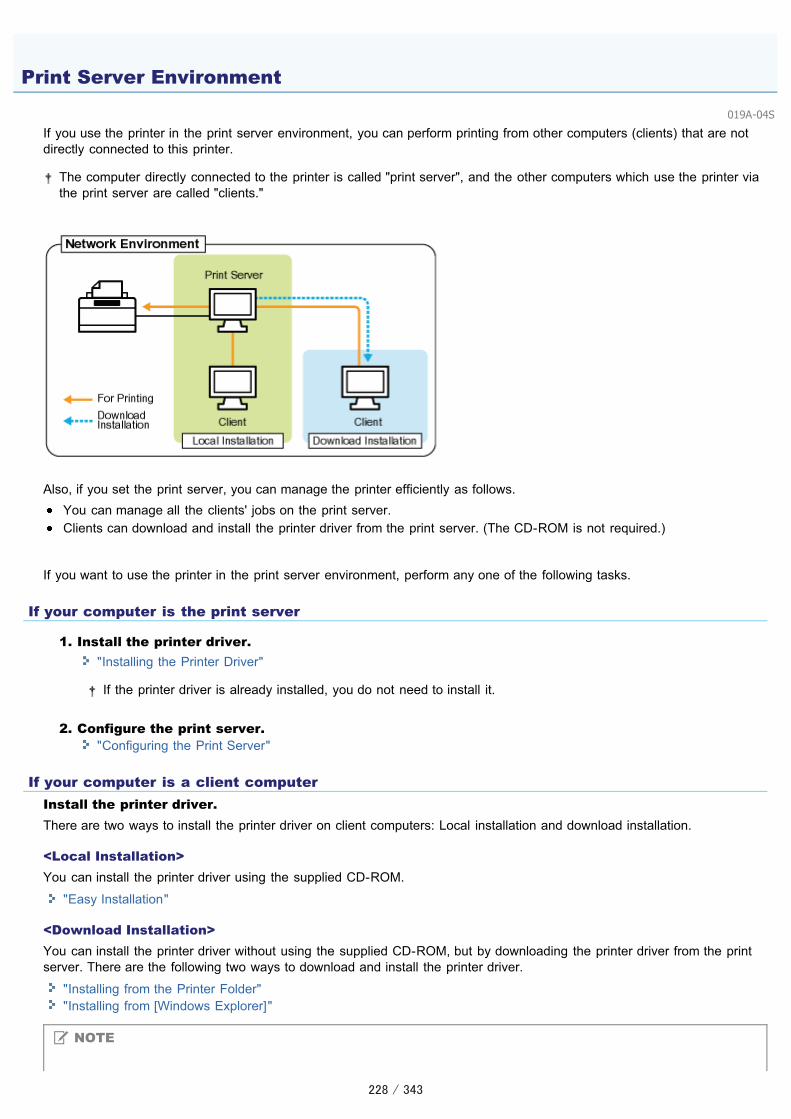
019A-04S
If you use the printer in the print server environment, you can perform printing from other computers (clients) that are notdirectly connected to this printer.
The computer directly connected to the printer is called "print server", and the other computers which use the printer viathe print server are called "clients."
Also, if you set the print server, you can manage the printer efficiently as follows.You can manage all the clients' jobs on the print server.Clients can download and install the printer driver from the print server. (The CD-ROM is not required.)
If you want to use the printer in the print server environment, perform any one of the following tasks.
If your computer is the print server
1. Install the printer driver."Installing the Printer Driver"
If the printer driver is already installed, you do not need to install it.
2. Configure the print server."Configuring the Print Server"
If your computer is a client computerInstall the printer driver.There are two ways to install the printer driver on client computers: Local installation and download installation.
<Local Installation>You can install the printer driver using the supplied CD-ROM.
"Easy Installation"
<Download Installation>You can install the printer driver without using the supplied CD-ROM, but by downloading the printer driver from the printserver. There are the following two ways to download and install the printer driver.
"Installing from the Printer Folder""Installing from [Windows Explorer]"
NOTE
Print Server Environment

Precautions when downloading and installing the printer driverIf a 64-bit operating system is running on the print server, the download installation for a client computer on which any ofthe following 32-bit operating systems is running is not supported due to the Windows restriction.
Windows 2000Windows XP (on which no service pack or SP1 is installed)Windows Server 2003 (on which no service pack is installed)
If you download and install the printer driver on any of the above 32-bit operating systems, you may fail to installthe driver and may not be able to open the printing preferences dialog box.
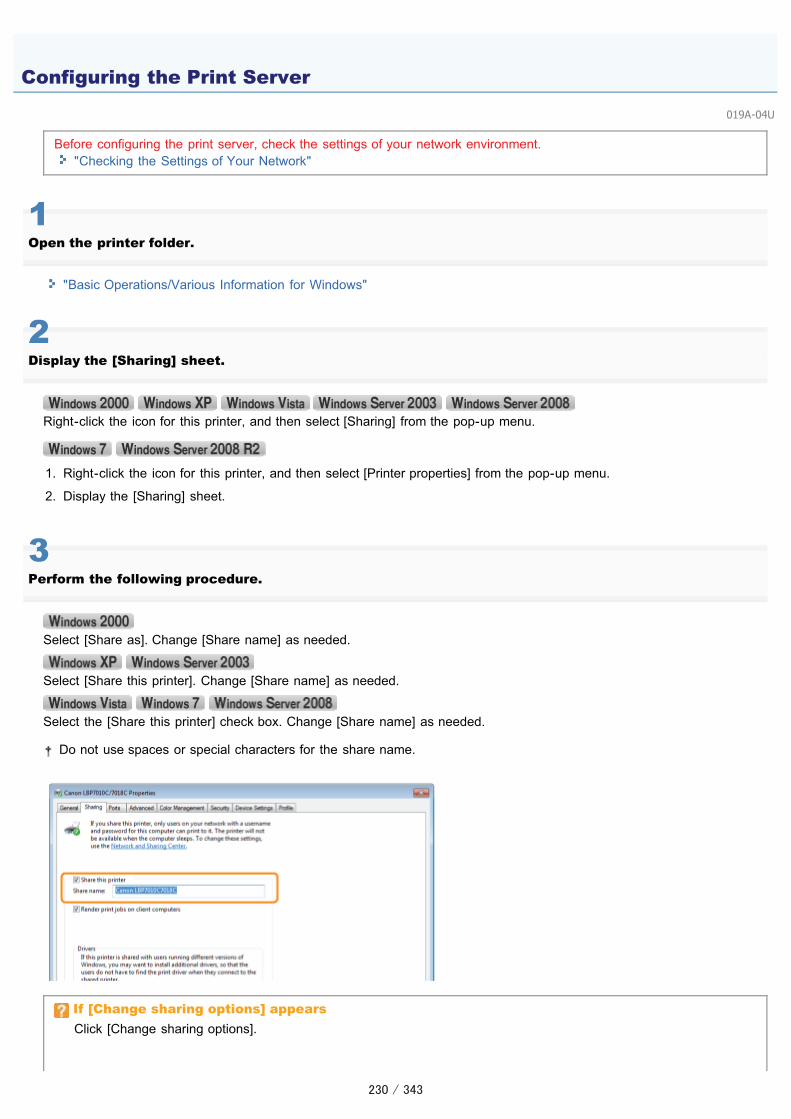
019A-04U
Before configuring the print server, check the settings of your network environment."Checking the Settings of Your Network"
1Open the printer folder.
"Basic Operations/Various Information for Windows"
2Display the [Sharing] sheet.
Right-click the icon for this printer, and then select [Sharing] from the pop-up menu.
1. Right-click the icon for this printer, and then select [Printer properties] from the pop-up menu.
2. Display the [Sharing] sheet.
3Perform the following procedure.
Select [Share as]. Change [Share name] as needed.
Select [Share this printer]. Change [Share name] as needed.
Select the [Share this printer] check box. Change [Share name] as needed.
Do not use spaces or special characters for the share name.
If [Change sharing options] appearsClick [Change sharing options].
Configuring the Print Server

If the [User Account Control] dialog box appears, click [Continue].
Next, install the additional driver using the following procedure.
4Insert the supplied CD-ROM "User Software" into the CD-ROM drive of your computer, and then click[Additional Drivers].
If CD-ROM Setup appears, click [Exit].
NOTE
When updating an additional driver (replacement driver)Perform the following procedure.
1. Uninstall the printer driver on the print server."Uninstalling the Printer Driver"
2. Install the new printer driver on the print server."Installing the Printer Driver"
3. Reinstall the additional driver.
5Select the additional driver.
(1) Select the additional driver.*

(2) Click [OK].
* Select the additional driver as follows according to the operating system on the print server.
Print Server Additional Driver to Be Selected
32-bit operating system Select the [x64] check box.
64-bit operating system(Windows XP and Server 2003)
Select the check box for [Windows 2000, Windows XP andWindows Server 2003] in the [Version] column.
64-bit operating system(Windows Vista, 7, and Server 2008)
Select the check box for [x86] in the [Processor] column.
If you are not sure whether you are using a 32-bit operating system or 64-bit operating system(Windows Vista, 7, and Server 2008)
"Basic Operations/Various Information for Windows"
6Click [Browse].
7Open the folder in which the printer driver is included.
If a 32-bit operating system is running on the print serverOpen the folders in the supplied CD-ROM: [English] - [x64] - [Driver].
If a 64-bit operating system is running on the print serverOpen the folders in the supplied CD-ROM: [English] - [32bit] - [Driver].
8Open the INF file.

(1) Select the INF file.(2) Click [Open].
9Click [OK] to start the installation of the additional driver.
� Wait a moment until the [Sharing] sheet automatically reappears. (It may take a long time to install the additionaldriver.)
If the [User Account Control] dialog box appearsClick [Yes].
10Click [Close] or [OK].
When the following screen appears, you can remove the CD-ROM.

� [State] or the printer icon change to those for the sharing settings.
IMPORTANT
To clear the printer sharing settingsClear it using the following procedure.
Select [Not shared] in the [Sharing] sheet.
Select [Do not share this printer] in the [Sharing] sheet.
Clear the [Share this printer] check box in the [Sharing] sheet.
If [Change sharing options] appears, click [Change sharing options]. If the [User Account Control] dialog box appears, click [Continue].

019A-04W
Before configuring the print server, check the settings of your network environment using the following procedure.
1Perform the following procedure.
���������� ���������������������������)�*��$� �!�+� �#�,������������(
���������� ������������������������ ����� �!��������$��)�*��$� �!�-���������������������)�*��$������������(
���������� ������������������������ ����� �!��������$��.�*���*��$��� ���� �!�� �$������/ � ����*��$connections].
���������� ������������������������ ����� �!��������$��.�*���*��$��� ���� �!�� �$������� ��� ! ,�����������(
���������� ������������������������ �������)�*��$������������������� ���� �����������(
From the [Start] menu, select [Control Panel], double-click [Network and Sharing Center], and then click [Manage networkconnections].
2Display the [Local Area Connection Properties] dialog box.
Right-click the [Local Area Connection] icon, then select [Properties] from the pop-up menu.
Click [Properties].
Checking the Settings of Your Network

If the [User Account Control] dialog box appearsClick [Yes] or [Continue].
3Make sure that [File and Printer Sharing for Microsoft Networks] is selected.
(1) Make sure that the [File and Printer Sharing for Microsoft Networks] check box is selected.(If the check box is not selected, select it.)
(2) Click [OK].
NOTE
If you are using Windows XPYou cannot configure the print server with the operating system default settings (the settings immediately afterinstallation).Before configuring the print server, run [Network Setup Wizard] to enable the printer sharing settings.For more details, see Windows Help.

019A-04X
There are two ways to install the printer driver on client computers: Local installation and download installation.
Local InstallationYou can install the printer driver using the supplied CD-ROM.
"Easy Installation"
Download InstallationYou can install the printer driver without using the supplied CD-ROM, but by downloading the printer driver from the printserver. There are the following two ways to download and install the printer driver.
"Installing from the Printer Folder""Installing from [Windows Explorer]"
NOTE
Precautions when downloading and installing the printer driverIf a 64-bit operating system is running on the print server, the download installation for a client computer on which any ofthe following 32-bit operating systems is running is not supported due to the Windows restriction.
Windows 2000Windows XP (on which no service pack or SP1 is installed)Windows Server 2003 (on which no service pack is installed)
If you download and install the printer driver on any of the above 32-bit operating systems, you may fail to installthe driver and may not be able to open the printing preferences dialog box.
Installation on Clients

019A-04Y
The procedure for installing the printer driver from the printer folder varies depending on your operating system.See the following according to your operating system.
Windows Vista, 7, and Server 2008Windows XP and Server 2003Windows 2000
Windows Vista, 7, and Server 2008
1Turn the computer on, and then log on to Windows.
2Open the printer folder.
"Basic Operations/Various Information for Windows"
3Click [Add a printer].
4Click [Add a network, wireless or Bluetooth printer].
Installing from the Printer Folder

5Click [The printer that I want isn't listed].
6Perform the following procedure.
(1) Select [Select a shared printer by name].(2) Click [Next].
7Select a shared printer.

(1) Select a shared printer on the print server.(2) Click [Select].
NOTE
Specifying the network path directlySpecify the network path as "\\the print server name (the computer name of the print server)\the printer name."
8Click [Install driver].
If the [User Account Control] dialog box appearsClick [Yes] or [Continue].
9Click [Next].
When [Set as the default printer] is displayed, select whether or not to use the printer as the default printer. (WindowsVista and Server 2008)

10Click [Finish].
If you want to print a test page, click [Print a test page].
When [Set as the default printer] is displayed, select whether or not to use the printer as the default printer. (Windows7 and Server 2008 R2)
Windows XP and Server 2003
1Turn the computer on, and then log on to Windows.
2Open the printer folder.
"Basic Operations/Various Information for Windows"
3Display [Add Printer Wizard].
Click [Add a printer].
Double-click [Add Printer].

4Click [Next].
5Select a printer type.
(1) Select [A network printer, or a printer attached to another computer].(2) Click [Next].
6Perform the following procedure.
(1) Select [Connect to this printer].(2) Click [Next].

7Select a shared printer.
(1) Select a shared printer on the print server.(2) Click [Next].
If the [Connect to Printer] dialog box appearsFollow the directions in the message.
NOTE
Specifying the network path directlySpecify the network path as "\\the print server name (the computer name of the print server)\the printer name."
8When the following screen appears, select whether or not to use this printer as the default printer.
(1) If you want to use the printer as the default printer, select [Yes].(2) Click [Next].

9Click [Finish].
Windows 2000
1Turn the computer on, and then log on to Windows.
2Open the printer folder.
"Basic Operations/Various Information for Windows"
3Double-click [Add Printer].

4Click [Next].
5Select a printer type.
(1) Select [Network printer].(2) Click [Next].
6Perform the following procedure.
(1) Select [Type the printer name, or click Next to browse for a printer].(2) Click [Next].
7

Select a shared printer.
(1) Select a shared printer on the print server.(2) Click [Next].
NOTE
Specifying the network path directlySpecify the network path as "\\the print server name (the computer name of the print server)\the printer name."
8Select whether or not to use the printer as the default printer.
(1) If you want to use the printer as the default printer, select [Yes].(2) Click [Next].
9Click [Finish].

019A-050
1Turn the computer on, and then log on to Windows.
2Display [Windows Explorer].
���������� ������������������������ ������������� ���������������������0��!�*��12,�����(
3Perform the following procedure.
(1) Select the print server from [Network] or [My Network Places].(2) Double-click the shared printer icon or drag and drop the icon into the printer folder.
4Follow the on-screen instructions to install the printer driver.
Installing from [Windows Explorer]

019A-051
Printer Unit Problems
Printing Cannot Be PerformedThe Printer Takes a Long Time to Start the Print JobThe Printer Pauses during Printing, and then Printing Repeatedly Starts and StopsYou Cannot Turn the Printer ONSteam Is Emitted from the Printer Output AreaThe Adobe Type Manager (ATM) Font Cannot Be Used
Driver Problems
You Cannot Install the Printer DriverYou Cannot Uninstall the Printer DriverThe Printer Driver Settings Cannot Be Changed"Profiles" Cannot Be Selected or Edited
Paper Jams
Paper Jams
Error Display
Indicators on the Printer Are On/BlinkingA Message Appears in the Printer Status Window
Printout Problems
Poor Printout Results
Troubleshooting
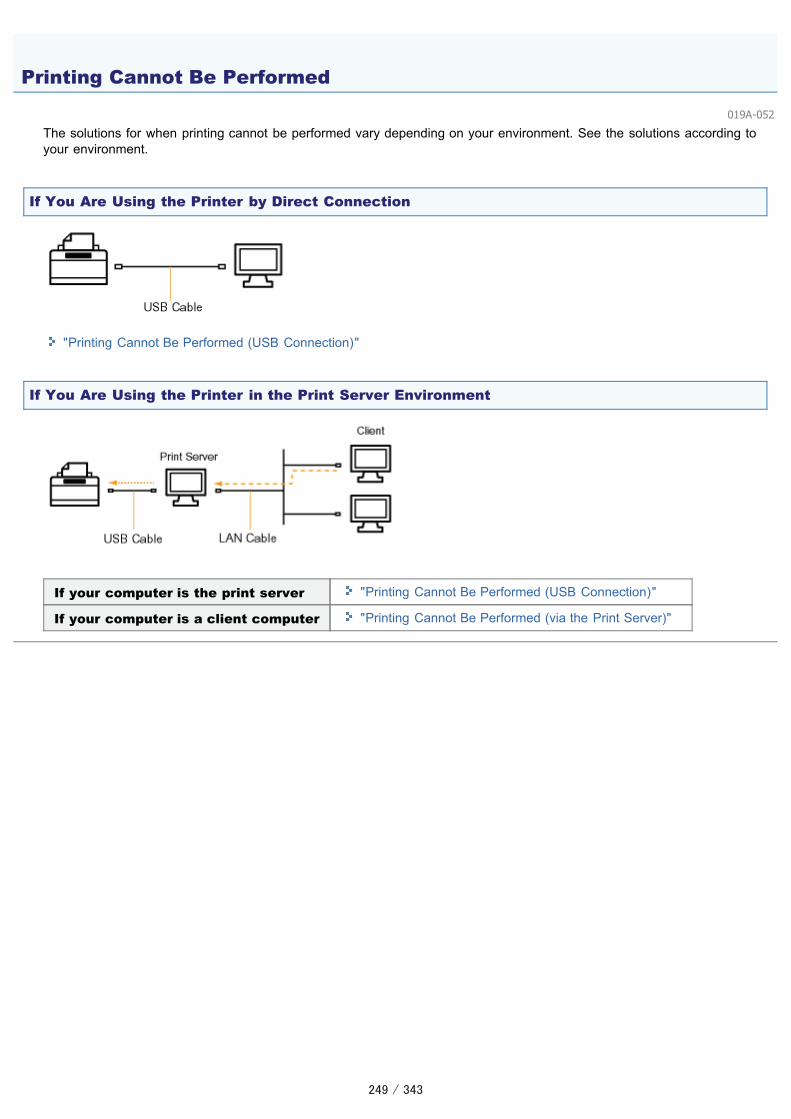
019A-052
The solutions for when printing cannot be performed vary depending on your environment. See the solutions according toyour environment.
If You Are Using the Printer by Direct Connection
"Printing Cannot Be Performed (USB Connection)"
If You Are Using the Printer in the Print Server Environment
If your computer is the print server "Printing Cannot Be Performed (USB Connection)"
If your computer is a client computer "Printing Cannot Be Performed (via the Print Server)"
Printing Cannot Be Performed

019A-053
If you cannot print when the printer is connected to the computer by a USB cable, check the problem following thequestions below.
<Question 1> Is the printer turned ON? (Is the (Power) indicator on?)
ON To <Question 2>
OFF Turn the printer ON.
Cannot be turned ON "You Cannot Turn the Printer ON"
<Question 2> Is the Toner indicator or the (Paper) indicator on/blinking?
On/Blinking "Indicators on the Printer Are On/Blinking"
Off/Not blinking To <Question 3>
<Question 3> Is the USB cable connected properly?
Try the following point.
Printing Cannot Be Performed (USB Connection)
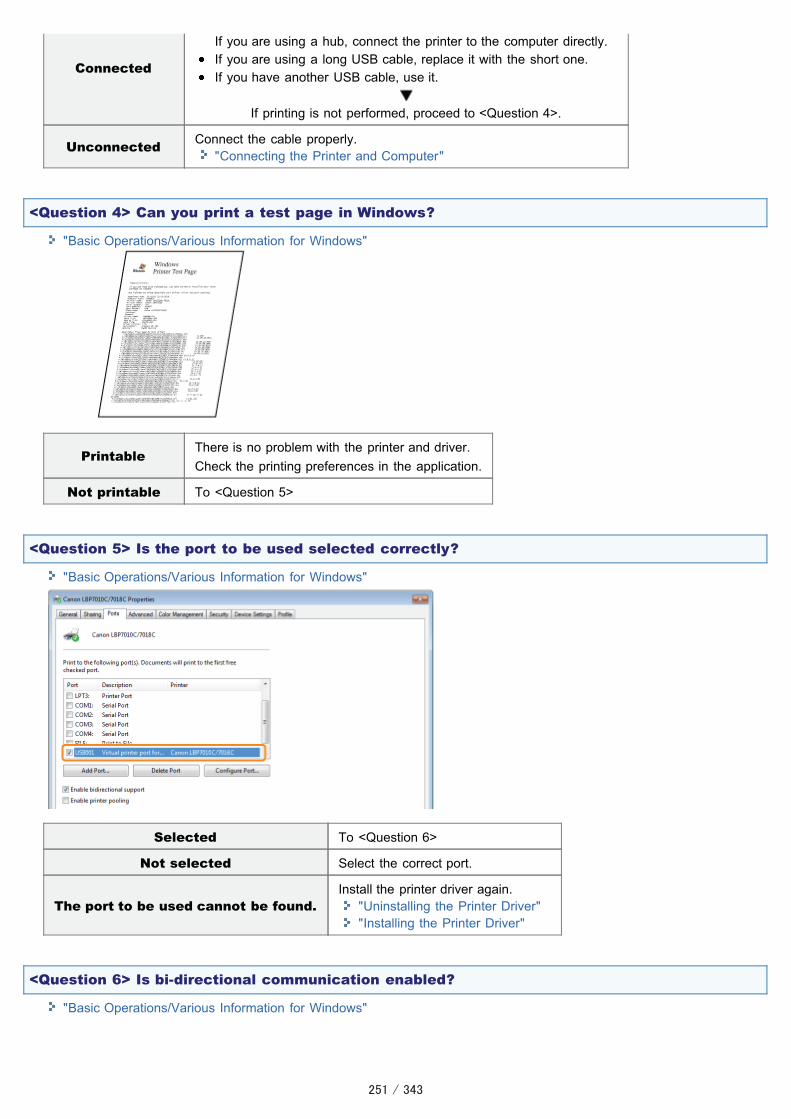
Connected
If you are using a hub, connect the printer to the computer directly.If you are using a long USB cable, replace it with the short one.If you have another USB cable, use it.
If printing is not performed, proceed to <Question 4>.
Unconnected Connect the cable properly."Connecting the Printer and Computer"
<Question 4> Can you print a test page in Windows?
"Basic Operations/Various Information for Windows"
Printable There is no problem with the printer and driver.Check the printing preferences in the application.
Not printable To <Question 5>
<Question 5> Is the port to be used selected correctly?
"Basic Operations/Various Information for Windows"
Selected To <Question 6>
Not selected Select the correct port.
The port to be used cannot be found.Install the printer driver again.
"Uninstalling the Printer Driver""Installing the Printer Driver"
<Question 6> Is bi-directional communication enabled?
"Basic Operations/Various Information for Windows"

Enabled To <Question 7>
Not enabled Enable bi-directional communication and restart the computer and printer.
<Question 7> Try the following points.
Make resident software invalid including security software.If any other devices are connected to your computer by USB connection, disconnect those unneeded.If drivers or software of any other devices (USB connection) is installed on your computer, uninstall those unneeded.Connect the USB cable to another USB port on your computer.Connect the printer to another computer with a USB cable.
If printing does not work, proceed to <Question 8>.
<Question 8> Install the printer driver again.
"Uninstalling the Printer Driver""Installing the Printer Driver"
If printing does not work, proceed to <Question 9>.
<Question 9> Uninstall the USB class driver, and then install the printer driver again.
"Uninstalling the USB Class Driver""Uninstalling the Printer Driver""Installing the Printer Driver"
If printing does not work, contact your local authorized Canon dealer.

019A-054
If you cannot print when the printer is used via the print server, check the problem following the questions below.
<Question 1> Is the printer turned ON? (Is the (Power) indicator on?)
ON To <Question 2>
OFF Turn the printer ON.
Cannot be turned ON "You Cannot Turn the Printer ON"
<Question 2> Is the Toner indicator or the (Paper) indicator on/blinking?
On/Blinking "Indicators on the Printer Are On/Blinking"
Off/Not blinking To <Question 3>
<Question 3> Is the printer connected to the print server properly?
Connected To <Question 4>
Unconnected Connect the cable properly."Connecting the Printer and Computer"
<Question 4> Can your computer be connected to the print server or the shared printer?
Printing Cannot Be Performed (via the Print Server)

Can be connected To <Question 5>
Cannot be connected "The Print Server for Connection Cannot Be Found""The Shared Printer Cannot Be Accessed"
<Question 5> Check the following points.
The print server is connected to the network properly.The additional driver (alternate driver) is updated properly. "Configuring the Print Server"
Printing can be performed from the print server.
If printing does not work, proceed to <Question 6>.
<Question 6> Can you print a test page in Windows?
"Basic Operations/Various Information for Windows"
Printable There is no problem with the printer and driver.Check the printing preferences in the application.
Not printable To <Question 7>
<Question 7> Is the printer on the print server displayed on the network?
"Basic Operations/Various Information for Windows"
Displayed To <Question 8>
Not displayed Ask your network administrator about the problem.

<Question 8> Install the printer driver again.
"Uninstalling the Printer Driver""Installation on Clients"
When installing the printer driver again, change the installation method.If you performed the local installation (installing the printer driver with the CD-ROM)��� ��������� �� ��������!������!�*��� !����� �� �����3���� ��������,������!��'��*���������+#&4/5(
If you performed the download installation (installing the printer driver without the CD-ROM)��� ��������� �� ��������!��������� ������ �� �����3���� ��������,������!��'��*������+#&4/5(
If printing does not work, proceed to <Question 9>.
<Question 9> Can another client print?
Printable Make resident software invalid including security software.
Not printable Contact your local authorized Canon dealer.

019A-055
Perform one of the following solutions according to the cause.
<Cause 1> The LAN cable is not connected properly.
Solution Connect the print server to the client computer with the LAN cable properly.
<Cause 2> The print server has not been started up.
Solution Start up the print server.
<Cause 3> The printer is not specified as a shared printer.
Solution Specify the printer as a shared printer."Configuring the Print Server"
<Cause 4> The user does not have permission to access the print server or printer.
Solution Ask your network administrator to change the user permissions.
<Cause 5> [Network discovery] is not enabled. (Windows Vista, 7, and Server 2008)
Solution
Perform the following procedure.
1. From the [Start] menu, select [Control Panel].2. Click [View network status and tasks].3. Set [Network discovery] to [On].
1. From the [Start] menu, select [Control Panel].2. Click [View network status and tasks].3. Click [Change advanced sharing settings].4. Specify [Turn on network discovery] in [Network discovery].
1. From the [Start] menu, select [Control Panel].2. Double-click [Network and Sharing Center].3. Set [Network discovery] to [On].
The Print Server for Connection Cannot Be Found

019A-056
Perform one of the following solutions according to the cause.
<Cause 1> The user of the computer to be used is not registered, or the password is notspecified.
Solution Register the user of the computer to be used or specify the password on the print server.For more details, ask your network administrator.
<Cause 2> The path to the network is not correct.
Solution 1
Check printers in the print server."Basic Operations/Various Information for Windows"
If the icon for this printer is not displayedAsk your network administrator about the problem.If the icon for this printer is displayedYou can install the printer driver by performing either of the following procedures and following theinstructions on the screen.
Double-clicking the icon for this printerDragging and dropping the icon for this printer into the printer folder
Solution 2 If you want to specify the network path directly, check if the network path is specified correctly as "\\theprint server name (the computer name of the print server)\the printer name."
The Shared Printer Cannot Be Accessed

019A-057
<Cause 1> The printer stops until temperature inside the printer is lowered so that the printquality is maintained (especially after paper with a narrower width is printed).
Solution Please wait a moment.Printing resumes after temperature inside the printer is lowered.
<Cause 2> This problem may occur in some applications depending on the processing type ofthe print data.
Solution
Performing the following procedure in the printer driver may be able to solve the problem.
1. Display the [Finishing] sheet.2. Click [Advanced Settings].3. Change the [EMF Spooling] setting.
When [EMF Spooling] is set to [On], the Printer Status Window may not be displayed automatically.In this case, display it manually.(For details on methods for displaying the Printer Status Window, see "Printer Status Window.")
The Printer Takes a Long Time to Start the Print Job

019A-07W
<Cause> If the printer is used continuously for an extended period of time, the internaltemperature of the printer increases, activating a safety mechanism and pausing printingtemporarily.
Solution
Please wait a moment.When the inside of the printer cools down, printing resumes.If the internal temperature of the printer has not decreased sufficiently, the safety mechanism isreactivated and printing is paused temporarily. When the inside temperature cools down sufficiently, theprinter resumes the normal printing speed.
The time until the safety mechanism activates or until the printer resumes the normal printing speedvaries depending on the printer usage conditions.
The Printer Pauses during Printing, and then Printing Repeatedly Startsand Stops
019A-058
Perform one of the following solutions according to the cause.
<Cause 1> The power plug is unplugged from the AC power outlet.
Solution Plug the power plug into the AC power outlet.
<Cause 2> The printer is plugged to an extension cord or multiple power strip.
Solution Plug the power plug directly into an AC power outlet.
<Cause 3> The breakers have tripped.
Solution Reset the breakers on the switch board.
<Cause 4> There is a break in the power cord.
Solution If the printer can be turned on after replacing the power cord with one that is of the same type, thenpurchase a new power cord and replace the broken one.
You Cannot Turn the Printer ON

019A-059
<Cause> Moisture in the paper evaporated due to the heat generated when the toner fixes.(particularly when the room temperature is low).
Solution
Although this is not a malfunction, you can prevent the steam emission by replacing the paper with newpaper in an unopened package.Also, store paper away from moisture.
"Precautions for Paper"
Steam Is Emitted from the Printer Output Area

019A-05A
<Cause> The printer does not support the Adobe Type Manager (ATM) font.
Solution Use a font which this printer supports.
The Adobe Type Manager (ATM) Font Cannot Be Used

019A-05C
If a problem occurs during the installation
Select a problem during the installation from any of the following.
Connection with a USB cable
"The Printer Is Not Recognized Automatically (Easy Installation)"
Connection via the print server(Client)
"The Print Server for Connection Cannot Be Found""The Shared Printer Cannot Be Accessed"
If the printer driver is not installed properly
Perform the following procedure.
Solution 1Install the printer driver again.
"Uninstalling the Printer Driver""Installing the Printer Driver"
Solution 2(Only when connecting with USB)
Uninstall the USB class driver, and then install the printer driver again."Uninstalling the USB Class Driver""Uninstalling the Printer Driver""Installing the Printer Driver"
You Cannot Install the Printer Driver

019A-05E
Perform one of the following solutions according to the cause.
<Cause 1> The printer is not turned ON.
Solution Turn the printer ON.
<Cause 2> The USB cable is not connected properly.
Solution Make sure that the printer and computer are properly connected with the USB cable."Connecting the Printer and Computer"
<Cause 3> The USB cable was already connected and the printer was turned ON before theprinter driver was installed.
Solution
Perform the following procedure.
1. Turn the printer OFF.2. Disconnect the USB cable.3. Connect the USB cable again.4. While the following screen appears, turn the printer ON.
<Cause 4> An inappropriate USB cable is being used.
Solution
Use a USB cable that is appropriate for the USB interface environment of the printer and has the followingsymbol.
The following is the USB interface environment of this printer.Hi-Speed USBUSB
<Cause 5> The USB class driver is installed.
Solution Uninstall the USB class driver."Uninstalling the USB Class Driver"
The Printer Is Not Recognized Automatically (Easy Installation)

019A-05F
Perform the following procedure.
Solution 1
Start the uninstaller directly from the supplied CD-ROM, and then uninstallthe printer driver.
"Starting the Uninstaller from the CD-ROM""Uninstalling the Printer Driver"
Solution 2(Only when connecting with USB)
Uninstall the USB class driver."Uninstalling the USB Class Driver"
NOTE
If a user without administrative rights installed the printer driverYou may not be able to uninstall the printer driver successfully depending on your operating system.In this case, uninstall the printer driver using the following procedure.
1. Open the printer folder."Basic Operations/Various Information for Windows"
2. Right-click the icon for this printer, then select [Remove device] or [Delete] from the pop-up menu.3. Click [Yes].
If the [User Account Control] dialog box appears, click [Yes].4. Uninstall the printer driver using the uninstaller.
"Uninstalling the Printer Driver"
You Cannot Uninstall the Printer Driver

019A-05H
1Insert the supplied CD-ROM "User Software" into the CD-ROM drive of your computer.
When the following screen appears, click [Exit].
If the [AutoPlay] dialog box appearsSelect [Open folder to view files], and then proceed to Step 4.
2Display [Computer] or [My Computer].
"Basic Operations/Various Information for Windows"
3Right-click the CD-ROM icon, then select [Open] from the pop-up menu.
Starting the Uninstaller from the CD-ROM

4Open the folder in which the uninstaller is included.
For a 32-bit operating systemOpen the [English] - [32bit] - [MISC] folders.
For a 64-bit operating systemOpen the [English] - [x64] - [MISC] folders.

5Double-click [CNACBUN.exe] or [CNACBUND.exe].
If the [User Account Control] dialog box appearsClick [Yes] or [Continue].
For details on the uninstallation, see "Uninstalling the Printer Driver."

019A-05J
Uninstall the USB class driver under the following circumstances.If the printer driver installed using a USB connection cannot be uninstalled properlyIf you cannot install the printer driver properly even after reinstalling it
When uninstalling the USB class driver, be sure to perform the following procedure.
If you delete the USB class driver, it is automatically installed again by USB connection.
1Check the following.
The printer and computer are connected using a USB cable.The printer is turned ON.
2Perform the following procedure.
���������� ������������������������������������ ����� �!����!��"�#����$���!!%&��'������ ���(
From the [Start] menu, select [Control Panel], and then click [Add or Remove Programs].
From the [Start] menu, select [Control Panel], and then click [Uninstall a program].
���������� ������������������������ ��������!!����&��'������ ���(
From the [Start] menu, select [Control Panel], and then double-click [Programs and Features].
3Make sure that [Canon LBP7010C/7018C] is not displayed.
(1) Make sure that [Canon LBP7010C/7018C] is not displayed in the dialog box.(2) Click [ ] to close the dialog box.
If [Canon LBP7010C/7018C] is displayedDelete [Canon LBP7010C/7018C] in the dialog box. (Uninstall the printer driver.)
Uninstalling the USB Class Driver

"Starting the Uninstaller from [Control Panel]" "Uninstalling the Printer Driver"
4Display [Device Manager].
1. ���������� ����������������������������������� ���(2. Double-click the [System] icon.3. ����$����6 �!* ���� "����+'���/ � ���(
1. From the [Start] menu, select [Control Panel].2. ����$����7��� ��� �!�/ ���� ��������8����(3. ����$����6 �!* ���� "����+'���/ � ���(
1. From the [Start] menu, select [Control Panel].2. ����$��6 �!* �� �!�����!������6 �!* ������+'���/ � ���(
1. ���������� ������������������������ ��������8����(2. ����$����6 �!* ���� "����+'���/ � ���(
1. From the [Start] menu, select [Control Panel].2. Double-click [Device Manager].
If the [User Account Control] dialog box appearsClick [Yes] or [Continue].
5Double-click [Universal Serial Bus controllers].
6Right-click [USB Printing Support], then select [Uninstall] from the pop-up menu.
Do not uninstall any drivers for other devices. If you uninstall them by mistake, Windows may not operate properly.

If the USB class driver is not installed properly, [USB Printing Support] is not displayed. Then, click [ ] to close the[Device Manager] dialog box.
If the USB class driver is under [Other Devices]Select the USB class driver which is displayed as [Unknown device], and then uninstall it.
7Click [OK].
8Click [ ] to close the [Device Manager] dialog box.
9Disconnect the USB cable from the computer, then restart Windows.

019A-05K
If [Spooling at Host] (whether the print data are processed in the computer) is set to [Disabled], you cannot change thedriver settings because some options are unavailable.To change the settings, set [Spooling at Host] to [Auto] using the following procedure.
1Open the printer folder.
"Basic Operations/Various Information for Windows"
2Right-click the icon for this printer, and then select [Printer properties] or [Properties] from the pop-up menu.
3Change the setting for [Spooling at Host].
(1) Display the [Device Settings] sheet.(2) Select [Auto] for [Spooling at Host].
If you cannot change the settingYou need administrative rights to change the setting.Contact your system administrator.
The Printer Driver Settings Cannot Be Changed

4Click [OK].

019A-05L
When the [Allow Profile Selection] and [Allow Setting Edition] check boxes are cleared, selecting and editing a "Profile" arerestricted.To select or edit a "Profile", select the check box using the following procedure.
1Open the printer folder.
"Basic Operations/Various Information for Windows"
2Right-click the icon for this printer, and then select [Printer properties] or [Properties] from the pop-up menu.
3Change the settings for [Define Document Property].
(1) Display the [Profile] sheet.(2) Select the [Allow Profile Selection] and [Allow Setting Edition] check boxes.
"Profiles" Cannot Be Selected or Edited

If you cannot change the settingYou need administrator rights to change the setting.Contact your system administrator.
4Click [OK].
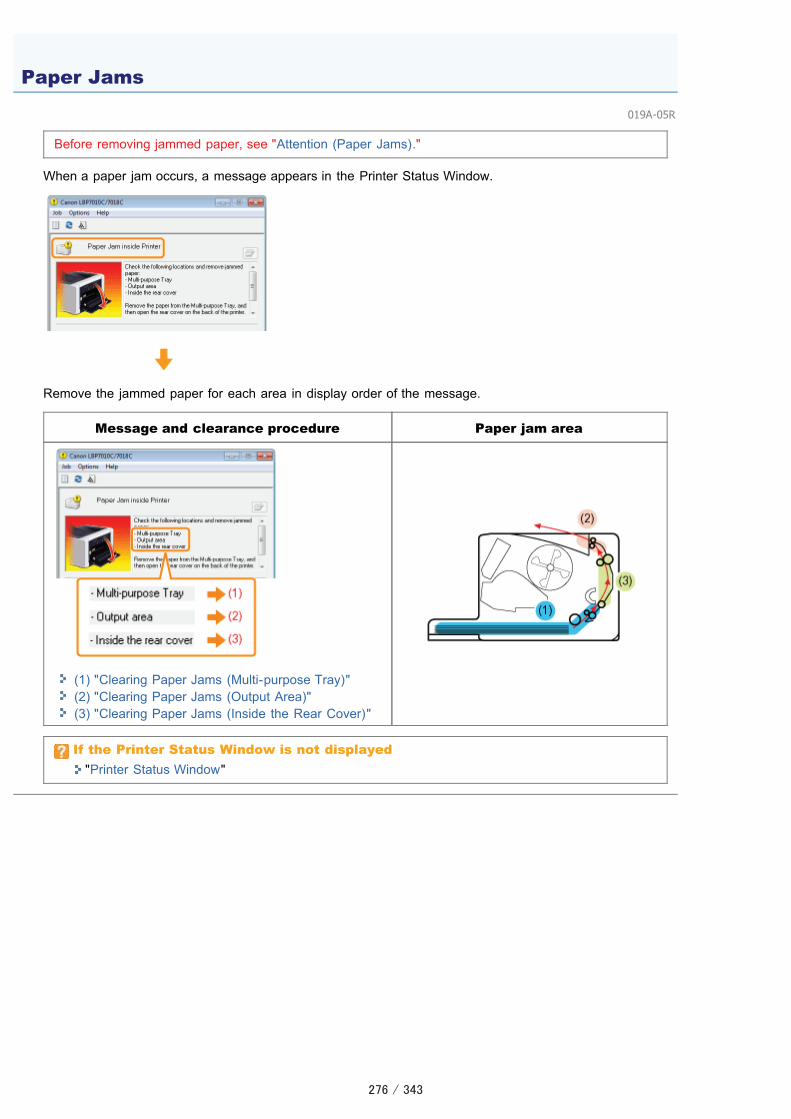
019A-05R
Before removing jammed paper, see "Attention (Paper Jams)."
When a paper jam occurs, a message appears in the Printer Status Window.
Remove the jammed paper for each area in display order of the message.
Message and clearance procedure Paper jam area
(1) "Clearing Paper Jams (Multi-purpose Tray)"(2) "Clearing Paper Jams (Output Area)"(3) "Clearing Paper Jams (Inside the Rear Cover)"
If the Printer Status Window is not displayed "Printer Status Window"
Paper Jams

019A-05S
See "Important Safety Instructions" also.
IMPORTANT
Leave the printer ON when removing the jammed paper.If the power is turned off, the data being printed will be deleted.
Do not remove the jammed paper forcefully.Removing jammed paper with excess force may cause the paper to tear or damage the inside of the printer. Remove thepaper by pulling it gently.
If the paper is tornRemove all remaining pieces of paper.
Do not touch the transfer roller.Print quality may deteriorate.
Attention (Paper Jams)

019A-07X
1Remove the tray cover.
2Remove the paper by pulling it gently.
If you cannot remove the paper easily, do not try to remove it forcefully but perform a procedure for another area which isdisplayed in a message.
3Install the tray cover.
Next, proceed to the procedure for clearing the paper jam which is occurred in another area displayed in themessage.
(1) "Clearing Paper Jams (Multi-purpose Tray)"
(2) "Clearing Paper Jams (Output Area)"
(3) "Clearing Paper Jams (Inside the Rear Cover)"
Clearing Paper Jams (Multi-purpose Tray)

019A-07Y
1Remove the paper by pulling it gently.
If you cannot remove the paper easily, do not try to remove it forcefully but perform a procedure for another area which isdisplayed in a message.
Next, proceed to the procedure for clearing the paper jam which is occurred in another area displayed in themessage.
(1) "Clearing Paper Jams (Multi-purpose Tray)"
(2) "Clearing Paper Jams (Output Area)"
(3) "Clearing Paper Jams (Inside the Rear Cover)"
Clearing Paper Jams (Output Area)

019A-080
1Open the rear cover.
2Remove the jammed paper.
(1) Hold both sides of the paper and slowly pull them down.(2) Remove the paper by pulling it gently.
3Close the rear cover.
� The paper jam message disappears, and the printer is ready to print.
Clearing Paper Jams (Inside the Rear Cover)

019A-05U
The indicators on the printer display the printer status as follows.Perform solutions according to the indicators are on/blinking.
Name Status Solution
(1) Toner Indicator
(Blinking theall colors)
The toner cartridges are beingmoved.
Wait until the toner cartridges stopmoving.
(Example: Black)
(On)
An error is occurring for the tonercartridges.(Such as when the tonercartridges have reached the endof their life)
Solve the problem following themessage displayed in the Printer StatusWindow.*1
"A Message Appears in the PrinterStatus Window"
(Example: Black)
(Blinking)
The toner cartridges are in thereplacement position.
(2) Paper Indicator(On)
The printer is in the toner cartridgereplacement mode*2.
(Blinking)
Paper needs to be checked.(Such as when paper runs out andwhen paper cannot be fedproperly)
Reload the paper properly, and thenpress the [ ] (Paper) key on theprinter.*3
(3) Power Indicator
(On)
The printer is turned ON.
*1 For details on the procedure for displaying the Printer Status Window, see "Printer Status Window."*2 It is a state where you can move the toner cartridges to the replacement position manually. For details, see "Moving
Toner Cartridges by Using Paper Key on the Printer."*3
Indicators on the Printer Are On/Blinking

For details on the procedure for loading paper, see "Loading Paper."

019A-05W
Perform solutions according to the displayed message.
The message type varies depending on the icon.
A service call is occurring.
" Service Error"
Communication cannot be performed with the printer.
" Incompatible Printer" " Network Board Error"
" Cannot Communicate with Server" " Cannot Communicate with Printer"
" Communication Error" " Incorrect Port"
The printer problems need to be corrected.
" Cannot Print" " Incorrect Toner Cartridge Position"
" Could Not Print" " Check the Toner Cartridges"
" Check the Printed Output" " Replace Toner Cartridges"
" Cover Open" " No Drum Cartridge"
" Paper Jam inside Printer" " Check the Drum Cartridge"
" Calibration Error" " Replace Drum Cartridge"
" Cleaning Required" " Updating Firmware"
" Waiting for Cleaning" " Printer Not Ready"
" Wrong Color Toner Cartridges" " Insufficient Memory"
" Insufficient Disk Space" " Out of Paper or Paper Could Not be Fed"
" No Toner Cartridge" " Check the Paper"
The printer pauses.
" Resume Printing" " Start Cleaning"
Service Error
<Cause> The printer is in an abnormal condition.
Solution Perform the procedure described in "When <Service Error> Is Displayed."
A Message Appears in the Printer Status Window

Incompatible Printer
<Cause> The connected printer cannot be used.
Solution Connect to the supported printer.
Cannot Communicate with Server
<Cause> The client computer cannot communicate with the print server.
Solution Check the status of the print server and your computer.
Communication Error
<Cause> The USB cable is not connected, or the printer is not turned ON.
Solution 1 Connect the USB cable.
Solution 2 Turn the printer ON.
Network Board Error
<Cause> The LAN cable is not connected to the network adaptor. Alternatively, the network adaptorand the printer are not turned ON.
Solution 1 Connect the LAN cable to the network adaptor.
Solution 2 Turn ON the printer and the network adaptor.
Cannot Communicate with Printer
<Cause 1> Because the bi-directional communication function is not enabled, the computer cannotcommunicate with the printer.
Solution Enable bi-directional communication and restart the computer and printer."Basic Operations/Various Information for Windows"
<Cause 2> The computer cannot communicate with the printer redirected in the terminal connectionenvironment.
Solution The Firewall settings and so on may be the cause.Check the communication settings for the server, clients, and so on.
Incorrect Port
<Cause> The printer is connected to a port which the printer does not support.
Solution Check the port."Basic Operations/Various Information for Windows"

Cannot Print
<Cause> Printing cannot be performed due to security restrictions.
Solution Contact your administrator.
Could Not Print
<Cause> Data transfer to the printer timed out, or a transfer error has occurred.
Solution 1Clicking [ ] (Resolve Error) continues printing.However, the error message may appear again.
Solution 2 Cancel the print job, and then print again."Canceling a Job"
Check the Printed Output
<Cause> You may not be able to obtain appropriate printout results.
Solution 1Clicking [ ] (Resolve Error) continues printing.However, the error message may appear again.
Solution 2 Cancel the print job, and then print again."Canceling a Job"
Cover Open
<Cause> The top cover or rear cover is open.
Solution Close the top cover and rear cover.
Paper Jam inside Printer
<Cause> A paper jam is occurring.
SolutionDo not pull out the jammed paper forcefully but remove it following the procedure described in the e-Manual.
"Paper Jams"
Calibration Error
<Cause> Calibration could not be finished properly.
Solution 1
Cancel printing, make sure that the toner remains in the toner cartridges, and then perform calibrationagain.
"Canceling a Job""Checking the Consumables Status""Adjusting Color (Calibration)"
When the toner cartridges have reached end of their life, replace those cartridges, and thenperform calibration again.
"Toner Cartridge Replacement"

Solution 2Clicking [ ] (Resolve Error) continues printing.However, data may not be printed in correct color.
Cleaning Required
<Cause> Cleaning the fixing roller of the printer is required.
Solution 1 Perform [Fixing Unit Cleaning 1]."Cleaning the Fixing Roller of the Printer"
Solution 2 Clicking [ ] (Resolve Error) continues printing.
Waiting for Cleaning
<Cause> The printer is waiting for that cleaning the fixing roller of the printer is performed.
Solution Another user need cleaning during printing a job, wait a moment until the user is complete cleaning.
Wrong Color Toner Cartridges
<Cause> wrong color toner cartridges are installed at the loading position for the displayed colors.
Solution Install the toner cartridges to the appropriate positions for each color."Replacing the Toner Cartridge"
Insufficient Disk Space
<Cause> The disk space on the computer or server is insufficient.
SolutionDelete unnecessary files.Click [ ] (Resolve Error) to resume printing after deleting the unnecessary files.
No Toner Cartridge
<Cause> The toner cartridges of the displayed colors are not installed.
Solution Install the toner cartridges."Replacing the Toner Cartridge"
Incorrect Toner Cartridge Position
<Cause> The toner cartridges are in incorrect position because the top cover is open while the tonercartridges are moving.
Solution Close the top cover.
Check the Toner Cartridges

<Cause 1> The toner cartridges of the displayed colors are not installed properly.
Solution 1 Install the toner cartridges again."Replacing the Toner Cartridge"
Solution 2 Turn the printer OFF, make sure that the (Power) indicator is off, wait for 10 seconds or longer, andthen turn it ON again.
<Cause 2> The toner cartridges of the displayed colors are damaged.
Solution Replace the toner cartridges with a new one."Replacing the Toner Cartridge"
Replace Toner Cartridges
<Cause 1> The toner cartridges of the displayed colors have reached the end of their life.
Solution
Replace the toner cartridges with a new one."Replacing the Toner Cartridge"
You can continue printing as is by clicking [ ] (Resolve Error), however, as this may result indamage to the printer.
<Cause 2> Print quality cannot be guaranteed due to the toner cartridges of the displayed colorsreaching the end of their life and so on.
Solution
Replace the toner cartridges with a new one."Replacing the Toner Cartridge"
You can continue printing as is by clicking [ ] (Resolve Error), however, print quality maydeteriorate.
No Drum Cartridge
<Cause> The drum cartridge is not installed.
Solution Install the drum cartridge."Replacing the Drum Cartridge"
Check the Drum Cartridge
<Cause 1> The drum cartridge is not installed properly.
Solution 1 Install the drum cartridge again."Replacing the Drum Cartridge"
Solution 2 Turn the printer OFF, make sure that the (Power) indicator is off, wait for 10 seconds or longer, andthen turn it ON again.
<Cause 2> The drum cartridge is damaged.
Solution Replace the drum cartridge with a new one.

"Replacing the Drum Cartridge"
Replace Drum Cartridge
<Cause> Print quality cannot be guaranteed due to a drum cartridge reaching the end of its life.
Solution
Replace the drum cartridge with a new one."Replacing the Drum Cartridge"
You can continue printing as is by clicking [ ] (Resolve Error), however, print quality maydeteriorate.
Updating Firmware
<Cause> The firmware is being updated.
Solution Please wait a moment.
Printer Not Ready
<Cause> The packing materials (sheet) are left in the output area.
SolutionTurn the printer OFF, make sure that the (Power) indicator is off, remove the packing material (sheet),and then turn it ON again.
"Removing the Packing Materials"
Insufficient Memory
<Cause> The memory on the computer or server is insufficient.
Solution Exit unnecessary applications.
Out of Paper or Paper Could Not be Fed
<Cause> Paper ran out or could not be fed properly.
Solution Load the paper properly, and then press the [ ] (Paper) key on the printer."Loading Paper"
Check the Paper
<Cause> The paper size of the current job is different from that of the previous job.
Solution 1 Load the appropriate paper, and then press the [ ] (Paper) key on the printer."Loading Paper"
Solution 2 Clicking [ ] (Resolve Error) allows the printer to print on the currently loaded paper.
Resume Printing

<Cause> You can resume printing because cleaning is complete.
SolutionLoad the appropriate paper, and then click [ ] (Resolve Error) or press the [ ] (Paper) key on theprinter.
"Loading Paper"
Start Cleaning
<Cause> The printer is waiting for that the cleaning page is loaded.
SolutionLoad the cleaning page in the multi-purpose tray with the printed side facing down, and press the [ ](Paper) key on the printer.
"Performing [Fixing Unit Cleaning 2]"

019A-05X
If <Service Error> is displayed in the Printer Status Window, perform the following procedure to cycle the power of theprinter.
1Turn the printer OFF, make sure that the (Power) indicator is off, wait for 10 seconds or longer,and then turn it ON again.
If the message does not reappear, the printer is ready.
If the message reappears, you need to request service. Follow the procedure below, and then contact your local authorized Canon dealer to request service.
2Note down the error code displayed in the Printer Status Window.
3Turn the printer OFF, then disconnect the cables or cords from the printer.
When <Service Error> Is Displayed

<How to disconnect the cable or cord>
USB cable(2) Turn the computer off.(3) Disconnect the cable from the printer.
Power cord(4) Disconnect the power plug from the AC power outlet.(5) Disconnect the cord from the printer.
4Contact your local authorized Canon dealer to request service.
When contacting your Canon dealer, please report also the error code which you noted down in Step 2.
If you are not sure what the problem is, contact your local authorized Canon dealer.

019A-05Y
Paper curls or creases.
Paper CurlsPaper Creases
Streaks (lines) appear.
White Streaks (Lines) AppearBlack Streaks (Lines), Smudge Marks, or White Points Appear
Unevenness or smudge marks appear.
Printing Is UnevenPrinted Pages Have White SpecksThe Toner Does Not Fix onto the Paper WellThe Printed Paper Has Smudge MarksSmudge Marks of Spattering Toner Appear around the Text or PatternsThe Back of the Printed Paper Has Smudge MarksThe Overall Print Result Is DarkResidual Images Appear on Non-printed AreasWhite Dust Is Attached to the Printed Transparencies
Printing is faint, is faded, has a problem with color, and so on.
The Overall Print Result Is FaintPrinting Is FadedColored Text Appears BlurredData Is Not Printed in the Correct Color (Specified Color) Due to "Out-of-Register Colors"Thin Lines or Fill Patterns Are Not Printed with the Specified Colors or Do Not Appear At AllShaded Patterns Are Not Printed in the Correct Color (Specified Color)Photographs and so on Are Printed in Different Colors from Those Displayed on the MonitorFill Patterns and Borders Are Not Printed in the Correct Color (Specified Color) Even When the SameColor Is Specified for ThemAdjusting the Color and so on for Printing
Printout is skewed, missing, or has unneeded space.
Poor Printout Results

The Printing Position Is SkewedA Portion of the Page Is Not PrintedData Is Reduced and PrintedThe Next Page Is Printed from Halfway across the Previous Page
Others
Blank Paper Is Output (Nothing Is Printed on the Paper)The Overall Surface of the Paper Is Printed in a Particular ColorThe Printout Is Different from What Is Displayed on ScreenThe Flap of the Printed Envelope SticksMultiple Sheets of Paper Are Fed at a TimePrinted Transparencies or Coated Paper Are Stuck Each Other or Printed Images Are Peeled OffPoor Print Quality Is Always Occurs at a Particular Position (the Same Position) on Paper
NOTE
Contacting your local authorized Canon dealerIf a problem that is not indicated in the e-Manual occurs, if none of the suggested measures solve the problem, or if youcannot determine the problem, contact your local authorized Canon dealer.
When using the printer in a certain environmentIf you use the printer in a certain environment or print certain paper, the data may not be printed properly or result indeterioration in print quality.To solve such problems, a service engineer may specify the print settings according to the operating environment or thepaper.The settings specified by the service engineer are registered in [Service Settings] in [Special Print Mode] in the printerdriver. Print with [Service Settings] specified, following the instructions of the service engineer.

019A-060
Perform one of the following solutions according to the cause.
<Cause 1> Damp paper is used.
Solution Replace the paper with new paper in an unopened package."Precautions for Paper"
<Cause 2> Appropriate paper is not being used.
Solution Replace the paper with that which can be used with this printer."Usable Paper"
<Cause 3> Depending on the paper type or the operating environment (especially in a high-humidity environment), the paper may curl as either of the following.
Side View Front View
Solution 1
Perform the following procedure in the printer driver.
1. Display the [Paper Source] sheet.2. Change the [Paper Type] setting as follows.
<Current Setting> <Changed Setting>
[Plain Paper] � [Plain Paper L]
[Plain Paper H] � [Plain Paper]
[Heavy Paper 1] � [Plain Paper H]
[Heavy Paper 2] � [Heavy Paper 1]
[Envelope H] � [Envelope]
[Coated Paper 2] � [Coated Paper 1]
[Coated Paper 3] � [Coated Paper 2]
If you change the settings, the toner may not fix onto paper well, and the printing may come outfaint.
Paper Curls

Solution 2
Perform the following procedure in the printer driver.
1. Display the [Finishing] sheet.2. Click [Advanced Settings].3. Set [Special Print Mode] to [Special Settings C3].
If the problem is not improved, specify [Special Settings D2].
Normally, use the printer with [Special Print Mode] set to [Off]. Change the settings only if thedescribed problems occur.
If you specify [Special Settings D2], printing speed drops.

019A-061
Perform one of the following solutions according to the cause.
<Cause 1> The paper is not loaded properly.
Solution Load the paper properly."Loading Paper"
<Cause 2> Damp paper is used.
Solution Replace the paper with new paper in an unopened package."Precautions for Paper"
<Cause 3> Appropriate paper is not being used.
Solution Replace the paper with that which can be used with this printer."Usable Paper"
<Cause 4> There is a foreign object inside the printer.
Solution Remove the foreign object inside the printer.
<Cause 5> Depending on the paper type or the operating environment (especially in a high-humidity environment), the paper may be creased.
Solution 1
Perform the following procedure in the printer driver.
1. Display the [Paper Source] sheet.2. Change the [Paper Type] setting as follows.
<Current Setting> <Changed Setting>
[Plain Paper] � [Plain Paper L]
[Plain Paper H] � [Plain Paper]
[Heavy Paper 1] � [Plain Paper H]
[Heavy Paper 2] � [Heavy Paper 1]
[Envelope H] � [Envelope]
[Coated Paper 2] � [Coated Paper 1]
[Coated Paper 3] � [Coated Paper 2]
Paper Creases

If you change the settings, the toner may not fix onto paper well, and the printing may come outfaint.
Solution 2
Perform the following procedure in the printer driver.
1. Display the [Finishing] sheet.2. Click [Advanced Settings].3. Set [Special Print Mode] to [Special Settings C3].
If the problem is not improved, specify [Special Settings D2].
Normally, use the printer with [Special Print Mode] set to [Off]. Change the settings only if thedescribed problems occur.
If you specify [Special Settings D2], printing speed drops.
<Cause 6> Depending on the printer status, the paper may be creased.
Solution
Perform the following procedure in the printer driver.
1. Display the [Finishing] sheet.2. Click [Advanced Settings].3. Set [Special Print Mode] to [Special Settings D1].
Normally, use the printer with [Special Print Mode] set to [Off]. Change the settings only if thedescribed problems occur.
If you specify [Special Settings D1], toner fixation may deteriorate. In this case, do not specify[Special Settings D1].
<Cause 7> When printing envelopes, the envelopes may crease depending on the type of theenvelopes or the operating environment (especially in a high-humidity environment).
Solution
Perform the following procedure in the printer driver.
1. Display the [Finishing] sheet.2. Click [Advanced Settings].3. Set [Special Print Mode] to [Special Settings B6].
Normally, use the printer with [Special Print Mode] set to [Off]. Change the settings only if thedescribed problems occur.

019A-062
Perform one of the following solutions according to the cause.
<Cause 1> Short white streaks (lines) appear at equal distance on the images depending onthe operating environment (especially in a high-humidity environment).
Solution Clean the photosensitive drum of the printer."Cleaning the Photosensitive Drum of the Printer"
<Cause 2> The photosensitive drum of the printer is deteriorated.
Solution Replace the drum cartridge with a new one."Drum Cartridge Replacement"
White Streaks (Lines) Appear

019A-081
Perform the following procedure.
<Cause> Black streaks (lines), smudge marks, or white points may appear on the imagesdepending on the operating environment (especially in a high-humidity or low-temperatureenvironment).
Solution Clean the photosensitive drum of the printer."Cleaning the Photosensitive Drum of the Printer"
Black Streaks (Lines), Smudge Marks, or White Points Appear

019A-063
Perform one of the following solutions according to the cause.
<Cause 1> Paper is too moist or too dry.
Solution Replace the paper with new paper in an unopened package."Precautions for Paper"
<Cause 2> The toner cartridges are almost out of toner.
Solution
Check the toner cartridges status and replace the toner cartridges of the colors are nearing the end oftheir life.
"Checking the Consumables Status""Toner Cartridge Replacement"
<Cause 3> The photosensitive drum of the printer is deteriorated.
Solution Replace the drum cartridge with a new one."Drum Cartridge Replacement"
<Cause 4> If the printer has not printed for a long period of time, strip-shaped unevennessmay appear.
Solution
Perform the following procedure in the printer driver.
1. Display the [Finishing] sheet.2. Click [Advanced Settings].3. Set [Special Print Mode] to [Special Settings J5].
Normally, use the printer with [Special Print Mode] set to [Off]. Change the settings only if thedescribed problems occur.
If you specify [Special Settings J5], unevenness or a phenomenon of "Out-of-Register Colors" mayoccur on the overall printed images, or the data may not be printed in the correct scaling factor(the specified scaling factor). In this case, do not specify [Special Settings J5].
<Cause 5> If the printer is used for a long period of time, unevenness may appear.
Perform the following procedure in the printer driver.
1. Display the [Finishing] sheet.2. Click [Advanced Settings].3. Set [Special Print Mode] to [Special Settings J6].
Printing Is Uneven

Solution Normally, use the printer with [Special Print Mode] set to [Off]. Change the settings only if thedescribed problems occur.
If you specify [Special Settings J6], unevenness or a phenomenon of "Out-of-Register Colors" mayoccur on the overall printed images, or the data may not be printed in the correct scaling factor(the specified scaling factor). In this case, do not specify [Special Settings J6].

019A-064
Perform one of the following solutions according to the cause.
<Cause 1> Appropriate paper is not being used.
Solution Replace the paper with that which can be used with this printer."Usable Paper"
<Cause 2> Damp paper is used.
Solution Replace the paper with new paper in an unopened package."Precautions for Paper"
<Cause 3> The photosensitive drum of the printer is deteriorated.
Solution Replace the drum cartridge with a new one."Drum Cartridge Replacement"
<Cause 4> Printed pages may have white specks depending on the application or data youuse.
Solution
Perform the following procedure in the printer driver.
1. Display the [Finishing] sheet.2. Click [Advanced Settings].3. Set [Rendering Mode] to [Mode 2].
Specifying [Mode 2] may deteriorate printer performance depending on the application or data youuse.
Printed Pages Have White Specks

019A-065
Perform one of the following solutions according to the cause.
<Cause 1> The setting for [Paper Type] is not specified properly.
Solution
Specify [Paper Type] properly.
If you are using envelopes, specify [Envelope H].
"Basic Printing Procedure"
<Cause 2> Appropriate paper is not being used.
Solution Replace the paper with that which can be used with this printer."Usable Paper"
<Cause 3> Depending on the paper type, toner fixation may deteriorate.
Solution
Perform the following procedure in the printer driver.
1. Display the [Finishing] sheet.2. Click [Advanced Settings].3. Set [Special Print Mode] to [Special Settings G2].
Normally, use the printer with [Special Print Mode] set to [Off]. Change the settings only if thedescribed problems occur.
If you specify [Special Settings G2], curls on the printed paper may become large or unevennessmay appear. In this case, do not specify [Special Settings G2].
<Cause 4> A problem is occurring inside the printer.
Solution If <Service Error> is displayed in the Printer Status Window, perform the solution using the procedure in"When <Service Error> Is Displayed."
The Toner Does Not Fix onto the Paper Well

019A-066
Perform the following procedure.
<Cause> The fixing roller is dirty.
Solution Clean the fixing roller."Cleaning the Fixing Roller of the Printer"
The Printed Paper Has Smudge Marks

019A-068
Perform one of the following solutions according to the cause.
<Cause 1> Appropriate paper is not being used.
Solution Replace the paper with that which can be used with this printer."Usable Paper"
<Cause 2> Depending on the paper type or the operating environment (especially in a low-humidity environment), smudge marks of spattering toner may appear.
Solution
Perform the following procedure in the printer driver.
1. Display the [Finishing] sheet.2. Click [Advanced Settings].3. Set [Special Print Mode] to [Special Settings A5].
If the problem is not solved, specify [Special Settings D7].
Normally, use the printer with [Special Print Mode] set to [Off]. Change the settings only if thedescribed problems occur.
When using paper that has been stored in an environment high in temperature and humidity, donot specify [Special Settings A5]. Print quality may deteriorate.
Smudge Marks of Spattering Toner Appear around the Text or Patterns
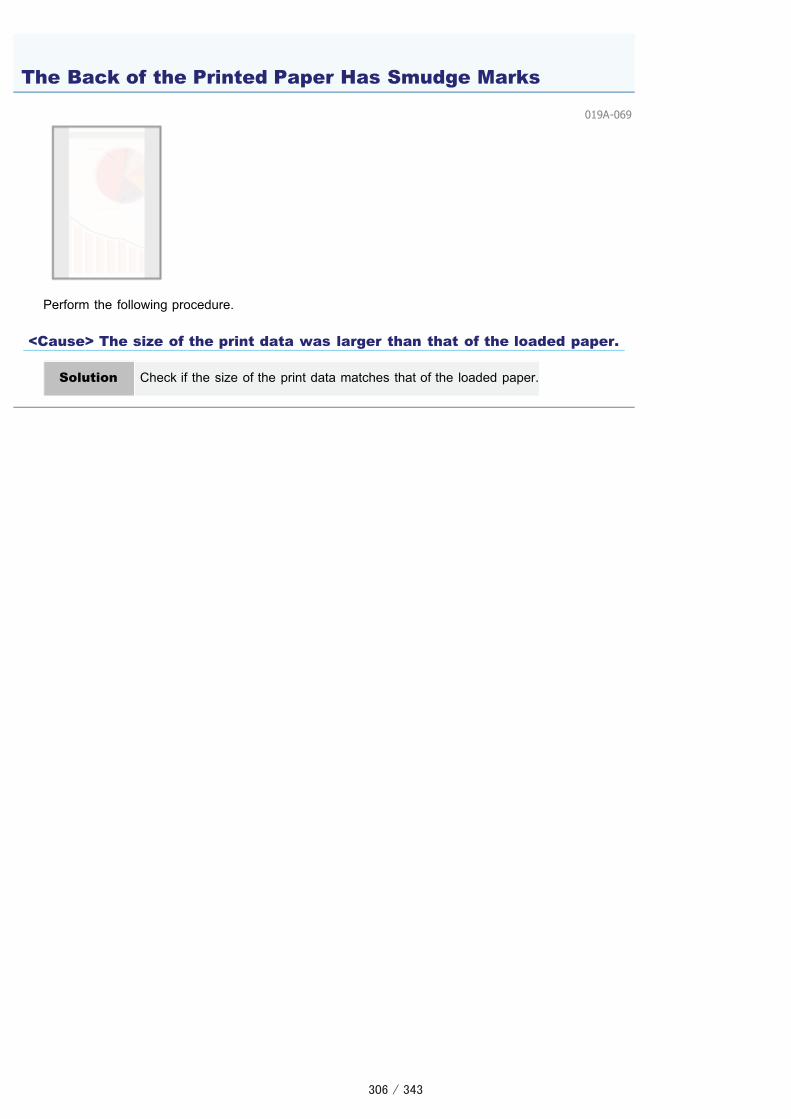
019A-069
Perform the following procedure.
<Cause> The size of the print data was larger than that of the loaded paper.
Solution Check if the size of the print data matches that of the loaded paper.
The Back of the Printed Paper Has Smudge Marks

019A-06A
Perform one of the following solutions according to the cause.
<Cause 1> The setting for the toner density is not appropriate.
Solution Adjust the toner density for printing to a lighter setting."Adjusting the Toner Density"
<Cause 2> The printer is exposed to direct sunlight or strong light.
Solution Move the printer."Moving the Printer"
The Overall Print Result Is Dark

019A-06C
Perform one of the following solutions according to the cause.
<Cause 1> Appropriate paper is not being used.
Solution Replace the paper with that which can be used with this printer."Usable Paper"
<Cause 2> Depending on the paper type or the operating environment (especially in a high-humidity environment), residual images may appear.
Solution 1
Perform the following procedure in the printer driver.
1. Display the [Paper Source] sheet.2. Change the [Paper Type] setting as follows.
<Current Setting> <Changed Setting>
[Plain Paper] � [Plain Paper L]
[Plain Paper H] � [Plain Paper]
[Heavy Paper 1] � [Plain Paper H]
[Heavy Paper 2] � [Heavy Paper 1]
[Envelope H] � [Envelope]
[Coated Paper 2] � [Coated Paper 1]
[Coated Paper 3] � [Coated Paper 2]
If you change the settings, the toner may not fix onto paper well, and the printing may come outfaint.
Solution 2
Perform the following procedure in the printer driver.
1. Display the [Finishing] sheet.2. Click [Advanced Settings].3. Set [Special Print Mode] to [Special Settings C3].
If the problem is not improved, specify [Special Settings D2].
Normally, use the printer with [Special Print Mode] set to [Off]. Change the settings only if thedescribed problems occur.
If you specify [Special Settings D2], printing speed drops.
Residual Images Appear on Non-printed Areas

<Cause 3> Depending on the printer status, residual images may appear.
Solution
Perform the following procedure in the printer driver.
1. Display the [Finishing] sheet.2. Click [Advanced Settings].3. Set [Special Print Mode] to [Special Settings D1].
Normally, use the printer with [Special Print Mode] set to [Off]. Change the settings only if thedescribed problems occur.
If you specify [Special Settings D1], toner fixation may deteriorate. In this case, do not specify[Special Settings D1].
<Cause 4> Depending on the paper type, images on a previous page may be printed faintly oncontinuous printing *.
* For example, images on the fourth page are printed faintly on the fifth page.
Solution
Perform the following procedure in the printer driver.
1. Display the [Finishing] sheet.2. Click [Advanced Settings].3. Set [Special Print Mode] to [Special Settings D3].
Normally, use the printer with [Special Print Mode] set to [Off]. Change the settings only if thedescribed problems occur.
<Cause 5> The photosensitive drum of the printer is deteriorated.
Solution Replace the drum cartridge with a new one."Drum Cartridge Replacement"

019A-06E
Perform the following procedure.
<Cause> You print transparencies after printing paper other than transparency continuously.
Solution Wipe and remove the chipped paper with a soft cloth.
White Dust Is Attached to the Printed Transparencies
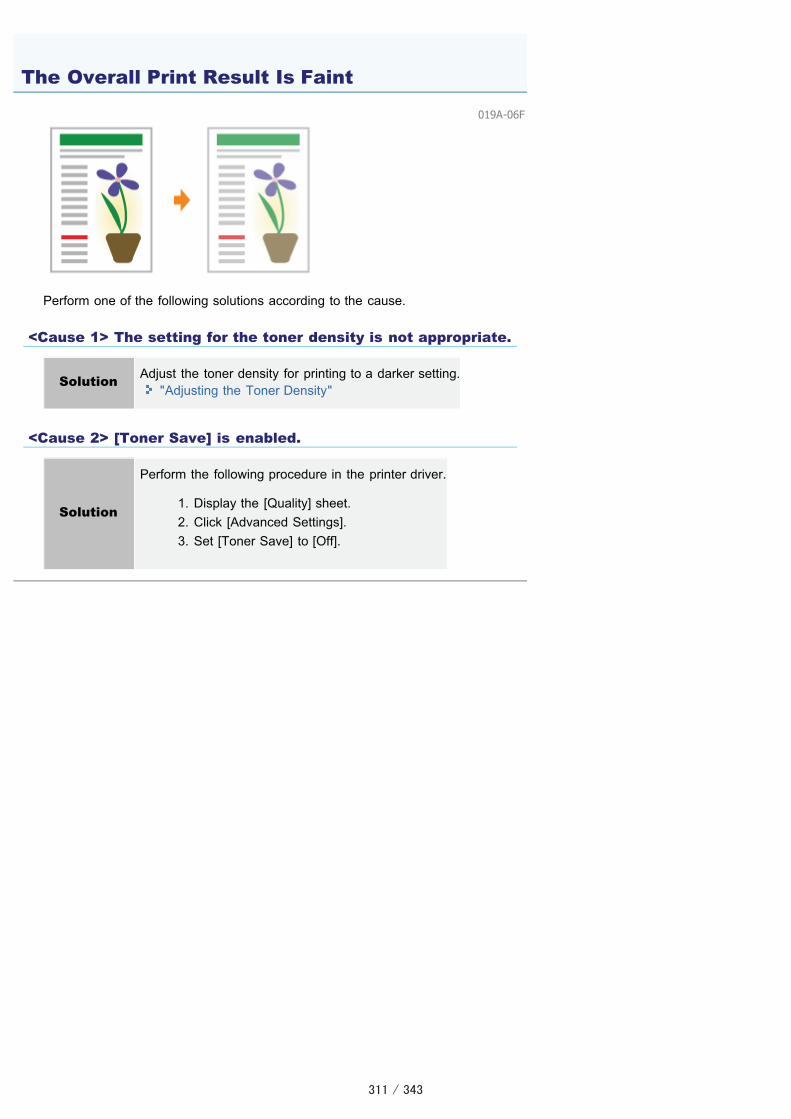
019A-06F
Perform one of the following solutions according to the cause.
<Cause 1> The setting for the toner density is not appropriate.
Solution Adjust the toner density for printing to a darker setting."Adjusting the Toner Density"
<Cause 2> [Toner Save] is enabled.
Solution
Perform the following procedure in the printer driver.
1. Display the [Quality] sheet.2. Click [Advanced Settings].3. Set [Toner Save] to [Off].
The Overall Print Result Is Faint

019A-082
Perform one of the following solutions according to the cause.
<Cause 1> The setting for [Paper Type] is not specified properly.
Solution
Specify [Paper Type] properly.
If you are using envelopes, specify [Envelope H].
"Basic Printing Procedure"
<Cause 2> Appropriate paper is not being used.
Solution Replace the paper with that which can be used with this printer."Usable Paper"
<Cause 3> The toner cartridges have reached the end of their life.
Solution
Check the toner cartridges status and replace the toner cartridges of the colors have reached the end oftheir life.
"Checking the Consumables Status""Toner Cartridge Replacement"
<Cause 4> When coarse paper is used, the toner does not fix onto paper well, and the printmay come out faint.
Solution
Perform the following procedure in the printer driver.
1. Display the [Finishing] sheet.2. Click [Advanced Settings].3. Set [Special Print Mode] to [Special Settings A6].
Normally, use the printer with [Special Print Mode] set to [Off]. Change the settings only if thedescribed problems occur.
<Cause 5> Depending on the paper type or the operating environment (especially in a high-humidity environment), images in which two or more colors (especially red, blue, and green)are overlaid may come out faint.
Perform the following procedure in the printer driver.
1. Display the [Finishing] sheet.
Printing Is Faded

Solution2. Click [Advanced Settings].3. Set [Special Print Mode] to [Special Settings B4].
Normally, use the printer with [Special Print Mode] set to [Off]. Change the settings only if thedescribed problems occur.

019A-083
Perform one of the following solutions according to the cause.
<Cause 1> A bold font is being used for the colored text.
Solution
Perform the following procedure in the printer driver.
1. Display the [Quality] sheet.2. Select the [Manual Color Settings] check box.3. Click [Color Settings].4. Display the [Matching] sheet.5. Set [Matching Method] to [Perceptual [Monitor Color Matched]].
<Cause 2> Colored text appears blurred due to a phenomenon of "Out-of-Register Colors."
Solution Perform the described solutions in "Data Is Not Printed in the Correct Color (Specified Color) Due to "Out-of-Register Colors"."
Colored Text Appears Blurred

019A-084
Perform one of the following solutions according to the cause.
<Cause 1> The toner cartridges are not installed properly.
Solution Check the installation status of the toner cartridges."Replacing the Toner Cartridge"
<Cause 2> Appropriate paper is not being used.
Solution Replace the paper with that which can be used with this printer."Usable Paper"
<Cause 3> The toner cartridges are almost out of toner.
Solution
Check the toner cartridges status and replace the toner cartridges of the colors are nearing the end oftheir life.
"Checking the Consumables Status""Toner Cartridge Replacement"
<Cause 4> The photosensitive drum of the printer is deteriorated.
Solution Replace the drum cartridge with a new one."Drum Cartridge Replacement"
<About Out-of-Register Colors>Laser printers are manufactured with technology of high precision. A phenomenon of "Out-of-Register Colors" may beslightly conspicuous depending on the print image. Please note that this is due to the structure of laser printers and isnot a printer malfunction.If you mind a phenomenon of "Out-of-Register Colors" during color printing, you may be able to improve the problem byperforming the following procedure in the printer driver.
1. Display the [Finishing] sheet.
2. Click [Advanced Settings].
3. Set [Special Print Mode] to [Special Settings C4].
Normally, use the printer with [Special Print Mode] set to [Off]. Change the settings only if the described problemsoccur.
Data Is Not Printed in the Correct Color (Specified Color) Due to "Out-of-Register Colors"

If you specify [Special Settings C4], printing speed drops.

019A-085
Perform one of the following solutions according to the cause.
<Cause 1> Some of the colors cannot be reproduced because of the combination of colors orpatterns.
Solution 1 Adjust the colors in the application and print again.See the instruction manual supplied with the application.
Solution 2 Change the patterns in the application and print again.See the instruction manual supplied with the application.
<Cause 2> The colors may appear different depending on the halftone pattern.
Solution 1 Readjust to a darker color and print again.See the instruction manual supplied with the application.
Solution 2 Reload paper to change the feeding direction, then print again.
Thin Lines or Fill Patterns Are Not Printed with the Specified Colors orDo Not Appear At All

019A-086
Perform the following procedure.
<Cause> The shaded pattern of the print data and the dither pattern of the printer areinterfering with one another.
Solution 1 Print again without specifying a shaded pattern in the application.See the instruction manual supplied with the application.
Solution 2
Perform the following procedure in the printer driver.
1. Display the [Quality] sheet.2. Click [Advanced Settings].3. Set [Color Halftones] or [B & W Halftones] to [Gradation] or [Color Tone].
Shaded Patterns Are Not Printed in the Correct Color (Specified Color)

019A-087
Perform the following procedure.
<Cause> The methods for adjusting the color on the screen (RGB) and in the printer (YMC) aredifferent. Therefore, the color on the screen may not be printed out exactly as it appears.
Solution 1
Perform the following procedure in the printer driver.
1. Display the [Quality] sheet.2. Select the [Manual Color Settings] check box.3. Click [Color Settings].4. Display the [Matching] sheet.5. Set [Matching Method] to [Perceptual [Monitor Color Matched]].
Solution 2
Perform the following procedure in the printer driver.
1. Display the [Quality] sheet.2. Select the [Manual Color Settings] check box.3. Click [Color Settings].4. Display the [Matching] sheet.5. Select [Gamma Adjustment] in [Matching Mode].6. Change the gamma value for [Gamma].
The larger the value is, the darker in color the data is printed.
Photographs and so on Are Printed in Different Colors from ThoseDisplayed on the Monitor

019A-088
Perform the following procedure.
<Cause> A special process may be applied depending on the line width of the border so thatthin lines are printed clearly.
Solution
Perform the following procedure in the printer driver.
1. Display the [Quality] sheet.2. Select the [Manual Color Settings] check box.3. Click [Color Settings].4. Display the [Matching] sheet.5. Select [Gamma Adjustment] in [Matching Mode].6. Change the gamma value for [Gamma].
The larger the value is, the darker in color the data is printed.
Fill Patterns and Borders Are Not Printed in the Correct Color (SpecifiedColor) Even When the Same Color Is Specified for Them

019A-089
This printer allows you to print with performing the following adjustments and corrections.
Correcting Rough-Textured Images Adjusting the Toner Density
Printing with Brightness and Contrast Adjusted Adjusting the Color
Matching the Color with the Screen Adjusting Color (Calibration)
Adjusting the Color and so on for Printing

019A-06J
Perform one of the following solutions according to the cause.
<Cause 1> [Gutter] is specified.
Solution
Perform the following procedure in the printer driver.
1. Display the [Finishing] sheet.2. Click [Gutter].3. Set [Gutter] to "0."
<Cause 2> "Top Margin" and "Paper Position" in the application are not specified properly.
Solution Specify the settings for "Top Margin" and "Paper Position" in the application properly.See the instruction manual supplied with the application.
The Printing Position Is Skewed

019A-06K
Perform one of the following solutions according to the cause.
<Cause 1> The setting for the scaling factor is not appropriate.
Solution 1
Perform the following procedure in the printer driver.
1. Display the [Page Setup] sheet.2. Clear the [Manual Scaling] check box.
If the [Manual Scaling] check box is cleared, the scale factor will be set according to [Page Size]and [Output Size] automatically.
Solution 2
Perform the following procedure in the printer driver.
1. Display the [Page Setup] sheet.2. Select the [Manual Scaling] check box, then specify an appropriate scale factor according to
the paper size to be used.
<Cause 2> The position of the paper is incorrect.
Solution Load the paper properly."Loading Paper"
<Cause 3> A document with no margins was printed.
Solution 1 Data is printed with a margin of 5 mm (10 mm for envelopes). Provide a margin around the data."Printable Area"
Solution 2
Perform the following procedure in the printer driver.
1. Display the [Finishing] sheet.2. Click [Advanced Settings].3. Set [Expand Print Region and Print] to [On].
Depending on the print data to be printed, the edge of paper may be missing partly during printingor may blot during color printing.
A Portion of the Page Is Not Printed

019A-06L
Perform the following procedure.
<Cause> The setting for the scaling factor is not appropriate.
Solution 1
Perform the following procedure in the printer driver.
1. Display the [Page Setup] sheet.2. Clear the [Manual Scaling] check box.
If the [Manual Scaling] check box is cleared, the scale factor will be set according to [Page Size]and [Output Size] automatically.
Solution 2
Perform the following procedure in the printer driver.
1. Display the [Page Setup] sheet.2. Select the [Manual Scaling] check box, then specify an appropriate scale factor according to
the paper size to be used.
Data Is Reduced and Printed
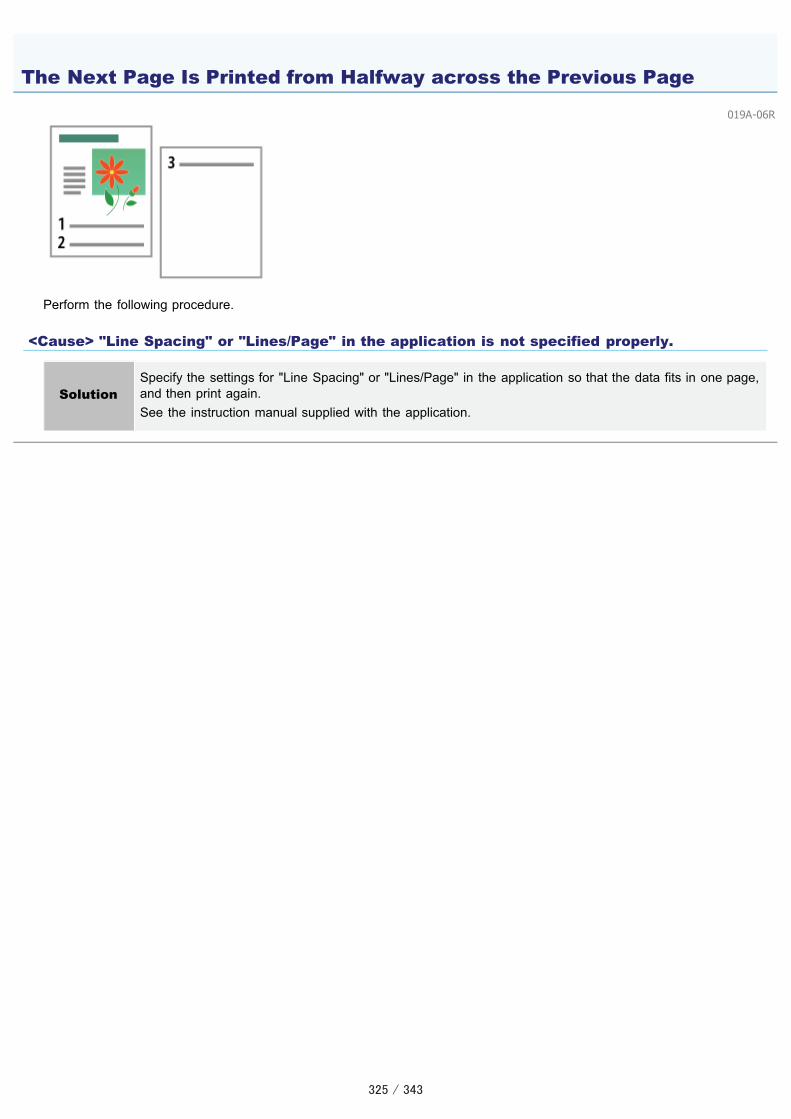
019A-06R
Perform the following procedure.
<Cause> "Line Spacing" or "Lines/Page" in the application is not specified properly.
SolutionSpecify the settings for "Line Spacing" or "Lines/Page" in the application so that the data fits in one page,and then print again.See the instruction manual supplied with the application.
The Next Page Is Printed from Halfway across the Previous Page
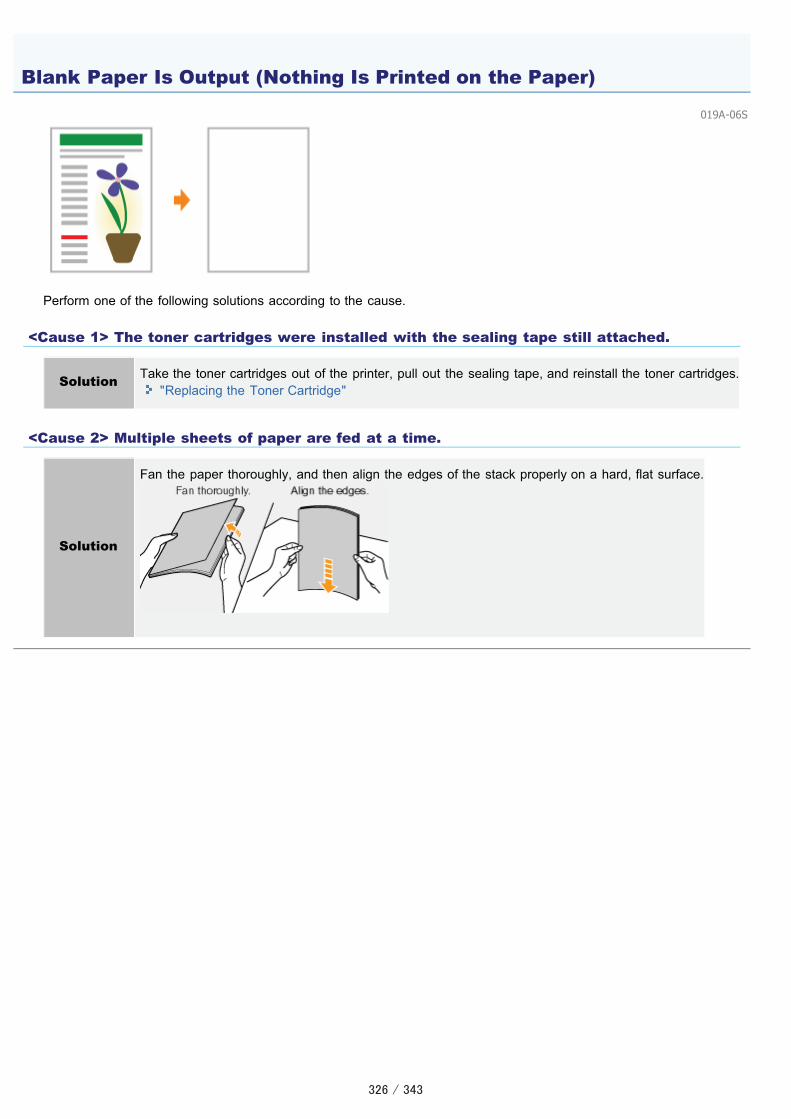
019A-06S
Perform one of the following solutions according to the cause.
<Cause 1> The toner cartridges were installed with the sealing tape still attached.
Solution Take the toner cartridges out of the printer, pull out the sealing tape, and reinstall the toner cartridges."Replacing the Toner Cartridge"
<Cause 2> Multiple sheets of paper are fed at a time.
Solution
Fan the paper thoroughly, and then align the edges of the stack properly on a hard, flat surface.
Blank Paper Is Output (Nothing Is Printed on the Paper)

019A-06U
Perform one of the following solutions according to the cause.
<Cause 1> The photosensitive drum of the printer is deteriorated.
Solution Replace the drum cartridge with a new one."Drum Cartridge Replacement"
<Cause 2> A problem is occurring inside the printer.
Solution When <Service Error> is displayed in the Printer Status Window, perform the solution using the procedurein "When <Service Error> Is Displayed."
The Overall Surface of the Paper Is Printed in a Particular Color

019A-06W
Perform the following procedure.
<Cause> This problem may occur in some applications depending on the processing type ofthe print data.
Solution
Performing the following procedure in the printer driver may be able to solve the problem.
1. Display the [Finishing] sheet.2. Click [Advanced Settings].3. Change the [EMF Spooling] setting.
When [EMF Spooling] is set to [On], the Printer Status Window may not be displayed automatically.In this case, display it manually.(For details on methods for displaying the Printer Status Window, see "Printer Status Window.")
The Printout Is Different from What Is Displayed on Screen

019A-06X
Perform one of the following solutions according to the cause.
<Cause 1> The envelope is inappropriate.
Solution Replace the envelope with that which can be used with this printer."Usable Paper"
<Cause 2> Depending on the type of the envelopes or the operating environment (especially ina high-humidity environment), the flaps may stick to the body of the envelopes.
Solution
Perform the following procedure in the printer driver.
1. Display the [Finishing] sheet.2. Click [Advanced Settings].3. Set [Special Print Mode] to [Special Settings B5].
Normally, use the printer with [Special Print Mode] set to [Off]. Change the settings only if thedescribed problems occur.
The Flap of the Printed Envelope Sticks

019A-06Y
Perform the following procedure.
<Cause> You are using paper which tends to be fed at a time.
Solution
Fan the paper thoroughly, and then align the edges of the stack properly on a hard, flat surface.
Multiple Sheets of Paper Are Fed at a Time

019A-08C
Perform the following procedure in the printer driver.
1. Display the [Finishing] sheet.
2. Click [Advanced Settings].
3. Set [Special Print Mode] to [Special Settings H2].
Normally, use the printer with [Special Print Mode] set to [Off]. Change the settings only if the described problemsoccur.
If you specify [Special Settings H2], printing speed drops.
Printed Transparencies or Coated Paper Are Stuck Each Other orPrinted Images Are Peeled Off

019A-08E
Perform the following procedure in the printer driver.
1. Display the [Finishing] sheet.
2. Click [Advanced Settings].
3. Set [Special Print Mode] to [Special Settings I1].
Normally, use the printer with [Special Print Mode] set to [Off]. Change the settings only if the described problemsoccur.
If you specify [Special Settings I1], printing speed drops.
Poor Print Quality Is Always Occurs at a Particular Position (the SamePosition) on Paper

019A-071
Points to Make Full Use of the Printer
Basic Operations/Various Information for Windows
For Windows 8 Users
Appendix

019A-08F
You can maximize the use of the printer by familiarizing with software tasks and functions supplied with the printer.
Printer Driver
The printer driver is software allows you to control the printer withthe printing instructions from the computer.The printer driver is equipped with a useful printing function and youcan use it with freely combining the settings.
Displaying the Setting Screen
<Pick Up>
Saving Paper Layout Printing (N-page Print)
Using Functions for InternalDocuments
Adding a Watermark to a Document to Be Printed(Watermark Printing)
Being Particular About the ImageQuality or Colors
Adjusting the Image Quality or Colors
Printer Status Window
The Printer Status Window is software allows you to check the printer status,specify the settings for the printer unit, and so on.The Printer Status Window is convenient because it simply notifies the printerstatus such as paper jams, life of the toner cartridges, and paper-out conditionswith messages, animations, and so on.
Printer Status Window
<Pick Up>
Canceling a Job Canceling a Job Being Printed with One Click
Periodical Cleaning Cleaning and Maintaining the Printer
Saving Power Consumption Energy-saving Mode
Points to Make Full Use of the Printer

019A-072Displaying [Computer] or [My Computer]Displaying the CD-ROM Top PageChecking the Processor Version of Windows Vista, 7, or Server 2008Printing a Test Page in WindowsChecking the Bi-directional CommunicationDisplaying the Printer FolderChecking Printers in the Print ServerChecking the Port
Displaying [Computer] or [My Computer]
Double-click [My Computer] on the desktop.
From the [Start] menu, select [My Computer].
From the [Start] menu, select [Computer].
Displaying the CD-ROM Top Page
If the CD-ROM top page does not appear even after inserting the CD-ROM, perform the following procedure.
The CD-ROM drive name is indicated as "D:" in this manual. The CD-ROM drive name may differ depending on thecomputer you are using.
1. From the [Start] menu, select [Run].2. Enter "D:\English\MInst.exe."
3. Click [OK].
1. Enter "D:\English\MInst.exe" in [Search programs and files] or [Start Search] under the [Start] menu.
2. Press the [ENTER] key on the keyboard.
Checking the Processor Version of Windows Vista, 7, or Server 2008
If you are not sure whether you are using 32-bit Windows Vista/7/Server 2008 or 64-bit Windows Vista/7/Server 2008, youcan check that using the following procedure.
1From the [Start] menu, select [Control Panel].
Basic Operations/Various Information for Windows

2Display [System].
����$���8���� �!�������8�������8���� �!�/ ���� ��������8����(
Double-click [System].
3Check the processor version.
For a 32-bit operating system[32-bit Operating System] is displayed.
For a 64-bit operating system[64-bit Operating System] is displayed.
Printing a Test Page in Windows
You can check the operations of the printer driver by printing a test page in Windows.
1Load A4 paper in the multi-purpose tray.
"Loading Paper"
NOTE
Open the auxiliary tray before printing.

2Open the printer folder.
Displaying the Printer Folder
3Right-click the icon for this printer, and then select [Printer properties] or [Properties] from the pop-up menu.
4Print a test page.
(1) Display the [General] sheet.(2) Click [Print Test Page] to print a test page.

Checking the Bi-directional Communication
1Open the printer folder.
Displaying the Printer Folder
2Right-click the icon for this printer, and then select [Printer properties] or [Properties] from the pop-up menu.
3Check the bi-directional communication.
(1) Display the [Ports] sheet.(2) Check the [Enable bidirectional support] check box is selected.

IMPORTANT
Do not clear the [Enable bidirectional support] check box.If the check box is cleared, you cannot perform printing.
Displaying the Printer Folder
���������� �����������������������������������(
From the [Start] menu, select [Printers and Faxes].
���������� ������������������������ ����� �!��������$���������� �!�4���6 �!* �������������� �!�� 2��(
From the [Start] menu, select [Control Panel], and then click [Printer].
From the [Start] menu, select [Devices and Printers].
From the [Start] menu, select [Control Panel], and then double-click [Printers].
Checking Printers in the Print Server
1Display [Windows Explorer].
���������� ������������������������ ������������� ���������������������0��!�*��12,�����(
2Check printers in the print server.
(1) Select the print server from [Network] or [My Network Places].(2) Check the icon for this printer is displayed.

Checking the Port
1Open the printer folder.
Displaying the Printer Folder
2Right-click the icon for this printer, and then select [Printer properties] or [Properties] from the pop-up menu.
3Check a port.
(1) Display the [Ports] sheet.(2) Confirm the port is selected properly.


019A-073
CANON INC.30-2, Shimomaruko 3-chome, Ohta-ku, Tokyo 146-8501, Japan
CANON MARKETING JAPAN INC.16-6, Konan 2-chome, Minato-ku, Tokyo 108-8011, Japan
CANON U.S.A., INC.One Canon Plaza, Lake Success, NY 11042, U.S.A.
CANON EUROPA N.V.Bovenkerkerweg, 59-61, 1185 XB Amstelveen, The Netherlands
CANON CHINA CO. LTD.15F Jinbao Building No.89, Jinbao Street, Dongcheng District, Beijing 100005, PRC
CANON SINGAPORE PTE LTD1 HarbourFront Avenue, #04-01 Keppel Bay Tower, Singapore 098632
CANON AUSTRALIA PTY LTD1 Thomas Holt Drive, North Ryde, Sydney NSW 2113, Australia
CANON GLOBAL WORLDWIDE SITEShttp://www.canon.com/
Office Locations

019A-08L
This printer supports Windows 8. Such as the operation procedures or descriptions for when you are using Windows 8,refer to the descriptions of Windows Vista/7. This section describes cautions for when you are using this printer withWindows 8. Be sure to read the contents described in this section carefully before using the printer.
Precautions for When Performing Procedures
Be sure to switch to the desktop when performing the following procedures.Installation and uninstallation of the printer driverDisplaying the Printer Status WindowDetailed settings of the printer driver *
* However, the settings that are specified in the desktop may not be reflected depending on the Windows Storeapplications.
For Windows 8 Users