Laying a Tile Floor
6
Laying a Tile Floor Epoxy mastic on a plywood subfloor is a durable alternative to the traditional mortar-bed method f all the finish floors available to the builder, none is more permanent than ceram- ic tile. Tile floors hundreds of years old attest to the durability of the materials, and today ceramic tiles are available in almost limitless colors and patterns. Because ceramic tile can resist the ravages of water (see p. 74), it is often chosen as the finish floor in wet loca- tions like bathrooms, kitchens and mud- rooms. But regardless of how durable and pretty the tile is on top, its useful life depends on things that can't be seen: a sturdy subfloor, high-quality mastics or mortar, an accurate layout and sound installation. This article describes a typical tile installa- tion in a small bathroom. The job was a re- model, but the procedures are the same for new construction. The tools are the same, too (photo below left). Except for the snap cutter, which you can rent from most tool-rental cen- ters, tile-laying equipment isn't expensive. Preparing the subfloor—The floor in this bathroom had been covered by wall-to-wall carpeting that extended from the neighboring living room. Years of careless splashing in the shower had rotted a corner of the rug, and the subfloor was about to follow. Fortunately the joists weren't damaged, so I didn't have to perform any framing surgery. I just had to re- move the toilet and tear out a rotten rug. The original subfloor was 1x6 T&G planking over joists 16 in. o. c. This is a satisfactory substrate for a finish floor that can flex, like vinyl or carpet, but a tile floor requires a stiffer base, or it will crack. I won't install a tile floor unless the subfloor and the under- layment are at least in. thick, so I covered by Michael Byrne the planking with -in. CDX plywood and fas- tened it down with 2-in. ring-shank nails driv- en into the joists every 6 in. At the walls, I left a -in. expansion gap. I never use particleboard as an underlay- ment because it's not as strong as plywood and it swells if it gets wet. Exterior grades of plywood, when properly fastened, can stand up to the occasional tub oveflow without swelling and popping the tiles loose. I left a gap of about in. to in. between the pieces of plywood for a glue joint. By edge-gluing the plywood sheets with the ep- oxy thinset, the underlayment becomes an in- tegral layer that won't move in isolated spots as a result of a water spill. If individual pieces are allowed to move, the result can be cracked tiles or broken grout lines. Unless the sub- floor needs a lot of surface preparation, glue the plywood edges as the tiles are set. Adja- cent pieces of plywood shouldn't be more than in. above or below each other, and for a larger floor, the edges of the plywood sheets should be staggered. Traditionally, floor tiles are set in a 1-in. thick bed of mortar. This is still the best method for wet locations, but it's also messier and trickier than using epoxy tile adhesives. The epoxy thinset used on this job (Latapoxy 210, manufactured by Laticrete International, 1 Laticrete Park North, Bethany, Conn. 06525) is acceptable for use in wet locations. Epoxy is really the best choice where raising the level of the floor with a layer of mortar is out of the question. Its water resistance, compressive strength and holding power allow it to stand up to daily bathroom use. I would never use an organic mastic for this installation for two reasons. (Organic mastics were originally made from rubber-tree ex- tracts. The term now describes a general class of ready-to-use thinset mastics that cure by evaporation.) First, water will eventually get through it to the subfloor and the tiles will loosen. Second, organic mastics don't get hard enough to support floor tiles, so the tiles in the high-traffic area will eventually move, and the grout will crack. To make sure that the tiles will sit on a flat plane, I knock down any high spots in the subfloor with a disc sander and I fill in the low spots with epoxy mastic. Even slight irregular- ities can make for wavy grout lines once the tiles are in place. Small tiles look especially bad on uneven surfaces. To find the low spots, I use a straightedge. I make pencil marks at the edges of the depres- sion just where the light begins to appear un- der the straightedge. I draw around each de- pression until an outline defines the low spot. I thoroughly vacuum the floor so that a layer of dust doesn't prevent adhesion between the mastic filler and the subfloor. Then I mix a batch of mastic and trowel it into each low spot with a side-to-side motion of the trowel (this will pick up any remaining dust on the floor), and I screed off excess rnastic with a straightedge. Once the mastic has set up, I re- move ridges with an abrasive stone. Laying out the tile—Rather than provide a line for each sheet or piece of tile, it's more convenient to divide a small floor like this one into workable parts. By projecting the location of a few grout lines onto the floor with chalk- line or a pencil, I can visualize the alignment Tools for tiling and cutting include (below left, clockwise from top) heavy aluminum straightedges for marking layout lines and aligning rows of tile, a snap cutter and assorted tile spacers and shims, a sponge, two margin trowels, biters for cutting tile, three notched trowels for spreading mastic, a sliding bevel, abrasive stones for smoothing cut edges, a chalkline. The snap cutter, below center, is used for straight cuts. Here the tile has been scored by the cutter wheel, and the wings are in position to complete the break—a downward push of the handle will do it. Taping the wings keeps them from marking the tiles, which are semivitreous pavers with cast-in spacing lugs on their edges. For narrow cuts, use biters (drawing, below). O
description
A high-tech membrane minimizes the chances for cracked tile or grout failure
Transcript of Laying a Tile Floor

Laying a Tile FloorEpoxy mastic on a plywood subfloor is a durable alternative
to the traditional mortar-bed method
f all the finish floors available to thebuilder, none is more permanent than ceram-ic tile. Tile floors hundreds of years old attestto the durability of the materials, and todayceramic tiles are available in almost limitlesscolors and patterns. Because ceramic tile canresist the ravages of water (see p. 74), it isoften chosen as the finish floor in wet loca-tions like bathrooms, kitchens and mud-rooms. But regardless of how durable andpretty the tile is on top, its useful life dependson things that can't be seen: a sturdy subfloor,high-quality mastics or mortar, an accuratelayout and sound installation.
This article describes a typical tile installa-tion in a small bathroom. The job was a re-model, but the procedures are the same fornew construction. The tools are the same, too(photo below left). Except for the snap cutter,which you can rent from most tool-rental cen-ters, tile-laying equipment isn't expensive.
Preparing the subfloor—The floor in thisbathroom had been covered by wall-to-wallcarpeting that extended from the neighboringliving room. Years of careless splashing in theshower had rotted a corner of the rug, and thesubfloor was about to follow. Fortunately thejoists weren't damaged, so I didn't have toperform any framing surgery. I just had to re-move the toilet and tear out a rotten rug.
The original subfloor was 1x6 T&G plankingover joists 16 in. o. c. This is a satisfactorysubstrate for a finish floor that can flex, likevinyl or carpet, but a tile floor requires astiffer base, or it will crack. I won't install atile floor unless the subfloor and the under-layment are at least in. thick, so I covered
by Michael Byrne
the planking with -in. CDX plywood and fas-tened it down with 2-in. ring-shank nails driv-en into the joists every 6 in. At the walls, I lefta -in. expansion gap.
I never use particleboard as an underlay-ment because it's not as strong as plywoodand it swells if it gets wet. Exterior grades ofplywood, when properly fastened, can standup to the occasional tub oveflow withoutswelling and popping the tiles loose.
I left a gap of about in. to in. betweenthe pieces of plywood for a glue joint. Byedge-gluing the plywood sheets with the ep-oxy thinset, the underlayment becomes an in-tegral layer that won't move in isolated spotsas a result of a water spill. If individual piecesare allowed to move, the result can be crackedtiles or broken grout lines. Unless the sub-floor needs a lot of surface preparation, gluethe plywood edges as the tiles are set. Adja-cent pieces of plywood shouldn't be morethan in. above or below each other, and fora larger floor, the edges of the plywood sheetsshould be staggered.
Traditionally, floor tiles are set in a 1-in.thick bed of mortar. This is still the bestmethod for wet locations, but it's also messierand trickier than using epoxy tile adhesives.The epoxy thinset used on this job (Latapoxy210, manufactured by Laticrete International,1 Laticrete Park North, Bethany, Conn. 06525)is acceptable for use in wet locations. Epoxy isreally the best choice where raising the levelof the floor with a layer of mortar is out of thequestion. Its water resistance, compressivestrength and holding power allow it to standup to daily bathroom use.
I would never use an organic mastic for this
installation for two reasons. (Organic masticswere originally made from rubber-tree ex-tracts. The term now describes a general classof ready-to-use thinset mastics that cure byevaporation.) First, water will eventually getthrough it to the subfloor and the tiles willloosen. Second, organic mastics don't gethard enough to support floor tiles, so the tilesin the high-traffic area will eventually move,and the grout will crack.
To make sure that the tiles will sit on a flatplane, I knock down any high spots in thesubfloor with a disc sander and I fill in the lowspots with epoxy mastic. Even slight irregular-ities can make for wavy grout lines once thetiles are in place. Small tiles look especiallybad on uneven surfaces.
To find the low spots, I use a straightedge. Imake pencil marks at the edges of the depres-sion just where the light begins to appear un-der the straightedge. I draw around each de-pression until an outline defines the low spot.I thoroughly vacuum the floor so that a layerof dust doesn't prevent adhesion between themastic filler and the subfloor. Then I mix abatch of mastic and trowel it into each lowspot with a side-to-side motion of the trowel(this will pick up any remaining dust on thefloor), and I screed off excess rnastic with astraightedge. Once the mastic has set up, I re-move ridges with an abrasive stone.
Laying out the tile—Rather than provide aline for each sheet or piece of tile, it's moreconvenient to divide a small floor like this oneinto workable parts. By projecting the locationof a few grout lines onto the floor with chalk-line or a pencil, I can visualize the alignment
Tools for tiling and cutting include (below left, clockwise from top) heavy aluminum straightedges for marking layout lines and aligning rows of tile,a snap cutter and assorted tile spacers and shims, a sponge, two margin trowels, biters for cutting tile, three notched trowels for spreading mastic, asliding bevel, abrasive stones for smoothing cut edges, a chalkline. The snap cutter, below center, is used for straight cuts. Here the tile has beenscored by the cutter wheel, and the wings are in position to complete the break—a downward push of the handle will do it. Taping the wings keepsthem from marking the tiles, which are semivitreous pavers with cast-in spacing lugs on their edges. For narrow cuts, use biters (drawing, below).
O
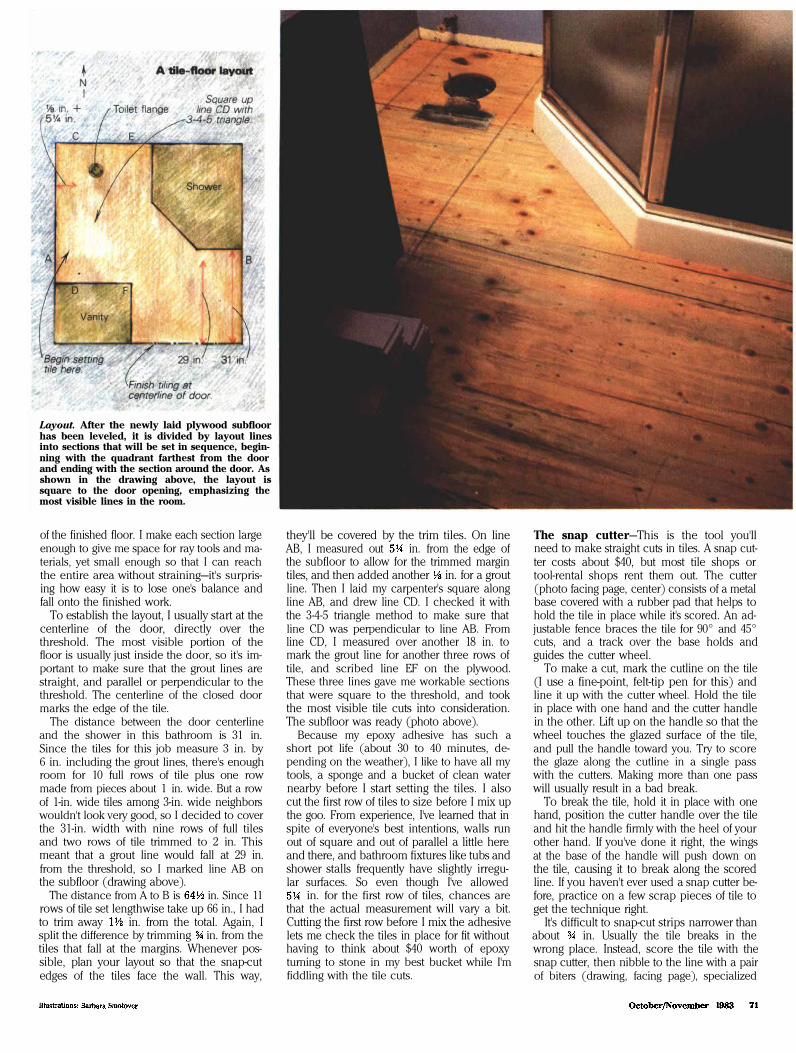
Layout. After the newly laid plywood subfloorhas been leveled, it is divided by layout linesinto sections that will be set in sequence, begin-ning with the quadrant farthest from the doorand ending with the section around the door. Asshown in the drawing above, the layout issquare to the door opening, emphasizing themost visible lines in the room.
of the finished floor. I make each section largeenough to give me space for ray tools and ma-terials, yet small enough so that I can reachthe entire area without straining—it's surpris-ing how easy it is to lose one's balance andfall onto the finished work.
To establish the layout, I usually start at thecenterline of the door, directly over thethreshold. The most visible portion of thefloor is usually just inside the door, so it's im-portant to make sure that the grout lines arestraight, and parallel or perpendicular to thethreshold. The centerline of the closed doormarks the edge of the tile.
The distance between the door centerlineand the shower in this bathroom is 31 in.Since the tiles for this job measure 3 in. by6 in. including the grout lines, there's enoughroom for 10 full rows of tile plus one rowmade from pieces about 1 in. wide. But a rowof 1-in. wide tiles among 3-in. wide neighborswouldn't look very good, so I decided to coverthe 31-in. width with nine rows of full tilesand two rows of tile trimmed to 2 in. Thismeant that a grout line would fall at 29 in.from the threshold, so I marked line AB onthe subfloor (drawing above).
The distance from A to B is in. Since 11rows of tile set lengthwise take up 66 in., I hadto trim away in. from the total. Again, Isplit the difference by trimming in. from thetiles that fall at the margins. Whenever pos-sible, plan your layout so that the snap-cutedges of the tiles face the wall. This way,
they'll be covered by the trim tiles. On lineAB, I measured out in. from the edge ofthe subfloor to allow for the trimmed margintiles, and then added another in. for a groutline. Then I laid my carpenter's square alongline AB, and drew line CD. I checked it withthe 3-4-5 triangle method to make sure thatline CD was perpendicular to line AB. Fromline CD, I measured over another 18 in. tomark the grout line for another three rows oftile, and scribed line EF on the plywood.These three lines gave me workable sectionsthat were square to the threshold, and tookthe most visible tile cuts into consideration.The subfloor was ready (photo above).
Because my epoxy adhesive has such ashort pot life (about 30 to 40 minutes, de-pending on the weather), I like to have all mytools, a sponge and a bucket of clean waternearby before I start setting the tiles. I alsocut the first row of tiles to size before I mix upthe goo. From experience, I've learned that inspite of everyone's best intentions, walls runout of square and out of parallel a little hereand there, and bathroom fixtures like tubs andshower stalls frequently have slightly irregu-lar surfaces. So even though I've allowed
in. for the first row of tiles, chances arethat the actual measurement will vary a bit.Cutting the first row before I mix the adhesivelets me check the tiles in place for fit withouthaving to think about $40 worth of epoxyturning to stone in my best bucket while I'mfiddling with the tile cuts.
The snap cutter—This is the tool you'llneed to make straight cuts in tiles. A snap cut-ter costs about $40, but most tile shops ortool-rental shops rent them out. The cutter(photo facing page, center) consists of a metalbase covered with a rubber pad that helps tohold the tile in place while it's scored. An ad-justable fence braces the tile for 90° and 45°cuts, and a track over the base holds andguides the cutter wheel.
To make a cut, mark the cutline on the tile(I use a fine-point, felt-tip pen for this) andline it up with the cutter wheel. Hold the tilein place with one hand and the cutter handlein the other. Lift up on the handle so that thewheel touches the glazed surface of the tile,and pull the handle toward you. Try to scorethe glaze along the cutline in a single passwith the cutters. Making more than one passwill usually result in a bad break.
To break the tile, hold it in place with onehand, position the cutter handle over the tileand hit the handle firmly with the heel of yourother hand. If you've done it right, the wingsat the base of the handle will push down onthe tile, causing it to break along the scoredline. If you haven't ever used a snap cutter be-fore, practice on a few scrap pieces of tile toget the technique right.
It's difficult to snap-cut strips narrower thanabout in. Usually the tile breaks in thewrong place. Instead, score the tile with thesnap cutter, then nibble to the line with a pairof biters (drawing, facing page), specialized

Epoxy mastic mixed to a stiff consistency isspread out along the first layout line (topphoto) with a notched trowel. Notch depthshould be about two-thirds the thickness of thetile. Frequently checking alignment with astraightedge, Byrne seats each tile with firmhand pressure (left). A light tap with the wood-en handle of the trowel will seat the occasionalproud edge. Pull up a freshly set tile occasion-ally to make sure the mastic coverage is cor-rect, as in the photo above.
cutters that have a straight cutting edge onone jaw and a curved one on the other. Usethe straight jaw on the glazed side, or face, ofthe tile.
Epoxy mastics—These adhesives were orig-inally developed for industrial applicationsthat required high bonding strength and resis-tance to chemicals. A tile-setting epoxy iscomposed of three separate components thatare mixed together just before use. Part A is aresin of oxygen, carbon and hydrogen mole-cules suspended in a water solution. Whencombined with a hardener (part B) the resinmolecules polymerize into long chains thatform a resistant skin with high bondingstrength. Part C is a mixture of portland ce-ment and very fine sand. It is blended into theconcoction of parts A and B to add body andcompressive strength.
There are several brands of epoxy mastic,and they all do basically the same thing. Theyare sold by the unit, half-unit or in bulk. A fullunit, enough to do a floor of about 50 sq. ft.,costs about $40. I use Latapoxy 210 chiefly be-cause the liquids are packaged in wide-mouthed containers that are easy to use, andthey're mixed at a one-to-one ratio.
The two liquids have to be thoroughlymixed in their own containers before they areblended together. Although it's tempting touse a beater mounted on a drill for mixing,don't do so unless you have a very slow drill.High-speed mixing will whip air bubbles intothe liquid, and they will weaken the mastic'sbonding and compressive strength. I use astick or a margin trowel for mixing.
Once the individual liquids are homog-enized, pour them into a bucket in the propor-tions specified by the manufacturer, mix thor-oughly, and slowly add the cement and sandwhile you keep stirring. I like to use my mar-gin trowel for this because I can scrape thesides and bottom of the bucket with the trow-el's straight sides and broad nose. Thereshould be no lumps in the final mix, and itshould be the consistency of very thick syrup.Never add water to thin the blend; it will ren-der the bond useless.
I've found that the ideal temperature forworking with epoxy mastics is between 70°Fand 85°F. On hot days, the epoxy sets up fast-er. Conversely, a cold day slows the stuffdown. I've laid floors on cold concrete slabsthat have taken three days to set up, and oth-ers on plywood that are ready to grout threehours later. But on the average, it takes 24hours before you can walk on the floor.
Setting the tile—Depending on the size ofthe section I'm about to set, I either pour theadhesive onto the floor or scoop it out of thebucket with my notched trowel. I spread out askim coat using the flat side of the trowel, andthen work it back in the other direction withthe notched edge (photo top left). The depthof the notch should be about two-thirds thethickness of the tile. Spreading the mastic inseveral directions ensures good adhesion.
For this job, I started setting the tiles

against the wall beginning at the intersectionof lines AB and CD. I pressed each tile downuntil it met solid resistance (photo facingpage, bottom left), and if a tile corner stood alittle proud, I tapped it down with the handleof my trowel.
Each tile should be completely embeddedin the adhesive, and from time to time I pullup a freshly set tile to make sure the coveragewas correct (photo facing page, bottom right).The bottom of the tile should be completelycoated with adhesive, and the adhesive has tobe wet enough to stick. If the epoxy mortarstarts to set up, it has to be thrown out—itspot life can't be extended by adding water. Ifthere isn't enough epoxy on the bottom of thetile I check, I use a trowel with a larger notch.
It's also important to make sure that thereisn't too much adhesive because it willsqueeze up between the tiles, and fill the gapthat has to be occupied by the grout. Trench-ing out clogged grout lines is a wearisometask. If there's too much epoxy, I turn to a toolwith a smaller notch. And if I get some masticon top of a tile, I wipe it off right away with awet sponge while it's still easy to remove.
On this job, I continued setting the trimmedtiles along the west wall, carefully aligningthem with the layout, and then set in as manyfull-size tiles as possible around the toiletflange. This left some gaps, and I had to cutsome tiles with curves to fit.
Cutting curves—This is where the biterscome into play. With them I can shape a tile tofit almost any peculiar gap in the floor, but thetile has to be cut slowly and in the correct se-quence (photos and drawing at right). To cutthe curve in the tiles around the flange, I firstdrew the curve on the tiles. Because they willbe covered by the toilet, these cuts don't haveto be very precise. So I drew freehand guide-lines. For radius cuts that are visible, I use acompass. Once the cutlines were drawn, Imarked concentric lines about in. apart andextending to the edge of the tile. The drawingat right shows the sequence for removing thewaste bit by bit. Start at the edge of the tile,and always work toward the middle, asshown. This is the best way to shape yourcuts and avoid breaks.
Angular cuts—Seven rows in from the northwall of the bathroom, the shower stall takes a45° jog across the floor, and this change of di-rection occurs in the center of a tile. To shapethis five-sided piece (photos far right), Imarked my cutlines with the aid of a slidingbevel and removed most of the waste with thesnap cutter, nibbling from the corners towardthe center. When I'd finally cut to the line, Ismoothed the nibbled edges with my abrasivestone. The stone is also very useful for tile-shaping work that's too minute for the bitersor snap cutter.
Trim tiles—The trim tiles where the wall andfloor meet can be set as the job proceeds orafter all the floor tiles have been placed andthe adhesive has set. I used a bullnose base
Cutting curves. Concentric lines leading tothe final line mark the sequence of cuts (draw-ing, below). To trim tiles to fit around the toiletflange, first mark the tiles with the outline ofthe curve, then nibble away the bits with thebiters, starting from the edges and working in(photos below). Two tile shards used as shimsunder one of the tiles (bottom photo) compen-sate for an uneven subsurface. The long boltsallow for the thickness of the new floor.
Cutting angles. The shower-stall angle istransferred to the tiles with a bevel gauge(top). To make a pair of angular cuts, begin byremoving as much waste as possible with asnap cutter. Then work slowly with the bitersfrom opposite corners to the middle (center).When you reach the line, smooth the rawedges with an abrasive stone (above).
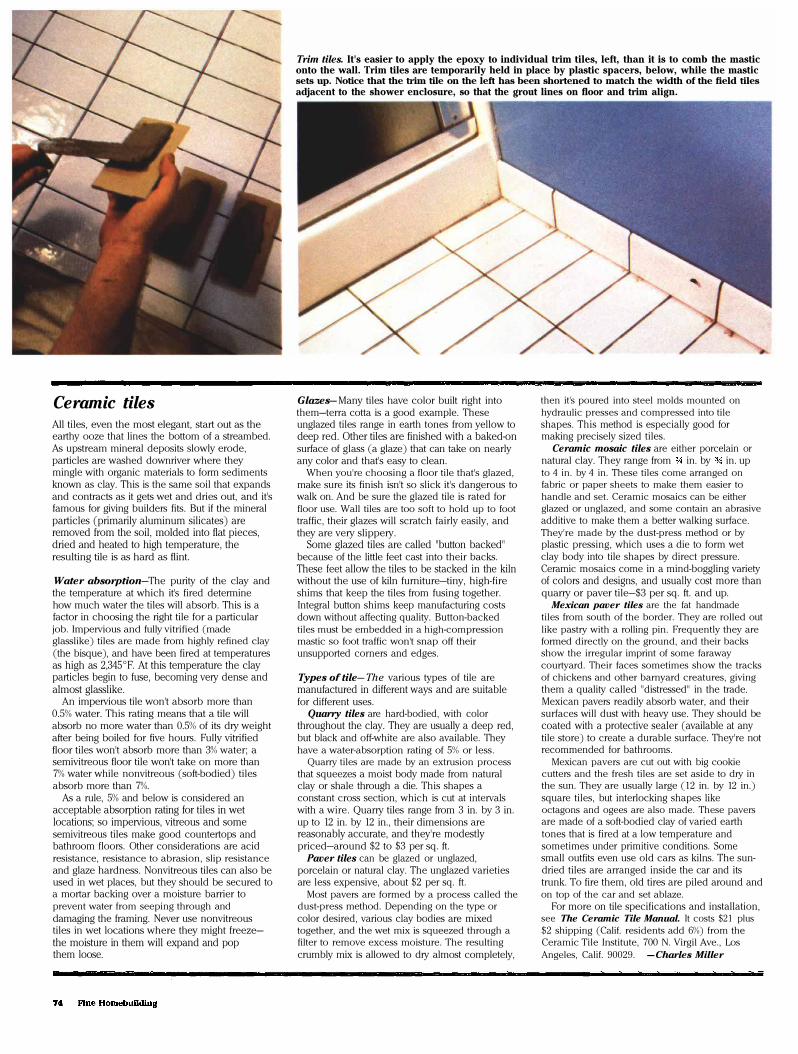
Trim tiles. It's easier to apply the epoxy to individual trim tiles, left, than it is to comb the masticonto the wall. Trim tiles are temporarily held in place by plastic spacers, below, while the masticsets up. Notice that the trim tile on the left has been shortened to match the width of the field tilesadjacent to the shower enclosure, so that the grout lines on floor and trim align.
Ceramic tilesAll tiles, even the most elegant, start out as theearthy ooze that lines the bottom of a streambed.As upstream mineral deposits slowly erode,particles are washed downriver where theymingle with organic materials to form sedimentsknown as clay. This is the same soil that expandsand contracts as it gets wet and dries out, and it'sfamous for giving builders fits. But if the mineralparticles (primarily aluminum silicates) areremoved from the soil, molded into flat pieces,dried and heated to high temperature, theresulting tile is as hard as flint.
Water absorption—The purity of the clay andthe temperature at which it's fired determinehow much water the tiles will absorb. This is afactor in choosing the right tile for a particularjob. Impervious and fully vitrified (madeglasslike) tiles are made from highly refined clay(the bisque), and have been fired at temperaturesas high as 2,345°F. At this temperature the clayparticles begin to fuse, becoming very dense andalmost glasslike.
An impervious tile won't absorb more than0.5% water. This rating means that a tile willabsorb no more water than 0.5% of its dry weightafter being boiled for five hours. Fully vitrifiedfloor tiles won't absorb more than 3% water; asemivitreous floor tile won't take on more than7% water while nonvitreous (soft-bodied) tilesabsorb more than 7%.
As a rule, 5% and below is considered anacceptable absorption rating for tiles in wetlocations; so impervious, vitreous and somesemivitreous tiles make good countertops andbathroom floors. Other considerations are acidresistance, resistance to abrasion, slip resistanceand glaze hardness. Nonvitreous tiles can also beused in wet places, but they should be secured toa mortar backing over a moisture barrier toprevent water from seeping through anddamaging the framing. Never use nonvitreoustiles in wet locations where they might freeze—the moisture in them will expand and popthem loose.
Glazes—Many tiles have color built right intothem—terra cotta is a good example. Theseunglazed tiles range in earth tones from yellow todeep red. Other tiles are finished with a baked-onsurface of glass (a glaze) that can take on nearlyany color and that's easy to clean.
When you're choosing a floor tile that's glazed,make sure its finish isn't so slick it's dangerous towalk on. And be sure the glazed tile is rated forfloor use. Wall tiles are too soft to hold up to foottraffic, their glazes will scratch fairly easily, andthey are very slippery.
Some glazed tiles are called "button backed"because of the little feet cast into their backs.These feet allow the tiles to be stacked in the kilnwithout the use of kiln furniture—tiny, high-fireshims that keep the tiles from fusing together.Integral button shims keep manufacturing costsdown without affecting quality. Button-backedtiles must be embedded in a high-compressionmastic so foot traffic won't snap off theirunsupported corners and edges.
Types of tile—The various types of tile aremanufactured in different ways and are suitablefor different uses.
Quarry tiles are hard-bodied, with colorthroughout the clay. They are usually a deep red,but black and off-white are also available. Theyhave a water-absorption rating of 5% or less.
Quarry tiles are made by an extrusion processthat squeezes a moist body made from naturalclay or shale through a die. This shapes aconstant cross section, which is cut at intervalswith a wire. Quarry tiles range from 3 in. by 3 in.up to 12 in. by 12 in., their dimensions arereasonably accurate, and they're modestlypriced—around $2 to $3 per sq. ft.
Paver tiles can be glazed or unglazed,porcelain or natural clay. The unglazed varietiesare less expensive, about $2 per sq. ft.
Most pavers are formed by a process called thedust-press method. Depending on the type orcolor desired, various clay bodies are mixedtogether, and the wet mix is squeezed through afilter to remove excess moisture. The resultingcrumbly mix is allowed to dry almost completely,
then it's poured into steel molds mounted onhydraulic presses and compressed into tileshapes. This method is especially good formaking precisely sized tiles.
Ceramic mosaic tiles are either porcelain ornatural clay. They range from in. by in. upto 4 in. by 4 in. These tiles come arranged onfabric or paper sheets to make them easier tohandle and set. Ceramic mosaics can be eitherglazed or unglazed, and some contain an abrasiveadditive to make them a better walking surface.They're made by the dust-press method or byplastic pressing, which uses a die to form wetclay body into tile shapes by direct pressure.Ceramic mosaics come in a mind-boggling varietyof colors and designs, and usually cost more thanquarry or paver tile—$3 per sq. ft. and up.
Mexican paver tiles are the fat handmadetiles from south of the border. They are rolled outlike pastry with a rolling pin. Frequently they areformed directly on the ground, and their backsshow the irregular imprint of some farawaycourtyard. Their faces sometimes show the tracksof chickens and other barnyard creatures, givingthem a quality called "distressed" in the trade.Mexican pavers readily absorb water, and theirsurfaces will dust with heavy use. They should becoated with a protective sealer (available at anytile store) to create a durable surface. They're notrecommended for bathrooms.
Mexican pavers are cut out with big cookiecutters and the fresh tiles are set aside to dry inthe sun. They are usually large (12 in. by 12 in.)square tiles, but interlocking shapes likeoctagons and ogees are also made. These paversare made of a soft-bodied clay of varied earthtones that is fired at a low temperature andsometimes under primitive conditions. Somesmall outfits even use old cars as kilns. The sun-dried tiles are arranged inside the car and itstrunk. To fire them, old tires are piled around andon top of the car and set ablaze.
For more on tile specifications and installation,see The Ceramic Tile Manual. It costs $21 plus$2 shipping (Calif. residents add 6%) from theCeramic Tile Institute, 700 N. Virgil Ave., LosAngeles, Calif. 90029. —Charles Miller

tile for trim here, and made sure that the trim-tile grout lines lined up with the floor-tilegrout lines. I back-buttered each tile andpressed it in place, then shimmed each onefrom below (photos facing page).
Grout—Grouting tiles is both an art and ascience, and while there's no substitute for ex-perience, knowing a little of the science canmake the art happen a lot easier. Groutdoesn't just fill the spaces between the tiles. Itshould be packed in from the setting bed tothe surface of the tile. Sometimes a tile won'tbe completely supported by mastic, with agap that may undercut its edge. These gapshave to be filled with grout, so the grout hasto be viscous enough to flow into the voids.
Before I mix the grout, I dampen the entirefloor with a sponge. This makes it easier tospread the grout, and it keeps water from be-ing sucked out too quickly by a dry settingbed or highly absorbent tiles. Premature dry-ing weakens the grout.
There are many grouts on the market, butfor this floor I mixed my own with equal partsof standard portland cement and 30-meshsand. A few years ago I started using latex ad-ditive in my grout, and I wouldn't do a jobnow without it. The latex makes the grouteasier to spread, and it also speeds curing. La-tex additives are made by Custom BuildingMaterials (6511 Salt Lake Ave., Bell, Calif.90201), Upco (3101 Euclid Ave., Cleveland,Ohio 44115) and by Laticrete International;these companies also make epoxy thinset.
Without a latex admix, a freshly groutedfloor has to be kept moist and covered for atleast 72 hours. With the latex, the floor isready to use in 24 hours, and it doesn't haveto be covered, unless it's especially hot anddry. I haven't had any problems with cornercracks or grout shrinkage. And when used fullstrength, the latex reduces mold and mildewgrowth on tiles in damp spots.
Follow the directions on the package if youuse a latex admix. The procedure usuallyamounts to slow machine or hand mixing untilthe grout is smooth and lump free, and aboutthe consistency of drywall joint compound.After letting it sit about five minutes, you mixthe grout again, and it's ready to use.
I remove any standing water from the floor,and if any areas have dried out (a problem onhot days) I remoisten them with my sponge.Then I dump enough grout on the floor to cov-er about 10 sq. ft. With my rubber trowel atabout a 30° angle, I force the grout into thevoids (photo above center). I go over eacharea a few times with a side-to-side motionuntil the gaps are packed and then I scrape offthe excess grout with the edge of the rubbertrowel. Next I thoroughly wring out a spongeand I go over the freshly packed area to re-move any grout that stands above the level ofthe tiles (photo top right). The pressure onthe sponge determines how quickly the ex-cess is removed.
I avoid bullying the grout, and if it seems alittle too soft, I spread and pack another por-tion of the floor, and then come back. But it's
Grouting. After excess epoxy is removed frombetween the tiles, grout is forced into thespaces with the sharp edge of a rubber trowel,below. It takes several passes from different di-rections to fill the voids. Most of the excessgrout is scraped away with the trowel. As thegrout begins to set up, the grout lines arebrought down and made slightly concave witha sponge, right. The sponge is worked in paral-lel strokes, and rinsed out frequently to re-move the sand and cement that it picks up. Thelast cleaning, below right, is with a nearly drysponge that is rinsed out after each pass.
important not to get too far ahead of thecleaning process—it takes a lot longer thanthe spreading. During this stage of the job, Iremix the grout about every 10 minutes tokeep it from setting up in the bucket.
When the joints have been formed and allthe sand is gone from the surface, I make par-allel sweeps with the sponge to complete thewet cleaning (photo center right). I use oneclean side of the sponge per wipe. The rest ofthe cleanup is done dry.
After about 10 or 15 minutes a cement hazebegins to form on top of the tiles. I remove itwith cheesecloth, making sure not to distortthe grout lines by pressing too hard. If someof the haze won't come off, I rub the area witha moist sponge. Then I remove with a margintrowel any grout that may have found its wayinto the expansion gap between the plywoodunderlayment and the wall.
Once the grout has hardened (about 24hours), I vacuum the dust and grit from thefloor, and I apply a bead of silicone caulk tothe tile where it abuts the tub or shower stall,and to the trim tiles at the margins of the floor(photo and drawing, right). The caulk keepsthe water out and allows the floor to expandand contract without damaging itself.
Caulking and finishing. Before the groutsets up, it is squared with a margin trowelalong the edges of the shower (below), and ex-cess grout is removed from expansion joints.Once it sets, a bead of silicone caulk is applied.
Michael Byrne lives in Walnut Creek, Calif.