
Last edited: 03.08.2018 Quick Reference Guide: … edited: 03.08.2018 Quick Reference Guide:...
18
Last edited: 03.08.2018 Quick Reference Guide: Managing Applicant Tracking in Workday as Primary Recruiter 1 *optional steps of the candidate life cycle Keep in mind Information Needed Overview: After searching for and selecting an active job requisition, the Applicant Tracking Module overview screen will display the applicant funnel, which shows 7 stages that an applicant can move through. Not all applicants are required to go through each stage in all instances. 1. New Applicant Note: there are 3 steps within this phase an applicant can move through. a. New Applicant b. Review * c. Under Consideration * 2. HR Phone Screen * 3. Assessments * 4. Interview 5. Reference Check 6. Offer 7. Ready for Hire • The name of the supervisory organization in which the position was created. • Earliest posting and earliest hire date. • Names of those who will act as the primary recruiter(s) and recruiting screener. • Job Requisition Number • Key words from the job description useful for filtering resumes. • Managing an applicant pool is a dynamic process. Within the process, you may skip or even repeat various processes as you work through your applicant pool. • At the end of the search, all documentation from the search should be compiled and attached to the respective candidate profile for the job requisition.
Transcript of Last edited: 03.08.2018 Quick Reference Guide: … edited: 03.08.2018 Quick Reference Guide:...

Last edited: 03.08.2018
Quick Reference Guide: Managing Applicant Tracking in Workday as Primary Recruiter
1
*optional steps of the candidate life cycle
Keep in mind Information Needed
Overview: After searching for and selecting an active job requisition, the Applicant Tracking Module overview screen will display the applicant funnel, which shows 7 stages that an applicant can move through. Not all applicants are required to go through each stage in all instances.
1. New Applicant Note: there are 3 steps within this phase an applicant can move through. a. New Applicant b. Review * c. Under Consideration *
2. HR Phone Screen * 3. Assessments * 4. Interview 5. Reference Check 6. Offer 7. Ready for Hire
• The name of the supervisory organization in which the position was created.
• Earliest posting and earliest hire date.
• Names of those who will act as the primary recruiter(s) and recruiting screener.
• Job Requisition Number
• Key words from the job description useful for filtering resumes.
• Managing an applicant pool is a dynamic process.
Within the process, you may skip or even repeat various processes as you work through your applicant pool.
• At the end of the search, all documentation from the search should be compiled and attached to the respective candidate profile for the job requisition.
Last edited: 03.08.2018
Quick Reference Guide: Managing Applicant Tracking in Workday as Primary Recruiter
2
Navigating the Recruiting Module:
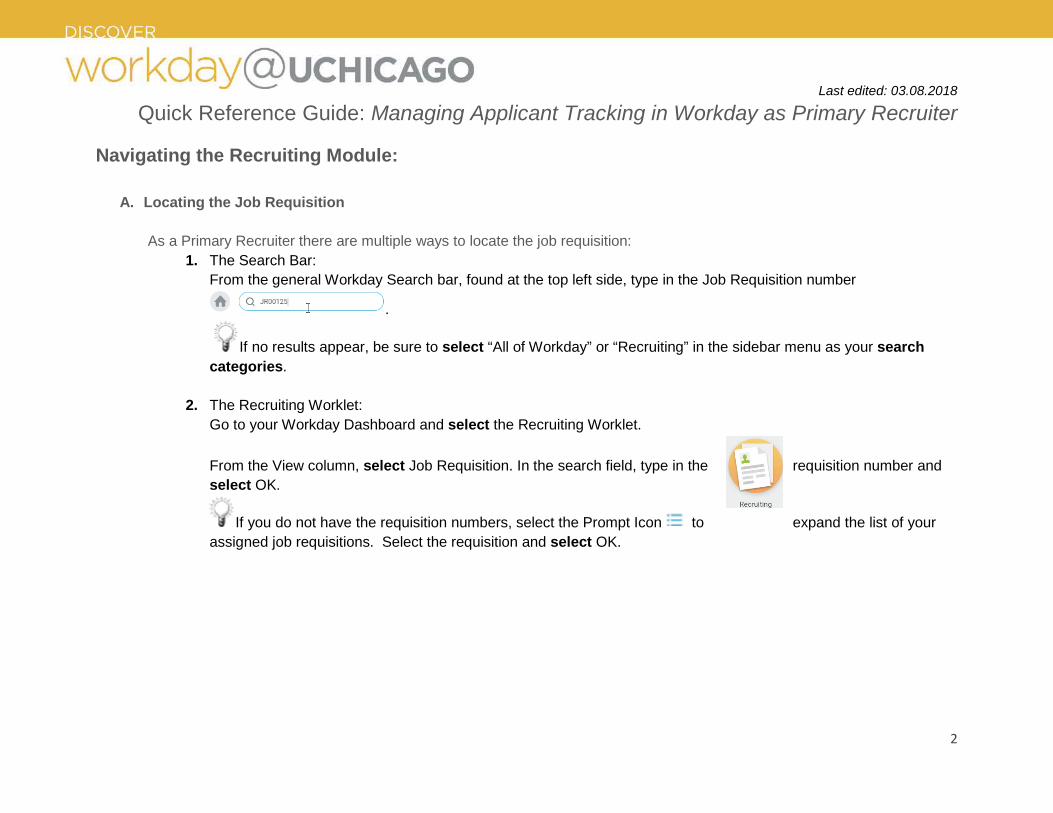
A. Locating the Job Requisition As a Primary Recruiter there are multiple ways to locate the job requisition:
1. The Search Bar: From the general Workday Search bar, found at the top left side, type in the Job Requisition number
.
If no results appear, be sure to select “All of Workday” or “Recruiting” in the sidebar menu as your search categories.
2. The Recruiting Worklet: Go to your Workday Dashboard and select the Recruiting Worklet. From the View column, select Job Requisition. In the search field, type in the requisition number and select OK.
If you do not have the requisition numbers, select the Prompt Icon to expand the list of your assigned job requisitions. Select the requisition and select OK.
Last edited: 03.08.2018
Quick Reference Guide: Managing Applicant Tracking in Workday as Primary Recruiter
3
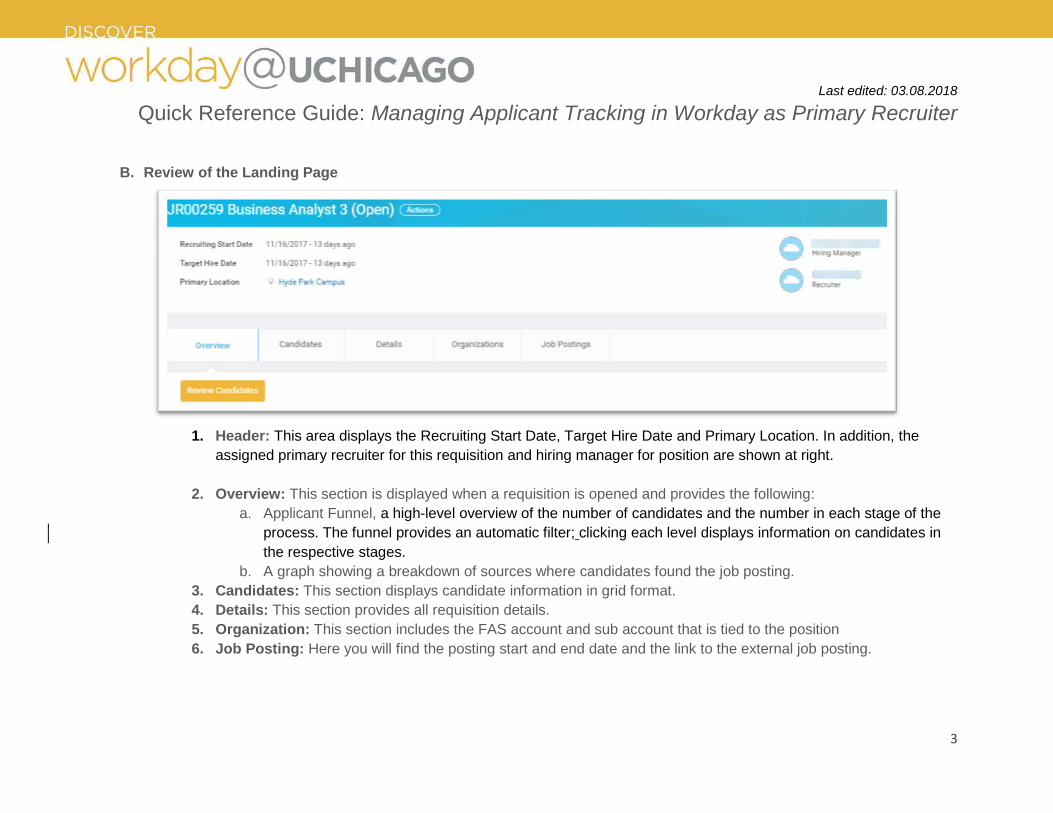
B. Review of the Landing Page
1. Header: This area displays the Recruiting Start Date, Target Hire Date and Primary Location. In addition, the
assigned primary recruiter for this requisition and hiring manager for position are shown at right.
2. Overview: This section is displayed when a requisition is opened and provides the following: a. Applicant Funnel, a high-level overview of the number of candidates and the number in each stage of the
process. The funnel provides an automatic filter; clicking each level displays information on candidates in the respective stages.
b. A graph showing a breakdown of sources where candidates found the job posting. 3. Candidates: This section displays candidate information in grid format. 4. Details: This section provides all requisition details. 5. Organization: This section includes the FAS account and sub account that is tied to the position 6. Job Posting: Here you will find the posting start and end date and the link to the external job posting.

Last edited: 03.08.2018
Quick Reference Guide: Managing Applicant Tracking in Workday as Primary Recruiter
4
C. Review of the Candidate Grid
a. Awaiting Me: This feature provides a quick snapshot of next actions needed for the specific candidate. The field is
active, which allows the Primary Recruiter to take action directly from the grid. Note that the tasks in the “Awaiting Me” column also route to the Primary Recruiter Workday inbox. If an action is initiated and completed from the grid, it will be archived in the Workday InBox.
b. Overview: This is the default display showing general applicant information, i.e. date applied, current job title, and a link to the resume. Data can be filtered on each of these columns.
c. Questions: The candidate’s response to the questionnaire from the application are found here. Data can be filtered on the columns for each question.
d. Contact: The candidate’s address, phone, email, degree information, social profile, and years in current job are listed here. Data can be filtered on each of these columns.

Last edited: 03.08.2018
Quick Reference Guide: Managing Applicant Tracking in Workday as Primary Recruiter
5
e. Resume: This section includes the resume text. Here, the Primary Recruiter and Recruiting Screener can search all candidate resumes by filtering for relevant skills, work history, educational background, etc. This helps narrow the pool and brings to light the top candidates for the position.
When a candidate is not awaiting an action from the Primary Recruiter, that candidate will not be listed on the grid. To see all active candidates, refresh the grid by selecting the “All Active Candidates” button located at the top of the Candidate Grid. As candidates are screened and dispositioned, they will be moved into the “Inactive Candidates” pool. To view all dispositioned candidates and the disposition reasons, select the “Inactive Candidates” button located at the top of the Candidate Grid.
Moving the Candidate through the Stages
A. Advancing a candidate: All applicants will start in the “New Applicant” stage. The Primary Recruiter moves the candidates through
the various stages using the button located at the bottom left hand corner of the screen. To activate the menu to move candidates, first select the desired candidate by checking the box to the left of the name.
Once the candidate is selected, the move forward button is active, select . On the next screen, use the Prompt Icon to activate the drop-down menu, then click the radio button to select the desired stage.

Last edited: 03.08.2018
Quick Reference Guide: Managing Applicant Tracking in Workday as Primary Recruiter
6
The stage will be displayed in the candidate’s record in the listing below. Be sure to click at the bottom of the screen to accept the move. Note, as the applicant moves through the stages, the menu options change to reflect the available stages remaining. Within this process, the candidates do not have to go through all stages, i.e. if the recruitment plan does not include HR Phone Screen, then that stage can be skipped.
Quick Tip: The “Move Forward” action can be taken on multiple candidates by selecting the box at the top of the grid, which selects all candidates, or by selecting multiple candidates at once and moving them to the next stage.
B. Disposition your candidates:
Similar to the above process of moving the candidate through the stages, the Primary Recruiter can disposition candidates via the “Decline” button located at the bottom left hand corner of the candidate screen. To activate the “Decline” button, select one or more candidates by checking the box next to names on the candidate grid. Once a candidate is selected, Select “Decline”.

Last edited: 03.08.2018
Quick Reference Guide: Managing Applicant Tracking in Workday as Primary Recruiter
7
On the next screen displaying s the Decline Candidate Menu”, using the Prompt Icon to open the drop down the menu and use the radio button to select the disposition reason. Select . at the bottom of the screen.
OPTIONAL MESSAGE: To send a message to a candidate through Workday after dispositioning the candidate, go to the “Candidate Grid” and use the check box select the candidate. At the bottom of the screen, Select “Send Message.”
1. 1. In the “Set up” section, go to “Message Template”; using the Prompt Icon , select “Disposition - Send Letter”. The “Channels” field defaults to e-mail and push notification. Remove the push notification by clicking the “x”. Select next.
Note: A message is not sent to the candidate automatically after dispositioning. automatically. The Primary Recruiter has the option of sending a push message through Workday (see below for further instruction) or communicate directly outside of Workday.

Last edited: 03.08.2018
Quick Reference Guide: Managing Applicant Tracking in Workday as Primary Recruiter
8
2. In the “Message” section, complete the “From Display Name” and “Reply To” fields (both are optional). The “Subject”, “Body” and “Message”, are editable fields. To expand each section, click on the arrows . Once the fields are updated, select
. Review the message and select .
“From Display Name” add the person sending the message. “Reply To” add the email address that will receive candidate responses.
Note: if the “reply to” is not updated, the default e-mail address will direct any candidate response to the Shared Services Help Desk, creating a Service Now Ticket. The Sender will not receive the candidate’s response.
Last edited: 03.08.2018
Quick Reference Guide: Managing Applicant Tracking in Workday as Primary Recruiter
9
Working through the Stages: 1. New Applicant
a. New Applicant b. Review* c. Under Consideration*
2. HR Phone Screen*
*Steps with an asterisk are not required in the applicant life cycle.
3. Interview
Schedule the interview:
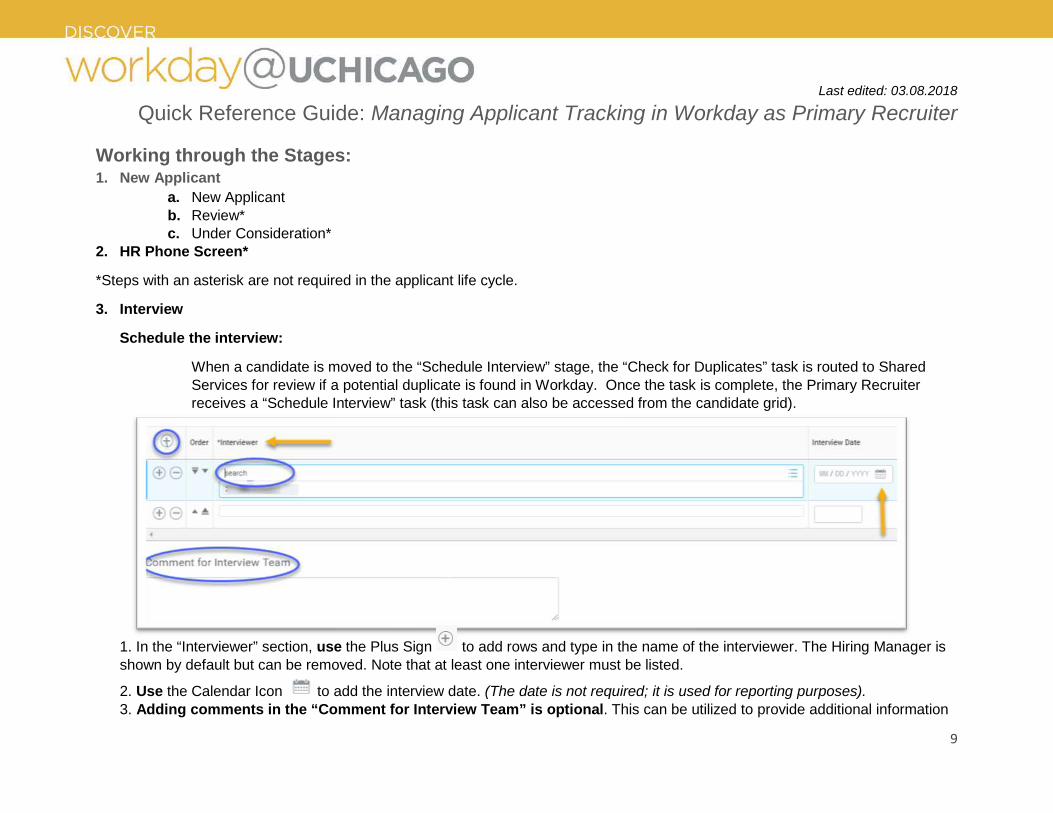
When a candidate is moved to the “Schedule Interview” stage, the “Check for Duplicates” task is routed to Shared Services for review if a potential duplicate is found in Workday. Once the task is complete, the Primary Recruiter receives a “Schedule Interview” task (this task can also be accessed from the candidate grid).
1. In the “Interviewer” section, use the Plus Sign to add rows and type in the name of the interviewer. The Hiring Manager is shown by default but can be removed. Note that at least one interviewer must be listed.
2. Use the Calendar Icon to add the interview date. (The date is not required; it is used for reporting purposes). 3. Adding comments in the “Comment for Interview Team” is optional. This can be utilized to provide additional information

Last edited: 03.08.2018
Quick Reference Guide: Managing Applicant Tracking in Workday as Primary Recruiter
10
to the committee team, i.e. time and date of the interview.
4. Select .
Rate the interview
Once an interview has been scheduled, each committee member will receive a “Rate the Interview” task in their Workday inbox.
The Interviewer will select their rating (1- Do Not Recommend, 2- Recommend, and 3- Highly Recommended) from the drop-down
menu options and select .
Note: This task does not stall the process if the interviewer(s) delay entering in their score.
After the Interview stage, 3 additional options become available: “Schedule additional interview, Assessment, and Reference Check). Both Schedule additional interview and Assessment” can be skipped, and the candidate can move to the Reference Check stage.

Last edited: 03.08.2018
Quick Reference Guide: Managing Applicant Tracking in Workday as Primary Recruiter
11
4. Assessments*
*This step is not required in the applicant life cycle.
The primary recruiter will receive an in-box “To Do” to Assess Candidate. 1. From the Assessment page, using the Prompt Icon , B the status of the assessment, “Scheduled” or “Complete”. Using the Calendar Icon, input the date.
2. Input the assesments and score. Use the plus sign to add rows as needed for each of the assesmsents requested. Using the Prompt Icon , select the assessment from the menu. Type in the Score of the assessment in the “score” coloumn. (OPTIONAL STEP)
Once the updates are complete, select “Done”.
Note: To request an assessment for a candidate the HRP reaches out to Shared Services- Help Desk, via Service Now: “Ask an HR Question” form.

Last edited: 03.08.2018
Quick Reference Guide: Managing Applicant Tracking in Workday as Primary Recruiter
12
5. Reference Check
When a candidate moves to the “Reference Check” stage, the Primary Recruiter receives a “to do” in their inbox to upload the reference check template, once the references are completed. The Primary Recruiter can access the document on HR Connect through the link provided. To upload the documentation, go to the “Candidate Grid” and Select the Candidate then select the Attachment tab. Select
at the bottom left. You can drag and drop the file or select the file. Using the prompt icon Label the document, by
selecting “Other Documents” select .
a. Primary Recruiter will need to submit a reference check “To Do” even if Shared Services supports the effort.
6. Offer When a candidate moves to the “Offer” stage, the Primary Recruiter receives an “Offer for Job Application” task in their inbox to initiate the offer. At this point, the Primary Recruiter will review and confirm the information in the 3 sections.
1. “Start”, which includes hire date, location, and business title. 2. “Compensation”, where you will need to update the offered compensation amount. 3. “One-Time Payment”, if the offer includes a sign on bonus, enter the total amount.
Once the information is reviewed and confirmed, Select Submit
Next, the Primary Recruiter receives the “Offer task” in the Workday inbox to generate the offer letter document. There are 6 offer letter templates that will generate based on the hire type: Employee Communication Promotion, Employment Communication Internal Transfer- Union 743, Employment Communication Lateral Move, New Hire Employment, New Hire Employment- Union 743, and Temporary Offer Letter.

Last edited: 03.08.2018
Quick Reference Guide: Managing Applicant Tracking in Workday as Primary Recruiter
13
To modify the letter, click arrows at the top right of the document. Within the expanded document, the Primary Recruiter can edit the information, input start and end time, adjust the signature, etc. Note, the gray sections are pulled from the job requisition and offer details page. Once the updates are complete, select “Done”. To print the document, click view PDF button and the letter will be sent to your Workday Inbox Notifications, where it can be downloaded and printed. Alternatively, the contents in the editor can be copied and pasted onto a Microsoft Word document.
The final letter must be sent via e-mail, outside of Workday. Once complete, Select on the task located in the Workday Inbox.
2. Set Offer Status:
After submitting the offer letter, complete the To-Do “Set Offer and Employment Agreement Status”.
Select . Using the down arrow, Select one of the following:
• Verbal Offer Declined • Verbal Offer Accepted* • Written Offer Declined • Written Offer Accepted*
• Note: Once the offer status is set, do not forget to submit the To-Do “Set Offer and Employment Agreement Status”. If not
submitted, it will not trigger the next step for background checks.
3. Background Checks:
When Verbal Offer Accepted* or Written Offer Accepted* is selected at the “Set Offer” step, Shared Services- Recruitment and Retention Specialists will receive a To-Do to initiate a background check and check for rehire eligibility.

Last edited: 03.08.2018
Quick Reference Guide: Managing Applicant Tracking in Workday as Primary Recruiter
14
The Specialists will first check re-hire eligibility. Then they initiate the background check with GIS and will track the progress on the candidate’s profile, with the following indicators.
• Background check Initiated • Background Check Passed • Background Check Not Passed • Background Check Exception • Not Eligible for Rehire
This process can be tracked in the “Additional Data” tab of the candidate’s profile. Alternatively, RPT Candidate background Check Status can be pulled in Workday to check the status.
Once the Background Check is set to “Passed” or “Background Check Exception” the “Ready for Hire” stage is activated.
7. Ready for Hire Select the candidate from the candidate grid and select “Ready for Hire”. Workday will convert the applicant and proceed into Complete “Hire” for external candidates or Complete “Change Job Process” for internal candidate. The HRP will receive the respective task in their Workday Inbox to process.
Note: At the end of the search; once a hire has been made, return to the candidate grid and disposition the remaining candidates. If the job requisition is still posted, the posting will automatically un-post.
Last edited: 03.08.2018
Quick Reference Guide: Managing Applicant Tracking in Workday as Primary Recruiter
15
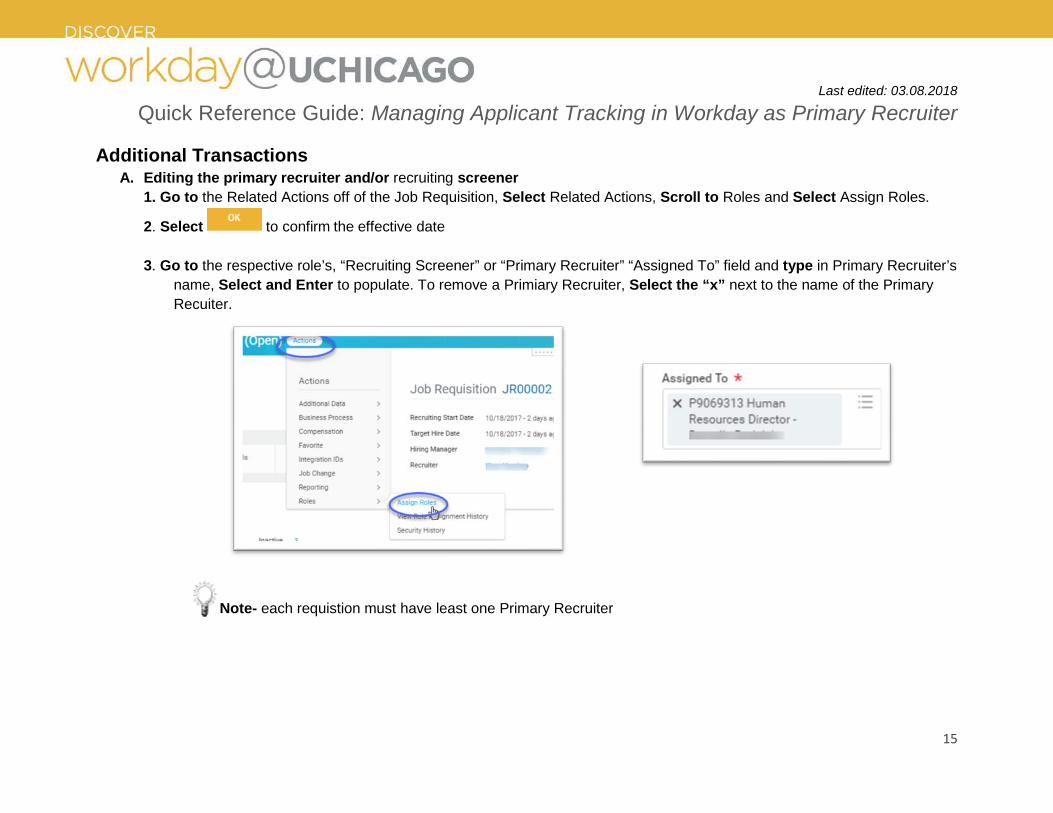
Additional Transactions A. Editing the primary recruiter and/or recruiting screener
1. Go to the Related Actions off of the Job Requisition, Select Related Actions, Scroll to Roles and Select Assign Roles.
2. Select to confirm the effective date
3. Go to the respective role’s, “Recruiting Screener” or “Primary Recruiter” “Assigned To” field and type in Primary Recruiter’s name, Select and Enter to populate. To remove a Primiary Recruiter, Select the “x” next to the name of the Primary Recuiter.
Note- each requistion must have least one Primary Recruiter

Last edited: 03.08.2018
Quick Reference Guide: Managing Applicant Tracking in Workday as Primary Recruiter
16
B. Undo Move on Candidate:
1. Go to the Related Actions off of the Candidate 2. Select Candidate Actions 3. Select “Undo Move”: Related Actions> Roles> Assign Roles. 4. Enter reason for change in the comment box. 5. Select “OK” to confirm
C. To Un-post Job:
To up-post a job after it has been posted for a least 7 calendar days. Go to the “Job Posting” tab located on the landing page. From the “Actions” tab, select “Un-post Job”.
This must be completed for both Internal and External postings.
Note- If HRP or Primary Recruiter tries to unpost before 7 days, the request will route to Shared Services for apporval.

Last edited: 03.08.2018
Quick Reference Guide: Managing Applicant Tracking in Workday as Primary Recruiter
17
D. To close the Job Requisition:
1. From the “Related Action” on the job requisition, select “Job Change”, select, “Select Close Job Requisition”.
2. Using the radio dials select “No Longer Recruiting; Position No Longer Needed” or “Requisition Opened in Error.”
Select

Last edited: 03.08.2018
Quick Reference Guide: Managing Applicant Tracking in Workday as Primary Recruiter
18
E. Requesting a Background Check Exception: 1. To inform Shared Services Recruitment Retention Specialist that your unit would like to move forward with the hire while the background check is pending, the HRP will need to upload the Background Check Exception letter on the candidate’s profile. A template for this letter can be found on the Shared Services Knowledge Base.
2. Once the document is uploaded, inform Shared Services Recruitment Retention Specialist by typing a comment in the Workday Activity Stream found at the bottom of the candidate’s profile and tagging your Shared Services contact.
Note: Shared Services initiates background checks for all positions that are posted. If no job requisition is created or the requisition was previously created in UChicago Jobs, the HRP must initiate the background check.


![Reviewed 24.06.2018 Accepted 03.08.2018 Correlating soil ... · challenges and risks in resource management [GLEICK et al. 2011]. Government is and has to be conferenced about up-coming](https://static.fdocuments.us/doc/165x107/5e7c40c682907e6bdf5e948e/reviewed-24062018-accepted-03082018-correlating-soil-challenges-and-risks.jpg)
![Reviewed 24.06.2018 Accepted 03.08.2018 Correlating soil and … · 2019-02-19 · challenges and risks in resource management [GLEICK et al. 2011]. Government is and has to be conferenced](https://static.fdocuments.us/doc/165x107/5e7c3e52c537b20576456eec/reviewed-24062018-accepted-03082018-correlating-soil-and-2019-02-19-challenges.jpg)