LABVIEW PROFESSIONAL DEVELOPMENT SYSTEMdownload.ni.com/support/daq/manuals/321888a.pdf6. If you use...
58
CVI ™, LabVIEW ™, National Instruments ™, NI-488.2M ™, NI-DAQ™, and NI-VXI ™ are trademarks of National Instruments Corporation. Product and company names are trademarks or trade names of their respective companies. 321888A-01 © Copyright 1998 National Instruments Corp. All rights reserved. January 1998 RELEASE NOTES LABVIEW PROFESSIONAL DEVELOPMENT SYSTEM Version 5.0 These release notes introduce you to LabVIEW, describe the system requirements for the LabVIEW software, and contain installation instructions and updated documentation information. The LabVIEW 5.0 Professional Development System includes the LabVIEW Full Development System, the LabVIEW Application Builder, and the Professional G Developers Toolkit. Note LabVIEW is Year-2000 compliant. Because LabVIEW has never stored two-digit years, the change to 2000 does not affect any internal storage of dates. Contents How to Proceed................................................................................................................ 3 Required System Configuration....................................................................................... 3 Windows ............................................................................................................ 3 Macintosh .......................................................................................................... 4 UNIX ................................................................................................................. 5 Installing LabVIEW......................................................................................................... 6 Windows ............................................................................................................ 6 Macintosh .......................................................................................................... 7 UNIX ................................................................................................................. 8 Data Acquisition and GPIB Installation Notes ................................................................ 10 Windows ............................................................................................................ 10 Macintosh .......................................................................................................... 10 GPIB and VXI Installation Notes for Sun ....................................................................... 11 Where to Go from Here ................................................................................................... 11 Examples and Solutions for Your LabVIEW Programs.................................... 12 Additional Resources......................................................................................... 12 Difference between LabVIEW for Windows 95 and Windows NT ................................ 13 Low-Level Register I/O..................................................................................... 13 Common LabVIEW Launch Errors on UNIX ................................................................. 13 ™
Transcript of LABVIEW PROFESSIONAL DEVELOPMENT SYSTEMdownload.ni.com/support/daq/manuals/321888a.pdf6. If you use...

0
it
.3.3
4
7
100
10111212
33
RELEASE NOTES
LABVIEW PROFESSIONAL DEVELOPMENT SYSTEMVersion 5.0
These release notes introduce you to LabVIEW, describe the system requirements for the LabVIEW software, and contain installation instructions and updated documentation information. The LabVIEW 5.Professional Development System includes the LabVIEW Full Development System, the LabVIEW Application Builder, and the Professional G Developers Toolkit.
Note LabVIEW is Year-2000 compliant. Because LabVIEW has never stored two-digyears, the change to 2000 does not affect any internal storage of dates.
ContentsHow to Proceed...............................................................................................................Required System Configuration......................................................................................
Windows............................................................................................................3Macintosh ..........................................................................................................UNIX .................................................................................................................5
Installing LabVIEW.........................................................................................................6Windows............................................................................................................6Macintosh ..........................................................................................................UNIX .................................................................................................................8
Data Acquisition and GPIB Installation Notes ................................................................Windows............................................................................................................1Macintosh ..........................................................................................................
GPIB and VXI Installation Notes for Sun .......................................................................1Where to Go from Here ...................................................................................................
Examples and Solutions for Your LabVIEW Programs....................................1Additional Resources.........................................................................................
Difference between LabVIEW for Windows 95 and Windows NT................................13Low-Level Register I/O.....................................................................................1
Common LabVIEW Launch Errors on UNIX.................................................................1
™
CVI ™, LabVIEW ™, National Instruments™, NI-488.2M ™, NI-DAQ™, and NI-VXI ™ are trademarks of National Instruments Corporation. Product and company names are trademarks or trade names of their respective companies.
321888A-01 © Copyright 1998 National Instruments Corp. All rights reserved. January 1998

15166667717122
4662728990
113
34838
94006
354
Configuring LabVIEW Windows on UNIX.................................................................... 14Configuring LabVIEW with the Tab Window Manager .................................. 14Configuring LabVIEW with the HP VUE Window Manager .......................... 14Configuring LabVIEW with the Motif Window Manager ............................... 14
Notice to Sun SPARCstation 5 Users..............................................................................Notice to HP-UX Users ...................................................................................................Notice to Concurrent PowerMAX Users......................................................................... 1Manual Clarifications and Additions............................................................................... 1
Multithreading................................................................................................... 1ActiveX ............................................................................................................. 1Instrumentation ................................................................................................. 1General Interface Features ................................................................................Support for Template VIs and Controls ............................................................ 2Adding VIs to the Project and Help Menus ...................................................... 2Toolkits ............................................................................................................. 2Allocation of Threads on Concurrent PowerMAX and Solaris 2 ..................... 23Clarifications to the LabVIEW User Manual ................................................... 24VISA Error Codes............................................................................................. 2
Using the Application Builder Libraries ......................................................................... 2Required System Configuration........................................................................ 2Standard Features..............................................................................................Customizable Features ......................................................................................
How to Build an Application........................................................................................... 2Create and Save an About VI (Optional) .......................................................... 2Save VIs that Use VI Server Functions ............................................................ 3Use the Build Application Item ........................................................................ 3
Application Building Example........................................................................................ 3Distributing Your Applications ....................................................................................... 3
Additional Files Required by Applications....................................................... 33Distribution Rights............................................................................................ 3Packaging Your Files for Distribution .............................................................. 3
Additional Notes for Building Applications.................................................................... 3Setting Preferences............................................................................................Using the VI Setup... Option to Limit VI Options............................................ 39Providing Help Information .............................................................................. 3
Professional Development Tools.....................................................................................VI Comparison.................................................................................................. 4Documentation Tools........................................................................................ 4Built-in System Configuration .......................................................................... 5
Managing Files with the Same Name..............................................................................
LabVIEW Professional Developers Release Notes 2 © National Instruments Corporation

ad
fore
r
ld
un
5
n
ds l
6
5. ts
How to ProceedIf you are upgrading from a previous version of LabVIEW, carefully rethe LabVIEW Upgrade Notes included with your upgrade package beforecontinuing with this installation. You need to consider several issues beconverting your VIs to this version of LabVIEW.
Read the Required System Configuration section, then follow the instructions in the Installing LabVIEW section of these release notes. Afteyou have installed LabVIEW, see the Where to Go from Here section for information about getting started with LabVIEW. In addition, you shouread the Manual Clarifications and Additions section before using LabVIEW 5.0.
Required System ConfigurationThis section describes the minimum system requirements needed to rLabVIEW 5.0.
WindowsLabVIEW 5.0 Professional Development System for Windows is distributed on CD. The LabVIEW CD contains versions for Windows 9and Windows NT and includes the complete instrument driver library available when LabVIEW 5.0 released.
The LabVIEW Online Tutorial default configuration requires the LabVIEW 5.0 distribution CD to be in your CD-ROM drive. You also cainstall the LabVIEW Online Tutorial files on your hard drive. This installation requires approximately 40 MB of hard disk space.
The LabVIEW Online Tutorial and LabVIEW Help files contain 256-colorgraphics. Your video driver, configured through Control Panels»Display, must be configured for 256 colors. Minimum requirements to view the tutorial are 800 × 600 pixel resolution and the Microsoft Video for Windows driver. For viewing Help files, National Instruments recommenthat you configure your video driver for 256 colors with 800 × 600 pixeresolution.
Note (Windows NT) If your display is in 16-bit mode, you might want to change it to 25or 24-bit color for better performance when viewing the LabVIEW Online Tutorial.
(Windows 95) LabVIEW 5.0 runs on any system that supports Windows 9You should have a minimum of 16 MB of RAM, but National Instrumenrecommends 32 MB for this version to run effectively.
© National Instruments Corporation 3 LabVIEW Professional Developers Release Notes

3
a
ause
f you th
the
re W
n
(Windows NT) LabVIEW 5.0 only runs on Windows NT 4.0 Service Pack or later. You should have a minimum of 16 MB of RAM and a 486/DX processor, but National Instruments recommends 32 MB of RAM and Pentium processor for this version to run effectively. LabVIEW for Windows NT only runs on Windows NT 80x86 computers. It does not runon other processors, such as the DEC Alpha, MIPS, or PowerPC, becLabVIEW uses 80386 instructions. DEC Alpha, MIPS, and PowerPC 80x86 emulators must emulate 80386 instructions to run LabVIEW.
Note On Windows systems, you need approximately 115 MB of disk storage space.
MacintoshLabVIEW for Macintosh is distributed on a CD containing both 680x0 and Power Macintosh software. In addition to the LabVIEW application, theCD also contains an instrument driver directory that includes all the LabVIEW instrument drivers available when LabVIEW 5.0 released.
LabVIEW for the 680x0-based Macintosh requires a math coprocessor.You cannot use a 68000-based computer, such as the Macintosh SE. Iare using a Macintosh IIsi or a Macintosh LC, you might not have a macoprocessor in your computer. Also, computers using the 680LC40 processor (Centris 610s and some low-end Centris 650s) do not havemath coprocessor functions, and therefore cannot run LabVIEW.
LabVIEW requires a minimum of 6 MB of available RAM, in addition to the RAM requirements for your system software and any other applications that you want to run simultaneously. National Instrumentsrecommends that you have at least 8 MB of RAM. You might need momemory, depending on the size of the application you design in LabVIEand the amount of data that your application manipulates.
(Power Macintosh) LabVIEW requires 24 MB of RAM and at least 130 MBof hard disk space.
(680x0-Based Macintosh) LabVIEW requires at least 130 MB of hard disk space.
LabVIEW requires System 7 or 8 and cannot run on System 6 or any previous versions of the Macintosh operating system.
For more accurate timing, install the Apple QuickTime extension. Wheyou use QuickTime, timing accuracy should increase from 16.6 ms resolution to approximately 1 ms resolution. System response varies depending on background applications, other extensions, networking activity, and disk caching.
LabVIEW Professional Developers Release Notes 4 © National Instruments Corporation

for
ns em
.1)
p on tall lan
ilable
ur
est
ater.
Note On Macintosh systems, you need approximately 100 MB of disk storage spacea minimal installation of LabVIEW or 150 MB for a full installation.
UNIXLabVIEW for Sun and HP-UX is distributed on CD only. LabVIEW for Concurrent PowerMAX is distributed on 4 mm DAT tape. These versioare not available on floppy disks. LabVIEW requires an X Window Systserver, such as OpenWindows 3, HP-VUE, or X11R6. LabVIEW doesnot require a specific graphical user interface (GUI) such as Motif or OpenLook, because LabVIEW uses Xlib to create its own GUI.
LabVIEW for Sun runs on SPARCstations with SunOS 4.1.3 (Solaris 1or later and Solaris 2.4 or later. LabVIEW for HP-UX runs on Hewlett-Packard Model 9000 Series 700 computers with HP-UX 9.0.5or later. LabVIEW for Concurrent PowerMAX runs on PowerMAX version 4.1 or later.
The workstation should have 32 MB of RAM with 32 MB or more of swaspace storage for LabVIEW to run effectively. In addition, the workstatimust have a minimum of 95 MB of disk storage space if you want to insthe entire LabVIEW package. To save space, install only the VIs you pto use.
LabVIEW uses a directory for storing temporary files. Some of the temporary files are large, so keep several megabytes of disk space avafor this temporary directory. The default for the temporary directory is /tmp . You can change the temporary directory by selecting Edit»Preferences....
If LabVIEW aborts unexpectedly, it might leave files behind in the temporary directory. Remove old files occasionally to avoid depleting yodisk space.
(Sun) You can use a TMPFS file system for this directory to improve performance. For Solaris 1.x, refer to the Sun System and Network Administration manual, part number 800-3805-10, for more informationabout the TMPFS file system. Solaris 2 uses TMPFS by default.
Operating System Patches on SunIf you plan to run LabVIEW on SunOS 4.1.3, you need to obtain the latrevision of the following patch from Sun:
• 100458-xx: Setitimer sometimes fails to deliver SIGALRM
You do not need any other patches to run LabVIEW on Solaris 2.4 or l
© National Instruments Corporation 5 LabVIEW Professional Developers Release Notes

t
er
r
ur
on
Operating System Patches on Concurrent PowerMAXYou need at least the following patches to run LabVIEW on ConcurrenPowerMAX 4.1. The base patches are odd numbers only.
Installing LabVIEW If you are upgrading from an earlier version of LabVIEW, read the LabVIEW Upgrade Notes included with your upgrade package before continuing with this installation.
WindowsComplete the following steps to install LabVIEW for Windows.
1. (Windows NT) Log on to Windows NT as an administrator or as a uswith administrator privileges.
2. Run x :\WIN95-NT\INSTALLER\SETUP , where x is the drive letter for your CD-ROM drive.
3. The installer gives you the option of performing a full installation oa minimal installation. If you do not have sufficient disk space (approximately 115 MB), choose the minimal installation and use yoLabVIEW CD to access the remaining components.
4. After you choose an installation, follow the instructions that appearyour screen.
5. (Windows 95) To use ActiveX Automation, you need to install Microsoft DCOM 95.
The LabVIEW installer automatically launches the installer for DCOM 95.
6. If you use data acquisition (DAQ) devices with LabVIEW, completethe following step. For more information about installation and configuration of DAQ drivers, refer to the Data Acquisition and GPIB Installation Notes section of this document.
The LabVIEW installer calls the NI-DAQ installer, which installs thecorrect DAQ driver software.
patch base-001 Base System Patch 001
patch base-003 Base System Patch 003
patch base-005 Base System Patch 005
patch base-007 Base System Patch 007
patch base-009 Base System Patch 009
LabVIEW Professional Developers Release Notes 6 © National Instruments Corporation

r,
ou r
st
n
,
a
ur
7. The LabVIEW 5.0 CD contains all the latest versions of our GPIBdrivers, located in the drivers directory. If you use GPIB devices with LabVIEW, complete the following step. For more information about installation and configuration of GPIB drivers, refer to the Data Acquisition and GPIB Installation Notes section of this document.
The LabVIEW installer calls the National Instruments GPIB installewhich installs the GPIB drivers and modifies the registry.
8. LabVIEW completes the following steps.
a. The LabVIEW installer installs the Advanced Analysis VIs automatically.
b. The LabVIEW installer installs NI-VISA automatically.
After you have completed the installation, LabVIEW is ready to run. If yplan to use DAQ or GPIB devices with LabVIEW, you must restart youcomputer to load the new drivers.
By default, the LabVIEW Online Tutorial requires the LabVIEW 5.0 distribution CD to be in the CD drive. If you want to install all the LabVIEW Online Tutorial files on you hard drive, copy the files located inx:\tutorial to the LabVIEW directory on you hard drive, where x is the drive letter for your CD-ROM drive. Overwrite any files that already exiin that directory.
Note If you have installed LabVIEW on a server, new users might want to copy the Activity directory from the server to their local machine. You use the Activity directory to complete activities that illustrate basic LabVIEW concepts. You cafind these activities in the LabVIEW User Manual and the LabVIEW Online Reference, which you can access by selecting Help»Online Reference….
MacintoshComplete the following steps to install LabVIEW for Macintosh.
1. (CD Installation) If you are installing LabVIEW on a Power Macintoshdouble-click the LabVIEW Installer icon in the Power Macintosh directory. If you are installing from a CD on a 680x0-based Macintosh, double-click the LabVIEW Installer icon in the 680x0 Macintosh directory.
2. The installer gives you the option of performing a full installation orminimal installation. If you do not have sufficient disk space (approximately 150 MB), choose the minimal installation and use yoLabVIEW CD to access the remaining components.
3. After you click the Install button, you are prompted to select a destination directory. Click the New Folder button to create a LabVIEW directory, then click the Install In Current Folder button to install the LabVIEW files in that directory.
© National Instruments Corporation 7 LabVIEW Professional Developers Release Notes

u r
:
led g
d:
After you have completed the installation, LabVIEW is ready to run. If yoplan to use DAQ or GPIB devices with LabVIEW, you must restart youcomputer to load the new drivers.
UNIXComplete the following steps to install LabVIEW for UNIX.
Solaris 11. To enable superuser privileges, type su root and enter the root
password.
2. If the directory /cdrom does not exist, type the following command
mkdir /cdrom
3. Mount the LabVIEW CD and type the following command:
mount -rt hsfs /dev/sr0 /cdrom
4. To change to the installation directory, type
cd /cdrom/solaris1
5. To run the installation script, type the following command:
./INSTALL
6. Follow the instructions on your screen.
Solaris 21. To enable superuser privileges, type su root and enter the root
password.
2. Insert the LabVIEW CD. On Solaris 2.x, the CD automatically mounts as soon as the CD is inserted into the drive. If this feature is disabon your workstation, you must mount the CD by typing the followincommand:
mount -o ro -F hsfs /dev/dsk/c0t6d0s2 /cdrom
3. See the README file in /cdrom/cdrom0/solaris2 or /cdrom/solaris2 for instructions on custom installation or other additional information.
4. If your CD was mounted automatically, type the following comman
pkgadd -d /cdrom/cdrom0/solaris2
If you used the mount command in step 2, type the following command:
pkgadd -d /cdrom/solaris2
5. Follow the instructions on your screen.
LabVIEW Professional Developers Release Notes 8 © National Instruments Corporation

HP-UX1. To enable superuser privileges, type su ro ot and enter the root
password.
2. Mount the LabVIEW CD on the / cdr om directory with the SAM system administration utility.
3. To change to the installation directory, type the following command:
cd / cdro m/H P-UX
4. To run the installation script, type the following command:
. / IN STALL
5. Follow the instructions on your screen.
PowerMAX1. Insert the 4 mm DAT tape into the tape drive.
2. To create the directory in which you will install LabVIEW, type the following command:
mkdi r /o pt/ l v50
3. To change to the new directory, type the following command:
cd / opt/ l v50
4. Extract the files from the tape by typing the following command:
t ar xv
5. To run the installation script, type the following command:
. / IN STALL
6. Follow the instructions on your screen.
After you have installed LabVIEW completely, it is ready to run.
Note The LabVIEW User Manual and the LabVIEW Online Reference, which you can access by selecting Help»Online Reference…, provide activities that illustrate basic LabVIEW concepts. If you want to complete these activities, copy the Act ivi t y directory from the LabVIE W directory to your home directory.
Note The LabVIEW documentation set, including the Code Interface Reference Manual and the VXI VI Reference Manual, is available in Portable Document Format (PDF) on the LabVIEW CD in the manual s directory. You can copy this directory or selected PDF files to the LabVI EW\manuals directory on your hard drive. You must have Adobe Acrobat Reader 3.0 or later installed to view these files.
Note If you are upgrading from a previous version of LabVIEW, read the LabVIEW Upgrade Notes. If you have one of the add-on packages, such as the LabVIEW Test Executive or the Picture Control Toolkit, consider installing those files at this time.
© National Instruments Corporation 9 LabVIEW Professional Developers Release Notes

he s
nts
B n
W Q
st
er
.
Data Acquisition and GPIB Installation NotesAll National Instruments GPIB interfaces and DAQ devices come with tdrivers and other software you need to use them. LabVIEW also comewith the drivers and other software you need to use National Instrumehardware. While the drivers included with LabVIEW are the same NI-488.2 and NI-DAQ drivers National Instruments includes with its GPIand DAQ hardware, the version numbers might differ. Always use thedriver with the higher version number. You can determine which versioof NI-DAQ you are using with LabVIEW by running the Get Device Information VI. If you already own a device with a version of NI-DAQ earlier than 5.0, do not install that driver.
You must configure your DAQ hardware before you can use the LabVIEDAQ VIs. To configure your DAQ hardware, you need to run the NI-DAConfiguration Utility. For more information about how to configure yourDAQ hardware with the NI-DAQ Configuration Utility, refer to the Help files installed with LabVIEW.
WindowsWhen you install LabVIEW, the installer places the application and moof the related files in a directory you specify. The default name of this directory is LABVIEW. If you install DAQ or GPIB VIs, the installer placesadditional files, described in the following sections.
Use the NI-DAQ Configuration Utility, which you launch by clicking theStart button and choosing Programs»LabVIEW »NI-DAQ Configuration Utility .
For information about how to configure your particular DAQ device, refto the NI-DAQ Configuration Help file. To view this Help file, click the Start button and select Programs»LabVIEW»NI-DAQ Configuration Help. Follow the links for configuring the devices you have.
You can find further information about the NI-DAQ driver in the NI-DAQ Read Me File. To view this file, click the Start button and select Programs»LabVIEW »NI-DAQ Read Me File.
MacintoshThe LabVIEW installation program installs two control panels and an extension in your system folder. NI-GPIB contains the driver code that communicates with your GPIB devices. NI-DAQ contains driver code that communicates with your DAQ devices. The NI-DMA/DSP extension contains DSP and DMA drivers used by DAQ, GPIB, and DSP drivers
LabVIEW Professional Developers Release Notes 10 © National Instruments Corporation

or
h
nd e
al
he
y.
e
l
GPIB and VXI Installation Notes for SunThe LabVIEW installer prompts you to choose the NI-488.2M drivers fthe GPIB hardware you are using (SB-GPIB-TNT, GPIB-ENET, or GPIB-SCSI-A). The installer then installs that driver for you. The only exception is the Solaris 1 NI-488.2M driver for the GPIB-SCSI-A, whicyou must install separately.
If you have a GPIB-SCSI-A, follow the installation instructions in the documentation that came with your original GPIB-SCSI-A hardware asoftware kit, including the Getting Started with Your GPIB-SCSI-A and thNI-488.2M Software for the Sun SPARCstation manual.
Note LabVIEW does not work with the GPIB-1014 series (VME) devices or the originGPIB-SCSI box. It does work with the newer GPIB-SCSI-A box.
The VXI device drivers for Solaris 1.x and 2.x are included on floppy disks with the LabVIEW for Sun VXI Upgrade and with the VXI/VME-SB2020kit. A VXI device driver must be installed on your system to perform VXIbus operations from LabVIEW. Install the appropriate device driver(Solaris 1.x or Solaris 2.x) before beginning development. To install the VXI device driver, refer to the Getting Started with Your VXI-SB2020 andthe NI-VXI Software for Solaris manual.
Note National Instruments periodically updates drivers for GPIB and VXI. If you addnew GPIB or VXI hardware for use with LabVIEW, the included drivers might supersede those sent with LabVIEW. Compare the version numbers and use tdriver with the higher number.
Where to Go from HereThe following resources can help get started with LabVIEW 5.0 quickl
If you are a new LabVIEW user, see the LabVIEW QuickStart Guide to learn how to begin programming with LabVIEW. The exercises in this manual guide you through the basic steps of building and debugging aLabVIEW application.
(Windows) For an introduction to the LabVIEW environment, complete thexercises in the LabVIEW Online Tutorial. Launch the tutorial by clicking LabVIEW Tutorial in the LabVIEW dialog box.
Note To access the LabVIEW launch dialog box, either launch LabVIEW or close alopen LabVIEW VIs if you already are running LabVIEW.
© National Instruments Corporation 11 LabVIEW Professional Developers Release Notes

l.
r
t
s
u I by
l
o
.
If you are using the Application Builder Library, see the Using the Application Builder Libraries section. Refer to the Source Code Control»Compare Files section for information about source code contro
Examples and Solutions for Your LabVIEW Programs(Windows and Macintosh) If you are using data acquisition (DAQ) or instrument I/O and want to find examples or generate solutions for youLabVIEW programs, launch the DAQ Solution Wizard by clicking Solution Wizard in the LabVIEW dialog box. For more information abouthe Solution Wizard, see the Chapter 3, Data Acquisition, and Chapter 4, Instrumentation, of the LabVIEW QuickStart Guide.
(Windows) To find any other type of example, open the Search ExampleHelp file by clicking Search Examples in the LabVIEW dialog box.
(Macintosh and UNIX) The examples directory contains a VI named readme.vi . With this VI, you can find the available examples. When yoselect a VI, you can see the documentation that was entered for that Vchoosing Window»Show VI Info.... To open a VI, choose File»Open....
Additional Resources
Note The LabVIEW documentation set, including the Code Interface Reference Manua and the VXI VI Reference Manual, is available in Portable Document Format (PDF) on the LabVIEW CD in the manuals directory. You can copy this directory or selected PDF files to the LabVIEW\manuals directory on your hard drive. You must have Adobe Acrobat Reader 3.0 or later installed to view these files.
(Windows and Macintosh) If you need to perform data acquisition, read theLabVIEW Data Acquisition Basics Manual, which contains important information about using the DAQ VIs and examples you can find in LabVIEW. For reference information about a particular DAQ VI, refer tthe LabVIEW Function and VI Reference Manual and the LabVIEW Online Reference, which you can access by selecting Help»Online Reference…. The New Features in LabVIEW 5.0 section in the LabVIEW Upgrade Notes also contains information about new features and changes in DAQ VIs
The DAQ examples folder contains a VI library named RUN_ME.LLB that has a Getting Started example VI for analog input, analog output, digital I/O, and counters. The RUN_ME.LLB examples provide an excellentstarting place for data acquisition.
LabVIEW Professional Developers Release Notes 12 © National Instruments Corporation

Difference between LabVIEW for Windows 95 and Windows NT
Low-Level Register I/OLabVIEW for Windows 95 has a set of VIs named In Port and Out Port that you can use to read or write hardware registers. WindowsNT applications cannot manipulate hardware directly. If you need to communicate with a hardware device in Windows NT, you must write a Windows NT driver.
Common LabVIEW Launch Errors on UNIXThe following table lists common errors that might occur when you launch LabVIEW for UNIX. See the Required System Configuration section of these release notes for more information about solving these and other installation problems.
Error Message/Description Probable Cause/Solution
Xli b: connect i on t o : 0. 0 r ef use d b y se r ver
Probable Cause—Trying to run LabVIEW as a user who does not have permission to open a window on the display server. Typically seen after running the su command to temporarily become a different user, such as root (superuser).
Solution—Exit the su command and launch LabVIEW as the login user.
cli ent i s not aut hor i ze d t o connect to se r ver
i nt ern al e r ro r d uri ng connec t ion au t hor i za t io n check
“ Execu t abl e v ers i on doesn’ t ma t ch re sour ce f il e”
Probable Cause—Version of LabVIEW executable does not match version of la bvi ew. r sc .
Solution—Verify that the appResFi l ePath parameter in the configuration file correctly sets the path to the l abview . rs c file.
© National Instruments Corporation 13 LabVIEW Professional Developers Release Notes

on
ve
.
el,
p,
Configuring LabVIEW Windows on UNIXThis section describes procedures for configuring LabVIEW windows UNIX operating systems.
Configuring LabVIEW with the Tab Window ManagerIf you use the Tab Window Manger (twm), you can change environment settings so that twm interacts better with LabVIEW. With twm, you cannot close the floating palette menus in LabVIEW if these windows do not hatitle bars. To correct this problem, add the following line to your .twmrc file in your home directory:
DecorateTransients
This line adds title bars to the floating windows so you can close them
Configuring LabVIEW with the HP VUE Window ManagerIf you use the HP VUE Window Manager (vuewm), you can change environment settings so that vuewm interacts better with LabVIEW. By default, vuewm does not incorporate the window position requests of anapplication. This behavior causes LabVIEW windows, such as the PanDiagram, Help, and file dialog windows, to not appear in consistent locations on your screen. To change the vuewm behavior, use the xrdb command to set two vuewm settings:
Vuewm.clientAutoPlace: False
Vuewm.positionIsFrame: False
To add the two entries, you also can edit the following files manually:
$HOME/.vue/sessions/home/vue.resources
$HOME/.vue/sessions/current/vue.resources
Configuring LabVIEW with the Motif Window ManagerIf you use the Motif Window Manager (mwm), you can change environmentsettings so that mwm interacts better with LabVIEW. By default, mwm does not incorporate the window position requests of an application. This behavior causes LabVIEW windows, such as the Panel, Diagram, Heland file dialog windows, to not appear in consistent locations on your screen. To change the behavior of mwm, use the xrdb command to set two mwm settings:
mwm.clientAutoPlace: False
mwm.positionIsFrame: False
LabVIEW Professional Developers Release Notes 14 © National Instruments Corporation

can ing t
1,
ess
e
.
z, ur e
er
To add the two entries, you also can edit the following file manually:
$HOME/.Xdefaults
Notice to Sun SPARCstation 5 UsersA bug exists in some early revisions of the SPARCstation 5. This bug cause LabVIEW and other programs to hang the system when executcertain floating-point operations. When this condition occurs, you musphysically reset the computer to recover. The problem exists in the firmware of the computer and can occur when running SunOS 4.1.3_USunOS 4.1.4, and Solaris 2.x.
Note This bug has been reported only on early revisions of the 70 MHz and 85 MHzSPARCstation 5.
To determine whether your SPARCstation 5 is affected, perform the following steps.
Caution Following these steps temporarily interrupts the operation of your computer, soyou should warn anyone who might be using your computer remotely.
1. From your SPARCstation 5 console, hold down the <Stop/L1 > key (located near the upper left corner of your keyboard) and prthe <A> key to break into the PROM monitor.
2. You see one of the following two prompts:
Type b (boot), c (continue), or n (new command mode)>
Type 'go' to resume ok
In the first case, select n to go to new command mode, where you sean ok prompt. If you already have an ok prompt, skip to step 3.
3. At the ok prompt, type
module-info
You then see information similar to the following lines:
CPU FMI,MB86904 Rev. 2.5 : 70.0 MHz
SBus (Divide By 3) : 23.3 MHz
4. Type go to exit the monitor and resume operation of your system
If your CPU Revision number (2.5 in this example) is earlier than 3.2, and your CPU clock speed (70.0 MHz in this example) is less than 110 MHthen your computer has this problem. Contact Sun and ask to have yoCPU firmware upgraded to swift_pg 3.2 or later. (Swift is the code namused by Sun for the SPARCstation 5 firmware.) The Sun Bug ID numbfor this problem is 1151654.
!
© National Instruments Corporation 15 LabVIEW Professional Developers Release Notes

gly
6.0.
W ion is
ist data the
u
ur .
W
ry
ve is ists
If you have a SPARCstation 5 with this bug, National Instruments stronrecommends upgrading your firmware.
Note This problem can affect programs other than LabVIEW. Notably, the GNU C compiler also can produce code that hangs your system in versions prior to 2.
Notice to HP-UX UsersBy default, HP workstations limit the size of a process such as LabVIEto 64 MB. You can change this setting by adjusting a kernel configuratparameter that limits the amount of data a process can use. To edit thparameter, enable superuser privileges by typing su root and entering the root password. Use the SAM system administration utility to view the lof kernel configuration parameters. Change the value of the maximum segment size in bytes parameter to a larger value. If you need to rebuildkernel and reboot for changes to take effect, the SAM utility guides yothrough this process.
Notice to Concurrent PowerMAX UsersAttempting to use 7-bit data with the LabVIEW Serial VIs might crash yomachine because the operating system only supports 8-bit characters
Although you can select the hardware flow control option for the LabVIESerial VIs, serial-line hardware flow control is not supported by the operating system and therefore does not work.
Manual Clarifications and AdditionsThis section contains information that was not included in the LabVIEWdocumentation as well as corrections to the LabVIEW manuals. For information about new features in this version of LabVIEW, see the LabVIEW Upgrade Notes.
MultithreadingColor of Code Interface and Call Library Function Nodes— In LabVIEW 5.0, the color of a code interface node (CIN) or Call LibraFunction node on a block diagram changes depending on whether LabVIEW considers it reentrant. If LabVIEW considers a CIN or Call Library Function node reentrant, LabVIEW assigns it the current primiticolor (the default is pale yellow). If a CIN or Call Library Function node not considered reentrant, its color is orange. This color designation exon all platforms, even if the platform itself is not threaded.
LabVIEW Professional Developers Release Notes 16 © National Instruments Corporation

ory
ine,
ions
CVI
tion
xt.
ActiveXole_lv5container.dll—The ActiveX Container uses a DLL named ole_lv5container.dll , which is located in the resource directory. If you build an application that includes ActiveX controls andmove it to another machine, you must install this file in the same directas the built application or in the System directory. In the LabVIEW documentation, references to ole_container.dll should be ole_lv5container.dll .
Data Format—The compatibility VIs for the LabVIEW 4.x Automation functions require that you pass flattened data in the LabVIEW 4.x format. LabVIEW 5.0 loads your LabVIEW 4.x VIs and automatically selects theConvert 4.x Data option for the Flatten To String and Unflatten From String functions.
InstrumentationSignal Generator by Duration VI—The Signal Generator by Duration VI has been added to the Analysis»Signal Generation palette. This VI generates a signal with a shape given by the waveform type: sine, costriangle, square, sawtooth, increasing ramp, or decreasing ramp.
CVI Function Panel Converter Changes—The improved CVI Function Panel Converter creates hierarchical text menus so you can find functquickly. Two new options have been added to the CVI Function Panel Converter. These options are ON by default.
• Map ViSession type to VISA Session RefNum—This option specifies that instrument session numbers of type ViSession in the Function Panel are converted to LabVIEW VISA RefNums in the resulting VI. Functions that contain the string _init in their name automatically register with the VISA refnum; functions that contain_close in their name automatically close the VISA refnum.
• Create instr.lib menu mirroring CVI Class Hierarchy —This option specifies that when converting a Function Panel file, a palette menu for the instrument is created in the Instrument Drivers menu. This menu is organized hierarchically according to the FuncPanel Tree in the .fp file.
General Interface Features
Icon and Text PalettesYou can display palettes in three modes: Standard, All Icons, or All TeChoose the palette display mode in the Edit»Select Palette Set»Display Style submenu.
© National Instruments Corporation 17 LabVIEW Professional Developers Release Notes

se
s are icon
icon ttes.
ot , ny
are
a
if
ll
a s
In All Icons mode, the Controls and Functions palettes contain icons thatrepresent options such as controls, indicators, functions, and VIs. Theicon palettes are similar to the icon palettes in previous versions of LabVIEW.
In All Text mode, you pop up to access the Controls or Functions palette. These text palettes contain the names of options. Items in text paletteorganized in the same order as in the icon palettes when you read thepalette row by row, left to right. Empty spaces in the icon palettes are skipped. Unlike icon palettes, you cannot tack down text palettes or subpalettes. In All Text mode, LabVIEW displays text palettes in the Project menu and the Find dialog box. In Standard or All Icons mode, LabVIEW displays these palettes as icon palettes.
Standard is the default mode. In Standard mode, all palettes default topalettes, but you can edit individual palettes to display them as text pale
When you edit a palette by selecting Edit»Edit Control & Function Palettes…, LabVIEW displays the palettes in All Icons mode. You cannedit palettes in the other modes because they do not contain as muchinformation (icon palettes have both icons and two-dimensional layoutwhile text palettes do not). In the editor, you can specify the mode for apalette by popping up and selecting either Icons or Text from the Standard Menu View submenu. The mode you select affects only the menu you editing.
Note In LabVIEW 5.0, you pop up on palettes or the icon of a submenu so you havemethod for changing the settings of the top-level Controls and Functions palettes.
File Manager ToolThe File Manager tool, which you access by choosing Project»File Manager…, simplifies copying, renaming, and deleting files withinVI libraries (LLBs). You also can use this tool to create new LLBs anddirectories and convert LLBs to and from directories, an important stepyou need to manage your VIs with the Source Code Control tools.
To avoid performing a file operation on a VI already in memory, close aVIs that might be affected before using this tool.
In the File Manager dialog box, shown in the following figure, you can view two locations (directory or LLB) simultaneously. When you selectfile, you can copy, rename, or delete it using the corresponding buttonbetween the two lists. Click New… to create a new directory or LLB.
LabVIEW Professional Developers Release Notes 18 © National Instruments Corporation

for to
nal
p
rs
thin es
Figure 1. File Manager Tool Dialog Box
If you select an LLB, you can click Convert LLBs to Dirs to convert it to a directory. If you select a directory and click this button, the tool scansall LLBs within that directory and gives you the option to convert themdirectories. The new directory is created in the same location as the original LLB.
If you assign the new directory a name that differs from that of the origiLLB, LabVIEW searches for the files that were within the LLB when calling a VI (even when the name is the same minus the .llb extension). When you convert an LLB to a directory, you have the option to back uthe LLB (the .llb extension changes to .llx ).
To convert a directory to an LLB, select a directory and click Convert Dirs to LLBs .
Click Check Filenames to scan a directory or VI library for platform-dependent filenames. The tool scans all filenames for invalid characters (: , \ , / , ?, * , <, >, or | ) and verifies filenames to be 31 characteor less (a limitation on the Macintosh). The Check Filenames option also scans files within LLBs. These files are portable, even if their names contain characters that are invalid on some platforms. By scanning wiLLBs, this tool helps you detect potential problems if you move your filout of VI libraries.
© National Instruments Corporation 19 LabVIEW Professional Developers Release Notes

te in ies
in
a le he
e ol at put
n of
Use the Show dates option at the bottom of the dialog box to display filemodification dates next to each file. You can choose to sort the files alphabetically or by date and disable files with the same name and daboth directory listings. Use this technique when comparing two directorto determine whether any files have changed.
Other General Interface FeaturesDragging and Dropping VI Icons—LabVIEW 5.0 simplifies the creation of VI icons. By selecting an image file and dropping it onto the VI icon the upper-right corner of a front panel, a 32-by-32 version of the imagereplaces the existing icon.
You can drag a VI icon from the icon pane in the upper-right corner to block diagram to instantly create a subVI call. By pressing <Shift> whidragging the VI icon, you automatically wire the non-default values of tcontrols as constants for the subVI.
If the subVI already appears in a block diagram, pressing <Shift> whildragging onto the existing call updates the attached constants. A contrits default value discards the constant attached to the subVI, and an inwired to anything other than a constant is unaffected.
When you press <Shift> while double-clicking a subVI icon to open thesubVI front panel, LabVIEW loads the values of the constants wired tothe subVI into the front panel controls. All unwired controls retain the default values.
You also can use the drag-and-drop technique for global variables andcustom controls. Additionally, you can drag a VI icon into a VI refnum oa front panel control to load VIs into memory dynamically, which is part the VI Server functionality.
Print to RTF/HTML Feature —The Print to RTF/HTML feature can export graphics in uncompressed graphics interchange format (GIF).
Configuration File VIs —The Configuration File VIs provide tools for reading from and writing to a platform-independent configuration file similar in format to a Windows initialization (.ini ) file.
Macintosh Open Transport Support—LabVIEW 5.0 supports Open Transport on Power Macintosh machines. Open Transport is a PowerPC-native networking driver.
LabVIEW Professional Developers Release Notes 20 © National Instruments Corporation

ns
Is,
ck . nly s
is
r
VI
,
tead
set
te a
ate
inish for
New Preferences Options—LabVIEW 5.0 adds the following two options in the Miscellaneous view of the Edit»Preferences… dialog box.
• Automatically close VISA sessions—Use this option to specify that VISA sessions, like file refnums, close automatically when the top-level VI goes idle. The default is ON, which closes VISA sessioautomatically.
• Treat read-only VI as locked—Using this option, you can choose whether to treat read-only VIs as locked. You cannot edit locked Vbut you can re-compile and execute them. In the Professional Developers Version, the option is selected by default. This setting specifies that if the source-code control uses file permissions to lochecked-in files, you cannot edit the files until you check them outHowever, you cannot save the VI to the same location (the read-ofile) unless you change the file permissions outside LabVIEW. Thibehavior is consistent with the behavior in previous versions of LabVIEW. When using the VI Server, the read-only status of files ignored except when saving
Execution System Selection—The default preferred execution system foa VI is same as caller. This setting allows the VI to run in the same execution system in which caller is running when the subVI call to theis made. The same as caller setting has the lowest run-time overhead. When you set a VI to same as caller and you run it at the top level, it runsin the standard execution system at its selected priority.
Icon Editor —The Undo button has been removed from the Icon Editorbut you can undo an action by selecting Edit»Undo or <Ctrl-Z> .
Seconds to Date/Time Function Change for Windows—In Windows, the value of the DST element of the date time rec cluster returned by the Seconds to Date/Time function is not set correctly. Insof returning whether the date time rec cluster has been modified for daylight saving time, it returns whether your current system settings areto account for daylight saving time.
Offscreen Updates Default Value—The default value for offscreen updates is now ON instead of OFF.
Support for Template VIs and ControlsYou can save commonly used VIs and controls as templates. To createmplate VI, save a VI with a .vit extension (or.ctt extension for typedefs). When you open a template VI or control, the new file you creis named automatically using your template name and a number corresponding to the number of times it has been opened. When you fediting the VI and save it, LabVIEW prompts you to enter a new namethe file.
© National Instruments Corporation 21 LabVIEW Professional Developers Release Notes

m.
tory,
.0.
ng
e
,
To modify a template, open it, make your changes, then save over the .vit (or .ctt ) file that you originally created.
(Macintosh) You also can use the Stationery Pad checkbox of the Get Info dialog box in the Finder to change a VI to a template.
Adding VIs to the Project and Help MenusYou can add VIs to the Project or Help menus by placing them inside theProject or Help directories in the LabVIEW directory. You can use this technique to provide quick access to VIs that act as tools in your systeNational Instruments uses this feature to make the Tech Support VIs accessible from the Help menu. Also, if you have the Application Builderlibraries installed, you can see a Create Distribution Kit option in the Project menu.
Any VI placed at the top level of the Project or Help directory is appended directly to the corresponding menu. If you create a subdireca submenu is appended. If you place a library (.llb ) inside of one of these directories, only VIs that are marked as top level are appended to the menu bar.
ToolkitsMost existing toolkits function with LabVIEW 5.0 without problems. However, you need to move the VIs so they appear in the menus. LabVIEW 5.0 is compatible with toolkits designed for 3.0, with the following exceptions.
You must upgrade the following toolkits for compatibility with LabVIEW 5.0:
• LabVIEW Test Executive—If you use LabVIEW Test Executive 5.0or earlier, you must upgrade to LabVIEW Test Executive 5.1. Thisupgrade is free to existing users of the LabVIEW Test Executive 5
With minor exceptions, you can use the previous version of the followitoolkits with LabVIEW 5.0:
• Picture Control Toolkit for G —You can use the Picture Control Toolkit 1.0 with LabVIEW 5.0 with the exception of the Draw 1-bit Pixmap VI. You can download an updated version of this VI from thNational Instruments FTP site (ftp.natinst.com ). The Picture Control Toolkit is being updated to include the fix mentioned aboveand the upgrade is free to existing users.
LabVIEW Professional Developers Release Notes 22 © National Instruments Corporation

ers.
to .
in
Ps.
WP
l r .
nd so ical
task
oes
• Internet Developers Toolkit for G—You can use the Internet Developers Toolkit 4.1 with LabVIEW 5.0, but you must delete printvi.llb , located in the user.lib\internet\image directory. The Internet Developers Toolkit is being updated to version 5.0 to include this fix, and this upgrade is free to existing us
The following toolkits do not install VIs in a location that causes them appear in the palettes. These toolkits are being updated to version 5.0You can use the existing toolkits by moving VIs to vi.lib\addons or user.lib . Alternatively, you can choose Edit»Edit Control and Function Palettes and add them to the palette of your choice.
• Picture Control Toolkit 1.0
• Statistical Process Control Toolkit 1.0
• Proportional-Integral-Derivative Toolkit 1.0
Allocation of Threads on Concurrent PowerMAX and Solaris 2On Concurrent PowerMAX and Solaris 2, LabVIEW allocates threads the following two ways.
• If LabVIEW has permission to increase its Light Weight Process (LWP) priorities from the default, it binds all created threads to LW
– Profiling is very accurate because each thread is bound to a Land the kernel monitors the execution timing of LWPs.
– The LabVIEW priority system is reflected in the way the kerneruns LWPs. Higher-priority execution threads (LWPs) take ovethe system, not allowing lower-priority system tasks to execute
– Switching between threads might require more time because LabVIEW runs through the system scheduler.
• If LabVIEW cannot increase its LWP priorities from the default, it creates a LWP per thread, but leaves the threads and LWPs unbouthe created threads have a pool of LWPs on which to run. The typuser does not have permission to raise LWP priorities. If LabVIEWthreads are not bound to LWPs:
– Profiling strictly uses wall-clock time. Threads might switch LWPs dynamically without kernel knowledge, so LabVIEW cannot use LWP timing statistics.
– The LabVIEW priority system only has an effect internal to LabVIEW. The system treats all of the LabVIEW LWPs as another process to schedule at the same priority as any otherin the system.
– Context switching between threads might be faster because it dnot involve the kernel scheduler.
© National Instruments Corporation 23 LabVIEW Professional Developers Release Notes

The About LabVIEW dialog box, which you can view by choosing Help»About LabVIEW …, indicates how LabVIEW currently allocates threads.
Clarifications to the LabVIEW User ManualThe following clarifications pertain to the LabVIEW User Manual:
• In Chapter 2, Creating VIs, the text and an illustration refer to an Undo button in the Icon Editor. The Undo button has been removed, but you can undo an action by selecting Edit»Undo or <Ctrl-Z>.
• In Activity 6-3, String Subsets and Number Extraction, the block diagram shows the From Exponential/Fract/Eng function. The blockdiagram should show the Scan From String function, as described in the text.
• In Activity 15-3, Calculate Harmonic Distortion, the pathname for library that includes the THD Example VI should be exa mple s\a nal ysis \ measu r e\ meas xmpl .l l .
• (Windows 95) In the Using NetDDE section of Chapter 23, Using DDE, the manual refers to REGEDI T and REDEGI T executables. The correct name is REGEDI T.
• In Chapter 25, Program-to-Program Communication, the PPC Client Example section refers to the PPC Open Connection, PPC Open Session, PPC Close Session, and PPC Close Connection VIs. These should be the PPC Open Port, PPC Start Session, PPC End Session, and PPC Close Port VIs, respectively. The PPC Server Example section refers to the PPC Close Session VI, which should be the PPC End Session VI.
VISA Error CodesThe following table lists numeric VISA error codes that were not included in the printed documentation.
Error Code Error Name Descrip tion
-1073807333 VI_ERROR_INV_DEGREE Specified degree is invalid.
-1073807328 VI_ERROR_INV_LOCK_TYPE The specified type of lock is not supported by this resource.
-1073807327 VI_ERROR_INV_ACCESS_KEY The access key to the specified resource is invalid.
-1073807312 VI_ERROR_ABORT User abort occurred during transfer.
-1073807301 VI_ERROR_QUEUE_ERROR Unable to queue the asynchronous operation.
-1073807254 VI_ERROR_ASRL_PARITY A parity error occurred during transfer.
-1073807253 VI_ERROR_ASRL_FRAMING A framing error occurred during transfer.
LabVIEW Professional Developers Release Notes 24 © National Instruments Corporation

e.
-1073807252 VI_ERROR_ASRL_OVERRUN An overrun error occurred during transfer. A character was not read from the hardware before the next character arrived.
-1073807240 VI_ERROR_INV_PARAMETER The value of some parameter (which parameter is not known) is invalid.
-1073807229 VI_ERROR_INV_LENGTH Invalid length specified.
-1073807204 VI_ERROR_SESN_NLOCKED The current session did not have a lock on the resourc
1073676290 VI_SUCCESS_EVENT_EN Specified event is already enabled for at least one of thespecified mechanisms.
1073676291 VI_SUCCESS_EVENT_DIS Specified event is already disabled for at least one of thespecified mechanisms.
1073676292 VI_SUCCESS_QUEUE_EMPTY Operation completed successfully, but queue was already empty.
1073676293 VI_SUCCESS_TERM_CHAR The specified termination character was read.
1073676294 VI_SUCCESS_MAX_CNT The number of bytes transferred is equal to the input count.
1073676416 VI_SUCCESS_QUEUE_NEMPTY Wait terminated successfully on receipt of an event notification. There is at least one more event occurrenceof the type specified by inEventType available for this session.
1073676420 VI_WARN_NSUP_ATTR_STATE Although the specified state of the attribute is valid, it is not supported by this resource implementation.
1073676421 VI_WARN_UNKNOWN_STATUS The status code passed to the operation could not be interpreted.
1073676424 VI_WARN_NSUP_BUF The specified I/O buffer is not supported.
1073676441 VI_SUCCESS_NESTED_SHARED Operation completed successfully, and this session hasnested shared locks.
1073676442 VI_SUCCESS_NESTED_EXCLUSIVE Operation completed successfully, and this session hasnested exclusive locks.
1073676443 VI_SUCCESS_SYNC Operation completed successfully, but the operation wasactually synchronous rather than asynchronous.
-1073807278 VI_ERROR_INV_WIDTH Invalid access width specified.
-1073807275 VI_ERROR_NSUP_VAR_WIDTH Cannot support source and destination widths that are different.
-1073807248 VI_ERROR_NSUP_ALIGN_OFFSET The specified offset is not properly aligned for the access width of the operation.
-1073807247 VI_ERROR_USER_BUF A specified user buffer is not valid or cannot be accessedfor the required size.
Error Code Error Name Description
© National Instruments Corporation 25 LabVIEW Professional Developers Release Notes

of pace ory
less
Using the Application Builder LibrariesFor more information about LabVIEW features refer to Chapter 27, Managing Your Applications, in the G Programming Reference Manual. This chapter contains tips for managing the source files of multiple developers and describes how to use the VI History item.
Required System ConfigurationApplications you create with the Application Builder Libraries have thesame approximate requirements as the development system. Memoryrequirements depend on the size of your application. Typically, applications require about the same amount of memory it takes to runyour VIs in the development system.
LabVIEW applications use a directory for storing temporary files. Somethe temporary files are large and it is best if several megabytes of disk sare available for this temporary directory. The default temporary directis \tmp . You can change the temporary directory by selecting Edit»Preferences....
It is best if the workstation has 32 MB of RAM, with 32 MB or more of swap space storage. It is possible for the Application Builder to run on than 24 MB of RAM, but performance suffers.
-1073807246 VI_ERROR_RSRC_BUSY The resource is valid, but VISA cannot currently access it.
1073676407 VI_WARN_CONFIG_NLOADED The specified configuration either does not exist or could not be loaded. VISA-specified defaults will be used.
1073676413 VI_SUCCESS_DEV_NPRESENT Session opened successfully, but the device at the specified address is not responding.
1073676418 VI_WARN_NULL_OBJECT The specified object reference is uninitialized.
-1073807313 VI_ERROR_NENABLED You must be enabled for events of the specified type inorder to receive them.
-1073807202 VI_ERROR_LIBRARY_NFOUND A code library required by VISA could not be located or loaded.
-1073807271 VI_ERROR_RESP_PENDING A previous response is still pending, causing a multiple query error.
-1073807263 VI_ERROR_NSYS_CNTLR The interface associated with this session is not the system controller.
1073676440 VI_SUCCESS_NCHAIN Event handled successfully. Do not invoke any other handlers on this session for this event.
Error Code Error Name Description
LabVIEW Professional Developers Release Notes 26 © National Instruments Corporation

nly
the ent
r
key
data
ion
s.
Standard FeaturesLabVIEW applications feature a simplified user interface that permits othe operation of VIs. The menus do not contain editing options. For example, the Save command and the Functions and Controls palettes are not present.
Menus display items related to VI operation. Because you cannot editVI, pop-up menus are short—displaying the same items the developmsystem displays when a VI is running.
(Windows and UNIX) Users access a pop-up menu by clicking a control oindicator with the right mouse button.
(Macintosh) Users access a pop-up menu by holding down the commandand clicking a control or indicator.
The items available to the user include the following:
• Operate controls and change their values.
• Interact with strip chart and graph indicators.
• Change the scale limits.
• Set controls, indicators, and array elements to default values.
• Use the pop-up menu of a control or indicator to cut, copy, or paste from a control or indicator to another control.
• Use the pop-up menu of a control or indicator to view the descriptof the item, and perform additional run-time operations, such as showing the control palette of the graph.
• Use any execution palette button the developer has not disabled.
• Log and print the front panel.
• View the Show VI Info... information for a VI.
• Use the Help window to see descriptions of controls and indicator
© National Instruments Corporation 27 LabVIEW Professional Developers Release Notes

g
nd h o se
g
e
ce
ou
ter to not ent
ties
elp
ou try ify
t
Customizable FeaturesWhen you build a run-time application, you can customize the followinitems:
• Do you want to embed a VI library in the application?
If you choose to embed a VI library in the application, the library aa LabVIEW run-time engine become a single file. When you launcthe file, it automatically opens all top-level VIs in the library. If you dnot embed a VI library, when you launch the application you can uit to open any VI, assuming the VI was saved with a development system for that platform.
By embedding a VI library, you can create a complete stand-aloneapplication, one that prevents the user, or customer, from accessinthe source VIs—even if the user has the development system. Thadvantage to not embedding a VI library is you can use the same run-time engine for multiple sets of VIs. This reduces the disk spausage for a customer running multiple VIs.
Additionally, you can use a combination of these two solutions. If yembed VIs within a library, they can still call subVIs outside of the application. You might want to do this when you have a set of VIs common to two applications, a set of VIs that require upgrading afthe user receives the application, or a large number of VIs to call (keep the base size of the application down). One disadvantage ofembedding every VI is the subVIs can be used in another developmsystem, because the users can view the diagrams.
• (Windows) Do you want the application to be an ActiveX server?
If you enable the ActiveX Server Support option, your application responds to requests from ActiveX clients. The functionality of the ActiveX server in your application is a subset of the LabVIEW ActiveX server. When you build an application myapp.exe , an ActiveX type library myapp.tlb is also created along with the executable. The type library defines a createable class, Application, and a dispatch class, Virtual Instrument, and exports the properties andmethods for these classes. You can find the Help for these properand methods in lvcomm.hlp in the LabVIEW Help directory. When you distribute the application make sure the type library and the hfile are located with the executable.
When you assign the name of the application to the ProgID Prefix your application is uniquely identified in the system registry. Once ybuild the application, you should run it at least once to enable regiswith the system. After the application is registered, ActiveX clientsaccess the server objects using ProgIDs. For example, if you specthe ProgID Prefix as myapp, clients instantiate an application objecusing the progID myapp.application .
LabVIEW Professional Developers Release Notes 28 © National Instruments Corporation

ns
ut
d y
hy.
ed
s in
, t
e, in
an
u ut
e
• Do you want a customized About... dialog box?
When you build an application, you can supply an About VI that ruwhen the user selects Help»About… from the Help menu. When you do not supply an About VI, the application has a basic, default Abodialog box. For more information, refer to the Create and Save an About VI section in this document.
How to Build an ApplicationThis section describes how to build an application. If you want your top-level VIs to run when opened, select Run When Opened from the VI Setup dialog of the top-level VI. If you want all of your VIs embeddewithin the application, save your application VIs into a single VI library bselecting File»Save with Options.
If you click the Application Distribution item, your program prompts youto select the VI library or directory where you want to save the hierarcEnter the name of a new library that you want to use to build the application. This selection automatically saves the VIs without their diagrams and includes any external subroutines and run-time menus referenced by the VIs in the VI library.
Next, choose the Project»Build Application... item to build the application. If you choose to embed a VI Library, and no VIs are markas Top-Level, the Build Application... item brings up the Edit VI Library dialog. The VIs you mark with the Top-Level option open when the application is launched. The following paragraphs describe these stepgreater detail.
Besides saving all the VIs necessary for your application in a VI libraryyou can also save a VI as an About VI, so users can view information abouyour application (such as the full name, version number, company namcopyright information, and so on). More information on the About VI is the next section of this document, Create and Save an About VI.
Create and Save an About VI (Optional)Most applications have an About dialog box that displays information about the application and the user or company that designed it. You ccreate an About VI that LabVIEW executes when a user selects Help»About…. You can have only one About VI per application, and yocan only have one if you embed a VI Library. If you do not supply an AboVI, LabVIEW displays a default dialog box like the one displayed in thLabVIEW development system.
© National Instruments Corporation 29 LabVIEW Professional Developers Release Notes

gins
oks
t
e
re
r
gle
e
y
at ion.
e
into
To create your own About VI, create a VI and save it so that its name bewith the word About (the first letter must be capitalized, with the subsequent letters in lowercase). When the application is launched it lofor a VI beginning with the word About.
If the user selects the About… menu item and an About VI is installed, thaVI runs. When it finishes execution, LabVIEW closes it automatically.
The About VI you create can share subVIs with your application VIs. However, your About VI cannot be a subVI in an application VI becausthe About VI cannot run while an application VI is running.
Note Your About VI must contain a message indicating that your application wascreated using LabVIEW from National Instruments. Please read the Distribution Rights section in the LabVIEW Software License Agreement for the copyright notice you must use to legally distribute your applications.
Save VIs that Use VI Server FunctionsVI Server functions dynamically load into applications; therefore, they anot part of the hierarchy of the top-level VIs and require a different procedure for saving. If you build an application that contains VI Servefunctions, use one of the following methods for saving:
• The easiest method is to save all dynamically loaded VIs into a sinlibrary:
– Build a dummy VI whose diagram contains the top-level application VI and all the dynamic top-level VIs. When you savthis VI with the options for Application Distribution, it saves allthe necessary VIs as well. Delete the dummy VI from the application library at this point, if you choose. The paths to thedynamic VIs might change and it might be necessary to modifyour code to account for this change.
– Select File»Save With Options...»Application Distribution... and save all dynamically loaded VIs to a new library, as you normally do. Then, for each VI that is dynamically loaded, repethis process, but save to the same library as your main applicatThis includes the Hierarchies of your dynamically called applications.
From a file management standpoint, this method can create a largexecutable file. From a memory standpoint, you still benefit from dynamic loading because the entire executable file does not load memory.
LabVIEW Professional Developers Release Notes 30 © National Instruments Corporation

the files
e
e.
to his
a
r
the
• The second method is to embed only your main application within executable and dynamically call external applications as separate (VIs and/or LLBs). If you use VI Server functions, you then must specify the path to the dynamically called applications by using thfunction Current VIs Path, followed by a Strip Path.
Use the Build Application ItemSelect the Project»Build Application... menu item to create an executabl
If you want to embed a VI library, click the embed menu item. A dialog box appears prompting you to select which VI library you want to use build an application. Select the VI library you created in the first step of tsection.
In addition, on the Windows platform, you can choose whether the application acts as an ActiveX server.
When you finish making selections, click OK . If you embed a VI library and no VIs in the library are marked with the Top Level item, LabVIEW displays the Edit VI Library... dialog box so you can select which VIs open at launch time. Use the Top Level item to mark the VIs that you wantto open when you launch the application. Most applications consist ofsingle top-level VI that calls other VIs. However, you can create applications that consist of multiple top-level VIs that open when you launch an application.
After the prompt, enter a name and destination for the application. Thebuild process can take a few minutes for very large applications.
Application Building ExampleComplete the following steps to explore application building using youLabVIEW development system:
1. Open the Sample VI, located in examples\appbuild.llb . This VI calls some Analysis VIs, including the Histogram VI, which call external subroutines. Items in the VI Setup… dialog box are currently configured to hide a number of the attributes of the window.
2. Run the Sample VI to see its behavior. When you are finished, clickSTOP button. Do not click the QUIT button unless you want to quit LabVIEW.
3. Choose File»Save with Options...»Application Distribution»Save. When prompted, enter the name sample.llb and then click Select.
© National Instruments Corporation 31 LabVIEW Professional Developers Release Notes

,
the
e
s ble.
ot It is
4. Examine the About Sample VI, which is also in examples\
appbuild.llb . This VI serves as the About dialog box for this application. When this VI executes, it acts similarly to a dialog boxin that it prevents you from interacting with other windows while it is open.
5. In the edit mode, select VI Setup... in the pop-up menu of the icon pane of the Sample VI. Then select the Run When Opened»OK .
6. Save a copy of the About Sample VI into examples\sample.llb and click OK .
7. Now you can build the application. Select File»Build Application… . Click the Embed VI Library button and choose sample.llb and click OK . LabVIEW then prompts you to mark which VIs you wantopened when the application launches. Choose the Sample VI fromdisplayed list, and select Top-Level»OK . A dialog box prompts you for a destination and name for the application you want to build. Move upward in the file hierarchy to the top level of your LabVIEWdirectory, and name the application (Windows) sample.exe or (Macintosh and UNIX) sample .
Note (Windows and UNIX) If you do not build the application at the top-level of the LabVIEW directory, you must place several files in the same directory as thapplication. These files communicate with hardware. See the Additional Files Required by Applications section of this document for a list of the files to be stored with your application.
8. Quit LabVIEW, and run the (Windows) sample.exe or (Macintosh and UNIX) sample application. It launches and then automatically openand runs the Sample VI. Look at the menu items that are now availaSelect (Windows, Macintosh, and UNIX) Help»About… or (Macintosh) Apple»About…. When you finish, click the QUIT button on the front panel of the application.
9. In practice, you might want to completely remove the STOP button from the front panel. If the top-level VI stops, the application does nautomatically quit, because that might not be the desired behavior.best to structure most applications so that the Abort item is disabled on the top-level VI, and the VI has a Quit item that calls the Quit LabVIEW function, located in Functions»Advanced.
LabVIEW Professional Developers Release Notes 32 © National Instruments Corporation

. If the
de
with
e
uilt
d
are
in
the LLs
at VIs,
Distributing Your ApplicationsThe following sections describe some relevant issues concerning the distribution of LabVIEW applications.
Additional Files Required by ApplicationsIt might be necessary to distribute additional files with your applicationrequired for execution or other operations, these files must be placed insame directory as the application.
If your application uses serial port or data acquisition functionality incluthe serpdrv or daqdrv files. If your application uses a GPIB or data acquisition board the user must install the hardware drivers that come their boards.
(Windows) If you created an ActiveX type library for your application, thtype library and help file must be included.
(Windows) The ActiveX Container uses a DLL named ole_lv5container.dll , which is located in the resource directory. If you build an application that includes ActiveX controls and move it toanother machine, you must install this file in the same directory as the bapplication or in the System directory.
(Windows) LabVIEW requires two system DLLs that might not be installeon all systems. These are msvcrt and mfc42.dll . The file msvcrt.dll is always required and mfc42.dll is required only if the application usesthe ActiveX container object. If they are not already present, these filesplaced in your Windows 95 system directory (system32 directory on the NT platform) by the LabVIEW installer. You must make sure these filesexist on the computer which runs the application. They can be placedeither the Windows 95 system directory (system32 directory on the NT platform) or in the same directory as the application. If you put them in Windows directory take care not to overwrite newer versions of these Dthat might have been installed by other applications.
(Macintosh) If you are building an application for the Power Macintosh thuses analysis routines or Program to Program Communication (PPC) put a copy of the Shared Libraries folder in the folder that contains your application.
Distribution RightsRefer to the LabVIEW Software License Agreement in your software package for information on the distribution rights for your platform.
© National Instruments Corporation 33 LabVIEW Professional Developers Release Notes
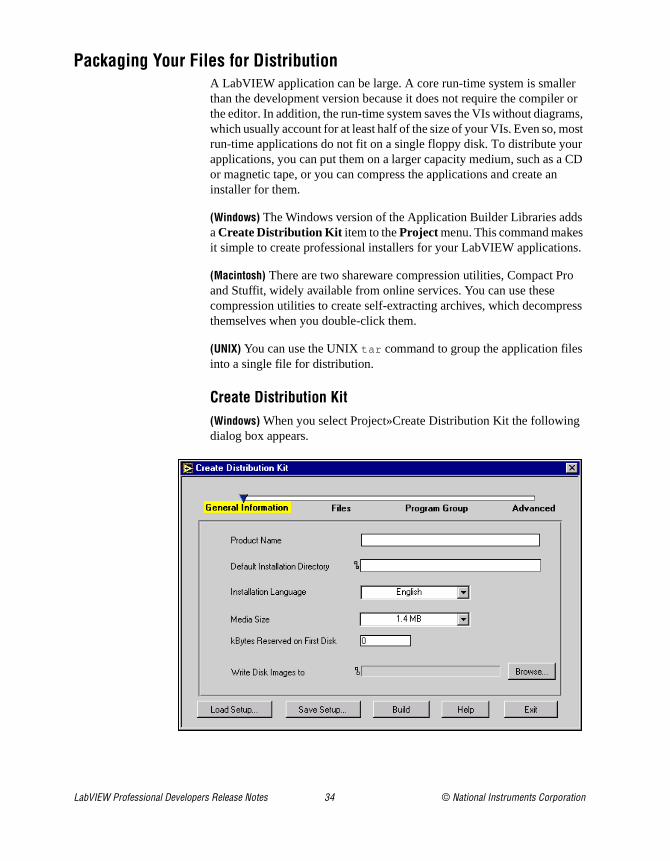
r r or ms, ost ur CD
s s.
o
ess
Packaging Your Files for DistributionA LabVIEW application can be large. A core run-time system is smallethan the development version because it does not require the compilethe editor. In addition, the run-time system saves the VIs without diagrawhich usually account for at least half of the size of your VIs. Even so, mrun-time applications do not fit on a single floppy disk. To distribute yoapplications, you can put them on a larger capacity medium, such as aor magnetic tape, or you can compress the applications and create aninstaller for them.
(Windows) The Windows version of the Application Builder Libraries adda Create Distribution Kit item to the Project menu. This command makesit simple to create professional installers for your LabVIEW application
(Macintosh) There are two shareware compression utilities, Compact Prand Stuffit, widely available from online services. You can use these compression utilities to create self-extracting archives, which decomprthemselves when you double-click them.
(UNIX) You can use the UNIX tar command to group the application filesinto a single file for distribution.
Create Distribution Kit(Windows) When you select Project»Create Distribution Kit the followingdialog box appears.
LabVIEW Professional Developers Release Notes 34 © National Instruments Corporation

the an
y
u the
n
er.
nd rite
ller
d tch,
to you of
t me
To create an installer, enter the information in this dialog box, then clickBuild button at the bottom. This command compresses the files, buildsinstaller, and writes the disk images to the hard drive path specified inWrite Disk Images to. You can run the installer image from that directoror copy it to floppies or other distribution media.
If you are not sure of the meaning of a field or button, click the Help button at the bottom of the dialog to bring up the Help window in LabVIEW. Yocan then put your cursor over any field or button, and a description of field or button appears in the Help window.
You can use the Save Setup item to save the information that you enter ithis dialog box. Subsequently, you can use the Load Setup item to retrieve information.
The Create Distribution Kit item has four dialog boxes: General Information , Files, Program Group, and Advanced. To switch between these dialog boxes, click the name of the box you want or drag the slid
General Information You use the General Information dialog box to describe appearance adefault items of the installer, and to specify a location on your drive to wthe installer images.
The Product Name item is used as part of a banner at the top of the instadialog and in various prompts for the user.
The Default Installation Directory item is used in the installer as the default location for installed files. The user can change the path in theinstaller program.
The Installation Language item lets you select the language that is usefor messages in the resulting installer. You can select from Danish, DuEnglish, Finnish, French, German, Italian, Japanese, Norwegian, Portuguese, Spanish, and Swedish.
The Media Size ring item lets you specify how the file is to be segmented—for 720 KB, 1.2 MB, or 1.4 MB floppies. Even if you plan distribute the files by CD, it is necessary to segment them. However, if want to run the installer from a CD or from your drive, you can place allthe files in the same directory and run the setup program from that directory.
The kBytes Reserved on First Disk item lets you reserve space on the firsdisk. You might reserve space on the first disk if you want to put a readfile on the first floppy.
© National Instruments Corporation 35 LabVIEW Professional Developers Release Notes

est
l. ore
es files pt,
d in e lick
t
tion
for
The Write Disk Images to item lets you specify where to write the disk images on your computer. The Create Distribution Kit item creates a setup program in that directory as well as files named data.001 , data.002 , and so on. If you plan to put the disk images on floppy, it is bto copy the setup and data.001 files to the first floppy, copy the data.002 file to the second floppy, and so on.
FilesYou use the Files dialog box to specify the files that you want to instalSpecify the files as a set of file groups. A file group can contain one or mfiles from several possible source locations on your computer. The application installs every file in a group to the same directory and sharthe same overwrite setting. For example, you can choose whether theoverwrite existing files of the same name without a prompt, with a promonly if the file being installed is newer, or never overwrite.
Press the Add Group button to define a group. You are prompted for a name for the group. This name is never seen by the user; it is only usethe Create Distribution Kit item to discriminate between groups. You arthen prompted to select files. You can add as many files as you want. Cthe Add File button to add a single file, or click Add Directory Contents to add every file in a directory, not including subdirectories.
Once you define a group, it shows up in the File Groups listbox item. When you select a group, you can specify the following settings for thagroup.
• The Group Destination item lets you specify whether you want the files in the selected group to install in the Installation directory or in the Windows directory. If you want to install the files in a subdirectory of the Installation directory or Windows directory, specify a relative path in the Relative Path item.
• The Replace Existing Files item lets you specify what happens if a fileof the same name as one of the source files is found in the destinadirectory. You can choose to always replace the file, ask the user, replace the file automatically if the source file is newer than the destination file, or never replace the file.
You can also edit the contents of a group using Edit Group or delete the contents using Delete Group.
Program GroupYou can use the Program Group dialog box to create a program groupyour installation. Under Windows NT, a program group appears as anicon/window in the program manager. Under Windows 95, a program group shows up in Start»Programs as a submenu. The program group
LabVIEW Professional Developers Release Notes 36 © National Instruments Corporation

easy
best
e
s ou
s
mize
g
an
look
age.
ight
ust
contains icons for the files you select, serving as shortcuts that make it to start the program regardless of its location on your computer.
Regardless of whether you plan to add items to a program group, it is to specify a program group name in the Program Group field. Even if you don't choose to install any files in a program group, an uninstall icon isadded to the group under Windows NT (under Windows 95, you use thAdd/Remove Programs control panel to uninstall programs).
Click Add File to add a file to the program group. A dialog box appearshowing you the currently defined file groups. If you select a file group, ycan then select a file within that group.
AdvancedThe Advanced dialog box contains items that let you customize the behavior of the installer. These items are intended for fairly isolated applications, so typically it is not necessary to use them.
Select the Use Custom Script item if you want to change to look of the installer. The LabVIEW and LabWindows Create Distribution Kit installers are based upon licensed components from Helpful ProgramIncorporated (HPI). Create Distribution Kit uses a file called template.inf , which is written in the HPI InstallIt scripting language and describes the dialogs that appear during the installation. To custothe look of the installer, make a copy of this file, make the necessary modifications, and then specify the location of the modified script usinthis item.
However, because the template script is written in a fairly flexible but somewhat complex scripting language, using this item is not recommended. National Instruments has some technical information available concerning a few common modifications you might make to installer script (many of them are LabWindows/CVI technical notes, because both LabWindows/CVI and LabVIEW use the same licensed components for the Create Distribution Kit items). Call National Instruments to order these technical notes. If you plan to customize theof the installer beyond the scope of those very simple modifications, it is necessary to buy the InstallIt package from HPI in order to get documentation and support for questions related to the scripting langu
Select the Run Executable After Installation item if you want to run a program after the installation completes. Additionally, you can use thisitem to run a program that finishes the installation. For example, you mwrite a DOS batch program or a C program that modifies a .ini file or a registry file. Install the file as part of your installation and then run it afterwards to make the necessary modifications. The file that you run mbe one of the files that you install.
© National Instruments Corporation 37 LabVIEW Professional Developers Release Notes

can
any
d able.
be
u
If you choose to run an executable after the installation completes, youuse the Command Line Arguments to specify arguments passed to the program. In addition to specifying standard arguments, you can embedof the following items in the command line argument string:
%dest The application installation directory chosen by the user
%src The directory that contains setup.exe
%group The installation program group name
%name The installation name
If any of these options are present at installation time, they are replacewith the proper values before the arguments are passed to the execut
Additional Notes for Building ApplicationsThe following sections contain some additional information that might useful in setting up your applications.
Setting PreferencesYour application has a Preferences dialog box. If you make changes, preference information for your application are written to (Windows and Macintosh) a preferences file or (UNIX) the .labviewrc file. The format for this information is the same as for LabVIEW; for more information see Chapter 7, Customizing Your Environment, in the G Programming Reference Manual.
(Windows) The only difference is the file name, which is the application name instead of labview . For example, if your application is named simple.exe , the preferences are stored in simple.ini . Remember to include your preference file (.ini ) with your application.
(Macintosh) The only difference is the file name, which is the applicationname instead of labview . For example, if your application is named Simple , the preferences are stored in Simple Preferences . Remember to include your preference file with your application.
(UNIX) To create a preferences file for your stand-alone application, yomust create a .labviewrc file on the target machine and place it insideyour home directory. Inside this file you create preferences using the following format: <application file name>.<preference> . For example, the.labviewrc file for LabVIEW has its preference set as labview.<preference>. An easy way to create a new executable
LabVIEW Professional Developers Release Notes 38 © National Instruments Corporation

ce a r.
d
ht
. he the stop
e
er
specific preference is to set your preferences in LabVIEW and then placopy of the .labviewrc file in your home directory of the target computeAll the user has to do at this point is change all the labview prefixes to the executable file name. The preferences file name, however, is still calle.labviewrc .
Using the VI Setup... Option to Limit VI OptionsWhen you design an application, consider which user options you migwant. For example, with the LabVIEW Development System, it is convenient to have an Abort button so users can easily test and halt VIsBecause this button aborts the program immediately—sometimes in tmiddle of input and output of sensitive data—you probably do not wantuser to halt the VI by this method. Instead, use a front panel control to the program synchronously.
You can use the VI Setup item in your VIs to make execution operations—such as the Abort button—available to the user. If the VI is to be used as a subVI, you can use the SubVI Node Setup... command to specialize operation of the subVI, such as configuring its front panel toopen when the subVI is called.
You might want to disable the following three items: Abort , Close Box, and Free Run. You also might want to hide all of the buttons, and then configure the top-level VI to run automatically when the VI is loaded. If you disable the Abort button, verify that your program does not accidentally run in an infinite loop.
You can disable the run-time pop-up menu for your VIs, so that users cannot set controls to default values or turn on autoscaling in graphs.
Additionally, you can customize your panels. For example, you can hidscrollbars or make specific VIs function like dialog boxes. When you choose VI Setup...»Dialog Box, the panel is modal, which means the uscannot interact with other panels while the panel is active.
Providing Help InformationAs a VI developer, it is best to document your VIs for other users,including all information necessary to load and operate the VIs. The regular LabVIEW documentation set is copyrighted material. Do not ship this documentation with the applications you create.
To create online help, you might want to enter information in the description field of the Show VI Info... dialog box for each panel. You might also want to place information in the Description dialog boxfor controls and indicators. When the user opens the Help window and
© National Instruments Corporation 39 LabVIEW Professional Developers Release Notes

lso lkit.
t
e
Is ou you ou ade
d
moves the cursor over indicators, the Help window displays description information.
Professional Development ToolsThe LabVIEW Professional Development system includes tools that aare distributed separately as part of the Professional G Developers tooThese tools are described in the Professional G Developers Toolkit Reference Manual, which is included with the Professional Developmensystem.
This section is a supplement to Professional G Developers Toolkit Reference Manual and provides information on the enhancements to thProfessional Developers tools in LabVIEW 5.0.
VI ComparisonYou can use the VI comparison tools to manage different versions of Vas you develop large applications. When you make changes to a VI, ymight want to compare the VI to an older version to verify the changes have made. Also, when multiple users are working on the same VIs, ymight need to view two versions of the same files to merge changes mby different users.
LabVIEW provides several tools for comparing VIs, which are describein the following sections.
• Compare Hierarchy—compares two different versions of the samehierarchy of VIs
• Compare VIs—compares two VIs
• Source Code Control»Compare Files—compares the local versionsof files with the versions under Source Code Control
Compare HierarchiesYou can use the Compare Hierarchy command to compare two hierarchies of VIs. Any file with the same name in both hierarchies is compared. After the comparison completes, Compare Hierarchy displays a summary of the differences. You can select a set of VIs that have differences and visually compare them using the Compare VIs tool.
To compare two VI hierarchies, select Project»Compare VI Hierarchies…. Use the Compare VI Hierarchies dialog box, shown in Figure 2, to select two hierarchies to compare.
LabVIEW Professional Developers Release Notes 40 © National Instruments Corporation

vel e
ared e d as ol
at
he
Figure 2. Compare VI Hierarchies
Select two VI hierarchies to compare by entering the path to the top-leVI. Use the … button to open a file dialog box to select a VI from the filsystem. You then can use the Compare Hierarchies button to compare VIs in the hierarchies. VIs with the same name but different paths are compand categorized as being either the same or different. VIs with the samname and path are considered shared VIs. All other VIs are categorizeeither added or deleted from the first VI hierarchy. The VIs and a symbindicating how they are categorized are displayed in the VIs in Hierarchies listbox. As you select different VIs in the listbox, a more detailed description appears in the Description listbox. To view the differences onthe screen, double-click an item in the listbox or use the Show Differences button.
The Read Hierarchies button categorizes the VIs in the hierarchy. VIs thneed to be compared are categorized as not compared . You can then selectively compare individual VIs by double-clicking an item or using tShow Differences button.
To abort comparisons of large VI hierarchies, use the Operate»Stop menu item or the <Ctrl-.> (Control and the period) key combination.
© National Instruments Corporation 41 LabVIEW Professional Developers Release Notes

m ck
nd ce
the
e
an
e r a list.
are
Comparison OptionsYou selectively can find differences in the front panel and block diagraof a VI as well as VI attributes such as settings in VI Setup. For the blodiagram, you can choose to ignore cosmetic differences. A cosmetic change is any change that does not affect the execution of the block diagram. Furthermore, you can choose to ignore the position and sizechanges in front panel and block diagram objects. Note that position asize changes include movement of an object from front to back and viversa.
Show DifferencesDifferences are shown by tiling the front panels and block diagrams of two VIs in the Differences window.
Figure 3. Differences Window
The Differences window includes a list of differences and details of the selected difference. To highlight a difference, double-click an item in thdifferences list, or select an item and click the Show Difference button. To highlight a detail, either double-click an item in the details list or selectitem and click the Show Detail button. A check mark indicates the itemsyou selected. You also can use the Tile Left and Right and the Tile Up and Down buttons to tile the windows of the two VIs you are comparing. Usthe Clear button to clear the differences list. If you have made edits aftecomparison, some of the differences might be stale; therefore, use theUpdate button to again compare the two VIs and update the differences You also can show the Differences window by selecting Project»Show Differences.
When you highlight a difference, objects that are part of the differenceselected. The Circle Differences checkbox option allows you to draw a redcircle around the object(s) that has changed. An example of a block diagram difference is show below.
LabVIEW Professional Developers Release Notes 42 © National Instruments Corporation
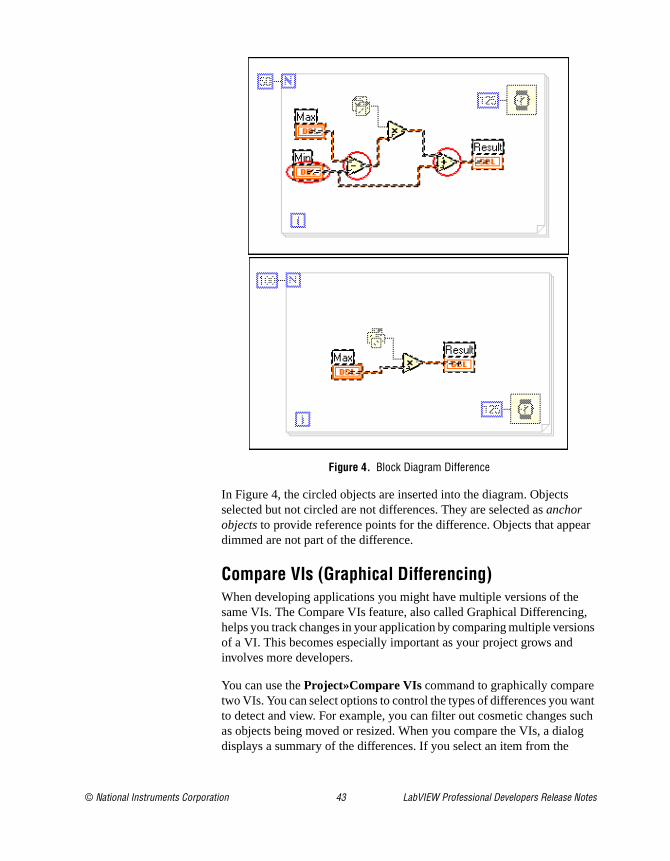
ar
g, ons
ant uch
og
Figure 4. Block Diagram Difference
In Figure 4, the circled objects are inserted into the diagram. Objects selected but not circled are not differences. They are selected as anchor objects to provide reference points for the difference. Objects that appedimmed are not part of the difference.
Compare VIs (Graphical Differencing)When developing applications you might have multiple versions of thesame VIs. The Compare VIs feature, also called Graphical Differencinhelps you track changes in your application by comparing multiple versiof a VI. This becomes especially important as your project grows and involves more developers.
You can use the Project»Compare VIs command to graphically comparetwo VIs. You can select options to control the types of differences you wto detect and view. For example, you can filter out cosmetic changes sas objects being moved or resized. When you compare the VIs, a dialdisplays a summary of the differences. If you select an item from the
© National Instruments Corporation 43 LabVIEW Professional Developers Release Notes

ly
son
the he
summary, Compare VIs displays and highlights the differences betweenthe two VIs.
To compare two VIs, select Project»Compare VIs…. Use the following dialog box to select two VIs to compare.
Figure 5. Compare VIs Dialog Box
The Select… button opens a dialog box to select a VI by name. You oncan select VIs that are already loaded into memory.
Comparing very large VIs can be lengthy. You can cancel the compariof two VIs through the Comparison Progress dialog box, shown in Figure 6.
Figure 6. Comparison Progress Dialog Box
The progress bar indicates the steps in the comparison algorithm, notnumber of differences left to find. When the comparison is complete, tfront panels and block diagrams of the two VIs are displayed in the Differences window, as shown in Figure 3.
LabVIEW Professional Developers Release Notes 44 © National Instruments Corporation

t
ved
se
e
tory
Comparison IssuesBecause LabVIEW cannot load two VIs with the same name, you musrename your VIs to compare them. When the Compare VI Hierarchies tool compares two VIs, the first VI loads as is, and the second VI is moto the temporary directory with a cmp. prefix. When using the Compare VIs tool you must rename the appropriate VI to load the two VIs into memory.
However, renaming the VIs does not affect the name of subVIs. Becauthe Compare VI Hierarchies tool does not rename the subVIs, the renamed VI will link to the subVIs loaded by the first VI.
Source Code Control»Compare FilesYou can use the Source Code Control»Compare Files… command to compare files from projects under Source Code Control (SCC) with thlocal versions of those files.
To compare VIs under SCC, select Project»Source Code Control»Compare Files…. You can use the SCC Compare Files dialogbox, shown in Figure 7, to compare the project files on the master direcwith the project files on the local directory.
Figure 7. SCC Compare Files Dialog Box
© National Instruments Corporation 45 LabVIEW Professional Developers Release Notes
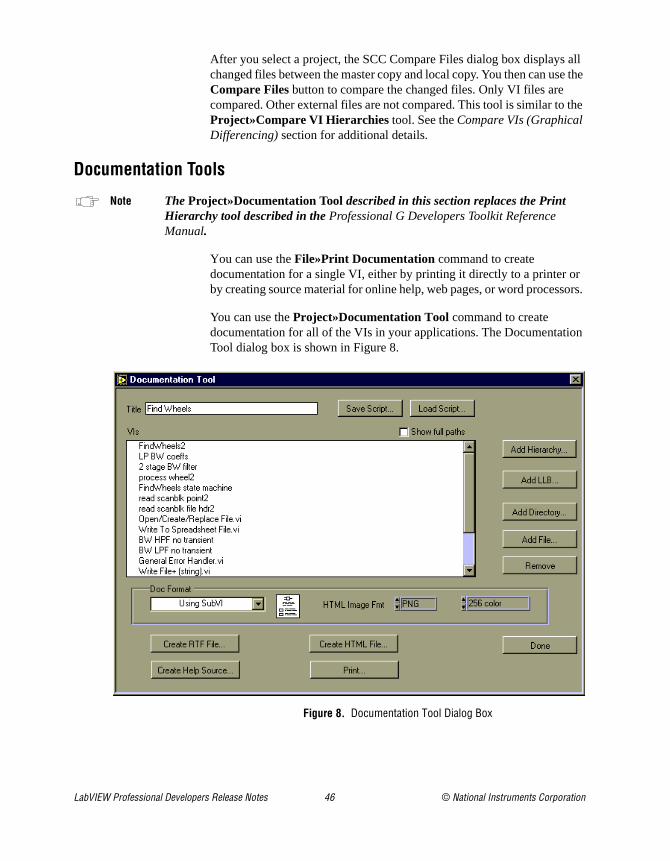
all e the
the
r ors.
on
After you select a project, the SCC Compare Files dialog box displayschanged files between the master copy and local copy. You then can usCompare Files button to compare the changed files. Only VI files are compared. Other external files are not compared. This tool is similar toProject»Compare VI Hierarchies tool. See the Compare VIs (Graphical Differencing) section for additional details.
Documentation Tools
Note The Project»Documentation Tool described in this section replaces the Print Hierarchy tool described in the Professional G Developers Toolkit Reference Manual.
You can use the File»Print Documentation command to create documentation for a single VI, either by printing it directly to a printer oby creating source material for online help, web pages, or word process
You can use the Project»Documentation Tool command to create documentation for all of the VIs in your applications. The DocumentatiTool dialog box is shown in Figure 8.
Figure 8. Documentation Tool Dialog Box
LabVIEW Professional Developers Release Notes 46 © National Instruments Corporation

om re
the m long
g
le
d
r
se
d for
n
Use the Add Hierarchy… , Add LLB… , Add Directory… , and Add File… buttons on the right side of the dialog box to add VI hierarchies frmemory, add all of the files in a directory or LLB, or add individual filesfrom disk. The files are listed in the listbox in the dialog box after they aadded. The order of the files controls the order that the VIs appear in resulting documentation. You can reorder the VIs by selecting files frothe list and dragging them to the desired location. If the paths are too to view, you can deselect the Show Full Paths checkbox at the top of the dialog box.
When you have the files in the desired order, select one of the followinbuttons to create the documentation:
• HTML —With HTML, you can make your documentation accessibfrom the World Wide Web. Images are written to external files in .PNG, .JPEG , or .GIF format based upon the format you choose in the Documentation Tool dialog box. See the Printing/Exporting Control and VI Descriptions to an RTF or HTML File section in Chapter 5, Printing and Documenting VIs, in the G Programming Reference Manual for more information about these formats.
• Rich Text Format (RTF)—RTF is a standard format that is supporteby a number of word processors, including Microsoft Word.
• Online Help Source—This produces an RTF file that is formatted foonline help (.hlp ) files. All images are written out as external bitmaps, and a help project and table of contents are created. Thefiles can then be compiled using a help compiler. See the Creating Your Own Help Files section in Chapter 5, Printing and Documenting VIs, in the G Programming Reference Manual for information about compilers for different platforms.
• Printer —Select this item to print documentation to a printer.
You can use the Save button at the bottom of the dialog box to save the settings and list of files you create to a file. If you select the Load button, you can restore the settings from the file you created using the Save button.
Source Code Control ToolsThe Source Code Control (SCC) tools make it easier to share work ancoordinate access to LabVIEW files. They provide a complete systemcontrolling, accessing, and documenting the different revisions of VIs that make up your projects. These tools are described in detail in the Professional G Developers Toolkit Reference Manual. The following sections describe how to get started quickly with these tools and also describe several enhancements to these tools that are not described ithe manual.
© National Instruments Corporation 47 LabVIEW Professional Developers Release Notes

ld
ill
the
.
rk it
VI es
nd o e
QuickStart Guide to Using the SCC ToolsFollowing is a brief summary of the steps for configuring and using theSCC tools. For more information on any of these steps, see the Professional G Developers Toolkit Reference Manual.
1. Administrator sets up system—At least one user in your workgroupshould be selected to administer the SCC system. This user shouselect the Administration option when installing the LabVIEW Professional Developers version.
The administrator is responsible for initializing the SCC system and setting up system-wide preferences. You do this from the Project»Source Code Control»Administration dialog box. When you set up the SCC system there are a couple of decisions you wneed to make:
– Which storage system do you want to use? The SCC tools can manage files or they can integrate with a third-party tool. See Support for Third-Party Tools and the Frequently Asked Questions about the SCC Tools sections for help in deciding which system to use.
– Will users be developing on multiple platforms or a single platform? This decision might help decide the storage systemyou will use, as well as how to configure that system. For multiplatform development, we recommend the built-in systemFor single platform development you can use either the built-insystem or one of the third party SCC tools that are supported.
Once the system is up and running, there is typically not a lot of woinvolved unless you want to change access privileges for files or limaccess for specific users.
If you are using ClearCase, refer to the ClearCase Installation Instructions section.
2. Users configure the SCC tools to access the system—The main decision users must make is where they will have a working directory. The working directory is a directory on your local system where all development takes place. As you retrieve files from SCC, they areretrieved to this directory and its subdirectories. You cannot add filto SCC which are outside of this directory.
Also, if you are using the Built-in system, it is important to understathe difference between the working directory, which is where you dyour work, and the master directory, which is where SCC stores thlatest versions of files. Users will not modify the master directory except when they check in files or create projects.
LabVIEW Professional Developers Release Notes 48 © National Instruments Corporation

ows
y er m sy
e f it ou our
lick
your
re
ter
er
With ClearCase, your work directory is the same directory as the master directory. ClearCase uses a virtual file system model that allmultiple users to have a unique view and set of files in the same directory. See the ClearCase Installation Instructions section for detailed information.
3. Users set up VIs for use with the SCC tools—As mentioned above, all files that the user will work with must be in the working directoror one of its subdirectories. In addition, files that will be stored undSCC cannot be stored in LLBs. LLBs are not flexible enough for theto work well with an SCC system because they do not allow for eaaccess to individual files. You can use the Project»File Manager tool to convert your LLBs to directories of VIs.
In converting LLBs to directories, you may find that you have somfiles with names that cannot be managed by the file system (i.e.: icontains a separator character such as \, /, or : ). Consequently, ymight have to rename of some files and update references within yhierarchy.
If you need to support Windows 3.1, see the Frequently Asked Questions about the SCC Tools section for suggestions on the best strategy for handling development.
4. Create SCC projects—A project in the SCC tools corresponds to ahierarchy of VIs. To create a project, first open the top-level VI of ahierarchy. Then select Project»Source Code Control»Project and cthe New Project button. The subsequent dialog box lets you select VI hierarchy, which can then be added to SCC.
You can add other project-related files such as documentation andshared libraries by using the Extra Files button in this dialog box.
5. Use SCC commands to access project files—At this point, you can begin to work with files under SCC. All commands related to SCC ain the Project»Source Code Control menu. Following is a brief description of the remaining commands:
– Retrieve Files—Use to copy files from SCC to your working directory.
– Checkout Files—Use to checkout files to your working directoryso that you can modify them.
– Checkin Files—Use to copy a file from your working directory toSCC so that other users can access it.
– Compare Files—Use to compare the files in your working directory with those under SCC. This command is described lain these release notes.
– Advanced—Use to create reports, view the history of files undSCC, access previous versions of files, and delete files.
© National Instruments Corporation 49 LabVIEW Professional Developers Release Notes

ns
iety an
ded
ave in the
tor iated de le .
W.
re
l
See the Professional G Developers Toolkit Reference Manual for more information about these commands. In addition, the following sectioprovided updated material and clarifications about using the SCC tools.
Support for Third-Party ToolsThe Source Code Control (SCC) tools are designed to work with a varof industry standard third-party tools for managing source code. You ceither use the built-in system, Visual SourceSafe for Windows, or ClearCase for Solaris 2. Support for other third-party tools might be adin the future based upon demand.
The Built-in system and Visual SourceSafe are described in the Professional G Developers Toolkit Reference Manual. ClearCase for Solaris 2 is described in the following section.
ClearCase SupportClearCase is a standard Source Code Control system on UNIX. If you hClearCase installed, you can select ClearCase for source code control Administration dialog box. All Source Code Control tools work with thesame interface as described in the Professional G Developers Toolkit Reference Manual.
ClearCase Installation InstructionsThe Professional Developers version provides the interface for using ClearCase in the LabVIEW development environment. The administramust create a ClearCase Versioned Object Base (VOB) and an assocstorage space outside of LabVIEW before users can use source codecontrol with ClearCase. When the administrator sets up the source cocontrol system from inside LabVIEW, he or she must provide the VOBdirectory as the master directory. Because ClearCase uses a virtual fisystem, users also must use this VOB directory as their local directory
In addition to providing the correct local directory, users must set up aClearCase view, and make sure it is set every time they launch LabVIETo emulate the model of having local copies of files, users must set upunique labels to mark current working versions of files. When working under this model, users must edit their views to show labeled files befomost recent versions.
Once the administrator and users configure their ClearCase systems, ClearCase is invisibly integrated into the LabVIEW source-code controinterface.
LabVIEW Professional Developers Release Notes 50 © National Instruments Corporation

or
as
e
.
e if se, pe. ), file
ere
h a
Setup—Administrator
1. Install ClearCase if it is not already on your system. Refer to the ClearCase documentation for instructions.
2. If you want to create public VOBs, either set up a registry passwordlocate the existing registry password.
3. Create the VOB.
a. Set your umask. For shared VOBs, the suggested umask setting is 2.
b. Create a mount point directory, such as /vobs .
c. Create or choose a directory to store the VOB database, such/vobstore .
d. Type cleartool mkvob -public -tag /vobs/vobname
/vobstore/vobname.vbs , where vobs is the mount point directory and vobstore is the directory where the VOB databasis stored.
e. Enter registry password (from step 2) if creating a public VOB
f. Enter comments, if any.
g. Restore your umask to its original setting.
4. Mount the VOB. For example, type cleartool mount /vobs/vobname
5. Provide the name of the VOB (for example, /vobs/vobname ) to users.
6. For ClearCase, you must specify that VIs are binary files and decidyou want to compress files. For each file extension that your VIs uyou must define an association of these extensions with their file tyFor most LabVIEW applications, this includes VIs (.vi), controls (.ctland globals (.glb). If you use any other extensions, you must definetypes for those as well.
a. Choose a file type for VIs, such as file , compressed_file , or binary_delta_file . You also can define your own file type and type manager (see the ClearCase documentation). National Instruments recommends compressed_file because binary_delta_file storage does not work as well.
b. You specify this association in a magic file in one of the paths in the magic path. See ClearCase documentation to determine whthe magic path is.
c. Somewhere in the search path for magic files, create a file wit.magic suffix.
d. Add the line: compressed_file : -name "*.vi" ; Replace compressed_file with your chosen file type.
© National Instruments Corporation 51 LabVIEW Professional Developers Release Notes

ew
use C
log ou
eat
7. Set up a view. Instructions for setting up a view are in the Setup—Usersection.
8. Set the view, and launch LabVIEW.
9. Select Project»Source Code Control»Administration.
10. Select ClearCase as the source code control system.
11. The ClearCase configuration window opens.
12. Set VOB directory (e.g. /vobs/vobname ).
13. Click OK in configuration window.
14. Click OK in administration window.
Additional Administrator Setup—OptionalYou must complete these steps if you want to add VIs to ClearCase.
1. Complete local configuration (See the Setup—User section.)
2. Set your umask to 2 to give other users in your group access to any ndirectories you create.
3. Set a view and launch LabVIEW.
4. Copy files to the VOB directory. Use Project»File Manager or copy them using UNIX commands. The file manager tools is useful becait can help to convert LLBs to VIs. (LLBs are not supported by the SCtools).
5. Open the top-level VI for a new project.
6. Create a new project, using Project»Source Code Control»Project.
7. Select New Project.
8. Select the top-level VI from the pop-up menu near the top of the diabox. It will automatically assign a name for the project, although ycan change it if you want to. Click Save.
9. The VI hierarchy and its subVIs are now in source code control. Repthis process for additional hierarchies.
Setup—User
1. Find out the VOB directory name from the administrator(s). For example, /vobs/vobname .
2. Create a view.
a. Set umask (typically 2 for shared files). See ClearCase documentation for more details.cleartool mkview -tag viewname viewstorage(for example, cleartool mkview -tag george
/viewstore/george.vws )(each user should have his own view)
LabVIEW Professional Developers Release Notes 52 © National Instruments Corporation

rid ue
sers
.
w
e
are
b. Restore umask to original value.
3. Set your view. For example, cleartool setview viewname .
4. Choose a label to mark current working versions of files. Your usein all uppercase letters is a good choice. (Your label must be uniqamong all who will access a particular VOB).
5. Edit your view to show versions with this label.
a. Edit your view. With your view set, execute cleartool edcs .
b. Using the text editor (launched by cleartool), add the line:element * LABELNAME , replacing LABELNAME with your chosen label to the view configuration spec just after the line element * CHECKEDOUT.
6. Launch LabVIEW. You must set the view every time you launch LabVIEW.
7. Select Project»Source Code Control»Local Configuration.
8. Choose ClearCase as your source code control system.
9. Enter the VOB directory name given to you by the administrator instep 1.
10. Enter the label name from step 4.
11. Click OK .
12. Enter your local working directory, which must be the same as theVOB directory.
13. Click OK .
14. To freeze your working set of VIs so that changes made by other udo not affect your work until you retrieve them, select Project»Source Code Control»Retrieve Files and retrieve the files you want to freezeWhen you select Retrieve Files, LabVIEW indicates if the files in your view are out of date and if retrieving files will update your vieby showing a snapshot of the latest versions of those files.
Built-in System ConfigurationIf you select the built-in system from the Administrator dialog box, youhave a set of options for deciding how files are locked for each user. Locking prevents users from accidentally modifying files without first checking them out. The Built-in Administration dialog box gives you thoption of using file system locking or internal locking.
• File System Locking—For many sites, this is the appropriate selection. With File System Locking, as you check files in they aremarked as read-only in the file system. As you check them out, theychanged to read-write. This works well for most developers.
© National Instruments Corporation 53 LabVIEW Professional Developers Release Notes

ey m t). nd al C ns
, o ant ss to
me as
the king e
ng
to a
CC. gh
er r
chy s of
• Internal Locking —With this option, as you check files in they are locked by LabVIEW. If you open the Show VI Info dialog box, you will see that the lock option is turned on. When you check files out thare automatically unlocked. This is the best choice for multiplatfordevelopment (i.e.: Windows, Macintosh, and/or UNIX developmenWhen you bring a VI from another platform, it must be recompiled asaved. With internal locking, you can actually save the VI. The internlocking just prevents you from making edits to a VI. Note that the SCtools can distinguish between real changes and simple modificatiosuch as a recompile that occurs when loading the VI.
In addition to these locking options, you must select a master directorywhich is where the Source Code Control tools store the files you add tSCC. Its important that all users have access to this directory. If you wusers to be able to modify files, then they need to have read write accethis directory.
In addition, under Windows 95/NT, each user should connect to the volucontaining this directory and map that volume as a Network drive (i.e.:D:\ rather than as a UNC path of the form \\machine\volume ). UNC filename support varies slightly between Windows 95/NT, and consequently the LabVIEW SCC tools do not support UNC filenames.
Managing Files with the Same NameThe manual incorrectly indicates that you cannot manage files that havesame name under SCC. In general, you should be cautious when worwith files with the same name because it is easy to accidentally link thwrong version of a file to a hierarchy. The SCC tools detect if you accidentally link the wrong version of a file when you edit a project usithe Project»Source Code Control»Project dialog box. You have the choice to avoid changing the project by moving the existing file in SCCthe new location, or adding the new file as file with the same name in different location.
SCC File WizardWhen you edit a project using Project»Source Code Control»Project, the SCC tools compare your hierarchy to the version that is already under SIf there are differences in the list of files, a File Wizard walks you throuthe process of updating SCC to reflect local changes.
This wizard first presents a dialog box summarizing the differences between the local version of your hierarchy and the version that is undSCC. This wizard detects whether one hierarchy has files that the othedoes not, and whether files are in different locations in the local hierarfrom the hierarchy under SCC. If you choose to edit the project, a serie
LabVIEW Professional Developers Release Notes 54 © National Instruments Corporation

e ade
Safe hat t
s of ree
y e nd can les. s
file ures
he you er file d by
ntages gree . As r
dialog boxes describe these differences in more detail and give you thoption to change the project or ignore the difference. No changes are munless you select Save in the final dialog box, which summarizes the newlist of files.
Frequently Asked Questions about the SCC Tools
How do I decide between the Built-in system, SourceSafe, and ClearCase?In many cases, the decision to use one of the third-party tools (Sourcefor Win95/NT or ClearCase for Solaris 2) might be based on the fact tyour company has standardized on one of these tools. If not, you musdecide what strategy you want to use for managing your files.
Fortunately, the SCC user interface in LabVIEW is the same regardleswhich storage system you select. The main difference between the thsystems are cost, control capabilities, and platform support.
The built-in system is available on all platforms, and does not have anadditional costs associated with it. It has most of the functionality of thother systems. One key difference is that it works by copying files to afrom a shared network directory that all users in a development groupaccess. It currently does not provide tools for limiting user access to fiIf you need to control the degree of access various users have, such aread-only and read-write, you can get some of this functionality using system permissions. However, this is not as powerful as the control featfound in third party packages.
SourceSafe for Windows 95/NT can be used transparently as part of tSCC tools. It provides a greater degree of user access control, allowingto create accounts with passwords and to assign access levels on a pbasis. The principal disadvantages are that it is not currently supportethe SCC tools on either Macintosh or UNIX, and there is an additionallicensing cost from Microsoft, the developers of SourceSafe.
ClearCase for Solaris 2 has many of the same advantages and disadvaas SourceSafe when compared to the built-in system. It has a high deof user access control, and works well when security is a primary issuewith SourceSafe, it involves an additional licensing cost from Atria, thedevelopers of ClearCase. While a version of ClearCase is available foWindows NT, it is currently not supported by the LabVIEW SCC tools.
© National Instruments Corporation 55 LabVIEW Professional Developers Release Notes

s it ges trol.
ms s
our
can
es, d for
nts r, you with
Is. pies
ert
from
How do I manage multiple hierarchies of VIs?A project corresponds to a single VI hierarchy. This relationship makepossible for the Project dialog box to scan your local hierarchy for chanand verify that it is consistent with the project under Source Code Con
If you are using server functionality to dynamically call subVIs, your application may consist of multiple hierarchies. You can manage systeof multiple hierarchies by creating individual projects for each set of VIthat your top-level VIs call dynamically. You can then create a project group to make it easier to access files from any of the projects used by yapplication. A project group is a collection of projects. If you select a project group in the Checkout, Checkin, or Retrieve dialog boxes, you work on any file that is in any of the VI hierarchies used by your application. You can create project groups by selecting Source Code Control»Project.
Why isn’t Windows 3.1 supported? What if I need Windows 3.1 support?Windows 3.1 is not supported because the SCC tools manage VIs as individual files and the Windows 3.1 8+3 character naming limitation makes this impractical. While LLBs make it possible to use longer namthey do not provide the level of transparent access to files that is needethe LabVIEW SCC tools.
While you cannot use the SCC tools on Windows 3.1, National Instrumeunderstands that customers need Windows 3.1 support. As a developemight need to deploy applications to customers that are using systemsWindows 3.1. In that case, we suggest you do your development on Windows 95 or NT. On those platforms you can use individual files for VWhen you are ready to distribute to Windows 3.1 users, you can save coof your VIs into LLBs. An easy way for to convert your files to or from LLBs is to use the File Manager dialog box, which has buttons to convbetween directories and LLBs.
In addition to managing VIs, can I use the SCC tools to manage other project files such as Word documents, text files, CIN source files, and so on?Yes. When you edit a project, you will see an Extra Files button. Use this button to add non-VI files to your project.
How do I access previous versions of files?If you are using SourceSafe, you can access previous versions of files the SourceSafe Explorer.
LabVIEW Professional Developers Release Notes 56 © National Instruments Corporation

ou the le.
me re
ant
l,
The Project»Source Code Control»Advanced dialog box has a button foraccessing a file history. With the built-in system and with ClearCase, ycan use this dialog box to retrieve previous versions of files. Note thatadministrator can configure the number of previous versions of files tomaintain, so you might not have access to all previous versions of a fi
You also can use this dialog box to label a version of a file with a short nasuch as BETA, making it easy to retrieve it later. Also, labeled versions anot automatically deleted based upon the administration option just described. Instead, you must delete them manually if you no longer wthe files.
If you want to label multiple files or retrieve all files with the same labeyou can use the System History option from the Advanced dialog box.
© National Instruments Corporation 57 LabVIEW Professional Developers Release Notes