Labs instructions for Enabling BeagleBone with TI … · Labs instructions for Enabling BeagleBone...
29
1 Labs instructions for Enabling BeagleBone with TI SDK 5.x Throughout this document there will be commands spelled out to execute. Some are to be executed on the Linux development host, some on the Linux target and some on the u-boot (bootloader) prompt. They are distinguished by different command prompts as follows: host $ <this command is to be executed on the host> target # <this command is to be executed on the target (BB)> u-boot :> <this command is to be executed on the u-boot prompt> Lab1: AMSDK installation Connect the Beaglebone and the laptop to the same router using Ethernet cables. Insert the SDK5 micro SD card into the slot of the Beaglebone. For some devices like the Beaglebone which use a built in USB to Serial adapter, a special script called START_HERE.sh has been created to assist in running the out of box software and installing the AMSDK (Sitara SDK). This script will be found when the board is booted into Linux and the START_HERE partition of the SD card is auto mounted on your Linux host machine. At that point the board is acting as an SD card reader to provide you access to the contents of the START_HERE partition which has the AMSDK installer, Quick Start Guides, and CCS installer. Launch Vmware and open the SDK image. If prompted whether you moved or copied the Vmware image, click on “I copied it”. Logon to Linux in the Vmware image: 5V power supply USB cable μSD ethernet cable ethernet cable
Transcript of Labs instructions for Enabling BeagleBone with TI … · Labs instructions for Enabling BeagleBone...
1
Labs instructions for Enabling BeagleBone
with TI SDK 5.x
Throughout this document there will be commands spelled out to execute. Some are to be executed on the Linux
development host, some on the Linux target and some on the u-boot (bootloader) prompt. They are distinguished by
different command prompts as follows:
host $ <this command is to be executed on the host>
target # <this command is to be executed on the target (BB)>
u-boot :> <this command is to be executed on the u-boot prompt>
Lab1: AMSDK installation
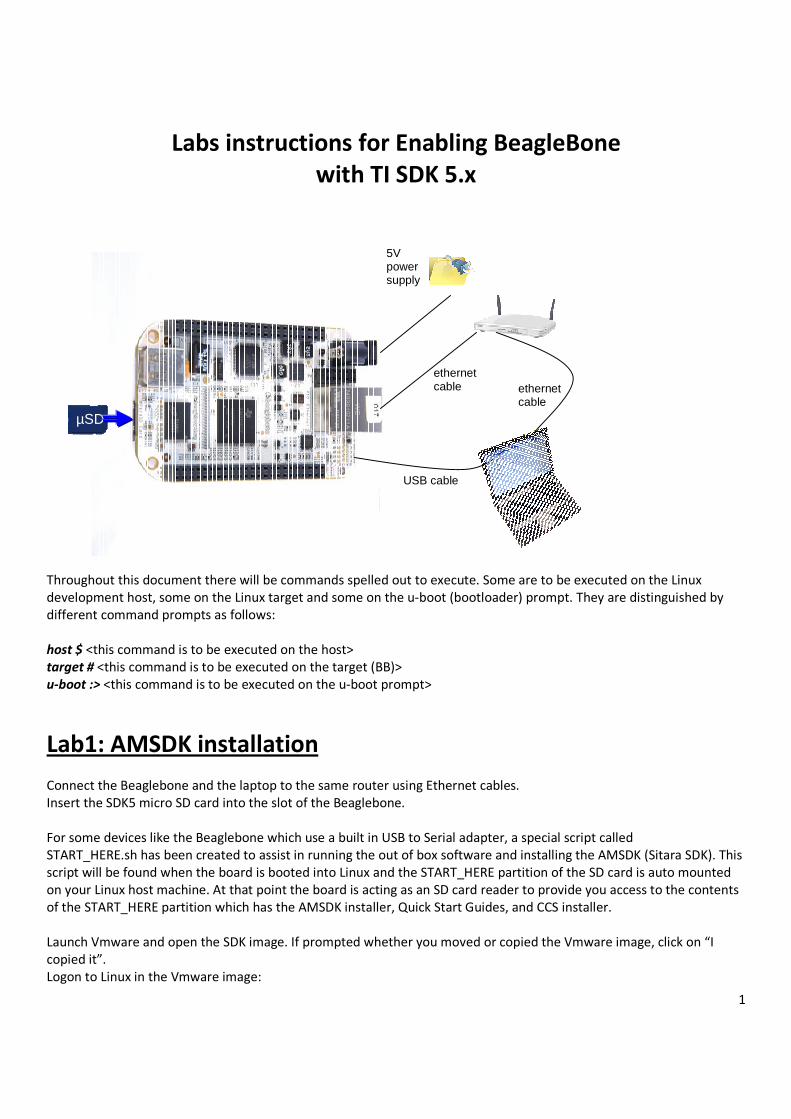
Connect the Beaglebone and the laptop to the same router using Ethernet cables.
Insert the SDK5 micro SD card into the slot of the Beaglebone.
For some devices like the Beaglebone which use a built in USB to Serial adapter, a special script called
START_HERE.sh has been created to assist in running the out of box software and installing the AMSDK (Sitara SDK). This
script will be found when the board is booted into Linux and the START_HERE partition of the SD card is auto mounted
on your Linux host machine. At that point the board is acting as an SD card reader to provide you access to the contents
of the START_HERE partition which has the AMSDK installer, Quick Start Guides, and CCS installer.
Launch Vmware and open the SDK image. If prompted whether you moved or copied the Vmware image, click on “I
copied it”.
Logon to Linux in the Vmware image:
5V power supply
USB cable
µSD
ethernet cable ethernet
cable

2
Login: user
Password: userpw
Connect the USB cable between the Beaglebone and the linux machine in the host PC. The board will boot into Linux.
Make sure that the USB “future devices Beaglebone” is connected to the Vmware machine. If not, connect it.
Next step is to connect the Mass Storage device to the Vmware machine, if not already connected.
Identify the proper icon (bottom right) by moving your mouse above the icons at the bottom of the Vmware window:
Then right-click on the icon, select ‘Connect’
You get below message, meaning that the USB partition will be disconnected from Windows but connected to the Linux
Vmware machine.
Click on ‘OK’.
At this point you will see two partitions mounted. These are the boot and START_HERE partitions.

3
On the START_HERE partition you will find the script called START_HERE.sh. To execute this script double-click the script
and if prompted select ‘Run in Terminal’. This will open a terminal window which will prompt you for which actions you
wish to perform.
Do not explore the remote version of Matrix GUI v2 at this stage.
Since we are not on the public web, decline opening the Software Developer’s Guide online.
Install the SDK and CCS at default location.
Click on Next at each question, leaving default settings. SDK installation begins, then CCS v5.
Since Code Composer Studio has already been installed, just go through the steps as if you wanted to add some new
features.
Once installation is finished, launch the setup

4
The password of the host’s user account is: userpw
You need it to ground the root access required by the script.
Accept default settings up to the autodetected IP address.
Regarding the boot setup, use SD card location for the kernel and filesystem as per below.
Do not restart Beaglebone at this stage.
You end up running Minicom, showing you the linux console. Press enter to see the console output. Press Enter to
confirm.
If linux has booted, you end up getting below screen
If not, boot linux:
u-boot :> boot
Once boot is finished, you will get linux logon screen.
Login as root, no password.

5
Lab 2: Remote Matrix
Remote Matrix refers to Matrix being ran in any modern day web browser not located on the target system. The URL for
Remote Matrix is:
http://<target system's ip address>:8080
Using the console, check the IP address of your board:
target # ifconfig
From the output displayed, look in the section that starts with eth0. You should see an IP address right after "inet addr".
This is the IP address you should use for remote Matrix.
With Remote Matrix you can interact with Matrix on your PC, cellphone, tablet, or any device with a modern web
browser. You can now launch text based applications or scripts and have the output streamed back to your web
browser. Launching a GUI application from Matrix requires you to look at the display device connected to the target
system (LCD or DVI output of your board if available) so is not possible here
Test the text based applications:
- Settings
- ARM benchmarks
- Cryptography examples: These examples execute the OpenSSL built-in speed test for a variety of cryptographic
algorithms. The results of the test are displayed on the screen and also written to the file
OpenSSLspeedResults.txt in the top level directory of the target filesystem. Refer to the “Sitara Linux Software
Developpers’s Guide” for more details on the different crypto examples.
Optional: If you have a USB stick, you can plug it on the Beaglebone and run the USB MSC Bonnie++ benchmark. Note
that this takes some time to complete, so do it as a last step only.
6
Lab3: Your first program on Beaglebone – using CCS
Launch Code Composer Studio (aka CCS) using the icon on the desktop of your linux host. When prompted about the
workspace, keep the default one.
Enabling CCS Capabilities
Because we use a new workspace, additional capabilities need to be enabled.
so that perspectives for those capabilities will be selectable in the Window -> Open Perspectives list.
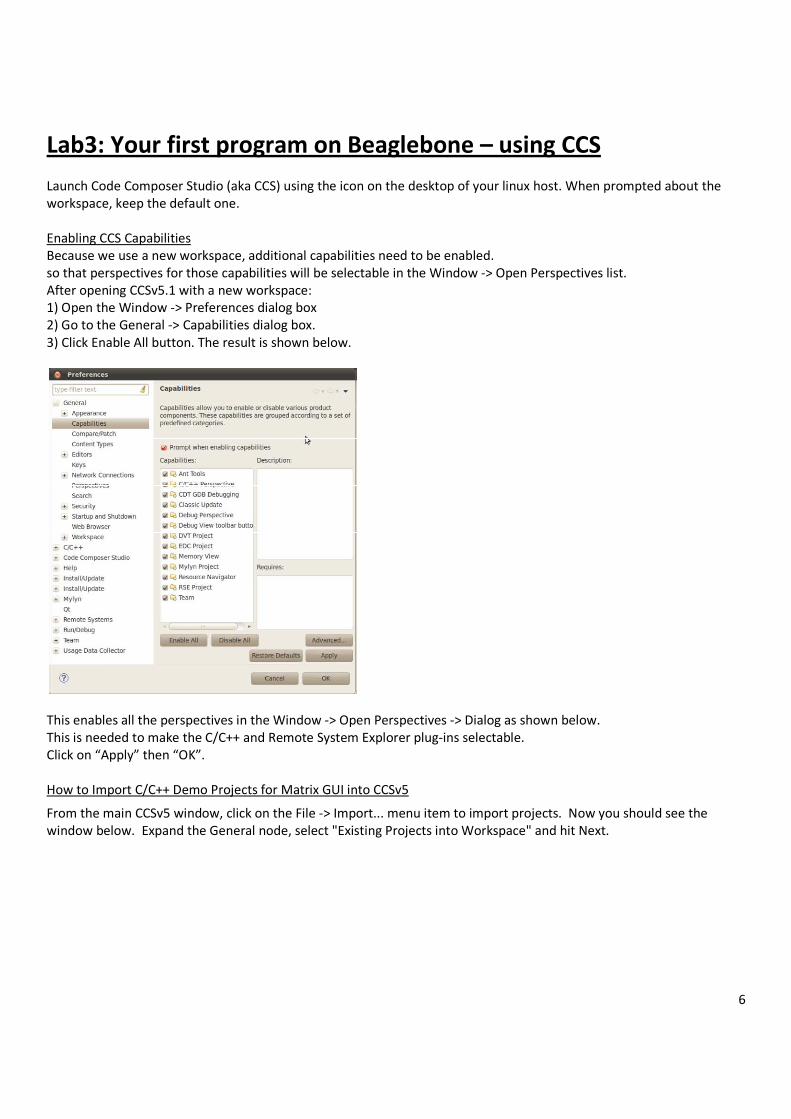
After opening CCSv5.1 with a new workspace:
1) Open the Window -> Preferences dialog box
2) Go to the General -> Capabilities dialog box.
3) Click Enable All button. The result is shown below.
This enables all the perspectives in the Window -> Open Perspectives -> Dialog as shown below.
This is needed to make the C/C++ and Remote System Explorer plug-ins selectable.
Click on “Apply” then “OK”.
How to Import C/C++ Demo Projects for Matrix GUI into CCSv5
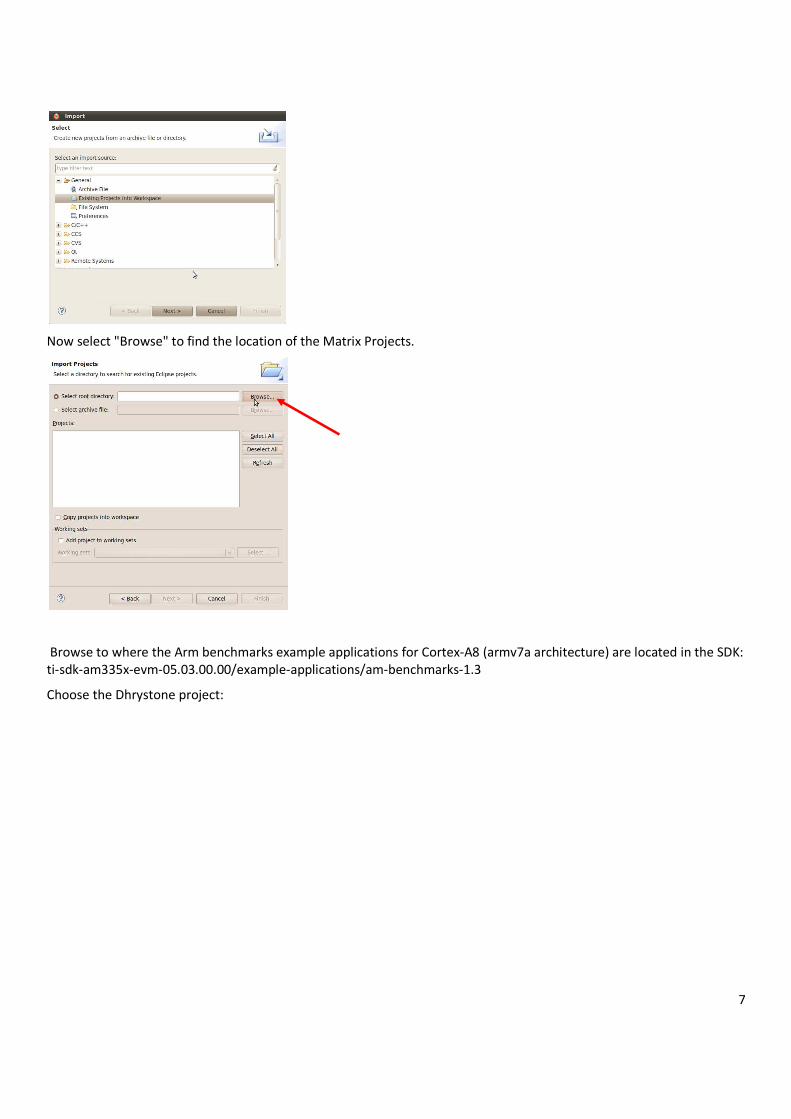
From the main CCSv5 window, click on the File -> Import... menu item to import projects. Now you should see the
window below. Expand the General node, select "Existing Projects into Workspace" and hit Next.
7
Now select "Browse" to find the location of the Matrix Projects.
Browse to where the Arm benchmarks example applications for Cortex-A8 (armv7a architecture) are located in the SDK:
ti-sdk-am335x-evm-05.03.00.00/example-applications/am-benchmarks-1.3
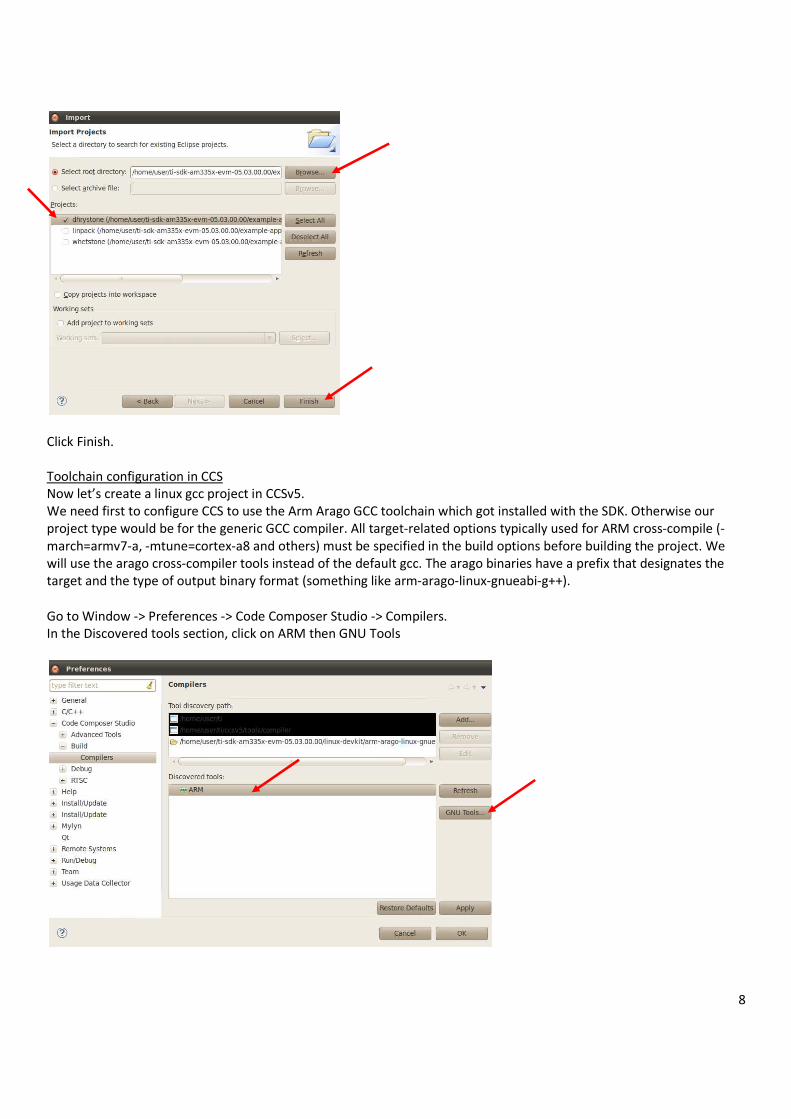
Choose the Dhrystone project:
8
Click Finish.
Toolchain configuration in CCS
Now let’s create a linux gcc project in CCSv5.
We need first to configure CCS to use the Arm Arago GCC toolchain which got installed with the SDK. Otherwise our
project type would be for the generic GCC compiler. All target-related options typically used for ARM cross-compile (-
march=armv7-a, -mtune=cortex-a8 and others) must be specified in the build options before building the project. We
will use the arago cross-compiler tools instead of the default gcc. The arago binaries have a prefix that designates the
target and the type of output binary format (something like arm-arago-linux-gnueabi-g++).
Go to Window -> Preferences -> Code Composer Studio -> Compilers.
In the Discovered tools section, click on ARM then GNU Tools

9
Select Edit
In the Tool installation directory, type: /home/user/ti-sdk-am335x-evm-05.03.00.00/linux-devkit/arm-arago-linux-
gnueabi .
Then click in any of the below empty boxes; the relative path will get filled in automatically as per below. Leave the
default and click on OK.
Click on OK again to confirm the GNU Build-Tool settings.
Back to the Preferences window, click on Apply, then OK.
Your project
Select Project -> New CCS project.
Type in my_Hello as project name.
Output type: Executable.
Change the ARM variant to Generic Cortex-A8 device.

10
Use the Hello World project template.
Click Finish.
The my_Hello project gets created in your CCS workspace and added to the Project Explorer window. Note that it is in
Bold letters, meaning this is the active project.
11
Note that you could add your source files to the project by right-clicking on the project and selecting “Add Files”.
Build your project:
Right-click on project name in the Project explorer -> Build project.
Check the console view for successful build.
The executable program my_Hello.exe gets created.
Now you need to copy it to the target filesystem.
Remote System Explorer (RSE) is an Eclipse plug-in that provides drag-and-drop access to the remote file system,
and also provides views for a remote shell, remote terminal and a remote process monitor which displays
information about all the processes running on the target. The first time this plug-in is used, a connection to the
target EVM needs to be established and configured.
Go to Window -> Open Perspective -> Other... -> Remote System Explorer to open the Remote System Explorer
perspective.
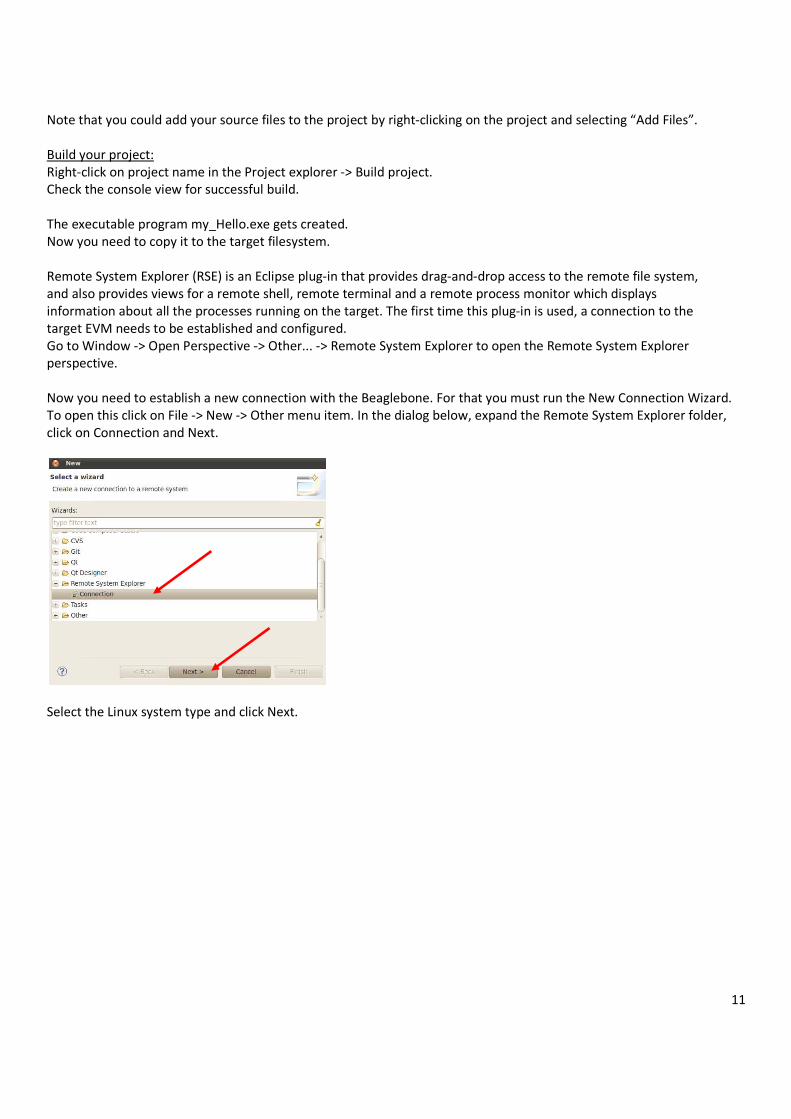
Now you need to establish a new connection with the Beaglebone. For that you must run the New Connection Wizard.
To open this click on File -> New -> Other menu item. In the dialog below, expand the Remote System Explorer folder,
click on Connection and Next.
Select the Linux system type and click Next.

12
Next to "Host name" enter the IP address of your Beaglebone, determined in Lab 2.
Use “my Beaglebone” as Connection name. Click on Next.
Check ssh.files and click Next.

13
Check processes.shell.linux and click Next.
Check ssh.shells and click Next.
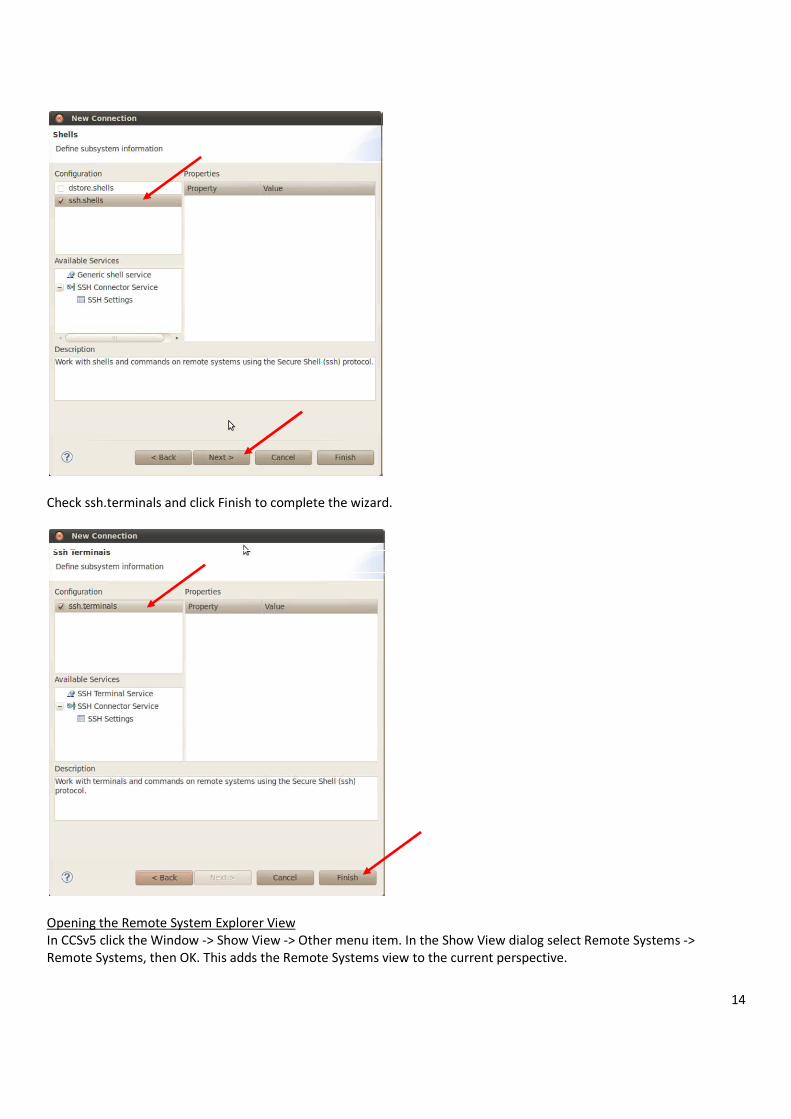
14
Check ssh.terminals and click Finish to complete the wizard.
Opening the Remote System Explorer View
In CCSv5 click the Window -> Show View -> Other menu item. In the Show View dialog select Remote Systems ->
Remote Systems, then OK. This adds the Remote Systems view to the current perspective.
15
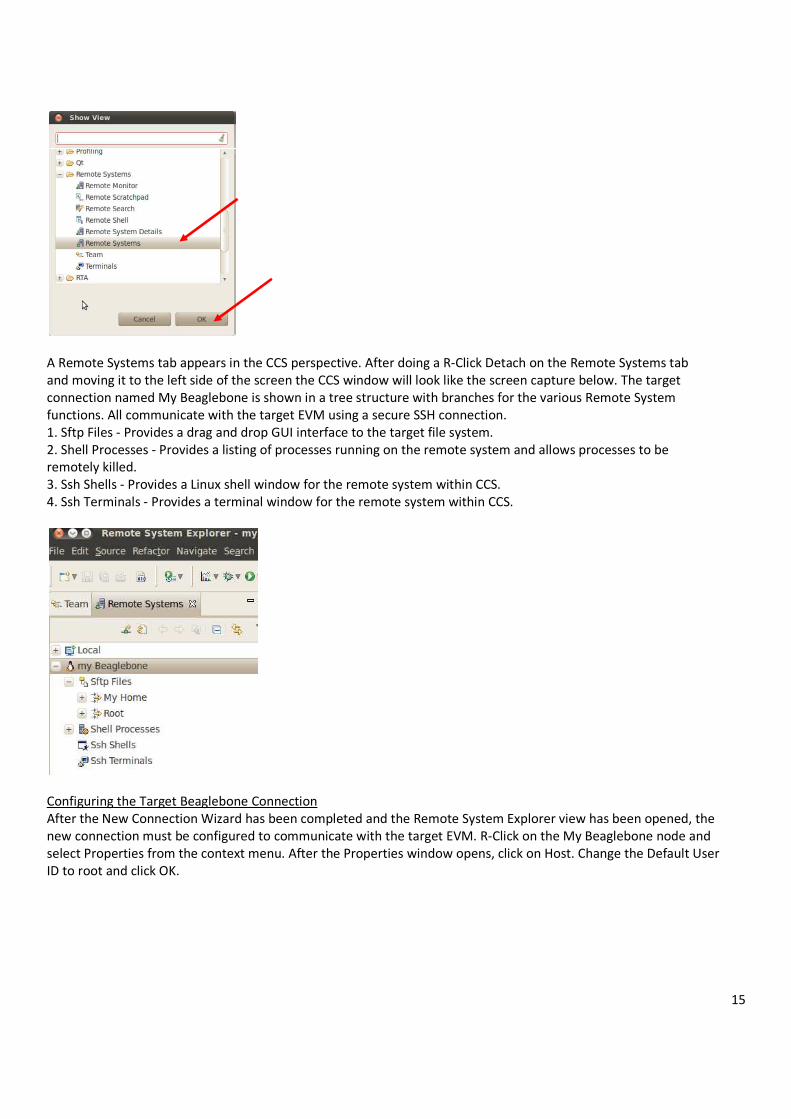
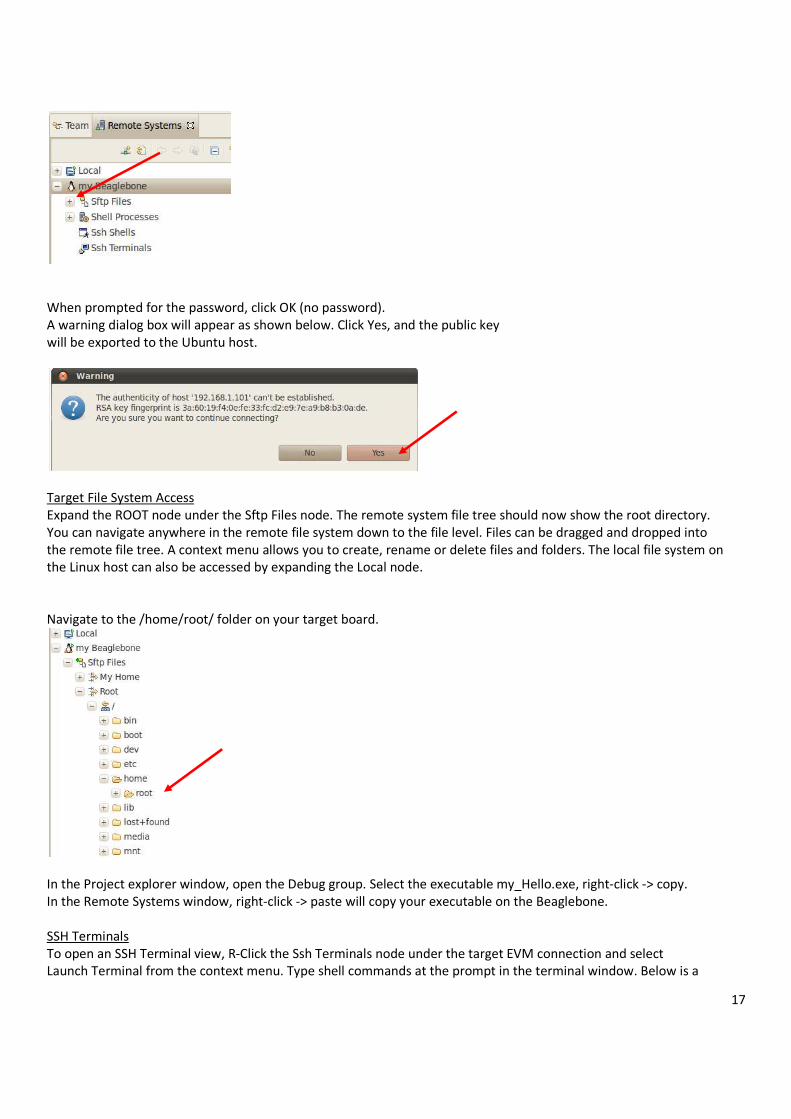
A Remote Systems tab appears in the CCS perspective. After doing a R-Click Detach on the Remote Systems tab
and moving it to the left side of the screen the CCS window will look like the screen capture below. The target
connection named My Beaglebone is shown in a tree structure with branches for the various Remote System
functions. All communicate with the target EVM using a secure SSH connection.
1. Sftp Files - Provides a drag and drop GUI interface to the target file system.
2. Shell Processes - Provides a listing of processes running on the remote system and allows processes to be
remotely killed.
3. Ssh Shells - Provides a Linux shell window for the remote system within CCS.
4. Ssh Terminals - Provides a terminal window for the remote system within CCS.
Configuring the Target Beaglebone Connection
After the New Connection Wizard has been completed and the Remote System Explorer view has been opened, the
new connection must be configured to communicate with the target EVM. R-Click on the My Beaglebone node and
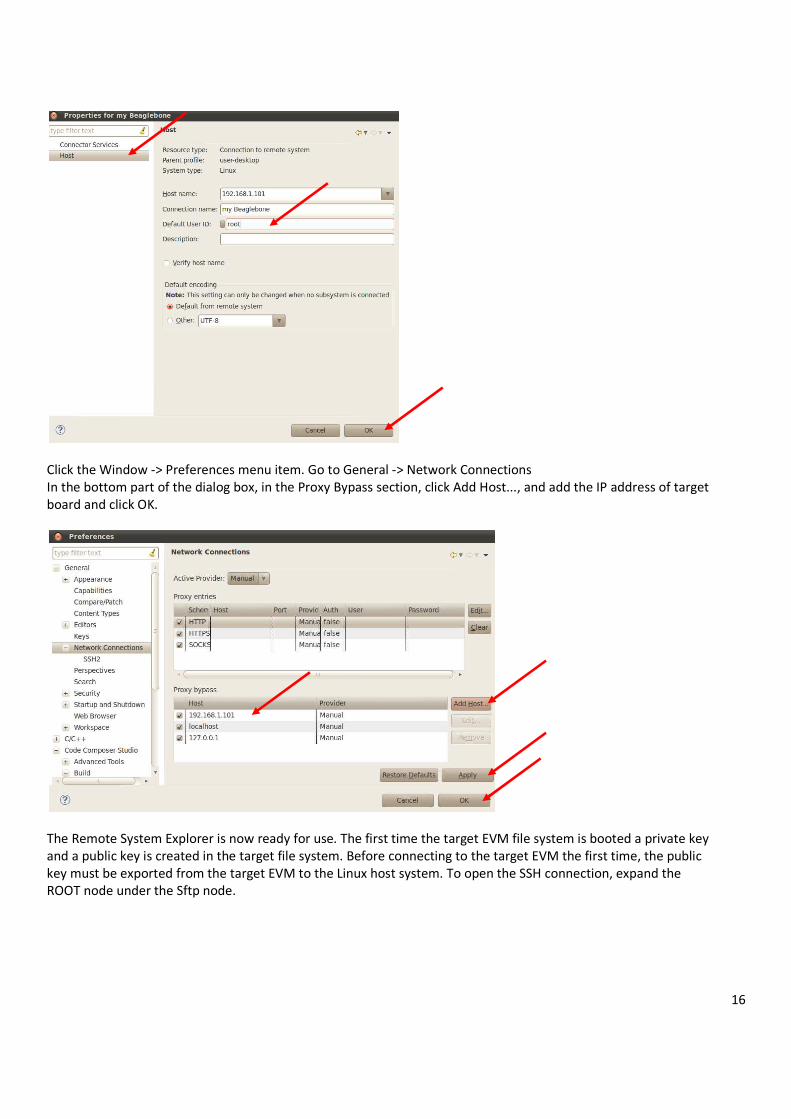
select Properties from the context menu. After the Properties window opens, click on Host. Change the Default User
ID to root and click OK.
16
Click the Window -> Preferences menu item. Go to General -> Network Connections
In the bottom part of the dialog box, in the Proxy Bypass section, click Add Host..., and add the IP address of target
board and click OK.
The Remote System Explorer is now ready for use. The first time the target EVM file system is booted a private key
and a public key is created in the target file system. Before connecting to the target EVM the first time, the public
key must be exported from the target EVM to the Linux host system. To open the SSH connection, expand the
ROOT node under the Sftp node.
17
When prompted for the password, click OK (no password).
A warning dialog box will appear as shown below. Click Yes, and the public key
will be exported to the Ubuntu host.
Target File System Access
Expand the ROOT node under the Sftp Files node. The remote system file tree should now show the root directory.
You can navigate anywhere in the remote file system down to the file level. Files can be dragged and dropped into
the remote file tree. A context menu allows you to create, rename or delete files and folders. The local file system on
the Linux host can also be accessed by expanding the Local node.
Navigate to the /home/root/ folder on your target board.
In the Project explorer window, open the Debug group. Select the executable my_Hello.exe, right-click -> copy.
In the Remote Systems window, right-click -> paste will copy your executable on the Beaglebone.
SSH Terminals
To open an SSH Terminal view, R-Click the Ssh Terminals node under the target EVM connection and select
Launch Terminal from the context menu. Type shell commands at the prompt in the terminal window. Below is a

18
sample command to list the contents of the remote /usr folder.
In the Console window, confirm that the binary is there:
target # ls
Before you can run your program, you need to make it executable:
target # chmod +x my_Hello.exe
Verify that it is marked as executable (x):
target # ls -l
Run your program:
target # ./my_Hello.exe
Optional:
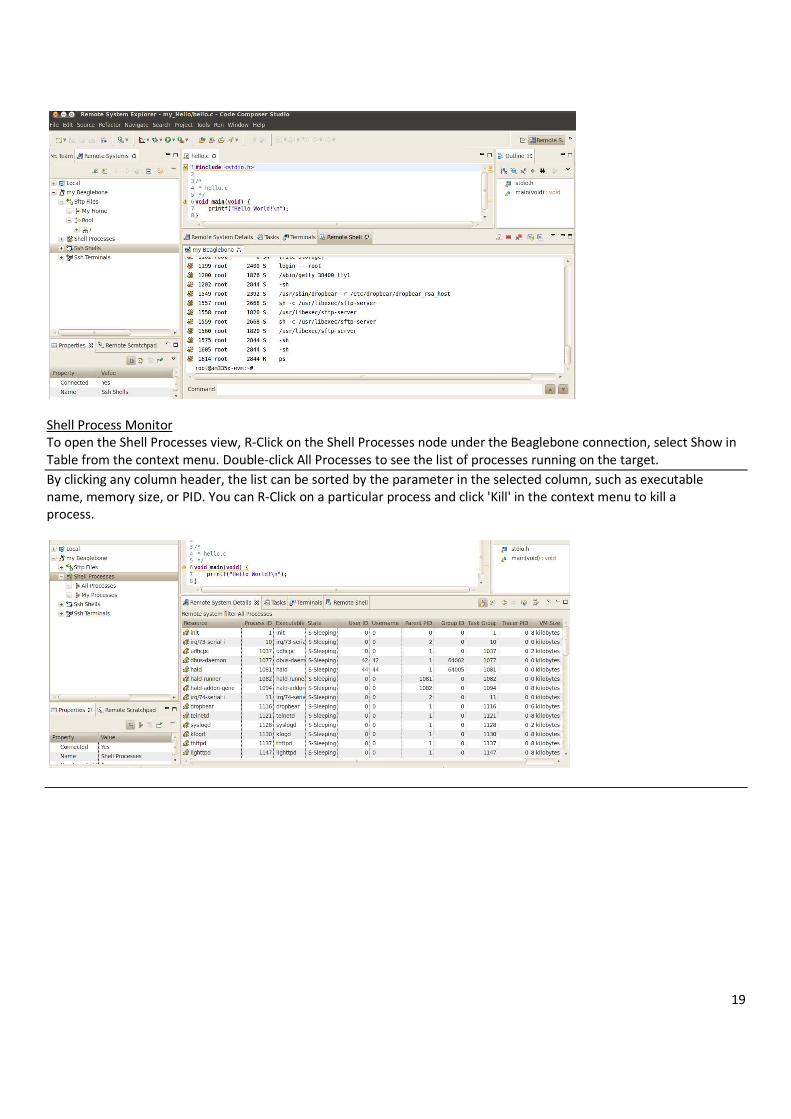
SSH Shells
To open an SSH Shell view, R-Click the Ssh Shells node under the target EVM connection and select Launch Shell from
the context menu. Type a shell command into the Command edit box and press the Enter key. Below is the output from
the ps command which displays the processes running on the remote system.
19
Shell Process Monitor
To open the Shell Processes view, R-Click on the Shell Processes node under the Beaglebone connection, select Show in
Table from the context menu. Double-click All Processes to see the list of processes running on the target.
By clicking any column header, the list can be sorted by the parameter in the selected column, such as executable
name, memory size, or PID. You can R-Click on a particular process and click 'Kill' in the context menu to kill a
process.
20
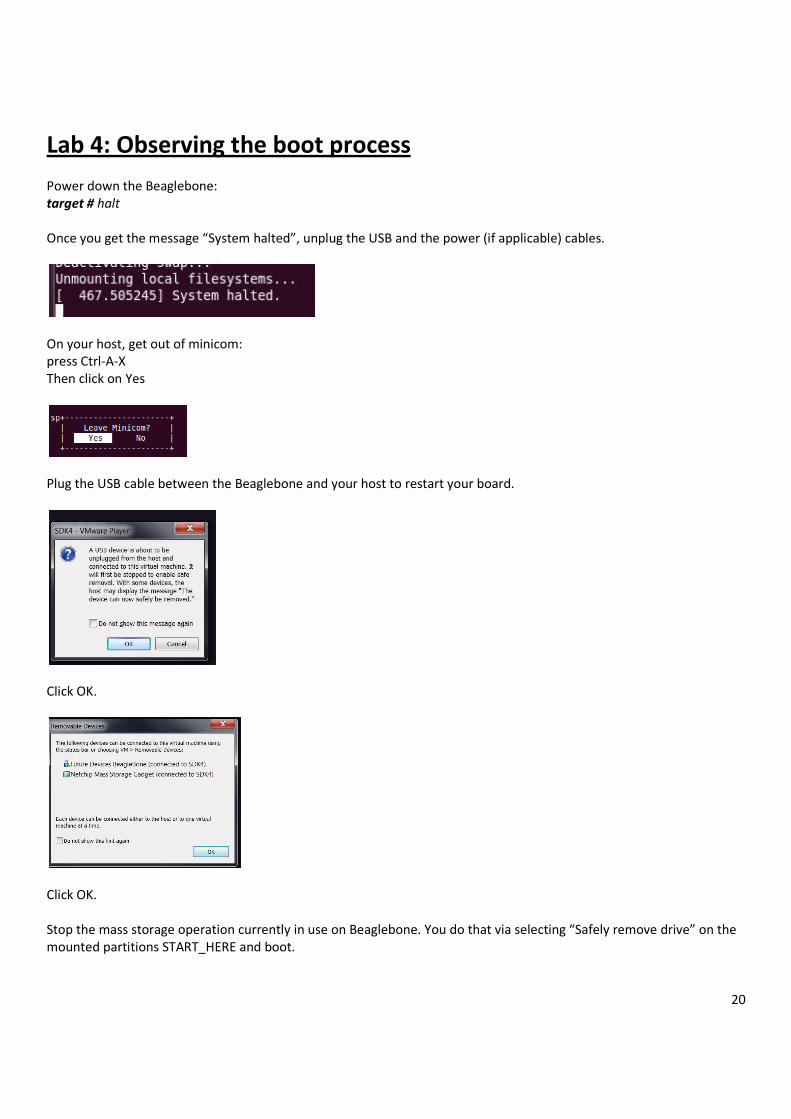
Lab 4: Observing the boot process
Power down the Beaglebone:
target # halt
Once you get the message “System halted”, unplug the USB and the power (if applicable) cables.
On your host, get out of minicom:
press Ctrl-A-X
Then click on Yes
Plug the USB cable between the Beaglebone and your host to restart your board.
Click OK.
Click OK.
Stop the mass storage operation currently in use on Beaglebone. You do that via selecting “Safely remove drive” on the
mounted partitions START_HERE and boot.

21
load the USB-to-serial driver with the following command:
host $ sudo modprobe ftdi_sio vendor=0x0403 product=0xa6d0
Check on which port the serial over USB got mounted:
host $ ls /dev/ttyUSB*
The highest port number is the serial port (the lower one is the Jtag port).
Launch minicom with that port as argument. For example in above case:
host $ minicom –D /dev/ttyUSB2
You are now back to the console.
Press Enter to get the Login script. Login as root like above.
We want to observe the boot log. So reboot the board:
target # reboot
Stop the boot process in u-boot by pressing the Enter key during boot:
Look at the u-boot parameters
u-boot :> print
Then boot linux:
u-boot :> boot
22
Observe the boot log (drivers mounted, etc).
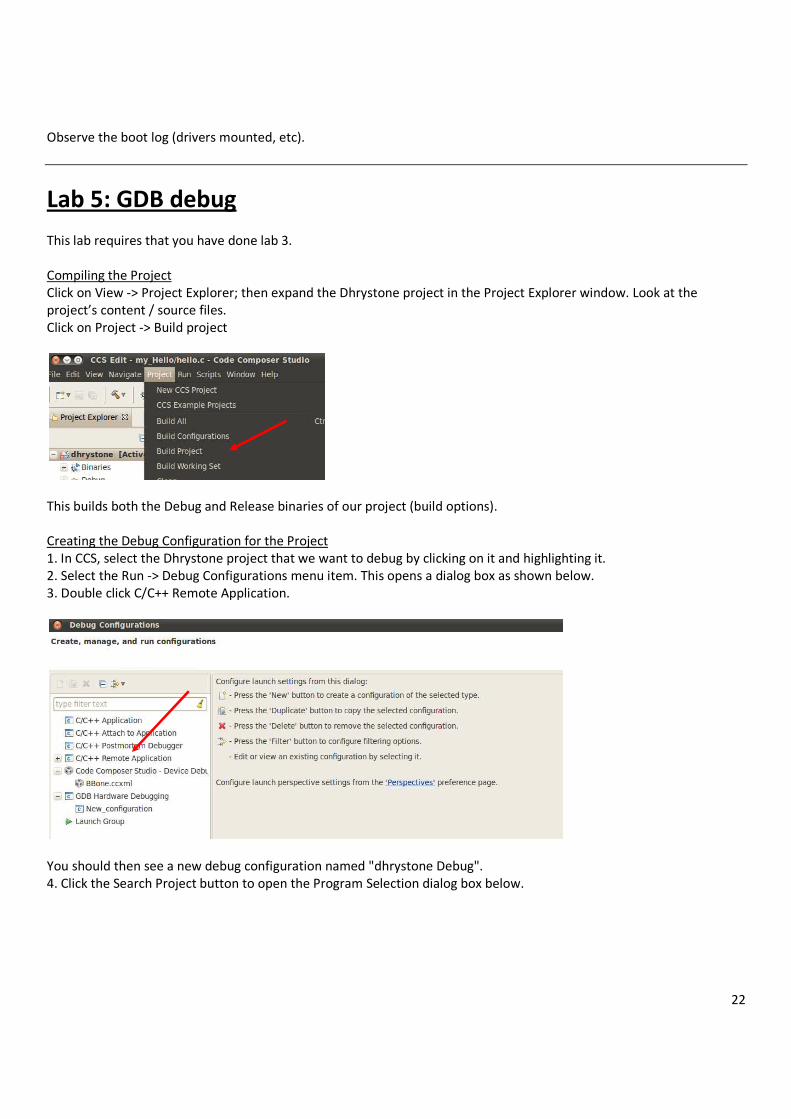
Lab 5: GDB debug
This lab requires that you have done lab 3.
Compiling the Project
Click on View -> Project Explorer; then expand the Dhrystone project in the Project Explorer window. Look at the
project’s content / source files.
Click on Project -> Build project
This builds both the Debug and Release binaries of our project (build options).
Creating the Debug Configuration for the Project
1. In CCS, select the Dhrystone project that we want to debug by clicking on it and highlighting it.
2. Select the Run -> Debug Configurations menu item. This opens a dialog box as shown below.
3. Double click C/C++ Remote Application.
You should then see a new debug configuration named "dhrystone Debug".
4. Click the Search Project button to open the Program Selection dialog box below.

23
Click on the "armle- /dhrystone/Debug/dhrystone" item and click OK.
5. Back to the Debug Configurations dialog box (still on the Main tab). Click Select Other to open the Select
Preferred Launcher dialog box shown below.
Check the Use Configuration Specific Settings box. Select "GDB (DSF) Manual Remote Debugging Launcher" and
click OK.

24
6. Back to the Debug Configurations dialog box. Click the Debugger tab. On the Debugger page, the Main tab should be
selected.
Click Browse next to "GDB debugger" and browse to the GDB executable. Click browse next to "GDB command file" and
browse to the .gdbinit file in the SDK install directory. When you try to browse to the .gdbinit file, you will need to R-
Click -> Show Hidden Files to see the file. The .gdbinit file is used by GDB to locate source files and library files on the
target.
On Ubuntu desktop click on Places -> Home folder to open the File browser. Navigate to ti-sdk-am335x-evm-05.03.00.00
directory.
In the File browser, click on Show hidden files
Double-click on .gdbinit to see its content; make sure that it is as below
25
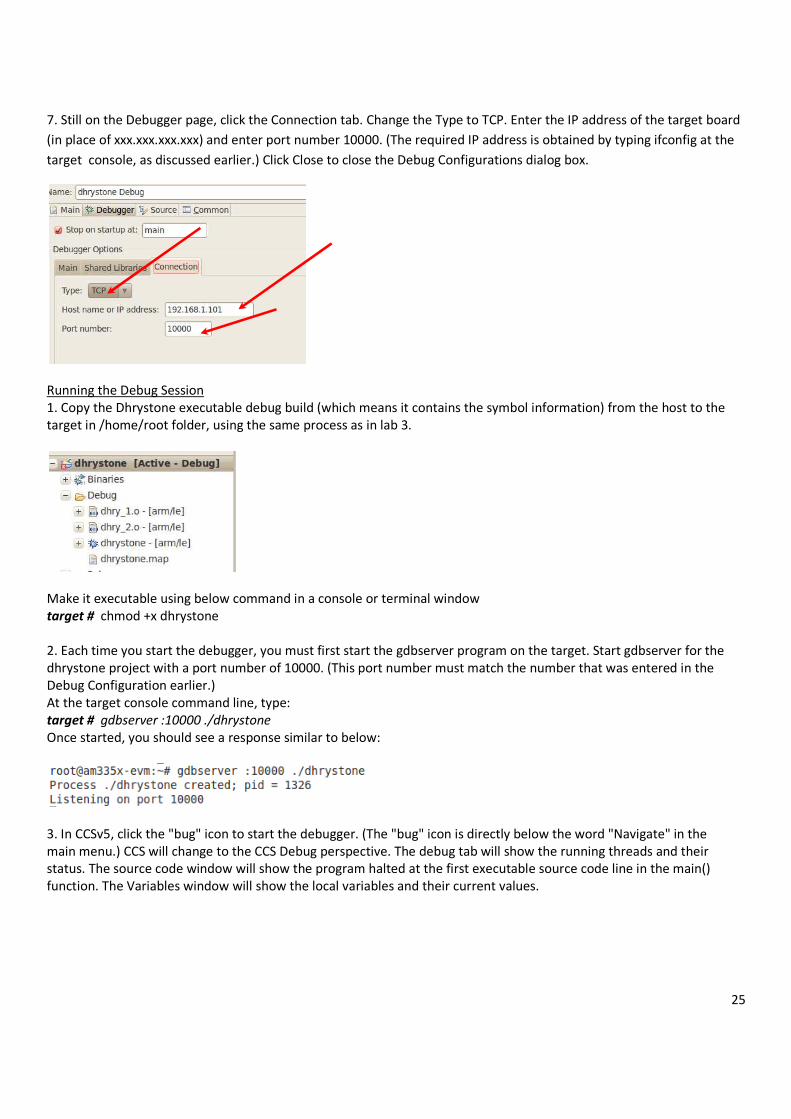
7. Still on the Debugger page, click the Connection tab. Change the Type to TCP. Enter the IP address of the target board
(in place of xxx.xxx.xxx.xxx) and enter port number 10000. (The required IP address is obtained by typing ifconfig at the
target console, as discussed earlier.) Click Close to close the Debug Configurations dialog box.
Running the Debug Session
1. Copy the Dhrystone executable debug build (which means it contains the symbol information) from the host to the
target in /home/root folder, using the same process as in lab 3.
Make it executable using below command in a console or terminal window
target # chmod +x dhrystone
2. Each time you start the debugger, you must first start the gdbserver program on the target. Start gdbserver for the
dhrystone project with a port number of 10000. (This port number must match the number that was entered in the
Debug Configuration earlier.)
At the target console command line, type:
target # gdbserver :10000 ./dhrystone
Once started, you should see a response similar to below:
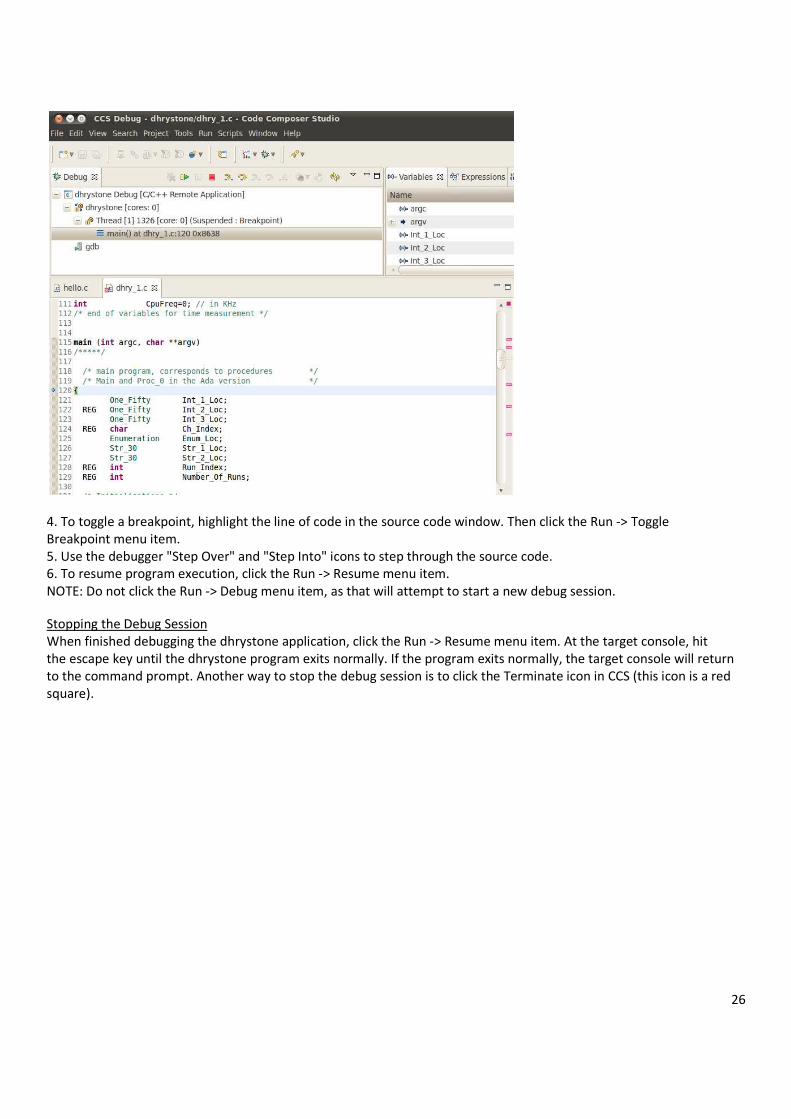
3. In CCSv5, click the "bug" icon to start the debugger. (The "bug" icon is directly below the word "Navigate" in the
main menu.) CCS will change to the CCS Debug perspective. The debug tab will show the running threads and their
status. The source code window will show the program halted at the first executable source code line in the main()
function. The Variables window will show the local variables and their current values.
26
4. To toggle a breakpoint, highlight the line of code in the source code window. Then click the Run -> Toggle
Breakpoint menu item.
5. Use the debugger "Step Over" and "Step Into" icons to step through the source code.
6. To resume program execution, click the Run -> Resume menu item.
NOTE: Do not click the Run -> Debug menu item, as that will attempt to start a new debug session.
Stopping the Debug Session
When finished debugging the dhrystone application, click the Run -> Resume menu item. At the target console, hit
the escape key until the dhrystone program exits normally. If the program exits normally, the target console will return
to the command prompt. Another way to stop the debug session is to click the Terminate icon in CCS (this icon is a red
square).

27
Lab 6: Angstrom – OPTIONAL
Power down the Beaglebone running the SDK:
target # halt
Once you get the message “System halted.”, unplug the USB and the power (if applicable).
Remove the micro SD card from the Beaglebone kit, replace it with the default SD card coming with the kit.
Launch USB-to-Ethernet interface
Disconnect the network cable from the Beaglebone.
Reconnect USB to bring up the board.
At boot-up, the processor on your BeagleBone is running a USB storage "gadget" driver. For the next exercise, you need
to swap the storage gadget for a USB-to-Ethernet gadget when you are ready to establish an IP connection over your
USB cable.
From your PC, eject the BEAGLE_BONE USB drive. The USB Ethernet gadget will automatically start.
Note #1: It has been observed in Windows that it may actually take a couple of minutes for the driver to load on
occasion.
Note #2: It has been observed in Windows that you may be prompted to locate the 'linux.inf' file. If you installed the
driver properly, you should be able to find it under c:\windows\system32\drvstore\linux_...
Configure the adapter that appears for DHCP.
The adapter should be given the IP address 192.168.7.1.
Navigate to your BeagleBone's web interface
At this point, you should have an IP connection over your USB cable, which should be providing fixed IP addresses.
The Linux distribution running on your BeagleBone is configured to start a handful of web servers upon boot. This is the
easiest way to get explore and program your BeagleBone if you are not already experienced with Linux.
Note: Please note that many of the tools do not support Internet Explorer. It is recommended you use recent versions of
Chrome or Firefox.
Open Firefox and enter the provided IP address / port
• BeagleBone 101 presentation - http://192.168.7.2
This application is showing Beaglebone slideset. The source can be edited using the Cloud9 IDE. The application is
'bone101.js'.

28
• GateOne - https://192.168.7.2
For documentation, please visit the on-line GateOne Documentation.
• Cloud9 IDE - http://192.168.7.2:3000
This development environment supports direct execution of JavaScript via Node.JS. Visit nodejs.org for information on
programming in Node.JS.
The IDE is pre-populated with the source and demos of the BoneScript and blinking projects.
Run the blinked project:
Run -> blinked
Verify that the LEDS blink properly.
Stop the running by clicking on the “Stop” button.
Debug the application:
Exercises the Steps features: Step in / out, over using the top buttons
29
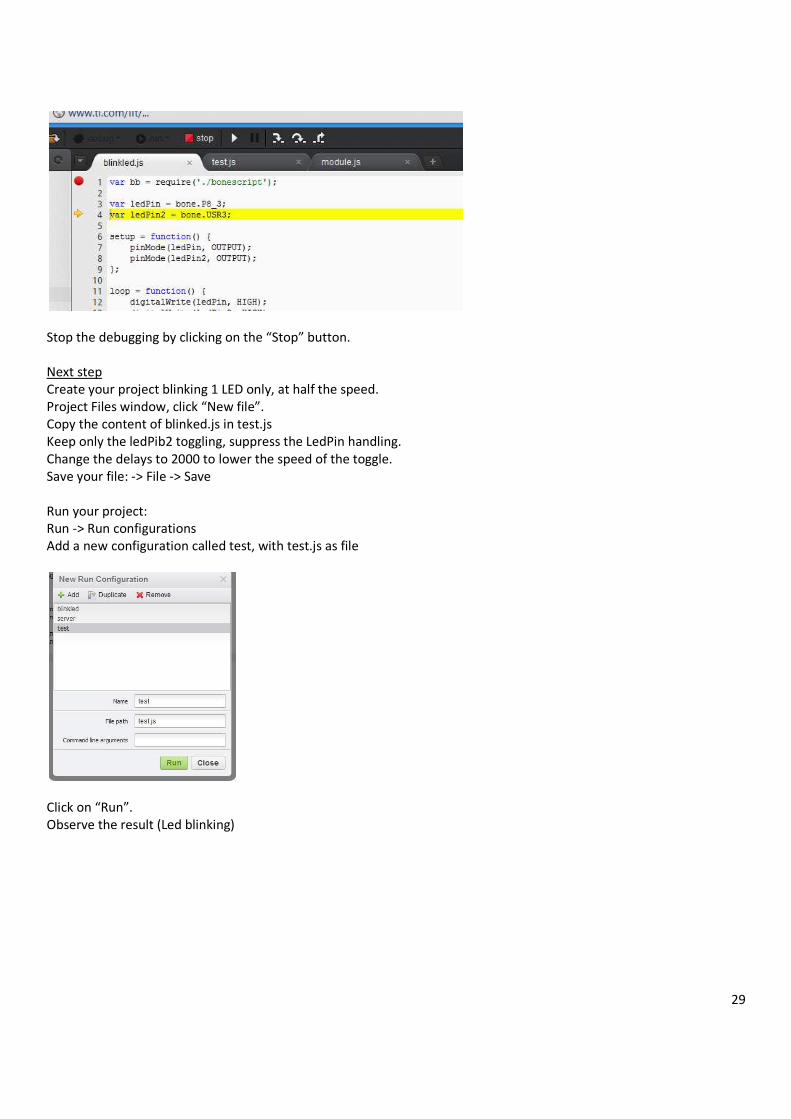
Stop the debugging by clicking on the “Stop” button.
Next step
Create your project blinking 1 LED only, at half the speed.
Project Files window, click “New file”.
Copy the content of blinked.js in test.js
Keep only the ledPib2 toggling, suppress the LedPin handling.
Change the delays to 2000 to lower the speed of the toggle.
Save your file: -> File -> Save
Run your project:
Run -> Run configurations
Add a new configuration called test, with test.js as file
Click on “Run”.
Observe the result (Led blinking)