Labconco Manual
68
Labconco Corporation 8811 Prospect Avenue Kansas City, MO 64132-2696 800-821-5525, 816-333-8811 FAX 816-363-0130 E-MAIL [email protected] HOME PAGE www.labconco.com To receive important product updates, complete your product registration card online at register.labconco.com User’s Manual Purifier ® Series Biological Safety Cabinets Models 34300 Series 34500 Series 34308 Series 34508 Series 34400 Series 34600 Series 34408 Series 34608 Series Please read the User’s Manual before operating the equipment. TYPE A2
Transcript of Labconco Manual

8/10/2019 Labconco Manual
http://slidepdf.com/reader/full/labconco-manual 1/68
Labconco Corporation
8811 Prospect Avenue
Kansas City, MO 64132-2696
800-821-5525, 816-333-8811
FAX 816-363-0130
E-MAIL [email protected]
HOME PAGE www.labconco.co
To receive important product updates,complete your product registration card
online at register.labconco.com
User’s Manual
Purifier® Series
Biological Safety Cabinets
Models34300 Series 34500 Series
34308 Series 34508 Series34400 Series 34600 Series
34408 Series 34608 Series
Please read the User’s Manual before operating the equipment.
TYPE
A2

8/10/2019 Labconco Manual
http://slidepdf.com/reader/full/labconco-manual 2/68
8/10/2019 Labconco Manual
http://slidepdf.com/reader/full/labconco-manual 3/68
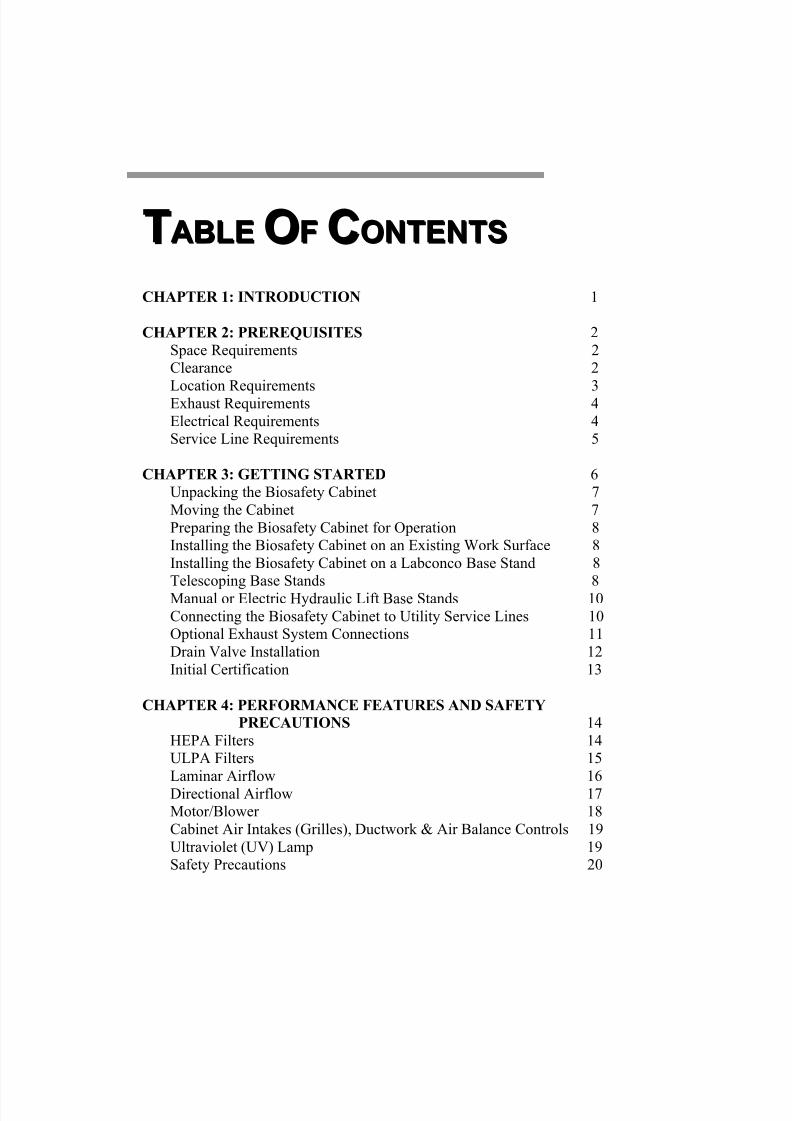
TTAABBLLEE OOFF CCOONNTTEENNTTSS
CHAPTER 1: INTRODUCTION 1
CHAPTER 2: PREREQUISITES 2
Space Requirements 2Clearance 2
Location Requirements 3Exhaust Requirements 4
Electrical Requirements 4Service Line Requirements 5
CHAPTER 3: GETTING STARTED 6Unpacking the Biosafety Cabinet 7
Moving the Cabinet 7
Preparing the Biosafety Cabinet for Operation 8Installing the Biosafety Cabinet on an Existing Work Surface 8
Installing the Biosafety Cabinet on a Labconco Base Stand 8Telescoping Base Stands 8
Manual or Electric Hydraulic Lift Base Stands 10
Connecting the Biosafety Cabinet to Utility Service Lines 10Optional Exhaust System Connections 11
Drain Valve Installation 12
Initial Certification 13
CHAPTER 4: PERFORMANCE FEATURES AND SAFETY
PRECAUTIONS 14
HEPA Filters 14ULPA Filters 15
Laminar Airflow 16
Directional Airflow 17Motor/Blower 18
Cabinet Air Intakes (Grilles), Ductwork & Air Balance Controls 19
Ultraviolet (UV) Lamp 19Safety Precautions 20

8/10/2019 Labconco Manual
http://slidepdf.com/reader/full/labconco-manual 4/68
CHAPTER 5: USING THE CABINET 22
System Reset Switch 22Information Center 23
Status Area 23
Data Area 24
Icon Area 24Operating the Sliding Sash 25
Starting the Biosafety Cabinet 26
The Logic Touchpad 27User Selectable Features 32
Timer Operation 32
Interval Timer Operation 33Stopwatch Timer Operation 33
Menu Options 33
UV Lamp Operation 33UV Lamp Timer 34
UV Lamp Maintenance 34Light Operation 35
Light Timer 35Light Maintenance 35
Blower Operation 36
Cabinet Set Up 36If An Airflow Alert Activates 39
Resetting the Airflow Alert System 39
Working in the Biosafety Cabinet 39
CHAPTER 6: MAINTAINING THE CABINET 42Routine Maintenance Schedule 42
Service Operations 43
Work Surface Removal 43Front Grille Removal 43
Towel Catch Removal 44
Front Panel Removal & Installation 45
Changing the Fluorescent Lamps 46Changing the Optional UV Lamp 46
Resetting a Circuit Breaker 47
Storage 47
CHAPTER 7: TROUBLESHOOTING 48
APPENDIX A: COMPONENTS 51
APPENDIX B: DIMENSIONS 53

8/10/2019 Labconco Manual
http://slidepdf.com/reader/full/labconco-manual 5/68

8/10/2019 Labconco Manual
http://slidepdf.com/reader/full/labconco-manual 6/68
Product Service 1-800-522-7658 1
CChhaapptteer r 11:: IInnttr r oodduuccttiioonn Congratulations on the purchase of a Labconco Purifier Logic Series
Biosafety Cabinet. The Biosafety Cabinet is designed to protect you, the
product and the laboratory environment from biohazardous aerosols. The
Logic Series Cabinet is the result of years of experience in manufacturing biohazard cabinetry, and users like you suggested many of its features to us.
The Biosafety Cabinet offers many unique features to enhance safety, performance and ergonomics. To take full advantage of them, please
acquaint yourself with this manual and keep it handy for future reference. If
you are unfamiliar with how biosafety cabinets operate, please reviewChapter 4: Performance Features and Safety Precautions before you begin
working in the cabinet. Even if you are an experienced biosafety cabinet
user, please review Chapter 5: Using the Cabinet ; it describes the BiosafetyCabinet’s features so that you can use it efficiently.
This manual and other technical information is available in PDF format
at our website: www.labconco.com.

8/10/2019 Labconco Manual
http://slidepdf.com/reader/full/labconco-manual 7/68
Product Service 1-800-522-76582
CChhaapptteer r 22:: PPr r eer r eeqquuiissiitteess Before you install the Biosafety Cabinet, you need to prepare the site for
installation. Examine the location where you intend to install the cabinet.
You must be certain that the area is level and of solid construction. In
addition, a dedicated source of electrical power must be located near theinstallation site.
Carefully read this chapter to learn:
• Location requirements.
• Electrical power requirements.
• Exhaust requirements.
•
Service utility requirements.
• Space requirements.
Refer to Appendix C: Specifications, for complete biosafety cabinet electrical
and environmental conditions, specifications and requirements.
Space RequirementsThe dimensions for the Logic A2 Biosafety Cabinets are shown in Appendix B:
Dimensions.
ClearanceA minimum clearance of at least 6 inches (150 mm) is suggested on the topand both sides of the cabinet for service.

8/10/2019 Labconco Manual
http://slidepdf.com/reader/full/labconco-manual 8/68
Chapter 2: Prerequisites
Product Service 1-800-522-7658 3
Location Requirements
Note: The Biosafety Cabinet should be located away from traffic patterns,
doors, fans, ventilation registers, fume hoods and any other air-handling
devices that could disrupt its airflow patterns. All windows in the room
should remain closed. Figure 2-1 shows the preferred location for theBiosafety Cabinet.
Preferred location
Air register blocked or redirectedto prevent cabinet disruption
Alternate location
Figure 2-1

8/10/2019 Labconco Manual
http://slidepdf.com/reader/full/labconco-manual 9/68
Chapter 2: Prerequisites
Product Service 1-800-522-76584
Exhaust Requirements
If you intend to connect the Biosafety Cabinet to the optional Canopy
Connection Kit, first examine the location to ensure that it accommodates the
cabinet’s exhaust duct. The area directly above the cabinet’s exhaust port
should be clear of structural elements, water and utility lines, or other fixedobstructions. There should be enough clearance to accommodate a 10-inch
diameter duct. Avoid cabinet locations that require an elbow directly abovethe cabinet’s exhaust connection or an excessive number of elbows in the
exhaust system. For further information about the cabinet’s exhaust systemrequirements, please refer to Chapter 3: Getting Started.
Electrical RequirementsThe different Biosafety Cabinet models have the following electrical
requirements:
Model # Requirements
3430000-3430009 115 VAC, 60 Hz, 12 Amps
3430800-3430809 115 VAC, 60 Hz, 12 Amps
3430820-3430829 230 VAC, 50/60 Hz, 6 Amps
3440000-3440009 115 VAC, 60 Hz, 12 Amps
3440800-3440809 115 VAC, 60 Hz, 12 Amps
3440820-3440829 230 VAC, 50/60 Hz, 6 Amps
3450000-3450009 115 VAC, 60 Hz, 16 Amps
3450800-3450809 115 VAC, 60 Hz, 16 Amps
3450820-3450829 230 VAC, 50/60 Hz, 8 Amps
3460000-3460009 115 VAC, 60 Hz, 16 Amps
3460800-3460809 115 VAC, 60 Hz, 16 Amps
3460820-3460829 230 VAC, 50/60 Hz, 8 Amps
All Biosafety Cabinets with model numbers ending in –00 to –09 are
designed for operation at 115 volts 60 Hz, alternating current. BiosafetyCabinets with model numbers ending in –20 to –29 are designed for
operation at 230 +/- 20 volts, 50/60 Hz alternating current.
Note: A dedicated outlet with a circuit breaker rated at 20 amps should
be located as close as possible to the right rear side of the cabinet, at a
height even with, or higher than, the top of the bench or stand.
Note: On 115 VAC models, both electrical outlets are protected by a ground
fault interrupter circuit (GFIC). Labconco does not recommend plugging theBiosafety Cabinet into a GFIC outlet.
Table 2-1

8/10/2019 Labconco Manual
http://slidepdf.com/reader/full/labconco-manual 10/68

8/10/2019 Labconco Manual
http://slidepdf.com/reader/full/labconco-manual 11/68
Product Service 1-800-522-76586
CChhaapptteer r 33:: GGeettttiinngg SSttaar r tteedd
Now that the installation is properly prepared, you are ready to inspect,install, and certify the Purifier Biosafety Cabinet. This chapter covers how to:
• Unpack and move the Biosafety Cabinet.
• Install the cabinet.
• Connect the electrical supply source.
• Connect the service lines.
•
Connect to an exhaust system (optional).
• Arrange certification of the Biosafety Cabinet.
Tools required for installation the Biosafety Cabinet include two 1/2"
wrenches, a flat-blade screwdriver, a #2 Phillips screwdriver, and a
carpenter’s level.
Note: The Biosafety Cabinet models weigh between 400–700 lbs. (182-318kg). The shipping pallet allows for lifting with a mechanical lift truck or
floor jack. If you must lift the product manually, use at least six (6) persons
and follow safe-lifting guidelines.Note: The side panels must be removed to access the fasteners that secure theBiosafety Cabinet to the pallet. DO NOT ATTEMPT TO LIFT THE
BIOSAFETY CABINET BY THE SIDE PANELS; DAMAGE WILL
OCCUR.

8/10/2019 Labconco Manual
http://slidepdf.com/reader/full/labconco-manual 12/68
8/10/2019 Labconco Manual
http://slidepdf.com/reader/full/labconco-manual 13/68
Chapter 3: Getting Started
Product Service 1-800-522-76588
Preparing the Biosafety Cabinet for Operation
Installation instructions for the cabinet (Labconco P/N 1056801) are attached
to the sash of the Biosafety Cabinet. If these instructions are missing or
unclear, contact Product Service at 800-821-5525 or 816-333-8811.
Installing the Biosafety Cabinet on an ExistingWork Surface
Note: The Biosafety Cabinet is very top heavy. Use caution when lifting ormoving it.
When installing the Biosafety Cabinet onto an existing work surface or
benchtop, ensure that the structure can safely support the combined weight of
the cabinet and any related equipment. The work surface should be at least as
wide as the Cabinet and 31 inches (787 mm) deep to properly support the unit.
A hole or notch may be cut in the supporting surface in the right front cornerto accommodate the optional drain valve.
Installing the Cabinet on a Labconco Base Stand
Labconco offers accessory Base Stands in a variety of configurations to suit
the particular needs. Stands can be ordered with adjustable telescoping legs
or with a manually or electrically adjustable hydraulic lift.
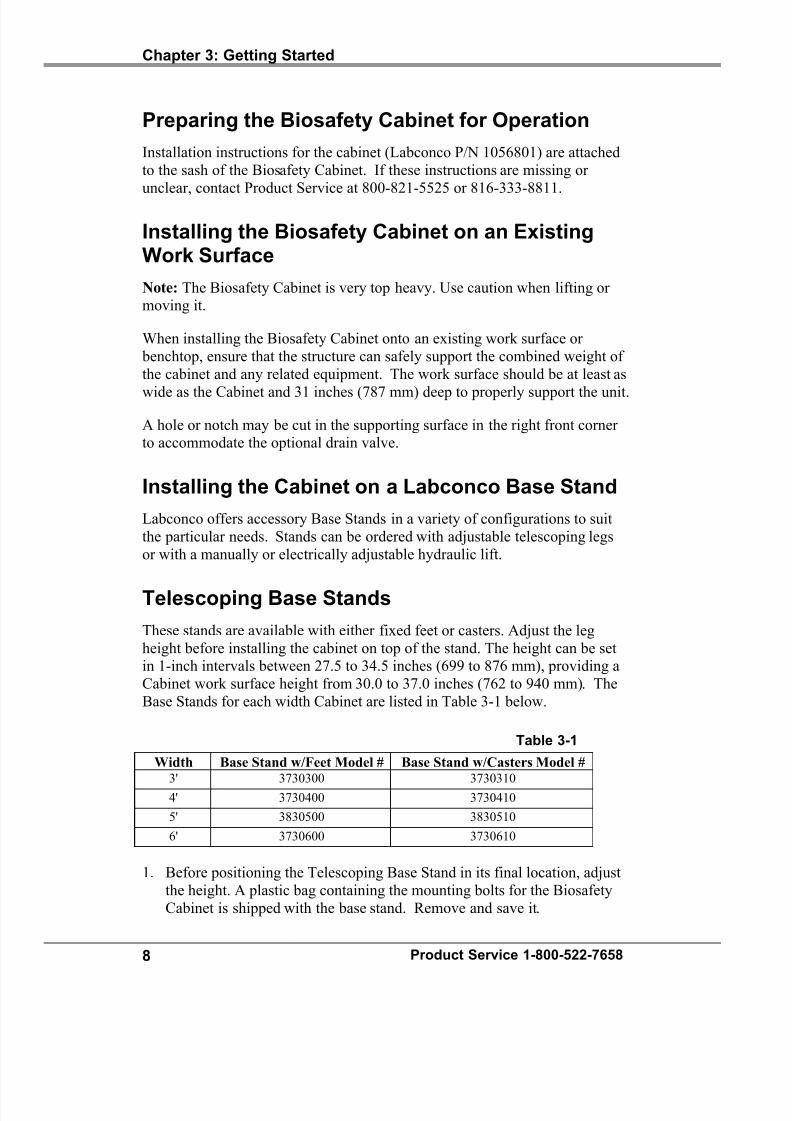
Telescoping Base Stands
These stands are available with either fixed feet or casters. Adjust the leg
height before installing the cabinet on top of the stand. The height can be setin 1-inch intervals between 27.5 to 34.5 inches (699 to 876 mm), providing a
Cabinet work surface height from 30.0 to 37.0 inches (762 to 940 mm). The
Base Stands for each width Cabinet are listed in Table 3-1 below.
Width Base Stand w/Feet Model # Base Stand w/Casters Model #3' 3730300 3730310
4' 3730400 3730410
5' 3830500 3830510
6' 3730600 3730610
1. Before positioning the Telescoping Base Stand in its final location, adjust
the height. A plastic bag containing the mounting bolts for the Biosafety
Cabinet is shipped with the base stand. Remove and save it.
Table 3-1

8/10/2019 Labconco Manual
http://slidepdf.com/reader/full/labconco-manual 14/68
Chapter 3: Getting Started
Product Service 1-800-522-7658 9
2. Select the height of the stand and slide four (4) leg extensions into base
stand corner posts and attach with 2 ¼ inch long bolt, flatwasher,lockwasher and nut. Ensure that the same height hole is selected for each
leg. Tighten the leg bolts securely. See Figure 3-1.
3. CAUTION: Only lift and support the weight of the cabinet at the
stainless steel sides and back. Damage will occur if lifted or supported onthe front edge. Move the base stand into its final location. Using a
carpenter’s level, adjust each leveling foot until the stand is level in both planes as shown in Figure 3-2. You are now ready to lift the Biosafety
Cabinet onto its stand.
Figure 3-2
Figure 3-1

8/10/2019 Labconco Manual
http://slidepdf.com/reader/full/labconco-manual 15/68
Chapter 3: Getting Started
Product Service 1-800-522-765810
Manual or Electric Hydraulic Lift Base Stands
These base stands offer infinitely adjustable height between 25.5 and 33.5
inches (648 to 851 mm), giving a Cabinet work surface height of 28.0 to 36.0inches. The height is adjusted either by a manual (hand crank) or electric
pump that drives hydraulic rams in the legs of the stands. All of thehydraulic stands are equipped with fixed feet, but can be converted to caster
wheels with the addition of Caster Kit #3784000. The Base Stands for eachCabinet model is listed in Table 3-2 below.
Width Manual Lift Stand # Electric (115V) Lift Stand # Electric (230V) Lift Stand #
3' 3780200 3780100 3780103
4' 3780201 3780101 3780104
5' 3780203 3780106 3780107
6' 3780202 3780102 3780105
Note: When installing the Cabinet on the hydraulic lift base stand, ensure that
the hydraulic lines and the electrical cord are clear of any obstructions before
installing the cabinet on the stand or operating the lift system.
Connecting the Biosafety Cabinet to UtilityService Lines
Note: Some models have a solenoid valve connected to the service valve on
the right side, rear position. The solenoid prevents gas from flowing to the
service valve when the unit blower is off. It is the only service valve positionthat can be fitted with a solenoid valve. Connect the gas service to the
solenoid valve.
The service lines (if any) should be connected to the tube fitting(s) on the
outside of the liner wall as shown in Figure 3-3. To install the tubing, followthese steps:
1. Ensure that the tubing is ¼ inch O.D., soft metal, and that the end has
been completely deburred.
2. Route the tubing from the rear of the cabinet, ensuring that it will line up
with the slot in the back of the side panel. The slot is located from 8 ¾ to
11 ¼ inches (222 to 288 mm) from the bottom of the cabinet.
Note: Make sure that the tube routing will not contact any electrical wires.DO NOT loop service line tubing within the side panels of the Cabinet.
3. Make sure that the nut on the tube fitting is loose, but do not remove it.
Look inside the fitting to make sure the tube ferrule is there.
4. Push the tube into the fitting until it is properly seated. The tube will go
approximately ¾ inch (19 mm) into the fitting.
Table 3-2

8/10/2019 Labconco Manual
http://slidepdf.com/reader/full/labconco-manual 16/68
Chapter 3: Getting Started
Product Service 1-800-522-7658 11
5. Tighten the tube fitting nut hand tight and then, using a 7/16-inch wrench,
tighten it at least ¾ turn more.
6. Close the service valve in the Biosafety Cabinet and then slowly open the
shutoff valve on the service valve. Test all fittings for leakage. Tightenthe tube nut slightly if needed.
Tube fitting nut
Tube fitting
Optional Exhaust System Connections
All Class II, Type A2 Biosafety Cabinets are shipped to recirculate theirHEPA filtered exhaust air back into the laboratory.
Certain applications such as working with odorous products or volatile toxicmaterials will require the connection of the Biosafety Cabinet to an exhaust
system.
Note: The canopy connection, also referred to as a thimble or air gap
connection, allows single or multiple biohazard cabinets to be connected toan exhaust system. During operation, the exhaust system draws all of the
cabinet’s exhaust air, plus a volume of room air (through the slots in the
canopy) into the exhaust duct. Canopy connections function as a “shockabsorber” allowing the system to function properly during changes in room
air pressure.
For information on selecting a canopy connection, go to Appendix D: Accessories.
Warning: If the research involves the use of toxic compounds or volatile
materials, contact the facility’s safety officer or Labconco to ensure that theBiosafety Cabinet and its exhaust system are compatible with the materials
you will be working with.
Figure 3-3

8/10/2019 Labconco Manual
http://slidepdf.com/reader/full/labconco-manual 17/68

8/10/2019 Labconco Manual
http://slidepdf.com/reader/full/labconco-manual 18/68
Chapter 3: Getting Started
Product Service 1-800-522-7658 13
Initial Certification
Prior to use, a qualified certifier should certify all Biosafety Cabinets. Under
normal operating conditions, the Biosafety Cabinet should be recertified at
least annually and when relocated or serviced. The certifier should perform
the following tests, as recommended in ANSI/NSF International Standard Number 49 in effect when the cabinet was manufactured:
• Downflow Velocity Profile Test
• Inflow Velocity Test
• Airflow Smoke Patterns
• HEPA Filter Leak Test
•
Vibration Test *
• Noise Level Test *
• Lighting Intensity Test *
*These tests are user comfort related tests and may be omitted at the
user’s or certifier’s discretion.
If you have any questions regarding certification agencies or need assistance
in locating one, contact Labconco’s Product Service Department at 1-800-522-7658 or 816-333-8811.

8/10/2019 Labconco Manual
http://slidepdf.com/reader/full/labconco-manual 19/68
Product Service 1-800-522-765814
CChhaapptteer r 44:: PPeer r f f oor r mmaannccee FFeeaattuur r eess aanndd SSaaf f eettyy PPr r eeccaauuttiioonnss All Purifier Series Logic Biosafety Cabinets operate using the following
principles:
• Filtration and retention of particulates by High Efficiency ParticulateAir (HEPA) filter(s)
• Laminar airflow
• Directional airflow
The major components in a Biosafety Cabinet are:
•
The HEPA filter(s) or optional ULPA filters
• The motor/blower to force air through the Cabinet
• Cabinet air intakes (grilles), ductwork and air balance controls
HEPA Filters
HEPA filters are disposable, dry-type particulate filters. The filter material ormedia is typically made of borosilicate microfibers formed into a thin sheet,
in a process similar to the production of paper. This sheet is folded, or pleated
to increase its surface area. The pleats are held in place by aluminum
diffusers or by beads of glue that add rigidity to the media pack. The pack isthen set into a frame, and sealed as shown in Figure 4-1.
The HEPA filter manufacturer establishes the efficiency of the filter bychallenging it with an aerosol of known particle size. The number of particles
that penetrate the filter are quantified, and this establishes the efficiency of
the filter. Thus, the filters used in the Logic Series Cabinets are at least
99.99% efficient in removing particles 0.3 micron.

8/10/2019 Labconco Manual
http://slidepdf.com/reader/full/labconco-manual 20/68
Chapter 4: Performance Features and Safety Precautions
Product Service 1-800-522-7658 15
Note: The HEPA filter media is very fragile. DO NOT touch the media. Ifyou think the media of a HEPA filter is damaged, DO NOT USE THE
CABINET. Have the HEPA filter integrity tested by a certifier before using
the cabinet.
Note: HEPA Filters are only effective against particulate material. Gases
will pass through the filter.
Filter framePolyurethane seal
Between media packand filter frame
Filter media pack –
A continuous sheetof filter media
ULPA Filters
Optional ULPA filters may be used to replace the standard HEPA filters in
the Purifier Logic Series Biosafety Cabinets. ULPA filters have the same
properties as described above except they are rated at least 99.999% efficientin removing particles 0.1-0.2 or 0.2-0.3 micron.
Figure 4-1

8/10/2019 Labconco Manual
http://slidepdf.com/reader/full/labconco-manual 21/68
Chapter 4: Performance Features and Safety Precautions
Product Service 1-800-522-765816
Laminar Airflow
Laminar airflow is defined as the movement of a body of air in a single
direction, with a uniform velocity. In practice, the laminar downflow of air in
the cabinet captures any aerosol generated in the work area of the cabinet,
and directs it to the HEPA filters. In order to be true laminar downflow, anumber of individual downflow velocity test points (The Downflow Velocity
Profile) must be +/- 16 feet per minute (0.08 m/s) of the average of all the test
points. This is illustrated in Figure 4-2.
Figure 4-2

8/10/2019 Labconco Manual
http://slidepdf.com/reader/full/labconco-manual 22/68
Chapter 4: Performance Features and Safety Precautions
Product Service 1-800-522-7658 17
Directional Airflow
Directional airflow also plays a key role in biosafety cabinet performance.
Air is drawn into the front of the cabinet at the front grille. This “curtain” of
air makes it more difficult for aerosols to escape out of the work area of the
cabinet and into the outside environment. This airflow is often calculated andreferred to as the Inflow Volume or Average Inflow Velocity. This is
illustrated in Figure 4-3.
Figure 4-3

8/10/2019 Labconco Manual
http://slidepdf.com/reader/full/labconco-manual 23/68

8/10/2019 Labconco Manual
http://slidepdf.com/reader/full/labconco-manual 24/68
Chapter 4: Performance Features and Safety Precautions
Product Service 1-800-522-7658 19
Cabinet Air Intakes (Grilles), Ductwork and AirBalance Controls
The location, size, and pattern of the grilles at the front and rear of the work
area affect cabinet containment and performance.
Note: Never block or obstruct the grilles of the Biosafety Cabinet.
The internal ductwork of the Biosafety Cabinet conveys the air from the workarea to the blower, and then from the blower to the filters. The positive
pressure rigid plenum of the Biosafety Cabinet is designed to deliver a more
uniform airflow to both HEPA filters, optimizing filter loading and
operational life.
Ultraviolet (UV) Lamp
The optional UV lamp generates a primary wavelength of light of 254nm. A
secondary emission is in the visible (blue) wavelength, resulting in thecharacteristic blue color while operating. UV light with a wavelength of 254
nm is biocidal, primarily by creating thymine dimers in DNA. These dimers
prevent the correct transcription of the DNA into RNA, resulting in cellulardeath or viral inactivation. In order to be effective, the UV light must directly
strike the nucleic acid, and its effectiveness can be diminished or negated by
dissolved proteins or metals, or by other UV-opaque substances protectingthe target nucleic acid.
Because of its limitations, UV light should be used as an adjunct to goodsurface disinfection practices. In order to get optimum performance from the
UV light, it should be replaced after 6,000 hours of operation or less, and the
exterior surface of the lamp should be kept clean and free of dust.
Note: The Logic Cabinet records the number of hours of operation of the UVlight. You can program in the number of hours (in 100-hour increments) it
will operate before a replacement message is displayed.
Note: UV irradiation is absorbed by the tempered safety glass of the sash.
Independent research has shown that the level of UV irradiation on theoutside of the cabinet’s sash is equal to background radiation levels.
Note: The UV sensitivity of a target organism varies, depending on the UV
output of the lamp, the genus and species of the organism, the medium the
agent is suspended in, etc. Contact the facilities Health and Safety Officer atyour facility for UV light use and recommendations.

8/10/2019 Labconco Manual
http://slidepdf.com/reader/full/labconco-manual 25/68
Chapter 4: Performance Features and Safety Precautions
Product Service 1-800-522-765820
Safety Precautions
WARNING: The Biosafety Cabinet Biohazard Cabinet should be certified
by a certification technician before its initial use. The cabinet should be
recertified whenever it is relocated, serviced or at least annually thereafter.
Do not assume that filter integrity and airflow performance have not beencompromised during shipping.
Some internal components of the Biosafety Cabinet may become
contaminated during operation of the unit. Only experienced personnel
competent in decontamination procedures should decontaminate the cabinet before servicing these components. If you have any questions regarding
certification agencies, or need assistance in locating one, contact Labconco’sProduct Service Department at 800-821-5525 or 816-333-8811.
DO NOT load more than 50 lbs. (23 Kg) in the work area. Exceeding this
limit may damage the worksurface and its supports. Excessive weight in thecabinet may increase the risk of it overturning, or failure of hydraulic lift
stands, resulting in the cabinet and stand overturning. If your applicationrequires loading more than 50 lbs., contact Labconco’s Product Service
Department at 800-821-5525 or 816-333-8811 for assistance.
Ensure that the Cabinet is connected to electrical service in accordance with
local and national electrical codes. Failure to do so may create a fire orelectrical hazard. Do not remove or service any electrical components
without first disconnecting the Biosafety Cabinet from electrical service.
Avoid the use of flammable gases or solvents in the Biosafety Cabinet. Caremust be taken to ensure against the concentration of flammable or explosive
gases or vapors. An open flame should NOT be used in the BiosafetyCabinet. Open flames will disrupt airflow patterns, burn the HEPA filter
and/or damage the filter’s adhesive. Gases under high pressure should not be
used in the Biosafety Cabinet, as they may disrupt its airflow patterns.
HEPA filters only remove particulate matter. Operations generating volatile
toxic chemicals or radionuclides must be evaluated carefully.
The media of HEPA filters is fragile and should not be touched. Avoid puncturing either HEPA filter during installation or normal operation. If you
suspect that a HEPA filter has been damaged, DO NOT use the cabinet;contact a local certification agency or Labconco at 800-821-5525 or 816-333-8811 for re-certification information.
The HEPA filters in the Biosafety Cabinet will gradually accumulate airborne
particulate matter from the room and from work performed in the cabinet.
The rate of accumulation will depend upon the cleanliness of the room air,
operating time and the nature of work being done in the cabinet. The FilterGauge accurately displays the amount of filter life remaining.

8/10/2019 Labconco Manual
http://slidepdf.com/reader/full/labconco-manual 26/68
Chapter 4: Performance Features and Safety Precautions
Product Service 1-800-522-7658 21
Proper operation of the cabinet depends largely upon its location and the
operator’s work habits. Consult the Installation and Normal Operationsections of this manual for further details.
Avoid direct exposure of plastic or coated materials to ultraviolet (UV)
radiation. Never bypass the UV safety interlock that only allows the UV
light to work when the sash is closed. When surface disinfecting theBiosafety Cabinet:
• Avoid splashing the disinfecting solution on skin or clothing.
• Ensure adequate ventilation.
• Carefully follow the disinfectant’s safety instructions.
• Always dispose of disinfecting solutions in accordance with local and
national laws.
• DO NOT allow disinfectants with high concentrations of free chlorine
to contact the stainless steel components of the Biosafety Cabinet for
a long period of time. Free chlorine will corrode stainless steel afterextended contact.
The electrical receptacle cover may be removed to facilitate surface
decontamination. In the event of gross contamination, the cover should be removed, sterilized and/or decontaminated as required and discarded.
Order Replacement Receptacle Cover #1287900. See Appendix A:
Components for a list of service parts.
Biosafety Cabinets should be decontaminated for any of the following
reasons:
• Before maintenance work requiring entry into contaminated areas.
•
Before HEPA filter changes.
• Before performing certification tests requiring entry into
contaminated areas.
• Before relocating the cabinet.
• Before changing research programs.
•
After the gross spill of biohazardous material or toxic chemicals.

8/10/2019 Labconco Manual
http://slidepdf.com/reader/full/labconco-manual 27/68
Product Service 1-800-522-765822
CChhaapptteer r 55:: UUssiinngg tthhee CCaabbiinneett
System Reset Switch
The Biosafety Cabinet has a system reset switch for resetting its
microprocessors. The switch is located on the front of the electronics module,on top of the Cabinet, as shown in Figure 5-1. Ensure that the switch is in the
“ON” (up) position before attempting to operate the Cabinet.
The System Reset
Switch
Figure 5-1

8/10/2019 Labconco Manual
http://slidepdf.com/reader/full/labconco-manual 28/68
Chapter 5: Using The Cabinet
Product Service 1-800-522-7658 23
Information Center
The Information Center is an LCD display located on the right side wall at
eye level. The center’s display is divided into three separate areas, as shown
in Figure 5-2, below. The display will turn itself off one minute after the
blower is turned off or the sash is closed.
Status Area
Data Area
Icon Area
Status Area
The Status Area displays the system’s condition during operation. This linecan display any of the following messages:
Blower Off
The cabinet blower is shut off.
Please Wait
For three minutes after the cabinet blower is turned on, the display will
say this, to allow the cabinet to reach proper operating conditions.
OK
The motor is operating properly, and the sash is not open too far.
Night-Smart™
If the Night-Smart mode is selected, as outlined later in the chapter, this
message will appear for one minute after the sash is closed, and then thedisplay will automatically shut off.
Figure 5-2
8/10/2019 Labconco Manual
http://slidepdf.com/reader/full/labconco-manual 29/68
Chapter 5: Using The Cabinet
Product Service 1-800-522-765824
Sash is too high
The sash is open too far for safe operation.
Airflow Alert
The airflow patterns in the cabinet have changed, resulting in a sudden
change in the motor speed. This is most likely due to a blockage of thegrille or the exhaust filter outlet. It may also be caused by removal of the
work surface while the cabinet is in operation.
System Error
The motor and display circuit board are not communicating properly.
DO NOT USE THE CABINET UNTIL THE PROBLEM HAS BEENCORRECTED.
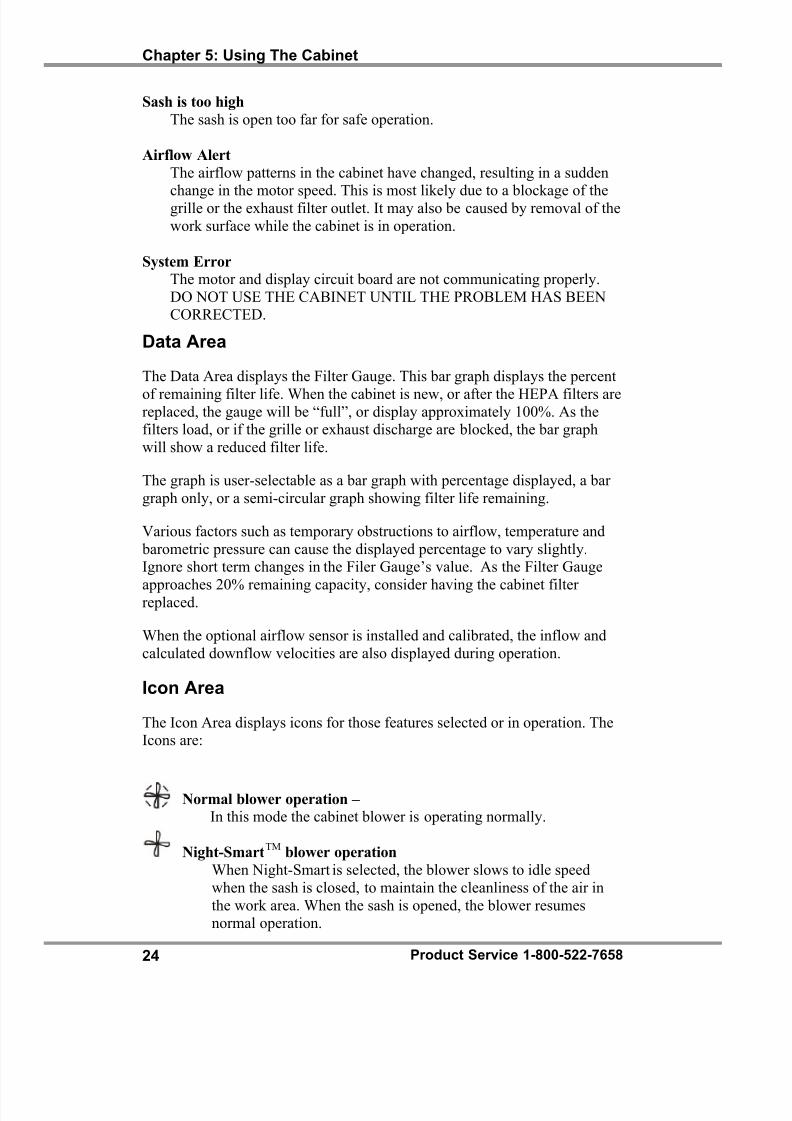
Data Area
The Data Area displays the Filter Gauge. This bar graph displays the percent
of remaining filter life. When the cabinet is new, or after the HEPA filters arereplaced, the gauge will be “full”, or display approximately 100%. As thefilters load, or if the grille or exhaust discharge are blocked, the bar graph
will show a reduced filter life.
The graph is user-selectable as a bar graph with percentage displayed, a bar
graph only, or a semi-circular graph showing filter life remaining.
Various factors such as temporary obstructions to airflow, temperature and
barometric pressure can cause the displayed percentage to vary slightly.Ignore short term changes in the Filer Gauge’s value. As the Filter Gauge
approaches 20% remaining capacity, consider having the cabinet filterreplaced.
When the optional airflow sensor is installed and calibrated, the inflow and
calculated downflow velocities are also displayed during operation.
Icon Area
The Icon Area displays icons for those features selected or in operation. TheIcons are:
Normal blower operation –
In this mode the cabinet blower is operating normally.
Night-SmartTM
blower operation
When Night-Smart is selected, the blower slows to idle speed
when the sash is closed, to maintain the cleanliness of the air in
the work area. When the sash is opened, the blower resumesnormal operation.
8/10/2019 Labconco Manual
http://slidepdf.com/reader/full/labconco-manual 30/68
Chapter 5: Using The Cabinet
Product Service 1-800-522-7658 25
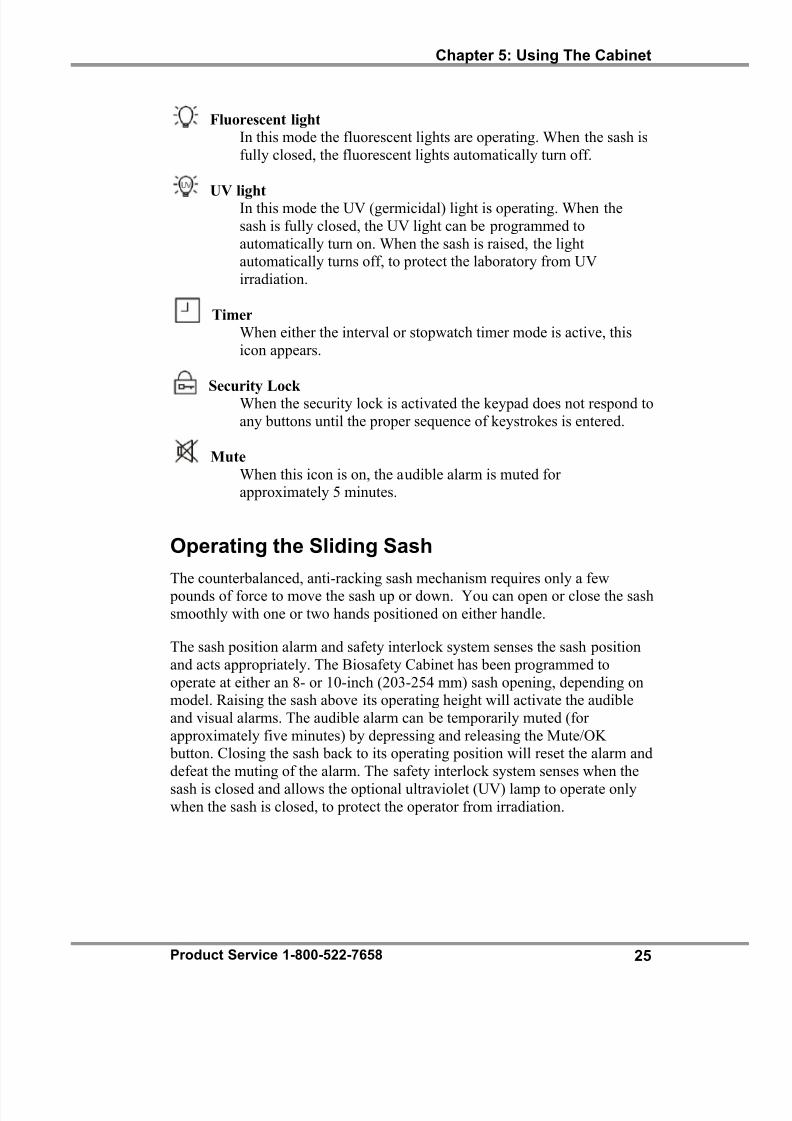
Fluorescent light
In this mode the fluorescent lights are operating. When the sash is
fully closed, the fluorescent lights automatically turn off.
UV lightIn this mode the UV (germicidal) light is operating. When the
sash is fully closed, the UV light can be programmed to
automatically turn on. When the sash is raised, the lightautomatically turns off, to protect the laboratory from UV
irradiation.
Timer
When either the interval or stopwatch timer mode is active, this
icon appears.
Security LockWhen the security lock is activated the keypad does not respond to
any buttons until the proper sequence of keystrokes is entered.
Mute
When this icon is on, the audible alarm is muted forapproximately 5 minutes.
Operating the Sliding Sash
The counterbalanced, anti-racking sash mechanism requires only a few pounds of force to move the sash up or down. You can open or close the sash
smoothly with one or two hands positioned on either handle.
The sash position alarm and safety interlock system senses the sash position
and acts appropriately. The Biosafety Cabinet has been programmed to
operate at either an 8- or 10-inch (203-254 mm) sash opening, depending onmodel. Raising the sash above its operating height will activate the audible
and visual alarms. The audible alarm can be temporarily muted (for
approximately five minutes) by depressing and releasing the Mute/OK button. Closing the sash back to its operating position will reset the alarm and
defeat the muting of the alarm. The safety interlock system senses when the
sash is closed and allows the optional ultraviolet (UV) lamp to operate onlywhen the sash is closed, to protect the operator from irradiation.

8/10/2019 Labconco Manual
http://slidepdf.com/reader/full/labconco-manual 31/68
Chapter 5: Using The Cabinet
Product Service 1-800-522-765826
Starting the Biosafety Cabinet
1. To start the Biosafety Cabinet, raise the sash until its bottom edge
aligns with the sash position label on the left corner post. The decal is
shown in Figure 5-3.2. Press the blower button to start the unit. The unit will run a self-test
for approximately 15 seconds. Additionally, you will be instructed to“Please Wait” for three minutes to allow the cabinet to reach proper
operating conditions. If the alarm sounds, recheck the sash position.If the sash is too high, the sash audible alarm and the LCD display
will indicate the sash is too high.
3. To turn the UV light on, the sash must be completely closed to prevent the escape of any UV radiation. Push the UV light button to
activate the UV light.
Note: The sash must be completely closed for the UV light to activate.
Sash position label
Figure 5-3

8/10/2019 Labconco Manual
http://slidepdf.com/reader/full/labconco-manual 32/68
Chapter 5: Using The Cabinet
Product Service 1-800-522-7658 27
The Logic Touchpad
The touchpad of the Logic Series Cabinet is shown in Figure 5-4. Take a
moment to get familiar with the buttons, their location and function. Also
familiarize yourself with the display located on the right side wall. The
display will report system functions, such as filter capacity, timer displays,alarm or error messages, as well as icons that illuminate when cabinet
functions such as UV light and blower are operational
Blower Button – Starts or stops the cabinet blower. Whenthe blower is in Smart-Start
TM mode, closing the sash turns
the blower off. When the sash is raised, the blower restarts
automatically. In Night-SmartTM
mode, when the sash isclosed, the motor slows to idle to maintain air cleanliness in
the work area. When the sash is reopened, the blower
resumes normal operation. Pressing this button overridesSmart-Start
TM and Night-Smart
TMoperation.
Light Button – Turns the fluorescent lamps on or off.Closing the sash automatically turns the lights off. When
the lights are in Smart-StartTM
mode, raising the sash turns
the lights on automatically.
UV Light Button – Turns the UV lamp on or off. When
the UV lamp is in Smart-StartTM
mode, closing the sash
turns the light on. When the sash is raised, the light turns
off automatically.
Timer Button – Allows you to select either a repeatinginterval timer, or an elapsed timer (stopwatch).
Mute/OK Button – Mutes all audible alarms for
approximately 5 minutes, unless it is a system error alarm.When in the Menu mode, this button is used to select an
option.
Menu Button – This button toggles the display between
the display and menu modes. When in the menu mode, pressing this button returns you to the previous menu level.
Select Buttons – Allow you to choose different options in
the menu mode.
Figure 5-4

8/10/2019 Labconco Manual
http://slidepdf.com/reader/full/labconco-manual 33/68
Chapter 5: Using The Cabinet
Product Service 1-800-522-765828
Figure 5-5

8/10/2019 Labconco Manual
http://slidepdf.com/reader/full/labconco-manual 34/68
Chapter 5: Using The Cabinet
Product Service 1-800-522-7658 29

8/10/2019 Labconco Manual
http://slidepdf.com/reader/full/labconco-manual 35/68
Chapter 5: Using The Cabinet
Product Service 1-800-522-765830
8/10/2019 Labconco Manual
http://slidepdf.com/reader/full/labconco-manual 36/68
Chapter 5: Using The Cabinet
Product Service 1-800-522-7658 31

8/10/2019 Labconco Manual
http://slidepdf.com/reader/full/labconco-manual 37/68
Chapter 5: Using The Cabinet
Product Service 1-800-522-765832
User Selectable Features
The Purifier Logic Series Biosafety Cabinet offers the user unparalleled
flexibility and convenience. The operation of the blower, fluorescent and UV
lights can either be operated manually, or you may choose to use the Smart-
Start™ or Night-Smart™ features that activate functions automatically whenthe sash is opened or closed.
The UV lamp can be programmed to operate for a given time interval whenthe sash is closed, before it shuts off.
NOTE: During the first fifteen seconds of operation, the Cabinet
performs an auto-diagnostic routine to check the operation of the
microprocessor. You cannot access the menu during this time.
NOTE: When you are in the menu mode, if a selection is not made within
30 seconds, the display will reset back to display mode.
NOTE: Pressing the appropriate touchpad button will override Smart-
StartTM
or Night-SmartTM
selections.
To access the menu, press the “MENU” button. The display panel will
show the first level menu. To select from the various menu options press
the “▲” or “▼” buttons until the selected option is displayed. Press
“OK” to accept that option, or press “MENU” to return to the previous
menu level.
For further explanation of the menu and its options, please refer to figure 5-4.
Timer Operation
NOTE: The timer button allows activation of an interval (countdown) or
stopwatch (elapsed) timer. The timers cannot be operated
simultaneously.
To access the main timer menu, press the “Timer” button anytime duringnormal operation. The main timer menu is shown on the LCD display. Use
the “▲” and “▼” buttons to highlight the Interval or Stopwatch Timer. Press
the “OK” button to select the highlighted timer function.

8/10/2019 Labconco Manual
http://slidepdf.com/reader/full/labconco-manual 38/68
Chapter 5: Using The Cabinet
Product Service 1-800-522-7658 33
Interval Timer Operation
1. When selected, the Interval Timer menu is displayed on the LCD.
The timer defaults to 0:00:00 (hours:minutes:seconds).
2. Press and hold the “▲” or “▼” buttons to increase or decrease the
timer interval.3. When the proper interval is entered on the display, press the “OK”
button to start the timer.4. When the timer reaches 0:00:00, an audible alarm will sound, and the
timer will reset itself and repeat the countdown .
5. Press the “OK” button to pause the timer.6. Press the “Menu” button to clear the interval timer and return to the
main timer menu.
Stopwatch Timer Operation
1. When selected, the Stopwatch Timer menu is displayed on the LCD.
The timer defaults to 0:00:00.
2. Press the “OK” button to start the timer.3. Press the “OK” button again to zero the timer.
4. Press the “Menu” button to clear the stopwatch timer and return to the
main timer menu.
Menu Options
UV Lamp OperationThis menu option allows you to select whether the UV light will turn on
automatically every time the sash is completely closed.
Smart-StartWhen the “Smart-Start” option is selected, the UV light will turn on
every time the sash is closed.
ManualWhen the “manual touchpad” option is selected, the UV light must be
turned on and off at the touchpad.

8/10/2019 Labconco Manual
http://slidepdf.com/reader/full/labconco-manual 39/68
Chapter 5: Using The Cabinet
Product Service 1-800-522-765834
UV Lamp TimerThe UV Lamp Timer allows you to decide whether the UV lamp will operatecontinuously or for a time period that you select.
IntervalWhen the “Interval” option is selected, the UV Interval Timer menu isdisplayed.
UV Interval TimerThis window lets you set the amount of time the UV lamp
stays lit when activated. Use the “▲” and “▼” buttons to
select the amount of time you need, then press the “OK”
button to set the interval.
NOTE: Raising the sash will reset the timer to its original
setting. Pressing “UV Light” will turn the light off,
pressing “Mute/OK” will pause the timer.
ContinuousIn the continuous mode, the UV light will remain lit until the “UV Light”
button is pressed, or the sash is raised.
UV Lamp MaintenanceThis selection allows you to check how many hours the UV lamp has burned.It also allows you to set the number of hours you want the lamp to last, and to
reset the UV lamp hourmeter.
UV Lamp HourmeterThis display only shows how many hours the UV lamp has been lit, and
how many hours remain until you will receive a warning to replace the
lamp.
Change UV Lamp LifeIn this option, you can set the number of operating hours beforereceiving the replace UV lamp warning. For most UV lamps, the output
of UV light decreases at a constant rate. Typically, after 6,000 hours of
operation the lamp will output 80% of the UV light it did when it was
new. This option allows you to set the warning at a life you prefer, in100 hour increments.
Reset UV Lamp ClockThis option lets you reset the UV hourmeter to 0 whenever the lamp has
been replaced.
8/10/2019 Labconco Manual
http://slidepdf.com/reader/full/labconco-manual 40/68
Chapter 5: Using The Cabinet
Product Service 1-800-522-7658 35
Light OperationThis menu option allows you to select whether the fluorescent lights will turnon automatically every time the sash is opened.
NOTE: The fluorescent lights will automatically turn off when the sash is
closed, no matter what its setting is.
Smart-StartWhen the “Smart-Start” option is selected, the fluorescent lights will
turn on every time the sash is opened.
ManualWhen the “manual touchpad” option is selected, the fluorescent lights
must be turned on and off at the touchpad.
Light TimerThe fluorescent Lamp timer allows you to decide whether the fluorescent
lamps will operate continuously or for a limited time period that you select.This may be desired for energy-savings as well as a safeguard for light-
sensitive materials or animals.
IntervalWhen the “interval” option is selected, the Light Interval Timer menu is
displayed.
Light Interval Timer
This window lets you set the amount of time for the fluorescentlamps to stay lit once activated. Use the “▲” and “▼” buttons toselect the amount of time, then press the “OK” button to set the
interval.
NOTE: Closing the sash will reset the timer to its original
setting. Pressing “Light” will turn the lights off, pressing
“Mute/OK“ will pause the timer.
ContinuousIn the continuous mode, the fluorescent lights will remain lit until
the “light” button is pressed, or the sash is closed.
Light MaintenanceThis selection allows you to check how many hours the fluorescent lamps
have burned. It also allows you to set the number of hours before replacement
and to reset the light hourmeter.

8/10/2019 Labconco Manual
http://slidepdf.com/reader/full/labconco-manual 41/68
Chapter 5: Using The Cabinet
Product Service 1-800-522-765836
Light HourmeterThis display only shows the hours the fluorescent lamps have been lit
and how many hours remain until you receive a warning to replace the
lamps.
Change Light LifeIn this option, you can set the hourmeter before you get the replace light
warning. For most fluorescent lamps, the output of light decreases at aconstant rate. Typically, after 6,000 hours of operation the lamp will
output less light than it did when it was new. This option allows you toset the warning at what ever level you prefer, in 100 hour increments.
Reset Light ClockThis option resets the light hourmeter to 0 after the fluorescent lampshave been replaced.
Blower OperationThis selection allows you to choose to operate the blower in Smart-Start,
Manual Touchpad, or in Night-Smart modes.
Smart-StartWhen the “Smart-Start” option is selected, the blower will turn on every
time the sash is opened. When the sash is closed, the blower will shutoff.
Manual TouchpadWhen the “Manual Touchpad” option is selected, the blower must be
turned on and off at the touchpad.
Night-SmartWhen the “Night-Smart” option is selected, the blower will turn on every
time the sash is opened. When the sash is closed, the blower speed willdecrease, to deliver 20-30% of the volume of air during normal
operation.
Cabinet Set UpThese selections allow for the customization of the display and the cabinetoperation.
Units of MeasureWhen equipped with the optional airflow sensor, this option allows youto select the air velocity units of measure. When “Metric” is selected, the
air velocities will be displayed in meters-per-second. When “US” is
selected, the velocities will be displayed in feet-per-second.

8/10/2019 Labconco Manual
http://slidepdf.com/reader/full/labconco-manual 42/68
Chapter 5: Using The Cabinet
Product Service 1-800-522-7658 37
Security LockNOTE: The security lock automatically reactivates and locks out
the keypad every time the blower is shut off, by the keypad or by
closing the sash. After the initial auto diagnostic screen is cleared,
the security lock reactivates.
The security lock feature prevents operation of the Biosafety Cabinet by
unauthorized users. To engage the security lock, access the SecurityLock submenu, as described in Figure 5-4. Select the “secure” option,
and press the “OK” button. A ‘lock’ icon appears on the LCD display.
Once engaged, the operator must enter the proper sequence of keystrokesto operate the cabinet. The proper sequence to unlock the Security Lock
is:
Press the “▼” keypad 3 times within 2 seconds.
After successful entry of the unlock code, the lock icon disappears fromthe display, and the user has full access to the keypad functions.
To disable the Security Lock, enter the Security Lock submenu and
select the non-secure mode. The lock is completely disabled.
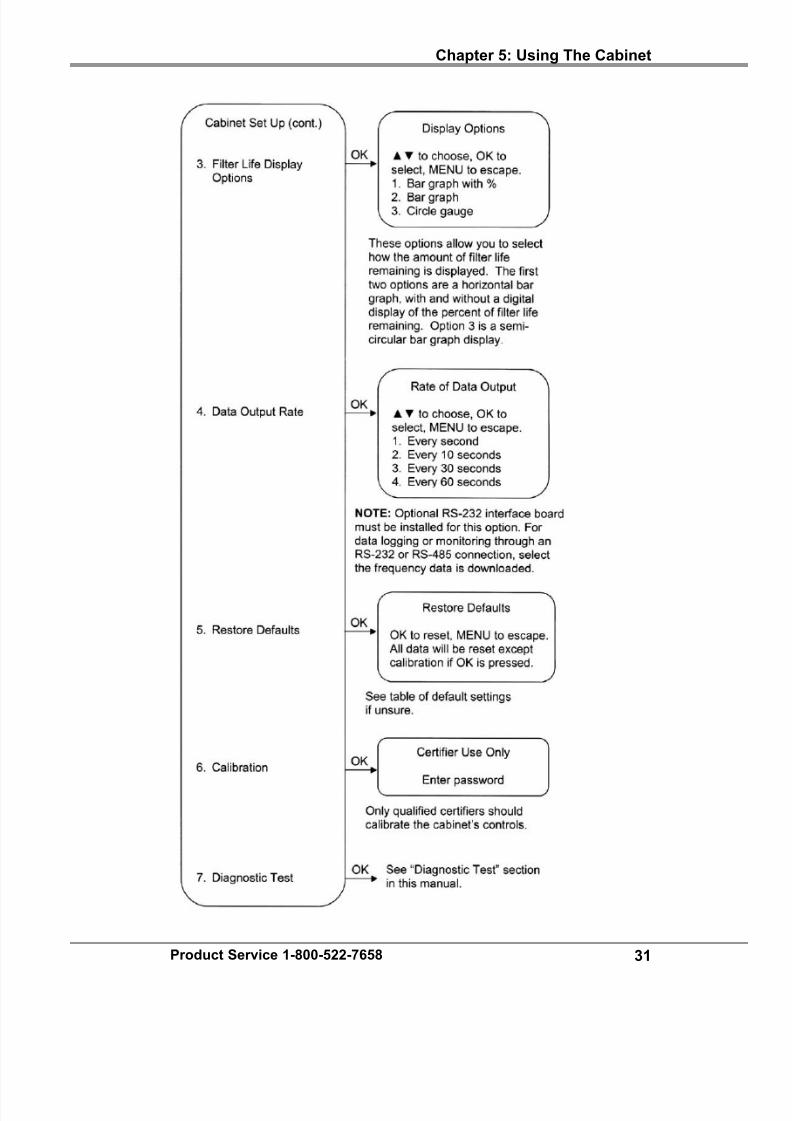
Filter Life Display OptionsThis menu selection determines how the filter life remaining gauge is
displayed. When “Bar Graph with %” is selected, the gauge will bedisplayed as a horizontal bar graph with the filter life remaining shown
graphically and digitally. When “Circle Graph” is selected, the gauge isdisplayed as a semicircular bar graph, including a digital display.
Data Output Rate Note: This selection will only work if the optional RS-232 board isinstalled.
This menu option selects the rate that the RS-232 board outputs data.Data can be output at a rate of once per second, once every 10 seconds,
once every 30 seconds, or once per minute.

8/10/2019 Labconco Manual
http://slidepdf.com/reader/full/labconco-manual 43/68
8/10/2019 Labconco Manual
http://slidepdf.com/reader/full/labconco-manual 44/68
Chapter 5: Using The Cabinet
Product Service 1-800-522-7658 39
If An Airflow Alert Activates
The most common causes of an Airflow Alert are:
• Blockage of the inlet grilles or exhaust outlet.
•
Removal of the work surface or grille during operation.
Resetting the Airflow Alert System
The Airflow Alert automatically resets to normal operation once the motor
speed has stabilized.
Working In the Biosafety Cabinet
Planning
• Thoroughly understand procedures and equipment required before beginning work.
• Arrange for minimal disruptions, such as room traffic or entry into theroom while the cabinet is in use.
Start-up
• Turn off UV light if included.
• Slowly raise the sash until the bottom of the sash aligns with the sash
indicator decal located on the left side of the work area.
• Turn on the fluorescent light and cabinet blower if the Smart-Start
features have not been activated.
• Check the air grilles for obstructions, and note the filter gauge
reading.
•
Allow the cabinet to operate unobstructed for 5 minutes.
• Wash hands and arms thoroughly with germicidal soap.
•
Wear a long sleeved lab coat with knit cuffs and over-the-cuff rubbergloves. Use protective eyewear. Wear a protective mask if
appropriate.

8/10/2019 Labconco Manual
http://slidepdf.com/reader/full/labconco-manual 45/68
Chapter 5: Using The Cabinet
Product Service 1-800-522-765840
Wipe-Down
• Raise the sash to its full open position (approximately 21.75 inches or
552 mm). Mute the alarm by depressing the "Alarm Silence" switch.
• Wipe down the interior surfaces of the cabinet with 70% ethanol, or a
suitable disinfectant, and allow to dry.
Loading Materials and Equipment
• Only load the materials required for the procedure. Do not overloadthe cabinet.
• Do not obstruct the front, side, or rear return air grilles.
• Large objects should not be placed close together.
•
Slowly close the sash until it is in the correct operating position.
• After loading the cabinet, wait two to three minutes to purge airborne
contaminants from the work area.
Work Techniques
• Keep all materials at least 4 inches (100 mm) inside from the sash,
and perform all contaminated operations as far to the rear of the work
area as possible.
• Segregate all clean and contaminated materials in the work area.
•
Arrange materials to minimize the movement of contaminatedmaterials into clean areas.
• Keep all discarded contaminated material to the rear of the work area.
• Avoid moving materials or the operator's hands and arms through the
front access opening during use.
• Avoid the use of an open flame. Use disposable lab ware or an
electric incinerator as alternatives.
•
Use proper aseptic technique.
• Avoid using techniques or procedures that disrupt the airflow patterns
of the cabinet.
• If there is a spill or splatter during use, all objects in the cabinetshould be surface decontaminated before removal. Thoroughly
disinfect the working area of the cabinet WHILE IT IS STILL IN
OPERATION, to prevent the release of contaminants from thecabinet.

8/10/2019 Labconco Manual
http://slidepdf.com/reader/full/labconco-manual 46/68
Chapter 5: Using The Cabinet
Product Service 1-800-522-7658 41
Final Purging
• Upon completion of work, the cabinet should be allowed to operate
for two to three minutes undisturbed, to purge airborne contaminantsfrom the work area.
Unloading Materials and Equipment• Objects in contact with contaminated material should be surface
decontaminated before removal from the cabinet.
• All open trays or containers should be covered before being removed
from the cabinet.
Wipe-Down
• Wipe down the interior surfaces of the cabinet with 70% ethanol, or asuitable disinfectant, and allow to dry.
•
Periodically lift the work surface and wipe down the area beneath it.
• Inspect and clean the towel catch located at the rear of the work area, beneath the work pan.
• Dispose of rubber gloves appropriately, and have lab coat laundered properly.
• Wash hands and arms thoroughly with germicidal soap.
Shutdown
• Lower the sash to turn off the fluorescent light and cabinet blower and
activate the UV light if appropriate.
8/10/2019 Labconco Manual
http://slidepdf.com/reader/full/labconco-manual 47/68

8/10/2019 Labconco Manual
http://slidepdf.com/reader/full/labconco-manual 48/68
Chapter 6: Maintaining The Cabinet
Product Service 1-800-522-7658 43
• Check the UV and fluorescent light hourmeters, and record their
readings in an operational log.
• All weekly activities.
Semiannually or Annually
•
Have the cabinet re-certified by a qualified certification technician.• All monthly activities.
Service Operations
Work Surface Removal:
Note: The work surface of the cabinet must be thoroughly decontaminated
before removing it.
1. Lift the front edge of the work surface straight up by grasping the knob
handles at either front corner.
2. Pull the work surface straight out, letting its rear edge rest on the center
support underneath.
3. Reinstall the work surface by resting the bottom on the center rail while pushing it back into the cabinet. Be sure to engage the tabs on the back
corners of the work surface with the slots on the rear wall of the work
area.
Front Grille Removal:
Note: The grille must be thoroughly decontaminated before removing it.
1. Remove the work surface as described earlier.
2. At one end of the grille, grip the front of grille with one hand, and the
back with the other hand. Pivot that end of the grille upward andinward, paralleling the angle of the sash, as shown in Figure 6-1.
3. Pull the other end of the sash up and away from the bottom edge of the
cabinet.

8/10/2019 Labconco Manual
http://slidepdf.com/reader/full/labconco-manual 49/68
Chapter 6: Maintaining The Cabinet
Product Service 1-800-522-765844
4. Reinstall the grille by reversing the above sequence, ensuring that the
grille properly engages the bottom edge of the cabinet.
Towel Catch Removal:
Although not normally required, the towel catch can be removed for cleaning,
inspection, etc.
Note: The work surface of the cabinet and the towel catch must be
thoroughly decontaminated before removing either.
1. Remove the work surface as described above.
2.
Lift the front end of the center support straight up to release it from thelocating pins (A). Set the support aside in the work area.
3. Remove the towel catch by pivoting the bottom out toward you (B).
4. Surface decontaminate the towel catch before removing it.
5. Reinstall the towel catch by sliding it back into position, ensuring that the
two slots on either end of the towel catch properly engage the rails on therear of the duct, as shown in Figure 6-2. Also ensure that the DOP
Sampling Line (the clear tube with a black cap) either passes through a
hole in the towel catch, or passes along the outside edge of the catchwithout being kinked.
Figure 6-1

8/10/2019 Labconco Manual
http://slidepdf.com/reader/full/labconco-manual 50/68
Chapter 6: Maintaining The Cabinet
Product Service 1-800-522-7658 45
Front Panel Removal and Installation:
1. Locate and remove the two Phillips
screws that secure the front panel asshown in Figure 6-3. They are
located on the bottom corners of the
front dress panel.
2.
Swing the bottom of the dress panel
out to clear the fluorescent light and
then lift the front dress panelstraight up and away from the
cabinet.
Figure 6-3
Figure 6-2

8/10/2019 Labconco Manual
http://slidepdf.com/reader/full/labconco-manual 51/68
Chapter 6: Maintaining The Cabinet
Product Service 1-800-522-765846
1. To reinstall the panel, reverse these
steps, ensuring that the plastic pinin the top corners of the dress panel
properly engage the corner posts.
Changing the Fluorescent Lamps:
1. Unplug the cabinet or turn off the System Reset Switch located on the top
of the cabinet.
2.
Remove the front dress panel as noted in Figure 6-3.
3. Remove the fluorescent lamps by pulling the lamp sockets straight off
each end of the lamp, and releasing both lamps from the spring clips thatsecure them in place.
4. Install the new lamps by reversing the removal procedure.
Changing the Optional UV Lamp:
Note: For optimum performance, the UV lamp should be changed on an
annual basis.
The UV lamp and the work area of the cabinet must be thoroughly
decontaminated before removing the lamp.
1. Start the cabinet and let it operate for 5 minutes.
2. Raise the sash to its full open position.
3. Thoroughly surface decontaminate the UV lamp and the work area of the
cabinet.
Figure 6-4

8/10/2019 Labconco Manual
http://slidepdf.com/reader/full/labconco-manual 52/68

8/10/2019 Labconco Manual
http://slidepdf.com/reader/full/labconco-manual 53/68
Product Service 1-800-522-765848
CChhaapptteer r 77:: TTr r oouubblleesshhoooottiinngg Refer to the following table if the Biosafety Cabinet fails to operate properly.
If the suggested corrective actions do not solve the problem, contact
Labconco for additional assistance.
PROBLEM CAUSE CORRECTIVE ACTIONCabinet blower and
lights won’t turn on
Unit not plugged into
outlet
Plug the Biosafety Cabinet into
appropriate electrical service.
Check connection to control box on top
of Cabinet.
System Reset Switch
is Off
Turn on the System Reset Switch.
Circuit breaker(s)
tripped
Reset circuit breakers.
Keypad disconnected
or defective
Run keypad diagnostics and check
connections.
Blower won’t turn on
but lights work
Sash closed Raise sash.
Blower wiring is
disconnected
Inspect blower wiring.
Blower motor is
defective
Replace blower motor.
Keypad disconnected
or defective
Run keypad diagnostics and check
connections.

8/10/2019 Labconco Manual
http://slidepdf.com/reader/full/labconco-manual 54/68
Chapter 7: Troubleshooting
Product Service 1-800-522-7658 49
PROBLEM CAUSE CORRECTIVE ACTIONFluorescent light not
working
Sash is closed Open sash – Fluorescent lights will not
work with the sash closed.
Lamp(s) are defective Replace defective lamp(s)
Lamp wiring is
disconnected
Inspect lamp wiring.
Defective lamp
ballasts
Replace lamp ballasts.
Keypad disconnected
or defective
Run keypad diagnostics and check
connections.
Fluorescent light is
dim or flickering
Lamp(s) are defective Replace defective lamp(s)
Lamp wiring is
disconnected
Inspect lamp wiring.
Defective lamp
ballast
Replace lamp ballast.
UV light not
working
Sash is open Close sash – UV light will not work
with the sash open.
Lamp is defective Replace defective lamp.
Lamp wiring isdisconnected
Inspect lamp wiring.
Defective lamp
ballast
Replace lamp ballast.
Keypad disconnected
or defective
Run keypad diagnostics and check
connections.
UV light is dim or
flickering
Lamp is defective or
is at end of operating
lifetime.
Replace defective or worn out lamp.
Lamp wiring is
disconnected
Inspect lamp wiring.
Defective lamp
ballast
Replace lamp ballast.

8/10/2019 Labconco Manual
http://slidepdf.com/reader/full/labconco-manual 55/68
Chapter 7: Troubleshooting
Product Service 1-800-522-765850
PROBLEM CAUSE CORRECTIVE ACTIONAirflow Alert goes
off and/or there is a
slight decrease in
filter life remaining
gauge
HEPA filter loading The gauge reading steadily decreases as
the Cabinet is used.
Blockage of the
return air slots or
grille
Check all return air slots and grilles to
ensure that they are not blocked or
restricted.
Blockage of the
exhaust outlet
Ensure that the exhaust outlet is not
blocked or restricted.
Blockage or
restriction under the
work surface
Ensure that the towel catch and plenum
beneath the work surface are
unobstructed.
Contamination ofwork in the cabinet
Improper techniqueor procedure for the
Biosafety Cabinet
See “Use of the Cabinet” section in themanual.
Restriction of the
return air slots or
grille – blockage of
the exhaust outlet
Ensure that all return air slots, grilles
and the exhaust outlet are unobstructed.
External factors are
disrupting the cabinet
airflow patterns or
acting as a source ofcontamination
See “Installation” section of this
manual.
Cabinet is out of
adjustment/HEPA
filter(s) are defective
Have cabinet recertified.

8/10/2019 Labconco Manual
http://slidepdf.com/reader/full/labconco-manual 56/68

8/10/2019 Labconco Manual
http://slidepdf.com/reader/full/labconco-manual 57/68

8/10/2019 Labconco Manual
http://slidepdf.com/reader/full/labconco-manual 58/68
Product Service 1-800-522-7658 53
AAppppeennddiixx BB::
DDiimmeennssiioonnss All dimensions in inches.
Width “A” “B” “C”3' 42.3 36.5 13.6
4' 54.3 48.5 19.9
5' 66.3 60.5 26.9
6' 78.3 72.5 32.9
B-1
*When equipped with Postfilter
*

8/10/2019 Labconco Manual
http://slidepdf.com/reader/full/labconco-manual 59/68
Product Service 1-800-522-765854
AAppppeennddiixx CC::
SSppeecciif f iiccaattiioonnss
Electrical Data
Cabinet Model Electrical Requirements
3430000 - 3430009 115 VAC – 60 Hz, 1 Phase – 12 Amps
3430800 - 3430809 115 VAC – 60 Hz, 1 Phase – 12 Amps
3440000 - 3440009 115 VAC – 60 Hz, 1 Phase – 12 Amps
3440800 - 3440809 115 VAC – 60 Hz, 1 Phase – 12 Amps
3450000 - 3450009 115 VAC – 60 Hz, 1 Phase – 16 Amps
3450800 - 3450809 115 VAC – 60 Hz, 1 Phase – 16 Amps3460000 - 3460009 115 VAC – 60 Hz, 1 Phase – 16 Amps
3460800 - 3460809 115 VAC – 60 Hz, 1 Phase – 16 Amps
Cabinet Model Electrical Requirements
3430020 to 3430829 230 VAC – 50/60 Hz, 1 Phase – 7 Amps
3440020 to 3440829 230 VAC – 50/60 Hz, 1 Phase – 7 Amps
3450020 to 3450829 230 VAC – 50/60 Hz, 1 Phase – 7 Amps
3460020 to 3460829 230 VAC – 50/60 Hz, 1 Phase – 8 Amps
Motor Specifications
Cabinet Model Electrical Requirements
All 3- and 4-foot
Cabinets, all Voltages
Electronically Commutated Motor (ECM)
120-277 VAC – 50/60 Hz,
7.7 Full Load Amps @115VAC4.3 Full Load Amps @230VAC
1/2 H.P. 1500 RPM maximum
Automatic Thermal Protection
Cabinet Model Electrical Requirements
All 5- and 6-foot
Cabinets, all Voltages
Electronically Commutated Motor
120-277 VAC – 50/60 Hz,9.6 Full Load Amps @115VAC
6.8 Full Load Amps @230VAC
3/4 H.P. 1500 RPM maximumAutomatic Thermal Protection

8/10/2019 Labconco Manual
http://slidepdf.com/reader/full/labconco-manual 60/68
Appendix C: Specifications
Product Service 1-800-522-7658 55
Environmental Conditions
• Indoor use only.
• Maximum altitude: 6562 feet (2000 meters).
•
Ambient temperature range: 41° to 104°F (5° to 40°C).
• Maximum relative humidity: 80% for temperatures up to 88°F(31°C), decreasing linearly to 50% relative humidity at 104°F (40°C).
• Main supply voltage fluctuations not to exceed ±10% of the nominal
voltage.
• Transient overvoltages according to Installation Categories II
(Overvoltage Categories per IEC 1010). Temporary voltage spikes onthe AC input line that may be as high as 1500V for 115V models and
2500V for 230V models are allowed.
• Used in an environment of Pollution degrees 2 (i.e., where normally
only non-conductive atmospheres are present). Occasionally,
however, a temporary conductivity caused by condensation must beexpected, in accordance with IEC 664.

8/10/2019 Labconco Manual
http://slidepdf.com/reader/full/labconco-manual 61/68
Product Service 1-800-522-765856
AAppppeennddiixx DD::
AAcccceessssoor r iieess Note: Accessories marked with an asterisk (*) require a qualified
certifier to install and/or calibrate before use.
Telescoping Base StandsThese stands are available with either fixed feet or caster wheels. The usersets the height of these stands before installation. The height can be set from
27.5 to 33.5 inches in 1-inch intervals, providing a cabinet work surface
height of 30.0 to 36.0 inches. The Base Stands for each Purifier Logic Series
model are listed below.
Width Logic Series # Base Stand w/Feet # Base Stand w/wheels #
3' 34300-xx, 34308-xx 3730300 3730310
4' 34400-xx, 34408-xx 3730400 3730410
5' 34500-xx, 34508-xx 3830500 3830510
6' 34600-xx, 34608-xx 3730600 3730610
Telescoping Base Stand Shelf Kit (# 3850100)
This 20 x 8-inch long shelf is specifically designed to hold the Aspirator
Pump or other small accessories, and attaches to the lower right side of the
base stand. The kit includes shelf, braces and self-drilling fasteners. NOTE:A power drill with a 5/16-inch socket is needed to attach the fasteners to
the base stand.
Manual or Electric Hydraulic Lift Base Stands
These base stands offer infinitely adjustable height between 25.5 and 33.5inches, giving a cabinet work surface height of 28.0 to 36.0 inches. The
height is adjusted either by a manual (hand crank) or electric pump that
drives hydraulic rams in the legs of the stands. All of the hydraulic stands areequipped with fixed feet, but can be converted to caster wheels with the
addition of Caster Kit #3784000. The Base Stands for each Purifier Logicseries model is listed below.
Width Logic Series # Manual Lift Stand #Electric (115V) Lift
Stand #
Electric (230V)
Lift Stand #
3' 34300-xx, 34308-xx 3780200 3780100 3780103
4' 34400-xx, 34408-xx 3780201 3780101 3780104
5' 34500-xx, 34508-xx 3780203 3780106 3780107
6' 34600-xx, 34608-xx 3780202 3780102 3780105

8/10/2019 Labconco Manual
http://slidepdf.com/reader/full/labconco-manual 62/68
Appendix D: Accessories
Product Service 1-800-522-7658 57
Hydraulic Base Stand Shelf Kit (# 3850200)
This 22 ¼ x 11 ¼-inch long shelf is specifically designed to hold the
Aspirator Pump or other small accessories, and attaches to the lower left sideof the base stand. The kit includes shelf and self-drilling fasteners. NOTE:
A power drill with a 5/16-inch socket is needed to attach the fasteners to
the base stand.
SoLo Electric Hydraulic Lift Base Stands
These base stands permit the Logic to be lowered enough to be transferredthrough a standard doorway as low as 78 inches. Casters provide mobility
and lock in place. The SoLo Stands for each Purifier Logic series model is
listed below.
Width Logic Series # 115V SoLo Stand # 230V SoLo Stand #
3' 34300-xx, 34308-xx 3780310 3780314
4' 34400-xx, 34408-xx 3780311 3780315
5' 34500-xx, 34508-xx 3780312 37803166' 34600-xx, 34608-xx 3780313 3780317
*Seismic Bracket Kit (# 3857000)Stainless steel brackets and attaching hardware to secure Telescoping Base
Stands in areas of seismic activity (does not include fasteners to attach to
floor).
*Service Valve Kit (# 3747500)Includes serrated hose tip ball valve with quarter turn handle, hardware and
instructions for plumbing to services mounts on left or right side interior. Allcabinets are factory prepared to accept up to 4 fixtures. Shipping weight 4
lbs. (2 kg).
Ultraviolet Lamp KitsIncludes a 254 nm UV lamp and ballast.
Catalog # For use with Shipping Weight
3858500 All 115 VAC models 5 lbs. (2.3 kg)3858501 All 100 VAC models 5 lbs. (2.3 kg)
3858502 All 230 VAC models 5 lbs. (2.3 kg)

8/10/2019 Labconco Manual
http://slidepdf.com/reader/full/labconco-manual 63/68
Appendix D: Accessories
Product Service 1-800-522-765858
IV Bar KitsBar supports intravenous solution bottles and bags. Kits include IV bar,
mounting hardware, and four hangers.
Catalog # For use with Shipping Weight
3858600 3-foot Purifier Logic Series 3 lbs. (1.4 kg)
3858601 4-foot Purifier Logic Series 4 lbs. ( 1.8 kg)
3858602 5-foot Purifier Logic Series 5 lbs. (2.3 kg)
3858603 6-foot Purifier Logic Series 6 lbs. (2.7 kg)
Shelf (# 3859000)The wire shelf measures 8 inches wide by 5 inches deep, with a weight
capacity of 2.2 lbs. (1 kg) and mounts to the rear grille. Shipping weight 5.0
lbs. (2.3 kg).
Cord/Tubing Management System (# 3859100)The kit includes three cord hooks and carabineers. The hooks mount to the
rear grille, and the carabineers secure power cords and/or tubing along therear wall of the work area. Shipping weight 5.0 lbs. (2.3 kg).
PrefilterThe prefilter is a sponge-type, adhesive-backed element that attaches to the
towel catch, to prevent objects from being drawn into the blower or onto the
HEPA filters.
Catalog # For use with Shipping Weight
3859200 All 3-foot Purifier Logic Series 1 lbs. (0.5 kg)
3859201 All 4-foot Purifier Logic Series 1 lbs. (0.5 kg)
3859202 All 5-foot Purifier Logic Series 1 lbs. (0.5 kg)
3859203 All 6-foot Purifier Logic Series 1 lbs. (0.5 kg)
PostfilterThe postfilter is a carbon-impregnated, cardboard-framed disposable filter.
These filters require either a factory-installed postfilter kit, or installation of aPostfilter Conversion Kit, shown below.
Catalog # For use with Shipping
Weight
3837201 All 4-foot Purifier Logic Series 5 lbs. (2.3 kg)
3837202 All 5-foot Purifier Logic Series 7 lbs. (3.2 kg)
3837203 All 6-foot Purifier Logic Series 10 lbs. (4.6 kg)
Not available for 3-foot models

8/10/2019 Labconco Manual
http://slidepdf.com/reader/full/labconco-manual 64/68
Appendix D: Accessories
Product Service 1-800-522-7658 59
*Postfilter Conversion KitThese kits allow the retrofitting of carbon postfilters in Logic cabinets that
originally did not have this option.
Catalog # For use with Shipping
Weight3859301 All 4-foot Purifier Logic Series 5 lbs. (2.3 kg)
3859302 All 5-foot Purifier Logic Series 5 lbs. (2.3 kg)
3859303 All 6-foot Purifier Logic Series 5 lbs. (2.3 kg)
*Canopy Connection KitContains the transition for thimble ducting the Biosafety Cabinet LogicSeries Cabinets to a 10-inch diameter stainless steel duct.
Catalog # For use with Duct Dia. Shipping Weight
3858700 3-foot Purifier Logic Series 10" 15 lbs. (7 kg)
3858701 4-foot Purifier Logic Series 10" 15 lbs. (7 kg)3858702 5-foot Purifier Logic Series 10" 15 lbs. (7 kg)
3858703 6-foot Purifier Logic Series 10" 15 lbs. (7 kg)
*Air-Tight Damper (# 3776800)The 10-inch diameter stainless steel damper mounts atop the Canopy
Connection Kit to adjust exhaust airflow. Shipping weight 13.0 lbs. (5.9 kg).
NOTE: This damper IS NOT prepared for the installation of the canopy
alarm sensor. If you want a canopy airflow sensor, order #3859700, listed
below.
*Air-Tight Damper with Canopy Alarm Sensor(# 3859700)This damper with integral canopy airflow sensor mounts atop the Canopy
Connection Kit to adjust exhaust airflow. Includes wiring harness to connect
with the Logic Control board. Shipping weight 13.0 lbs. (5.9 kg).
*Backdraft Damper (# 3858800)The backdraft damper mounts in a vertical run of duct to prevent the reverse
pressurization of the exhaust system. Sized for 10-inch diameter ductwork.
Shipping weight 5.0 lbs. (2.3 kg).

8/10/2019 Labconco Manual
http://slidepdf.com/reader/full/labconco-manual 65/68
Appendix D: Accessories
Product Service 1-800-522-765860
*Remote Blowers
Labconco offers a full line of epoxy-coated steel remote exhaust blowers for
use with its Biosafety Cabinets. Please contact Labconco’s Customer ServiceDepartment at 800-821-5525 for assistance with blower selection and sizing.
Ergonomic Chair with Armrests (# 3744000)Lab chair has 6-way articulating seat and back control for personalizedadjustment. Pneumatic mechanism adjusts seat height from 18 1/4" to 25
3/4". Five-leg black reinforced composite base rests on 2" ball bearing
casters. Aluminum support ring. Removable arm rests. Black vinylupholstery. Shipping weight 35 lbs. (15.9 kg).
Adjustable Footrest (# 3746000)
Elevates feet and permits angle repositioning while in use. 18 1/2"w x 111/2"d x 8"h. Shipping weight 6 lbs. (2.7 kg).
*Inflow/Downflow Sensor KitIncludes airflow sensor, hardware and wiring needed to display inflow and
downflow on the Information Center LCD.
Catalog # For use with Shipping Weight
3859400 3-foot Purifier Logic Series 3 lbs. (1.4 kg)
3859401 4-foot Purifier Logic Series 4 lbs. (1.8 kg)
3859402 5-foot Purifier Logic Series 5 lbs. (2.3 kg)
3859403 6-foot Purifier Logic Series 6 lbs. (2.7 kg)
Aspirator Pump Kit (# 3850300 or 3850301)Kit includes components required to outfit the cabinet with a system to safely
aspirate fluids. The pump has an integrated 2L glass jar with fill limiter thatseals to contain fluids. The chemically resistant diaphragm pump can be
switched with the foot pedal provided. 10-ft. of clear tubing, filter as well asa sealed grommet for the cabinet wall is in the kit.
• 3850300 Vacuum Aspiration Kit (Logic) 110V
• 3850301 Vacuum Aspiration Kit (Logic) 220V

8/10/2019 Labconco Manual
http://slidepdf.com/reader/full/labconco-manual 66/68
Appendix D: Accessories
Product Service 1-800-522-7658 61
Turntable (# 3852000)The 12-inch diameter Turntable is intended to be utilized in the rear corners
of the biosafety cabinet work area to provide quick access to supplies. Ball bearing hub and stainless steel upper and lower surfaces are autoclaveable.
*ULPA Supply Filters (# 3859500, 01, 02, 03)Rated at 99.999% efficiency with particles 0.12 microns.
*ULPA Exhaust Filters (# 3859600, 01, 02, 03)Rated at 99.999% efficiency with particles 0.12 microns.

8/10/2019 Labconco Manual
http://slidepdf.com/reader/full/labconco-manual 67/68
Product Service 1-800-522-765862
AAppppeennddiixx EE::
QQuuiicckk CChhaar r tt Model 34308 34300 34408 34400 34508 34500 34608 34600
Cabinet Size (in feet) 3 3 4 4 5 5 6 6
Sash Opening (inches) 8 10 8 10 8 10 8 10
Starting Serial #1 0705_ 0705_ 0705_ 0705_ 0705_ 0705_ 0705_ 0705_ Nominal Avg. Downflow (FPM) 55+/-5 55+/-5 55+/-5 55+/-5 55+/-5 55+/-5 55+/-5 55+/-5
Nominal Average Inflow (FPM) 105+/-5 105+/-5 105+/-5 105+/-5 105+/-5 105+/-5 105+/-5 105+/-5
Supply HEPA Data
Labconco P/N 3838400 3838400 3838401 3838401 3838402 3838402 3838403 3838403
Exhaust HEPA Data
Labconco P/N 3838500 3838500 3838501 3838501 3838502 3838502 3838503 3838503
Motor/Blower Data
Labconco P/N2 3832200 3832200 3832201 3832201 3832202 3832202 3832203 3832203 Motor HP 1/2 1/2 1/2 1/2 3/4 3/4 3/4 3/4
Blower Size (inches) 10 x 8 10 x 8 10 x 8 10 x 8 10 x 8 10 x 8 10 x 8 10 x 8
Fluorescent/UV Lamp DataFluorescent Lamps (2 each) F25T8
TL741F25T8TL741
F32T8TL741
F32T8TL741
F40T8SP41
F40T8SP41
F40T8SP41
F40T8SP41
Light intensity (ft-candles)3 90-100 90-100 90-100 90-100 90-100 90-100 90-100 90-100
UV Lamp G30T8 G30T8 G30T8 G30T8 G30T8 G30T8 G30T8 G30T8 UV energy(uW-cm2)4 240 240 240 240 240 240 240 240
Prefilter Data
Labconco P/N 3858900 3858900 3858901 3858901 3858902 3858902 3858903 3858903
Postfilter Data
Labconco P/N NA NA 3837201 3837201 3837202 3837202 3837203 3837203
1. The primary serial tag is on the lower outside edge of the right corner post.
The secondary serial tag is located on the front of the electronics module on
the top right side of the cabinet. The first two digits of the serial number are
the year of production, the next two are the month. The next 5 digits are thesequence of production, and the letter following the serial number is the
revision level of the cabinet.
2. Each motor must be programmed by Labconco for the appropriate width
cabinet.
3. As per ANSI/NSF Std. 49 with a background of 15 ft-candles.
4. Measured in the geometric center of the work surface.
5. If the optional Canopy Alarm is installed

8/10/2019 Labconco Manual
http://slidepdf.com/reader/full/labconco-manual 68/68
DECLARATION OF CONFORMITY
Application Council Directive(s): 73/23/EEC, 89/336/EEC, 2002/95/EC (ROHS),
2002/96/EC (WEEE), 2004/108/EC
Standard(s) to which conformity is declared: EN61010-1, EN55022, EN61000-3-2/3,
EN61326-1
Manufacturer’s Name: Labconco Corporation
Manufacturer’s Address: 8811 Prospect Avenue
Kansas City, MO 64132 USA
Importer’s Name: See Shipping/Customs Documents
Importer’s Address: See Shipping/Customs Documents for your equipment
Type of Equipment: Laboratory Equipment
Model No.: Purifier Logic Series Biological Safety Cabinets34308-2X 3' Wide, 8" Sash
34408-2X, -3X 4' Wide, 8" Sash34508-2X 5' Wide, 8" Sash34608-2X, -3X 6' Wide, 8" Sash
34410-2X 4' Wide, 8" Sash, Total Exhaust
34610-2X 6' Wide, 8" Sash, Total Exhaust
Serial No.: Various – See Individual Declaration
Year of Manufacture: 2007 and Subsequent
I, the undersigned, hereby declare that the equipment specified above conforms to the
above Directive(s) and Standard(s).
See individual Declaration of Conformity whichwill be signed by the importer for your country.
Place: _______________________________________(Signature)