Lab
19
School of Information Systems IS302: Lab Exercise Week 11 Version 3.2 March 2012
-
Upload
dalibor-zivic -
Category
Documents
-
view
3 -
download
0
description
d
Transcript of Lab

School of Information Systems
IS302: Lab Exercise
Week 11
Version 3.2
March 2012

SINGAPORE MANAGEMENT UNIVERSITYSCHOOL OF INFORMATION SYSTEMS
IS302 – INFORMATION SECURITY AND TRUST
LABORATORY SETUP ( 10 minutes)
For the following lab exercises, two virtual operating systems, IST Windows XP and IST Linux have been created. You will be using these 2 virtual machines to run the lab tools and applications. These 2 guest operating systems are running in a closed network (with different IP addresses) within the same physical machine.
Course: IS 302 Information Security and Trust Page 2
IST Windows XP IST Linux
Lab Physical Host Machine

Using the Virtual Operating System
1. When the virtual machines first starts up if you see the following prompt, select “I copied it”.
2. You will see the following when both virtual machines load successfully.
3. Select IST Lab Windows XP by clicking on “IST Lab Windows XP” button located at the bottom left hand corner of the screen. Similarly, select IST Lab Linux by clicking on “IST Lab Linux”.
4. To use the Virtual Machine, simply click within the image screen. To release control back to the host
machine, use Shift-Ctl-Alt.
Course: IS 302 Information Security and Trust Page 3

IS302 – INFORMATION SECURITY AND TRUST
LABORATORY EXERCISE AWINDOWS AND LINUX PASSWORD
1 OBJECTIVE AND LEARNING OUTCOMES
1.1 OBJECTIVE
The objective of this exercise is to learn about the importance of secure passwords in Windows and Linux.
1.2 LEARNING OUTCOMES
At the end of the laboratory session, students should be able to:
1. Run brute force attacks on Windows and Unix passwords2. Implement secure passwords for systems.
2 LABORATORY EXERCISE
2.1 Windows Password- Ophcrack (20 minutes)
1. Click on the IST Windows XP virtual machine to get focus and click “User” to log in.
2. Go to Start->Control Panel->User Accounts in the IST Windows XP Virtual machine.
Exercise 1: List the accounts in the IST Windows XP.
___________________________________________________________________________________
3. Open command prompt. Run the command ipconfig.
Exercise 2: What is the IP address of IST Windows XP?
___________________________________________________________________________________
Course: IS 302 Information Security and Trust Page 4

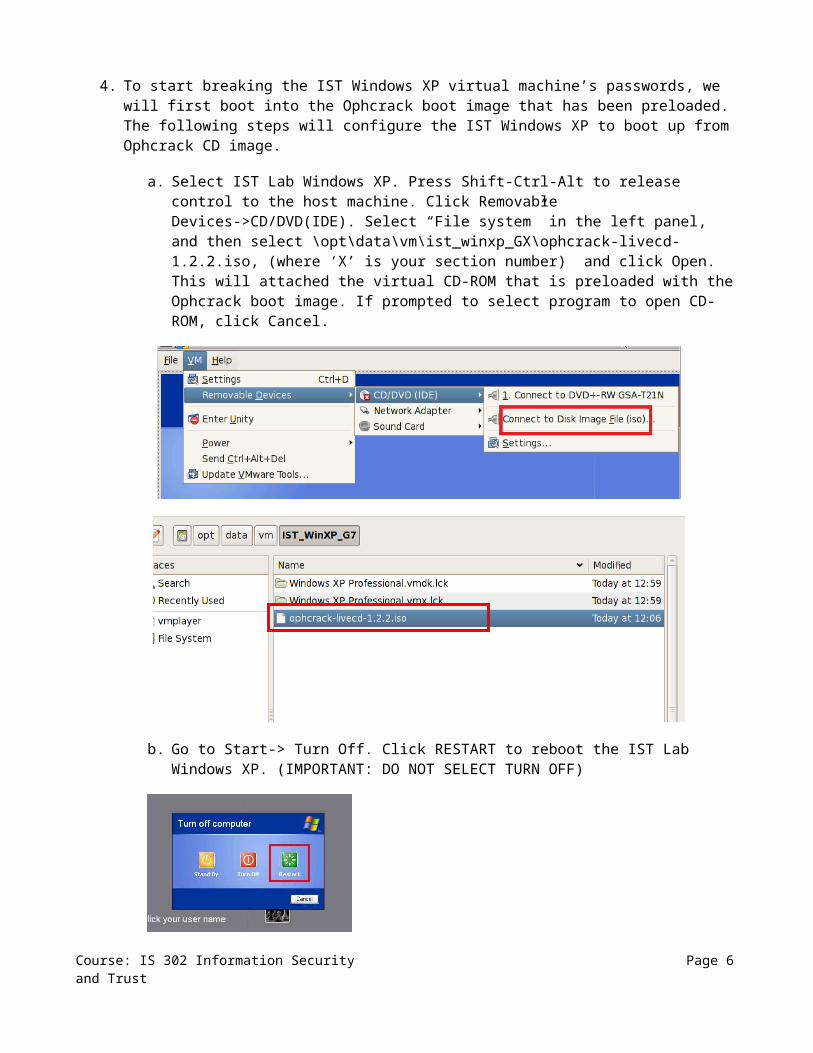
4. To start breaking the IST Windows XP virtual machine’s passwords, we will first boot into the Ophcrack boot image that has been preloaded. The following steps will configure the IST Windows XP to boot up from Ophcrack CD image.
a. Select IST Lab Windows XP. Press Shift-Ctrl-Alt to release control to the host machine. Click Removable Devices->CD/DVD(IDE). Select “File system” in the left panel, and then select \opt\data\vm\ist_winxp_GX\ophcrack-livecd-1.2.2.iso, (where ‘X’ is your section number) and click Open. This will attached the virtual CD-ROM that is preloaded with the Ophcrack boot image. If prompted to select program to open CD-ROM, click Cancel.
b. Go to Start-> Turn Off. Click RESTART to reboot the IST Lab Windows XP. (IMPORTANT: DO NOT SELECT TURN OFF)
5. When the IST Lab Windows XP restarts, the Ophcrack LiveCD image will be loaded. Select the first option by hitting enter.
Course: IS 302 Information Security and Trust Page 5
6. The Ophcrack image takes approximately 2-3 minutes to load. After the loading image, it will proceed to crack the Windows passwords.
Exercise 3: What is the NTPasswd for bob and Administrator?
_______________________________________________________________________________________
7. Once you get the password for bob and Administrator you can stop Ophcrack by clicking “Stop” and then “Exit” to end ophcrack.
8. In the terminal below, type Enter
9. The terminal will prompt for shutdown. Type “n” and Enter. (IMPORTANT: DO NOT TYPE “y”)
Course: IS 302 Information Security and Trust Page 6

10. Press Shift-Ctrl-Alt to return control to the host machine. Click VM-> Removable Devices-> CD/DVD(IDE) and click Disconnect to disable the virtual CD-ROM. If prompted to “Disconnect anyway (and override the lock)?” click “Yes”. This is to allow IST Lab Windows XP to reboot back to Windows XP.
11. Click on the IST Lab Windows XP and enter “reboot” and hit enter. IST Lab Windows XP will now reboot back to Windows XP.
Course: IS 302 Information Security and Trust Page 7

2.3 Linux Password-John the Ripper (20 minutes)
1. Click on the IST Lab Linux virtual machine to get focus and login with the following credentials.
Username: root, Password: passwd
2. In the IST Linux virtual machine, click on Computer, located at the lower left hand corner. Select Gnome Terminal.
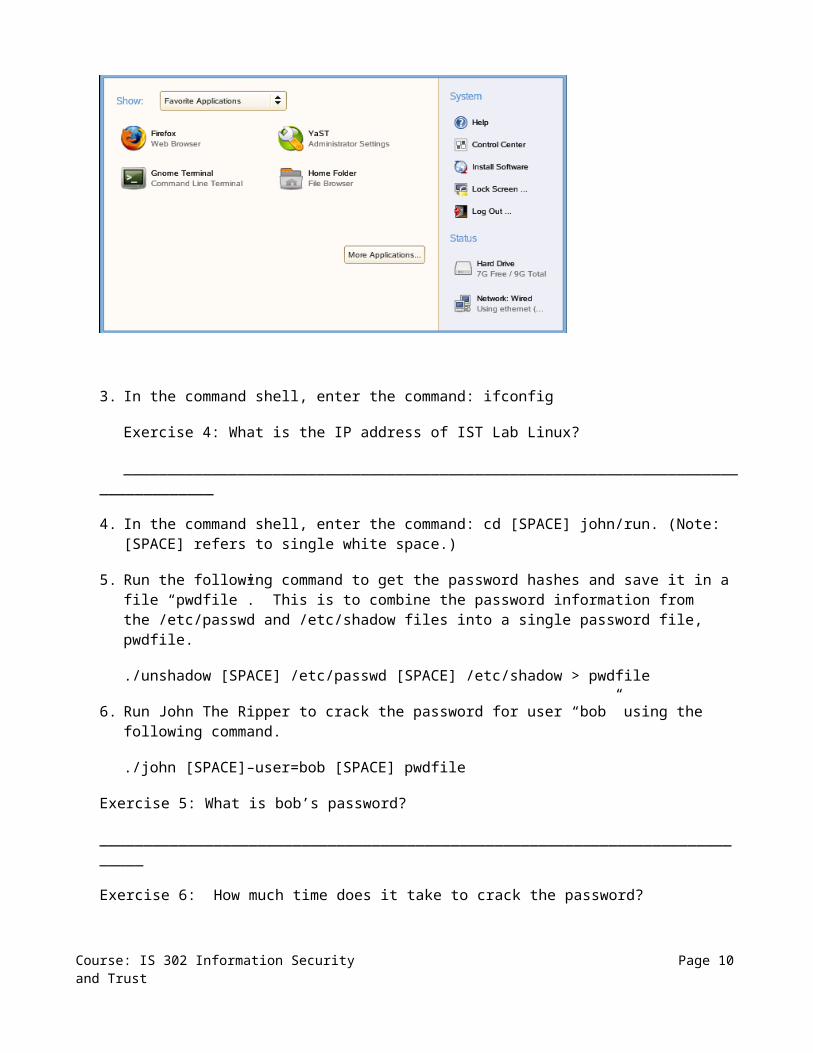
3. In the command shell, enter the command: ifconfig
Exercise 4: What is the IP address of IST Lab Linux?
___________________________________________________________________________________
4. In the command shell, enter the command: cd [SPACE] john/run. (Note: [SPACE] refers to single white space.)
5. Run the following command to get the password hashes and save it in a file “pwdfile”. This is to combine the password information from the /etc/passwd and /etc/shadow files into a single password file, pwdfile.
Course: IS 302 Information Security and Trust Page 8

./unshadow [SPACE] /etc/passwd [SPACE] /etc/shadow > pwdfile
6. Run John The Ripper to crack the password for user “bob” using the following command.
./john [SPACE]–user=bob [SPACE] pwdfile
Exercise 5: What is bob’s password?
_____________________________________________________________________________
Exercise 6: How much time does it take to crack the password?
_____________________________________________________________________________
Exercise 7: How would you change the password to make it less susceptible to brute-force dictionary attack?
_____________________________________________________________________________
2.4 Strong Password Settings
1. Configure a strong password for bob that you think will be resilient to dictionary attack. The following commands changes the password for user “bob”.
passwd [SPACE] bob
You will be prompted to enter your password twice to confirm the password change for user bob. If the password you entered is too simple, Linux will show a warning message. If you want to keep the password, you can ignore the message and proceed to enter your password again to confirm the change.
2. Run the following command to get the password hashes and save it in a file “pwdfile”.
./unshadow [SPACE] /etc/passwd [SPACE] /etc/shadow > pwdfile
3. Run John to ripper to crack the password for user “bob” using the following command.
./john [SPACE]–user=bob [SPACE] pwdfile
You can type Ctrl-C to stop the password cracking process.
Exercise 9: Is your password cracked successfully? If so, how long did it take?
_____________________________________________________________________________
-END OF LAB A-
Course: IS 302 Information Security and Trust Page 9
SINGAPORE MANAGEMENT UNIVERSITYSCHOOL OF INFORMATION SYSTEMS
IS302 – INFORMATION SECURITY AND TRUST
LABORATORY EXERCISE BFIREWALL AND INTRUSION DETECTION SYSTEMS
1 OBJECTIVE AND LEARNING OUTCOMES
1.1 OBJECTIVE
The objective of this exercise is to learn about the functions of firewall and intrusion detection system.
1.2 LEARNING OUTCOMES
At the end of the laboratory session, students should be able to:
3. Identify port scan attack trace in Snort IDS.4. Configure firewall using YAST Firewall Manager in Linux.
2 LABORATORY EXERCISE
2.2 Start Snort IDS on IST Linux (10 minutes)
1. Click on the IST Linux virtual machine to get focus and login with the following credentials if you are not already logged on.
Username: root, Password: passwd
12. In IST Linux virtual machine, click on Computer, located at the lower left hand corner. Select Gnome Terminal.
13. Start the Snort IDS with the following command:
Course: IS 302 Information Security and Trust Page 10

snort [SPACE] –c [SPACE] /etc/snort/snortlab.conf [SPACE] –A [SPACE] fast
Snort is now monitoring the packets sent and received by IST Linux. Do not close the terminal. In the next section we will launch a port scan from IST Windows XP and later examine the alert Snort captures.
2.3 Launch Port Scan from IST Windows XP (10 minutes)
Port scans are used by attackers to gather information about the services that are running on the targeted server. This information is important to attackers as it will determine the methods used to compromise the targeted server.
In the following steps, we will launch a port scan from IST Windows XP to find out the listening ports running on IST Linux.
1. Click on IST Windows XP virtual machine to get focus and click “User” to log in if you have not already logged in.
14. Click in the Nmap icon, . Nmap is an open source port scanning tool that is frequently used to scan for hosts and services in a network.
15. Enter the IST Lab Linux IP address, you noted in LAB A Exercise 4. Select “Regular Scan” in the Profile field. Click Scan to start scanning.
Exercise 2: List the ports and services that are opened on IST Linux.
Course: IS 302 Information Security and Trust Page 11
Replace this with the IP noted in LAB A Exercise 4

2.4 View Snort Alerts (10 minutes)
You have just launch a port scan in the previous section; we will now examine the alert log capture by Snort.
1. Click on the IST Linux image to get focus.
2. Stop the Snort IDS by typing “ctrl-C” on the terminal.
16. View the Snort alerts using a Linux text editor, Gedit with the following command.
gedit[space]/var/log/snort/alert
Exercise 3: What important information can you get about an attack from the alert log?
______________________________________________________________________________
Exercise 4: Discuss how Snort detects the port scan. [Hint: http://www.dslreports.com/faq/171]
_______________________________________________________________________________
Exercise 5: What do you suggest as a counter-measure to port scan attacks?
2.5 Enable Firewall (15 minutes)
In this section, we will enable the firewall on IST Linux as a counter-measure to the port scan attacks. By default, when the firewall is enabled all ports will be blocked. Any incoming traffic will be dropped by the firewall.
1. Open the YaST Firewall Manager as follows
a. Click on Computer, located at the lower left hand corner.
b. Click on YaST
c. Click on Security and Users
d. Double click on Firewall.
Course: IS 302 Information Security and Trust Page 12

17. Enable the firewall
18. Click on Start Firewall Now and then click Next.
Course: IS 302 Information Security and Trust Page 13

19. Click Accept. The firewall is now enabled and will block all incoming traffic to IST Linux.
20. We shall now verify that the firewall is indeed enabled and dropping all incoming traffic by running the port scan from IST Windows XP again. Click on IST Windows XP virtual machine to get focus and start NMap to run a regular port scan on IST Linux again.
Exercise 6: List the ports and services that are opened on IST Linux.
____________________________________________________________________________________
Exercise 7: Has the number of open ports been reduced? Why?
2.5 Configure Firewall to Allow Authorized Traffic (15 minutes)
The IST Linux virtual machine is running as a web server. Hence, it will need to allow users access to the port 80 (HTTP). In the following section, we will configure the firewall to allow HTTP access on the IST Linux server.
1. Let us first verify that port 80 on the IST Linux virtual machine is not accessible from IST Windows XP. Click on the IST Windows XP virtual machine to get focus. In the IST Windows XP, got to Start->Internet Explorer to open the Internet Explorer browser. Go to the IST Linux webpage. (Refer to LAB A Exercise 4 for the IST Linux IP address.) E.g. http://172.16.92.145
21. Click on the IST Linux virtual machine to get focus. In IST Linux, open the YaST Firewall Manager.
22. Click on “Allowed Services” located at the left hand frame
23. Under Service to Allow, select HTTP Server and click Add.
Course: IS 302 Information Security and Trust Page 14

24. Click Next and Accept to finish the configuration. HTTP port 80 is now configured as an allowed service on the firewall. The firewall will now drop all incoming traffic except for port 80 traffic.
Exercise 8: Can you access the IST Linux webpage from IST WinXP after configuring the firewall?
3. Discussion (Optional)
1. Design a secure white list firewall policy for a server (10.10.9.1) with the following requirements:
Allow potential external clients to access the website hosted on port 80 of the server which provides product and company information.
Allow the administrator to remotely manage the server from the IP address 10.10.10.1 using SSH (port 22).
Based on the information above, complete the IP filter table shown below.
Source IP Source Port Destination IP Destination Port Allow/DenyAny Any Allow
Any AllowAny Any Any Any Deny
2. The company plans to implement an Intrusion Detection System. The network diagram below depicts the current network design of the company. Base on the diagram below; discuss where the intrusion detection system should be deployed.
-END LAB B-
Course: IS 302 Information Security and Trust Page 15