
Lab Manual 2008
50
FOS 4222 FOOD MICROBIOLOGY LABORATORY MANNUAL SPRING SEMESTER, 2008 M-W 1:00-3:50 Dr. ANITA WRIGHT Room 214 Aquatic Food Products Building Phone: 392-1991, Ext. 311 Lab Ext. 312 Email: [email protected] Website: http://fshn.ifas.ufl.edu/faculty/ACWright/FOS4222.html Teaching Assistants: Dr. Venata Vedum-Mai and Melissa Jones F F O O O O D D
-
Upload
atul-sharma -
Category
Documents
-
view
71 -
download
1
description
basic lab techniques
Transcript of Lab Manual 2008

FOS 4222 FOOD MICROBIOLOGY
LABORATORY MANNUAL
SPRING SEMESTER, 2008
M-W 1:00-3:50
Dr. ANITA WRIGHT Room 214 Aquatic Food Products Building
Phone: 392-1991, Ext. 311 Lab Ext. 312
Email: [email protected]
Website: http://fshn.ifas.ufl.edu/faculty/ACWright/FOS4222.html
Teaching Assistants: Dr. Venata Vedum-Mai and Melissa Jones
FFOOOODD

2
TABLE OF CONTENTS
LAB EXERCISES PAGE
Section 1:
LAB EXERCISE 1: INTRODUCTION 3
LAB EXERCISE 2: MEDIA 6
LAB EXERCISE 3: MICROSCOPY 11
LAB EXERCISE 4: ENUMERATION 17
LAB EXERCISE 5: MPN 21
LAB EXERCISE 6: E. COLI 24
LAB EXERCISE 7: FUNGI 27
LAB EXERCISE 8: SALMONELLA 29
Section 2:
LAB EXERCISE 9: IMMUNOASSAYS 34
LAB EXERCISE 10: DNA PROBE 38
LAB EXERCISE 11: PCR 41
LAB EXERCISE 12: MOLECULAR TYPING 46

3
LAB EXERCISE 1: INTRODUCTION TO THE LABORATORY
OVERVIEW: These lab exercises in this mannual are designed to supplement your course work
and will chronologically follow (for the most part) the sections you are studying in class. They
should provide practical “hands on experience” with standard microbiology, as well as recently
developed rapid methods and molecular techniques. Basic principles of experimental controls,
data presentation, and interpretation will be explored.
Two very important issues in microbial science are safety and data handling. We will be working
with appropriate precautions and equipment for pathogens, but remember ALL bacteria are
potential pathogens for some people or at some doses. If you are not sure about a procedure:
ALWAYS ASK!
Lab Safety Rules:
1. Absolutely no food or drink
2. No mouth pipetting
3. Always wear gloves and lab coat
4. Report any spills/contamination
5. Disinfect area before and after
6. Dispose of gloves and all contaminated materials in biohazard
7. Breakable or sharp or sharp objects are disposed to sharps container
8. WASH HANDS BEFORE LEAVING!
Failure to respect safety rules will result in expulsion from lab.
Lab Safety Assignment:
1. Fill out Safety form
2. Locate fire extinguisher
Grading:
Lab notebook with answers to study questions provided for each lab (20%)
Lab report (20%)
Quizzes on current lab (10%) Note: You are required to read lab assignments before class.
Two Exams (25% each = 50% total)
Be Prepared! Lab quiz will be given prior to each lab based on the material that will be
covered that day.

4
Lab notebook: Laboratory data are the backbone of science, and your records should be
accurate and precise. Scientific papers are generally composed of a number of experiments.
Your notes should be sufficient such that you can later examine them and comprehend what,
why and how you did something. Data should be recorded such that you (or anyone else) will
be able to repeat the experiment from the description in your notebook. Some laboratory
work, especially where data may be patentable or subject to government regulation, will
require bound notebooks to be dated, signed and witnessed daily. All pages must be written
in ink on sequentially numbered pages, and copies made on a regular basis. In practice, raw
data is generally recorded outside of the notebook and then entered later (but not too much
later). Pictures, tables, and other tabulations are permanently attached and are not removed
from the notebook. Multiple notebooks are used when working on independent projects. The
following elements should be present the recording of all experiments:
1. Date and Title of experiment.
2. Statement of purpose: Brief description of rational for experiment
3. Methods: Detailed step by step outline of experiment to include all variables and
controls. Include anything that might be relevant: source of reagents, strains,
temperatures, phase of the moon, etc. The object of this section is to provide a history of
what you have done so that you or anybody else should be able to read and follow the
protocol and reproduce the data. This section should be written before beginning any
experiment. If you are following the protocol from the lab manual, you can cut and paste
this from the lab manual. If there are deviations to the protocol that occur, such as a tube
that was omitted or the wrong incubation temp., etc., record those in your results. Once a
standard protocol has been established it can be referred to by a reference name or
number
4. Results: Record everything! Including negative data, screw ups, changes in protocol,
contamination. You do not know what might become important later. For example if you
are doing plate counts, include the actual number of colonies at each dilution. Making
tables ahead of time in your notebook is useful so you do not forget to record anything.
5. Data analysis: This section should be well-labeled so that it is easy to comprehend. For
example, if you have been using a code for your strains (#1-10), your table or chart
should be converted back to the strain names so it does not have to be deciphered every
time you go back to it. Publishable data requires statistics, minimally mean, Standard
deviation, p values.
6. Discuss you interpretation of results. This section should record any thoughts you have
about the meaning of the data. Discuss how the data compares to expected results based
on prior data or your own or in the literature. Are comparisons of strains statistically
valid. Include implications for future experiments.
7. Provide answers to study question in your notebook.

5
Lab report: Lab report will cover the last two laboratory sections on PCR and molecular tying.
A 4-6 page (double space) lab report will discuss the methods and results of these experiments.
Send in word format to Maria ([email protected]).
1. Statement of Purpose (1-2 pages): brief description of the purpose of the experiment.
Should include some background on the topic and a rationale for the particular
variables you are investigating. State hypothesis if possible. Direct quotes use
quotation marks and any outside supporting material must be referenced (use ASM
format).
2. Methods Description (1 page): Describe protocol in your own words so that someone
else could do the experiment. Divide in to sections such as the following: Bacteria,
culture conditions, biofilm assay. Include reagents and manufacturer if known.
3. Results (1-2 pages): Describe results in writing without interpreting but do not draw
any conclusions. Prepare tables or graphs to incorporate raw data and analysis as
needed.
4. Discussion. Conclusions (1 page): Discuss what the results and draw conclusions. Did
you prove your hypothesis? Why or why not? How do your results compare to other
data in the literature? What future experiments would you recommend?
5. References: Two required

6
LAB EXERCISE 2: MEDIA
Isolation and cultivation of specific microorganisms is essential to the study of microbiology. In
the environmental food, bacteria exist in complex communities that are extremely diverse and
are rapidly altered with changing conditions. Robert Koch is credited with the concept of a “pure
culture”, which allowed microbiologists to characterize a particular organism independently of
related flora. This development was essential to the study of infectious disease and to
establishing “Koch’s Postulates. His first observation of bacterial colonies on solid medium was
on a potato. Later agar was incorporated into broth medium to provide solid support and the
addition of a variety of components into the medium. The method for inoculation of bacteria
varies with the target organism and the matrix from which the organism is isolated. Several
methods are listed below:
Agar Inoculation:
1. Spread plating: Liquid sample (usually 100 µl) on agar plate is spread evenly across
the surface using a sterile hockey stick.
2. Pour plating: Liquid sample (usually 1 ml) is pipetted into an empty sterile petri dish,
and liquid agar (at 50°C) is pored into dish and swirled to distribute the sample evenly
throughout the agar.
3. Streak plating: Method for isolation of individual colonies. Using sterile loop (flamed)
streaking sample across one edge of the plate two or three times. Re-flame and make
another two or three parallel streaks by drawing the loop across the initial streaks once
at a right angle. Flame the loop and repeat as before, this time pulling the loop through
the second set of streaks.
4. Stabbing: Inoculate by stabbing strait down the center of the media in slant tube.
Ensure that the stab is as straight as possible to help prevent misinterpretation of
bacteria spreading
Selective/differential media were developed to provide the ability to differentiate among
different genera or even species of bacteria. These agars are generally used for “presumptive”
identification and require further confirmatory assays for positive identification. The use of these
media requires application of appropriate microbial controls to ensure proper media reaction.
Both a positive control and a negative are required. Most bacterial culture media resemble the
natural substrate on which the microorganisms usually grow. The content of a particular medium
will depend upon then nutrient requirements of the microorganisms of interest. There are several
different forms of media, which include liquid or broth medium and solid or semisolid agars.
Broth medium contains nutrients dissolved in water and is used often as enrichment for more
robust growth of bacteria. Solid medium contains nutrients in water and a solidifying agent. The
most common solidifying agent is agar, which is a complex polysaccharide composed of
galactose and galacturonic acid. It is found in many marine plants and is extracted commercially
from certain marine algae. Agar is resistant to enzymatic hydrolysis by most microorganisms;
however, a few species, mainly in the marine environment, do hydrolyze agar. Silica gel (from
inorganic chemical silicic acid) can be used in place of agar as a solidifying agent and is also
used when microorganisms need to be cultivated on media that are inorganic matter free.
Bacteria generally grow in colonies on solid media, but slant tubes can be inoculated by stabbing
7
bacteria into the agar in order to observe chemical reactions, such as for the production of acid or
H2S. Semisolid media have a lower concentration of solidifying agent, which results in a more
jellylike consistency, and is used for motility or gelatin-hydrolysis testing of bacteria. The
nutritional requirements of bacteria vary widely. For example, autotrophs may require only
simple inorganic substrates while more fastidious bacteria (including most human pathogens)
require complex vitamins and growth factors just to survive and multiply. Necessary nutrients to
support bacterial growth always include the following: a) Water, b) Nitrogen (inorganic salts,
peptides, proteins, amino acids); c) Energy or carbon source (carbohydrates, peptides, proteins,
amino acids) ; d) Accessory growth factors (i.e., blood for pathogens, milk for milk
microorganisms).
Food microbiologist use media to detect and differentiate microorganisms from the food we
consume. The types of media are as varied as the organisms that they target. General categories
of media include the following:
1. Non-Selective Media. Multipurpose media that incorporate a wide variety of nutrients and
growth factors for general cultivation of most bacteria.
2. Enrichment Media. Microorganisms to be analyzed are often outnumbered or out-
competed by other microbes (especially in food, water, and soil). Enrichment media
increase the number of target microorganisms while suppressing the growth of competing
microflora.
3. Elective Media. Satisfy the minimum nutritional requirements and are particularly useful
if the microorganism has unusual nutritional requirements. “Wild” yeast cells can be
isolated by using lysine agar on which other microorganisms can not grow unless they
utilize lysine as their sole source of nutrition.
4. Selective Media. Generally support the growth of several species, but also include
inhibitory agents which restrict the growth of undesired microorganisms.
5. Differential Media. Contains reagents (usually dyes) that react with pH changes or other
metabolic consequences of growth to produce reactions that are indicative of particular
species. Colonies will have species-specific characteristics which are easily recognized. For
example, haemolytic and non-haemolytic microorganisms can be easily distinguished by
examining for zones of lysis formed on blood agar plates. Unfortunately these reactions are
not always 100% reliable and generally further tests are required for identification.
Note: Media for food microbiology are commonly both selective and differential.
Some media can be purchased already prepared, but proper preparation of most media is an
essential skill in the food laboratory. The following criteria apply to all reagents and media used
in microbial analysis:
Preparation criteria:
1. Reagents and chemicals must be of suitable grade and composition.
2. Purchase smaller 500g quantities to ensure minimal exposure to atmosphere.
3. Store media in a clean, dry, cool place away from sun (no longer than two years).
4. List dates of receipt and first opened on each container.
5. Solutions should be prepared using laboratory pure (distilled or deionized) water.
6. Use borosilicate glassware or other non-reactive vessels.
7. Weigh media to the nearest 0.1 gram.
8. Stir continuously with heat to prevent scorching and provide an even mixture.
9. Check pH before and after sterilization.

8
10. Clearly label all media preparations accordingly before sterilization.
Sterilization criteria:
1. Media with sugars should be filtered or autoclaved for < 10 minutes.
2. Total heat exposure should not exceed 45 minutes for any medium.
3. Adequately space items for proper sterilization to take place.
4. Indicator strips are run with each autoclave operation to ensure proper sterilization.
5. Media should be removed immediately.
6. Sterilize rehydrated media within 2 hours (30 minutes optimal) of preparation.
7. Media is never re-autoclaved.
8. Maintained sterilization records (batch number, date, etc).
9. Cool in water bath between 46-50oC for not more than 4 hours.
10. Discard Durham fermentation tubes with any air bubbles.
Storage of Reagents and Media:
1. Store prepared media in clean, dry areas without light exposure.
2. Store media containing sugars at room temperature for not more than 7 days.
3. Store prepared media under refrigeration (generally not to exceed 4 weeks).
4. Refrigerated media brought to room temperature 4 hours prior to use.
5. Tubes with water loss should be discarded.
Media should be checked for contamination prior to use.
Cultures can fail to grow or produce unexpected or invalid results when reagents are prepared
incorrectly. Common errors include following:
1. Incorrect weighing of reagents or measuring of water volume.
2. Deterioration of media because of exposure to heat, moisture, or oxidation.
3. Water impurities such as heavy metals, pesticides or chlorine.
4. Contamination of glassware with detergents or chemicals.
5. Incomplete mixing.
6. Overheating of some media can produce caramelization of sugars or breakdown of
indicator dyes.
7. Improper pH determination leading to non-ideal growth conditions.
Media are often sterilized by autoclaving. An autoclave is a chamber in which steam sterilization
is used to add heat, humidity, and pressure to the chamber. By increasing the pressure within the
chamber the boiling point of liquids is increased and sterilization time is decreased. Autoclave
sterilization requires 121ºC and 15 psi for 15 to 60 min. Media are autoclaved in a container that
will accommodate at least twice the volume to be prepared in order to prevent boiling over.
Procedure:
Day 1: Media Pouring Contest and Autoclave Field Trip.
Media preparation:
1. Measure 5 grams ± 0.1 grams tryptone, 2.5 grams ± 0.1 grams yeast extract, and 5 grams
± 0.1 grams NaCl, using the weigh boats and scales provided in the back room. Carefully
poor it into 1 liter media bottle or flask.
2. Add 500 ml of distilled water.

9
3. Tilt the bottle at a 45º angle and drop a stir bar into it.
4. Place the bottle onto the center of the hotplate and allow it to stir sat a slow speed (do not
use the heat) until reagents are in solution.
5. Add 7.5 grams of agar.
6. Briefly stir the mixture and bring to autoclave. Agar will go into solution during
autoclaving. (Some media require heating until agar is dissolved before autoclaving.)
Plate pouring:
1. After autoclaving media is generally cooled to 45°-50°C to prevent condensation of
plates. We will use pre-autoclaved and pre-cooled media that will be provided in the
waterbath.
2. Separate plates into stacks of four (save the plastic sleeves for storage).
3. Pore the warm media (about 50°C) into the plate until the bottom is completely covered.
Pouring media that is too hot will produce excess condensation and water on the plates.
4. Stack up to 20 plates on top of each other and allow to solidify. This helps to prevent
condensation from building up on the lids.
5. Once solid, invert plates so that the agar is on the top and allow to sit overnight. Sitting
overnight allows some of the excess water to evaporate.
6. The next morning place the plates back into the plastic selves, tape shut and label with
the date and name of the media.
7. Incubate 10 uninoculated plates at room temperature to check for sterility at 24 and 48
hours.
8. Refrigerate to store.
Days 1-3: Isolation and selective media.
Materials:
A. L. agar-
This is a non-selective agar that will support growth of most aerobic heterotrophic
bacteria and will serve as a positive control for the viability of the organisms assayed.
B. TCBS agar –
Thiosulfate-citrate-bile salts-sucrose agar is a combination selective and differential
media. Bile salts provide the selective reagent by preventing the growth of most gram
positive strains of bacteria. The fermentation of sucrose by Vibrio cholerae produces
yellow colonies due to a change in pH, while most other Vibrios produce green
colonies since they do not ferment sucrose.
C. EMB agar –
Eosin-methylene blue agar (Levine): Lactose utilization and eosin and methylene
blue dyes permit differentiation among enteric lactose fermentors and nonfermentors
as well as the identification of Escherichia coli. E. coli colonies are blue-black with a
metallic green sheen caused by the large quantity of acid that is produced and the
precipitates of dyes onto the growth’s surface.
D. TSI/LIA agar slants –
Triple sugar-iron (TSI) is designed to differentiate among the different groups of
Enterbacteriaceae, which are capable of fermenting glucose with the production of
acid. TSI slants contain lactose, sucrose, glucose and the acid base indicator phenol
red. Phenol red indicates the production of acid by a change in color of the medium

10
from orange-red to yellow. Typical salmonella will have a red top with a yellow butt.
In most cases H2S is produced which will appear as a black precipitate.
Lysine iron agar- Salmonellae will produce an alkaline reaction from the
decarboxylation of lysine to cadaverine. LIA contains brom thymol blue, which turns
yellow with the production of acid. Typical salmonella will have a purple top with a
yellow butt. In most cases, there is also production of H2S, which will appear as a
black precipitate.
E. Motility Agar. Motility can be observed with the microscope, but observations can be
difficult because there is very little contrast between the bacterial cell and its
environment in live, unstained cells. The MOT Agar Motility Test determines
motility when culture growth radiates out from the line of inoculation in semi-solid
medium. Non-motile organisms will grow only on the inoculation line. It is
important to insert and remove the needle in a single, straight line.
1. Streak each of the control strains and unknown bacteria to the different media listed
above and incubate at the 35°C. Label all plates on the bottom and include date, your
initials, organism, and type of media. Record the observed reactions for each species at
24 and 48h. 2. Using the same organisms from above, transfer the bacteria via sterile flamed needle by
inoculating the MOT agar with a single straight line into the tube and incubate at room
temperature. Observe the tubes at 24 and 48 hours. Check the tube for growth (motility)
that radiates out from the inoculation line.
STUDY QUESTIONS:
1. Why is it necessary to avoid condensation on solid medium?
2. What are the advantages of spread plating? Stabbing?
3. What are sources of contamination of microbial media?
4. Why are bile salts used in selective media?
5. What would be the expected results for these strains for media incubated at
room temp? at 4º C?

11
LAB EXERCISE 3: THE MICROSCOPE AND STAINING TECHNIQUES
Compound microscope: The compound microscope (Figure 1) consists of two separate lens
systems and is the most widely used in the field of microbiology. The first lens system in the
compound microscope, called the objective, is nearest to the specimen being viewed. The
objective magnifies the
specimen and produces a
real image within the
body tube. The objective
lens system is comprised
of both convex and
concave lenses, which
correct various chromatic
and spherical aberrations
inherent to a simple
convex lens. Typically
there are at least three
objectives: the low-
power objective (16mm),
the high-dry objective
(4mm), and the oil-
immersion objective
(1.8mm). Focal length
of the objective is
determined by the distance (mm) used to produce the real image. The shorter the focal length of
the objective, the shorter will be the working distance between the objective and specimen. The
ocular lens consists of the eyepiece that you look through. The ocular magnifies the real image
in the body tube to produce a virtual image that is seen by the eye while viewing the specimen.
The total magnification can be calculated by multiplying the magnification of the objective by
the magnification of the ocular. The objective magnification is usually found engraved on the
side of the objective mount and the ocular magnification is usually found on the eyepiece.
Resolving power is the ability to show two closely adjacent points as both distinct and separate.
Resolving power is a function of both the wavelength of the light used to view the specimen and
the numerical aperture of the lens system. Therefore, the shorter the wavelength of light, the
smaller will be the structure that is clearly visible. However, decreasing wavelength to increase
resolution is limited due to the narrow spectrum of visible light (400 to 750nm). The greatest
increase in resolution can be achieved by increasing the numerical aperture, which is defined
as the function of the effective diameter of the objective in relation to its focal length and the
refractive index of the space between specimen and the objective. To decrease the refraction
between the slide and objective, immersion oil is used because it has roughly the same refractive
index as the glass slide. This decrease in refraction increases the light rays entering the objective
and results in a greater resolution and clearer image.
Fluorescence microscope: Fluorescence microscopy requires a special type of powerful
illumination source, usually a mercury lamp. The light from the lamp passes through special
colored filters, which only allow light with distinct wavelengths to pass. This narrow band of
light hits the bacterial specimen. Certain compounds in the specimen (either natural compounds
Figure 1. A. Compound Microscope

12
or fluorescent stains) capture
the light and reflect it back up
as light with a lower energy. This
reflected light is detected either
with the viewer's eye, or with
sensitive detectors. Because this
type of microscopy uses reflected
light on a dark background, very
small amounts of light (and of your
sample) can be seen. Fluorescent
compounds include natural
compounds such as chlorophyll, as
well as certain DNA-binding dyes
such as ethidium bromide and
DAPI. Sometimes fluorescent stains
are attached to the constant region
of antibodies, to generate very
specific, very sensitive bacterial
tags.
STAINING TECHNIQUES
Bacteria are almost colorless and require staining to increase the contrast in their color with their
surroundings. Stains generally react with the cell wall, not the background. Three advantages to
staining include: 1) Providing contrast between the bacteria and the background to determine cell
morphology; 2) Permitting the study of internal structures, such as the cell wall, vacuoles, or
nuclear bodies; and 3) Allowing higher magnification as a result of the increased contrast.
Simple stain. The Simple Stain is the easiest method, but lacks the power of discrimination seen
with Gram and other stains. Simple staining is routinely used to determine size, shape, and
arrangement of bacterial cells, as well as for direct microscopic cell counts. Typical dyes are
crystal violet, safranin, carbol fuchsin, and methylene blue. These dyes are generally salts that
include a colored ion or chromophore. For example, methylene blue is actually methylene blue
chloride, and the color is derived from the positively charged (cationic) methylene blue ion. The
interior of a bacterial cell has a slight negative charge in medium at neutral pH combines with
the positively charged methylene blue ion. Basic dyes have a positively charged color-bearing
ion, while an acidic dye will be negatively charged.
Gram stain: Hans Christian Joachim Gram, a Danish physician invented the Gram Stain method
in 1884. The Gram Stain is a differential stain that permits the division of bacterial species into
two distinct groups: gram positive and gram negative. The two cell groups differ in permeability
of the cell surface layers, and in cell wall composition. Gram positive cell walls have much more
extensive peptidoglycan layers than do gram negative organisms, while gram positives lack the
double membrane seen with gram negatives. Both gram-positive and gram-negative bacteria take
up crystal violet and iodine, but the crystal violet-iodine complex is trapped inside the gram-
positive cell by the dehydration and reduced porosity of the thick peptidoglycan layer. Cell walls
Figure 2. Fluorescence Microscope

13
of gram-negative bacteria contain more lipids than gram-positive cell walls, and are more soluble
in alcohol and acetone. It is theorized that these lipids are removed from the cell walls during the
decolorizing step or that due to their higher lipid content, the gram-negative cells may contain
fewer acidic reactive sites for binding with the basic dye.
Four different solutions are used in a Gram stain:
1. The basic dye (crystal violet) stains
bacterial cells with a purple blue color.
2. The mordant (Iodine) increases the affinity
between the bacterial cell and the dye.
Acids, bases, and metallic salts are examples
of a mordant. A mordant complex is
required to prevent certain cells from losing
the stain during the decolorization step.
3. The decolorizing agent (95% ethanol)
removes the dye from some of the stained
cell. Cells with thick peptidoglycan layers
will resist destaining and remain blue.
4. The counterstain (safranin) is another basic
dye but of a different color from the initial
stain and is used to stain the decolorized
cells. The counterstained cells will appear
red or pink.
Stained cells that retain the basic dye following decolorization are termed gram-positive, while
those that are decolorized are termed gram-negative.
Spore stain: Species of the genera Bacillus and Clostridium produce a highly resistant body
called an endospore (a cell with a tough spore coat). The endospore provides the bacteria with
the capability to survive long periods of time in high temperatures or toxic chemicals.
Endospores are also resistant to standard staining techniques, and heat must be applied along
with a suitable stain in order to stain the endospore. Malachite green dye used in conjunction
with steam is a common spore stain and is not removed from the endospore by washing. Safranin
counterstain stain is then applied to stain the cell interior light red and contrast with spore coat
green stain. The spore stain can also be used to visualize fungal endospores from molds and
yeast, which are a diverse group of heterotrophic organisms comprising the higher fungi. Many
are saprophytes and digest dead organic matter and waste, while others are parasitic and obtain
their nutrients from the tissues of the other organisms. Most fungi, such as the molds, are
multicellular, but yeasts are unicellular.
Fluorescent staining: Chromofluors are chemicals that adsorb light at one wavelength to
produce excited electrons, that emit light at another wavelength = fluorescence. To visualize
these stains a fluorescent microscope is required, which will illuminate with ultraviolet light to
produce the excitation wavelength required for the chromofluor emission. Filters are used to
isolate emitted light at a particular wavelength and separate it from other wavelengths traveling
to the ocular lens. A dark field condenser is used to create dark background. Chromofluors can

14
be used to directly stain molecules within the cells, such as DNA or RNA, or they may be
coupled to other probe molecules (usually antibodies) that bind specific components of the cell.
DAY 1: GRAM AND SPORE STAIN. In this laboratory we will examine three bacterial
species using differential staining procedures which will include the Gram and spore stains. A
demonstration of fluorescent microscopy will also be presented.
IMPORTANT: Notes on the use of the microscope
� Never dust a lens by blowing on it as harmful saliva will be deposited on lenses.
� Use only lens paper to clean after use - Never use facial tissues to clean lenses.
� Avoid touching lenses. Light fingerprints can seriously degrade image quality.
� Use proper immersion oil on immersion objectives as specified by manufacturer. Avoid
getting immersion liquid on non-immersion objectives.
� Keep microscopes covered when not in use.
Procedures:
A. Preparation and Fixation of Bacteria.
1. With a wire loop, place a small drop of each of the three bacterial suspensions on a
clean slide. (see Figure below)
2. For multiple samples use grease pen to prepare individual circles for each sample.
3. Spread the drop on the slide to form a thin film.
4. Allow film layer on slide to dry by holding high above (film side up) a Bunsen flame
(Don’t over heat!).
5. When film is dry, pass the slide three times through Bunsen flame. This is called heat
fixing. The purpose of heat fixing is to kill the microorganism, coagulate the
protoplasm of the cell, and cause it to adhere to the slide.
B. Gram Stain Procedure
1. Cover the entire heat fixed smear with crystal violet dye and let stand for 30 seconds.
2. Tilt slide so as to drain off excess crystal violet to run off into sink and rinse very
gently for 1-3 seconds with deionized water, drain.
3. Cover the smear with iodine solution (mordant) and let stand for 30 seconds.
4. Tilt slide to drain off excess iodine solution and rinse gently with deionized water.
5. Dry slide between blotting paper.
6. Flood slide with ethanol (decolorizing solution) for 10-20 seconds.
7. Rinse ethanol from slide with deionized water to stop the decolorizing process.
8. Cover the smear for 20 seconds with safranin counterstain.
9. Wash slide with running water, gently blot dry, and allow to air dry.
10. Examine the stained preparation using oil immersion objective.
11. Examine and make drawings the stained microorganisms for the following:
• Size and shape
• Arrangement (singly, pairs, chains, clusters, etc.)
• Pleomorphisms (the same organism having more than one form)
• Gram-positive vs. gram-negative coloration
Important note: The Gram stain should not be taken as an absolute indicator of gram-positive
or gram-negative because, in certain instances, the Gram stain will not give the characteristic or
expected reaction. The Gram stain is based on how quickly cells lose the crystal violet-iodine

15
complex during the decolorization step. It is possible for Gram-positives to appear Gram-
negative reaction (or vise versa) under certain conditions. Factors that could possibly affect
Gram stain reaction include the following:
1. Overheating the slide during the fixation step causing cells to burst.
2. Too many cells: The higher the number of cells the longer the decolorization takes or it
may be incomplete altogether. This would result in the gram-negative cells appearing to
be gram-positive.
3. The extent to which the smear is washed. Excess dye remaining from too little washing or
over-decolorization if over washing occurs.
4. The age of the culture suspension from which the smear is made.
C. Spore stain procedure:
1. Heat fix bacterial and fungal suspension as described above in Part I.
2. Cover smear with malachite green and place over boiling water for five minutes.
(Keep smear saturated by adding additional malachite green if stain boils off.)
3. After 5 min, remove slide and cool. Gently wash with deionized water for 20 sec.
4. Counterstain with safranin dye for 30 seconds.
5. Gently wash with deionized water and blot dry.
6. Examine the stained endospore preparation using oil immersion objective.
7. Make drawings of the stained microorganism for the following:
• Size and shape
• Arrangement
• Polymorphism
• Presence of spores

16
STUDY QUESTIONS:
1. Diagram the difference in the Gram negative and Gram positive cell walls and explain how
these difference contribute to the results of the gram stain.
2. Why would you see differences in morphology of cells within a pure culture?
3. Based on your previous knowledge of microbiology, which strain would you identify as
Escherichia coli, Bacillus subtilus, or Staphylococcus aureus?
4. What other test would you suggest for confirmed identification of species?

17
LAB EXERCISE 4: ENUMERATION OF MICROORGANISMS
In order to determine food product safety the total number of bacteria within a sample is
frequently determined. This laboratory will examine advantages and disadvantages of two
methods for enumerating microorganisms in foods: Direct Microscopic Count (DMC) and
Standard Plate Counts (SPC).
Direct microscopic count is also referred to as the Petroff-Hausser method and uses slides
embedded with grids of etched squares that contain a specified volume of microorganisms to be
counted. The etched area is covered with a glass slip at a fixed distance from the etched surface,
and bacteria are counted using the high dry (40X) objective of the light microscope. This method
is only accurate for food samples containing a large number of microorganisms (4 x 10⁶ to 2 x
107 bacteria/ml). The major sources of error are inaccuracies in diluting samples and in filling the
etched chambers. Also food particles mask the microorganisms and lead to an underestimation.
The DMC has been used most extensively with milk. A measured volume of milk is spread over
the surface of the area over the etched grid, dried, stained, and viewed under oil-immersion. To
determine the number of bacteria per field, clusters, clumps, or chains are counted as one
bacterial cell because each cluster would give rise to a single colony if plated on solid medium.
Limitations of this method include the inability to determine low concentrations of cells, to count
motile cells, and to distinguish viable and non-viable microorganisms (unless the method is
combined with the use of vital fluorescent dyes described below for viability determination).
Advantages are that results are obtained rapidly and inexpensively with relatively simple
equipment.
Standard plate counts. Bacteria may also be enumerated by either spread or pour plating to solid
media for standard plate counts. Plating to agar media allows determination of viability, as
numbers of bacteria are calculated by the number of colony forming units (CFUs). Samples are
serially diluted and dilutions are applied to agar plates. For spread plates samples are spread over
the agar surface with a glass rod, while the pour plate method uses molten agar mixed with
sample and poured onto the agar surface. With the SPC procedure we assume that a single cell
will give rise to a separate colony; however, this method may not always measure the actual
total number of organisms. Cells in pairs or clusters can still produce a single colony and thus
underestimate actual number of bacteria. Also, not all strains of microorganisms will always
grow on all media under all conditions. Bacteria that are stressed or injured may become
noncultureable and require special recovery media or specific environmental conditions to grow.
It is important to remember that determining colony counts from a food product will depend on
the growth characteristics of organism itself. Some species may spread or swarm over the plate
and present difficulties in determining a single CFU. Swarming is the coordinated migration of
multicellular colonies that results in the production of non-separate colonies. Therefore, the plate
count technique is usually an estimation of the actual number of living bacteria in a sample. The
counts obtained by these methods should not be reported as total viable cell counts but rather as
CFU per unit of sample. Although there are inherent inaccuracies in this method, the plate
count is still the most accurate and widely used method for enumerating bacteria.
Rules for Counting Colonies on Plates and Recording Data: To calculate the Aerobic Plate
Count, multiply the total number of colonies counted by the reciprocal of the dilution factor. The
18
dilution factor is simply the amount of sample transferred over the total volume of the sample
from which it was taken.
1. How many to count. To obtain the Aerobic Plate Count, count duplicate plates from dilutions
that produce 25 to 300 colonies and average the two counts. Use a Quebec colony counter
equipped with magnification and a guide plate ruled in cm2.
2.Consecutive dilutions. If plates from two consecutive serial dilutions yield 25 to 250 colonies,
compute the count per milliliter for each dilution by multiplying the number of colonies per plate
by the dilution used. Report the arithmetic average as the Aerobic Plate Count per milliliter,
unless the higher computed count is more than twice the lower one. If this is the case report the
lower computed count as the Aerobic Plate Count per milliliter or per gram, as applicable.
3. No plate with 25 to 250 colonies. When number of CFU per plate exceeds 250, for all
dilutions, record the counts as too numerous to count (TNTC) for all but the plate closest to 250,
and count CFU in those portions of the plate that are representative of colony distribution. Mark
calculated APC with EAPC to denote that it was estimated aerobic plate count from counts
outside of 25-250 per plate range.
4. All plate with fewer than 25 colonies. If plates from all dilutions yield fewer than 25
colonies each, record the actual number of colonies on the lowest dilution and report the count as
the Estimated Aerobic Plate Count per milliliter or per gram.
5. Plates with no colonies. If plates from all dilutions of any sample have no colonies and
inhibitory substances have not been detected, report the count as less than (<) one times the
corresponding lowest dilution. For example, if no colonies appear on the 1:100 dilution, report
the count as “less than 100 (<100) Estimated Aerobic Plate Count” per milliliter or per gram.
6. Spreaders. If spreaders occur on the plate(s) selected, count colonies on the representative
portions of the plate where colonies are well distributed in spreader free areas. If all the plates
prepared from the original samples have excessive spreader growth or are known to be
contaminated or are otherwise unsatisfactory, report as “Spreaders” (Spr) or “Laboratory
Accident” (LA). Inhibitory substances in a sample may be responsible for the lack of colony
formation.
7. Computing and recording counts. To compute the Aerobic Plate Count, multiply the total
number of colonies or the average number per plate by the reciprocal of the dilution used.
Record the dilutions used, and the number of colonies counted or estimated on each plate. When
colonies on duplicate plates and/or consecutive dilutions are counted and the results are averaged
prior to recording, round off counts to two significant figures (one decimal place) only at the
time of conversion to the Aerobic Plate Count.
Sample preparation is essential to enumeration of bacteria from solid foods. Liquid foods like
milk can be examined directly, but solid food samples are generally homogenized in culture
media or buffer prior to enumeration. The volume of food will depend upon the matrix and
expected level of bacterial contamination. A weighed amount of solid food is blended
mechanically with diluent such as phosphate buffered saline (PBS). Generally 1 to 25 grams of
food are blended with equal volume of liquid in a blender or stomacher. Liquid foods are added
directly to the diluent in measured amounts. Sterile water is not used as diluent because it can
cause cell destruction due to osmotic lysis. Adequate sample mixing and changing pipettes to
avoid carry over between dilutions is essential to prevent miscalculations.

19
Day 1. STANDARD PLATE COUNTS:
A. Serial Dilutions: Before samples are enumerated, they usually need to be diluted or there will
be too many colonies on a plate to count. Decimal or serial 10 fold dilutions are employed
because they are easier to manipulate mathematically (See Figure 1 below). Samples (1ml) are
mixed or vortexed and transferred to dilutions tubes (9 ml) using a fresh sterile pipette with each
transfer. Dilution protocol is shown below. Samples will be plated in duplicate to agar plates in
order to determine CFU/ml.
Figure 1. Serial dilutions
Materials:
Sample culture (log or stationary?)
Phosphate Buffered Saline
Pipettes
Test tubes
Glass spreaders
Alcohol
Quebec colony counter
L agar (LA)
Procedure:
1. For sample, prepare 6 dilution tubes with 9 ml sterile PBS, using aseptic technique. Label
a series of dilution tubes ranging from 10-1
to 10-6
for each sample, with corresponding
plates that are labeled for 10-2
to 10-7
.
2. Use a well-mixed sample so that the test portion represents the entire lot.
3. Using aseptic technique, pipette 1.0 ml of sample into 9-mL PBS dilution tube. Recap
tube and mix the test tube thoroughly for 10 seconds. Using new pipette, apply 0.1-mL of
this dilution to a previously marked Petri dish. Flame spreader and gently spread liquid
around plate. Plate each dilution in duplicate.
4. Using new pipette, continue dilutions from first diluted sample and repeat as above until
the end of the dilution series.
5. Allow plates to dry and then invert and incubate at 35°C for 24 hours.
6. Calculate the number of bacteria from plate counts and convert the CFU/ml to
LogCFU/ml. Average the numbers obtained from all groups and calculate the standard
deviation.
DAY 2: Direct Microscopic Count
In this lab, DMC will be used to directly enumerate the number of bacteria in a samples
derived either from liquid food products. Numbers obtained for all lab groups will be compiled
and used to determine standard deviation. One of the most common counting chambers for DMC

20
is the hemocytometer, also used for counting blood cells. The counting grid is divided into 25
small squares, further divided into 16 smaller ones (Fig. 1). The depth of the hemocytometer
chamber, 0.1 mm differs from Petroff-Hausser counter which is 0.02 mm, and thus calculations
will also differ between methods.
Figure 1. Hemocytometer grid
Materials:
Gloves
Biohazard waste container
Hemacytometer slide and glass cover slip
Microscope
Disposable pipettes and Pipettors
Methyl violet stain
Bacterial culture
Disinfectant
Water bottle
PBS dilution tubes (9 ml)
Procedure
1. Add 1 drop of methyl violet stain to empty test tube
2. Add 1 ml of sample or 1:10 diluted sample to test tubes with dye.
3. Place 10µl of stained cells onto the notch of the grid-etched slide. Cover drop with a
cover glass and read the number of bacteria using the 40X objective.
4. The cells to be counted will appear green with a purple border. If there are more than
100 cells per 1mm large square, count the next dilution of sample.
5. Count the cells in the large 1mm center square containing 25 small squares (See
Figure 1 below). If there is more than one cell per small square, count all the cells in
five small squares (four corners and the center). Regard a clump of cells as one cell.
Multiply number obtained by 5 to estimate the total for 1 mm2.
6. If there is less than one cell per square, count all 25 large squares.
7. Bacteria/ml = the number of bacteria in the 25 squares x 104 x dilution factor.
8. Count both chambers and use the mean of the two counts.
9. Rinse slides with disinfectant and then water to biohazard waste .
STUDY QUESTIONS:
1. How do the two methods of enumeration compare in terms of sensitivity of detection?
2. What does the standard deviation indicate?
3. Do the numbers of cells obtained by DMC indicate they were all viable?
4. Can the food matrix influence the results?
Large central square = 1mm2
with 25 small squares further
subdivided into 16 squares

21
LAB EXERCISE 5: MOST PROBABLE NUMBER AND INDICATOR ORGANISMS
Most probable number (MPN) is a procedure to estimate the population density of viable
microorganisms in a test sample. It applies the theory of probability to positive growth responses
in a standard dilution series or end point titration. Growth of bacteria is obtained in enrichment
broth, which is generally a non-selective medium that encourages the growth of injured or
stressed cells. A positive growth response is indicated by turbidity or gas production in
fermentation tubes. The number of sample dilutions to be prepared is based on the expected
population within the sample. Generally tenfold dilution is used with replicates of 3, 5 or 10 test
tubes for each dilution in the MPN series. When a higher number of tubes are inoculated in the
series, the confidence limits of the MPN are narrowed. Most reliable results occur when all
tubes at the lower dilutions are positive and all tubes at the higher dilutions are negative. For
large microbial populations, the MPN value is generally not as precise as population numbers
derived from direct plating methods, and it should be emphasized that MPN values are only
estimates. MPN values are, however, particularly useful when low concentrations of organisms
(<100/g) are encountered in such materials as milk, food, water and soil or where the matrix may
interfere with obtaining accurate colony counts.
Coliforms. MPN is commonly used to estimate the numbers of coliform bacteria in food. These
organisms are defined as “gram-negative, non-sporeforming, facultative rods that ferment lactose
with acid and gas formation within 48 hrs at 35°C”. These organisms are natural flora of the
intestines of warm blooded animals, including humans. Collectively, coliforms are referred to as
indicator organisms because they indicate the presence of animal or human fecal
contamination. The historical definition of this group has been based on the methods used for
their detection, primarily lactose fermentation. Although E. coli is nearly always found in fresh
fecal pollution from warm-blooded animals, other coliform organisms may be found in the
absence of E. coli. The genera Escherichia, Enterobacter, Klebsiella, and Citrobacter usually
represent the majority of coliform isolates, with Enterobacter the most frequently isolated. It is
important to note that not all coliforms originate from sewage, and E. coli may be more readily
affected by conventional water treatment than other coliforms. Differentiation of coliform types
is valuable in determining the source of increased coliform densities. Large numbers of coliforms
of the same type in water source suggests that multiplication has occurred. Industrial waste
containing high concentrations of bacterial nutrients are capable of promoting growth of
coliforms in effluents and receiving waters. Elevated temperatures (45°C) are needed to
discriminate organisms of fecal origin from others in the coliform group. Thus, incubation at
45°C is used to determine fecal coliform numbers, while total coliforms are determined by
incubation at 35°C.
E. coli detection is considered to be a more accurate measure of fecal contamination and requires
confirmatory assays or the use of media, such as EMB, which is selective and differential for the
species. E. coli LST-MUG broth combines lactose medium (LST) with a substrate of
methylumbelliferone glucose (MUG) to release fluorescent compound 4-methylumbelliferone in
the presence of the enzyme glucuronidase, which is produced by the majority of E. coli (94%)
but not by other coliforms.
22
Day 1: Total and Fecal coliform MPN. In this exercise you will perform coliform MPNs from
a water sample or from samples brought to class. Fecal coliform detection is a simple 24-48 h
test using A-1 medium with a Durham tube. A-1 is a differential medium that uses the
production of gas, from the fermentation of lactose, to indicate the presence of coliforms.
Durham tubes are small tubes that are placed upside down inside larger tube to catch some of the
gas that is produced during lactose fermentation. Samples of different amounts are inoculated
directly into replicate tubes, alternatively samples can be diluted (usually 10 fold) and volumes
of diluted samples can be used to inoculate tubes. In this case we will use 3 replicate tubes at
each of 4 dilutions for a 3-tube MPN with 4 dilutions.
Materials:
A-1 MPN tubes
Whirl-Pak bags
10-ml pipettes
Pipettes and tips
Portable UV light
UV protective goggles
EM agar plates
Wooden applicator sticks
Procedure:
1. Two racks with A-1 Medium with Durham tubes will be provided.
2. Set up and label a three-tube MPN rack with a row for each of four dilutions for the Total
coliform MPN. The first row of three tubes should contain 10 ml of 2X or 1X A-1 media for
liquid samples, depending on the total volume of sample. The remaining three rows of three
tubes should contain 10mL of 1X A-1 media. (Solid samples will all use 10ml of 1X
medium).
3. Shake sample bag (Whirl-Pak) or tube 25 times within 7 seconds in a one-foot arc to mix
sample. Use a well-mixed sample so that the test portion represents the entire lot, dilute
sample 10-1
, 10-2
, 10-3
.
4. Inoculate each of the three tubes in the first row containing either 2X or 1X A-1 media with
either 10 ml or 1 ml of undiluted sample, respectively.
5. Inoculate each of the three tubes in the next rows (containing 1X A-1 media) with 1.0 diluted
water sample.
6. Incubate all tubes at 35 o
C (±0.5oC) for 48 hours for total coliform determination.
7. Repeat the above MPN method for the Fecal Coliform MPN with a second set of A-1 MPN
tubes, and incubate tubes at 35oC (±0.5
oC) for 1 hour.
8. After 1-hour incubation, transfer these tubes to 44.5oC (±0.2
oC).
9. At 24 and 48 hour total incubation time, record gas production as positive. All tubes
exhibiting a positive result from Fecal coliform MPN should be streaked for isolation onto
EMB Medium for a confirmation of E.coli. Incubate plates at 35°C for 24h and record
results.

23
DAYs 2 and 3.
Computation of MPN Results:
1. Write down the number of positive tubes for all dilutions at 24 and 48 hours. To obtain 3
digit number for MPN table, begin with the first dilution that is completely negative or the
last dilution with positives and the next two dilutions with positives. If all have positives,
start with most diluted sample. (as an example: 3-2-0).
2. Most Probable Number (MPN) values are determined from established tables. Look up the
corresponding three-digit number on the MPN table. This number should be reported as an
MPN of Fecal Coliforms per g or ml of sample.
LAB WRITE-UP: 1. How did the numbers compare for the different assays?
2. How did the numbers compare at 24 and 48h?
3. Which numbers would you expect to be higher: total, fecal, or E.coli MPN?
4. How can you adjust the sample size for MPN determinations?
5. What are some limitations of fecal coliform MPN?

24
LAB EXERCISE 6: Escherichia coli
Eschericia coli is a gram negative bacillus in the family Enterobacteriaceae, which can be
classified as diarrheogenic or nondiarrheogenic according to the effects on the human host. The
normal flora of the human intestine harbors nondiarrheogenic E. coli that are considered
relatively harmless to the host. These generally harmless bacteria are frequently used as
indicators of fecal contamination. Most strains will grow under conditions for fecal coliform
analysis, but are differentiated by the following characteristics:
1. Methyl red positive
2. Voges-Proskauer negative
3. Does not use citrate as sole carbon source
4. Indole positive are E. coli type 1 and associated with mammalian intestines
Methods of detection: Typical E. coli assay include the following:
1. IMViC tests: determine indole, methyl red, V-P, citrate characteristics but are
time-consuming
2. MacConkey’s agar: selective/differential agar used to detect coliforms such as E.
coli in milk and water. It contains peptone, bile salts, NaCl, and lactose with an
indicator dye to indicate fermentation. The inhibitory action of bile salts on the
growth of gram-positive organisms allows for the isolation of gram-negative
bacteria. Incorporation of the carbohydrate lactose, and the pH indicator neutral
red permits differentiation of enteric bacteria on the basis of their ability to
ferment lactose. Colonies that ferment lactose will appear pink or red, while non-
lactose fermentors will be colorless. Typical appearances are as follows: E. coli –
red, non-mucoid; Klebsiella- pink, mucoid; Salmonella- colorless.
3. EMB (described in Lab 3)
4. Violet Red Bile Agar: modification of MacConkey’s and includes crystal violet to
inhibit gram positives and produce more red E. coli colonies.
5. MacConkey’s Sorbitol Agar (MSA): uses sorbitol instead of lactose fermentation
as an indicator.
6. MUG ASSAY: uses the substrate 4-methlumbelliferyl PD-glucuronidide (MUG),
which will fluoresce upon enzymatic degradation. Most (93%) E. coli produce the
enzyme B- glucuronidase, which is detected in this fluorogenic assay.
7. E.coli Petrifilm (3M Company): Contain ready-made media enriched with
standard nutrients, a gelling agent, and indicator dyes. Includes Violet Red Bile
(VRB) agar, which detects glucuronidase activity.
Pathogens: Positive results for E. coli may indicate not only fecal contamination but also the
presence of human pathogens. Six groups of E. coli are known as diarrheogenic including
enteropathogenic (EPEC) strains that attach to the brush border of the intestinal epithelial cells
and cause a specific type of cell damage called effacing lesions. Effacing lesions represent
destruction of brush border microvilli adjacent to adhering bacteria. Enterotoxigenic (ETEC)
strains produce two distinct enterotoxins, which are responsible for diarrhea and distinguished by
their heat stability: heat stable enterotoxin (ST) and heat-labile enterotoxin (LT). The
enteroinvasive (EIEC) strains cause diarrhea by penetrating and multiplying within the intestinal
epithelial cells. The enteroaggregative (EaggEC) strains show unique localized regions with a
25
“stacked brick” appearance. The diffuse adhering (DAEC) strains adhere over the entire surface
of the epithelial cells and usually cause disease in immunocompromised or malnourished
children. The enterohemorragic E. coli (EHEC) include E. coli 0157:H7. The first E. coli
0157:H7 outbreak occurred 1982 at fast-food restaurants in Oregon and Michigan. The first case
documented was from a young girl who died from hemolytic uremic syndrome (HUS) as a result
of eating an undercooked cheeseburger. During an investigation, the CDC team traced the
bacteria back through the meat slaughtering and distribution system to the farm, pinpointing its
reservoir in cattle. Entrance into the human food supply is through the contamination of meat and
produce with fecal material. EHEC is considered a major health concern in the US and it is
responsible for an estimated 10,000- 20,000 infections and 250 deaths per year. This dangerous
serotype of ubiquitous and normally harmless genus has the ability to attach to human intestinal
cells and produces potent toxins that produce bloody diarrhea. It may also enter the blood stream
and the renal system, producing high mortality particularly in children. There is no cure for an
infection with this toxin. Although bacteria are killed by antibiotics, toxin is already present by
the time symptoms appear. Thus, antibiotics are not recommended, as they can set the stage for
complications by destroying those harmless bacteria that compete the pathogen. The incubation
period of hemorrhagic colitis usually lasts for 3 to 4 days with a range of approximately 2 to 8
days.
It should be noted that EHEC is not detected in many of the standard tests for E. coli. Nearly
all E. coli (93%) ferment sorbitol with the exception of EHEC, which exhibits clear colonies on
MacConkey sorbitol agar. It also does not produce B- glucuronidase and therefore is negative for
the MUG assay. EHEC is also unique from other E. coli strains in terms of growth
characteristics: Although EHEC grows rapidly between 30-40ºC, it shows slow growth at 44–
44.5ºC. Therefore, it is not be detected in standard screening procedures for fecal coliforms
involving these temperatures ranges. However, EHEC resembles other pathogens, such as
Salmonella, in that it can be acclimated to grow at very low pH (3.7- 4.0), such as that found in
apple juice.
Day 1. The purpose of this lab is to compare alternate methods for E. coli detection. Obtain
sample and bacterial controls from your instructor. Alternatively, water sample or swabbed
surface expected to be positive for E. coli may be used. Determine E. coli counts by 1) SPC by
spread plating to petrrifilm vs. MacConkey’s Sorbitol Agar and by 2) MPN using MUG broth
and streaking to MacConkey’s.
Materials: Petrifilm, MSA, MUG-MPN tubes (10 ml-1X), pipettes, glass spreader, inoculation
loops, burners, alcohol, water bath, and incubators.
Prodedure:
1. Use a well-mixed sample so that the test portion represents the entire lot, dilute sample 10-1
,
10-2
, 10-3
.
2. Distribute samples to MPN-MUG tubes as described in Lab 4 and incubate tubes at 35°C
(±0.5°C) for 1 hour and then transfer these tubes to 44.5°C (±0.2°C) water bath.
3. Spread Plate samples to MacConkey’s in duplicate as described in Lab 4.
4. Place the 3M Petrifilm (Note: Petrifilm should be stored below 8°C) on a flat surface and
dispense 1mL of your sample onto the center of the Petrifilm.
5. Distribute the sample on the Petrifilm in duplicate by applying downward pressure using a
spreader to press the top film over the sample.

26
6. Incubate the Petrifilm plates at 35°C in stacks placed in a horizontal position with the clear
side of the plate up. The stacks should not exceed 20 plates.
Day 2 and 3. Record results at 24 and 48h
1. SVC on MSA: determine logCFU/ml as described in Lab 4.
2. Petrifilm: All of the colored dots indicate a colony and should be counted. The
circular growth area is 20 cm. You may count the number of colonies in a square
area and multiply by 20 to get the total number of colonies.
3. MPN-MUG: Examine the (MUG) test tubes for fluorescence by darkening the
room and placing an ultraviolet light over the tube. (POSSIBLE EYE
DAMAGE!!! WEAR SAFETY GLASSES!). For safety reasons please do not
directly look into the ultraviolet light. Examine the turbidity of the (MUG) test
tubes from the incubator at 44.5°C. Streak all turbid samples after 24h incubation to
MSA and incubate at 35°C.
Record results for SPC and MPN as logCFU/ml and post on board.
Sample
Group
E. coli Numbers
Plate Counts (CFU/ml) MPN (MPN/ml)
Petrifilm SPC- MSA MUG 24h MUG 48h MSA
1
2
3
4
5
6
7
8
9
Reference:
Harrigan, W. F. 1998. Laboratory Methods in Food Microbiology. Academic Press, London
Lab Write-up:
1. Compare results from the different assays and time points.
2. Samples 1-5 and 6-10 are from identical sources respectively and represent duplicate
samples. Calculate MPN using 3 vs. 15 tube replicates. How do these results differ
statistically?
3. What are the advantages of using MPN-MUG assay?
4. How did the initial numbers of E. coli in sample alter the results?
5. Would any of the tests detect EHEC?

27
LAB EXERCISE 7: FUNGI - MOLDS AND YEAST
Molds and Yeast are a diverse group of heterotrophic organisms comprising the higher fungi.
Many are saprophytes, which digest dead organic matter and waste, while others are parasitic
and obtain their nutrients from the tissues of the other organisms. Most fungi, such as the molds,
are multicellular. Yeast are unicellular fungi closely related to the molds. They are ellipsoidal,
spherical, or cylindrical cells, and are several times larger than the average bacterial cell.
Because of their large size, numerous structures and inclusions may be readily seen using a light
microscope.
In the food industry, the presence of molds or yeast may be either beneficial or detrimental.
Molds are used in the manufacture of cheeses such as Blue, Camembert, and Stilton as a ripening
substrate. They are also employed to produce enzymes and acids as in the case of various
Oriental foods such as soy sauce and miso. Yeast are used in the manufacture of a number of
foods through fermentation, such as beer, wine, vinegar, and some cheeses, which are surface
ripened. Yeast, like the molds, are grown for their enzymatic action in foods, but may also serve
a source of single cell protein. A special strain of Saccharomyces cerevisiae, which produces
large amounts of carbon dioxide, is added to bread dough to make it rise.
Mold spoilage is frequently found in nuts and oilseeds and in refrigerated foods such as cheese
and cured meats. Rhizopus nigricans is the most common bread mold, but several other species,
which thrive in bread, are Penicillium, Aspergillus, and Monilla. The contamination of bread by
Monilla, a pink bread mold, is extremely troublesome because it is difficult to eliminate from a
bakery once it has become established. Bacillus species are the most likely to contaminate Rye
bread, which hydrolyze proteins and starch and give the bread a stringy texture. Yeast can cause
spoilage in certain foods such as sauerkraut, pickles, meats, and other foods. Fresh fruit juices,
because of their high sugar and acid content, provide an excellent growth environment for molds
and yeast. Penicillium expansum, which grows on apples, produces a toxin, patulin, that can
contaminate cider. Other molds in foods are capable of producing other toxic compounds called
mycotoxins, of which aflatoxins are an example.
The body of a fungus is called a thallus. The thallus consists of a mass of intertwining branching
threads called mycelium. A single strand of these thread-like structures is called a hypha. Much
of the mycelium of each mold grows within or on the surface of the growth medium and
functions to extract nutrients for its survival and growth. This is termed vegetative mycelium.
Growing above this vegetative mycelium are specialized fruiting structures that produce asexual
or sexual spores.
Molds and yeast are grouped into four classes, based on their mode of sexual reproduction:
1. Phycomyces resembles algae but differ in lacking chlorophyll. This class includes both
aquatic and terrestrial molds in which sexual spores, when produced, are borne exposed.
The growth of molds in this class tend to spread over the entire surface of the culture
plates, appearing not a single colony but as a fibrous coarse mass, whose borders are
limited only by the walls of the petri plate. The vegetative mycelium of the Phycomyces
is coenocytic, or nonseptate (without crosswalls) and consists of a continuous mass of
multinucleate protoplasm within the tube-like cell walls of the mold. The fruiting, stalk-
like structures of the Phycomyces produce sporangiospores, an asexual spore enclosed in
sporangia, or spore case. Less frequently, molds produce sexually by the fusion of two

28
hyphae, which give rise to gametes. From these gametes, sexual spores are produced. In
certain Phycomyces genera, the sexual spores are formed singly and without a covering
and are termed zygospores.
2. The class Ascomycetes are characterized by the formation of sexual spores called
ascospores. These ascospores are produced in a sac –like ascus with several spores being
formed. Some genera of Ascomycetes do, however, produce asexual spores. These spores
are termed condiospores and they are unenclosed. Molds of the class Ascomycetes tend
to form discrete colonies on culture plates.
3. The class Basidiomycetes are the fleshy fungi and bear sexual spores, termed
basidiospores, in highly developed structures called basidia.
4. The class Deuteromycetes (or Fungi Imperfecti) represent a taxonomic “dumping
ground” for those molds and yeast in which no sexual reproduction has been observed.
Within this class are pathogenic fungi such as the genus Trichophyton, which is the cause
of athlete’s foot, and the species Candida albicans, the cause of a throat infection known
as thrush.
Procedure:
Yeast morphology and growth
1. Prepare a suspension of baker’s yeast as described on the back of package. Allow
to grow for about 45 minutes at room temperature.
2. Make a methylene blue stain of the yeast culture and observe by using a
microscope.
3. Make drawings of all observations.
4. Inoculate three tubes of yeast extract sucrose broth with baker’s yeast and
incubate at 50, 20
0 (room temp.) and 43
0C.
Molds morphology Growth
1. Observe all mold cultures for characteristics such as color, texture, reverse color,
2. Make a slide mount of each mold culture. Take a small amount of mold growth
and suspend it in water on a clean slide and cover with coverslip. Starting with
low power magnification, use all three objectives, if necessary, to observe the
following:
• Mycelium
• Spores if present
• Fruiting heads
• Special structures
3. Make drawings of all observations.
4. Select one of the mold cultures and inoculate some spores onto a Potato Dextrose
agar plate and a Czapek’s agar plate (general purpose media for the cultivation of
both molds and yeast). Incubate plates at room temperature in a dark area. Do not
invert mold plates during incubation. Check growth in 5 and 7 days.
5. Divide one Potato Dextrose agar (PDA) plate into three sections. Using one mold
culture, the baker’s yeast and a bacterial culture provided, inoculate each of the
three sections on each plate. Incubate the plates and record results in 2 days and
again at day 5.

29
LAB EXERCISE 8: DETECTION OF SALMONELLA
Salmonella are facultatively anaerobic, Gram-negative, rod-shaped bacteria. Salmonella are
motile by peritrichous flagella, grow on citrate as a sole carbon source, and generally produce
hydrogen sulfide (H2S), although H2S-negative serovars do exist. Well-established culture
methods for the detection of Salmonella in various foods are available from the following:
1. FDA, Bacteriological Analytical Manual (BAM): http://vm.cfsan.fda.gov/~ebam/bam-
toc.html
2. USDA, Microbiological Laboratory Handbook:
http://www.fsis.usda.gov/Science/Microbiological_Lab_Guidebook/index.asp
3. American Public Health Association. 2001. Compendium of Methods for the
Microbiological Examination of Foods. 4th Edition.
4. Culture and rapid methods validated by the AOAC
Currently, there are over 2,500 recognized serovars of Salmonella, however 10 serovars are
responsible for the majority of illness in humans, known as salmonellosis. Salmonella is widely
distributed throughout nature with the primary reservoir being the intestinal track of mammals,
birds and reptiles. Salmonellosis is a communicable disease and is readily transmitted from
animals to humans, but most often is acquired through the ingestion of contaminated food
products. The actual number of cases may be between 400,000 and 4 million/yr. Clinical
symptoms include stomach pain, diarrhea, headache, and fever accompanied by chills. After
ingestion, bacteria reproduce in the small intestine, and onset of illness usually occurs 8 to 48
hours after ingestion. Symptoms can persist for 3 to 5 days. Salmonellosis can be fatal for the
very young, infirm, and those with compromised immune systems. Salmonellosis is usually
contracted from food products that have been abused during handling. Abuse can occur through
exposure to warm temperatures and/or cross-contamination
Media and test kits: The following media are often used for the enrichment/isolation of
Salmonella from food.
Primary enrichment media:
a. Universal pre-enrichment broth (UPB): Used for the recovery of sublethally injured
Salmonella and Listeria from food products. Sodium and potassium phosphate buffers
provide sufficient buffering capacity to prevent the rapid decrease in pH, allowing for the
repair of injured cells which may be sensitive to low pH. UPB also contains peptones,
essential ions, dextrose as an energy source, and sodium pyruvate to aid in the recovery
of stressed cells.
Secondary (selective) enrichment media:
a. Tetrathionate (TT) broth: Tetrathionate and excess thiosulfate suppress coliform
microorganisms and other accompanying bacteria, whereas all tetrathionate-reducing
bacteria (e.g. salmonellae and Proteus) can multiply more or less normally in this
medium. Acidic tetrathionate decomposition products are formed, which are neutralized
by calcium carbonate. TT broth contains bile salts, which largely inhibit all
microorganisms that do not normally live in the intestine. The addition of brilliant green
suppresses, above all, the Gram-positive microbial flora. An iodine solution is also added
to provide an inhibitory effect.
b. Rappaport-Vassiliadis (RV) medium: This medium is a modification of the Salmonella
Enrichment Broth with lower concentrations of malachite green and magnesium chloride

30
to improve the growth of Salmonella at 43 °C. Peptone from soymeal is also used for the
same reason. The pH of RV medium is 5.2 for increased selectivity.
Isolation/plating media:
a. Bismuth sulfite (BS) agar: Brilliant green and bismuth largely inhibit the accompanying
bacterial flora. Colonies of H2S-positive salmonellae exhibit blackening due to the
formation of iron sulfide. Reduction of bismuth ions to metallic bismuth produces a
metallic lustre around the colonies.
b. Xylose lysine desoxycholate (XLD) agar: Degradation of xylose, lactose and sucrose to
acid causes phenol red to change its color to yellow. Production of hydrogen sulfide is
indicated by thiosulfate and iron (III) salt, which react to form a precipitate of black iron
sulfide in the colonies. Bacteria which decarboxylate lysine to cadaverine can be
recognized by the appearance of a purple coloration around the colonies due to an
increase in pH. These reactions can proceed simultaneously or successively, this may
cause the pH indicator to exhibit various shades of color or it may change its color from
yellow to red on prolonged incubation. The culture medium is weakly inhibitory.
c. Hektoen enteric (HE) agar: When compared with other selective culture media (e.g. SS
Agar, BPL Agar and Bismuth Sulfite Agar), HE agar has the advantage that it only
slightly inhibits the growth of Salmonella and Shigella, thus giving high yields of these
microorganisms, but at the same time ensures adequate inhibition of accompanying
microorganisms. Lactose-positive colonies have a clearly different color from lactose-
negative colonies due to the presence of the two indicators bromothymol blue and acidic
fuchsin. This color difference is also observed for colonies, which can only slowly
ferment lactose due to the presence of sucrose and salicin. These reactive compounds can
be fermented more easily - false-positive pathogenic results are thus avoided. The
combination of thiosulfate as a reactive compound with an iron salt as an indicator causes
H2S-positive colonies to become black in color. The mixture of bile salts suppresses the
growth of most of the accompanying microorganisms.
Differential media:
a. Triple sugar-iron (TSI): Designed to differentiate among the different groups of
Enterobacteriaceae, which are capable of fermenting glucose with the production of acid.
TSI slants contain lactose, sucrose, glucose and the acid base indicator phenol red.
Degradation of sugar and accompanying acid production are detected by the pH indicator
phenol red, which changes its color from red-orange to yellow, on alkalinization it turns
deep red. Thiosulfate is reduced to hydrogen sulfide by several species of bacteria, the
hydrogen sulfide reacts with an iron salt to give black iron sulfide.
b. Lysine iron agar (LIA). Lysine is decarboxylated by LDC-positive microorganisms to
give the amine cadaverine, which causes the pH indicator bromocresol purple to change
its color to violet. As decarboxylation only occurs in an acidic medium (below pH 6.0),
the culture medium must first be acidified by glucose fermentation. This medium can
therefore only be used for the differentiation of glucose-fermenting microoganisms.
LDC-negative, glucose-fermenting microoganisms cause the entire culture medium to
turn yellow. On prolonged incubation alkalinization of the culture medium surface may
occur, resulting in a color change to violet. H2S production causes a blackening of the
culture medium due to the formation of iron sulfide.

31
Enterotube II:
The BBL™ Enterotube™ II is a prepared multimedia tube for the rapid identification of
Enterobacteriaceae. Each compartment of the Enterotube™ II tests for a specific
biochemical trait of the microorganism. After incubation, each compartment is observed
for color change, which indicates a positive result. The results are recorded and a score
for each result is tabulated. Using the provided score card, the scores are combined to
form either a 5 or 6 digit code. The resulting code can be used to identify the unknown
microorganism. In some cases, further biochemical testing is needed to differentiate
among several possible identifications.
Reveal for Salmonella:
The Reveal for Salmonella test system is a presumptive qualitative test that detects the
presence of Salmonella organisms in foods within 21 h total testing time. Foods are
enriched with a proprietary resuscitation medium called Revive and then selectively
enriched with either Selenite Cystine or Rappaport-Vassiliadis selective media. The
enriched culture is used to inoculate the detection device, which initiates a lateral flow
through a reagent zone containing anti-Salmonella antibodies conjugated to colloidal gold
particles that capture antigens present in the culture. The antigen-antibody complex
migrates farther and is captured by an additional anti-Salmonella antibody, causing the
colloidal gold to precipitate and form a visual line, indicating a positive result. A
procedural control line also will form regardless of the presence of Salmonella organisms
to indicate the test is working properly.
PROCEDURE: The following procedure is based on the U.S. Food and Drug Administration’s
Bacteriological Analytical Manual (BAM) Online, updated September 2005. A flow chart has
been provided as an overview to the analytical procedure for the isolation of Salmonella.
DAY 1
a) Each group will be given a samples that contain Salmonella positive control, a non-
Salmonella negative control and two unknowns that have been incubated in Universal
pre-enrichment broth (UPB) for 24 h at 35 ± 2.0°C.
b) For each culture: Transfer 1.0 ml of the UPB enrichment to a 9.0 ml tube of tetrathionate
(TT) broth. Transfer 0.1 ml of the UPB enrichment to a 9.9 ml tube of Rappaport-
Vassiliadis (RV) medium.
c) Incubate RV medium 24 ± 2 h at 42 ± 0.2°C (circulating, thermostatically controlled,
water bath). Incubate TT broth 24 ± 2 h at 35 ± 2.0°C.
DAY 2
a) Vortex tubes and streak broths for isolation on bismuth sulfite (BS) agar, xylose lysine
desoxycholate (XLD) agar, and Hektoen enteric (HE) agar. In addition, streak a
MacConkey plate (to be used for the Enterotube II). Incubate plates 24 ± 2 h at 35°C.
b) Save the RV medium for use on DAY 4 at 4°C.
DAY 3
a) Examine BS, XLD, and HE plates for presence of colonies that resemble Salmonella.
32
TYPICAL Salmonella COLONY MORPHOLOGY:
1. Hektoen enteric (HE) agar. Blue-green to blue colonies with or without black
centers. Many cultures of Salmonella may produce colonies with large, glossy
black centers or may appear as almost completely black colonies.
2. Xylose lysine desoxycholate (XLD) agar. Pink colonies with or without black
centers. Many cultures of Salmonella may produce colonies with large, glossy
black centers or may appear as almost completely black colonies.
3. Bismuth sulfite (BS) agar. Brown, gray, or black colonies; sometimes they have
a metallic sheen. Surrounding medium is usually brown at first, but may turn
black in time with increased incubation, producing the so-called halo effect.
ATYPICAL Salmonella COLONY MORPHOLOGY: In the absence of typical or suspicious
Salmonella colonies, search for atypical Salmonella colonies as follows:
1. HE and XLD agars. Atypically a few Salmonella cultures produce yellow
colonies with or without black centers on HE and XLD agars. In the absence of
typical Salmonella colonies on HE or XLD agars after 24 ± 2 h incubation, then
pick 2 or more atypical Salmonella colonies.
2. BS agar. Atypically some strains produce green colonies with little or no
darkening of the surrounding medium. If typical or suspicious colonies are not
present on BS agar after 24 ± 2 h, then do not pick any colonies but reincubate an
additional 24 ± 2 h. If typical or suspicious colonies are not present after 48 ± 2 h
incubation, then pick 2 or more atypical colonies.
b) Pick 2 or more colonies of Salmonella from each selective agar. Lightly touch the very
center of the colony to be picked with sterile inoculating needle and inoculate TSI slant
by streaking slant and stabbing butt. Without flaming, inoculate LIA slant by stabbing
butt twice and then streaking slant. Since lysine decarboxylation reaction is strictly
anaerobic, the LIA slants must have deep butt (4 cm). Store picked selective agar plates
at 5-8°C. Again without flaming, inoculate a tube of tryptic soy broth (TSB).
c) Incubate TSI and LIA slants and TSB at 35°C for 24 ± 2 h. Cap tubes loosely to maintain
aerobic conditions while incubating slants to prevent excessive H2S production.
d) Select an isolated colony from the MAC plate and use to inoculate an Enterotube II as
demonstrated by the instructor. Incubate at 35°C for 24 ± 2 h.
e) Transfer the RV medium (saved from DAY 3) to a fresh RV tube by
DAY 4 a) Examine/interpret the TSI and LIA slants as follows:
a. Salmonella in culture typically produces alkaline (red) slant and acid (yellow) butt,
with or without production of H2S (blackening of agar) in TSI.
b. In LIA, Salmonella typically produces alkaline (purple) reaction in butt of tube.
Consider only distinct yellow in butt of tube as acidic (negative) reaction. Do not

33
eliminate cultures that produce discoloration in butt of tube solely on this basis.
Most Salmonella cultures produce H2S in LIA. Some non- Salmonella cultures
produce a brick-red reaction in LIA slants.
b) Examine and score the Enterotube II. Use the codebook to determine the identity of your
unknown microorganism.
c) Describe your results, including any color changes seen in broth, agar plates and slants.
What do these color changes tell you about the isolated microorganism(s)?
d) What was the identity of your unknown?
e) Were there any differences in the results obtained from enrichment in TT broth versus
enrichment in RV broth? If so, describe those differences and why they might have
occurred
STUDY QUESTIONS:
1. What is the lowest initial Salmonella concentration detected by this FDA protocol?
2. The USDA’s method for evaluating meat products for Salmonella uses a different
medium for primary enrichment. What is the name of this broth and why does the use of
it seem odd? (HINT: What are the biochemical traits of Salmonella?) Explain the
rationale behind using this broth for the enrichment of Salmonella.
3. Are there any other bacteria in the Enterobacteriaceae that can produce typical colonies
on the plating media used in this lab? If so, what are they and how could you determine
if they are Salmonella or not using conventional culture techniques?

34
LAB EXERCISE 9: Immunoassays
Agglutination assay: Antibodies or immunoglobulins (Ig) are proteins produced by the immune
system in response to infectious disease. They are generally specific for a particular organism
and can bind with high affinity to a particular antigen on the cell surface. Common types of
antigens include LPS (O antigen), capsular polysaccharide (K antigen), flagella (H antigen).
These structures contain epitopes (the antibody-binding portion of the antigen) that are specific
to a particular species or strain of bacteria and bind the unique Fab segment of the antibody.
Some antigens also bind less specifically to the tail of Fc portion of the antibody and can detect
all strains of a species. The antigen-antibody binding is commonly used for detection of
foodborne pathgens. One of the simplest tests is the agglutionation assay, which is detected
visulally due to the clumping of bacteria and antibody. An example of an agglutination assay is
the one used for Staphylococcus aureus. These Gram positive, halophilic cocci can be highly
pathogenic and produces a variety of toxins, which can be lethal to humans. It is responsible for
20-50% of all foodborne illness outbreaks in the United States. The bacterium is sensitive to heat
and nearly all sanitizing agents. Therefore, detection of S. aureus in processed foods is an
indication of poor sanitation, and post-processing contamination is usually the result of human
contamination or contamination from unsanitary surfaces. Foods that are suspected to be the
source of “staph” food poisoning are examined for the presence of the organism and/or its
enterotoxins. Microbiological tests for S. arueus include the use of a differential/selective Baird-
Parker medium. Colonies should appear as black, shiny, convex colonies with a narrow white
margin, surrounded by a clear zone.
The BBL Staphyloside Latex Test is an agglutination assay that can be used to detect
bacterial surface structures that are unique to pathogenic S. aureus. One such component is
coagulase enzyme, which the catylses the fomation of fibrin clots from the fibrinogen in plasma.
It is produced as both a soluble and surface-associated form and is also referred to as clumping
factor. Another surface
factor is Protein A,
which is able to bind the
non-specific or Fc end
of IgG antibody
molecules and thus
render them inactive.
The Staphyloside Latex
test consists of blue
latex particles coated
with human fibrinogen
and IgG. Colonies of
staphylococci which
have clumping factor or
Protein A present, will cross linking the latex and produce visible agglutination of latex particles.
The agglutination will occur notably with S. aureus. If neither clumping factor nor Protein A is
present, no agglutination will occur, and the result will be regarded as negative. The reaction is
illustrated here.

35
1.Bind Ab
2.Add Ag
3.Wash Unbound Ag
4.Add labeled Ab
5.Wash unbound Ab
6. Appearance of green color as
increasing concentrations of
enzyme convert substrate,
indicating increased
concentrations of antigen
ELISA assay: Another very powerful immunoassay is the Enzyme-Linked ImmunoSorbent assay
(ELISA). This method is also referred to as a “sandwich” ELISA, and the basic principles are
outlined in this figure.
Basically in Step 1 a high
affinity “capture” antibody
(Ab) that is specific for the
target organisms is absorbed
to the surface of a microtiter
plate. If cells or antigen (Ag)
are present that correspond to
this antibody, they will be
captured by the antibody in
Step 2. In Step 3 bound Ag
will remain and unbound will
be removed during washing.
In order to detect the bound
antigen, a labeled secondary
antibody conjugated to an
enzyme label and also specific
for the antigen completes the sandwich in Step 4. This antibody will also bind the cells or
antigen and all unbound labeled antibody is removed in the final washing in step5. The enzyme
label can then be used for detection of a positive sample. In this assay the enzyme converts the
substrate to a green color. Thus, presence of any potential pathogens will be noted by the
appearance of a green color. The antibodies in this assay may detect all strains within a species
or may be specific for a particular serotype.
Antibody Lateral Flow devices: In these assays, reagents are loaded into one end of the device
and the sample moves through the paper by lateral diffusion (wicking) until it reached the spot
where antibody markers are bound on the
paper. Anitbodies are gold conjugated
and the complex of antibody and antigen
continues to move and bind second
antibody which captures complex. The
captured complex then aggregates and
forms visual indication markers for
positive sample.
Antibody Lateral Flow Devices
• Reagents are load in one end
of the device
• Sample moves through the
paper where antibody
markers are bound.
• Visual indicator marks
presences.
Positive ResultPositive
Control

36
Day 1: Salmonella detection assays
Microbiological detection of Salmonella spp may require days and may not always produce
species-specific results. An alternative method is the enzyme-linked immunosorbent assay
(ELISA) such as the TECRA® Salmonella Visual Immunoassay. Although, kits like TECRA®
are rapid, other kits have been developed that require fewer steps and therefore give results more
rapidly. An example of this is the Visual Immunoprecipitate Assay (VIP)® Salmonella kit.
While these kits are faster, they utilize different ELISA concepts. This kit uses a proprietary
reagent system to form an antigen-antibody-chromogen complex. When the Salmonella antigen
comes in contact with the antibody-chromogen complex, a precipitate forms and causes a color
change, which is indicated by the colored line that appears in the detection window.
Immunological protocols:
Each group will be given two unknown cultures, and results for positive and negative
controls will be provided by instructor. The purpose of this lab will be to identify the
Salmonella spp. IMPORTANT:
Change your pipette tip between reagent bottles. DO NOT use the same tip.
Reveal Lateral Flow Device
1.Using the dropper, place 5 free-flowing drops of each unknown into the sample port on
the Reveal for Salmonella device.
2.Read the results after 15 minutes at room temperature. Make sure that the device is
level and is not disturbed during incubation.
TECRA® Salmonella Visual Immunoassay ELISA
1. Heat the broth cultures for 15min in a boiling water bath. After 15 min vortex the tubes
before use.
2. The four Removawells that are already coated with the capture antibody. One for each
sample, one for positive control and one for the negative control (label them accordingly
on the top of the plastic cling wrap).
3. Using a new pipette tip for each sample add 200µL of the controls and samples into
individual wells. Cover the wells with plastic cling wrap film and incubate for 30 min at
35-37°C.
4. Quickly invert the holder, emptying its contents into a contaminated waste container.
Remove residual liquid by striking the wells firmly several times face down on a piece
of absorbent paper towel. This is important for effective removal of sample residue.
5. Add 0.5 mL of wash solution in each well, taking care not to trap air bubbles in the
bottom of the wells. Wash and completely empty the wells a total of three (3) times as
outlined above.
6. Ensure the Removawells are empty before proceeding.
7. Add 200µL of Conjugate [4] to each well. Cover the holder with plastic cling wrap and
incubate for 30 min at 35-37°C.
8. Empty the wells and wash them thoroughly a total of four (4) times as described in steps
6 and 7.
37
9. Ensure the Removawells are empty before proceeding. 10. Add 200µL of Substrate [6] to each well. Incubate at 20-25°C (room temperature).
11. At 10min the positive control should be equivalent to either Panel 4 on the Color Card.
Results can be read visually using the Color Card.
Day 2 Agglutination assays
Polyvalent Salmonella flagellar (H) test:
1. Add 2.5 ml formalinized physiological saline solution to 5 ml TSB enrichment.
2. Place 0.5 ml of appropriately diluted Salmonella polyvalent flagellar (H) antiserum in a
13 x 100 mm serological test tube.
3. Add 0.5 ml of the TSB enrichment.
4. Prepare saline control by mixing 0.5 ml formalinized physiological saline solution with
0.5 ml formalinized antigen.
5. Incubate the test mixture and the control mixture in a 48-50°C water bath. Observe at 15
min intervals and read final results in 1 h..
Staphylococcus aureus agglutionation assay
Materials:
Baird-Parker medium, plates
BBL Staphyloside Latex Test
Inoculating loops
Procedure:
1. You will be given a positive control (S. aureus), a negative control (E. coli) and two
unknowns grown on L agar.
2. Streak these strains for isolation to the Baird-Parker plates and incubate overnight at
35°C. Observe and record the colony appearance the next day.
3. BBL Staphyloside Latex Test: (Warning: The reagents contain material from human
origin. All reagent materials have been tested for HIV or Hepatitis C, but extreme
care must still be taken when handling all materials. The reagents also contain
azide, which is very toxic by inhalation, in contact with skin, and if swallowed.
Contact with acids liberates very toxic gas. After contact with skin, wash
immediately with plenty of water.)
4. Assay positive and negative control strains and unknown strains using the latex test.
(NOTE: Better results are obtained from non selective media.)
5. Mix the latex reagent by shaking; expel any latex from the dropper.
6. Dispense 1 drop each of Test Latex onto four circles on the reaction card, and add 1 drop
of Control Latex onto another four circles.
7. Using a microbiological loop pick up and smear 5 suspect colonies from each of the
strains onto a Test Latex circle and mix bacteria into the Test Latex reagent.
8. Spread to cover the circle.
9. Repeat step 8-9 with the Control Latex for each of the strains.
10. Pick up and gently rock the card for 20 seconds and observe and record agglutination
reactions under normal lighting conditions.
11. Dispose of the reaction cards in the orange biohazard bucket.

38
Interpretation of test results:
• Positive: A positive result is obtained if agglutination of the blue latex particles is
seen in 20 seconds in the test circle, with no agglutination in the control circle.
• Negative: A negative result is obtained if no agglutination occurs and a smooth
suspension remains at 20 seconds in the test circle.
Lab Write-up QUESTIONS: 1. What are the cellular components that are detected by the S. aureus latex test?
2. What are the corresponding host components?
3. What is the difference between Fab and Fc regions of the antibody?
4. If both the test latex and negative control latex agglutinated, is that a false positive? False
Negative?
5. Why the TECRA® ELISA procedure termed a sandwich ELISA.
6. What are possible advantages of the TECRA® ELISA procedure over the VIP® kit?
7. What antigens might be the targets for antibodies is this kit?
8. Can immunoassays discriminate virulent vs. avirulent strains?
39
LAB EXERCISE 10: DNA PROBE DETECTION OF VIBRIOS
DNA probes are used for Colony Blot Hybridization to directly enumerate bacteria in
food samples. In this procedure, colonies from standard plate counts are lifted from the L-agar
plates to a sterile filter paper and then hybridized with a DNA oligonucleotide probe that is
specific for a particular bacterial species. DNA probes are enzymatically labeled with an alkaline
phosphatase enzyme. The alkaline phosphatase label to detect probe-positive colonies is
visualized by color change of a substrate (NBT/BCIP solution) that reacts with this enzyme.
Postive colonies produce brown/bluish colonies, when substrate is cleaved by the enzyme, while
negative colonies appear yellow. This protocol is used for enumeration of bacterial colonies on
spread plates to detect probe positive colonies in a background of other bacteria. It can be used in
conjunction with growth on different media, although it will not work well on differential agar
containing dyes.
Vibrio species are gram-negative, halophiles that are common to estuarine environments. V.
vulnificus remains one of the leading causes of seafood related deaths in humans with a mortality
rate of approximately 50%. Disease can result from the consumption of raw or undercooked
shellfish, such as oysters and clams, which harbor the bacteria and lead to fatal septicemia
(cellular destruction due to accumulation of bacteria in the blood). Exposure of open cuts to the
bacterium in seawater can also lead to wound infections. Fortunately, most people are not
susceptible to this disease, and fatalities are primarily in individuals with underlying disorders
that compromise the immune system, including HIV/AIDS, cancer, diabetes, liver disease or
hemochromatosis. Vibrio species are quite variable biochemically and it is difficult to
discriminate species based on traditional differential media, such as TCBS (see lab 2). Also
growth on selective media generally requires pre-enrichment in broth used for end-point titration
of MPN enumeration (see lab 3). Unfortunately, this process requires days and lacks species
specificity. This probe is derived from the cytolysin gene (vvh), and has been shown to be very
species specific.
PROCEDURE: Positive and negative controls should be prepared with each batch of samples
and processed simultaneously with unknown samples. Incubation should be done in a water bath
or hybridization oven that is accurate within ± 1º C.
DAY 1:
1. Scrub and shuck 4-6 oysters and weigh oyster meat in sterile Petri dish (need at least
50g). Place oysters in sterile blender jar. Add an equal weight or volume (1g: 1ml) of
sterile phosphate buffered saline (PBS) to blender jar, using sterile grad cylinder.
2. Homogenize oyster sample for 2 min on hi-speed and add 1 ml of oyster homogenate to 9
ml of APW and continue to serially dilute using the 9 ml APW dilution tubes to the 10-3
dilution.
3. Plate 100 µL from each dilution tube to duplicate plates each of LA and TCBS, yielding 2
LA and 2 TCBS plates per dilution (Remember: plating 100 µL increases the dilution on
the plate, i.e plating 100 µL from a 10-6
dilution tube will result in 10-7
plate.)
4. Incubate plates (media side up) at 37ºC for approximately 24 hours.
DAY 2:
1. Count colonies on L agar and TCBS plates and place plates in cabinet at room
temperature.

40
2. Record numbers and determine CFU/g for comparison to colony blot hybridization
results.
DAY 3:
Preparation of Colony Lifts:
1. Label 85 mm Whatman #541 filters with pencil to record your group number and the
dilution of the plate you are blotting. Handle filters aseptically.
2. Overlay colonies on spread plate with filter (pencil side up) so that there are no bubbles
under filter by first lining up one edge of the filter with one edge of the plate. (DO NOT
pick up filter and replace on agar.). Use a “hockey stick” to lightly press the filter directly
against the agar surface and remove bubbles.
3. Allow filter to sit on plate for 15 min to ensure transfer of smaller colonies.
4. Place 100 mm Whatman #3 filter onto microwaveable tray and saturate with lysis
solution (about 3ml) using squeeze bottle
5. Aseptically lift the #541 filter from the agar plate using tweezers and overlay the #541
filter onto the wet #3 filter with colony side up ensuring contact and no bubbles between
filters.
6. Microwave filters on medium to high heat until the filters are dry but not brown (about 3-
5 min.).
7. Place #541 filters into a clean container containing ammonium acetate neutralization
buffer (about 20 ml per filter) colony side down and incubate at room temperature, with
shaking (125 rpm) for 5 min.
8. Drain the neutralization buffer and rinse in 1x SSC buffer (20 ml per filter). Swirl briefly,
drain and repeat.
9. Place filters, colony side up, onto absorbent paper and dry completely at room
temperature over night. Dried filters may be stored at room temp. in a sealed plastic bag.
Alternatively, filters are to be processed immediately and drying is not necessary.
Proteinase K treatment:
1. The proteinase K working solution (40 µg/mL) will be prepared for you by your TA.
Solution is pre-warmed to 42ºC.
2. Transfer filters to a container with about 5 ml per filter of proteinase solution.
3. Incubate with shaking at 42° C for 30 min.
4. Empty the container and rinse with shaking in1x SSC buffer (20 ml/ filter) at room temp
for 10 min. Repeat 3 times.
5. Filters can be dried and stored indefinitely.

41
Hybridization Demonstration:
1. Include control filters with each bag. Place 5-10 filters into a bag (Whirl Pack 4.5” X 9”)
or tupperware container and add 100 ml of pre-warmed hybridization buffer (56° for
VVAP). Exclude air from bag and seal or roll up.
2. Incubate with shaking (125 rpm) at temperature for 30 min.
3. In new bag add probe (5 picomoles/filter, usually 3 to 20 µl of probe) to pre-warmed
hybridization buffer (25-100 ml).
4. Transfer filters with forceps to fresh buffer with probe. Exclude air from bag and seal or
roll up. Incubate for 1 h with shaking (125 rpm) at 56°C.
5. Transfer filters to container with pre-warmed (56°C) 1x SSC/1%SDS using 10 ml/filter
with shaking (125 rpm) at appropriate temp for 10 min.
6. In the same container, rinse five times in 1x SSC buffer (20ml/filter) at room temperature
for 5 min. each rinse. Filters can be combined at this point with appropriate increase in
the volume of buffer.
Probe Development Demonstration:
1. In a new petri-dish, develop each filter in 2 ml of NBT/BCIP solution.
2. Incubate at room temperature (or at 35°C for faster results). Cover to omit light. Check
development of the positive control every 1/2 hr.
3. To stop further development, place filters in new container and rinse 3 times at room
temp with DI water for 10 min. each.
NOTE: be sure to dispose of the NBT/BCIP correctly. It is a hazardous waste.
4. Place the filters on an absorbent paper in the dark and allow to dry. Positive colonies will
have a bluish or brown color. Negative colonies should appear colorless or yellow. The
filters should be stored in the dark to prevent color change
STUDY QUESTIONS:
1. Create a table comparing your TCBS counts and your colony blot hybridization counts
for each dilution. Do these counts differ? In what ways? Give an explanation of your
results.
2. What accounts for the specificity of colony blot hybridization?
3. Is colony blot hybridization more specific than traditional plating? than the MPN
method? Why or why not?
4. We saw in the ELISA lab that by increasing the speed of an assay we decreased the
sensitivity. Is the same true when comparing traditional plating to colony blot
hybridization? Why or why not? (hint: base your answer on your results)
42
LAB EXERCISE 11: POLYMERASE CHAIN REACTION (PCR) LAB
PCR is a method for rapid amplification of short pieces of DNA using DNA polymerase, and
was first described by Kleppe, Ohtsuka, and Kleppe in 1971. Saiki and colleagues went on to
develop a primer-directed enzymatic amplification of DNA using a thermo-stable polymerase.
PCR is one of the most widely applied procedures in biology today. Applications include the
following:
• Identification of species using species- or type-specific primers
• Molecular characterization: DNA fingerprinting
• DNA Sequencing: single primer is used to amplify one strand to be sequenced
• Cloning of targeted genes
• Gene expression studies using reverse transcriptase PCR (RT-PCR) to detect RNA
transcripts of specific genes
• Quantification of bacteria or expressed genes
PCR amplification is one of the most powerful diagnostic tools available for
identification of food borne pathogens, providing extremely rapid and specific detection. PCR
primers are currently available for every major pathogen, and some of the assays require less
than an hour. PCR will often detect as little as one microorganism in a sample. Some sample
media can be very complex with a large background of other organisms, such as fecal samples.
Thus, this method is exceptionally useful for finding the “needle in the haystack”.
This procedure is based on 1) the specificity of DNA sequences, called primers, which
serve as species-specific markers, and 2) the thermal stability of the Taq polymerase enzyme.
In PCR reactions, a gene target is selected that is specific for the organism or gene of interest.
For example, PCR primers for Salmonella are based on the virulence gene invA. Thus, detection
is not only specific for the species but may also determine if strains have virulence potential.
Through a series of enzymatic reactions, a small amount of DNA is amplified exponentially to
produce thousands of DNA fragments that can then be visualized on an agarose gel. Electrical
charge is used to separate DNA fragments by size on the gel. There is a positive charge at one
end of the gel box and a negative charge at the other end. DNA is negatively charged and will
migrate toward the positive electrode. Smaller fragments of DNA move through the gel more
quickly than larger fragments, which allows for separation by size. After migration, DNA-
specific dyes are then used to visualize the PCR product.
The reaction mixture is prepared in small volumes of 10 to 100µL and contains the
following components:
a) Template or target DNA (10 to 1000 ng) from the microorganism of interest that you are
tying to detect in your sample
b) Primers or short pieces of DNA (14-45 bases) that correspond to your target DNA and
match up or hybridize in different directions at 2 separate locations that are usually 500
to 3000 bp apart.
c) Taq polymerase is a heat stable enzyme that functions optimally around 72ºC, but is
stable at higher temperatures, which are needed for denaturation of DNA. Thus the
enzyme is added only once but is repeatedly “reused” for the multiple cycles of the
amplification reactions
d) dNTPs are nucleotide bases (ATP,CTP,GTP,TTP) or building blocks of DNA.
e) Buffers and salts at concentrations that are optimized for the reaction. Generally the
MgCl2 concentration is adjusted for optimization.
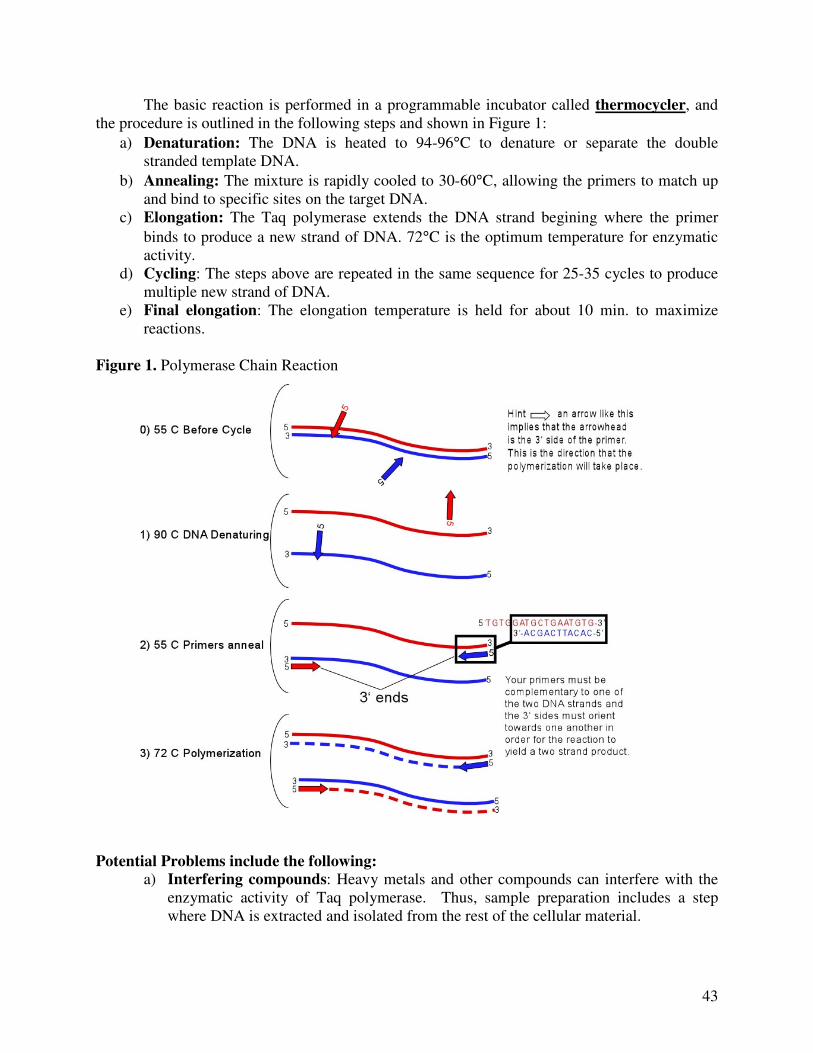
43
The basic reaction is performed in a programmable incubator called thermocycler, and
the procedure is outlined in the following steps and shown in Figure 1:
a) Denaturation: The DNA is heated to 94-96°C to denature or separate the double
stranded template DNA.
b) Annealing: The mixture is rapidly cooled to 30-60°C, allowing the primers to match up
and bind to specific sites on the target DNA.
c) Elongation: The Taq polymerase extends the DNA strand begining where the primer
binds to produce a new strand of DNA. 72°C is the optimum temperature for enzymatic
activity.
d) Cycling: The steps above are repeated in the same sequence for 25-35 cycles to produce
multiple new strand of DNA.
e) Final elongation: The elongation temperature is held for about 10 min. to maximize
reactions.
Figure 1. Polymerase Chain Reaction
Potential Problems include the following:
a) Interfering compounds: Heavy metals and other compounds can interfere with the
enzymatic activity of Taq polymerase. Thus, sample preparation includes a step
where DNA is extracted and isolated from the rest of the cellular material.

44
b) Sample size: Some organisms may be present in very low numbers in foods.
Although PCR can detect 1 organism in a sample, generally very small samples are
analyzed. These problems can be addressed by testing multiple samples and
enrichment of samples.
c) Viability question: DNA can be extremely stable under certain conditions and PCR
may detect DNA that is present from organisms that are not alive
d) Quantification: The amount of product produced roughly reflects that amount of
template. Therefore more heavily contaminated samples will produce more fragments
and exhibit a stronger band. However, exact quantification requires more complex
procedures or special equipment.
PROTOCOL:
Ground rules for molecular biology:
1. Always were gloves (DNases on hands destroy DNA, some of the reagents used are
carcinogens).
2. Be aware of cross-contamination (change tips frequently and NEVER use the same tip
for different reagents).
3. Always run controls (positive and negative).
4. Due to the extreme sensitivity of the PCR assay, false positive are possible if samples are
cross contaminated. False negatives are possible due to experimental error usually
arising from pipetting problems. Therefore, positive and negative controls are extremely
important, and data is only acceptable when controls show the expected results.
Colonies from the previous lab have been selected for DNA extraction and PCR analysis.
The PCR primers are based on sequences from the invA gene and should produce a PCR product
about 457 bp in length. You will perform PCR amplification with your Salmonella strain. Each
group will perform PCR on the following samples:
1. Positive control: DNA from a known Salmonella strain that is positive for invA
2. Negative control for specificity: DNA from V. vulnificus
3. Negative control for contamination: PCR reaction with everything except the target
DNA. Water will be added to compensate for the volume.
DAY 1:
Material needed:
Salmonella culture
Microcentrifuge tubes
Sterile PBS
DNA templates from target strain (which you will be extracting)
PCR tubes
PCR master mix reaction: water, DNA, Taq, dNTPs, buffer, and primers.
PCR racks
10-20 µl pipettors
200 µl pipettors
Filtered pipette tips
Centrifuge
Heat Block
Thermocycler

45
DNA extraction:
1. Pipette 1 ml from each of the two (Vibrio spp. and Salmonella spp.) L Broth cultures into
two microcentrifuge tubes. Label them accordingly.
2. Centrifuge your tubes at 10,000 rpm for 10 min.
3. Pour off the supernatant, taking care not to dislodge the pellet.
4. Add 400 µl of sterile PBS to each microcentrifuge tube.
5. Vortex the tubes until the pellet is completely resuspended.
6. Boil the tubes at 100°C for 5 min in the heat block.
7. Centrifuge tubes at 13,000 rpm for 3 min.
8. Transfer supernatants to sterile microcentrifuge tubes taking care not to disrupt the pellet.
The supernatants contain your DNA, DO NOT DISCARD!!
PCR amplification procedure:
1. Prepare a master mix in a separate tube on ice. Reaction mixture given below is for 1
sample. You will need to prepare a mixture for 4 samples (multiply volumes by 4). Write
in the final volume before starting and check off each item as it is added.
Volume Final Volume
Primer forward 1.0 µL
Primer reverse 1.0 µL
dNTP 2.5 µL
10x buffer 2.5 µL
Water 16.75 µL
Add last: Taq 0.25 µL
**Do not add Taq until you are ready to add the DNA to your PCR tube and you
are ready to go into the thermocycler.
Keep all your reagents on ice.
2. Label PCR tubes to indicate sample and lab group.
3. Add 24µL of master mix to each tube.
4. To your PCR tube, add 1µL of your template (either DNA or water).
5. Thermocycler should be started and preheated. Once temperature is up, place tubes in
thermocycler, and start program. This gives you a “hot start”.
DAY 2:
Material needed:
Gel boxes with combs and trays
Power units
UV source
Camera/film
1% Agarose
1X TAE
Loading dye
Ethidium Bromide (EtBr)
PCR rack
10-20 µl pipettes
Filtered tips
Gel electrophoresis:

46
1. Add 5µL EtBr (CARCINOGEN!! WEAR GLOVES!) to a flask containing previously
prepared 1% agarose gel that is kept warm in the water bath.
2. Set gel tray into gel box with rubber ends forming a seal with the side of the gel box.
3. Insert the comb with the 12 pronged-end facing downward.
4. Pour the gel into the gel tray. Avoid making bubbles in the gel. If bubbles do form use a
sterile pipette tip to pop them immediately, before the gel sets.
5. When gel is completely solidified (approximately 15 min), remove comb and rotate gel
tray so the wells are on the same side of the gel box as the negative electrode.
6. Carefully load 12µL of the samples to any lane but the first on the gel.
7. Carefully load 5µL of marker to the first lane.
8. Run gel at 100mV for ½ h.
9. View gel on UV light (WEAR SAFETY GLASSES!).
Molecular weight markers are run simultaneously to estimate the size of the fragments.
Ethidium bromide is added to the gel to bind DNA and make it visible under UV light.
Lab Questions
1. On what basis do you select primers used to identify target DNA, and how do they
determine the specificity of PCR?
2. Define positive/negative controls and explain why they are important.
3. Why do you need a thermostable enzyme?
4. From the PCR products we obtained above, what other steps could be done to further
characterize the DNA and the strains from which they were derived?
5. Define template, primers, and elongation.
Helpful website:
http://dlab.reed.edu/projects/vgm/vgm/VGMProjectFolder/VGM/RED/RED.ISG/
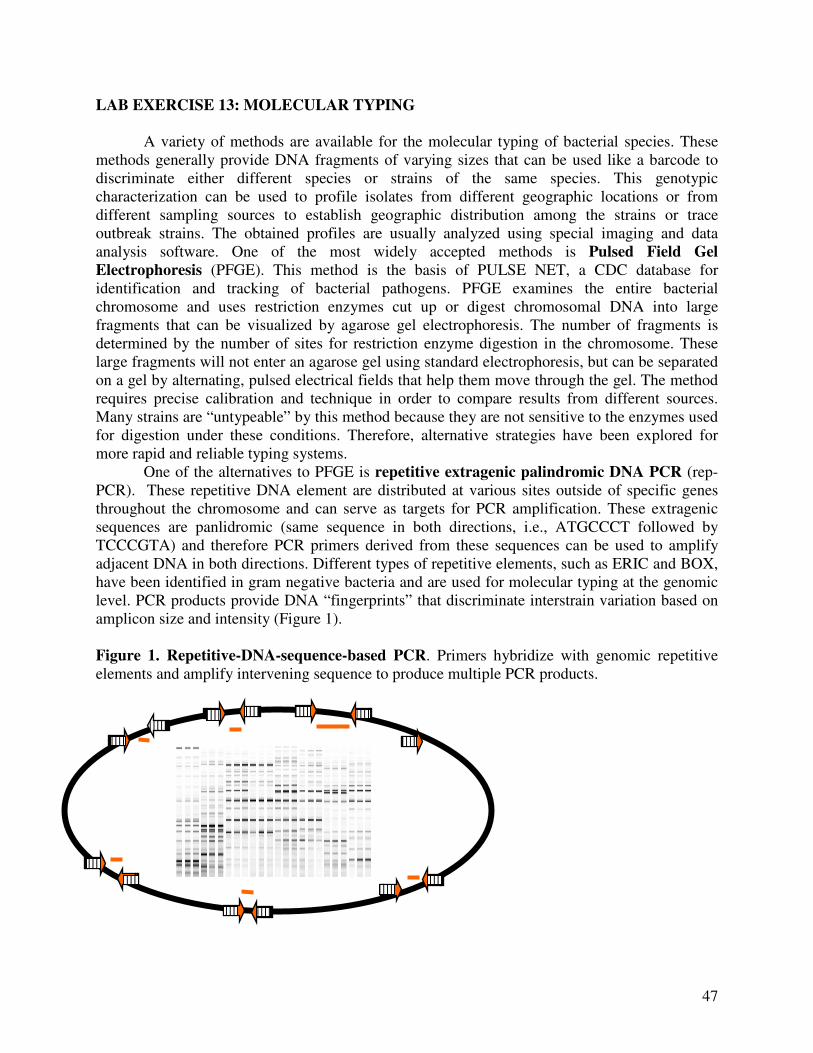
47
LAB EXERCISE 13: MOLECULAR TYPING
A variety of methods are available for the molecular typing of bacterial species. These
methods generally provide DNA fragments of varying sizes that can be used like a barcode to
discriminate either different species or strains of the same species. This genotypic
characterization can be used to profile isolates from different geographic locations or from
different sampling sources to establish geographic distribution among the strains or trace
outbreak strains. The obtained profiles are usually analyzed using special imaging and data
analysis software. One of the most widely accepted methods is Pulsed Field Gel
Electrophoresis (PFGE). This method is the basis of PULSE NET, a CDC database for
identification and tracking of bacterial pathogens. PFGE examines the entire bacterial
chromosome and uses restriction enzymes cut up or digest chromosomal DNA into large
fragments that can be visualized by agarose gel electrophoresis. The number of fragments is
determined by the number of sites for restriction enzyme digestion in the chromosome. These
large fragments will not enter an agarose gel using standard electrophoresis, but can be separated
on a gel by alternating, pulsed electrical fields that help them move through the gel. The method
requires precise calibration and technique in order to compare results from different sources.
Many strains are “untypeable” by this method because they are not sensitive to the enzymes used
for digestion under these conditions. Therefore, alternative strategies have been explored for
more rapid and reliable typing systems.
One of the alternatives to PFGE is repetitive extragenic palindromic DNA PCR (rep-
PCR). These repetitive DNA element are distributed at various sites outside of specific genes
throughout the chromosome and can serve as targets for PCR amplification. These extragenic
sequences are panlidromic (same sequence in both directions, i.e., ATGCCCT followed by
TCCCGTA) and therefore PCR primers derived from these sequences can be used to amplify
adjacent DNA in both directions. Different types of repetitive elements, such as ERIC and BOX,
have been identified in gram negative bacteria and are used for molecular typing at the genomic
level. PCR products provide DNA “fingerprints” that discriminate interstrain variation based on
amplicon size and intensity (Figure 1).
Figure 1. Repetitive-DNA-sequence-based PCR. Primers hybridize with genomic repetitive
elements and amplify intervening sequence to produce multiple PCR products.
48
In this lab, we will compare the genetic profiles of V. vulnificus strains isolated from oysters and
clinical case of septicemia. Rep-PCR genomic typing will be performed using DiversiLab
Microbial Typing System (Bacterial Barcodes, Inc., Houston, TX). Extracted DNA will be
amplified by PCR using the DiversiLab Salmonella kit (DL-SE01).
PROTOCOL You will do PCR simultaneously on an unknown strain of V. vulnificus, a positive control, a
negative control for a total of 3 PCR reactions/group.
1. Positive controls: DNA from 8 different V. vulnificus strains (one per group; 4 from
oyster and 4 from environmental).
2. Negative control: Provided in the DiversiLab Kit.
3. Positive control : Provided in the DiversiLab Kit.
Material needed:
DNA templates
Gel electrophoresis
Equipment: PCR racks, forceps, 10-20 µl pipettors (6), 100-200 µl pipettors (6), Filtered tips
(6 boxes each size), PCR tubes (6 containers with 10 in each), 1.5 ml tubes (6 containers with
10 in each), 6 gel boxes with combs, tray, 6 power units, UV source, Camera/film.
DAY 1:
PCR amplification procedure:
1. Prepare a master mix in a separate tube on ice. Reaction mixture given below is for 1 sample.
You will need to prepare a mixture for 4 samples. In other words multiply volumes by 4 and
add to one tube. Write in the final volume before starting and check off each item as it is
added. Keep all your reagents on ice.
Volume Final Volume
Rep-PCR MM1 18.0 µL
GeneAmp® 10x PCR Buf. 2.5 µL
Primer Mix P 2.0 µL
AmpliTaq DNA Polymerase 0.5 µL
2. Label PCR tubes to indicate sample and group. Add DNA, positive, and negative control to
each tube.
3. Add 23.0 µL of master mix to each tube.
4. To each PCR tube, add 2µL DNA, 2µL of the positive, and 2µL of the negative controls.
5. Vortex and return tubes in ice.
6. Program and preheat thermocycler. Once temperature is up, pause and place tubes in
thermocycler. Start program. This gives you a “hot start.”
DAY 2:
Gel electrophoresis:
The PCR reaction produces multiple DNA fragments for each strain and will be electrophoresed
on an agarose gel. DNA is prepared in a “loading buffer” which contains tracking dye and
glycerol to prevent the DNA from diffusing out of the well. The DNA is applied to the gel,
which is placed in an electrical field, and DNA migrates to the positive electrode due to the net
negative charge of DNA. The agarose acts as a molecular sieve with the shorter fragments of

49
DNA migrating faster. Molecular weight markers are run simultaneously to estimate the size of
the fragments. Ethidium bromide (Carcinogen!! Dispose properly and use gloves!) is added to
the gel to bind DNA and make it visible under UV light.
1. Prepare 1x TAE buffer from 20x stock.
2. Prepare agarose gel (2% in TAE buffer or 2 g in 100 ml). Microwave to melt, cool to 50C,
add 10 µl EtBr (CARCINOGEN!! WEAR GLOVES!), and pour gel.
3. Add loading buffer to PCR product at a ratio of 1:6. Vortex and centrifuge.
4. Fill gel box with buffer, place gel in box.
5. Carefully load 12 µl of sample or markers to each lane on gel.
6. Run gel at 100mV for ½ h.
7. View gel on UV light (POSSIBLE EYE DAMAGE!!! WEAR SAFETY GLASSES!)
Rep-PCR Demonstration in Building 866
The PCR products of the 8 V. vulnificus strains tested will be loaded on the Bacterial Barcode
chip, to be analyzed by the Bioanalyzer (As shown in the flow chart below).
4. Dendrogram are based on similarity of banding patterns and indicate the relatedness of
the DNA targets among different strains.
1. PCR amplicons are loaded on the chip 2. Chip is loaded in the Bioanalyzer
3. Band size and intensity is calculated as amplicons are scanned during microcapilary electrophoresis

50
References 1. Beyer, W., F. Mukendi, M. Kimmig, and P. Böhm, 1998. Suitability of repetitive-DNA-
sequence-based PCR fingerprinting for characterizing epidemic isolates of Salmonella
enterica serovar Saintpaul. J. Clin. Microbiol. 36:1549-1554.
2. Jensen, M. A., J. A. Webster, and N. Straus, 1993. Rapid Identification of Bacteria on the
Basis of Polymerase Chain Reaction-Amplified Ribosomal DNA Spacer Polymorphism.
Appl and Environ Microbiol. 59(4):945-942.
3. Versalovic, J., F. de Bruijn, and J. Lupski, 1998. Repetitive sequence-based PCR (rep-
PCR) DNA fingerprinting of bacterial genomes. In: Bacterial Genomes: Physical
Structure and Analysis. Chapman & Hall: New York.
Lab Questions
1. How do the banding patterns on the gels relate to the origin of the strains?.
2. What are some sources of variability found in genetic typing assays?
3. Why where we able to use rep-PCR Salmonella typing kit for V. vulnificus typing?
4. Which assay would you expect to be more specific: regular PCR, rep-PCR or ELISA?
Which assay would be more sensitive?