LAB 9 DNA & Gene Expression - Los Angeles Mission College Lab9 - DNA Gene... · 1 LAB 9 – DNA &...
24
1 LAB 9 – DNA & Gene Expression Overview In this laboratory you will investigate three aspects of genes: 1) the structure of DNA - the molecule of which genes are made; 2) the copying or replication of DNA as it occurs during S phase of the cell cycle, and 3) the expression of genes into the protein products they encode. In addition, you will learn how to isolate DNA from cells and how DNA is analyzed in the laboratory by agarose gel electrophoresis in the context of a hypothetical “crime scene investigation”. Introduction D eoxyribon ucleic a cid, or DNA for short, is a nucleic acid commonly referred to as “genetic material”. As you learned in last week’s laboratory, genes are actually specific segments of chromosomes which are simply really long pieces of DNA! So given the obvious importance of DNA we want to make sure you understand DNA structure , how DNA is copied in cells, and how specific genes are expressed into “gene products”, which for most genes is a specific protein. While it would be good to learn about all these aspects of DNA before learning how to purify and analyze it in the laboratory, for practical reasons it will be necessary to do things the other way around. So let’s start with gel electrophoresis… Part 1: GEL ELECTROPHORESIS & DNA PURIFICATION Gel electrophoresis of DNA The next exercise you will begin involves a technique you have no doubt seen on crime investigation shows such as “CSI”, though you probably did not realize what the actors were actually doing (or pretending to do!). The technique is called agarose gel electrophoresis and it is used to separate a collection of DNA fragments based on differences in DNA fragment length. Agarose is a gel-like polysaccharide derived from a type of seaweed and is routinely used for this purpose. From start to finish this exercise will take ~2 ½ hours, during most of which you will be doing other things. So our goal at this point is to get the exercise started with as little delay as possible. The results of your gel will be addressed later in Part 4 as part of a hypothetical crime scene investigation. For now, let’s give you a quick overview of the technique itself so you can get your agarose gel electrophoresis started. To carry out agarose gel electrophoresis you will need the following: an electrophoresis chamber or “gel box” filled with electrophoresis buffer an agarose gel slab containing wells to load DNA samples several DNA samples to load on your agarose gel a power supply to run electrical current through your agarose gel
-
Upload
truongkien -
Category
Documents
-
view
215 -
download
0
Transcript of LAB 9 DNA & Gene Expression - Los Angeles Mission College Lab9 - DNA Gene... · 1 LAB 9 – DNA &...

1
LAB 9 – DNA & Gene Expression
Overview
In this laboratory you will investigate three aspects of genes: 1) the structure of DNA - the
molecule of which genes are made; 2) the copying or replication of DNA as it occurs during S
phase of the cell cycle, and 3) the expression of genes into the protein products they encode. In
addition, you will learn how to isolate DNA from cells and how DNA is analyzed in the
laboratory by agarose gel electrophoresis in the context of a hypothetical “crime scene
investigation”.
Introduction
Deoxyribonucleic acid, or DNA for short, is a nucleic acid commonly referred to as “genetic
material”. As you learned in last week’s laboratory, genes are actually specific segments of
chromosomes which are simply really long pieces of DNA! So given the obvious importance of
DNA we want to make sure you understand DNA structure , how DNA is copied in cells, and
how specific genes are expressed into “gene products”, which for most genes is a specific
protein. While it would be good to learn about all these aspects of DNA before learning how to
purify and analyze it in the laboratory, for practical reasons it will be necessary to do things the
other way around. So let’s start with gel electrophoresis…
Part 1: GEL ELECTROPHORESIS & DNA PURIFICATION
Gel electrophoresis of DNA
The next exercise you will begin involves a technique you have no doubt seen on crime
investigation shows such as “CSI”, though you probably did not realize what the actors were
actually doing (or pretending to do!). The technique is called agarose gel electrophoresis and it
is used to separate a collection of DNA fragments based on differences in DNA fragment length.
Agarose is a gel-like polysaccharide derived from a type of seaweed and is routinely used for this
purpose. From start to finish this exercise will take ~2 ½ hours, during most of which you will
be doing other things. So our goal at this point is to get the exercise started with as little delay as
possible. The results of your gel will be addressed later in Part 4 as part of a hypothetical crime
scene investigation. For now, let’s give you a quick overview of the technique itself so you can
get your agarose gel electrophoresis started.
To carry out agarose gel electrophoresis you will need the following:
an electrophoresis chamber or “gel box” filled with electrophoresis buffer
an agarose gel slab containing wells to load DNA samples
several DNA samples to load on your agarose gel
a power supply to run electrical current through your agarose gel

2
Below is a diagram of an electrophoresis chamber or “gel box” containing an agarose gel
submerged in electrophoresis buffer (liquid that will conduct electrical current) as viewed from
the side:
DNA molecules have a net negative charge for reasons you will learn later on. When a DNA
sample is placed in the well of an agarose gel submerged in electrophoresis buffer and subjected
to electrical current, the DNA will be drawn toward the positive electrode, the cathode (colored
red), and away from the negative electrode, the anode (colored black). The rate at which DNA
fragments move through the porous agarose gel matrix is inversely proportional to the length of
the DNA fragment. In other words, the shorter the DNA fragment, the faster it will move
through the gel. Likewise, the longer the DNA fragment, the slower it will move through the
gel. The picture below shows an agarose gel (looking down onto the gel) after it has been run
and stained to reveal the DNA fragments which are dark blue:
This gel reveals that the DNA sample loaded
into the first well (lane 1) contains 9 bands
and thus 9 DNA fragments of different sizes.
The DNA samples in lanes 2 and 3 contain
one and two different fragment sizes,
respectively. The fragments that moved the
furthest down the gel are the shortest and the
fragments that moved the least distance are
the longest. Keep in mind that each band
you see on a stained gel is not a single piece
of DNA but literally billions of copies of the
same DNA fragment.
Now that you have a basic idea of how gel electrophoresis works, we need to review how to
“load” and “run” an agarose gel which involves more than it may seem. To load your samples
you will need to understand how to use a micropipettor like the one shown on the next page.
This is what you will use to load your DNA samples, and you need to know how to use it
properly so that you do not lose your DNA samples or damage the agarose gel in the process.
cathode anode
1 2 3 –
+

3
A micropipettor like the one shown here is a
device used to very accurately measure
microliter (l) volumes of liquid. You will
use a micropipettor like this one to load and
run actual DNA samples on an agarose gel,
however, before you do so it is important to
familiarize yourself with the instrument and
to practice using it. First let’s get
acquainted with each part of the
micropipettor and its corresponding
function.
NOTE: Since there is only one micropipettor
per table, it would be best if someone reads the
next 3 paragraphs aloud as the micropipettor is
passed around your group for each person to
see and experience the function of each part:
The end of the micropipettor labeled “tip attachment” is where you will attach a disposable plastic tip.
The liquid you measure will be contained within the tip and thus will not make contact with the
micropipettor itself. When you are finished measuring your liquid, you will discard the tip and use a new
tip for the next measurement. This avoids contamination of your sample as well as the micropipettor.
The tip eject button will move the tip eject shaft downward to eject the disposable tip.
The volume readout shows the number of microliters (l) the micropipettor is set to measure. The
volume readout is adjusted by turning the volume adjustment knob. Each micropipettor has a range of
volumes it is designed to measure. If you set the micropipettor to a volume outside this range you can
damage the instrument’s internal mechanism which may destroy its accuracy. The micropipettor you will
be using is commonly called a “P200” and is designed to measure volumes ranging from 20 to 200 l.
Thus, you should never adjust the volume readout to less than 20 l or higher than 200 l for this
particular micropipettor.

4
The plunger is pressed downward with your thumb and then released to draw liquid into the disposable
tip. The measured liquid can then be expelled from the tip by depressing the plunger. If you press down
on the plunger you will reach a point of resistance called the “first stop” as shown in the illustration.
When depressed to the first stop, the plunger will draw in the volume indicated on the volume readout as
it is released. To measure 50 l for example, you will set the volume readout to “050”, submerge the tip
on the end of the micropipettor into the liquid to be measured, and slowly release the plunger to its rest
position. The liquid can then be expelled from the tip by depressing the plunger to the first stop. If any
liquid remains in the tip at this point, the plunger can be depressed beyond the first stop toward the
“second stop” (see illustration). This will force any remaining liquid out of the tip. The only time you
will concern yourself with the second stop is for this purpose.
Once everyone in your group is acquainted with the P200 micropipettor, you will all practice
using the micropipettor to load a liquid sample on an agarose gel.
*Exercise 1A – Using a micropipettor to load an agarose gel
In addition to a P200 micropipettor, your table should have a rack of disposable micropipettor
tips, a small tube of blue liquid, and glass Petri dish containing a small agarose gel submerged in
water. Everyone at your table should practice loading some of the blue liquid into the agarose
gel as described below. Before you begin, be sure you are in a comfortable position with the
practice gel in front of you and all other materials you will need within comfortable reach:
1. adjust the volume readout of the micropipettor to 25 l
2. place a disposable tip snugly on the end of the micropipettor by firmly inserting it into a
tip in the rack
3. open the small tube of blue liquid, depress the plunger to the first stop, immerse the end of
the tip into the liquid, and slowly release the plunger
4. position the micropipettor with the tip just above the specific well in the gel that you want
to load, being sure the tip is in the liquid submerging the gel but NOT deep into the well
(you don’t want to poke a hole in the gel!)
5. use a finger from your off hand to
steady the micropipettor as shown in
the picture and slowly depress the
plunger to the first stop to expel the
liquid into the well (you can push
beyond the first stop expel any
residual liquid), and be sure NOT to
release the plunger just yet!
6. move the tip out of the liquid, and then release the plunger (this is extremely important, you
do NOT want to release the plunger before removing the tip from the liquid or else you will
pull most of the sample back into the tip)
7. dispose of your used tip into the small beaker at your table
NOTE: It is very important that you don’t move the gel once samples have been loaded, otherwise the
samples may come out of the wells after which they are lost, you can’t get them back!

5
Now that each member of your group has had a chance to practice loading an agarose gel, we
can move on to the next exercise and carry out the agarose gel electrophoresis of DNA for real.
The context of this exercise will be the analysis of DNA samples from a hypothetical crime
scene and several suspects. For the moment we just want to get your gel running, so we will
address the principles behind this exercise later in the lab after you have a better understanding
of DNA structure.
*Exercise 1B – Agarose gel electrophoresis of DNA
Obtain a set of six small tubes labeled A, B, C, D, E and F from your instructor. These are the
six DNA samples you will use for this exercise. The agarose gel you will load is in an
electrophoresis chamber or “gel box” which your instructor will specify. Position the gel box so
that it is in a comfortable position to load and close enough to the power supply so that it can
connected without moving the gel (once loaded you cannot move the gel!). Load, run and stain
your gel as described below:
1. load 40 l of each DNA sample on
your agarose gel as indicated in the
diagram to the right:
2. place the lid on the gel box so that the red electrode (+) is connected on the side opposite the
wells (be careful to do this gently to avoid disturbing your samples)
3. plug the wires from the lid into the power supply, matching red to red and black to black
4. turn on the power supply and set it to ~100 volts (and press “run” if necessary)
5. allow the gel to run for 1 hour and 30 minutes (set a timer so you don’t forget!)
At this point move on to “DNA purification” and return to this exercise when the gel run is complete.
6. turn off the power supply, disconnect the lid and carefully remove your gel in its tray and
gently slide it off the gel tray into the plastic dish provided
7. place one of the blue staining cards, blue side down, directly onto the gel surface being sure it
covers the whole gel
8. place the gel tray on top and a beaker on top of that to ensure adequate contact between the
gel and the staining card, leave for 5 minutes, then remove and discard the staining card
9. submerge the gel in deionized water and let it soak with occasional agitation for 10 minutes
10. discard the water by gently holding the gel against the bottom of the plastic dish and pouring
into the sink, and soak the gel in fresh dionized water twice more for 10 minutes each
Once you complete the staining and washing of your gel, go to Part 4 on page 17 to finish the exercise.

6
DNA purification
DNA is surprisingly easy to purify from plant and animal tissues. You may recall from an earlier
lab that chromosomes, which are made of DNA, are stored in the nuclei of eukaryotic cells. So
to purify chromosomal DNA you need to somehow release it from the cell nuclei and then
separate it from all other cellular materials. To do this will require three general steps:
1) breaking open cells in the tissue to release the DNA from cell nuclei
o this is done by mashing the tissue in a solution with detergent and salt to break up
cell membranes
2) removing the insoluble material (the DNA remains dissolved in liquid since it is soluble)
o this is done by filtering the tissue “mash” and retaining the liquid portion
3) precipitating the DNA in the liquid collected (making the DNA insoluble)
o this is done by adding the right amounts of salt and alcohol to make the DNA insoluble
Now that you have a basic understanding of the principles
involved, let’s purify some DNA from strawberry tissue…
*Exercise 1C – Purification of DNA from strawberry tissue
Carefully follow the steps below, and in about 5 minutes you will have isolated strawberry DNA!
1. add 4 ml of ice cold detergent/salt solution to the strawberry slice in a Ziploc bag which
should already be at your table
2. remove most of the air from the Ziploc bag, seal it, and thoroughly mash the
strawberry slice in the detergent/salt solution (squeeze with hands or press on table top)
3. set up a funnel over a glass beaker and line the funnel with 2 or more layers of cheese
cloth (fold the cheese cloth into 2 or more layers)
4. transfer as much of the strawberry mash as you can from the Ziploc bag to the cheese cloth in
the funnel
5. allow the liquid from the strawberry mash to pass through the cheesecloth and collect in the
beaker (you can squeeze the cheesecloth to help as much liquid as possible pass through)
6. add 10 ml of ice cold ethanol to the liquid collected in the beaker and mix thoroughly by
swirling the beaker
7. used a hooked glass rod to stir and collect the precipitated DNA

7
Part 2: DNA STRUCTURE & DNA REPLICATION
DNA Structure
Like the proteins and polysaccharides you learned about in Lab 4, DNA is a polymer. Recall
that a polymer is a chain of smaller molecules or monomers. For example, proteins are
polymers of amino acids (which are the monomers in proteins). So if DNA is a polymer of
smaller monomers, what are the monomers in DNA? The answer is nucleotides.
All nucleotides in DNA have the same basic
structure: the sugar deoxyribose connected
to a phosphate group on one side and to
one of four possible nitrogenous bases
(“bases” for short) on the other. The
phosphate group is acidic and thus
negatively charged. This is why DNA has a
net negative charge. Because all nucleotides
in DNA contain deoxyribose they are called
deoxyribonucleotides, though for simplicity
we will just call them “nucleotides”. As
shown below, the four different nucleotides
in DNA are each referred to by their base:
adenine (A), cytosine (C), guanine (G) and
thymine (T).

8
These four nucleotides can be linked together in any order to form a nucleotide polymer that is
referred to as a single strand of DNA like the example shown below.
Notice that each nucleotide is connected to
the next via the sugar (deoxyribose) and
phosphate, thus forming what is called the
“sugar-phosphate backbone” of a DNA
strand. Notice also that each end of the
sugar-phosphate backbone is different: what
we call the 5’ end has a free phosphate
group, while the other end has a free
hydroxyl (–OH) group on the sugar, what
we call the 3’ end. The order of the
nucleotides in a DNA strand constitutes its
“DNA sequence”.
The base of each nucleotide in a strand of
DNA sticks out perpendicular to the sugar-
phosphate backbone. This is important
because DNA is actually a double-stranded
molecule. The two strands of a DNA
molecule are held together by interactions
between the bases on each strand, a
phenomenon known as base pairing.
Below are three different illustrations, each representing a double-stranded DNA molecule.
Notice the base pairing between the two strands and that they are anti-parallel (the 5’ and 3’
ends are oriented in the opposite direction). The two strands also form a coil or helix, hence the
reference to DNA as a double-stranded helix or simply a “double helix”.
G C
T A
A T
G
G
C
C
A T
GC
T A
T A
A T
A T
G C
A T
O
O
OH
–OP
OO
–OP
O
OO
P–O
–OO
P
OO
O
OH
H2C
H2C
H2C
H2C
O
O
O
O
O
O
O
O
PO–
O–
O–
O–
OH
HO
O
O
O
P
P
P
O
O
O
O
O
O
O
O
T A
G C
C G
A T
CH2
CH2
CH2
CH2
5’
5’
3’
3’

9
The base-pairing in a DNA molecule involves chemical attractions between certain bases due to
hydrogen bonding. For base pairing to occur, the bases must have complementary chemical
groups (e.g., partial negative matched with partial positive or vice versa) and complementary
sizes (one large base such as A or G and one small base such as C or T). For these two reasons,
the base pairing in DNA is limited to adenine with thymine (A:T base pairs) and guanine with
cytosine (G:C base pairs):
The fact that base pairing in DNA is limited to A:T and G:C gives DNA a remarkable property:
the sequence of one DNA strand determines the sequence of the other. For example, if the
sequence of one DNA strand is all A’s, the other strand must be all T’s for base pairing to occur
between the strands. Let’s consider another example starting with the sequence of one strand:
5’ – C A T G C A A C G T C C A A A T T A G T – 3’
Since each strand of DNA molecule must be complementary, the two strands must be in an
anti-parallel orientation and have nucleotides that will base pair with all the nucleotides on the
opposite strand. Therefore, the double stranded sequence of this short DNA molecule must be:
5’ – C A T G C A A C G T C C A A A T T A G T – 3’
3’ – G T A C G T T G C A G G T T T A A T C A – 5’
Look carefully at this sequence and you will see that each strand is, in fact, anti-parallel to the
other, and all of the nucleotides positioned across from each other can base pair (A:T or G:C).
These two criteria must be met, otherwise the strands cannot interact with each other to form a
double helix. So if you know the sequence of one DNA strand you can easily determine the
sequence of the other since there is only one possibility.
At this point you know enough about DNA structure to do the next exercise in which you will
build a model of double-stranded DNA after being given the sequence of a single DNA strand…

10
*Exercise 2A – Building a double-stranded DNA molecule
To build your DNA molecule you will use the model kit located at your table. Acquire a single-
strand DNA sequence from your instructor and then follow the instructions below:
1. on your worksheet, write the single-strand DNA sequence you’ve been given, indicating the
5’ and 3’ ends
2. use your model kit to build each nucleotide in your single strand sequence
3. assemble the nucleotides in the order of your sequence, beginning at the 5’ end
4. write the complementary sequence to your original single-strand sequence on your worksheet
5. build the complementary sequence as you did in steps 2 and 3 above
6. put the two DNA strands that you’ve just built together to form a double-stranded DNA
molecule, being sure they are anti-parallel and that the base pairs match up properly
NOTE: Save the DNA molecule you have just built for use in Exercise 2B.
DNA Replication
In Lab 7 you learned that when a cell enters the cell cycle, in order to divide it must first copy all
of its chromosomes – all of its DNA. This, as you may also recall, will occur during S phase (S
for DNA Synthesis). The process of copying DNA, DNA synthesis, is formally known as DNA
replication. DNA replication is an extremely complex process involving many different
enzymes playing specific roles in the process. In the lecture part of this course you will probably
learn about some of these enzymes, however for the purpose of this laboratory we will not be
concerned with these details. We simply want you to learn how the process unfolds, knowing
that many different enzymes are required.
The process of DNA replication depends on base pairing between nucleotides. As it turns out,
each original DNA strand is used as a template or guide to produce a complementary DNA
strand. This requires that the base pairs between the two original strands be disrupted, thus
“unzipping” the DNA. A new strand with complementary nucleotides is then produced for each
original strand. The net result is two identical copies of the original DNA molecule! Let’s
revisit the DNA sequence in the example from the previous section to see how this would work:
5’ – C A T G C A A C G T C C A A A T T A G T – 3’
3’ – G T A C G T T G C A G G T T T A A T C A – 5’
For the above DNA molecule to be copied by DNA replication, the two strands must first be
separated:
5’ – C A T G C A A C G T C C A A A T T A G T – 3’
3’ – G T A C G T T G C A G G T T T A A T C A – 5’
11
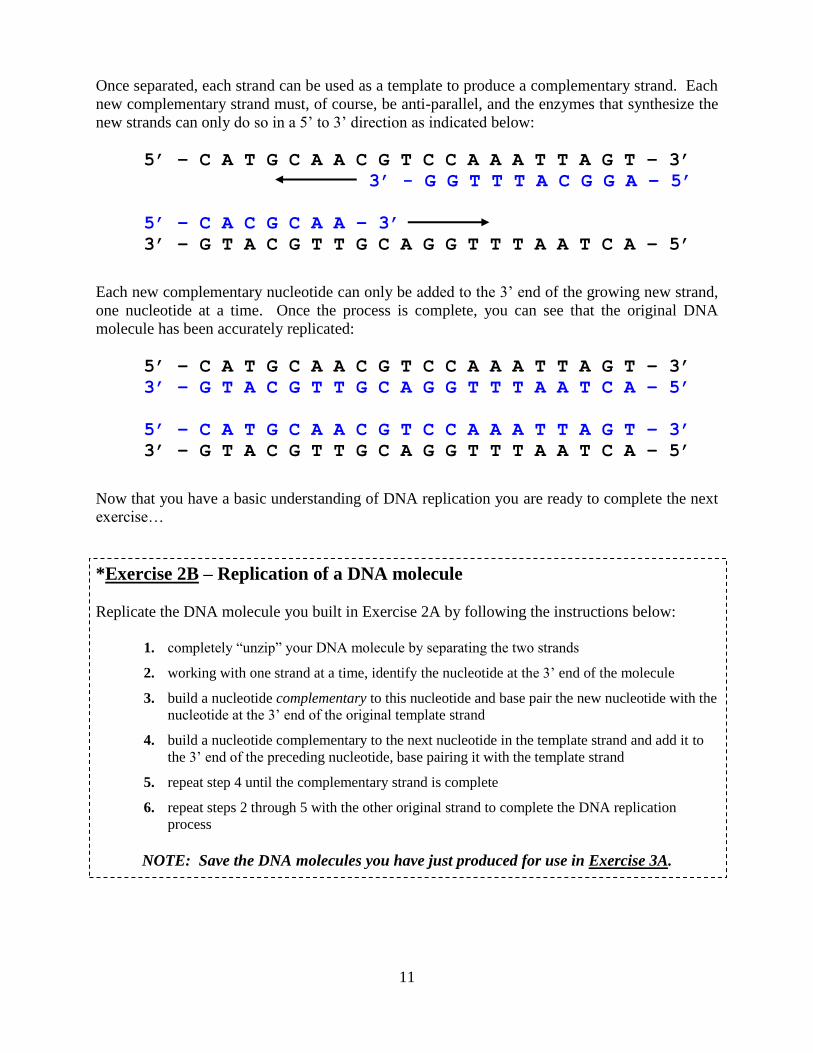
Once separated, each strand can be used as a template to produce a complementary strand. Each
new complementary strand must, of course, be anti-parallel, and the enzymes that synthesize the
new strands can only do so in a 5’ to 3’ direction as indicated below:
5’ – C A T G C A A C G T C C A A A T T A G T – 3’
3’ - G G T T T A C G G A – 5’
5’ – C A C G C A A – 3’
3’ – G T A C G T T G C A G G T T T A A T C A – 5’
Each new complementary nucleotide can only be added to the 3’ end of the growing new strand,
one nucleotide at a time. Once the process is complete, you can see that the original DNA
molecule has been accurately replicated:
5’ – C A T G C A A C G T C C A A A T T A G T – 3’
3’ – G T A C G T T G C A G G T T T A A T C A – 5’
5’ – C A T G C A A C G T C C A A A T T A G T – 3’
3’ – G T A C G T T G C A G G T T T A A T C A – 5’
Now that you have a basic understanding of DNA replication you are ready to complete the next
exercise…
*Exercise 2B – Replication of a DNA molecule
Replicate the DNA molecule you built in Exercise 2A by following the instructions below:
1. completely “unzip” your DNA molecule by separating the two strands
2. working with one strand at a time, identify the nucleotide at the 3’ end of the molecule
3. build a nucleotide complementary to this nucleotide and base pair the new nucleotide with the
nucleotide at the 3’ end of the original template strand
4. build a nucleotide complementary to the next nucleotide in the template strand and add it to
the 3’ end of the preceding nucleotide, base pairing it with the template strand
5. repeat step 4 until the complementary strand is complete
6. repeat steps 2 through 5 with the other original strand to complete the DNA replication
process
NOTE: Save the DNA molecules you have just produced for use in Exercise 3A.

12
Part 3: GENE EXPRESSION
A gene is much like a recipe in a cookbook, with a chromosome being like the cookbook itself.
Gene expression in this analogy would be equivalent to using a recipe in the cookbook to make a
food item. However instead of instructing how to prepare a food item, a gene contains
instructions on how to construct a protein (or in some cases an RNA molecule).
Like DNA replication, gene expression is very complicated and involves many different
enzymes. Thus, we will leave most of these details to the lecture portion of the course and
simply address how the process unfolds in general. The process of gene expression requires two
distinct cellular processes: 1) the transcription of DNA encoding the protein into a very similar
nucleic acid polymer called RNA (ribonucleic acid), and 2) the translation of the RNA sequence
into a protein – a polymer of amino acids. How a DNA sequence encodes the amino acids in a
protein involves the “genetic code”, something we will also address. Before we look into these
concepts, however, we first need to become familiar with RNA.
RNA
RNA, like DNA, is a polymer of nucleotides. The nucleotides from which RNA is made,
however, contain the sugar ribose which has one more –OH group than deoxyribose. The
nucleotides in RNA are thus called ribonucleotides, though for simplicity we may also refer to
them as “nucleotides” as we have done regarding DNA. The bases in ribonucleotides are the
same as in deoxyribonucleotides with one exception: the base uracil (U) is used in place of
thymine (T). Below is a diagram illustrating these differences:
One other key difference between RNA and DNA is that RNA exists as a single-stranded
molecule. Even though RNA is single-stranded, its nucleotides still participate in base-pairing as
you will see, with uracil (U) forming base pairs with adenine (A).

13
Transcription
Returning to the cookbook analogy, transcription is essentially making a photocopy of a recipe.
The recipe is the DNA sequence encoding the instructions to build a protein, and RNA serves as
a simple photocopy of the original recipe. This is a pretty good analogy, however it does not
take into account the two strands of a DNA molecule, each having a different sequence. In fact,
only one DNA strand of a gene actually contains the instructions for building a protein, the
strand we call the coding strand. The complementary strand, called the template strand, does
not contain any instructions yet it is extremely important in the process of transcription.
Transcription is actually very similar to DNA replication in that DNA is “unzipped” and used as
a template to make a complementary strand of RNA instead of DNA. Unlike DNA replication,
this occurs only within a single gene at a time (DNA replication results in the copying of entire
chromosomes), and only one DNA strand, the template strand, is used to make RNA. The
resulting RNA is complementary to the DNA template strand and thus a copy of the DNA coding
strand sequence, with uracil (U) in place of thymine (T). To illustrate this, let’s pretend the DNA
sequence we used earlier is to be transcribed:
5’ – C A T G C A A C G T C C A A A T T A G T – 3’coding
3’ – G T A C G T T G C A G G T T T A A T C A – 5’template
5’ – C A T G C A A C G T C C A A A T T A G T – 3’coding
5’ – C A U G C A A – 3’
3’ – G T A C G T T G C A G G T T T A A T C A – 5’template
5’ – C A T G C A A C G T C C A A A T T A G T – 3’coding
3’ – G T A C G T T G C A G G T T T A A T C A – 5’template
5’ – C A U G C A A C G U C C A A A U U A G U – 3’RNA
As you can see, the RNA produced is complementary to the template strand and identical in
sequence to the coding strand, with U’s in place of T’s. In our cookbook analogy, we have just
created a photocopy of the recipe! The RNA molecule is now ready to be used in the process of
translation to make the protein encoded by its sequence. It is important to realize that, even
though all RNA molecules are made by the process of transcription, they can be used in a variety
of ways. At the moment we are only considering one role for RNA, serving as a copy of the
coding strand in a gene. RNA used for this purpose is called messenger RNA or mRNA for
short. Another role for RNA will be addressed when we look at the process of translation.
Let’s move on to the next exercise reinforcing the concept of transcription…
+

14
*Exercise 3A – Transcription of DNA into RNA
Your group will transcribe the DNA molecules you produced in Exercise 2B. To do so you will
consider the strand with the original sequence given by your instructor as the coding strand, and
the other strand as the template strand. Once you have identified your coding and template
strands, proceed as described below:
1. completely “unzip” your DNA molecule by separating the two strands
2. identify the nucleotide at the 3’ end of the template strand
3. build a ribonucleotide complementary to this nucleotide and base pair it with the
nucleotide at the 3’ end of the DNA template strand
4. build a ribonucleotide complementary to the next nucleotide in the template strand and add it
to the 3’ end of the preceding ribonucleotide, base pairing it with the DNA template strand
5. repeat step 4 until the complementary mRNA is complete
6. “unzip” the mRNA from the DNA template strand, and restore the DNA to its original
double-stranded state
NOTE: Save the RNA molecules you have just produced for use in Exercise 3C.
The Genetic Code
Before we look at translation, you need to understand the genetic code. While this may seem
like yet another thing you need to learn in biology class, having knowledge of the genetic code is
truly a remarkable privilege. Scientists and thinkers from the past would have given anything to
know what you are about to learn, arguably the most fundamental biological process there is:
how genes store information, information in the form of a DNA sequence that can be expressed
into proteins and passed on to the next generation. In other words, you are about to learn what
genetic information actually means, not just for human beings, but for all life on earth.
Once it was known that genes are made of DNA which somehow codes for proteins, a number of
scientists set out to uncover the underlying genetic code. Since proteins are polymers of amino
acids, they reasoned correctly that the sequence of nucleotides in DNA (or more specifically the
sequence of bases) must somehow encode specific amino acids and their order in a protein.
Recall from Lab 4 that there are 20 amino acids used to make proteins. This fact was well
known in the early 1960s when these investigations began, thus the genetic code was assumed to
consist of at least 20 different short nucleotide sequences, presumably of the same length.
Given that there are only 4 different one nucleotide sequences (A, C, G, T), 16 different two
nucleotide sequences (AA, AC, AG, AT...), and 64 different three nucleotide sequences (AAA,
AAC, AAG, AAT…), a code consisting of three nucleotide sequences was clearly the best
candidate. Through some very clever experimentation the genetic code was soon discovered to
be just that, a 3-nucleotide code which is read in a 5’ to 3’ direction. We now refer to each 3-
nucleotide combination in the genetic code as a codon. The meanings of all 64 codons have
been determined and are represented in the following chart:

15
This chart uses uracil (U) instead of thymine (T) since RNA, not DNA, is used to make proteins
during the process of translation (though both nucleotides have the same meaning in the genetic
code). The chart is organized to make it easy to find any particular codon. Codons in each row
begin with the same base, codons in each column have the same second base, and codons in each
box have a different third base.
If you look carefully you will notice that all 20 amino acids are represented in this code, with
some being represented by only one codon (e.g., UGG for tryptophan), and others being
represented by as many as six codons (e.g., leucine). You will also notice that there is a single
start codon (AUG, which also codes for methionine), as well as three stop codons (UAA, UAG,
UGA). The importance of these codons in the production of a polypeptide will be addressed as
we move on to the final step of gene expression, translation, but not before you complete the
next exercise.
*Exercise 3B – Understanding the genetic code
Use the chart of the genetic code on this page to complete the corresponding exercises on your
worksheet.
Translation
A messenger RNA molecule (mRNA) produced by transcription in the nucleus of a cell is
transferred to the cell cytoplasm where its sequence is translated into proteins by ribosomes.
This process, known as translation or protein synthesis, also involves another functional type
of RNA, transfer RNA (tRNA for short). Each tRNA is attached one of the 20 different amino
acids, ready to deliver it to a ribosome when needed, and also contains a 3-nucleotide anticodon.
The role of ribosomes is to: 1) facilitate base-pairing of mRNA codons with tRNA anticodons,

16
and 2) catalyze the formation of peptide bonds between amino acids delivered by consecutive
tRNAs. This basic process is illustrated in the diagram below:
The process begins when a ribosome locates the start codon – AUG. This is extremely important
to ensure that the ribosome not only begins where it is supposed to, but also uses the correct
reading frame. From this point the ribosome, working with two codons and two tRNAs at a
time, will move in a 5’ to 3’ direction down the mRNA until it reaches a stop codon and ends the
process. To see how important start codons and reading frames are, let’s consider the mRNA
sequence you produced earlier:
5’ – C A U G C A A C G U C C A A A U U A G U – 3
Beginning with the AUG start codon and moving in the 5’ to 3’direction, a ribosome would
translate this mRNA sequence into the following polypeptide (see your genetic code chart):
met – gln – arg – pro – asn (stop)
If translation was to begin at CAU instead of the start codon AUG, the ribosome would be using
the wrong reading frame and would produce an entirely different polypeptide:
5’ – C A U G C A A C G U C C A A A U U A G U – 3
his – ala – thr – ser – lys – leu
There is also a third reading frame which would yield a completely different polypeptide as well:
5’ – C A U G C A A C G U C C A A A U U A G U – 3
cys – asn – val – gln – ile – ser
As you can see, beginning translation at the start codon ensures that the codons are read correctly
and the polypeptide is made correctly. In this way, a DNA sequence transcribed into an identical
RNA sequence can be used to consistently produce many copies of the same polypeptide.

17
Now that you understand the process, let’s put gene expression into context. Pretend you just ate
a starchy meal, say a mashed potato. As a consequence, your blood sugar (glucose) will go up
and special cells in your pancreas will produce more insulin to help restore your blood sugar to
normal levels. Insulin is a protein consisting of a single polypeptide. To make more insulin,
these pancreatic cells will have to express the insulin gene. This means transcribing the insulin
gene into mRNA followed by ribosomes translating insulin mRNA into insulin polypeptides. A
single insulin gene (you actually have two, one from mom and one from dad) can yield many
mRNA copies by transcription, and each mRNA can yield many insulin polypeptides. Thus
huge amounts of the gene product, in this case the protein hormone insulin, can be expressed
from a single gene.
*Exercise 3C – Translation of mRNA into a polypeptide
In this exercise you will translate the mRNA molecules you produced in Exercise 3A into a short
polypeptide. Before you do so, be sure that all your tRNAs are connected to the correct amino
acid and then proceed as follows:
1. identify the AUG start codon in your mRNA sequence
2. locate a tRNA in your model kit with an anticodon complementary to AUG
3. base pair the anticodon of this tRNA with the AUG start codon in the mRNA
4. locate a tRNA in your model kit that has an anticodon complementary to next codon in your
mRNA molecule (be sure you are going in a 5’ to 3’ direction)
5. base pair the anticodon of this tRNA with the mRNA codon
6. form a peptide bond between the amino acids of the adjacent tRNAs and remove the first
tRNA (the dipeptide just formed should now be attached only to the second tRNA)
7. repeat steps 4 through 6 until you reach a stop codon at which point you should release your
polypeptide from the last tRNA which should then be detached from the mRNA
Part 4: CRIME SCENE INVESTIGATION
Once your agarose gel from Exercise 1C is stained and sufficiently washed so that you can
clearly see the bands, you will be ready to complete the final exercise of this lab. Before we
explain how you will interpret your stained gel as part of a hypothetical crime scene
investigation, let’s clarify just what samples A, B, C, D and E are meant to represent:
A – DNA ladder (a collection of DNA fragments of known size)
B – DNA from the crime scene
C – DNA from suspect #1
D – DNA from suspect #2
E – DNA from suspect #3
F – DNA from college teacher

18
The crime in question is the theft of a college teacher’s car, a 1974 Ford Pinto. After
disappearing, the car was soon found stripped of its tires, cool rims and other valuable parts.
Investigators found a fresh blood stain on a door handle. Due to circumstantial evidence, three
of your classmates are suspects (three students will be randomly chosen as suspects). Your
group has been provided DNA samples from all relevant individuals for analysis.
A few things need explaining before you can analyze the DNA samples you ran on your gel.
First of all, the DNA in lane A, the “DNA ladder”, is a set of DNA fragments of known size.
These fragments can be used to estimate the size or length of other DNA fragments on your gel.
If your instructor wants you to estimate any DNA fragment sizes he/she will indicate the sizes of
the fragments in the DNA ladder on the whiteboard and provide instruction on how to do this.
The other DNA samples were not simply loaded on your gel as is. The chromosomal DNA
purified from each blood sample would be far too large to be resolved on an agarose gel, the
DNA needs to be cut into smaller fragments. This is accomplished by special DNA cutting
enzymes called restriction endonucleases or what are commonly called “restriction enzymes”.
Restriction enzymes are enzymes produced by bacteria to cut DNA at very specific, short DNA
sequences. Bacteria produce restriction enzymes to protect themselves from invading viruses.
Their discovery, however, has revolutionized the field of biology. Their ability to cut DNA in
such a highly specific and reproducible manner actually allows us to precisely cut and splice
pieces of DNA together – they are essentially “DNA scissors”. For example, thanks to
restriction enzymes, human genes such as the insulin gene can be cut and spliced into yeast DNA
so that yeast cells can produce human insulin! To better appreciate what restriction enzymes do,
let’s look at three different restriction enzymes and the sequences they cut:
restriction restriction cut DNA
enzyme site product
EcoRI 5’…GAATTC…3’ 5’…G AATTC…3’
3’…CTTAAG…5’ 3’…CTTAA G…5’
SmaI 5’…CCCGGG…3’ 5’…CCC GGG…3’
3’…GGGCCC…5’ 3’…GGG CCC…5’
PstI 5’…CAGCTG…3’ 5’…CAGCT G…3’
3’…CTGCAG…5’ 3’…C TGCAG…5’
The sequence that each restriction enzyme cuts is called a “restriction site”, and you will notice
that each of these restriction enzymes cuts a 6 base pair restriction site. Most restriction sites are
between 4 and 8 base pairs, however 6 base pair restriction sites are most common. Another
feature you will notice is that each restriction site above is palindromic, which means the
sequence reads the same, 5’ to 3’, on both strands. Almost all restriction enzymes cut
palindromic restriction sites.
You should also notice that each restriction enzyme above cuts its specific restriction site in a
different way. Both EcoRI and PstI produce staggered cuts yielding DNA ends with single-

19
stranded overhangs. EcoRI yields 5’ overhangs whereas PstI yields 3’ overhangs. Such
overhangs are useful for stitching together DNA from different sources. For this reason they are
commonly called “sticky ends” since DNA samples cut with the same restriction enzyme have
complementary overhangs that fit together very nicely. Some restriction enzymes such as SmaI
produce a blunt end cut with no overhangs at all, which in some situations is more desirable.
The DNA samples you have run on your gel have all been cut with the same restriction enzymes.
This is much like taking a long, linear piece of string and cutting it in very specific places. What
you end up with is a reproducible set of smaller fragments. Because the DNA from each person
is slightly different in sequence, there will be differences in some of the DNA fragment lengths
in each sample. There are multiple reasons for this, however you can appreciate that a restriction
site sequence may be present in more or less copies in the DNA sample from one person
compared to another. The net result is that the set of DNA fragments produced after cutting
with restriction enzymes is a unique “DNA fingerprint” for each person, something that is
revealed by running the DNA fragments on an agarose gel.
As you examine your stained gel, you will compare the DNA fragment pattern from the blood at
the crime scene with the DNA fragment patterns for each suspect and the college teacher. If the
DNA fragment pattern from the blood sample on the car (sample B) matches the pattern for any
of the suspects or the college teacher, this is strong evidence that the blood is actually from that
person. You will then draw your own conclusions…
*Exercise 4 – Interpretation of crime scene evidence
You will examine your stained agarose gel as indicated below. If necessary you can observe
your gel on a light box at the front of the lab:
1. diagram a record of the bands on your gel on your worksheet
2. identify which samples, if any, match the pattern of bands from the crime scene sample
3. based on your results, answer the corresponding questions on your worksheet

20

LABORATORY 9 – WORKSHEET Name ________________________
Section _______________________
Ex. 1A & 1B – Gel electrophoresis of DNA
Label the diagram on the right above the wells to show how
the DNA samples A, B, C, D, E and F were loaded on the gel:
When subjected to electric current, why do DNA fragments
migrate toward the cathode?
Describe the relationship between DNA fragment length and the rate of migration through an
agarose gel.
Ex. 1C – Purification of DNA from strawberry tissue
How did you release the DNA from cells in the strawberry slice?
What did you add to the liquid filtrate to make the strawberry DNA insoluble?
Describe the appearance of your strawberry DNA after it was precipitated.
Ex. 2A – Building a double-stranded DNA molecule
Write the DNA sequence your group was given below, then write the complementary strand just
below it (be sure to also indicate the 5’ and 3’ ends of each DNA strand).

What does it mean to say that the strands in a DNA molecule are anti-parallel?
What are the 3’and 5’ ends of a DNA strand?
Ex. 2B – Replication of a DNA molecule
Using different colors for “old” and “new” DNA strands, write the DNA sequence of your
original DNA molecule as well as the sequences of the resulting two DNA molecules after the
completion of DNA replication.
Based on your model of DNA replication, does the original DNA molecule stay intact?
What is meant by the term DNA template?
Ex. 3A – Transcription of DNA into RNA
Using different colors for RNA and DNA strands, write the DNA sequence of your original
DNA molecule as well as the RNA molecule produced by transcription. As always, be sure to
label the 5’ and 3’ ends of each strand, and correctly label the DNA template and coding strands.
DNA and RNA differ in three basic ways. What are these three differences?

Ex. 3B – Understanding the genetic code
Indicate all codons that specify the amino acid serine.
If the genetic code consisted of 4-nucleotide codons, how many different codons would there be?
Determine the amino acid sequence encoded by the following mRNA sequence, and don’t forget
to begin with the start codon:
5’ – GCGUAUGACCGUUAUAGAUGGGCGUCUUCCACACUGAAUACUAACGAAU – 3’
What is the reading frame of a DNA sequence and why is this so important?
Ex. 3C – Translation of an mRNA into a polypeptide
Write out the mRNA sequence you generated by transcription in Exercise 2C, and below the
sequence indicate the amino acid sequence your mRNA encodes:
Where do the amino acids used during translation come from?
Describe the basic roles of ribosomes during the process of translation.

Ex. 4 – Interpretation of crime scene evidence
Draw all the DNA bands you see on your gel in the gel diagram on the first page of this
worksheet.
What is the function of a restriction enzyme?
Below is the restriction site for the restriction enzyme HindIII. If a DNA sample was cut with
this enzyme, what would be the average DNA fragment size (in other words, how often would
this sequence be present in a DNA molecule on average)?
HINT: Consider the rules of probability from the previous lab and that there is a ¼ chance that
any particular nucleotide will be at a given position.
5’ – AAGCTT – 3’
3’ – TTCGAA – 5
Whose DNA fingerprint, if any, matches the DNA obtained from the blood stain at the crime
scene?
Based on this evidence, what can you conclude with regard to this person and the crime that was
committed (be careful not to assume anything more than what the evidence supports)?
Considering this evidence, what do you think happened?
Is this evidence sufficient to convict this person of a crime? Why or why not?
What can you conclude about the suspects whose DNA did not match the DNA at the crime
scene?