Lab 7: Silverlight API - TerpConnectpamani/GEOG677/... · Lab 7: Silverlight API ... xmlns:x="...
14
GEOG677 Dept. Of Geography, University of Maryland at College Park 1 Lab 7: Silverlight API Due Date: 02/07/2014 Overview Microsoft Silverlight is a development platform for creating engaging, interactive user experiences for Web, desktop, and mobile applications when online or offline. It is compatible with multiple web browsers used on Microsoft Windows and Mac OS X. Silverlight applications have features and purposes similar to those of Adobe Flash. The ArcGIS API for Microsoft Silverlight allows users to integrate ArcGIS Server, ESRI MapIt, and Bing Maps services and capabilities in a Silverlight application. You can create RIAs that utilize the powerful mapping, geocoding, and geoprocessing capabilities provided by ArcGIS Server. This lab assignment is designed to help you become familiar with different options for developing Web GIS applications based on Silverlight. Specifically, this assignment is divided into three parts: Part I: ArcGIS API for Silverlight Part II: ArcGIS Viewer for Silverlight Part I: ArcGIS API for Silverlight With ArcGIS API for Silverlight, you can integrate interactive maps and tasks in the web applications. To learn more details, check out this link - http://resources.arcgis.com/en/help/silverlight- api/concepts/index.html#/ArcGIS_API_for_Silverlight_overview To develop a Silverlight application, there are a few software need to be installed first. 1. Visual Studio or Visual Web Developer 2013 Express http://www.visualstudio.com/en-US/products/visual-studio-express-vs You can get the trial version that can be used for free for 90 days. Or, you can get a free copy of Visual Studio (Professional version) as a student from here (https://www.dreamspark.com/Product/Product.aspx?productid=72&cmpid=W_ MSS_DSV_DS_HP1216_Hero) using your UMD email as verification. 2. ArcGIS API for Microsoft Silverlight Download V3.2 from this page - https://developers.arcgis.com/silverlight/ The downloading and installation process may take a lot of time to complete. You should install the software in specific sequence (see above) to avoid any potential issues.
Transcript of Lab 7: Silverlight API - TerpConnectpamani/GEOG677/... · Lab 7: Silverlight API ... xmlns:x="...
GEOG677 Dept. Of Geography, University of Maryland at College Park
1
Lab 7: Silverlight API
Due Date: 02/07/2014
Overview
Microsoft Silverlight is a development platform for creating engaging, interactive user
experiences for Web, desktop, and mobile applications when online or offline. It is compatible
with multiple web browsers used on Microsoft Windows and Mac OS X. Silverlight applications
have features and purposes similar to those of Adobe Flash.
The ArcGIS API for Microsoft Silverlight allows users to integrate ArcGIS Server, ESRI MapIt,
and Bing Maps services and capabilities in a Silverlight application. You can create RIAs that
utilize the powerful mapping, geocoding, and geoprocessing capabilities provided by ArcGIS
Server.
This lab assignment is designed to help you become familiar with different options for
developing Web GIS applications based on Silverlight.
Specifically, this assignment is divided into three parts:
Part I: ArcGIS API for Silverlight
Part II: ArcGIS Viewer for Silverlight
Part I: ArcGIS API for Silverlight
With ArcGIS API for Silverlight, you can integrate interactive maps and tasks in the web
applications. To learn more details, check out this link -
http://resources.arcgis.com/en/help/silverlight-
api/concepts/index.html#/ArcGIS_API_for_Silverlight_overview
To develop a Silverlight application, there are a few software need to be installed first.
1. Visual Studio or Visual Web Developer 2013 Express
http://www.visualstudio.com/en-US/products/visual-studio-express-vs
You can get the trial version that can be used for free for 90 days.
Or, you can get a free copy of Visual Studio (Professional version) as a student
from here
(https://www.dreamspark.com/Product/Product.aspx?productid=72&cmpid=W_
MSS_DSV_DS_HP1216_Hero) using your UMD email as verification.
2. ArcGIS API for Microsoft Silverlight
Download V3.2 from this page - https://developers.arcgis.com/silverlight/
The downloading and installation process may take a lot of time to complete. You should install
the software in specific sequence (see above) to avoid any potential issues.
GEOG677 Dept. Of Geography, University of Maryland at College Park
2
The general steps of creating a web application using the ArcGIS API for Silverlight:
1. Install the prerequisite Microsoft software packages.
2. Install ArcGIS API for Silverlight.
3. In Visual Studio or Web Developer Express, create a Silverlight application project
4. Add a reference to one or more of the ArcGIS API for Silverlight assemblies in your
Silverlight application project.
5. In the Silverlight application, open a Silverlight user control in XAML view and add
code to access and display an ArcGIS Server map service.
There are many samples (examples) that are available for you to use and modify
the codes from this Web site: https://developers.arcgis.com/silverlight/sample-
code/start.htm
6. Compile the code and run your application.
7. Deploy the project to a web server
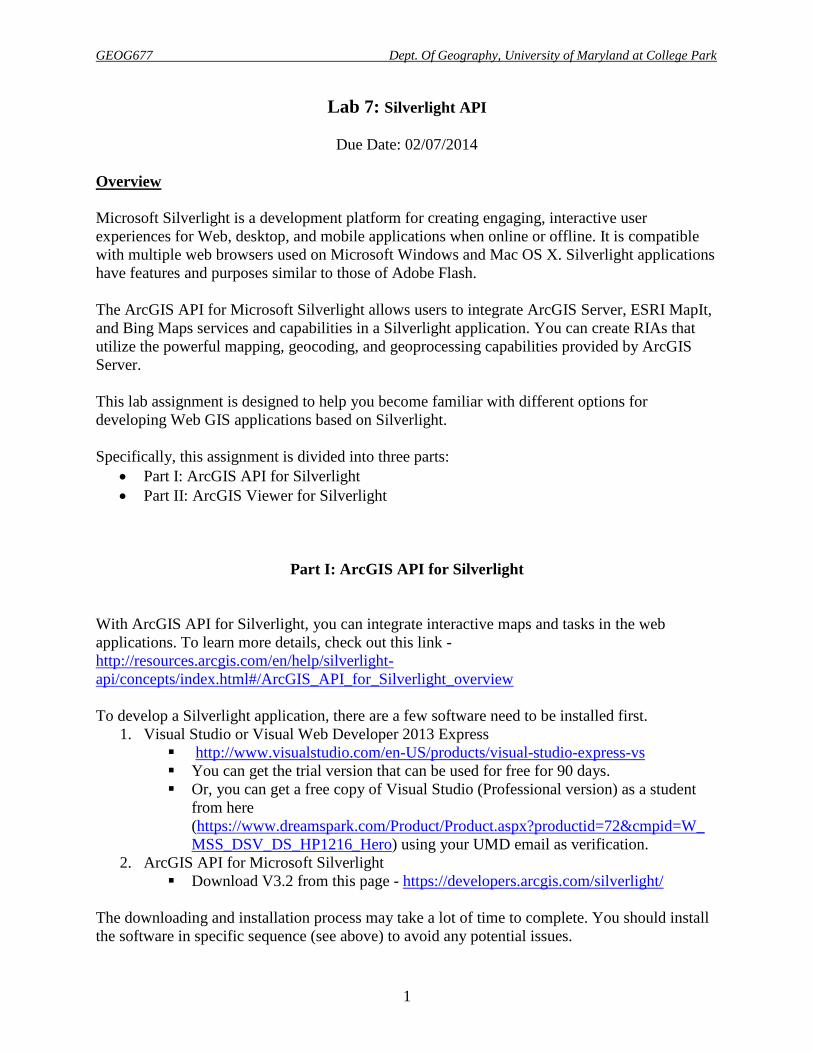
Here below is an example to illustrate the steps and also share some tips and tricks when creating
the ArcGIS API for Silverlight application.
http://www.terpconnect.umd.edu/~jma3/GEOG677/W2013/Silverlight/API_Demo/Silverlight_D
emo1TestPage.html

GEOG677 Dept. Of Geography, University of Maryland at College Park
3
Now, suppose that you have already installed Visual Studio and also ArcGIS API for Silverlight.
Start Visual Studio or Visual Web Developer Express. (I use the latter for demonstrations here.)
Create a new project. (We can choose the installed template – Visual C#.)
If you are creating a new Silverlight application, in the New Silverlight Application dialog box,
choose Host the Silverlight application in a new website with and a New Web project type
setting of ASP.NET Web Application Project.
By default, the MainPage.xaml file should be displayed.

GEOG677 Dept. Of Geography, University of Maryland at College Park
4
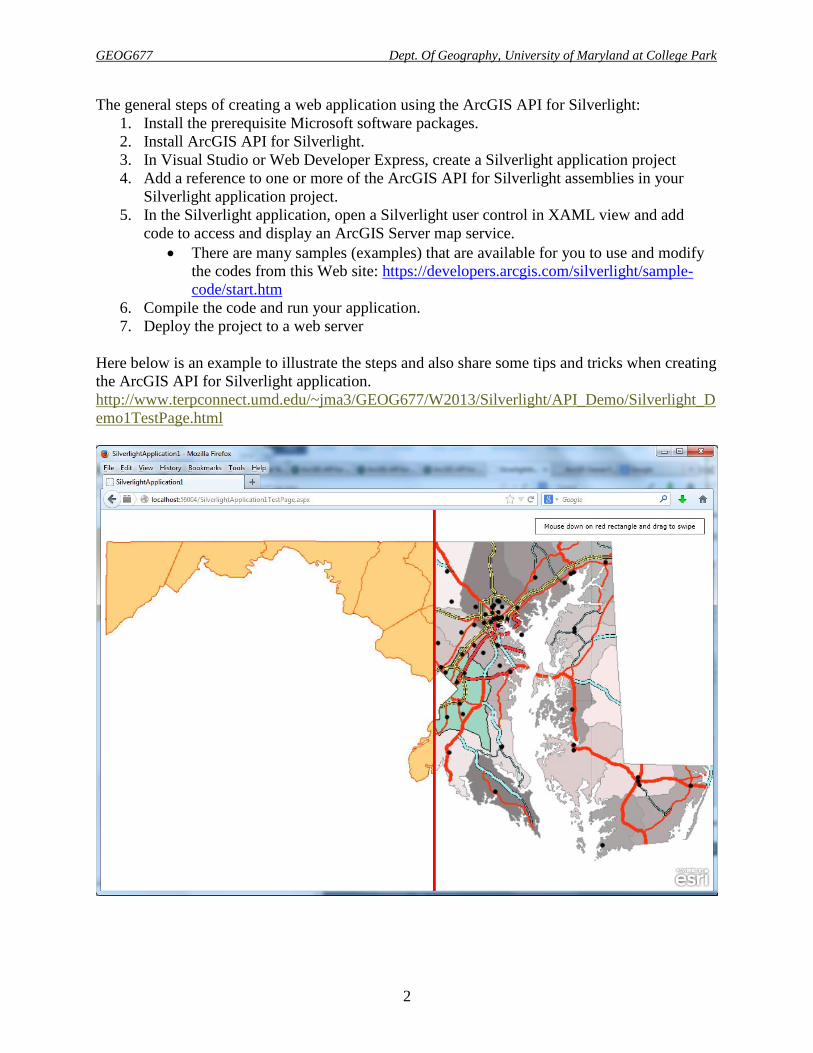
Now, add a reference to one or more of the ArcGIS Silverlight API assemblies in your
Silverlight application project.
Open Solution Explorer and locate the Silverlight application project. Right click on the
References node and select "Add Reference...".
Under the tab – Assemblies > Extensions, you will check the small box in front of the
ESRI.ArcGIS.Client assembly. (See the screen shot below)
GEOG677 Dept. Of Geography, University of Maryland at College Park
5
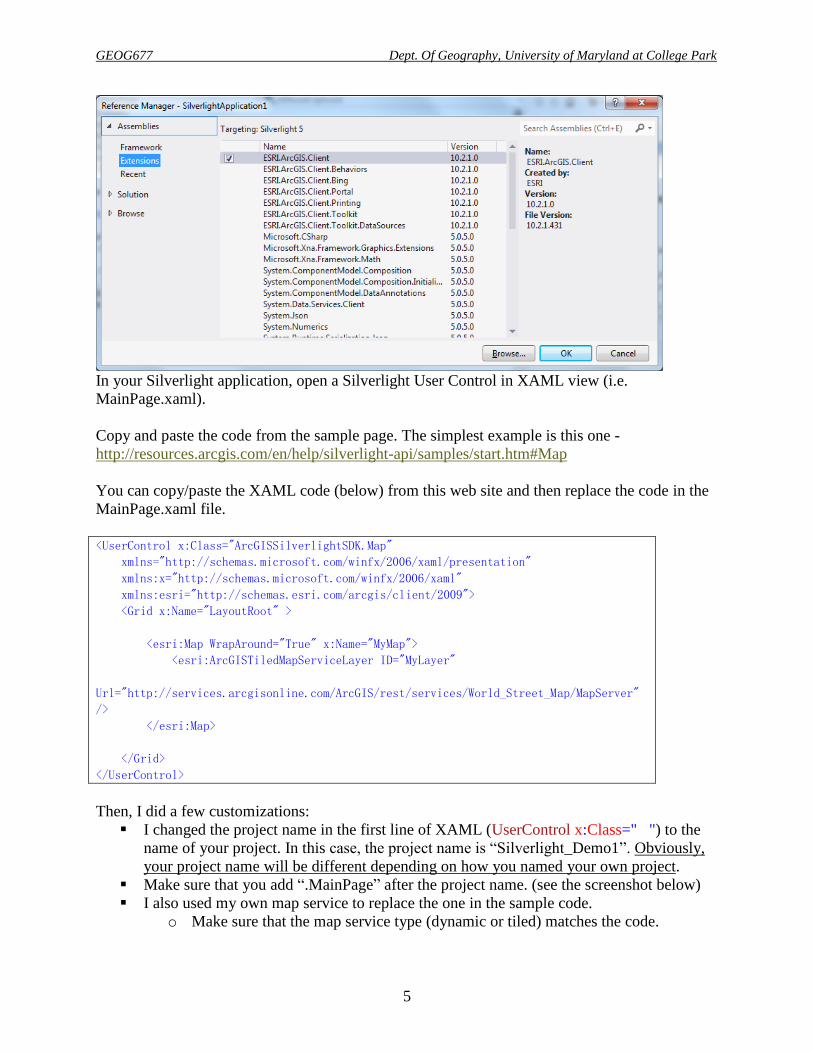
In your Silverlight application, open a Silverlight User Control in XAML view (i.e.
MainPage.xaml).
Copy and paste the code from the sample page. The simplest example is this one -
http://resources.arcgis.com/en/help/silverlight-api/samples/start.htm#Map
You can copy/paste the XAML code (below) from this web site and then replace the code in the
MainPage.xaml file.
<UserControl x:Class="ArcGISSilverlightSDK.Map"
xmlns="http://schemas.microsoft.com/winfx/2006/xaml/presentation"
xmlns:x="http://schemas.microsoft.com/winfx/2006/xaml"
xmlns:esri="http://schemas.esri.com/arcgis/client/2009">
<Grid x:Name="LayoutRoot" >
<esri:Map WrapAround="True" x:Name="MyMap">
<esri:ArcGISTiledMapServiceLayer ID="MyLayer"
Url="http://services.arcgisonline.com/ArcGIS/rest/services/World_Street_Map/MapServer"
/>
</esri:Map>
</Grid>
</UserControl>
Then, I did a few customizations:
I changed the project name in the first line of XAML (UserControl x:Class=" ") to the
name of your project. In this case, the project name is “Silverlight_Demo1”. Obviously,
your project name will be different depending on how you named your own project.
Make sure that you add “.MainPage” after the project name. (see the screenshot below)
I also used my own map service to replace the one in the sample code.
o Make sure that the map service type (dynamic or tiled) matches the code.
GEOG677 Dept. Of Geography, University of Maryland at College Park
6
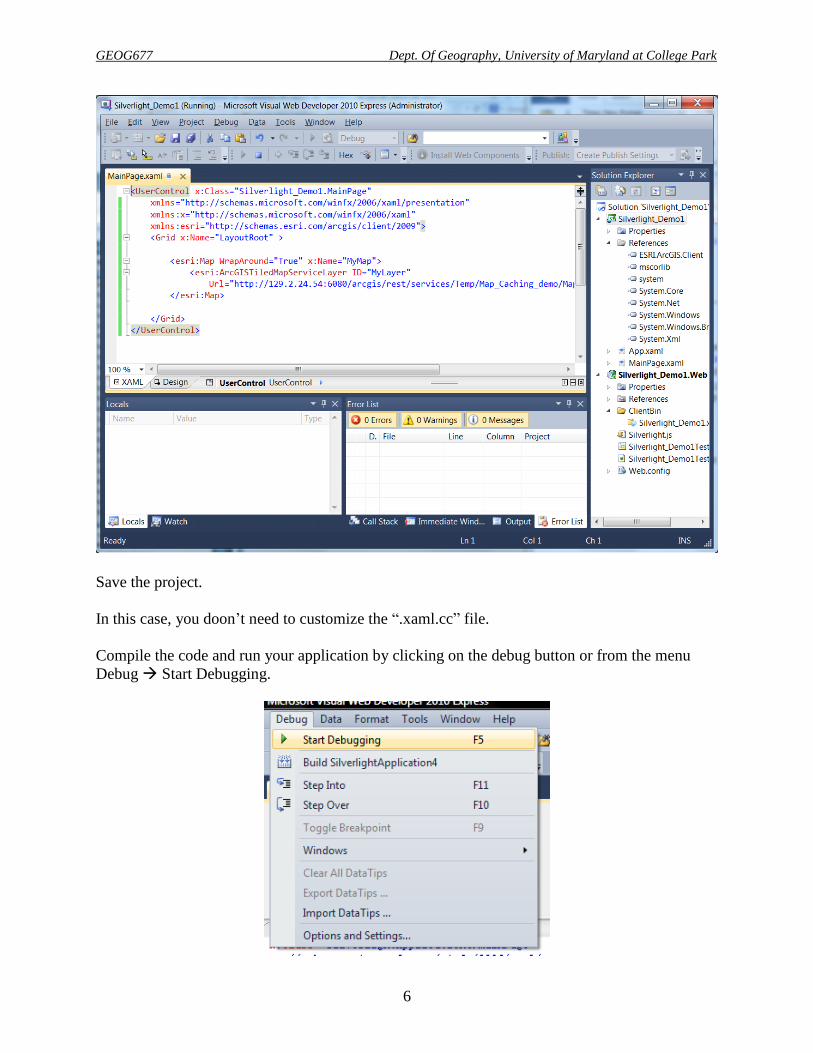
Save the project.
In this case, you doon’t need to customize the “.xaml.cc” file.
Compile the code and run your application by clicking on the debug button or from the menu
Debug Start Debugging.
GEOG677 Dept. Of Geography, University of Maryland at College Park
7
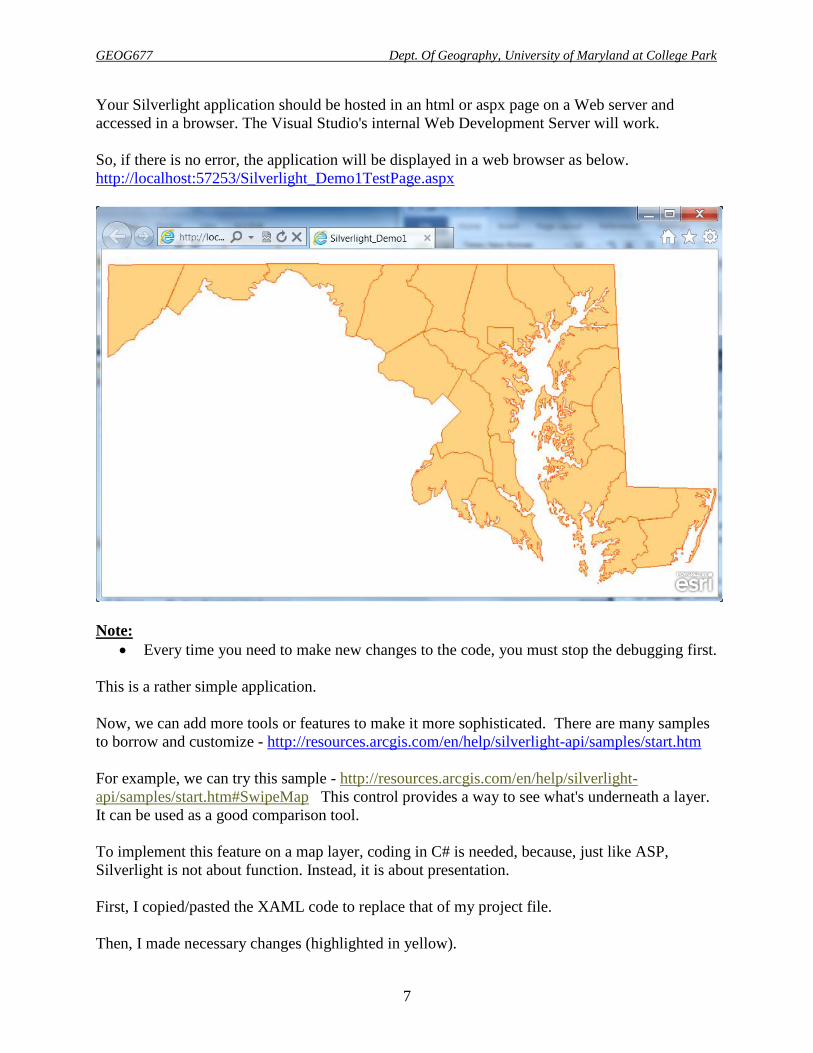
Your Silverlight application should be hosted in an html or aspx page on a Web server and
accessed in a browser. The Visual Studio's internal Web Development Server will work.
So, if there is no error, the application will be displayed in a web browser as below.
http://localhost:57253/Silverlight_Demo1TestPage.aspx
Note:
Every time you need to make new changes to the code, you must stop the debugging first.
This is a rather simple application.
Now, we can add more tools or features to make it more sophisticated. There are many samples
to borrow and customize - http://resources.arcgis.com/en/help/silverlight-api/samples/start.htm
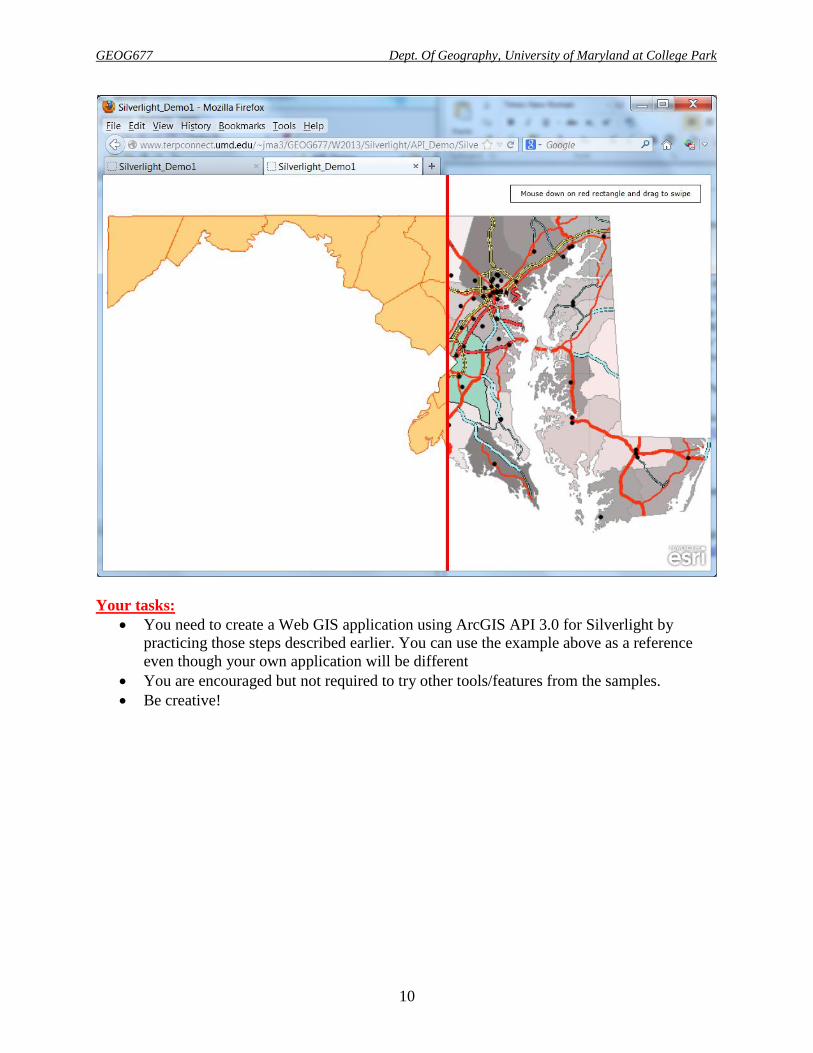
For example, we can try this sample - http://resources.arcgis.com/en/help/silverlight-
api/samples/start.htm#SwipeMap This control provides a way to see what's underneath a layer.
It can be used as a good comparison tool.
To implement this feature on a map layer, coding in C# is needed, because, just like ASP,
Silverlight is not about function. Instead, it is about presentation.
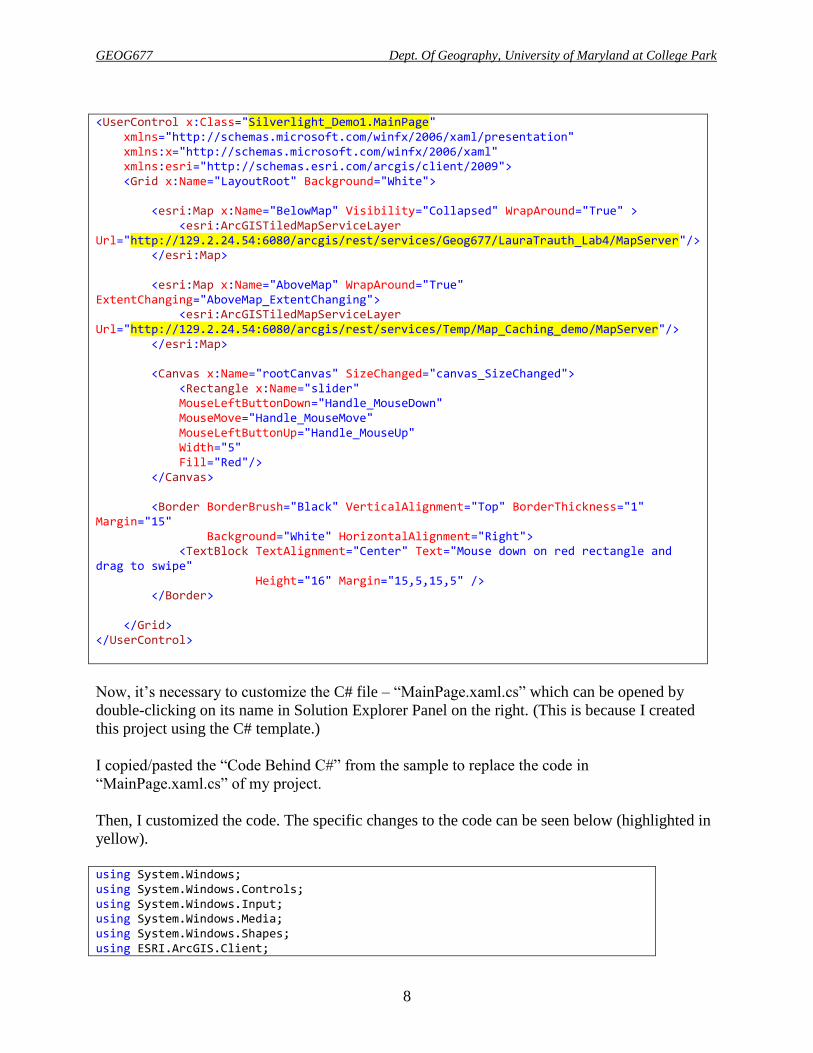
First, I copied/pasted the XAML code to replace that of my project file.
Then, I made necessary changes (highlighted in yellow).
GEOG677 Dept. Of Geography, University of Maryland at College Park
8
<UserControl x:Class="Silverlight_Demo1.MainPage" xmlns="http://schemas.microsoft.com/winfx/2006/xaml/presentation" xmlns:x="http://schemas.microsoft.com/winfx/2006/xaml" xmlns:esri="http://schemas.esri.com/arcgis/client/2009"> <Grid x:Name="LayoutRoot" Background="White"> <esri:Map x:Name="BelowMap" Visibility="Collapsed" WrapAround="True" > <esri:ArcGISTiledMapServiceLayer Url="http://129.2.24.54:6080/arcgis/rest/services/Geog677/LauraTrauth_Lab4/MapServer"/> </esri:Map> <esri:Map x:Name="AboveMap" WrapAround="True" ExtentChanging="AboveMap_ExtentChanging"> <esri:ArcGISTiledMapServiceLayer Url="http://129.2.24.54:6080/arcgis/rest/services/Temp/Map_Caching_demo/MapServer"/> </esri:Map> <Canvas x:Name="rootCanvas" SizeChanged="canvas_SizeChanged"> <Rectangle x:Name="slider" MouseLeftButtonDown="Handle_MouseDown" MouseMove="Handle_MouseMove" MouseLeftButtonUp="Handle_MouseUp" Width="5" Fill="Red"/> </Canvas> <Border BorderBrush="Black" VerticalAlignment="Top" BorderThickness="1" Margin="15" Background="White" HorizontalAlignment="Right"> <TextBlock TextAlignment="Center" Text="Mouse down on red rectangle and drag to swipe" Height="16" Margin="15,5,15,5" /> </Border> </Grid> </UserControl>
Now, it’s necessary to customize the C# file – “MainPage.xaml.cs” which can be opened by
double-clicking on its name in Solution Explorer Panel on the right. (This is because I created
this project using the C# template.)
I copied/pasted the “Code Behind C#” from the sample to replace the code in
“MainPage.xaml.cs” of my project.
Then, I customized the code. The specific changes to the code can be seen below (highlighted in
yellow).
using System.Windows; using System.Windows.Controls; using System.Windows.Input; using System.Windows.Media; using System.Windows.Shapes; using ESRI.ArcGIS.Client;

GEOG677 Dept. Of Geography, University of Maryland at College Park
9
namespace Silverlight_Demo1 { public partial class MainPage : UserControl { bool isMouseCaptured; double mouseHorizontalPosition; public MainPage() { InitializeComponent();
The rest of the code remain unchanged from the original sample code.
Debug and Run the application.
Now that I have created this project, I would like to publish it to a web server. The procedures
are very simple:
1. Use WinSCP to connect to the Terpconnect server
2. Create a folder on the server (For example, “Silverlight\API_Demo” in my case)
3. On your local computer, navigate to the Silverlight project folder
In my case, all the files for this specific project are saved under this folder -
C:\WorkSpace\Geog677\W2013\Demos\Silverlight\Silverlight_Demo1
4. Further navigate to the sub-folder “\Silverlight_Demo1\Bin\Debug”
5. Transfer the following two files from this subfolder to the folder on Terpconnect.
“Silverlight_Demo1.xap”
“Silverlight_Demo1TestPage.html”
The file names will be different in your case depending on how you named your
project. The bottom line is that you just need to upload the XAP and HTML files
to the server.
The URL of my Silverlight web application is -
http://www.terpconnect.umd.edu/~jma3/GEOG677/W2013/Silverlight/API_Demo/Silverlight_D
emo1TestPage.html
GEOG677 Dept. Of Geography, University of Maryland at College Park
10
Your tasks:
You need to create a Web GIS application using ArcGIS API 3.0 for Silverlight by
practicing those steps described earlier. You can use the example above as a reference
even though your own application will be different
You are encouraged but not required to try other tools/features from the samples.
Be creative!
GEOG677 Dept. Of Geography, University of Maryland at College Park
11
Part II: ArcGIS Viewer for Silverlight
The ArcGIS Viewer for Silverlight is a ready-to-deploy configurable client application built with
the ArcGIS API for Silverlight. Essentially it is a template for ArcGIS API for Silverlight. It
allows users to quickly create rich web mapping applications using a fully interactive
configuration experience. The idea to reduce as much programming as possible so that users can
develop great Silverlight applications without involving much coding. It is designed so users can
configure and deploy a web mapping application n easily and quickly.
The latest version is 3.2 released December 2013.
To learn more about the concepts of ArcGIS Viewer for Silverlight, check out this Web page -
http://resources.arcgis.com/en/help/silverlight-viewer/concepts/index.html
The first step is to download ArcGIS Viewer for Silverlight 3.2:
http://resources.arcgis.com/en/communities/silverlight-viewer/
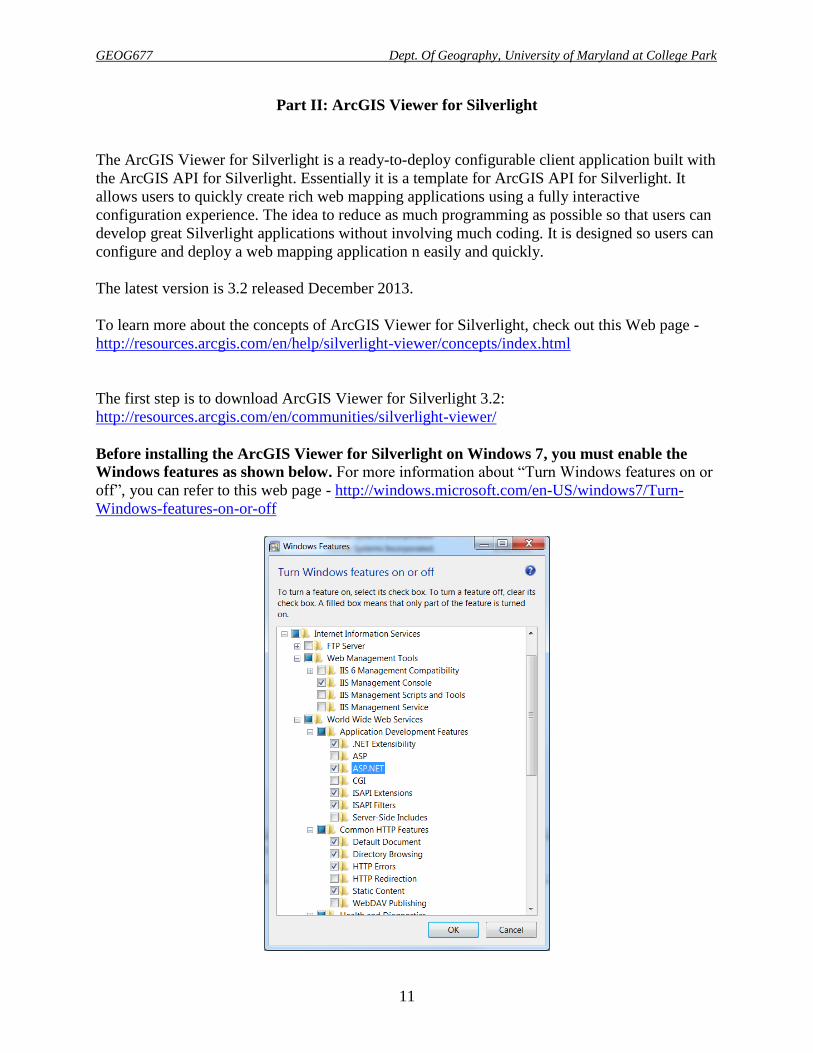
Before installing the ArcGIS Viewer for Silverlight on Windows 7, you must enable the
Windows features as shown below. For more information about “Turn Windows features on or
off”, you can refer to this web page - http://windows.microsoft.com/en-US/windows7/Turn-
Windows-features-on-or-off

GEOG677 Dept. Of Geography, University of Maryland at College Park
12
The use of ArcGIS Viewer for Silverlight is very straight forward because it is GUI driven and
the steps are easy to follow. Refer to this Web page -
http://resources.arcgis.com/en/help/silverlight-
viewer/concepts/index.html#/Quick_Start_guide_to_the_ArcGIS_Viewer_for_Silverlight/01770
000003v000000/
Once you have installed the ArcGIS Viewer for Silverlight, open the Application Builder as
follows:
1. Click the Start menu > All Programs > ArcGIS > ArcGIS Viewer for Silverlight 3.2. This
opens the Application Builder component of ArcGIS Viewer for Silverlight in your
default browser.
2. In the browser window, click Create New Application.
3. To create your Viewer application, you must first choose a map. You can create a New
Map, which includes a configurable basemap and options for adding layers, or you can
create a map based on an existing Web Map from ArcGIS Online.
GEOG677 Dept. Of Geography, University of Maryland at College Park
13
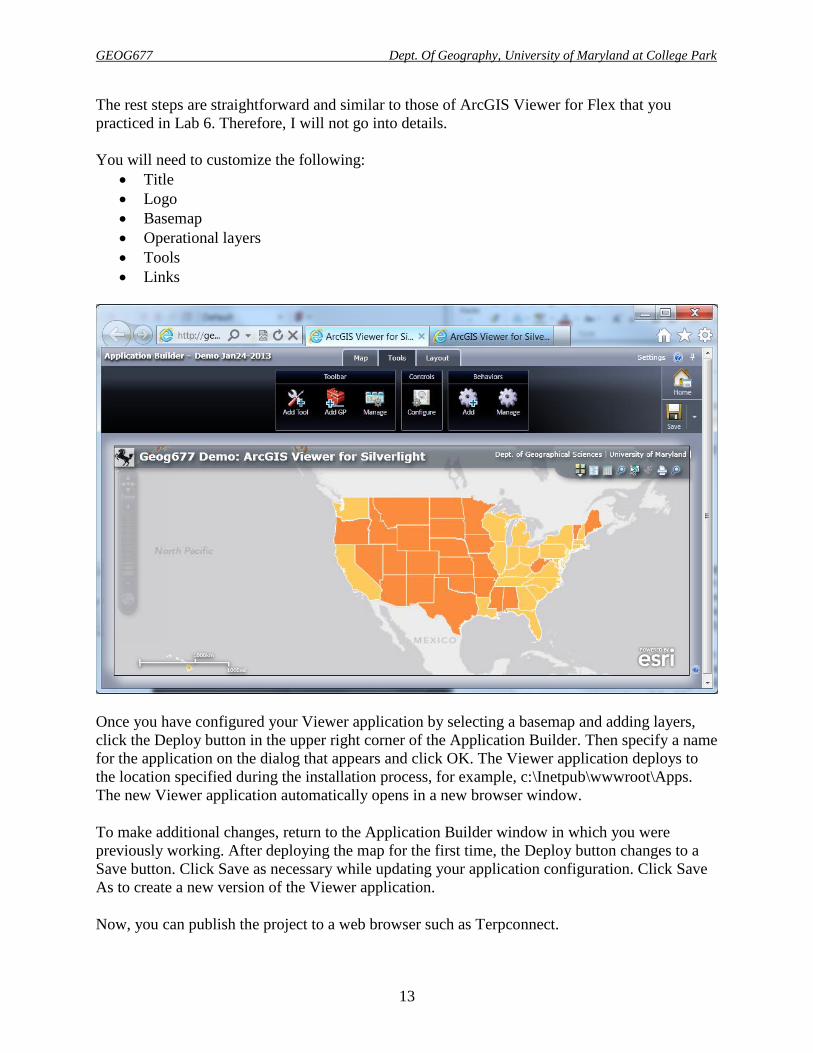
The rest steps are straightforward and similar to those of ArcGIS Viewer for Flex that you
practiced in Lab 6. Therefore, I will not go into details.
You will need to customize the following:
Title
Logo
Basemap
Operational layers
Tools
Links
Once you have configured your Viewer application by selecting a basemap and adding layers,
click the Deploy button in the upper right corner of the Application Builder. Then specify a name
for the application on the dialog that appears and click OK. The Viewer application deploys to
the location specified during the installation process, for example, c:\Inetpub\wwwroot\Apps.
The new Viewer application automatically opens in a new browser window.
To make additional changes, return to the Application Builder window in which you were
previously working. After deploying the map for the first time, the Deploy button changes to a
Save button. Click Save as necessary while updating your application configuration. Click Save
As to create a new version of the Viewer application.
Now, you can publish the project to a web browser such as Terpconnect.
GEOG677 Dept. Of Geography, University of Maryland at College Park
14
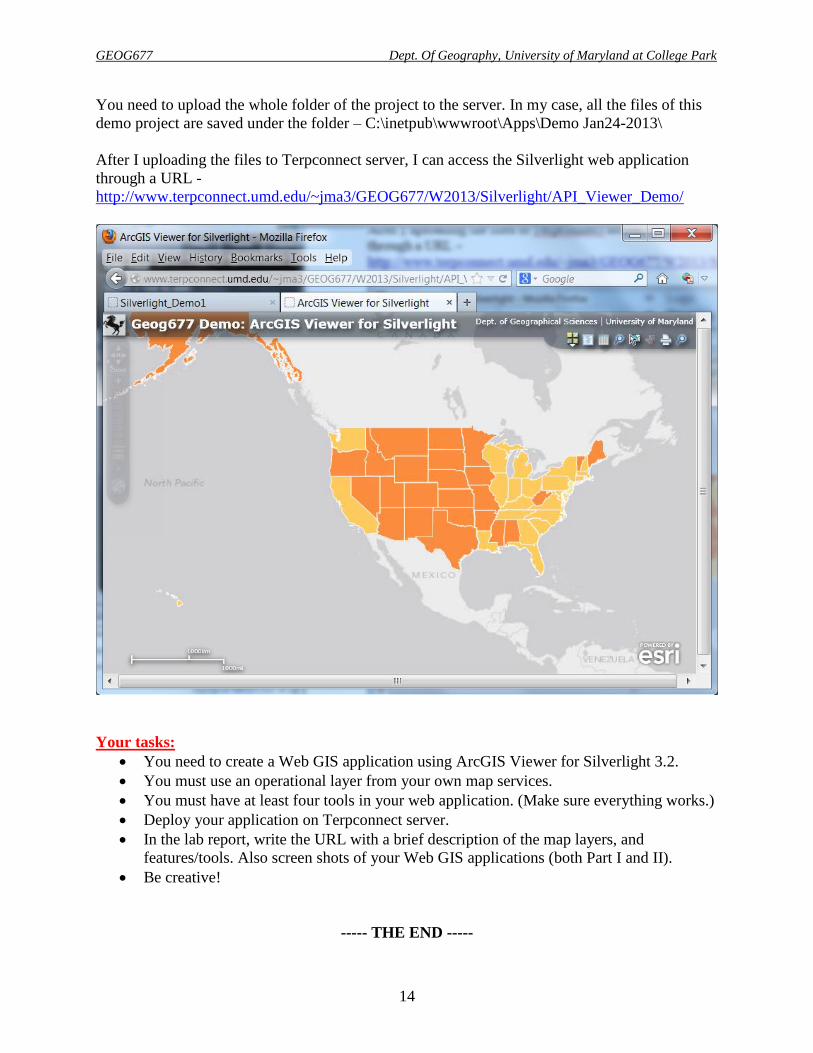
You need to upload the whole folder of the project to the server. In my case, all the files of this
demo project are saved under the folder – C:\inetpub\wwwroot\Apps\Demo Jan24-2013\
After I uploading the files to Terpconnect server, I can access the Silverlight web application
through a URL -
http://www.terpconnect.umd.edu/~jma3/GEOG677/W2013/Silverlight/API_Viewer_Demo/
Your tasks:
You need to create a Web GIS application using ArcGIS Viewer for Silverlight 3.2.
You must use an operational layer from your own map services.
You must have at least four tools in your web application. (Make sure everything works.)
Deploy your application on Terpconnect server.
In the lab report, write the URL with a brief description of the map layers, and
features/tools. Also screen shots of your Web GIS applications (both Part I and II).
Be creative!
----- THE END -----