LAB 3: SYSTEM ANALYSIS & DEBUGGING WITH OSCILLOSCOPE AND...
14
ELEC 3040/3050 Lab Manual Lab 3 – Revised 10/30/17 3-1 LAB 3: SYSTEM ANALYSIS & DEBUGGING WITH OSCILLOSCOPE AND LOGIC ANALYZER INTRODUCTION The purpose of this lab is to continue to gain experience with designing and testing microcontroller-based systems, and to become familiar with debug tools, including the use of an oscilloscope and a logic analyzer as microcontroller system analysis and debug tools. In the development and debugging of a microcontroller-based system, you will often have a need to examine signals being sent to and from the microcontroller to determine correct data patterns, control signal sequencing, timing, etc. To that end you will make a few modifications of last week’s program, and then perform timing analyses as these programs run on the microcontroller. OSCILLOSCOPE OVERVIEW The Digilent EEBOARD contains the hardware components of several electronic system test instruments: oscilloscope, logic analyzer, waveform generator, pattern generator, and voltmeter. The user interfaces for these instruments are implemented in the Waveforms program used in the first lab. EEBOARD/Waveforms provide a four-channel oscilloscope that is simple to use, and yet compares in nature and function to more sophisticated oscilloscopes that you may use later on in your career. The following discussion is a brief introduction to the functions available on this oscilloscope. You will be expected to learn these functions and to set up the oscilloscope for debugging system designs in this and later labs. Documentation for the Waveforms instruments is accessed by clicking on “Help” in the main Waveforms window, and then selecting the desired instrument. It is recommended that you read the oscilloscope help information prior to the lab. Digilent also provides analog electronics tutorials and lab materials to accompany the EEBOARD on their web site, with examples showing the use of the different Waveforms instruments. http://www.digilent.cc/Classroom/RealAnalog/index.cfm. Waveforms can be downloaded from the Digilent site for use on your own computer. If no EEBOARD is attached, Waveforms runs in a “demo mode”, which allows you to investigate the program features. What is a digital oscilloscope? A digital oscilloscope is not merely an oscilloscope to be used exclusively for digital circuits. The word “digital” refers to the method used to obtain signals to be viewed and analyzed. Unlike analog oscilloscopes, in which input signals directly control amplifiers that drive the deflection coils of a cathode ray tube (CRT), a digital oscilloscope digitizes its input signals with an analog to digital converter (ADC). The ADC periodically samples
Transcript of LAB 3: SYSTEM ANALYSIS & DEBUGGING WITH OSCILLOSCOPE AND...

ELEC 3040/3050 Lab Manual Lab 3 – Revised 10/30/17
3-1
LAB 3: SYSTEM ANALYSIS & DEBUGGING WITH OSCILLOSCOPE AND LOGIC ANALYZER
INTRODUCTION The purpose of this lab is to continue to gain experience with designing and testing microcontroller-based systems, and to become familiar with debug tools, including the use of an oscilloscope and a logic analyzer as microcontroller system analysis and debug tools. In the development and debugging of a microcontroller-based system, you will often have a need to examine signals being sent to and from the microcontroller to determine correct data patterns, control signal sequencing, timing, etc. To that end you will make a few modifications of last week’s program, and then perform timing analyses as these programs run on the microcontroller. OSCILLOSCOPE OVERVIEW The Digilent EEBOARD contains the hardware components of several electronic system test instruments: oscilloscope, logic analyzer, waveform generator, pattern generator, and voltmeter. The user interfaces for these instruments are implemented in the Waveforms program used in the first lab. EEBOARD/Waveforms provide a four-channel oscilloscope that is simple to use, and yet compares in nature and function to more sophisticated oscilloscopes that you may use later on in your career. The following discussion is a brief introduction to the functions available on this oscilloscope. You will be expected to learn these functions and to set up the oscilloscope for debugging system designs in this and later labs. Documentation for the Waveforms instruments is accessed by clicking on “Help” in the main Waveforms window, and then selecting the desired instrument. It is recommended that you read the oscilloscope help information prior to the lab. Digilent also provides analog electronics tutorials and lab materials to accompany the EEBOARD on their web site, with examples showing the use of the different Waveforms instruments.
http://www.digilent.cc/Classroom/RealAnalog/index.cfm. Waveforms can be downloaded from the Digilent site for use on your own computer. If no EEBOARD is attached, Waveforms runs in a “demo mode”, which allows you to investigate the program features. What is a digital oscilloscope? A digital oscilloscope is not merely an oscilloscope to be used exclusively for digital circuits. The word “digital” refers to the method used to obtain signals to be viewed and analyzed. Unlike analog oscilloscopes, in which input signals directly control amplifiers that drive the deflection coils of a cathode ray tube (CRT), a digital oscilloscope digitizes its input signals with an analog to digital converter (ADC). The ADC periodically samples

ELEC 3040/3050 Lab Manual Lab 3 – Revised 10/30/17
3-2
the amplitude (voltage level) of the analog input signal and converts each sample to a binary number, storing the binary values in an internal memory. A microprocessor conditions the digital data according to the functions that you request and displays the results on a screen. The EEBOARD data acquisition circuits convert 40M samples per second on each of four separate input channels into 8-bit values, storing up to 16K data samples in a high-speed memory (buffer), from which they can be uploaded to the attached PC and displayed in a user interface. The Waveforms oscilloscope instrument, illustrated in Figure 1, emulates a traditional oscilloscope front panel on your computer, with settings that can be manipulated with the PC mouse and keyboard.
Figure 1. EEBOARD/Waveforms oscilloscope instrument (shown in demo mode).
Unlike analog oscilloscopes, a digital oscilloscope allows a user to capture a single signal trace, zoom in and out to view a portion or all of the captured data, use cursors to make measurements on waveforms, save waveforms to disk and recall them at a later time for analysis, save the oscilloscope setup and restore it later, and capture the display for inclusion in reports.

ELEC 3040/3050 Lab Manual Lab 3 – Revised 10/30/17
3-3
The following is a list of EEBOARD oscilloscope features (from the EEBOARD data sheet.)
• 4 channels, 40 MSa/sec sampling frequency • 70 MHz analog input stage bandwidth • 9 MΩ /10 pF input impedance • +/-20V input range • AC/DC coupling • 10 bits Analog to Digital converter • 0.8 mV to 40 mV/LSB resolution • Input protection up to +-200V • Up to 16 KSa buffer depth • Advanced triggering(edge, pulse, transition types and hysteresis, hold-off
parameters) • Channels filtering: average, decimate, min/max • FFT, XY, and Histogram functions • Recording and audio functions • Advanced data measurements for each channel and global measurements • Export data and waveform options
Connecting the Oscilloscope to the Circuit Four different signals can be captured and displayed simultaneously, captured via “probes” connected between circuit nodes and the SCOPE connector (channels 1-4), shown in Figure 2. Recall that voltage is the potential difference between two points. In most cases, one of these points is a common reference (ground). Therefore, each SCOPE channel must be connected to the circuit with two wires: one between the node to be measured and one of the connectors marked “AC” (for AC-coupling) or “DC” (for DC-coupling), with the second wire connected to ground (the holes with the dash below and arrow above them.) In contrast, a traditional oscilloscope probe, pictured in Figure 3, has a probe to touch the signal to be measured and a clip to connect to ground; these are connected to the instrument with a BNC connector.
Figure 2. Oscilloscope connections Figure 3. Typical oscilloscope probe on the EEBOARD.
Four Scope Channels
Ground Connection

ELEC 3040/3050 Lab Manual Lab 3 – Revised 10/30/17
3-4
Setting Up and Using The Waveform Display Waveforms are displayed on the oscilloscope as two-dimensional graphs of voltage (vertical axis) vs. time (horizontal axis). Controls are provided to set trigger conditions and format the two axes. All displayed signals have common horizontal settings (time base), but each signal has separate vertical settings, allowing it to be displayed in a manner that best facilitates study of the signal. As shown in Figure 1, on the right side of the oscilloscope window, are four channel configuration toolbars, labeled C1-C4, whose colors correspond to the displayed waveforms. Clicking in the small box to the left of the channel number toggles the display of that channel, allowing removal of selected signals from the display to facilitate studying the remaining signals. The SCOPE can capture signals in the range +/- 0.8 mV to +/- 20 V. Please do not attempt to measure signals that exceed +/- 20 V to avoid damaging the EEBOARD! Coupling
AC coupling removes any dc offset from a displayed signal before it is sampled, resulting in a signal that alternates around 0 volts. This is useful when a small amplitude signal is superimposed on a dc level. Removing the dc level allows the “interesting” part of the signal to be expanded to fill the display. AC coupling also attenuates low frequency content from a signal. If the measured signal contains low frequency components, however, then ac coupling will introduce distortion in the displayed signal. A low frequency digital signal or square wave will not have flat “tops and bottoms” when measured under ac coupling. DC coupling results in the signal being measured and displayed in its entirety. This is preferred for digital signals, which vary between voltages corresponding to logic 0 and logic 1. While the coupling mode for each channel is user-selectable via the front panel on most oscilloscopes, the EEBOARD has separate connectors in the PROBE block, labeled AC and DC. Each signal must be connected with a wire to either the AC or a DC connector, to use the corresponding coupling mode.
Triggering
A waveform is produced on an analog oscilloscope by sweeping an electron beam horizontally across the screen at a fixed rate, while deflecting the beam vertically with the acquired signal. A digital oscilloscope appears to do likewise, although a “sweep” is generated from acquired data samples stored in its memory. A sweep begins when the oscilloscope is “triggered” by some user-specified event. A trigger signal can be derived from one of the signals being measured or from a separate trigger input. In Waveforms, a trigger condition is defined by the following drop-down lists in the Trigger toolbar that sits directly above the signal display area.

ELEC 3040/3050 Lab Manual Lab 3 – Revised 10/30/17
3-5
• Mode – Selects the type of triggering. o Normal: the acquisition is triggered only on the specified condition. The
oscilloscope only sweeps if the input signal reaches the set trigger point. o Auto: when the trigger condition does not appear in approximately 2
seconds (configurable in Options), the acquisition is started automatically. o None: the acquisition is started immediately, without a trigger.
• Source – selects the source of the trigger signal, normally one of the signals acquired on channels 1-4.
• Type – the type of trigger event to be detected. In this lab, the most common option is “Edge”, which causes acquisition to be triggered by a rising or falling edge of the source signal.
• Condition (Cond.) – select rising or falling edge of the source signal to activate the trigger
• Level – select the voltage level at which to activate the trigger while the signal is
rising/falling. For example, to capture a digital signal that switches between 0V and 3V, one might trigger on the rising edge of the signal as it passes through the 50% point of 1.5V.
Horizontal Display Settings
Referring to Figure 1, the “Time” toolbar in the top right section of the Oscilloscope window contains two control settings, “Base” and “Pos”, which configure the horizontal waveform display. These settings are common to all four channels, so that the user can determine and compare signal values within a common time frame. Base (“Time Base” or Time/Division) The time base (time/division) is the amount of time represented by each major horizontal division on the display grid, and thus determines the time duration of the displayed signal. In Figure 1, the time base is set to 1ms/div. This is reflected in the times displayed along the bottom of the screen (the x axis). All displayed waveforms have a common time base, allowing values to be compared at specific points in time. A time base should be selected that allows “interesting features” of a waveform to be conveniently studied. For example, channels C1, C2 and C3 can be easily examined in Figure 1, but one might wish to use a smaller time base to “spread out” (zoom in on) one of the sinusoidal bursts displayed on channel C4. Position (Pos) The position setting controls the horizontal position of the trigger condition (time 0), relative to the center of the display area. An analog oscilloscope begins plotting signals on the screen, from left to right, when a specified “trigger condition” is detected. A digital oscilloscope, however, samples signals continuously, saving the samples in

ELEC 3040/3050 Lab Manual Lab 3 – Revised 10/30/17
3-6
memory. Thus a digital oscilloscope can display both pre-trigger and post-trigger data. Changing the trigger position on the screen allows the user to conveniently focus on signals before and/or after the trigger. The trigger position can be changed in the drop down list in the Time toolbar, or by dragging the black triangle found above the time 0 position.
Vertical Display Settings (Channel Configuration)
The channel configuration toolbar contains boxes labeled C1, C2, C3 and C4, which each contain two settings that configure the vertical display of their respective waveforms. Toggling the square check box next to the channel number displays or removes that channel trace from the screen.
Range (Volts/Division) The amplitude of a signal is indicated by its vertical height on the display and the number of volts represented by each division on the display grid. The “range” (volts per division) for each channel is selected from its drop-down Range box. The y axis of the display is labeled with voltages for one selected channel. In Figure 1, the displayed voltages are for Channel 1. Clicking on the colored triangle next to the channel name at the left side of the window changes the display to that channel’s voltages. Each channel can have a different setting for volts per division, allowing each waveform to be displayed with the most convenient setting to facilitate analysis. Again, note that the maximum input range is +/- 20 volts!
Offset (Vertical Position) For convenience, a waveform can be shifted up or down on the display by changing the “vertical offset” from the drop-down list labeled Offset. The offset can also be changed by dragging up or down the colored triangle next to the channel name at the left of the display. For example, one might want to compare two waveforms by shifting one up or down to superimpose it on the other.
Starting and Stopping Data Acquisition and Saving/Printing Waveforms
Run/Stop and Single Trace Operation In the top left portion of the oscilloscope window is the Acquisition Toolbar, which contains the Run/Stop and Single buttons. The oscilloscope can be triggered one time or repetitively. Clicking on the Single button causes a single waveform to be acquired and displayed when the triggering condition is met. Then data acquisition stops until the user again clicks on either Single or Run. Performing a single acquisition allows aperiodic signals to be studied (one-time events, perhaps). “Normal” (repetitive) triggering, initiated and halted by the Run button, operates continuously, producing a new sweep every time the trigger condition is met. This works best when the acquired signal is periodic, otherwise a different waveform will be displayed on each sweep, resulting in what appears to be an unstable signal.

ELEC 3040/3050 Lab Manual Lab 3 – Revised 10/30/17
3-7
Saving/Restoring Data and Configuration Settings Once you have a good setup for your oscilloscope, you may want to save it and then restore it in a later lab. From the menu bar, select File > Save Oscilloscope Project to save your settings, and File > Save Acquisition Data to save the current data. You will be prompted for a file name to save/restore. (You should save these on your H: drive.) Select File > Open to restore saved settings and data. You can also export data or screenshots from the File menu, and copy text and images via the Edit menu. The latter is especially useful for capturing images to include in reports.
LOGIC ANALYZER OVERVIEW In an embedded system it is often desirable to monitor the logic states of multiple digital signals to determine if the system is operating as expected. A logic analyzer captures and displays signal logic states (0 and 1), rather than analog voltage levels, over a designated time interval. As with an oscilloscope, probes are connected to the signals to be monitored and the states of those signals are sampled and captured over a period of time. Sampling is performed on transitions of an internal or external clock. The state of each signal line is interpreted as 0 or 1, according to whether the sampled voltage level is below or above a threshold value. The captured states are stored in a memory, from which all or part of the data can be displayed as a timing diagram or in tabular form. Captured signals can be displayed individually or as multi-signal buses (such as microcontroller I/O ports). The EEBOARD logic analyzer comprises 32 signal connections and a few dedicated trigger and clock connections on the Digital 1-4 blocks at the top of the board, plus the Waveforms Logic Analyzer instrument. Note that these connections are shared with the Static I/O instrument; signals can be used with either or both of these instruments. The following is a list of EEBOARD logic analyzer features (from the EEBOARD data sheet.) It is recommended that you review the Waveforms “help” information on the logic analyzer prior to the start of lab.
• 32 digital pins (shared with Digital Signal Generator and Static I/O) • 100MSamples/sec • Internal/external clock • Up to 16K samples per pin buffer depth • Trigger options • Save signals values option • Customized visualization for each signal or bus • Tabular data visualization • Digital logic thresholds: Vil_max = 0.8 V, Vih_max = 2.0V
The Waveforms logic analyzer instrument displays one waveform per signal or bus, as illustrated in Figure 4. The left pane shows signal information and the main pane shows the waveforms. Signals Switch S1 and Switch S2 are individual signals, connected to

ELEC 3040/3050 Lab Manual Lab 3 – Revised 10/30/17
3-8
digital inputs DI0 and DO1, respectively. A bus is group of signal lines, with the displayed numeric value determined by treating the signals as bits of a binary number. In Figure 4, bus Count1 comprises 4 digital signals: digital inputs DIO 7-4. The binary numbers represented by these signals are displayed as a sequence of decimal numbers in the waveform area. In Figure 4, the bus has been “expanded” (by clicking on the + sign to the left of label Count1) into the individual binary signals [3] – [0], where [3] is the most significant bit (MSB) of the displayed number and [0] is the least significant bit (LSB).
Figure 4. Waveforms Logic Analyzer main window
Connecting Signals to the Logic Analyzer To probe digital signals with the logic analyzer, connect wires between the nodes to be examined and the numbered connectors (31-0) in the EEBOARD DIGITAL 1-4 blocks. Connector number N is displayed as “DIO N” in the logic analyzer window. It is also good practice to connect a ground point in your circuit to the ground connector (indicated by the dash above and arrow below the holes) on each DIGITAL block used, to ensure that the digital signal voltages are measured relative to a common ground. If you desire to use one or more external signals to trigger data acquisitions, the EEBOARD provides four “trigger” connections (T1-T4) on blocks DIGITAL 2-3. In addition, a clock connection CLK on block DIGITAL 4 allows a signal from your system to provide the data acquisition clock, instead of the EEBOARD internal clock. Triggering a Data Acquisition

ELEC 3040/3050 Lab Manual Lab 3 – Revised 10/30/17
3-9
One is often interested in determining what a system was doing immediately before and/or after some “event”. Typical events might be activation of an interrupt request signal by a device, arrival of a particular data pattern at an input port, writing data to an output port, etc. The logic analyzer captures and stores data samples continuously, while examining the data for the occurrence of a user-specified event, referred to as a “trigger condition”. A trigger condition comprises designated states or transitions on one or more signals from an internal or external source. When the logic analyzer detects a trigger condition, it displays data captured prior to and following the trigger event. In the display area of Figure 4, the solid triangle above the topmost waveform indicates when the trigger condition was detected (in this case the trigger condition was Count1 = 0000), and at the bottom of the display, time prior to and following the trigger condition are shown as negative and positive values, respectively. One of three triggering modes can be selected from the Mode drop-down menu box above the display area.
• Normal – acquisition is performed when the trigger condition is detected. • Auto – acquisition is performed when the trigger condition is detected, or after a
specified time (configurable in Options) if the trigger condition is not detected. • None – acquisition is performed immediately without a trigger.
The triggering source can be signals on the EE Board digital inputs, one of the Waveforms instruments, or an external signal, as selected from the following Source drop-down menu options above the display area.
• Analyzer (the most commonly-used trigger source): Acquisition is triggered by a user-specified pattern on selected DIO31-DIO0 lines.
• Scope: Trigger defined in the Oscilloscope instrument. • AWG 1-4: Trigger defined in the Automatic Waveform Generator instrument. • Pattern: Trigger defined in the Pattern Generator instrument. • External 1-4: Trigger is a rising signal on external trigger input T1-T4,
respectively, on EEBOARD blocks DIGITAL 2 and 3.
Analyzer trigger conditions are displayed in the Trigger column of the signal information pane at the left side of the window, showing the current role of each signal in the trigger condition, which can be one of the following.
Don't Care: not used in trigger condition. Low: low logic level. High: high logic level. Rising Edge: signal transition from low to high level. Falling Edge: signal transition from high to low level. Any Edge: any signal transition.
A trigger condition is the logical AND of all pattern conditions (0,1,X) combined with the logical OR of edge conditions (eg, a rising edge on DIO 1, any edge on DIO 2, etc.) For example, in Figure 4, a trigger condition has been defined as the occurrence of the 4-bit pattern 0000 on bus Count1. In an interrupt-driven system, one might use rising edge of an interrupt request signal as a trigger. The default condition for each input is “X” (no trigger).

ELEC 3040/3050 Lab Manual Lab 3 – Revised 10/30/17
3-10
To change this, right click on the current trigger value associated with that signal and select the desired trigger option from the pop-up menu. The defined trigger condition is displayed in the Trigger box immediately above the right side of the display area. In Figure 4, the trigger condition is shown as: Trigger: DIO7=0 AND DIO6=0 AND DIO5=0 AND DIO4=0 Clicking on this box produces a form in which trigger options for the signals can be modified. Some find it more convenient to define trigger conditions in this box, rather than in the signal definition pane.
Performing Data Acquisition To begin data acquisition, click the Run or Single button in the upper left corner of the screen. The “Run” option performs continuous data acquisition, periodically updating the display with new information each time the selected trigger condition is met. The “Single” option captures and displays a single set of data when the trigger condition is met, and then stops data acquisition.
Sampling Clock Either the 100MHz internal clock or an external signal, connected to CLK on the EEBOARD DIGITAL 4 block, may be used as the data acquisition sampling clock. One sample of each input signal is taken per clock period and stored in a buffer. The clock source is selected from the Clock drop-down box immediately above the display area. In Figure 4, the Internal clock is selected. Time Base The “time base” is the time per division in the display grid. This is selected via the Base drop-down box and slider immediately above the display area. In Figure 4, the selected time base is 1 seond per division. Note that time is displayed along the bottom of the screen, relative to the position of the trigger event, with negative values indicating times prior to the trigger and positive values indicating times after the trigger. The time base can be changed to zoom in on a specific event, or zoom out to view multiple events. The position of the trigger point on the display can be changed by dragging the solid triangle immediately above the topmost waveform, or by selecting the desired position from the Position drop-down box immediately above the display area. Note that when capturing a display for inclusion in a presentation or report, the events that you wish the audience to see should be clearly visible in the display. It is also good practice to size the display window vertically to minimize “empty space”.
ELEC 3040/3050 Lab Manual Lab 3 – Revised 10/30/17
3-11
Data Visualization Signal Names To facilitate studying captured data, it may be helpful to create buses and/or assign names to signals on the display. Signal names and states are displayed in the “Signals Definition Grid” on the left side of the window. A name can be assigned to a signal by clicking in the “Name” column at the left of the screen, which puts the grid into edit mode, and then entering the desired name. (The default names are DIO 0-31). Signal Buses The most efficient way to organize signals into a bus is to select those signals by left-clicking on the first one and then control-left clicking on each successive signal. Then right click on the last selected signal name, and from the pop-up menu select Insert > Buses > New Bus From Selected Signals. This adds a new horizontal line to the display. For example, Count1 in Figure 4 was created from DIO 7-4. Clicking the “+” to the left of the bus name expands the bus to individual signals; clicking again collapses the bus to the single row. It helps to connect signals to EEBOARD DIO inputs in the order in which you would like them displayed.
Information Display In addition to graphical display of signals as waveforms, captured data can also be viewed in tabular form, or as a list of “events” (signal changes) by selecting View > Data or View > Events from the menu bar, or by clicking on the corresponding buttons below the menu bar. Display Format The colors used for the display background, signal waveforms, etc. can be changed as desired to facilitate viewing on a computer screen and/or for inclusion in printed reports. For example, colored signal traces displayed on a black background might not be easily viewed in a report or presentation slide. Display configuration can be changed via the Options menu, accessible by clicking the Options button below the menu bar, or from the menu bar select Settings > Options. Saving Information The Files menu (on the menu bar) provides options to save and restore logic analyzer settings, to facilitate setting up future test sessions. Likewise, captured data can be saved exported in different formats for use in a spreadsheet, MATLAB, or some other tool.
ELEC 3040/3050 Lab Manual Lab 3 – Revised 10/30/17
3-12
PRE-LAB ASSIGNMENT 1. Study this lab description. If necessary, review the procedure for editing, assembling,
and downloading from Labs 1 & 2, and make any necessary corrections to the program from Lab 2.
2. Modify the program from Lab 2 to produce a second decade counter, which performs the opposite function of the first counter, i.e. when the first counter is counting up, the second one should count down, and vice-versa. Write the value of the second counter to pins PC[7:4], and connect these pins to EEBOARD digital I/O lines DIO11-DIO8, configured as LEDs in WaveForms.
3. In your laboratory notebook, record the following. a. program flowcharts b. draft program and functions (or directions to content on H: drive) c. a plan for testing (a test procedure)
LAB PROCEDURE Please ensure that you record all observations and measurements in your engineering notebooks. Some of this data might be appropriate for inclusion in subsequent reports.
The lab procedure is to load and execute the program from Lab 2, modified as described above, and capture the microcontroller inputs/outputs on the logic analyzer. Verify that the correct sequence of values is being generated, and measure the exact rate at which the count is being changed. Then, use the oscilloscope to measure the rate at which each bit of the count is being changed. 1. As specified in Table 2, use wires to connect the indicated microcontroller signals to
the DIGITAL blocks on the EEBOARD.
2 Using the procedure described above, configure Waveforms to assign the signals listed in Table 2 to buses as follows: a. Create a bus (Count1) to display PC[3:0], connected to EEBOARD DIO 7-4. b. Create a bus (Count2) to display PC[7:4], connected to EEBOARD DIO 11-8. c. Microcontroller port pins PA1 and PA2 are inputs that we want to study. These will
be kept as individual signals. Assign these as indicated in Table 2.
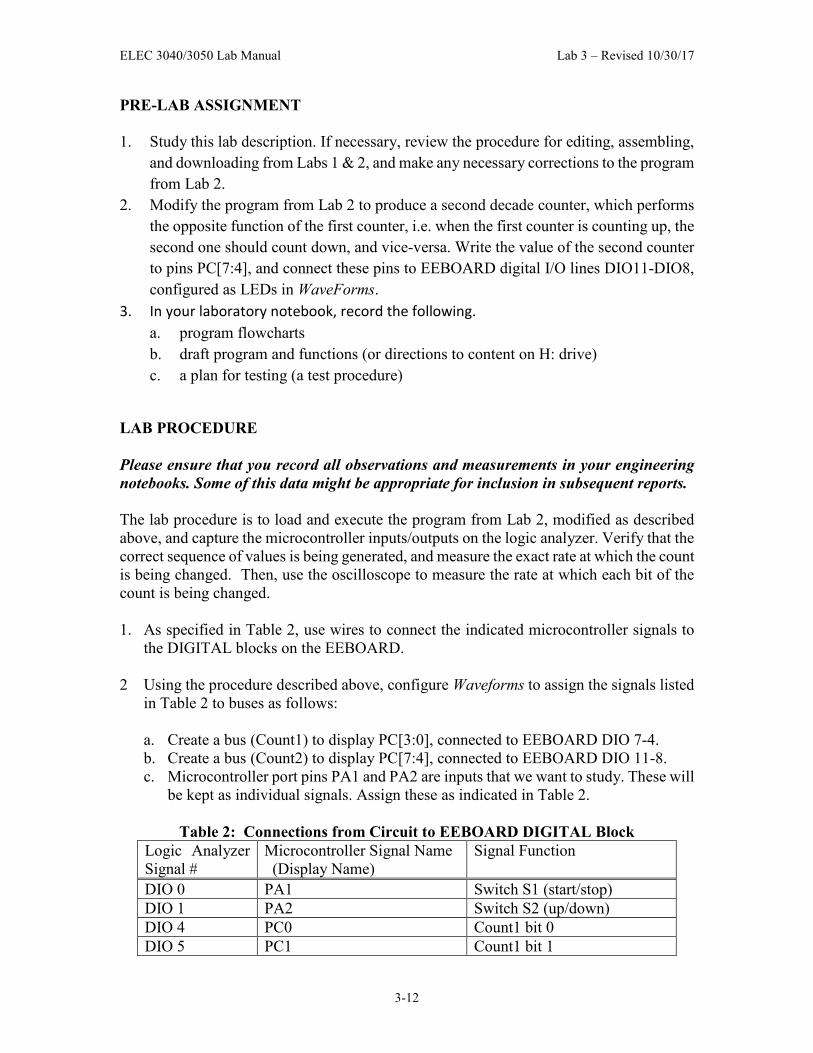
Table 2: Connections from Circuit to EEBOARD DIGITAL Block Logic Analyzer Signal #
Microcontroller Signal Name (Display Name)
Signal Function
DIO 0 PA1 Switch S1 (start/stop) DIO 1 PA2 Switch S2 (up/down) DIO 4 PC0 Count1 bit 0 DIO 5 PC1 Count1 bit 1

ELEC 3040/3050 Lab Manual Lab 3 – Revised 10/30/17
3-13
DIO 6 PC2 Count1 bit 2 DIO 7 PC3 Count1 bit 3 DIO 8 PC4 Count2 bit 0 DIO 9 PC5 Count2 bit 1 DIO 10 PC6 Count2 bit 2 DIO 11 PC7 Count2 bit 3
3 In the toolbars, select appropriate values for Clock (Internal), trigger Mode (Normal)
and Source (Analyzer), and Timebase, so that you can capture and display a complete counting sequence on Port GPIOC, with a count of 0000 for Count1 defined as a trigger condition.
4 You are now ready to perform a data acquisition. Your program should be running. To
start the data acquisition, click on the Single button to capture and display a single set of data.
5 You can vary the amount of information displayed by changing the Timebase box.
Experiment with different values of this value, noting the effects on the displayed information. Record your observations of the results, and especially note and record the time delay between changes of the count displayed on the LEDs. This will give you some information that you can relate to the timing of the instructions executed in your “delay” function. Note that the logic analyzer sampling rate (100MHz) determines the accuracy of the resulting data, while the Time Base determines the amount and level of detail displayed in the window.
6 Open the Waveforms Oscilloscope instrument. Wire PC0 and PC4 to the DC
connections for channels 1 and 2 in the SCOPE block, and wire a ground point in your circuit to the ground connectors for channels 1 and 2. For best results, configure both channels for 2 volts per division and adjust the time base until you see a good waveform. Sketch what you see, noting signal frequency, period, and amplitude. From this information, determine the exact time duration of your “delay” function.
The oscilloscope and logic analyzer can be left connected on your project board. Keep in mind in later labs that both instruments can be beneficial to you in debugging your circuits. Feel free to “play around” with them and get a feel for what they can do for you.

ELEC 3040/3050 Lab Manual Lab 3 – Revised 10/30/17
3-14
LAB REPORT (For the next schedule report.) 1. Brief statement of the goals of the lab. 2. Describe your observations of the operation of your program, including the
measured logic analyzer and oscilloscope information described above. You should especially note the measured execution time of your delay function.
3. Brief statement of what was learned/accomplished in this lab.