Lab 3: Editing a Rhapsody Model in RMM - IBM · 2018-03-29 · Lab 3: Editing a Rhapsody Model in...
33
© Copyright IBM Corp. 2018 1 - 1 Course materials may not be reproduced in whole or in part without the prior written permission of IBM. Lab 3: Editing a Rhapsody Model in RMM Objectives After completing this lab, you will be able to: ► Create an RTC repository workspace and local sandbox ► Load a Rhapsody model from RMM into your local sandbox ► Modify the model, link a work item to the change set and deliver the change set to a stream Scenario In general, when teams are working in parallel, there are two approaches: Optimistic: Teams work concurrently on the model in their own workspaces, without explicitly locking resources. Whilst this is the most flexible solution, when changes are delivered, there is the potential for conflict if two or more teams have modified the same artifact – in which case a merge is required. Pessimistic: Before editing a part of the model, the team locks that model element – preventing other teams from modifying it. Whilst this is a simpler solution (a merge is never* required) – it is also less flexible than the optimistic model. Making sure that the model is configured at the lowest level of granularity (‘everything is a unit”) helps mitigate this. *When an element is locked in Rhapsody – the integration places a lock on that same element in the team stream. If another team tries to lock that same element – RTC will check it and declare that it is already locked. However, if the other team decided to edit the file without locking it (terribly bad practice if the decision has been made to work pessimistically) then there is a chance of a conflict. RTC is not checking that stream in real time so there is a small chance that another team could modify a locked element before their RTC client has realized the element is locked. In this case, a merge would be required. Rational Team Concert may be configured to ‘auto-lock’ elements by declaring specific file types to be automatically read-only. In that case engineers must unlock units before working on them. This is outside the scope of this workshop however. In this Lab, you will start by setting up the Rational Team Concert client to connect to the RMM repository on the Jazz Team Server as Pete. You will create a repository workspace and a local sandbox for Pete. You will then load a model from RMM into Pete’s sandbox. You will then try out the pessimistic approach by locking a model element as Pete and seeing the results as Dan. You will not make any changes to the locked element however since the delivery of changes is the same whether you are working optimistically or pessimistically – the only real difference is the potential for a conflict. You will then create a new task in CCM for the sample user Pete to modify the model. From here on you will work optimistically. You will work as Pete, modifying the model and associating the changes with the task created earlier. You will publish Pete’s changes back to the team Stream. Finally, you will switch to Dan’s workspace and accept Pete’s changes – updating Dan’s version of the model. Note that in this lab there is no conflict – conflict resolution will be handled in Lab 6. Pete’s Activity:
Transcript of Lab 3: Editing a Rhapsody Model in RMM - IBM · 2018-03-29 · Lab 3: Editing a Rhapsody Model in...
© Copyright IBM Corp. 2018 1 - 1
Course materials may not be reproduced in whole or in part without the prior written permission of IBM.
Lab 3: Editing a Rhapsody Model in RMM
Objectives
After completing this lab, you will be able to:
► Create an RTC repository workspace and local sandbox
► Load a Rhapsody model from RMM into your local sandbox
► Modify the model, link a work item to the change set and deliver the change set to a stream
Scenario
In general, when teams are working in parallel, there are two approaches:
Optimistic: Teams work concurrently on the model in their own workspaces, without explicitly locking resources.
Whilst this is the most flexible solution, when changes are delivered, there is the potential for conflict if two or more
teams have modified the same artifact – in which case a merge is required.
Pessimistic: Before editing a part of the model, the team locks that model element – preventing other teams from
modifying it. Whilst this is a simpler solution (a merge is never* required) – it is also less flexible than the
optimistic model. Making sure that the model is configured at the lowest level of granularity (‘everything is a unit”)
helps mitigate this.
*When an element is locked in Rhapsody – the integration places a lock on that same element in the team stream. If
another team tries to lock that same element – RTC will check it and declare that it is already locked. However, if
the other team decided to edit the file without locking it (terribly bad practice if the decision has been made to work
pessimistically) then there is a chance of a conflict. RTC is not checking that stream in real time so there is a small
chance that another team could modify a locked element before their RTC client has realized the element is locked.
In this case, a merge would be required.
Rational Team Concert may be configured to ‘auto-lock’ elements by declaring specific file types to be
automatically read-only. In that case engineers must unlock units before working on them. This is outside the scope
of this workshop however.
In this Lab, you will start by setting up the Rational Team Concert client to connect to the RMM repository on the
Jazz Team Server as Pete. You will create a repository workspace and a local sandbox for Pete. You will then load a
model from RMM into Pete’s sandbox. You will then try out the pessimistic approach by locking a model element
as Pete and seeing the results as Dan. You will not make any changes to the locked element however since the
delivery of changes is the same whether you are working optimistically or pessimistically – the only real difference
is the potential for a conflict.
You will then create a new task in CCM for the sample user Pete to modify the model. From here on you will work
optimistically. You will work as Pete, modifying the model and associating the changes with the task created earlier.
You will publish Pete’s changes back to the team Stream. Finally, you will switch to Dan’s workspace and accept
Pete’s changes – updating Dan’s version of the model. Note that in this lab there is no conflict – conflict resolution
will be handled in Lab 6.
Pete’s Activity:

Rhapsody Model Manager Tech Jam
1 - 2 © Copyright IBM Corp. 2018
Course materials may not be reproduced in whole or in part without the prior written permission of IBM.
Task 1: Create a Repository Workspace for Pete
In this task, you will configure Pete’s workspace (the workspace folder has already been created for you and has the
same preferences as dan – such as auto-refreshing the sandbox). You will start by creating a new repository
connection to the architecture management area on Jazz. You will then connect to the Sample Models project and
create a new repository workspace on the server for Pete. That repository workspace will flow into the default
stream in RMM (‘Sample Models Stream’). You will then load the only component in that stream (Sample Models
Default Component) into your local workspace (that is your sandbox).
1. Open Pete’s Workspace:
a. Switch to the Rhapsody client
b. From the Rhapsody menu, select File Close
c. Switch to the RTC Client
d. From the menu, select File Switch Workspace C:\Workspaces\pete

Lab 3 – Editing a Rhapsody Model in RMM
© Copyright IBM Corp. 2018 1 - 3
Course materials may not be reproduced in whole or in part without the prior written permission of IBM.
TIP: Rational Team Concert will close and reload. The list of workspaces that appear in the switch menu can be
configured in RTC preferences (Window Preferences) then General Startup and Shutdown
Workspaces
2. Create a Repository Connection:
a. Close the Welcome page if it appears
b. In the sidebar, click the Create a Repository Connection link:
c. In the URI field, type https://ibmjazz:9443/am
d. In the Name field, type RMM
e. In the User ID field, type pete
f. In the Password field, type pete

Rhapsody Model Manager Tech Jam
1 - 4 © Copyright IBM Corp. 2018
Course materials may not be reproduced in whole or in part without the prior written permission of IBM.
g. Click Finish
h. In any Repository Connection Certificate Problems dialogs (there may be several – or none), select
Accept this certificate permanently and click OK:
i. If a Secure Storage dialog appears, click No:
3. Connect to the Sample Models Project Area:

Lab 3 – Editing a Rhapsody Model in RMM
© Copyright IBM Corp. 2018 1 - 5
Course materials may not be reproduced in whole or in part without the prior written permission of IBM.
a. Right-click the pete@RMM repository connection and select Manage Connected Project Areas:
b. Select Sample Models:
c. Click Finish
4. Create a Repository Workspace:
a. Expand the Sample Models project area:
Rhapsody Model Manager Tech Jam
1 - 6 © Copyright IBM Corp. 2018
Course materials may not be reproduced in whole or in part without the prior written permission of IBM.
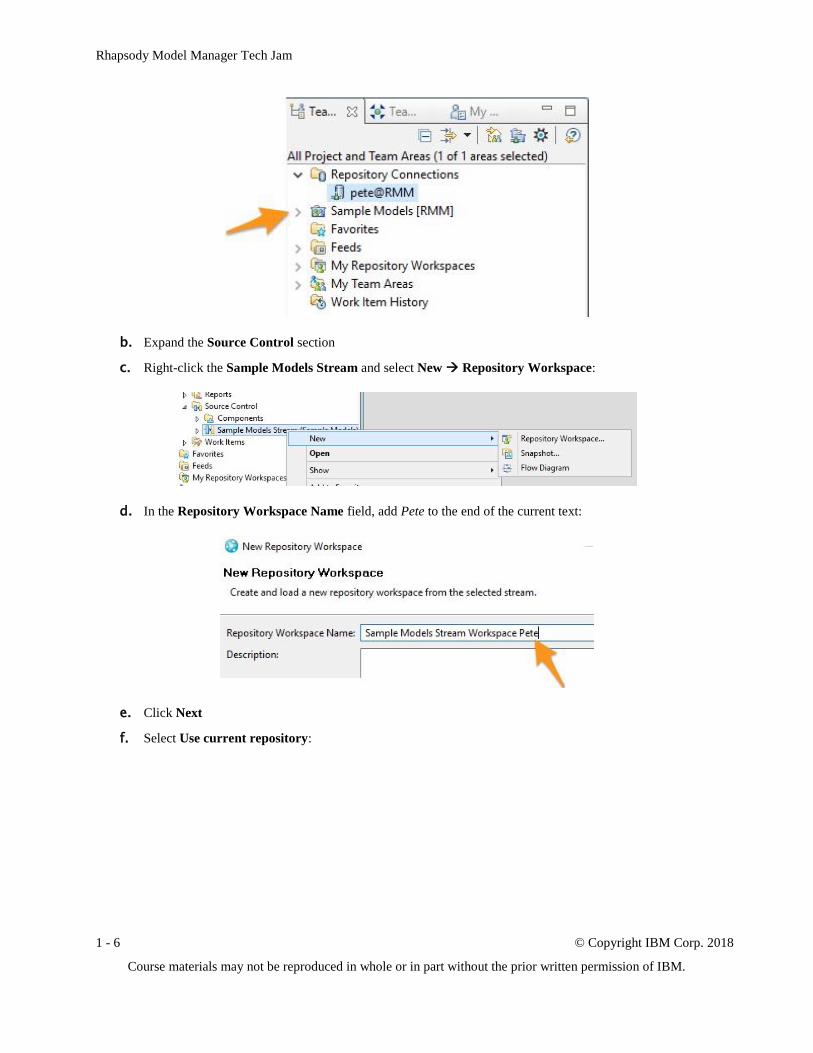
b. Expand the Source Control section
c. Right-click the Sample Models Stream and select New Repository Workspace:
d. In the Repository Workspace Name field, add Pete to the end of the current text:
e. Click Next
f. Select Use current repository:

Lab 3 – Editing a Rhapsody Model in RMM
© Copyright IBM Corp. 2018 1 - 7
Course materials may not be reproduced in whole or in part without the prior written permission of IBM.
g. Click Next
h. In the Read Access Permission window, select Project Area:
TIP: Setting the visibility to Project Area will allow another user to change their flow target to this workspace –
effectively allowing collaboration between users without / before publishing those changes into a stream.
i. Click Next
j. In the Components to Add window, select the Sample Models Default Component:
k. Click Finish
Rhapsody Model Manager Tech Jam
1 - 8 © Copyright IBM Corp. 2018
Course materials may not be reproduced in whole or in part without the prior written permission of IBM.
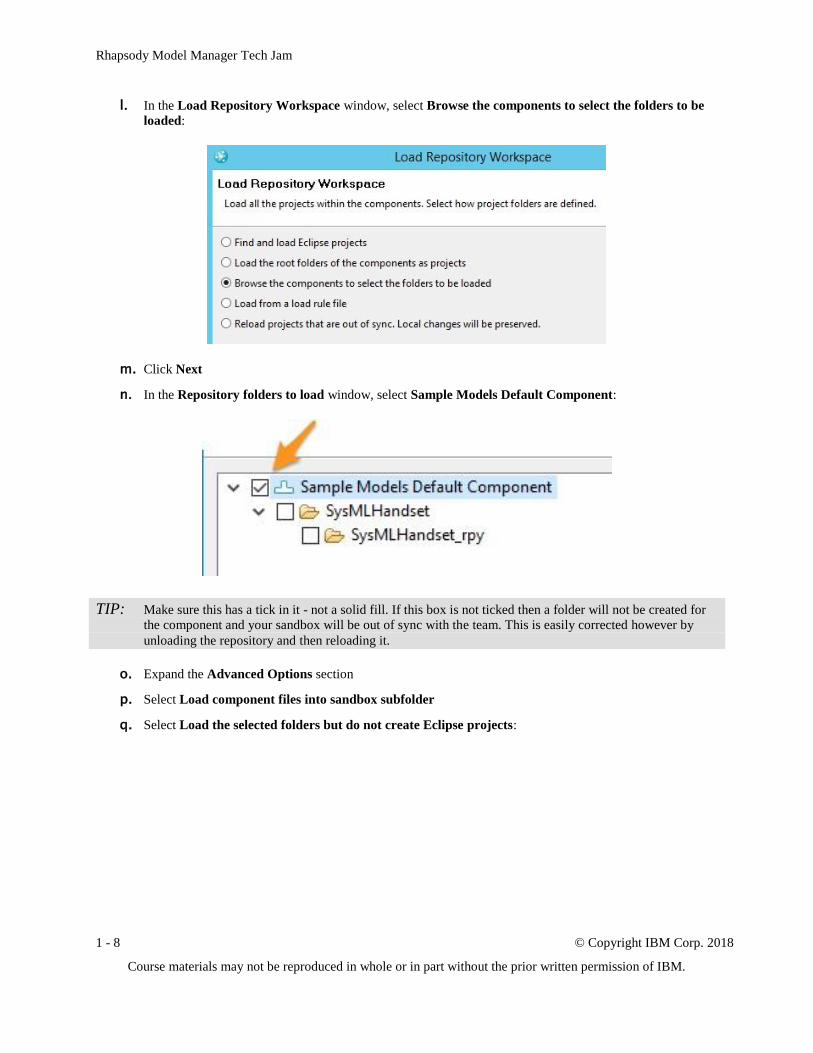
l. In the Load Repository Workspace window, select Browse the components to select the folders to be
loaded:
m. Click Next
n. In the Repository folders to load window, select Sample Models Default Component:
TIP: Make sure this has a tick in it - not a solid fill. If this box is not ticked then a folder will not be created for
the component and your sandbox will be out of sync with the team. This is easily corrected however by
unloading the repository and then reloading it.
o. Expand the Advanced Options section
p. Select Load component files into sandbox subfolder
q. Select Load the selected folders but do not create Eclipse projects:

Lab 3 – Editing a Rhapsody Model in RMM
© Copyright IBM Corp. 2018 1 - 9
Course materials may not be reproduced in whole or in part without the prior written permission of IBM.
r. Click Finish
s. If you receive a confirmation dialog, click OK:
5. Confirm Folder Creation:
a. Open Windows Explorer and navigate to C:\Workspaces\pete
b. Confirm that on the filesystem Pete’s workspace folder contains new folders - one for the stream and
another for the component – and the SysML Handset Rhapsody project is also present
Task 2: Work Pessimistically by Locking a Unit
In this task, you will lock a Unit in the Rhapsody model as Pete and then switch to playing the role of Dan to
observe the changes. Note that in this task you will not actually make any changes since the process of delivering
those changes is the same whether you are working optimistically or pessimistically. The only real difference is that
in optimistic mode there is a chance of a conflict.

Rhapsody Model Manager Tech Jam
1 - 10 © Copyright IBM Corp. 2018
Course materials may not be reproduced in whole or in part without the prior written permission of IBM.
1. Lock a Unit:
a. Switch to the Rhapsody client
b. From the menu, select File Open
c. Navigate to C:\Workspaces\pete\Sample Models Stream Workspace Pete\Sample Models Default
Component\SysMLHandset and double-click the SysMLHandset.rpyx file
d. In the Rhapsody browser, expand Packages
e. Right-click the Analysis package and select Rational Team Concert Lock:
f. Note that the Analysis package now has a blue lock icon indicating that it is locked by ‘you’:
2. Switch to Dan:
a. From the Rhapsody menu, select File Close
b. Switch to the RTC Client
c. From the menu, select File Switch Workspace C:\Workspaces\dan
TIP: Rational Team Concert will close and reload.
d. Switch back to the Rhapsody client
Lab 3 – Editing a Rhapsody Model in RMM
© Copyright IBM Corp. 2018 1 - 11
Course materials may not be reproduced in whole or in part without the prior written permission of IBM.
e. From the menu, select File Open
f. Navigate to C:\Workspaces\dan\Sample Models Stream Workspace Dan\Sample Models Default
Component\SysMLHandset and double-click the SysMLHandset.rpyx file
g. In the browser, expand Packages
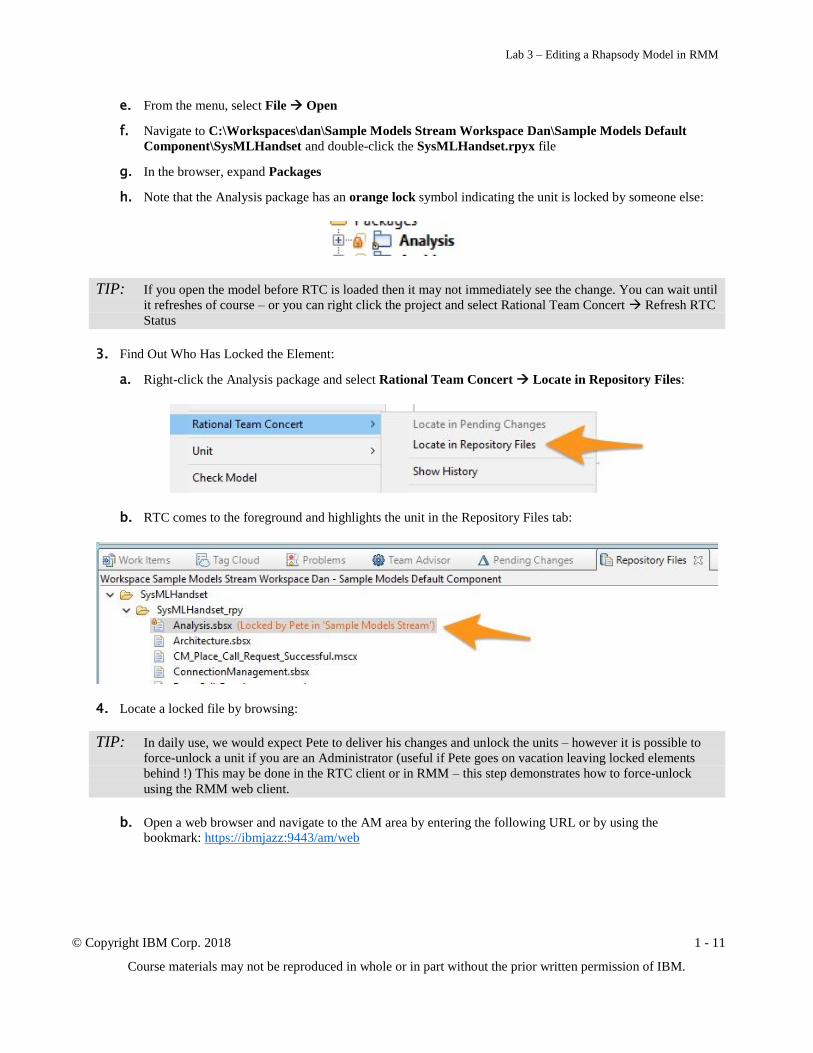
h. Note that the Analysis package has an orange lock symbol indicating the unit is locked by someone else:
TIP: If you open the model before RTC is loaded then it may not immediately see the change. You can wait until
it refreshes of course – or you can right click the project and select Rational Team Concert Refresh RTC
Status
3. Find Out Who Has Locked the Element:
a. Right-click the Analysis package and select Rational Team Concert Locate in Repository Files:
b. RTC comes to the foreground and highlights the unit in the Repository Files tab:
4. Locate a locked file by browsing:
TIP: In daily use, we would expect Pete to deliver his changes and unlock the units – however it is possible to
force-unlock a unit if you are an Administrator (useful if Pete goes on vacation leaving locked elements
behind !) This may be done in the RTC client or in RMM – this step demonstrates how to force-unlock
using the RMM web client.
b. Open a web browser and navigate to the AM area by entering the following URL or by using the
bookmark: https://ibmjazz:9443/am/web
Rhapsody Model Manager Tech Jam
1 - 12 © Copyright IBM Corp. 2018
Course materials may not be reproduced in whole or in part without the prior written permission of IBM.
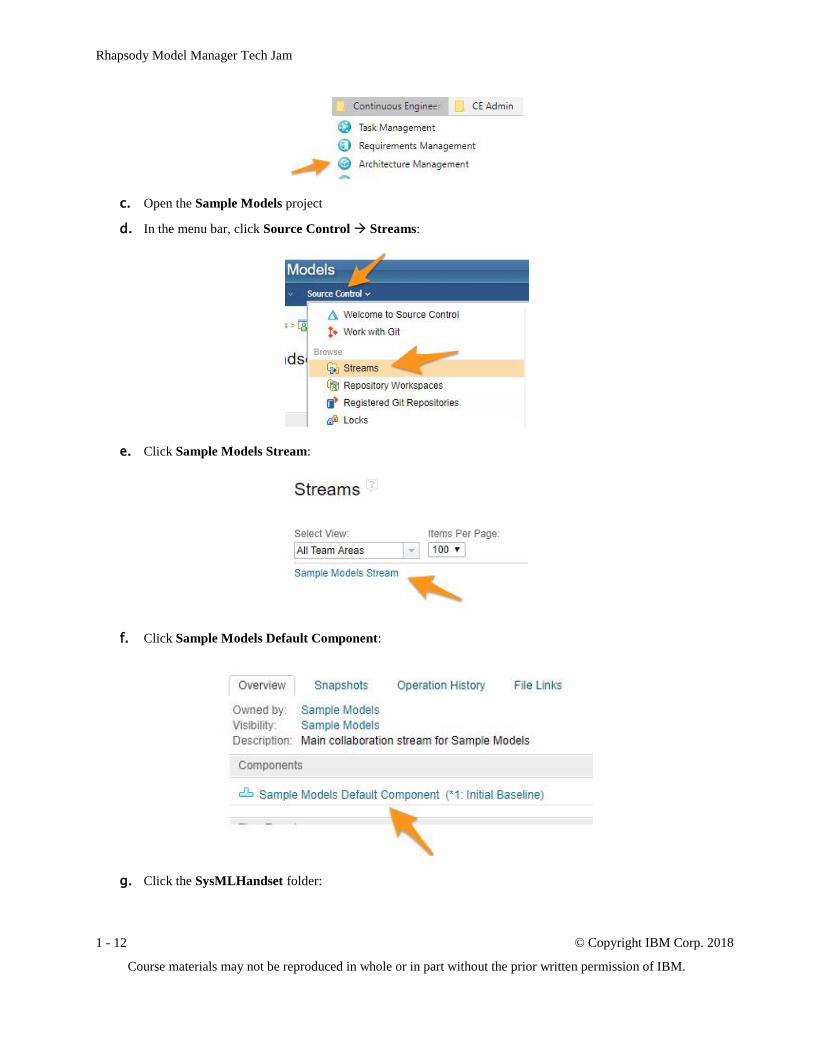
c. Open the Sample Models project
d. In the menu bar, click Source Control Streams:
e. Click Sample Models Stream:
f. Click Sample Models Default Component:
g. Click the SysMLHandset folder:

Lab 3 – Editing a Rhapsody Model in RMM
© Copyright IBM Corp. 2018 1 - 13
Course materials may not be reproduced in whole or in part without the prior written permission of IBM.
h. Click the SysMLHandset_rpy folder:
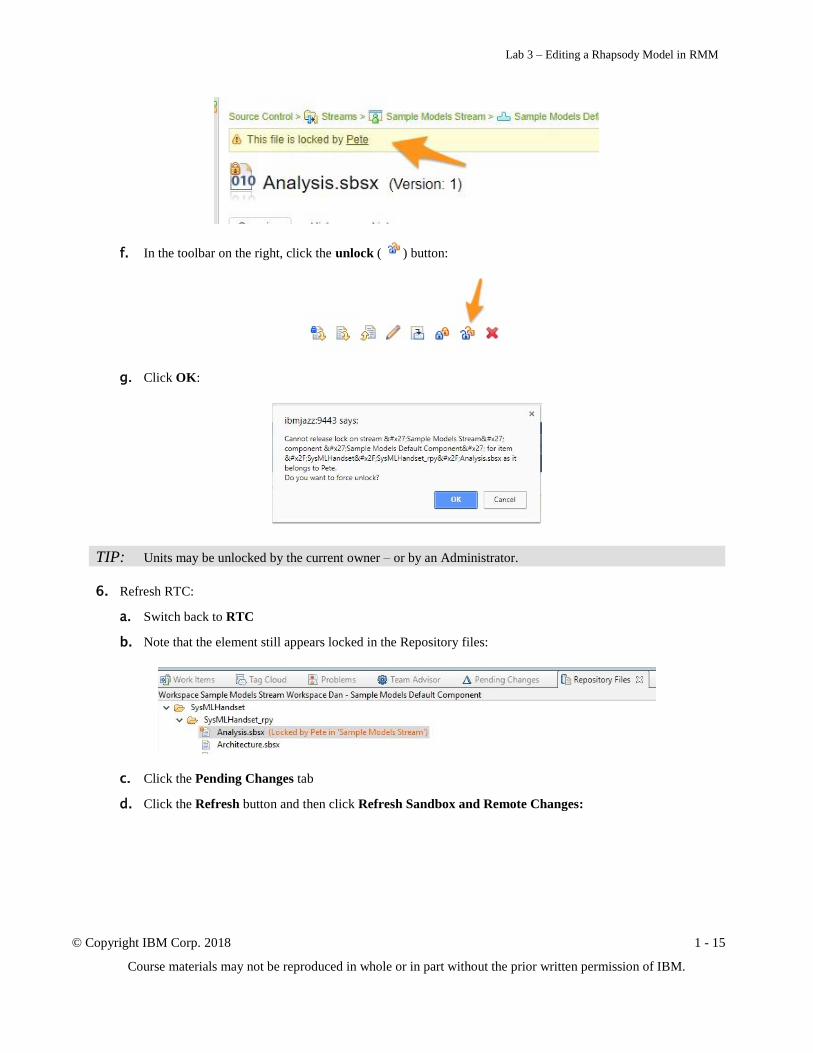
i. Note that the Analysis.sbsx file has a lock symbol (and the hover says its locked by Pete)
5. Locate a locked file by search:
a. From the menu, select Source Control Advanced Search:

Rhapsody Model Manager Tech Jam
1 - 14 © Copyright IBM Corp. 2018
Course materials may not be reproduced in whole or in part without the prior written permission of IBM.
b. In the Search For field, select Locks
c. In the Search By field, type Pete into the Owner field (and select Pete when his name pops up)
d. Click Search
e. Click the Analysis.sbsx file
Lab 3 – Editing a Rhapsody Model in RMM
© Copyright IBM Corp. 2018 1 - 15
Course materials may not be reproduced in whole or in part without the prior written permission of IBM.
f. In the toolbar on the right, click the unlock ( ) button:
g. Click OK:
TIP: Units may be unlocked by the current owner – or by an Administrator.
6. Refresh RTC:
a. Switch back to RTC
b. Note that the element still appears locked in the Repository files:
c. Click the Pending Changes tab
d. Click the Refresh button and then click Refresh Sandbox and Remote Changes:

Rhapsody Model Manager Tech Jam
1 - 16 © Copyright IBM Corp. 2018
Course materials may not be reproduced in whole or in part without the prior written permission of IBM.
e. Click the Repository Files tab and note the unit is no longer locked:
7. Observe status in Rhapsody:
a. Switch back to Rhapsody
b. Note the Analysis package is now once again unlocked and in-sync:
Task 3: Create a Work Item
In this task, you will create a work item in RTC using the web client – assigned to Pete. Note that in this task it does
not matter who creates the task since pete and dan all have the same permissions.
1. Create a New Task:
a. Switch to the web browser, use the bookmark to open Task Management:
TIP: If you are already logged in as ibm, dan or pete – then that's fine you can stay logged in as that user. If
instead you need to login then login using ibm/ibm. In this task, the creator of the work item is irrelevant.
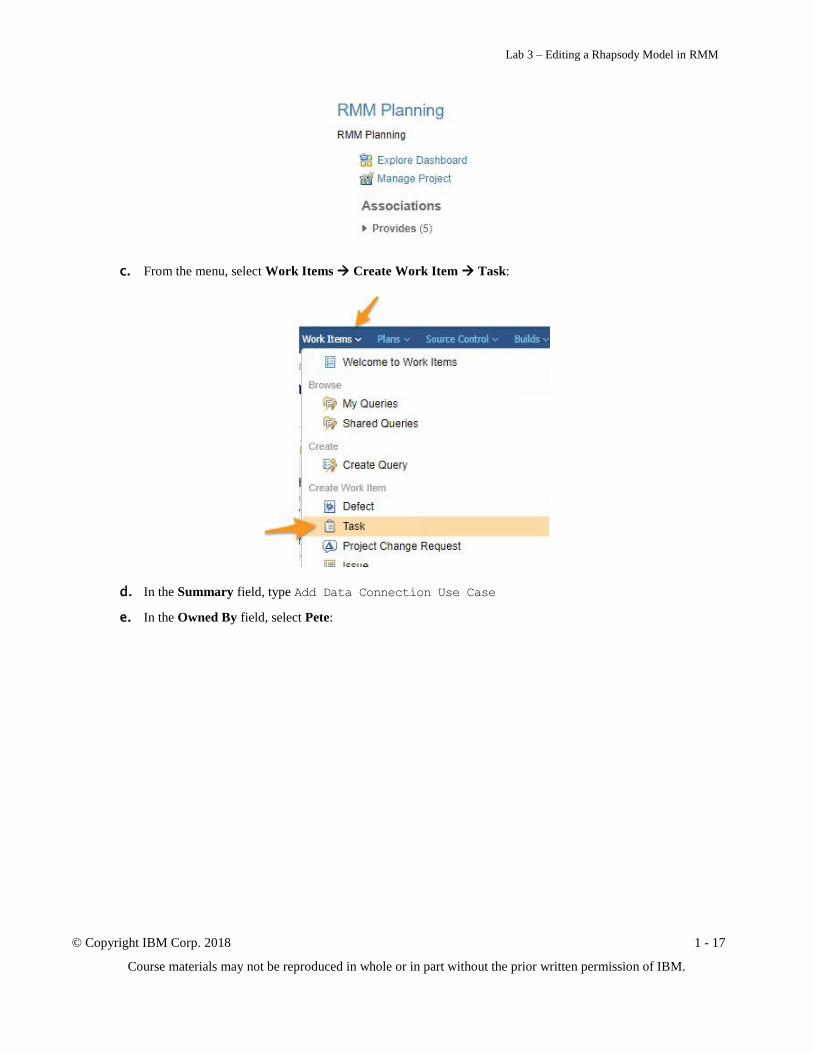
b. Click the RMM Planning project to open it:
Lab 3 – Editing a Rhapsody Model in RMM
© Copyright IBM Corp. 2018 1 - 17
Course materials may not be reproduced in whole or in part without the prior written permission of IBM.
c. From the menu, select Work Items Create Work Item Task:
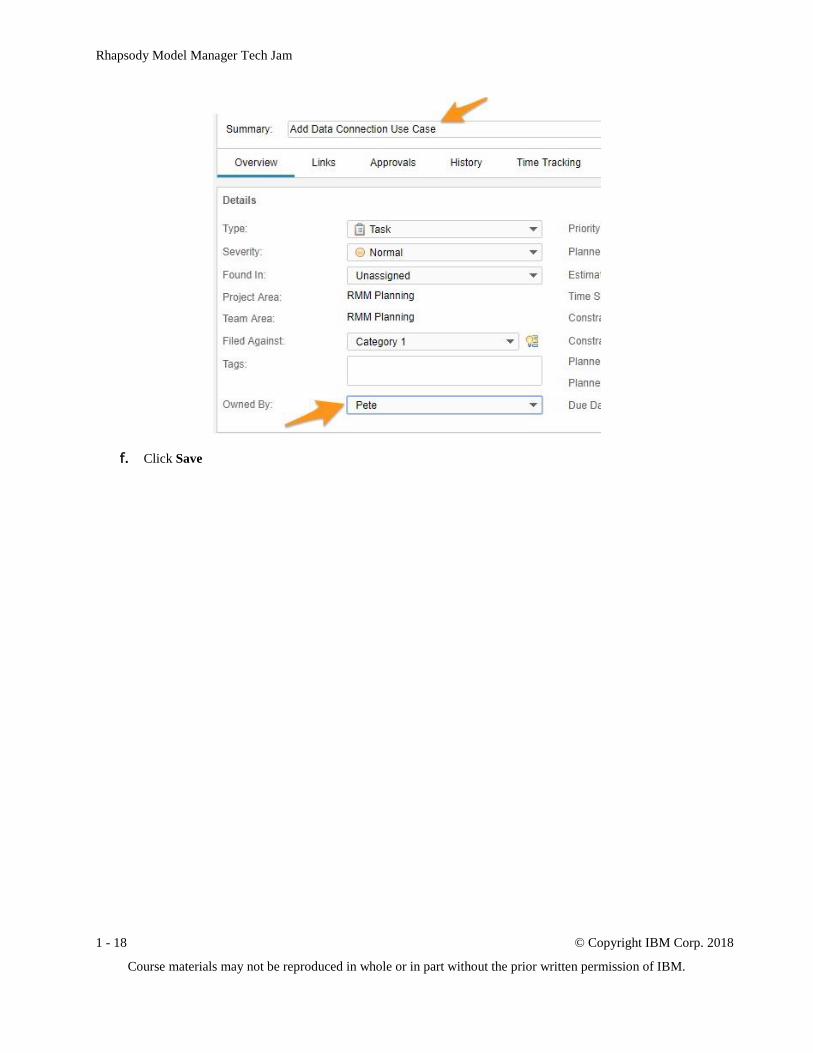
d. In the Summary field, type Add Data Connection Use Case
e. In the Owned By field, select Pete:
Rhapsody Model Manager Tech Jam
1 - 18 © Copyright IBM Corp. 2018
Course materials may not be reproduced in whole or in part without the prior written permission of IBM.
f. Click Save

Lab 3 – Editing a Rhapsody Model in RMM
© Copyright IBM Corp. 2018 1 - 19
Course materials may not be reproduced in whole or in part without the prior written permission of IBM.
Task 4: Connect to the Planning Project
In this task, you will add an additional connection in the RTC Client to the planning area such that you can see any
work items assigned to you (as Pete). You will then run a query to see Pete’s work items and configure the My
Work tab to show the same. Finally, you will accept the work items assigned to you and set one as the current work
item.
1. Switch to Pete’s Workspace:
a. Switch to the Rhapsody client
b. From the menu select File Close
c. Switch to the RTC Client
d. From the menu, select File Switch Workspace C:/Workspaces/pete
2. Observe My Work:
a. Click the My Work tab in the sidebar:
b. Note that it shows no work
TIP: This is because the client can only see the Sample Models RMM project – it cannot yet see the RMM
Planning project
3. Create a Repository Connection for CCM:
a. Click the Team Artifacts tab in the sidebar:

Rhapsody Model Manager Tech Jam
1 - 20 © Copyright IBM Corp. 2018
Course materials may not be reproduced in whole or in part without the prior written permission of IBM.
b. Right-click the Repository Connections category and select New Jazz Repository Connection:
c. In the URI field, type https://ibmjazz:9443/ccm
d. In the Name field, type CCM
e. In the User ID field, type pete
f. In the Password field, type pete
g. Click Finish
4. Connect to the RMM Planning Project Area:

Lab 3 – Editing a Rhapsody Model in RMM
© Copyright IBM Corp. 2018 1 - 21
Course materials may not be reproduced in whole or in part without the prior written permission of IBM.
a. Right-click the pete@CCM repository connection and select Manage Connected Project Areas:
b. Select RMM Planning:
c. Click Finish
5. Run Work Items Query:
a. Click the Work Items tab at the bottom of the user interface
b. Click Open assigned to me (RMM Planning):

Rhapsody Model Manager Tech Jam
1 - 22 © Copyright IBM Corp. 2018
Course materials may not be reproduced in whole or in part without the prior written permission of IBM.
c. Note the new work item:
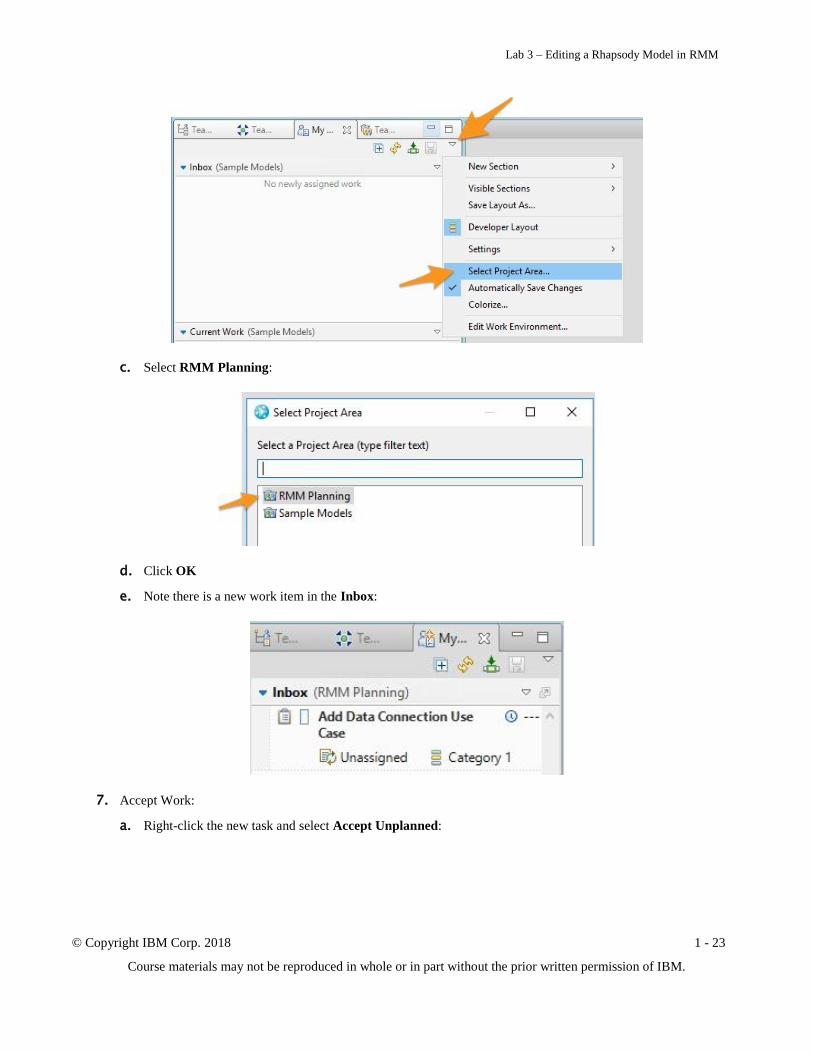
6. Configure My Work View:
a. Click the My Work tab in the sidebar:
b. Click the twisty in the top right-hand corner of the My Work panel and click Select Project Area:
Lab 3 – Editing a Rhapsody Model in RMM
© Copyright IBM Corp. 2018 1 - 23
Course materials may not be reproduced in whole or in part without the prior written permission of IBM.
c. Select RMM Planning:
d. Click OK
e. Note there is a new work item in the Inbox:
7. Accept Work:
a. Right-click the new task and select Accept Unplanned:

Rhapsody Model Manager Tech Jam
1 - 24 © Copyright IBM Corp. 2018
Course materials may not be reproduced in whole or in part without the prior written permission of IBM.
b. Note that the work item moves into the Future Work section at the bottom of the panel:
TIP: You may need to click that section to expand it in order to see the Future Work
8. Set Work Items for Today:
a. Right-click the work item and select Plan For Today:
TIP: Note that the work item moves into the Current Work section. You may have multiple items in the current
work section – but only one may be the ‘active’ (or ‘Current’) work item.
9. Set the Current Work Item:
a. Right-click the work item and select Set as Current Work Item:
Lab 3 – Editing a Rhapsody Model in RMM
© Copyright IBM Corp. 2018 1 - 25
Course materials may not be reproduced in whole or in part without the prior written permission of IBM.
TIP: RTC should now associate any changes you make with this work item automatically. However, at the time
of writing the RMM integration does not yet support this feature.
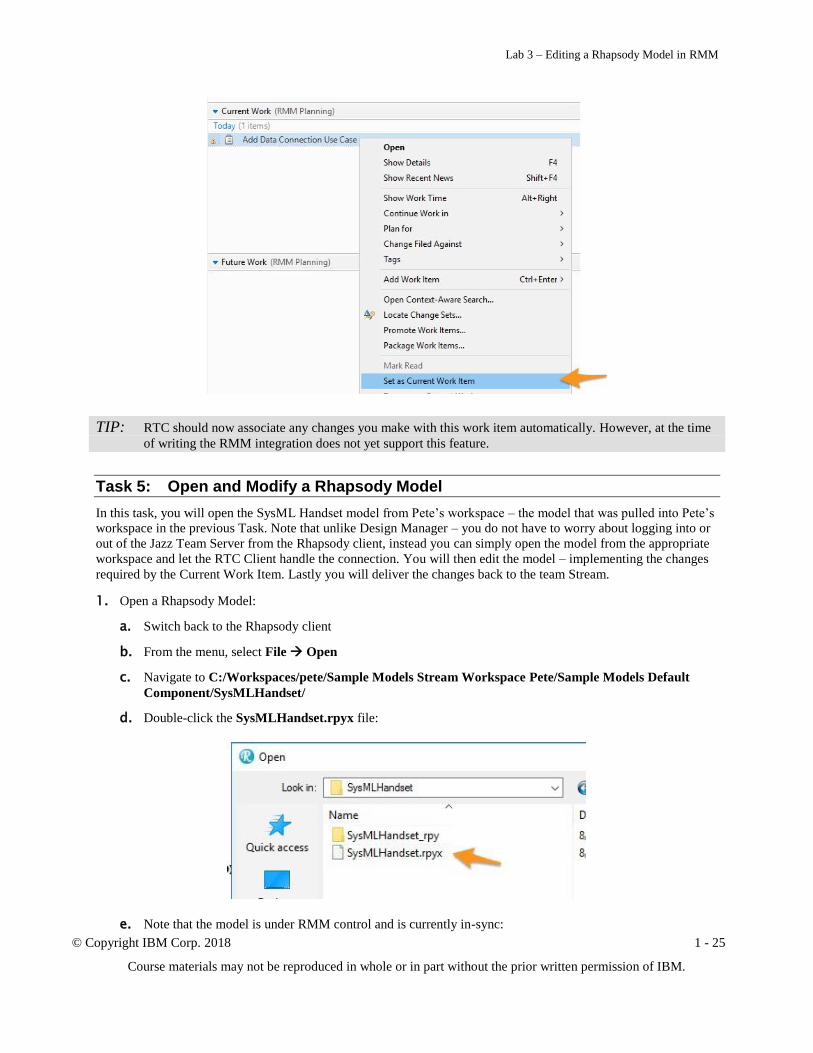
Task 5: Open and Modify a Rhapsody Model
In this task, you will open the SysML Handset model from Pete’s workspace – the model that was pulled into Pete’s
workspace in the previous Task. Note that unlike Design Manager – you do not have to worry about logging into or
out of the Jazz Team Server from the Rhapsody client, instead you can simply open the model from the appropriate
workspace and let the RTC Client handle the connection. You will then edit the model – implementing the changes
required by the Current Work Item. Lastly you will deliver the changes back to the team Stream.
1. Open a Rhapsody Model:
a. Switch back to the Rhapsody client
b. From the menu, select File Open
c. Navigate to C:/Workspaces/pete/Sample Models Stream Workspace Pete/Sample Models Default
Component/SysMLHandset/
d. Double-click the SysMLHandset.rpyx file:
e. Note that the model is under RMM control and is currently in-sync:
Rhapsody Model Manager Tech Jam
1 - 26 © Copyright IBM Corp. 2018
Course materials may not be reproduced in whole or in part without the prior written permission of IBM.
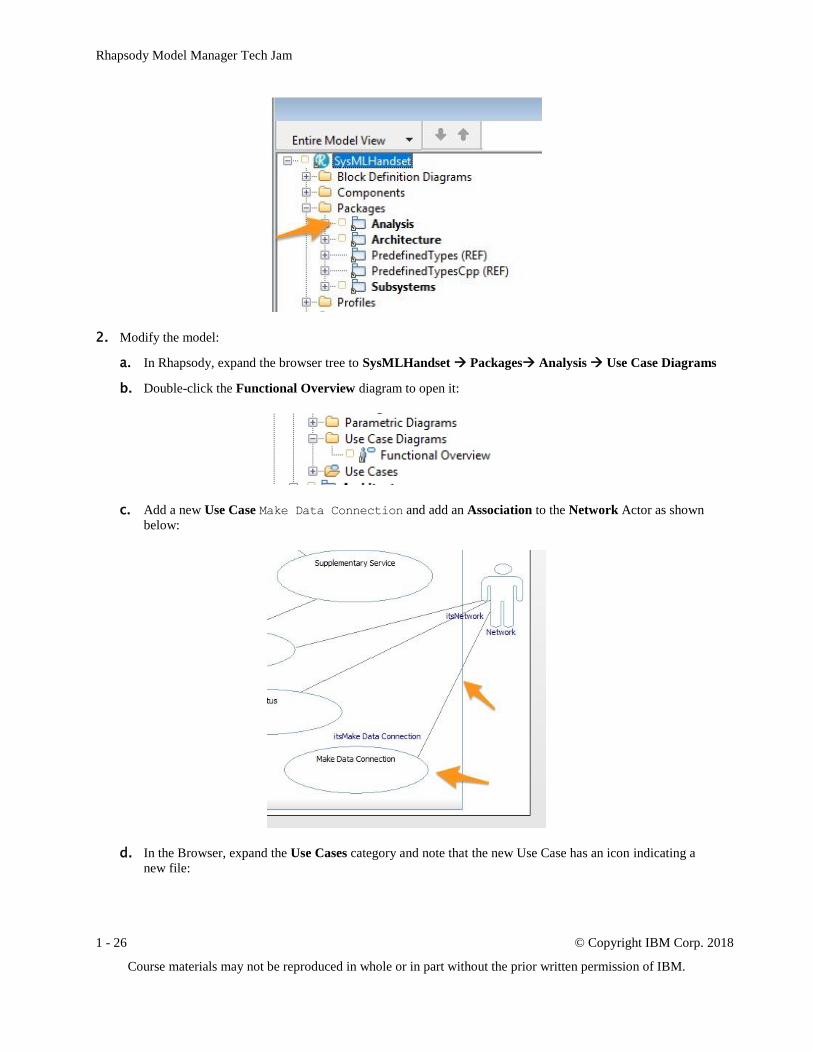
2. Modify the model:
a. In Rhapsody, expand the browser tree to SysMLHandset Packages Analysis Use Case Diagrams
b. Double-click the Functional Overview diagram to open it:
c. Add a new Use Case Make Data Connection and add an Association to the Network Actor as shown
below:
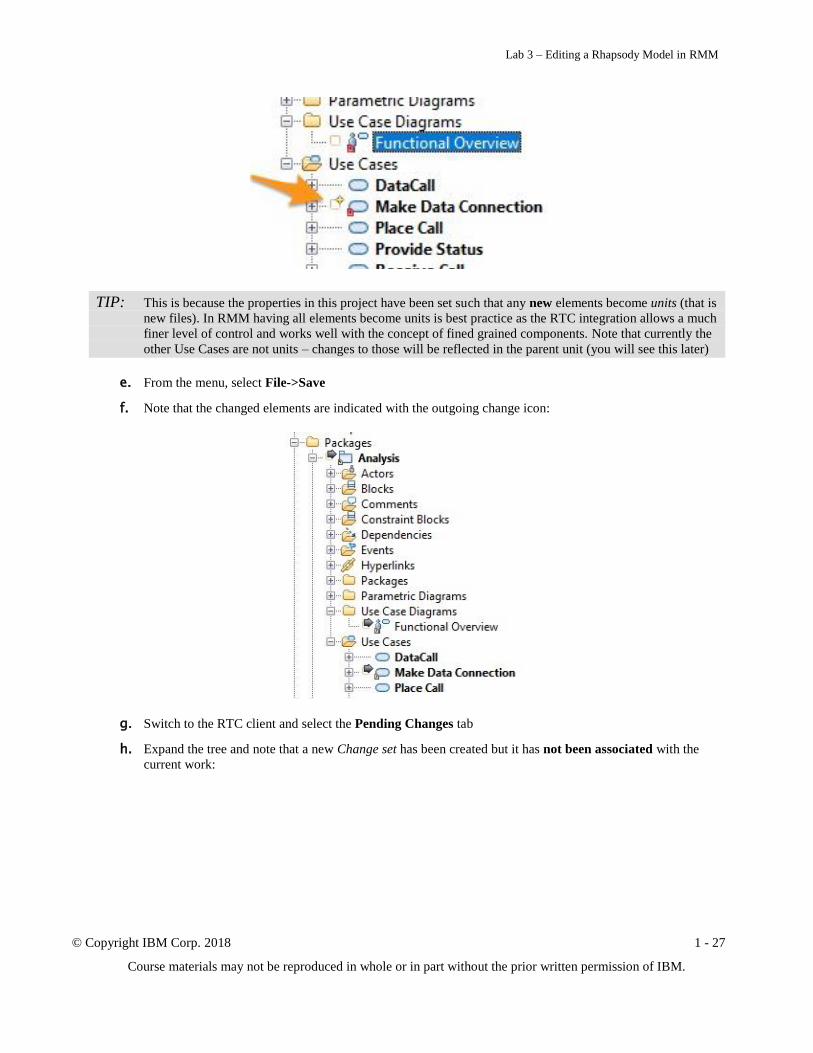
d. In the Browser, expand the Use Cases category and note that the new Use Case has an icon indicating a
new file:
Lab 3 – Editing a Rhapsody Model in RMM
© Copyright IBM Corp. 2018 1 - 27
Course materials may not be reproduced in whole or in part without the prior written permission of IBM.
TIP: This is because the properties in this project have been set such that any new elements become units (that is
new files). In RMM having all elements become units is best practice as the RTC integration allows a much
finer level of control and works well with the concept of fined grained components. Note that currently the
other Use Cases are not units – changes to those will be reflected in the parent unit (you will see this later)
e. From the menu, select File->Save
f. Note that the changed elements are indicated with the outgoing change icon:
g. Switch to the RTC client and select the Pending Changes tab
h. Expand the tree and note that a new Change set has been created but it has not been associated with the
current work:

Rhapsody Model Manager Tech Jam
1 - 28 © Copyright IBM Corp. 2018
Course materials may not be reproduced in whole or in part without the prior written permission of IBM.
TIP: This is a defect in the current version – new change sets should be associated with the current work item
automatically. For this tech jam you will manually associate them
i. Note there are changed files and a new one for the new Use Case:
j. Note that there are also unresolved elements:
TIP: Although Dan ignored these (they were not delivered to the stream) – when Pete saved the model –
Rhapsody created new files locally.
3. Ignore Extraneous Files
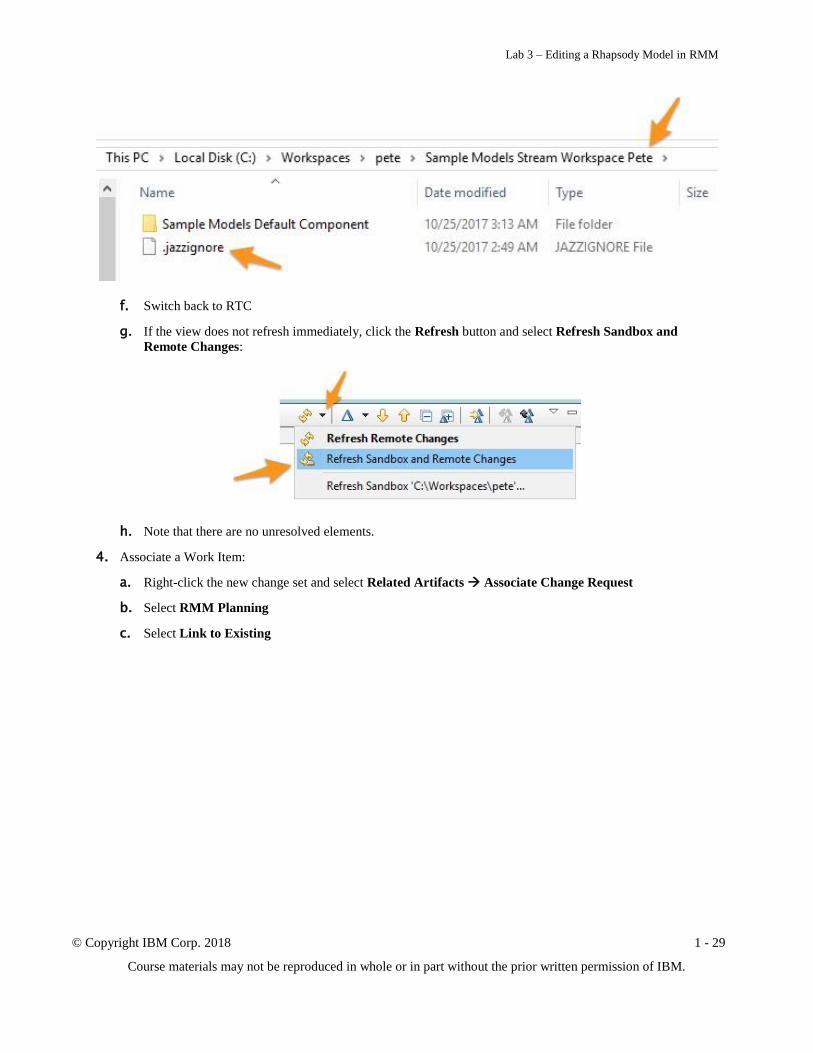
a. Open Windows Explorer
b. Navigate to C:\Workspaces\dan\Sample Models Stream Workspace Dan
c. Right-click the .jazzignore file and select Copy
d. Navigate to C:\Workspaces\pete\Sample Models Stream Workspace Pete
e. Right-click inside this folder and select Paste:
Lab 3 – Editing a Rhapsody Model in RMM
© Copyright IBM Corp. 2018 1 - 29
Course materials may not be reproduced in whole or in part without the prior written permission of IBM.
f. Switch back to RTC
g. If the view does not refresh immediately, click the Refresh button and select Refresh Sandbox and
Remote Changes:
h. Note that there are no unresolved elements.
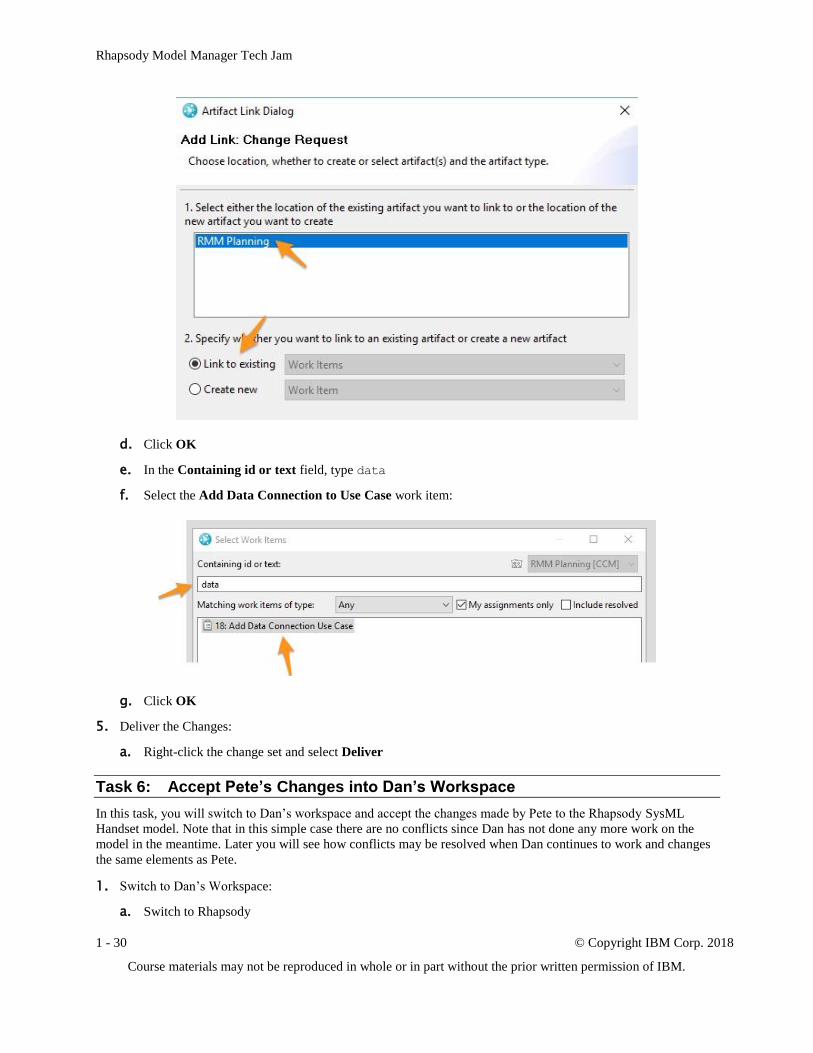
4. Associate a Work Item:
a. Right-click the new change set and select Related Artifacts Associate Change Request
b. Select RMM Planning
c. Select Link to Existing
Rhapsody Model Manager Tech Jam
1 - 30 © Copyright IBM Corp. 2018
Course materials may not be reproduced in whole or in part without the prior written permission of IBM.
d. Click OK
e. In the Containing id or text field, type data
f. Select the Add Data Connection to Use Case work item:
g. Click OK
5. Deliver the Changes:
a. Right-click the change set and select Deliver
Task 6: Accept Pete’s Changes into Dan’s Workspace
In this task, you will switch to Dan’s workspace and accept the changes made by Pete to the Rhapsody SysML
Handset model. Note that in this simple case there are no conflicts since Dan has not done any more work on the
model in the meantime. Later you will see how conflicts may be resolved when Dan continues to work and changes
the same elements as Pete.
1. Switch to Dan’s Workspace:
a. Switch to Rhapsody
Lab 3 – Editing a Rhapsody Model in RMM
© Copyright IBM Corp. 2018 1 - 31
Course materials may not be reproduced in whole or in part without the prior written permission of IBM.
b. From the menu, select File Close
c. Switch back to RTC
d. In RTC, select File Switch Workspace C:\Workspaces\dan
TIP: RTC closes and re-opens
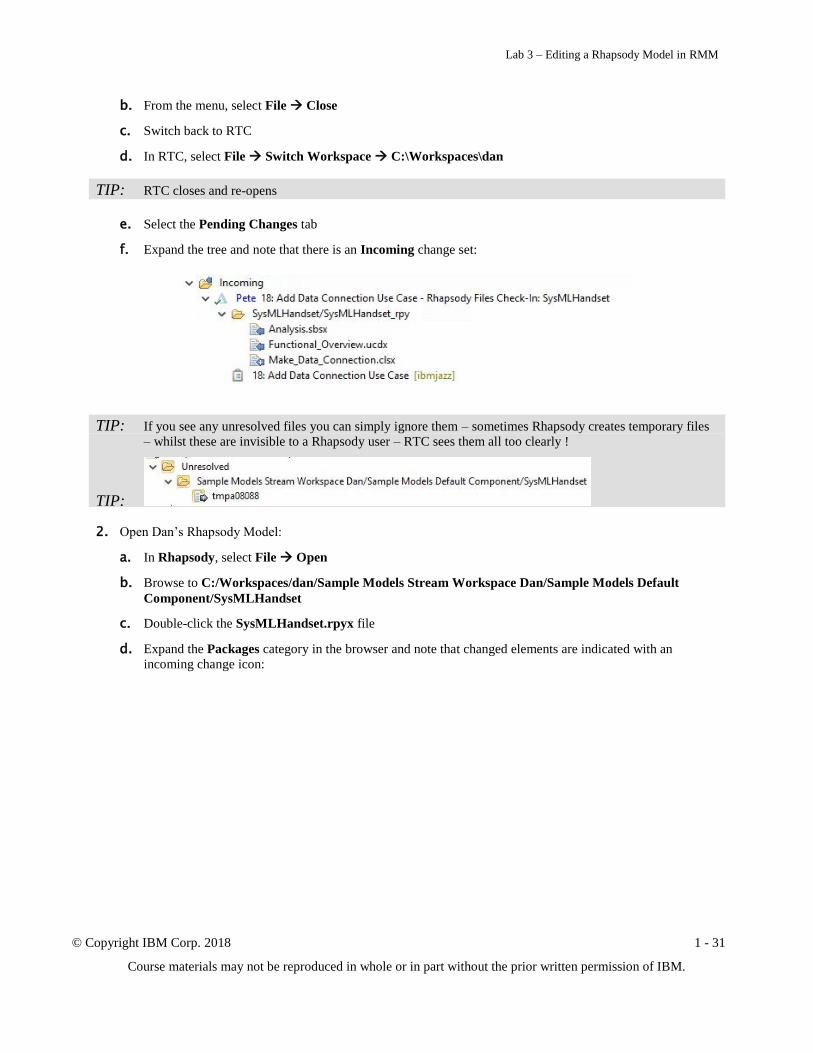
e. Select the Pending Changes tab
f. Expand the tree and note that there is an Incoming change set:
TIP: If you see any unresolved files you can simply ignore them – sometimes Rhapsody creates temporary files
– whilst these are invisible to a Rhapsody user – RTC sees them all too clearly !
TIP:
2. Open Dan’s Rhapsody Model:
a. In Rhapsody, select File Open
b. Browse to C:/Workspaces/dan/Sample Models Stream Workspace Dan/Sample Models Default
Component/SysMLHandset
c. Double-click the SysMLHandset.rpyx file
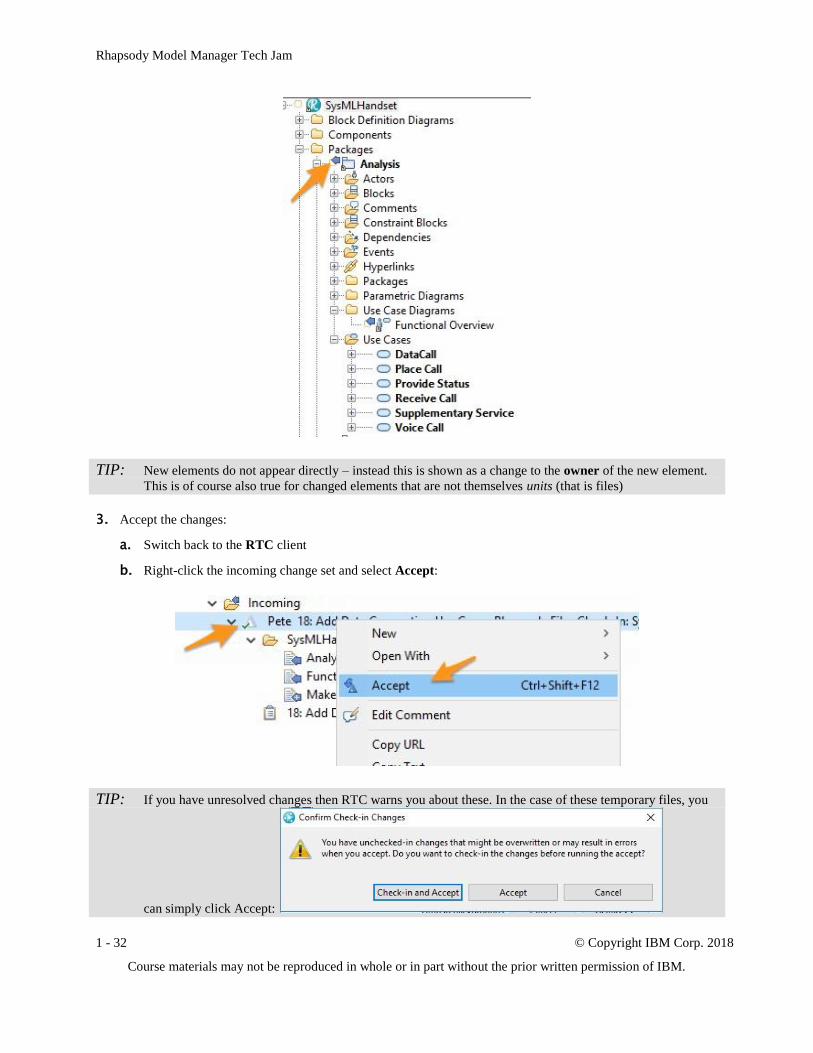
d. Expand the Packages category in the browser and note that changed elements are indicated with an
incoming change icon:
Rhapsody Model Manager Tech Jam
1 - 32 © Copyright IBM Corp. 2018
Course materials may not be reproduced in whole or in part without the prior written permission of IBM.
TIP: New elements do not appear directly – instead this is shown as a change to the owner of the new element.
This is of course also true for changed elements that are not themselves units (that is files)
3. Accept the changes:
a. Switch back to the RTC client
b. Right-click the incoming change set and select Accept:
TIP: If you have unresolved changes then RTC warns you about these. In the case of these temporary files, you
can simply click Accept:

Lab 3 – Editing a Rhapsody Model in RMM
© Copyright IBM Corp. 2018 1 - 33
Course materials may not be reproduced in whole or in part without the prior written permission of IBM.
c. Switch back to the Rhapsody client
d. Rhapsody indicates when units have changed – click Yes to All:
e. Note that the browser is once again back in sync: