
L9 e m - Hamilton College
4
Phys 195 Spring 2014 Cathode Rays INTRODUCTION: If a glass tube containing air (or some other gas) at low pressure is fitted with 2 electrodes and connected to a high voltage source, an eerie glow appears to emanate from the cathode (i.e. the negative electrode). The nature of these “cathode rays” was a mystery for much of the latter half of the 19 th century. In 1897 J.J. Thomson, working in the Cavendish laboratory at Cambridge, suggested that “cathode rays” were produced by tiny, rapidly moving, negatively charged particles interacting with the gas, and that these particles were constituents of atoms. Today we know these particles as electrons. By observing the deflection of cathode rays in a magnetic field, Thompson was able to determine e/m, the charge to mass ratio of the particles making up the cathode rays. About 20 years later, the American physicist Robert A. Millikan, using his famous oil drop apparatus, accurately determined the charge of the electron, and thus, using the charge to mass ratio, it became possible to determine the mass of the electron. The Uchida e/m apparatus is a modern version of Thomson’s apparatus (see Fig. 1). At the heart of the apparatus is a sealed glass globe containing an electron “gun”. The gun consists of two parallel metal "plates" (the cathode and the anode), and a heater contained within the cathode. A high voltage power supply is used to create a potential difference between the anode and cathode. The heater is simply a wire filament, similar to the filament in a light bulb. Heating the cathode causes it to emit low energy electrons. This effect, called thermionic emission, was first studied extensively by Thomas Edison. The electrons emitted by the cathode are accelerated to a high velocity by the electric field between the cathode and the anode. The anode has a small hole in its center, and some of the accelerated electrons pass through the hole, resulting in an electron beam moving to the right. Fig. 1 Uchida e/m apparatus with blow-up of electron gun. In order to see the path of the electrons, the globe contains helium gas at a low pressure. An electron traveling through the gas occasionally interacts with a helium atom, exciting it to a higher energy state. The excited helium atom then returns to its ground state, emitting a blue-green photon in the process. Thus, the trajectory of the electrons in the beam can be seen as a trail of blue-green light. The process of light emission following electrical Anode Wires to filament heater
Transcript of L9 e m - Hamilton College

Phys 195 Spring 2014
Cathode Rays
INTRODUCTION: If a glass tube containing air (or some other gas) at low pressure is fitted with 2 electrodes and connected to a high voltage source, an eerie glow appears to emanate from the cathode (i.e. the negative electrode). The nature of these “cathode rays” was a mystery for much of the latter half of the 19th century. In 1897 J.J. Thomson, working in the Cavendish laboratory at Cambridge, suggested that “cathode rays” were produced by tiny, rapidly moving, negatively charged particles interacting with the gas, and that these particles were constituents of atoms. Today we know these particles as electrons. By observing the deflection of cathode rays in a magnetic field, Thompson was able to determine e/m, the charge to mass ratio of the particles making up the cathode rays. About 20 years later, the American physicist Robert A. Millikan, using his famous oil drop apparatus, accurately determined the charge of the electron, and thus, using the charge to mass ratio, it became possible to determine the mass of the electron. The Uchida e/m apparatus is a modern version of Thomson’s apparatus (see Fig. 1). At the heart of the apparatus is a sealed glass globe containing an electron “gun”. The gun consists of two parallel metal "plates" (the cathode and the anode), and a heater contained within the cathode. A high voltage power supply is used to create a potential difference between the anode and cathode. The heater is simply a wire filament, similar to the filament in a light bulb. Heating the cathode causes it to emit low energy electrons. This effect, called thermionic emission, was first studied extensively by Thomas Edison. The electrons emitted by the cathode are accelerated to a high velocity by the electric field between the cathode and the anode. The anode has a small hole in its center, and some of the accelerated electrons pass through the hole, resulting in an electron beam moving to the right.
Fig. 1 Uchida e/m apparatus with blow-up of electron gun.
In order to see the path of the electrons, the globe contains helium gas at a low pressure. An electron traveling through the gas occasionally interacts with a helium atom, exciting it to a higher energy state. The excited helium atom then returns to its ground state, emitting a blue-green photon in the process. Thus, the trajectory of the electrons in the beam can be seen as a trail of blue-green light. The process of light emission following electrical
Anode
Wires to filament heater
Phys 195 Spring 2014
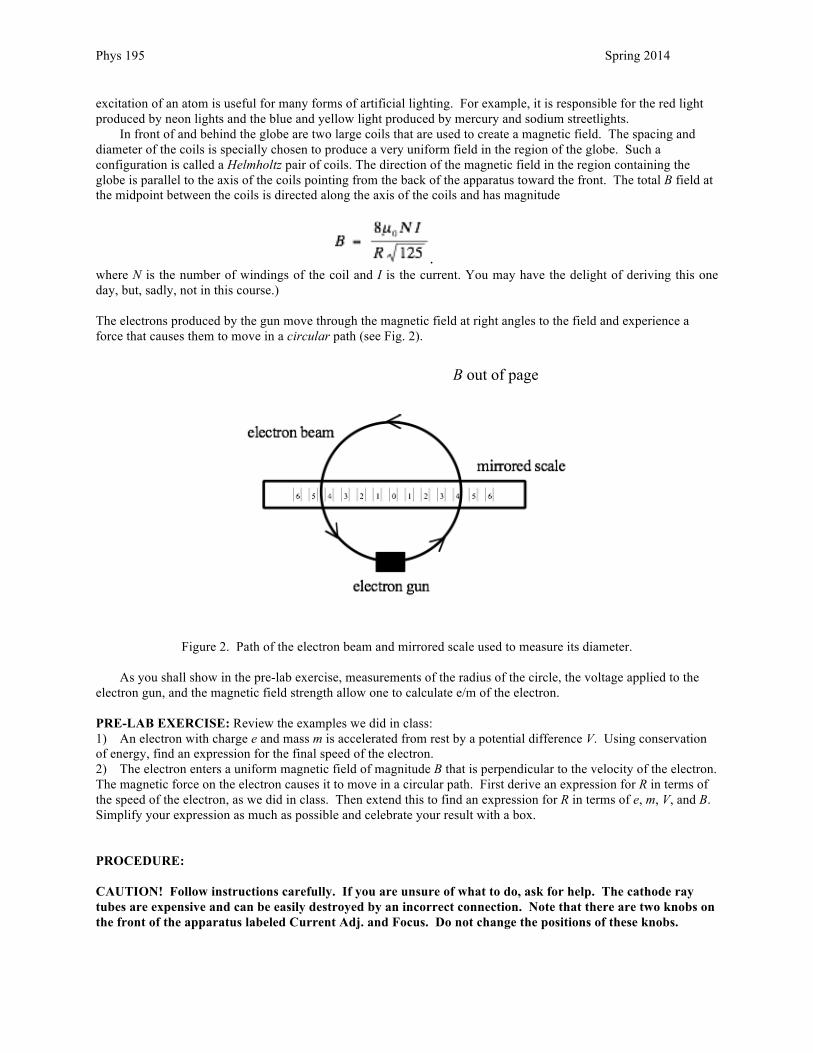
excitation of an atom is useful for many forms of artificial lighting. For example, it is responsible for the red light produced by neon lights and the blue and yellow light produced by mercury and sodium streetlights. In front of and behind the globe are two large coils that are used to create a magnetic field. The spacing and diameter of the coils is specially chosen to produce a very uniform field in the region of the globe. Such a configuration is called a Helmholtz pair of coils. The direction of the magnetic field in the region containing the globe is parallel to the axis of the coils pointing from the back of the apparatus toward the front. The total B field at the midpoint between the coils is directed along the axis of the coils and has magnitude
. where N is the number of windings of the coil and I is the current. You may have the delight of deriving this one day, but, sadly, not in this course.) The electrons produced by the gun move through the magnetic field at right angles to the field and experience a force that causes them to move in a circular path (see Fig. 2).
Figure 2. Path of the electron beam and mirrored scale used to measure its diameter.
As you shall show in the pre-lab exercise, measurements of the radius of the circle, the voltage applied to the electron gun, and the magnetic field strength allow one to calculate e/m of the electron. PRE-LAB EXERCISE: Review the examples we did in class: 1) An electron with charge e and mass m is accelerated from rest by a potential difference V. Using conservation of energy, find an expression for the final speed of the electron. 2) The electron enters a uniform magnetic field of magnitude B that is perpendicular to the velocity of the electron. The magnetic force on the electron causes it to move in a circular path. First derive an expression for R in terms of the speed of the electron, as we did in class. Then extend this to find an expression for R in terms of e, m, V, and B. Simplify your expression as much as possible and celebrate your result with a box. PROCEDURE: CAUTION! Follow instructions carefully. If you are unsure of what to do, ask for help. The cathode ray tubes are expensive and can be easily destroyed by an incorrect connection. Note that there are two knobs on the front of the apparatus labeled Current Adj. and Focus. Do not change the positions of these knobs.
B out of page
Phys 195 Spring 2014
You are provided with two power supplies. The Discharge Tube Power Supply is used for the electron gun. The Epsco Filtered DC Power Supply that you used last week for the solenoid lab will be used for the Helmholtz coils. Be sure you understand which is which. 1) Identify the pair of yellow terminals on the Discharge Tube Power Supply that produce 6 V AC and connect to the HEATER terminals on the front of the Uchida apparatus. Turn on the power supply. After 5-10 seconds you should see the glow of the heater filament. 2) DANGER: High voltage, use appropriate care. Make sure the control knob for the 0-500 volt supply on the Discharge Tube Power Supply is turned fully counterclockwise. Connect the 0 - 500 V DC terminals on the power supply to the ELECTRODES terminals on the front of the Uchida apparatus. You must connect + and – as indicated since we need the cathode to be negative and the anode to be positive. Although the Discharge Tube Power Supply has a built-in voltmeter, we will use a digital meter to get more accurate voltage readings. Connect the hand-held DMM, set at 1000V full-scale, to the high voltage output from the power supply, in parallel with the connection to the ELECTRODES. Slowly turn up the voltage on the Discharge Tube Power Supply. At about 100 - 150 V, you should see a faint green beam emanate from the gun. Set the voltage at 175 V. 3) Set the Keithley multimeter to measure DC amps, up to a maximum of 2000mA. Make a series circuit consisting of the Epsco DC power supply, the HELMHOLTZ COILS (connectors on left side of Uchida), and the Keithley multimeter. Gradually increase the current in the Helmholtz coils until you have a circular electron beam. Be careful not to exceed 2000 mA, or you will burn out the fuse on the Keithley meter and/or overheat the Helmholtz coils. 4) Adjust the current through the Helmholtz coils until you have a circular beam with its center approximately at the same height as the mirrored scale, as shown in Fig. 2 above. Note: It doesn’t matter if the beam is centered left/right on the scale. 5) Measure and record the positions of the right and left sides of the electron beam, using the mirror to avoid parallax error. These measurements are difficult, but critical, so be as accurate as possible. You may find it helps you to read the scale if you illuminate it slightly with a flashlight. 6) Record the gun voltage and the Helmholtz coil current. 7) Repeat the experiment a number of times with as wide a range of voltages as possible, but do not exceed 350 V. You will find that at some low voltage the beam cuts out. Try to get one reading as close to the cut out point as possible. For each voltage, adjust the current to the Helmholtz coils so that the circle is roughly centered on the mirrored scale, as in your first measurement. ANALYSIS: 1) Enter your data into Excel and calculate B from your current values. 2) Use the expression derived in the pre-lab exercise to determine e/m for each data set. 3) Estimate the absolute uncertainties in I, V and R and determine the % uncertainties. 4) Determine the % and absolute uncertainty in each calculated value of e/m. Pause to think about dominant error. 5) Make a graph of e/m vs. voltage V. Include error bars. On your graph, indicate the accepted value for e/m. 6) If you made accurate measurements, you will probably see a systematic trend in your e/m vs. voltage graph, and you will see that your measured e/m value gets closer to the accepted value as voltage increases. There are a number of systematic effects that may be responsible for your results. One is that the electrons lose kinetic energy as they interact with He atoms along their path. Assume that electrons lose a fixed amount of energy in their flight around the tube, and discuss how this would affect your results. SOME OTHER THINGS TO CONSIDER: 1) Assuming a voltage of 150 V, calculate the speed of the electrons leaving the electron gun. You may wish to write "WOW!" next to your answer. 2) In this experiment we ignored the effect of gravity on the motion of the electron. To see if this is legitimate, determine the magnitude of the gravitational force acting on the electron. Compare to the magnetic force on an electron leaving the gun (Assume typical values: Voltage = 150 V and Current = 1.0 A.). Does the gravitational force produce a significant systematic error? 3) The magnetic field of the earth has a magnitude of about T. In our experiment the earth's field is roughly perpendicular to the field produced by the Helmholtz coils. Calculate the magnitude of the field produced

Phys 195 Spring 2014
by the Helmholtz coils when the current is 1.5A. Calculate the total magnetic field experienced by the electrons. Does the earth's magnetic field produce a significant systematic error in this experiment? Suppose the apparatus were rotated so that the earth's field and the field from the Helmholtz coils were in the same direction. By what percentage would the earth's field increase the field experienced by the electron?