L O Ñ A P Automatic S E Digital Blood Pressure Arm Monitor ...
56
mmHg M M D Automatic Digital Blood Pressure Arm Monitor INSTRUCTION MANUAL • ENGLISH & ESPA Ñ OL Model 01-5021 (adult) Model 01-5022 (large adult)
Transcript of L O Ñ A P Automatic S E Digital Blood Pressure Arm Monitor ...

mmHg
M
MD
Automatic Digital Blood Pressure Arm Monitor
INST
RUCT
ION M
ANUAL • E
NGLI
SH &
ESP
AÑOL
Model 01-5021 (adult)Model 01-5022 (large adult)

2 – English
stop!please ensure you have all of the followIng componentsbefore usIng your dIgItal blood pressure monItor.
If you are mIssIng any parts, IncludIng Inserts orInstructIon manuals, do not return to place of purchase. contact customer care at 866-326-1313.
Digital Monitor 4 AA Batteries
Instruction ManualQuick Start GuideBlood Pressure Reading Tracking LogFAQ Information Sheet
Canvas Storage Bag
mmHg
M
Adult Arm Cuffor Large Adult
Arm Cuff

English – 3
Index
Care and Safety Information .................................................................................4-5Introduction ..................................................................................................................6Features of Digital Blood Pressure Monitor...........................................................7Getting Started.............................................................................................................8Battery Installation and Replacement / AC Power ..............................................9Setting Date and Time..............................................................................................10Applying Your Blood Pressure Cuff .................................................................11-12Taking Your Blood Pressure Reading ..............................................................12-13Interpreting your Results...................................................................................14-15Memory Function......................................................................................................16Care and Maintenance .............................................................................................17Description of Device & Label Symbols ...............................................................18Display Symbols.........................................................................................................19Troubleshooting & Error Codes .......................................................................20-21FCC Statement............................................................................................................22Electromagnetic Compatibility........................................................................23-26Specifications .............................................................................................................27Warranty ......................................................................................................................28Instrucciones en Español...................................................................................29-56
toll-free customer care help line: 1-866-326-1313monday – friday 8:30 a.m. – 4:30 p.m. cst
Distributed byVeridian Healthcare1175 Lakeside DriveGurnee, IL 60031www.veridianhealthcare.com
Made in China
#93-1045 11/14©2014 Veridian Healthcare, LLC

4 – English
Care & Safety InformationNOTE: Read all instructions and inserts included with this monitor carefully before use. Thefollowing basic precautions are needed when using an electrical product.
CAUTION: Failure to read and observe all precautions could result in personal injury orequipment damage.
Improper care or use of your blood pressure monitor may result in injury, damage to the unitor ineffective treatment. Following these instructions will ensure the blood pressure monitor’sefficacy and long life.
GENERAL CAUTIONS AND WARNINGS• Measurement results should be discussed with your physician or healthcare
professional; never self-diagnose or attempt treatment as this may be dangerous • Intended for adult use only; this device is not approved for infant or child use • Keep out of reach of children • Do not use the unit if it has any damaged parts, if it has been submersed in water or
dropped• If any abnormality occurs, discontinue use until the unit has been examined and repaired• Only use included attachments and parts; do not use attachments from other brands or
models as these may not be properly calibrated for use with this device and may result inmeasurement error
• This monitor may not be appropriate for individuals with serious arrhythmias; consult withyour physician for proper monitor use and evaluation.
• Check the blood circulation of the user before measurement• Do not share the cuff with an infected person.• Do not disassemble the unit or attempt to repair it; substitution of a component different
from that supplied may result in measurement error and will void manufacturer warranty• Always follow local regulations for proper disposal of the monitor, cuff and batteries

English – 5
Care & Safety Information
OPERATING CAUTIONS AND WARNINGS• Prolonged overinflation may cause congestion, swelling or bruising in some people• Wait a minimum of 2 minutes between measurements (20-minutes is recommended);
excessive frequent measurements may restrict blood circulation• Do not use this device while connected to any monitoring equipment on the same limb• The application of the cuff over a wound or inflammation diseases• Consult with your healthcare professional for guidance for use if you have any of the
following: intravascular shunt; mastectomy on the arm cooresponding to themeasurement side of the body
• If you experience any discomfort or an abnormality occurs, stop using the deviceimmediately; to stop the device during operation, press the POWER button and the cuffwill automatically deflate
• Operation outside of stated operating temperature may result in measurement error ordevice malfunction; operation environment temperature is: 41°F – 104°F (5°C – 40°C);Humidity: ≤90% RH
• Never use this unit while operating a vehicle or in the bathtub or shower
STORAGE CAUTIONS AND WARNINGS• Storage outside of stated storage temperature may result in measurement error or device
malfunction; storage environment temperature is: -4°F – 131°F (-20°C – 55°C); Humidity: ≤90% RH
• Keep the unit out of reach of small children• Always keep the unit unplugged while not in use; remove the batteries if the unit will not
be used for an extended period of time
CLEANING CAUTIONS AND WARNINGS• Never immerse the unit in water to clean as it may damage the unit• Follow the ‘Cleaning and Maintenance’ portion of this manual for instruction on how to
clean and care for your monitor

6 – English
Introduction
It is recommended that you first seek the advice and recommendation of yourphysician or healthcare professional when using home diagnostic devices, includingblood pressure monitors.
Automatic digital blood pressure monitors use the oscillometric method to electronicallymeasure your blood pressure. The monitor detects your blood’s movement through the arteryin your arm and converts the movements into a digital reading. The oscillometric methoddoes not require a stethoscope, making the monitor ideal for home use.
Blood pressure readings determined with this device are equivalent to measurementsobtained by a trained healthcare professional using the cuff/stethoscope auscultationmethod, within the limits prescribed by the American National Standard for Electronic orAutomated Sphygmomanometers.
Thank you for purchasing our Automatic Digital Blood Pressure Monitor. Withproper care and use, your monitor will provide you with many years of reliablereadings.
PLEASE READ THIS INSTRUCTION MANUAL COMPLETELY BEFORE OPERATING THIS UNIT.
English – 7
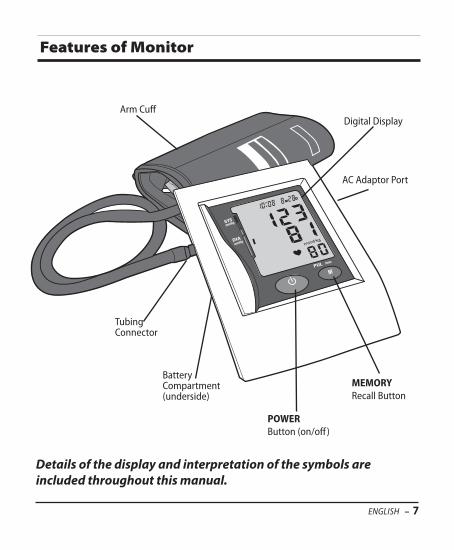
Details of the display and interpretation of the symbols areincluded throughout this manual.
Features of Monitor
mmHg
M
MD
Arm CuffDigital Display
AC Adaptor Port
memoryRecall Button
powerButton (on/off )
TubingConnector
BatteryCompartment(underside)

8 – English
Before Taking a Measurement1. Your readings should only be interpreted by your physician or healthcare professional with
access to your individual medical history. Regular use of a home blood pressure monitorwill allow you to track and record your readings for discussion with your physician.
2. Conduct your measurement in a quiet place while seated in a relaxed position. Rest for 15minutes before taking your reading. If an error occurs or you desire to take a secondreading, allow 15 minutes between readings for your blood vessels to return to normal.
3. Avoid smoking, eating, taking medication, alcohol, physical activity or any other stressfulactivity for 30 minutes prior to taking a reading.
4. Always remove any jewelry or constrictive clothing that may interfere with the cuffplacement.
5. Keep yourself and the monitor still during measuring; do not talk during the reading.
6. It is recommended that you take your readings as the same time each day to bettermonitor any indications in your results.
7. Record your daily measurement on the included chart or some other written document toshare with your physician.
Getting Started
Variations in Blood PressureBlood pressure is influenced by many factors and can change from moment to moment.Normally, blood pressure is lowest during sleeping periods and rises during the day.

English – 9
This unit comes complete with 4 AA batteries. 2
It is necessary to replace the batteries when the Low Battery symbolappears on the display or when the display does not turn on after the POWERbutton is pressed.
Replacing Battery, Fig. 11. Press down and lift the cover.
2. Insert or replace 4 AA batteries into the batterycompartment, ensuring to match the indicatedpolarity symbols. Always use new batteries.
3. Replace the battery cover.
4. Dispose of batteries according to local disposaland recycling regulations.
It is recommended to remove the batteries if the unitwill not be used for an extended period of time.
AC Power AdapterAn AC adapter is available separately for battery-free operation. The AC adapterplugs into the side of the unit as shown, Fig. 2. Please remember to practicecommon sense electrical safety precautionswhile using the adapter. To order an AC adapter,please see the enclosed order form.
AC Adapter Output: 6V DC 600mA
Battery Installation / AC Power
AC AdapterPort
Fig. 2
--
+
+
Fig. 1

10 – English
Setting the Date and Time
Date and time will default to factory settings, 12:00 a.m. 1M 1D, if you do not choose to setthe correct information.
1. When the unit is off, press and release both the POWER and Mbutton at the same time. The month will begin to flash, Fig. 1.
2. Press the M button to change until the desired number appears. Toscroll through the numbers quicker, hold down the M button as thenumbers advance.
3. Press the POWER button to confirm the month entry.
4. Next, the date will blink. Repeat steps 2 and 3 to set the date, thenhours, then minutes.
5. After setting the minutes, the unit will automatically exit out of the date/time settingmode.
When the monitor is off, the date and time will still appear at the top of the screen.
The time is displayed in 24hr Military Time. This chart explains the time conversion.
Fig. 1
Military Time = Regular Time
1:00 = 1am 7:00 = 7am 13:00 = 1pm 19:00 = 7pm2:00 = 2am 8:00 = 8am 14:00 = 2pm 20:00 = 8pm3:00 = 3am 9:00 = 9am 15:00 = 3pm 21:00 = 9pm4:00 = 4am 10:00 = 10am 16:00 = 4pm 22:00 = 10pm5:00 = 5am 11:00 = 11am 17:00 = 5pm 23:00 = 11pm6:00 = 6am 12:00 = 12pm 18:00 = 6pm 24:00 = 12am
It Is necessary to set the date and tIme for the monItor every tImebatterIes are InItIally Installed or replaced.

English – 11
Before applying your blood pressure cuff, be sure you have selected theappropriate size cuff. To determine the proper cuff size, measure the circumference of yourleft upper arm at the point midway between inside bend of your elbowand your shoulder, Fig 1.
Adult Cuff fits arm circumference 11-3/4” - 16-1/2” (30-42 cm)Large Adult Cuff fits arm circumference 16-1/2” - 18-7/8” (42-48 cm)Additional cuffs are available for order on the enclosed order form.
If for any reason you are unable to or should not use your left arm,please modify the instructions for cuff application to your right arm.Your physician can help you identify which arm is best for you to takemeasurements from.
1. The cuff should not be plugged into the monitor until after the cuff isapplied to your arm.
2. Remove any constrictive clothing or jewelry that may interfere withcuff placement.
3. Be seated at a table or desk with your feet flat on the floor and legsuncrossed.
4. Position the cuff on a solid surface with the tubing facing up andaway from you. The metal ring/bar on the cuff should be to the leftof the tubing.
5. Open the cuff by pulling or rolling the bottom of the cuff to the right,Fig 2. This should open the cuff without fully unrolling it, creating acylinder. Do not extend the cuff beyond the metal bar.
6. Insert your left arm into the created cuff cylinder. Position the indexmark over the main artery on the inside of your arm, Fig 3, 4.
Applying Your Blood Pressure Cuff
Fig. 2
Fig. 3
Fig. 1
proper cuff fIt and placement Is crItIcal In obtaInIng accurate bloodpressure measurements. please read these InstructIons carefully andconsIder consultIng wIth your physIcIan for further dIrectIon.
Fig. 4
Main Artery

12 – English
Applying Your Blood Pressure Cuff
Taking Your Blood Pressure Reading
Please read the preceding portions of this manual prior to taking your firstreading.
Reminder, it is important to avoid smoking, eating, taking medication, alcoholconsumption or physical activity 30 minutes prior to taking a reading.
1. Position the monitor on a flat, stable surface with the digital display inview.
2. Insert the cuff tubing connector into the port on the left side of your monitor, Fig 1. 3. Rest your elbow on a solid surface with your palm facing upward. Elevate your arm so that the
cuff is at the same level as your heart, Fig 2. Relax your left hand.
mmHg
M
MD
Fig. 1
7. The bottom edge of the cuff should be positioned approximatelyone inch above the elbow joint, Fig 5.
8. The cuff should fit comfortably, yet snugly around your arm. Youshould be able to insert one finger easily between your arm and thecuff.
The cuff size is suitable for use when the vertical mark is within thehorizontal OK range. A different size cuff is needed if the mark isoutside the OK range.
If you are not comfortable with applying your cuff, please seek theassistance of another member of your household or work with yourphysician to practice the cuff application. Incorrectly applied cuffs mayresult in inaccurate readings.
note: you can stop the inflation or deflation process at any time bypressing the power button.
Fig. 5
0.4”-0.8”/1-2cm

English – 13
Taking Your Blood Pressure Reading
4. Press the POWER button to turn the unit on; the unit will run aself-test, Fig 3.
5. The unit will briefly display the last reading value for that memorybank. If there is no previous measurement, the unit will display ‘0’for all of the reading values, Fig 4.
6. The cuff will automatically inflate to approximately 190mmHg or40 mmHg higher than the last systolic pressure reading store inmemory.
7. When the inflation has reached optimum level, the display will begin to show the decreasingpressure while you feel the pressure of the cuff decrease.
8. Your blood pressure measurement and pulse will display simultaneously on the screen, Fig 5.Both the systolic and diastolic readings will display at the same time.
9. The Hypertension Indicator will indicate your reading range in the left side of the display, Fig 6.See page 15 for a chart interpreting the Hypertension Indicator results.
10. If an irregular heartbeat was detected during the reading, the Irregular Heartbeat Detector willappear on the display, Fig 7. See page 14 for more information on the Irregular HeartbeatDetector feature.
11. The reading will automatically be stored in memory, up to 60 readings.
12. Select POWER to turn the unit off and conserve energy and battery life. The unit willautomatically shut-off and revert to time/date mode after approximately 1 minute.
13. Disconnect the cuff and tubing from the monitor prior to storing.
Fig. 3 Fig. 4 Fig. 5 Fig. 6 Fig. 7
mmHg
M
MD
Fig. 2

14 – English
Interpreting Your Results
Irregular Heartbeat DetectionAn irregular heartbeat is defined as a heartbeat rhythm that is more than 25% slower or 25%faster than the average measurement detected while the monitor is conducting themeasurement. When this device detects an irregular rhythm two or more times during thereading, the IHB symbol will appear on the display screen.
This monitor will operate if the icon appears, but the results may be compromised, especiallyif this symbol appears often. Please consult with your physician or trained healthcareprofessional for further information regarding an irregular heartbeat and if this symbolappears frequently.
Pulse
Pulse
Blood Pressure
normal heartbeat
Irregular heartbeat
short beat
long beat
Blood Pressure

English – 15
Interpreting Your Results
Hypertension IndicatorThis unit features our unique Hypertension Indicator. The World Health Organization hasestablished globally accepted standards for the assessment of high or low blood pressure.
This chart can help you identify where your blood pressure measurements fall according toWHO classification standards. This chart should only be considered as a guideline; alwaysconsult with your physician to interpret your individual results. Never adjust yourmedication(s) dosage, or severely alter your diet or exercise routine without consulting withyour physician.
mmHg
M
MD
The HypertensionIndicator islocated on theleft side of thedisplay window
Stage 3 Hypertension
Systolic pressure: ≥ 180 mmHgorDiastolic pressure: ≥ 110 mmHg
Stage 2 Hypertension
Systolic pressure: ≥ 160-179 mmHgorDiastolic pressure: ≥ 100-109 mmHg
Stage 1 Hypertension
Systolic pressure: ≥ 140-159 mmHgorDiastolic pressure: ≥ 90-99 mmHg
High Normal
Systolic pressure: ≥ 130-139 mmHgorDiastolic pressure: ≥ 85-89 mmHg
Normal
Systolic pressure: ≥ 120-129 mmHgorDiastolic pressure: ≥ 80-84 mmHg
Optimal
Systolic pressure: < 120 mmHgorDiastolic pressure: < 80 mmHg

16 – English
Memory FunctionRecalling Measurements in Memory
You can recall up to 60 total measurements in memory. Thesemeasurements can be shared with your physician or trainedhealthcare professional.
1. Press and release the M (MEMORY) button. The unit will showhow many measurements are stored within the bank, Fig 1.
2. Press the M (MEMORY) button again to scroll through thesaved measurements. Measurements will appear on thedisplay from oldest to most current. All results for a givenmeasurement will display, including measurement results,pulse rate, Hypertension Indicator icon and IrregularHeartbeat alert (if applicable), Fig 2. After you’ve scrolledthrough all the readings, the unit will automatically turn off.
3. When the number of readings exceeds 60, the oldest data willbe replaced with the new record.
Clearing Measurements from Memory
1. Press and release the M (MEMORY) button. The unit willdisplay how many measurements are stored within the bank.
2. Press and hold down the M (MEMORY) button until twohorizontal lines flash, Fig. 3. This indicates that allmeasurements have been erased.
Fig. 2
Fig. 1
Fig. 3

English – 17
Proper care and maintenance of your blood pressure monitor will help ensure long life for theproduct; improper use of the monitor may void the included warranty.
Monitor Care and Maintenance• Do not use any liquids on the monitor; use a soft, dry cloth to clean the monitor as needed • Storage outside of stated storage temperature may result in measurement error or device
malfunction; storage environment temperature is: 4oF – 131oF (-20oC – 55oC) Humidity ≤90% RH• Do not store in direct sunlight• Always keep the unit unplugged while not in use; remove the batteries if the unit will not
be used for an extended period of time• Do not attempt to disassemble your monitor; disassembling your monitor may void the
manufacturers warranty • Do not subject the monitor to strong shocks; take care not to drop the monitor • With proper care, the monitor will maintain performance for a minimum of 10,000
measurements or three years• No component of this device can be maintained by the user; the circuit diagrams,
component part lists, descriptions, calibration instruction or other information which willassist the user's appropriately qualified technical personnel to repair those parts ofequipment which are designated repairable can be supplied.
• It is recommended that monitor performance be reviewed every two years or after serviceor repair; please contact your service provider or call customer care
Cuff Care and Maintenance• The cuff should not be submerged or washed in a washing machine, but may be spot
cleaned with a mild-detergent as needed; it is suggested that the cuff be cleaned once amonth if the deviced is used daily
• Clean the cuff thoroughly after every 200 uses or more frequently as needed• To disinfect the cuff, wipe the inside (skin contact side) of the cuff lightly moistened with
70-90% ethyl rubbing alcohol and allow to air dry; it is suggested to disinfect the cufffrequently when used in clinical settings or if the cuff is contaminated in any way
• Never attempt to iron or dry the cuff; if the cuff becomes wet, allow the cuff to air drycompletely before use or storage
• With proper care, the cuff will maintain performance for a minimum of 1000 measurements
Care and Maintenance

18 – English
Description of Device and Label Symbols
Read This Manual—All included manuals should be read prior to first use
Warning—Symbol indicates a warning, prohibition or mandatory action that mitigatesa risk that is not necessarily obvious to the device operator
Typ e BF Applied Parts—Indicates that a part of this unit comes in contact with the pa-tient in order to carry out it’s intended function; in the case of this device the cuff is theType BF Applied Part
Environment Protection—dispose of this product properly; consult with your local recy-cling ordinances for proper recycling and disposal
Keep Dry—This device should be kept dry; never submerge the unit or cuff. Consultwith the Care and Maintenance section of this manual for information on cleaning yourmonitor
Polarity Symbol—Polarity of D.C. power connector; note connector may not be includedwith this device but is available for purchase with the included form
Symbol Meaning
2012
2012

English – 19
Display SymbolsSymbol Meaning
Systolic Blood Pressure—The ‘top’ blood pressure result
Diastolic Blood Pressure—The ‘bottom’ blood pressure result
Milligrams of Mercury—Unit of blood pressure measurement for this device
Pulse Rate—Pulse rate per minute during the measurement
Low Battery—Battery is low and should be replaced
Down Arrow—The cuff is not properly wrapped or has too much air left in it; arrowwill cease flashing when the unit is ready for measurement
Up Arrow—A measurement error has occurred and the measurement should beattempted again
Irregular Heartbeat Icon—An irregular heartbeat was detected during the measurement
Memory Reading—Reading on display is a reading from a memory bank
Average—The display shows the average of the last three measurements in mem-ory
Error– An error has occurred during the measurement

20 – English
Troubleshooting – Error Codes
Display shows anabnormal result
Display is blankwhen power is on
No responsewhen POWER ispressed or whennew batterieshave been loaded
Problem
Cuff position was not correct orwas not tight enough
Body posture was not correctduring measurement
Speaking, excessive movement,angry, excited or nervousanxiety during measurement
Batteries may be expired orinstalled improperly
Incorrect operation; possiblestrong electromagneticinterference
Apply the cuff properly and attempt anew measurement
Review the ‘Taking a Measurement’portion of this manual and attempt anew measurement
Wait a period of time and attempt anew measurement after calm hasreturned; do not speak or move duringmeasurement
Check the polarity of the batteries andreinstall if necessary; replace batterieswith new batteries
Remove batteries and wait a minimumof five minutes; reinstall batteries andattempt a new measurement
Possible Cause Solution

English – 21
Problem Possible Cause Solution
Troubleshooting - Error Codes
If an error code persists or is not remedied, please contactcustomer care at 866-326-1313.
Display Shows Er 1
Display Shows Er 0
Display Shows Er 2
Display Shows Er 3
Display Shows Er 4
Display Shows Er 5
Display Shows Er 6
Display Shows Er 7
Display Shows Er 8
Display Shows Er A
Review the ‘Taking a Measurement’portion of the manual, wait aminimum of 5 minutes and attempt anew measurement.
Review the Applying Cuff portion ofthis manual; re-apply the cuff, wait aminimum of 5 minutes and attempt anew measurement.
Check that the cuff is applied properly,wait a minimum of 5 minutes andattempt a new measurement. If themonitor still does not perform orperforms abnormally, contactCustomer Care
Pressure system is unstablebefore measurement
Failed to detect systolic pressure
Failed to detect diastolicpressure
Pneumatic system blocked orcuff is too tight during inflation
Pneumatic system leakage orcuff is too loose during inflation
Cuff pressure above 300 mmHg
Cuff pressure above 15 mmHgfor more than 3 minutes
EEPROM accessing error
Device parameter checkingerrorPressure sensor parametererror

22 – English
FCC StatementNOTE:POTENTIAL FOR RADIO/TELEVISION INTERFERENCE (for U.S.A. only)This product has been tested and found to comply with the limits for a Class B digitaldevice, pursuant to part 15 of the FCC rules.
These limits are designed to provide reasonable protection against harmful interference in aresidential installation. The product generates, uses, and can radiate radio frequency energyand, if not installed and used in accordance with the instructions, may cause harmfulinterference to radio communications. However, there is no guarantee that interference willnot occur in a particular installation. If the product does cause harmful interference to radioor television reception, which can be determined by turning the product on and off, the useris encouraged to try to correct the interference by one or more of the following measures:
• Reorient or relocate the receiving antenna
• Increase the separation between the product and the receiver.
• Connect the product into an outlet on a circuit different from that to which the receiver isconnected.
• Consult the dealer or an experienced radio/TV technician for help.
POTENTIAL FOR RADIO/TELEVISION INTERFERENCE (for Canada only)This digital apparatus does not exceed the Class B limits for radio noise emissions fromdigital apparatus as set out in the interference-causing equipment standard entitled “DigitalApparatus”, ICES-003 of the Canadian Department of Communications.
Cet appareil numérique respecte les limites de bruits radioeléctriques applicables auxappareils numériques de Clase B prescrites dans la norme sur le materiel brouilleur:“Appareils Numériques”, ICES-003 édictée par le minister des communications.
Changes or modifications not expressly approved by the party responsible for compliancecould void the user’s authority to operate the equipment.

English – 23
Electromagnetic Compatibility
RF emissions CISPR 11
RF emissions CISPR 11
Harmonic emissions IEC 61000-3-2
Voltage fluctuations/flickeremissions IEC 61000-3-3
guidance and manufacture’s declaration - electromagnetic emissionsThis monitor is intended for use in the electromagnetic environment specified below.The customer or the user of this monitor should assure that it is used in such an environment.
Table 1for all me eQuIpment and me systems
Emmission Test
Group 1
Class B
Class A
Complies
This monitor uses RF energy only for its internalfunction. Therefore, its RF emissions are very lowand are not likely to cause any interference innearby electronic equipment.
This monitor is suitable for use in allestablishments, including domesticestablishments and those directly connected tothe public low-voltage power supply networkthat supplies buildings used for domesticpurposes.
Compliance Electromagnetic Environment Guidance

24 – English
Electromagnetic Compatibility
Electrostaticdischarge (ESD)IEC 61000-4-2
Electrical fasttransient/burstIEC 61000-4-4
SurgeIEC 61000-4-5
Voltage dips,shortinterruptionsand voltagevariationson power supplyinput linesIEC 61000-4-11
Power frequency(50/60 Hz)magnetic fieldIEC 61000-4-8
guidance and manufacture’s declaration - electromagnetic immunityThis monitor is intended for use in the electromagnetic environment specified below.The customer or the user of this monitor should assure that it is used in such an environment.
Table 2for all me eQuIpment and me systems
Immunity Test
± 6 kV contact± 8 kV air
± 2 kV for power supply lines± 1 kV for input/output lines
± 1 kV line(s) to line(s)± 2 kV line(s) to earth
<5 % UT(>95 % dip in UT)for 0.5 cycle40 % UT(60 % dip in UT)for 5 cycles70 % UT(30 % dip in UT)for 25 cycles<5 % UT(>95 % dip in UT)for 5 s
3 A/m
± 6 kV contact± 8 kV air
± 2 kV for power supply lines
± 1 kV line(s) to line(s)± 2 kV line(s) to earth
<5 % UT(>95 % dip in UT)for 0.5 cycle40 % UT(60 % dip in UT)for 5 cycles70 % UT(30 % dip in UT)for 25 cycles<5 % UT(>95 % dip in UT)for 5 s
3 A/m
Floors should be wood, concrete orceramic tile. If floors are covered withsynthetic material, the relative humidityshould be at least 30 %.
Mains power quality should be that of atypical commercial or hospitalenvironment.
Mains power quality should be that of atypical commercial or hospitalenvironment.
Mains power quality should be that of atypical commercial or hospitalenvironment. If the user of this monitorrequires continued operation duringpower mains interruptions, it isrecommended that this monitor bepowered from an uninterruptible powersupply or a battery.
Power frequency magnetic fields shouldbe at levels characteristic of a typicallocation in a typical commercial orhospital environment.
IEC 60601 Test Level Compliance Level Electromagnetic Environment Guidance

English – 25
Electromagnetic Compatibility
Conducted RFIEC 61000-4-6
Radiated RFIEC 61000-4-3
guidance and manufacturer’s declaration - electromagnetic immunityThis monitor is intended for use in the electromagnetic environment specified below.The customer or the user of this monitor should assure that it is used in such an environment.
Table 3for me eQuIpment and me systems that are not lIfe-supportIng
Immunity Test
3 Vrms 150 kHz to 80 MHz
3 V/m 80 MHz to 2,5 GHz
3 Vrms
3 V/m
note 1 At 80 MHz and 800 MHz, the higher frequency range applies.note 2 These guidelines may not apply in all situations. Electromagnetic propagation is affected by absorption andreflection from structures, objects and people.
* Field strengths from fixed transmitters, such as base stations for radio (cellular/cordless) telephones and land mobileradios, amateur radio, AM and FM radio broadcast and TV broadcast cannot be predicted theoretically with accuracy. Toassess the electromagnetic environment due to fixed RF transmitters, an electromagnetic site survey should beconsidered. If the measured field strength in the location in which this monitor is used exceeds the applicable RFcompliance level above, this monitor should be observed to verify normal operation. If abnormal performance is observed,additional measures may be necessary, such as re-orienting or relocating this monitor.** Over the frequency range 150 kHz to 80 MHz, field strengths should be less than 3V/m.
Portable and mobile RF communicationsequipment should be used no closer to any partof this monitor, including cables, than therecommended separation distance calculatedfrom the equation applicable to the frequencyof the transmitter.
recommended separation distance:
80 MHz to 800 MHz 800 MHz to 2,5 GHz
Where P is the maximum output power ratingof the transmitter in watts (W) according to thetransmitter manufacturer and d is therecommended separation distance in meters(m).
Field strengths from fixed RF transmitters, asdetermined by an electromagnetic site survey,*should be less than the compliance level in eachfrequency range.**
Interference may occur in the vicinity ofequipment marked with the following symbol:
IEC 60601 Test Level Compliance Level Electromagnetic Environment Guidance
1d = 2.
1d = 2.
d = 2.3

26 – English
Electromagnetic Compatibility
0,01
0,1
1
10
100
recommended separation distances between portable and mobile rf communications equipment and this monitorThis monitor is intended for use in an electromagnetic environment in which radiated RF disturbances are controlled. Thecustomer or the user of this monitor can help prevent electromagnetic interference by maintaining a minimum distancebetween portable and mobile RF communications equipment (transmitters) and this monitor as recommended below,according to the maximum output power of the communications equipment.
Table 4for me eQuIpment and me systems that are not lIfe-supportIng
Rated maximumoutput
power oftransmitter
W
0,12
0,38
1,2
3,8
12
0,12
0,38
1,2
3,8
12
0,23
0,73
2,3
7,3
23
For transmitters rated at a maximum output power not listed above, the recommended separation distance d in meters(m) can be determined using the equation applicable to the frequency of the transmitter, where P is the maximum outputpower rating of the transmitter in watts (W) according to the transmitter manufacturer.note 1 At 80 MHz and 800 MHz, the separation distance for the higher frequency range applies.note 2 These guidelines may not apply in all situations. Electromagnetic propagation is affected by absorption andreflection from structures, objects and people.
Separation distance according to frequency of transmitterm
150 kHz to 80 MHz 80 MHz to 800 MHz 800 MHz to 2,5 GHz
1d = 2. 1d = 2. d = 2.3

English – 27
name Automatic Premium Digital Blood Pressure Arm Monitormodel number 01-5021 (adult); 01-5022 (large adult)display system Digital display/LCDmeasuring method Oscillometricpower source 4 ×1.5V Batteries SIZE AA; DC 6V 600mAmeasuring range Pressure: 0-300 mmHg
Pulse: 40-180 beats/minuteaccuracy Pressure: ±3 mmHg
Pulse: ±5% of readingInflation Pump Drivedeflation Automatic Pressure Release Valvememory Built-in memory enabling display of up to 60 measurements automatic shut-off Approximately 1 minute after last button operationbattery life Approximately 360 measurementsoperation environment Temperature 41oF – 104oF (5oC – 40oC)
Humidity ≤90% RHstorage environment Temperature -4oF – 131oF (-20oC – 55oC)
Humidity ≤90% RHmonitor dimensions 4-1/8” x 6” x 1-3/4”weight 12.7 oz. (without batteries) arm circumference range Adult size cuff fits arm circumference:
11-3/4” - 16-1/2” (30-42 cm)Large adult size cuff fits arm circumference: 16-1/4” -18-7/8” (42-48 cm)
accessories Cuff, detailed guidebook, quick start guide, blood pressure log, four “AA” batteries, storage case
options (sold separately) Small adult size cuff fits arm circumference: 8-5/8” -11-3/4” (22-30 cm), AC Adapter
specifications are subject to change without notice
Product Specifications

28 – English
Congratulations on your purchase of a Digital Blood Pressure Monitor. Your Digital Blood Pressure Monitoris covered by the following limited warranty commencing upon the date of purchase, and subject to thefollowing terms and conditions:
The Warrantor warrants that its Digital Blood Pressure Monitor will be free from defects in materials andworkmanship under normal consumer usage for as long as the original purchaser owns the product.
Periodic maintenance, repair and replacement of parts due to normal wear and tear are excluded fromcoverage. Defects or damage that result from: (a) improper operation, storage, misuse or abuse, accident orneglect, such as physical damage (cracks, scratches, etc.) to the surface of the product resulting frommisuse; (b) contact with liquid, water, rain, extreme humidity or heavy perspiration, sand, dirt or the like,extreme heat, or food; (c) use of the Digital Blood Pressure Monitor for commercial purposes or subjectingthe Digital Blood Pressure Monitor to abnormal usage or conditions; or (d) other acts which are not the faultof the Warrantor, are excluded from coverage. This warranty does not cover batteries or other power sourcesthat may be provided with, or used with the Digital Blood Pressure Monitor.
If the Digital Blood Pressure Monitor fails to conform to this limited warranty, return the Digital BloodPressure Monitor postage prepaid to: Attn: Repair Department, 1175 Lakeside Drive, Gurnee, IL,60031. When returning a product, please also include: (i) a copy of your receipt, bill of sale or othercomparable proof of purchase; (ii) a written description of the problem; and (iii) your name, address andtelephone number. Carefully package the product to avoid any damage that may occur while in transit;shipping insurance with returned receipt is recommended. At our option, the Warrantor will repair orreplace the unit found to be defective in materials or workmanship under normal consumer usage. Thepurchaser will be notified of any additional repairs required prior to completing the repair, and will beresponsible for parts charges, if any, and repair charges not covered by this limited warranty.
EXCEPT AS PROVIDED FOR IN THIS LIMITED WARRANTY, ALL EXPRESS AND IMPLIED WARRANTIES ANDCONDITIONS ARE DISCLAIMED, INCLUDING WITHOUT LIMITATION THE IMPLIED WARRANTIES OFMERCHANTABILITY AND FITNESS FOR A PARTICULAR PURPOSE. THE REPAIR OR REPLACEMENT ASPROVIDED UNDER THIS LIMITED WARRANTY IS THE EXCLUSIVE REMEDY OF THE CONSUMER, AND ISPROVIDED IN LIEU OF ALL OTHER WARRANTIES, EXPRESS OR IMPLIED. IN NO EVENT SHALL THE WARRANTORBE LIABLE, WHETHER IN CONTRACT OR TORT (INCLUDING NEGLIGENCE) FOR DAMAGES IN EXCESS OF THEPURCHASE PRICE OF THE PRODUCT, OR FOR ANY INDIRECT, INCIDENTAL, SPECIAL OR CONSEQUENTIALDAMAGES OF ANY KIND, OR FOR DAMAGES TO, OR LOSS OF, OTHER PROPERTY OR EQUIPMENT ORPERSONAL INJURIES TO THE FULL EXTENT THESE DAMAGES MAY BE DISCLAIMED BY LAW.
Some states and jurisdictions do not allow the limitation or exclusion of incidental or consequentialdamages, or limitation on the length of an implied warranty, so the above limitations or exclusions may notapply to you. This warranty gives you specific legal rights, and you may also have other rights that vary fromstate to state or from one jurisdiction to another.
Lifetime Limited Warranty

mmHg
M
MD
Automático Digital de LujoPara la Presión ArterialMonitor
MANUAL DE IN
STRU
CCIO
NES
• ES
PAÑOL
Modelo 01-5021 (adulto)Modelo 01-5022 (adulto grande)

30 – EspAñol
¡alto! asegúrese de tener la totalIdad de los sIguIentescomponentes antes de usar su monItor dIgItal depresIón arterIal
sI falta alguno de los elementos, IncluIdos los Insertos o losmanuales de InstruccIones, no haga la devolucIón en el lugar dondeefectuó la compra. comuníQuese con atencIón al clIente al teléfono866-326-1313.
Manual DetalladoGuía de Referencia RápidaRegistro de Presión ArterialPreguntas con Frecuencia Hechas
Monitor de Digitaces 4 Baterías Tipo AA Estuche
mmHg
M
Adulto del Brazoo puño Adulto
Grande del Brazo

EspAñol – 31
Contenido
Sombre cuidado y seguridad ...........................................................................32-33Introducción ...............................................................................................................34Funciones del monitor digital de presión arterial .............................................35Cómo comenzar.........................................................................................................36Colocación y reemplazo de las baterías /alimentación de c.a........................37Ajuste de fecha y hora..............................................................................................38Colocación del brazalete de medición de presión arterial........................39-40Toma de lecturas de presión arterial ..............................................................40-41Interpretación de lecturas de presión arterial .............................................42-43Función de memoria ................................................................................................44Cuidado y mantenimiento ......................................................................................45Descripción del dispositivo y símbolos de la etiqueta .....................................46Símbolos del visor .....................................................................................................47Solución de problemas & códigos de error...................................................48-49Declaración de la FCC...............................................................................................50Compatibilidad electromágnetica ..................................................................51-54Especificaciones del producto ...............................................................................55Garantía .......................................................................................................................56
línea de ayuda gratuita de asistencia al cliente: 1-866-326-1313de lunes a viernes de 8:30 a 16:30 (hora central del este)
Distribuido ParaVeridian Healthcare1175 Lakeside DriveGurnee, IL 60031www.veridianhealthcare.com
Hecho En China
#93-1045 11/14©2014 Veridian Healthcare, LLC

32 – EspAñol
Sobre cuidado y seguridadNOTA: Lea todas las instrucciones e insertos incluidos con este monitor cuidadosamenteantes de usar. Las siguientes precauciones básicas son necesarios cuando se utiliza un aparatoeléctrico.
Precaución: Si no se leen y respetan todas las precauciones podrían provocarse lesiones per-sonales o daños al equipo.
El cuidado o uso inadecuado del monitor digital puede ocasionar lesiones, daños a la unidad,o resultar en un tratamiento ineficaz. Si sigue estas instrucciones, se garantizará la eficacia y lavida útil prolongada del monitor de presión arterial.
PRECAUCIONES GENERALES Y ADVERTENCIAS• Consulte los resultados de la medición con su médico o profesional de atención médica;
nunca se auto diagnostique, ni intente un tratamiento, ya que esto puede ser peligroso
• Uso destinado únicamente para adultos; este dispositivo no está aprobado para uso infantil
• Mantenga fuera del alcance de los niños
• No use la unidad si tiene alguna parte dañada, si ha sido sumergida en agua o si el brazaletese ha caído
• Si ocurre alguna anormalidad, deje de usar hasta que la unidad haya sido examinada yreparada
• Utilice solamente los aditamentos y accesorios incluidos; no utilice aditamentos de otrosmodelos o marcas
• No comparta el brazalete con una persona infectada
• Este monitor puede no ser apropiado para personas con arritmia grave; Consulte con sumédico para monitor adecuado uso y evaluación.
• Compruebe la circulación de la sangre del usuario antes de la medición
• No desarme la unidad, ni intente repararla, la sustitución de un componente diferente aladministrado puede provocar error en la medición y anulará la garantía del fabricante
• Siga siempre los reglamentos locales para desechar correctamente el medidor, la manga ylas baterías

EspAñol – 33
Sobre cuidado y seguridad
PRECAUCIONES DE OPERACIóN Y ADVERTENCIAS• La inflación excesiva prolongada puede provocar congestión, inflamación o hematomas en
algunas personas• Espere un mínimo de 2 minutos entre cada medición (se recomienda 20 minutos); mediciones
frecuentes excesivas pueden restringir la circulación de la sangre• No use este dispositivo mientras está conectado a ningún equipo de monitoreo en la misma
extremidad• La aplicación del puño sobre una herida o enfermedades de la inflamación• Consulte con su profesional de la salud sobre la orientación de uso Si usted tiene cualquiera de
los siguientes: derivación intravascular; mastectomía en el cooresponding del brazo hacia ellado de la medición del cuerpo
• Si siente cualquier molestia u ocurre una anormalidad, suspenda inmediatamente el uso deldispositivo; para detener el dispositivo durante la operación, presione el botón de POWER y elbrazalete se desinflará automáticamente
• La operación fuera de la temperatura de operación establecida puede causar error en lamedición o la mala función del dispositivo; la temperatura ambiente de operación es: 41°F –104°F (5°C – 40°C); Humedad: ≤90% RH
• Nunca use esta unidad mientras esté en un vehículo en marcha ni en la bañera o la ducha
PRECAYCUIBES GENERALES Y ADVERTENCIAS• El almacenamiento fuera de la temperatura de almacenamiento establecida
puede causar error en la medición o el mal funcionamiento del dispositivo; la temperaturaambiente de operación es: -4°F – 131°F (-20°C – 55°C); Humedad: ≤90% RH
• Mantenga la unidad lejos del alcance de los niños pequeños
• Siempre mantenga la unidad desconectada mientras no se usa, retire las pilas de la unidadsi no se usará por un largo periodo de tiempo
PRECAYCUIBES GENERALES Y ADVERTENCIAS• Nunca sumerja la unidad en el agua para limpiarla, ya que esto podría dañarla
• Siga la sección de “limpieza y mantenimiento" de este manual para conocer lasinstrucciones acerca de cómo limpiar y cuidar su monitor

34 – EspAñol
Introducción
Se recomienda que usted primero busca el consejo y la recomendación de su médicoo profesional de cuidados médicos cuando utilice dispositivos de diagnóstico en elhogar, incluidos monitores de presión arterial.
Los monitores automáticos digitales de presión arterial emplean el método oscilométrico paramedir la presión arterial electrónicamente. El monitor detecta el movimiento de la sangre porla arteria de su brazo y convierte dichos movimientos en una lectura digital. El métodooscilométrico no requiere de un estetoscopio; con lo cual, el equipo resulta ideal para usodoméstico
Las lecturas de la presión arterial determinadas con este dispositivo son equivalentes a lasmediciones obtenidas por un profesional de cuidados médicos capacitado mediante elmétodo de auscultación con brazalete/estetoscopio, dentro de los límites prescritos por lanorma nacional estadounidense para esfigmomanómetros electrónicos o automatizados(American National Standard for Electronic or automated Sphygmomanometers).
Muchas gracias comprar el monitor automático de la presión arterial de Digitaces.Con el cuidado y uso adecuados, el monitor le brindará muchos años de lecturasconfiables.
SÍRVASE LEER TODA ESTA GUÍA ANTES DE OPERAR LA UNIDAD.

EspAñol – 35
los detalles del visor y la interpretación de los símbolos están incluidos eneste manual.
mmHg
M
MD
Brazalete parael brazo Visor Digital
Puerto paraadaptador AC
powerBotón de encendido(encendido/apagado- on/off )
Conector deltubo
Compartimientode las baterías(superficie inferior)
memorIaBotón parallamar la
Funciones del monitor digital de presión arterial

36 – EspAñol
Antes de tomarse la presión
1. Sus lecturas sólo deben ser interpretadas por su médico o profesional de cuidadosmédicos con acceso a su historia clínica individual. El uso periódico de un monitor en elhogar le permitirá rastrear y registrar sus lecturas para comentarlas con su médico.
2. Tómese la presión en un lugar tranquilo y sentado en una posición relajada. Descansedurante 15 minutos antes de tomarse la presión. Si se produce un error o si desea tomaruna segunda lectura, deje transcurrir 15 minutos entre lecturas para que sus vasossanguíneos se normalicen.
3. Evite fumar, comer, tomar medicación, beber alcohol, hacer actividad física o cualquier otraactividad estresante 30 minutos antes de tomarse la presión.
4. Quítese siempre las joyas o indumentaria apretada que pudiere interferir en la colocacióndel brazalete.
5. Manténgase quieto usted y el monitor durante la medición; no hable durante la lectura.
6. Se recomienda tomarse la presión a la misma hora todos los días para controlar mejor lasindicaciones en sus resultados.
7. Registre su medición diaria en la planilla que se incluye o en algún otro documento escritopara compartirla con su médico.
Variaciones de la Presión Arterial La tensión es influida por muchos factores y puede cambiar al momento. Normalmente, latensión es más baja durante períodos y subidas durmientes durante el día.
Cómo comenzar

EspAñol – 37
Esta unidad viene completa con 4 baterías tipo AA.
Será necesario cambiar las baterías cuando se presente el símbolo de Batería Baja enel visor, o cuando no se encienda el visor después de haber pulsado el botónde encendido POWER.
Reemplazo de la Baterîa, Fig. 11. Presione hacia abajo para levantar la tapa
2. Inserte o cambie 4 baterías tipo AA en elcompartimento de baterías; asegúrese de quecoincidan los símbolos de polaridad indicados.Use siempre baterías nuevas.
3. Vuelva a colocar la tapa.
4. Disponga de las baterías según la disposiciónlocal y las regulaciones del reciclaje.
Se recomienda para quitar las baterías si la unidad noes utilizada por un periodo de tiempo extendido.
Adaptador de alimentación de c.a.Hay un adaptador de c.a. disponible porseparado, para funcionamiento sin baterías. Eladaptador de c.a. se enchufa en el costado de launidad, según se indica en la Fig. 3. Recuerdetomar precauciones de seguridad eléctricaguiadas por el sentido común mientra use eladaptador. Para efectuar el pedido de unadaptador de c.a., vea el formulario de pedidoque se adjunta.
Adaptador de c.a. Salida: 6V de c.a., 600mA
Acceso del Adaptador de la CA
Fig. 2
--
+
+
Fig. 1
Colocación y reemplazo de la batería/alimentación de c.a.

38 – EspAñol
Si usted no elije ajustar la información correcta, la fecha y la hora indicadaserá la determinada por defecto por el fabricante: 12:00 a.m. 1M 1D.
1. Con la unidad apagada, pulse y libere simultáneamente los botones deencendido POWER y de M. Comenzará a parpadear el mes, Fig. 1.
2. Pulse el botón de M para cambiar el número hasta que se visualice elnúmero deseado. Si desea que los números pasen más rápido,mantenga pulsado el botón de M mientras avanzan los números.
3. Pulse el botón de encendido para confirmar el ingreso del mes. 4. A continuación, parpadeará la fecha. Repita los pasos 2 y 3 para ajustar la
fecha; después las horas, luego los minutos.5. Una vez ajustados los minutos, la unidad saldrá automáticamente del modo
de ajuste de fecha/hora.
Aunque el monitor esté apagado, seguirán visualizándose la fecha y la hora en laparte superior de la pantalla.
La hora se presenta en formato militar de 24 horas. Esta planilla explica laconversión de la hora.
Hora formato militar = Hora formato estándar
1:00 = 1am 7:00 = 7am 13:00 = 1pm 19:00 = 7pm2:00 = 2am 8:00 = 8am 14:00 = 2pm 20:00 = 8pm3:00 = 3am 9:00 = 9am 15:00 = 3pm 21:00 = 9pm4:00 = 4am 10:00 = 10am 16:00 = 4pm 22:00 = 10pm5:00 = 5am 11:00 = 11am 17:00 = 5pm 23:00 = 11pm6:00 = 6am 12:00 = 12pm 18:00 = 6pm 24:00 = 12am
Ajuste de fecha y hora
Fig. 1
es necesarIo ajustar la fecha y hora del monItor cuando se colocan lasbaterías por prImera vez o cada vez Que se las reemplaza.

EspAñol – 39
Colocación del brazalete de presión arterial
Antes de colocarse el brazalete de presión arterial, asegúrese de haber seleccionado el tamaño debrazalete adecuado. Para determinar el tamaño correcto, mida la circunferencia de su brazosuperior izquierdo en la curva situado a mitad del camino del interior del punto en medio de sucodo y de su hombro, Fig 1.
el brazalete para adultos se adapta a una circunferencia de brazo deentre 11-3/4” y 16-1/2” (de 30 a 42 cm)el brazalete para adulto grande se adapta a una circunferencia de brazode entre 16-1/2” - 18-7/8” (42-48 cm)
hay disponibles otros brazaletes para efectuar el pedido en el formulario depedido que se adjunta.
Si, por cualquier motivo, usted no puede o no debe usar su brazo izquierdo,modifique las instrucciones para la colocación del brazalete en el brazoderecho. Su médico puede ayudarlo a identificar el brazo que le resulte mejorpara tomarse la presión.
1. No debe enchufar el brazalete al monitor mientras no esté colocado enel brazo.
2. Quítese cualquier indumentaria apretada o joya que pudiere interferiren la colocación del brazalete.
3. Permanezca sentado a una mesa o escritorio, con los pies planos sobreel suelo y las piernas uncrossed.
4. Coloque el brazalete sobre una superficie sólida, con los tubos haciaarriba y lejos de usted. El aro/barra de metal del brazalete debe quedara la izquierda de los tubos.
5. Abra el brazalete tirando o desenrollando la parte inferior del brazaletehacia la derecha, Fig. 2, para que se abra el brazalete sin tener quedesenrollarlo totalmente, creando un cilindro. No extienda el brazaletemás allá de la barra de metal.
6. Inserte el brazo izquierdo en el cilindro creado por el brazalete.Posicione la marca indice sobre la arteria principal, del lado internodel brazo, Fig. 3,4.
Fig. 2
Fig. 3
Fig. 4
Main Artery
Fig. 1
es muy Importante el ajuste y la colocacIón adecuada del brazalete paraobtener medIcIones precIsas de la presIón arterIal. lea cuIdadosamenteestas IndIcacIones y consulte con su médIco para mÁs InstruccIones.

40 – EspAñol
Colocación del brazalete de presión arterial
Toma de lecturas de presión arterial
7. El borde inferior del brazalete debe quedar posicionadoaproximadamente a una pulgada sobre la articulación del codo, Fig. 5.
8. El brazalete debe sentirse cómodo, aunque bien ajustado, alrededor delbrazo. Se debe poder insertar fácilmente un dedo entre el brazo y elbrazalete.
El tamaño del brazalete es adecuado para uso cuando la marca vertical de“índice” se encuentra dentro del rango horizontal aceptable. Senecesitará un tamaño diferente de brazalete cuando la marca de “índice” quede fuera del rangoaceptable.
Si no se siente cómodo al colocarse el brazalete, procure la ayuda de otro integrante de la familia opractique la colocación del brazalete con su médico. La colocación incorrecta del brazalete darácomo resultado lecturas inexactas.
Lea las partes precedentes de este manual antes de tomarse lapresión arterial por primera vez.
Recuerde: es importante evitar fumar, comer, tomar medicación,beber alcohol o realizar actividad física 30 minutos antes de tomarsela presión.
1. Coloque el monitor sobre una superficie plana y estable,con el visor digital a la vista.
2. Inserte el conector de tubos del brazalete en el puerto quese encuentra del lado izquierdo del monitor, Fig. 1.
3. Su codo debe descansar en una superficie sólida, con lapalma de la mano hacia arriba. Eleve el brazo, de maneratal que el brazalete y su corazón se encuentren alineados,Fig. 2. Deje su mano izquierda relajada.
mmHg
M
MD
Fig. 1
Fig. 2note: you can stop the inflation or deflation process at any time bypressing the power button.
Fig. 5
0.4”-0.8”/1-2cm

EspAñol – 41
Toma de lecturas de presión arterial
4. Pulse el botón de encendido POWER para encender la unidad, que ejecutará una pruebaautomática, Fig. 3.
5. La unidad visualizará brevemente el último valor de lectura de ese banco de memoria. Si no hayuna medición anterior, en el visor se presentará ‘0’ para todos los valores de lectura.
6. El brazalete se inflará automáticamente hasta alcanzar aproximadamente 190mmHg o 40mmHg más que la última lectura de presión sistólica almacenada en la memoria.
7. Cuando el proceso de inflado haya alcanzado su óptimo nivel, el visor comenzará a mostrar lapresión disminuyendo y usted sentirá cómo disminuye la presión en el brazalete.
8. La medición de presión arterial y pulso se presentarán simultáneamente en la pantalla, Fig. 5. Sevisualizarán al mismo tiempo las lecturas de presión sistólica y diastólica.
9. El indicador de hipertensión mostrará el rango de lecturas en el sector izquierdo del visor, Fig. 6.Para una planilla de interpretación de los resultados del indicador de hipertensión, consulte lapágina 43.
10. Si se detectó un latido irregular durante la lectura, en el visor se presentará el detector de latidosirregulares, Fig. 7. Para más información acerca de la función del indicador del detector delatidos irregulares, consulte la página 42.
11. La lectura se almacenará automáticamente en la memoria, hasta un máximo de 60 lecturas.
12. Seleccione POWER para apagar la unidad y ahorrar energía y la vida útil de las baterías. Launidad se apagará automáticamente y volverá al modo de fecha/hora después deaproximadamente 1 minuto.
13. Desconecte el brazalete y los tubos del monitor antes de guardarlo.
Fig. 3 Fig. 4 Fig. 5 Fig. 6 Fig. 7
mmHg
M
MD

42 – EspAñol
Interpretación de lecturas de Presión ArterialDetector de latidos irregulares
Un ritmo cardíaco irregular se define como un ritmo cardíaco 25% más lento o 25% másrápido que la medición promedio detectada mientras el monitor lleva a cabo la medición.Cuando este dispositivo detecta un ritmo cardíaco irregular en dos o más ocasiones durante lalectura, aparecerá el símbolo IHB en la pantalla.
Este monitor operará si aparece el icono, pero los resultados podrían verse afectados,especialmente si dicho símbolo aparece con mucha frecuencia. Por favor, consulte con sumédico o profesional de la salud capacitado si este símbolo aparece con frecuencia, a fin deobtener más información acerca de un ritmo cardíaco irregular.
Pulso
Pulso
PresiónArterial
ritmo cardiaco normal
ritmo cardiaco irregular
golpecorto
golpelargo
PresiónArterial

EspAñol – 43
Interpretación de lecturas de presión arterialIndicador de hipertensiónLa barra ligera en el lado izquierdo de la pantalla de visualización iluminará en color en larealización de la lectura, indicando adonde la medida baja según los estándares de laOrganización Mundial de la Salud.
Este gráfico pueden ayudarle a identificar dónde las mediciones de presión sanguínea bajasegún la OMS normas de clasificación. Este gráfico sólo debe considerarse como una directriz;siempre consulte con su médico para interpretar sus resultados individuales. Nunca ajustar sumedicamento(s) dosis o alteran la dieta o rutina de ejercicios sin consultar con el médico.
mmHg
M
MD
El indicador dehipertensión eslocalizado en elsector izquierdodel visor
Grado 3 de HipertensiónPresión arterial sistólica: ≥ 180 mmHgorPresión arterial diastólica: ≥ 110 mmHg
Grado 2 de HipertensiónPresión arterial sistólica: ≥ 160-179 mmHgorPresión arterial diastólica: ≥ 100-109 mmHg
Grado 1 de HipertensiónPresión arterial sistólica: ≥ 140-159 mmHgorPresión arterial diastólica: ≥ 90-99 mmHg
Alta NormalPresión arterial sistólica: ≥ 130-139 mmHgorPresión arterial diastólica: ≥ 85-89 mmHg
NormalPresión arterial sistólica: ≥ 120-129 mmHgorPresión arterial diastólica: ≥ 80-84 mmHg
óptimaPresión arterial sistólica: < 120 mmHgorPresión arterial diastólica: < 80 mmHg

44 – EspAñol
Función de memoria
Memorización de mediciones en la memoriaPuede memorizar hasta un total de 60 mediciones en la memoria.Estas mediciones las puede compartir con su médico o profesionalcapacitado para el cuidado de la salud.
1. Pulse y libere el botón M (de memoria). La unidad demostrarácuántas medidas se almacenan dentro del banco, seguido porel último resultado, Fig. 1.
2. Pulse nuevamente el botón M (de memoria), para desplazarsepor las mediciones que están almacenadas. Las medidasaparecerán en la exhibición de la más viejo a la más actual.Todos los resultados para una medida dada exhibirán,incluyendo los resultados de la medida, el pulso, el icono y laalarma irregular del latido del corazón (si fuera aplicable), Fig 2.Del indicador de la hipertensión. Después de que usted hayaenrollado a través de todas las lecturas, la unidad apagaráautomáticamente.
3. Cuando el número de lecturas excede las 60, las más antiguasserán reemplazadas por el nuevo registro.
Borrado de mediciones de la memoria1. Pulse y libereel botón M (de memoria). La unidad mostrará la
cantidad de mediciones almacenadas en el banco.
2. Pulse y libere el botón M (de memoria), hasta que brillen doslíneas horizontales, Fig 3. Esto indica que se han borrado todaslas mediciones.
Fig. 2
Fig. 1
Fig. 3

EspAñol – 45
Cuidado Y MantenimientoEl buen cuidado y mantenimiento de su medidor de presión ayudará a asegurar la larga vida útil delproducto. El uso inadecuado del medidor puede invalidar la garantía incluida.
CUIDADO Y MANTENIMIENTO DEL MEDIDOR• No use ningún líquido para limpiar el medidor. Use un paño suave y seco para limpiarlo según sea necesario• Almacenar el medidor a temperaturas de almacenamiento que excedan las establecidas puede ocasionar
errores o mal funcionamiento. La temperatura de almacenamiento recomendada es: 4oF – 131oF (-20oC – 55oC) Humedad ≤90% RH
• No almacene en la luz solar directa• Mantenga siempre la unidad desconectada cuando no esté en uso. Retire las baterías si no planea usar el
medidor durante un lapso prolongado• No trate de desarmar su medidor, ya que ello podría invalidar la garantía del fabricante• No someta el medidor a golpes fuertes y no lo deje caer• Con el cuidado apropiado, el monitor mantendrá el rendimiento para un mínimo de 10.000 mediciones o
tres años• Ningún componente de este dispositivo se puede mantener por el usuario; los diagramas de circuitos , listas
de componentes de piezas , descripciones, instrucciones de calibración o de otro tipo de información queayuden a personal técnico debidamente cualificado del usuario para reparar las partes del equipo que sedesignan reparable puede suministrarse
• Se recomienda que el rendimiento del monitor se revisará cada dos años o después de servicio o reparación; por favor póngase en contacto con su proveedor de servicios o llamar a atención al cliente
CUIDADO Y MANTENIMIENTO DE LA MANGA,• No sumerja la manga ni la lave en lavadora. Limpie las manchas con un detergente suave según sea
necesario• Limpie el puño a conciencia después de que cada 200 aplicaciones o más con frecuencia según lo
necesitado• No trate de planchar o secar la manga. Si se humedece, deje que se seque con el aire completamente antes
de usarla o almacenarla; se sugiere que el brazalete limpiarse una vez al mes si el deviced es utilizadodiariamente
• Para desinfectar el brazalete, limpie el interior (lado de contacto de la piel) del brazalete ligeramentehumedecido con 70-90% etílico alcohol para frotar y secar al aire; se sugiere para desinfectar el brazaletecon frecuencia cuando se utiliza en entornos clínicos o si el manguito está contaminado de ninguna manera
• No trate de retirar el tubo y la bolsa de aire de la manga de nylon, ya que esto podría dañarla• Trate de no doblar el tubo de manera forzada ni torcerlo durante el almacenamiento.• Con el cuidado apropiado, el brazalete mantendrá el rendimiento para un mínimo de 1000 mediciones

46 – EspAñol
Lea este Manual — todos los manuales incluidos deben leerse antes del primer uso
ADVERTENCIA—indica una advertencia, prohibición o acción obligatoria que mitiga elriesgo de que no es necesariamente evidente para el operador del dispositivo
Typ e BF aplicado partes — indica que una parte de esta unidad entra en contacto con elpaciente para realizarlo ha destinado función; en el caso de este dispositivo el brazaletees la parte aplicada de tipo BF
Protección del medio ambiente — desechar este producto correctamente; Consulte consus reciclaje las ordenanzas locales para el reciclaje y la eliminación
Mantenga seco — este dispositivo debe mantenerse seco; Nunca sumerja la unidad o elpuño. Consulte con la sección de cuidado y mantenimiento de este manual paraobtener información sobre la limpieza de su monitor
Símbolo de polaridad— conector de alimentación de la polaridad de D.C.; Nota conec-tor puede no estar incluido en este dispositivo, pero está disponible para su compra conel formulario incluido
Símbolo Significado
2012
2012
Descripción del dispositivo y símbolos de la etiqueta

EspAñol – 47
Símbolos VisualizadosSímbolo Significado
Pesión arterial sistólica —El resultado de la presión arterial “más alta”
Presión arterial diastólica — El resultado de la presión arterial “más baja”
Miligramos de mercurio—unidad de lectura de la presión arterial de esteaparato.
Pulso —pulsaciones por minuto durante la lectura
Se presenta cuando es necesario cambiar las baterías
Flecha hacia abajo—No se colocó correctamente el brazalete o queda demasiado aire en el mismo; la flecha dejará de titilar cuando la unidad estélista para la lectura
Flecha hacia arriba — Se produjo un error en la lectura y se debe tomar nuevamente
Irregular Heartbeat Icon—Se presenta cuando se detecta un latido irregular durante la medición
Lectura de la Memoria—Se presenta para recordar una medición de la memoria
Promedio—El visor muestra el promedio de las tres últimas lecturas en la memoria
Error—ha producido un error durante la medición

48 – EspAñol
Solución de ProblemasProblema
La posición del brazalete no eracorrecta o no estaba losuficientemente ajustado.
La postura del cuerpo no eracorrecta durante la lectura.
Durante la lectura, habló, semovió excesivamente, estabaenojado, excitado, ansioso onervioso.
Es probable que las bateríasestén vencidas o no se hayancolocado correctamente.
Funcionamiento incorrecto;posiblemente hayainterferencia electromagnéticafuerte.
Coloque el brazalete correctamente eintente realizar una lectura nueva.
Lea la sección “Cómo tomar unalectura” de este manual e intenterealizar una lectura nueva.
Espere unos instantes e intenterealizar una lectura nueva cuando sehaya calmado; no hable ni se muevadurante la lectura.
Revise la polaridad de las baterías yvuélvalas a colocar si fuera necesario;cambie las baterías por unas nuevas.
Quite las baterías y espere por lomenos cinco minutos; vuelva a colocarlas baterías e intente realizar unalectura nueva.
Causa posible Solución
El monitormuestra unamedición anormal
El visor está enblanco cuando seenciende elequipo
No hay respuestacuando sepresiona el botónde encendido(POWER) odespués decolocar bateríasnuevas.

EspAñol – 49
Solución de Problemas - Códigos de Error
si un código de error persiste o no se remedia, entre encontacto con por favor el cuidado del cliente en 866-326-1313.
Código Causa posible Solución
Pantalla Muestra Er 1
Pantalla Muestra Er 0
Pantalla Muestra Er 2
Pantalla Muestra Er 3
Pantalla Muestra Er 4
Pantalla Muestra Er 5
Pantalla Muestra Er 6
Pantalla Muestra Er 7
Pantalla Muestra Er 8
Pantalla Muestra Er A
Revise la parte de "Cómo tomar unamedición" del manual, espere un mínimode 5 minutos e intentar una nuevamedición
Revise la parte de "Cómo tomar unamedición" del manual, espere un mínimode 5 minutos e intentar una nuevamedición
Compruebe que el brazalete se aplicacorrectamente, espere un mínimo de 5minutos e intentar una nueva medición. Siel monitor no funciona o funciona demanera anormal, comuníquese conAtención al Cliente
Sistema de presión es inestableantes de la medición
No se pudo detectar la presiónsistólica
Presión Error al detectar-diastólica
Sistema neumático bloqueado obrazalete es demasiado apretadodurante el infladoFuga en el sistema neumático o elbrazalete es demasiado flojo durantela inflación
La presión del manguito por encimade 300 mmHg
La presión del manguito por encimade 15 mmHg durante más de 3minutos
Error al acceder a EEPROM
Parámetro de dispositivo decomprobación de erroresError de parámetro Sensor depresión

50 – EspAñol
Declaración de la FCCNOTA:POTENCIAL DE INTERFERENCIA PARA RADIO/TELEVISIÓN (sólo para EE.UU.)
Este producto ha sido probado y se comprobó que cumple con los límites para un dispositivodigital Clase B, de acuerdo con la parte 15 de las disposiciones de la FCC (Comisión Federal deComunicaciones).
Estos límites están diseñados para proporcionar una protección razonable contra lainterferencia dañina de una instalación residencial. El producto genera, usa y puede irradiarenergía de radiofrecuencia y, si no se instala y usa de acuerdo con las instrucciones, podríaocasionar una interferencia dañina para las comunicaciones de radio. No obstante, no haygarantía alguna de que la interferencia no ocurrirá en una instalación en particular. Si elproducto ocasiona interferencia dañina para la recepción de radio o televisión, la cual sepuede determinar al encender y apagar el producto, se exhorta al usuario a que trate decorregir la interferencia mediante una o más de las medidas siguientes:
• Reoriente o cambie de lugar la antena receptora
• Aumente la separación entre el producto y el receptor.
• Conecte el producto a un tomacorriente en un circuito diferente al que está conectado elreceptor.
• Consulte al distribuidor o a un técnico de radio/TV experimentado para obtener ayuda
POTENCIAL DE INTERFERENCIA PARA RADIO/TELEVISIÓN (sólo para Canadá)
Este aparato digital no excede los límites de Clase B para emisiones de ruido de radio para unaparato digital, como se estipula en la norma sobre equipos causantes de interferenciatitulada “Aparato digital”, ICES-003 del Departamento Canadiense de Comunicaciones.
Cet appareil numérique respecte les limites de bruits radioeléctriques applicables auxappareils numériques de Clase B prescrites dans la norme sur le materiel brouilleur: “AppareilsNumériques”, ICES-003 édictée par le minister des communications.
Los cambios o modiUcaciones no aprobados expresamente por la parte responsable delcumplimiento podrían anular la autoridad del usuario para operar el equipo.

EspAñol – 51
Electromágnetica Compatibilidad
Emisiones deradiofrecuencia CISPR 11
Emisiones deradiofrecuencia CISPR 11
Emisiones armónicas CEI 61000-3-2
Fluctuaciones y parpadeode tensión CEI 61000-3-3
Guía y declaración del fabricante – emisiones electromagnéticas Este monitor tiene la finalidad de usarse en el ambiente electromagnético que se especifica a continuación.El cliente o usuario de este monitor debe asegurarse de que se utilice en dicho entorno.
Tabla 1Para todos los EQUIPOS ME y SISTEMAS ME
Prueba de emisiones
Grupo 1
Clase B
Clase A
Cumple
Este monitor usa energía de RF únicamente parasu funcionamiento interno. Por lo tanto, susemisiones de radiofrecuencia son muy bajas y noes probable que causen ninguna interferencia enlos equipos electrónicos cercanos.
Este monitor es apto para usarse en todo tipo deestablecimiento, inclusive en ámbitos domésticosy en aquellos conectados directamente a la redpública de baja tensión que alimenta a losedificios destinados a vivienda.
Cumplimiento Guía sobre el ambiente electromagnético

52 – EspAñol
Electromágnetica Compatibilidad
Descargaelectrostática CEI 61000-4-2
Transitorioseléctricosrápidos/enráfagasCEI 61000-4-4
SobretensiónCEI 61000-4-5
Bajas de tensión,interrupcionesbreves yvariaciones detensión en laslíneas deentrada desuministroeléctricoCEI 61000-4-11
Camposmagnéticos defrecuencia deenergía(50/60 Hz)CEI 61000-4-8
Guía y declaración del fabricante – emisiones electromagnéticas Este monitor tiene la finalidad de usarse en el ambiente electromagnético que se especifica a continuación.El cliente o usuario de este monitor debe asegurarse de que se utilice en dicho entorno.
Tabla 2Para todos los EQUIPOS ME y SISTEMAS ME
Prueba deInmunidad
± 6 kV por contacto± 8 kV por aire
± 2 kV para líneas dealimentación eléctrica± 1 kV para líneas deentrada/salida
± 1 kV línea(s) a línea(s)± 2 kV línea(s) a tierra
<5 % UT (baja de >95 % enUT) durante 0.5 ciclos
40 % UT (baja de 60% en UT)durante 5 ciclos
70 % UT (baja de 30% en UT)durante 25 ciclos
<5 % UT (baja de >95 % enUT) durante 5 seg.
3 A/m
± 6 kV por contacto± 8 kV por aire
± 2 kV para líneas dealimentación eléctrica
± 1 kV línea(s) a línea(s)± 2 kV línea(s) a tierra
<5 % UT (baja de >95 % enUT) durante 0.5 ciclos
40 % UT (baja de 60% en UT)durante 5 ciclos
70 % UT (baja de 30% en UT)durante 25 ciclos
<5 % UT (baja de >95 % enUT) durante 5 seg.
3 A/m
Los pisos deben ser de madera, concretoo baldosas de cerámica. Si el piso estárecubierto con material sintético, lahumedad relativa debe ser por lo menosdel 30%.
La calidad de la corriente suministradapor la red de distribución de energíadebe ser la de un entorno comercial uhospitalario típico.
La calidad de la corriente suministradapor la red de distribución de energíadebe ser la de un entorno comercial uhospitalario típico.
La calidad de la corriente suministradapor la red de distribución de energíadebe ser la de un entorno comercial uhospitalario típico. Si el usuario de estemonitor requiere que éste continúefuncionando aún durante interrupcionesen el suministro de energía, serecomienda alimentar el monitor desdeuna fuente de alimentaciónininterrumpida o con una batería.
Los campos magnéticos de frecuencia deenergía deben tener los nivelescaracterísticos de un lugar típico en unambiente comercial u hospitalario típico.
Nivel de prueba CEI 60601 Nivel de cumplimiento Guía sobre el ambiente
electromagnético
Nota: UT es la tensión de corriente alterna (de la red de distribución de energía eléctrica) antes de aplicar el nivel de prueba.

EspAñol – 53
Electromágnetica Compatibilidad
RF conducidaCEI 61000-4-6
RF irradiadaCEI 61000-4-3
Guía y declaración del fabricante – Inmunidad electromagnéticaEste monitor tiene la finalidad de usarse en el ambiente electromagnético que se especifica a continuación.El cliente o usuario de este monitor debe asegurarse de que se utilice en dicho entorno.
Tabla 3Para los EQUIPOS ME y SISTEMAS ME que no son Sistemas de Soporte Vital
3 Vrms de 150 kHz a 80 MHz
3 V/m de 80 MHz a 2,5 GHz
3 Vrms
3 V/m
NOTA 1: A 80 MHz y 800 MHz, se aplica la gama de frecuencias más alta.NOTA 2: Estas guías pueden no aplicarse en todas las situaciones. La absorción y la reflexión provocadas por estructuras,objetos y personas afectan la propagación electromagnética.
* Las intensidades de campo creadas por los transmisores fijos, como por ejemplo los de estaciones base para telefonía deradio (celular/inalámbrica) y radios móviles terrenas, de radio amateur, emisoras de radio AM y FM y emisoras de televisión,no se pueden predecir con precisión en forma teórica. Para evaluar el entorno electromagnético provocado por transmisoresde RF fijos, se debe considerar la posibilidad de realizar una prueba electromagnética en el lugar. Si la intensidad de campomedida en el lugar donde se usará el monitor excede el nivel de conformidad de RF indicado anteriormente, se debe vigilarel monitor con el fin de verificar su buen funcionamiento. En caso de detectarse un funcionamiento anormal, puede que seanecesario tomar medidas adicionales, como la reorientación o reubicación del monitor.** Dentro de la gama de frecuencias comprendidas entre 150 kHz y 80 MHz, las intensidades de campo deben ser inferiores a 3V/m.
Los equipos de comunicaciones por RFportátiles y móviles no deben utilizarse a unadistancia inferior de la distancia de separaciónrecomendada, respecto de cualquier parte delmonitor (incluso los cables). La distancia deseparación recomendada se calcula a partir dela ecuación aplicable a la frecuencia deltransmisor.
Distancia de separación recomendada:
80 MHz a 800 MHz
800 MHz a 2,5 GHz
donde P es la potencia máxima de salida deltransmisor en vatios (W) según el fabricantedel transmisor, y d es la distancia deseparación recomendada en metros (m).
Las intensidades de campo de transmisoresfijos de RF, determinadas en base a unestudio electromagnético del lugar* debenser menores que el nivel de conformidad encada gama de frecuencias.**
Puede haber interferencias cerca de equiposmarcados con el siguientesímbolo:
1d = 2.
1d = 2.
d = 2.3
Prueba deInmunidad
Nivel de prueba CEI 60601 Nivel de cumplimiento Guía sobre el ambiente
electromagnético

54 – EspAñol
Electromágnetica Compatibilidad
0,01
0,1
1
10
100
Distancias de separación recomendadas entre los equipos de comunicaciones por RF portátiles y móviles y este monitorEste monitor ha sido diseñado para utilizarse en un entorno electromagnético en el cual las perturbaciones por emisiones deRF irradiada están bajo control. El cliente o usuario del monitor puede contribuir a que no ocurran interferenciaselectromagnéticas manteniendo una distancia mínima entre el monitor y los equipos de comunicaciones por RF portátiles ymóviles (transmisores), según lo recomendado a continuación, de acuerdo con la potencia máxima de salida del equipo decomunicaciones.
Tabla 4Para los EQUIPOS ME y SISTEMAS ME que no son Sistemas de Soporte Vital
Potenciamáxima desalida deltransmisor
W
0,12
0,38
1,2
3,8
12
0,12
0,38
1,2
3,8
12
0,23
0,73
2,3
7,3
23
En el caso de los transmisores cuya potencia máxima de salida no figura en la lista anterior, la distancia de separaciónrecomendada d en metros (m) puede determinarse por medio de la ecuación aplicable a la frecuencia del transmisor,donde P es la potencia máxima de salida del transmisor en vatios (W), conforme lo declarado por su fabricante.NOTA 1: A 80 MHz y 800 MHz, se aplica la distancia de separación para la gama de frecuencias más alta.NOTE 2: Estas guías pueden no aplicarse en todas las situaciones. La absorción y la reflexión provocadas por estructuras,objetos y personas afectan la propagación electromagnética.
Distancia de separación según la frecuencia del transmisorm
150 kHz to 80 MHz 80 MHz to 800 MHz 800 MHz to 2,5 GHz
1d = 2. 1d = 2. d = 2.3

EspAñol – 55
nombre y Monitor automático digital de lujo para la presión arterial (brazo) número de modelo 01-5021 (adulto), 01-5022 (adulto grande)sistema de visualización Visor digital/visor de cristal líquidométodo de medición Oscilométricofuente de energía 4 ×1.5V TALLA AA de las baterías; C.C. 6V 600mArango de medición Presión: de 0 a 300 mmHg
Pulso: de 40 a 180 pulsos por minutoprecisión Presión: ±3 mmHg
Pulso: ±5% de la lecturaInflado Accionamiento por bombadesinflado Válvula automática de alivio de presiónmemoria Visor con memoria incorporada que permite hasta
60 mediciones cierre automático Aproximadamente 1 minuto después de la última vez que se
accionó un botónvida de batería Aproximadamente 360 medidasentorno operativo Temperatura 41oF – 104oF (5oC – 40oC ; Humedad ≤ 90%entorno de almacenamiento Temperatura -4oF – 131oF (-20oC – 55oC); Humedad ≤90%dimensiones del monitor 4-1/8” x 6” x 1-3/4”dimensiones del monitor Peso 12,7 oz. (sin baterías)rango de circunferencia de brazo El brazalete para adultos se adapta a una circunferencia de brazo:
11-3/4” - 16-1/2” (30-42 cm)El brazalete para adultos tamaño grande se adapta a lacircunferencia de brazo: 16-1/4” - 18-7/8” (42-48 cm),
accesorios Brazalete, manual detallado, guía de referencia rápida, registro de presión arterial, cuatro baterías tipo “AA”, estuche
opciones El brazalete para adultos tamaño pequeño se adapta a la(se venden por separado) circunferencia de brazo: 8-5/8”-11-3/4” (22-30 cm), adaptador de c.a.specifications are subject to change without notice
Especificaciones del Producto

56 – EspAñol
Felicitaciones por su compra de un Monitor de Brazo Para la Presión Arterial Automático Digital. Su Monitorde Brazo Para la Presión Arterial Automático Digital está cubierto por la siguiente garantía limitada a partirde la fecha de compra y está sujeto a los siguientes términos y condiciones:
El Warrantor garantiza que su Monitor de Brazo Para la Presión Arterial Automático Digital estará libre dedefectos en materiales y mano de obra bajo el uso normal del consumidor por el tiempo que el compradororiginal sea propietario del producto.
Se excluyen de la cobertura el mantenimiento periódico, las reparaciones y el reemplazo de partes debidosal desgaste normal. Los defectos o daños que resulten de: (a) la operación incorrecta, el almacenamientoincorrecto, el uso inadecuado o abuso, accidente o negligencia, como el daño físico (grietas, raspones, etc.)en la superficie del producto resultado del uso inadecuado; (b) el contacto con líquidos, agua, lluvia,humedad extrema o transpiración abundante, arena, polvo o suciedad en general, calor extremo, oalimentos; (c) el uso del Monitor de Brazo Para la Presión Arterial Automático Digital con propósitoscomerciales o someter al Monitor de Brazo Para la Presión Arterial Automático Digital a un uso ocondiciones anormales; u (d) otros actos que no son culpa de Veridian, se excluyen de la cobertura. Estagarantía no cubre baterías ni otras fuentes de energía que se puedan suministrar o usar con el Producto.
Si el monitor de la presión arterial de Digitaces no puede ajustarse a esta garantía limitada, vuelva elfranqueo del monitor de la presión arterial de Digitaces pagado por adelantado a: Attn: RepairDepartment, 1175 Lakeside Drive, Gurnee, IL, 60031. Cuando devuelva un producto, por favor incluyaademás: (i) una copia de su recibo, factura u otro comprobante de compra; (ii) una descripción por escritodel problema; y (iii) su nombre, dirección y número telefónico. Embale cuidadosamente el producto paraevitar daños mientras está en tránsito; se recomienda contratar un seguro de envío con acuse de recibo.Según lo que elija, el Warrantor reparará o reemplazará la unidad que se considere defectuosa en materialeso mano de obra bajo el uso normal del consumidor. Al comprador se le notificará cualquier reparaciónadicional requerida antes de completar la reparación, y será responsable de pagar el cargo por las piezas, silo hubiese, y los cargos de reparación que no estén cubiertos por esta garantía limitada.
EXCEPTO COMO LO DISPONE ESTA GARANTÍA LIMITADA, NO SE ACEPTA RESPONSABILIDAD ALGUNA PORTODAS LAS GARANTÍAS Y CONDICIONES EXPRESAS E IMPLÍCITAS, INCLUIDAS EN FORMA NO RESTRICTIVA,LAS GARANTÍAS IMPLÍCITAS DE COMERCIABILIDAD Y APTITUD PARA UN PROPÓSITO EN PARTICULAR. LAREPARACIÓN O REEMPLAZO, COMO SE ESTIPULA EN ESTA GARANTÍA LIMITADA, ES EL ÚNICO RECURSOEXCLUSIVO DEL CONSUMIDOR Y SE PROPORCIONA EN LUGAR DE TODAS LAS DEMÁS GARANTÍAS, EXPRESASO IMPLÍCITAS. EN NINGÚN CASO EL WARRANTOR SERÁ RESPONSABLE, CON BASE EN OBLIGACIONESCONTRACTUALES O CULPA EXTRACONTRACTUAL (INCLUIDA LA NEGLIGENCIA), POR DAÑOS Y PERJUICIOSQUE SUPEREN EL PRECIO DE COMPRA DEL PRODUCTO, O POR CUALQUIER DAÑO INDIRECTO, INCIDENTAL,ESPECIAL O CONSECUENTE DE CUALQUIER TIPO, O POR DAÑOS A OTRA PROPIEDAD O EQUIPO, O PÉRDIDADE PROPIEDAD O EQUIPO O LESIONES PERSONALES, EN LAS MÁS AMPLIAS EXTENSIÓN EN QUE LA LEYPERMITA EL DESCARGO DE LA RESPONSABILIDAD POR DICHOS DAÑOS.
Algunos estados y jurisdicciones no permiten la limitación o exclusión de daños incidentales oconsecuentes, o la limitación en la duración de una garantía implícita, de modo tal que las limitaciones oexclusiones podrían no aplicarse a usted. Esta garantía le otorga derechos legales específicos y ustedtambién puede tener otros derechos, que varían dependiendo del estado o de una jurisdicción a otra.
Garantía de vida útil limitada