Kubernetes on NVIDIA DGX ServersNot to be confused with the hardware notion. A Kubernetes pod is the...
39
DU-09176-001 | 2018-09-12 User Guide Kubernetes on NVIDIA DGX Servers
Transcript of Kubernetes on NVIDIA DGX ServersNot to be confused with the hardware notion. A Kubernetes pod is the...

DU-09176-001 | 2018-09-12
User Guide
Kubernetes on NVIDIA DGX Servers

Kubernetes on NVIDIA DGX Servers DU-09176-001| ii
Document Change History
DU-09176-001
Version Date Authors Description of Change
01 2018-09-12 Michael Balint, Robert Sohigian Initial release
Kubernetes on NVIDIA DGX Servers DU-09176-001| iii
Table of Contents
Chapter 1. Overview ...................................................................................... 1 1.1 What Is Kubernetes? .................................................................................. 1 1.2 Choosing a Distribution ............................................................................... 1 1.3 Accessing the Example File Archive ................................................................. 3
Chapter 2. Kubernetes Basics .......................................................................... 4 2.1 Getting Started ......................................................................................... 4 2.2 Terminology ............................................................................................ 4 2.3 Kubernetes Manifest................................................................................... 5
Chapter 3. Installation ................................................................................... 7 3.1 Choosing Between Basic and DeepOps Installs ................................................... 7
3.1.1 Basic Install ..................................................................................... 7 3.1.2 DeepOps Install ................................................................................ 8
Chapter 4. Use Cases ..................................................................................... 9 4.1 Introduction............................................................................................. 9 4.2 Using NGC Containers with Kubernetes and Launching Jobs .................................. 9 4.3 Running a PyTorch Training Job ................................................................... 11 4.4 TensorRT Inferencing as a Service ................................................................. 12
4.4.1 Inferencing Toy Example ................................................................... 13 4.4.2 Deploying Inferencing in a Production Environment ................................... 14
4.5 Leveraging Kubeflow Across the Cluster ......................................................... 15 4.5.1 Installation .................................................................................... 15 4.5.2 Ensure That Storage Is Connected (Or Disable It) ...................................... 16 4.5.3 Turn Usage Reporting Off (Optional) ..................................................... 16 4.5.4 Bringing Up a Jupyter Notebook ........................................................... 16
Chapter 5. Using Persistent Storage ............................................................... 19 5.1 Introduction ........................................................................................... 19 5.2 Using NFS .............................................................................................. 19 5.3 Using Rook with Ceph ................................................................................ 22
5.3.1 Performing a DeepOps or Manual Installation ........................................... 22 5.3.2 Using Rook Storage........................................................................... 23 5.3.3 Teardown ...................................................................................... 23
Chapter 6. Monitoring the Cluster .................................................................. 24 6.1 Leveraging DCGM, Prometheus, and Grafana for Monitoring.................................. 24 6.2 Generating a Usage Report ......................................................................... 26
Chapter 7. Additional Setup .......................................................................... 27 7.1 Adding a Node to the Cluster ....................................................................... 27 7.2 Using Helm to Manage Kubernetes Software .................................................... 27 7.3 Configuring User Access with RBAC ............................................................... 29 7.4 Securing a Cluster .................................................................................... 31
APPENDIX A. Kubernetes Web UI (Formerly Dashboard) .................................... iv
Kubernetes on NVIDIA DGX Servers DU-09176-001| 1
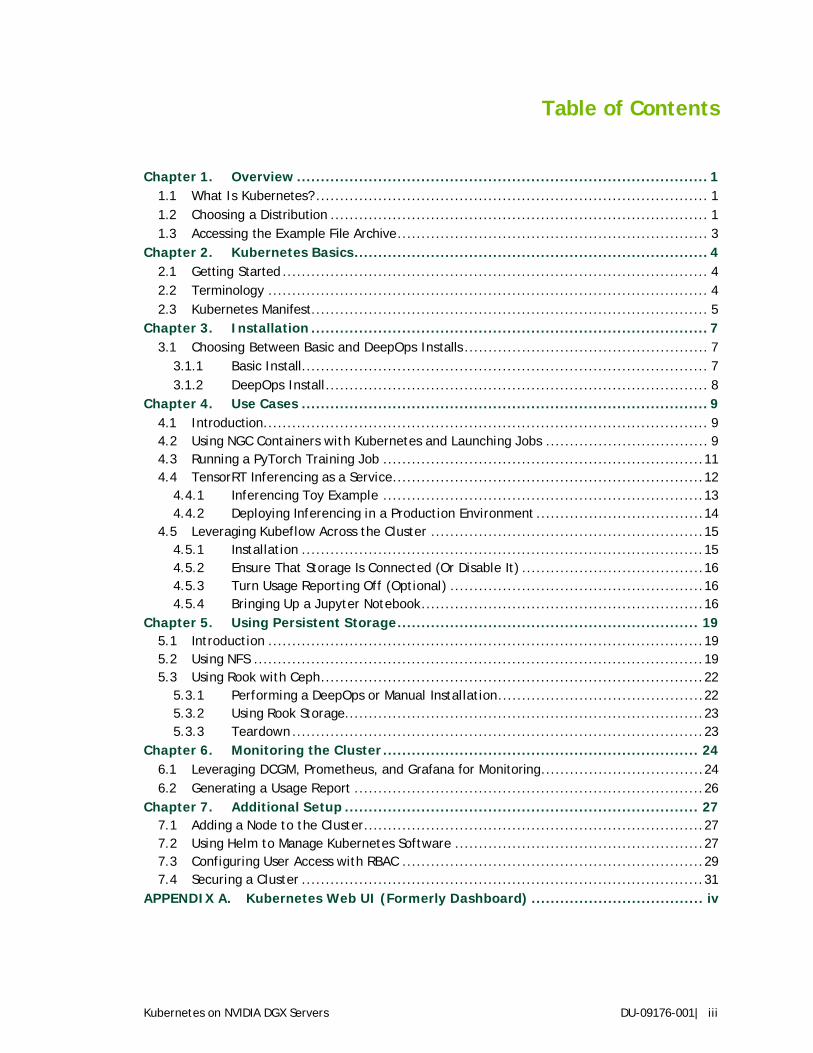
Chapter 1. Overview
1.1 What Is Kubernetes? Kubernetes is an open-source platform which enables users to orchestrate containerized workloads across a cluster.
For NVIDIA® DGX™ servers, Kubernetes is an especially useful way of efficiently allowing users to distribute their work across a cluster. For example, a deep learning (DL) training job can be submitted that makes the request to use eight GPUs and Kubernetes will schedule that job accordingly as GPUs become available in the cluster. Once the job is complete, another job can start using the same GPUs. Another example is a long-standing service can be set up to receive live input data and output inferenced results. Further examples are detailed in Chapter 4.
Deploying Kubernetes and forming DGX servers as a cluster requires some setup, but it is preferable to giving users direct access to individual machines. Instead of users needing to ensure that they reserve a server, Kubernetes handles scheduling their work. It also can split up a single node so that multiple users can use it at the same time. All of this ensures that GPUs are being used as efficiently as possible. User access to the cluster can still be managed, certain nodes can be tagged for privileged use, specific jobs can have resource priority over others, and jobs can write to network storage. These topics are covered starting in Chapter 5.
1.2 Choosing a Distribution The officially-supported distribution of Kubernetes for DGX servers is known as Kubernetes on NVIDIA GPUs.

Kubernetes on NVIDIA DGX Servers DU-09176-001| 2
Alternatively, it is possible to leverage mainstream Kubernetes with the NVIDIA Device Plugin or GKE Kubernetes (which has its own device plugin1 for NVIDIA GPUs).
However, these solutions will not provide the full set of features and functionality offered by Kubernetes on NVIDIA GPUs, such as:
Heterogeneous GPU support — If there is a mix of servers with NVIDIA Tesla® P100 and V100 GPUs, it is advantageous to be able to easily schedule jobs across this variety in the cluster. This includes a whole host of other abilities, like being able to schedule a job with a GPU memory limit as part of the resource request.
GPU monitoring and health status — The NVIDIA distribution of Kubernetes can tap into DCGM to monitor GPU state. GPU health check is also not supported in the GKE version of Kubernetes.
Alternative container support — The NVIDIA distribution of Kubernetes supports more than just Docker. CRI-O2 support has been added, with makes running OCI-compliant container runtimes possible. See here for instructions on how to leverage this functionality.
New features — NVIDIA incorporates features into Kubernetes on NVIDIA GPUs well before they get added to mainstream Kubernetes.
1 Device plugins interface with Kubernetes to advertise resources to the cluster. 2 CRI-O is a lightweight alternative to using Docker as the container runtime for Kubernetes and allows you to run any OCI-compliant container runtime.
Kubernetes on NVIDIA DGX Servers DU-09176-001| 3
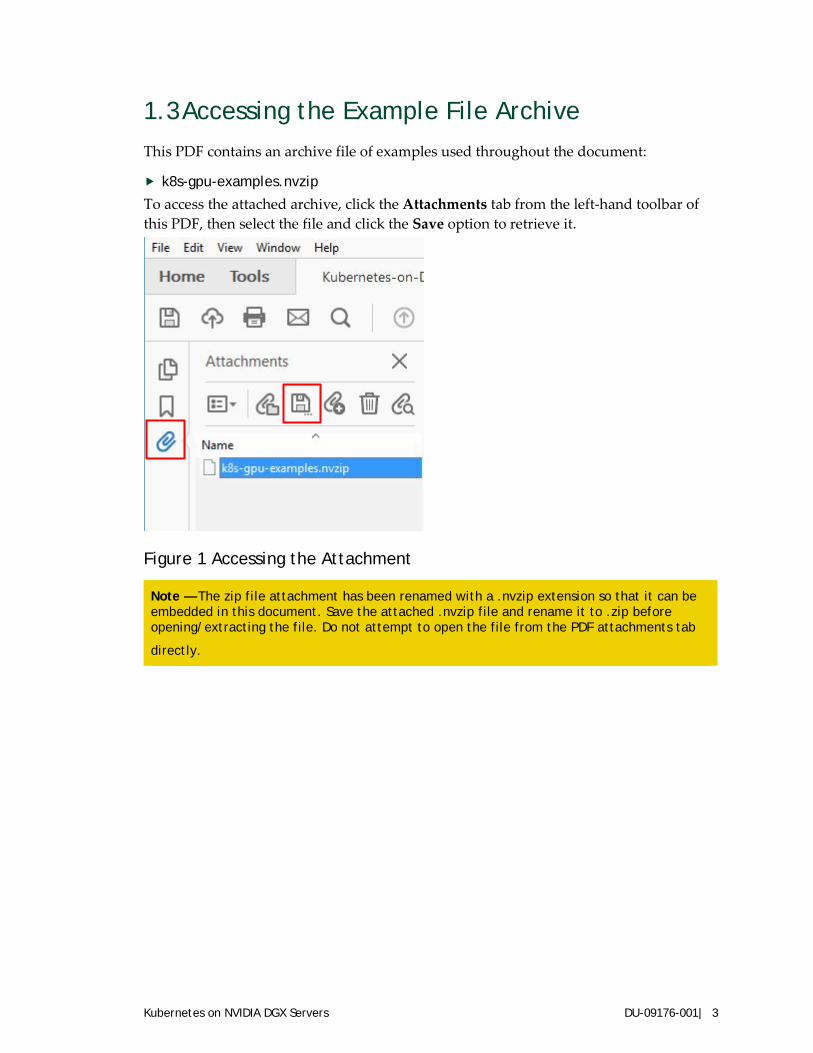
1.3 Accessing the Example File Archive This PDF contains an archive file of examples used throughout the document:
k8s-gpu-examples.nvzip To access the attached archive, click the Attachments tab from the left-hand toolbar of this PDF, then select the file and click the Save option to retrieve it.
Figure 1 Accessing the Attachment
Note — The zip file attachment has been renamed with a .nvzip extension so that it can be embedded in this document. Save the attached .nvzip file and rename it to .zip before opening/extracting the file. Do not attempt to open the file from the PDF attachments tab
directly.

Kubernetes on NVIDIA DGX Servers DU-09176-001| 4
Chapter 2. Kubernetes Basics
2.1 Getting Started This section provides a quick introduction to getting started with Kubernetes – and may be skipped if the user is familiar with Kubernetes. For a more rigorous introduction to Kubernetes, refer to the Kubernetes Tutorials and the overall Kubernetes Documentation.
2.2 Terminology The following table has terms that are commonly used when working with Kubernetes, which the rest of this document consistently refers to. It is helpful to be familiar with these terms and concepts.
Additional terms can be found in the Kubernetes glossary.
Term Definition
cluster Master and node(s)
deployment An API object which allows an application to be deployed on a cluster. This will typically include a pod definition and the number of replicas.
job A finite or batch task that runs to completion. Use this for scheduling DL training
kubectl The CLI for communication with a Kubernetes cluster and deploying manifests
kubelet The agent which runs on each node in the cluster and is responsible for making sure that containers are running in a pod.
manifest Kubernetes is configured by editing manifest files full of metadata which define a Kubernetes object. Usually, these files are written in YAML, but they may also be written in JSON
master Central interface for management, deployments, control, and access
namespace Identifiers used to create virtual clusters in the same physical cluster

Kubernetes on NVIDIA DGX Servers DU-09176-001| 5
node A worker machine/server in a Kubernetes cluster.
pod Not to be confused with the hardware notion. A Kubernetes pod is the smallest atomic Kubernetes object and represents a set of running containers on a cluster. For example, a pod can include a docker container which runs an inferencing service. This pod can be deployed on a node in the cluster.
replicas An API object which allows you to deploy an application on a cluster. This will typically include a pod definition and the number of replicas.
secret A secret that you wish to use in pods, jobs, or deployments. For example, an API key could be saved as a secret and be leveraged when accessing a container registry.
service An API object which describes how to access applications, such as a pod. This can be used to expose a port on a running pod and define a load-balancer.
Table 1 Commonly used Kubernetes terms
2.3 Kubernetes Manifest Configuration in Kubernetes involves creating/editing a manifest defining a Kubernetes object and submitting them to the Kubernetes API using kubectl. An example manifest called pod.yml follows.
apiVersion: v1 kind: Pod metadata: name: static-web labels: role: myrole spec: containers: - name: web image: nginx ports: - name: web containerPort: 80 protocol: TCP
The first line defines which version of the Kubernetes API to use when creating the object. This is typically just v1 but can also be further specified into batch/v1 or apps/v1 depending on the use-case. Alpha and beta versions may also be specified. See here for more information.
Next, the kind of object is specified. In this case, a Pod is being defined. Other objects could be Job, Deployment, or Service.
In the metadata field, this object is given a name as well as any labels that should be associate with it. This is helpful for finding/filtering objects in the future.

Kubernetes on NVIDIA DGX Servers DU-09176-001| 6
The spec section then actually defines the object. Since in this case a Pod is being defined, the associated container(s) that should be created within it must also be defined. For this example, a nginx image is pulled and port 80 is opened within the Pod. Note that this does not make port 80 accessible for this Pod in the cluster. To do that, configure a Service object.
To deploy this pod, the kubectl create command would be used.
$ kubectl create -f pod.yml

Kubernetes on NVIDIA DGX Servers DU-09176-001| 7
Chapter 3. Installation
3.1 Choosing Between Basic and DeepOps Installs There are two recommended methods of installation on DGX systems:
For a basic installation, recommended for single machines (for example, an NVIDIA DGX Station™ workstation ), such as a simple on-premises cluster setup or where the system administrator wishes to start from scratch and learn about each component they are implementing, install Kubernetes on NVIDIA GPUs directly per the instructions below.
For a more advanced installation, recommended for larger clusters or more advanced usage that employ best practices, refer to the DeepOps project.
3.1.1 Basic Install Follow the official Kubernetes on NVIDIA GPUs Installation Guide for the latest installation instructions. If Kubernetes is being installed on a single node, follow the optional instructions to untaint3 the master node so jobs can be run on it. If installing Kubernetes on a cluster, follow the setup steps for the master first, then set up each node thereafter.
Note — The installation requires access to the NGC registry (nvcr.io) and thus will not work if the network is behind a firewall or has limitations on external connections to the internet.
3 Taints and tolerations involve tagging nodes in your Kubernetes cluster with special flags so that future work might be scheduled (or avoided) on them.
Kubernetes on NVIDIA DGX Servers DU-09176-001| 8
If any problems are encountered with installation or setup, file an issue on the NVIDIA Kubernetes github.
3.1.2 DeepOps Install The DeepOps project facilitates deployment of multi-node GPU clusters for DL and HPC environments. It is strongly recommended that system administrators use DeepOps to bring up their DGX clusters since it employs best practices when it comes to setting up things such as storage and configuring authentication and user access.
To install, follow the instructions in the DeepOps README.
Kubernetes on NVIDIA DGX Servers DU-09176-001| 9
Chapter 4. Use Cases
4.1 Introduction Most of the following use cases can be configured and executed through the Kubernetes Web UI (Dashboard). For a basic run-through on how to leverage the Kubernetes Web UI, reference the Kubernetes Web UI documentation. The following examples use the terminal on the master instead.
4.2 Using NGC Containers with Kubernetes and Launching Jobs
NVIDIA GPU Cloud (NGC) manages a catalog of fully integrated and optimized DL framework containers that take full advantage of NVIDIA GPUs in both single and multi-GPU configurations. They include NVIDIA CUDA® Toolkit, DIGITS workflow, and the following DL frameworks: NVCaffe, Caffe2, Microsoft Cognitive Toolkit (CNTK), MXNet, PyTorch, TensorFlow, Theano, and Torch. These framework containers are delivered ready-to-run, including all necessary dependencies such as the CUDA runtime and NVIDIA libraries.
To access the NGC container registry via Kubernetes, add a secret which will be employed when Kubernetes asks NGC to pull container images from it.
1. Generate an NGC API Key, which will be used for the Kubernetes secret. a) Login to the NGC Registry at https://ngc.nvidia.com/ b) Go to https://ngc.nvidia.com/configuration/api-key c) Click on GENERATE API KEY
Kubernetes on NVIDIA DGX Servers DU-09176-001| 10
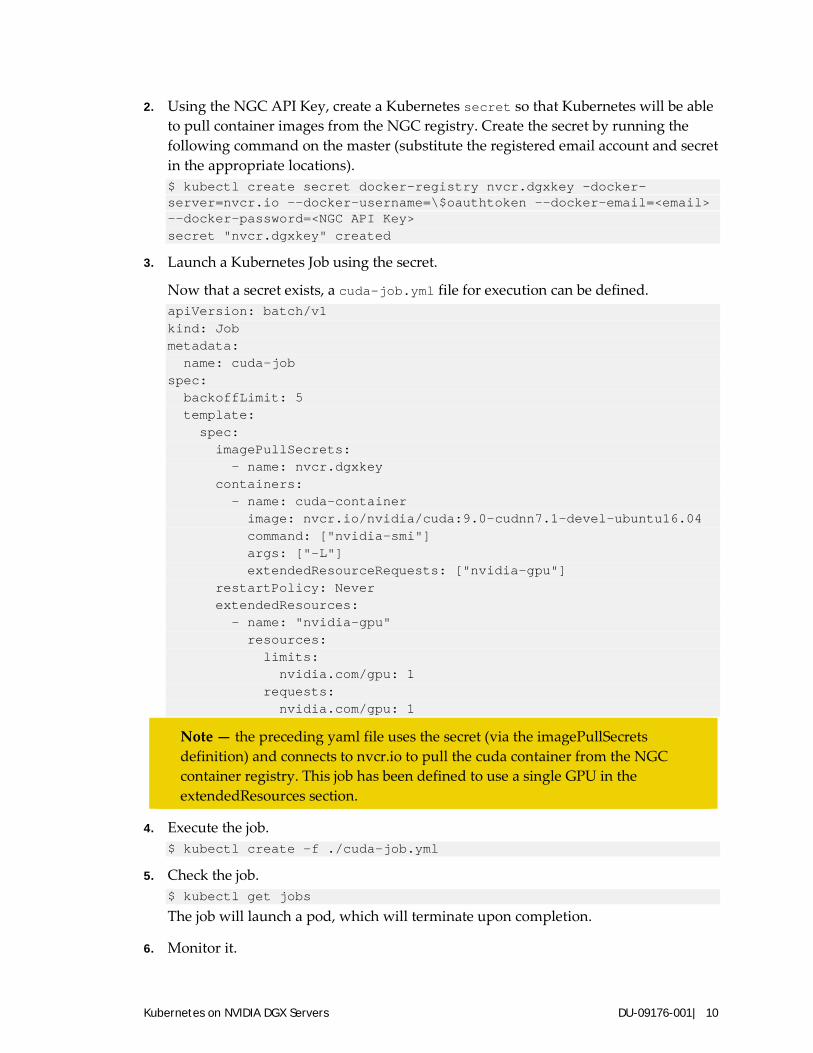
2. Using the NGC API Key, create a Kubernetes secret so that Kubernetes will be able to pull container images from the NGC registry. Create the secret by running the following command on the master (substitute the registered email account and secret in the appropriate locations). $ kubectl create secret docker-registry nvcr.dgxkey –docker-server=nvcr.io --docker-username=\$oauthtoken --docker-email=<email> --docker-password=<NGC API Key> secret "nvcr.dgxkey" created
3. Launch a Kubernetes Job using the secret.
Now that a secret exists, a cuda-job.yml file for execution can be defined. apiVersion: batch/v1 kind: Job metadata: name: cuda-job spec: backoffLimit: 5 template: spec: imagePullSecrets: - name: nvcr.dgxkey containers: - name: cuda-container image: nvcr.io/nvidia/cuda:9.0-cudnn7.1-devel-ubuntu16.04 command: ["nvidia-smi"] args: ["-L"] extendedResourceRequests: ["nvidia-gpu"] restartPolicy: Never extendedResources: - name: "nvidia-gpu" resources: limits: nvidia.com/gpu: 1 requests: nvidia.com/gpu: 1
Note — the preceding yaml file uses the secret (via the imagePullSecrets definition) and connects to nvcr.io to pull the cuda container from the NGC container registry. This job has been defined to use a single GPU in the extendedResources section.
4. Execute the job. $ kubectl create -f ./cuda-job.yml
5. Check the job. $ kubectl get jobs
The job will launch a pod, which will terminate upon completion.
6. Monitor it.

Kubernetes on NVIDIA DGX Servers DU-09176-001| 11
$ kubectl get pods --show-all
7. Follow the logs to see output (note that the pod name will differ from the job name and will have some random characters at the end of it). $ kubectl logs -f <cuda-pod-name>
There will eventually see a single line listing the GPU allocated to this pod
8. To delete the job (this will also remove the pod). $ kubectl delete job cuda-job
For more background on Kubernetes jobs, including how they are executed and available parameters, refer to the official documentation on the topic.
4.3 Running a PyTorch Training Job Running a DL training job follows the same convention.
1. Ensure that a Kubernetes secret is set up for access to the NGC Registry.
2. Define pytorch-job.yml. apiVersion: batch/v1 kind: Job metadata: name: pytorch-example spec: backoffLimit: 5 template: spec: imagePullSecrets: - name: nvcr.dgxkey containers: - name: pytorch-container image: nvcr.io/nvidia/pytorch:18.08-py3 command: ["/bin/sh"] args: ["-c", "python /workspace/examples/upstream/mnist/main.py"] extendedResourceRequests: ["nvidia-gpu"] restartPolicy: Never extendedResources: - name: "nvidia-gpu" resources: limits: nvidia.com/gpu: 4 requests: nvidia.com/gpu: 4
3. Execute the job. $ kubectl create -f ./pytorch-job.yml
Kubernetes on NVIDIA DGX Servers DU-09176-001| 12
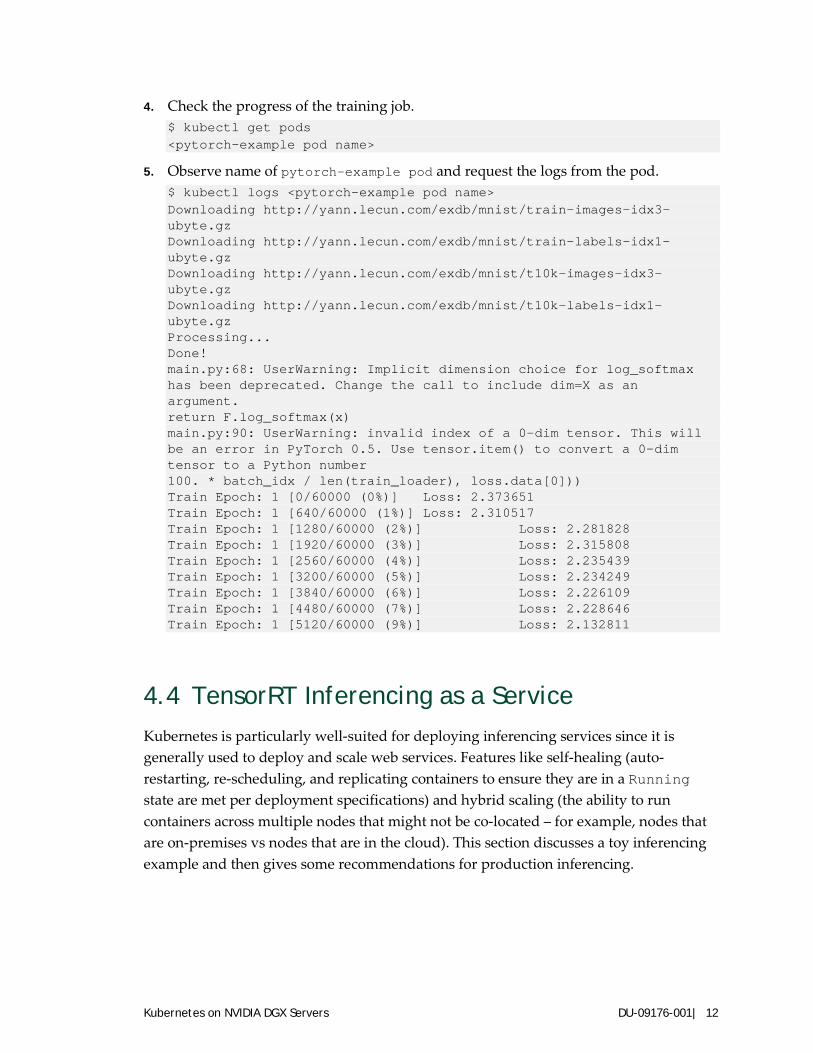
4. Check the progress of the training job. $ kubectl get pods <pytorch-example pod name>
5. Observe name of pytorch-example pod and request the logs from the pod. $ kubectl logs <pytorch-example pod name> Downloading http://yann.lecun.com/exdb/mnist/train-images-idx3-ubyte.gz Downloading http://yann.lecun.com/exdb/mnist/train-labels-idx1-ubyte.gz Downloading http://yann.lecun.com/exdb/mnist/t10k-images-idx3-ubyte.gz Downloading http://yann.lecun.com/exdb/mnist/t10k-labels-idx1-ubyte.gz Processing... Done! main.py:68: UserWarning: Implicit dimension choice for log_softmax has been deprecated. Change the call to include dim=X as an argument. return F.log_softmax(x) main.py:90: UserWarning: invalid index of a 0-dim tensor. This will be an error in PyTorch 0.5. Use tensor.item() to convert a 0-dim tensor to a Python number 100. * batch_idx / len(train_loader), loss.data[0])) Train Epoch: 1 [0/60000 (0%)] Loss: 2.373651 Train Epoch: 1 [640/60000 (1%)] Loss: 2.310517 Train Epoch: 1 [1280/60000 (2%)] Loss: 2.281828 Train Epoch: 1 [1920/60000 (3%)] Loss: 2.315808 Train Epoch: 1 [2560/60000 (4%)] Loss: 2.235439 Train Epoch: 1 [3200/60000 (5%)] Loss: 2.234249 Train Epoch: 1 [3840/60000 (6%)] Loss: 2.226109 Train Epoch: 1 [4480/60000 (7%)] Loss: 2.228646 Train Epoch: 1 [5120/60000 (9%)] Loss: 2.132811
4.4 TensorRT Inferencing as a Service Kubernetes is particularly well-suited for deploying inferencing services since it is generally used to deploy and scale web services. Features like self-healing (auto-restarting, re-scheduling, and replicating containers to ensure they are in a Running state are met per deployment specifications) and hybrid scaling (the ability to run containers across multiple nodes that might not be co-located – for example, nodes that are on-premises vs nodes that are in the cloud). This section discusses a toy inferencing example and then gives some recommendations for production inferencing.

Kubernetes on NVIDIA DGX Servers DU-09176-001| 13
4.4.1 Inferencing Toy Example Inferencing in a production environment has many considerations, but for a toy example, we’ll keep things simple by running a single Kubernetes pod and expose it with a service. Since we want a long-standing service, we will not be using a job and instead launch our pod and corresponding service as a Kubernetes deployment. Note that this example uses an older version of TensorRT, which includes an inferencing server.
In the following tensorrt-service-deployment.yml file, a Kubernetes deployment which launches a TensorRT pod is defined.
apiVersion: apps/v1 kind: Deployment metadata: name: tensorrt-deployment labels: app: tensorrt spec: replicas: 1 selector: matchLabels: app: tensorrt template: metadata: labels: app: tensorrt spec: imagePullSecrets: - name: nvcr.dgxkey containers: - name: tensorrt-container image: nvcr.io/nvidia/tensorrt:17.12 command: ["/bin/sh"] args: ["-c", "tensorrt_server/onnx_inception_v1"] ports: - containerPort: 8000 extendedResourceRequests: ["nvidia-gpu"] extendedResources: - name: "nvidia-gpu" resources: limits: nvidia.com/gpu: 4 requests: nvidia.com/gpu: 4 --- apiVersion: v1 kind: Service metadata: labels:

Kubernetes on NVIDIA DGX Servers DU-09176-001| 14
run: tensorrt-service name: tensorrt-service spec: ports: - port: 8000 targetPort: 8000 selector: app: tensorrt-server type: NodePort
Scale in this deployment can be increased by incrementing the replicas count. Port 8000 is also exposed, which is leveraged by the service definition at the end of the file. For more on services, the various service types, and how to expose specific ports, refer to the official Kubernetes documentation.
1. To run this deployment, execute the following on the master. $ kubectl create -f ./tensorrt-deployment.yml deployment "tensorrt-deployment" created service "tensorrt-service" created
2. Ensure the pod is running. $ kubectl get pods NAME READY STATUS RESTARTS AGE tensorrt-deployment 1/1 Running 0 47m
3. Make a request to the exposed service endpoint to run inferencing on the data. $ curl --data-binary @rex.jpg \ http://127.0.0.1:8000/api/classify { "confidence" : 0.5003, "label" : "DINGO" }, { "confidence" : 0.4035, "label" : "KELPIE" }, { "confidence" : 0.0692, "label" : "BASENJI" } ]
4.4.2 Deploying Inferencing in a Production Environment
4.4.2.1 Using the NGC Inference Server Container For running inferencing in production, use the latest version of the Inference Server container provided on NGC. Consult the Inference Server User Guide for more information on leveraging this container.
4.4.2.2 Deploying a Load Balancer or Ingress Service The deployment in the toy example above only uses one replica and is exposed through a service using the NodePort type. Scaling the deployment can be done by increasing the number of replicas. Production deployments should consider leveraging a LoadBalancer service type or committing to using an Ingress resource.

Kubernetes on NVIDIA DGX Servers DU-09176-001| 15
4.5 Leveraging Kubeflow Across the Cluster Kubeflow runs on Kubernetes, creating an easy-to-use, scalable way of building ML models in TensorFlow and PyTorch, as well as leveraging those models in production. Additionally, a multi-tenant Jupyter notebook frontend can be enabled, allowing users on the cluster to request GPU resources and write their code without needing to know anything about Kubernetes or containers. Users simply point their browser to the Kubeflow service, request resources, and start coding in python.
See this video for a demo of Kubeflow in action.
4.5.1 Installation For comprehensive installation instructions, follow the Kubeflow User Guide. Below are abbreviated instructions on how to get set up quickly.
1. Download ksonnet4.
Download the latest ksonnet Linux amd64 release to the master.
$ wget https://github.com/ksonnet/ksonnet/releases/download/v0.12.0/ks_0.12.0_linux_amd64.tar.gz
2. Unpack the release. $ tar -xzf ks_0.12.0_linux_amd64.tar.gz
3. Move the ks binary to /usr/local/bin/. $ sudo cp ks_0.12.0_linux_amd64/ks /usr/local/bin/
4. Install Kubeflow. $ export KUBEFLOW_VERSION=0.2.5
Kubeflow 0.2.5 is recommended by this guide as it was tested to work with Kubernetes on NVIDIA GPUs v1.9.7. Installing a more recent release may be attempted. For kubeflow releases see: https://github.com/kubeflow/kubeflow/releases
5. Run the deployment script for a quick and easy setup. $ mkdir kubeflow && cd kubeflow $ curl https://raw.githubusercontent.com/kubeflow/kubeflow/v${KUBEFLOW_VERSION}/scripts/deploy.sh | bash
4 Ksonnet is a tool which allows you to write, package, and deploy apps on Kubernetes. It leverages reusable json snippets to define the app.

Kubernetes on NVIDIA DGX Servers DU-09176-001| 16
4.5.2 Ensure That Storage Is Connected (Or Disable It) Kubeflow (specifically Jupyter) expects persistent volumes to be attached. Before launching a Jupyter Notebook server, ensure that storage is connected. For NFS, refer to the section in this document on how to define a PersistentVolume for NFS.
Alternatively, the requirement for storage may be disabled by running the following commands. Be aware that any code created in a Jupyter Notebook won’t persist, should the cluster be taken down.
(cd to the kubeflow_ks_app directory…)
$ ks param set kubeflow-core jupyterNotebookPVCMount "null" $ ks apply default
4.5.3 Turn Usage Reporting Off (Optional) Note that usage reporting is turned on by default. To disable it, run the following commands…
(cd to the kubeflow_ks_app directory…)
$ ks param set kubeflow-core reportUsage false $ ks apply default $ kubectl delete deploy spartakus-volunteer
4.5.4 Bringing Up a Jupyter Notebook 1. Connect to the Jupyter Notebook on the master.
$ PODNAME=`kubectl get pods --namespace=${NAMESPACE} --selector="app=tf-hub" --output=template --template="{{with index .items 0}}{{.metadata.name}}{{end}}"` $ kubectl port-forward --namespace=${NAMESPACE} $PODNAME 8000:8000
2. Open a browser and go to http://localhost:8000
3. To expose Kubeflow externally so it can be accessed anywhere on the same network, change the service type and expose it. $ ks param set kubeflow-core jupyterHubServiceType NodePort $ ks apply default $ kubectl get services
4. Look for the NodePort tf-hub service and associated port. $ kubectl get services | grep tf-hub tf-hub-0 ClusterIP None <none> 8000/TCP 2m tf-hub-lb NodePort 10.97.38.143 <none> 80:30303/TCP 2m
The tf-hub-port in this case is 30303.
Go to http://<master>:<tf-hub-port>

Kubernetes on NVIDIA DGX Servers DU-09176-001| 17
5. At the sign-in prompt, sign-in using any username/password. Sign in using any username/password
6. Select a CPU or GPU image from the Image dropdown menu depending on what
type of training is being done. CPU and GPU images for each TensorFlow minor version(e.g.: 1.4.1,1.5.1,1.6.0) are available. Another option is to enter the name of any TF image to be run.
7. Allocate memory, CPU, GPU, or other resources as needed.
Request GPU resources by specifying the following json in Extra Resource Limits section: {"nvidia.com/gpu": 1}
8. Click Spawn (note that the images are tens of GBs in size and can take a long time to download depending on the network connection). The Jupyter Notebook interface should launch.
9. Test that the instance has access to GPUs via in a new Jupyter Notebook: !!nvidia-smi
The resulting output should show a line for each GPU that was requested for the instance.
10. Run a script leveraging TensorFlow with MNIST data. from tensorflow.examples.tutorials.mnist import input_data
mnist = input_data.read_data_sets("MNIST_data/", one_hot=True) import tensorflow as tf x = tf.placeholder(tf.float32, [None, 784]) W = tf.Variable(tf.zeros([784, 10])) b = tf.Variable(tf.zeros([10])) y = tf.nn.softmax(tf.matmul(x, W) + b) y_ = tf.placeholder(tf.float32, [None, 10]) cross_entropy = tf.reduce_mean(-tf.reduce_sum(y_ * tf.log(y), reduction_indices=[1]))

Kubernetes on NVIDIA DGX Servers DU-09176-001| 18
train_step = tf.train.GradientDescentOptimizer(0.05).minimize(cross_entropy) sess = tf.InteractiveSession() tf.global_variables_initializer().run() for _ in range(1000): batch_xs, batch_ys = mnist.train.next_batch(100) sess.run(train_step, feed_dict={x: batch_xs, y_: batch_ys}) correct_prediction = tf.equal(tf.argmax(y,1), tf.argmax(y_,1)) accuracy = tf.reduce_mean(tf.cast(correct_prediction, tf.float32)) print(sess.run(accuracy, feed_dict={x: mnist.test.images, y_: mnist.test.labels}))
Kubernetes on NVIDIA DGX Servers DU-09176-001| 19
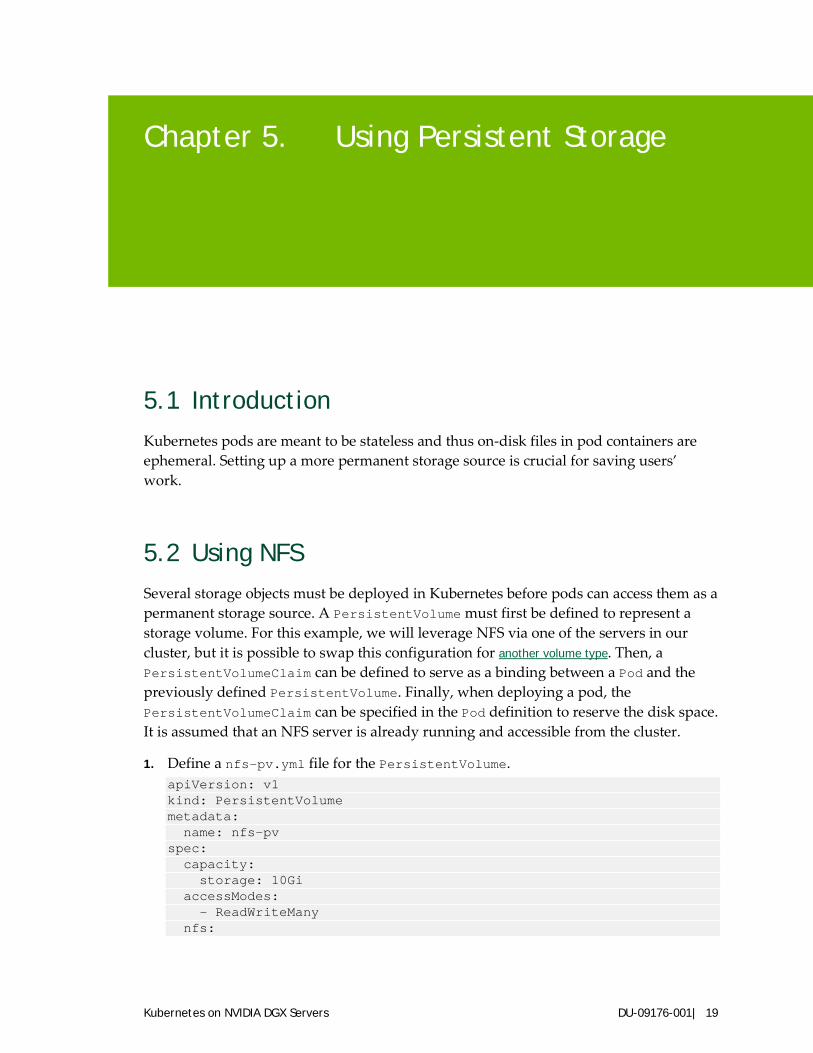
Chapter 5. Using Persistent Storage
5.1 Introduction Kubernetes pods are meant to be stateless and thus on-disk files in pod containers are ephemeral. Setting up a more permanent storage source is crucial for saving users’ work.
5.2 Using NFS Several storage objects must be deployed in Kubernetes before pods can access them as a permanent storage source. A PersistentVolume must first be defined to represent a storage volume. For this example, we will leverage NFS via one of the servers in our cluster, but it is possible to swap this configuration for another volume type. Then, a PersistentVolumeClaim can be defined to serve as a binding between a Pod and the previously defined PersistentVolume. Finally, when deploying a pod, the PersistentVolumeClaim can be specified in the Pod definition to reserve the disk space. It is assumed that an NFS server is already running and accessible from the cluster.
1. Define a nfs-pv.yml file for the PersistentVolume. apiVersion: v1 kind: PersistentVolume metadata: name: nfs-pv spec: capacity: storage: 10Gi accessModes: - ReadWriteMany nfs:
Kubernetes on NVIDIA DGX Servers DU-09176-001| 20
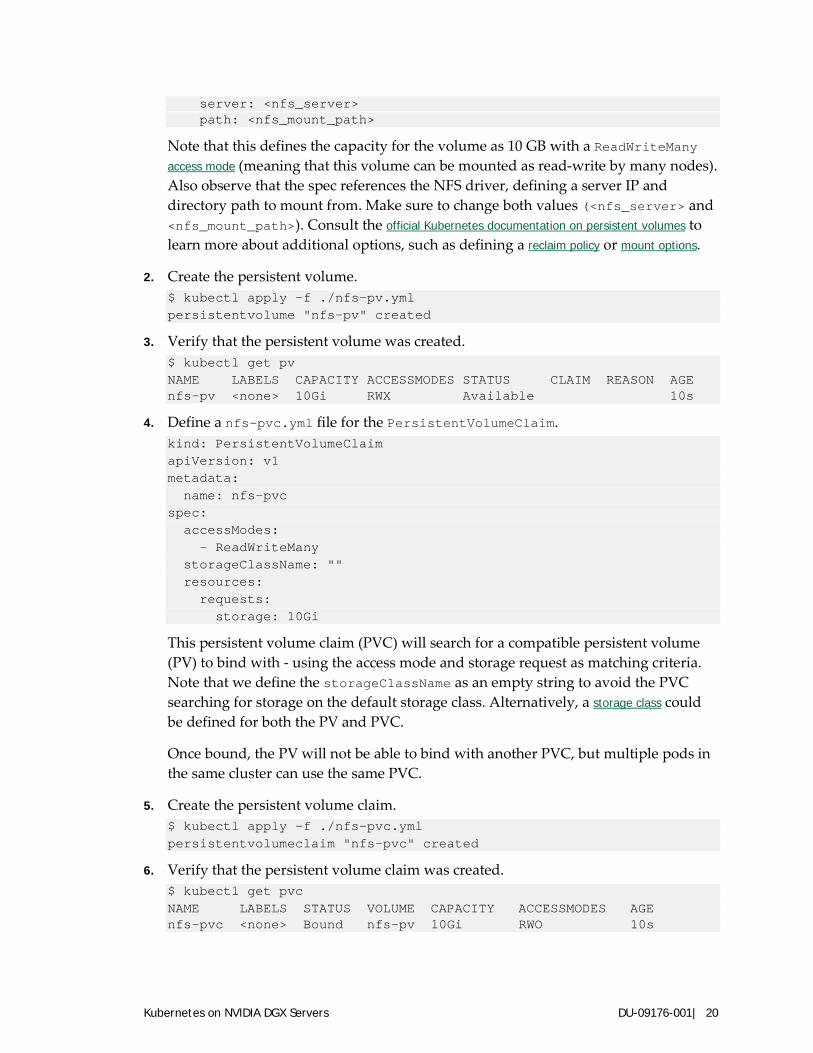
server: <nfs_server> path: <nfs_mount_path>
Note that this defines the capacity for the volume as 10 GB with a ReadWriteMany access mode (meaning that this volume can be mounted as read-write by many nodes). Also observe that the spec references the NFS driver, defining a server IP and directory path to mount from. Make sure to change both values (<nfs_server> and <nfs_mount_path>). Consult the official Kubernetes documentation on persistent volumes to learn more about additional options, such as defining a reclaim policy or mount options.
2. Create the persistent volume. $ kubectl apply -f ./nfs-pv.yml persistentvolume "nfs-pv" created
3. Verify that the persistent volume was created. $ kubectl get pv NAME LABELS CAPACITY ACCESSMODES STATUS CLAIM REASON AGE nfs-pv <none> 10Gi RWX Available 10s
4. Define a nfs-pvc.yml file for the PersistentVolumeClaim. kind: PersistentVolumeClaim apiVersion: v1 metadata: name: nfs-pvc spec: accessModes: - ReadWriteMany storageClassName: "" resources: requests: storage: 10Gi
This persistent volume claim (PVC) will search for a compatible persistent volume (PV) to bind with - using the access mode and storage request as matching criteria. Note that we define the storageClassName as an empty string to avoid the PVC searching for storage on the default storage class. Alternatively, a storage class could be defined for both the PV and PVC.
Once bound, the PV will not be able to bind with another PVC, but multiple pods in the same cluster can use the same PVC.
5. Create the persistent volume claim. $ kubectl apply -f ./nfs-pvc.yml persistentvolumeclaim "nfs-pvc" created
6. Verify that the persistent volume claim was created. $ kubectl get pvc NAME LABELS STATUS VOLUME CAPACITY ACCESSMODES AGE nfs-pvc <none> Bound nfs-pv 10Gi RWO 10s
Kubernetes on NVIDIA DGX Servers DU-09176-001| 21
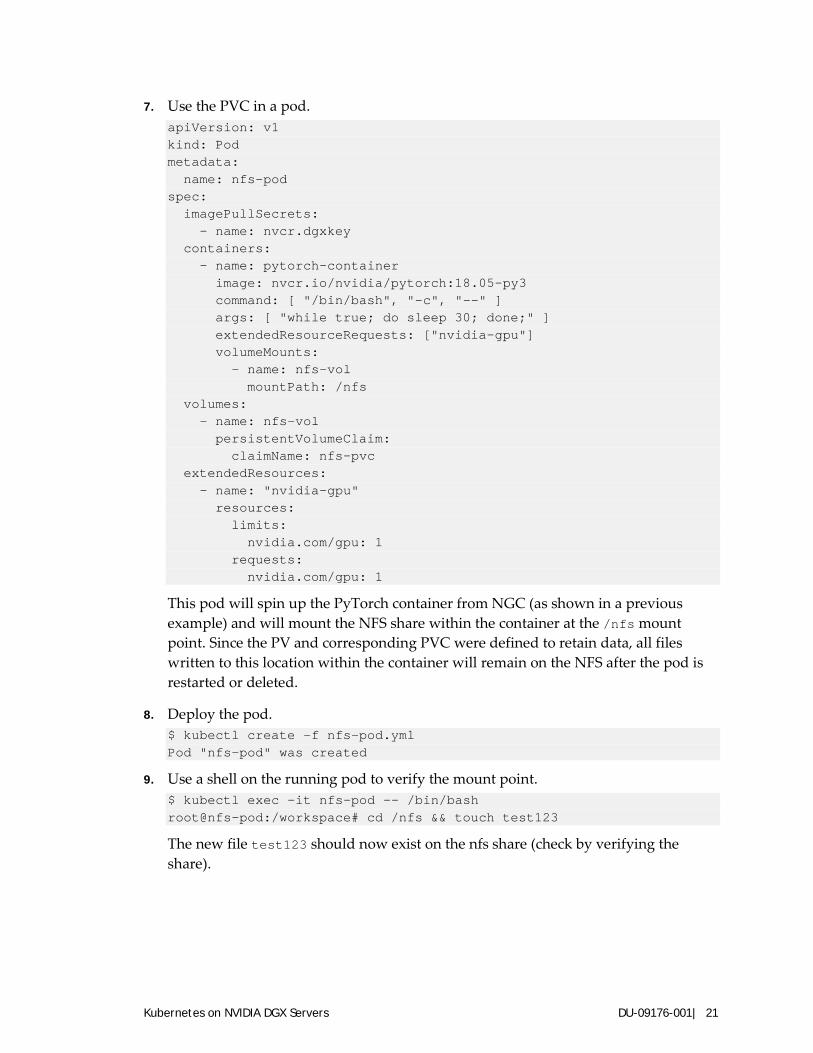
7. Use the PVC in a pod. apiVersion: v1 kind: Pod metadata: name: nfs-pod spec: imagePullSecrets: - name: nvcr.dgxkey containers: - name: pytorch-container image: nvcr.io/nvidia/pytorch:18.05-py3 command: [ "/bin/bash", "-c", "--" ] args: [ "while true; do sleep 30; done;" ] extendedResourceRequests: ["nvidia-gpu"] volumeMounts: - name: nfs-vol mountPath: /nfs volumes: - name: nfs-vol persistentVolumeClaim: claimName: nfs-pvc extendedResources: - name: "nvidia-gpu" resources: limits: nvidia.com/gpu: 1 requests: nvidia.com/gpu: 1
This pod will spin up the PyTorch container from NGC (as shown in a previous example) and will mount the NFS share within the container at the /nfs mount point. Since the PV and corresponding PVC were defined to retain data, all files written to this location within the container will remain on the NFS after the pod is restarted or deleted.
8. Deploy the pod. $ kubectl create -f nfs-pod.yml Pod "nfs-pod" was created
9. Use a shell on the running pod to verify the mount point. $ kubectl exec -it nfs-pod -- /bin/bash root@nfs-pod:/workspace# cd /nfs && touch test123
The new file test123 should now exist on the nfs share (check by verifying the share).

Kubernetes on NVIDIA DGX Servers DU-09176-001| 22
5.3 Using Rook with Ceph Rook provides an abstraction layer for orchestrating, managing, and scaling, cluster storage. We recommend using Rook with Ceph as a means for providing persistent storage on Kubernetes clusters of DGX servers.
Ceph is advantageous because 1) it is capable of multiple storage types (block, object, and file storage), 2) it provides a means to scale-out storage on multiple nodes but present itself as a single system, and 3) it has many enterprise storage features including replication (or erasure encoding), snapshots, thin provisioning, tiering (ability to shift data between flash and hard drives), and self-healing capabilities.
5.3.1 Performing a DeepOps or Manual Installation DeepOps is the preferred method for installing Rook and Ceph. It automates the setup of Kubernetes clusters through Ansible scripts that systems administrators can pick and choose from or run entirely.
If DeepOps is not to be used, instructions for a manual installation of Rook and Ceph are also given.
5.3.1.1 DeepOps Installation DeepOps is the preferred method for installing Rook and Ceph. It automates the setup of Kubernetes clusters through Ansible scripts that systems administrators can pick and choose from or run entirely. Directions on using it are available via the Management Server Setup instructions.
5.3.1.2 Manual Installation If DeepOps is not leveraged, the Rook GitHub repository can be used instead. Setup is facilitated by using the examples directory contained within it.
1. Clone the repository.
This step requires git. $ git clone https://github.com/rook/rook.git
2. cd to examples in the cluster/examples/kubernetes directory. $ cd cluster/examples/kubernetes/ceph
3. Use the operator and cluster manifests to start rook and ceph. $ kubectl create -f operator.yaml $kubectl create -f cluster.yaml
4. Verify that rook-ceph-operator, rook-ceph-agent, and rook-discover pods are in the Running state before proceeding. $ kubectl -n rook-ceph-system get pods

Kubernetes on NVIDIA DGX Servers DU-09176-001| 23
NAME READY STATUS RESTARTS AGE rook-ceph-operator-6f5cf4cc77-mj92t 1/1 Running 0 1m rook-ceph-agent-flw5v 1/1 Running 0 1m rook-discover-l6q8r 1/1 Running 0 1m
5.3.2 Using Rook Storage Rook storage can be leveraged as a block, object, or shared file system.
Follow these links for examples of how to use Rook and Ceph with pods:
Block: Create block storage to be consumed by a pod Object: Create an object store that is accessible inside or outside the Kubernetes
cluster Shared File System: Create a file system to be shared across multiple pods
5.3.3 Teardown To remove the Rook setup, follow the teardown directions.

Kubernetes on NVIDIA DGX Servers DU-09176-001| 24
Chapter 6. Monitoring the Cluster
6.1 Leveraging DCGM, Prometheus, and Grafana for Monitoring
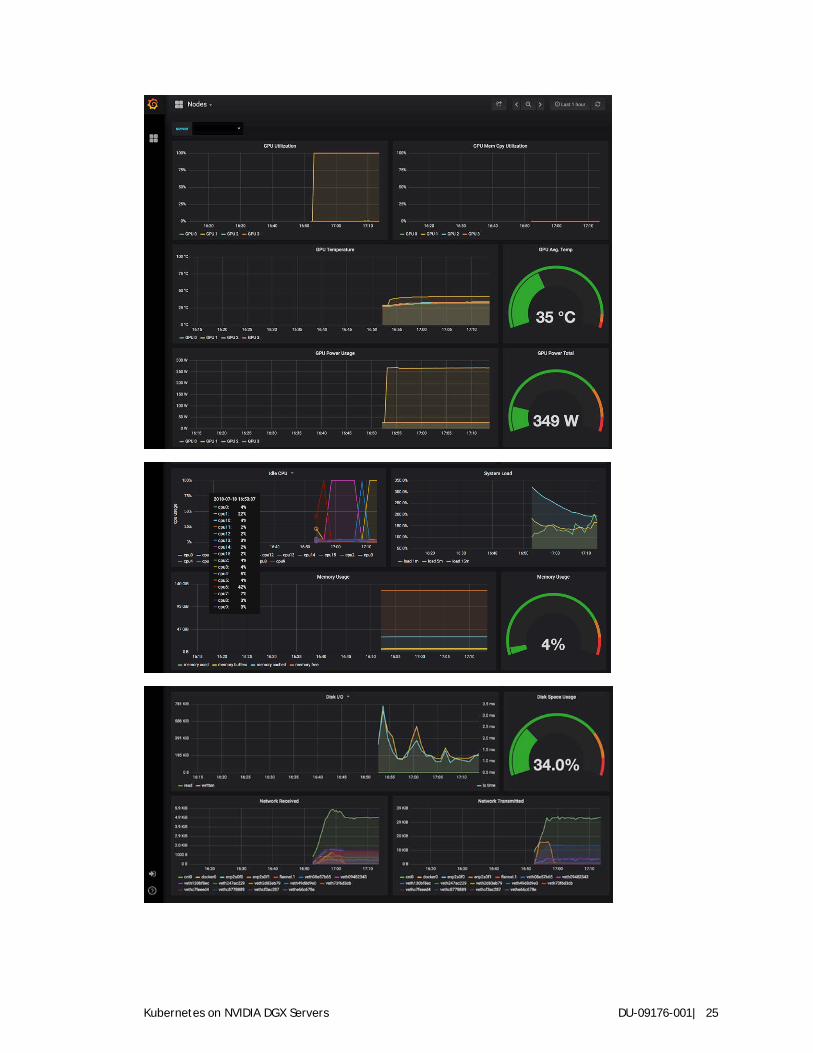
An integrated monitoring stack is provided with NVIDIA Kubernetes deployments. It can be initialized by following the directions in the installation guide. Once set up, access must be done either through a browser on the master (go to http://localhost:3000) or by looking for the Grafana service port.
$ kubectl get services --all-namespaces |grep grafana monitoring grafana NodePort 10.x.x.x <none> 3000:30902/TCP 14m
In this example, navigating to http://<machine_ip>:30902 shows the grafana home page.
Click on Home → Nodes to view GPU stats for the nodes.
Kubernetes on NVIDIA DGX Servers DU-09176-001| 25
Kubernetes on NVIDIA DGX Servers DU-09176-001| 26
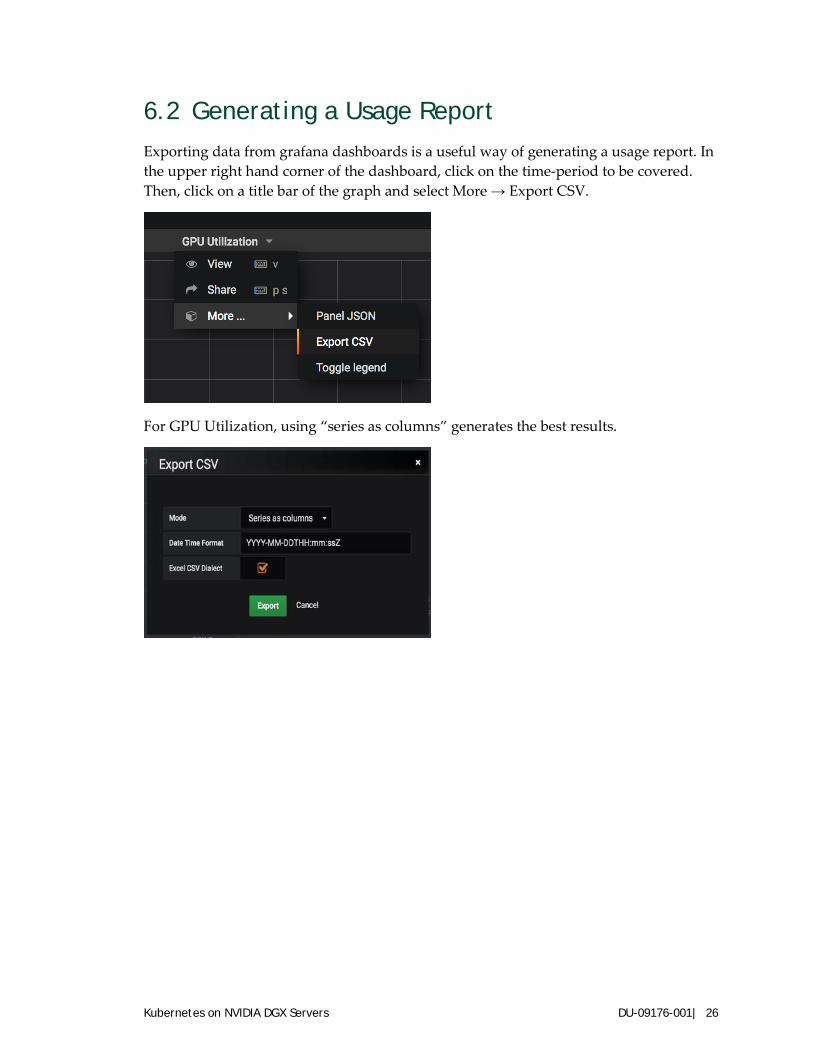
6.2 Generating a Usage Report Exporting data from grafana dashboards is a useful way of generating a usage report. In the upper right hand corner of the dashboard, click on the time-period to be covered. Then, click on a title bar of the graph and select More → Export CSV.
For GPU Utilization, using “series as columns” generates the best results.

Kubernetes on NVIDIA DGX Servers DU-09176-001| 27
Chapter 7. Additional Setup
The setup documented in this section is not required but is useful to refer to as necessary.
7.1 Adding a Node to the Cluster Whether adding a new node on-premises or in the cloud, all that is required is
1. Install and run Kubernetes on the node to be added.
Follow the instructions in the installation guide.
2. Instruct the node to join the cluster. $ sudo kubeadm join --token <token> <master-ip>:<master-port> --discovery-token-ca-cert-hash sha256::<hash> --ignore-preflight-errors=all
3. Retrieve the token on the master by running the following command. $ sudo kubeadm token create --print-join-command
7.2 Using Helm to Manage Kubernetes Software Helm is a tool that streamlines installation and management of Kubernetes applications. Think of it like apt/yum/homebrew for Kubernetes. Helm charts are the equivalents of packages on Kubernetes - complete with package release versions and the ability to roll back from new installations. For more on Helm, how to make Helm charts, and other information on Helm, refer to the official docs.
Kubernetes on NVIDIA DGX Servers DU-09176-001| 28
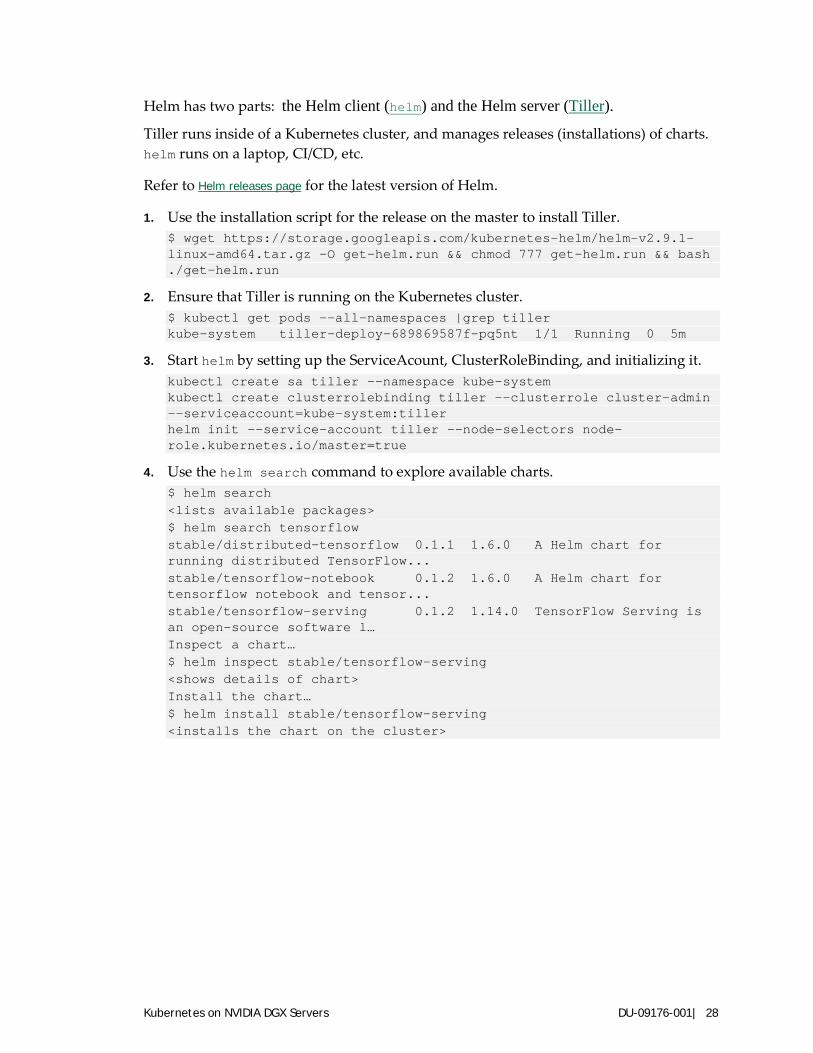
Helm has two parts: the Helm client (helm) and the Helm server (Tiller).
Tiller runs inside of a Kubernetes cluster, and manages releases (installations) of charts. helm runs on a laptop, CI/CD, etc.
Refer to Helm releases page for the latest version of Helm.
1. Use the installation script for the release on the master to install Tiller. $ wget https://storage.googleapis.com/kubernetes-helm/helm-v2.9.1-linux-amd64.tar.gz -O get-helm.run && chmod 777 get-helm.run && bash ./get-helm.run
2. Ensure that Tiller is running on the Kubernetes cluster. $ kubectl get pods --all-namespaces |grep tiller kube-system tiller-deploy-689869587f-pq5nt 1/1 Running 0 5m
3. Start helm by setting up the ServiceAcount, ClusterRoleBinding, and initializing it. kubectl create sa tiller --namespace kube-system kubectl create clusterrolebinding tiller --clusterrole cluster-admin --serviceaccount=kube-system:tiller helm init --service-account tiller --node-selectors node-role.kubernetes.io/master=true
4. Use the helm search command to explore available charts. $ helm search <lists available packages> $ helm search tensorflow stable/distributed-tensorflow 0.1.1 1.6.0 A Helm chart for running distributed TensorFlow... stable/tensorflow-notebook 0.1.2 1.6.0 A Helm chart for tensorflow notebook and tensor... stable/tensorflow-serving 0.1.2 1.14.0 TensorFlow Serving is an open-source software l… Inspect a chart… $ helm inspect stable/tensorflow-serving <shows details of chart> Install the chart… $ helm install stable/tensorflow-serving <installs the chart on the cluster>

Kubernetes on NVIDIA DGX Servers DU-09176-001| 29
7.3 Configuring User Access with RBAC Role-based access control (RBAC) provides a way to regulate access to the Kubernetes cluster based upon roles that can be defined by the cluster administrator. Additionally, authentication may be performed through an Identity Provider (IdP), such as Google or LDAP via OpenID token. This section covers a basic use case for leveraging RBAC and namespaces. Namespaces are virtual clusters backed by the same physical cluster which are a convenient way of segmenting deployments, especially for clusters that have many users and teams.
For more information on RBAC, refer to the Kubernetes guide on the topic. A more automated setup of users with admin privileges in the cluster can leverage the DeepOps scripts.
Note —RBAC should be enabled by default. If it is not, it might be necessary to start the apiserver with --authorization-mode=RBAC.
In this example, a user with limited namespace access will be created with the following account information:
Username: employee Group: nvidia
The necessary RBAC policies will be added so this user can fully manage deployments (i.e. use kubectl run command) only inside the office namespace. At the end, the policies will be tested to make sure they work as expected.
1. Create the nvidia-team Namespace.
Execute the kubectl create command to create the namespace (as the admin user):
$ kubectl create namespace nvidiateam
As previously mentioned, Kubernetes does not have API Objects for User Accounts. Of the available ways to manage authentication (see Kubernetes official documentation for a complete list), we will use OpenSSL certificates for their simplicity. The necessary steps are:
2. Create a private key for the user.
In this example, the file is named employee.key. $ openssl genrsa -out employee.key 2048
3. Create a certificate sign request employee.csr using the private key was just created.
Make sure to specify the username and group in the -subj section (CN is for the username and O for the group $ openssl req -new -key employee.key -out employee.csr -subj "/CN=employee/O=nvidia"

Kubernetes on NVIDIA DGX Servers DU-09176-001| 30
4. Locate the Kubernetes cluster certificate authority (CA).
This will be responsible for approving the request and generating the necessary certificate to access the cluster API. Its location is normally /etc/kubernetes/pki/. Check that the files ca.crt and ca.key exist in the location.
5. Generate the final certificate employee.crt by approving the certificate sign request, employee.csr, made earlier.
Substitute the CA_LOCATION placeholder with the location of the cluster CA. In this example, the certificate will be valid for 500 days. $ openssl x509 -req -in employee.csr -CA CA_LOCATION/ca.crt -CAkey CA_LOCATION/ca.key -CAcreateserial -out employee.crt -days 500
6. Save both employee.crt and employee.key in a safe location.
In this example, /home/employee/.certs/ will be used.
7. Add a new context with the new credentials for the Kubernetes cluster. $ kubectl config set-credentials employee --client-certificate=/home/employee/.certs/employee.crt --client-key=/home/employee/.certs/employee.key $ kubectl config set-context employee-context --namespace=nvidiateam --user=employee
8. An access denied error should be generated when using the kubectl CLI with this configuration file. This is expected as permitted operations have not yet been defined for this user. $ kubectl --context=employee-context get pods
9. Create the Role for Managing Deployments
Create a role-deployment-manager.yaml file with the content below. This yaml file creates a rule that allows a user to execute several operations on Deployments, Pods and ReplicaSets (necessary for creating a Deployment), which belong to the core (expressed by "" in the yaml file), apps, and extensions API Groups. kind: Role apiVersion: rbac.authorization.k8s.io/v1beta1 metadata: namespace: office name: deployment-manager rules: - apiGroups: ["", "extensions", "apps"] resources: ["deployments", "replicasets", "pods"] verbs: ["get", "list", "watch", "create", "update", "patch", "delete"] # You can also use ["*"]
10. Create the Role in the cluster. $ kubectl create -f role-deployment-manager.yaml
11. Bind the role to the Employee User.
Kubernetes on NVIDIA DGX Servers DU-09176-001| 31
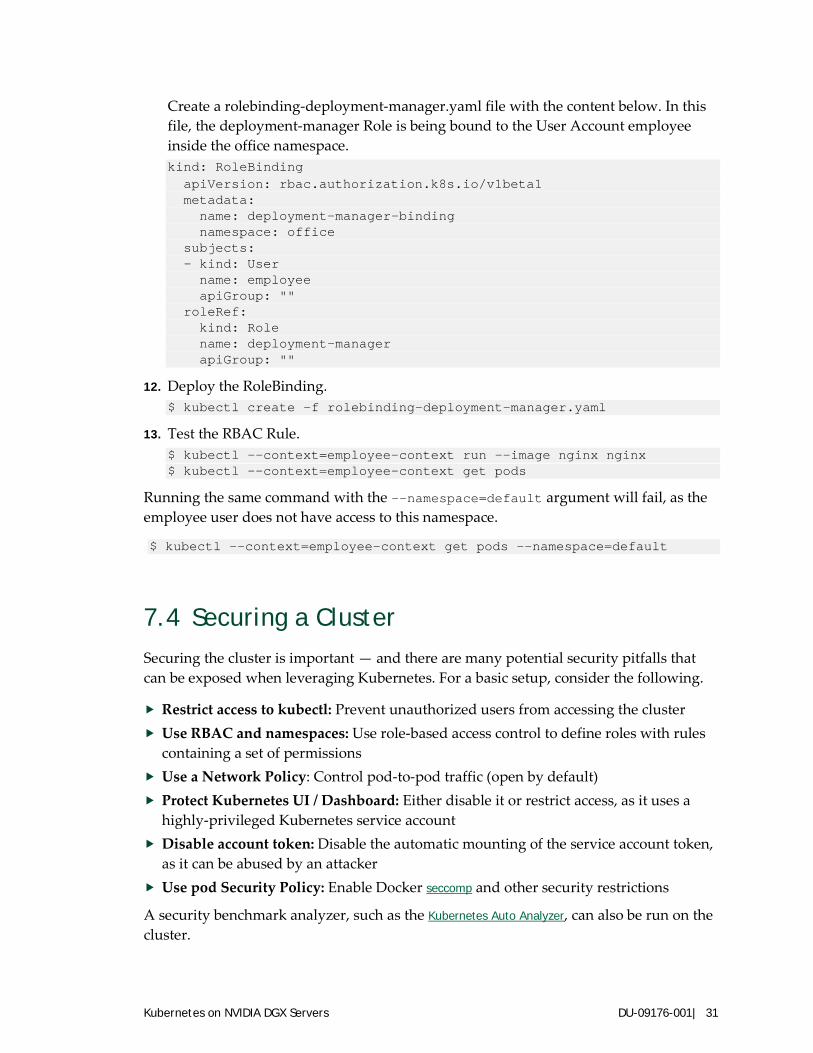
Create a rolebinding-deployment-manager.yaml file with the content below. In this file, the deployment-manager Role is being bound to the User Account employee inside the office namespace. kind: RoleBinding apiVersion: rbac.authorization.k8s.io/v1beta1 metadata: name: deployment-manager-binding namespace: office subjects: - kind: User name: employee apiGroup: "" roleRef: kind: Role name: deployment-manager apiGroup: ""
12. Deploy the RoleBinding. $ kubectl create -f rolebinding-deployment-manager.yaml
13. Test the RBAC Rule. $ kubectl --context=employee-context run --image nginx nginx $ kubectl --context=employee-context get pods
Running the same command with the --namespace=default argument will fail, as the employee user does not have access to this namespace.
$ kubectl --context=employee-context get pods --namespace=default
7.4 Securing a Cluster Securing the cluster is important — and there are many potential security pitfalls that can be exposed when leveraging Kubernetes. For a basic setup, consider the following.
Restrict access to kubectl: Prevent unauthorized users from accessing the cluster Use RBAC and namespaces: Use role-based access control to define roles with rules
containing a set of permissions Use a Network Policy: Control pod-to-pod traffic (open by default) Protect Kubernetes UI / Dashboard: Either disable it or restrict access, as it uses a
highly-privileged Kubernetes service account Disable account token: Disable the automatic mounting of the service account token,
as it can be abused by an attacker Use pod Security Policy: Enable Docker seccomp and other security restrictions
A security benchmark analyzer, such as the Kubernetes Auto Analyzer, can also be run on the cluster.
Kubernetes on NVIDIA DGX Servers DU-09176-001| iv
APPENDIX A. Kubernetes Web UI (Formerly Dashboard)
A.1. Running the Kubernetes Web UI The Kubernetes Web UI (formerly Dashboard) is a useful way of maintaining a Kubernetes cluster via a browser. It will perform most of the operations that would normally be done from the command line on the master (via kubectl). The Web UI also provides information on the state of Kubernetes resources in the cluster and any errors that maybe have occurred.
A.2. Installing the Kubernetes Web UI By default, the Kubernetes Web UI is not deployed. To do so, use the officially-recommended setup deployment yaml.
$ kubectl create -f https://raw.githubusercontent.com/kubernetes/dashboard/master/src/deploy/recommended/kubernetes-dashboard.yaml
A.3. Accessing the Kubernetes Web UI There are multiple ways to access the Web. Granting access to the Web UI publicly presents huge security risks and should be avoided unless the intent is to grant all users on-site access to the Kubernetes cluster.
The default method of accessing the Web UI is via the master.
Kubernetes on NVIDIA DGX Servers DU-09176-001| v
1. Open a proxy up to the Kubernetes Dashboard service. $ kubectl proxy
2. On the master, navigate the browser to the dashboard. http://localhost:8001/api/v1/namespaces/kube-system/services/https:kubernetes-dashboard:/proxy/
3. A login page is presented - to log in, it is necessary to create a service account and retrieve its associated token. $ kubectl create serviceaccount my-dashboard-sa serviceaccount "my-dashboard-sa" created
4. Give the service account cluster-admin permissions on the cluster.
Caution — Ensure this change conforms to company security policies..
$ kubectl create clusterrolebinding my-dashboard-sa \ --clusterrole=cluster-admin \ --serviceaccount=default:my-dashboard-sa clusterrolebinding "my-dashboard-sa" created
5. Get the name of the secret associated with the newly-created cluster role binding. $ kubectl get secrets | grep my-dashboard-sa my-dashboard-sa-token-wb7lf kubernetes.io/service-account-token 3 10s
6. Get the token from the secret description (substitute the name of the secret). $ kubectl describe secret my-dashboard-sa-token-wb7lf
The resulting token can be used to authenticate on the login screen.
A.4. Ideal Access for Kubernetes Web UI An ideal Kubernetes deployment for many users that need to access and control Kubernetes via the Web UI would involve implementing an SSO-like experience where each user has specific permissions to access the interface. This is outside of the scope of this document. For more information, consult the official Kubernetes authentication documentation.
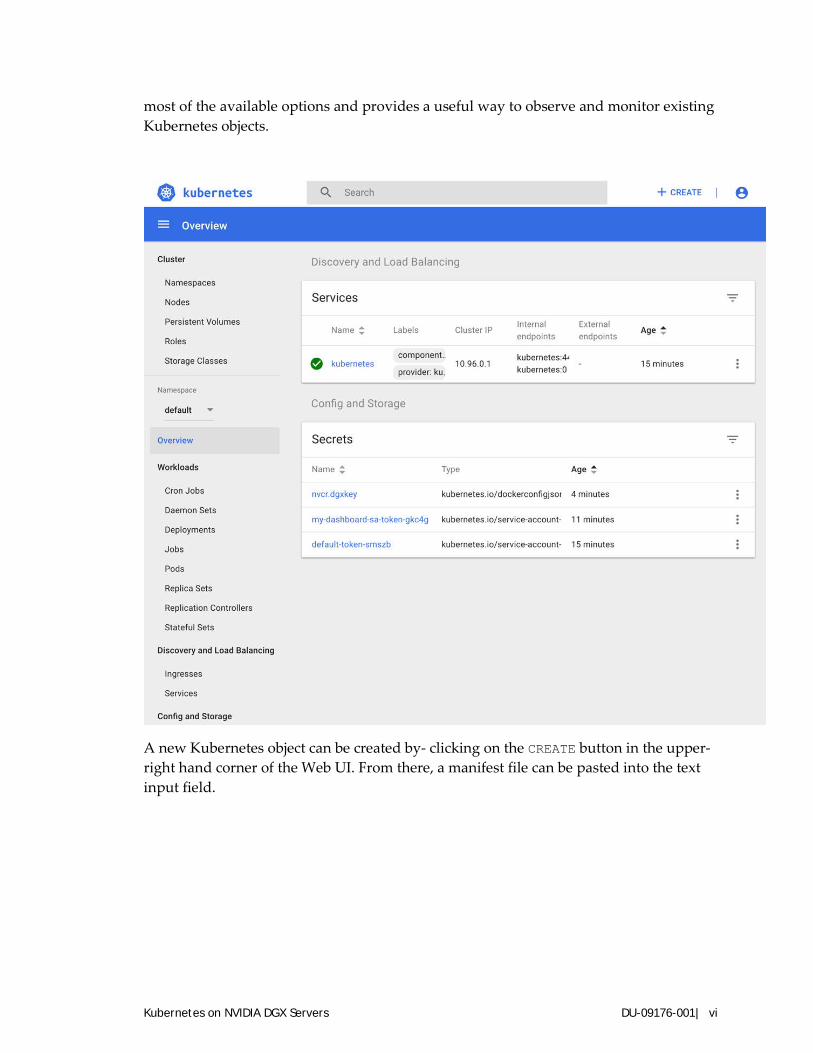
A.5. Using the Kubernetes Web UI Everything from managing roles to setting up namespaces and launching pods, jobs, and deployments can be done through the Web UI. For most users, leveraging the kubectl CLI will be more efficient, but the UI presents a good way for new users to see
Kubernetes on NVIDIA DGX Servers DU-09176-001| vi
most of the available options and provides a useful way to observe and monitor existing Kubernetes objects.
A new Kubernetes object can be created by- clicking on the CREATE button in the upper-right hand corner of the Web UI. From there, a manifest file can be pasted into the text input field.

Kubernetes on NVIDIA DGX Servers DU-09176-001| vii

www.nvidia.com
Notice The information provided in this specification is believed to be accurate and reliable as of the date provided. However, NVIDIA Corporation (“NVIDIA”) does not give any representations or warranties, expressed or implied, as to the accuracy or completeness of such information. NVIDIA shall have no liability for the consequences or use of such information or for any infringement of patents or other rights of third parties that may result from its use. This publication supersedes and replaces all other specifications for the product that may have been previously supplied. NVIDIA reserves the right to make corrections, modifications, enhancements, improvements, and other changes to this specification, at any time and/or to discontinue any product or service without notice. Customer should obtain the latest relevant specification before placing orders and should verify that such information is current and complete. NVIDIA products are sold subject to the NVIDIA standard terms and conditions of sale supplied at the time of order acknowledgement, unless otherwise agreed in an individual sales agreement signed by authorized representatives of NVIDIA and customer. NVIDIA hereby expressly objects to applying any customer general terms and conditions regarding the purchase of the NVIDIA product referenced in this specification. NVIDIA products are not designed, authorized or warranted to be suitable for use in medical, military, aircraft, space or life support equipment, nor in applications where failure or malfunction of the NVIDIA product can reasonably be expected to result in personal injury, death or property or environmental damage. NVIDIA accepts no liability for inclusion and/or use of NVIDIA products in such equipment or applications and therefore such inclusion and/or use is at customer’s own risk. NVIDIA makes no representation or warranty that products based on these specifications will be suitable for any specified use without further testing or modification. Testing of all parameters of each product is not necessarily performed by NVIDIA. It is customer’s sole responsibility to ensure the product is suitable and fit for the application planned by customer and to do the necessary testing for the application to avoid a default of the application or the product. Weaknesses in customer’s product designs may affect the quality and reliability of the NVIDIA product and may result in additional or different conditions and/or requirements beyond those contained in this specification. NVIDIA does not accept any liability related to any default, damage, costs or problem which may be based on or attributable to: (i) the use of the NVIDIA product in any manner that is contrary to this specification, or (ii) customer product designs. No license, either expressed or implied, is granted under any NVIDIA patent right, copyright, or other NVIDIA intellectual property right under this specification. Information published by NVIDIA regarding third-party products or services does not constitute a license from NVIDIA to use such products or services or a warranty or endorsement thereof. Use of such information may require a license from a third party under the patents or other intellectual property rights of the third party, or a license from NVIDIA under the patents or other intellectual property rights of NVIDIA. Reproduction of information in this specification is permissible only if reproduction is approved by NVIDIA in writing, is reproduced without alteration, and is accompanied by all associated conditions, limitations, and notices. ALL NVIDIA DESIGN SPECIFICATIONS, REFERENCE BOARDS, FILES, DRAWINGS, DIAGNOSTICS, LISTS, AND OTHER DOCUMENTS (TOGETHER AND SEPARATELY, “MATERIALS”) ARE BEING PROVIDED “AS IS.” NVIDIA MAKES NO WARRANTIES, EXPRESSED, IMPLIED, STATUTORY, OR OTHERWISE WITH RESPECT TO THE MATERIALS, AND EXPRESSLY DISCLAIMS ALL IMPLIED WARRANTIES OF NONINFRINGEMENT, MERCHANTABILITY, AND FITNESS FOR A PARTICULAR PURPOSE. Notwithstanding any damages that customer might incur for any reason whatsoever, NVIDIA’s aggregate and cumulative liability towards customer for the products described herein shall be limited in accordance with the NVIDIA terms and conditions of sale for the product.
VESA DisplayPort DisplayPort and DisplayPort Compliance Logo, DisplayPort Compliance Logo for Dual-mode Sources, and DisplayPort Compliance Logo for Active Cables are trademarks owned by the Video Electronics Standards Association in the United States and other countries.
HDMI HDMI, the HDMI logo, and High-Definition Multimedia Interface are trademarks or registered trademarks of HDMI Licensing LLC.
OpenCL OpenCL is a trademark of Apple Inc. used under license to the Khronos Group Inc.
Trademarks NVIDIA, the NVIDIA logo, GeForce, and SLI are trademarks and/or registered trademarks of NVIDIA Corporation in the U.S. and other countries. Other company and product names may be trademarks of the respective companies with which they are associated.
Copyright © 2018 NVIDIA Corporation. All rights reserved.