KU MIX 5.0 QUICK START G - The University of Kansasiri/projects/concrete/QuickStartGuide... · ·...
17
KU MIX 5.0 QUICK START GUIDE USING THIS GUIDE This guide provides instructions to help you set up KU MIX 4.0 and is divided into three sections: 1. Before You Begin 2. Using KU MIX 5.0 3. Input Material Details ABOUT KU MIX KU MIX is a concrete mix design program based in Microsoft Excel that includes aggregate optimization. Optimization is performed on the basis of aggregate volume and may, therefore, be used for concretes containing lightweight aggregates as well as normalweight aggregates. KU MIX VERSION Version 5.0 Released July 6, 2012 COMMENTS /SUGGESTIONS Please send comments, suggestions, or report any problems to [email protected] . PART 1: BEFORE YOU BEGIN 2 1.1 Materials Required 2 1.2 Setting Up Your Computer 2-4 PART 2: USING KU MIX 5 2.1 Startup and Settings 5 2.2 General Navigation 5 2.3 Process to Design an Optimized Mix 6 - 14 PART 3: INPUT MATERIAL DETAILS 15 3.1 Cementitious Materials 15 3.2 Aggregates 15 3.3 Air Entraining Agents 16 3.4 Other Admixtures 16 PART 4: TROUBLESHOOT 17 TABLE OF CONTENTS UPDATED 7/6/12
-
Upload
hoanghuong -
Category
Documents
-
view
216 -
download
0
Transcript of KU MIX 5.0 QUICK START G - The University of Kansasiri/projects/concrete/QuickStartGuide... · ·...

KU MIX 5.0
QUICK START GUIDE
USING THIS GUIDE
This guide provides instructions to help you set up KU MIX
4.0 and is divided into three sections:
1. Before You Begin
2. Using KU MIX 5.0
3. Input Material Details
ABOUT KU MIX
KU MIX is a concrete mix design program based in
Microsoft Excel that includes aggregate optimization.
Optimization is performed on the basis of aggregate volume
and may, therefore, be used for concretes containing
lightweight aggregates as well as normalweight aggregates.
KU MIX VERSION Version 5.0
Released July 6, 2012
COMMENTS /SUGGESTIONS Please send comments, suggestions, or report any problems
PART 1: BEFORE YOU BEGIN 2
1.1 Materials Required 2
1.2 Setting Up Your Computer 2-4
PART 2: USING KU MIX 5
2.1 Startup and Settings 5
2.2 General Navigation 5
2.3 Process to Design an Optimized Mix 6 - 14
PART 3: INPUT MATERIAL DETAILS 15
3.1 Cementitious Materials 15
3.2 Aggregates 15
3.3 Air Entraining Agents 16
3.4 Other Admixtures 16
PART 4: TROUBLESHOOT 17
TABLE OF CONTENTS
UPDATED 7/6/12

2
PART 1: BEFORE YOU BEGIN
1.1 Materials Required
Gather the following materials before you prepare to run KU MIX.
1. The KU MIX 5.0 Excel file.
2. Computer with Microsoft Excel 2000 or newer
If you are using Excel 2000 or 2003, use KU Mix 5.0 (Excel 2003); for Excel
2007 or Excel 2010, make sure to use KU Mix 5.0 (Excel 2007).xlsm or KU Mix
5.0 (Excel 2010).xlsm correspondingly.
3. You will need your Microsoft Office CD to install the Solver Add-In if prompted
in Section 1.2, Step 1.
1.2 Setting Up Your Computer
Before opening KU MIX for the first time, perform the following series of operations
through the Excel menu items:
1. Install Solver Add-in.
For Excel 2000 or 2003:
Go to: Tools → Add-Ins… → Select “Solver Add-In” if not already selected.
Figure 1

3
For Excel 2007:
a. Click the Microsoft Office Button , and then click Excel Options.
b. Click Add-Ins, and then in the Manage box, select Excel Add-ins.
c. Click Go.
d. In the Add-Ins available box, select the Solver Add-in check box, and click OK.
Tip: If Solver Add-in is not listed in the Add-Ins available box, click Browse to
locate the add-in. If you get prompted that the Solver Add-in is not currently in
stalled on your computer, click Yes to install it.
e. After you load the Solver Add-in, the Solver command is available in the Analysis
group on the Data tab.
For Excel 2010:
a. Click the File menu and choose Options.
b. Now in the Excel Options dialogue box, click Add-Ins from the left sidebar.
c. In the Manage drop-down box, select Solver Add-in, and then click Go.
d. In the Add-Ins available box, select the Solver Add-in check box, and click OK.
e. After you load the Solver Add-in, the Solver command is available in the Analysis
group on the Data tab.
2. Security Setting for VBA
For Excel 2000 or 2003: Go to: Tools → Macro → Security… → Select Medium (or lower)
Figure 2

4
Then, go to: Tools → Macro → Security… → Select the Trusted Publishers Tab
Check the “Trust access to Visual Basic Project” checkbox and press Okay to finish
setting up your computer.
For Excel 2007 or 2010:
1. Click the Microsoft Office Button , and then click Excel Options for
Excel 2007; click the File button, then click Options for Excel 2010.
2. Click Trust Center, and then click Trust Center Settings.
3. Select Macro Settings, and then select Disable all macros with notification.
4. Mark the Trust access to the VBA project object model box.
5. Click OK and OK.
Security Warning: Every time the program is opened, click Options… and
then click Enable this content (this appears at the top of the screen below
the Home tab and above the formula bar). The program will not run until
this operation has been completed.
PART 1: BEFORE YOU BEGIN
Figure 3

5
PART 2: USING KU MIX
2.1 Startup and Settings
To begin using KU MIX:
1. Open KU MIX 4.0 .xls in Microsoft Excel 2000 or 2003, open KU MIX 4.0 (Excel
2007).xlsm or KU MIX 4.0 (Excel 2010).xlsm if you are using Excel 2007 or 2010.
2. If prompted, choose Enable Macros (In Excel 2007 and 2010, select Enable this
content under Options if you receive a Security Warning).
2.2 General Navigation
KU MIX 4.0 has four main sections that may be accessed using the buttons found on
each page.
The Home Page for KU MIX is the starting and ending page for any optimization
process. From the Home page, all major operations necessary for concrete mixture
optimization may be accessed using the navigation buttons. Final report information
may be updated with the Change Header/Footer button and saved in a separate
Excel Workbook with the Save Mix Design button.
View additional details regarding the aggregate
gradation and optimization.
Functions as both a final report for the concrete
mix design and a navigation site. Home
Materials to be used for concrete mix design and
mixture optimization may be input and stored. Input Materials
Concrete mix design properties are identified
and mix design optimization is accomplished. Design Mix
View Gradation
Details

6
2.3 Process to Design an Optimized Mix
The optimization process consists of six steps. All steps can be accomplished easily
by navigating from the Home page.
Use Section A of this guide, “Quick Reference Navigation,” for a general
description of the optimization process and for future reference.
Use Section B of this guide, “Detailed Instructions,” for a more in-depth
explanation of the optimization process.
A. Quick Reference Navigation
B. Detailed Instructions
Step 1 of 5: Input Material Information
Click Input Materials from the Home Page
PART 2: USING KU MIX
Enter the materials information which may be used
in the concrete mix optimization (aggregates,
cementitious materials, admixtures).
Select the materials and mix properties for
optimization.
Optimize the concrete mix using the selected
materials.
View the completed concrete mix design (Home).
Review the optimized combined gradation details
(recommended).
Save the completed mix design as a new Excel
Workbook (optional).
Figure 4

7
Step 1 of 5: Input Material Information (continued)
From this point, four basic materials may be entered: Cementitious Materials,
Aggregates, Air Entraining Agents, and Other Admixtures. Materials entered during this
process will be available during the mix design process described in Step 2.
A detailed description of each column header can be found on pages 15—16.
To begin, Click Cementitious Materials and enter the material information.
Click Input Materials to continue entering materials and their properties for
Aggregates, Air Entraining Agents, and Other Admixtures.
Click Design Mix to continue after all material information has been entered.
Step 2 of 5: Design Concrete Mix
A complete concrete mix can be designed using the following four steps.
1. Begin with Part 1: “Select the Cementitious Materials, Water-Cementitious Material
Ratio, and Design Air Content”
PART 2: USING KU MIX
Figure 6
Figure 5

8
Step 2 of 5: Design Concrete Mix (continued)
a. Click the Select Cementitious Materials button to choose which of these
cementitious materials will be used in the current mix design.
Selecting cementitious materials involves three steps:
i. Materials entered during Step 1 may be added to the current mix design by
selecting the desired material in BOX 1 and clicking the Add > button. Materials
selected from BOX 1 will appear in BOX 2 and can be removed by clicking the
Delete button.
ii. After all desired materials have been added to BOX 2, click the Select button to
complete the process. Materials selected for use will appear in BOX 3.
iii. To finish and save your selections, click Close.
PART 2: USING KU MIX
BOX 1 BOX 2
BOX 3
Figure 7

9
Step 2 of 5: Design Concrete Mix (continued)
b. Enter the quantities (in lb/yd3) for the materials selected in Step 2a (shown in Figure 6).
c. Enter (or select) the Water-Cementitious Material Ratio
d. Enter (or select) the Design Air Content Percent
2. Go to: “Select Aggregates and Gradation Constraints”
a. From the pull-down list, select the Top Sieve size that will retain aggregates from
the combined gradation.
b. Enter (or select) the desired maximum and minimum percentage retained on the
Top Sieve.
The actual percentage retained on the Top Sieve will automatically be adjusted to
obtain an optimum combined gradation. This range represents a target that may or
may not be satisfied depending on the aggregates selected and any blend
limitations (Part d.).
PART 2: USING KU MIX
Figure 6 (repeated)
Figure 8

10
Step 2 of 5: Design Concrete Mix (continued)
c. Click Select Aggregates to select aggregates for use in the current mix design.
The process for selecting aggregates is identical to the process outlined on Page 7
for selecting cementitious materials. If desired, the View Aggregates tab shows
the individual aggregate gradations. Click View Gradation to display the chart.
d. If desired, input minimum and maximum restrictions (as a percentage of total
aggregate volume) on the aggregate blend. These limitations will be enforced
during the optimization process and may adversely effect the combined gradation.
3. Go to: “Select Chemical Admixtures”
PART 2: USING KU MIX
Figure 10
Figure 9

11
Step 2 of 5: Design Concrete Mix (continued)
a. Click Select AEA to select an air entraining agent for use in the current mix
design. The process for selecting an air entraining agent is identical to the process
outlined on Page 7 for selecting cementitious materials.
b. Enter the air entraining agent quantity (US fl oz/yd3) into the table.
c. Click Select Admixtures to select additional chemical admixtures.
d. Enter the quantities (US fl oz/yd3) for any additional chemical admixtures into the
table.
4. Go To: “Complete and View Concrete Mix Design”
a. Click Optimize Mix Design
b. Click View Mix Design to see the completed mix design. An example of a
completed mix design is shown on Page 14.
Step 3 of 5: Evaluate Optimized Mix Gradation Details (Optional)
Click View Gradation Details to view additional gradation details.
1. Select minimum and maximum combined gradation limits for comparison purposes
only. This step will not change the combined gradation.
a. Click Input Gradation Limits to enter specific minimum and maximum limits for
the percent retained on each sieve.
b. Click Select Gradation Limits. These limits are for comparison purposes only.
These optional limits may be toggled on or off using the checkbox located below
part b.
PART 2: USING KU MIX
Figure 12
Figure 11

12
Step 3 of 5: Evaluate Optimized Mix Design Details (continued)
2. If desired, manually adjust the aggregate blend using the scroll bars to change the
percentages of each aggregate in the mix design. The aggregate blend must total
100%.
Note: KU Mix will automatically adjust the mixture proportions and combined
aggregate details based on any changes to the aggregate blend.
a. Click Restore to return to the original optimized aggregate blend.
Note: When the values entered for Percent Retained do not sum to 100% for an
individual aggregate, KU Mix normalizes the values for that aggregate to 100%
during the optimization process.
PART 2: USING KU MIX
Figure 13

13
Step 4 of 5: Update the Report Header and Footer Information
On the Home Page:
a. Click Change Header/Footer
b. Update information as necessary and click OK to update the mix design report, or
click Cancel to return to the home page without making any changes.
Step 5 of 5: Save the Optimized Mix Design Report and Gradation Details (Optional)
Click Save Mix Design to save the report as a new Microsoft Excel Workbook.
PART 2: USING KU MIX
Figure 14

14
PART 2: USING KU MIX
Figure 15: Example of completed concrete mix design
15
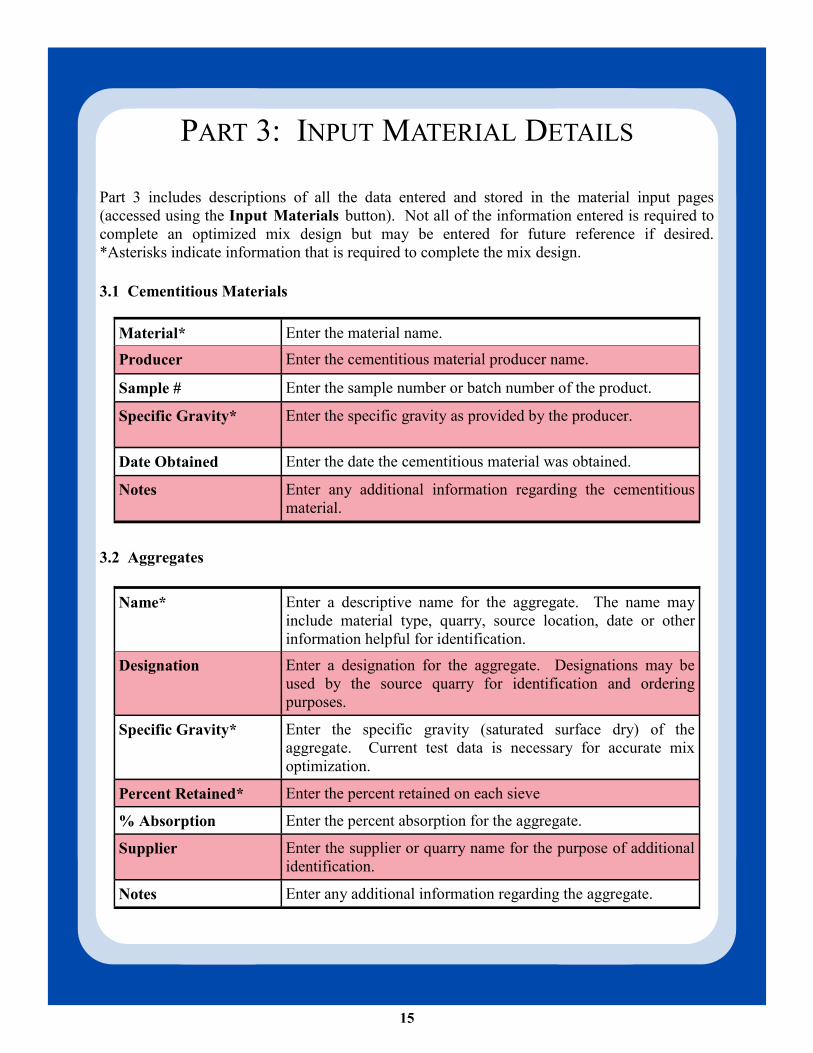
PART 3: INPUT MATERIAL DETAILS
Part 3 includes descriptions of all the data entered and stored in the material input pages
(accessed using the Input Materials button). Not all of the information entered is required to
complete an optimized mix design but may be entered for future reference if desired.
*Asterisks indicate information that is required to complete the mix design.
3.1 Cementitious Materials
3.2 Aggregates
Name* Enter a descriptive name for the aggregate. The name may
include material type, quarry, source location, date or other
information helpful for identification.
Designation Enter a designation for the aggregate. Designations may be
used by the source quarry for identification and ordering
purposes.
Specific Gravity* Enter the specific gravity (saturated surface dry) of the
aggregate. Current test data is necessary for accurate mix
optimization.
Percent Retained* Enter the percent retained on each sieve
% Absorption Enter the percent absorption for the aggregate.
Supplier Enter the supplier or quarry name for the purpose of additional
identification.
Notes Enter any additional information regarding the aggregate.
Material* Enter the material name.
Producer Enter the cementitious material producer name.
Sample # Enter the sample number or batch number of the product.
Specific Gravity* Enter the specific gravity as provided by the producer.
Date Obtained Enter the date the cementitious material was obtained.
Notes Enter any additional information regarding the cementitious
material.
16
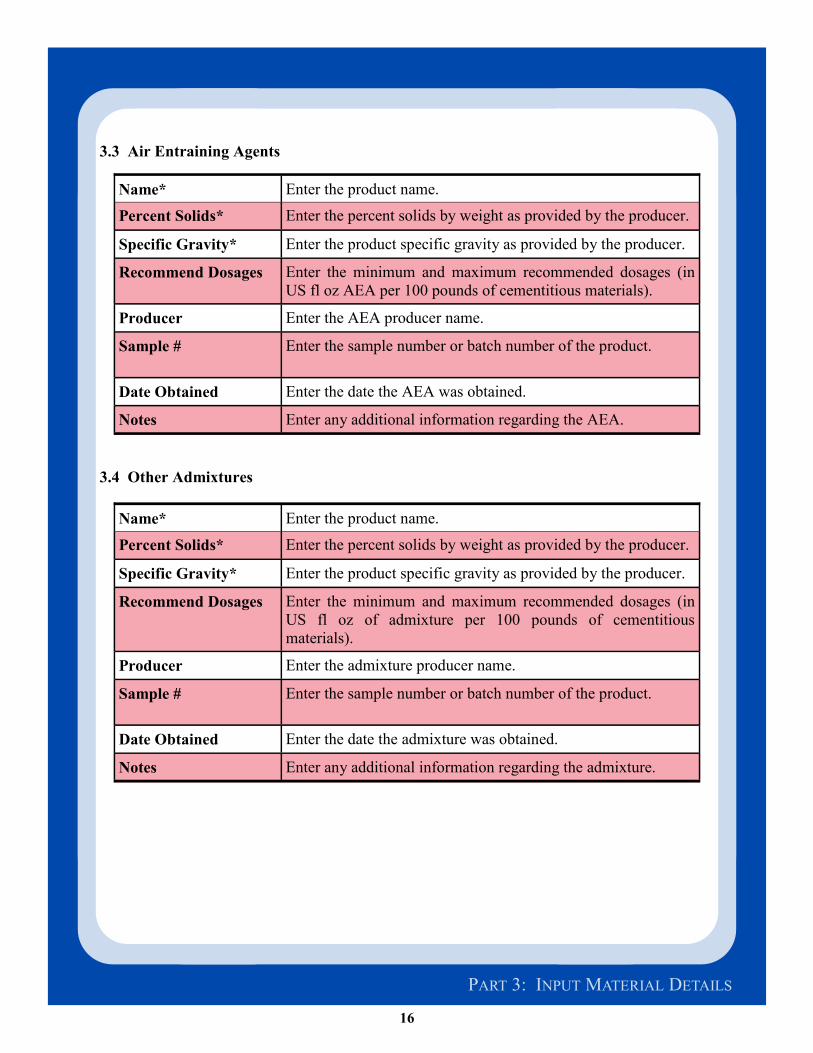
3.3 Air Entraining Agents
3.4 Other Admixtures
Name* Enter the product name.
Percent Solids* Enter the percent solids by weight as provided by the producer.
Specific Gravity* Enter the product specific gravity as provided by the producer.
Recommend Dosages Enter the minimum and maximum recommended dosages (in
US fl oz AEA per 100 pounds of cementitious materials).
Producer Enter the AEA producer name.
Sample # Enter the sample number or batch number of the product.
Date Obtained Enter the date the AEA was obtained.
Notes Enter any additional information regarding the AEA.
Name* Enter the product name.
Percent Solids* Enter the percent solids by weight as provided by the producer.
Specific Gravity* Enter the product specific gravity as provided by the producer.
Recommend Dosages Enter the minimum and maximum recommended dosages (in
US fl oz of admixture per 100 pounds of cementitious
materials).
Producer Enter the admixture producer name.
Sample # Enter the sample number or batch number of the product.
Date Obtained Enter the date the admixture was obtained.
Notes Enter any additional information regarding the admixture.
PART 3: INPUT MATERIAL DETAILS

17
PART 4: TROUBLESHOOT
For Microsoft Excel 2000 and newer:
4.1 “Compile Error: Can’t find project or library”
1. Click OK in the error box.
Make sure that you are in the window for Microsoft Visual Basic.
2. Click the Reset button on the toolbar (or go to Run → Reset).
3. Go to: Tools → References
Uncheck any box that is marked as “MISSING”.
4. Click OK.
5. Close Microsoft Visual Basic application.
6. Save KU Mix.
PART 4: TROUBLESHOOT