
Kronos Telecommuting - Connecticut
13
Kronos Telecommuting 1. Entering both REGTC & REG 2. Entering OTC when working Overtime 3. Entering REGTC into the schedule planner This guide will show you how to enter telecommuting time for the multiple scenarios covered below.
Transcript of Kronos Telecommuting - Connecticut
Kronos Telecommuting
1. Entering both REGTC & REG
2. Entering OTC when working Overtime
3. Entering REGTC into the schedule planner
This guide will show you how to enter telecommuting time for the multiple scenarios covered below.
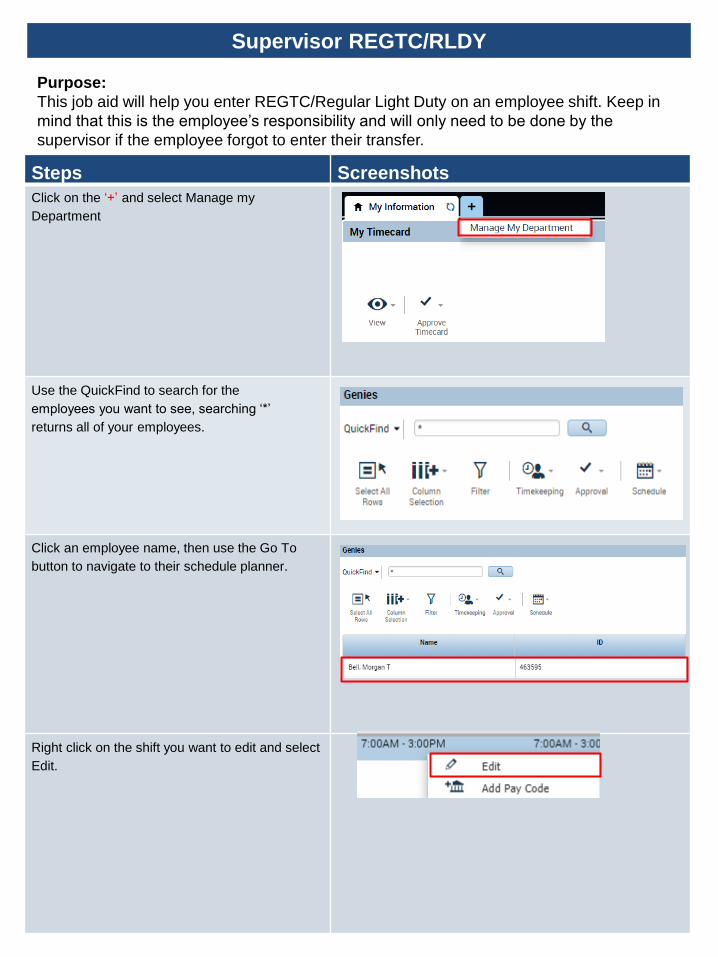
Supervisor REGTC/RLDY
Steps Screenshots
Click on the ‘+’ and select Manage my
Department
Use the QuickFind to search for the
employees you want to see, searching ‘*’
returns all of your employees.
Click an employee name, then use the Go To
button to navigate to their schedule planner.
Right click on the shift you want to edit and select
Edit.
Purpose:
This job aid will help you enter REGTC/Regular Light Duty on an employee shift. Keep in
mind that this is the employee’s responsibility and will only need to be done by the
supervisor if the employee forgot to enter their transfer.
Steps Screenshots
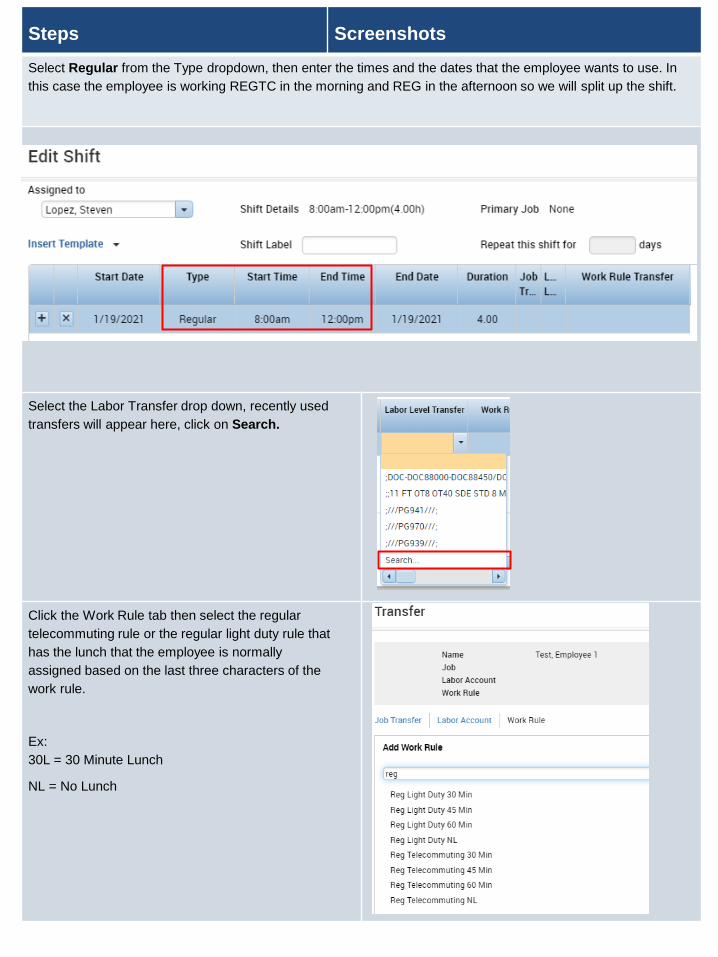
Select Regular from the Type dropdown, then enter the times and the dates that the employee wants to use. In
this case the employee is working REGTC in the morning and REG in the afternoon so we will split up the shift.
Select the Labor Transfer drop down, recently used
transfers will appear here, click on Search.
Click the Work Rule tab then select the regular
telecommuting rule or the regular light duty rule that
has the lunch that the employee is normally
assigned based on the last three characters of the
work rule.
Ex:
30L = 30 Minute Lunch
NL = No Lunch
Steps Screenshots
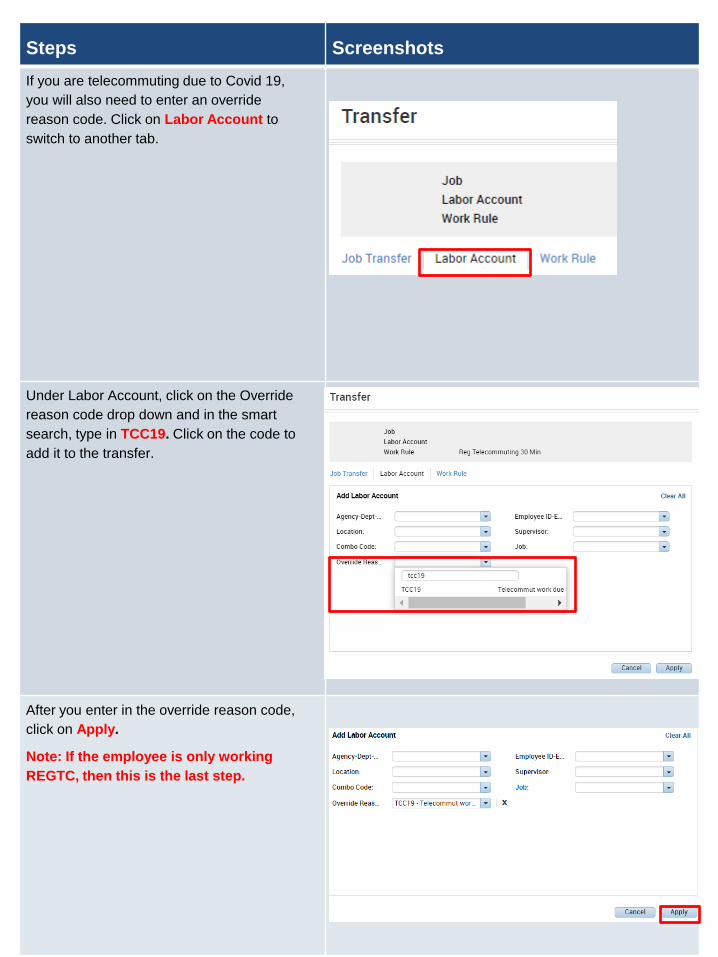
If you are telecommuting due to Covid 19,
you will also need to enter an override
reason code. Click on Labor Account to
switch to another tab.
Under Labor Account, click on the Override
reason code drop down and in the smart
search, type in TCC19. Click on the code to
add it to the transfer.
After you enter in the override reason code,
click on Apply.
Note: If the employee is only working
REGTC, then this is the last step.

Steps Screenshots
After you have added the first half of the shift being REGTC, you will need to click on the ‘+’ icon to add an additional row for
the regular shift. Add in the times for the additional shift, and then we will need to insert another work rule transfer.
First look at the pay rule assigned to the employee by
hovering over their name or right clicking their name on
their timecard.
Enter that pay rule that most resembles the employee’s in the work rule transfer drop down. Once that work
rule transfer is entered the Edit shift window will look as its shown below.
Click Save, and refresh the timecard. This is what the timecard will look like after the employee punches in and
out.

Steps Screenshots
You can also follow all the previous steps to add in a transfer directly on a timecard.
Click on the Transfer cell on the timecard between an In and Out punch. Select Search to view all the Transfer
options.
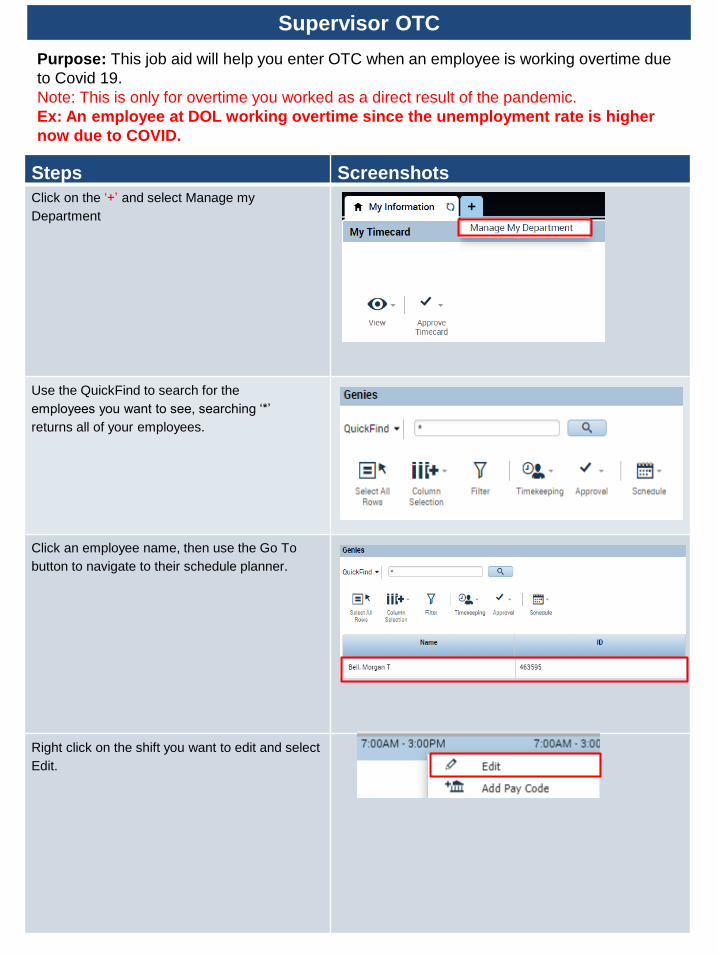
Supervisor OTC
Steps Screenshots
Click on the ‘+’ and select Manage my
Department
Use the QuickFind to search for the
employees you want to see, searching ‘*’
returns all of your employees.
Click an employee name, then use the Go To
button to navigate to their schedule planner.
Right click on the shift you want to edit and select
Edit.
Purpose: This job aid will help you enter OTC when an employee is working overtime due
to Covid 19.
Note: This is only for overtime you worked as a direct result of the pandemic.
Ex: An employee at DOL working overtime since the unemployment rate is higher
now due to COVID.
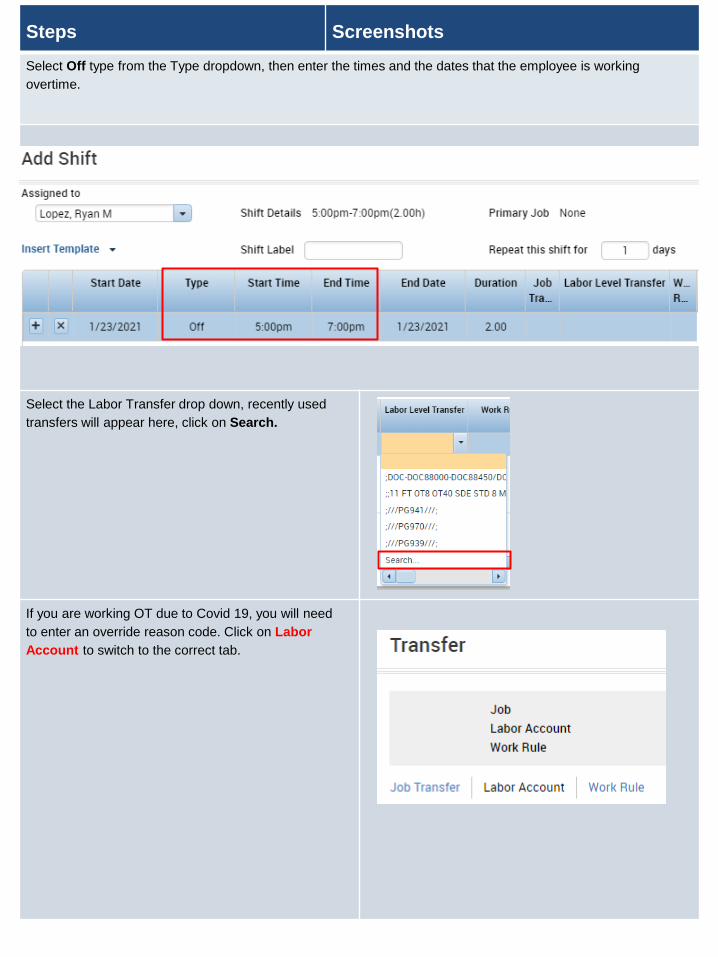
Steps Screenshots
Select Off type from the Type dropdown, then enter the times and the dates that the employee is working
overtime.
Select the Labor Transfer drop down, recently used
transfers will appear here, click on Search.
If you are working OT due to Covid 19, you will need
to enter an override reason code. Click on Labor
Account to switch to the correct tab.
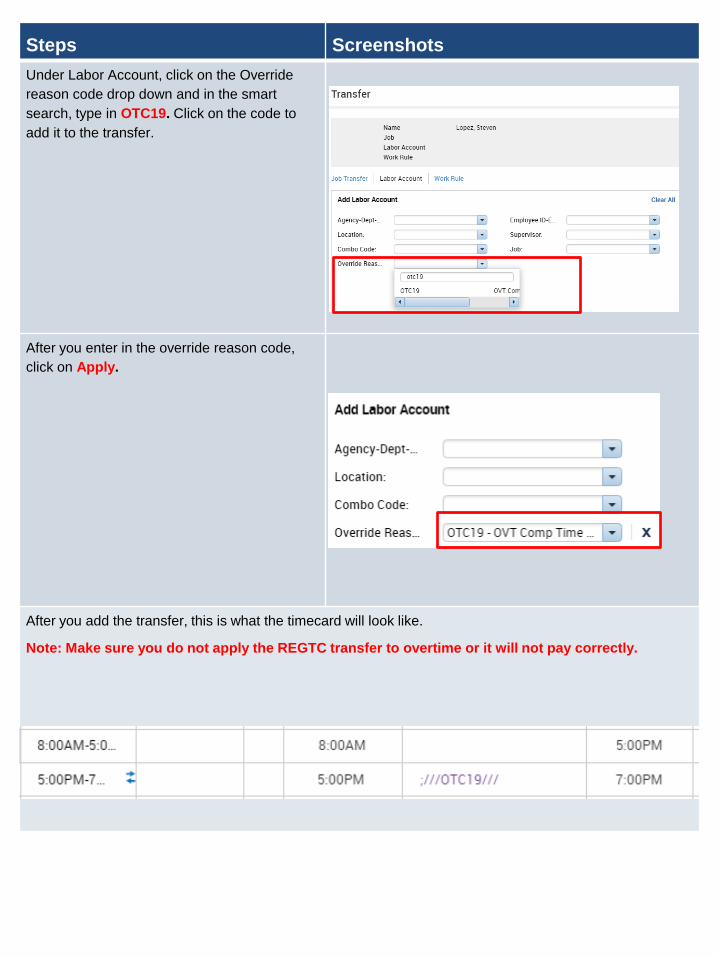
Steps Screenshots
Under Labor Account, click on the Override
reason code drop down and in the smart
search, type in OTC19. Click on the code to
add it to the transfer.
After you enter in the override reason code,
click on Apply.
After you add the transfer, this is what the timecard will look like.
Note: Make sure you do not apply the REGTC transfer to overtime or it will not pay correctly.

Supervisor REGTC/RLDY into their schedule
Steps Screenshots
Click on the ‘+’ and select Manage my
Department
Use the QuickFind to search for the
employees you want to see, searching
‘*’ returns all of your employees.
Click an employee name, then use the
Go To button to navigate to their
schedule planner.
Right click on the employee name and
select Schedule Pattern
Purpose: This job aid will help you enter REGTC/Regular Light Duty on a long term basis for
an employee.
Note: If you choose this option, you will need to consistently check that the
employee is working remotely the entire time, if the employee comes in, you will
need to manually remove the transfer from the schedule planner
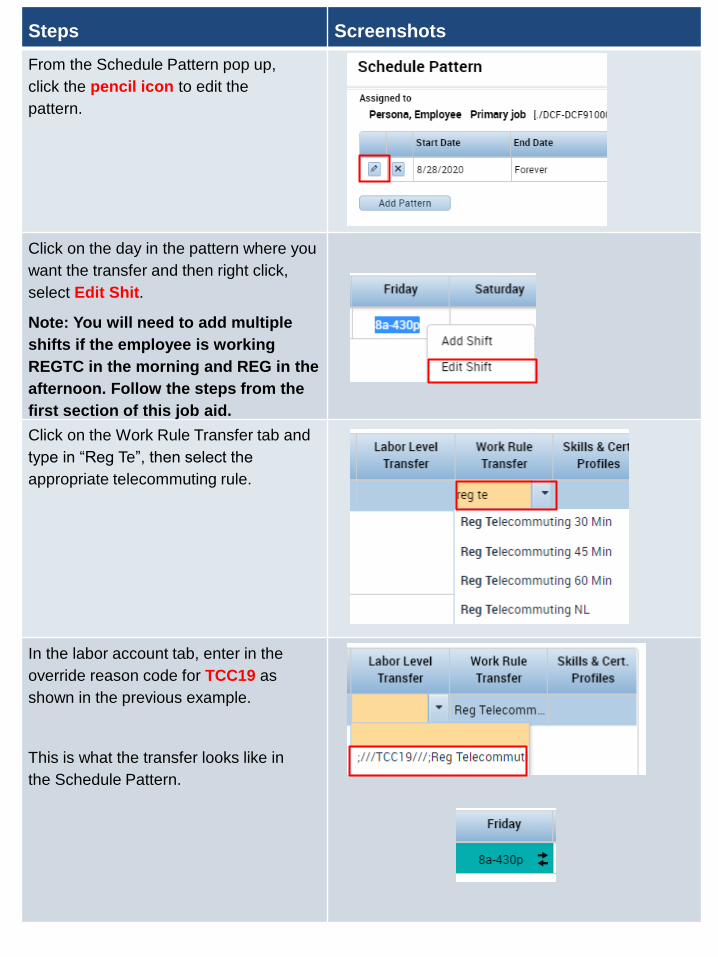
Steps Screenshots
From the Schedule Pattern pop up,
click the pencil icon to edit the
pattern.
Click on the day in the pattern where you
want the transfer and then right click,
select Edit Shit.
Note: You will need to add multiple
shifts if the employee is working
REGTC in the morning and REG in the
afternoon. Follow the steps from the
first section of this job aid.
Click on the Work Rule Transfer tab and
type in “Reg Te”, then select the
appropriate telecommuting rule.
In the labor account tab, enter in the
override reason code for TCC19 as
shown in the previous example.
This is what the transfer looks like in
the Schedule Pattern.
Steps Screenshots
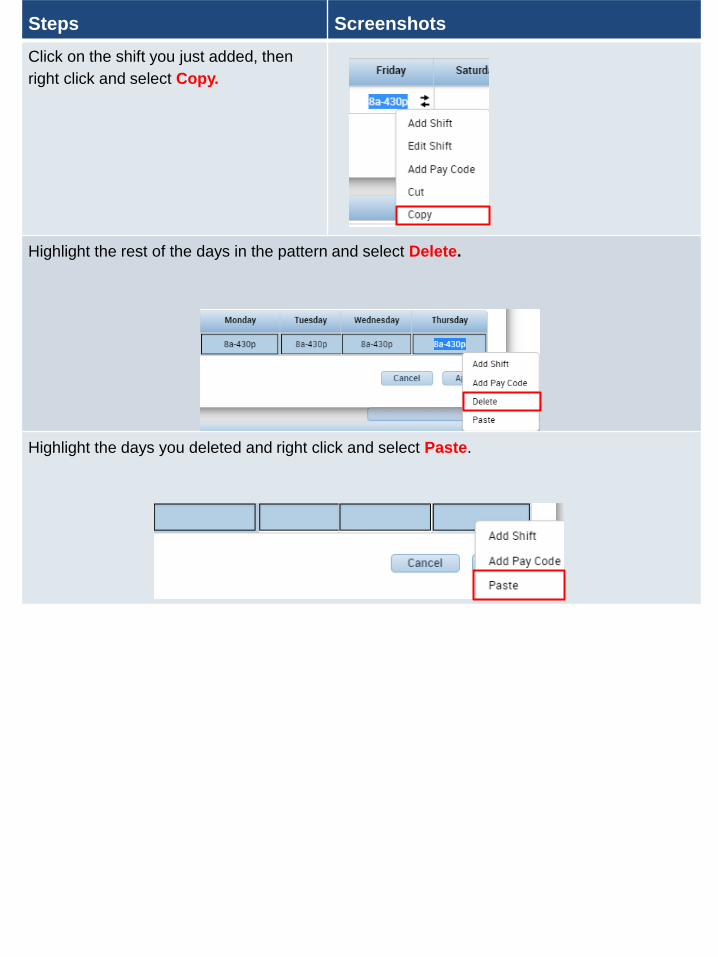
Click on the shift you just added, then
right click and select Copy.
Highlight the rest of the days in the pattern and select Delete.
Highlight the days you deleted and right click and select Paste.

Steps Screenshots
This is how your pattern will look once you have inserted the transfer on each day. Make
sure the Override Other Patterns box is selected, then click Apply and Save.
Next time the employee clocks in the transfer will be automatically added.
Note:
-This can be done for individual shifts as well.
-You will need to update the schedule planner every time they physically come
in.
-Standard practice is that the employee would enter in the transfer, this is a
work around that would move the responsibility of entry from the employee to
the supervisor and should be used only in cases where an employee is
consistently telecommuting.