Kinkoph/TYV Office 2007 Sample Chapter
17
Click here to buy the book. Sample Chapter
-
Upload
john-wiley-and-sons -
Category
Documents
-
view
217 -
download
2
description
sample chapter
Transcript of Kinkoph/TYV Office 2007 Sample Chapter

Click here to buy the book.
Sample
Chapter

Before you begin working withany of the Microsoft Officeprograms, you must first open aprogram. When you finish yourwork, you can close theprogram. If applicable, you cansave your work before exiting aprogram completely.
START AN OFFICE APPLICATION
1 Click Start.
2 Click All Programs.
3 Click Microsoft Office.
4 Click the name of the program thatyou want to open.
Note: Depending on which programs you installed, notall of the Office programs may be listed in the menu.
11
22 4433
click
click
click
click
Start and Exit Office Applications
Start and Exit Office Applications
4
l The program that you selected opensin a new window.
Note: See the next task to learn how to identifydifferent areas of the program window.
04_045909 ch01.qxp 11/15/06 11:04 PM Page 4
COPYRIG
HTED M
ATERIAL
Click here to buy the book.

EXIT AN OFFICE APPLICATION
1 Click the Close button ( ).
l You can also click the Office button andthen click Exit.
22
11
Office Basics chapter1
5
OFFICE FEATURES
If you have not yet saved your work, theprogram prompts you to do so beforeexiting.
Note: Outlook does not prompt you to save anything beforeclosing, unless you have unsaved e-mail messages that youwere composing.
2 Click Yes to save.
The program window closes.
l If you click No, the program closeswithout saving your data.
l If you click Cancel, the program windowremains open.
Can I create a shortcut icon for an Office application?Yes. You can create a shortcut icon that appears on the Windows desktop. Whenever you want to open the program, you can simply double-click the shortcut icon. Follow these steps to create a shortcut icon:
1 Right-click over a blank area of the desktop and click New.
2 Click Shortcut.
The Create Shortcut dialog box appears.
3 Click Browse, navigate to the Office program, and double-click the filename.
4 Click Next.
5 Type a name for the shortcut.
6 Click Finish.
The new shortcut icon appears on the desktop.
33
44
55
66
04_045909 ch01.qxp 11/15/06 11:04 PM Page 5
Click here to buy the book.

All of the Office programs share a common appearance and many of thesame features, such as menu bars, toolbars, and scroll bars. When youlearn your way around one program, you can easily use the same skills tonavigate the other Office programs. If you are new to Office, you shouldtake a moment and familiarize yourself with the types of on-screenelements that you can expect to encounter.
Office Button MenuClick to display a menu of file commands, such as New and Open.
Title BarDisplays the name of the open file and the Office program.
Quick Access ToolbarDisplays quick access buttons to the Save, Undo, and Redo commands.
Program Window ControlsUse these buttons to minimize the program window, restore the window to full size, or close the window.
Status BarDisplays information about the current worksheet or file.
RibbonDisplays groups of related commands in tabs. Each tab offers shortcut buttons to common tasks.
Navigate the Program Windows
6
04_045909 ch01.qxp 11/15/06 11:04 PM Page 6
Click here to buy the book.

Work AreaThe area where you add, and work with, data in a program. Depending on the Office program, the work area may be a document, a worksheet, or a slide.
Formula BarThis appears only in Excel. Use this bar to type and edit formulas and perform calculations on your worksheet data.
Document Window ControlsUse these buttons to minimize or restore the current document.
Scroll BarsUse the vertical and horizontal scroll bars to scroll through the item displayed in the work area, such as a document or worksheet.
Zoom ControlsUse this feature to zoom your view of a document.
Office Basics chapter1
7
OFFICE FEATURES
04_045909 ch01.qxp 11/15/06 11:04 PM Page 7
Click here to buy the book.

New to Office 2007, menus and toolbars in Word, Excel,PowerPoint, and Access arereplaced by the new Ribbonfeature. The Ribbon offers anintuitive way to locate commandsthat accomplish various programtasks. The Ribbon is grouped intotabs, and each tab holds a set ofrelated commands. In addition,some tabs appear only whenneeded, such as when you areworking with a particular objectin a document.
USE THE RIBBON
1 Click a tab.
The tab organizes related tasks andcommands into logical groups.
11
22
X
Work with the Ribbon
Work with the Ribbon
8
2 Click a button to activate a commandor feature.
l Buttons with arrows displayadditional commands.
l With some groups of commands, youcan click the corner group button todisplay a dialog box of additionalsettings.
When you move the mouse pointerover Live Preview options on theRibbon, you see the results in thedocument before applying thecommand.
Publisher and Outlookstill use the familiarmenu and toolbarfeatures from previousversions of Office.However, some of theOutlook features, suchas the Appointmentwindow, use the newRibbon features.
04_045909 ch01.qxp 11/15/06 11:04 PM Page 8
Click here to buy the book.

Is there a way I can keep the Ribbon minimized?Yes. You can keep the Ribbon minimized and click a tab when you need to use a command. Follow these steps:
1 Click the Customize Quick Access Toolbar button at the end of the Quick Access Toolbar.
2 Click Minimize the Ribbon.
The program’s Ribbon is minimized at the top of the screen.
To use a Ribbon while it is minimized, you can simply click the tab containing the tools that you want to access.
11
22
MINIMIZE THE RIBBON
1 Double-click a tab name.
11
22
Office Basics chapter1
9
OFFICE FEATURES
The Ribbon is minimized.
2 Click the tab name again to maximize theRibbon.
04_045909 ch01.qxp 11/15/06 11:04 PM Page 9
Click here to buy the book.

The Quick Access toolbar appearsin the top-left corner of theprogram window. You can use the toolbar to quickly activate theSave, Undo, and Redo commands.You can customize the toolbar toinclude other commands that youneed to keep in view at all times.For example, you might add theQuick Print command or anothercommon command you use. Youcan also choose to display thetoolbar above or below theRibbon.
1 Click the Customize Quick AccessToolbar button.
Note: The Quick Access toolbar is not available inPublisher or Outlook.
2 Click More Commands.
l You can click any of the commoncommands to add them to thetoolbar.
l You can click Show Below theRibbon if you want to display thetoolbar below the Ribbon.
The Options dialog box opens to theCustomization tab.
3 Click the Choose commands from .
4 Click a command group.
11
22
33
44
TuesdaWednesdayThursdayFri
TuesdTuesdTu
Customize the Quick Access Toolbar
Customize the Quick Access Toolbar
10
04_045909 ch01.qxp 11/15/06 11:04 PM Page 10
Click here to buy the book.

How do I remove a button fromthe Quick Access toolbar?To remove a command, reopen theprogram’s Options dialog box byfollowing the steps in this task,click the command name in thelist box on the right, and thenclick the Remove button.Click OK. The button nolonger appears on thetoolbar.
5 Click the command that you want to addto the toolbar.
6 Click the Add button.
l Office adds the command.
You can repeat Steps 5 and 6 to addadditional buttons to the toolbar.
7 Click OK.
66
55
77
Office Basics chapter1
Are there other ways tocustomize the Quick Accesstoolbar?Yes. You can add commandsdirectly from the Ribbon and placethem on the toolbar. Simplyclick the tab containingthe command that youwant to add, right-clickthe command, and thenclick Add to QuickAccess Toolbar. Thecommand is immediatelyadded as a button on thetoolbar.
11
OFFICE FEATURES
l The new command appears on the QuickAccess toolbar.
04_045909 ch01.qxp 11/15/06 11:04 PM Page 11
Click here to buy the book.

In previous versions of Office,you could customize theprogram window to suit the wayyou worked. You can do thesame in Office 2007 using theOptions dialog box. The dialogbox features groups of settingsthat you can change to controlhow the program works, looks,and interacts with you.
1 Click the Office button.
2 Click the program’s Options button.
This example uses the Word Optionsbutton.
11
22
33
55
44
Find Customizing Options
Find Customizing Options
12
The program’s Options dialog boxappears.
3 Click the tab that you want to view.
Each tab displays sets of relatedcontrols that you can set for theprogram.
4 Make the changes that you want tothe settings.
5 Click OK to apply your changes.
04_045909 ch01.qxp 11/15/06 11:04 PM Page 12
Click here to buy the book.

11
22
33
44
55
LivePreview LivePreview
Turn Off Live Preview
Live Preview allows you topreview the effects of a featurebefore committing to aparticular selection. Many of theRibbon’s tools offer LivePreviews. For example, whenyou move the mouse pointerover a gallery item on theRibbon, the style is immediatelyreflected in the document. Youcan turn the feature off if youfind it too distracting.
1 Click the Office button.
2 Click the program’s Options button.
This example uses the Excel Optionsbutton.
Turn Off Live Preview Office Basics chapter1
OFFICE FEATURES
13
The program’s Options dialog boxappears.
3 Click the Popular tab.
4 Click the Enable Live Previewcheck box to deselect the feature ( changes to ).
5 Click OK.
The program turns off Live Preview.
04_045909 ch01.qxp 11/15/06 11:04 PM Page 13
Click here to buy the book.

You can use the Office Help tools to assistyou when you run into a problem or needmore information about a particular task.With an Internet connection, you can useMicrosoft’s online Help files to quicklyaccess information about an Office feature.The Help window offers tools that enableyou to search for topics that you want tolearn more about.
1 Click the Help button.
22
11
33
You must log on to your Internetconnection in order to use the onlineHelp files.
Find Help with Office
Find Help with Office
14
The Help window opens.
2 Type a word or phrase that you wantto learn more about.
3 Click the Search button.
You can also press to start thesearch.
l You can click links to view othertopics.
Note: You must log on to the Internet to accessMicrosoft’s online Help files.
04_045909 ch01.qxp 11/15/06 11:04 PM Page 14
Click here to buy the book.

Can I use the Help featureif I am offline?Yes. You can still access theHelp files that are installedwith the program. However,the online resources offeryou more help topics, aswell as links to demosand other help tools.
l The Search Results window displays a listof possible matches.
4 Click a link to learn more about a topic.
44
55
Office Basics chapter1
Where can I find a table of contents for theHelp files?You can click the Home button ( ) on the Helpwindow’s toolbar to quickly display the table ofcontents for the Officeprogram that you are using. You can click ahelp category to displaysubtopics of helpinformation. You canclick an article to viewmore about a topic.Many articles includelinks to related articles.
15
12
3
4
56
OFFICE FEATURES
l The Help window displays the article, andyou can read more about the topic.
l You can use the Back and Forwardbuttons ( and ) to move back andforth between help topics.
l You can click the Print button ( ) toprint the information.
5 Click to close the window.
04_045909 ch01.qxp 11/15/06 11:04 PM Page 15
Click here to buy the book.

You can add and remove Officecomponents using the Officesetup program. For example, youmay choose to install two orthree programs that you workwith the most, and then addanother component later. Youmight also decide to remove aprogram that you do not use.
1 Insert the Office CD.
Note: Depending on your computer’s setup, the Officewindow may open automatically. If not, see the tip inthis task.
The Microsoft Office window appears.
2 Click the Microsoft OfficeProfessional Plus 2007 option ( changes to ).
3 Click Continue.
22
33
44
55
Word
Power point
Excel
Outlook Outlook
Installing Outlook
Installing Outlook
Before you begin, you need the OfficeCD. Also, be sure to close any openprograms.
Add and Remove Office Components
Add and Remove Office Components
16
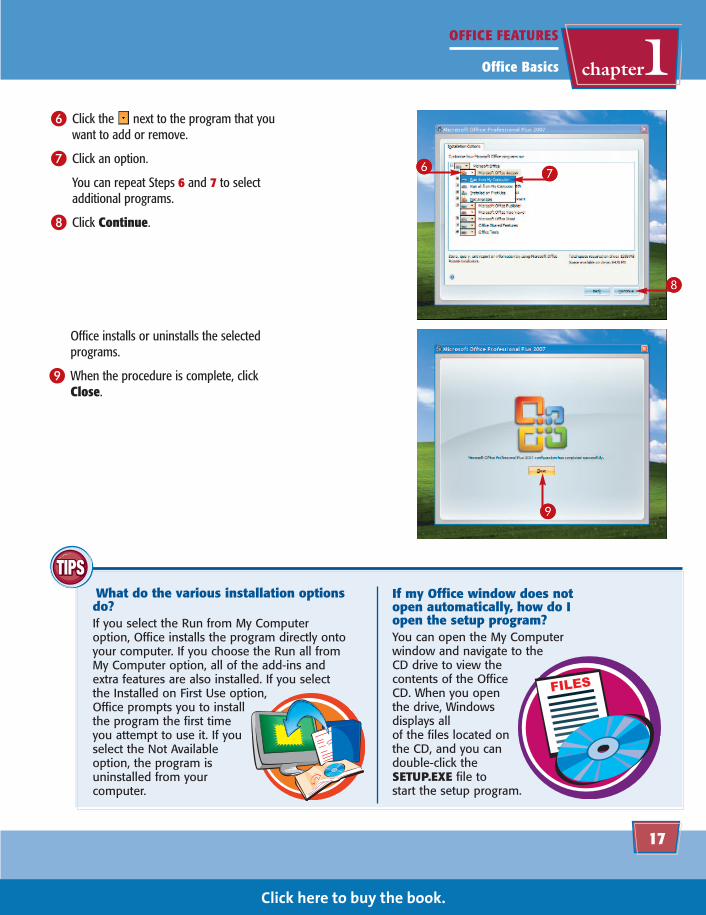
4 Click the Add or Remove Featuresoption ( changes to ).
5 Click Continue.
04_045909 ch01.qxp 11/15/06 11:04 PM Page 16
Click here to buy the book.
What do the various installation optionsdo?If you select the Run from My Computeroption, Office installs the program directly ontoyour computer. If you choose the Run all fromMy Computer option, all of the add-ins andextra features are also installed. If you selectthe Installed on First Use option,Office prompts you to installthe program the first timeyou attempt to use it. If youselect the Not Availableoption, the program isuninstalled from yourcomputer.
6 Click the next to the program that youwant to add or remove.
7 Click an option.
You can repeat Steps 6 and 7 to selectadditional programs.
8 Click Continue.
66 77
88
99
Office Basics chapter1
If my Office window does notopen automatically, how do Iopen the setup program?You can open the My Computerwindow and navigate to theCD drive to view thecontents of the OfficeCD. When you openthe drive, Windowsdisplays all of the files located onthe CD, and you candouble-click theSETUP.EXE file to start the setup program.
17
FILES
OFFICE FEATURES
Office installs or uninstalls the selectedprograms.
9 When the procedure is complete, clickClose.
04_045909 ch01.qxp 11/15/06 11:04 PM Page 17
Click here to buy the book.

You can use the Office Diagnosticstool to diagnose and repairproblems that you are having withany Office program. For example, aprogram may not work properly ifan important program file iscorrupted or accidentally deleted.You can run the diagnosis to checkthe problem and attempt to makeany repairs. Microsoft Word’sdiagnostic tool is shown in thisexample.
1 Click the Office button.
2 Click the program’s Options button.
11
22
33
44
Dr. DiagnosticsgnosticDiagn
Diagnose Office Programs
Diagnose Office Programs
18
The program’s Options dialog boxappears.
3 Click the Resources tab.
4 Click Diagnose.
04_045909 ch01.qxp 11/15/06 11:04 PM Page 18
Click here to buy the book.

What if I am still having troublewith my Office programs?You can also run the repair programwith the Microsoft Setup feature. Todo so, insert your Office CDand click the Repairoption when prompted.Setup runs the repairtool, which may takea long time,depending on yourcomputer’sresources.
The Microsoft Office Diagnostics dialogbox appears.
5 Click Continue.
55
66
Office Basics chapter1
How do I update my Officeprogram?You can use the Resources tab in theOptions dialog box to check forprogram updates. Open the dialogbox as shown in this task, andclick the Resources tab.Next, click the Check forUpdates button. Youmust log onto yourInternet connectionin order to check forprogram updates.
19
Program
Update
ProgramUpdate
ProgramUpdate
OFFICE FEATURES
6 Click Start Diagnostics.
The Office Diagnostics program runs. Theprocedure may take awhile.
If the program finds any problems, youcan follow the prompts to fix them.
04_045909 ch01.qxp 11/15/06 11:04 PM Page 19
Click here to buy the book.