Kim Lapsley Crochets: Gumball - sylkecrafts.com · Gumball This is a pattern for Gumball, the wacky...
15
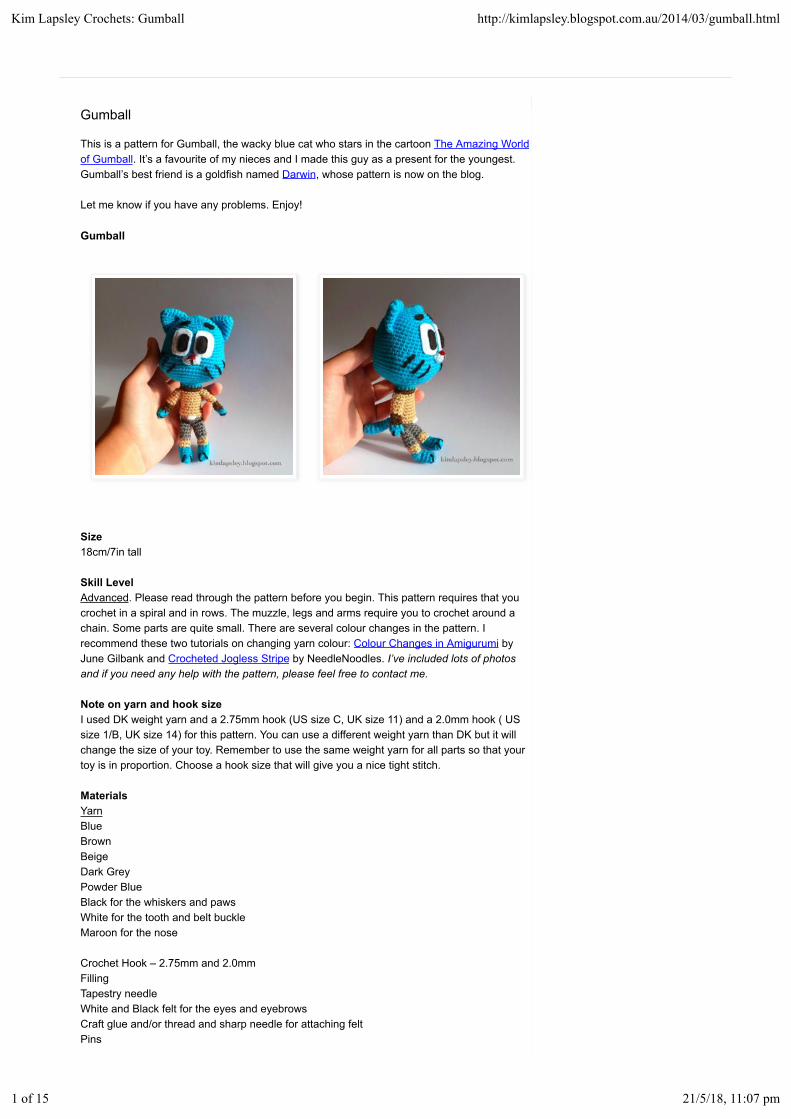
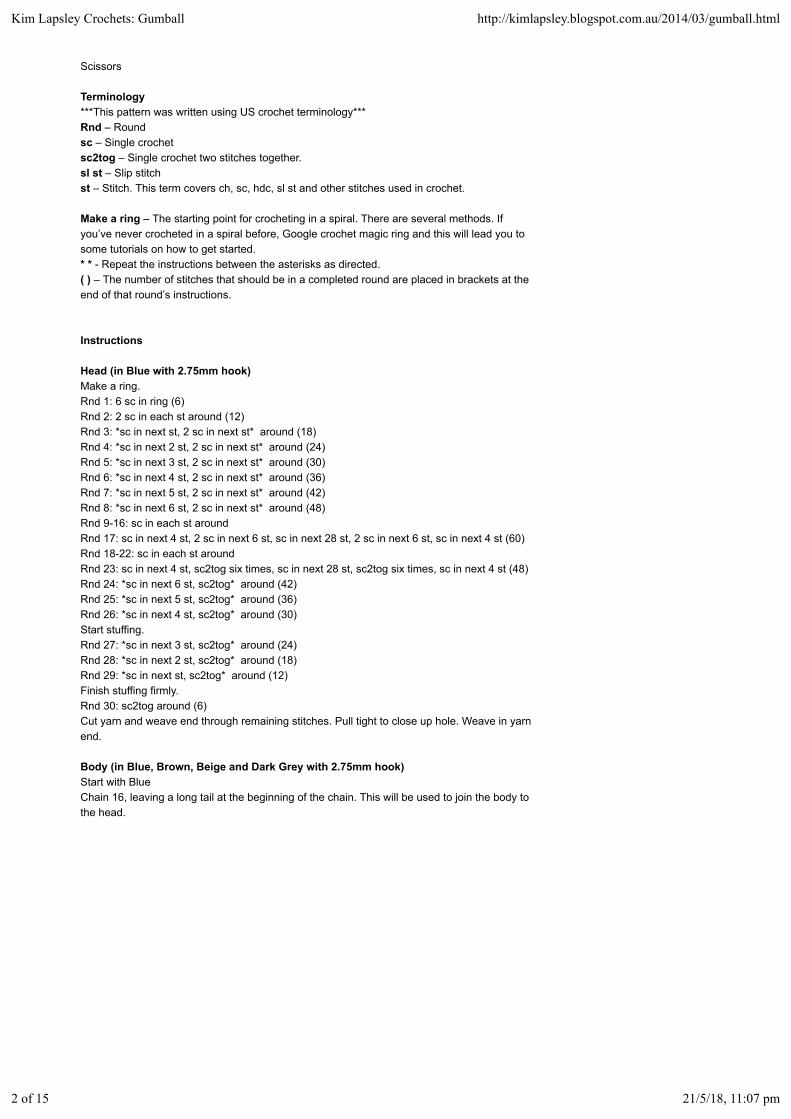
Gumball This is a pattern for Gumball, the wacky blue cat who stars in the cartoon The Amazing World of Gumball. It’s a favourite of my nieces and I made this guy as a present for the youngest. Gumball’s best friend is a goldfish named Darwin, whose pattern is now on the blog. Let me know if you have any problems. Enjoy! Gumball Size 18cm/7in tall Skill Level Advanced. Please read through the pattern before you begin. This pattern requires that you crochet in a spiral and in rows. The muzzle, legs and arms require you to crochet around a chain. Some parts are quite small. There are several colour changes in the pattern. I recommend these two tutorials on changing yarn colour: Colour Changes in Amigurumi by June Gilbank and Crocheted Jogless Stripe by NeedleNoodles. I’ve included lots of photos and if you need any help with the pattern, please feel free to contact me. Note on yarn and hook size I used DK weight yarn and a 2.75mm hook (US size C, UK size 11) and a 2.0mm hook ( US size 1/B, UK size 14) for this pattern. You can use a different weight yarn than DK but it will change the size of your toy. Remember to use the same weight yarn for all parts so that your toy is in proportion. Choose a hook size that will give you a nice tight stitch. Materials Yarn Blue Brown Beige Dark Grey Powder Blue Black for the whiskers and paws White for the tooth and belt buckle Maroon for the nose Crochet Hook – 2.75mm and 2.0mm Filling Tapestry needle White and Black felt for the eyes and eyebrows Craft glue and/or thread and sharp needle for attaching felt Pins Kim Lapsley Crochets: Gumball http://kimlapsley.blogspot.com.au/2014/03/gumball.html 1 of 15 21/5/18, 11:07 pm
Transcript of Kim Lapsley Crochets: Gumball - sylkecrafts.com · Gumball This is a pattern for Gumball, the wacky...
Gumball
This is a pattern for Gumball, the wacky blue cat who stars in the cartoon The Amazing Worldof Gumball. It’s a favourite of my nieces and I made this guy as a present for the youngest.Gumball’s best friend is a goldfish named Darwin, whose pattern is now on the blog.
Let me know if you have any problems. Enjoy!
Gumball
Size18cm/7in tall
Skill LevelAdvanced. Please read through the pattern before you begin. This pattern requires that youcrochet in a spiral and in rows. The muzzle, legs and arms require you to crochet around achain. Some parts are quite small. There are several colour changes in the pattern. Irecommend these two tutorials on changing yarn colour: Colour Changes in Amigurumi byJune Gilbank and Crocheted Jogless Stripe by NeedleNoodles. I’ve included lots of photosand if you need any help with the pattern, please feel free to contact me.
Note on yarn and hook sizeI used DK weight yarn and a 2.75mm hook (US size C, UK size 11) and a 2.0mm hook ( USsize 1/B, UK size 14) for this pattern. You can use a different weight yarn than DK but it willchange the size of your toy. Remember to use the same weight yarn for all parts so that yourtoy is in proportion. Choose a hook size that will give you a nice tight stitch.
MaterialsYarnBlueBrownBeigeDark GreyPowder BlueBlack for the whiskers and pawsWhite for the tooth and belt buckleMaroon for the nose
Crochet Hook – 2.75mm and 2.0mmFillingTapestry needleWhite and Black felt for the eyes and eyebrowsCraft glue and/or thread and sharp needle for attaching feltPins
Kim Lapsley Crochets: Gumball http://kimlapsley.blogspot.com.au/2014/03/gumball.html
1 of 15 21/5/18, 11:07 pm
Scissors
Terminology***This pattern was written using US crochet terminology***Rnd – Roundsc – Single crochetsc2tog – Single crochet two stitches together.sl st – Slip stitchst – Stitch. This term covers ch, sc, hdc, sl st and other stitches used in crochet.
Make a ring – The starting point for crocheting in a spiral. There are several methods. Ifyou’ve never crocheted in a spiral before, Google crochet magic ring and this will lead you tosome tutorials on how to get started.* * - Repeat the instructions between the asterisks as directed.( ) – The number of stitches that should be in a completed round are placed in brackets at theend of that round’s instructions.
Instructions
Head (in Blue with 2.75mm hook)Make a ring.Rnd 1: 6 sc in ring (6)Rnd 2: 2 sc in each st around (12)Rnd 3: *sc in next st, 2 sc in next st* around (18)Rnd 4: *sc in next 2 st, 2 sc in next st* around (24)Rnd 5: *sc in next 3 st, 2 sc in next st* around (30)Rnd 6: *sc in next 4 st, 2 sc in next st* around (36)Rnd 7: *sc in next 5 st, 2 sc in next st* around (42)Rnd 8: *sc in next 6 st, 2 sc in next st* around (48)Rnd 9-16: sc in each st aroundRnd 17: sc in next 4 st, 2 sc in next 6 st, sc in next 28 st, 2 sc in next 6 st, sc in next 4 st (60)Rnd 18-22: sc in each st aroundRnd 23: sc in next 4 st, sc2tog six times, sc in next 28 st, sc2tog six times, sc in next 4 st (48)Rnd 24: *sc in next 6 st, sc2tog* around (42)Rnd 25: *sc in next 5 st, sc2tog* around (36)Rnd 26: *sc in next 4 st, sc2tog* around (30)Start stuffing.Rnd 27: *sc in next 3 st, sc2tog* around (24)Rnd 28: *sc in next 2 st, sc2tog* around (18)Rnd 29: *sc in next st, sc2tog* around (12)Finish stuffing firmly.Rnd 30: sc2tog around (6)Cut yarn and weave end through remaining stitches. Pull tight to close up hole. Weave in yarnend.
Body (in Blue, Brown, Beige and Dark Grey with 2.75mm hook)Start with BlueChain 16, leaving a long tail at the beginning of the chain. This will be used to join the body tothe head.
Kim Lapsley Crochets: Gumball http://kimlapsley.blogspot.com.au/2014/03/gumball.html
2 of 15 21/5/18, 11:07 pm
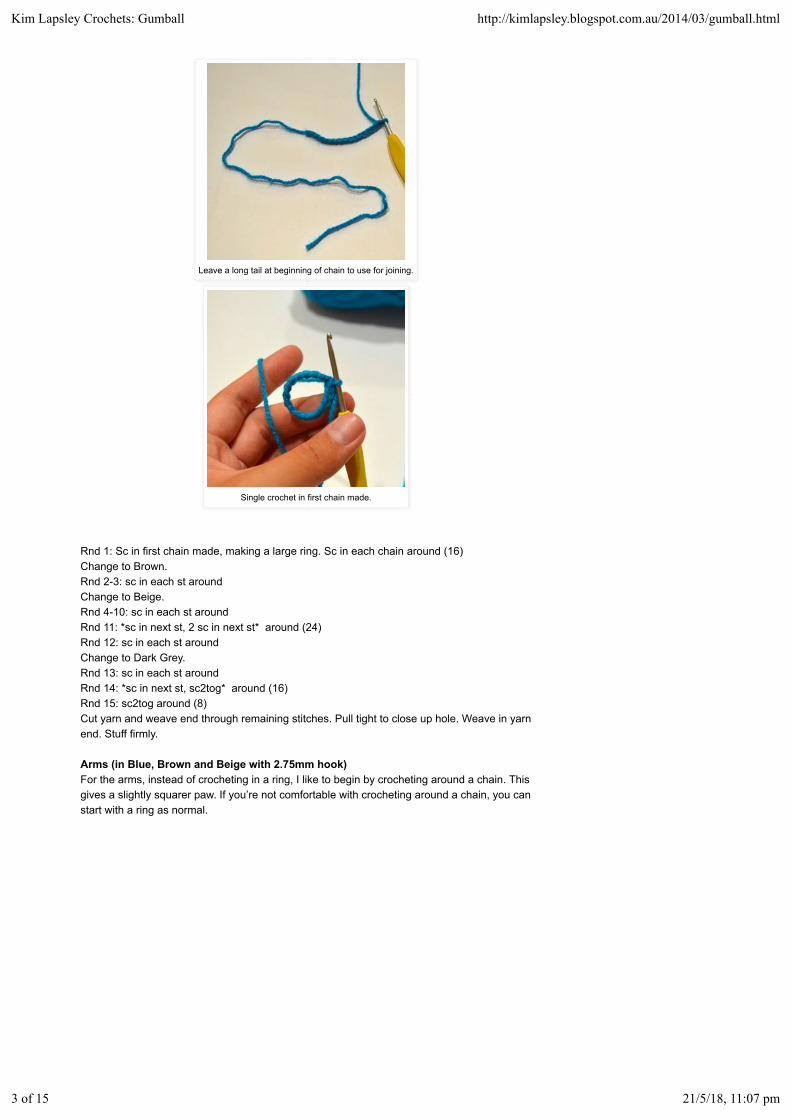
Rnd 1: Sc in first chain made, making a large ring. Sc in each chain around (16)Change to Brown.Rnd 2-3: sc in each st aroundChange to Beige.Rnd 4-10: sc in each st aroundRnd 11: *sc in next st, 2 sc in next st* around (24)Rnd 12: sc in each st aroundChange to Dark Grey.Rnd 13: sc in each st aroundRnd 14: *sc in next st, sc2tog* around (16)Rnd 15: sc2tog around (8)Cut yarn and weave end through remaining stitches. Pull tight to close up hole. Weave in yarnend. Stuff firmly.
Arms (in Blue, Brown and Beige with 2.75mm hook)For the arms, instead of crocheting in a ring, I like to begin by crocheting around a chain. Thisgives a slightly squarer paw. If you’re not comfortable with crocheting around a chain, you canstart with a ring as normal.
Leave a long tail at beginning of chain to use for joining.
Single crochet in first chain made.
Kim Lapsley Crochets: Gumball http://kimlapsley.blogspot.com.au/2014/03/gumball.html
3 of 15 21/5/18, 11:07 pm
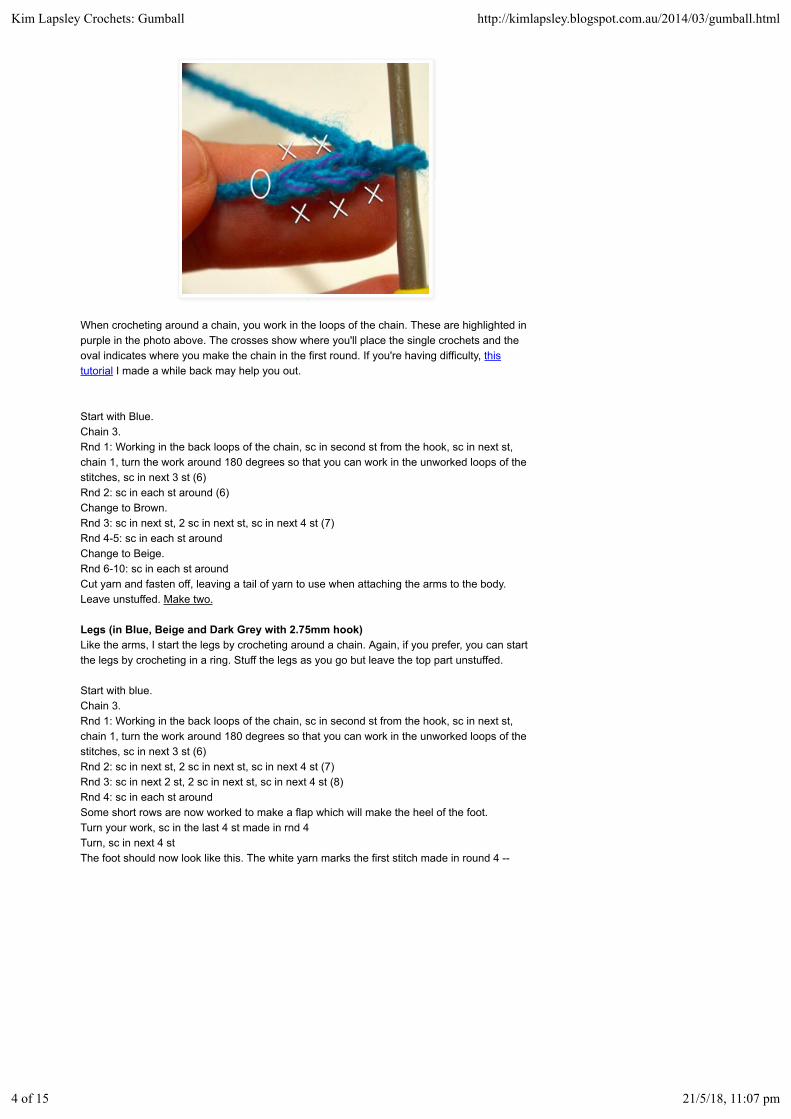
When crocheting around a chain, you work in the loops of the chain. These are highlighted inpurple in the photo above. The crosses show where you'll place the single crochets and theoval indicates where you make the chain in the first round. If you're having difficulty, thistutorial I made a while back may help you out.
Start with Blue.Chain 3.Rnd 1: Working in the back loops of the chain, sc in second st from the hook, sc in next st,chain 1, turn the work around 180 degrees so that you can work in the unworked loops of thestitches, sc in next 3 st (6)Rnd 2: sc in each st around (6)Change to Brown.Rnd 3: sc in next st, 2 sc in next st, sc in next 4 st (7)Rnd 4-5: sc in each st aroundChange to Beige.Rnd 6-10: sc in each st aroundCut yarn and fasten off, leaving a tail of yarn to use when attaching the arms to the body.Leave unstuffed. Make two.
Legs (in Blue, Beige and Dark Grey with 2.75mm hook)Like the arms, I start the legs by crocheting around a chain. Again, if you prefer, you can startthe legs by crocheting in a ring. Stuff the legs as you go but leave the top part unstuffed.
Start with blue.Chain 3.Rnd 1: Working in the back loops of the chain, sc in second st from the hook, sc in next st,chain 1, turn the work around 180 degrees so that you can work in the unworked loops of thestitches, sc in next 3 st (6)Rnd 2: sc in next st, 2 sc in next st, sc in next 4 st (7)Rnd 3: sc in next 2 st, 2 sc in next st, sc in next 4 st (8)Rnd 4: sc in each st aroundSome short rows are now worked to make a flap which will make the heel of the foot.Turn your work, sc in the last 4 st made in rnd 4Turn, sc in next 4 stThe foot should now look like this. The white yarn marks the first stitch made in round 4 --
Kim Lapsley Crochets: Gumball http://kimlapsley.blogspot.com.au/2014/03/gumball.html
4 of 15 21/5/18, 11:07 pm
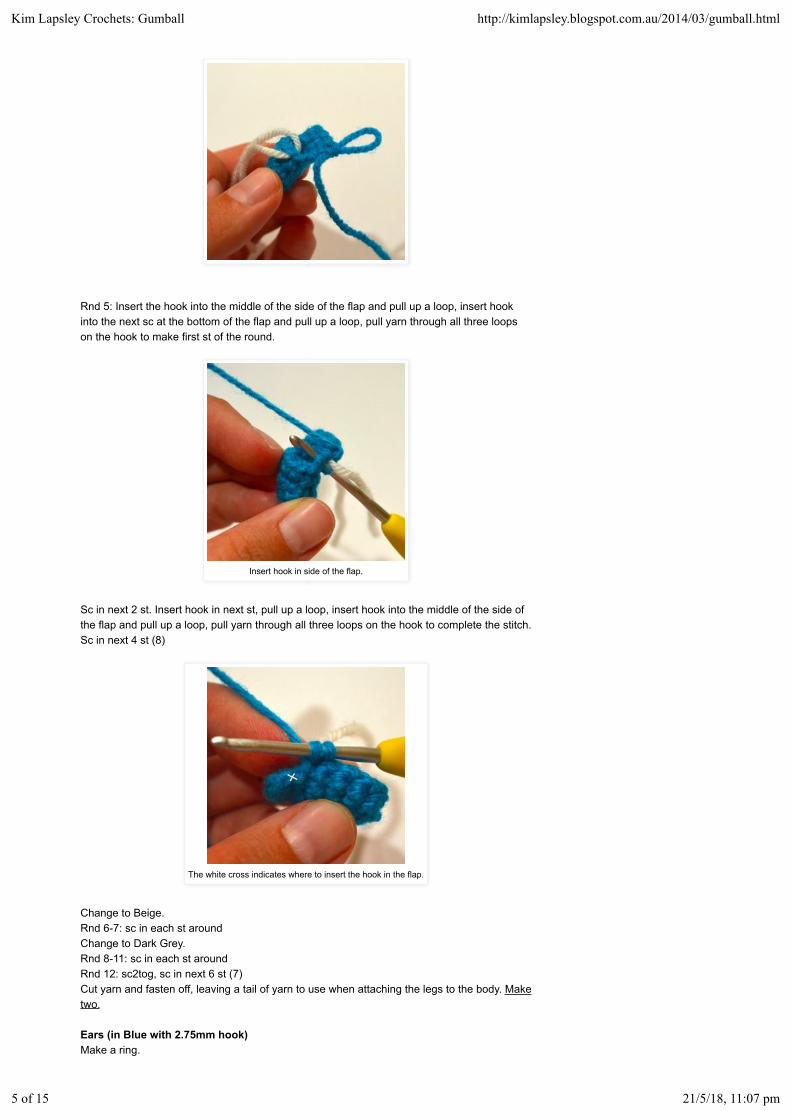
Rnd 5: Insert the hook into the middle of the side of the flap and pull up a loop, insert hookinto the next sc at the bottom of the flap and pull up a loop, pull yarn through all three loopson the hook to make first st of the round.
Sc in next 2 st. Insert hook in next st, pull up a loop, insert hook into the middle of the side ofthe flap and pull up a loop, pull yarn through all three loops on the hook to complete the stitch.Sc in next 4 st (8)
Change to Beige.Rnd 6-7: sc in each st aroundChange to Dark Grey.Rnd 8-11: sc in each st aroundRnd 12: sc2tog, sc in next 6 st (7)Cut yarn and fasten off, leaving a tail of yarn to use when attaching the legs to the body. Maketwo.
Ears (in Blue with 2.75mm hook)Make a ring.
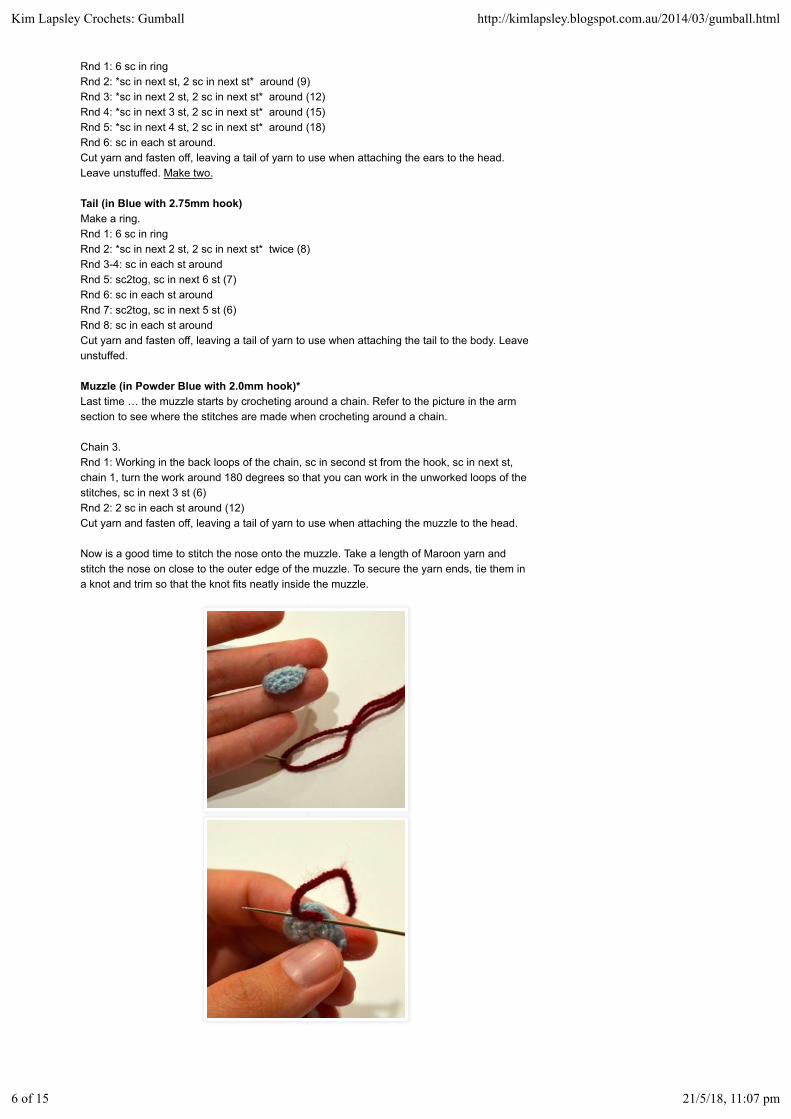
Insert hook in side of the flap.
The white cross indicates where to insert the hook in the flap.
Kim Lapsley Crochets: Gumball http://kimlapsley.blogspot.com.au/2014/03/gumball.html
5 of 15 21/5/18, 11:07 pm
Rnd 1: 6 sc in ringRnd 2: *sc in next st, 2 sc in next st* around (9)Rnd 3: *sc in next 2 st, 2 sc in next st* around (12)Rnd 4: *sc in next 3 st, 2 sc in next st* around (15)Rnd 5: *sc in next 4 st, 2 sc in next st* around (18)Rnd 6: sc in each st around.Cut yarn and fasten off, leaving a tail of yarn to use when attaching the ears to the head.Leave unstuffed. Make two.
Tail (in Blue with 2.75mm hook)Make a ring.Rnd 1: 6 sc in ringRnd 2: *sc in next 2 st, 2 sc in next st* twice (8)Rnd 3-4: sc in each st aroundRnd 5: sc2tog, sc in next 6 st (7)Rnd 6: sc in each st aroundRnd 7: sc2tog, sc in next 5 st (6)Rnd 8: sc in each st aroundCut yarn and fasten off, leaving a tail of yarn to use when attaching the tail to the body. Leaveunstuffed.
Muzzle (in Powder Blue with 2.0mm hook)*Last time … the muzzle starts by crocheting around a chain. Refer to the picture in the armsection to see where the stitches are made when crocheting around a chain.
Chain 3.Rnd 1: Working in the back loops of the chain, sc in second st from the hook, sc in next st,chain 1, turn the work around 180 degrees so that you can work in the unworked loops of thestitches, sc in next 3 st (6)Rnd 2: 2 sc in each st around (12)Cut yarn and fasten off, leaving a tail of yarn to use when attaching the muzzle to the head.
Now is a good time to stitch the nose onto the muzzle. Take a length of Maroon yarn andstitch the nose on close to the outer edge of the muzzle. To secure the yarn ends, tie them ina knot and trim so that the knot fits neatly inside the muzzle.
Kim Lapsley Crochets: Gumball http://kimlapsley.blogspot.com.au/2014/03/gumball.html
6 of 15 21/5/18, 11:07 pm

* The muzzle in the photos may look a little different from yours. This is because I couldn’tfind a DK weight yarn in powder blue so I used a thinner yarn and added a third even round.Just wanted to let you know in case you found it confusing.
Assembly***These are guidelines only. Be guided by your own eyes at all times.***
Join the head to the body. Centre the body over the closed opening of the head. Pin it inplace and stitch on using the yarn end left on the body.
Tie knot to secure yarn ends.
Kim Lapsley Crochets: Gumball http://kimlapsley.blogspot.com.au/2014/03/gumball.html
7 of 15 21/5/18, 11:07 pm
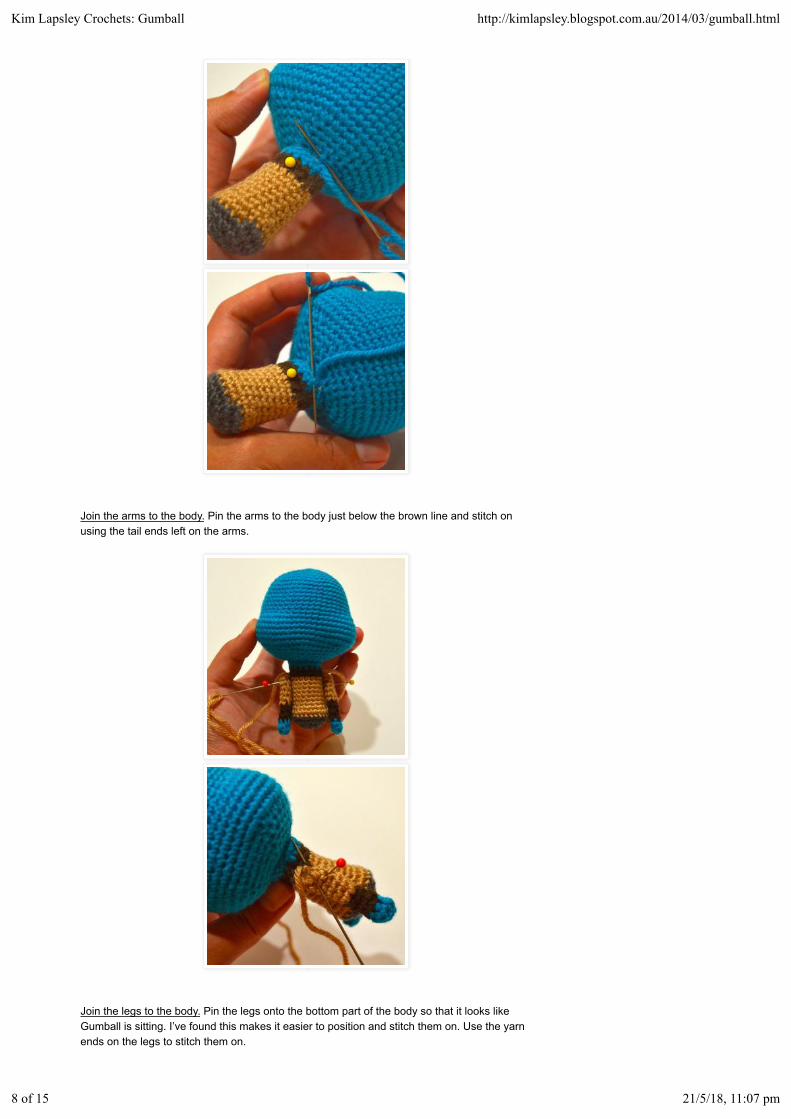
Join the arms to the body. Pin the arms to the body just below the brown line and stitch onusing the tail ends left on the arms.
Join the legs to the body. Pin the legs onto the bottom part of the body so that it looks likeGumball is sitting. I’ve found this makes it easier to position and stitch them on. Use the yarnends on the legs to stitch them on.
Kim Lapsley Crochets: Gumball http://kimlapsley.blogspot.com.au/2014/03/gumball.html
8 of 15 21/5/18, 11:07 pm
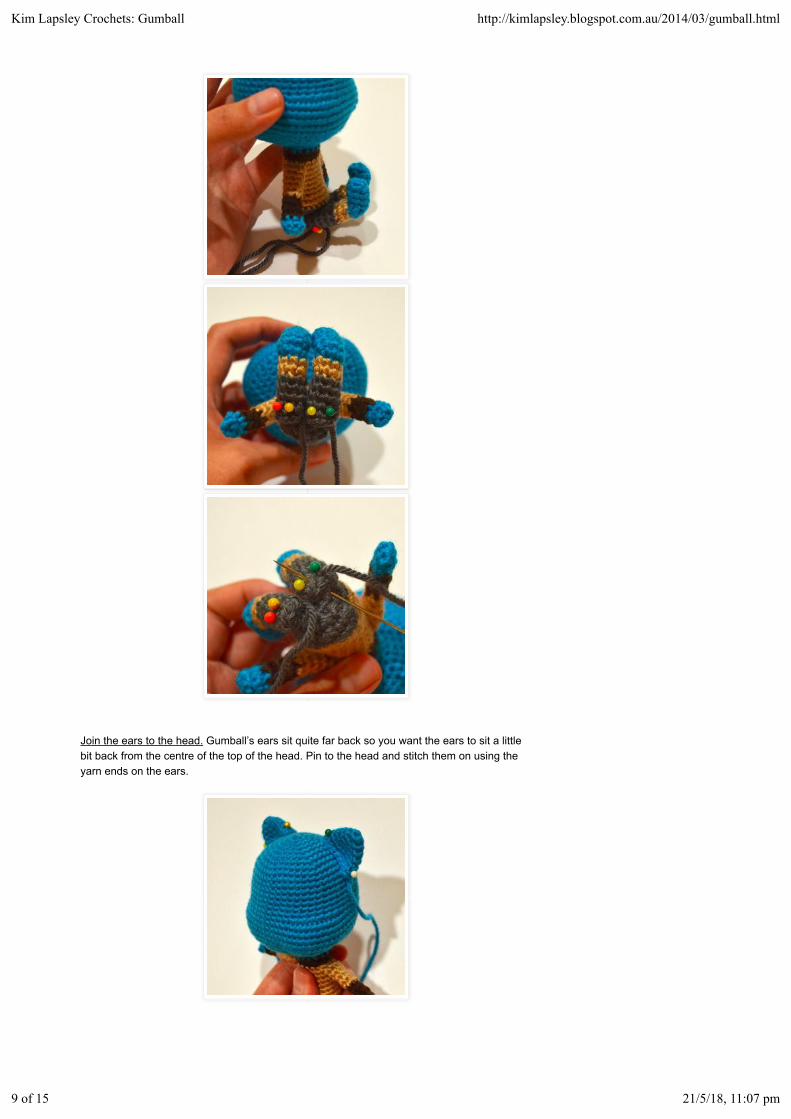
Join the ears to the head. Gumball’s ears sit quite far back so you want the ears to sit a littlebit back from the centre of the top of the head. Pin to the head and stitch them on using theyarn ends on the ears.
Kim Lapsley Crochets: Gumball http://kimlapsley.blogspot.com.au/2014/03/gumball.html
9 of 15 21/5/18, 11:07 pm
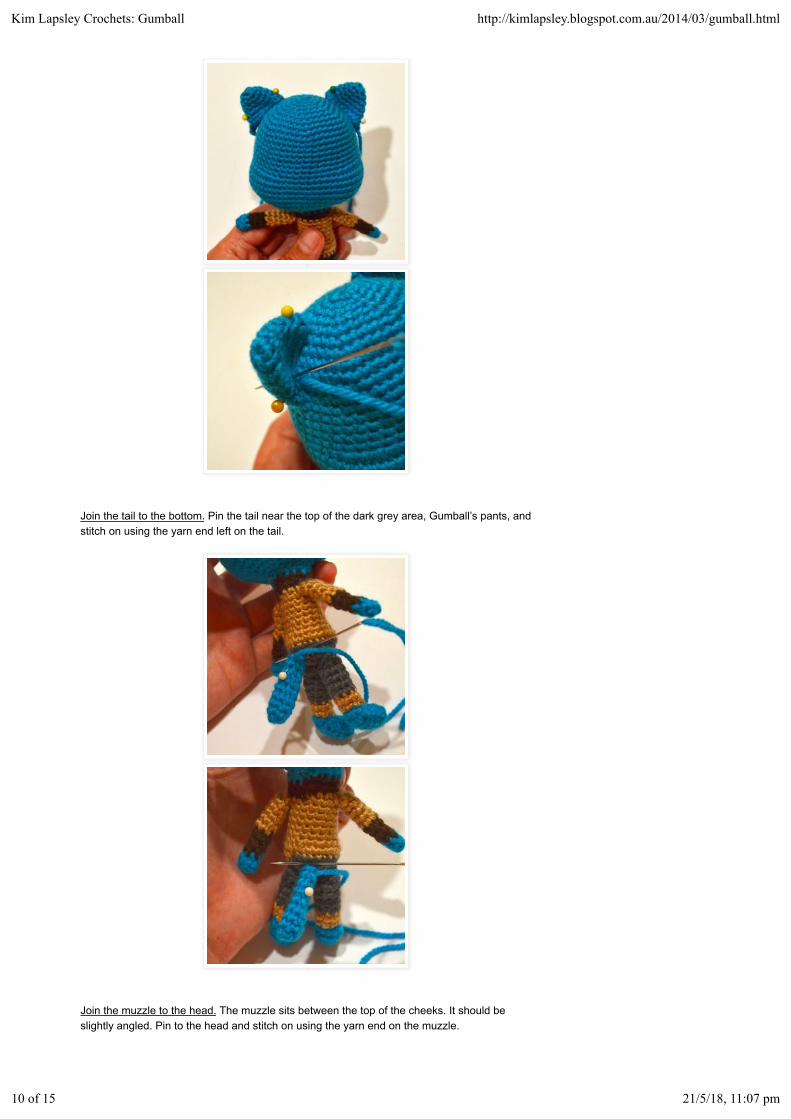
Join the tail to the bottom. Pin the tail near the top of the dark grey area, Gumball’s pants, andstitch on using the yarn end left on the tail.
Join the muzzle to the head. The muzzle sits between the top of the cheeks. It should beslightly angled. Pin to the head and stitch on using the yarn end on the muzzle.
Kim Lapsley Crochets: Gumball http://kimlapsley.blogspot.com.au/2014/03/gumball.html
10 of 15 21/5/18, 11:07 pm
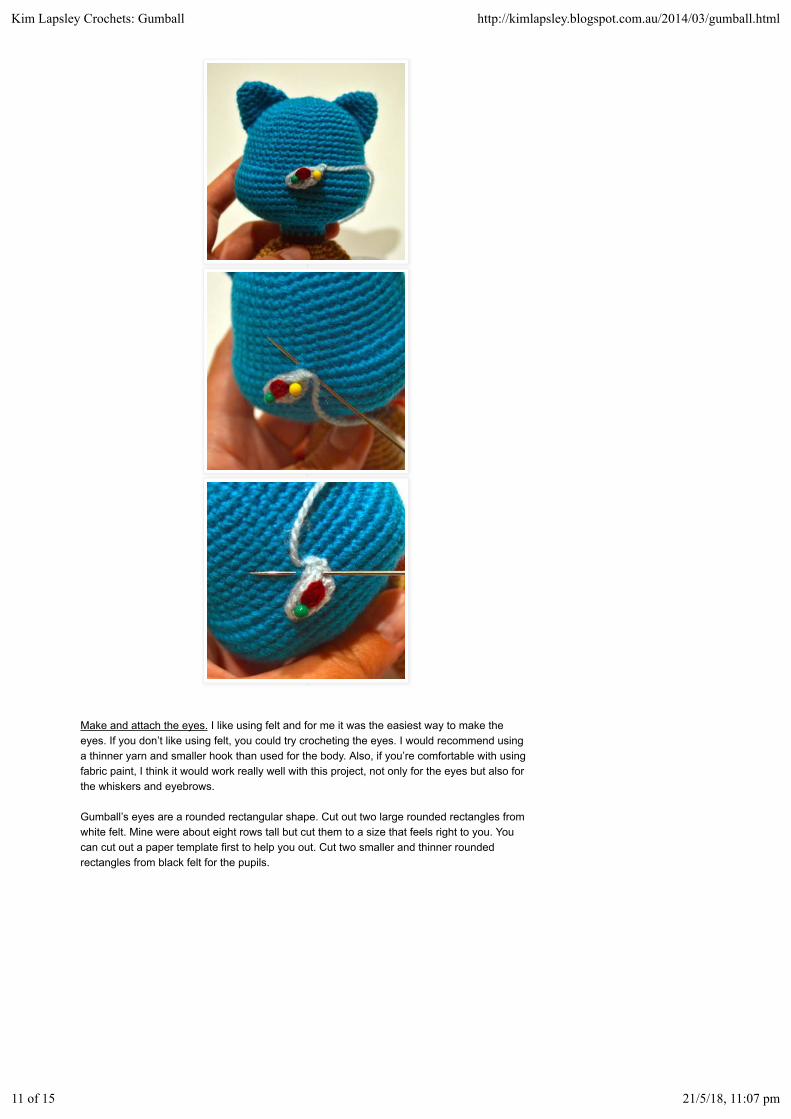
Make and attach the eyes. I like using felt and for me it was the easiest way to make theeyes. If you don’t like using felt, you could try crocheting the eyes. I would recommend usinga thinner yarn and smaller hook than used for the body. Also, if you’re comfortable with usingfabric paint, I think it would work really well with this project, not only for the eyes but also forthe whiskers and eyebrows.
Gumball’s eyes are a rounded rectangular shape. Cut out two large rounded rectangles fromwhite felt. Mine were about eight rows tall but cut them to a size that feels right to you. Youcan cut out a paper template first to help you out. Cut two smaller and thinner roundedrectangles from black felt for the pupils.
Kim Lapsley Crochets: Gumball http://kimlapsley.blogspot.com.au/2014/03/gumball.html
11 of 15 21/5/18, 11:07 pm
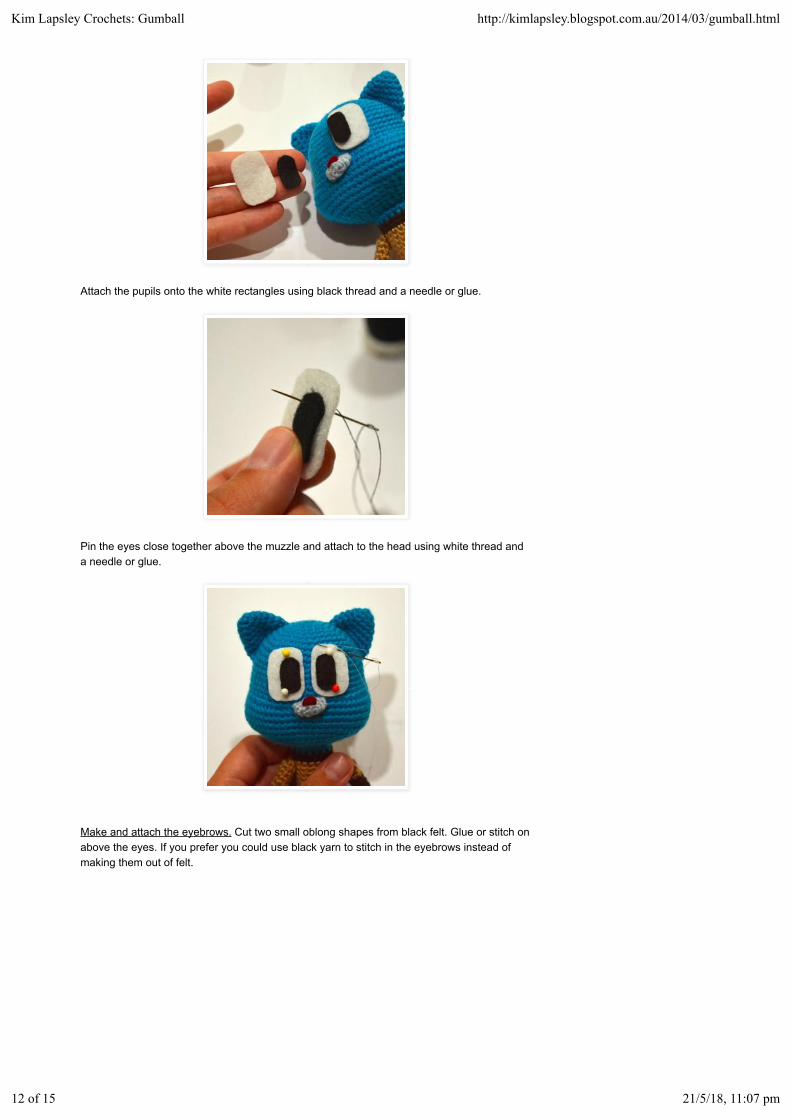
Attach the pupils onto the white rectangles using black thread and a needle or glue.
Pin the eyes close together above the muzzle and attach to the head using white thread anda needle or glue.
Make and attach the eyebrows. Cut two small oblong shapes from black felt. Glue or stitch onabove the eyes. If you prefer you could use black yarn to stitch in the eyebrows instead ofmaking them out of felt.
Kim Lapsley Crochets: Gumball http://kimlapsley.blogspot.com.au/2014/03/gumball.html
12 of 15 21/5/18, 11:07 pm
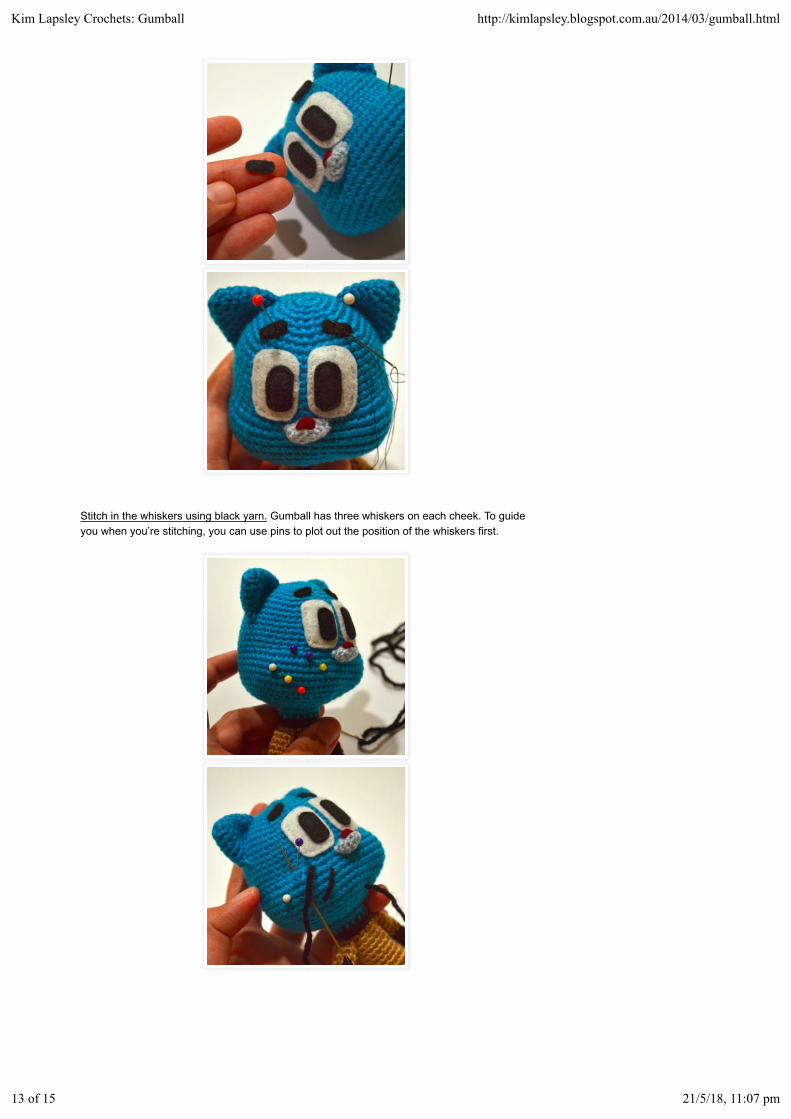
Stitch in the whiskers using black yarn. Gumball has three whiskers on each cheek. To guideyou when you’re stitching, you can use pins to plot out the position of the whiskers first.
Kim Lapsley Crochets: Gumball http://kimlapsley.blogspot.com.au/2014/03/gumball.html
13 of 15 21/5/18, 11:07 pm
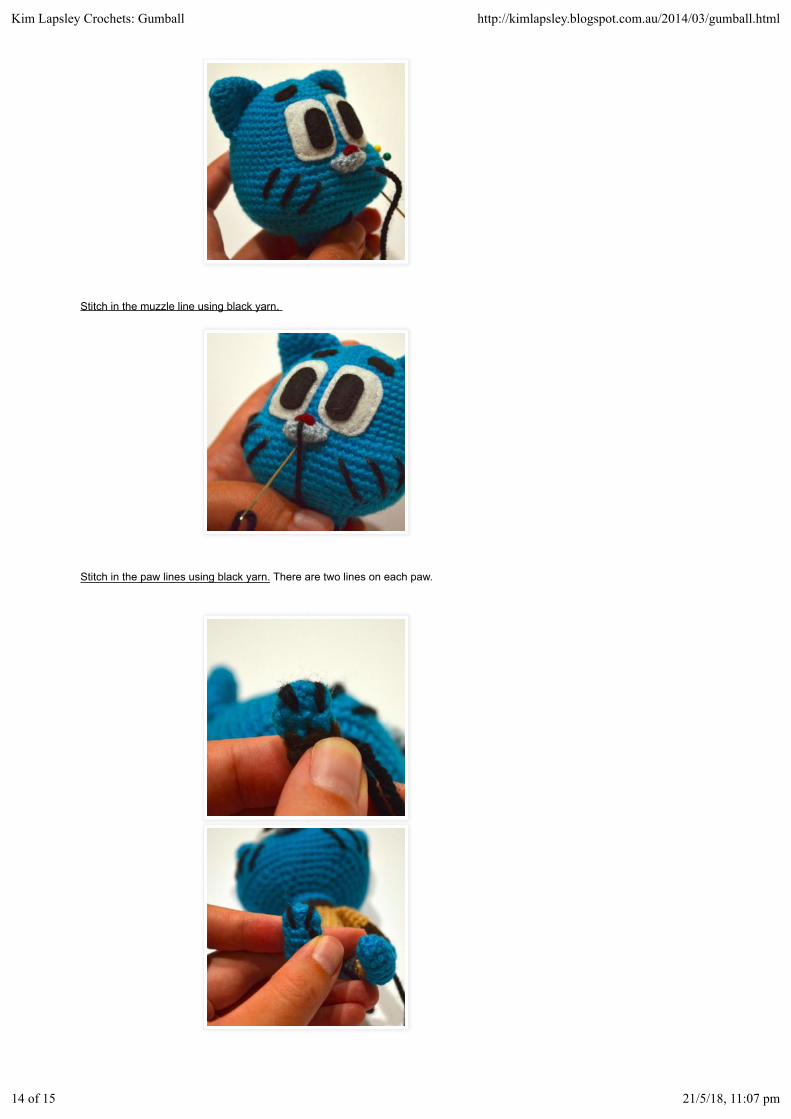
Stitch in the muzzle line using black yarn.
Stitch in the paw lines using black yarn. There are two lines on each paw.
Kim Lapsley Crochets: Gumball http://kimlapsley.blogspot.com.au/2014/03/gumball.html
14 of 15 21/5/18, 11:07 pm
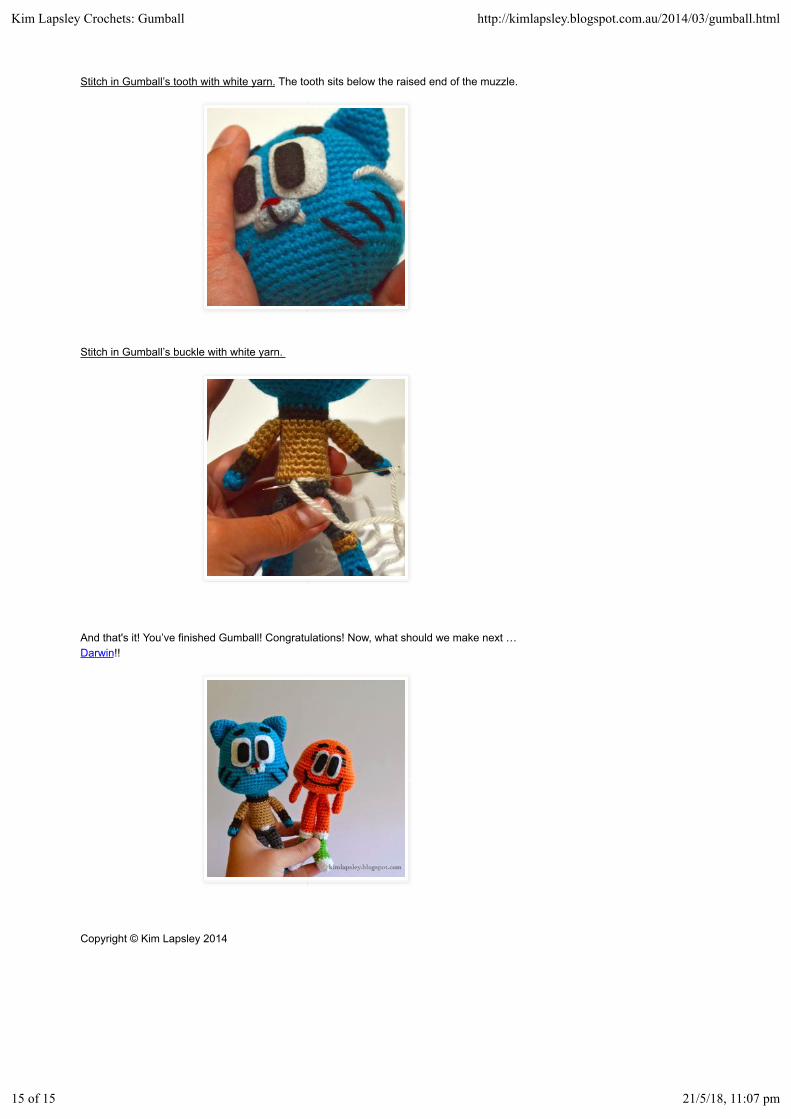
Stitch in Gumball’s tooth with white yarn. The tooth sits below the raised end of the muzzle.
Stitch in Gumball’s buckle with white yarn.
And that's it! You’ve finished Gumball! Congratulations! Now, what should we make next …Darwin!!
Copyright © Kim Lapsley 2014
Kim Lapsley Crochets: Gumball http://kimlapsley.blogspot.com.au/2014/03/gumball.html
15 of 15 21/5/18, 11:07 pm