KIM Best Practices Guide for Shotcrete - Kryton Best Practices Guide for Shotcrete Nov 2013....
24
KIM Best Practices Guide for Shotcrete Nov 2013 Contents 1. What This Document Is For 2. Materials You Will Need 3. Receiving Surfaces For Shotcrete 4. Pre-Shoot Inspection and Preparation 5. Control Joint Spacing 6. How to Install Control Joints o How to Install PVC o How to Install Control Joint Reveals o Cutting Horizontal Reinforcement 7. How to Install Wall-to-Wall Construction Joints o Where to Place Reveals for Wall Construction Joints 8. How to Install Construction Joints Between the Wall and the Slab 9. How to Form Reveals at Wall-to-Slab Construction Joints o Top of Wall o Top of Slab 10. How to Apply Krystol Waterstop Treatment o How to Prepare the Joint o The Importance of Saturated Surface Dry (SSD) o How to Mix and Apply Krystol Waterstop Treatment 11. How to Install Krystol Waterstop Grout 12. How To Deal With Irregularly Shaped Joints 13. How to Waterproof Pipe Penetrations 14. Curing 15. Other Considerations o Shotcrete Accelerators o Reinforcement and Tie Wires 16. Crack Repair Detail Kryton International Inc. 1645 East Kent Avenue, Vancouver B.C., Canada V5P 2S8 | TEL 1.604.324.8280 | FAX 1.604.324.8899 | TOLL FREE 1.800.267.8280 | WEB kryton.com
Transcript of KIM Best Practices Guide for Shotcrete - Kryton Best Practices Guide for Shotcrete Nov 2013....

KIM Best Practices Guide for Shotcrete Nov 2013
Contents
1. What This Document Is For 2. Materials You Will Need 3. Receiving Surfaces For Shotcrete 4. Pre-Shoot Inspection and Preparation 5. Control Joint Spacing 6. How to Install Control Joints
o How to Install PVC o How to Install Control Joint Reveals o Cutting Horizontal Reinforcement
7. How to Install Wall-to-Wall Construction Joints o Where to Place Reveals for Wall Construction Joints
8. How to Install Construction Joints Between the Wall and the Slab 9. How to Form Reveals at Wall-to-Slab Construction Joints
o Top of Wall o Top of Slab
10. How to Apply Krystol Waterstop Treatment o How to Prepare the Joint o The Importance of Saturated Surface Dry (SSD) o How to Mix and Apply Krystol Waterstop Treatment
11. How to Install Krystol Waterstop Grout 12. How To Deal With Irregularly Shaped Joints 13. How to Waterproof Pipe Penetrations 14. Curing 15. Other Considerations
o Shotcrete Accelerators o Reinforcement and Tie Wires
16. Crack Repair Detail
Kryton International Inc. 1645 East Kent Avenue, Vancouver B.C., Canada V5P 2S8 | TEL 1.604.324.8280 | FAX 1.604.324.8899 | TOLL FREE 1.800.267.8280 | WEB kryton.com

KIM Best Practices Guide for Shotcrete Nov 2013
What This Document Is For This guide provides important tips and details for how to build a waterproof, multistory basement using KIM treated shotcrete and the Krystol Waterstop System. Shotcrete provides many advantages over traditional cast-in-place construction, but also brings new waterproofing challenges. Follow the instructions in this guide to ensure that your shotcrete project is successfully waterproofed. This guide assumes that shotcrete will be installed by an ACI certified shotcrete crew following the procedures found in ACI 506R – Guide to Shotcrete. Important Note about Using Krystol Internal Membrane (KIM) Concrete Waterproofing Admixture to Waterproof Your Structure You are using the KIM system to make a waterproof membrane out of the concrete or shotcrete. This is different from traditional construction where the concrete forms the structure only. The KIM concrete you are placing will be the only barrier to water penetration. This means that common defects found in typical concrete cannot be tolerated in KIM shotcrete. Poor consolidation, unplanned cold joints, cracks, penetrations, contaminations, etc. will all result in a leaking structure. To avoid leakage and achieve success you must follow the critical instructions outlined in this document. In addition to this guide, the following Kryton literature contains important instructions and guidance to help you successfully install the KIM waterproofing system: Tips for placing waterproof shotcrete
Application Instruction # Title
1.21 Instructions for Shotcrete Nozzleman and Crew 1.22 Instructions for Shotcrete Inspector
How to install waterproof joints
Application Instruction # Title
4.12 Waterproofing Construction Joints 4.21 Waterproofing Construction Joints (Specific Instructions for Shotcrete) 4.22 Waterproofing Unintended Cold Joints (Shotcrete) 4.14 Waterproofing Control Joints
These instructions are all available from www.kryton.com or from your Kryton representative.
Kryton International Inc. 1645 East Kent Avenue, Vancouver B.C., Canada V5P 2S8 | TEL 1.604.324.8280 | FAX 1.604.324.8899 | TOLL FREE 1.800.267.8280 | WEB kryton.com

KIM Best Practices Guide for Shotcrete Nov 2013
Materials You Will Need To Install The KIM Waterproofing System 1. KIM treated shotcrete
a. Supplied by an approved ready-mix provider
2. The Krystol Waterstop System, consisting of: a. Krystol Waterstop Treatment b. Krystol Waterstop Grout External
3. The Krystol Crack Repair System a. Krystol Plug b. Krystol T1 c. Krystol Bari-Cote
Receiving Surfaces for Shotcrete
1. If conventional formwork cannot be used, the best receiving surface is drain matt such as MiraDrain or Delta Drain. The drain matt provides a consistent, non absorptive surface for the shotcrete.
2. The resulting drainage cavity also reduces the water pressure acting on the KIM shotcrete walls. This results in improved crack sealing and reduces the risk of leaks.
Installation of drain matt prior to shotcrete
work
Note - Rock, concrete, masonry and other absorptive surfaces must be damp prior to shooting in accordance with ACI 506.2.
Kryton International Inc. 1645 East Kent Avenue, Vancouver B.C., Canada V5P 2S8 | TEL 1.604.324.8280 | FAX 1.604.324.8899 | TOLL FREE 1.800.267.8280 | WEB kryton.com

KIM Best Practices Guide for Shotcrete Nov 2013
Pre-Shoot Inspection and Preparation A pre-shoot inspection is critical to any shotcrete project. The following points are particularly important for the successful installation of waterproof shotcrete.
1. Verify rebar is properly positioned, braced and clean. o Remove any overspray or excess Krystol Waterstop Treatment from rebar, particularly around
joints.
2. Ensure that excess tie wires are removed, and ends are cut to minimize congestion.
3. Ensure Krystol Waterstop Treatment is applied to constructions joints and has properly hardened.
4. Verify control joints are properly installed at the correct spacing. o Verify horizontal rebar is properly cut and secured (where specified)
5. Clean the construction joint of debris.
6. Dampen the joint surface, but remove standing water just before shooting.
7. Verify that “KIM Admixture” is marked on the shotcrete delivery ticket.
Control joint spacing Control joints prevent leaks due to random cracking. Without control joints, drying shrinkage and other factors will cause cracks to form at regular intervals in a shotcrete span. Control joints create an intentional plane of weakness within the shotcrete and induce a crack. Control joints must be spaced at regular intervals so that cracks from within the joints and not at random locations. Cracks that are isolated to control joints are easily made watertight using the Krystol Waterstop System.
1. The maximum joint spacing for shotcrete is 20 times the wall section thickness to a maximum of 16 feet (5 m).
o For a 200 mm (8 in.) wall, space joints at no more than 4 m (13 ft.) o For a 250 mm (10 in.) wall, space joints at no more than 5 m (16 ft.) o For 300 mm (12 in.) walls, the maximum spacing remains 5 m (16 ft.)
2. Joints must be placed within 10 feet (3 m) of corners.
3. Additional joints may be needed in areas where the concrete changes thickness or direction, as these
areas are more likely to crack.
Kryton International Inc. 1645 East Kent Avenue, Vancouver B.C., Canada V5P 2S8 | TEL 1.604.324.8280 | FAX 1.604.324.8899 | TOLL FREE 1.800.267.8280 | WEB kryton.com

KIM Best Practices Guide for ShotcreteNov 2013
Place joints within 10 feet of corners for improved crack control.
In some cases, project conditions may require closer joint spacing. If cracks are forming regularly in between the control joints while following the above guidelines, then reduce the control joint spacing for the duration of the work.
How to Install Control JointsInstall control joints to shotcrete walls as per Application Instruction 4.14 – Waterproofing Horizontal and Vertical Construction Joints.
Typical control joint with crack inducing PVC and reveal.
Kryton International Inc.1645 East Kent Avenue, Vancouver B.C., Canada V5P 2S8 | TEL 1.604.324.8280 | FAX 1.604.324.8899 | TOLL FREE 1.800.267.8280 | WEB kryton.com
KIM Best Practices Guide for ShotcreteNov 2013
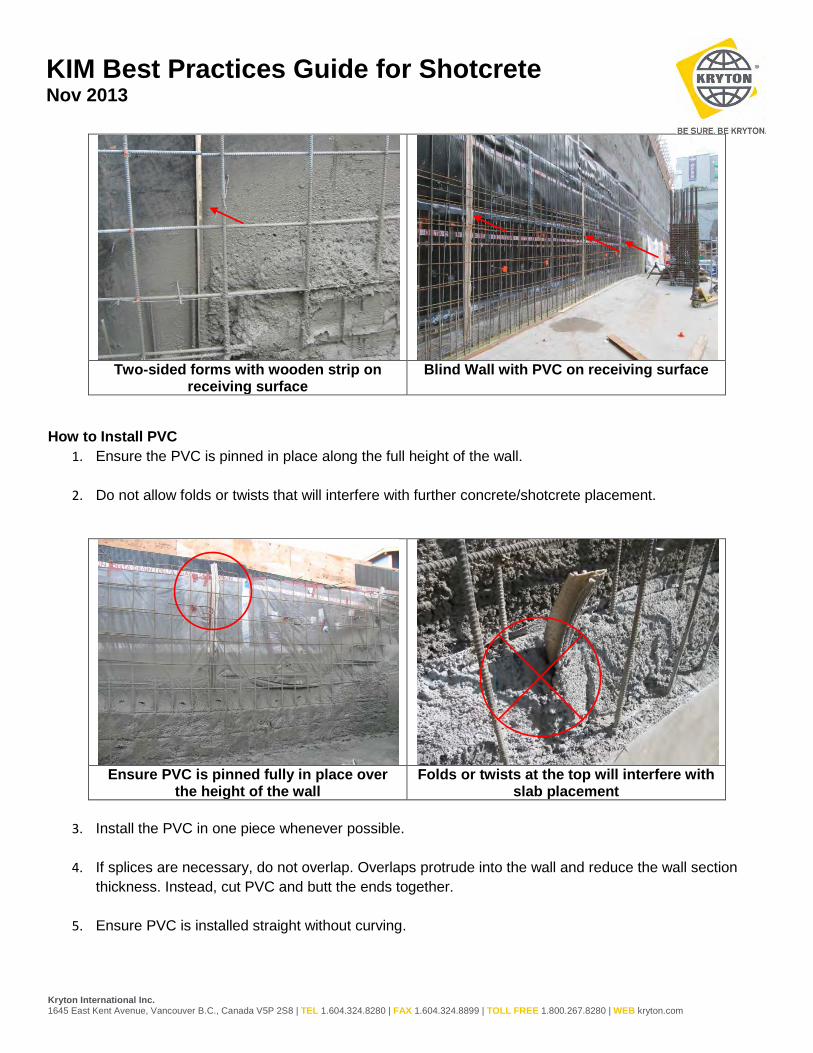
Two-sided forms with wooden strip on receiving surface
Blind Wall with PVC on receiving surface
How to Install PVC 1. Ensure the PVC is pinned in place along the full height of the wall.
2. Do not allow folds or twists that will interfere with further concrete/shotcrete placement.
Ensure PVC is pinned fully in place over the height of the wall
Folds or twists at the top will interfere with slab placement
3. Install the PVC in one piece whenever possible.
4. If splices are necessary, do not overlap. Overlaps protrude into the wall and reduce the wall section thickness. Instead, cut PVC and butt the ends together.
5. Ensure PVC is installed straight without curving.
Kryton International Inc.1645 East Kent Avenue, Vancouver B.C., Canada V5P 2S8 | TEL 1.604.324.8280 | FAX 1.604.324.8899 | TOLL FREE 1.800.267.8280 | WEB kryton.com

KIM Best Practices Guide for Shotcrete Nov 2013
Avoid overlapping PVC. Instead, butt ends together to minimize protrusions into the
shotcrete wall.
There is a slight curve to this segment of PVC. This will make the crack fall outside
of the reveal. Install the PVC straight for the best results.
6. Secure the PVC to prevent bulges. If budging sections cannot be pinned in place, make a cut in the PVC and pin each down separately.
Ensure the PVC is flush to the receiving surface
How to Install Control Joint Reveals
1. Form reveals while the shotcrete still remains plastic.
2. Using a trowel or other suitable tool, cut the two sidewalls of the reveal into the plastic shotcrete, then remove shotcrete in between to form the reveal.
3. Using a trowel, wooden insert or other suitable too; lightly finish the sides of the keyway to produce a rough but level profile.
Kryton International Inc. 1645 East Kent Avenue, Vancouver B.C., Canada V5P 2S8 | TEL 1.604.324.8280 | FAX 1.604.324.8899 | TOLL FREE 1.800.267.8280 | WEB kryton.com

KIM Best Practices Guide for Shotcrete Nov 2013
Formation of control joint reveal
Typical control joint reveal The resulting crack is isolated to the joint
Important **The reveal must be aligned with the crack inducing element in the control joint (PVC center bulb or wooden strip). If they are out of alignment, the crack will from outside of the reveal where it is more difficult to repair.** **If the reveal is very rough and uneven, the Krystol Waterstop Grout is more likely to crack or contain voids.** **If the reveal is rough and uneven, use a chisel to clean the reveal prior to installing Krystol Waterstop Grout.**
Kryton International Inc. 1645 East Kent Avenue, Vancouver B.C., Canada V5P 2S8 | TEL 1.604.324.8280 | FAX 1.604.324.8899 | TOLL FREE 1.800.267.8280 | WEB kryton.com
KIM Best Practices Guide for Shotcrete Nov 2013
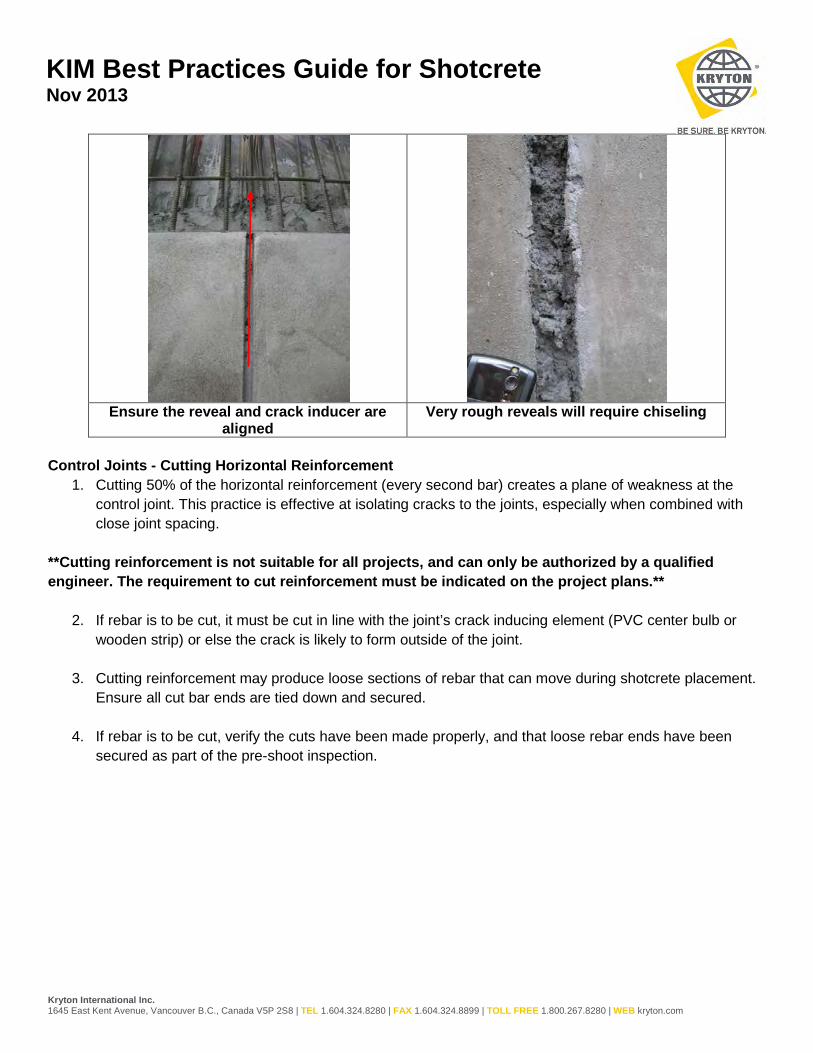
Ensure the reveal and crack inducer are
aligned Very rough reveals will require chiseling
Control Joints - Cutting Horizontal Reinforcement
1. Cutting 50% of the horizontal reinforcement (every second bar) creates a plane of weakness at the control joint. This practice is effective at isolating cracks to the joints, especially when combined with close joint spacing.
**Cutting reinforcement is not suitable for all projects, and can only be authorized by a qualified engineer. The requirement to cut reinforcement must be indicated on the project plans.**
2. If rebar is to be cut, it must be cut in line with the joint’s crack inducing element (PVC center bulb or
wooden strip) or else the crack is likely to form outside of the joint.
3. Cutting reinforcement may produce loose sections of rebar that can move during shotcrete placement. Ensure all cut bar ends are tied down and secured.
4. If rebar is to be cut, verify the cuts have been made properly, and that loose rebar ends have been secured as part of the pre-shoot inspection.
Kryton International Inc. 1645 East Kent Avenue, Vancouver B.C., Canada V5P 2S8 | TEL 1.604.324.8280 | FAX 1.604.324.8899 | TOLL FREE 1.800.267.8280 | WEB kryton.com

KIM Best Practices Guide for ShotcreteNov 2013
Where specified, ensure cuts in horizontal rebar are in line with the crack inducer.
How to Install Wall-to-Wall Construction JointsUse this construction joint detail at the termination of wall shoots as per Application Instruction 4.21 – Waterproofing Horizontal and Vertical Construction Joints (Shotcrete)
1. Shoot the wall to length; then cut back so the joint is angled 45 degrees to the nozzleman.
2. Remove overspray from reinforcement at the joint.
3. Apply Krystol Waterstop Treatment as per Application Instruction 4.21 – Waterproofing Horizontal and Vertical Construction Joints (Shotcrete)
a. For the best results, applying Krystol Waterstop Treatment the same day the shotcrete is placed (the moisture in the shotcrete will help cure the Krystol Waterstop Treatment).
4. When shooting the next section, form a reveal at the construction joint as per Application Instruction 4.21 – Waterproofing Horizontal and Vertical Construction Joints (Shotcrete) (this is essentially identical to forming reveals at the control joints).
Kryton International Inc.1645 East Kent Avenue, Vancouver B.C., Canada V5P 2S8 | TEL 1.604.324.8280 | FAX 1.604.324.8899 | TOLL FREE 1.800.267.8280 | WEB kryton.com

KIM Best Practices Guide for Shotcrete Nov 2013
Typical wall-to-wall construcion joint with KWT.
Important **Do not install a crack inducing element (PVC or wooden strip) at construction joints, and do not cut rebar unless the project plans specify this action at the construction joints as well. The break in the wall is enough to from a crack at a construction joint. Also, the sloped surface of a construction joint will cause a crack inducer to direct the crack away from the reveal.** **Ensure the construction joint profile will allow the joint and resulting crack to intersect the reveal (refer to the diagrams on the following page.**
Kryton International Inc. 1645 East Kent Avenue, Vancouver B.C., Canada V5P 2S8 | TEL 1.604.324.8280 | FAX 1.604.324.8899 | TOLL FREE 1.800.267.8280 | WEB kryton.com

KIM Best Practices Guide for Shotcrete Nov 2013
Where to Place Reveals for Wall Construction Joints Correct: Water ingress along the joint will be directed to the reveal filled with Krystol Waterstop Grout. Incorrect: The following joint profile is often used, but is not suitable for use with the KIM system, as it allows cracks to form outside of the reveal: Water ingress along the joint can bypass the reveal, and it is more likely to require additional repair.
Existing Shotcrete New Shotcrete
Krystol Waterstop Grout
Existing Shotcrete New Shotcrete
Reveal
Krystol Waterstop Grout Crack
Kryton International Inc. 1645 East Kent Avenue, Vancouver B.C., Canada V5P 2S8 | TEL 1.604.324.8280 | FAX 1.604.324.8899 | TOLL FREE 1.800.267.8280 | WEB kryton.com

KIM Best Practices Guide for ShotcreteNov 2013
How to Install Construction Joints between the Wall and the SlabTwo joint systems are available. See the drawings below for further detail.
1. Finish the top of walls flat:
1. Shoot the wall to height and finish flat.2. Remove overspray from reinforcement. 3. Apply Krystol Waterstop Treatment to the joint area (Application Instruction 4.12 – Waterproofing
Horizontal and Vertical Construction Joints: External Method) 4. Form a reveal at the bottom of the wall/slab construction joint.5. Use KIM concrete around the outer perimeter of the slab; minimum thickness 1.5x wall thickness.6. Apply Krystol Waterstop Treatment to the top of the slab.7. Pin plywood or similar material to from a reveal at the bottom of the wall.8. Shoot the next wall section as normal.
Kryton International Inc.1645 East Kent Avenue, Vancouver B.C., Canada V5P 2S8 | TEL 1.604.324.8280 | FAX 1.604.324.8899 | TOLL FREE 1.800.267.8280 | WEB kryton.com

KIM Best Practices Guide for ShotcreteNov 2013
2. Build a ledge into the wall for the slab:
**This option simplifies the slab pour, but it must be approved the projects structural engineer**
1. Shoot the wall to specified height.2. Shoot past the specified height at half thickness to create an “L” shaped ledge.
a. Minimum thickness of KIM shotcrete: 100 mm (4 in.) b. Build the half wall to the height of the slab + 10%c. The minimum width for slab to rest on must be specified by the project’s structural engineer.d. Finish the joint to a rough but level profile.e. Remove all overspray from reinforcement.
3. Apply Krystol Waterstop Treatment to the joint area (Application Instruction 4.12 – Waterproofing Horizontal and Vertical Construction Joints External Methods)
4. Form a reveal at the bottom of the wall/slab construction joint.5. Pour slab as normal. 6. Apply Krystol Waterstop Treatment to the top of the slab.7. Pin plywood or similar material to from a reveal at the bottom of the wall.8. Shoot the next wall section as normal.
Kryton International Inc.1645 East Kent Avenue, Vancouver B.C., Canada V5P 2S8 | TEL 1.604.324.8280 | FAX 1.604.324.8899 | TOLL FREE 1.800.267.8280 | WEB kryton.com

KIM Best Practices Guide for Shotcrete Nov 2013
Important **Remove all overspray from reinforcement using an air lance.** **Ensure a minimum of 25 mm (1 in.) of clearance around the reinforcement for the slab (or as specified)**
Typical top of wall joint
Note the rough but level profile, and the removal of overspray from rebar using an air
lance.
Kryton International Inc. 1645 East Kent Avenue, Vancouver B.C., Canada V5P 2S8 | TEL 1.604.324.8280 | FAX 1.604.324.8899 | TOLL FREE 1.800.267.8280 | WEB kryton.com

KIM Best Practices Guide for ShotcreteNov 2013
How to Form Reveals at the Wall-to-Slab Construction Joints1. Pin plywood or other suitable form at the base of the wall. Place shotcrete as normal, then remove the
form to leave a reveal between the slab and the shotcrete wall.
2. Maximum dimensions are 40 mm x 40 mm tapering to a height of 30 mm (depth)
3. Smaller keyways with similar proportions are acceptable. A keyway will perform best if the keyway is deeper than it is wide, i.e.
a. 25 mm by 40 mm (ideal for walls with sufficient shotcrete cover over the rebar)b. 12.5 mm by 25 mm (suitable for walls with limited shotcrete cover over the rebar).
Top of wall
Joint prepared for slab pour (with top-of-wall reveal)
Top of slab
Top of slab prepared for wall shoot (with reveal formed by plywood)
Kryton International Inc.1645 East Kent Avenue, Vancouver B.C., Canada V5P 2S8 | TEL 1.604.324.8280 | FAX 1.604.324.8899 | TOLL FREE 1.800.267.8280 | WEB kryton.com
KIM Best Practices Guide for Shotcrete Nov 2013
How to Apply Krystol Waterstop Treatment 1. Krystol Waterstop Treatment is applied at all construction joint locations as per Application Instructions
4.12 & 4.21.
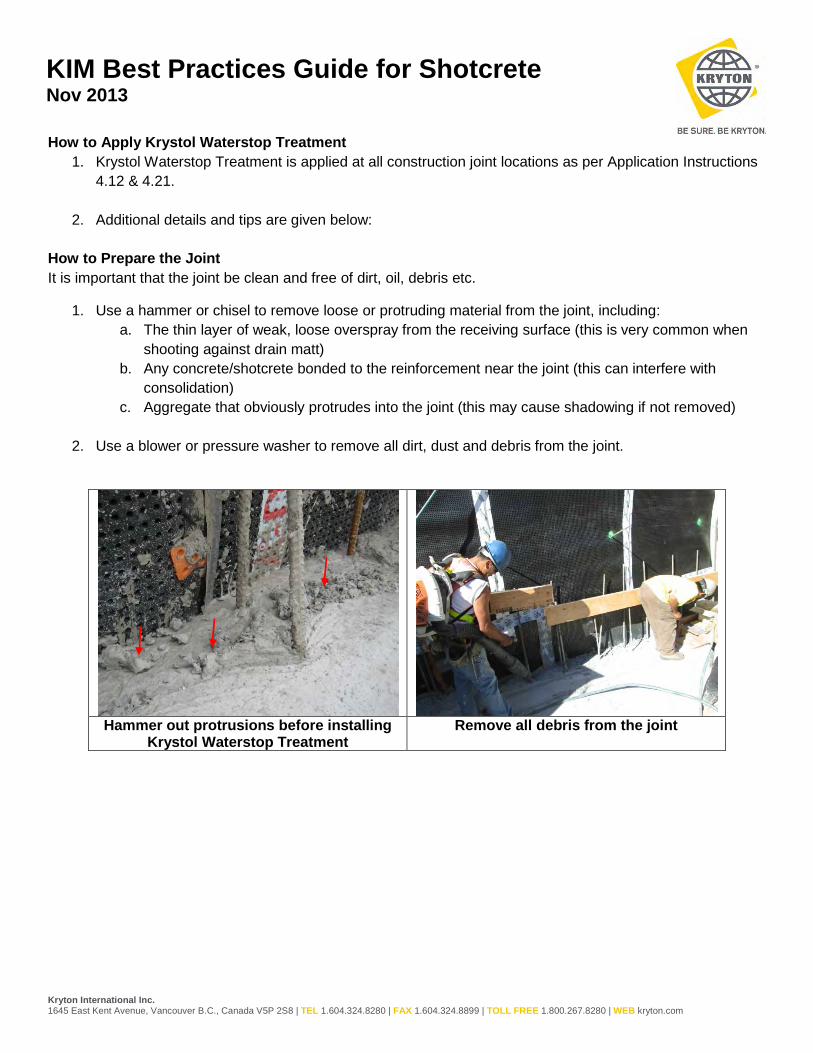
2. Additional details and tips are given below: How to Prepare the Joint It is important that the joint be clean and free of dirt, oil, debris etc.
1. Use a hammer or chisel to remove loose or protruding material from the joint, including: a. The thin layer of weak, loose overspray from the receiving surface (this is very common when
shooting against drain matt) b. Any concrete/shotcrete bonded to the reinforcement near the joint (this can interfere with
consolidation) c. Aggregate that obviously protrudes into the joint (this may cause shadowing if not removed)
2. Use a blower or pressure washer to remove all dirt, dust and debris from the joint.
Hammer out protrusions before installing
Krystol Waterstop Treatment Remove all debris from the joint
Kryton International Inc. 1645 East Kent Avenue, Vancouver B.C., Canada V5P 2S8 | TEL 1.604.324.8280 | FAX 1.604.324.8899 | TOLL FREE 1.800.267.8280 | WEB kryton.com

KIM Best Practices Guide for Shotcrete Nov 2013
The Importance of Saturated Surface Dry (SSD)
Saturated surface dry or SSD is a state in which the pores of the concrete are saturated with water but there is no standing water on the surface. The SSD condition is critical to achieving good results with Krystol Waterstop Treatment.
1. If Krystol Waterstop Treatment is applied to a dry surface it will dry out quickly from evaporation and suction from the dry concrete. Rapid drying will result in a weak, dusty treatment.
2. If Krystol Waterstop Treatment is applied to an oversaturated surface (i.e. with puddles) will become diluted and washed out, resulting in a weak product.
3. To achieve SSD, soak the joint surface thoroughly with water. If the water quickly evaporates or soaks in, continue to apply water until the concrete remains damp.
a. In hot weather, the joint will require multiple soakings with a hose before it is SSD.
b. Begin soaking a minimum of 20 minutes before applying Krystol Waterstop Treatment in hot weather.
c. During application, continue to dampen the joint ahead of the applicator so it remains SSD.
4. Immediately before applying Krystol Waterstop Treatment, use a sponge to soak up any water that has
pooled in the joint. The concrete should look and feel slightly damp without any visible water droplets or puddles. Be sure to remove water that has pooled in voids in the concrete.
How to Mix and Apply Krystol Waterstop Treatment
As each construction joint becomes accessible, apply the Krystol Waterstop Treatment as soon as possible.
1. Vertical wall construction joints – apply the same day the wall is shot.
2. Horizontal joints (top of wall and slab) – apply as soon as possible. It will be much easier if you can apply Krystol Waterstop Treatment before additional reinforcement is installed.
The proper mix ratio is 3 parts powder to 1 part water based on loose powder (do not pack). The Krystol Waterstop Treatment should be a thick but flowing batter.
3. The correct coverage is 1 kg/m2, which should provide a thick coating (1-2 mm thick).
4. Use a stiff bristled brush and push the Krystol Waterstop Treatment into all the voids in the joint surface. A smaller bush will be useful around areas of greater rebar congestion.
Kryton International Inc. 1645 East Kent Avenue, Vancouver B.C., Canada V5P 2S8 | TEL 1.604.324.8280 | FAX 1.604.324.8899 | TOLL FREE 1.800.267.8280 | WEB kryton.com
KIM Best Practices Guide for Shotcrete Nov 2013
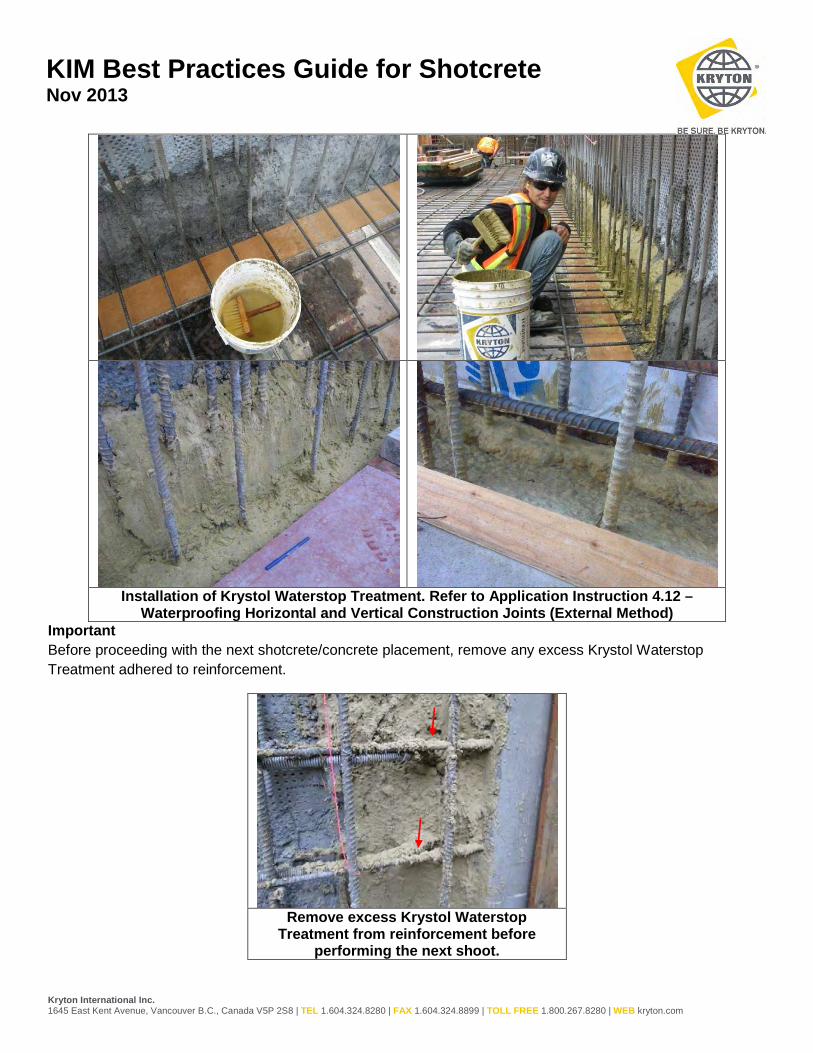
Installation of Krystol Waterstop Treatment. Refer to Application Instruction 4.12 –
Waterproofing Horizontal and Vertical Construction Joints (External Method) Important Before proceeding with the next shotcrete/concrete placement, remove any excess Krystol Waterstop Treatment adhered to reinforcement.
Remove excess Krystol Waterstop
Treatment from reinforcement before performing the next shoot.
Kryton International Inc. 1645 East Kent Avenue, Vancouver B.C., Canada V5P 2S8 | TEL 1.604.324.8280 | FAX 1.604.324.8899 | TOLL FREE 1.800.267.8280 | WEB kryton.com

KIM Best Practices Guide for Shotcrete Nov 2013
Important **When pouring slabs, ensure that the wall-to-slab joint area is consolidated to produce a rough but level profile. Highly irregular joints are not well suited to the application of Krystol Waterstop Treatment**
Ideal slab joint profile Insufficient consolidation
Chiseling is now required
How to Install Krystol Waterstop Grout
1. Use the external (grey) version, product code K322x.
2. Install to all joint reveals as per Application Instruction 4.12, 4.14 & 4.21.
3. Wait a minimum of 28 days before installing grout to allow for initial concrete shrinkage.
4. In practice, the longer until grout is installed; the better. Ideally, wait until the building is “topped off” so that loading due to construction has stabilized.
Use Krystol Waterstop Grout (External) to fill all reveals flush to the surface
Kryton International Inc. 1645 East Kent Avenue, Vancouver B.C., Canada V5P 2S8 | TEL 1.604.324.8280 | FAX 1.604.324.8899 | TOLL FREE 1.800.267.8280 | WEB kryton.com

KIM Best Practices Guide for ShotcreteNov 2013
How to deal with Irregularly Shaped jointsIf wall sections are shot with irregularly joints (i.e. horizontal and vertical sections) extra reveals will be needed to control cracking.
Cracks are common at corners within walls (see below). Joints are needed at the locations indicated to isolate the cracks. If joints are not installed, the crack repair system will need to be used to repair the cracks.
Use control joints to contain cracks that propagate from corners.
ImportantDo not allow bolts used to secure equipment (HVAC etc) to penetrate the Krystol Waterstop Grout.
If the joint is actively leaking, stop and treat the reveal using the Kryton Crack Repair System as described at the end of this publication.
How to Waterproof Pipes and PenetrationsPipes and penetration are treated using a variation of the Krystol Waterstop System. Refer to Application Instruction 5.33 – Waterproofing Pipe Penetrations (New Construction).
Typical Pipe Penetration
Kryton International Inc.1645 East Kent Avenue, Vancouver B.C., Canada V5P 2S8 | TEL 1.604.324.8280 | FAX 1.604.324.8899 | TOLL FREE 1.800.267.8280 | WEB kryton.com
KIM Best Practices Guide for Shotcrete Nov 2013
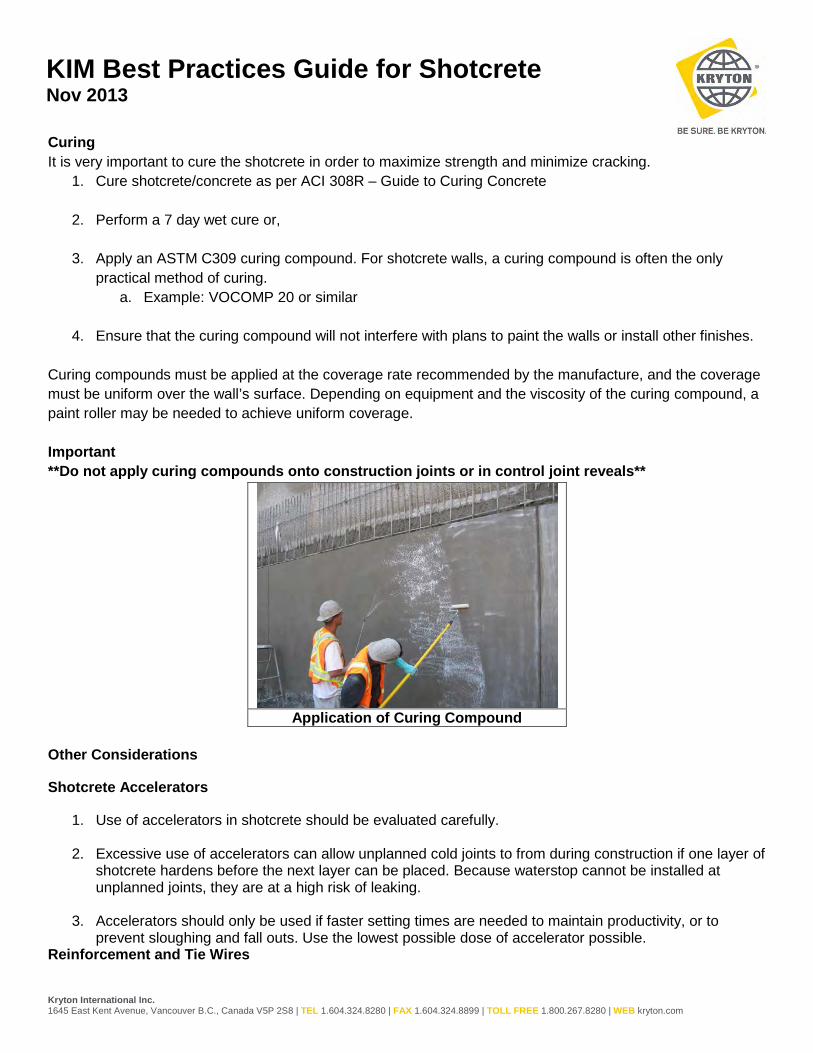
Curing It is very important to cure the shotcrete in order to maximize strength and minimize cracking.
1. Cure shotcrete/concrete as per ACI 308R – Guide to Curing Concrete
2. Perform a 7 day wet cure or,
3. Apply an ASTM C309 curing compound. For shotcrete walls, a curing compound is often the only practical method of curing.
a. Example: VOCOMP 20 or similar
4. Ensure that the curing compound will not interfere with plans to paint the walls or install other finishes. Curing compounds must be applied at the coverage rate recommended by the manufacture, and the coverage must be uniform over the wall’s surface. Depending on equipment and the viscosity of the curing compound, a paint roller may be needed to achieve uniform coverage. Important **Do not apply curing compounds onto construction joints or in control joint reveals**
Application of Curing Compound
Other Considerations
Shotcrete Accelerators
1. Use of accelerators in shotcrete should be evaluated carefully.
2. Excessive use of accelerators can allow unplanned cold joints to from during construction if one layer of shotcrete hardens before the next layer can be placed. Because waterstop cannot be installed at unplanned joints, they are at a high risk of leaking.
3. Accelerators should only be used if faster setting times are needed to maintain productivity, or to prevent sloughing and fall outs. Use the lowest possible dose of accelerator possible.
Reinforcement and Tie Wires
Kryton International Inc. 1645 East Kent Avenue, Vancouver B.C., Canada V5P 2S8 | TEL 1.604.324.8280 | FAX 1.604.324.8899 | TOLL FREE 1.800.267.8280 | WEB kryton.com

KIM Best Practices Guide for Shotcrete Nov 2013
1. Inspect reinforcement to ensure it is clean and free of oil, loose rust, dust or other surface contaminates.
2. Ensure the rebar is well braced so it will not vibrate during placement.
3. Cut tie wires as short as possible. Excess tie wire ends serve no purpose and will interfere with rebar encapsulation.
4. Bracing or repositioning the rebar cage after shooting has started will displace the rebar and create
voids within the wall. Inspect the shooting area in advance to ensure there is sufficient bracing and clearance.
Remove excess tie wires Remove dirt and contaminates from
reinforcement
Crack Repair Detail 1. The repair of actively leaking cracks and joints is described in Application Instruction 5.11 –
Waterproofing Cracks, Holes and Joints.
2. Even after taking all possible steps to prevent random cracking, some cracks are likely to form during the construction period. Not all cracks will leak or require repair.
3. Crack repair will normally be performed as the final step before occupancy. Consult with your Kryton
representative for advice regarding repair procedures.
Kryton International Inc. 1645 East Kent Avenue, Vancouver B.C., Canada V5P 2S8 | TEL 1.604.324.8280 | FAX 1.604.324.8899 | TOLL FREE 1.800.267.8280 | WEB kryton.com
KIM Best Practices Guide for Shotcrete Nov 2013
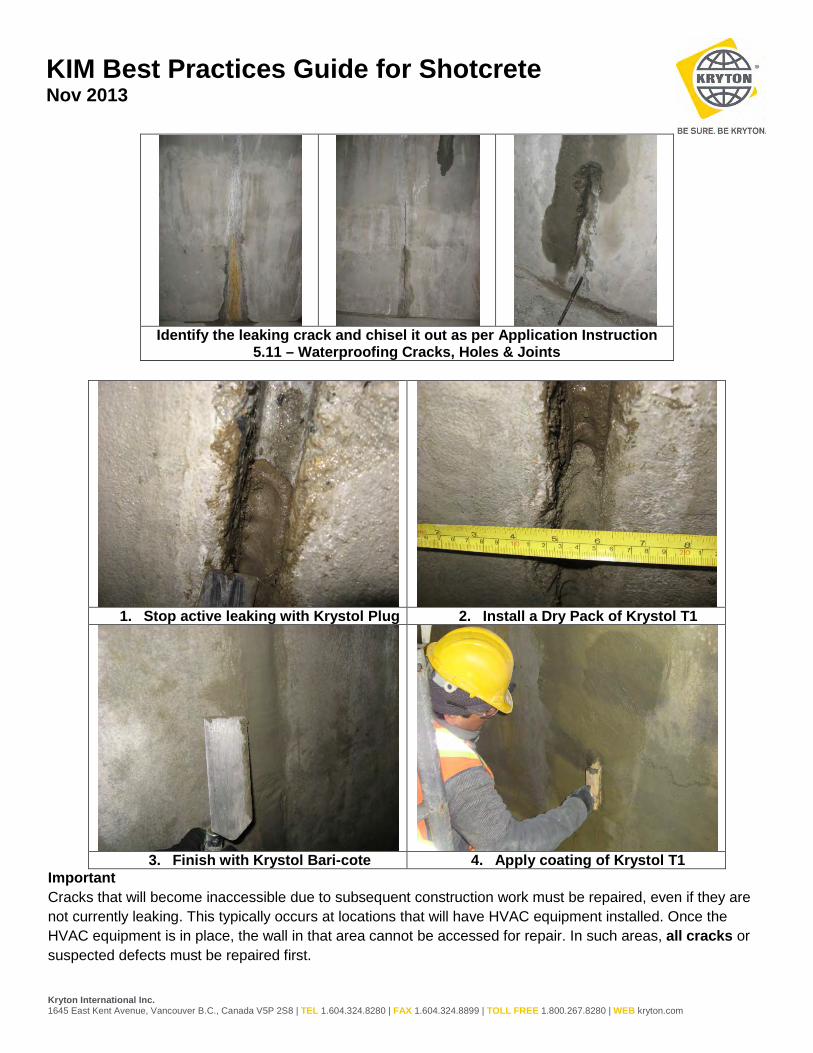
Identify the leaking crack and chisel it out as per Application Instruction
5.11 – Waterproofing Cracks, Holes & Joints
1. Stop active leaking with Krystol Plug 2. Install a Dry Pack of Krystol T1
3. Finish with Krystol Bari-cote 4. Apply coating of Krystol T1
Important Cracks that will become inaccessible due to subsequent construction work must be repaired, even if they are not currently leaking. This typically occurs at locations that will have HVAC equipment installed. Once the HVAC equipment is in place, the wall in that area cannot be accessed for repair. In such areas, all cracks or suspected defects must be repaired first.
Kryton International Inc. 1645 East Kent Avenue, Vancouver B.C., Canada V5P 2S8 | TEL 1.604.324.8280 | FAX 1.604.324.8899 | TOLL FREE 1.800.267.8280 | WEB kryton.com