Kids Yoga Teacher Certification...
47
Kids Yoga Teacher Certification Program Section 4: Standing and Kneeling Postures
Transcript of Kids Yoga Teacher Certification...

Kids Yoga Teacher Certification Program
Section 4:
Standing and Kneeling Postures

Section 4: Standing and Balancing Postures
Table of Contents Introduction……………………………………………………………………………. 2 Standing and Kneeling Postures Mountain Pose (Tadasana)…………………………………………………………. 3 Chest Expander Forward Fold……………………………………………………… 5 Standing Back Bend/Forward Bend………………………………………………… 7 Chair (Utkatasana)…………………………………………………………………… 9 Down Dog (Adho Mukha Svanasana)……………………………………………… 11 Child’s Pose (Balasana)……………………………………………………………… 13 Triangle (Trikonasana)……………………………………………………………….. 14 Pyramid (Parsvottanasana)………………………………………………………….. 16 Warrior 1 (Virabhadrasana)…………………………………………………………… 18 Warrior 2 (Virabhadrasana)…………………………………………………………… 20 Arrow (Extended Angle – Utthita Parsvakonasana)……………………………….. 22 Airplane………………………………………………………………………………….. 24 King Dancer (Natarajasana)…………………………………………………………… 26 Eagle (Garudasana)…………………………………………………………………… 28 Tree Pose (Vrksasana)………………………………………………………………… 30 Ragdoll (Hands to Feet Forward Fold – Padangusthasana)………………………. 34 Spider……………………………………………………………………………………. 36 Spinal Balance (hold back foot)………………………………………………………. 38 Knee Balance…………………………………………………………………………… 40 Lunge (Alanasana)……………………………………………………………………… 41 Plank (Chaturanga Dandasana)………………………………………………………. 42 Camel (Ustrasana)……………………………………………………………………… 44 Rabbit…………………………………………………………………………………… 46
1

Section 4: Standing and Balancing Postures
Introduction This section will explain methods for teaching numerous standing, kneeling and balancing postures. You will learn the steps to bring your students into each pose, the physical and mental benefits of each pose, modifications you students can do when needed and specific teaching points for common student problems. Standing poses are best practiced after warm-ups and sun salutations and before seated or lying down poses. These poses have been ordered as they would be taught in class, in which one pose flows into another. Keep this order in mind when you are planning your own classes. You will also see the Sanskrit name in paratheses for each posture that has a Sanskrit name. Many students enjoy learning the Sanskrit names of yoga postures and Sanskrit provides a single terminology (language) for yoga teachers throughout the world, so we can better understand one another and what we are teaching.
2

Section 4: Standing and Balancing Postures
Mountain Pose (Tadasana)
Benefits:
• Improves posture • Increases body awareness • Relaxes the mind and body
Steps:
• Start standing with feet a few inches apart and parallel (not turned out) • Reach up through the top of the head to lengthen the spine • Draw your shoulders back then relax them down • Bring the palms of your hands in line with the seams of your pants • Engage abdominal muscles and drop your tailbone down, so there is less
sway in the low back • Bring your chin level to the floor • Find one point in front of you to focus on, then bring your attention to your
breath • Take 4-5 long slow breaths
Flow Variation:
• Inhale, reaching arms overhead • Exhale, drop arms back to sides
3

Section 4: Standing and Balancing Postures
Explorations: • Have students slightly shift their weight onto one foot and notice the changes
that occur throughout the body because of that small movement. Teaching Points: Help students find their best posture in Tadasana by having them do the following:
• Roll back and forth on your feet (ball to heel) until you are over the center of your feet (neither leaning forward or back) and not on the outside or inside edges
• Imagine someone is pulling the top of your head towards the ceiling – this will help students lengthen their spines and not slouch
• Draw your shoulders back, then relax them down – this will help students bring their shoulders in line with the rest of their bodies, not rolled forward or squeezed back too far
• Imagine trying to drop your tailbone to the floor – this will help students bring their pelvis to a neutral position
• Have students focus on their breath in this positions for a minute – this will help them become more aware of how proper posture feels
• Because you want your students to create a balanced vertical line, look at them from the side. Draw an imaginary straight line with your eyes, beginning with the students’ ears. That line should pass down through the center of the shoulder, hip, knee and ankle joints.
Note: Many people in Western cultures habitually stand with the pelvis pushed forward. To help bring the pelvis to a neutral position, have students place their hands on their hips and tilt their pelvis forward and back until they feel the pelvic bowl is straight up and down, balanced over the hips.
4

Section 4: Standing and Balancing Postures
Chest Expander
Benefits:
• Stretches shoulders and chest • Strengthens spine • Strengthens arms • Relieves neck and shoulder tension
Steps:
• Begin in mountain pose • Bring your hands behind your back, interlace fingers (hold a strap if you can’t
reach your hands together) • Check your posture. Keep hips neutral. • Inhale, roll your shoulders back, opening chest • With fingers interlaced (or holding strap) raise hands away from tailbone • Press your shoulders down, squeeze shoulder blades together • Take 3-6 slow breaths in this position • Lower your hands back to tailbone, keep fingers interlaced (or holding strap) • Bend your knees, press your tailbone back and fold forward, bringing your
head towards your knees • Lift hands away from your tailbone, keeping your back straight • Take 4-6 slow long breaths in this position • Release your hands back down to your tailbone • Use strength of legs to rise back up to standing
5

Section 4: Standing and Balancing Postures
Exploration: While in this position, try breathing in through your nose and exhaling completely through your mouth. This can help the shoulders and neck relax more, so you can go more deeply into the stretch. Modification: For students who can’t interlace their fingers behind their back, have them hold a strap behind their back and bring their hands as close together as they can. Students can also place their hands on their hips and bring their elbows back as much as possible to help stretch the front of their chest. Teaching Points: Remind students to press back through their hips as they fold forward, so they are folding from the hips rather than rounding down from their back. Students can keep their knees slightly bent, if needed.
6

Section 4: Standing and Balancing Postures
Standing Back Bend
Benefits
• Increases circulation to the spine • Stretches shoulders • Strengthens legs and back • Stretches and strengthens spine
Steps:
• Begin in mountain pose • Bring your hands behind your back, placing your palms or fists on lower back • Pull your elbows back, open your chest, relax your shoulders • Inhale, reaching your chest up towards ceiling • Exhale, pressing your hips forward • Keep looking straight ahead (if your neck is very strong you can let it fall back) • Take 3-4 deep breaths in this position • Roll your shoulders forward, come back to standing • Bend your knees, placing your hands on your thighs, just above knees • Tuck your chin to your chest, rounding your back • Take 3-4 deep breaths into your back, stretching it • Drop your hands to your sides, slowly roll up to standing
7

Section 4: Standing and Balancing Postures
Teaching Points Instruct students to keep their hips pressed forward, belly tight and their knees straight. This helps to create more arch in the back, while preventing too much strain on the low back. Encourage students to squeeze shoulder blades together and breathe deeply through the nose to better open through the chest. Variation:
Students can also try the standing backbend with their arms over their head. This is more difficult – placing more weight overhead – so have students try the other form of backbending first, then build up to this version.
8

Section 4: Standing and Balancing Postures
Chair (Utkatasana)
Benefits:
• Strengthens muscles in the thighs and hips • Improves ankle flexibility • Stretches shoulders and chest • Strengthens muscles in the upper back
Steps:
• Start standing with feet a few inches apart and parallel • Inhale, reach arms overhead • Exhale, sit down (like sitting in a chair) • Keep reaching arms up, creating one line from hands to tailbone. • Tuck tailbone slightly to reduce sway in low back • Stay here for 3-4 long breaths • Inhale, reach arms up as you stand up • Exhale, hands to side or to heart
Teaching Points: Encourage kids to sit back, putting more weight on their heels and bringing their head and shoulders back (not leaning forward too much). This will help kids to develop their balance and improve the strength of their legs.
9

Section 4: Standing and Balancing Postures
Variation: (flowing chair) • Chair can also be practiced as a flowing exercise by doing the following: • Start in standing position • Inhale, reach arms up, looking up • Exhale, sit down • Inhale, stand up • Exhale, sit down • Repeat 5-6 times • After standing the last time, exhale and bring hands to heart
10

Section 4: Standing and Balancing Postures
Down Dog (Adho Mukha Svanasana)
Benefits:
• Stretches palms, chest, back, hamstrings, calves and feet • Relieves low back discomfort • Improves digestion • Strengthens arms, wrists legs and torso • Energizes the body • Improves focus and stimulates the mind
Steps:
• Come to all fours, placing hands directly under shoulders, knees and feet hip width apart
• Spread your fingers wide • Inhale, curl your toes under and draw your shoulder blades back • Exhale, lift your hips and press back through your heels, drop your head • Press your tailbone high and open your chest, pressing your chest towards
your feet • Keep your arms straight, press down through your whole hand (including
thumb and index finger) • Look towards your feet, shake your head from side to side then nod forward
and back to loosen your neck and shoulders • Slowly pedal your heels down to the floor one at a time to get more stretch in
your calves • Breathe deeply into your back • Stay here for 5-10 breaths • Walk your feet forward between your hands, coming into forward fold • Slowly roll up, coming to standing
11

Section 4: Standing and Balancing Postures
Exploration: One way to explore down dog is to practice with the heels turned out. In western culture, many people have tight calves because they do not regularly squat. These powerful muscles of propulsion and balance are also tightened by running and jogging. In down dog, turn the heels out and firmly press them down. Notice how much more stretch you feel in the calves. Then bring heels back in line with toes. Modification: Some students may have problems with their wrists and find it difficult to place weight on the wrists. Have these students modify by using their forearms instead of their hands (dolphin), placing their forearms parallel to each other on the floor. Teaching Points: Down dog is considered one of the most fundamental of all yoga postures. It is often used between other postures as a transitional posture to keep the flow of the practice going. Check that your students are doing the following: 1) Keeping their hands shoulder width apart, not too close or too far away; 2) Keeping the distance between the hands and feet about the same as the distance from the student’s heels to their tailbone (so the triangle formed is not too narrow or too wide)
12
Section 4: Standing and Balancing Postures
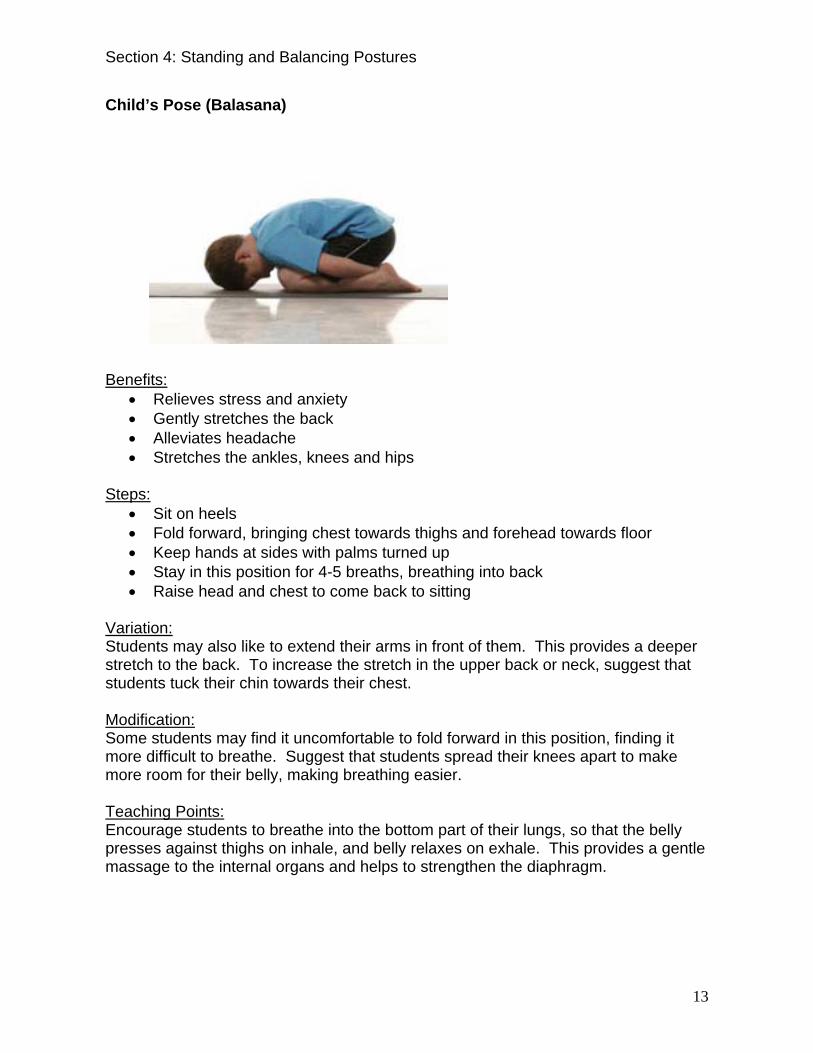
Child’s Pose (Balasana)
Benefits:
• Relieves stress and anxiety • Gently stretches the back • Alleviates headache • Stretches the ankles, knees and hips
Steps:
• Sit on heels • Fold forward, bringing chest towards thighs and forehead towards floor • Keep hands at sides with palms turned up • Stay in this position for 4-5 breaths, breathing into back • Raise head and chest to come back to sitting
Variation: Students may also like to extend their arms in front of them. This provides a deeper stretch to the back. To increase the stretch in the upper back or neck, suggest that students tuck their chin towards their chest. Modification: Some students may find it uncomfortable to fold forward in this position, finding it more difficult to breathe. Suggest that students spread their knees apart to make more room for their belly, making breathing easier. Teaching Points: Encourage students to breathe into the bottom part of their lungs, so that the belly presses against thighs on inhale, and belly relaxes on exhale. This provides a gentle massage to the internal organs and helps to strengthen the diaphragm.
13

Section 4: Standing and Balancing Postures
Triangle (Trikonasana)
Benefits:
• Improves balance • Stretches hamstring muscles • Stretches the back • Increases flexibility of the hip joints • Strengthen muscles in the front of thigh
Steps:
• Step feet apart. The width should be determine by the length of the student’s legs – the legs are about as wide as the length from the student’s foot to the crease between the hip and thigh.
• Turn your left foot in, so the left toes point about halfway towards the right foot. • Turn the right foot towards the front of the mat (away from you) • Bring arms out to your sides at shoulder height. • Shift your left hip up. • Exhale, reach your right hand towards the right, then let it drop down your right
leg as your left arm reaches towards the ceiling. • Only bring your right hand down to a point where you can still keep your chest
open to the side (not dropped towards the floor), with your shoulders stacked one on top of the other and your hips stacked vertically over one another. Right hand can be placed on your right thigh, shin or ankle or on the floor behind your right foot (depending on flexibility).
14

Section 4: Standing and Balancing Postures
• Press against your right leg with your right hand to open the chest more to the side, if needed.
• Take 4-5 slow, deep breaths through your nose in this position, breathing into your back.
• Inhale, press down through your toes and come back to standing. • Turn feet in other direction and repeat on the other side.
Exploration: Once your students are in Triangle Pose, encourage students to stretch out through both arms and both legs, pressing down through the legs, while reaching up through the top arm. You want your students to expand their limbs in all directions from their center – like a starfish. Have students notice how many triangles their bodies make. Modifications: If a student has a difficult time stepping their feet wide, while maintaining balance, have them keep their feet only as far apart as is comfortable for them. Then, they can gradually work on bringing the feet farther apart. Variation: Extended Triangle with arm next to ear From Triangle, bring top arm next to ear (or towards ear). Only go so far as you can keep chest and belly open to the side. Notice if belly or chest begins to turn towards floor and come back to a point where chest and belly can stay open to side. Teaching Points: Many students drop their top shoulder and chest towards the floor, while pressing their tailbone out. This reduces the stretch in the low back and can strain the top shoulder joint and upper back. If you notice students dropping their chests towards the floor, have everyone come to the wall with their backs next to the wall, feet in triangle position and arms against the wall at shoulder height. Tell your students to slowly drop their right hand down their right leg, while keeping their left shoulder blade and left sitting bone on the wall. They may not be able to bring their right hand down their right leg very far, but they will feel the stretch in their side and low back and gain a better understanding of how to properly do the posture to get all of its benefits.
15

Section 4: Standing and Balancing Postures
Pyramid (Parsvottanasana)
Benefits:
• Stretches the calves and hamstrings • Stretches the shoulders and chest • Improves balance • Releases the hips • Improves digestion and circulation
Steps:
• From standing, step left foot back (1 to 2 feet, depending on heigh of the child) • Turn back foot out until the heel of your back foot can press down to the floor • Check that the front heel and back heel are lined up • Hold opposite elbows behind back or just place hands on hips • Inhale, look up and arch back • Exhale, fold forward, folding from the hips and pressing back through the
tailbone to keep the back flat • As you fold forward, keep reaching your head and chest forward, getting long • Stay in this position for 4-5 long breaths. • On next inhale, use the strength of the legs to come back up • Step back foot forward, back to mountain pose • Repeat on the other side.
16

Section 4: Standing and Balancing Postures
Modification: To modify the arm position, have students place hands on hips and draw elbows back, rather than holding onto opposite elbows behind the back. This requires less shoulder flexibility, while also gently improving current levels of flexibility. Teaching Points: Many students tend to shift their hips as they come down, so that the hip of the forward foot is pressed forward, while the hip of the back leg is shifted back. To bring hips back to a balanced position, remind students to draw the right hip back (when the right foot is forward). Making this adjustment will cause greater stretch in the hamstring muscles, but will also improve students’ balance in this position. Many students also will begin rounding their backs, attempting to get their heads closer to their front leg. Encourage students to bend their front knee if they need to, in order to decrease the stretch in the hamstrings, so they can maintain a flat back. Rounding the back can strain it, so it’s better for students to bend the front knee and maintain a flat back.
17

Section 4: Standing and Balancing Postures
Warrior 1
Benefits:
• Strengthens the arches, ankles, knees and thighs • Stretches the hips and shoulders • Strengthens the arms • Broadens the chest • Increases muscular endurance
Steps: • Start standing towards the back of your mat with your hands at your sides and
feet hip width apart and parallel • Place your hands on your hips and step your right foot forward one full, but
comfortable stride • Turn your back foot out slightly, so your heel and outside edge of your back
foot press against the floor • Use your hands to square your hips forward (so hips are not turned to the
side) • Exhale, dropping your hands to your sides • Inhaling, sweep your arms overhead with your palms facing each other about
shoulder width apart • Exhale, bend your right knee until it is directly over your right ankle • Draw your shoulders slightly back and down to open your chest
18

Section 4: Standing and Balancing Postures
• Tuck your tailbone slightly • Look forward or slightly up • Take 4-5 breaths in this position • Continue with Warrior 2 before repeating this exercise on the other side
Exploration: One of the greatest challenges of Warrior 1 is squaring the hips to the front. Focusing on the following points can help: 1) Make sure the back foot isn’t turned out too much. As you turn your foot in, it becomes easier to turn your hips and torso forward. 2) Focus on the hips. When the right leg is in front, focus on bringing the left hip forward. 3) The arm on the side of the body of the back leg is often understretched. To counteract this, bring the shoulder into the turn as well as the hips. Teaching Points: Check that students keep their front knee directly over the ankle. This will help protect the knee and ankle joints. Also, Warrior 1 includes a slight back bending movement, so it is fine to notice an arch in students’ lower backs. Encourage students to keep the back leg straight and keep the weight evenly distributed between the front and back legs, so they are neither leaning forward or backwards, but the torso is upright and the chest open.
19

Section 4: Standing and Balancing Postures
Warrior 2
Benefits:
• Strengthens the arches, ankles, knees and thighs • Strengthens the arms • Stretches the hips and shoulders • Enhances muscular endurance • Lengthens the spine
Steps: • Start in Warrior 1 (see previous exercise) with your right foot forward • Inhale, reaching up through your arms and straightening both legs • Exhale, turn your body towards the left (open to the side), bring your arms
down to shoulder height and bend your right knee, so that it is directly over your ankle
• Check that your shoulders are over your hips, so you are not leaning forward or backward (this will even out the weight distribution over your legs)
• Keeping your hips facing the side, turn your head to look over your right finger tips
• Breathe deeply, allowing your ribs to expand fully with each breath • Take 4-5 breaths in this position • On your next inhale, straighten both legs, bring your hands down to your sides
and step to the front of your mat • Repeat Warrior 1 and 2 on the other side
20

Section 4: Standing and Balancing Postures
Exploration: Bring your focus to your back arm, stretching back through the back hand as much as you reach forward with the front hand. Notice the stretch through the arms and shoulders and how you can become more active in this position. Imagine you are trying to pull the mat apart with your feet, pressing your feet down and apart on the mat. This way you aren’t simply hanging out over your joints, but actively engaging the muscles in your legs. Teaching Points: Remind students to keep front knee bent over the ankle and to draw their knee slightly back, so they can just see their big toe. This helps open the hips more while strengthening the leg. Also, remind students to keep the chest open to the side, only turning the neck to look over the front hand. This helps to keep the hips and chest more open.
21

Section 4: Standing and Balancing Postures
Arrow (Extended Angle)
Benefits:
• Strengthens ankles and muscles in the thighs • Opens the hips • Improves digestion • Stretches muscles in the back and sides of the body
Steps:
• If starting from Warrior 2 (with right knee bent), simply drop right elbow to right thigh and sweep left arm around, bringing your upper arm next to your ear.
• You can also start from standing position by first stepping feet out about 3-4 feet, turn right foot to front of mat and turn left foot in about 10 degrees. Bend right knee over right foot, drop right elbow to right thigh and sweep left arm next to ear.
• Try to establish one straight diagonal line from hand to foot • Keep bringing left shoulder back, opening chest to the side • Actively reach with your left hand as you breathe deeply through your nose • Stay here for 4-5 long breaths • Repeat on other side
Exploration: Actively extend and stretch your top arm, while you press back through the heel of your extended leg. Notice the stretch along your side and breathe into the stretch.
22

Section 4: Standing and Balancing Postures
Teaching Points: Often students will drop their chest towards the floor and press the tailbone back (so that the buttocks sticks out). Instruct students to stack one hip on top of the other (as in Triangle) and tuck their tailbone in, while keeping their chest open to the side. Have your students imagine they are between two panes of glass, making their body narrow. Students may not be able to drop down as far into the extended angle, but it will help bring a better stretch to the side of their body and their low back. Students also often keep their hip raised. Remind them to drop their hips to create one straight line from their hand to the heel of their back foot. This will help to open the hips more. Finally, encourage students to keep their arm next to their ear and draw their shoulder back. This will help them to keep their chest open to the side, rather than letting the chest drop.
23

Section 4: Standing and Balancing Postures
Airplane
Step 1
Step 2
Benefits:
• Improves balance • Strengthens the legs and arms • Improves posture and back strength • Improves flexibility of hips and legs
Steps:
• Start standing • Inhale, stepping your right foot in front of you as you bring your fists to your
chest (step 1) • Exhale, put your weight on your right foot as you lift your left foot off the
ground and spread your wings like an airplane • Stay there for 3-4 breaths • Bring your hands back to your chest and lower your left foot back to the
ground, coming back to standing Repeat on the other side Teaching Points: Often students want to get into the T position so much that they lose their balance or begin rounding their back. Encourage students to move slowly, focusing on the feeling of the pose. Have them focus on the feeling of reaching forward with the hands and reaching back through the back foot, lengthening through the spine, and
24

Section 4: Standing and Balancing Postures
stopping at the point where they notice they are beginning to wobble or beginning to round their back. Variation: From airplane, students can go into a one-leg forward fold. Have students drop their hands to the floor, close to the foot they are standing on. Encourage them to lift their back leg up as much as they can, while dropping their nose toward their knee (of their standing leg). This creates an inversion that works on balance and developing more flexibility and strength in the hips and legs.
25

Section 4: Standing and Balancing Postures
King Dancer
Benefits:
• Strengthens the leg muscles and arches of the feet • Opens chest and shoulders • Stretches the hips and quadriceps • Tones the spine • Improves balance
Steps:
• Start standing with your hands at your sides and feet hip width apart and parallel
• Inhaling, sweep your arms overhead • Exhaling, drop your right arm to your side (left arm still raised) • Find a point to focus on, slow down your breathing • On your next inhale, bend your right knee bring your right heel towards your
tailbone, then hold onto your right foot with your right hand • If you can balance here, begin to press your right foot away from your tailbone,
still holding your foot in your right hand (left arm still overhead) • Take 5-6 slow long breaths in this position, focusing on one point in front of
you to help still your mind and body • On your next exhale, release your foot and bring both arms back down to your
sides • Repeat on the other side
26

Section 4: Standing and Balancing Postures
Modification: Students can also practice this pose standing next to a wall (extended arm and standing leg next to the wall). This can help students become more comfortable with balance poses. Students with knee problems can skip the ankle hold and simply lift their foot towards their lower hand, while stretching up through their raised arm. Teaching Points: Students are often anxious to begin kicking their raised foot back. When students first bring their raised foot to their hand, have them first bring their knees together. This will bring their body into proper alignment and give them time to find their balance before kicking back. Many students begin tipping forward too much as they kick their raised foot up and back. This, however, reduces the back arch that this pose is meant to create. Encourage students to keep reaching their top hand up, as well as forward as they kick their back foot up and back. Also, instruct students to draw their shoulder back (shoulder on the same side as hand holding foot). This will help keep the chest and torso open and more upright. Remind students to keep their hips facing forward. This will increase the stretch in their standing leg, while also helping them maintain their balance.
27

Section 4: Standing and Balancing Postures
Eagle (Garundasana)
Step 1 Step 2
Benefits:
• Improves balance • Enhances concentration • Stretches shoulders and the muscles around shoulder blades • Strengthens the legs
Steps:
• Start standing with feet about hip width apart and parallel • Inhale, reach your arms overhead • Exhale, drop your arms to shoulder height and cross your right arm under your
left arm. • Bend your elbows, bringing your hands towards your face and wrap your
forearms around each other, bringing your palms together. • On your next exhale, squat down, keeping your upper body in a vertical
position (not leaning forward) • Cross your right thigh over your left thigh and wrap your right foot around your
left calf. • Tuck your tailbone to keep your low back from swaying too much.
28

Section 4: Standing and Balancing Postures
• Focus on one point in front of you and focus on your breath. • Stay in this position for 3-4 slow breaths • Release your arms, raising arms overhead • Counter with a forward fold
Modifications: Students often have difficulty wrapping their legs around each other. Encourage students to simply squat or only cross their leg over, placing their foot on the floor next to their opposite leg. Encourage students to only go to the point where they feel challenged, but are able to maintain their balance and maintain a slow and even breath. Teaching Points: Instruct students to tuck their tailbone once they are in this position. This helps keep the pelvis in a neutral position. Also, check that students keep their knees bent. There is a tendency for students to straighten their legs once they come into this position. Keeping the knees bent will help to work the muscles in the legs.
29

Section 4: Standing and Balancing Postures
Tree Pose
Benefits:
• Strengthens muscles of standing leg and foot • Lengthens the spine • Improves balance • Opens shoulders, chest and hips • Improves concentration and focus
Steps:
• Stand with your feet about hip width apart and parallel (not turned out) • Put your weight on your left foot • Find a point to focus on at eye level in front of you (this is called your “drishti”
point) • Bring your right foot to the inside of your left ankle, calf or thigh (whichever
feels doable for you) • Draw your right knee back to open through your hips • Reach up through the top of your head to lengthen through your spine • Bring your hands to your heart or bring your hands out to the sides (like tree
branches) with your palms up. Bringing the hands out to the sides helps with balance and turning the palms up helps to open the chest.
• Focus on your breath, taking 4-5 long slow breaths through the nose. • Bring hands back to sides and drop foot to floor. • Repeat on other side.
30

Section 4: Standing and Balancing Postures
Exploration:
• Remind students to focus on their “drishti” point (spot on the wall), on their breath or on the sensations of the movement – noticing the little dance of their standing foot as they maintain their balance.
• Another way to explore balance is to close the eyes and notice how removing visual cues affects balance.
Variations: • From tree pose, keep foot against opposite leg and reach arms overhead,
bringing palms together. • Keep arms next to ears, shoulders back and relaxed. • Take 3-4 slow breaths through the nose in this position. • Repeat on other side
Modification: For students who have trouble with balance, have them:
1) Stand with their back against a wall, or 2) Bring the sole of their foot only to their ankle (not to calf or thigh – see picture)
Teaching Points: Students may think that tree pose is about balance only and overlook the need for symmetry in the pose. Remind students to press down through the standing leg and level hips, so they are parallel to the floor – not tilted towards one side. Pressing down through the standing foot, while reaching up through the head, also helps improve stability in the pose.
31

Section 4: Standing and Balancing Postures
Flow Variation: Toppling Tree Another variation to Tree Pose is Toppling Tree, which requires more leg strength and flexibility than regular tree pose. Of course, this variation is best suited for older kids (ages 8 and older).
Benefits:
• Opens hips • Improves balance • Strengthens legs • Improves flexibility of legs and hips
Steps:
• Start in Tree Pose with right foot placed on left thigh • Bring right knee back to open through hips and bring hands together in front of
chest • Focus on your natural breath and find your balance, staying in this position for
3-4 breaths • Exhale, fold forward, pressing back through the hips and bending the standing
leg, if necessary • Drop your head, so you are looking towards the knee of your standing leg
32

Section 4: Standing and Balancing Postures
• Stay in this position for 2-3 breaths • Inhale, bend the standing leg, coming all the way down into a one-foot squat
(other foot is crossed on the opposite thigh) with hands on the floor for support • Bring hands together in front of chest, doing your best to balance on one foot
(place hands on floor as necessary). Stay in this position for 3-4 breaths • Place hands back on floor • Exhale, straighten standing leg and fold forward (other foot is still placed on
opposite thigh) • Stay here for 2-3 breaths • Bend knee of standing leg slightly • Inhale, use strength of the standing leg to come back to Tree Pose (with right
foot still placed on left thigh) • Stay in tree pose for 3-4 breaths • Exhale, drop hands and feet back to sides • Repeat on the other side
Modification: If students find this toppling tree series difficult, they can try modifying it by placing their right foot across their opposite shin (instead of thigh). This way, as they come down into the squat, the right calf will drop to the floor, giving them more support for balancing and requiring less flexibility. It is also easier to come back to standing with the right foot in this modified position, while still doing an exercise that will help build leg strength.
33

Section 4: Standing and Balancing Postures
Hands to Feet Forward Fold (Padangusthasana)
Benefits:
• Stretches hamstrings and hips • Strengthens arms and shoulders • Relieves tension in head and neck
Steps:
• From one leg forward fold, drop raised leg, placing feet about 2 inches apart on the floor and parallel (not turned out)
• If coming from standing position, fold forward, checking that feet are about 2 inches apart and parallel (not turned out)
• Wrap first two fingers of each hand around each big toe with elbows pointing out
• Inhale, look up, lengthening through the spine • Exhale, use the strength of the arms to pull the upper body down, bringing the
nose towards the knees. • Stay in this position for 4-5 long breaths, breathing through the nose • Release hands, coming back to an easy forward fold • Come back to standing or place hands on floor and step back to down dog
Variation: Hands to Feet Forward Fold with Leg Lift to Side Steps:
• While still holding the big toes with first two fingers of each hand, begin placing weight onto left leg
• Raise head and chest slightly, lengthening through the spine
34

Section 4: Standing and Balancing Postures
• Bend left knee slightly as you put your weight on your left leg • Inhale, lift right leg to the side, while still holding the right big toe with the right
hand fingers • Stay in this position for 3-4 slow breaths • Drop right foot back to floor • Repeat on the other side
35

Section 4: Standing and Balancing Postures
Spider
Benefits:
• Improves balance and coordination • Improves digestion • Builds core strength • Strengthens the arms and wrists • Opens the hips • Stretches the wrists
Steps:
• Stand with feet about hip width apart, bend your knees and place fingertips on the floor
• Draw fingertips back, so they are in line with your heels • Bend elbows slightly and move backs of thighs onto upper arms • Begin sitting back onto upper arms, as you transfer more weight to your hands • Lift one foot off the ground at a time • Bring feet together in front of your chest • Stay in this position for 3-4 natural breaths, breathing through your nose • Bring feet back to floor on either sides of your hands • Counter with Child’s Pose. While in this pose, rotate the wrists and allow arms
to relax
36

Section 4: Standing and Balancing Postures
Counter pose of Child’s Pose
Teaching Points: If students have problems with their wrists, instruct them not to go into the full position, but to come into the position keeping their feet on the floor and not placing their full body weight on their arms.
37

Section 4: Standing and Balancing Postures
Spinal Balance (hold back foot)
Benefits:
• Stretches shoulders and chest • Stretches quadriceps • Increases spinal flexibility • Improves balance and coordination
Steps:
• Start on all fours with wrists directly under shoulders and knees about hip width apart
• Look towards floor, keeping neck long • Inhale, extend right arm and left leg out • Bend left knee and bring right hand back, holding left ankle
38

Section 4: Standing and Balancing Postures
• Inhale, press left foot up and back to go deeper into the stretch • Stay in this position for 3-4 long, slow breaths • Return to all fours • Repeat on other side (left arm, right leg) • Counter with child’s pose to relax back muscles
Exploration: Notice the difference it makes to your overall balance if you roll your shoulder back and squeeze your shoulder blades together while dropping the hip of your raised leg slightly, so your hips are even to the floor. Then, press down and forward with your hand on the floor and press down and back with the knee that’s on the floor. All these slight movements will help you become more steady in this pose. Teaching Points: Encourage your students to move slowly from the first form of spinal balance into the foot hold. If they find themselves start to wobble and lose balance, they should back off slightly, regain their balance, then try again to move slowly into the position. Also, students have a tendency to hold their breath in this posture, so remind them to keep breathing through their nose, making their breath full and deep.
39

Section 4: Standing and Balancing Postures
Knee Balance
Benefits:
• Stretches front of the thigh (quadriceps) • Increases knee flexibility • Opens shoulders and chest • Improves balance
Steps:
• Start kneeling on both knees, with your hands at your sides • Hold left foot with left hand • Draw left shoulder back and open through your chest • Stay in this position for 4-5 breaths • Repeat on the right side
Variation: Try to hold both ankles at the same time, balancing on just your knees. Teaching Points: Make sure that students have enough padding under their knees, so there is no strain on their knees. You can have students fold their mats to provide extra support.
40

Section 4: Standing and Balancing Postures
Lunge
Steps:
• Start on all fours (on hands and knees - shoulders over wrists and hips over knees) or start in down dog
• Bring right foot forward, placing right foot between your hands • Check that right knee is directly over right ankle • Scoot left foot back until gentle stretch is felt • Inhale, straighten right leg as you bring hips back towards back foot (keeping
hips raised) • Exhale, come forward again, bending front knee and dropping down into lunge • Continue moving back and forth 4-6 times
Teaching Points: Have students move slowly and only drop hips or press back until they feel a gentle stretch. This exercise is to warm up the muscles in the legs, not stretch them too deeply, so it’s important that students move slowly and simply focus on maintaining the back and forth movement, only going to the point where they feel a very gentle stretch. This warm-up is best used towards the end of the warm-up sequence, once students have already been moving their bodies through a few warm-ups.
41

Section 4: Standing and Balancing Postures
Plank
Benefits:
• Strengthens arms and wrists • Improves core strength • Stretches wrists and toes
Steps:
• Start on all fours (on hands and knees) with hands under shoulders and elbows straight
• Step one leg back and then the other, curling toes under (so you are on the ball of the foot)
• Bring your body into one straight diagonal line from your neck to your heels • Press back through the heels, lift up through the belly, while keeping the hips
in a neutral position (not flexed or extended) • Stay here for 3-4 soft breaths
42

Section 4: Standing and Balancing Postures
• From here, you can do either of the following: 1) Chaturanga – bend your elbows to lower your chest and belly to the floor.
Keep your elbows in close to your sides and keep your hips slightly raised, so your chest reaches the floor just before your belly.
2) Press back to Child’s Pose – drop your knees to the floor and sit back on your heels as you lower your belly to your thighs and your forehead to the floor
Modification: Many students lack the core strength or arm strength to properly practice the full plank pose. Encourage students to try the modification. Steps:
• Start on all fours (on hands and knees) with hands under shoulders and hips over knees
• Walk hands forward about 3-5 inches • Reach forward with head and chest until shoulders are once again directly
over the wrists • Lift up through the abdominal muscles, so the hips don’t drop and back stays
straight – not swayed • There should be one straight line from the neck to the tailbone • From here, you can do either of the following:
1) Chaturanga – bend your elbows to lower your chest and belly to the floor. Keep your elbows in close to your sides and keep your hips slightly raised, so your chest reaches the floor just before your belly.
2) Press back to Child’s Pose – drop your knees to the floor and sit back on your heels as you lower your belly to your thighs and your forehead to the floor
Teaching Points: Students often have a tendency to either drop their hips (creating a sway back) or lift their hips too much (almost coming into down dog). To help students check if they are in one straight line, have them look towards their feet. They should be able to just see their thighs and feet. If they can see their knees, their hips are usually too high. If they can’t see their thighs, their hips are usually too low. Bringing their hips to the point where they create one straight line from their neck to their heels (or neck to tailbone for modified plank) will better help develop their core strength.
43

Section 4: Standing and Balancing Postures
Camel
Benefits:
• Stretches the thighs, torso, chest, shoulders and throat • Strengthens the legs, pelvis and lower back • Aids digestion • Stimulates circulation • Improves posture
Steps:
• Start in a kneeling position with knees about hip width apart and your hands on your hips, elbows back
• Point feet straight back with top of the feet on the floor • Inhale, stretch up through the top of your head • Exhale, press hips forward as you arch back and head falls back • If possible, students can place hands one at a time on each heel, but only if
they can keep their hips pressed forward (hips directly over knees) • Allow the chest and throat to fully open • Take 4-5 deep breaths through the nose in this position. • Slowly come back up, brining one hand up at a time • Sit back on heels and rest in child’s pose (chest dropped to thighs) for 3-4
breaths • Come back to kneeling and repeat on other side
44

Section 4: Standing and Balancing Postures
Counter with Child’s Pose
Teaching Points: Many students will have a difficult time reaching their hands to their feet. Encourage them to do the modification for camel (see below) by keeping their hands on their low back. It’s important that students keep their hips directly over their knees, regardless of the form of the pose they choose. Otherwise, a person is merely leaning back rather than lifting up and arching the back. It’s important to have students practice a counter pose, such as child’s pose, immediately after camel. The intense backbend of camel causes muscles to contract along the spine. Child’s pose gives these muscles a chance to relax and prevents muscles spasms or strain. Modification: Many students may have a difficult time reaching their hands to their heels while keeping their hips pressed forward. Have them do the Half Camel modification instead.
45

Section 4: Standing and Balancing Postures
Rabbit
Benefits:
• Stretches the upper back, neck and shoulders • Strengthens the hips • Relieves headache and tension
Steps:
• Start in Child’s Pose • Place hands around the soles of the feet • Inhale, lift hips, while keeping hands on feet, trying to bring knees to a right
angle • Exhale, tuck chin to chest, bringing the top of the head to the floor • Continue to actively press up through the hips to stretch more through the
shoulders and upper back • Stay in this position for 4-5 slow breaths • Exhale, slowly bring hips down, sitting back on heels – back to Child’s Pose
Exploration: This position provides a strong stretch for the upper back. To enhance this stretch, pause slightly after inhalation, rounding the back a little more while holding the breath in. Only hold the breath in for a second or two, then allow shoulders and hips to relax a little during the exhale. Teaching Points: Remind students to strongly tuck the chin to the chest, so the top of the head can be placed on the floor, while fully lifting their hips. If a student finds it difficult to do this while holding the soles of their feet, encourage them to hold their ankles or calves instead. Lifting the hips and tucking the head are more important for stretching the upper back than maintaining the hold of the soles of the feet.
46