Keysight M8190A Arbitary Waveform Generator
34
Getting Started Guide Keysight M8190A Arbitrary Waveform Generator
Transcript of Keysight M8190A Arbitary Waveform Generator
Getting Started
Guide
Keysight M8190A Arbitrary Waveform Generator

Notices © Keysight Technologies, Inc. 2017
No part of this manual may be
reproduced in any form or by any
means (including electronic storage
and retrieval or translation into a
foreign language) without prior
agreement and written consent from
Keysight Technologies, Inc. as
governed by United States and
international copyright laws.
Manual Part Number
M8190-91020
Edition
Edition 10.0, October 2017
Keysight Technologies,
Deutschland GmbH
Herrenberger Str. 130
71034 Böblingen, Germany
For Assistance and Support
http://www.keysight.com/find/assist
Limitation of Warranty
The foregoing warranty shall not
apply to defects resulting from
improper or inadequate maintenance
by Buyer, Buyer-supplied software or
interfacing, unauthorized modification
or misuse, operation outside of the
environmental specifications for the
product, or improper site preparation
or maintenance. No other warranty is
expressed or implied. Keysight
Technologies specifically disclaims
the implied warranties of
Merchantability and Fitness for a
Particular Purpose.
ESD sensitive device
All front-panel connectors of the
M8190A are sensitive to Electrostatic
discharge (ESD). We recommend to
operate the instrument in an
electrostatic safe environment.
There is a risk of instrument
malfunction when touching a
connector.
Please follow this instruction:
Before touching the front-panel
connectors, discharge yourself by
touching the properly grounded
mainframe.
Warranty
THE MATERIAL CONTAINED IN THIS
DOCUMENT IS PROVIDED “AS IS,”
AND IS SUBJECT TO BEING
CHANGED, WITHOUT NOTICE, IN
FUTURE EDITIONS. FURTHER, TO
THE MAXIMUM EXTENT PERMITTED
BY APPLICABLE LAW, KEYSIGHT
DISCLAIMS ALL WARRANTIES,
EITHER EXPRESS OR IMPLIED, WITH
REGARD TO THIS MANUAL AND ANY
INFORMATION CONTAINED HEREIN,
INCLUDING BUT NOT LIMITED TO
THE IMPLIED WARRANTIES OF
MERCHANTABILITY AND FITNESS
FOR A PARTICULAR PURPOSE.
KEYSIGHT SHALL NOT BE LIABLE
FOR ERRORS OR FOR INCIDENTAL
OR CONSEQUENTIAL DAMAGES IN
CONNECTION WITH THE
FURNISHING, USE, OR
PERFORMANCE OF THIS DOCUMENT
OR OF ANY INFORMATION
CONTAINED HEREIN. SHOULD
KEYSIGHT AND THE USER HAVE A
SEPARATE WRITTEN AGREEMENT
WITH WARRANTY TERMS COVERING
THE MATERIAL IN THIS DOCUMENT
THAT CONFLICT WITH THESE
TERMS, THE WARRANTY TERMS IN
THE SEPARATE AGREEMENT SHALL
CONTROL.
Technology Licenses
The hardware and/or software
described in this document are
furnished under a license and may be
used or copied only in accordance
with the terms of such license.
Restricted Rights Legend
If software is for use in the
performance of a U.S. Government
prime contract or subcontract,
Software is delivered and licensed as
“Commercial computer software” as
defined in DFAR 252.227-7014 (June
1995), or as a “commercial item” as
defined in FAR 2.101(a) or as
“Restricted computer software” as
defined in FAR 52.227-19 (June 1987)
or any equivalent agency regulation
or contract clause. Use, duplication or
disclosure of Software is subject to
Keysight Technologies’ standard
commercial license terms, and non-
DOD Departments and Agencies of
the U.S. Government will receive no
greater than Restricted Rights as
defined in FAR 52.227-19(c)(1-2)
(June 1987). U.S. Government users
will receive no greater than Limited
Rights as defined in FAR 52.227-14
(June 1987) or DFAR 252.227-7015
(b)(2) (November 1995), as applicable
in any technical data.
Safety Notices
A CAUTION notice denotes a
hazard. It calls attention to an
operating procedure, practice,
or the like that, if not correctly
performed or adhered to, could
result in damage to the product
or loss of important data. Do not
proceed beyond a CAUTION
notice until the indicated
conditions are fully understood
and met.
A WARNING notice denotes a
hazard. It calls attention to an
operating procedure, practice,
or the like that, if not correctly
performed or adhered to, could
result in personal injury or
death. Do not proceed beyond a
WARNING notice until the
indicated conditions are fully
understood and met.
CAUTION
WARNING

Safety Summary
General Safety
Precautions
The following general safety precautions must be observed during all phases of
operation of this instrument. Failure to comply with these precautions or with
specific warnings elsewhere in this manual violates safety standards of design,
manufacture, and intended use of the instrument. For safe operation the general
safety precautions for the M9502A and M9505A AXIe chassis, must be followed.
See: http://www.keysight.com/find/M9505A Keysight Technologies Inc. assumes
no liability for the customer's failure to comply with these requirements. Before
operation, review the instrument and manual for safety markings and instructions.
You must follow these to ensure safe operation and to maintain the instrument in
safe condition.
Initial Inspection
Inspect the shipping container for damage. If there is damage to the container or
cushioning, keep them until you have checked the contents of the shipment for
completeness and verified the instrument both mechanically and electrically. The
Performance Tests give procedures for checking the operation of the instrument. If
the contents are incomplete, mechanical damage or defect is apparent, or if an
instrument does not pass the operator’s checks, notify the nearest Keysight
Technologies Sales/Service Office.
WARNING To avoid hazardous electrical shock, do not perform electrical tests
when there are signs of shipping damage to any portion of the outer enclosure
(covers, panels, etc.).
General
This product is a Safety Class 3 instrument. The protective features of this product
may be impaired if it is used in a manner not specified in the operation
instructions.
Environment
Conditions This instrument is intended for indoor use in an installation category II, pollution
degree 2 environment. It is designed to operate within a temperature range of 0
°C – 40 °C (32 °F – 105 °F) at a maximum relative humidity of 80% and at altitudes
of up to 2000 meters.
This module can be stored or shipped at temperatures between -40 °C and +70 °C.
Protect the module from temperature extremes that may cause condensation
within it.
Before Applying Power Verify that all safety precautions are taken including those defined for the
mainframe.
Line Power
Requirements The Keysight M8190A operates when installed in an Keysight AXIe mainframe.
Do Not Operate in an
Explosive Atmosphere Do not operate the instrument in the presence of flammable gases or fumes.
Do Not Remove the
Instrument Cover Operating personnel must not remove instrument covers. Component replacement
and internal adjustments must be made only by qualified personnel. Instruments
that appear damaged or defective should be made inoperative and secured
against unintended operation until they can be repaired by qualified service
personnel.
Safety Symbols
Table 1 Safety Symbol
Symbol Description
Indicates warning or caution. If you see this symbol on a product, you must refer to the manuals for
specific Warning or Caution information to avoid personal injury or damage to the product.
C-Tick Conformity Mark of the Australian ACA for EMC compliance.
CE Marking to state compliance within the European Community: This product is in conformity with the
relevant European Directives.
General Recycling Mark
Table 2 Compliance and Environmental Information
Symbol Description
This product complies with the WEEE Directive (2002/96/EC) marketing requirements. The affixed label
indicates that you must not discard this electrical/electronic product in domestic household waste.
Product category: With reference to the equipment types in the WEEE Directive Annexure I, this product
is classed as a “Monitoring and Control instrumentation” product.
Do not dispose in domestic household waste.
To return unwanted products, contact your local Keysight office, or see
http://about.keysight.com/en/companyinfo/environment/takeback.shtml for more information.
Contents
M8190A Getting Started Guide 5
Contents
1 Introduction
2 M8190A Software Installation
2.1 Pre-Requisites 11
2.2 Installation Process 12
2.3 Post Installation Steps 20
2.4 Updating M8190A Software 21
2.5 How to Use the Instrument 22
2.6 How to Access Two M8190A Modules in a Single Chassis 24
2.7 Basic Problems 27
3 AXle Chassis
3.1 ESM Front Panel Connector 29
4 M8190A Maintenance
4.1 ESD Protection 31
4.2 Power and Ventilation Requirements 31
4.3 Thermal Protection 32
4.4 Battery 32
4.5 Operating Environment 32
4.6 Cleaning Recommendation 32
5 Characteristics
5.1 Performance Specification 33
5.2 General 33

Keysight M8190A – Arbitrary Waveform Generator
Getting Started Guide
1 Introduction
Introduction The Keysight M8190A is a 12 GSa/s Arbitrary Waveform Generator. It combines
excellent signal fidelity with highest sampling rates. It offers up to 2 GSa waveform
memory per channel and three different high bandwidth output paths to ideally
address applications.
Features and Benefits Precision AWG with
14-bit resolution up to 8 GSa/s with Option -14B
12-bit resolution up to 12 GSa/s with Option -12G
14-bit resolution up to 7.2 GSa/s with Option -DUC
Spurious-free-dynamic range (SFDR) up to 80 dBc typical
Harmonic distortion (HD) up to -72 dBc typical
Standard arbitrary waveform memory size 128 MSa per channel with
Option -14B and Option -12G, 64 MSa IQ sample pairs with Option -DUC
231 = ~2147 MSa arbitrary waveform memory per channel with
Option -02G in 12 bit mode
~1610 MSa arbitrary waveform memory per channel with
Option -02G in 14 bit mode
~805 MSa IQ sample pair arbitrary waveform memory per channel with
Option -02G in DUC mode. I.e. with
Option -02G and Option -DUC, the M8190A offers
~805 MSa I data and ~805 MSa Q data per channel.
Analog bandwidth 3.5 GHz; (5 GHz with Option - AMP)
Transition times 50 ps (20 % to 80 %) with Option - AMP
Differential output
Form-factor: 2-slot AXIe module
Controlled via external PC or embedded AXIe system controller M9537A
1 Introduction
8 M8190A Getting Started Guide
Getting Started with
M8190A The M8190A is a modular instrument packaged in the AXIe form factor. AXIe is a new
open standard for high-performance modular instrumentation. Three form factors are
available: two-slot, five-slot and fourteen slot AXIe chassis. These include an
embedded AXIe system module that does not occupy a module slot. In addition, an
AXIe embedded controller forms an entire system that can control the M8190A AWG.
This embedded controller consumes one module slot of the AXIe chassis. Besides
using an embedded controller, the M8190A AWG can be controlled by an external
desktop PC or an external laptop as well. For PCIe interface, a PCIe adapter card and
PCIe cable are needed to connect to the AXIe chassis, and in case of USB 2.0, only a
USB cable will be required.
There are two different ordering possibilities:
AXIe chassis, PCIe or USB 2.0 cable, PC and M8190A AWG are ordered
separately. The different components come in different packages and need to be
installed. Please follow the instructions given in chapter 3 of M8190A User’s
Guide or the instructions given in the User’s Guide of the AXIe chassis.
M8190A bundle, there are two configurations available:
Option -BU1, contains a 5- slot AXIe chassis, embedded controller and
the M8190A AWG. The M8190A firmware and SFP (soft front panel) is
already installed and configured on the embedded controller.
User set up:
Username: M8190a_admin
Password: admin!123
Directory of the software:
Firmware:
C:\Program Files (x86)\Keysight\M8190\bin
SoftFrontPanel:
C:\Program Files (x86)\Keysight\M8190\SFP
Option -BU2, contains a 2- slot AXIe chassis and either a laptop cable
with laptop adapter card or desktop cable with desktop adapter card.
The AWG is already plugged in the 2- slot AXIe chassis. Cable and
adapter card needs to be connected as described in chapter 2 of
M8190A User’s Guide or as described in the User’s Guide of the AXIe
chassis.
Introduction 1
M8190A Getting Started Guide 9
Related Documents To access documentation related to the Keysight M8190A Arbitrary Waveform
Generator, use one of the following methods:
CD - Browse the product CD for M8190 documentation.
Start > All Programs > Keysight M8190 > Keysight M8190 Documentation -
Provides links to all product documentation except for the IVI driver
documentation.
Start > All Programs > Keysight Instrument Drivers > AgM8190 Arbitrary
Waveform Generator - Provides link to the product IVI driver help system.
Go to the product web site (www.keysight.com/find/M8190A) and browse the
manuals under Document Library tab.
Additional Documents Additional documentation can be found at:
http://www.keysight.com/find/M9502A for 2-slot chassis related
documentation.
http://www.keysight.com/find/M9505A for 5-slot chassis related
documentation.
http://www.keysight.com/find/M9514A for 14-slot chassis related
documentation.
http://www.keysight.com/find/M9048A for PCIe desktop adapter card related
documentation.
http://www.keysight.com/find/M9537A for embedded AXIe controller related
documentation.
http://www.keysight.com/find/M8190A for AXIe based AWG module related
documentation.
http://www.keysight.com/find/M8192A for AXIe based synchronization module
related documentation.


Keysight M8190A – Arbitrary Waveform Generator
Getting Started Guide
2 M8190A Software
Installation
This chapter explains the steps required to install M8190A software package.
2.1 Pre-Requisites
The following are the pre-requisites for installing Keysight M8190A software:
The supported operating systems are:
Windows 10 (32 bit or 64 bit)
Windows 8.1 (32 bit or 64 bit)
Windows 8 (32 bit or 64 bit)
Windows 7 (32 bit or 64 bit)
Ensure that you have Keysight IO Libraries Suite Version 17.3 or higher
installed on your system. The Keysight IO Libraries Suite can be found on the
CD that is part of shipment content or at
http://www.keysight.com/find/iosuite.
Even if a non-Keysight I/O library is already installed, it is still necessary to install the
Keysight I/O library. The Keysight I/O library will install as “secondary” I/O library in this
case. This use case is fully supported. There only needs to be some additional
considerations when doing SCPI remote programming. For more information on SCPI
remote programming, refer to M8190A User's Guide. A non-Keysight “primary” I/O library
must support the HiSLIP protocol otherwise; the Soft Front Panel and the IVI drivers will
not work.

2 AXIe Chassis
12 M8190A Getting Started Guide
2.2 Installation Process
Follow the given steps to install Keysight M8190A software on your system.
1. Double-click the executable (M8190_Setup.exe). This executable file will be
available either on CD or Web.
See http://www.keysight.com/find/M8190A
The installer will first check for some pre-requisites and install them, if necessary. It is
possible that your PC requests a reboot during this step. Reboot your PC, if requested.
Introduction 2
M8190A Getting Started Guide 13
2. The Keysight M8190A Setup will prepare the InstallShield Wizard for the
installation process. The following window will appear.
3. Follow the onscreen instructions to begin the installation process.
Click Next.

2 AXIe Chassis
14 M8190A Getting Started Guide
4. We recommend you to read the document to check if your hardware
configuration is supported.
Click Next to proceed to the license agreements.
5. Accept the terms of Keysight software end-user license agreement.
Click Next.
.
Introduction 2
M8190A Getting Started Guide 15
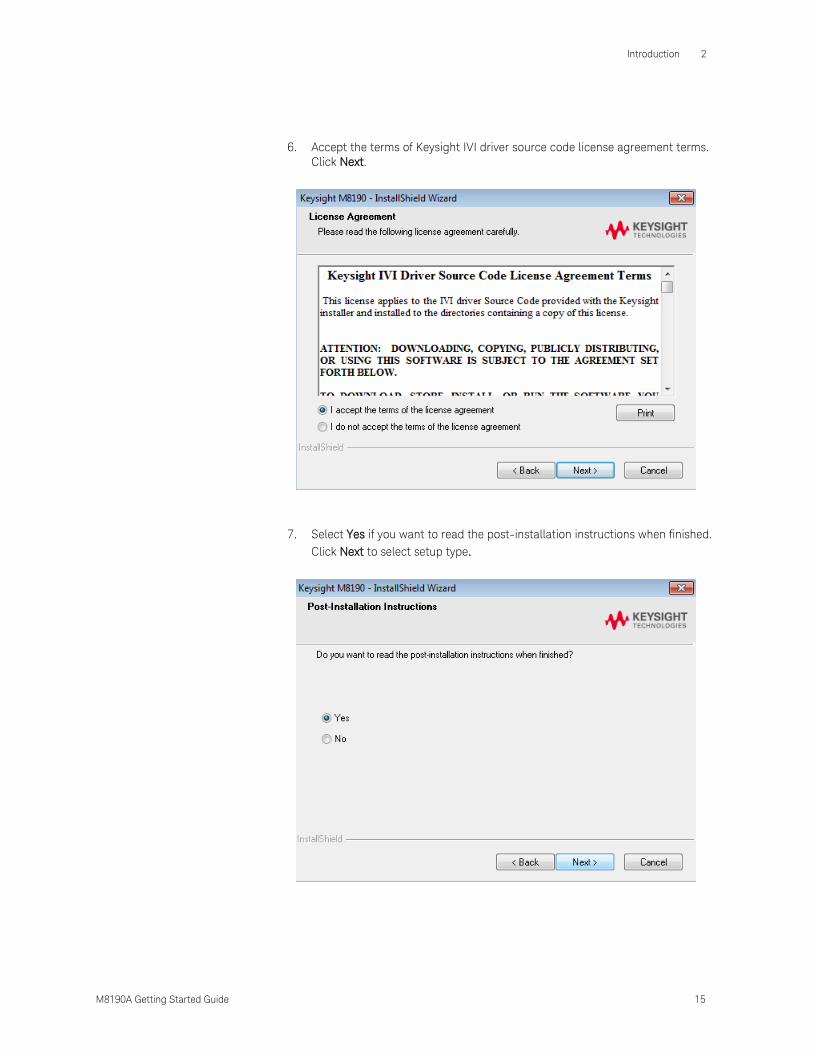
6. Accept the terms of Keysight IVI driver source code license agreement terms.
Click Next.
7. Select Yes if you want to read the post-installation instructions when finished.
Click Next to select setup type.
2 AXIe Chassis
16 M8190A Getting Started Guide
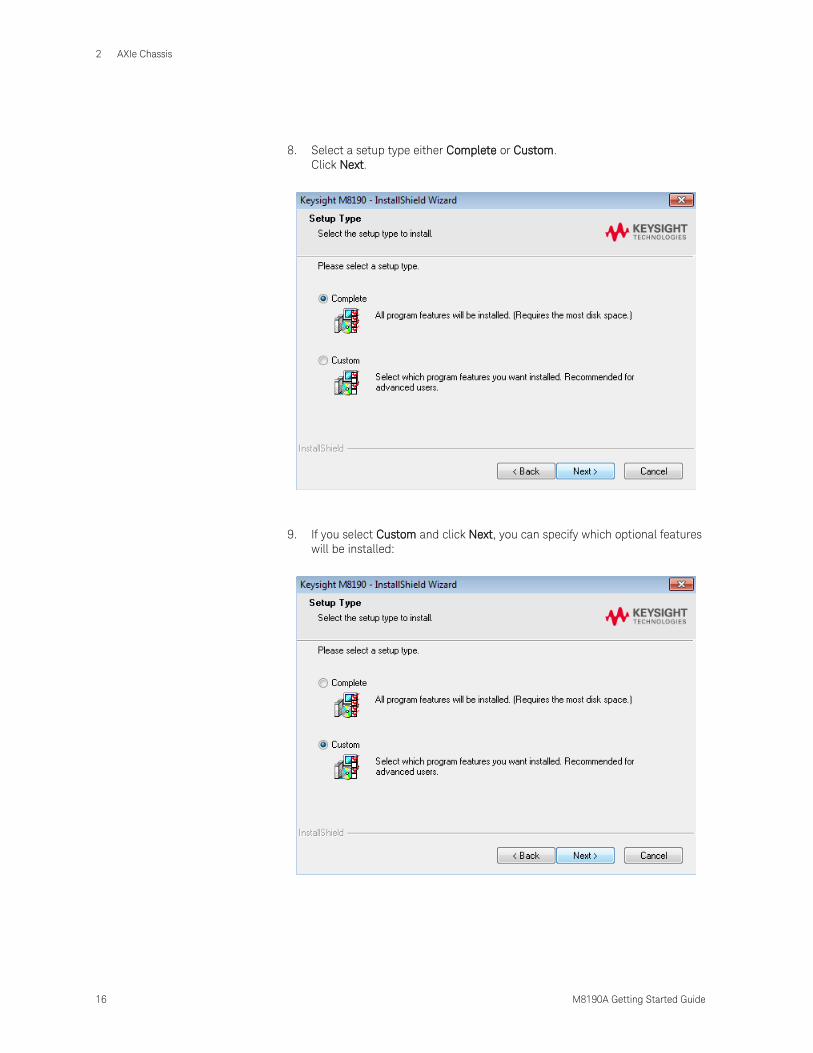
8. Select a setup type either Complete or Custom.
Click Next.
9. If you select Custom and click Next, you can specify which optional features
will be installed:
Introduction 2
M8190A Getting Started Guide 17
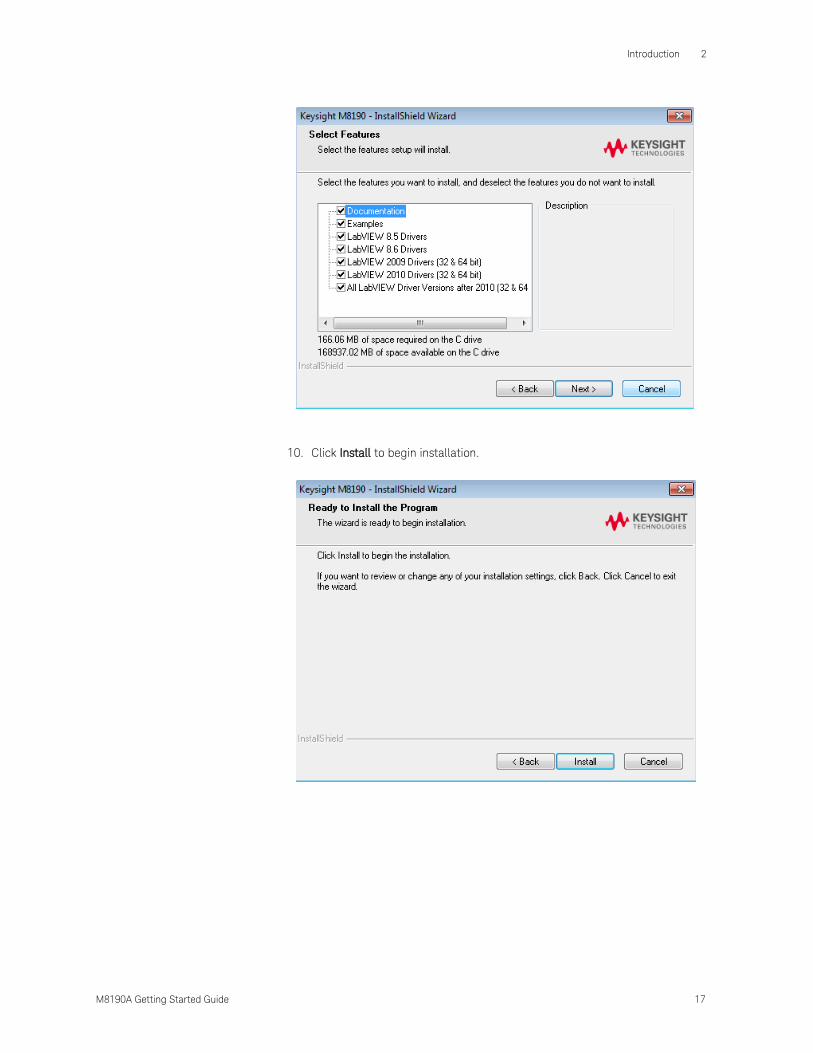
10. Click Install to begin installation.

2 AXIe Chassis
18 M8190A Getting Started Guide
11. The Setup Wizard will now install AgM8190 IVI Drivers.
Introduction 2
M8190A Getting Started Guide 19
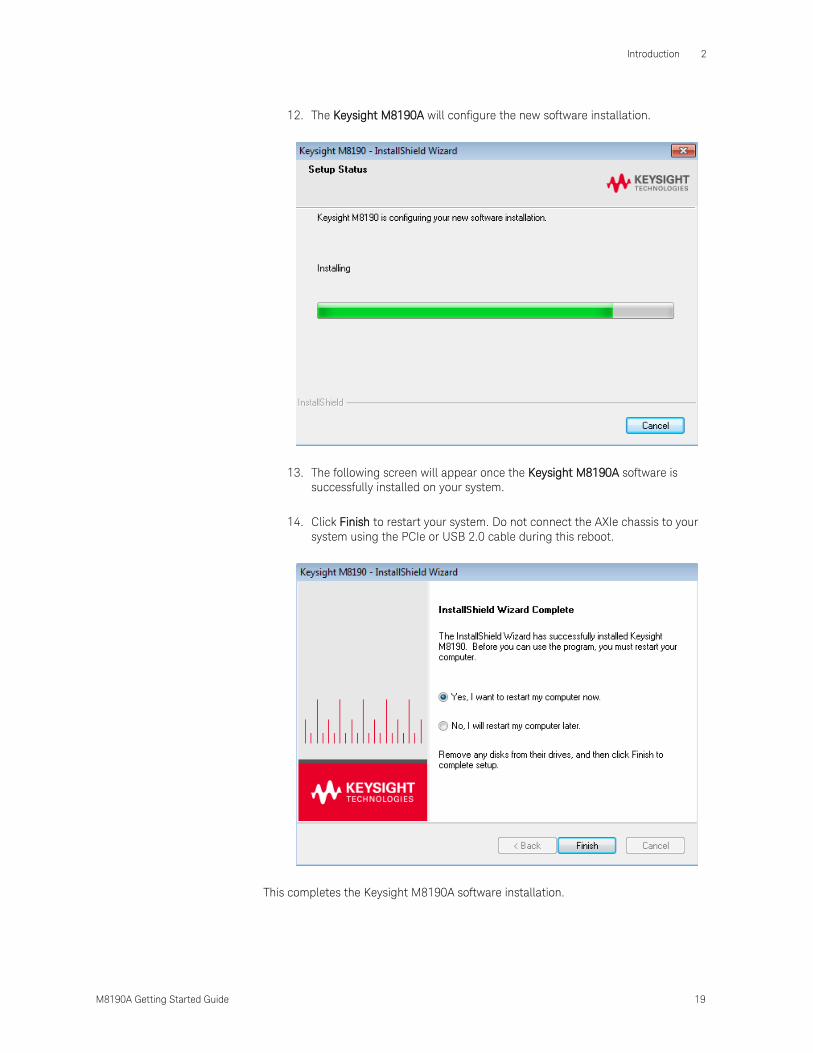
12. The Keysight M8190A will configure the new software installation.
13. The following screen will appear once the Keysight M8190A software is
successfully installed on your system.
14. Click Finish to restart your system. Do not connect the AXIe chassis to your
system using the PCIe or USB 2.0 cable during this reboot.
This completes the Keysight M8190A software installation.
2 AXIe Chassis
20 M8190A Getting Started Guide
2.3 Post Installation Steps
Follow the post installation steps as shown below:
If your instrument is already powered up and connected to your PC using the PCIe or
USB 2.0 cable, just reboot your PC and start with step 5.
1. Shut down PC and instrument.
2. Connect the instrument to the PC using the PCIe or USB 2.0 cable. The USB
2.0 port is available for AXIe chassis with option U20 only.
3. Switch on the instrument. Wait until the ‘Access’ LED of the M8190A has
switched from red to green.
4. Switch on the PC.
5. The PC should automatically recognize the instrument.
Check this in the device manager; e.g. via Start > Control Panel > Device
Manager, or right-click Computer > Manage > Device Manager:
The instrument should be visible in the device tree as Keysight – M8190.
Your PC might request a reboot. Reboot your PC, if requested.
6. Check if the M8190 is also visible in the Keysight Connection Expert
(e.g. via Start > Keysight IO Libraries Suite > Keysight Connection Expert).
If something went wrong and the instrument is not shown in the PXI section,
it may be necessary to reboot the PC once more.
Introduction 2
M8190A Getting Started Guide 21
2.4 Updating M8190A Software
Updated versions of the M8190A software are available on the Keysight website. These
software components are available as .EXE files. To download a software upgrade:
1. Go to http://www.keysight.com/find/M8190A.
2. Click the Technical Support tab.
3. Click Drivers, Firmware & Software.
4. Download the required software update from the list of available updates.
5. Install the software update. Refer to the steps described in the section
Installation Process.
2 AXIe Chassis
22 M8190A Getting Started Guide
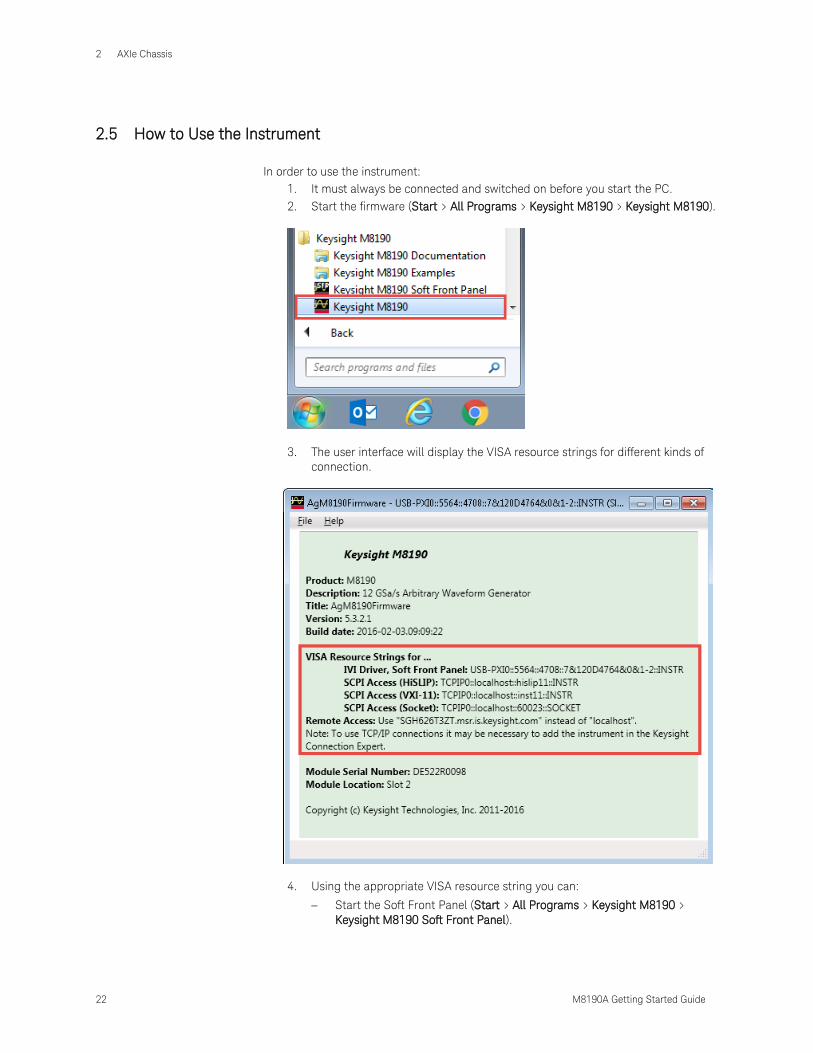
2.5 How to Use the Instrument
In order to use the instrument:
1. It must always be connected and switched on before you start the PC.
2. Start the firmware (Start > All Programs > Keysight M8190 > Keysight M8190).
3. The user interface will display the VISA resource strings for different kinds of
connection.
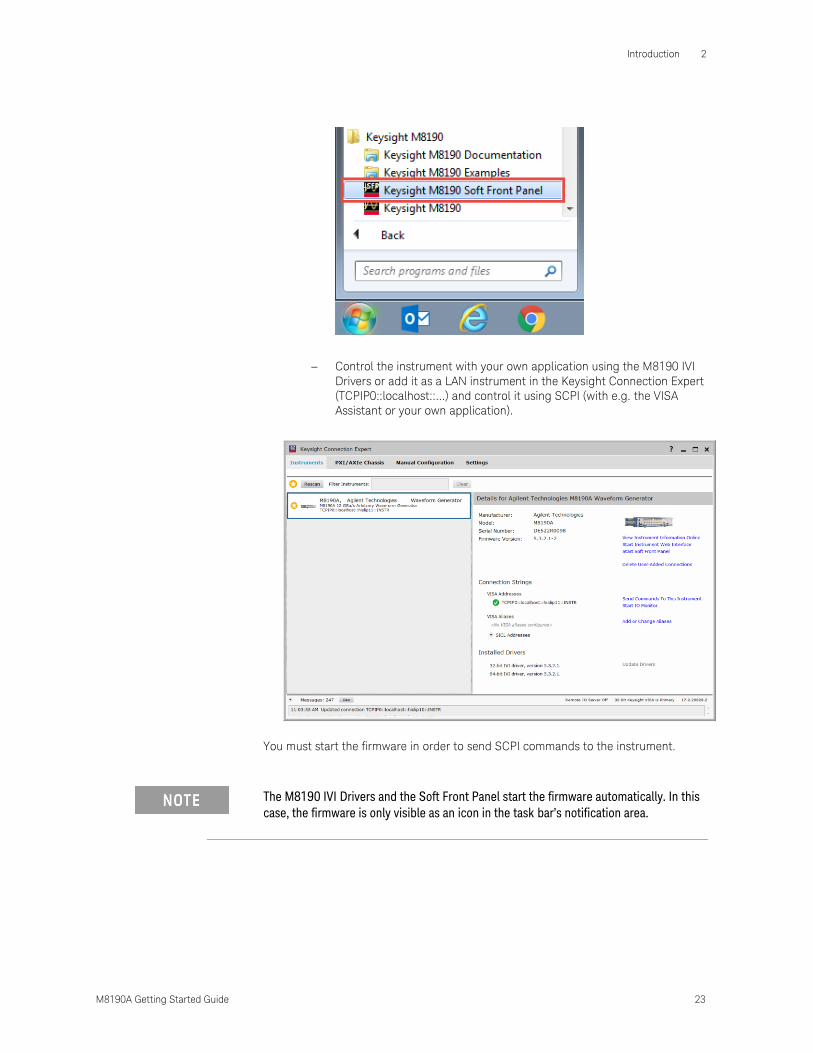
4. Using the appropriate VISA resource string you can:
Start the Soft Front Panel (Start > All Programs > Keysight M8190 >
Keysight M8190 Soft Front Panel).
Introduction 2
M8190A Getting Started Guide 23
Control the instrument with your own application using the M8190 IVI
Drivers or add it as a LAN instrument in the Keysight Connection Expert
(TCPIP0::localhost::…) and control it using SCPI (with e.g. the VISA
Assistant or your own application).
You must start the firmware in order to send SCPI commands to the instrument.
The M8190 IVI Drivers and the Soft Front Panel start the firmware automatically. In this
case, the firmware is only visible as an icon in the task bar’s notification area.
2 AXIe Chassis
24 M8190A Getting Started Guide
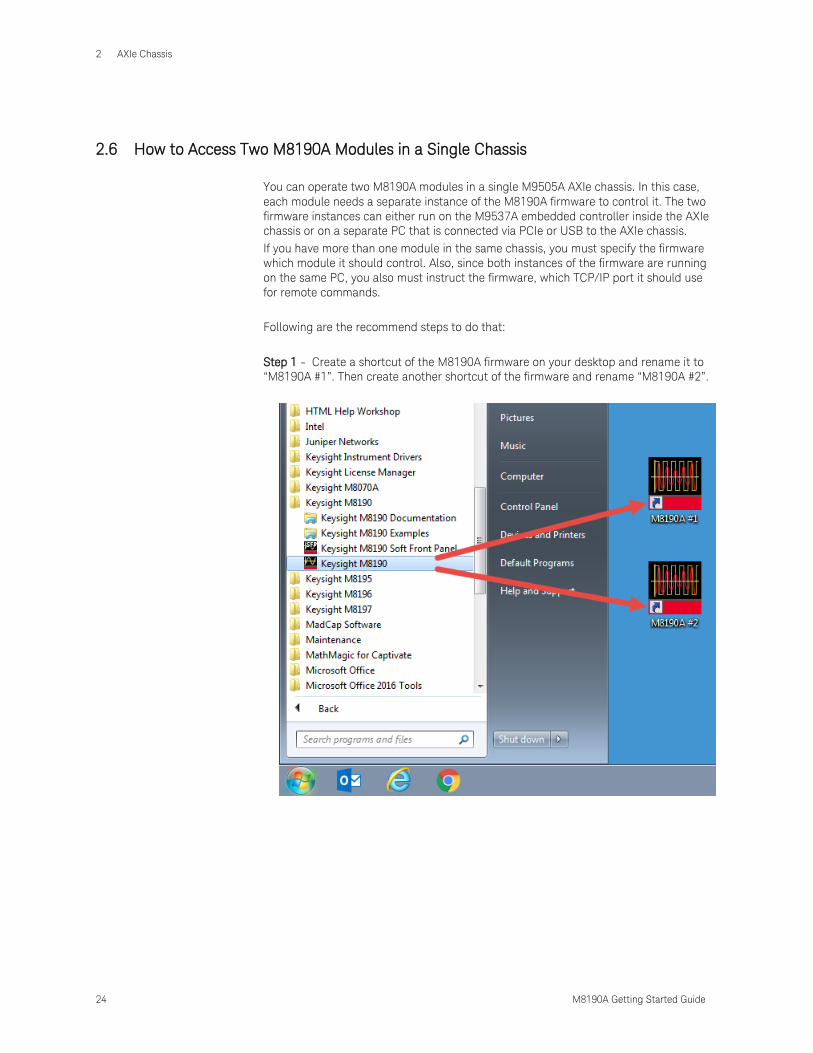
2.6 How to Access Two M8190A Modules in a Single Chassis
You can operate two M8190A modules in a single M9505A AXIe chassis. In this case,
each module needs a separate instance of the M8190A firmware to control it. The two
firmware instances can either run on the M9537A embedded controller inside the AXIe
chassis or on a separate PC that is connected via PCIe or USB to the AXIe chassis.
If you have more than one module in the same chassis, you must specify the firmware
which module it should control. Also, since both instances of the firmware are running
on the same PC, you also must instruct the firmware, which TCP/IP port it should use
for remote commands.
Following are the recommend steps to do that:
Step 1 - Create a shortcut of the M8190A firmware on your desktop and rename it to
“M8190A #1”. Then create another shortcut of the firmware and rename “M8190A #2”.
Introduction 2
M8190A Getting Started Guide 25
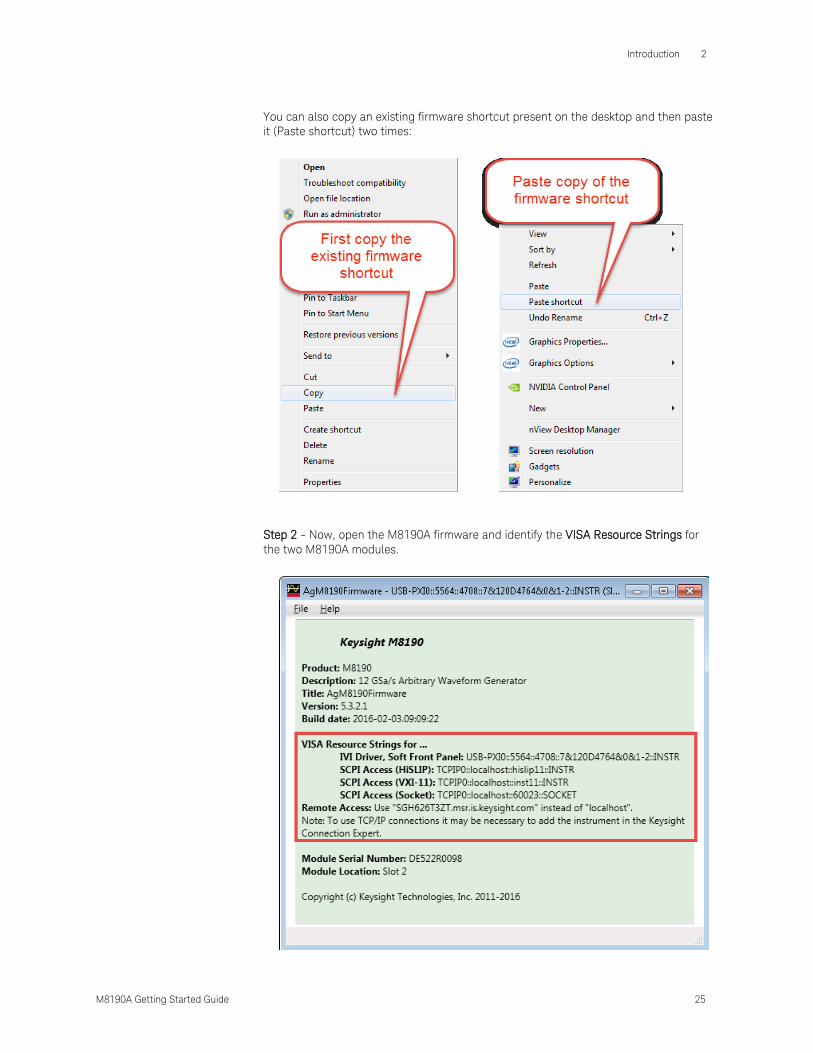
You can also copy an existing firmware shortcut present on the desktop and then paste
it (Paste shortcut) two times:
Step 2 - Now, open the M8190A firmware and identify the VISA Resource Strings for
the two M8190A modules.
2 AXIe Chassis
26 M8190A Getting Started Guide
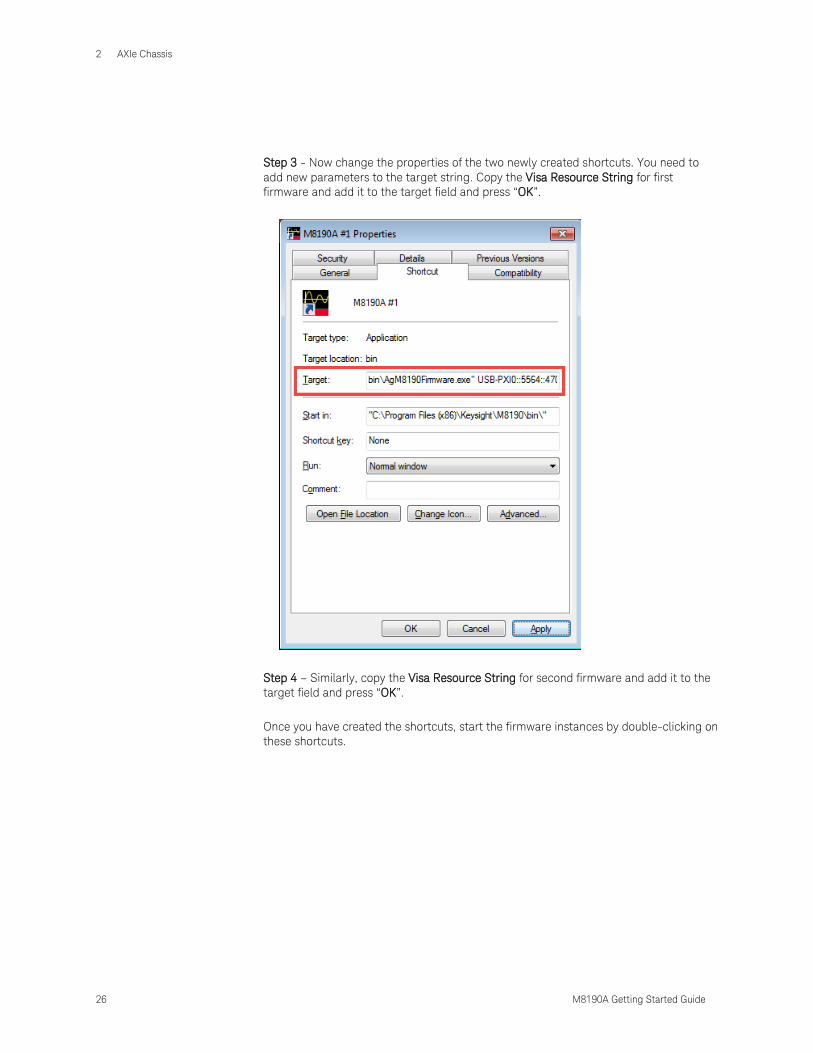
Step 3 - Now change the properties of the two newly created shortcuts. You need to
add new parameters to the target string. Copy the Visa Resource String for first
firmware and add it to the target field and press “OK”.
Step 4 – Similarly, copy the Visa Resource String for second firmware and add it to the
target field and press “OK”.
Once you have created the shortcuts, start the firmware instances by double-clicking on
these shortcuts.
Introduction 2
M8190A Getting Started Guide 27
2.7 Basic Problems
Query The M8190A firmware does not come up.
Solution You should power cycle the chassis and reboot the host system.
The following is the power-up sequence:
1. Power up the chassis first. Use the ON/STANDBY button on the front panel of
the chassis.
2. Wait until the chassis ESM Status LED becomes steady green.
3. Wait another 60 seconds for the chassis to finish booting up.
4. Power up the remote host.
If you are using the AXIe Embedded Controller Module as the host computer, then you
need not perform the host PC power up steps because the Embedded Controller startup is
managed internally and the controller automatically starts after the chassis power is
stable.
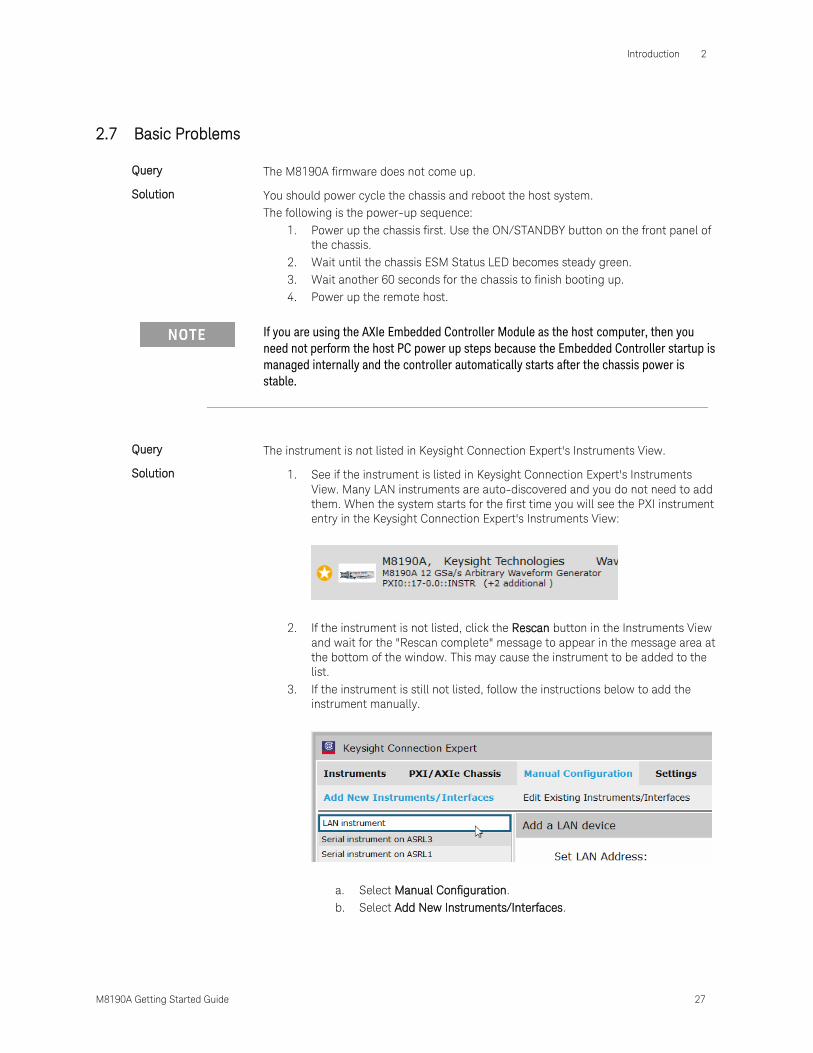
Query The instrument is not listed in Keysight Connection Expert's Instruments View.
Solution 1. See if the instrument is listed in Keysight Connection Expert's Instruments
View. Many LAN instruments are auto-discovered and you do not need to add
them. When the system starts for the first time you will see the PXI instrument
entry in the Keysight Connection Expert's Instruments View:
2. If the instrument is not listed, click the Rescan button in the Instruments View
and wait for the "Rescan complete" message to appear in the message area at
the bottom of the window. This may cause the instrument to be added to the
list.
3. If the instrument is still not listed, follow the instructions below to add the
instrument manually.
a. Select Manual Configuration.
b. Select Add New Instruments/Interfaces.

2 AXIe Chassis
28 M8190A Getting Started Guide
c. When the system is first configured and started, the TCP/IP LAN
connection will not be available. You should manually add the LAN
instrument manually. To do so, select LAN Instrument from the list of
devices that can be added, at the left of the screen. While doing so,
make sure that the firmware is running in the background.
d. Fill in the instrument's properties. The IP address of the instrument
will be the IP address of the PC running the firmware or localhost.
e. Test the connection.
f. Click Accept.
For more details, refer to online help of Keysight Connection Expert.
Query The M8190A firmware comes up, but the M8190A SFP (Soft Front Panel) does not
comes up.
Solution Ensure that same version of both M8190A Firmware and M8190A IVI drivers must be
properly installed.
Query The M8190A firmware display an error message asking for a log file.
Solution The stated folder might be a hidden one. When entering the path manually in the
File Explorer (…\AppData\...) it should show up.
Query M8190A firmware upgrade is not successful.
Solution If your firmware upgrade is not successful, follow the given steps:
1. Manually uninstall the old versions of the M8190A Firmware and the
M8190A IVI driver.
2. Now, start the fresh installation of the new M8190A firmware version.
Query The AXIe chassis or a module does not power up.
Solution If the chassis or a module does not appear to power up, check the following:
The circuit breakers at the rear of the chassis are set to the right, which is the
ON position.
The AC power cords are connected to a working power source.
The electrical circuits are not overloaded. Check the combined power
requirements of all equipment on the same circuit.
There are no empty slots in the chassis. Leaving slots empty can overheat the
inserted modules, causing them to shut down.
Query Contacting Keysight for sales, service and support.
Solution To contact Keysight for sales, service and support, go to;
www.keysight.com/find/contactus.
Keysight M8190A – Arbitrary Waveform Generator
Getting Started Guide
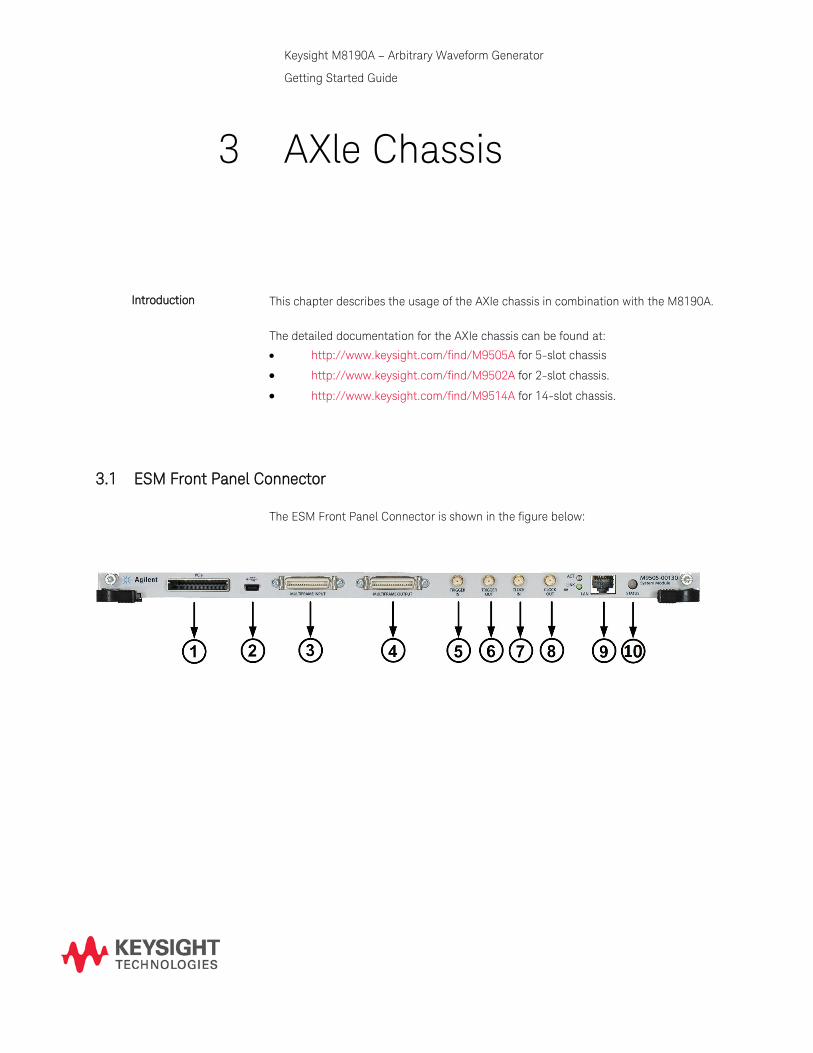
3 AXle Chassis
Introduction This chapter describes the usage of the AXIe chassis in combination with the M8190A.
The detailed documentation for the AXIe chassis can be found at:
http://www.keysight.com/find/M9505A for 5-slot chassis
http://www.keysight.com/find/M9502A for 2-slot chassis.
http://www.keysight.com/find/M9514A for 14-slot chassis.
3.1 ESM Front Panel Connector
The ESM Front Panel Connector is shown in the figure below:
3 AXIe Chassis
30 M8190A Getting Started Guide
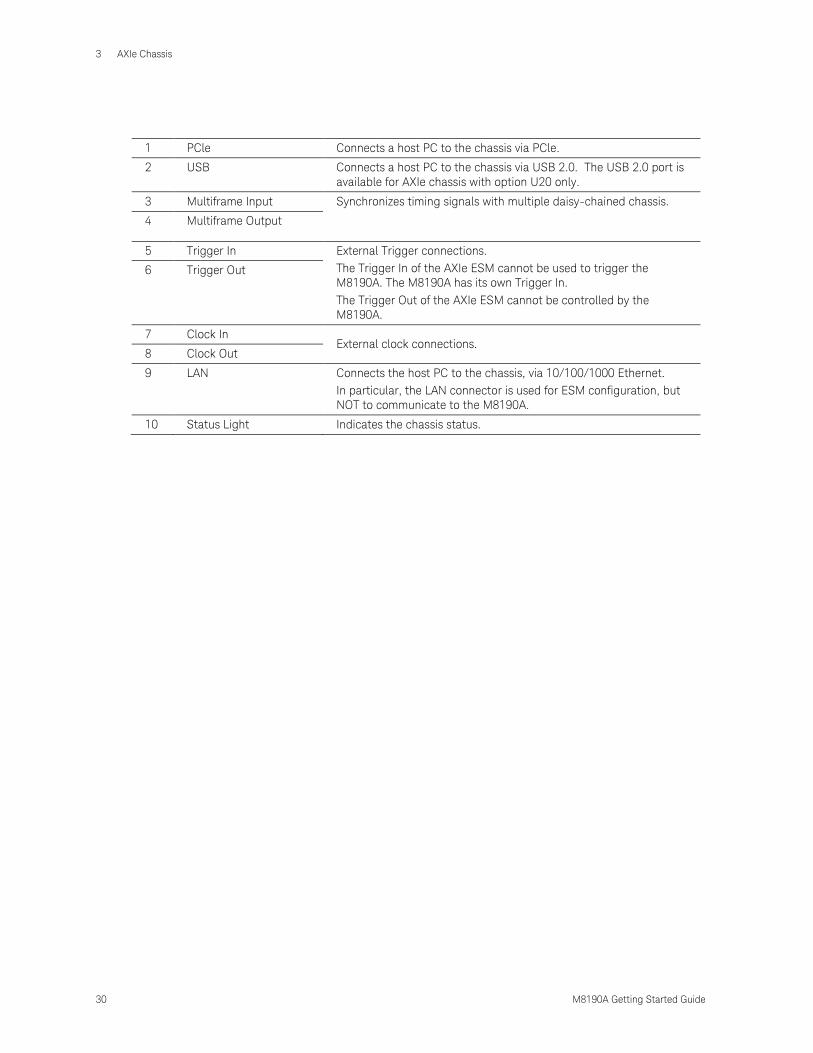
1 PCle Connects a host PC to the chassis via PCle.
2 USB Connects a host PC to the chassis via USB 2.0. The USB 2.0 port is
available for AXIe chassis with option U20 only.
3 Multiframe Input Synchronizes timing signals with multiple daisy-chained chassis.
4 Multiframe Output
5 Trigger In External Trigger connections.
The Trigger In of the AXIe ESM cannot be used to trigger the
M8190A. The M8190A has its own Trigger In.
The Trigger Out of the AXIe ESM cannot be controlled by the
M8190A.
6 Trigger Out
7 Clock In External clock connections.
8 Clock Out
9 LAN Connects the host PC to the chassis, via 10/100/1000 Ethernet.
In particular, the LAN connector is used for ESM configuration, but
NOT to communicate to the M8190A.
10 Status Light Indicates the chassis status.

Keysight M8190A – Arbitrary Waveform Generator
Getting Started Guide
4 M8190A Maintenance
Introduction This chapter explains how to install and maintain the M8190A. It covers the following
topics:
ESD Protection
Power & Ventilation Requirements
Thermal Protection
Battery
Operating Environment
Cleaning Recommendation
4.1 ESD Protection
All the connectors are very sensitive to electrostatic discharge (ESD). When you
connect a device or cable that is not fully discharged to these connectors, you risk
damage to the instrument and expensive instrument repairs.
Electrostatic discharge (ESD) can damage the circuits of the M8190A. Avoid applying
static discharges to the front-panel connectors. Before connecting any coaxial cable to
the connectors, momentarily short the center and outer conductors of the cable
together. Avoid touching the front-panel connectors without first touching the frame of
the instrument. Be sure the instrument and all connected devices (DUT, etc.) are
properly earth-grounded (to a common ground) to prevent buildup of static charge and
electrical over-stress.
4.2 Power and Ventilation Requirements
For power and ventilation requirements, refer to:
http://www.keysight.com/find/M9505A for 5-slot chassis related documentation.
http://www.keysight.com/find/M9502A for 2-slot chassis related documentation.
4 M8190A Maintenance
32 M8190A Getting Started Guide
4.3 Thermal Protection
Overheating Detection The instrument monitors its internal temperature. If the temperature exceeds
approximately 80°C the power supply is switched off. The instrument will not turn on
automatically if the temperature is decreasing again.
Fan Failure If a fan is broken or prevented from operating by a blockage the temperature will
increase. When the temperature exceeds approximately 80°C the overheating
detection switches off the instrument for safety reasons. For reliability, it is
recommended to send instruments with broken or defective fans immediately to
Keysight Service for repair.
4.4 Battery
The M8190A does not have a battery.
4.5 Operating Environment
Storage Temperature −40 °C to +70 °C
Operating Temperature 0 °C to 40 °C
Humidity 95%R.H. (at 40 °C)
Altitude Up to 2000 m
Installation Category II
Pollution Degree 2
The instrument is not designed for outdoor use. Do not expose the instrument to rain or
other excessive moisture. Protect the instrument from humidity and temperature
changes, which could cause condensation within the instrument.
Do not operate the instrument in the presence of flammable gases, fumes or powders.
Operation of any electrical instrument in such an environment constitutes a definite
safety hazard.
4.6 Cleaning Recommendation
To prevent electrical shock, disconnect the instrument from mains before cleaning. Use
a dry cloth or one slightly dampened with water to clean external case parts. Do not
attempt to clean internally.
Keysight M8190A – Arbitrary Waveform Generator
Getting Started Guide
5 Characteristics
5.1 Performance Specification
The performance specification can be found in the Data Sheet of the M8190A at:
http://www.keysight.com/find/M8190A
5.2 General
Power consumption 210 W (nom), 12 GSa/s operation
Operating temperature 0 °C to 40 °C
Storage temperature -40 °C to 70 °C
Operating humidity 5 % to 80 % relative humidity, non-condensing
Operating altitude up to 2000 m
Safety designed to IEC 61010-1, UL 61010-1, CAN/CSA-C22.2 No. 61010-1
EMC tested to IEC61326-1
Warm-up time 30 min
Calibration interval 1 year recommended
Cooling
Requirements When operating the M8190A choose a location that provides at least 80 mm of
clearance at rear, and at least 30 mm of clearance at each side for the
AXIe chassis.

This information is subject to change without notice.
© Keysight Technologies 2017
Edition 10.0, October 2017
www.keysight.com