![Dell Precision 15 7000 series (7510) Owner's Manual...b. Remove the screws that secure the keyboard to the computer [4]. c. Lift the front side and slide the keyboard to remove it](https://static.fdocuments.us/doc/165x107/5e98b42e626a1d2c4209287b/dell-precision-15-7000-series-7510-owners-manual-b-remove-the-screws-that.jpg)
Keyboard and Mouse Support - Herman Miller · ... without notice, ... Note: To ease assembly,...
5
Z © 2012 Herman Miller, Inc. Zeeland, Michigan. Printed in the U.S.A. ® Y, Z, Action Office, and Mirra are among the registered trademarks of Herman MIller, Inc. TM Sense, Setu, Compass and Sayl are among the trademarks of Herman Miller, Inc. Illustrations and specifications are based on the latest product information available at the time of publication. The right is reserved to make changes in design and specifications at any time, without notice, and also to discontinue products. Part no. 1b3tkb rev C. 1 Y Keyboard Tray Mechanism Installation Tools Required: 1/8” Allen Wrench 1/8” Drill Bit #2 Phillips Bit Measuring Tape Power Driver Note: Items shown represent generic list of components included. Actual tray components will vary based on product configuration. (see nomenclature) Parts Included: Track Base Track Base Hardware Pack Y7710. Series Product Y7710. 1A (includes Y7728. A) Y7710. 2A (includes Y7728. A) Y7710. 1B (includes Y7728. B) Y7710. 2B (includes Y7728. B) Y7727. 1G (includes Y7728. B) Y7727. 2H (includes Y7728. B) Y7727. 1J (includes Y7728. C) Y7727. Series Product Y7728. A & C Y7728. B Hardware Pack Hardware Pack Keyboard Tray Keyboard Tray Arm Mechanism Arm Mechanism Mouse Tray Mouse Tray Mouse Holder Mouse Tray Bracket Bracket Spacer Hardware Pack Mouse Holder Bracket
Transcript of Keyboard and Mouse Support - Herman Miller · ... without notice, ... Note: To ease assembly,...
Z© 2012 Herman Miller, Inc. Zeeland, Michigan. Printed in the U.S.A.® Y, Z, Action Office, and Mirra are among the registered trademarks of Herman MIller, Inc.TM Sense, Setu, Compass and Sayl are among the trademarks of Herman Miller, Inc.
Illustrations and specifications are based on the latest product information available at the time of publication. The right is reserved to make changes in design and specifications at any time, without notice, and also to discontinue products.
Part no. 1b3tkb rev C.
1
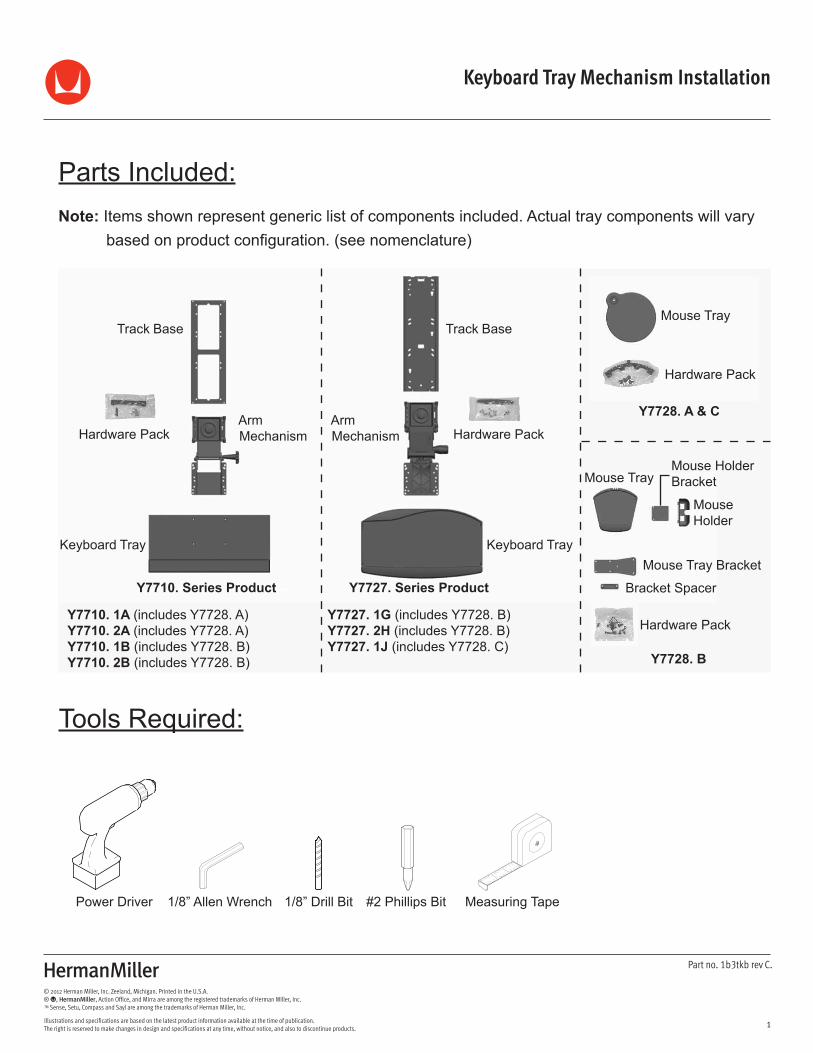
Y Keyboard Tray Mechanism Installation
Tools Required:
1/8” Allen Wrench 1/8” Drill Bit #2 Phillips Bit Measuring TapePower Driver
Note: Items shown represent generic list of components included. Actual tray components will vary basedonproductconfiguration.(seenomenclature)
Parts Included:
Track Base Track Base
Hardware Pack
Y7710. Series Product
Y7710. 1A (includesY7728.A)Y7710. 2A (includesY7728.A)Y7710. 1B (includesY7728.B)Y7710. 2B (includesY7728.B)
Y7727. 1G (includesY7728.B)Y7727. 2H (includesY7728.B)Y7727. 1J (includesY7728.C)
Y7727. Series Product
Y7728. A & C
Y7728. B
Hardware Pack
Hardware Pack
Keyboard Tray Keyboard Tray
Arm Mechanism
Arm Mechanism
Mouse Tray
Mouse Tray
Mouse Holder
Mouse Tray Bracket
Bracket Spacer
Hardware Pack
Mouse Holder Bracket

Z© 2012 Herman Miller, Inc. Zeeland, Michigan. Printed in the U.S.A.® Y, Z, Action Office, and Mirra are among the registered trademarks of Herman MIller, Inc.TM Sense, Setu, Compass and Sayl are among the trademarks of Herman Miller, Inc.
Illustrations and specifications are based on the latest product information available at the time of publication. The right is reserved to make changes in design and specifications at any time, without notice, and also to discontinue products.
Part no. 1b3tkb rev C.
2
Arm Mechanism and Track Base Installation:Note: To ease assembly, keyboard tray product should be installed to any new uninstalled work surface product prior to work surface product installation. It is recommended that attachment of keyboard tray product to existingproduct,bedoneby(2)personsto reduce the risk of product damage and possible personal injury.
Note: Arm mechanism slide inserts are coated with lubricant. Use care to avoid lubricant contacting clothing or adjacent products.
Assembly Tip:Performsteps1thru3using(1)mountingholeatfrontoftrackbaseand(1)atrearto temporarily secure track base. Then complete steps 1 thru 3 for remaining hardware.
(packaged configuration)
Disassemblepackagedconfigurationbyremoving arm mechanism from track base to ease installation of track base to work surface.
1Place track base back from front of work surface as shown, making sure rear travel stop is towards rear of work surface.
2Using noted mounting holes as template, mark and drill 1/8” x 1/2” deep pilot holes.
3Secure track base to work surface with #12 x 5/8” wood screws, supplied in hardware pack, at all drilled pilot holes.(Encore product track base)
(Echo, Ovation product track base)
Arm Mechanism
Front of Work surface7/8”FromFront Edge
#12 x 5/8”Wood Screw #12 x 5/8”
Wood Screw
1/2” FromFront Edge
Rear Travel Stop
Rear Travel Stop
Track Base
Z© 2012 Herman Miller, Inc. Zeeland, Michigan. Printed in the U.S.A.® Y, Z, Action Office, and Mirra are among the registered trademarks of Herman MIller, Inc.TM Sense, Setu, Compass and Sayl are among the trademarks of Herman Miller, Inc.
Illustrations and specifications are based on the latest product information available at the time of publication. The right is reserved to make changes in design and specifications at any time, without notice, and also to discontinue products.
Part no. 1b3tkb rev C.
3
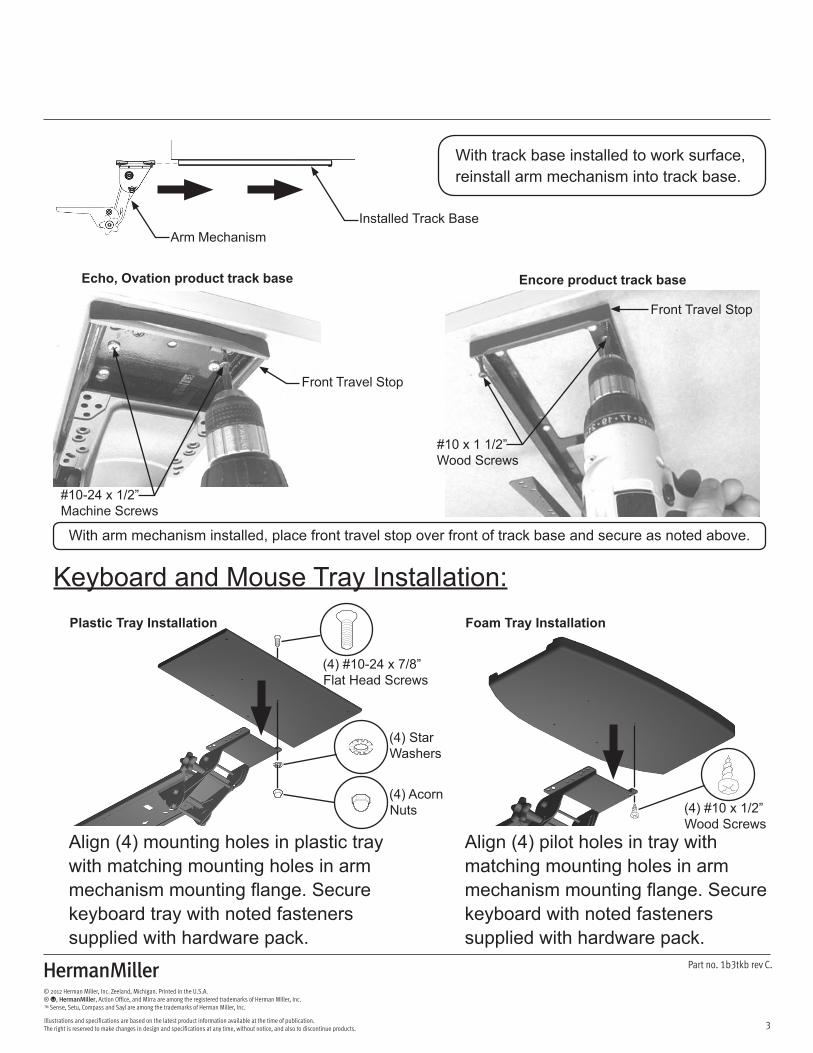
Align(4)mountingholesinplastictraywith matching mounting holes in arm mechanismmountingflange.Securekeyboard tray with noted fasteners supplied with hardware pack.
Align(4)pilotholesintraywithmatching mounting holes in arm mechanismmountingflange.Securekeyboard with noted fasteners supplied with hardware pack.
Echo, Ovation product track base Encore product track base
With track base installed to work surface, reinstall arm mechanism into track base.
With arm mechanism installed, place front travel stop over front of track base and secure as noted above.
#10-24x1/2”Machine Screws
#10 x 1 1/2” Wood Screws
Front Travel Stop
Front Travel Stop
Arm MechanismInstalled Track Base
Keyboard and Mouse Tray Installation:Plastic Tray Installation
(4)#10-24x7/8”Flat Head Screws
(4)StarWashers
(4)AcornNuts
Foam Tray Installation
(4)#10x1/2”Wood Screws
Z© 2012 Herman Miller, Inc. Zeeland, Michigan. Printed in the U.S.A.® Y, Z, Action Office, and Mirra are among the registered trademarks of Herman MIller, Inc.TM Sense, Setu, Compass and Sayl are among the trademarks of Herman Miller, Inc.
Illustrations and specifications are based on the latest product information available at the time of publication. The right is reserved to make changes in design and specifications at any time, without notice, and also to discontinue products.
Part no. 1b3tkb rev C.
4
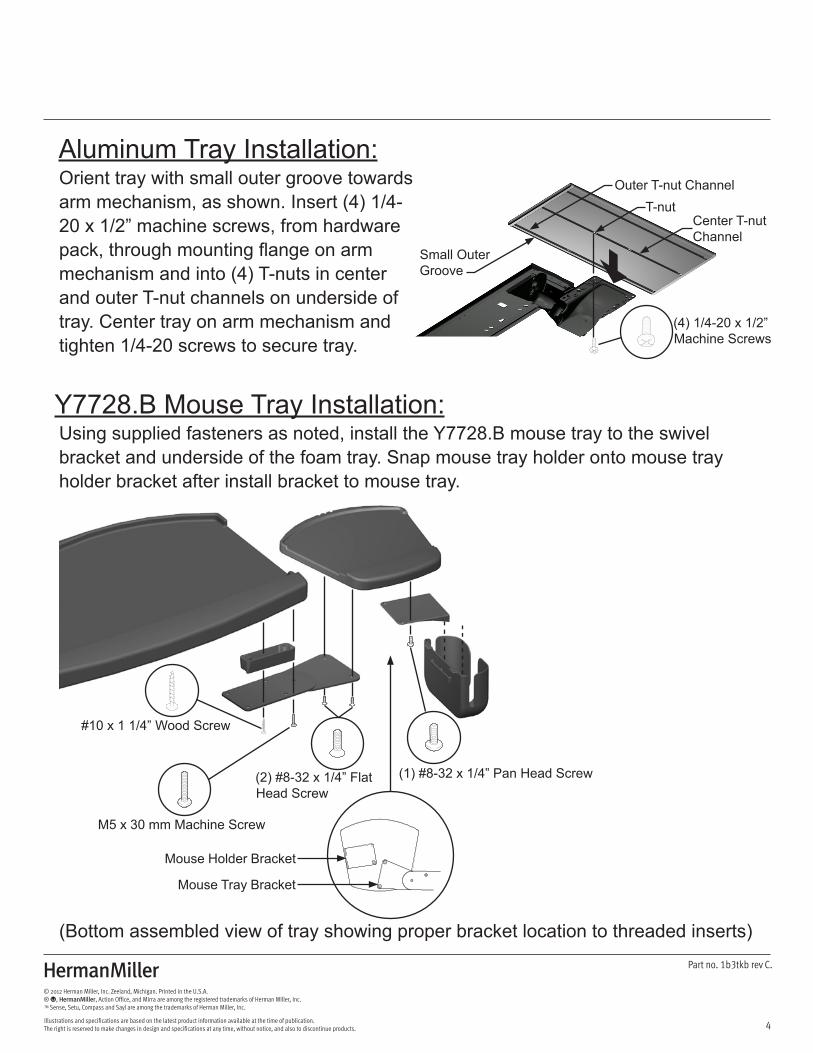
Orient tray with small outer groove towards armmechanism,asshown.Insert(4)1/4-20 x 1/2” machine screws, from hardware pack,throughmountingflangeonarmmechanismandinto(4)T-nutsincenterand outer T-nut channels on underside of tray.Centertrayonarmmechanismandtighten1/4-20screwstosecuretray.
Usingsuppliedfastenersasnoted,installtheY7728.Bmousetraytotheswivelbracket and underside of the foam tray. Snap mouse tray holder onto mouse tray holder bracket after install bracket to mouse tray.
(Bottomassembledviewoftrayshowingproperbracketlocationtothreadedinserts)
Small Outer Groove
#10x11/4”WoodScrew
(2)#8-32x1/4”FlatHead Screw
(1)#8-32x1/4”PanHeadScrew
M5 x 30 mm Machine Screw
Mouse Holder Bracket
Mouse Tray Bracket
OuterT-nutChannelT-nut
CenterT-nutChannel
(4)1/4-20x1/2”Machine Screws
Aluminum Tray Installation:
Y7728.BMouseTrayInstallation:
Z© 2012 Herman Miller, Inc. Zeeland, Michigan. Printed in the U.S.A.® Y, Z, Action Office, and Mirra are among the registered trademarks of Herman MIller, Inc.TM Sense, Setu, Compass and Sayl are among the trademarks of Herman Miller, Inc.
Illustrations and specifications are based on the latest product information available at the time of publication. The right is reserved to make changes in design and specifications at any time, without notice, and also to discontinue products.
Part no. 1b3tkb rev C.
5
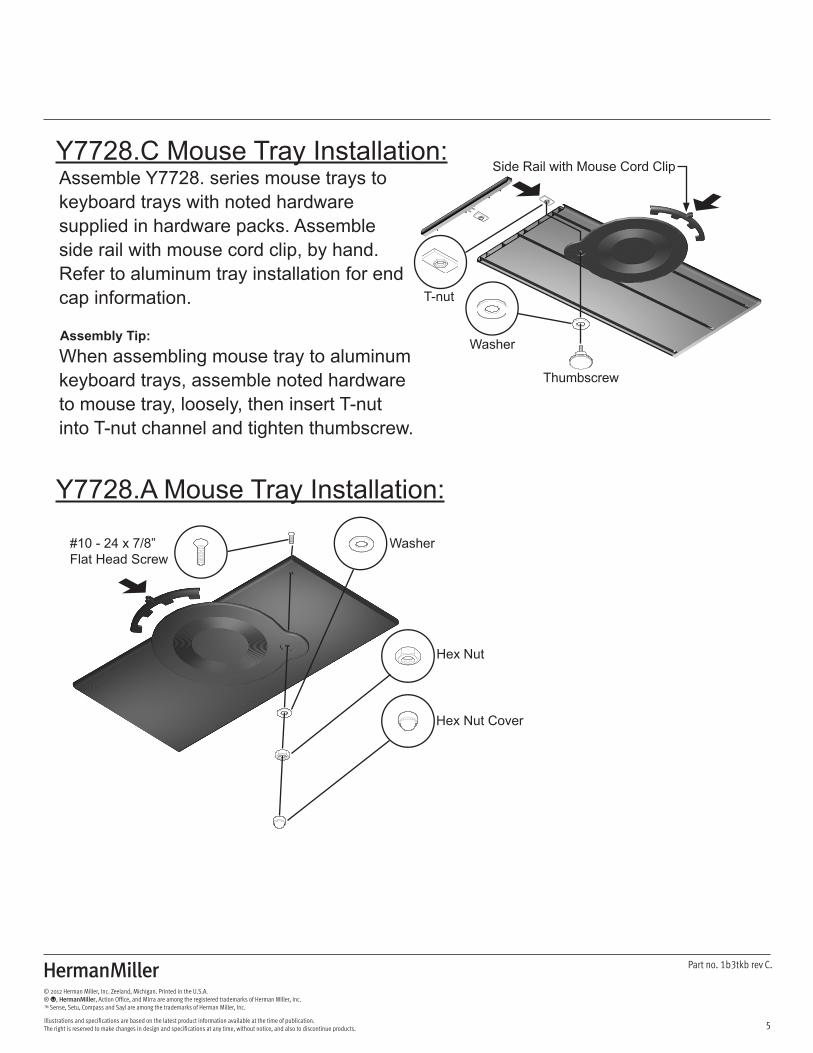
AssembleY7728.seriesmousetraystokeyboard trays with noted hardware supplied in hardware packs. Assemble side rail with mouse cord clip, by hand. Refer to aluminum tray installation for end cap information.
When assembling mouse tray to aluminum keyboard trays, assemble noted hardware to mouse tray, loosely, then insert T-nut into T-nut channel and tighten thumbscrew.
Assembly Tip:
SideRailwithMouseCordClip
T-nut
#10-24x7/8”Flat Head Screw
Washer
Hex Nut
HexNutCover
Washer
Thumbscrew
Y7728.CMouseTrayInstallation:
Y7728.AMouseTrayInstallation: