Key Preparedness Handouts - PREP Oregon set of Preparedness Handouts for PREP Part 1 includes...
16
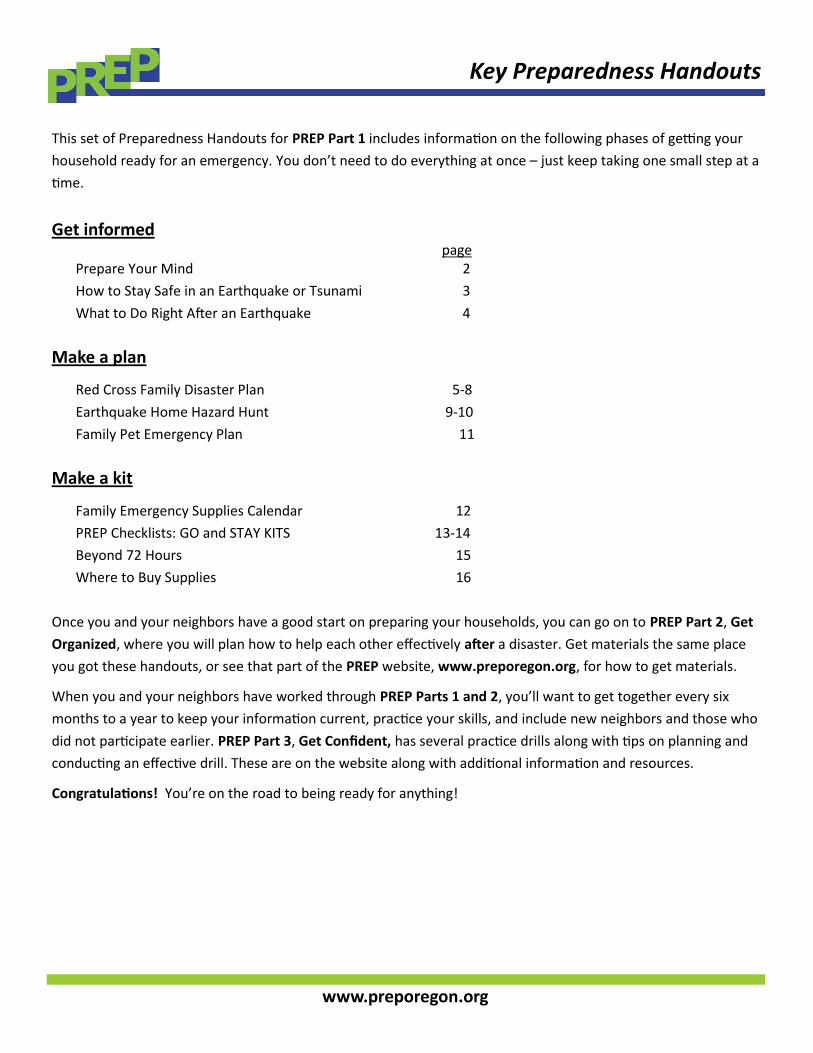
This set of Preparedness Handouts for PREP Part 1 includes informaon on the following phases of geng your household ready for an emergency. You don’t need to do everything at once – just keep taking one small step at a me. Get informed page Prepare Your Mind 2 How to Stay Safe in an Earthquake or Tsunami 3 What to Do Right Aſter an Earthquake 4 Make a plan Red Cross Family Disaster Plan 5-8 Earthquake Home Hazard Hunt 9-10 Family Pet Emergency Plan 11 Make a kit Family Emergency Supplies Calendar 12 PREP Checklists: GO and STAY KITS 13-14 Beyond 72 Hours 15 Where to Buy Supplies 16 Once you and your neighbors have a good start on preparing your households, you can go on to PREP Part 2, Get Organized, where you will plan how to help each other effecvely aſter a disaster. Get materials the same place you got these handouts, or see that part of the PREP website, www.preporegon.org, for how to get materials. When you and your neighbors have worked through PREP Parts 1 and 2, you’ll want to get together every six months to a year to keep your informaon current, pracce your skills, and include new neighbors and those who did not parcipate earlier. PREP Part 3, Get Confident, has several pracce drills along with ps on planning and conducng an effecve drill. These are on the website along with addional informaon and resources. Congratulaons! You’re on the road to being ready for anything! Key Preparedness Handouts www.preporegon.org
Transcript of Key Preparedness Handouts - PREP Oregon set of Preparedness Handouts for PREP Part 1 includes...
This set of Preparedness Handouts for PREP Part 1 includes information on the following phases of getting your
household ready for an emergency. You don’t need to do everything at once – just keep taking one small step at a
time.
Get informed page
Prepare Your Mind 2
How to Stay Safe in an Earthquake or Tsunami 3
What to Do Right After an Earthquake 4
Make a plan
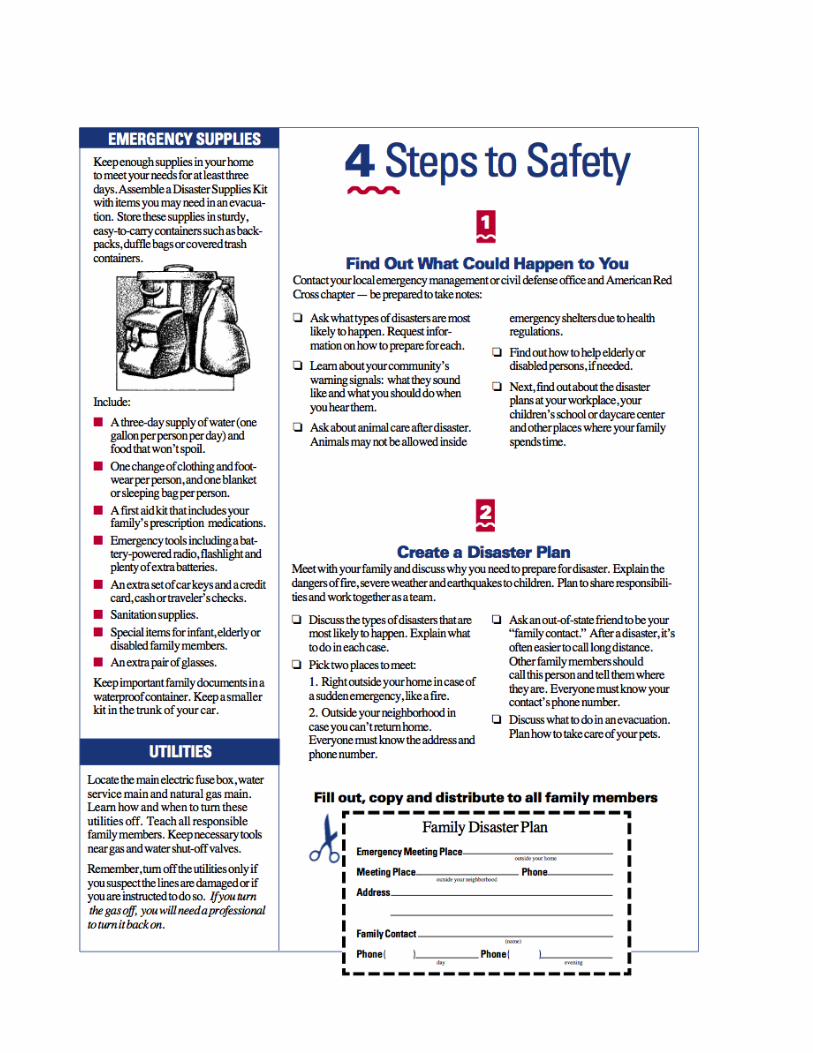
Red Cross Family Disaster Plan 5-8
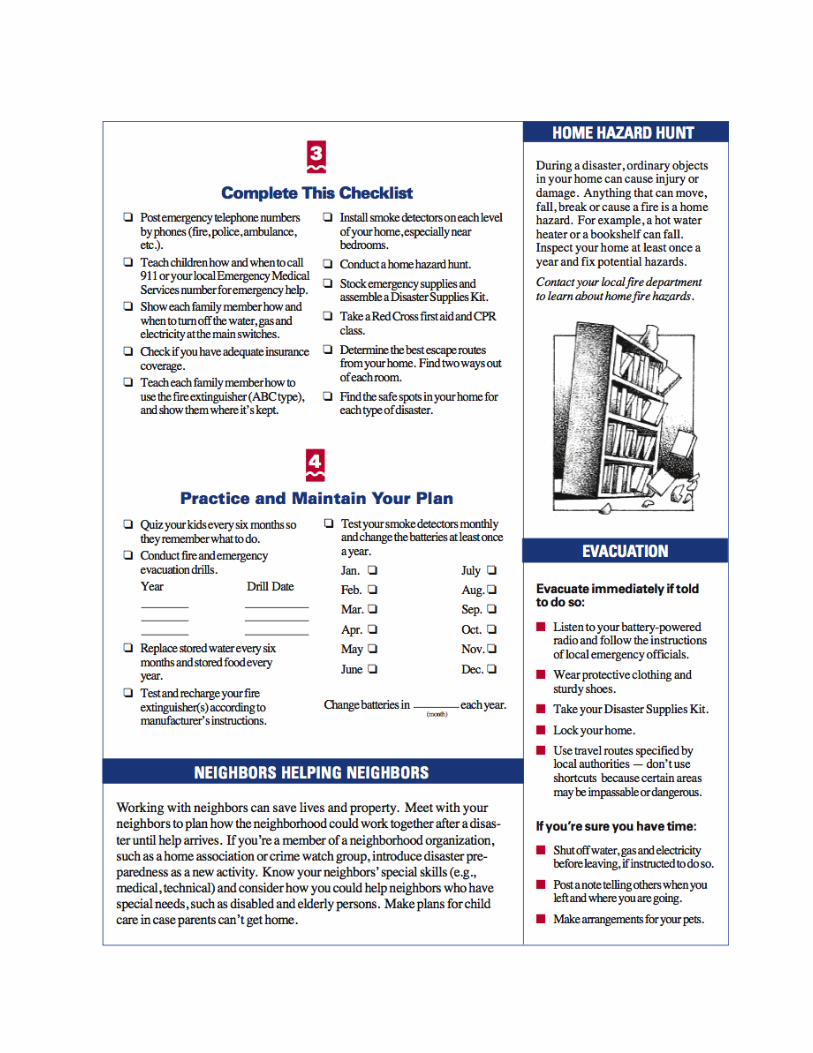
Earthquake Home Hazard Hunt 9-10
Family Pet Emergency Plan 11
Make a kit
Family Emergency Supplies Calendar 12
PREP Checklists: GO and STAY KITS 13-14
Beyond 72 Hours 15
Where to Buy Supplies 16
Once you and your neighbors have a good start on preparing your households, you can go on to PREP Part 2, Get
Organized, where you will plan how to help each other effectively after a disaster. Get materials the same place
you got these handouts, or see that part of the PREP website, www.preporegon.org, for how to get materials.
When you and your neighbors have worked through PREP Parts 1 and 2, you’ll want to get together every six
months to a year to keep your information current, practice your skills, and include new neighbors and those who
did not participate earlier. PREP Part 3, Get Confident, has several practice drills along with tips on planning and
conducting an effective drill. These are on the website along with additional information and resources.
Congratulations! You’re on the road to being ready for anything!
Key Preparedness Handouts
www.preporegon.org
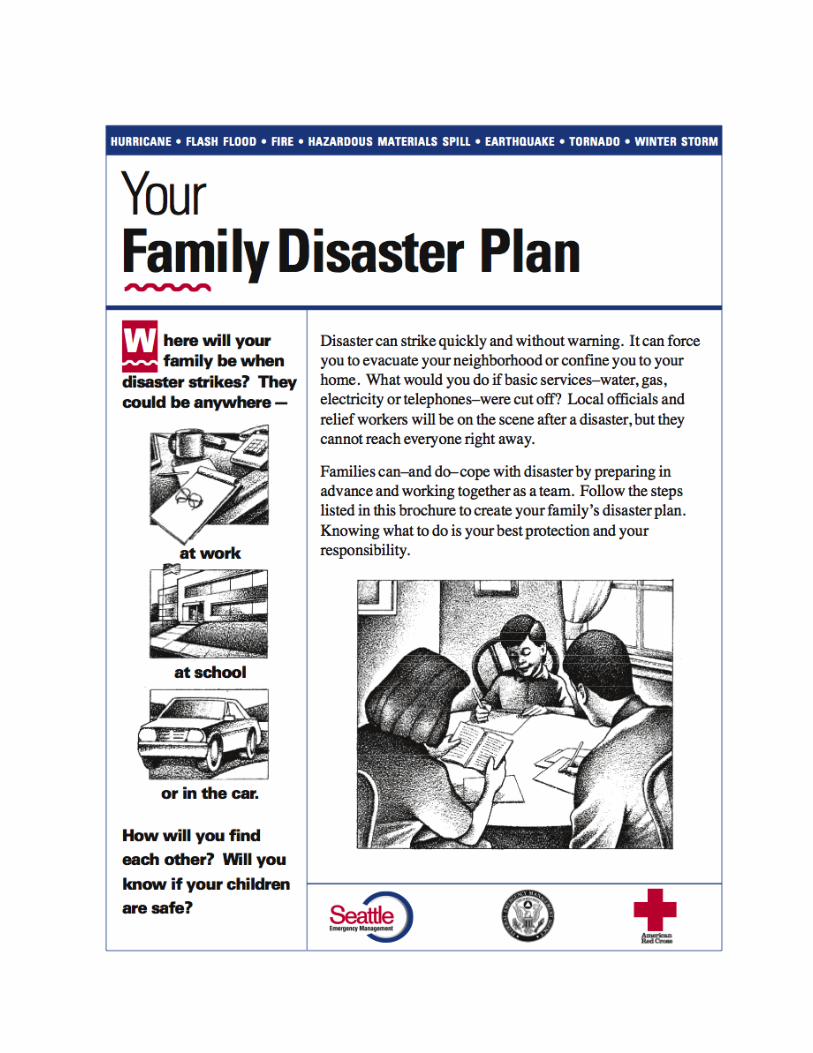
Your mind – including your thoughts, feelings and outlook on life - is your most fundamental and important
survival tool. It's the one thing you can be sure you'll have with you, no matter what. Here’s what you need to
know to be mentally prepared:
You’ve already taken the first step toward mental preparedness. People who have actually thought
about what a disaster could be like are more likely to survive than people who haven’t, even if they
haven’t made other preparations.
Confusion often happens after a disaster. People can go into a mild state of shock as their body tries to
adjust to a major disruption. The best antidote to stress is to breathe – slow and deep breathing gets
oxygen back to the brain. Knowing this will help you help others, once you have secured your own safety.
If you have made plans for what to do during and immediately after a disaster, you'll be able to cope
that much more easily. You’ll feel secure knowing that you’re ready, and you’ll be able to focus on the
situation at hand.
Physical practice helps. Physically practice Drop, Cover and Hold and the other plans you and your
household make in getting prepared. Aided by muscle memory, you will react more quickly and safely
without having to think through what to do.
Understand that disasters often bring out the best in people. Records of disasters show that most people
respond with care and compassion toward others and show courage and presence of mind.
In a disaster, just stay alert to what’s happening and re-evaluate your plans as you go along.
You and the people nearby will be each other’s main support. This is why knowing your neighbors is so
important. The Get Prepared with Your Neighbors and Get Organized parts of PREP will help you make or
strengthen those connections, and will help you all make plans such as deciding on a neighborhood gathering
area so you can find each other easily after a disaster.
So take heart - you’re partway there already!
Prepare Your Mind
2 www.preporegon.org

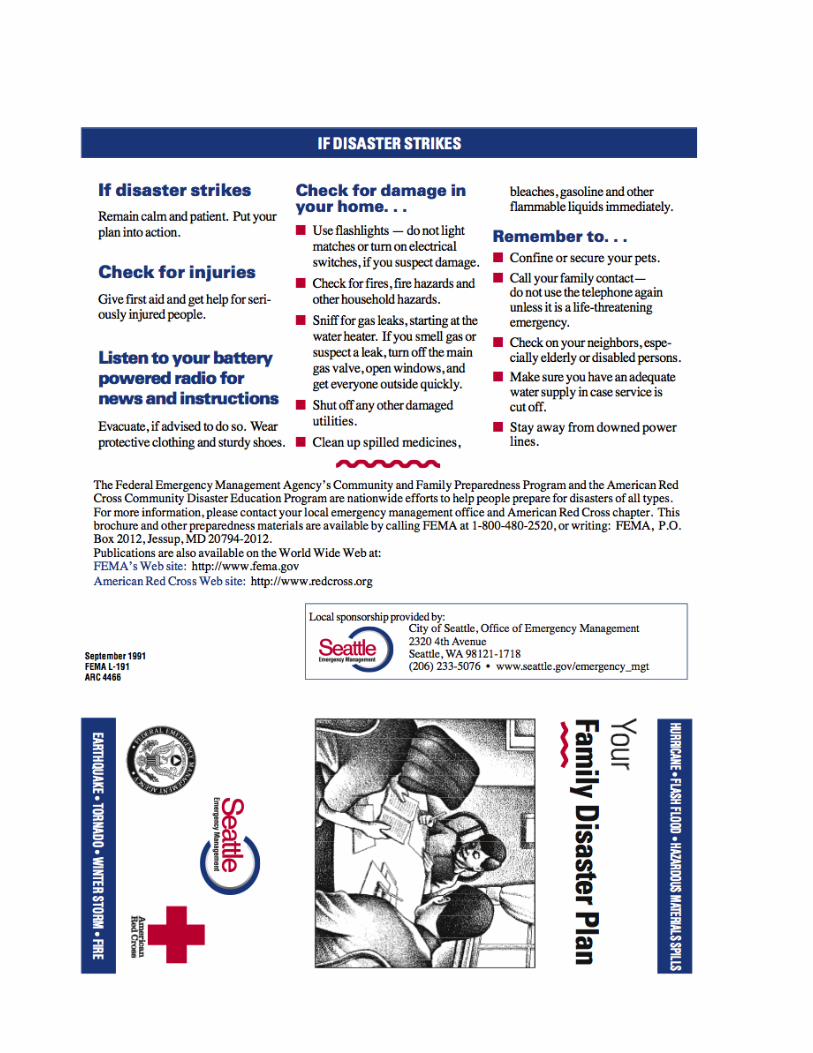
Stay as safe as possible during an earthquake. Take no more than a few steps to a nearby safe place and stay
there until the shaking or rolling stops.
If you are indoors DROP, COVER and HOLD ON. Get under a sturdy table or desk and hold on to it until the shaking stops. If
there isn’t a table or desk near you, crouch in an inside corner of the room and cover your face and head
with your arms.
Stay away from glass, windows, outside doors and walls, and anything that could fall, such as light fixtures
or tall bookshelves (see Earthquake Home Hazard Hunt).
Stay in bed if you’re there when the quake hits. Hold on and cover your head with a pillow, unless you’re
near a window or mirror or under a heavy light fixture that could fall. If so, move to the nearest safe place.
Use a doorway for shelter only if it’s close by and if you know the doorway is strongly supported (in some
buildings it may not be, especially newer ones). Watch out for doors, which will swing and cause injuries.
Stay inside until the shaking or rolling stops and you’re sure it’s safe to go outside. Most injuries occur
when people inside buildings try to go to a different location inside the building or try to leave.
When you go out, watch out for any falling debris above you.
Be aware that the electricity may go out or the sprinkler systems or fire alarms may turn on.
DO NOT use the elevators.
If you are outdoors Move away from buildings, streetlights and utility wires. The greatest danger is directly outside buildings,
at exits and along outside walls. Ground movement during a quake is rarely the direct cause of death or
injury. Most victims are hurt by collapsing walls, flying glass and falling objects or debris.
Stay outside until the shaking stops and be ready for aftershocks, which can also be very strong. Stay away
from damaged areas.
If you are driving Stop as quickly as safety permits and stay in the car with your seat belt fastened. Avoid stopping near or
under buildings, trees, overpasses and utility wires.
Proceed cautiously once the earthquake has stopped. Avoid downed electrical wires and elevated roads,
bridges or ramps that might have been damaged by the earthquake.
If you are trapped under debris Do not light a match.
Do not move about or kick up dust. Cover your mouth with a handkerchief or clothing.
Tap on a pipe or wall so rescuers can locate you. Use a whistle if you have one. Shout only as a last resort.
Shouting can exhaust and dehydrate you and cause you to inhale dangerous amounts of dust.
If you are on the coast Pay attention to the tsunami evacuation signs. Know your best route to higher ground.
Move inland to higher ground immediately after the shaking or rolling stops and stay there. You’ll have
between 20 and 30 minutes to seek higher ground.
Stay away from the beach. Never go down to the beach to watch a tsunami come in. If you can see the
wave you are too close to escape it.
CAUTION: If you see water being pulled strongly out from the shoreline this is nature's tsunami warning
and it should be heeded. You should move away immediately.
How to Stay Safe in an Earthquake or Tsunami
www.preporegon.org 3

Check yourself and your loved ones for injuries. The number one injury is cut feet from walking on broken
glass: see the next item.
Protect your head, feet, and hands. A bicycle helmet or hard hat protects from falling debris. Sturdy shoes
protect from broken glass. Leather gloves protect from sharp objects. All should be stored ahead of time
under each person's bed with a flashlight.
To prevent fire, check the natural gas or propane at your home. If you smell a rotten egg smell, hear a
hissing noise, or (for natural gas) see the meter dials spinning fast, open a window and quickly leave the
building. Turn off the gas at the outside main valve, where the pipe comes out of the ground, by turning it
¼ turn in either direction – a NON-SPARK cast aluminum adjustable wrench works well. If possible, call the
gas company from outside your house or at a neighbor's home.
For propane, turn off the valve on top of the tank, turning it to the right until it’s completely closed.
NEVER turn the gas or propane back on. To avoid dangerous leaks, it must be turned back on by the gas
company or a certified plumber.
If there is a small, contained fire, use your fire extinguisher. (PASS: Pull the pin, Aim the hose at the base
of the fire, Squeeze the handle, and Sweep from side to side of the fire.)
If the fire is too big to put out with one fire extinguisher, quickly evacuate and call 911 from a neighbor’s
house or cell phone.
Look for electrical system damage if you can. If you see sparks or broken or frayed wires, or if you smell
hot insulation, turn off the electricity at the main fuse box or circuit breaker. Do not step in water to get to
the fuse box or circuit breaker. Shut off the individual circuits before shutting off the main circuit breaker.
If you are outside, stay away from downed power lines. You can’t tell by looking at them whether they
are 'live' or not. NEVER try to move them. NEVER try to hop over them. Be sure to check overhead for
power lines and other hanging items. NEVER walk under a power line that is resting on a tree branch or
fallen tree.
Shut off water at the main house valve. This traps water in your home and keeps pollutants out of
possible drinking water. Likely locations for the house valve are the basement, near the water heater, the
garage or at the curb or the meter.
These steps are covered in more depth in the Get Organized part of PREP.
What to Do Right After an Earthquake
4 www.preporegon.org

Earthquake Home Hazard HuntRecommendations for reducing earthquake hazards in your home
are presented on the other side of this poster.
FEMA 528 9/2005
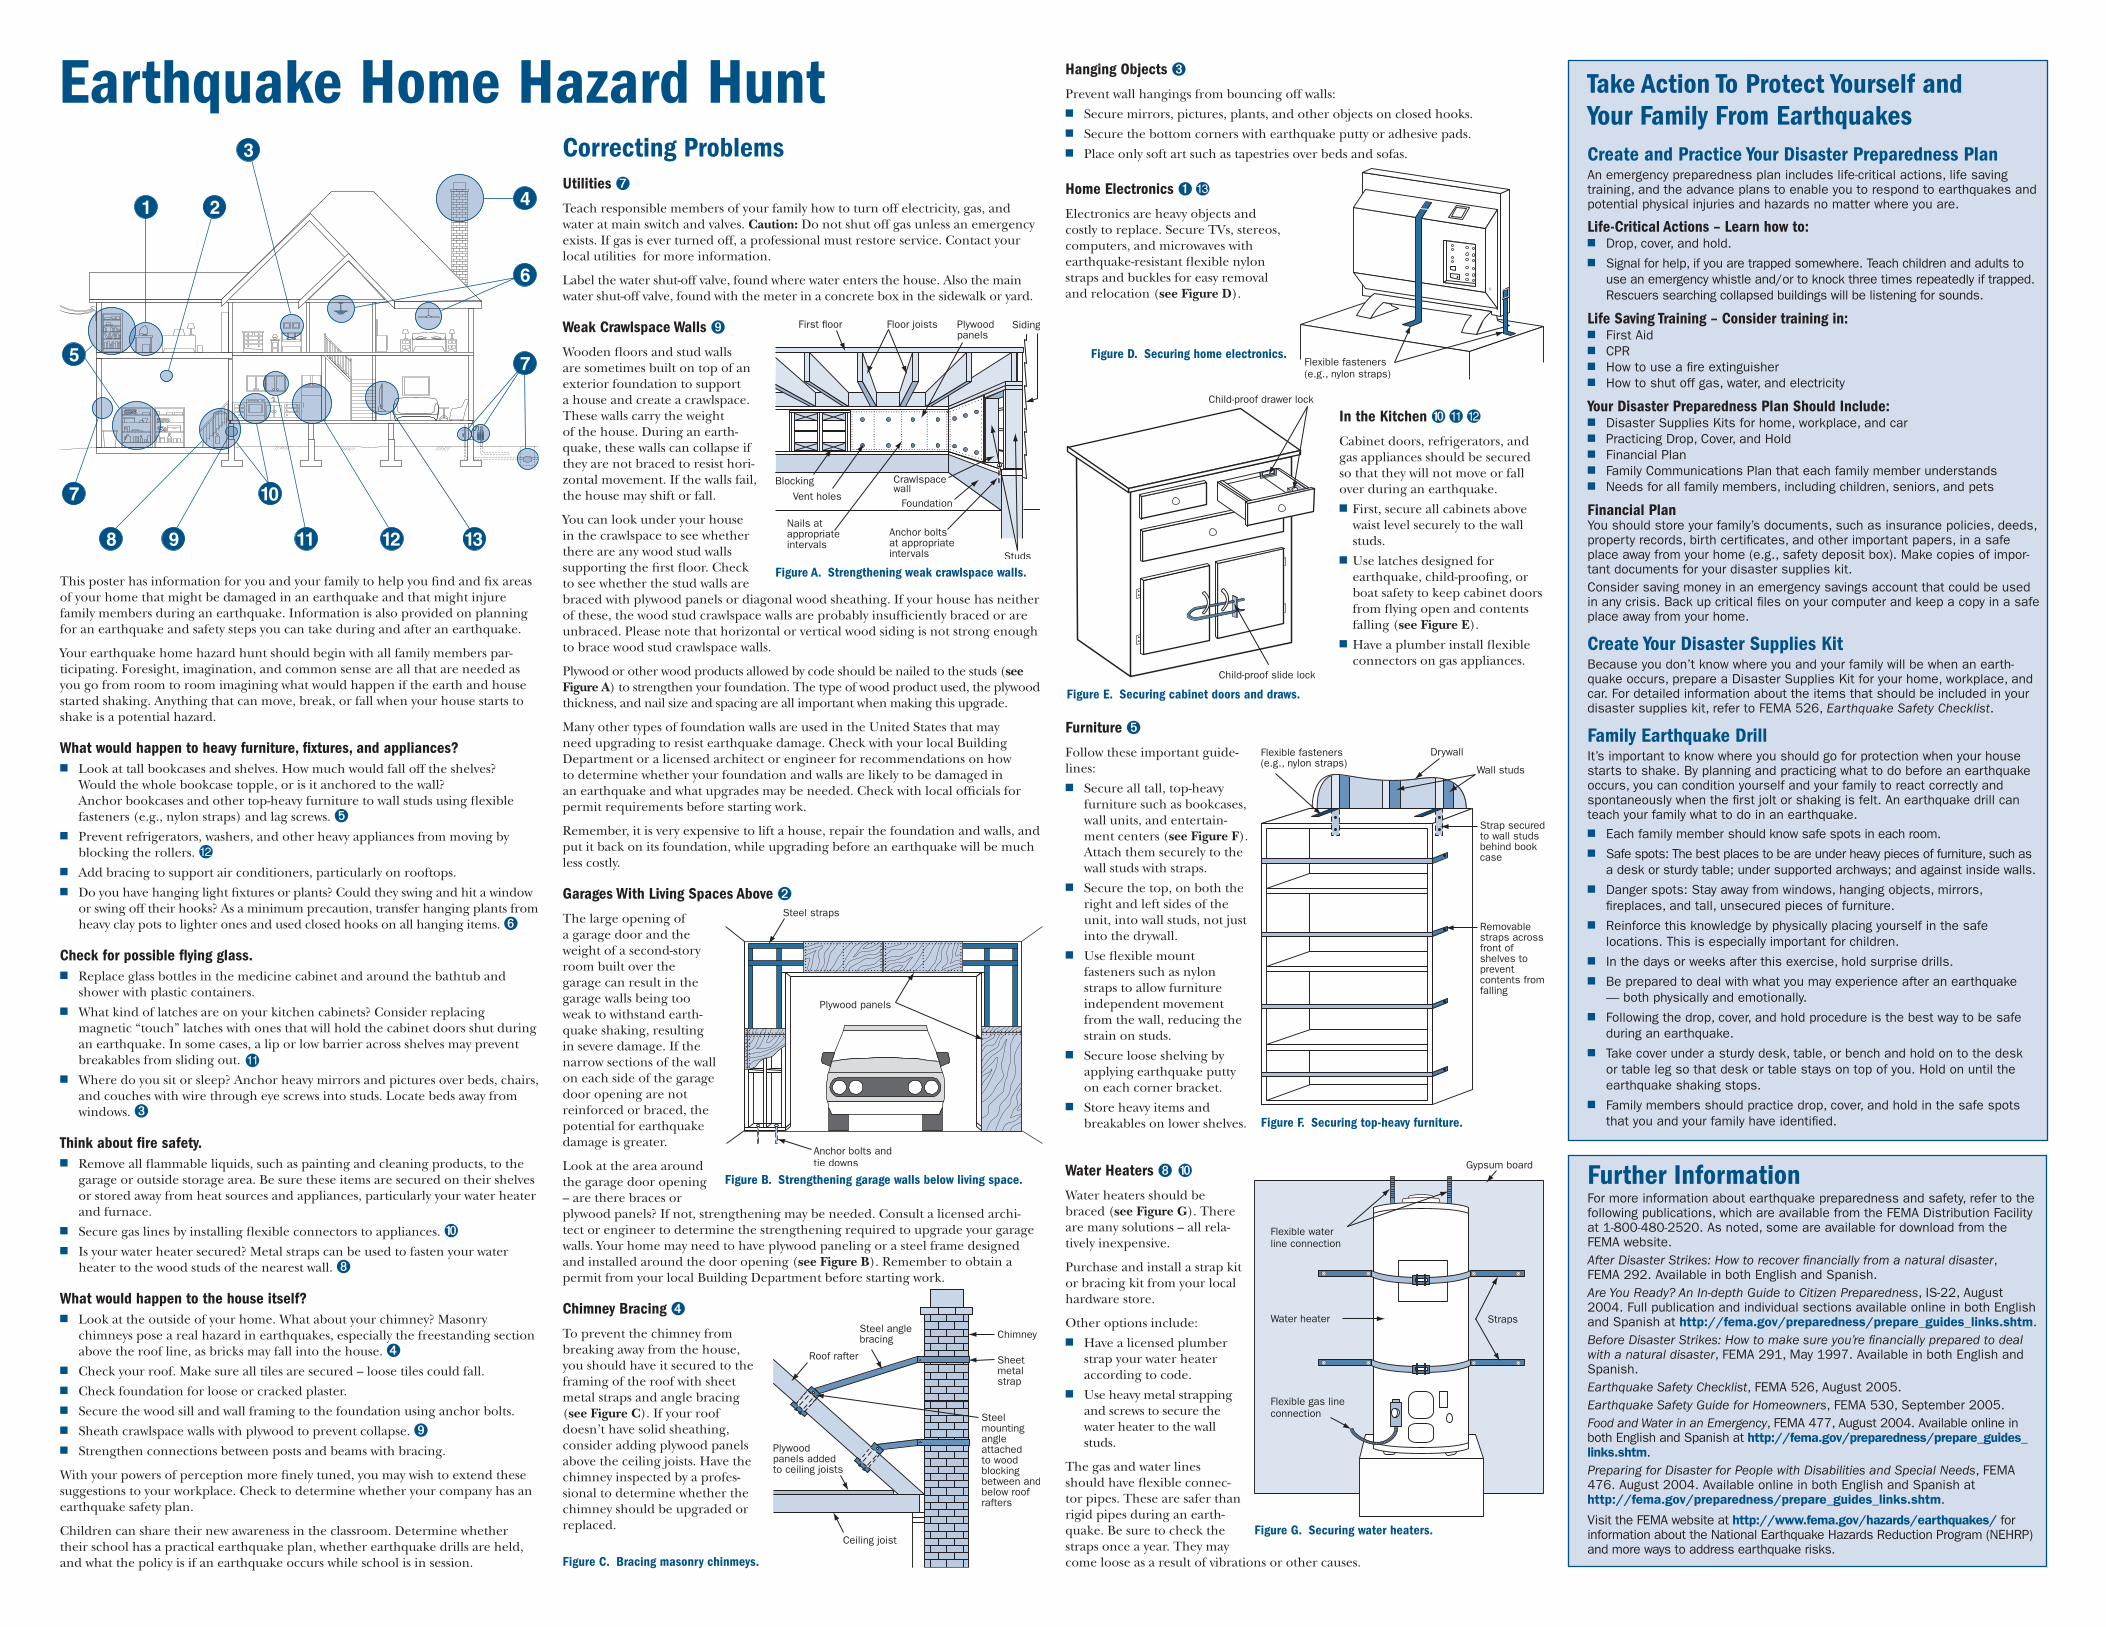
This poster has information for you and your family to help you find and fix areas of your home that might be damaged in an earthquake and that might injure family members during an earthquake. Information is also provided on planning for an earthquake and safety steps you can take during and after an earthquake.
Your earthquake home hazard hunt should begin with all family members par-ticipating. Foresight, imagination, and common sense are all that are needed as you go from room to room imagining what would happen if the earth and house started shaking. Anything that can move, break, or fall when your house starts to shake is a potential hazard.
What would happen to heavy furniture, fixtures, and appliances?n Look at tall bookcases and shelves. How much would fall off the shelves?
Would the whole bookcase topple, or is it anchored to the wall? Anchor bookcases and other top-heavy furniture to wall studs using flexible fasteners (e.g., nylon straps) and lag screws. ➎
n Prevent refrigerators, washers, and other heavy appliances from moving by blocking the rollers.
n Add bracing to support air conditioners, particularly on rooftops.n Do you have hanging light fixtures or plants? Could they swing and hit a window
or swing off their hooks? As a minimum precaution, transfer hanging plants from heavy clay pots to lighter ones and used closed hooks on all hanging items. ➏
Check for possible flying glass.n Replace glass bottles in the medicine cabinet and around the bathtub and
shower with plastic containers.n What kind of latches are on your kitchen cabinets? Consider replacing
magnetic “touch” latches with ones that will hold the cabinet doors shut during an earthquake. In some cases, a lip or low barrier across shelves may prevent breakables from sliding out.
n Where do you sit or sleep? Anchor heavy mirrors and pictures over beds, chairs, and couches with wire through eye screws into studs. Locate beds away from windows. ➌
Think about fire safety.n Remove all flammable liquids, such as painting and cleaning products, to the
garage or outside storage area. Be sure these items are secured on their shelves or stored away from heat sources and appliances, particularly your water heater and furnace.
n Secure gas lines by installing flexible connectors to appliances. ➓n Is your water heater secured? Metal straps can be used to fasten your water
heater to the wood studs of the nearest wall. ➑
What would happen to the house itself?n Look at the outside of your home. What about your chimney? Masonry
chimneys pose a real hazard in earthquakes, especially the freestanding section above the roof line, as bricks may fall into the house. ➍
n Check your roof. Make sure all tiles are secured – loose tiles could fall.n Check foundation for loose or cracked plaster.n Secure the wood sill and wall framing to the foundation using anchor bolts.n Sheath crawlspace walls with plywood to prevent collapse. ➒n Strengthen connections between posts and beams with bracing.
With your powers of perception more finely tuned, you may wish to extend these suggestions to your workplace. Check to determine whether your company has an earthquake safety plan.
Children can share their new awareness in the classroom. Determine whether their school has a practical earthquake plan, whether earthquake drills are held, and what the policy is if an earthquake occurs while school is in session.
Further InformationFor more information about earthquake preparedness and safety, refer to the following publications, which are available from the FEMA Distribution Facility at 1-800-480-2520. As noted, some are available for download from the FEMA website.After Disaster Strikes: How to recover financially from a natural disaster, FEMA 292. Available in both English and Spanish.Are You Ready? An In-depth Guide to Citizen Preparedness, IS-22, August 2004. Full publication and individual sections available online in both English and Spanish at http://fema.gov/preparedness/prepare_guides_links.shtm.Before Disaster Strikes: How to make sure you’re financially prepared to deal with a natural disaster, FEMA 291, May 1997. Available in both English and Spanish.Earthquake Safety Checklist, FEMA 526, August 2005.Earthquake Safety Guide for Homeowners, FEMA 530, September 2005.Food and Water in an Emergency, FEMA 477, August 2004. Available online in both English and Spanish at http://fema.gov/preparedness/prepare_guides_links.shtm.Preparing for Disaster for People with Disabilities and Special Needs, FEMA 476. August 2004. Available online in both English and Spanish at http://fema.gov/preparedness/prepare_guides_links.shtm.
Visit the FEMA website at http://www.fema.gov/hazards/earthquakes/ for information about the National Earthquake Hazards Reduction Program (NEHRP) and more ways to address earthquake risks.
Take Action To Protect Yourself and Your Family From EarthquakesCreate and Practice Your Disaster Preparedness PlanAn emergency preparedness plan includes life-critical actions, life saving training, and the advance plans to enable you to respond to earthquakes and potential physical injuries and hazards no matter where you are.
Life-Critical Actions – Learn how to:n Drop, cover, and hold.n Signal for help, if you are trapped somewhere. Teach children and adults to
use an emergency whistle and/or to knock three times repeatedly if trapped. Rescuers searching collapsed buildings will be listening for sounds.
Life Saving Training – Consider training in:n First Aidn CPRn How to use a fire extinguishern How to shut off gas, water, and electricity
Your Disaster Preparedness Plan Should Include:n Disaster Supplies Kits for home, workplace, and carn Practicing Drop, Cover, and Holdn Financial Plann Family Communications Plan that each family member understandsn Needs for all family members, including children, seniors, and pets
Financial PlanYou should store your family’s documents, such as insurance policies, deeds, property records, birth certificates, and other important papers, in a safe place away from your home (e.g., safety deposit box). Make copies of impor-tant documents for your disaster supplies kit.Consider saving money in an emergency savings account that could be used in any crisis. Back up critical files on your computer and keep a copy in a safe place away from your home.
Create Your Disaster Supplies KitBecause you don’t know where you and your family will be when an earth-quake occurs, prepare a Disaster Supplies Kit for your home, workplace, and car. For detailed information about the items that should be included in your disaster supplies kit, refer to FEMA 526, Earthquake Safety Checklist.
Family Earthquake DrillIt’s important to know where you should go for protection when your house starts to shake. By planning and practicing what to do before an earthquake occurs, you can condition yourself and your family to react correctly and spontaneously when the first jolt or shaking is felt. An earthquake drill can teach your family what to do in an earthquake.n Each family member should know safe spots in each room.n Safe spots: The best places to be are under heavy pieces of furniture, such as
a desk or sturdy table; under supported archways; and against inside walls.n Danger spots: Stay away from windows, hanging objects, mirrors,
fireplaces, and tall, unsecured pieces of furniture.n Reinforce this knowledge by physically placing yourself in the safe
locations. This is especially important for children.n In the days or weeks after this exercise, hold surprise drills.n Be prepared to deal with what you may experience after an earthquake
— both physically and emotionally.n Following the drop, cover, and hold procedure is the best way to be safe
during an earthquake.n Take cover under a sturdy desk, table, or bench and hold on to the desk
or table leg so that desk or table stays on top of you. Hold on until the earthquake shaking stops.
n Family members should practice drop, cover, and hold in the safe spots that you and your family have identified.
Earthquake Home Hazard Hunt Hanging Objects ➌Prevent wall hangings from bouncing off walls:n Secure mirrors, pictures, plants, and other objects on closed hooks.n Secure the bottom corners with earthquake putty or adhesive pads.n Place only soft art such as tapestries over beds and sofas.
Home Electronics ➊
Electronics are heavy objects and costly to replace. Secure TVs, stereos, computers, and microwaves with earthquake-resistant flexible nylon straps and buckles for easy removal and relocation (see Figure D).
In the Kitchen ➓Cabinet doors, refrigerators, and gas appliances should be secured so that they will not move or fall over during an earthquake.n First, secure all cabinets above
waist level securely to the wall studs.
n Use latches designed for earthquake, child-proofing, or boat safety to keep cabinet doors from flying open and contents falling (see Figure E).
n Have a plumber install flexible connectors on gas appliances.
Furniture ➎Follow these important guide-lines:n Secure all tall, top-heavy
furniture such as bookcases, wall units, and entertain-ment centers (see Figure F). Attach them securely to the wall studs with straps.
n Secure the top, on both the right and left sides of the unit, into wall studs, not just into the drywall.
n Use flexible mount fasteners such as nylon straps to allow furniture independent movement from the wall, reducing the strain on studs.
n Secure loose shelving by applying earthquake putty on each corner bracket.
n Store heavy items and breakables on lower shelves.
Water Heaters ➑ ➓
Water heaters should be braced (see Figure G). There are many solutions – all rela-tively inexpensive.
Purchase and install a strap kit or bracing kit from your local hardware store.
Other options include:n Have a licensed plumber
strap your water heater according to code.
n Use heavy metal strapping and screws to secure the water heater to the wall studs.
The gas and water lines should have flexible connec-tor pipes. These are safer than rigid pipes during an earth-quake. Be sure to check the straps once a year. They may come loose as a result of vibrations or other causes.
Correcting ProblemsUtilities ➐ Teach responsible members of your family how to turn off electricity, gas, and water at main switch and valves. Caution: Do not shut off gas unless an emergency exists. If gas is ever turned off, a professional must restore service. Contact your local utilities for more information.
Label the water shut-off valve, found where water enters the house. Also the main water shut-off valve, found with the meter in a concrete box in the sidewalk or yard.
Weak Crawlspace Walls ➒Wooden floors and stud walls are sometimes built on top of an exterior foundation to support a house and create a crawlspace. These walls carry the weight of the house. During an earth-quake, these walls can collapse if they are not braced to resist hori-zontal movement. If the walls fail, the house may shift or fall.
You can look under your house in the crawlspace to see whether there are any wood stud walls supporting the first floor. Check to see whether the stud walls are braced with plywood panels or diagonal wood sheathing. If your house has neither of these, the wood stud crawlspace walls are probably insufficiently braced or are unbraced. Please note that horizontal or vertical wood siding is not strong enough to brace wood stud crawlspace walls.
Plywood or other wood products allowed by code should be nailed to the studs (see Figure A) to strengthen your foundation. The type of wood product used, the plywood thickness, and nail size and spacing are all important when making this upgrade.
Many other types of foundation walls are used in the United States that may need upgrading to resist earthquake damage. Check with your local Building Department or a licensed architect or engineer for recommendations on how to determine whether your foundation and walls are likely to be damaged in an earthquake and what upgrades may be needed. Check with local officials for permit requirements before starting work.
Remember, it is very expensive to lift a house, repair the foundation and walls, and put it back on its foundation, while upgrading before an earthquake will be much less costly.
Garages With Living Spaces Above ➋The large opening of a garage door and the weight of a second-story room built over the garage can result in the garage walls being too weak to withstand earth-quake shaking, resulting in severe damage. If the narrow sections of the wall on each side of the garage door opening are not reinforced or braced, the potential for earthquake damage is greater.
Look at the area around the garage door opening – are there braces or plywood panels? If not, strengthening may be needed. Consult a licensed archi-tect or engineer to determine the strengthening required to upgrade your garage walls. Your home may need to have plywood paneling or a steel frame designed and installed around the door opening (see Figure B). Remember to obtain a permit from your local Building Department before starting work.
Chimney Bracing ➍To prevent the chimney from breaking away from the house, you should have it secured to the framing of the roof with sheet metal straps and angle bracing (see Figure C). If your roof doesn’t have solid sheathing, consider adding plywood panels above the ceiling joists. Have the chimney inspected by a profes-sional to determine whether the chimney should be upgraded or replaced.
Figure A. Strengthening weak crawlspace walls.
Figure B. Strengthening garage walls below living space.
Figure C. Bracing masonry chinmeys.
Figure E. Securing cabinet doors and draws.
Figure F. Securing top-heavy furniture.
Figure D. Securing home electronics.
Figure G. Securing water heaters.
11
13
12
11 12

Family Pet Emergency Plan
Keep this plan, a photo of your pet, another photo with you or your family, and your pet’s vaccination and veterinary records with your pet emergency kit. Put a copy of all these items with your important family papers. Update information as you replace food and water supplies every 6 months.
Your Pet’s Information
Pet’s name: Type of pet: Age:
Microchip/License #: Breed: Color:
Veterinary Information
Veterinarian: Address: Phone:
Medical or behavior problems: Pet’s medication and doses:
Sheltering Information: If you have to evacuate, take your pets with you. DO NOT LEAVE YOUR PETS BEHIND. However, it’s important to know that
animals will not be allowed in most public emergency shelters. Below, list options for pet-friendly lodging (hotels or motels) and longer-term boarding options. Long-term boarding could include veterinarians, boarding kennels, animal shelters, or neighbors, friends or family who don’t need to evacuate.
Pet-friendly lodging
Name: Address: Phone:
Name: Address: Phone:
Longer-term boarding options
Name: Address: Phone:
Name: Address: Phone:
Pet Emergency Kit: Just like their owners, pets will need an emergency kit with enough food and water for 2 to 3 weeks after a disaster. Food and
water in the kit should be replaced every 6 months and kept in a container that’s easy to access (consider a rolling suitcase or backpack). Other items:
Pet first-aid kit and book Medications, flea treatments Non-spill bowls Can opener Extra harness and leash ID tags
Carrier with pet’s name and yours Pet toys Familiar bedding or blanket Treats Garbage bags for cleanup Grooming items
Especially for cats: Disposable litter trays, litter and scoop Pillowcase Anti-stress remedies, such as Bach's Rescue Remedy
Especially for dogs: Cage liner (e.g., newspapers) Paper towels and disinfectant Pet shampoo Muzzle
Adapted by PREP with permission from plan by Multnomah County Emergency Management, Portland
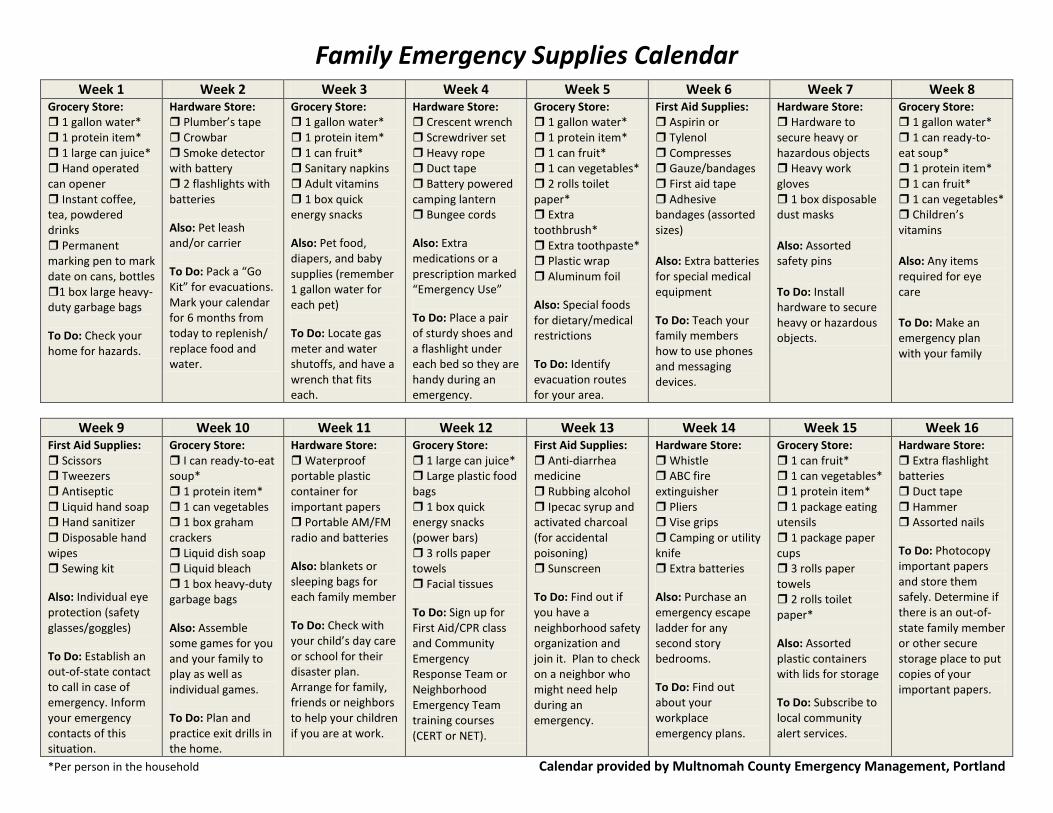
Family Emergency Supplies Calendar Week 1 Week 2 Week 3 Week 4 Week 5 Week 6 Week 7 Week 8
Grocery Store: 1 gallon water* 1 protein item* 1 large can juice* Hand operated can opener Instant coffee, tea, powdered drinks Permanent marking pen to mark date on cans, bottles 1 box large heavy-duty garbage bags
To Do: Check your home for hazards.
Hardware Store: Plumber’s tape Crowbar Smoke detector with battery 2 flashlights with batteries
Also: Pet leash and/or carrier
To Do: Pack a “Go Kit” for evacuations. Mark your calendar for 6 months from today to replenish/ replace food and water.
Grocery Store: 1 gallon water* 1 protein item* 1 can fruit* Sanitary napkins Adult vitamins 1 box quick energy snacks
Also: Pet food, diapers, and baby supplies (remember 1 gallon water for each pet)
To Do: Locate gas meter and water shutoffs, and have a wrench that fits each.
Hardware Store: Crescent wrench Screwdriver set Heavy rope Duct tape Battery powered camping lantern Bungee cords
Also: Extra medications or a prescription marked “Emergency Use”
To Do: Place a pair of sturdy shoes and a flashlight under each bed so they are handy during an emergency.
Grocery Store: 1 gallon water* 1 protein item* 1 can fruit* 1 can vegetables* 2 rolls toilet paper* Extra toothbrush* Extra toothpaste* Plastic wrap Aluminum foil
Also: Special foods for dietary/medical restrictions
To Do: Identify evacuation routes for your area.
First Aid Supplies: Aspirin or Tylenol Compresses Gauze/bandages First aid tape Adhesive bandages (assorted sizes) Also: Extra batteries for special medical equipment
To Do: Teach your family members how to use phones and messaging devices.
Hardware Store: Hardware to secure heavy or hazardous objects Heavy work gloves 1 box disposable dust masks Also: Assorted safety pins To Do: Install hardware to secure heavy or hazardous objects.
Grocery Store: 1 gallon water* 1 can ready-to-eat soup* 1 protein item* 1 can fruit* 1 can vegetables* Children’s vitamins Also: Any items required for eye care To Do: Make an emergency plan with your family
Week 9 Week 10 Week 11 Week 12 Week 13 Week 14 Week 15 Week 16 First Aid Supplies: Scissors Tweezers Antiseptic Liquid hand soap Hand sanitizer Disposable hand wipes Sewing kit
Also: Individual eye protection (safety glasses/goggles)
To Do: Establish an out-of-state contact to call in case of emergency. Inform your emergency contacts of this situation.
Grocery Store: I can ready-to-eat soup* 1 protein item* 1 can vegetables 1 box graham crackers Liquid dish soap Liquid bleach 1 box heavy-duty garbage bags
Also: Assemble some games for you and your family to play as well as individual games.
To Do: Plan and practice exit drills in the home.
Hardware Store: Waterproof portable plastic container for important papers Portable AM/FM radio and batteries
Also: blankets or sleeping bags for each family member
To Do: Check with your child’s day care or school for their disaster plan. Arrange for family, friends or neighbors to help your children if you are at work.
Grocery Store: 1 large can juice* Large plastic food bags 1 box quick energy snacks (power bars) 3 rolls paper towels Facial tissues
To Do: Sign up for First Aid/CPR class and Community Emergency Response Team or Neighborhood Emergency Team training courses (CERT or NET).
First Aid Supplies: Anti-diarrhea medicine Rubbing alcohol Ipecac syrup and activated charcoal (for accidental poisoning) Sunscreen
To Do: Find out if you have a neighborhood safety organization and join it. Plan to check on a neighbor who might need help during an emergency.
Hardware Store: Whistle ABC fire extinguisher Pliers Vise grips Camping or utility knife Extra batteries
Also: Purchase an emergency escape ladder for any second story bedrooms.
To Do: Find out about your workplace emergency plans.
Grocery Store: 1 can fruit* 1 can vegetables* 1 protein item* 1 package eating utensils 1 package paper cups 3 rolls paper towels 2 rolls toilet paper*
Also: Assorted plastic containers with lids for storage
To Do: Subscribe to local community alert services.
Hardware Store: Extra flashlight batteries Duct tape Hammer Assorted nails
To Do: Photocopy important papers and store them safely. Determine if there is an out-of-state family member or other secure storage place to put copies of your important papers.
*Per person in the household Calendar provided by Multnomah County Emergency Management, Portland
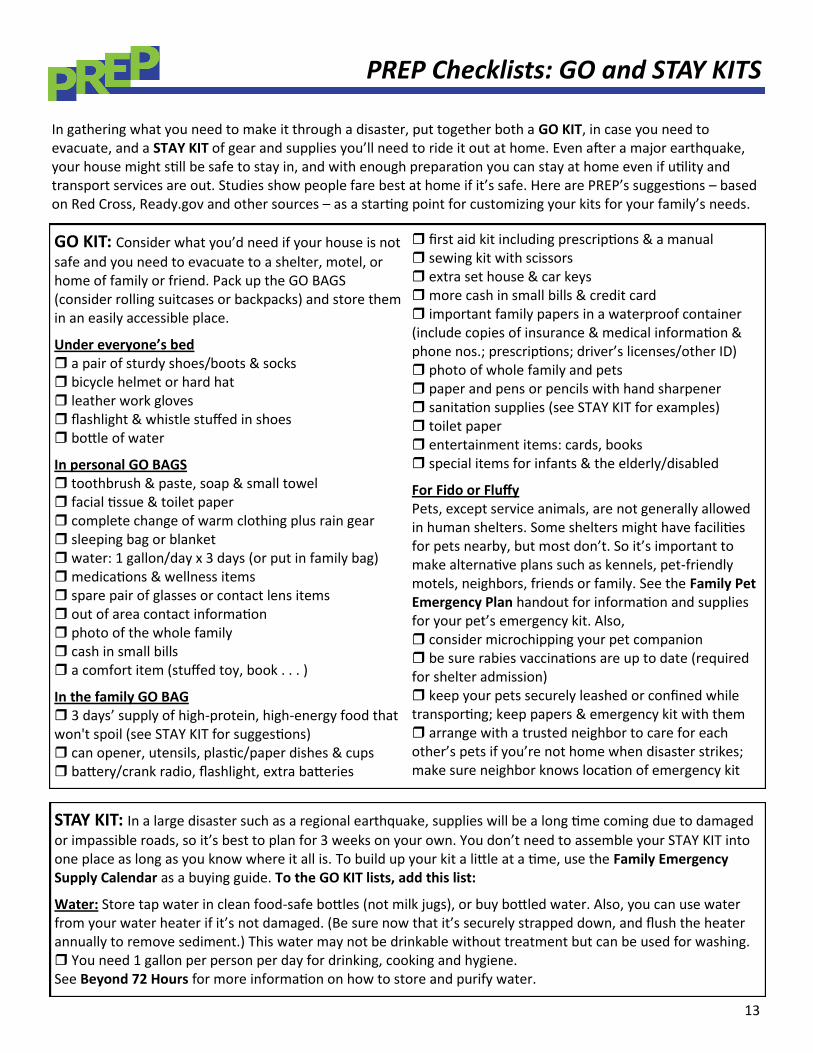
In gathering what you need to make it through a disaster, put together both a GO KIT, in case you need to evacuate, and a STAY KIT of gear and supplies you’ll need to ride it out at home. Even after a major earthquake, your house might still be safe to stay in, and with enough preparation you can stay at home even if utility and transport services are out. Studies show people fare best at home if it’s safe. Here are PREP’s suggestions – based on Red Cross, Ready.gov and other sources – as a starting point for customizing your kits for your family’s needs.
PREP Checklists: GO and STAY KITS
GO KIT: Consider what you’d need if your house is not
safe and you need to evacuate to a shelter, motel, or home of family or friend. Pack up the GO BAGS (consider rolling suitcases or backpacks) and store them in an easily accessible place.
Under everyone’s bed a pair of sturdy shoes/boots & socks bicycle helmet or hard hat leather work gloves flashlight & whistle stuffed in shoes bottle of water
In personal GO BAGS toothbrush & paste, soap & small towel facial tissue & toilet paper complete change of warm clothing plus rain gear sleeping bag or blanket water: 1 gallon/day x 3 days (or put in family bag) medications & wellness items spare pair of glasses or contact lens items out of area contact information photo of the whole family cash in small bills a comfort item (stuffed toy, book . . . )
In the family GO BAG 3 days’ supply of high-protein, high-energy food that won't spoil (see STAY KIT for suggestions) can opener, utensils, plastic/paper dishes & cups battery/crank radio, flashlight, extra batteries
first aid kit including prescriptions & a manual sewing kit with scissors extra set house & car keys more cash in small bills & credit card important family papers in a waterproof container (include copies of insurance & medical information & phone nos.; prescriptions; driver’s licenses/other ID) photo of whole family and pets paper and pens or pencils with hand sharpener sanitation supplies (see STAY KIT for examples) toilet paper entertainment items: cards, books special items for infants & the elderly/disabled
For Fido or Fluffy Pets, except service animals, are not generally allowed in human shelters. Some shelters might have facilities for pets nearby, but most don’t. So it’s important to make alternative plans such as kennels, pet-friendly motels, neighbors, friends or family. See the Family Pet Emergency Plan handout for information and supplies for your pet’s emergency kit. Also, consider microchipping your pet companion be sure rabies vaccinations are up to date (required for shelter admission) keep your pets securely leashed or confined while transporting; keep papers & emergency kit with them arrange with a trusted neighbor to care for each other’s pets if you’re not home when disaster strikes; make sure neighbor knows location of emergency kit
STAY KIT: In a large disaster such as a regional earthquake, supplies will be a long time coming due to damaged
or impassible roads, so it’s best to plan for 3 weeks on your own. You don’t need to assemble your STAY KIT into one place as long as you know where it all is. To build up your kit a little at a time, use the Family Emergency Supply Calendar as a buying guide. To the GO KIT lists, add this list:
Water: Store tap water in clean food-safe bottles (not milk jugs), or buy bottled water. Also, you can use water from your water heater if it’s not damaged. (Be sure now that it’s securely strapped down, and flush the heater annually to remove sediment.) This water may not be drinkable without treatment but can be used for washing. You need 1 gallon per person per day for drinking, cooking and hygiene. See Beyond 72 Hours for more information on how to store and purify water.
13
14 www.preporegon.org
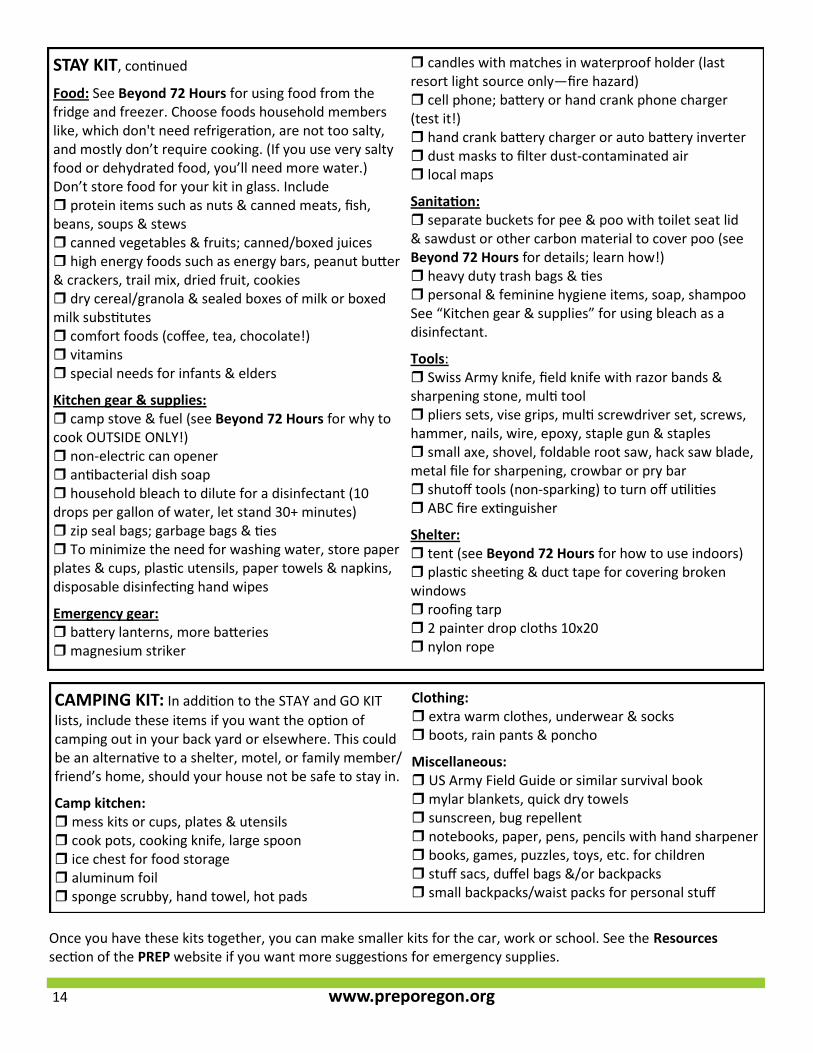
CAMPING KIT: In addition to the STAY and GO KIT
lists, include these items if you want the option of camping out in your back yard or elsewhere. This could be an alternative to a shelter, motel, or family member/friend’s home, should your house not be safe to stay in.
Camp kitchen: mess kits or cups, plates & utensils cook pots, cooking knife, large spoon ice chest for food storage aluminum foil sponge scrubby, hand towel, hot pads
Clothing: extra warm clothes, underwear & socks boots, rain pants & poncho
Miscellaneous: US Army Field Guide or similar survival book mylar blankets, quick dry towels sunscreen, bug repellent notebooks, paper, pens, pencils with hand sharpener books, games, puzzles, toys, etc. for children stuff sacs, duffel bags &/or backpacks small backpacks/waist packs for personal stuff
STAY KIT, continued
Food: See Beyond 72 Hours for using food from the fridge and freezer. Choose foods household members like, which don't need refrigeration, are not too salty, and mostly don’t require cooking. (If you use very salty food or dehydrated food, you’ll need more water.)Don’t store food for your kit in glass. Include protein items such as nuts & canned meats, fish, beans, soups & stews canned vegetables & fruits; canned/boxed juices high energy foods such as energy bars, peanut butter & crackers, trail mix, dried fruit, cookies dry cereal/granola & sealed boxes of milk or boxed milk substitutes comfort foods (coffee, tea, chocolate!) vitamins special needs for infants & elders
Kitchen gear & supplies: camp stove & fuel (see Beyond 72 Hours for why to cook OUTSIDE ONLY!) non-electric can opener antibacterial dish soap household bleach to dilute for a disinfectant (10 drops per gallon of water, let stand 30+ minutes) zip seal bags; garbage bags & ties To minimize the need for washing water, store paper plates & cups, plastic utensils, paper towels & napkins, disposable disinfecting hand wipes
Emergency gear: battery lanterns, more batteries magnesium striker
candles with matches in waterproof holder (last resort light source only—fire hazard) cell phone; battery or hand crank phone charger (test it!) hand crank battery charger or auto battery inverter dust masks to filter dust-contaminated air local maps
Sanitation: separate buckets for pee & poo with toilet seat lid & sawdust or other carbon material to cover poo (see Beyond 72 Hours for details; learn how!) heavy duty trash bags & ties personal & feminine hygiene items, soap, shampoo See “Kitchen gear & supplies” for using bleach as a disinfectant.
Tools: Swiss Army knife, field knife with razor bands & sharpening stone, multi tool pliers sets, vise grips, multi screwdriver set, screws, hammer, nails, wire, epoxy, staple gun & staples small axe, shovel, foldable root saw, hack saw blade, metal file for sharpening, crowbar or pry bar shutoff tools (non-sparking) to turn off utilities ABC fire extinguisher
Shelter: tent (see Beyond 72 Hours for how to use indoors) plastic sheeting & duct tape for covering broken windows roofing tarp 2 painter drop cloths 10x20 nylon rope
Once you have these kits together, you can make smaller kits for the car, work or school. See the Resources section of the PREP website if you want more suggestions for emergency supplies.
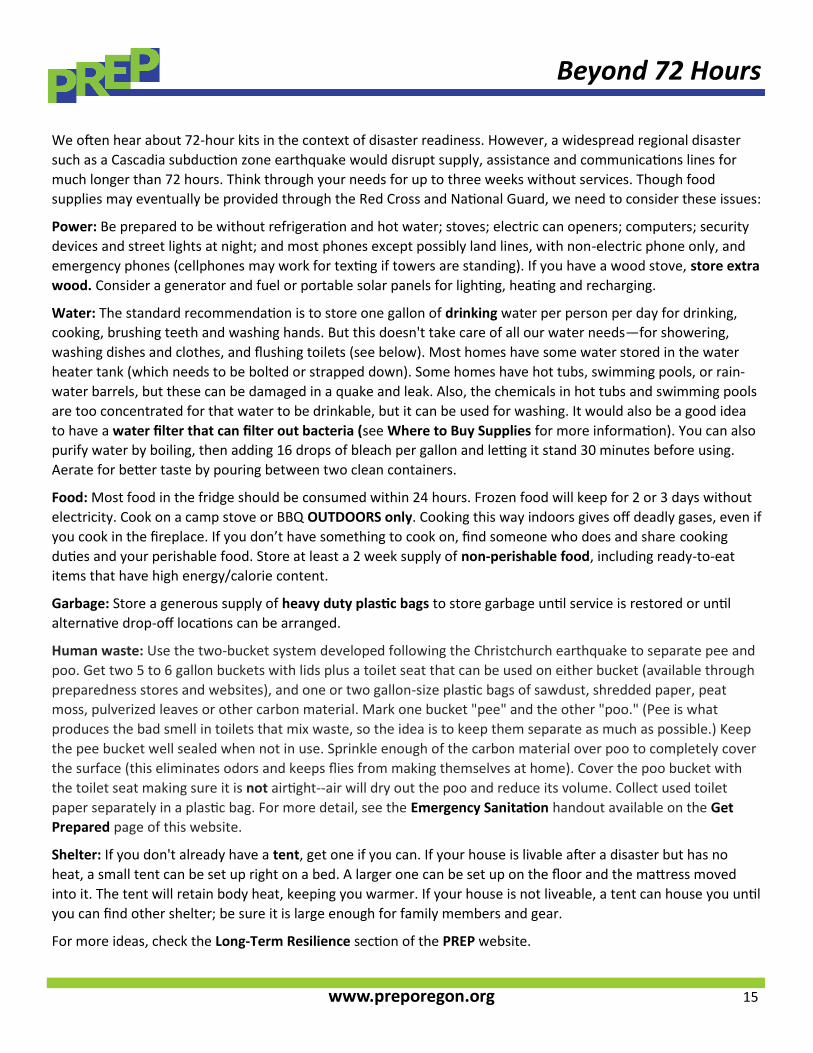
Beyond 72 Hours
We often hear about 72-hour kits in the context of disaster readiness. However, a widespread regional disaster
such as a Cascadia subduction zone earthquake would disrupt supply, assistance and communications lines for
much longer than 72 hours. Think through your needs for up to three weeks without services. Though food
supplies may eventually be provided through the Red Cross and National Guard, we need to consider these issues:
Power: Be prepared to be without refrigeration and hot water; stoves; electric can openers; computers; security
devices and street lights at night; and most phones except possibly land lines, with non-electric phone only, and
emergency phones (cellphones may work for texting if towers are standing). If you have a wood stove, store extra
wood. Consider a generator and fuel or portable solar panels for lighting, heating and recharging.
Water: The standard recommendation is to store one gallon of drinking water per person per day for drinking,
cooking, brushing teeth and washing hands. But this doesn't take care of all our water needs—for showering,
washing dishes and clothes, and flushing toilets (see below). Most homes have some water stored in the water
heater tank (which needs to be bolted or strapped down). Some homes have hot tubs, swimming pools, or rain-
water barrels, but these can be damaged in a quake and leak. Also, the chemicals in hot tubs and swimming pools
are too concentrated for that water to be drinkable, but it can be used for washing. It would also be a good idea
to have a water filter that can filter out bacteria (see Where to Buy Supplies for more information). You can also
purify water by boiling, then adding 16 drops of bleach per gallon and letting it stand 30 minutes before using.
Aerate for better taste by pouring between two clean containers.
Food: Most food in the fridge should be consumed within 24 hours. Frozen food will keep for 2 or 3 days without
electricity. Cook on a camp stove or BBQ OUTDOORS only. Cooking this way indoors gives off deadly gases, even if
you cook in the fireplace. If you don’t have something to cook on, find someone who does and share cooking
duties and your perishable food. Store at least a 2 week supply of non-perishable food, including ready-to-eat
items that have high energy/calorie content.
Garbage: Store a generous supply of heavy duty plastic bags to store garbage until service is restored or until
alternative drop-off locations can be arranged.
Human waste: Use the two-bucket system developed following the Christchurch earthquake to separate pee and
poo. Get two 5 to 6 gallon buckets with lids plus a toilet seat that can be used on either bucket (available through
preparedness stores and websites), and one or two gallon-size plastic bags of sawdust, shredded paper, peat
moss, pulverized leaves or other carbon material. Mark one bucket "pee" and the other "poo." (Pee is what
produces the bad smell in toilets that mix waste, so the idea is to keep them separate as much as possible.) Keep
the pee bucket well sealed when not in use. Sprinkle enough of the carbon material over poo to completely cover
the surface (this eliminates odors and keeps flies from making themselves at home). Cover the poo bucket with
the toilet seat making sure it is not airtight--air will dry out the poo and reduce its volume. Collect used toilet
paper separately in a plastic bag. For more detail, see the Emergency Sanitation handout available on the Get
Prepared page of this website.
Shelter: If you don't already have a tent, get one if you can. If your house is livable after a disaster but has no
heat, a small tent can be set up right on a bed. A larger one can be set up on the floor and the mattress moved
into it. The tent will retain body heat, keeping you warmer. If your house is not liveable, a tent can house you until
you can find other shelter; be sure it is large enough for family members and gear.
For more ideas, check the Long-Term Resilience section of the PREP website.
www.preporegon.org 15
Note that, while you can buy various kinds of emergency kits that are already put together, you will pay extra for the convenience. You can put your own kit together more inexpensively by investing some time. Plus, some things you may already have at home.
Stores in the Portland area (most also sell online) Portland Preparedness Center 7202 NE Glisan St, Portland, (503) 252-2525. Carries a wide variety of emergency supplies, both short and long term. You can shop online or go in and see before you buy.
Sanderson Safety 1101 SE Third Avenue, Portland; (503) 238-5700. First aid kits, hard hats, lots more.
Northwest Health and Safety 6300 NE St. James Rd, Suite 106, Vancouver, WA, (360) 737-8910. First aid supplies and related classes.
Bob’s Red Mill 5000 SE International Way, Milwaukie, (503) 607-6455; toll-free (800) 553-2258. Packaged and bulk flours, beans and whole grains; gluten-free products made in dedicated facility. Products available in local stores in all 50 states and Canada (locator on website).
Portland Homestead Supply Company, 8012 SE 13th Avenue, Portland, (503) 233-8691. A “one-stop resource for urban homesteaders.” Supplies and equipment for numerous activities. E-newsletter with info on classes.
Andy & Bax, 324 SE Grand, (503) 234-7538. Combination surplus and outdoor store.
Next Adventure, 426 SE Grand, (503) 233-0706. Store has both new and used gear.
REI Wide range of camping and wilderness survival gear. Area stores at 1405 NW Johnson, Portland, (503) 221-1938 12160 SE 82nd, Portland, (503) 659-1156 (Clackamas store) 7410 SW Bridgeport Rd, Tigard, (503) 624-8600 2235 NW Allie Avenue, Hillsboro, (503) 617-6072
Also: REI-Outlet, How to Choose a First-Aid Kit, First Aid Checklist, How to Choose a Water Treatment System.
US Outdoor Store 219 SW Broadway, Portland, (503) 223-5937. Sale room upstairs.
Wholesale Sports Website shows local store inventory (no online shopping). Stores at 9401 SE 82nd Ave, Portland, (503) 777-8700 11505 NE Fourth Plain Rd, Vancouver, WA, (360) 604-8000
Other camping and sporting goods stores, surplus stores, thrift stores, dollar and other discount stores (especially Fred Meyer, Bi-Mart, Wal-Mart and Costco). Also, Radio Shack for hand crank and solar radios.
Stores in Other Parts of Oregon The RedEshop, 559 NW Van Buren Ave, Corvallis, (541) 791-4911. Website is RedESsupply. Supplier for NET and CERT volunteer first responder teams.
REI stores: 380 Powerhouse Dr, Bend, (541) 385-0594 306 Lawrence St, Eugene, (541) 465-1800
Wholesale Sports Website shows local store inventory (no online shopping). Stores at 63492 Hunnell Rd, Bend, (541) 693-5000 1260 Lancaster Dr SE, Salem, (503) 589-0800
More Online Sources for Emergency Kits and Supplies
Where to Buy Supplies
www.preporegon.org
Red Cross Store American Preparedness
Emergency Essentials Survival-Gear.com
The Ready Store